
Emergency Solar Hand Crank Radio - Radio Sharper Image - Free user manual and instructions
Find the device manual for free Emergency Solar Hand Crank Radio Sharper Image in PDF.


| Product Type | Emergency Solar Hand Crank Radio |
| Brand | Sharper Image |
| Power Sources | Solar panel, hand crank dynamo, built-in rechargeable battery |
| Battery Type | Ni-MH rechargeable (usually 3.6V, 600mAh) |
| Radio Bands | AM, FM, Weather (NOAA) band |
| Additional Features | LED flashlight, SOS alarm, USB port for charging devices |
| Dimensions | Approx. 6.5 x 3.5 x 1.5 inches (165 x 89 x 38 mm) |
| Weight | Approx. 0.5 lbs (227 g) |
| Solar Panel | Polycrystalline, designed for trickle charging |
| Crank Charging | Rotate at 2-3 turns per second; 1 minute cranking provides about 10 minutes of radio use |
| USB Output | 5V DC, 500mA max for emergency charging |
| Battery Life (fully charged) | Approx. 20 hours radio use (moderate volume) |
| LED Flashlight | Bright white LED, 3 modes: constant, flash, SOS |
| Maintenance & Cleaning | Wipe with dry cloth; avoid water; keep solar panel clean; store in dry place |
| Safety Precautions | Do not use in wet conditions; do not leave in direct sunlight for long periods; keep away from children |
| Spare Parts & Repairability | Battery replacement possible; contact Sharper Image for parts |
| Warranty | 1-year limited warranty |
Frequently Asked Questions - Emergency Solar Hand Crank Radio Sharper Image
User questions about Emergency Solar Hand Crank Radio Sharper Image
0 question about this device. Answer the ones you know or ask your own.
Ask a new question about this device
Download the instructions for your Radio in PDF format for free! Find your manual Emergency Solar Hand Crank Radio - Sharper Image and take your electronic device back in hand. On this page are published all the documents necessary for the use of your device. Emergency Solar Hand Crank Radio by Sharper Image.
USER MANUAL Emergency Solar Hand Crank Radio Sharper Image
Thank you for purchasing the Sharper Image Emergency Solar Hand Crank Radio. Please take a moment to read this guide and store it for future reference.
IDENTIFICATION OF PARTS
Tray 1:
- Flashlight ON/OFF button
- Clock/Radio Tune Up Button
- LCD Display
- Volume Up Button
- Solar Panel
- Power On/Standby
- Clock/Radio Tune Down Button
- Volume Down Button
- Radio Mode Select and Clock Set Button
- Weather Alert Indicator
- Speaker
- Telescopic Antenna
- Metal Clasp
- Battery Compartment
- Rubber Dust Cover
- Mini USB DC Input Port [under the Rubber Dust Cover]
- Charging Indicator (under the Rubber Dust Cover)
- USB Charging Port (under the Rubber Dust Cover)
- Headphone Jack [under the Rubber Dust Cover]
- Solar/Cranking Charging Indicator
- Reset Button [under the Rubber Dust Cover]
- Crank Handle

Before You Get Started
- Remove the plastic battery pull tab that was included during shipping to energize the rechargeable battery.
- Press the reset button with an open-ended paper clip (Figure 2, Reference 21).
- If the display does not turn on after, press the RESET button, the internal rechargeable battery may become very low power. Lift the crank handle and rotate the crank clockwise or connect the unit to a computer with a USB charger for charging.
Warnings
When used in the directed manner, this unit has been designed and manufactured to ensure your personal safety. However, improper use can result in potential electrical shock or fire hazards. Please read all safety and operating instructions carefully before use, and keep these instructions handy for future reference. Take special note of all warnings listed in these instructions.
Before using this product, please read the following warning and cautions:
- Read these instructions – All the safety and operating instructions should be read before the unit is operated.
- Keep these instructions – The safety and operating instructions should be kept for future reference.
- Heed all warnings – All warnings on the device and in the operating instructions should be adhered to.
- Do not use this item near water – The device should not be used near water; for example, near a bath tub, washbowl, kitchen sink, laundry tub, in a wet basement or near a swimming pool.
- The device should be cleaned only as recommended by the manufacturer.
- Do not install near any heat sources such as radiators, heat registers, stoves, or other device [including amplifiers] that produce heat. The battery can explode.
- Do not place near a fire. The battery can explode.
- Only use attachments / accessories recommended by the manufacturer.
- Refer all servicing to qualified service personnel. Servicing is required when the device has been damaged in any way, such as liquid has been spilled or the device has been exposed to rain or moisture, does not operate normally, or has been dropped.
- This device shall not be exposed to dripping or splashing water and that no object filled with liquids such as vases shall be placed on the device.
- Unplug immediately if liquid has been spilled or any object has fallen into the unit.
- Unplug on time after the battery is fully charged.
- Power sources: The device should only be connected to the power supply described in the operating instructions, or as marked on the device. Do not overload wall outlet.
- There is a danger of battery explosion if the battery is replaced incorrectly. Only replace with the exact same type of battery.
- Do not attempt to dismantle, open or repair this product yourself.
- Only operate within specified temperature range [32 °F to 131 °F].
- Do not store the AAA batteries for extended periods of time. They may leak or rupture, damaging the unit.

LITHIUM BATTERY SAFETY INSTRUCTIONS
- Do not burn or bury batteries. Do not puncture or crush. Do not disassemble. Recycle Lithium batteries. Do not dispose of in the trash.
- If the electrolyte in the cells should get on your skin, thoroughly wash with soap and water. If in the eyes, rinse thoroughly with cool water. Immediately seek medical attention.
- Charge batteries on a fireproof surface away from flammable items or liquids.

HAND CRANK WARNING
To prevent overheating of the dynamo hand crank and permanent damage, do not crank faster than approximately two revolutions per second. Do not crank continuously for more than two minutes. After two minutes, allow two minutes of rest before cranking again.
FEATURES
- The Emergency Solar Hand Crank Radio includes the following features:
- Super bright 3 LED flashlight
- AM/FM with Weather Band Feature
- Weather Alert Feature [public alert certified]
- Emergency smart phone/mp3/mp4/USB charger
- Backlight digital display
- Clock
• Audio output (headphones)
POWER SOURCES
- The Emergency Solar Hand Crank Radio can be powered from the following sources:
- DC power from a USB power source, such as a computer
- AC power by adding a USB to AC adaptor [not included]
- DC car charger by adding a USB to DC car adaptor (not included)
- Solar power
- Hand crank power
- Three AAA batteries (not included)
- NOTE: There is a charging LED on the back of the unit (Figure 2, reference 17). The LED is flashing during charging. When fully charged, the LED will turn on constantly.
NOTE: Lithium battery is the priority power supply, not the AAA batteries. Only when the lithium battery has insufficient power [or there's no lithium battery at all] will AAA battery power be used.
DC AND AC POWER
- Prior to using the Emergency Solar Hand Crank Radio, we recommend you fully charge the rechargeable battery through the USB Power Input (Figure 2). This may take up to four hours. Connect the DC power input cable to the USB mini jack, and the other end to the USB power source.
- The red battery charge indicator light will be flashing when charging [Figure 2]. Continue to charge the Emergency Solar Hand Crank Radio for several hours or until the charging light turns on constantly. The Emergency Solar Hand Crank Radio is now ready for use.
- NOTE: Use 5.0V USB power source (from a computer or appropriate AC or DC adaptor). Overvoltage may result in damaging the Emergency Solar Hand Crank Radio.
SOLAR POWER
- Place the Emergency Solar Hand Crank Radio in direct (or indirect) sunlight with the solar panel facing upwards. The green battery charging light may illuminate when charging, as shown in reference 20 in Figure 2.
- NOTE: There is not enough solar energy to turn on the red charging light. Thus, no light or a faint green light (which consumes less energy) may be present during solar charging.
- NOTE: If the display heats up outside the operational range, the display will fade. For solar charging, partial sunlight or shade is enough.

HAND CRANK POWER
To operate the hand crank, perform the following:
IMPORTANT NOTE: Disconnect the smartphone or PDA first from the USB charging port before cranking (the crank charges the internal battery and by design, the smart device must be disconnected first to prevent the phone from power cycling and reduce the load on the crank).
- Lift the hand crank from the cradle, as shown in Figure 6.
- Turn the hand crank either clockwise or counterclockwise at about two cranks per second for two minutes to activate the internal battery for initial use, or when the unit has not been used for more than 60 days. The red battery charging light illuminates when charging, as shown in Figure 1. After two minutes, rest for two minutes to extend the life of the hand crank and repeat.
DRY CELL BATTERY AAA BATTERY POWER
- Open the Battery Door on the back of the radio.
- Insert 3 x AAA [UM-4] batteries (not included) and close the battery door (Figure 2, reference 14).
NOTE: For optimum performance, alkaline-type batteries are recommended. - Follow the polarity diagrams shown in the battery compartment.
NOTE: Make certain the batteries are installed correctly. The wrong polarity may damage the unit.
WARNING
- Do not mix old and new batteries.
- Do not mix alkaline, standard [carbon-zinc] or rechargeable [nickel-cadmium] batteries.
- Only batteries of the same type are recommended.
- If the unit isn't used for an extended period of time, remove the batteries. Old or leaking batteries can damage the unit and may void any warranty.
- Do not dispose of batteries in fire, batteries may explode or leak.
POWER CONSUMPTION
The Emergency Solar Hand Crank Radio includes a 3.7 DC rechargeable lithium ion battery (700 mAh) as the primary power source, but different operational modes result in significantly varied power consumption. Here is a general guide on power consumption:
| Mode Typical User Operation Power | Consumption | Recommended Power Source | |
| Flashlight Emergency or remote use Low Solar, Hand Crank, Band Radio | AAA | Batteries | |
| AM/FM/Weather | Emergency or remote use Low Solar, Hand Crank, AAA Band Radio | Batteries | |
| Weather Alert Smart phone charging | Continuous monitoring [1] High AC, USB [from computer], | Hand Crank, AAA Batteries | |
| Smart phone charging Short term emergency use High AC, USB [from computer], | Hand Crank, AAA Batteries | ||
Turn the light on and off with the light switch on the top of the unit (Figure 1).
RADIO OPERATION
The Emergency Solar Hand Crank Radio includes a digital LCD display [Figure 7] with backlighting, with the following push button controls:
- POWER button turns the radio on/off. Transitions from clock display to radio tuner display.
• MODE switches the radio band between AM, FM, weather band and weather band alert mode.
· TUN : ▲Adjusts the radio frequency up
· TUN : ▼Adjusts the radio frequency down
· VOL+: Adjusts the radio volume up
· VOL-: Adjusts the radio volume down
NOTE: The backlight will automatically turn off if no buttons are pressed for 20 seconds.
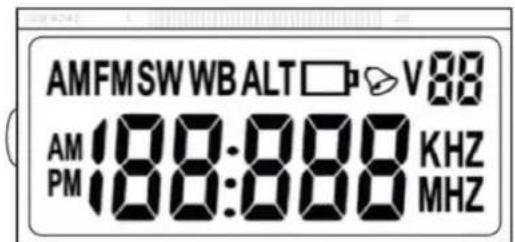
(Figure 7)
TIME
When first powered up, the time will default to 12:00 AM.
- Set 12Hr/24Hr Mode. Press and hold the MODE button for two seconds to enter the time setting mode. 12 hr. will begin flashing. Press the TUN+ button to switch between 12 hour and 24-hour time mode. Press the MODE button to proceed to the next step.
- Set Hour. Press the TUN ▲ or TUN ▼ to adjust the hour up or down. Hold the TUN button to change rapidly. Press the MODE button to proceed to the next step.
- Set Minute. Press the TUN ▲ or TUN ▼ to adjust the minute up or down. Hold the TUN button to change rapidly. Press the MODE button to exit the time setting mode.
RADIO BAND MODE
NOTE: Radio reception is dramatically reduced when charging from USB. Disconnect USB power when listening to the radio.
Press the POWER button to turn the radio on and transition from time mode. The radio will default to AM band [or the last radio band since power up]. Press the MODE button to change to the AM band. Press the MODE button to change to the Weather Band (WB). While displaying the Weather Band, press the MODE button again to change to Weather Band Alert mode (the ALT symbol will appear).
![graph LR A["AM"] --> B["FM"] B --> C["WB"] C --> D["WB Alert"] D --> E["↑"] E --> F["(Figure 8)"]](/content/2026/07/1436370/images/2842012b2a9e353d86f03d7537d123e881f6922814b4bf727f5b648a430f6462.jpg)
NOTE: Radio interference will be present while charging the Emergency Solar Hand Crank Radio. For best reception, there is a telescoping antenna. Extend the antenna and change the position if the reception is weak.
AM/FM RADIO TUNING
When the radio is turned on, press the TUN ▲ button to increase the frequency and press the TUN ▼ button to decrease the frequency.
To auto scan, press and hold the TUN ▲ [or] ▼ button for at least one second and the radio will automatically tune to next radio station with enough reception.
WEATHER BAND TUNING
There are seven distinct weather channels. The frequencies are 162.400 MHz, 162.425 MHz, 162.450 MHz, 162.475 MHz, 162.500 MHz, 162.525 MHz and 162.550 MHz
For a complete list of weather radio broadcasting stations, please visit the National Weather Service website: http://www.nws.noaa.gov/nwr/indexnw.htm
Our recommendation is to tune to the station with the best reception using the TUN ▲ button. You will hear the "Voice of the National Weather Service", an automated voice that provides forecast information, weather statements, watches and warnings.
WEATHER ALERT MODE
When you enter the Weather Alert Mode, your radio will be silenced and enter weather alert standby mode. The radio will remain in standby mode until there is a weather statement, watch or warning. To activate the Weather Alert Mode, press the MODE button until the ALT symbol appears on the display. The ALT symbol will remain until there is a weather statement, watch or warning. In the event of an alert, the alert light will flash, and the radio will sound (with the voice of the National Weather Service). To disable the alert light, press MODE button. To disable the alert light but continue in alert mode, press the MODE button again.
To verify you have reception in your area, the National Weather Service [NWS] normally run tests each Wednesday between 10 a.m. and noon local time. Tests may occur at other days and times when there is a threat of severe weather in the listening area or for other reasons.
NOTE: If battery power is low, the unit will exit the weather alert mode and enter the time display mode.
CELL PHONE AND MP3/MP4 OPERATION
- Because smartphone batteries vary in their current ratings, we cannot specify charging rates or usage time. 10 to 15 minutes of cranking may result in 1 or more minute of talk-time, but your results may vary.
NOTE: Charging a smartphone through the Phone Charger Jack is intended for emergency purposes only. It is not intended for recharging fully a discharged smartphone battery. Smartphone battery capacity significantly exceeds the battery capacity of the Emergency Solar Hand Crank Radio. - Therefore, a fully charged Emergency Solar Hand Crank Radio will only partially charge a smart phone or PDA. After the battery stops charging the device, begin cranking if a DC power source is not available to continue recharging the smartphone.
- To charge the smartphone or PDA:
-
Turn off the radio and flashlight to conserve power.
-
Lift the rubber tab on the back of the Emergency Solar Hand Crank Radio to expose the connectors, as shown in Figure 2.
-
Plug the smartphone charging cable (Figure 2, reference 1) into the Emergency Solar Hand Crank Radio charge USB output (Figure 2). Connect the appropriate smartphone tip into the other end of the smartphone charging cable. Plug other end of the smartphone tip into the smartphone's charging connector.
-
If the phone does not begin charging, disconnect the phone and begin cranking. When charging a smartphone via the smartphone charger, it is important to turn the crank at least two revolutions per second. After two minutes of cranking at two revolutions per minute, wait two minutes to begin cranking again. This will extend the crank life.
- NOTE: You may receive a charging compatibility error on your smartphone, but your device may still charge and it will not harm your device.
- CAUTION: Before charging, please refer to the user manual of the device you wish to charge to make sure the charging current required does not exceed 1Amp [1,000 mA] of charging current.
• Overloading the charge circuit may damage the Emergency Solar Hand Crank Radio and void the warranty.
LOW BATTERY INDICATION
When the battery voltage is less than 3.0V, the low battery indication will flash: ☐ The radio will not operate in a low battery condition.
When the battery voltage is less than 3.0V, the low battery indication will flash: The radio will not operate in a low battery condition.
The Emergency Solar Hand Crank Radio includes an audio output jack. This allows you to listen with headphones or connect to an auxiliary input source, such as an amplifier.
CAUTION: Guard your ears against hearing damage. When listening with headphones, start at the lowest volume and gradually increase until you can hear it comfortably and clearly.
Read this Important Information before Using Your Earbuds:
- Avoid extended play at very high volume as it may impair your hearing.
- If you experience ringing in your ears, reduce the volume or shut off the unit.
- Keep the volume at a reasonable level even if your headset is an open-air type designed to allow you to hear outside sounds. Please note that excessively high volume may still block outside sounds.
RESETTING THE UNIT
If the unit experiences a power surge or electric shock, it is possible that the internal micro-controller may lock up and the unit will not respond to any commands from the panel controls. In this event, use a straightened paper clip, toothpick or similar objects to press the RESET button located on the back of the unit [see Figure 9]. The reset operation clears the system memory to factory default, and all your previous settings will be erased.
CAUTION: Do not use a sharp or pointed object to press the reset button. It may damage the reset switch inside the unit.

Reset Button
(Figure 9)
CARE AND MAINTENANCE
BATTERY MAINTENANCE
To maintain the battery:
- Periodically charge the battery to extend battery life.
- Switch off power after radio use to extend battery life.
- Remove the battery or reinsert the plastic battery pull tab for extended storage.
- Remove the AAA batteries for extended storage to prevent battery leakage.
The battery is a rechargeable 3.7V / 700 mAh lithium ion battery. To replace the battery, open the battery compartment cover (Figure 2) by squeezing the tab.
NOTE: Only replace with rechargeable 3.7V lithium ion battery. Replacing the battery with a non-rechargeable battery may damage the unit.
GENERAL CARE AND MAINTENANCE
- Do not tamper with the internal components of the unit.
- Clean your unit with a damp (never wet) cloth. Solvent or detergent should never be used.
- Avoid leaving your unit in direct sunlight or in hot, humid or dusty places.
- Keep your unit away from heating appliances and sources of electrical noise such as fluorescent lamps or motors.
- CAUTION: Never allow any water to enter the unit while cleaning.
SPECIFICATIONS
- Battery Power:3.7V / 700 mAh lithium ion rechargeable battery [replaceable] or 3 x AAA [UM-4] batteries
• Radio Bands: AM: 522 KHz to 1629 KHz and FM: 87.5 MHz to 108 MHz
- Weather Band: 162.400 to 162.550 MHz
- Flashlight: 3-LED Flashlight
- Size and Dimensions: 7.75" x 3.75" x 2.0"
- Weight: about 1 lb.
- Temperature Range:
- Working temperature range: 32 to 131 °F (0 to 55 °C)
- Storage temperature range: 14 to 140 °F (-10 to 60 °C)
TROUBLESHOOTING GUIDE
| Problem Solution | |
| The unit will not power up Make sure batteries are installed with the proper polarity. Replace the batteries if low battery voltage. Press reset button, if the display does not turn on after Press the RESET button. The internal rechargeable battery may become very low power. Lift the crank handle and rotate the crank clockwise or connect the unit to computer or USB charger for charging. | |
| Phone generates an error message when plugged into the Emergency Solar Hand Crank Radio. | A lower voltage output may result in error messages on the phone but should still charge the phone. |
| My iPod / iPhone does not display the charge signal. The output voltage of the Emergency Solar Hand Crank Radio is lower than the operating voltage of the iPod / iPhone, and will not charge these devices until the battery is fully discharged. The device is only intended for emergency charges and not for topping off already charged devices. | |
| The Emergency Solar Hand Crank Radio will no longer hold a charge. | Replace the 3V lithium ion rechargeable battery [CR123A]. Typically, this battery will hold 2000 charge cycles. |
| The Weather Band reception is poor. · Weather band reception can be poor inside a metal building, structure or where electronic noise is present. Try moving outside to improve reception. · Check local reception by driving to a different location and testing the weather band reception. · Radio reception is dramatically reduced when charging from USB. Disconnect USB power when listening to the radio. | |
| My smartphone connector is not supported. Where can I purchase the proper tip for my smartphone? | Contact Ambient Weather with your smartphone model and connector type. The connectors included cover about 95% of the smartphone market. |
| The Emergency Solar Hand Crank Radio will not fully charge my smartphone. | Charging a smartphone through the Phone Charger Jack is intended for emergency purpose only. It is not intended for recharging fully a discharged battery. Smartphone battery capacity significantly exceeds the battery capacity of the Emergency Solar Hand Crank Radio. Therefore, a fully charged Emergency Solar Hand Crank Radio will only partially charge a smartphone or mp3/mp4 device. After the battery stops charging the device, disconnect the device and begin cranking if a DC power source is not available. |
| I never receive weather alerts. Verify you receive the test alert | from the NationalWeather Service on Wednesday as described in the weather alert section of this manual. Verify you have tuned the weather band to your local area and you have reception before activating the Weather Alert feature. Make sure you have good weather radio reception. If your radio reception is poor, you will not receive any alerts. |
| How can I receive warnings only and not watches or statements? | Selective filtering of statements, watches and warnings is not possible. You will always receive all three levels. |
| The Emergency Solar Hand Crank Radio is locked up and will not respond to commands. How do I reset it? | Remove the battery. Press the reset button with a paperclip. If the display does not turn on after press the RESET button, the internal rechargeable battery may become very low power. Lift the crank handle and rotate the crank clockwise or connect the unit to computer or USB charger for charging. |
| The yellow solar charging light does not illuminate during solar charging. | There is not enough solar energy to drive the yellow charging light. For solar charging, you will see a faint yellow light. The brighter the sunlight, the brighter the green charging light. |
| The display fades when placed in direct sunlight. If the display | heats up outside the operational range, the display will fade. For solar charging, partial sunlight or shade is sufficient. |
| The Emergency Solar Hand Crank Radio The weather alert mode | consumes a significant amount of power because it is constantly scanning for the emergency 1050 Hz tone from the National Weather Service. We recommend connecting power input to a USB computer port or the optional USB to AC converter for continuous alert operation (reference Section 11). Otherwise, you must rely on hand crank power in this mode. |
The device complies with Part 15 of the FCC rules. Operation is subject to the following two conditions:
- This device may not cause harmful interference.
- This device must accept any interference received, including interference that may cause undesired operation.
This equipment has been tested and found to comply with the limits for a Class B digital device, pursuant to Part 15 of the FCC rules. These limits are designed to provide reasonable protection against harmful interference in a residential installation. This equipment generates, uses and can radiate radio frequency energy and if not installed and used in accordance with the instructions, may cause harmful interference to radio communications. However, there is no guarantee that interference will not occur in a particular installation. If this equipment does cause harmful interference to radio or television reception, which can be determined by turning the equipment off and on, the user is encouraged to try correcting the interference by one or more of the following measures:
- Reorient the receiving antenna.
-
Increase the separation between the equipment and receiver.
-
Connect the equipment into and outlet on a circuit different from that to which the receiver is connected.
- Consult the dealer or an experienced radio/TV technician for help.
You are cautioned that changes or modifications not expressly approved by the party responsible for compliance could void your authority to operate the equipment.
WARRANTY / CUSTOMER SERVICE
Sharper Image branded items purchased from SharperImage.com include a 1-year limited replacement warranty. If you have any questions not covered in this guide, please call our Customer Service department at 1 (877) 210-3449. Customer Service agents are available Monday through Friday, 9:00 a.m. to 6:00 p.m. ET.
- IDENTIFICATION OF PARTS
- TRAY 1
- BEFORE YOU GET STARTED
- WARNINGS
- BEFORE USING THIS PRODUCT, PLEASE READ THE FOLLOWING WARNING AND CAUTIONS
- LITHIUM BATTERY SAFETY INSTRUCTIONS
- HAND CRANK WARNING
- FEATURES
- POWER SOURCES
- DC AND AC POWER
- SOLAR POWER
- HAND CRANK POWER
- DRY CELL BATTERY AAA BATTERY POWER
- WARNING
- POWER CONSUMPTION
- RADIO OPERATION
- TIME
- RADIO BAND MODE
- AM/FM RADIO TUNING
- WEATHER BAND TUNING
- WEATHER ALERT MODE
- CELL PHONE AND MP3/MP4 OPERATION
- LOW BATTERY INDICATION
- READ THIS IMPORTANT INFORMATION BEFORE USING YOUR EARBUDS
- RESETTING THE UNIT
- CARE AND MAINTENANCE
- BATTERY MAINTENANCE
- GENERAL CARE AND MAINTENANCE
- SPECIFICATIONS
- THE DEVICE COMPLIES WITH PART 15 OF THE FCC RULES. OPERATION IS SUBJECT TO THE FOLLOWING TWO CONDITIONS
- WARRANTY / CUSTOMER SERVICE
Brand : Sharper Image
Model : Emergency Solar Hand Crank Radio
Category : Radio