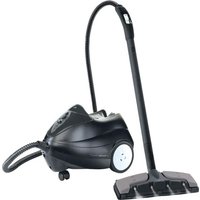
Vapour M6S - Steam cleaner EUROFLEX - Free user manual and instructions
Find the device manual for free Vapour M6S EUROFLEX in PDF.


| Product Type | Steam Cleaner |
| Brand | Euroflex |
| Model | Vapour M6S |
| Dimensions (L x W x H) | Approx. 30 x 25 x 28 cm |
| Weight | 2.5 kg |
| Power Supply | 230 V, 50 Hz |
| Power Consumption | 1500 W |
| Water Tank Capacity | 1 L |
| Heating Time | Approx. 30 seconds |
| Steam Pressure | 3.5 bar |
| Steam Temperature | Up to 100 °C |
| Main Functions | Sanitizes, degreases, removes dirt without chemicals |
| Surfaces Recommended | Hard floors, tiles, windows, kitchen surfaces |
| Accessories Included | Floor nozzle, detail brush, extension tubes, measuring cup |
| Maintenance | Descale regularly with vinegar solution; clean nozzle after use |
| Safety Features | Pressure relief valve, no-boil dry protection, child lock |
| Spare Parts Availability | Filters, nozzles, and seals available from manufacturer |
| Warranty | 2 years |
| Reparability | User-replaceable parts; service centers available |
| Energy Efficiency Class | Not applicable (non-energy label product) |
| Noise Level | < 70 dB |
| CE Marking | Yes |
Frequently Asked Questions - Vapour M6S EUROFLEX
User questions about Vapour M6S EUROFLEX
0 question about this device. Answer the ones you know or ask your own.
Ask a new question about this device
Download the instructions for your Steam cleaner in PDF format for free! Find your manual Vapour M6S - EUROFLEX and take your electronic device back in hand. On this page are published all the documents necessary for the use of your device. Vapour M6S by EUROFLEX.
USER MANUAL Vapour M6S EUROFLEX
Compact Multi Purpose Steam Cleaner
INSTRUCTION MANUAL
Before using this product, please read the instructions and keep it for future references.
IMPORTANT: SAVE THESE INSTRUCTIONS
SAFETY WARNING
- This appliance should not be used by children and persons with reduced physical, sensory or mental capabilities. Close attention is necessary when used by or near children, pets or plants. Do not leave this appliance unattended. Always disconnect the appliance from the power supply when not in use. Keep out of reach of children.
• Children should not play with the appliance. - Cleaning and user maintenance should not be done by children without supervision.
- Keep the appliance out of reach of children when it is plugged in or cooling down.
- If the electrical cord is damaged, it must be replaced by the manufacturer, its service agent or similarly qualified person in order to avoid a hazard.
- The steam released from the appliance is extremely hot. Both appliance and accessory tools may scald. Avoid direct contact. The steam symbol 🏠 (symbol 5597 relative to IEC 60417-1) warns operators that there is the risk of scalding!
- Never open the boiler cap while using the device.
- Unscrew the boiler cap only when the device is switched off, pressure-free and cooled.
TY INSTRUCTIONS
- This appliance is not to be used if it has been dropped, if there are visible signs of damage or if it is leaking.
- Disconnect the appliance from the power supply prior to any maintenance or cleaning operations. Always allow the appliance to completely cool down.
- Do not leave the appliance unattended while it is connected to the power supply. Disconnect the plug if you need to get away even just for a few minutes.
Important Notices
- This appliance complies with European Directives regarding “electromagnetic compatibility” and “Electrical product safety”. The appliance carries CE marking.
- Do not direct the steam jet towards people, animals or plants.
- Do not point the jet of steam in the direction of electrical or household appliances.
- Do not use the appliance with wet hands or bare feet.
- Do not use the appliance when close to flammable or explosive substances.
- Do not insert any object in the various openings and do not use the appliance if any opening is obstructed.
- Do not store the appliance outdoors.
- Do not expose the appliance to atmospheric agents, water, humidity or heat sources.
- Use a dry or slightly damp cloth to clean this appliance.
- Only use accessories and spare parts recommended by the manufacturer.
- The manufacturer, importer or distributor assume no responsibility for damage to property or injury to persons, in the event that this appliance is damaged as result of improper use or assembly.
- Repairs must be carried out exclusively by personnel authorized by the manufacturer. Equipment repaired by unauthorised personnel poses a danger to the user and cancels the warranty.
- Do not pull on the electrical cable. Do not use the cable to move the appliance. Do not crush the cable when closing doors. Avoid any contact with sharp edges and corners. Keep the cable away from hot surfaces.
IMPORTANT SAFE
ATTENTION! This appliance is equipped with a 3-prong grounded power cord. Insert only into a 3-prong grounded electrical outlet. Do not try to remove the contacts of the grounded connection.
- The manufacturer reserves the right to make changes to the design and features of the appliance without notice.
• This appliance is intended for domestic use only. - Connect the appliance only after making sure that the voltage of the electrical network corresponds to that indicated on the plate of the appliance.
- Do not immerse the appliance in water or other liquids. Always turn off and unplug appliance when filling with water.
- Do not allow to be used as a toy. Close attention is necessary when used by or near children, pets or plants.
- Do not use with any opening blocked.
- Follow all labels and marking instructions on the appliance.
- Before filling with water or emptying, always switch off the unplug it and allow it to cool completely. Always turn the boiler cap slowly to open the boiler. This will allow any residual steam to escape gradually.
- Use caution while emptying the appliance. Contact with hot metal parts, hot water or steam may cause burns.
- Be sure Boiler Cap is (and remains) closed during use.
- Never use cleaning solutions, perfumes, oils or other chemical substances other than tap or distilled/demineralized water in the appliance. Use of chemicals may damage appliance and will void your warranty.
- When in use, never turn the appliance on its side.
CAUTIONS
- Always drain condensed water from hose before use or if unit has been left idle for a period of time. To drain hose, direct steam gun opening into a sink or other appropriate container and slide the steam control trigger forward on the Steam Gun. Once hose is emptied, normal use may be resumed.
- Extreme care should be taken when opening the Boiler Cap as it may become hot during use and escaping steam can cause scalding.
TY INSTRUCTIONS
CAUTIONS
- Do not use the floor brush without a microf attached to the system.
ADVICE ON DISPOSAL
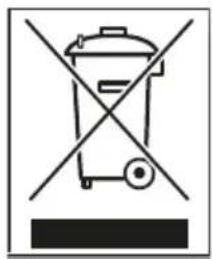
I. When this crossed-out bin symbol appears on a product it means that the product is covered by European Directive 2002/96/EC
2 All electrical and electronic products should be disposed of separately from the municipal waste stream via specific collection facilities designated by the government or the local authorities.
-
Proper disposal of your old appliance will help prevent potential negative consequences for the environment and human health.
-
For more detailed information about disposal of your old appliance, please contact your municipality, the waste disposal service or the shop where you purchased the product.
INDICATIONS OF USE
This manual can not take into account every possible use.
For further information or for any problems that are not covered in detail in this manual, please contact the Service Center or retailer. Keep this manual in a safe place for future reference.
Destroy all plastic bags and packaging material, they can be a risk for children!
NOTE: Keep the packaging for possible future transport (eg relocations, repairs, etc.)
Attention: the photographs and/or drawings in this document are for illustrative purposes only. Actual appliance and the accessories may vary due to product enhancement.
Safety Information in Digital Format: www.plastecs.it/warning

1 - Steam Gun
2 - (2) Extension Tubes
3 - Steam Control Trigger
4 - Floor Brush
5 - Boiler Cap
6 - Power Indicator Light (orange)
7 - Steam Ready Light (green)
8 - Power Switch
9 - Flexible Steam Hose
10 - Shoulder Strap
11 - Filler Funnel
12 - Brush Adapter (2)
13 - Nylon Detail Brush
14 - Stainless Steel Detail Brush
15 - Window Tool
16 - Detail Nozzle
17 - Scraper
18 - Floor Brush Microfibre Pad
19 - Small Brush
20 - Small Brush Microfibre Pads
21 - Grout Brush
22 - Accessory Storage Bag


Technical Data
Adapter Input: 220-240V\~50/60Hz
Cord Length: 7 meters/23 feet
Power: 1450 watts
Boiler: Stainless Steel
Boiler Capacity:1.2 liter/2 pints
Max. Steam Temp.: 130°C/266°F
Max. Boiler Temp.: 4.5 bar
Read and pay attention to all Safety Labels and Product Markings
![graph TD A["Caution: Danger of scalding. Not water will accumulate in hose during idle periods. Always drain hose prior to resuming work. For household use only."] --> B["Important"] B --> C["Do not overfill boiler. Read instruction manual before use. Only add tap water or demineralised water to boi…](/content/2026/07/1435553/images/8db8af380cd79ee88b91b0783c810aa605b1f721204662c20e8530da0eae2b2b.jpg)
1 The Compact Steam Cleaner Features
I. No need for detergents or chemicals. Just add water.
2. Lightweight and compact.
3. Ergonomic, lightweight Steam Gun.
4. Steam Gun locks in as carry handle.
5. Versatile, quick-change accessories.
6. On/Off steam control.
7. Stainless Steel Boiler – non-corroding, reduces calcium buildup.
8. Multiple uses – clean bathrooms, kitchens, living areas, pet areas, floors and much more.

2 Accessories - Attachment & Descriptions
BRUSH ADAPTER, FLOOR BRUSH & SMALL BRUSH
The Brush Adapter is used to connect the Floor Brush and Small Brush to the Steam Cleaner.
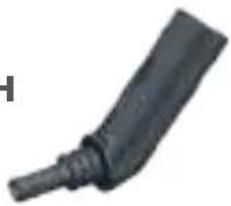
A. Attach Brush Adapter to Floor Brush
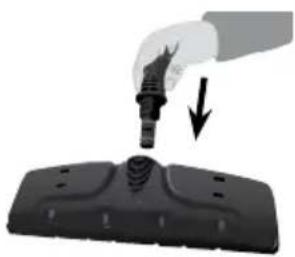
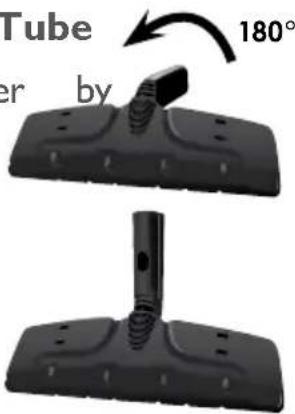
I. Insert the Brush Adapter in the Floor Brush
The Floor Brush attaches to your Steam Cleaner using the Brush adapter. Insert the Brush Adapter in the Floor Brush and turn it 180° to lock in place.
2. Attach Floor Brush & Adapter to Extension Tube
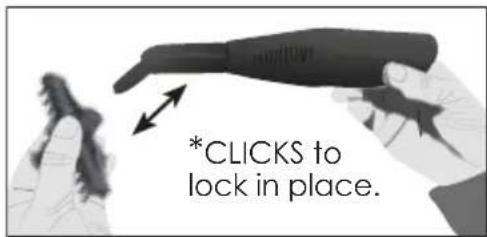
Attach the Extension Tube to Brush Adapter by
pressing the locking button while sliding Tube into Brush Adapter. Be sure button and hole line up and button locks in place. To disconnect, press the locking button and pull the two pieces apart.
WARNING: Always ensure steam control trigger is off and not steaming when attaching an accessory to the unit.
B. Attach Brush Adapter to Small Brush
The Small Brush is used for smaller areas that the Floor Brush cannot easily reach, such as corners of floors and on stairs.
To use: Insert the Brush Adapter in the Small Brush and turn it 180° to lock it in place.

EXTENSION TUBE(s)
This Steam Cleaner comes with two Extension Tubes that are used for floor cleaning and to extend the reach of the Steam Cleaner.

C. ATTACH EXTENSION TUBE TO STEAM GUN
To use: Hold down the locking button on the Steam Gun while sliding it in an Extension Tube. Be sure the locking button lines up with the hole on the Extension Tube and button locks in place.
To attach Extension Tubes together: Press down the locking button while sliding Tubes together. Be sure button and hole line up and button locks in place.
To disconnect Extension Tubes: Press the locking button and pull the two sections apart.

WARNING: Always ensure steam control trigger is off and not steaming when attaching an accessory to the unit.
D. ATTACH EXTENSION TUBE TO BRUSH ADAPTER
Once the desired Brush is attached to the Brush Adapter, press the locking button on the Extension Tube while sliding the Tube in the Brush Adapter. Ensure the locking button and the hole on the Brush Adapter line up.

E. ATTACH WINDOW TOOL
Attach Extension Tube or Steam Gun to Window Tool
The Window Tool is very useful for cleaning large windows and glass.
To use: Connect Window Tool to Steam Gun or Extension Tube for hard to reach surfaces. Apply steam liberally, rub with soft spongy edge, then remove excess water and dirt with s blake. Wipe dirt from squeegee blake and repeat this process until the windows are clean.

CAUTION: When cleaning windows, always avoid any sudden changes in temperature to prevent glass breakage or cracks.
F. ATTACH DETAIL NOZZLE
Attach Extension Tube or Steam Gun to Detail Nozzle
The Detail Nozzle is very useful cleaning hard to reach areas. It is ideal for shower, door and window tracks, shutters and sanitary fixtures.
To use: Slide and lock Detail Nozzle on the Steam Gun or Extension Tube.

WARNING: Always ensure steam control trigger is off and not steaming when attaching an accessory to the unit.
G. DETAIL NOZZLE & ACCESSORIES
Attach Extension Tube or Steam Gun to Detail Nozzle
I. Attach Nylon or Stainless Steel Brush to Detail Nozzle
The Nylon Detail Brush is best for spot cleaning or tough dirt. Stainless Steel
Detail Brush is best for metal.
To use: Push the Nylon/Steel Detail Brush on the end of the Detail Nozzle.
(Detail Nozzle should be connected to the Steam Gun or Extension Tubes.)

2. Attach Scraper to Detail Nozzle
The Scraper is best for removing small amounts of wallpaper and also anything that can be scraped from a flat surface, e.g., grease deposits in an oven. It is also useful when defrosting freezers.
To use: Push the Scraper on the end of the Detail Nozzle. (Detail Nozzle should connected to the Steam Gun or Extension Tubes.)

3. Attach Grout Brush to Detail Nozzle
The Grout Brush is designed to clean the grout in between tiles. Use on grouted floors, backsplashes and in showers.
To use: Push the Grout Brush on the end of the Detail Nozzle.
(Detail Nozzle should be connected to the Steam Gun or Extension Tubes.)
H. ATTACH MICROFIBRE PAD TO BRUSHES
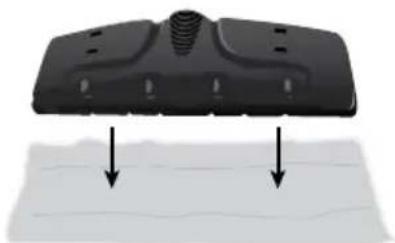
FLOOR BRUSH – A Microfibre Pad can be fitted on the Floor Brush to absorb dirt and protect delicate surfaces. It can also be used on vertical washable surfaces following the same procedure as for the floor.
-
Place Floor Brush on Microfibre Pad.
-
Fold long sides up, then insert ends under Pad Holders.
-
This is how the Floor Brush should look with Microfiber Pad in place.


SMALL BRUSH – A fitted Microfibre Pad should be placed over the bristles of the Small Brush to clean smooth surfaces such as kitchen cupboards, splash backs, countertops, etc. Fit the Small Microfibre Pad over the bristles and top of Small Brush as shown.

WARNING: The Microfibre Pad around the Floor Brush or the Small Brush can become hot enough to scald or cause burns. Make sure you let the Pad cool before touching it.
WARNING: Always ensure steam control trigger is off and not steaming when attaching an accessory to the unit.
I. ATTACH SHOULDER STRAP
Using the detachable Shoulder Strap allows for greater freedom of movement when both hands are needed for cleaning tasks or to reach higher places.
To attach Shoulder Strap to the Steam Cleaner, simply snap Shoulder Strap hooks on the connecting rings found on unit.

When using Steam Cleaner with the Shoulder Strap, avoid rocking or tilting the unit excessively as this may cause water to enter the hose and be discharged along with the steam.
3
Filling Steam Cleaner with Water
WARNINGS
- Carefully read all instructions before removing Boiler Cap.
- Always switch off the appliance and be sure it has cooled before filling the Boiler.
*IMPORTANT*
Use ordinary tap water. Use distilled or demineralized water if tap water is too hard. DO NOT add detergents, perfumes, oils or other chemical substances. This will cause damage to the Steam Cleaner and void the warranty.
Follow these instructions to avoid overfilling the Boiler.
- Be sure the appliance is switched off at the Power Switch and disconnect
the appliance from the power outlet. - Carefully remove the Boiler Cap by turning it counter-clockwise.
- Pour in a maximum of 1.2 litres / 2 pints of water using the Filler Funnel provided.
Do not overfill the Boiler, excess water in the Boiler will be flushed out a unit, resulting in wet floors or wet cleaning.

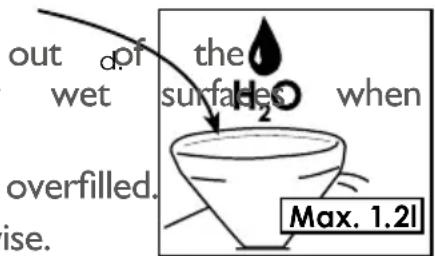
• Dry steam will only emit if the Boiler is not overfilled.
- Replace the Boiler Cap by turning it clockwise.
- Do not over-tighten the Boiler Cap, finger tight is sufficient.
- Plug electrical cord into a 3-prong grounded power outlet.
- Turn on the Power Switch.
- The Steam Cleaner will heat up, produce steam and the Boiler will become pressurised.
- When the green Steam Ready Light turns on the Steam Cleaner is ready to use. Note: the green Steam Ready Light may turn on and off during use, this is normal and not a fault.
- If using cold water, heating time is about 6-7 minutes. Using hot water will reduce the heating time.
WARNING: Always ensure steam control trigger is off and not steaming when attaching an accessory to the unit.
CAUTIONS
• Always drain condensed water from Hose before use or if appliance has been left idle for a period of time. To drain, direct steam gun opening into a sink and slide Steam Control trigger on Steam Gun forward. Once Hose is empty, resume normal use. Never direct the steam jet toward people, animals or plants.
- Extreme care should be taken when opening the Boiler Cap as it may become hot during use and escaping steam can cause scalding.
4 Turning Steam Cleaner ON
- Plug electrical cord into a power outlet.
- Press the Power Switch.
• The Power indicator light (orange) will turn on.
• The Steam Cleaner will heat up in approximately 6-7 minutes. - When the green Steam Ready Light illuminates, the Steam Cleaner is ready to use.
- Some water may come out from the steam gun on the attachments. This is unheated, condensed water in the Hose and is normal.
NOTE: Do not turn on Steam Cleaner if Water Tank is empty.
5 Steam Release
To release steam from the Steam Cleaner, slide forward the steam control trigger found on the Steam Gun. Steam will continue to be released while the trigger is in the forward position. To stop the steam, slide the steam control trigger backward.

IMPORTANT: When the Steam Cleaner has run out of water, steam output will cease. Follow refill instructions to use your Steam Cleaner again.
6 Refilling the Boiler During Use
WARNINGS
- ALWAYS vent the Boiler (release all pressure/steam) before opening Boiler Cap. Venting is done by sliding the Steam Control Trigger forward to the "On" position. If no steam is emitting then there is no pressure in the Boiler and the Boiler Cap is safe to open. Slide back the Steam Control Trigger to the "Off" position.
- Always unplug the unit and be sure it has cooled off before refilling the Boiler – at least 5 minutes.
- NEVER turn on Steam Cleaner if the Boiler is empty!
When water in the boiler runs out, steam will stop emitting from the Steam Cleaner. To refill the Boiler with water, follow the steps below:
- Switch off the Steam Cleaner by depressing the Power Switch and unplug the appliance from the power outlet.
- Carefully and slowly turn the Boiler Cap counter-clockwise. If a hissing sound is heard, residual steam and pressure remain in the Boiler. Wait until the last of the steam and pressure escapes and the hissing stops before removing the Boiler Cap.
• Take care of where the Boiler Cap is placed as the underside of the cap is very hot. Ensure there are no children present who may pick up the hot cap and cause burns to themselves. - Allow the Steam Cleaner to cool for at least 5 minutes before refilling with water.
- Refill the Boiler with a maximum of 1.2 litres (2 pints) of water using the Filler Funnel. (Note: only use the Filler Funnel supplied. Its nozzle is made from a heat resistant material to prevent it from melting when filling a hot boiler. Other plastic funnels can melt and become welded to the inside of the boiler spout, voiding the product's warranty).
- Be extremely careful when refilling, as the interior of the very hot. Water may spurt out as hot water or hot steam causing burns.
- Do not overfill the Boiler, excess water in the Boiler will be flushed out of the unit, resulting in wet floors or wet surfaces when cleaning. Dry steam will only emit if the Boiler is not overfilled.
- Replace the Boiler Cap by turning it clockwise. Do not over-tighten the Boiler Cap, finger tight is sufficient.
- Plug the appliance into a power outlet.
- Turn on the Power Switch.
- The Steam Cleaner will heat up, produce steam and the Boiler will become pressurised.
- When the green Steam Ready Light turns on the Steam Cleaner is ready to use. Note: the green Steam Ready Light may turn on and off during use, this is normal and not a fault.
- If using cold water, heating time is about 6-7 minutes. Using hot water will reduce the heating time.
WARNING: Do not open the Boiler Cap until there is no steam being release from the Steam Gun. If the Boiler Cap is opened while there is hot steam and pressure in the Boiler severe burns and injury can occur. If the Boiler Cap is turned and steam/pressure start to escape from the Steam Cleaner, unplug the Steam Cleaner from the power outlet and let the unit cool down for at least 15 minutes before attempting to refill or use the Steam Cleaner.

Turning Steam Cleaner Off After Use
- To turn Steam Cleaner off, press the Power Switch and unplug the electrical cord from the power outlet.
• Any remaining water can be left in the unit.
REMINDERS
- Use ordinary tap water.
• We recommend using distilled or demineralized water as way to care for and utilize your Steam Cleaner. - If tap water is too hard, distilled or demineralized water should be used to avoid the risk of sediment and mineral build up in the Boiler.
- Do not add detergents, perfumes, oils or other chemical substances to the Boiler. This will cause damage to the Steam Cleaner and void the warranty.

Cleaning the Steam Cleaner
We recommend you periodically clean the Steam Cleaner to prevent the accumulation of calcium, mineral deposits and other sediment caused by the use of tap water. After every 10-15 refills, fill the Boiler three-quarters full of hot tap water, shake several times and empty out the water into a sink. Repeat several times to ensure that the Boiler is flushed of any calcium or mineral deposits. Wipe the Steam Cleaner with a damp cloth and dry.
NEVER HOLD THE STEAM CLEANER UNDER THE TAP TO FILL. Use the filler funnel provided to fill the Boiler.
If distilled or demineralised water is regularly used in the Steam Cleaner, cleaning of the Boiler can be done less frequently. In some areas tap water is very hard, it is recommended that the Boiler is cleaned more frequently if hard water is used.
The cleaning of the Boiler and Steamer is the sole responsibility of the appliance owner. Calcium, mineral deposits and other sediments left to build up in the Steam Cleaner causing it to fail and/or the steam pathways in the Steam Cleaner to block, is not covered by the product warranty. Users must follow the cleaning instructions above.
The Steam Cleaner is intended for domestic household use only. It is not intended for commercial use. Any use other than for domestic household purposes will void the product warranty.
9 Replacement of Brushes, Microfiber Pads and Accessories
The Nylon and Stainless Steel Detail Brushes and the Microfibre Pads for the Small Brush and Floor Brush provided with the Steam Cleaner are to get you started using your Steam Cleaner. As these brushes and microfibre pads become dirty or wear out, replacement brushes and microfibre pads can be purchased from the retailer from which you purchased your Steam Cleaner and/or from most other electrical appliance retail outlets. It is normal to have replacements of the brushes and microfibre pads close at hand while cleaning as the brushes wear out or the microfibre pads become dirty.
Any of the other accessory tools are replaceable by contacting Euroflex on the website.
10 Steam Cleaner Tips & Reminders
This steam cleaning appliance has many practical uses that have not been mentioned in this manual. Please contact the Customer Support Line for tips and suggestions of where and how to use the Steam Cleaner. Alternatively visit the website for additional information. Steam cleaning allows the user to clean chemical-free by using the power of steam, in place of harsh chemical-based detergents. The heat from the steam softens and loosens dirt on surfaces, while the steam pressure lifts the dirt away. All that is left to do is to wipe the surface to remove the dirt and moisture using a microfibre cloth or by using a cleaning cloth if the surface is soiled or greasy.
TIP: to get the best cleaning results use a microfiber pad to wipe the dirt and moisture from the surface being cleaned. Microfiber is designed to pick up and hold dirt, a great aid in lifting and removing the dirt that the steam cleaner has softened and loosened. Also, Microfiber requires moisture to glide over surfaces, the steam cleaner provides moisture that the Microfiber needs to glide. Microfiber and Steam are a great cleaning combination!
Making Contact with Surfaces
The steam is at its hottest just as it leaves the nozzle/accessory. This is the area of the steam output that should be used to clean to achieve maximum performance. All accessories should make direct contact with the surfaces being cleaned to transfer the heat from the Steam Cleaner to the surface in order to soften and loosen dirt. If the accessory being
used does not make contact with the surface, the desired results may not be achieved. If assistance is required contact our Customer Support Line.
TIP: steam will clean hard, sealed, non-porous surfaces in place of harsh chemical-based cleaners and detergents. For soft furnishings such as carpets, rugs, lounges, children's toys etc, steam will refresh and deodorise the fibres. Steam is not used to clean carpets, other than to spot clean. To clean carpets proper carpet cleaning equipment should be used.
Water
Use ordinary tap water for all cleaning. In hard water areas, we recommend distilled or demineralised water to reduce the formation of calcium and other mineral deposits in the Steam Cleaner. Use distilled or demineralised water when steaming light coloured fabrics to eliminate the possibility of hard water stains.
IMPORTANT: Do not add cleaning solutions, perfumes, oils or any other chemicals to the water used in the Boiler.
Superheated Temperature
The temperature in the stainless steel Boiler reaches a superheated range of about 130°C. The superheated temperature dries out most of the moisture droplets within the steam, to create a “vapour-like” steam that dries quickly when used to clean floors. One of the properties of “vapour-like” steam is that it cools very rapidly to avoid burns and injuries, therefore users will find that the steam is cool to the touch at a distance of 25cm from the steam gun opening. But when the microfibre floor pad is inserted on to the floor brush or the fitted pad is inserted on to the small brush, the steam gets “encased” within the pad and heats up the pad during floor or surface cleaning. The heat is an essential component to cleaning because it softens and loosens dirt quickly, so that it can be easily wiped away without the use of harsh chemical cleaners. During the cleaning process the heat must be transferred on to the surface, therefore each cleaning accessory in this product must make contact with the floor or surface while cleaning in order to get an effective clean.
TIP: the hot steam can be used to kill dust mites in soft furnishings and mattresses. The Steam Cleaner is ideal for asthma sufferers, persons with skin sensitivities and anyone with chemical sensitivities.

Microfiber Pad Care & Cleaning
Your Microfiber Pads are designed for hundreds of uses. Wash Pads regularly, either by hand washing (using mild soap and warm water) or in your washing machine on a delicate cycle, cool water. Never use fabric softener or bleach. We recommend letting Pads air dry to maintain maximum long term effectiveness.
Replacement pads are available at most retail outlets or on the Euroflex website at www.euroflex.com.au.
Microfiber washing instructions
| MICROFIBER FLOOR PAD |
| 75% Polyester / 25% Polyamide |
| Hand wash only |
| Tumble dry low or air dry |
| No bleach / No fabric softener |
| MICROFIBER BRUSHES PADS |
| 90% Polyester / 10% Polyamide |
| Hand wash only |
| Tumble dry low or air dry |
| No bleach / No fabric softener |
12
Troubleshooting
| ISSUES POSSIBLE CAUSES SOLUTIONS | ||
| Steam is not coming out of the Steam Nozzles | Improper Handle Assembly Call | Customer Service to receive instructions to correct the problem |
| Why does the Green Steam Ready Light turn off when I'm using the Steam Cleaner? | Euroflex Steam Cleaners have a Thermostat Temperature Control. When the correct temperature in the boiler is reached, the thermostat cuts off power, making this appliance more energy efficient. | |
| When should I replace my Microfibre pads? It will depend on | how often you use your Pads and how well you wash & maintain them. Use mild soap and water to hand wash or a gentle cycle on the washing machine. Allow to air dry. Never use fabric softener or bleach. | |
| The steam seems to be making my floor too wet | Front Steam Jets are being used too frequently | Only use Front Steam Jets in short bursts for cleaning tougher dirt or to clean hard to reach areas |
| The Cleaning Pad is too wet (saturated with moisture) | Replace the wet Pad with a dry, clean Pad and continue cleaning | |
Customer Support
Customers needing assistance with their Steam Cleaner can call the Customer Support Line on the phone numbers listed below. Customers should also call the Customer Support Line if they require product warranty repair or post-warranty product servicing. Our friendly Customer Service Team can assist you with getting the best cleaning results from your Steam Cleaner or they will provide helpful steam cleaning tips, too.
Customer Support Line
AUSTRALIA 1800 663 866
NEW ZEALAND 0800 666 783
Euroflex Australia Pty Ltd
79 Furniss Road
DARCH WA 6065
AUSTRALIA
TEL: 08 9302 2526
Email: admin@euroflex.com.au
Website: www.euroflex.com.au
Euroflex New Zealand Ltd
c/- Durbins
137 Glenfield Road
Birkenhead Auckland 0626
NEW ZEALAND
TEL: 0800 666 783
Email: admin@euroflex.com.au
Website: www.euroflex.com.au
Plastecs SRL
Via dei Colli, 59
31058 Susegana (TV)
ITALY
Tel: +39 0438 453334
Email: info@plastecs.it
Website: www.euroflex-appliances.com

euroflex
Home, Simplified.




- COMPACT MULTI PURPOSE STEAM CLEANER
- INSTRUCTION MANUAL
- IMPORTANT: SAVE THESE INSTRUCTIONS
- SAFETY WARNING
- TY INSTRUCTIONS
- IMPORTANT NOTICES
- IMPORTANT SAFE
- ATTENTION! THIS APPLIANCE IS EQUIPPED WITH A 3-PRONG GROUNDED POWER CORD. INSERT ONLY INTO A 3-PRONG GROUNDED ELECTRICAL OUTLET. DO NOT TRY TO REMOVE THE CONTACTS OF THE GROUNDED CONNECTION
- CAUTIONS
- ADVICE ON DISPOSAL
- INDICATIONS OF USE
- TECHNICAL DATA
- 1 THE COMPACT STEAM CLEANER FEATURES
- 2 ACCESSORIES - ATTACHMENT & DESCRIPTIONS
- BRUSH ADAPTER, FLOOR BRUSH & SMALL BRUSH
- ATTACH BRUSH ADAPTER TO FLOOR BRUSH
- INSERT THE BRUSH ADAPTER IN THE FLOOR BRUSH
- ATTACH FLOOR BRUSH & ADAPTER TO EXTENSION TUBE
- WARNING: ALWAYS ENSURE STEAM CONTROL TRIGGER IS OFF AND NOT STEAMING WHEN ATTACHING AN ACCESSORY TO THE UNIT
- ATTACH BRUSH ADAPTER TO SMALL BRUSH
- EXTENSION TUBE(S)
- ATTACH EXTENSION TUBE TO STEAM GUN
- ATTACH EXTENSION TUBE TO BRUSH ADAPTER
- ATTACH WINDOW TOOL
- ATTACH DETAIL NOZZLE
- ATTACH EXTENSION TUBE OR STEAM GUN TO DETAIL NOZZLE
- DETAIL NOZZLE & ACCESSORIES
- ATTACH NYLON OR STAINLESS STEEL BRUSH TO DETAIL NOZZLE
- ATTACH SCRAPER TO DETAIL NOZZLE
- ATTACH GROUT BRUSH TO DETAIL NOZZLE
- ATTACH MICROFIBRE PAD TO BRUSHES
- ATTACH SHOULDER STRAP
- FILLING STEAM CLEANER WITH WATER
- WARNINGS
- IMPORTANT
- FOLLOW THESE INSTRUCTIONS TO AVOID OVERFILLING THE BOILER
- 4 TURNING STEAM CLEANER ON
- 5 STEAM RELEASE
- 6 REFILLING THE BOILER DURING USE
- TURNING STEAM CLEANER OFF AFTER USE
- REMINDERS
- CLEANING THE STEAM CLEANER
- NEVER HOLD THE STEAM CLEANER UNDER THE TAP TO FILL. USE THE FILLER FUNNEL PROVIDED TO FILL THE BOILER
- 9 REPLACEMENT OF BRUSHES, MICROFIBER PADS AND ACCESSORIES
- 10 STEAM CLEANER TIPS & REMINDERS
- MAKING CONTACT WITH SURFACES
- WATER
- SUPERHEATED TEMPERATURE
- MICROFIBER PAD CARE & CLEANING
- MICROFIBER WASHING INSTRUCTIONS
- TROUBLESHOOTING
- CUSTOMER SUPPORT
- CUSTOMER SUPPORT LINE
- EUROFLEX AUSTRALIA PTY LTD
- EUROFLEX NEW ZEALAND LTD
- NEW ZEALAND
- PLASTECS SRL
- EUROFLEX
Brand : EUROFLEX
Model : Vapour M6S
Category : Steam cleaner