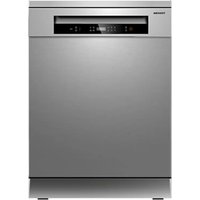
DW-14F1S-MY - Dishwasher TOSHIBA - Free user manual and instructions
Find the device manual for free DW-14F1S-MY TOSHIBA in PDF.


| Product Type | Freestanding Dishwasher |
| Brand | Toshiba |
| Model | DW-14F1S-MY |
| Place Settings | 14 |
| Dimensions (H x W x D) | 845 x 598 x 600 mm |
| Weight | 45 kg |
| Power Supply | 220-240 V, 50 Hz, 10 A |
| Energy Efficiency Class | D |
| Noise Level | 49 dB(A) |
| Water Consumption | 9.5 L per cycle |
| Energy Consumption | 95 kWh per 100 cycles |
| Number of Programs | 6 |
| Key Programs | Eco, Intensive, Normal, Quick, Glass, Pre-wash |
| Additional Functions | Delay start (1-24h), Half load, Extra dry |
| Control Type | Electronic with LED display |
| Safety Features | Child lock, AquaStop, Overflow protection |
| Interior Material | Stainless steel |
| Cutlery Basket | Yes, removable |
| Upper Basket Adjustment | Height-adjustable |
| Spare Parts Availability | Available through authorized service centers |
| Repairability Index | 7.5 / 10 |
| Maintenance | Clean filters monthly, descale every 3 months |
| Warranty | 2 years |
Frequently Asked Questions - DW-14F1S-MY TOSHIBA
User questions about DW-14F1S-MY TOSHIBA
0 question about this device. Answer the ones you know or ask your own.
Ask a new question about this device
Download the instructions for your Dishwasher in PDF format for free! Find your manual DW-14F1S-MY - TOSHIBA and take your electronic device back in hand. On this page are published all the documents necessary for the use of your device. DW-14F1S-MY by TOSHIBA.
USER MANUAL DW-14F1S-MY TOSHIBA
DISHWASHER
INSTRUCTION MANUAL
Model:
DW-14F1(S)-MY
Read these instructions carefully before using your
DISHWASHER, and keep it carefully.
SAFETY INSTRUCIONS
All instructions described should be carefully read and followed.
- These instructions are precautions to prevent the risks of serious injury or death of the user, and any damages to property.
| MARKINGS | |
 WARNING WARNING | WARNING indicates high possibility of serious injury (*1) or death of the user. |
 CAUTION CAUTION | CAUTION indicates high possibility of serious injury (*2) or property loss (*3). |
(*1) Serious injury - injury which requires hospitalization, lengthy treatment, or blindness, hot and cold skin burn, electric shock, broken bones or poisoning.
(*2) Injury - injury, skin burn or electric shock which does not require hospitalization or lengthy treatment.
(*3) Property loss - extended loss of houses, furniture, domestic animals or pets.
| SYMBOLS | ||
 | PROHIBITED! | ∅PROHIBITED! Indicates prohibited actions.Detailed instructions would be indicated on the inside of the circle or around the symbol in figures or in writing. |
 | IMPORTANT | ●IMPORTANT! Indicates mandatory actions.Detailed instructions would be indicated on the inside of the circle or around the symbol in figures or in writing. |
 | CAUTION | △CAUTION! Recommends to take precautions.Detailed instructions would be indicated on the inside of the triangle or around the symbol in figures or in writing. |
Warning
 Away from children Away from children | Do not allow below people to operate the dishwasherThe dishwasher cannot be used by persons (including children) with reduced physical, sensory or mental capabilities, or lack of experience and knowledge, unless they have been given supervision or instruction concerning use of the appliance by a person responsible for their safety.Take care of children and ensure they will not play with the dishwasher.The packing material may be dangerous to children. |
 No modification No modification | Do not dismantle or modify the dishwasher.This may cause fire, electric shock or fault, and cause injuries. If repair is required, please contact with the vendor of the dishwasher. |
 Electric shock Electric shock | Use suitable power source according to the power indicated on the dishwasher nameplate.It will cause fire or electric shock. The use of improper power source may cause the socket overheated and cause fire. |
 Disconnect power plug Disconnect power plug | Before cleaning or maintaining the dishwasher, disconnect the power plug first. |
 No touch by wet hand No touch by wet hand | Do not connect or disconnect the power plug by wet hand.This may cause electric shock or fault and cause injuries. |
 Electric shock Electric shock | Do not use damaged power lines, power plug or loose power socket.This may cause electric shock or fault, and cause injuries or fires. |
 No dis-assembly and repair without permission No dis-assembly and repair without permission | Do not damage power line.Do not damage, cut, process power line or bend, pull, twist or bind power line.Besides, do not yank the metal part of the power line, or put weights on the line or clamp the power line.The power line may be damaged and cause fire or electric shock. If the power line is damaged, the damaged line must be replaced by the manufacturer or its service agent or personnel having similar qualification, so as to prevent dangers. |
 No water spraying No water spraying | Do not spray water directly onto the parts of the main body of the dishwasher.This may cause accidents of electric shock or short circuit. |
 Away from flammable materials Away from flammable materials | Do not put flammable materials into the dishwasher.Do not put flammable materials of kerosene, gasoline, volatile oil, diluent, ethyl alcohol etc. as well as dishes having such matters into the dishwasher.It will may cause explosion or fire. |
| Wipe off dust | Wipe off dust or dirt accumulated on the plug of power line.The accumulated dust or dirt may cause fire. |
| Prohibit | Do not touch the inside of the cabinet, steam jets for during operation or 30 minutes after operation.There is a fear of burning. |
| Instruction | Take out the dishes, clean filters, handle it more than 30 minutes after operation.There is a fear of burning. |
| Prohibit | Do not use extension cord.It may cause fire due to heat. |
| Instruction | It there is abnormality such as the spray arm is not moving, smoke or strange smell, immediately unplug the power plug and stop using the dishwasher.Please ask the agent you purchased for inspection/repair. There is a danger of electric shock, fire by electric leakage or short-circuiting. |
| [XXC7]Insert plug | Insert the power plug securely to the base and let the cord go downward.If the cord goes upward or if the plug is incompletely inserted, it may cause fire due to electric leakage or heat generation. |
 Prohibit Prohibit | Do not operate by putting easily combustible items such as towels and cloth inside the cabinet of the dishwasher.There is a fear of fire. |
 Instruction Instruction | Separate from the heat source such as gas stove 15 cm or more.There are fears of fires and deformations. |
 Prohibit Prohibit | Do not place anything on the main unit.Do not place heavy objects or hot objects on top of the main unit, such as containers of water or hot water, heat appliances, glasses, electric products, cutlery etc.Falling by opening and closing the door may cause injury. Also, spilled water may deteriorate insulation and cause electric leakage and fire. |
 Away from flammable matrtials Away from flammable matrtials | Do not place the dishwasher near fire.Do not put the burning candle or cigarette on the dishwasher. It may cause fire. |
 Careful installation Careful installation | Make sure the dishwasher can be set at a smooth drainage location.The use of dishwasher having poor drainage may cause water to flow back to the dishwasher and cause electric shock or fire. |
 Correct grounding Correct grounding | The dishwasher must be grounded.The current resistance are minimum after grounding, and this can reduce the danger of electric shock when the dishwasher become fault state. The electric wires of this dishwasher have grounding wire and grounding plug.Fault connection of the grounding wire will cause electric shock. If E3 failure occurs, please unplugging the power plug from the outlet, and needs to be repaired by professional electricians or service men. |
 No dis-assembly and repair without permission No dis-assembly and repair without permission | Do not change the plug without permission.When the plug does not match the socket, proper power socket shall be installed by professional electricians. |
Caution
| No pulling by force | When disconnecting the plug from the socket, do not pull the power line by force. Pull out by grasping the power plug. It may cause electric shock or fault and cause injuries. |
| No use | Do not use soap, washing powder or other hand sanitizer. Only dishwashing powder suitable for automatic dishwasher. It may cause machine fault. |
| No washing | Do not wash plastic utensils.For plastic utensils, only those marked with safety for the dishwasher or other similar situations, can be washed by the dishwasher. For the plastic utensils without marks, check details with the utensil manufacturer. |
| Application environment | Only for indoor use.Such home appliance is for household use, e.g.:- Applications in staff kitchen of shop, office and other working environments;- Farmhouse;- Use for customers in hotel, car hotel and other residence environments;- Environments of inns |
| No climbing | Do not sit or stand on the dish rack or door of the dishwasher.It may cause dangers of injuries due to deformation or damage. |
| Pull off power plug | When the dishwasher is not used for long time, pull off the power plug from the power socket and close the dishwasher door.Electric shock or short circuit may be caused due to the degradation of insulating material. |
| Care about the door | The door shall keep close, to prevent stumble.It is very dangerous to open the door during washing, and hot water may cause scald. |
| Care for safety | When install the items (dishes, utensils etc) into the dishwasher:1. Be careful to put sharp utensil to prevent it from scratch the door sealing strip.2. Warning: the cutters and other sharp tools must be put in the basket, and the sharp end is put downwards or horizontally. |
| Care for cleaning | Moisten the soft cloth by mild cleaning solution, then wipe the machine, and wipe it dry by dry cloth. |
| Attention | After washing, check if the dishwashing powder is empties.Firstly, confirm that there is no error or abnormality notification on the panel before using the dishwasher.When installing the dishwasher, use new water hose. Do not use the current water hose.Maximum inlet water pressure is 1 MPa.Minimum water inlet pressure is 0.04 MPa. |
 Loading capacity Loading capacity | Quantity of tableware advised: 162 pcs (Cup x14 + Saucer x14 + Glass x14 + Small serving bowl x1 + Medium serving bowl x1 + Large serving bowl x1 + Dessert dishes x14 + Dinner plate x14 + Soup plate x14 + Oval platter x1 + Soup spoon x14 + Fork x14 + Knife x14 + Teaspoon x14 + Dessert spoon x14 + Serving spoon x 2 + Serving fork x1 + Gravy ladle x1) |
| [236Y]Prohibit | Do not strongly push open door and main body, nor put the downward pressure to the door. Falling may cause injuries. |
| Attention to pinching of fingers | Be careful not to pinch fingers when opening and closing the door.There is a risk of getting hurt while pinching fingers. |
| [2TT3]Prohibit | Do not get close to the exhaust port.Steam or hot air may cause the burns. |
 Attention to burn Attention to burn | While using or after using the dishwasher, pay attention to hot water drained out.High temperature hot water may come out, there is a risk of burns. |
 Prohibit Prohibit | Prohibit to hit or tap the dishwasher.Electric shock, electric leakage short circuit may cause fire. |
 Instruction Instruction | Set the filters correctly.Residues clogs, causing breakdown. |
 Prohibit Prohibit | Do not put light and small dishes such as plastic containers.If it is dropped by water pressure of the water spray, it may cause malfunction due to clogging the dishwasher. |
 Prohibit Prohibit | Do not use for purposes other than dishwasher dryer.It may cause a malfunction. |
 Instruction Instruction | Make the main unit a solid level surface.Normal operation may not be possible. It may cause water leakage. |
 Instruction Instruction | Fix the connection of drainage pipe certainly.It may cause water leakage. |
Treatments
- Handle the package of the dishwasher with extreme care.
• All packages are recyclables. - Plastic parts are marked with abbreviation of international standard;
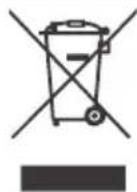
| PE Polyethylene, e.g., tableted package material | |
| PS | Polystyrene, e.g., packing material |
| POM | Polymethyl, e.g., plastic clip |
| ABS | Polymer, e.g., control panel |
| PP | Polypropylene, e.g., inner wall |
Warning
● The packing material may be dangerous to children!
- The disposal of package and machine shall be submitted to the recycle center.
- When the machine is not in service, please switch off the power and close the machine door.
- The cardboard package is made by recycled paper and shall be collected for recycling.
- If the generated rubbish cannot be treated properly, they will be harmful to the environment and human health, and they shall be properly disposed to prevent potential threat.

Warning
- For more details of product recycle, please contact relevant departments of local government or the service center for domestic refuse management.
● Treatment: Please do not treat the product as unclassified municipal refuses.
Different refuses have to be subject to special treatment separately.
Such warning sign is used to prevent dangers to you and others.
Please follow it strictly.
After reading, please store it properly for use just in case.
Please carefully read the instruction manual before using the dishwasher, and this is helpful for the use and maintenance of the product.
01 Recognize the dishwasher
Dishwasher features 10
Control panel 11
02 Program Setting
Washing program 13
Start up 14
Changing the program mid-cycle 14
Put additional dishes in 15
End of washing program 15
03 Use the dishwasher
Water softener 16
Adding salt to the softener 17
Rinse aid and detergent 18
Adding rinse aid to the dispenser 19
Adding rinse aid to the dispenser 20
Install dishwasher bowl basket 21
Basket used tips 24
04 Cleaning and care
Filter cleaning 26
Spray arms cleaning 27
Care and maintenance 28
05 Installation
Product dimension 29
Power connection 30
Water connection 30
Connection of drain hoses 31
06 Troubleshooting
Before connecting customer service center 32
Error code 34
Specification 35
Recognize the dishwasher
Important:
Before using the dishwasher for the first time, read following instructions to ensure the best results.
Dishwasher features
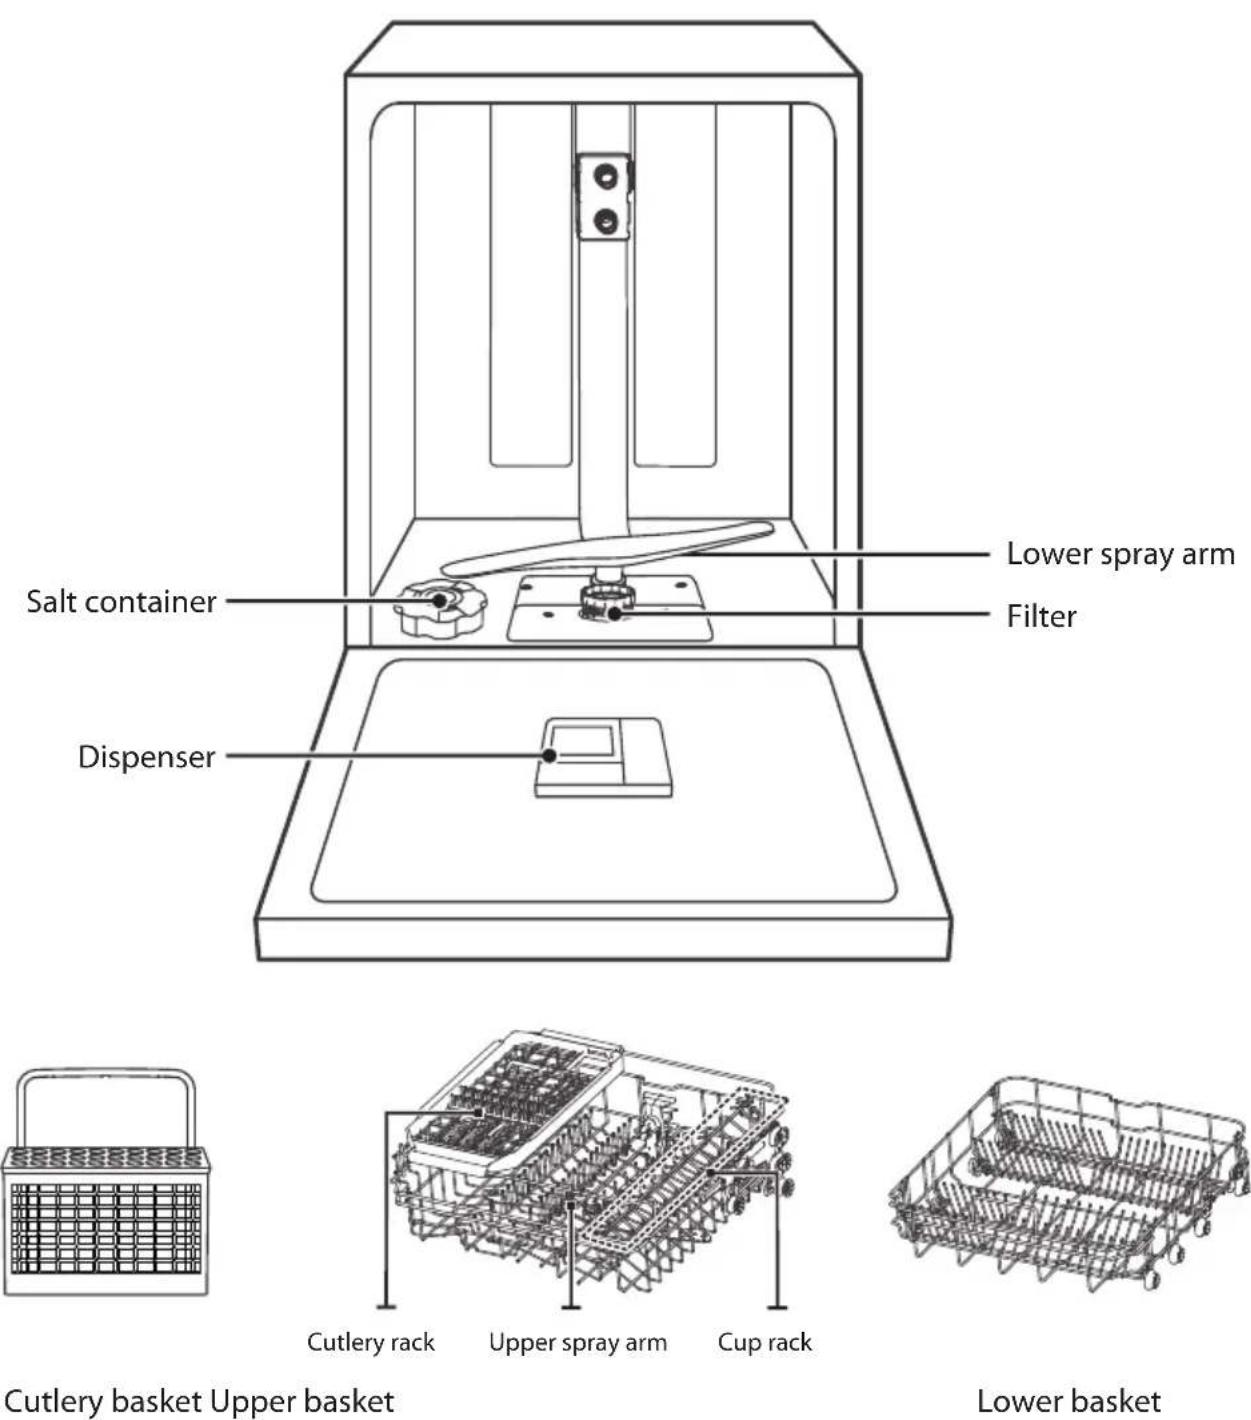
Cutlery basket Upper basket
Lower basket
Control panel

| 1 Power | Power on/off | |
| 2 Program | Select the appropriate washing program and corresponding icon will light up. Ⓐ AUTO Light to heavily soiled daily used items, automatic detection of the amount of soils. ⚪HYGIENE Use to remove bacteria your dishes and glassware. Maintains the water temperature at 70°C.eco ECO This is standard program. For general dirty dishes and utensils (such as pots, plates, glasses, pans). ⚠ GLASS For slight dirty dishes and glasses. ⚡ 90 MIN For normally soiled loads that need quick wash. ⚢ RAPID For slight dirty dishes, the required cleaning time is relatively short. | |
| Delay start | Touch this button to set the delayed hours for washing. You can delay the star of washing up to 24 hours. One touch on this button delays the star of washing by one hour. After setting the delay time, touch the Start/Pause button to start. | |
| 4 Half load | When you have about or less than 6 place setting dishware to wash, you can choose this function to save energy and water. (It can only be used with Intensive, ECO, Glass and 90 min.) | |
| 5 Child lock | This option allows you to lock the buttons on the control panel, so children cannot accidentally start the dishwasher by pressing the buttons on the panel. Only the Power button remains active. To lock or unlock the buttons on the control panel, press and hold the Half load button + Function button for 3 seconds simultaneously. | |
| 6 Function | Select a function and the corresponding icon will light up. | |
 EXTRA DRYING EXTRA DRYING | Use this option when you want to dry your dishes more completely. It can only be used with Hygiene, ECO, Glass, 90 min. | |
 POWER WASH POWER WASH | To wash very dirty, hard to clean dishes. It can only be used with Hygiene, ECO, Glass, 90 min. | |
| 7 Start/Pause | To start or pause the washing process of the dishwasher. | |
| 8 Display | When a program is selected, it shows the highest temperature and length of the program.when program starts, it shows the actual water temperature and the remaining time of the program. | |
 Water insufficient indicator Water insufficient indicator | ||
 If the “☀” indicator is lit, it means the dishwasher is low on dishwasher rinse aid and requires a refill. If the “☀” indicator is lit, it means the dishwasher is low on dishwasher rinse aid and requires a refill. | ||
 If the “⊆” indicator is lit, it means the dishwasher is low on dishwasher salt and requires a refill. If the “⊆” indicator is lit, it means the dishwasher is low on dishwasher salt and requires a refill. | ||
Washing program
Following table shows best cleaning procedures and amount of dishwashing powder required according to the dirty level of the dishes, as well as the
| Program | Highest Water Temperature | Dishwashing powder (g) | Time (min) | Power (Kwh) | Water (L) |
 AUTO AUTO | 55°C | 5/30/1\ or\ 2\ pieces | 150 | 0.9-1.3 | 11~15 |
 HYGIENE HYGIENE | 70°C | 35/1\ piece | 175 1.5 | 13.5 | |
| eco | 47°C | 5/30/1\ or\ 2\ pieces | 195 | 0.93 11 | |
 GLASS GLASS | 42°C | 5/30/1\ piece | 130 | 0.9 14.5 | |
 90MIN 90MIN | 65°C | 35/1\ piece | 90 | 1.35 12.5 | |
 RAPID RAPID | 55°C | 30 0.75 1125 |
Attention
The above program data is for reference only. Test conditions are as follows:
- Washing capacity: 162 pcs (Cup x14 + Saucer x14 + Glass x14 + Small serving bowl x1 + Medium serving bowl x1 + Large serving bowl x1 + Dessert dishes x14 + Dinner plate x14 + Soup plate x14 + Oval platter x1 + Soup spoon x14 + Fork x14 + Knife x14 + Teaspoon x14 + Dessert spoon x14 + Serving spoon x 2 + Serving fork x1 + Gravy ladle x1)
● Power consumption at shutdown state and standby state similarly are 0.49w.
Start up
- The plug shall be firstly plugged into the socket. Power supply shall be of 220-240V AC 50Hz type, with socket of 10 A 220-240V AC.
- Make sure that the water supply is turned on to full pressure.
- Close the door, press "ON/OFF" button turn on the dishwasher.
- Press the button of desired program, the corresponding indicator will light up.
- Then, pass"Start/Pause"button to start.
![graph LR A["Power"] --> B["ECO"] B --> C["Return to 00"]](/content/2026/07/1433068/images/f5cc2f60be24d53f156f0409ae81e8b1cdfe723fca2f68232bb7e9916c1dbe5e.jpg)
Changing the program mid-cycle
A wash cycle can only be changed if it has been running for a short time otherwise, the detergent may have already been released and the dishwasher may have already drained the wash water. If this is the case, the dishwasher needs to be reset and the detergent dispenser must be refilled. To reset the dishwasher, follow the instructions below:
- Press the Start/Pause button to pause the washing.
- Press the Program button for more than 3 seconds, the dishwasher will enter standby mode.
- Press the Program button to select the desired program.
- Press the Start/Pause button, the dishwasher will run after 10 seconds.
![graph LR A["00"] --> B["3 seconds"] B --> C["A"] C --> D["eco"] D --> E["00"]](/content/2026/07/1433068/images/04f821a6280223d2b070d04855ce59cc5603c288edd96f9547607141b429d63a.jpg)
Put dishes in additional
Additional dishes can be placed in at any time before dishwasher program start. If you want to reload dishes in the process of washing, please follow instructions below:
- Press "Start/Pause" button to pause washing program;
- Wait for 5 seconds to open the door;
- Put the additional dishes in;
- Close the door;
- Press "Start/Pause" button and after 10 seconds, the dishwasher will start again.
![graph LR A[" washing machine"] --> B["Recycle"] B --> C["Heating"] C --> D["Washing machine"]](/content/2026/07/1433068/images/d495f1953bc2d4acbec3fcd709b0e519a0c898d28e2bc67cfe920cbd24915af1.jpg)
End of washing program
After the program finishes, the machine show "End" after the buzzer beeps for 8 seconds.
- Turn off the machine
Press ON/OFF button to turn off the dishwasher.
- Open the door carefully
Hot dishes are more likely to be damaged. The dishes shall be cool for about 15 minutes and then taken out from the dishwasher.
- Clear the dishwasher
It is normal that the dishwasher still remains wet inside.
⚠ Warning
It is extremely emely dangerous to open the door in the process of washing as this may cause severe burn by hot water.
Water softener
The water softener must be set manually, using the water hardness dial.
The water softener is designed to remove minerals and salts from the water, which would have a detrimental or adverse effect on the operation of the appliance.
The more minerals there are, the harder your water is.
The softener should be adjusted according to the hardness of the water in your area. Your local Water Authority can advise you on the hardness of the water in your area.
Adjusting salt consumption
The dishwasher is designed to allow for adjustment in the amount of salt consumed based on the hardness of the water used. This is intended to optimise and customise the level of salt consumption.
Please follow the steps below for adjustment in salt consumption.
- Close the door and switch on the appliance.
- Press the Start/Pause button for more than 5 seconds, when the salt indicator flashes means entering the water softener settings. set model within 60 seconds after the appliance was switched on.
- Press the Start/Pause button to select the proper set according to your local environment, the sets will change in the following sequence: H1->H2->H3->H4->H5->H6.
- Without any operation in five seconds, the machine will exit from set mode, the machine is into standby status.
| WATER HARDNESS | Water softener level Mmol/l | Salt consumption (gram/cycle) Water softener I | |||
| German *dH | French *fH | British *Clarke | Mmol/l | ||
| 0 - 5 | 0 - 9 | 0 - 6 | 0 - 0.94 | H1 | 0 |
| 6 - 11 | 10 - 20 | 7 - 14 | 1.0 - 2.0 | H2 | 9 |
| 12 - 17 | 21 - 30 | 15 - 21 | 2.1 - 3.0 | H3 | 12 |
| 18 - 22 | 31 - 40 | 22 - 28 | 3.1 - 4.0 | H4 | 20 |
| 23 - 34 | 41 - 60 | 29 - 42 | 4.1 - 6.0 | H5 | 30 |
| 35 - 55 | 61 - 98 | 43 - 69 | 6.1 - 9.8 | H6 | 60 |
1°dH=1.25 Clarke=1.78 fH=0.178mmol/l
The manufactory setting: H3
Contact your local water board for information on the hardness of your water supply.
Warning
- Only use salt specifically designed for dishwashers use!
Every other type of salt not specifically designed for dishwasher use, especially table salt, will damage the water softener. In case of damages caused by the use of unsuitable salt the manufacturer does not give any warranty nor is liable for any damages caused.
- Only fill with salt before running a cycle.
This will prevent any grains of salt or salty water, which may have been spilled, remaining on the bottom of the machine for any period of time, which may cause corrosion.
Please follow the steps below for adding dishwasher salt:
![graph TD A["Hand holding bowl with salt"] --> B["Add 1 cup, drops back"] B --> C["Salt being added to a bowl"] C --> D["Add 2 cups, pouring liquid into a container"] D --> E["Add 3 cups, stirring liquid"]](/content/2026/07/1433068/images/55c749b3ae6c50316e8c7b923c1df7e20166b538e33c4c337433b401f685dee9.jpg)
- Remove the lower basket and unscrew the reservoir cap.
- Place the end of the funnel (supplied) into the hole and pour in about 1.5kg of dishwasher salt.
- Fill the salt container to its maximum limit with water, It is normal for a small amount of water to come out of the salt container.
- After filling the container, screw back the cap tightly.
- The salt warning light will stop being after the salt container has been filled with salt.
- Immediately after filling the salt into the salt container, a washing program should be started (We suggest to use a short program). Otherwise the filter system, pump or other important parts of the machine may be damaged by salty water. This is out of warranty.
Attention
- The salt container must only be refilled when the salt warning light ( ) in the control panel comes on. Depending on how well the salt dissolves, the salt warning light may still be on even though the salt container is filled.
If there is no salt warning light in the control panel (for some Models), you can estimate when to fill the salt into the softener by the cycles that the dishwasher has run. - If salt has spilled, run a soak or quick program to remove it.
Function of the rinse aid and detergent
The rinse aid is released during the final rinse to prevent water from forming droplets on your dishes, which can leave spots and streaks. It also improves drying by allowing water to roll off the dishes. Your dishwasher is designed to use liquid rinse aids.
Warning
Only use branded rinse aid for dishwasher. Never fill the rinse aid dispenser with any other substances (e.g. Dishwasher cleaning agent, liquid detergent). This would damage the appliance.
When to refill the rinse aid
The regularity of the dispenser needing to be refilled depends on how often dishes are washed and the rinse aid setting used.
- The Low Rinse Aid indicator ( ☀️ ) will appear in the display when more rinse aid is needed.
- Do not overfill the rinse aid dispenser.
Function of detergent
The chemical ingredients that compose the detergent are necessary to remove, crush and dispense all dirt out of the dishwasher. Most of the commercial quality detergents are suitable for this purpose.
Warning
• Proper Use of Detergent
Use only detergent specifically made for dishwashers use. Keep your detergent fresh and dry.
Don't put powdered detergent into the dispenser until you are ready to wash dishes.
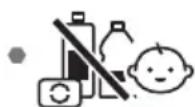
Dishwasher detergent is corrosive! Keep dishwasher detergent out of the reach of children.
Adding rinse aid to the dispenser

1 Remove the rinse reservoir cap by lifting up the handle.

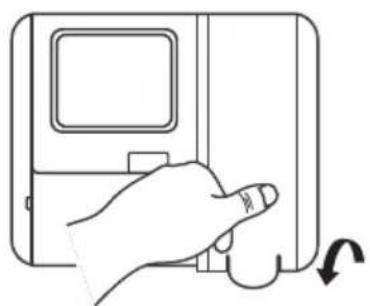
3 Close the cap after all.
2 Pour the rinse aid into the dispenser, being careful not to overfill.
Adjusting the rinse aid reservoir
To achieve a better drying performance with limited rinse aid, the dishwasher is designed to adjust the consumption by user. Follow the below steps.
- Close the door and switch on the appliance.
- Within 60 seconds after step 1, press the Start/Pause button more than 5 seconds, and then press the Delay button to enter the set model, the rinse aid indication blinks as 1 Hz frequency.
- Press the Start/Pause button to select the proper set according to your using habits, the sets will change in the following sequence: D1->D2->D3->D4->D5->D1. The higher the number, the more rinse aid the dishwasher uses.
- Without operation in 5 seconds or press the Power button to exit the set model, the set success.

1 Please choose an open way according to the actual situation.
- Open the cap by sliding the release catch.
- Open the cap by pressing down the release catch.

2 Add detergent into the larger cavity (A) for the main wash cycle. For better cleaning result, especially if you have very dirt items, pour a small amount of detergent onto the door. The additional detergent will activate during the pre-wash phase.

3 Close the flap by sliding it to the front and then pressing it down.
Suggestion
● Purchase dishes suitable for dishwasher.
- Use a suitable mild dishwashing powder. If necessary, consult the manufacturer for more information.
- For special appliances, try to select a washing program that with a lower temperature.
- Do not take out the glass dishes immediately after the program ends to prevent damage.
Use the dishwashing machine rationally
- Wooden, ivory, porcelain or pearl shank tool
• Non heat-resistant plastic products - Stale non heat-resistant cutters with glue adhesive part
• Cohesive knives or dishes - Tin or copper vessels
- Crystal glass
• Rusty steel products - Wooden utensils
- Synthetic fiber products
Limited use: Not for:
- After several cleanings, some glassware will become dull
- Silver or aluminum products tend to change color during cleaning
- Color of smooth dishes may fade out if often washed
Precautions before and after the bowl basket is placed
(For the best use of dishwasher, follow the instructions below. For different models, the characteristics and appearance of the basket will be different) Clear larger food residues. Soften the residue of burnt food left on the pan. It is not necessary to rinse dishes with water first. Place the dishes in the dishwasher as follows:
- Cups, glasses, pots and so on are placed face down.
- For curved or concave and convex vessels, place them diagonally so that the water flows out.
- All utensils should be placed safely and must not be overturned.
- All utensils should be placed that the arms can rotate freely during washing.
Attention
For small objects, it is easy to fall out from the basket, which should not be placed in the dishwasher.
- The open of hollow tablewares (such as cups, glasses, pots, etc.) should face downward so that water does not easily remain in the container or grooves.
- Dishes and knives should not be placed in other utensils, and they can't overlaid each other.
- Do not place glass close to each other to avoid damage.
- For long knives, placing upright is very dangerous.
- Long or sharp knives (eg. meat cleavers) should be placed horizontally in the basket.
- Do not use the dishwasher overloaded so that you can get better cleaning performance.
Loading the upper basket
Use the upper rack for small or delicate items such as small plates, cups, saucers, glasses, and dishwasher-safe plastic items.
- Place items so that the open end faces down for cleaning and drying.
- Do not stack items on top of each other.

| Number | Item |
| 1 | Cups |
| 2 | Saucers |
| 3 | Glasses |
| 4 | Small serving bowl |
| 5 | Medium serving bowl |
| 6 | Large serving bowl |
Loading the lower basket
The lower rack is recommended for dinner plates, soup bowls, dishes, pots, pans, lids, and grill trays. Plates should be positioned vertically and facing the center of the rack.
Make sure that large items do not interfere with the rotation of the spray arms, and do not prevent the detergent dispenser from opening.
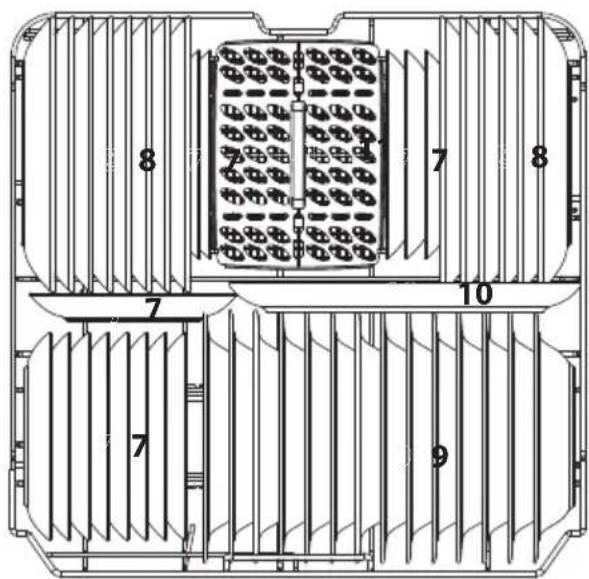
| Number | Item |
| 7 | Dessert dishes |
| 8 | Dinner plates |
| 9 | Soup plates |
| 10 | Oval platter |
| 11 | Cutlery basket |
Loading the cutlery rack
The cutlery rack is best suited for washing flatware and most cooking or serving utensils. The separators on the cutlery racks help keep flatware separated to avoid damage and improve cleaning.


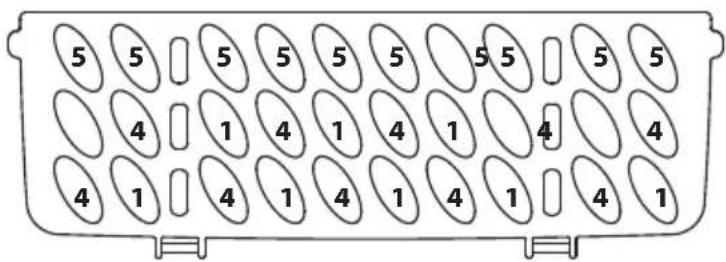
| Number | Item | Number | Item |
| 1 | Soup spoons | 5 | Dessert spoons |
| 2 | Forks | 6 | Serving spoons |
| 3 | Knives | 7 | Serving forks |
| 4 | Teaspoons | 8 | Gravy ladles |
Adjusting the upper basket
The height of the upper basket can be easily adjusted to accommodate taller dishes in either the upper or lower basket. We recommend adjust the height of the upper basket before loading dishes.
To adjust the height of the upper rack, follow these steps:

1 To raise the upper basket just lift, the upper basket at the center of each side until the basket locks into place in the upper position. It is not necessary to lift the adjuster handle.

2 To lower the upper basket lift the , adjust handles on each side to release the basket and lower it to the lower position.
Sliding cutlery rack
The cutlery rack can slide to the right or left at will.
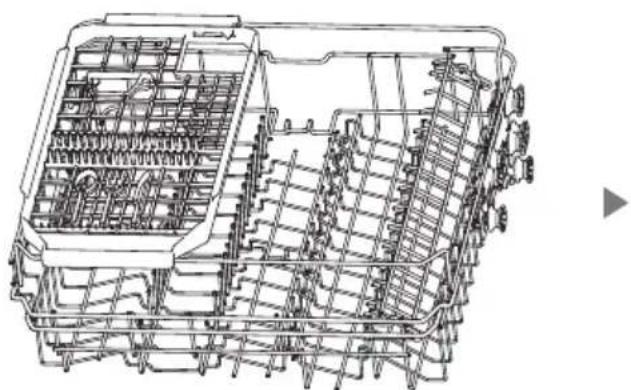

Folding back the cup shelves
To make room for taller items in the upper basket, raise the cup rack upwards. You can then lean the tall glasses against it. You can also remove it when it is not required for use.


Folding back the rack shelves
The spikes of the lower basket are used for holding plates and a platter. They can be lowered to make more room for large items.
raise upwards fold backwards


Cleaning and care
Filter cleaning
The filtering system in the base of the wash cabinet retains coarse debris from the washing cycle. The collected coarse debris may cause the filters to clog. Check the condition of the filters regularly and clean them if necessary under running water.
Follow the steps below to clean the filters in the wash cabinet.
Warning
- Do not over tighten the filters. Put the filters back in sequence securely, otherwise coarse debris could get into the system and cause a blockage.
- Never use the dishwasher without filters in place. Improper replacement of the filter may reduce the performance level of the appliance and damage dishes and utensils.

1 Hold the coarse filter and rotate it anticlockwise to unlock the filter. Lift the filter upwards and out of the dishwasher.

The fine filter can be pulled off the bottom of the filter assembly.
The coarse filter can be detached from the main filter by gently squeezing the tabs at the top and pulling it away.
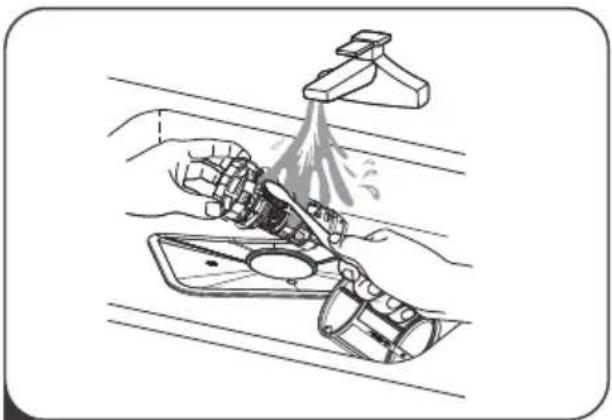
3 Larger food remnants can be cleaned by rinsing the filter under running water. For a more thorough clean, use a soft cleaning brush.

4 Reassemble the filters in the reverse order of the disassembly, replace the filter insert, and rotate clockwise to the close arrow.
Spray arms cleaning
It is necessary to clean the spray arms regularly for hard water chemicals will clog the spray arm jets and bearings.
To clean the spray arms, follow the instructions below:

1 To remove the upper spray arm, hold the nut in the center still and rotate the spray arm counterclockwise to remove it.

2 To remove the lower spray arm, pull out the spray arm upward.

3 Wash the arms in soapy and warm water and use a soft brush to clean the jets. Replace them after rinsing them thoroughly.
Care and maintenance
The door and the door seal
Clean the door seals regularly with a soft damp cloth to remove food deposits.
When the dishwasher is being loaded, food and drink residues may drip onto the sides of the dishwasher door. These surfaces are outside the wash cabinet and are not accessed by water from the spray arms. Any deposits should be wiped off before the door is closed.
The control panel
Control panel can be wiped with a slightly wet cloth. After cleaning, make sure it is completely dry.
Do not use Sharp tools, Scratch sponge, or Rough detergent anywhere in the machine.
⚠ Warning
- Do not use spray detergent to clean the door, as it may damage the door lock and other electrical components.
- Do not use abrasives or rough paper towels, as it may leave scratches or spots on stainless steel surface.
Product dimension

| Height (H) | 845mm |
| Width (W) | 598mm |
| Depth (D1) | 600mm (with the door closed) |
| Depth (D2) | 1175mm (with the door opened 90° ) |
⚠ Warning

Electric Shock
The machine shall be installed after the power is off. If not, electric shock or death can be caused.
Please make sure the machine is properly grounded before use.
Power connection
⚠ Warning
Electric Shock
- Do not use an extension cord or power adapter on this machine.
- In case, do not cut off or remove the grounding connection of power cord.
Power requirements
Please check the label of rated value of power supply system for knowing rated voltage and connect the machine to appropriate power supply. 10A fuse is required and time-delay fuse or circuit breaker is recommended. Only separate circuit is suitable for this machine.
Machine connection
Make sure that supplied voltage and frequency correspond to those on rating plate. Plug can only be connected to a properly grounded socket. If the socket that the machine must be connected to is not suitable for the plug, replace the socket, and do not use a power adapter that may cause overheating and burning.
Water connection
Connect the cold water supply hose to a threaded 3/4(inch) connector and make sure that it is fastened tightly in place.
If the water pipes are new or have not been used for an extended period of time, let the water run to make sure that the water is clear. This precaution is needed to avoid the risk of the water inlet to be blocked and damage the appliance.
Connection of drain hoses
Insert the drain hose into a drain pipe with a minimum diameter of 4 cm, or let it run into the sink, making sure to avoid bending or crimping it. The height of drain pipe must be less than 1000 mm. The free end of the hose must not be immersed in water to avoid the back flow of it.
⚠️ Please securely fix the drain hose in either position A or position B
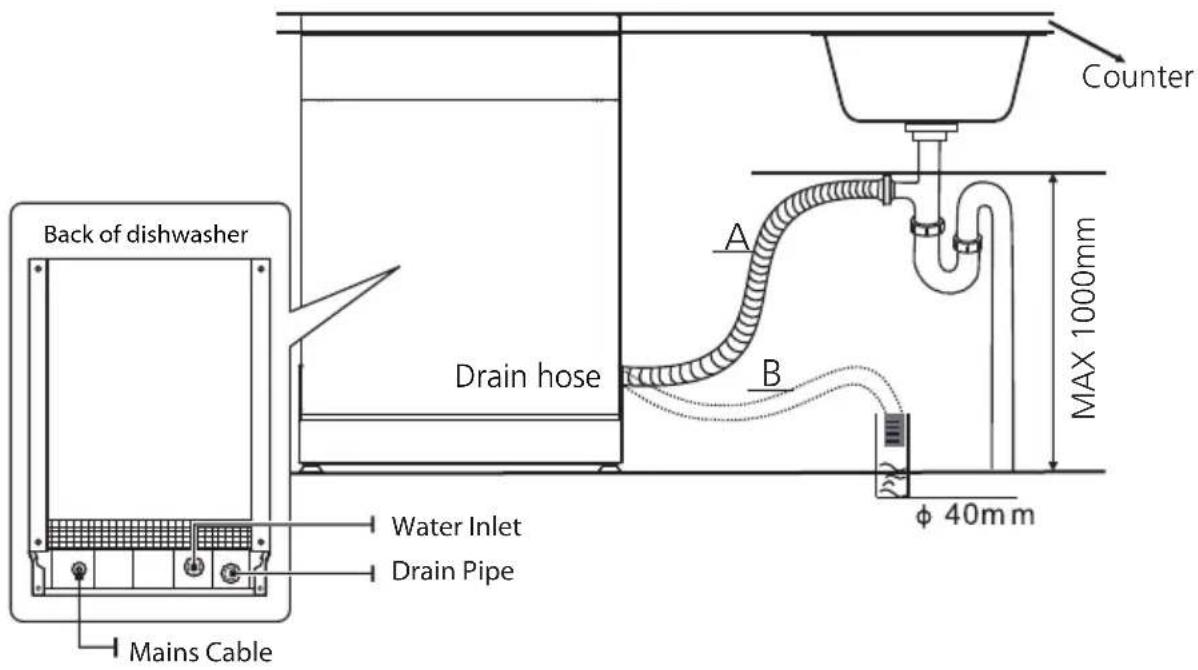
How to drain excess water from hoses
If the sink is 1000 higher from the floor, the excess water in hoses cannot be drained directly into the sink. It will be necessary to drain excess water from hoses into a bowl or suitable container that is held outside and lower than the sink.
Water outlet
Connect the water drain hose. The drain hose must be correctly fitted to avoid water leaks. Ensure that the water drain hose is not kinked or squashed.
Extension hose
If you need a drain hose extension, make sure to use a similar drain hose.
It must be no longer than 4 meters; otherwise the cleaning effect of the dishwasher could be reduced.
Syphon connection
The waste connection must be at a height less than 100 cm (maximum) from the bottom of the dish. The water drain hose should be fixed.
Before connecting customer service center
Please check the chart below before connecting customer service center
| Problem | Possible cause Solutions | |
| The machine is not working | Fuse burn-out or circuit trip. | Replace fuse or reset circuit breaker Remove any other appliances that share same circuit with the dishwasher. |
| Power is not connected. | Make sure that dishwasher is on and the door is firmly closed. Make sure power cord is properly plugged into the socket. | |
| Door is open. | Close the door. | |
| Insufficient drainage | Drainage pipe has a knot or is blocked. | Check the drainage pipe. |
| Filter is blocked. | Check coarse filter. | |
| Sink drian is blocked. | Check the sink drain to ensure good drainage. If the kitchen sink drain is not working properly, you shall ask a pipe technician for help rather than a dishwasher qualified serviceman. | |
| Foam remains in liner | Improper dishwashing powder is used. | In order to avoid foaming, only dishwashing powder specially designed for dishwasher can be used. In such case, open the door and allow the foam to evaporate. In case of too much foam, start any washing program for cleaning. |
| Detergent overflows. | Wipe off spilled cleaner immediately. | |
| Colors on liner | Use dishwashing powder with coloring agent. | Make sure that dishwashing powder used is free of coloring agent. |
| White film on liner | Hard water minerals. | Use wet sponge with dishwashing powder and wear rubber gloves for interior cleaning. Do not use any detergent other than dishwashing powder as it may generate foam or bubble. |
| Rust on dishes | Dishes with rust are easily to be corroded. | Avoid washing dishes that are easily to be corroded in dishwasher. |
| Crush in dishwasher | Dishes in the rack prevents spray arm from rotating. | Suspend the program and reposition the dishes that prevent spray arm from rotating. |
| Problem Possible cause Solutions | ||
| Noise from dishwasher | Dishes are loose. | Suspend the program and reposition the dishes. |
| Beats in water pipe | This may be caused by site installation or cross section | It has no effect on operation of dishwasher. In case of any doubts, please contact qualified pipe technician. |
| Dishes remain dirty after washing | Dishes are not placed correctly. | Please see “Install dishwasher bowl basket” information for details (Page 22). |
| The program is not powerful enough. | Select a more powerful program. | |
| Dishwashing powder is not enough. | Use more dishwashing powder or replace new detergent. | |
| Placement of dishes affects the rotation of spray arm. | Reposition the dishes so that spray arm can rotate freely. | |
| Filter assembly is dirty or not properly installed on the base, which may impede the rotation of spray arm. | Clean or properly install the filter and clean spray arm. | |
| Glassware is not glossy | Add too much dishwashing powder under soft water conditions. | If soft water is used, use less powder and select a shorter washing program to clean the glassware. |
| White point on dishes or glassware | Hard water produces more scale. | Add dishwashing powder. |
| Black or grey imprints on dishes | Friction between aluminum utensil and dishes. | Use mild detergent to eliminate these imprints. |
| Dishwashing powder remains in adding position | Placement of dishes hinders the addition of dishwashing powder. | Place the dishes correctly. |
| Dishes are not completely dry | Placement is improper. | Please see “Install dishwasher bowl basket” information for details (Page 22). |
| Dishes are taken out too early. | Do not take dishes out immediately after the program ends. Slightly open the door let the vapor out and wait until dishes are cool. | |
| Program is wrong. | When shorter washing procedures are used, washing temperature is lower and cleaning effectiveness is reduced. A longer program shall be selected. | |
| The dishes have poor drainage ability. | These dishes have poor drainage ability, which are not suitable to be washed in dishwasher. | |
Error code
When failure occurs, error code will appear to remind you:
| Error code Possible cause | ||
| E1 | Long water intake time | Flow-meters, drain valves, or pump failures shall be repaired by qualified serviceman. |
| E3 | Abnormal heating | Heating pipe or thermistor is at abnormal state, which needs to be unplugged the power plug from the outlet, and needs to be repaired by qualified serviceman. |
| E4 | Overflow or water tank problem | The machine occur overflow or something wrong with the floater in the water tank, needs to be repaired by qualified serviceman. |
| Ed | Abnormal communication | Need to be repaired by qualified serviceman. |
Specification
| Model | DW-14F1(S)-MY |
| Dimension (mm) | 598 (W) x 845 (H) x 600 (D) |
| Rated voltage | 220-240V |
| Rated frequency | 50 Hz |
| Rated power | 1760-2100 W |
| Water consumption | 11 L |
| Power consumption | 0.93 kWh |
| Control mode | Mechanical type |
| Water-proofing grade | IPX1 |
| Washing capacity | 162 pcs (Cup x14 + Saucer x14 + Glass x14 + Small serving bowl x1 + Medium serving bowl x1 + Large serving bowl x1 + Dessert dishes x14 + Dinner plate x14 + Soup plate x14 + Oval platter x1 + Soup spoon x14 + Fork x14 + Knife x14 + Teaspoon x14 + Dessert spoon x14 + Serving spoon x 2 + Serving fork x1 + Gravy ladle x1) |
| Total weight | 47 Kg |
| Net weight | 41.5 Kg |


- SAFETY INSTRUCIONS
- WARNING
- CAUTION
- TREATMENTS
- 01 RECOGNIZE THE DISHWASHER
- 02 PROGRAM SETTING
- 03 USE THE DISHWASHER
- 04 CLEANING AND CARE
- 05 INSTALLATION
- 06 TROUBLESHOOTING
- RECOGNIZE THE DISHWASHER
- CONTROL PANEL
- WASHING PROGRAM
- ATTENTION
- START UP
- CHANGING THE PROGRAM MID-CYCLE
- PUT DISHES IN ADDITIONAL
- END OF WASHING PROGRAM
- ⚠ WARNING
- WATER SOFTENER
- ADJUSTING SALT CONSUMPTION
- FUNCTION OF THE RINSE AID AND DETERGENT
- WHEN TO REFILL THE RINSE AID
- FUNCTION OF DETERGENT
- ADDING RINSE AID TO THE DISPENSER
- ADJUSTING THE RINSE AID RESERVOIR
- SUGGESTION
- USE THE DISHWASHING MACHINE RATIONALLY
- LIMITED USE: NOT FOR
- PRECAUTIONS BEFORE AND AFTER THE BOWL BASKET IS PLACED
- LOADING THE UPPER BASKET
- LOADING THE LOWER BASKET
- LOADING THE CUTLERY RACK
- ADJUSTING THE UPPER BASKET
- SLIDING CUTLERY RACK
- FOLDING BACK THE CUP SHELVES
- FOLDING BACK THE RACK SHELVES
- CLEANING AND CARE
- FILTER CLEANING
- SPRAY ARMS CLEANING
- CARE AND MAINTENANCE
- THE DOOR AND THE DOOR SEAL
- THE CONTROL PANEL
- PRODUCT DIMENSION
- POWER CONNECTION
- POWER REQUIREMENTS
- MACHINE CONNECTION
- WATER CONNECTION
- CONNECTION OF DRAIN HOSES
- HOW TO DRAIN EXCESS WATER FROM HOSES
- WATER OUTLET
- EXTENSION HOSE
- SYPHON CONNECTION
- BEFORE CONNECTING CUSTOMER SERVICE CENTER
- ERROR CODE
Brand : TOSHIBA
Model : DW-14F1S-MY
Category : Dishwasher