
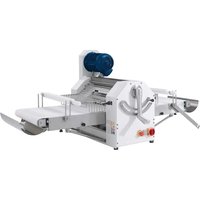
LMA624 - Pasta machine Doyon - Free user manual and instructions
Find the device manual for free LMA624 Doyon in PDF.


| Product Type | Electric Pasta Machine |
| Model | LMA624 |
| Brand | Doyon |
| Dimensions (W x D x H) | 30 cm x 20 cm x 25 cm |
| Weight | 4.5 kg |
| Power Supply | 220-240 V, 50/60 Hz |
| Power Consumption | 150 W |
| Material | Stainless steel and ABS plastic |
| Pasta Shapes | Spaghetti, fettuccine, lasagna, macaroni, and more |
| Capacity | Up to 1 kg of dough per batch |
| Mixing Function | Automatic mixing and kneading |
| Extrusion Method | Twin-screw extrusion |
| Safety Features | Overheat protection, non-slip feet, safety lock |
| Cleaning | Detachable parts are dishwasher safe; wipe body with damp cloth |
| Included Attachments | Spaghetti, fettuccine, lasagna, and macaroni dies |
| Repairability | Spare parts available; user-replaceable extrusion dies |
| Certifications | CE, RoHS |
Frequently Asked Questions - LMA624 Doyon
User questions about LMA624 Doyon
0 question about this device. Answer the ones you know or ask your own.
Ask a new question about this device
Download the instructions for your Pasta machine in PDF format for free! Find your manual LMA624 - Doyon and take your electronic device back in hand. On this page are published all the documents necessary for the use of your device. LMA624 by Doyon.
USER MANUAL LMA624 Doyon
DOYON REVERSIBLE SHEETERS LSB516 / LMF624 / LSA616, 620 / LMA620, 624, 630 / LSB516 / LMF624 TABLE OF CONTENTS
CHAPTER 1 - RECEPTION OF THE MERCHANDISE .... 2 - IMPORTANT SAFEGUARDS WARNING .... 3
CHAPTER 2 - GENERAL INFORMATION .... 4
CHAPTER 3 - THE USE OF THE SHEETER
3.1.-General description 5
3.2.-Machine's characteristics 8
3.3.-Improper use of the machine 8
CHAPTER 4 - TECHNICAL DATA
4.2.-Technical characteristics 9
4.3.-Electric specifications 9
4.4.-Electric installation 9
4.5.-Security system 10
4.6.-Control panel 11
CHAPTER 5 - ELECTRIC CONNECTION AND INSTALLATION
5.1.-Installation 12
5.2.-Electric installation 13
CHAPTER 6 - SHEETERS OPERATON
6.1.-General information....14
6.2.-Start 14
6.3.-Working process 15
CHAPTER 7 - MAINTENANCE
7.1.-When the machine is new 16
7.2.-Every day 16
7.3.-Every week....16
7.4.-Every 6 months....18
CHAPTER 8 - CONVEYOR BELTS
8.1. - How to change the conveyor belts on LSB516 & LMF624 . . . 19
8.2.-How to change the conveyor belts on LSA & LMA.. 23
CHAPTER 9 - SECURITY INSTRUCTIONS
9.1.- Security instructions 24
9.2.-Special precautions 24
LIMITED WARRANTY 25
LMA-A.DOC
04-2008
CHAPTER 1
CAUTION READ ALL INSTRUCTIONS
IMPORTANT RECEPTION OF THE MERCHANDISE
Take care to verify that the received equipment is not damaged before signing the delivery receipt. If a damage or a lost part is noticed, write it clearly on the receipt. If it is noticed after the carrier has left, contact immediately the freight company in order that they do their inspection.
We do not assume the responsibility for damages or losses that may occur during transportation.
For your safety, this equipment has been verified by qualified technicians and carefully crated before shipment. The freight company assumes full responsibility concerning the delivery in good condition of the equipment in accepting to transport it.
IMPORTANT SAFEGUARDS
Read all instructions.
To protect against electrical shock, do not immerse cord, plugs, portable appliance in water or other liquids.
Remove plug from the outlet when the appliance is not in use, before putting on or taking off parts, and before cleaning.
Do not use outdoors.
Do not let cord hang over edge of table or counter or touch hot surfaces.
Do not operate any appliance with a damaged cord or plug or after the appliance malfunctions or is dropped or damaged in any manner. Return appliance to the nearest authorized service facility for examination, repair or electrical or mechanical adjustment.
The use of accessory attachments not recommended by the appliance manufacturer may cause injuries.
Do not place on or near a hot gas or electric burner or in a heated oven.
Always check if the control switch is OFF before plugging cord into wall outlet. To disconnect, turn the control switch to OFF, then remove plug from wall outlet.
Do not use appliance for other than intended use.
Avoid contacting moving parts.
Save these instructions.
CHAPTER 2
GENERAL INFORMATION ABOUT THE MACHINE
The machine's manual must always be kept close to the machine.
- Before switching on and using the machine, read this manual carefully, especially the safety instructions.
- This manual must be kept in a safe place and be accessible to everyone that use the machine.
- Always re-install the plastic pieces when you replace the motor and never connect the grounded wire for the motor.
The manufacturer is not responsible for the machine's damages in the following situations:
- Bad use of the machine.
- Problems with electric power.
• Non-authorized changes. - Deficient upkeep.
- Use of unoriginal parts and products of the machines.
• Not following this manual.
• Repairs made by unauthorized technicians.
CHAPTER 3
THE USE OF THE SHEETER
3.1 - GENERAL DESCRIPTION
Doyon sheeters are designed to be used by qualified people in the pastry and bakery's business.
Open the tables and put the supports in the lowest position, [at 133/4 in., (35cm) from the floor LMF624,LMA630 fig. 3.1 and 3.2].


Fig. 3.1 Fig. 3.2 Also, lower the security bars (fig. 3.3 and 3.4) near the canvas.


Fig. 3.3 Fig. 3.4 After these two procedures, plug the machine, but first, verify if the electric power is correct.
There is one sideboard at the extremity of the trays (fig. 3.5), which must be placed out from the canvas (open position), so it can collect the dough when it eventually comes off the canvas.

Fig. 3.5
At the top of the sheeter, there is a recipient for small quantities of flour. This is to powder the dough when it's being worked. This recipient can be easily removed for cleaning (fig. 3.6).
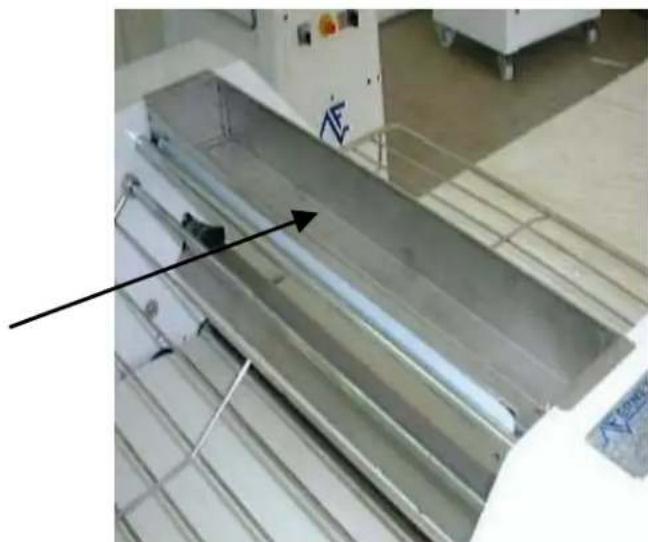
Fig. 3.6
The scraper above the sheeter's superior cylinder (point A, fig. 3.7) which is fixed to it, can be removed to clean the machine.
The scrapers of the sheeter's inferior cylinder (point B, fig. 3.7) are fixed to the lateral parts of the sheeter, to clean the cylinder and the canvas.

Fig. 3.7
Under each working board, there is a flour collector (fig. 3.8), which can be easily removed by loosening the lateral screws from the tables (fig. 3.9) and pulling them.


Fig. 3.8 Fig. 3.9
The sheeter LSB516 and LMF624 has two rolling pins, which you can work with.
3.2 - MACHINE'S CHARACTERISTICS
The LSB516 may work with a maximum of 11 Lbs. (5 kg) of dough. The LMF624 may work with a maximum of 22 Lbs. (10 kg) of dough. Roller openings from 0 to 1 1/2 " (0 to 38 mm) LSB516 & LMF624.
The LSA616 may work with a maximum of 15 Lbs. (7 kg) of dough. The LMA630 may work with a maximum of 30 Lbs. (14 kg) of dough. Roller openings from 3/32 to 1 7/8" (2.5 to 50 mm) LSA616 & LMA630.
These quantities may change due to the quality of the dough. It is excellent for puff pastries and soft dough.
3.3 - IMPROPER USE OF THE MACHINE
Doyon sheeter was designed to be used by qualified people in the pastry and bakery's business. Other uses will be considered improper.
The manufacturer is not responsible for any machine damages or personal injuries due to improper use of the machine.
It's not advisable to work with dough, which are not alimentary dough.
CHAPTER 4
TECHNICAL DATA
4.2 -TECHNICAL CHARACTERISTICS
- Steel body.
- Belt driven.
• Electric motor with 20 speeds. - Synthetic paint that makes the machine's surface completely smooth and easier to clean.
• Stainless steel cylinders. - Wheel-mounted (LMA620,624,630/LMF624 only).
•
• 4.3 - ELECTRIC SPECIFICATIONS
| LMF624/LB516/LSA616/LMA630 | |
| Voltage 120V / 240-1ph-3ph / 480 3ph | |
| Speed Variable speed control: 20 speeds | |
| Frequency [Hz] 60HZ | |
| Motor kw .75kw | |
| NEMA configuration 5-15P / 6-15P / 15-15P / L16-20P | |
4.4 - ELECTRIC INSTALLATION
Doyon's machines have an electric installation in compliance with the American (ANSI/UL std. 763), Canadian (CSA std. C22.2 no. 1335.2.14) and European rules.
4.5 - SECURITY SYSTEMS
The potentially most dangerous area of these machines is the two superimposed cylinders with convergent rotation movements.
So, there are safety bars that obstruct the entry in this area. Those safety bars are completely built in stainless steel and designed in a way to allow the user to watch the dough (fig. 4.2).

Fig. 4.2
The machine can only begin its work if the security bars are in working position, that is, completely down. The machine has an electric protection system that does not allow the machine to work if the bars are not completely down.
If you lift the security bars, the machine will stop. To restart it, press the green button "Start I" (fig. 4.3).
It is forbidden to remove, modify or damage the security bars of the machine.
4.6 - CONTROL PANEL
The fig.4.3 shows the control panel of the machine, with the following titles:

Fig. 4.3
Up speed button : Increases the speed.
Down speed button : Decreases the speed.
Emergency stop : If you push it, the machine will stop immediately.
Start 1 : By pressing this button, the machine will start.
Stop 0 : By pressing this button, the machine will stop.
CHAPTER 5
ELECTRIC CONNECTION AND INSTALLATION
5.1 - INSTALLATION
THE MANUFACTURE IS NOT RESPONSIBLE FOR THE MATERIAL AND PERSONAL DAMAGES THAT A WRONG INSTALLMENT MAY CAUSE.
The LMF624 & LMA630 is wheel-mounted so you can move it easily.
The surface where the machine (LMF624, LMA630, LSA616 or LSB516) will be in service must be solid, horizontally leveled, in a way to prevent a possible instability and consequently a fall during the working process.
The sheeter (LMA630 & LMF624) doesn't need to be fixed on the floor, just tighten up the anti-vibrate footing supports (fig. 5.1).

Fig. 5.1
5.2 - ELECTRIC INSTALLATION
Make sure that the plugs you have in the room have the same voltage and power presented on the machine's nameplate.
This machine is equipped with trees legs plug. For your protection, always connected this plug in an outlet equipped with the same configuration and never cut one of those legs.
The electric plug must be as close as possible to the machine.
Avoid plugging more than one machine into the same electric plug. In case you need to plug more than one machine in the same electric plug, make sure that it has the electric capacity for it.
See chapter 4.3 NEMA configuration for the plug on the machine.
5.2.1 - PRECAUTIONS
Warning! Take all the precautions in a way to avoid dangers of fire, electric shocks and personal damages. Only qualified people are allowed to intervene in the electric parts of the machine, always follow these rules:
- Stop the machine.
- Switch off the power, the general switch.
- Unplug the machine.
- Do the necessary repairs or maintenance.
- Plug the machine only at the end.
CHAPTER 6
SHEETERS OPERATION
6.1 - GENERAL INFORMATION
- Verify if the electric connections are as explained in chapter 5.3.
- Put the machine horizontally using the levelers (fig. 5.2).
- Set the table canvas (fig. 3.2).
6.2 - START
When you switch on the machine, check immediately if all protection systems, explained in chapter 4.5, are working perfectly.
6.3 - WORKING PROCESS
- Put the general switch in position I and press the green start button (I) fig. 4.3.
The LMF624/LMA624 has two working mechanism and the LSB516/LSA616 has only one. - Manual driving (fig. 6.1) on LMF624/LMA630 and LSB516/LSA616.
- Pedal driving (fig. 6.2) on LMF624 only.

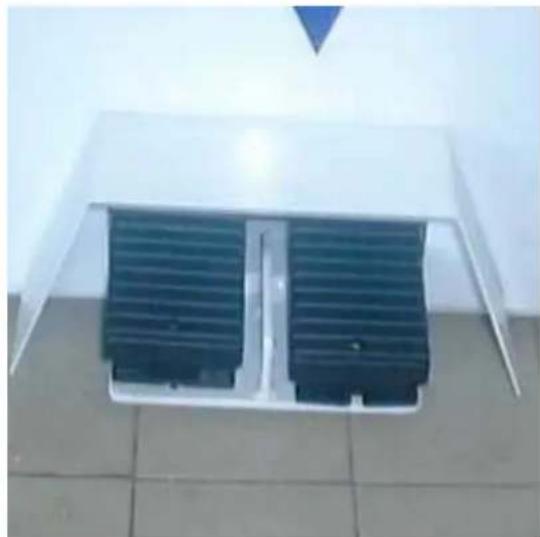
Fig. 6.1 Fig. 6.2 LMF624 only
-
Pull the manual driving down or up (fig. 6.1), or press the right or left pedal (fig. 6.2) to activate the canvas. When using the pedal driving, the manual driving switch must be in the middle.
-
The lever of fig. 6.3, controls the opening between the two cylinders, so you can obtain different dough thickness.
-
The sheeter has 20 speeds, select the desired speed (fig. 4.3).
-
With the button to increase and decrease the speed, you can change the speed.
-
To stop the machine, you have to put the driving switch in central position and then, press red button Stop "0" (fig. 4.3).
-
You may stop the machine's work by lifting the security bars or pressing the emergency stop. In this last procedure, to restart the machine, it will be necessary to twist out the emergency button, and press the green button Start "I".
-
At the end of the work, switch off the general switch.

Fig. 6.3
CHAPTER 7
MAINTENANCE
WARNING: BEFORE ANY OPERATIONS OF MAINTENANCE AND CLEANING, SWITCH OFF THE MAIN SWITCH OF THE MACHINE AND UNPLUG IT.
IF YOU NEED TO TAKE OFF SOME OF THE PROTECTIONS DURING THE OPERATIONS, DO NOT START WORKING WITHOUT THEM.
7.1 - WHEN THE MACHINE IS NEW
When the machine is new, it's advisable to try it with some dough before starting the production, to remove some lubricator's residue.
After the 1st working week, you have to control the belts tension.
7.2 - EVERY DAY
The machine must be cleaned every day, especially in the areas that have contact with the dough.
To clean the cylinders, do not use knives, sandpaper, metallic objects, hard brushes or any tools that may damage its surface. You may use plastic tools or soft sponges.
To clean the canvas use a soft brush.
Do not use toxic products, solvents, abrasive agents or any product that may damage the surfaces or the dough's composition.
Before switching the machine on, make sure that nothing has been forgotten on the machine.
7.3 - EVERY WEEK
Every week, the cylinder's scrapers must be cleaned.
To clean the scrapers above the superior cylinder, you have to dismount it by loosening the two screws (fig.7.1).

Fig. 7.1
The other scrapers are fixed under the inferior cylinder. So, in order to dismount them to clean them, you have to:
- Remove the two springs under the canvas from the studs (fig. 7.2).
- Pull the scraper extremities until it's loose.
- Lift the scraper.
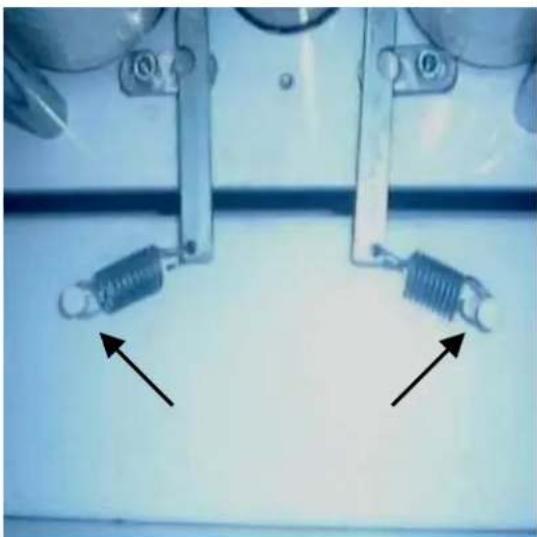
Fig. 7.2
7.4 - EVERY 6 MONTHS
Every 6 months you have to control the belt's tension. Press in the middle of the belt, and if the looseness is superior to 5/8 in. (1,5cm) , there is a need to stretch it (fig. 7.3).

Fig. 7.3 (LMF624/LMA630)
CHAPTER 8
CONVEYOR BELTS
8.1 - HOW TO CHANGE THE CONVEYOR BELTS ON THE LSB516 & LMF624
-
Unplug the sheeter.
-
Remove the flour collector.
Unscrew the flour collector fixing screws [picture A, B], and then take the flour collector off [picture C].


- Lift the trays and put them in close position [picture D].

- Remove the "spring pin" of the handle [picture E, F] and then the handle.

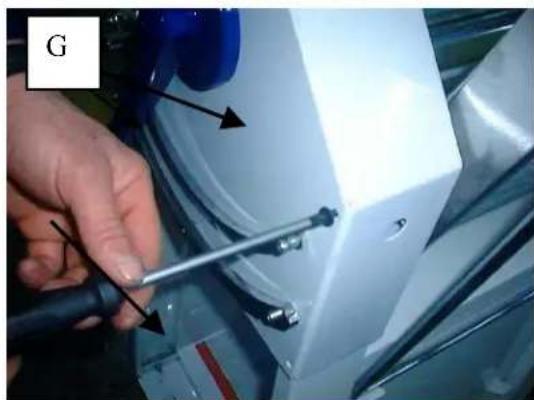
- Remove the superior front cover [picture G] and the two back covers [picture H].

- Loosen the belt stretcher [picture I] and take the belt off [picture J].

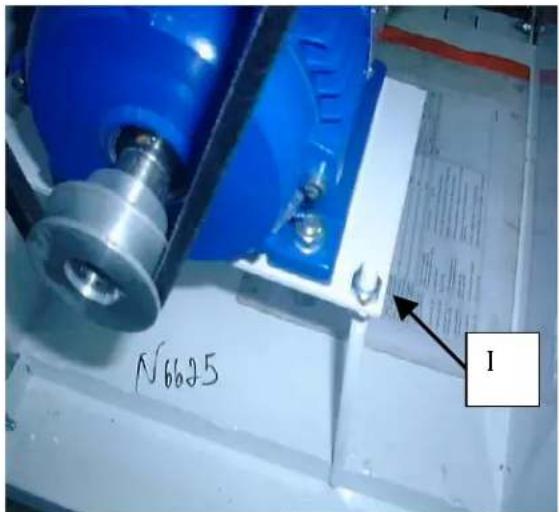

- To remove the big pulley, unscrew the central screw [picture K].

- Remove the chains of the roller by taking the links off [picture K].

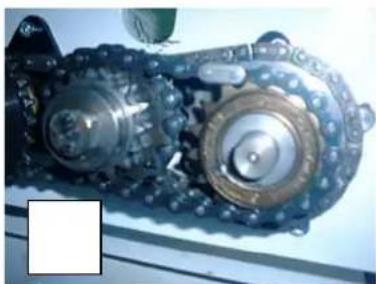
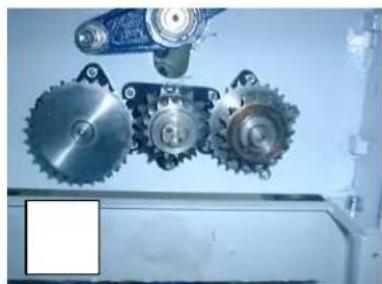
- In the back part, next to the big pulley, remove the snap rings of the table's guiding shafts.


Loosen the triangular flange bearing on the two principal rollers (only on the handle side or front side), unscrew three screws on each flange bearing.

- Remove the conveyor belt rollers.

- Then remove the table's guiding shafts.

-
Now remove the sheeter's tables, and then change the conveyor belts.
-
To assemble the sheeter, you must proceed in reverse order.
8.2- HOW TO REMOVE THE CONVEYOR BELT ON LSA616 & LMA630
Every time, that it is needed to remove the tables for cleaning the machine, the under instruction procedures must be followed.
Remove the flour collector (Fig. 3.6);
Remove the inferior cylinders' scrapers, by firstly unscrewing the spring (Fig. 7.2);
Remove the table with a screwdriver, in a way to push the table in the direction of the arrow, always from the controls area to the opposite side (Fig. 8.2a).
Fig. 8.2a (LSA616 & LMA630)


Insert one end of the conveyor in the spring insert the back side one. Push in the spring load.


In same time you push the spring load, insert the opposite side of the conveyor in the front slut.
To remove the conveyor make the same process in the opposite way.
CHAPTER 9
SECURITY INSTRUCTIONS
9.1 - SECURITY INSTRUCTIONS
- The machine must be used only for the functions that it has been conceived for. Doyon will not be responsible for the damages caused by an improper, bad or irrational use of the machine.
- Before cleaning or doing maintenance, turn the main switch off and unplug it.
- Do not remove security parts of the machine.
- If the machine has inactive security units, do not turn it on.
- The work of the machine may be stopped by using the red stop switch.
• The control panel has low tension (24 v). - If you detect any damages or bad function of the machine, inactive it immediately and call for an authorized technician, otherwise it may cause irreversible damages.
- The electric connections must follow the procedures presented in the installation chapter.
9.2 - SPECIAL PRECAUTIONS
9.2.1 - CAUTION WITH THE BELTS
Danger, the belts must be protected with fixed protections. In order to have access to them, you must respect the instructions of the manual.
9.2.2 - ELECTRIC HAZARDS
The electric installation follows the Canadian, American and European security rules. Nevertheless, when using electric tools, respect the basic security rules in a way to avoid the risk of fire, electric shocks, personal and material damages.
Only qualified people may access the parts that have electric current, which are obliged to:
- Stop the machine
- Turn off the main switch.
- Unplug the machine.
- Do the necessary operations.
- Plug the machine again.
9.2.3 - HYGIENIC HAZARDS
All the materials that are in contact with the dough must be non toxic and inoffensive.
CAUTION SAVE THESE INSTRUCTIONS
LIMITED WARRANTY
(Continental United States Of America And Canada Only)
Doyon Equipment Inc. guarantees to the original purchaser only that its product are free of defects in material and workmanship, under normal use.
This warranty does not cover any light bulbs, thermostat calibration or defects due to or resulting from handling, abuse, misuse, nor shall it extend to any unit from which the serial number has been removed or altered, or modifications made by unauthorized service personnel or damage by flood, fire or other acts of God. Nor will this warranty apply as regards to the immersion element damaged by hard water.
The extent of the manufacturer's obligation under this warranty shall be limited to the replacement or repair of defective parts within the warranty period. The decision of the acceptance of the warranty will be made by Doyon Equipment service department, which decision will be final.
The purchaser is responsible for having the equipment properly installed, operated under normal conditions with proper supervision and to perform periodic preventive maintenance.
If any parts are proven defective during the period of one year from date of purchase, Doyon Equipment Inc. hereby guarantees to replace, without charge, F.O.B. Linière, Quebec, Canada, such part or parts.
Doyon Equipment Inc. will pay the reasonable labor charges in connection with the replacement parts occurring within one year from purchase date. Travel over 50 miles, holiday or overtime charges are not covered. After one year from purchase date, all labor and transportation charges in connection with replacement parts will be the purchaser's responsibility.
Doyon Equipment Inc. does hereby exclude and shall not be liable to purchaser for any consequential or incidental damages including, but not limited to, damages to property, damages for loss of use, loss of time, loss of profits or income, resulting from any breach or warranty.
In no case, shall this warranty apply outside Canada and continental United States unless the purchaser has a written agreement from Doyon Equipment Inc.


- DOYON REVERSIBLE SHEETERS LSB516 / LMF624 / LSA616, 620 / LMA620, 624, 630 / LSB516 / LMF624 TABLE OF CONTENTS
- CHAPTER 3 - THE USE OF THE SHEETER
- CHAPTER 4 - TECHNICAL DATA
- CHAPTER 5 - ELECTRIC CONNECTION AND INSTALLATION
- CHAPTER 6 - SHEETERS OPERATON
- CHAPTER 7 - MAINTENANCE
- CHAPTER 8 - CONVEYOR BELTS
- CHAPTER 9 - SECURITY INSTRUCTIONS
- CHAPTER 1
- CAUTION READ ALL INSTRUCTIONS
- IMPORTANT RECEPTION OF THE MERCHANDISE
- IMPORTANT SAFEGUARDS
- READ ALL INSTRUCTIONS
- CHAPTER 2
- GENERAL INFORMATION ABOUT THE MACHINE
- THE MACHINE'S MANUAL MUST ALWAYS BE KEPT CLOSE TO THE MACHINE
- CHAPTER 3
- THE USE OF THE SHEETER
- 3.1 - GENERAL DESCRIPTION
- 3.2 - MACHINE'S CHARACTERISTICS
- 3.3 - IMPROPER USE OF THE MACHINE
- CHAPTER 4
- TECHNICAL DATA
- 4.2 -TECHNICAL CHARACTERISTICS
- 4.4 - ELECTRIC INSTALLATION
- 4.5 - SECURITY SYSTEMS
- 4.6 - CONTROL PANEL
- CHAPTER 5
- ELECTRIC CONNECTION AND INSTALLATION
- 5.1 - INSTALLATION
- 5.2 - ELECTRIC INSTALLATION
- 5.2.1 - PRECAUTIONS
- CHAPTER 6
- SHEETERS OPERATION
- 6.1 - GENERAL INFORMATION
- 6.2 - START
- 6.3 - WORKING PROCESS
- CHAPTER 7
- MAINTENANCE
- 7.1 - WHEN THE MACHINE IS NEW
- 7.2 - EVERY DAY
- 7.3 - EVERY WEEK
- 7.4 - EVERY 6 MONTHS
- CHAPTER 8
- CONVEYOR BELTS
- 8.1 - HOW TO CHANGE THE CONVEYOR BELTS ON THE LSB516 & LMF624
- 8.2- HOW TO REMOVE THE CONVEYOR BELT ON LSA616 & LMA630
- CHAPTER 9
- SECURITY INSTRUCTIONS
- 9.1 - SECURITY INSTRUCTIONS
- 9.2 - SPECIAL PRECAUTIONS
- 9.2.1 - CAUTION WITH THE BELTS
- 9.2.2 - ELECTRIC HAZARDS
- 9.2.3 - HYGIENIC HAZARDS
- CAUTION SAVE THESE INSTRUCTIONS
- LIMITED WARRANTY
Brand : Doyon
Model : LMA624
Category : Pasta machine