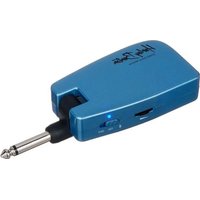
DNAfx bAss Mobile - Bass Effects Harley Benton - Free user manual and instructions
Find the device manual for free DNAfx bAss Mobile Harley Benton in PDF.


| Product Type | Bass Multi-Effects Processor |
| Model | DNAfx bAss Mobile | Brand | Harley Benton |
| Dimensions (approx.) | 120 x 80 x 30 mm |
| Weight | 200 g |
| Power Supply | USB (5V DC) or 2x AA batteries |
| Display | LCD screen with backlight |
| Input | 1/4" instrument jack |
| Output | 1/4" jack (headphone/amp) |
| USB Port | Micro USB for power and data |
| Presets | 40 factory presets |
| Effects Types | Compressor, Distortion, Modulation, Delay, Reverb |
| Tuner | Built-in chromatic tuner |
| Drum Machine | Built-in with multiple patterns |
| Controls | Footswitch, encoder dial, buttons |
| Material | Plastic chassis |
| Color | Black |
| Accessories Included | USB cable, quick start guide |
| Maintenance | Clean with dry cloth; avoid moisture |
| Safety | Do not disassemble; keep away from liquids |
| Spare Parts | Available via manufacturer |
| Repairability | Repairable by qualified technician |
Frequently Asked Questions - DNAfx bAss Mobile Harley Benton
User questions about DNAfx bAss Mobile Harley Benton
0 question about this device. Answer the ones you know or ask your own.
Ask a new question about this device
Download the instructions for your Bass Effects in PDF format for free! Find your manual DNAfx bAss Mobile - Harley Benton and take your electronic device back in hand. On this page are published all the documents necessary for the use of your device. DNAfx bAss Mobile by Harley Benton.
USER MANUAL DNAfx bAss Mobile Harley Benton
1.1 Symbols and signal words.... 5
2 Safety instructions.... 7
3 Features.... 9
4 Starting up 10
5 Connections and controls.... 11
6 Operating.... 13
6.1 Selecting the amp modelling model.... 13
6.2 Selecting timbre.... 14
6.3 Selecting digital effects.... 15
6.4 Saving amp settings.... 16
6.5 Setting the drum machine.... 16
6.6 USB audio.... 18
6.7 Bluetooth® audio.... 19
7 Amp, effect and drum list.... 20
8 Technical specifications.... 25
9 Plug and pin assignments.... 27
10 Protecting the environment.... 29
1 General information
This document contains important instructions for the safe operation of the product. Read and follow the safety instructions and all other instructions. Keep the document for future reference. Make sure that it is available to all those using the product. If you sell the product to another user, be sure that they also receive this document.
Our products and documentation are subject to a process of continuous development. They are therefore subject to change. Please refer to the latest version of the documentation, which is ready for download under www.thomann.de.
1.1 Symbols and signal words
In this section you will find an overview of the meaning of symbols and signal words that are used in this document.
| Signal word Meaning | |
| DANGER! This combination of symbol and signal word indicates an immediate dangerous situation that will result in death or serious injury if it is not avoided. | |
| WARNING! This combination of symbol and signal word indicates a possible dangerous situation that can result in death or serious injury if it is not avoided. | |
| NOTICE! This combination of symbol and signal word indicates a possible dangerous situation that can result in material and environmental damage if it is not avoided. | |
Warning signs Type of danger

Warning – dangers due to batteries.
Warning – danger zone.
2 Safety instructions
Intended use
This device is intended to be used for sound processing of signals from musical instruments with electromagnetic pickups. Any other use or use under other operating conditions is considered to be improper and may result in personal injury or property damage. No liability will be assumed for damages resulting from improper use.
This device may be used only by persons with sufficient physical, sensorial, and intellectual abilities and having corresponding knowledge and experience. Other persons may use this device only if they are supervised or instructed by a person who is responsible for their safety.
Safety

DANGER!
Risk of injury and choking hazard for children!
Children can suffocate on packaging material and small parts. Children can injure themselves when handling the device. Never allow children to play with the packaging material and the device. Always store packaging material out of the reach of babies and small children. Always dispose of packaging material properly when it is not in use. Never allow children to use the device without supervision. Keep small parts away from children and make sure that the device does not shed any small parts (such as knobs) that children could play with.

WARNING!
Incorrect handling of lithium batteries can result in injury!
In the event of a short circuit, overheating or mechanical damage, lithium batteries can cause severe injuries. Handle lithium batteries in a correct and professional manner. Store lithium batteries in a cool and dry place in their original packaging. Keep lithium batteries away from sources of heat. Never open lithium batteries. Only charge rechargeable lithium batteries with a suitable charger. Remove the lithium batteries before disposing of the device. Cover the poles of used lithium batteries with adhesive tape to prevent short circuits. Electrolyte can escape from damaged lithium batteries. Put the damaged lithium battery in air-tight packaging. Collect the electrolyte with absorbent paper. Wear rubber gloves while doing so.

NOTICE!
Damage to the device if operated in unsuitable ambient conditions!
The device can be damaged if it is operated in unsuitable ambient conditions. Only operate the device indoors within the ambient conditions specified in the "Technical specifications" chapter of this user manual. Avoid operating it in environments with direct sunlight, heavy dirt and strong vibrations. Avoid operating it in environments with strong temperature fluctuations. If temperature fluctuations cannot be avoided (for example after transport in low outside temperatures), do not switch on the device immediately. Never subject the device to liquids or moisture. Never move the device to another location while it is in operation. In environments with increased dirt levels (for example due to dust, smoke, nicotine or mist): Have the device cleaned by qualified specialists at regular intervals to prevent damage due to overheating and other malfunctions.

NOTICE!
Possible damage to lithium-ion batteries through incorrect storage!
Deep discharge can permanently damage lithium-ion batteries or cause them to lose some of their capacity. Charge the lithium-ion batteries before longer breaks in use and before storage. Ensure that the device is switched off for storage. Store the device at room temperature or cooler in an environment as dry as possible. Recharge the lithium-ion batteries about every three months if they are stored for a longer period of time to avoid permanent damage due to too deep self-discharge. Fully charge the lithium-ion batteries only shortly before use at room temperature.
3 Features
Special features of the device:
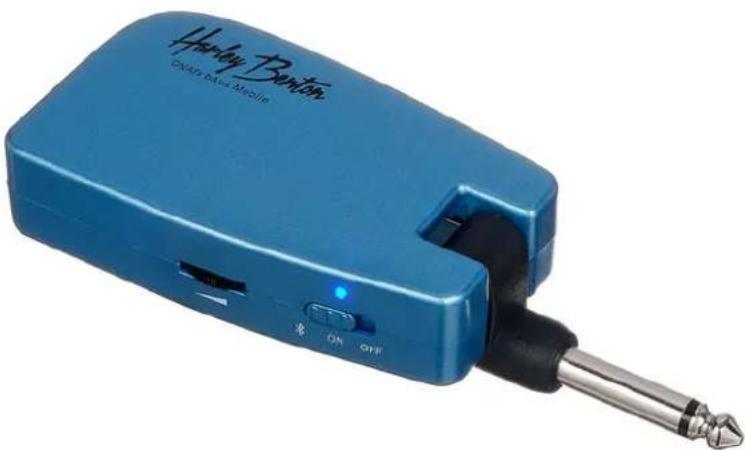
■ Headphone amp & drum machine for electric bass 7 well-known bass amp and speaker models, each with its own pre-set memory slot: Clean Finger, Clean Pick, SlapBass Overdrive, Clean Solo, Jazz Solo, Djent Pick 7 different digital effects: Flanger, Phaser, Echo, Room Reverb, Hall Reverb, AnaDly+PlateRev, Chorus+PlateRev ■ 5 different tone/EQ settings - Drum machine with 28 different rhythm styles Bluetooth 5.0 ■ Rechargeable 720 mAh lithium-ion battery (charging time: 2.5 hours, running time: 4 hours) USB-C port for audio recordings, charging and firmware updates ■ Swivelling jack input Headphones output ■ Rechargeable via USB (5 V, 1 A) ■ Dimensions: 48×19.5×63 mm Weight: 150 g ■ Accessories: Quick start guide & USB cable
4 Starting up
Unpack and check carefully there is no transportation damage before using the unit. Keep the equipment packaging. To fully protect the product against vibration, dust and moisture during transportation or storage use the original packaging or your own packaging material suitable for transport or storage, respectively.
Charging the device

If the status LED of the main switch flashes blue when the device is switched on, the maximum remaining battery life is 30 minutes.
- Turn the device off using the main switch.
- Plug the USB-C cable into the device and connect the USB-C cable to a USB charger connection.
The device starts to charge. During charging, the status LED of the main switch lights up red. When the status LED lights up green, charging is complete and the device is ready for use again.
5 Connections and controls

1 [AMP] | Button to call up the amp modelling models 2 [TONE] | Button to call up the timbre 3 [EFX] | Button to call up digital effects 4 [DRUM] | Button to call up the drum machine 5 ◀ | Button to toggle between the settings and to decrease a value 6 ▶ | Button to toggle between the settings and to increase a value 7 LEDs to display the respective operating mode and effect strength 8 6.35 mm (1/4") jack plug for connection to the instrument 9 */ [ON] / [OFF] | Main switch
Set the switch to [ON] to switch on the device. The status LED lights up.
Set the switch to * to enable the Bluetooth® function for audio playback.
Set the switch to [OFF] to switch off the device.
10 Control to adjust the instrument signal volume. 11 📞 | Headphone output, designed as 3.5 mm jack socket 12 Port for the included USB-C cable for audio recordings and for charging the unit
6 Operating
- Turn the volume control to the left to set the volume to minimum.
- Switch on the unit and adjust the volume as required.
6.1 Selecting the amp modelling model
- Press [AMP] to switch on the amp modelling models.
- Press or to toggle between the seven different amp modelling models.
⇒ The [AMP] LED lights up in the corresponding colour (see ✉ Chapter 7 'Amp, effect and drum list' on page 20).
6.2 Selecting timbre
- Press [TONE] to switch on the timbre of the selected amp modelling model.
- Press or to toggle between the five different timbres. ⇒ The [TONE] LED lights up in the corresponding colour (see ✉ Chapter 7 'Amp, effect and drum list' on page 20).
6.3 Selecting digital effects
- Press [EFX] to enable the effect of the selected amp modelling model.
- Press or to toggle between the seven different effects. ⇒ The [EFX] LED lights up in the corresponding colour (see ✉ Chapter 7 'Amp, effect and drum list' on page 20). Press again [EFX] to disable the effect of the selected amp modelling model.
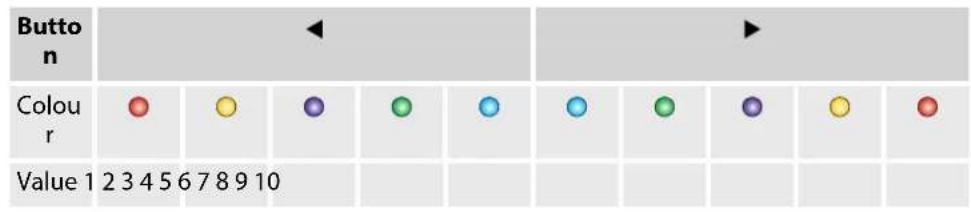
- Press and hold [EFX] to adjust the effect strength. The [EFX] LED flashes.
- Press ◀ or ▶ to set the effect strength of the selected effect from 1 to 10 as desired.
- The LED lights up in the corresponding colour:

6.4 Saving amp settings
Press and hold down [AMP].
The selected settings (amp modelling, timbre, digital effect) are saved as the future default settings for the selected amp modelling model. They are always available when the amp modelling model is selected.
6.5 Setting the drum machine
- Press [DRUM] to switch on the drum machine.
The [DRUM] LED lights up when the drum machine is switched on.
- Press ◀ or ▶ to toggle between the 28 different rhythms.
The LED lights up in the corresponding colour (see Chapter 7 'Amp, effect and drum list' on page 20).

Press and hold down [DRUM] to switch off the drum machine again.
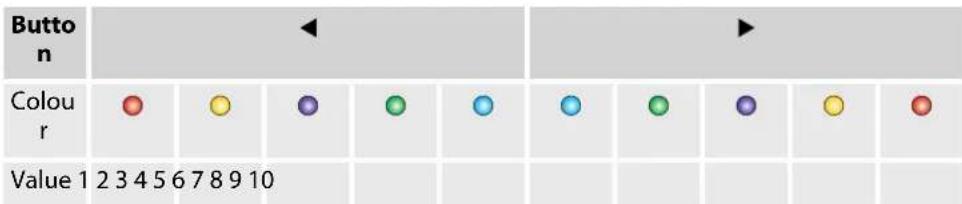
- To adjust the volume, press [DRUM] while the drum machine is switched on.
The [DRUM] LED lights up green.
- Press ◀ or ▶ to adjust the volume of the drum machine from 1 to 10 as desired.
- LED or lights up in the corresponding colour.
- Press [DRUM] again to adjust the speed.
⇒ The [DRUM] LED flashes blue.
- Press ▶ to adjust the speed of the drum machine between 40 and 260 BPM in increments of one BPM, or press and hold down ▶ to adjust the speed in larger increments. ⇒ The [DRUM] LED flashes at the selected speed.
6.6 USB audio
The unit can be used as a USB-C audio interface with support for DAWs in Windows® and Mac. Windows® users have to install ASIO drivers to achieve low-latency recording and monitoring.
6.7 Bluetooth® audio
- Set the main switch to ✗ to enable the Bluetooth® function for audio playback.
- Open the Bluetooth® list of your device to be paired and select 'DNAfx bAss Mobile'.
- Accept the connection.
- After a successful connection, the unit can output the playback signals of your paired device.

You can only adjust the playback signal on the paired device.
7 Amp, effect and drum list
AMP
| Number Button and LED colour Name Template/description | ||
| 1 | [AMP] ● | Clean Finger Markbass® TA501 |
| 2 | [AMP] ● | Clean Pick Aguilar® DB751 |
| 3 | [AMP] ● | Slap Bass Ampeg® SVT |
| 4 | [AMP] ● | Overdrive Digitech® Metal Master/Markbass® Little Marcus 500 |
| 5 | [AMP] ● | Clean Solo Ampeg® SVT |
| 6 | [AMP] ● | Jazz Solo Markbass® TA501 |
| 7 | [AMP] ○ | Djent Pick Peavey® Invective 120 |

All trademarks and product names are the property of their respective owners and are used as reference for the effect types in this user manual.
TONE
| Number Button and LED colour Name | ||
| 1 | [TONE] ● | Darker |
| 2 | [TONE] ● | Dark |
| 3 | [TONE] ○ | Flat |
| 4 | [TONE] ● | Bright |
| 5 | [TONE] ● | Brighter |
EFX
| Number Button and LED colour Name | ||
| 1 | [EFX] ● | Flanger |
| 2 | [EFX] ● | Phaser |
| 3 | [EFX] ● | Echo |
| 4 | [EFX] ● | Room Reverb |
| 5 | [EFX] ● | Hall Reverb |
| 6 | [EFX] ● | AnaDly+PlateRev |
| 7 | [EFX] ○ | Chorus+PlateRev |
DRUM
| Number Button and LED colour Rhythm Time signature | ||
| 1 | Pop 1 4/4 | |
| 2 | Pop 2 4/4 | |
| 3 | Pop 3 4/4 | |
| 4 | Pop 4 6/8 | |
| 5 | Pop 5 3/4 | |
| 6 | Ballad 1 4/4 | |
| 7 | Ballad 2 4/4 | |
| 8 | Ballad 3 4/4 | |
| 9 | Ballad 4 6/8 | |
| 10 | Blues 1 4/4 | |
| 11 | Blues 2 4/4 | |
| 12 | Blues 3 6/8 | |
| 13 | Blues 4 6/8 | |
| 14 | Funk 1 4/4 | |
| 15 | ▶○ | Funk 2 4/4 |
| 16 | ▶○ | Funk 3 4/4 |
| 17 | ▶○ | Punk 1 4/4 |
| 18 | ▶○ | Punk 2 4/4 |
| 19 | ▶○ | Punk 3 6/8 |
| 20 | ▶○ | Rock 1 4/4 |
| 21 | ▶○ | Rock 2 4/4 |
| 22 | ▶○ | Rock 3 6/8 |
| 23 | ▶○ | Metal 1 4/4 |
| 24 | ▶○ | Metal 2 4/4 |
| 25 | ▶○ | Metal 3 6/8 |
| 26 | ▶○ | Jazz 1 4/4 |
| 27 | ▶○ | Jazz 2 4/4 |
| 28 | ▶○ | Jazz 3 3/4 |
8 Technical specifications
| Input connections Power supply/USB audio USB-C socket | ||
| Instrument 6.35 mm (1/4") jack socket | ||
| Output connections Headphones 3.5 mm jack socket | ||
| Power supply | 5 V ≠ 1 A via USB port | |
| Operating voltage | 3.7 V ≠ 130 mA | |
| Battery Battery type Lithium-ion | ||
| Voltage 3.7 V | ||
| Capacity 720 mAh | ||
| Charging time in the device 2.5 h | ||
| Operating time approx. 4 h | ||
| Bluetooth® Frequency range 2402 MHz ... 2480 MHz | ||
| Max. transmission power +2 dBm | ||
| Standard | Version 5.0 | |
| Dimensions (W × H × D) | 48 mm × 19.5 mm × 63 mm | |
| Weight 150 g | ||
| Ambient conditions Temperature range 0 °C...40 °C | |
| Relative humidity 20%...80% (non-condensing) | |
Further information
| Effect type Headphone amplifier | |
| Number of control channels 1 | |
| Volume control per channel yes | |
| Number of inputs 1 | |
| Rack format no |
9 Plug and pin assignments
Introduction
This chapter will help you select the right cables and plugs to connect your valuable equipment in such a way that a perfect sound experience is ensured.
Please note these advices, because especially in 'Sound & Light' caution is indicated: Even if a plug fits into the socket, an incorrect connection may result in a destroyed power amp, a short circuit or 'just' in poor transmission quality!
Balanced and unbalanced transmission
Unbalanced transmission is mainly used in semi-professional environments and in hi-fi use. Instrument cables with two conductors (one core plus shielding) are typical representatives of unbalanced transmission. One conductor is ground and shielding, while the signal is transmitted through the core.
Unbalanced transmission is susceptible to electromagnetic interference, especially at low levels, such as microphone signals and when using long cables.
In a professional environment, therefore, balanced transmission is preferred, because this enables undisturbed transmission of signals over long distances. In addition to the conductors 'Ground' and 'Signal', in a balanced transmission a second core is added. This also transfers the signal, but phase-shifted by 180°.
Since the interference affects both cores equally, by subtracting the phase-shifted signals, the interfering signal is completely neutralized. The result is a pure signal without any noise interference.
1/4" TS phone plug (mono, unbalanced)

Three-pole 1/8" mini phone jack (stereo, unbalanced)

1 Signal 2 Ground, shielding
1 Signal (left) 2 Signal (right) 3 Ground, shielding
10 Protecting the environment
Disposal of the packing material

Environmentally friendly materials have been chosen for the packaging. These materials can be sent for normal recycling. Ensure that plastic bags, packaging, etc. are disposed of in the proper manner.
Do not dispose of these materials with your normal household waste, but make sure that they are collected for recycling. Please follow the instructions and markings on the packaging.

Observe the disposal note regarding documentation in France.
Disposal of batteries

Batteries do contain some hazardous chemicals so they should not be thrown away with the normal household waste. They should be returned to the manufacturer for disposal or recycled elsewhere in accordance with your local regulations.
Only dispose of lithium batteries when they are empty. Remove lithium batteries from the device before disposal if this is possible without destroying it. Protect used lithium batteries against short circuit, for example by taping the poles. Dispose the built-in lithium batteries together with the device. Check for an appropriate collection facility.
Dispose of the batteries and rechargeable batteries at relevant collection points or through your local waste facility.
Disposal of your old device

This product is subject to the European Waste Electrical and Electronic Equipment Directive (WEEE) as amended.
Do not dispose of your old device with your normal household waste; instead, deliver it for controlled disposal by an approved waste disposal firm or through your local waste facility. When disposing of the device, comply with the rules and regulations that apply in your country. If in doubt, consult your local waste management facility. Proper disposal protects the environment as well as the health of your fellow human beings.
Also note that waste avoidance is a valuable contribution to environmental protection. Repairing a device or passing it on to another user is an ecologically valuable alternative to disposal.
You can return your old device to Thomann GmbH at no charge. Check the current conditions on www.thomann.de.
If your old device contains personal data, delete those data before disposing of it.
- 1 GENERAL INFORMATION
- 1.1 SYMBOLS AND SIGNAL WORDS
- 2 SAFETY INSTRUCTIONS
- SAFETY
- DANGER
- RISK OF INJURY AND CHOKING HAZARD FOR CHILDREN
- WARNING
- INCORRECT HANDLING OF LITHIUM BATTERIES CAN RESULT IN INJURY
- NOTICE
- DAMAGE TO THE DEVICE IF OPERATED IN UNSUITABLE AMBIENT CONDITIONS
- POSSIBLE DAMAGE TO LITHIUM-ION BATTERIES THROUGH INCORRECT STORAGE
- 3 FEATURES
- SPECIAL FEATURES OF THE DEVICE
- 4 STARTING UP
- CHARGING THE DEVICE
- 5 CONNECTIONS AND CONTROLS
- 6 OPERATING
- 6.1 SELECTING THE AMP MODELLING MODEL
- 6.2 SELECTING TIMBRE
- 6.3 SELECTING DIGITAL EFFECTS
- 6.4 SAVING AMP SETTINGS
- 6.5 SETTING THE DRUM MACHINE
- 6.6 USB AUDIO
- 6.7 BLUETOOTH® AUDIO
- 7 AMP, EFFECT AND DRUM LIST
- 9 PLUG AND PIN ASSIGNMENTS
- INTRODUCTION
- BALANCED AND UNBALANCED TRANSMISSION
- 1/4" TS PHONE PLUG (MONO, UNBALANCED)
- THREE-POLE 1/8" MINI PHONE JACK (STEREO, UNBALANCED)
- 10 PROTECTING THE ENVIRONMENT
- DISPOSAL OF THE PACKING MATERIAL
- DISPOSAL OF BATTERIES
- DISPOSAL OF YOUR OLD DEVICE
Brand : Harley Benton
Model : DNAfx bAss Mobile
Category : Bass Effects