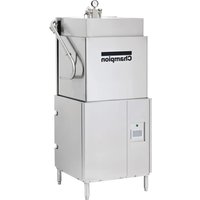
DH6000 - Dishwasher Champion - Free user manual and instructions
Find the device manual for free DH6000 Champion in PDF.


| Product Type | Dishwasher |
| Brand | Champion |
| Model | DH6000 |
| Width | 60 cm |
| Height | 85 cm |
| Depth | 60 cm |
| Weight | 45 kg |
| Power Supply | 220-240 V ~ 50 Hz, 10 A |
| Energy Class | A++ |
| Water Consumption | 9 L per cycle |
| Noise Level | 49 dB(A) |
| Number of Place Settings | 12 |
| Wash Programs | Eco, Intensive, Normal, Quick, Delicate |
| Delay Start | Up to 24 hours |
| Child Lock | Yes |
| Anti-Flood System | Yes |
| Filter Type | Self-cleaning stainless steel |
| Spare Parts Availability | Through Champion service centers |
| User Manual | Free downloadable PDF |
Frequently Asked Questions - DH6000 Champion
User questions about DH6000 Champion
0 question about this device. Answer the ones you know or ask your own.
Ask a new question about this device
Download the instructions for your Dishwasher in PDF format for free! Find your manual DH6000 - Champion and take your electronic device back in hand. On this page are published all the documents necessary for the use of your device. DH6000 by Champion.
USER MANUAL DH6000 Champion
Operation, Cleaning, and Maintenance Guide

Models:
DH6000
Hot water sanitizing machine w/fresh water rinse and built-in stainless steel electric booster
DH6000-VHR
Hot water sanitizing machine w/fresh water rinse and built-in stainless steel electric booster/Ventless Heat Recovery


Issue Date: 9.5.19
Manual P/N 115256 rev. A
For machines beginning with S/N D190217104 and above
National Service Department
In Canada: In the USA:
Toll-free: (800) 263-5798 Toll-free: (800) 858-4477
Tel: (905) 562-4195 Tel: (336) 661-1556
Fax: (905) 562-4618 Fax: (336) 661-1660
email: service@moyerdiebellimited.com email: service@championindustries.com
ATTENTION
The model no., serial no., voltage, Hz and phase are needed to identify your machine and to answer questions.
The machine data plate is located on the right front corner of the lower panel
Please have this information ready if you call for service assistance.

ENERGY STAR
Three ways to REGISTER YOUR PRODUCT and ACTIVATE YOUR WARRANTY.
- Use your mobile device and connect to the website www.championindustries.com to register your product.
- Scan the QR code http://champDW.us located on the front of the panel of the machine.
- Complete the fax form on the next page and fax to 1-800 661-1660.
PRODUCT REGISTRATION
BY FAX
COMPLETE THIS FORM AND FAX TO:
(336) 661-1660 in the USA
1-(800) 204-0109 in Canada
PRODUCT REGISTRATION CARD
Model
Serial #
Date of Installation: ____/____/____
Company Name: ____
Address: ____ (Street) State/Province Zip/Postal Co
Telephone #: ( ) ____ --- ____
Contact:
Installation Company: ____
Address:
Telephone #: ____
Contact:
FAILURE TO REGISTER YOUR PRODUCT MAY VOID YOUR WARRANTY
IMPORTANT
IMPORTANT
Specifications are subject to change based on continual product improvement.
Revision History
Revision Revised Serial Number Revision
Date Pages Effectivity Description
8.5.19
All
D190217104 Released first edition.
9.5.19 9 D190818180 Added cycle counter to the
program.
Limited Warranty
LIMITED WARRANTY
Champion Industries (herein referred to as "The Company"), 3765 Champion Blvd., Winston-Salem, North Carolina 27105, and 2674 N. Service Road, Jordan Station, Ontario, Canada, L0R 1S0, warrants machines, and parts, as set out below.
Warranty of Machines: The Company warrants all new machines of its manufacture bearing the name "Champion and installed within the United States and Canada to be free from defects in material and workmanship for a period of one (1) year after the date of installation or fifteen (15) months after the date of shipment by The Company, whichever occurs first. [See below for special provisions relating to glasswashers.] Warranty registration must be submitted to The Company within ten (10) days after installation either online on the Champion Industries website (http://www.champion-industries.com or by the fax form provided at the front of this manual. The Company will not assume any responsibility for extra costs for installation in any area where there are jurisdictional problems with local trades or unions.
If a defect in workmanship or material is found to exist within the warranty period, The Company, at its election, will either repair or replace the defective part or accept return of the machine for full credit; provided; however, as to glasswashers, The Company's obligation with respect to labor associated with any repairs shall end (a) 120 days after shipment, or (b) 90 days after installation, whichever occurs first. In the event that The Company elects to repair, the labor and work to be performed in connection with the warranty shall be done during regular working hours by a Champion authorized service technician. Defective parts become the property of The Company. Use of replacement parts not authorized by The Company will relieve The Company of all further liability in connection with its warranty. In no event will The Company's warranty obligation exceed The Company's charge for the machine. The following are not covered by The Company's warranty:
a. Lighting of gas pilots or burners.
b. Cleaning of gas lines.
c. Replacement of fuses or resetting of overload breakers.
d. Adjustment of thermostats.
e. Adjustment of clutches.
f. Opening or closing of utility supply valves or switching of electrical supply current.
g. Cleaning of valves, strainers, screens, nozzles, or spray pipes.
h. Performance of regular maintenance and cleaning as outlined in the operator's guide.
i. Damages resulting from water conditions, accidents, alterations, improper use, abuse, tampering, improper installation, or failure to follow maintenance and operation procedures.
j. Wear on Pulper cutter blocks, pulse vanes, and auger brush.
Examples of the defects not covered by warranty include, but are not limited to: (1) Damage to the exterior or interior finish as a result of the above, (2) Use with utility service other than that designated on the rating plate, (3) Improper connection to utility service, (4) Inadequate or excessive water pressure, (5) Corrosion from chemicals dispensed in excess of recommended concentrations, (6) Failure of electrical components due to connection of chemical dispensing equipment installed by others, (7) Leaks or damage resulting from such leaks caused by the installer, including those at machine table connections or by connection of chemical dispensing equipment installed by others, (8) Failure to comply with local building codes, (9) Damage caused by labor dispute.
Warranty of Parts: The Company warrants all new machine parts produced or authorized by The Company to be free from defects in material and workmanship for a period of 90 days from date of invoice. If any defect in material and workmanship is found to exist within the warranty period The Company will replace the defective part without charge.
DISCLAIMER OF WARRANTIES AND LIMITATIONS OF LIABILITY. THE COMPANY'S WARRANTY IS ONLY TO THE EXTENT REFLECTED ABOVE. THE COMPANY MAKES NO OTHER WARRANTIES, EXPRESS OR IMPLIED, INCLUDING, BUT NOT LIMITED, TO ANY WARRANTY OF MERCHANTABILITY, OR FITNESS OF PURPOSE. THE COMPANY SHALL NOT BE LIABLE FOR INCIDENTAL OR CONSEQUENTIAL DAMAGES. THE REMEDIES SET OUT ABOVE ARE THE EXCLUSIVE REMEDIES FOR ANY DEFECTS FOUND TO EXIST IN THE COMPANY'S' DISHWASHING MACHINES AND THE COMPANY'S PARTS, AND ALL OTHER REMEDIES ARE EXCLUDED, INCLUDING ANY LIABILITY FOR INCIDENTALS OR CONSEQUENTIAL DAMAGES.
The Company does not authorize any other person, including persons who deal in Champion dishwashing machines to change this warranty or create any other obligation in connection with Champion dishwashing machines.
Table of Contents
Revision History...... i
Limited Warranty....ii
Specification Sheets....vi
Safety Symbols - User Manual Display......viii
Operation....1
Machine Assembly ....1
Detergent Requirement....2
Recommended Water Hardness....2
Loading Wares 2
Machine Controls....3
Cycle Times....4
Operation Sequence....5
Changing Cycle Times ....7
Rinse Sentry 8
Alarm Notifications 8
Cycle Counter 9
Cleaning 10
Deliming....13
Maintenance....17
Maintenance Schedules 17
Troubleshooting Chart....18
STANDARD FEATURES
• Factory Authorized Startup
• HMI – Operator Touch Screen Interface
• On-Board Service Diagnostics
- Field Convertible – Single to three, or three to single phase
- Sleep Mode – All internal heaters shut off after 4 hours idle
• Built-in booster configured to ensure 180° rinse
• Field convertible from straight to corner operation
• Dual NSF listed as both a dishwasher and potwasher
- Rinse Sentry – ensures 180°F final rinse
- Auto start – starts unit when hood is closed
- Single or dual point electrical connection
• High efficiency 2 HP pump
- Self draining pump
• Automatic tank fill
• Automatic drain valve – drains wash tank when power is off
• PRV (Mounted Pressure Reducing Valve)
- Vent fan control
• 4 selectable cycles
OPTIONS & ACCESSORIES
□ NEW Built-in detergent and rinse aid pumps
□ Drain Water Tempering kit (unmounted)
□ Ventless/Heat Recovery/Condensate Removal option
☐ Door Interlock – locks door closed during the vent fan cycle
□ Racks
□ Peg
□ Flat
□ Corner Operation splash baffle
NEW Champion ION scale prevention system
DH6000
High Temperature
Hood-type Dishwashing Machine


Photo is for general visual representation only. Please refer to specifications for the latest detailed product information.
SPECIFIER STATEMENT
Specified unit will be Champion model DH-6000 high temperature hood-type dish-washing machine. Features HMI controls, Rinse Sentry, Auto start, up to 60 racks/hour, 0.73 US gals/rack [2.76 liters/rack, 0.61 imp. gals/rack]. 1 year parts and labor warranty.
Champion Industries, Inc.
3765 Champion Blvd., Winston-Salem, NC 27105
Tel: 336/661-1556 Fax: 336/661-1979
2674 N. Service Road
Jordan Station, Ontario, Canada LOR 150
Tel: 800/263-5798 Fax: 905/562-4618
www.ChampionIndustries.com
Champion®
The Dishwashing Machine Specialists
Specification Sheet
DH6000
High Temperature
Hood-type Dishwashing Machine
Shipping weight crated: 300 lbs.
![5-3/4" [145] Min Clearance 7-1/4" [184] 31-5/8" [804] 4-11/16" [119] Side View 17-3/16" [437] 72" [1829] 4-3/8" [110] 50-7/8" [1293]](/content/2026/07/1423899/images/d7394e4335352e3ed200cbb581b148a58a9600c007a628a5c4683eb751a7913b.jpg)
![34" [863] 66-1/16" [1678] 3-9/16" ② [91] 11-5/16" ② [288] 19-1/2" ③ [496] Front View ① 8-9/16" [217] 6-1/4" [159] ③ ① 4-7/16" [112] 33-5/8" [853]](/content/2026/07/1423899/images/7a393a17e051c4c13369ef35a3d448127642c510c41aae9af047db4c1a9a5090.jpg)
Dimensions shown in inches and [mm]

![WALL 5-3/4" [146] 18-7/16" [469] 6-7/8" [175] 4-13/16" [122] 6-1/16" [154] 25-3/8" [645] Inside Table Flange 26-7/8" [683] Plan View](/content/2026/07/1423899/images/865ffee254fbc5bbce1c4db7e33d139ee29030b09c2cd98719af7d98b1ed75ab.jpg)
![Corner Table Configuration 6" [152] to Inside Tank Wall 8-1/8" [207] to Rack Guide](/content/2026/07/1423899/images/cf802de3952b7478dab6d4b7ce53077066b6267716283d9cd672460a03c1b1a4.jpg)
Side View
![30° [762] 1-1/2" [32] Roll 7-1/4" [184] 21-3/8" [543] 1-1/8" [29]](/content/2026/07/1423899/images/ad3dac4778105cdc3ae1deaef06006bee34d48992a9eba55dc0afb383eff0c21.jpg)
Typical Table Construction
UTILITIES
| 1 | Electrical Machine Connection(See Electrical Box) |
| 2 | Hot Water 3/4" NPT Hot Water 110° - 140°F20-22 PSI Flow Pressure |
| 3 | Drain 1.5" OD Connection; 15 GPM Max Flow (Drain water tempering height 5") |
| 4 | Drain Water Tempering 1/2" Cold water line with customer supplied cut-off valve(optional) |
| 5 | Integrated Detergent System Detergent bottle supply connections (optional) |
Warning: Plumbing, electrical connections should be made by qualified personnel who will observe all the applicable plumbing, sanitary and safety codes and the National Electrical Code.
Note: Optional Drain Tempering: 1/2" NPT cold water connection required. 1/2" NPT drain connection from back flow preventer to house drain. (HLLD INSTALLED and PLUMBLED). Due to an ongoing value analysis program at Champion, specifications contained in this catalog are subject to change without notice.
Champion Industries, Inc.,
3765 Champion Blvd., NC 27105
336/661-1556 · Fax: 336/661-1979
ChampaignIndustries.com
| Machine & Built-in Booster (Standard) | |||
| Voltage | Rated Amps | Minimum Supply Circuit Ampacity | Maximum Overcurrent Protective Device |
| 208-240/60/1 | 77-58 | 100 | 100 |
| 208-240/60/3 | 46-41 | 60 60 | |
| 480/60/3 | 20 | 30 30 | |
| Machine Only(two point electrical connection or no built-in booster) | |||
| Voltage | Rated Amps | Minimum Supply Circuit Ampacity | Maximum Overcurrent Protective Device |
| 208-240/60/1 | 38-34 | 50 | 50 |
| 208-240/60/3 | 25-23 | 30 | 30 |
| 480/60/3 | 11 | 15 | 15 |
| Booster Only (two point electrical connection) | |||
| Voltage | Rated Amps | Minimum Supply Circuit Ampacity | Maximum Overcurrent Protective Device |
| 208-240/60/1 | 39-34 | 50 | 50 |
| 208-240/60/3 | 21-18 | 25 | 25 |
| 480/60/3 | 9 | 15 | 15 |
Note: Water Hammer Arrestor (meeting ASSL-1010 standard or equivalent)
SPECIFICATIONS
Capacities
Racks per hr. (NSF rated) 60
Wash tank (gal.) 10
2 HP
Motor horsepower
Water consumption
Gal. per hr. (max. use) 39
Gal. per rack 0.73
Temperature °F
Wash 150
Rinse 180
Heating
Tank heat, electric 5.2 kW
Electric Booster 7.5 kW
| Dish-washer Mode | Pot & Pan Mode | |||
| Selectable cycle times in minutes | 1 | 2 | 4 | 6 |
| Time cycles in seconds | ||||
| Wash 36 94 214 | 334 | |||
| Rinse | 8 | 10 | 10 | 10 |
| Sanitary Dwell | 16 | 16 | 16 | 16 |
| Total | 60 | 120 | 240 | 360 |
STANDARD FEATURES
• Factory Authorized Startup
- Ventless Heat Recovery
• HMI – Operator Touch Screen Interface
• On-Board Service Diagnostics
• Field Convertible – three to single phase
- Sleep Programmable – All internal heaters shut off after selected time is reached
- Door Interlock – locks door closed during cycle
• Built-in booster configured to ensure 180° rinse
• Field convertible from straight to corner operation
• Dual NSF listed as both a dishwasher and potwasher
- Rinse Sentry – ensures 180°F final rinse
• Auto start – starts unit when hood is closed
- Single or dual point electrical connection
• High efficiency 2 HP pump
- Self draining pump
- Automatic tank fill
• Automatic drain valve – drains wash tank when power is off
- PRV (Mounted Pressure Reducing Valve)
- 4 selectable cycles
OPTIONS & ACCESSORIES
□ NEW Built in detergent and rinse aid pumps
□ Drain Water Tempering Kit (unmounted)
□ Racks
□ Peg
□ Flat
□ Corner operation splash baffle
□ NEW Champion ION scale prevention system
DH6000-VHR
with Ventless Heat-Recovery and Condensate Removal


NSF Photo is for general visual representation only. Please refer to specifications for the latest detailed product information.
SPECIFIER STATEMENT
Specified unit will be Champion model DH6000 with Ventless Heat-Recovery and Condensate Removal, high temperature hood-type dishwashing machine. Features HMI controls, Rinse Sentry, Auto start, up to 40 racks/hour, 0.73 US gals/rack [2.76 liters/rack, 0.61 imp. gals/rack].
1 year parts and labor warranty.
Champion Industries, Inc.
3765 Champion Blvd., Winston-Salem, NC 27105
Tel:336/661-1556 Fax:336/661-1979
2674 N. Service Road
Jordan Station, Ontario, Canada LOR 150
Tel:800/263-5798 Fax:905/562-4618
www.ChampionIndustries.com
DH6000-VHR
with Ventless Heat-Recovery and Condensate Removal
Specification Sheet
Champion®
The Dishwashing Machine Specialists
Shipping weight crated: 350 lbs.
Dimensions shown in inches and [mm]
VENTLESS/HEAT RECOVERY/CONDENSATE REMOVAL

UTILITIES
| 1 Electrical Machine Connection(See Electrical Box) | |
| 2 | Cold Water 3/4" NPT Cold Water 50° - 75°F45 PSI Min Incoming (20-22 PSI flow) |
| 3 | Drain 1.5" OD Connection; 15 GPM Max Flow (Drain water tempering height 5") |
| 4 | Drain Water Tempering 1/2" Cold water line with customer supplied cut-off valve (optional) |
| 5 | Integrated Detergent System Detergent bottle supply connections (optional) |
Warning: Plumbing, electrical connections should be made by qualified personnel who will observe all the applicable plumbing, sanitary and safety codes and the National Electrical Code.
Note: Optional Drain Tempering: 1/2" NPT cold water connection required. 1/2" NPT drain connection from back flow preventer to house drain. (FELD INSTALLED and PLUMBFD). Due to an ongoing value analysis program at Champion, specifications contained in this catalog are subject to change without notice.
Champion Industries, Inc.,
3765 Champion Blvd., NC 27105
336/661-1556 · Fax: 336/661-1979
ChampionIndustries.com
| Machine & Built-in Booster (Standard) | |||
| Voltage | Rated Amps | Minimum Supply Circuit Ampacity | Maximum Overcurrent Protective Device |
| 208-240/60/1 | 77-68 | 100 | 100 |
| 208-240/60/3 | 46-41 | 60-60 | |
| 480/60/3 | 20 | 30-30 | |
Machine Only
| Voltage | Rated Amps | Minimum Supply Circuit Ampacity | Maximum Overcurrent Protective Device |
| 208-240/60/1 | 38-34 | 50.50 | |
| 208-240/60/3 | 25-23 | 30.30 | |
| 480/60/3 | 11 | 15 | 15 |
Booster Only (two point electrical connection)
| Voltage | Rated Amps | Minimum Supply Circuit Ampacity | Maximum Overcurrent Protective Device |
| 208-240/60/1 | 39-34 | 50 | 50 |
| 208-240/60/3 | 21-18 | 25 | 25 |
| 480/60/3 | 9 | 15 | 15 |
Note: Water Hammer Arestor (meeting ASSE-1010 standard or equivalent) to be supplied (by others) in common water supply line at service connection.
SPECIFICATIONS
Capacities
Racks per hr. (NSF rated) 40 Wash tank (gal.) 10
Motor horsepower
Water consumption
Gal. per hr. 29 Gal. per rack 0.73
Temperature °F
Wash 150 Rinse 180
Heating
Tank heat, electric 5.2 kW Electric Booster 7.5 kW
| Dish-washer Mode | Pot & Pan Mode | |||
| Selectable cycle times in minutes | 1 | 2 | 4 | 6 |
| Time cycles in seconds | ||||
| Wash 36 94 214 334 | ||||
| Rinse | 8 | 10 | 10 | 10 |
| Sanitary Dwell | 16 | 16 | 16 | 16 |
| Vent Fan | 30 | 30 | 30 | 30 |
| Total | 90 | 150 | 270 | 390 |
Safety Symbols
The following symbols are used throughout this manual to alert the reader to important information.

WARNING:
Warning statements indicate a condition or practice extremely important to the health of the operator or the operation of the machine.

CAUTION:
Caution statements indicate a condition or practice that may result in damage to the machine.

NOTE:
Note statements highlight important information necessary for the operation of the machine.
User Manual Display
Operation and cleaning instructions are available on the dishwasher digital display. To access the manuals:
- Press the 'TOOLS' button

- Press the 'MANUALS' button

- Press a manual to be viewed (Operation, Cleaning).
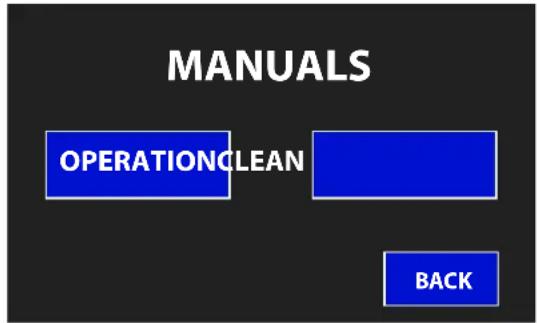
- Press 'BACK' to return to MAIN screen.
Machine Assembly
To Assemble the dishwasher:
• Install the pump strainer.
• Install the scrap screens and screen spacer.
• Install the upper and lower wash and rinse spray arms. The arms are interchangeable.
• Make sure the arms spin freely.

Fig. 1

Fig. 2
Operation
Detergent Requirement

Use a commercial grade NON-CHLORINATED detergent in this dishwasher. Consult the chemical supplier for the rinse-aid requirements.
Recommended Water Hardness
- A water supply with a water hardness of 3 grains/US Gal - 0.83 Imp. Gal - 5/3mg/L or less is highly recommended.
Loading Wares
- Wares should be scrapped and rinsed to remove large food particles and debris (Fig. 3).

Fig. 3

Fig. 4
- Load plates in peg racks, bowls and cups in flat-bottom racks, and glasses in a glass rack.
- Load silverware in a single layer in a flat-bottom rack.
- Load pots, pans, and utensils upside down in a flat-bottom rack.
- Load bake sheets and trays on the short edge in a bake sheet rack.
- Do not overload dish racks and only wash one dish rack at a time.
- Never wash objects such as mops, floor mats, or other foreign materials.
Machine Controls
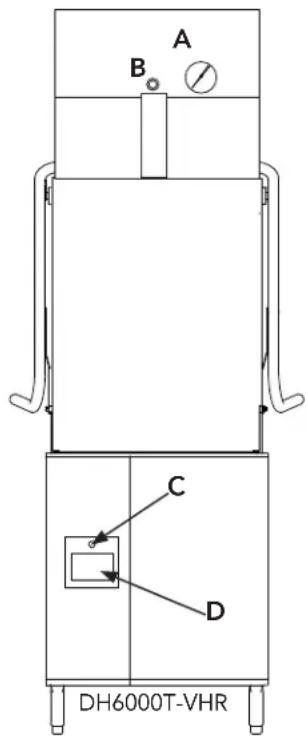
The pressure gauge is located at the top of the machine. The control panel is located on the front left side of the lower panel.
A - Pressure Gauge - Displays the incoming water pressure.
B - Latch - Locks the doors during a cycle.
C - Green Push Button Power Switch - Powers off display, heaters and opens drain.
D - Digital Touchscreen Display - shows machine status and time cycle selections.
Main Touchscreen Display

① Select a 1, 2, 4, or 6 minute wash cycle.
② Status window shows the machine operation state such as, FILLING, READY etc.
③ Settings Icon accesses data and maintenance menus.
④ Temperature display window shows wash and final rinse temperatures.
⑤ Time Remaining area shows the elapsed time for the Rinse, Dwell, and (Recovery cycles VHR only).

- The DH6000T-VHR cycle consists of a wash, rinse, dwell and recovery time. The recovery portion of the cycle removes steam and recycles heat.
| DH6000 CYCLE OPTION* DH6000 CYCLE TIMES* | |
| Dishwasher Cycle Option 1 Approx. 1 minute | |
| Wash 36 seconds | |
| Rinse 8 seconds | |
| Dwell ** 16 seconds | |
| Dishwasher Cycle Option 2 Approx. 2 minutes | |
| Wash 94 seconds | |
| Rinse 10 seconds | |
| Dwell ** 16 seconds | |
| Pot/Pan Cycle Option 4 Approx. 4 minutes | |
| Wash 214 seconds | |
| Rinse 10 seconds | |
| Dwell ** 16 seconds | |
| Pot/Pan Cycle Option 6 Approx. 6 minutes | |
| Wash 334 seconds | |
| Rinse 10 seconds | |
| Dwell ** 16 seconds | |
| DH6000-VHR CYCLE OPTION DH6000-VHR CYCLE TIMES* | |
| Dishwasher Cycle Option 1 Approx. 1 minute | |
| Wash* 36 seconds | |
| Rinse 8 seconds | |
| Dwell ** 16 seconds | |
| Recovery *** 30 seconds | |
| Dishwasher Cycle Option 2 Approx. 2 minutes | |
| Wash* 94 seconds | |
| Rinse 10 seconds | |
| Dwell ** 16 seconds | |
| Recovery ** 30 seconds | |
| Pot/Pan Cycle Option 4 Approx. 4 minutes | |
| Wash* 214 seconds | |
| Rinse 10 seconds | |
| Dwell * 16 seconds | |
| Recovery *** 30 seconds | |
| Pot/Pan Cycle Option 6 Approx. 6 minutes | |
| Wash* 334 seconds | |
| Rinse 10 seconds | |
| Dwell ** 16 seconds | |
| Recovery *** 30 seconds | |
* Cycle times can be changed when machine is washing.
** Cycle pauses.
*** Exhaust fan runs to remove steam and recover heat from wash chamber.
Operation Sequence
- Push the green power button on.
- FILLING is displayed
- READY displayed when the machine filled.
- Touch SELECT CYCLE button for 1, 2, 4, or 6 minute total cycle.
- Insert dish rack of wares and close doors.
- WASHING displayed during wash cycle.
• TIME REMAINING indicates the rinse, dwell, and recovery portions of the cycle are running.
• RINSING = 10 seconds and final rinse temperature is displayed
• DWELLING = 16 second pause. - RECOVERY = 30 seconds as fan runs removing steam and heat (VHR only).
- READY is displayed at the end of the cycle.

Check the chemical levels in the containers.

Push the green power button ON.
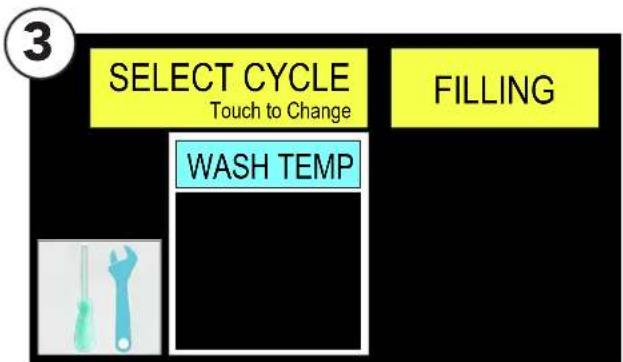
'FILLING' is displayed as machine fills automatically.

The machine preheats. Minimum wash temperature is 150° F.
Operation
Operation Sequence (continued)

When READY appears, touch the SELECT CYCLE button to choose a cycle. Each touch advances the cycle time between 1, 2, 4, and 6 minutes.
NOTE: A cycle may be selected before or after the door is closed. Cycle starts when door is closed.
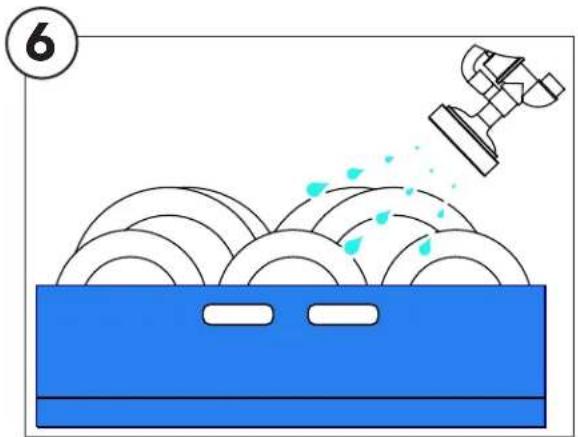
Scrap and load wares into dish rack. Wash one rack at a time and do not overload the rack. Slide the rack into the machine and close the doors.
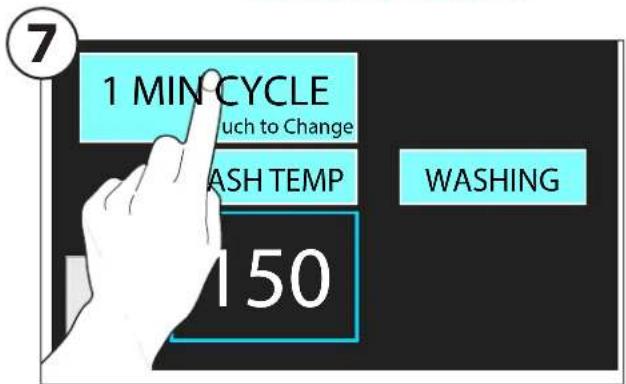
When the CYCLE is selected, the machine starts and 'WASHING' is displayed.

At the end of the wash cycle the 10 sec. final rinse begins. The RINSE TEMP display must read between 185-195°F. Check pressure gauge to ensure 18-20 PSI during final rinse cycle.

'DWELLING' is displayed as the 16 sec. DWELL begins.

(For VHR only), 'RECOVERY' is displayed as the heat recovery fan runs for 30 secs. to remove steam and recover heat.
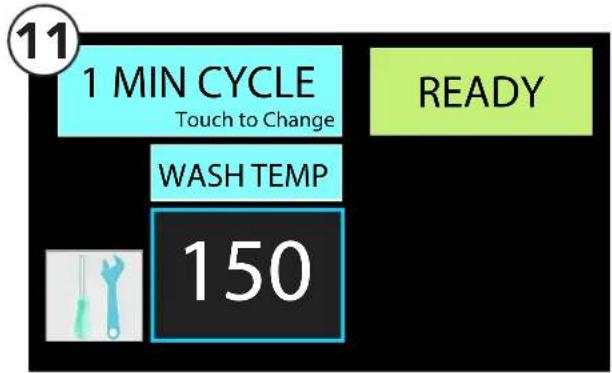
The display returns to READY at the end of the 1 MIN CYCLE. Open the doors, and remove the rack of clean wares.

Caution:
Wares may be hot after washing. Be careful when removing wares.
Changing Cycle Times
• Starting a Dishwasher Cycle
A cycle time must be selected before closing the doors to start a cycle.
When "SELECT CYCLE" is displayed, the operator can open and close the doors without starting another cycle. Pushing 'Select Cycle' and closing the door starts a cycle.
- Changing from a short cycle to a longer cycle.
Entering a longer wash cycle when a shorter cycle is running will extend the wash cycle.
- Changing from a long cycle to a shorter cycle while washing.
Entering a shorter cycle when a longer cycle is running will stop the longer cycle and the short cycle will complete its time.
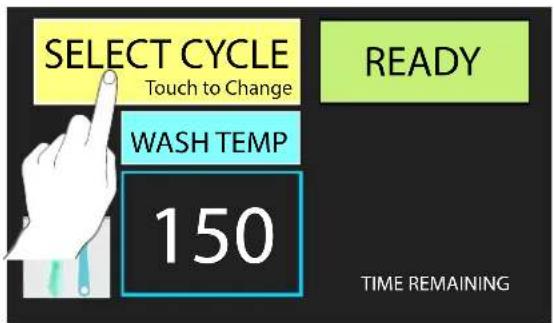
When displayed, Select Cycle must be pressed to begin a cycle.

Cycle can be changed when the dishwasher is in cycle.
Operation
Rinse Sentry
- This machine is equipped with a Rinse Sentry Feature that monitors the booster temperature during the wash cycle and will extend the wash cycle time until a minimum of 180° F is achieved in the tank. Once achieved, the machine will complete the wash cycle and perform a final rinse.
Alarm/Notifications
"CHECK DRAIN" ALARM

Condition: The dishwasher has stopped filling.
Cause: The machine has filled for 6 minutes but has not filled.
Solution:
- Check the wash tank upper float for something jamming it.
TO RESET THIS ALARM:
Push the 'CHECK DRAIN' button once the problem is fixed.
Call service if the machine continues to alarm.
"CHECK FLOATS" ALARM

Condition: The dishwasher has stopped operation.
Cause: The upper float is up but the lower float is not made.
Solution:
- Check the wash tank lower float to see if it is jammed.
TO RESET THIS ALARM:
Push the 'CHECK FLOATS' button once the problem is fixed.
Call service if the machine continues to alarm.
"CHECK THERMISTOR" ALARM and LOCKOUT
![graph TD A["THERMISTOR"] --> B["WASH TEMP"] B --> C["CALL FOR SERVICE"]](/content/2026/07/1423899/images/89227efdf601b3b6a20cc1125f10b34fccc152febb3e0e1fc977bbccec8a01e5.jpg)
Condition: The dishwasher operation is locked out.
Cause: A temperature sensing thermistor has a problem.
Solution: Contact the service agent for repair.
"SLEEP" MODE

Condition: Dishwasher is off; all heaters are disabled.
Cause: The machine was idle for user programmed time.
- This machine is equipped with a cycle counter that records the number of total cycles the machine operates. The counter can be accessed when the machine is idle. The counter can not be reset.
• To access the counter:

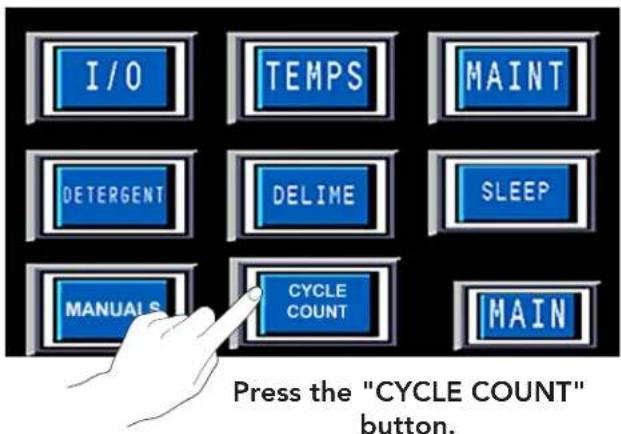

"CYCLE COUNT" is displayed. Press "BACK" and "MAIN" buttons to return to the main screen.
Cleaning
Cleaning
- Clean the machine at the end of each meal period or after every 2 hours of continuous operation and at the end of the day.

CAUTION:
Dishwasher surfaces may be hot. Use caution when cleaning the machine.
To clean the dishwasher:
-
Push the power button OFF. The electric drain valve will open and the machine will drain. The drain valve will remain open for 10 minutes. The drain valve has a lever to open it manually if necessary (Fig. 6).
-
Pushing the power button on and immediately off will open the drain valve for another 10 minutes.

Fig. 6
-
Open the door and flush the interior with fresh water.
-
Remove the upper and lower wash and rinse spray arms and flush with clean water (Fig. 7).
-
Check the rinse spray arm nozzles. If necessary, remove the end plugs and clean the nozzles with a small paper clip (Fig. 8). Flush the arms clean and replace the end plugs (Fig. 8).
-
Remove the scrap screens and pump strainer Flush and back flush the screens in a sink. Do not strike the screens against hard surfaces.
-
Clean the drain in the bottom of the wash tank.
Cleaning

Fig. 7

Fig. 8
Cleaning
Cleaning (continued)
- Clean the float switch.
- Clean the detergent probe with a non-metallic green Scotch Brite™ scrub pad.
- Wipe the interior with a soft cloth.
- Reinstall the scrap screens and spray arms making sure the spray arms spin freely.
- Wipe the machine exterior clean with a soft cloth and mild detergent.
DO NOT FLUSH THE EXTERIOR OF THE MACHINE WITH WATER.
- Leave the doors open to aid in overnight drying of the machine interior.

Fig. 9


Deliming

WARNING:
Consult the chemical representative's recommendations for the use of deliming chemicals. Wear protective clothing, goggles and face shield when handling chemicals.
Deliming
Deliming intervals are determined by the amount of lime build-up in the dishwasher. A password protected delime time interval is adjustable by manager, maintenance or service.
Delime Alarm
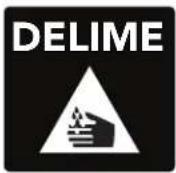
- A yellow "DELIME" button will appear when deliming is due.
- Press the "Delime" button.
• The message box below appears. - Press "YES" to begin deliming, "NO" to pause.
- The yellow "Delime" button will reappear again later.
NOTE: Deliming can also be started manually. See page 17 for instructions.

Step1: Deliming begins when "CLOSE DOOR TO START" displayed. The operation can be stopped by pressing and holding the words "PRESS AND HOLD TO CANCEL" below the message window.

Step 2: "DRAINING" displayed as machine drains.

Deliming
Deliming (continued)
Step 3: "CLEAN SCREENS" picture displayed.
- Remove scrap screens.
- Clean food soils.
• Reinstall screens.

Step 4: "CLOSE DOOR TO FILL" displayed.

Step 5: Close doors and machine fills.
- "FILLING" displayed.

Step 6: "ADD DELIME CHEMICAL" displayed.
- Open the doors and add the delime chemical according to the chemical representative's instructions.
• The wash tank capacity = 10 US gals.
• DELIMING OPERATION CAN NOT BE STOPPED ONCE DELIMER IS ADDED.
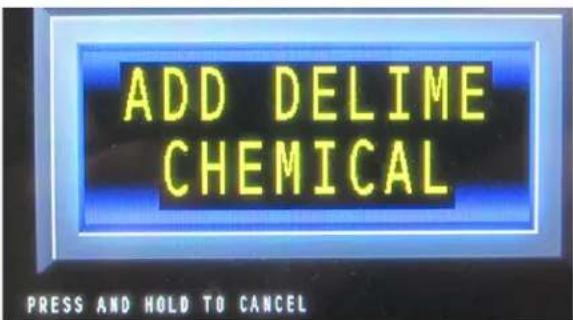
Step 7: "CLOSE DOOR TO START" displayed.

Step 8: "DELIME IN PROGRESS"
- Door latches
- Green power button deactivates
- Machine washes.
- The remaining WASH DELIME time in minutes is displayed on screen.
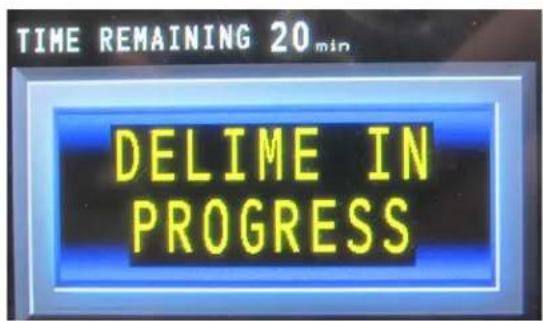
Step 9: "TIME REMAINING" disappears from screen.
"DRAINING" displayed.
- Door remains latched
- Green power button deactivated
- Drain valve opens and machine drains.

Deliming

Deliming (continued)
Step 10: Machine Fills

Step 11: "DELIME RINSE" displayed.
- Final rinse water valve opens for the pre-programmed time.
• Time remaining displayed on screen. - Valve closes.
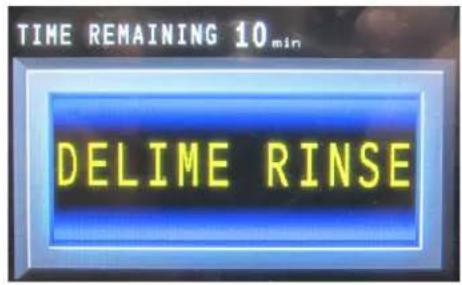
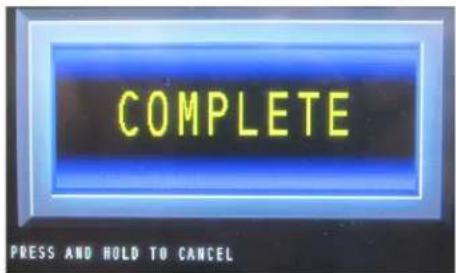
Step 12: "COMPLETE" displayed.
- Deliming operation complete.
- Door latch unlocks.
- Green power button reactivated.
• Make sure door is closed. - Push "COMPLETE" button to fill machine.
- Resume normal operation.
Manual Delime Start
Deliming can be started manually without waiting for the scheduled interval. To start:
- Press the main screen 'TOOLS' button.
- Press the 'DELIME' button.

- Press DELIME START to begin.
- The message box below appears to confirm the selection.
- Press "YES" to begin deliming, "NO" to cancel.
- Follow the screen prompts beginning on page 13 to delime.


Maintenance
Maintenance
Maintenance Schedules
Daily Maintenance
- Check the chemical container levels
- Make sure the water supply is on and the drain is clear of debris.
- Clean the machine.
- Check all of the wash arm and rinse arm spray jets and clean as necessary.
- Check the digital display for damage.
• Make sure the dish racks are in good condition
Weekly Maintenance
- Inspect the water and the drain lines for leaks.
- Check underneath the dishwasher for leaks.
- Make sure the floor drains are clear of debris and handle the machine drain flow.
- Check the chemical tubing and chemical container levels.
Monthly Maintenance
- Check and delime machine if required.
- Replace damaged scrap screens.
- Replace worn spray arm bearings.
- Check chemical dispenser squeeze tubes and replace as required.
- Remove chemical tubes from containers and flush with hot water.
Yearly Maintenance
Contact your authorized service agent for a preventive maintenance inspection.
Lubrication
There are no lubrication points or schedules for this dishwasher.
Troubleshooting Chart
| Condition Cause | Use Solution | |
| Dishwasher will not run. HMI unresponsive. | Hood not closed/bad door switch. Bad pump/contactor. Power off/overload tripped. Cycle not selected | Close Hood completely. Check breaker on panel. Select 1,2,4 or 6 min. cycle. |
| Low or no water. Main water | supply is off. PRV setting incorrect. Line strainer clogged. Valve of float defective. | Open supply valve. Set to 20-22 PSI flowing. Contact Service Agent. Contact Service Agent. |
| Chemicals won't feed into dishwasher. | Chemical supply low. Pick-up tube clogged. Supply tubing damaged. Supply tubing kinked Detergent Pump Error Squeeze tube worn. | Refill chemical container. Rinse tube with warm water. Replace tubing. Straighten tubing. Check chemical containers. Replace squeeze tube. |
| Poor wash results. Wares in | correctly loaded in dish rack. Clogged screens. Clogged spray arms. Chemical injectors not feeding. Detergent Dispenser leaking. Water temperature below 55°F for VHR. | Reposition wares or reduce amount of wares. Clean screens. Clean spray arms. Check chemical supplies. Repair detergent pump hose. Contact Service Agent Increase water temp to 75°F. |
| Dishwasher stays in wash cycle. | Rinse Sentry extends wash mode to allow final rinse water booster temperature to reach 180°F/82°C. | Contact Service Agent. |
| Dishwasher will not drain. | Drain screen. Drain valve defective. Building drain clogged. | Clean screen. Contact Service Agent, open drain valve manually to drain. Contact Building Maintenance. |
| Excessive steam is escaping the Heat Recovery System. | Incoming cold water temp. above 75°F. Incoming water pressure is below 45 PSI flowing pressure at the dishwasher. Recovery coil or fan defective. | Check incoming water temperature. Check incoming water pressure. Check machine level. Contact Service Agent. |
This Page Intentionally Left Blank

- MODELS
- DH6000
- DH6000-VHR
- NATIONAL SERVICE DEPARTMENT
- ATTENTION
- THREE WAYS TO REGISTER YOUR PRODUCT AND ACTIVATE YOUR WARRANTY
- PRODUCT REGISTRATION
- BY FAX
- PRODUCT REGISTRATION CARD
- REVISION HISTORY
- LIMITED WARRANTY
- TABLE OF CONTENTS
- STANDARD FEATURES
- OPTIONS & ACCESSORIES
- SPECIFIER STATEMENT
- CHAMPION®
- THE DISHWASHING MACHINE SPECIALISTS
- SPECIFICATIONS
- CAPACITIES
- MOTOR HORSEPOWER
- WATER CONSUMPTION
- TEMPERATURE °F
- HEATING
- SAFETY SYMBOLS
- WARNING
- CAUTION
- NOTE
- USER MANUAL DISPLAY
- MACHINE ASSEMBLY
- TO ASSEMBLE THE DISHWASHER
- DETERGENT REQUIREMENT
- RECOMMENDED WATER HARDNESS
- LOADING WARES
- MACHINE CONTROLS
- OPERATION SEQUENCE
- OPERATION
- OPERATION SEQUENCE (CONTINUED)
- CHANGING CYCLE TIMES
- RINSE SENTRY
- ALARM/NOTIFICATIONS
- SOLUTION
- TO RESET THIS ALARM
- CLEANING
- TO CLEAN THE DISHWASHER
- CLEANING (CONTINUED)
- DO NOT FLUSH THE EXTERIOR OF THE MACHINE WITH WATER
- DELIMING
- DELIME ALARM
- DELIMING (CONTINUED)
- STEP 3: "CLEAN SCREENS" PICTURE DISPLAYED
- STEP 4: "CLOSE DOOR TO FILL" DISPLAYED
- STEP 5: CLOSE DOORS AND MACHINE FILLS
- STEP 6: "ADD DELIME CHEMICAL" DISPLAYED
- STEP 8: "DELIME IN PROGRESS
- STEP 10: MACHINE FILLS
- STEP 11: "DELIME RINSE" DISPLAYED
- STEP 12: "COMPLETE" DISPLAYED
- MANUAL DELIME START
- MAINTENANCE
- MAINTENANCE SCHEDULES
- DAILY MAINTENANCE
- WEEKLY MAINTENANCE
- MONTHLY MAINTENANCE
- YEARLY MAINTENANCE
- LUBRICATION
- THIS PAGE INTENTIONALLY LEFT BLANK
Brand : Champion
Model : DH6000
Category : Dishwasher