
NA-128XB1 - Washing machine PANASONIC - Free user manual and instructions
Find the device manual for free NA-128XB1 PANASONIC in PDF.
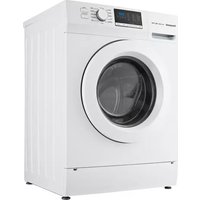


| Product Type | Front-loading washing machine |
| Brand | Panasonic |
| Model | NA-128XB1 |
| Capacity | 7 kg |
| Spin Speed | 1200 rpm |
| Dimensions (H x W x D) | 850 x 600 x 550 mm |
| Weight | 65 kg |
| Power Supply | 220-240 V ~ 50 Hz |
| Power Consumption | 2000 W |
| Energy Efficiency Class | A+++ |
| Water Consumption | 50 L per cycle (approx.) |
| Noise Level (Wash/Spin) | 56 dB / 78 dB |
| Programs | Cotton, Synthetics, Delicates, Quick, Eco, Wool, Rinse & Spin |
| Features | AquaStop, child lock, delayed start, foam detection, unbalanced load detection |
| Display | LED digital display |
| Drum Material | Stainless steel |
| Motor | Inverter motor |
| Maintenance | Clean lint filter monthly; descale every 3 months |
| Safety Features | Overheating protection, door lock, anti-flood system |
| Spare Parts Availability | Genuine Panasonic parts available through service centers |
| Repairability Index | 8.5 / 10 |
Frequently Asked Questions - NA-128XB1 PANASONIC
User questions about NA-128XB1 PANASONIC
0 question about this device. Answer the ones you know or ask your own.
Ask a new question about this device
Download the instructions for your Washing machine in PDF format for free! Find your manual NA-128XB1 - PANASONIC and take your electronic device back in hand. On this page are published all the documents necessary for the use of your device. NA-128XB1 by PANASONIC.
USER MANUAL NA-128XB1 PANASONIC
| NA-127XB1L01NA-127XB1W01 | NA-128XB1L01NA-128XB1W01 | |
| Rated voltage | 220-240 V ~ | |
| Rated frequency | 50 Hz | |
| Rated power consumption | 1900-2150 W | 1900-2150 W |
| Power consumed for heating | 1900 W | 1900 W |
| Outside dimensions | 595X470X845 (mm) | 595X535X845 (mm) |
| Net weight | 60 kg | 64 kg |
| Rated washing capacity | 7 kg | 8 kg |
| Rated dewatering capacity | 7 kg | 8 kg |
| Rated water consumption for washing | 18 L | 22 L |
| Water consumption (L/work cycle) | 56 | 64 |
| Tap water pressure | 0.03-1.0 MPa | |
| Washing noise | < 62 dB (A-weight) | |
| Spin noise | < 76 dB (A-weight) | |
Disposing of Waste Electrical & Electronic Equipment
Declaration of Conformity with the requirements of the E-Waste (Management) Rules-2016. The Product is in conformity with the requirements of the reduction of hazardous substances of the E-Waste Rules-2016. The content of hazardous substance with the exemption of the applications listed in SCHEDULE 1 of the E-Waste Rules-2016: 1. Lead (Pb) - not over 0.1% by weight. 2. Cadmium (Cd) - not over 0.01% by weight. 3. Mercury (Hg) - not over 0.1% by weight. 4. Hexavalent chromium (Cr6+) - not over 0.1% by weight. 5. Polybrominated biphenyls (PBBs) - not over 0.1% by weight. 6. Polybrominated diphenyl ethers (PBDEs) - not over 0.1% by weight.

For the purpose of recycling to facilitate effective utilization of resources, please return this product to a nearby authorized Collection Centre, registered Dismantler or Recycler, or Panasonic Service Centre when disposing of this product.
Customer care number (Toll free): 1800 103 1333 1800 108 1333
Please see the Panasonic website for further information on Collection Centres, etc., or call the toll-free number. http://www.panasonic.com/in/corporate/sustainability/panasonic-india-e-recycle-program.html
Panasonic Corporation
http://www.panasonic.com
Printed in China
Panasonic®
Operating Instructions
Washing Machine
(Household use)
Model No.
NA-127XB1L01
NA-127XB1W01
NA-128XB1L01
NA-128XB1W01

Thank you for purchasing this Panasonic product.
Before operating this washing machine, please read these instructions carefully to ensure it is used properly. In particular, make sure you read the Safety Precautions on pages 3, 4, and 5 to ensure safety. ■ The instructions are subject to change without notice. ■ Please keep the instructions properly for further reference. The machine contains recyclable materials, which should be properly treated or recycled when it is discarded to protect the environment.
X0718-0
Table of Contents
Operating Instructions
Safety Precautions (Please observe them fully) .... 9...
Name of Parts 6
Placement Location 7
Carrying the Machine ....7
Installation of Bottom Plate 7
Set-in Installation 7
Placement Location
and Product Dimension 7
Installation 8
How to Remove Anchor Bolts
Used for Transport 8
Horizontal Adjustment 8
Water Inlet & Drain Hose and
Power Cord 9
Tightening Drain Hose 9
Connecting the water Inlet hose ……9
Drain Hose 10
Connecting Power 10
Check after Installation 11
Installation Checklist 11
Trial operation after installation ……11
Preparations before Washing……12
Descriptions of Operating Buttons 15
Detergent - Softener (How to Add)…17
Operation Methods
Operation Method 20
Optional Functions.... 21
Timed operation 21
Child Lock 21
Maintenance and Care
Maintenance and Care 22
Machine Body 22
Detergent Container 22
Door Glass and Door Gasket ……23
Pump Filter 23
Filter Mesh of Inlet Valve 24
Preventing frozen water inlet & drain
hose and internal connection hose ..24
If Required
Fault Checklist 25
Abnormal Display 27
Specifications ...... Back cover
Safety Precautions (Please observe them fully)
Be sure to follow the safety precautions described below to prevent injury or property losses to the user or others.
■ Ignoring or incorrectly understanding these symbols may result in the following consequences.
⚠ Warning
This describes issues which may cause serious injury.
Caution
This describes issues which may cause personal injury or property damages.
Items to be observed are distinguished using the following symbols and described as follows.

Indicates prohibited items.

Indicates items that must be obeyed.
Immediately stop using the machine and pull out the power plug in case of the following situations. Contact the service provider as recognized by Panasonic to check and repair the machine!
• The washing machine does not start when it is powered.
• Abnormal sound is heard when the washing machine is operating.
May result in smoke, fire or electric shock.
Keep sources of ignition, such as candles or cigarettes, away from the machine.

No smoking. They may cause fire or deformation.


⚠ Warning
During Operation

The washing machine may be damaged by lightning. Water leaks or flooding may occur or overpressure of water.

Do not place the washing machine in a damp place such as a bathroom or exposed to the outside weather!

Do not use the washing machine in places exposed to water.

This may cause electric shock, fire, failure and deformation.
Do NOT connect to the hot water supply!

This may result in deformation of or damage to the plastic parts of the water inlet hose, causing water leaks, electricity leaks or electric shock.
Keep flammable chemicals away from the washing machine, for example, kerosene, gasoline, light gasoline, thinner, alcohol, or clothing soaked with these chemicals!

Prohibited

They may cause an explosion or a fire.
When cleaning your washing machine, do not apply water directly to any part of it.

No water sprinkling. It may cause short circuit and electric shock.

Warning
Power wires
The power socket must be used independently, unidirectional, with two poles and a ground wire, rated at 10A, 220-240V ~

If the power socket is used together with other appliances, fire may occur due to heating.
Ensure the power plug is fully inserted into the household mains socket!
Otherwise, a loose connection may overheat and cause an electric shock or fire. Never use a damaged power cord or loose power socket.
Remove any dust that may accumulate around the power plug.

When dust has accumulated on and around the power plug, and the dust gets damp or wet, the insulation plug becomes defective and may cause fire.
Pull out the power plug, and wipe off dampness with a dry cloth.
Avoid any actions that may damage the power cord and power plug. (Do not cause damage to them; do not fabricate them; keep away from a heating appliance; do not excessively bend, twist, extend, or bind them, or place heavy objects on them).

Using the damaged power cord and power plug may cause electric shock, short circuit, and fire.
Prohibited

Please consult the service center for repairs of the power cords and power plug.
Always pull the power plug out of the power supply before cleanup or maintenance!

Plug MUST be pulled out

Otherwise, electric shock or injury may occur.
Do NOT touch the power plug with wet hands!

No touching with wet hands

Doing so may cause an electric shock.
To prevent injury
Do NOT dismantle, repair or modify the washing machine


No dismantling
Otherwise, it may result in fire or injury. - If repairs are needed, contact your local Customer Service Centre.
Children should be supervised to ensure that they do not enter the drum. Do NOT place a chair or a similar object close to the washing machine!

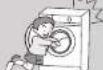
Prohibited
There is a risk of injury if a child has entered the drum.
Do NOT touch the laundry inside the drum until it has completely stopped!


Never touch
You may be injured if your hands are wrapped by the clothes even if the drum spins slowly. Be sure to protect the children against such risks.
Avoid collision of the door glass by a hard object to
prevent the glass from breaking, which may cause injury!
Prohibited
Do NOT slide your hand (or unprotected foot) underneath the washing machine when in use!

It may cause injury.
Prohibited
This appliance is not intended for use by persons (including children) with reduced
Prohibited physical, sensory or mental capabilities, or lack of experience and knowledge, unless they have been given supervision or instruction concerning use of the appliance by a person responsible for their safety.
May cause fire or serious injury.
Warning
Power - Power cord
Do not drag the power cords when pulling out the power plug. Please hold the plug with hands when pulling it out!

Electric shock or short circuit may occur which may cause fire.
Never use the socket if the socket hole is loose, and never use a damaged power cord or power plug!

Prohibited
Otherwise, it may cause electric shock, short circuit, and fire.
Please contact your customer service center for repair if needed.

service center
Y connection is applied for the power cord. If the power cord is damaged, it must be replaced by the manufacturer, its service agent, or similarly qualified persons in order to avoid a hazard.

Otherwise, there may be negative consequences.
A single-phase power plug, with a ground wire at both poles, shall be used. Reliable grounding shall be ensured! If a grounding unit is not installed, static electricity may be generated at the case body or other metal parts!

Electric shock may occur in case of a fault or electric leak.
Must be grounded.

! Caution
During Operation
BE CAREFUL not to get laundry caught in the door seal when the door is closed.

This may result in a water leak or damage to the laundry during the wash cycle.
Prohibited

The water pressure for the washing machine is 0.03-1 MPa.

0.03-1 MPa

Water leaks may occur at both ends of the water inlet hose in case of overpressure.
Ensure that the water tap and water inlet pipe joint are reliably installed. Make sure that the inlet hose has been fully inserted into the inlet hose joint or into the special water tap purchased separately. Do not insert or pull out the inlet hose frequently to prevent looseness of the inlet hose or wear of the waterproof washer for the inlet hose joint.

May cause water leaks or fire due to changes in water pressure.
Prohibited
To prevent injury
Do not wash, rinse or spin the waterproof sheets and garments!

(For example) sleeping bags, diapers, sauna bathrobe, rubber driver's suits, skiing clothes and covers for bikes, motorcycles and automobiles.
Prohibited
Otherwise, personal injury or damage to the machine, wall, ground or clothing, or water leaks may occur due to vibrations or rotation during the spin cycle.
Do not climb up or put heavy objects on the top of the machine!

You may be injured due to set deformation or breakage of the washing machine. The objects placed on the top
Prohibited may drop and break due to vibrations during operation.

Please remove the cover when discarding the washing machine!

Otherwise, a child may be locked in the drum in extreme situations.

Do not obstruct the openings on the bottom face with carpet, etc.
Prohibited

Name of Parts and Placement Location

Accessories
Please ensure that all accessories are supplied with the machine.
Cover cap (4) (see P8)

Bottom plate (1) (see P7)

Inlet hose (1) (see P9)

Bottom cover screws (4)

※ New hose-sets supplied with the appliance are to be used, and old hose-sets should not be reused.
Carrying the Machine
The washing machine must be carried by 2 people.
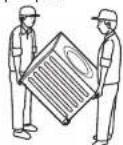
Start by tilting the appliance backwards. The appliance should be carried by two people, one on each side holding it from the bottom.
Installation of Bottom Plate
Place the washing machine so that it is tilted backward. Insert the end without holes into the box at the rear of the washing machine. Press the bottom plate to make it bend slightly, and insert the front end into the box of the washing machine. Fasten two screws on the left and right respectively (Note: the screws have been supplied in the accessories).
Notes:
- Install the bottom plate before removing the anchor bolts. Make sure the inclined position of the washing machine is reliable and a person standing nearby helps to support the machine with hands. - When installing the bottom plate, make sure that the plate does not bend seriously to prevent breakage of the bottom plate.
Set-in installation
- You need a space of at least 64 cm wide. Provide at least 2 cm of clearance on both sides and at least 5 cm of clearance on the top and 3 cm on the back of the machine. - Be sure to insert the power plug into the independent dedicated household socket. Make sure the socket is placed in such a place that enables you to easily pull out the plug.

Placement Location and Product Dimension
Make sure there is enough space for the washing machine.


Caution
- Install the appliance on a flat, stable surface to avoid excessive vibration and noise. - Do NOT install the appliance in direct sunlight or in a place where temperatures reach freezing. - Do NOT let metallic portions of the appliance come into contact with metal plate of furniture, sinks or other appliances. - Be sure to remove all packages (including the foam cushion and anchor bolts assembly) before using the machine. Otherwise, damages may occur.
Installation Water Inlet & Drain Hose and Power Cord
How to Remove Anchor Bolts Used for Transport
Internal parts have been fixed by four anchor bolts used for transport. Make sure these bolts are available during handling or moving. Remove them before setting using a spanner (not included in the list of accessories).
Caution
Excessive vibrations may occur if the machine spins with the anchor bolts attached.


The anchor bolts used for anchoring should be kept when you need to move the washing machine due to change of home address. The bolts must be provided to the customers.
If you need to handle the washing machine again, install it in the reverse order of removal.
① Loosen the 4 bolts using a spanner or similar tool. ② Rotate the rubber part of the bolt counterclockwise to pull it out. ③ Take out the 4 cover caps from the accessories. Press the cover caps into the holes until they fit securely.
Caution
If the cover caps are not properly installed, foreign objects or a child's fingers may enter the machine. If you find it difficult to pull out the rubber due to deformation, please contact the designated service center.
Horizontal Adjustment
- Ensure the washing machine is level and stable when the four feet are placed on the ground.
- You can adjust the levelness using a level or by adjusting the height of the feet (place the level on the left, right, front, and rear as needed).
- Tighten nut A using a thin-type spanner.
- Adjust the height of the feet (4) by rotating them as shown below.
- Tighten nut A upward to prevent the feet from loosening. ※The level and spanner are not included in the accessories.
Level

Tightening Drain Hose
- Ensure the end of the drain hose is placed within 1 meter from the ground to prevent siphoning.
- Fix the drain hose using a lifting rope to ensure that the bend does not affect water flow. This prevents displacement of the drain hose. 3. Do not insert the drain hose into the washing machine if it is too long, to prevent abnormal operation.
Caution
- Do not remove the fastening clip of the drain hose.
- Improper horizontal adjustment may result in high noise from the washing machine, excessive vibrations and obvious displacement of the machine.

Connecting the water inlet hose
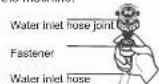


Remove the joint from the water inlet hose supplied together with the machine. Loosen the four screws at the joint using a cross-head screwdriver. Rotate part b in the direction shown below until a 5mm gap is obtained. Connect the water inlet joint and the water tap. Rotate part b as shown below until reliable tightening is obtained. Remove the joint from the water inlet hose supplied together with the machine. Loosen the four screws at the joint using a cross-head screwdriver. Rotate part b in the direction shown below until a 5mm gap is obtained. Connect the water inlet joint and the water tap. Rotate part b as shown below until reliable tightening is obtained.
Water Inlet & Drain Hose and Power Cord
■ How to connect inlet hose and joint
Connect the inlet hose to the joint. If you hear a click sound when pulling down the part of the water inlet hose, it indicates that the hose has been automatically connected. (Pull down the water inlet hose to make sure the hose will not be pulled out)

■ How to connect the inlet hose and inlet valve
Fit the nut part of the inlet hose onto the thread part of the inlet valve.
※ Never fold the water inlet hose to prevent leaks.


Slightly raise the bend to tighten the nut. ※ Confirm that the nut has been reliably tightened, and that the bend is not loose.
■ How to remove water inlet hose
Loosen the four screws at the joint using a cross-head screwdriver in anticlockwise direction.
Caution
- Be sure to tighten nuts to prevent water leaks.
- Be sure to use the new fittings supplied as accessories.
- You can buy a water inlet hose that is long enough at a local service center recognized by Panasonic if the supplied hose is not long enough.
Drain hose
Caution
Never distort, draw or bend the drain hose.
Be sure to insert the drain hose into the drain hose duct. The height of the drain hose shall not exceed 1m.

Caution
—Never obstruct the drain hole of the wash basin and ensure that the drained water flows smoothly. —Never immerse the end of the drain hose in water that has been drained off. Otherwise, water may flow back to the washing machine again.
Connecting Power
Nameplate —— ( Back of the Box)

Caution
- The standard for the rated power of the washing machine are indicated on the nameplate. Please confirm if the power used at your home conforms to the standard.
- Never insert the power plug of the washing machine into an extension line or a multi-hole socket. – In case of defective power cord or power plug, do not use them/it, and contact a service center recognized by Panasonic for replacement.
Check after Installation
Installation Checklist

① Anchor bolts Have you removed them and attached the cover caps properly? ② Location Is the appliance on a flat, stable surface? Does it run without vibrating? ③ Inlet hose Is it free from leaks? Is the water supply normal? ④ Drain hose Is it free from leaks? Does it drain normally? ⑤ Adjustable stands Are they bolted securely to the appliance? ⑥ Power supply Is the household dedicated mains socket, fully rated at AC 220 V to 240 V?
Trial operation after installation
Check if water leaks and abnormal noises occur, and if drainage functions properly after the installation. Carry out the following operations when no laundries are available in the drum.
- Turn on the water tap.
- Close the door. 3 Press 【Power】button to power on the machine. Select 【Tub Clean】button and press 【Start /Pause】button.
Confirm the following:
-Is there any abnormal noise? If yes, confirm that the washing machine is stable. -Is there any water leakage? If yes, make sure that the water hose has been properly connected.
The following errors may occur:

- Is the drain hose properly connected? - Is the drain hose blocked?

- Is the water inlet hose properly connected?
- Is the water tap been turned on?
After the fault is checked and cleared, operation continues if you press 【 Start /Pause 】. You may also restart the program by pressing 【 Power 】. If the fault persists, pull out the power plug and contact the service center as recognized by Panasonic.
Preparations before Washing
Initial Use
Before initial washing, make sure the "tub clean" function is executed when no laundries are present in the washing machine. Turn on the water tap, power on, and press "tub clean". (Notes: better cleanup effects can be obtained if a proper amount of bleach is used).
Classification of Laundry
Read clothing care labels to sort the laundry into different loads.
- Sort the laundry by colour, type of fabric and how soiled it is. Doing so will help you choose the correct programme and temperature for each wash.
Laundry Preparation
■ Pre-washing treatment of local stain positions
- Collar and gusset
Apply special stain remover at the dirty positions on the collar and gusset.
Stain
Apply detergent or oxygen-rich bleach at positions with stains
- Sludge, solid stains
(Curry, chilli sauce)
Apply special detergent or soap at positions with stains, and scrub using hands.


Laundry to be placed in a laundry net (to be washed with other clothes)
- Bras with metal wires, and tights
Put them into a laundry net to prevent them or the appliance from being damaged.

Laundry net (Note: the net must be purchased separately)
- Lace clothing and small items:
Checking laundry
cloth and remove sharp objects, for example, the hairpins and screws, which may damage the cloth.

Tie up any loose strings on the apron and pillowcases etc. If zippers or sharp ornaments are provided on the clothing, close the zippers. Turn clothing with raised fabrics and zippers inside out. Otherwise, the clothes

Clothes that are not colour fast should be washed separately (to prevent dyeing).

Red or dark blue clothes. Jeans etc.
- REMOVE any hair, animal fur, sand and other materials with a brush before washing.

For clothes prone to fluff, be sure to turn them toward the outside from the inside.

- Prevent static electricity
Static electricity may be generated, depending on the type of clothes. Please use softener during washing
Rough amount of detergent (for each piece of clothes)※ The following weights are for reference only.

(blending, about 200 g) (blending, about 200 g) (blending, about 50 g)

Female shirt

Socks Briefs


(100% cotton, about 50 g) (100% cotton, about 500 g)

Pajamas (pcs)
(100% cotton, about 500 g)

Long-sleeve undershirt
(100% cotton, about 150 g)

Bath towel
(100% cotton, about 300 g)

(chemical fiber, about 400 g)
Preparations before Washing
Delicates/Synthetic/Intensive Programs
The drum spins gently in the [Delicates/Synthetic/Intensive] program.
Laundry load:
- For [Delicates] program: 2.0 kg or less
- For [Intensive] program: 2.0 kg or less
Approximate weights:
- Wool sweater: 400 g (Qty: 1)

- Chemical fiber jacket: 600 g (Qty: 1)

- Pants: 400 g (Qty: 1)

Tips for washing delicates:
Fold the laundry so that its shape enables it to be easily put into the drum. Put it into the drum while making sure it is flat.
Change the direction of each laundry if there are many laundries to ensure even overall thickness.
※ Vibrations occur if the number of laundry exceeds a proper value. In this case, observe the specifications on the rated capacity.
Detergent
- Use a mild liquid detergent for delicate items.
Other detergents may damage the laundry.
- "Rinse" function may be required in the [Delicates/Synthetic/Intensive] program to remove residual detergent from the laundry.
Hanging the laundry
- Hang out white or light-coloured wool and nylon items away from direct heat or sunlight.
- After washing, lay out wool and nylon clothes, and return them to their normal shape before hanging in the shade. This will help to reduce the ironing time.
- Hang wool items with creases smoothed out, or spread them out to dry.

- Use hangers for shirts, blouses and trousers. Wrap a towel around the hanger to approximate the clothing's shoulder width so that it will retain its shape as it dries.


If clothing shrinks in the wash
Spread the item out to its original size on an ironing board. Use dress pins to hold the size and shape. Then, use an iron to steam it and leave it to dry.

Preparations before Washing Descriptions of Operating Buttons
Bedding programme
Make sure that the label of each item to be washed shows either the wash (☐)
or hand-wash symbol (W).
- Wash only one blanket at a time.
Washables:
---100 % synthetic fibre blankets—up to 3 kg. ---100 % synthetic fibre futons and 100% cotton blankets-up to 1.5 kg (single bed size) --- Sheets. --- Bedspreads. --- 100 % synthetic fibre undersheets.
Non-washables
--- 100 % wool blankets --- Long-piled blankets --- Electric blankets (including cover)
Caution
Before closing the door, make sure that all laundries have been put into the inner drum as shown in the figure to prevent the laundries from being caught by the drum, which may damage the laundries or the gaskets.
Putting bedding into the drum
- Fold down blanket or bedspread into a quarter of their original size.


- Put the blanket or bedspread into the drum. Fold it while putting it into the drum (fold into 1/6 of the original size).

Both ends of blanket should face the rear of the drum.
Caution
- Do NOT roll the blanket or bedspread into balls, or haphazardly fold them. - This may cause excessive vibration and damage the laundry or the appliance. - Do not use the blanket nets. Otherwise, spinning will fail.


- Power Button
Press this button to power on the washing machine. At this time, the indicator lamp goes on. The washing machine is shut down if you press this button when the machine is operating.
- Start / Pause Button
Start: press this button to start up the washing machine after the required program and functions have been selected.
Pause: press this button to temporarily disable the program during operation of the machine. Re-press this button to continue executing the program.
- Program selection knob
Select an appropriate program for the item to be washed. This enables better washing effects.
- Tub Clean Button
Press 【Power】and 【Tub Clean】, and then press 【Start/Pause】 to execute the tub clean program. This program is not enabled if the initially selected button is not 【Tub Clean】, unless you press [User] again and select it at first. All functional buttons are disabled except for
【Power】button when this program is running. Do not select the selection knob before pressing 【Tub Clean】. No child lock setting and unlocking functions are available. Therefore, you cannot pause its operation.
- Preset Button
This button allows you to set the end time of the washing. Pressing it continuously allows you to switch between 3-24 hours. The set time indicates that washing will be finished after 【 xx 】
- Water Temp Button
The default washing temperature varies for different washing programs. This button allows you to select the water temperature suitable for the washing.
- Spin Speed Button
The default spinning speed varies for different washing programs. This button allows you to select the spinning speed suitable for the washing.
- Options Button
This button allows you to select different functional programs as needed (see P16 for details).
Spin Speed + Water Temp
To set the 【Child Lock】 function, press and hold the two functional buttons for about 3 seconds after the operation has started.
The 【Child Lock】 function is intended to prevent a child from touching the control panel during washing, which may cause changes in the program or improper washing (see P21 for details).
Descriptions of Operating Buttons Detergent - Softener (How to Add)

Soak
Press the 【Options】 button and select the 【Soak】 program, so that the 【Soak】 indicator lamp is on. This function is for thick/heavy laundries or laundries that do not absorb water easily. It enables less detergent and a cleaner effect.
Extra Rinse
Press the 【Options】 button and select the 【Extra Rinse】 program, so that the 【Extra Rinse】 indicator lamp is on. This function adds a rinse process to achieve a better rinse effect.
Prewash
Press the 【Options】 button and select the 【Prewash】 program, so that the 【Prewash】 indicator lamp is on. This function is for dirty clothes.
Easy Iron
Press the 【Options】 button and select the 【Easy Iron】 program, so that the 【Easy Iron】 indicator lamp is on. This function reduces the extent of folds after washing. To perform free-ironing treatment, the clothes are shaken for 12 hours before the final spinning. If you need to terminate the easy iron function in advance, press the 【Start/Pause】 button to display this step. Then, run the next step, which is the spinning step.
Eco.
Press the 【Options】 button and select the 【Eco.】 program, so that the 【Eco.】 indicator lamp is on. This function reduces energy consumption during washing.
Caution
The above functions are single-choice. Only a part of them are valid.
Pull out the detergent drawer and add detergent or softener to the correct compartment. Check the packages for the recommended amounts (the amount depends on the number of laundries and the extent of stains).
Caution
Do NOT use the appliance when the detergent container is removed. This may result in a water leak.
Softener compartment Prewashing compartment
Main detergent compartment
Main detergent compartment
The following detergents and additives may be added to this compartment:
- Detergent
- Tub cleaning detergent
The detergent will enter the drum ONLY when water flows through the detergent box. Therefore, if you have forgotten to add detergent, please power off the machine and restart, and then select "single drain" function to drain off water from the washing machine. After that, add detergent and restart the program. ※ "single drain"
select Program selection knob 【 Spin 】 and press Spin Speed button "No Spin".
Detergent
1.Liquid detergent
Caution
Do not use liquid detergent as the main detergent for programs with pre-washing.
It is recommended that a mild liquid detergent be used for cotton program.
- Powdered detergent
It is advisable to use low-foam soap powder. The following ways help prevent powdered detergent from being left in the detergent box: - Wipe inside the detergent compartment to make it dry.
- Make sure no blocks of powder are added to the compartment. Detergent blocks may cause obstruction after a prolonged period.
Amount of detergent
Please follow the recommended amount of detergent described on the package. The amount of detergent you should use depends on the following factors:
- How soiled the laundry is
- Amount of the laundry
- Water hardness
The amount of foam varies according to the amount and type of detergent, how soiled the laundry is, and the hardness and temperature of the water.
Softener compartment
The following additives may be added to this compartment:
- Fabric softener
Fabric Softener
To prevent static, add softener before you start washing. It will be automatically added in the final rinse cycle.
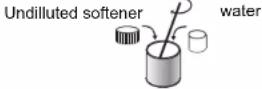
Dilute concentrated softeners before you add them. Add up to only 70 mL to the compartment to avoid overflowing.
Please note the position of the blue cover to avoid negatively affecting the auto filling of the softener.
The filled softener should not exceed the maximum marked amount.
※ Certain brands of softeners may stick to the compartment (becoming residues) when water is used to flush them. In this case, flush using clean water.
If flushing cannot be done, you can take down the detergent box from the machine and perform flushing (see P22 for details).
Prewashing compartment
Prewashing detergent
Whenever you use the Prewash of Cotton, Intensive, Synthetic, Down Jacket, Bedding and Mixed programme, always put detergent in this compartment.
Caution
The amount of foam depends on the amount and types of detergent used, how soiled the laundry is, and the temperature.
Overflow of foam and water may occur if the door is opened during operation. In this case, receive the foam and water using a towel. Do NOT use excessive powdered detergent to prevent excessive foams. Otherwise, a de-foaming program is included automatically, which prolongs the washing time.
※"single drain" select Program selection knob "Spin" and press Spin speed button "No Spin".
Program list Program list
| Program | Capacity (kg) | Applicable clothing types and conditions | Automatic configuration | Additional choice | |||||
| 7.0 8.0 | Time required | Maximum temperature | Maximum dehydration rotating speed | Pre-washing detergent | Detergent | Softener | |||
| Cotton | 7.0 | 8.0 | Daily clothing with cotton, linen and cotton, blended fabric (for example: T-shirts, underwear, towels, tablecloths, etc.) | 1:40 | 90 °C | 1200 r/min | ○ | ● | ○ |
| Intensive | 2.0 | 2.0 | Underwear and small items | 1:59 | 90 °C | 1200 r/min | ○ | ● | ○ |
| Synthetic | 3.5 4.0 | Mild washing is applicable to clothing with cotton, linen and chemical fiber. | 1:03 | 60 °C | 800 r/min | ○ | ● | ○ | |
| Delicates | 2.0 2.0 | Mild washing is also fit for wool and wool blended clothing that can be washed by hands or a washer. | 0:39 | 40 °C | 600 r/min | × | ● | ○ | |
| Spin | 7.0 8.0 | Dehydrate the washed clothing | 0:11 | — | 1200 r/min | × | × | × | |
| Rinse&Spin | 7.0 8.0 | Clothing only for rinsing and spinning | 0:17 | — | 1200 r/min | × | × | ○ | |
| Colored | 7.0 8.0 | Clothing tending to fade | 0:57 | 40 °C | 1200 r/min | × | ● | ○ | |
| Wash | 7.0 8.0 | Clothing for washing only | 0:43 | 90 °C | — | × | ● | × | |
| Rapid wash | 3.5 4.0 | Ultra-fast washing for clothing with less stain | 0:15 | 40 °C | 800 r/min | × | ● | ○ | |
| Down Jacket | 2.0 2.0 | Washing down jackets | 1:06 | 40 °C | 1200 r/min | ○ | ● | ○ | |
| Bedding | 3.5 4.0 | Washing large items | 1:41 | 90 °C | 1200 r/min | ○ | ● | ○ | |
| Mixed | 7.0 8.0 | Washing ordinary items | 1:12 | 90 °C | 1200 r/min | ○ | ● | ○ | |
| Tub Clean | — | — | Cleaning the drum | 1:07 | 90 °C | — | × | ● | × |
※ Capacity is the maximum capacity of dry cloth ○ means that detergent and softner are added when necessary ● means that detergent and softner must be added X means that detergent and softner are not allowed Note: the time in the form is the standard time set by the program, influencing by the hydraulic pressure, water temperature, environment temperature, etc. and the actual operation time may be changed slightly.
Time needed
Time depends on the program selected and the temperature setting. - Actual time may be different from the time shown in the form.
- Display time includes time to supply water and to drain water, and will be changed due to the hydraulic pressure, discharging conditions and number of clothing.
- If change the setting during washing, the display time will be extended
- Time may be extended to correct the deviation of the clothing.
Change setting during washing
- Other functions cannot be changed once the washing starts. If any change is needed, turn off the switch before starting the machine. - During the washing process, if the spin speed needs to be altered, it can be altered by pressing the [Start/Pause] button. - If the washing process is finished, there is no need for alteration. The program cannot be altered once the machine starts, no matter how you turn the rotary knob.
Additional functions
- Depending on the selected program, different additional functions may be used in combination.
- Some functions cannot be used in some programs.
- If an unusable function is chosen, a warning will sound as a reminder.
- During washing, the Extra Rinse function can be changed. Once the rinsing program starts, the setting cannot be changed.
Operation Methods

- Open the door and put the laundry into the drum. For details on preparation and laundry, see P12, P18-19.
- Close the door and turn on the water tap.
Caution
- Make sure that no laundry is caught by the door. - Do not put too much laundry in the drum. - This may cause excessive vibrations or damage to the washing machine.
- Insert the power plug and turn on the [Power] button.
- Select the program knob to set the desired washing program.
■ The time required for washing is displayed on the panel.
- Select additional functions and other settings In standby status, the selected functional items blink, and indicators for other optional function items are on. If other items are optional when a function is in "pause" status, the indicators for the current items blink. If other functions are not optional when a function is in "pause" status, the indicators for the current items are on.
Soak: (see P16 for details). Extra Rinse: An additional rinse cycle enables Prewash: (see P16 for details). Easy Iron: (see P16 for details). Eco.: (see P16 for details).
For details on optional functions and settings for each program, see P18-19.
※ The above figure is based on cotton program.
0:59 indicates the remaining time before water entry.

The buzzer sounds, and the operation is finished.
Caution
- Be sure to apply "additional rinse" function if detergent on the laundries are not completely removed using the basic washing programs.
- The laundries should not be left in the drum for a long time to prevent color fading, deformation and folding.
- If the program is running, and you turn the knob to make it depart from the position of the current program, the buzzer will sound, indicating invalid operation. In this case, however, the set functions and the remaining time set remain unchanged. The program cannot be paused if you press. 【Start/ Pause】. In this case, the buzzer will sounds, indicating invalid operation, and "EP" blinks at the "remaining time" window. The program cannot be paused unless you turn the knob to the correct position of the program. Or, you can press. 【Power】 to re-select to start the program.
Optional functions
Timed operation
Select the duration from the current time to the end time. - Time saver is not available for the following functions: 【Tub Clean】. - The actual operation duration may differ from the preserved duration, depending on the type of laundry, temperature conditions, and water inlet/drain conditions.
Caution
- Do not use detergent that is hard to dissolve during the saver function, as blocks may be formed before washing in this case. As a result, the detergent may fail to flow out.
To set timed operation, do the following:
- Press the 【Power】 button to power on the machine.
- Select the required program and optional functions.
- Set the preset time. Continuously press the 【Preset】 button until the required time is displayed.
- Press the 【Start/Pause】 button to complete the saver setting.
Be sure to re-set in steps as described above after power-off.
Cancelling preset time
Press the 【Power】 button to cancel all settings.
Viewing preset time setting
The remaining time is displayed when the preset time is set.
Child lock
- The door and buttons must be locked to prevent a child from entering the drum.
- Setting and releasing the child lock:
- Setting: After starting the program, press and hold 【Water Temp】+【Spin Speed】 for 3 seconds to activate this function. The indicator lamp will turn on after setting, and remain on until the operation is finished.
- Release: After starting the program, press and hold 【Water Temp】+【Spin Speed】 for 3 seconds to deactivate this function. The function will be canceled.
The following example describes how to use the child lock:
Put the laundry into the drum, select the program, and start the machine. Then set the "child lock".
The "Child Lock" indicator lamp lights up, and the child lock is in a "locked" status during operation of the machine.

The lock is released after the operation.
Maintenance and Care
Machine Body
The machine body should be cleaned using a soft cloth and a mild detergent, such as kitchen detergent or soapy water.
Warning
- Never spray water onto the machine body.
- Never use abrasive cleaners, thinner, or products containing alcohol or kerosene.
Detergent Container
Make sure that the detergent container is cleaned periodically to prevent residual detergent and the growth of bacteria.
- Pull out the detergent container

- Remove the detergent container by pulling it out while pressing down on the middle of the softener cover.

- Remove the softener cover.

- Wash out the detergent residue with water. Use a cloth to wipe the water from the washing machine.
- Attach the softener cover to the original position of the softener box.
Door Glasses and Door Gaskets
Do the following whenever the work of the machine is finished.
- Remove any objects on the door gasket. - Wipe the door glass and door gasket with a dry soft cloth to remove any wire debris and dirt. - Open the door for ventilation and drying if required.
Pump Filter
- Remove the power plug of the washing machine, press the two clasps as shown in the picture, pull out the right clasp first, then pull out the left clasp and take the service board out.
- Clean the residue and dirt & stains on the pump filter. Confirm if the pump behind the filter is blocked.

- Re-assemble the filter and the service panel after cleanup. Check for water leaks.


- After placing the saucer under the filter, open the pump filter by rotating the filter to the left to discharge the residual water.

Maintenance and Care Fault Checklist
Filter Mesh of Water Inlet Valve Preventing frozen water inlet & drain
hoses and internal connection hoses
- Periodically remove the water inlet hose, and remove the dirt & stains on the filler mesh.
- To prevent water splashing, execute the steps described below before removing the water inlet hose.
- Turn off the water tap. 2.Switch on the appliance.
- Select the [Cotton] program and then press [Start/Pause] button.
- Turn off the washing machine after 1 minute. Water is drained from the inlet hose.
- Disconnect the water inlet hose and remove it.
- Clean the filter mesh, which is located on the rear of the washing machine. To do this, use a small brush, for example, a toothbrush.
- Re-connect the water inlet hose. Turn on the water tap and check for leaks.
If the washing machine is delivered in freezing weather conditions, after setting up, leave it at room temperature for 24 hours before using. This will ensure that the water inlet/drain hoses and internal connection hoses do not become clogged up with ice.
If your water supply hose freezes, perform the following procedures:
- Wrap warm towels around the joints of the water inlet hose.

- Add 2 to 3 liters of warm water to the drum.

- Run the [Spin] program after a dozen of minutes.

| Problem Cause | ||
| Body | Buttons do not work. | - While washing is in progress, it can only be switched after【 Start/Pause 】 button is pressed. If you want to change the programme, temperature, rinse and other items after the washing machine is started, please turn off machine and turn on the power again. |
| Door do not open. | - Door lock may be activated.- Child lock may be activated.(See P21).- The water temperature or level may be too high | |
| Unusual odour | - Rubber parts may give off a smell when you start using the appliance, but the smell will go away over time. | |
| Wash | Water cannot be seen during the wash process. | - During wash process, the Water amount used by the drum type washing machine is less that used by the pulsator washing machine. |
| No water going into the appliance | - The water tap might be turned off.- The water inlet hose may be frozen.(P24).- The water supply may be disrupted.- The water bath may be clogged. | |
| Water is going into the appliance, but cannot be stored. | - Do not open the door to pour water or hot water into the drum, otherwise water may not be stored, but may be drained out immediately.- If you have paused the washing and then restart it, the appliance may drain out some water.- If drain hose is removed from the fixing screw, water will not accumulate on the drum. | |
| Water goes into the appliance during the wash process | - If the water level is dropped, water is automatically supplied.- For heavy loads, the water may fill up repeatedly. | |
| Drainage during the wash process | - After the safe water level for overflow is reached, forced drainage will occur during the wash process. | |
| Rinse | No water flows into the appliance during the rinse process | - If water exist in the drum, starts from draining. |
| Time | The remaining time is changed | - The display time is corrected randomly. Therefore, time pause may occur. The displayed time is the standard time and is different from the actual needed time.- If the load is not balanced during the rinse process, operating times will be added, and the rinse time will be extended accordingly. |
Fault Checklist Abnormal Display
| Problems | Causes | |
| Detergent and Foams | There is only a few foams | - Do not directly put powdered detergent into the drum.· Be sure to put it into a detergent container.- The amount of foam varies, depending on the water temperature, water amount and the quality of water.· Low amount of detergent; Type of detergent (low-foam· Serious stains; detergent etc)· Excessive amount of laundry. |
| Excessive foams; Foams may be attached to the internal surface of the cover | The amount of foam varies, depending on the temperature, amount and hardness of the water.You may have used too much detergent.The type of detergent you are using may cause excess foam | |
| No foams | - Do not directly put powdered detergent into the drum.→ Be sure to put it into a detergent container.- The amount of foam varies, depending on the temperature, amount and softness of the water.- Detergent may not be in the detergent box. | |
| Fabric softener overflows. | - The softener may have exceeded the MAX level of the detergent container (See P17).- You may have spilt the liquid when closing the detergent container too strongly. | |
| After the wash has finished, powdered detergent residue remains | - Do not directly put powdered detergent into the drum.→ Be sure to put it into a detergent container. | |
| Sound | Abnormal sound and excessive vibration | - Whether the washing machine is placed on a flat surface.- The anchor bolts may not have been removed.The appliance may be on a sloping or unstable surface.If none of the above is the cause, contact your local Customer Service Centre.- Whether hairpins or metal pieces are included in the machine. |
| There is noise when the water drains out | - This is normal; it is noise generated by the operation of the drain pump | |
| Others | The electricity supply cuts out while the appliance is on | - The appliance stops operating. When power is restored, it resumes operation from the point that it had stopped |
| The water supply is disrupted. | - When the water is supplied again, it may be impure at first.You have to disconnect the water supply hose and drain away the impure water through the lap. Make sure that the water supply hose has been reconnected before using the appliance | |
| The display is not clear | - The appliance may be in a brightly lit or sunlit area.This situation is not a failure | |
Buzzer sounds, displayed U and digits
| U 11Unable to drain | Check for the following problems:- The drain hose is clogged.- The drain hose is immersed in water.- The drain hose is more than 1m high.- The water is frozen.- The drain filter is clogged(see P23 ) . | If U11 is still displayed after troubleshooting, it will disappear when you press [Start/Pause]. The program continues running from the time before alarming. Or, you can press the [Power] switch to re-select a time for starting program. Please contact the service center recognized by Panasonic after removing the power plug if the faults persist after troubleshooting as described above. |
| U 14Unable to supply water | - The water tap is turned on.- The water tap and inlet hose have been frozen.- Water is cut off.- Stains are present on the inlet filter mesh (see P24). | If U14 is still displayed after troubleshooting, it will disappear when you press [Start/Pause]. The program continues running from the time before alarming. Or, you can press the [Power] switch to re-select a time for starting program. Please contact the service center recognized by Panasonic after removing the power plug if the faults persist after troubleshooting as described above. |
| H 27The door is not closed | - Whether the door is opened> Please close the door. | Check that the door is closed. H27 will disappear when you press [Start/Pause]. The program continues running from the time before alarming. Or, you can press the [Power] switch to re-select a time for starting program. Please contact the service center recognized by Panasonic after removing the power plug if the faults persist after troubleshooting as described above. |
| H XX | - The buzzer sounds when a mark with H appears (e.g. [HXX] ([H01])). Please contact the service center recognized by Panasonic after removing the power plug. | |
- DISPOSING OF WASTE ELECTRICAL & ELECTRONIC EQUIPMENT
- PANASONIC®
- OPERATING INSTRUCTIONS
- WASHING MACHINE
- TABLE OF CONTENTS
- OPERATION METHODS
- MAINTENANCE AND CARE
- IF REQUIRED
- SAFETY PRECAUTIONS (PLEASE OBSERVE THEM FULLY)
- DURING OPERATION
- WARNING
- POWER WIRES
- TO PREVENT INJURY
- POWER - POWER CORD
- CAUTION
- NAME OF PARTS AND PLACEMENT LOCATION
- ACCESSORIES
- CARRYING THE MACHINE
- INSTALLATION OF BOTTOM PLATE
- NOTES
- SET-IN INSTALLATION
- PLACEMENT LOCATION AND PRODUCT DIMENSION
- INSTALLATION WATER INLET & DRAIN HOSE AND POWER CORD
- HOW TO REMOVE ANCHOR BOLTS USED FOR TRANSPORT
- HORIZONTAL ADJUSTMENT
- TIGHTENING DRAIN HOSE
- CONNECTING THE WATER INLET HOSE
- WATER INLET & DRAIN HOSE AND POWER CORD
- DRAIN HOSE
- CONNECTING POWER
- CHECK AFTER INSTALLATION
- TRIAL OPERATION AFTER INSTALLATION
- PREPARATIONS BEFORE WASHING
- INITIAL USE
- CLASSIFICATION OF LAUNDRY
- LAUNDRY PREPARATION
- DELICATES/SYNTHETIC/INTENSIVE PROGRAMS
- LAUNDRY LOAD
- APPROXIMATE WEIGHTS
- TIPS FOR WASHING DELICATES
- DETERGENT
- HANGING THE LAUNDRY
- IF CLOTHING SHRINKS IN THE WASH
- PREPARATIONS BEFORE WASHING DESCRIPTIONS OF OPERATING BUTTONS
- DESCRIPTIONS OF OPERATING BUTTONS DETERGENT - SOFTENER (HOW TO ADD)
- SOAK
- EXTRA RINSE
- PREWASH
- EASY IRON
- ECO
- MAIN DETERGENT COMPARTMENT
- LIQUID DETERGENT
- AMOUNT OF DETERGENT
- SOFTENER COMPARTMENT
- FABRIC SOFTENER
- PREWASHING COMPARTMENT
- TIME NEEDED
- CHANGE SETTING DURING WASHING
- ADDITIONAL FUNCTIONS
- OPTIONAL FUNCTIONS
- TIMED OPERATION
- CANCELLING PRESET TIME
- VIEWING PRESET TIME SETTING
- CHILD LOCK
- MACHINE BODY
- DETERGENT CONTAINER
- DOOR GLASSES AND DOOR GASKETS
- PUMP FILTER
- MAINTENANCE AND CARE FAULT CHECKLIST
- FILTER MESH OF WATER INLET VALVE PREVENTING FROZEN WATER INLET & DRAIN
- HOSES AND INTERNAL CONNECTION HOSES
Brand : PANASONIC
Model : NA-128XB1
Category : Washing machine