
MAD113MCAF - Deep fryer MIDEA - Free user manual and instructions
Find the device manual for free MAD113MCAF MIDEA in PDF.


| Product Type | Deep Fryer |
| Brand | Midea |
| Model | MAD113MCAF |
| Capacity | 3.5 L |
| Oil Capacity | 2.5 L |
| Power | 1800 W |
| Voltage | 220-240 V, 50/60 Hz |
| Temperature Range | 130°C - 190°C |
| Timer | 60-minute mechanical timer with bell |
| Control Type | Dial controls for temperature and timer |
| Basket Material | Stainless steel wire mesh |
| Body Material | Stainless steel with cool-touch handles |
| Viewing Window | Yes, large window for monitoring |
| Safety Features | Overheat protection, automatic shut-off, cool-touch exterior |
| Filtration | Built-in oil filtration system (optional) |
| Dishwasher Safe Parts | Basket and lid |
| Non-Slip Feet | Yes |
| Cord Length | 0.9 m |
| Dimensions (W x D x H) | 30 x 25 x 28 cm |
| Weight | 3.2 kg |
| Warranty | 2 years |
Frequently Asked Questions - MAD113MCAF MIDEA
User questions about MAD113MCAF MIDEA
0 question about this device. Answer the ones you know or ask your own.
Ask a new question about this device
Download the instructions for your Deep fryer in PDF format for free! Find your manual MAD113MCAF - MIDEA and take your electronic device back in hand. On this page are published all the documents necessary for the use of your device. MAD113MCAF by MIDEA.
USER MANUAL MAD113MCAF MIDEA
TWO-ZONE AIR FRYER OVEN


MSmartHome
Download the app & activate product
USER MANUAL
MAD113MCAF
THANK YOU LETTER
Thank you for choosing Midea! Before using your new Midea product, please read this manual thoroughly to ensure that you know how to operate the features and functions that your new appliance offers in a safe way.
CONTENTS
THANK YOU LETTER 01
SAFETY INSTRUCTIONS 02
SPECIFICATIONS 09
PRODUCT OVERVIEW 10
OPERATING INSTRUCTIONS 11
APP SET UP 26
CLEANING AND MAINTENANCE 28
TROUBLESHOOTING 30
1 YEAR LIMITED WARRANTY 33
TRADEMARKS, COPYRIGHTS AND LEGAL STATEMENT 34
DATA PROTECTION NOTICE 35
IMPORTANT SAFEGUARDS
Intended Use
The following safety guidelines are intended to prevent unforeseen risks or damage from unsafe or incorrect operation of the appliance. Please check the packaging and appliance on arrival to make sure everything is intact to ensure safe operation. If you find any damage, please contact the retailer or dealer. Please note modifications or alterations to the appliance are not allowed for your safety concern. Unintended use may cause hazards and loss of warranty claims.
Explanation of Symbols

Danger
This symbol indicates that there are dangers to the life and health of persons due to extremely flammable gas.

Warning of electrical voltage
This symbol indicates that there is a danger to life and health of persons due to voltage.

Warning
The signal word indicates a hazard with a medium level of risk which, if not avoided, may result in death or serious injury.

Caution
The signal word indicates a hazard with a low degree of risk which, if not avoided, may result in minor or moderate injury.

Attention
The signal word indicates important information (e.g. damage to property), but not danger.

Observe instructions
This symbol indicates that a service technician should only operate and maintain this appliance in accordance with the operating instructions.
Read these operating instructions carefully and attentively before using/commissioning the unit and keep them in the immediate vicinity of the installation site or unit for later use!
CAUTION
- Read all instructions
- To protect against the risk of electric shock, DO NOT immerse power cord, plug, or the appliance in water or other liquid.
- DO NOT rinse the appliance under a faucet or other water source.
- This appliance is NOT to be used by children or by persons with reduced physical, sensory, or mental capabilities. Close supervision is necessary when this appliance is used near children and these individuals. Children should not use or play with this appliance.
- Turn off and unplug when not in use and before cleaning. Allow to cool before putting on or taking off parts or accessories. To turn off, press Cancel. To unplug, grasp the plug and pull from the outlet. Never pull from the power cord.
- Avoid making contact with moving parts.
- Inspect the appliance and power cord regularly. DO NOT operate any appliance with a damaged cord or plug. DO NOT operate after the appliance malfunctions, or is dropped or damaged in any manner.
- DO NOT use any accessories or attachments not authorized by MIDEA. The use of attachments not recommended by the manufacturer may cause injury, fire or electric shock.
- For household countertop use only. DO NOT use outdoors. Not for commercial use.
- DO NOT place the appliance or any of its parts on any kind of stovetop, near gas or electric burners, or in a heated oven; heat from an external source will damage the appliance.
- DO NOT use appliance for anything other than intended use.
- DO NOT attempt to repair, replace, alter, or modify components of the appliance. This may cause electric shock, fire and/or injury, and will void the warranty.
- DO NOT tamper with any of the safety mechanisms.
- DO NOT leave the appliance unattended while in use.
- DO NOT store any materials, other than the included accessories, in the cooking cavity when not in use.
- DO NOT place any combustible materials in the cooking cavity; such as paper, cardboard, plastic, styrofoam or wood.
- Use extreme caution when moving an appliance containing hot oil or other hot liquids.
- Keep your air fryer away from flammable materials (curtains, tablecloths, etc). Use on a stable and heat-resistant surface away from heat sources or liquids. • To avoid the risk of fire, property damage and personal injury, DO NOT spray cooking oil into the cooking cavity.
- Do not place any objects on top of air fryer at any time.
- The air fryer's cooking cavity contains electrical components. To avoid electric shock, DO NOT put liquid of any kind into the cooking cavity.
- Proper maintenance is recommended after each use. Refer to CLEANING AND MAINTENANCE.
- Let the appliance cool to room temperature before cleaning or storage.
- Do not clean with metal scouring pads. Pieces can break off the pad and touch electrical parts, creating a risk of electric shock.
WARNING
- The appliance's outer surfaces may become hot during use. DO NOT touch hot surfaces. Only use the air fryer basket handle to lift and carry the air fryer basket. Wear proper hand protection when handling hot components. Extreme caution must be used when moving the appliance.
- Let the appliance cool to room temperature before handling or moving.
- WARNING: Spilled food can cause serious burns. Keep appliance and cord away from children.
- NEVER drape cord over edge of table or counter or touch hot surfaces, NEVER use power outlet below counter.
- DO NOT overfill the appliance or accessories. Overfilling may cause food to contact the heating element, which may result in fire and/or personal injury.
- DO NOT cover the air inlet, air outlet (upper) or air outlet (lower) while the appliance is in operation. Doing so will prevent even cooking and may cause damage to the appliance.
- An air fryer works with hot air only. NEVER pour or spray oil into the cooking cavity. This could result in fire and/or personal injury.
- While cooking, the internal temperature of the appliance reaches several hundred degrees. To avoid personal injury, NEVER place unprotected hands inside the appliance until it has cooled to room temperature.
- When cooking, DO NOT place the appliance against a wall or against other appliances. Leave at least 5in (13cm) of free space on the back, front, sides, and above the appliance. DO NOT operate the appliance on or near combustible materials such as tablecloths and curtains. DO NOT place anything on top of the appliance.
- Do not put food in the Drip tray.
- The food height of Lower oven cavity is 1 inch from the upper electric heat tube.
- DO NOT dish wash the drip tray.
- When in operation, hot air is released through the air outlets. Keep your hands and face at a safe distance from the vents and take extreme caution when removing the accessories from the appliance.
- Should the unit emit black smoke, press Cancel and unplug the appliance immediately. Wait for smoking to stop before removing the basket and then clean the appliance thoroughly. If the cause was not burnt food, contact our Customer Service Center at 1-866-646-4332.
- NEVER connect this appliance to an external timer switch or separate remote-control system.
- Use extreme caution when removing hot baskets from the appliance, or disposing of hot grease.
- Without proper cleaning, food and grease splatter may build up around the heating element. This can cause smoke, fire, and/or personal injury.
- Oversized foods and/or metal foil packages, or utensils must not be inserted into the cooking cavity as they may cause risk of fire and/or personal injury.
- DO NOT use appliance accessories in any other appliance including microwave ovens, toaster ovens, convection or conventional ovens, ceramic, electric, induction or gas cooktops, or outdoor grills.
- Do not place paper, cardboard, non-heat-resistant plastic, or similar materials, into your air fryer. You may use parchment paper or foil.
- Never put baking or parchment paper into the air fryer without food on top. Air circulation can cause paper to lift and touch heating coils.
• Always use heat-safe containers. Be extremely cautious if
using containers that aren't metal or glass.
- Do not cover crumb tray or any part of the oven with metal foil. This will cause overheating of the oven.
IMPORTANT SAFEGUARDS
PLUG & CORD
- This appliance has a polarized plug (one blade is wider than the other). To reduce the risk of electric shock, this plug is intended to fit into a polarized outlet only one way. If the plug does not fit fully into the outlet, reverse the plug. If it still does not fit, contact a qualified electrician.
Do not attempt to modify the plug in any way.
- A short power-supply cord is provided to reduce the risk resulting from becoming entangled in or tripping over a longer cord.
- Extension cords are available and may be used if care is exercised in their use.
If an extension cord is used:
- The marked electrical rating of the extension cord should be at least as great as the electrical rating of the appliance (see page 9).
- The cord should be arranged so that it will not drape over the countertop or tabletop where it can be pulled on by children or tripped over unintentionally.
- Do not share the extension cord with other appliances.
- DO NOT use the appliance in power outlets other than 120V~ (60Hz). DO NOT use with power converters or adapters.
- DO NOT let the power cord contact hot surfaces or open flames, including stovetop.
- Read this manual carefully and completely and retain for future reference. Failure to adhere to safety instructions may result in serious injury or damage.
• To avoid injury, read and understand the instructions in this user manual before attempting to use this appliance. - The failure to follow any of the important safeguards and/or the instructions for safe use is a misuse of your appliance that can void your warranty and create the risk of serious injury. - To disconnect, turn any control to "off", then remove plug from wall outlet.
SAVE THESE INSTRUCTIONS
- Changes or modifications not expressly approved by the party responsible for compliance could void the user's authority to operate the equipment.
- This equipment has been tested and found to comply with the limits for a Class B digital device, pursuant to part 15 of the FCC Rules. These limits are designed to provide reasonable protection against harmful interference in a residential installation. This equipment generates, uses and can radiate radio frequency energy and, if not installed and used in accordance with the instructions, may cause harmful interference to radio communications. However, there is no guarantee that interference will not occur in a particular installation. If this equipment does cause harmful interference to radio or television reception, which can be determined by turning the equipment off and on, the user is encouraged to try to correct the interference by one or more of the following measures:
—Reorient or relocate the receiving antenna.
Increase the separation between the equipment and receiver.
Connect the equipment into an outlet on a circuit different from that to which the receiver is connected.
Consult the dealer or an experienced radio/TV technician for help.
SPECIFICATIONS
| MAD113MCAFProduct Model | |
| Voltage | 120V~ |
| Frequency | 60Hz |
| Rated Power | 1700W |
| Capacity 11QT |
How To Find The Model Name And Serial Number
Both the model name and serial number can be found on the rating label that is located on the bottom of the air fryer.

PRODUCT OVERVIEW
Parts and Accessories
Before using your new air fryer, make sure that all parts and accessories are included.


NOTE
All the pictures in this manual are for explanatory purposes only. Any discrepancy between the real object and the illustration in the drawing shall be subject to the real subject.
OPERATING INSTRUCTIONS
Control Panel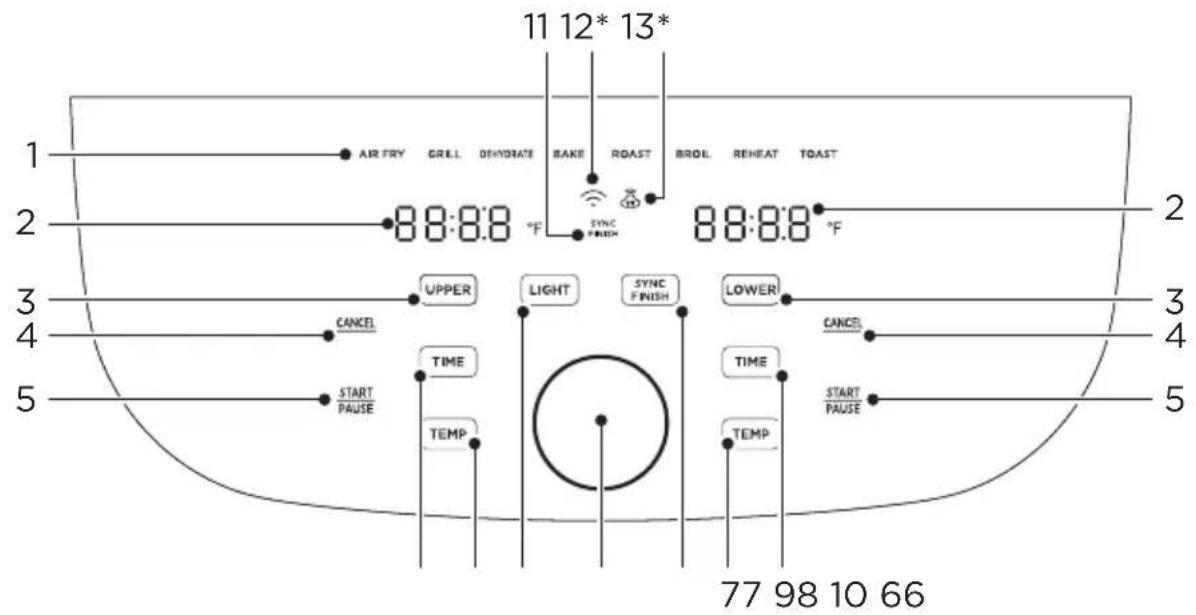
| DescriptionName | ||
| 1 Functions | Any of the 8 functions can be used in the upper or lower cavity to cook a large variety of meals. The temperature and time can be adjusted for each function. After touchingUPPERorLOWERrotate the knob to change the function and push the knob to select the function. | |
| 2 | Display | The cook time, set temperature, reminder messages, and error messages are shown here. |
| 3 | Cavity Selection Button | TouchUPPERorLOWERto program or adjust the function for each cavity. While cooking,UPPERorLOWERcan be touched to show the respective function for each cavity. |
| 4 | Cancel | TouchCANCELwhile cooking to stop the cooking cycle and touchCANCELwhile programming to return to the standby state. |
| 5 Start/Pause | TouchSTARTPAUSEto start cooking. While cooking, touchSTARTPAUSEto pause cooking and touch again to resume cooking. | |
| 6 TIME | After selecting a function, touchTIMEand rotate the knob to adjust the set cook time. | |
| 7 TEMP | After selecting a function, touchTEMPand rotate the knob to adjust the set temperature. | |
| 8 LIGHT | • At any time, touchLIGHTto activate or deactivate the light in both cavities. | |
| 9 | SYNC FINISH Button | • The sync finish function will make both cavities finish cooking at the same time. After programming both cavities, touchSYNCFINISHto activate or deactivate the sync finish function. If the sync finish function is activated, “SYNC FINISH” will appear and touching eitherSTARTwill start both cavities. The cavity with less cook time will display “HoLd” until both cavities have the same remaining cook time. |
| 10 Knob | • Rotate the knob to adjust and push the knob to select the cook time, set temperature, or function. | |
| 11 | SYNC FINISH Indicator | • If the sync finish indicator is visible, the sync finish function is activated. |
| 12* | APP Connection* | • Ifflashing, the air fryer is available to connect to MSmartHome. If solid, the air fryer is connected to MSmartHome. Long press the knob button to reconnect to APP. |
| 13* | APP Recipe* | • If theis visible, cooking settings for a MSmartHomercipe have been uploaded to the air fryer. |
*Only applies to APP connected models.
Display Messages
| DescriptionMessage | |
 | ·While programming, the display will show the set cook time. While cooking, the display will show the remaining cook time. |
 | ·The display shows the set temperature. |
 | ·Some recipes will display the "turn Food" reminder when the food is ready to be turned, flipped, or shook. |
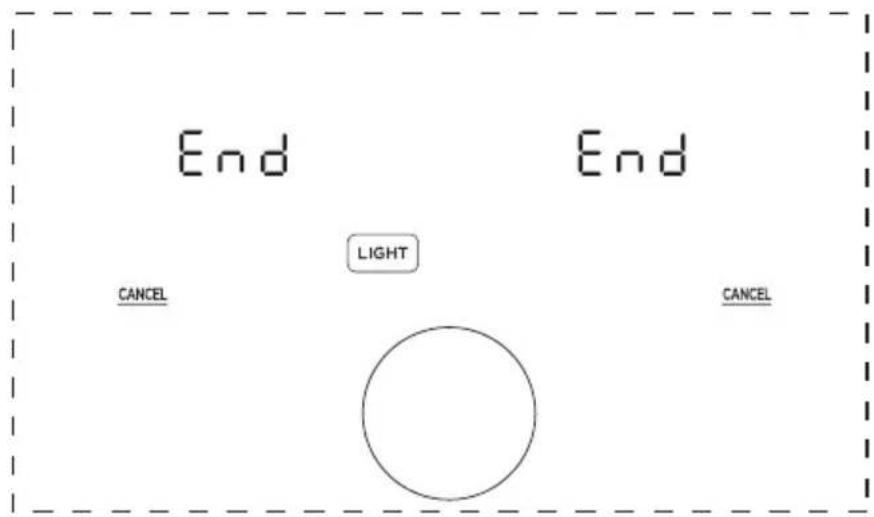
 | ·Cooking is complete and the upper basket or lower tray can be removed. |
 | ·The upper cavity is not operating properly. Please contact our Customer Service Center at +1-866-646-4332. |
 | ·The lower cavity is not operating properly. Please contact our Service service Center at +1-866-646-4332. |
 | ·The upper basket was removed, or the lower door is open. Note: No buttons for that cavity can be used while open. |
 | ·While the sync finish function is activated, the cavity with less cook time will show "HoLd" until both cavities have the same remaining cook time. |
Upper Cavity Cooking (Basket)
- Place the crisper plate into the basket (crisper plate handle up) and evenly place food onto the crisper plate.

- Insert the basket into the upper cavity.
- Plug the air fryer into an appropriate power outlet and the air fryer will now be in standby mode.
- Touch UPPER to start programming a cooking cycle for the upper cavity.

- Rotate the knob to change the function and press the knob to select a function.

- The preset cook time will now be flashing. Rotate and push the knob to adjust and select a cook time. If you want to further adjust the temperature or time, touch or TIME and rotate/push the knob to adjust the temperature or time. Note: The function can still be changed by touching UPPER.

- Once the desired function, temperature, and time have been selected, touch the left START to start cooking.

- Approximately half-way through cooking, the left display will show "Turn Food" If recommended by the recipe, turn, flip, or shake the food. After 30 seconds the "Turn Food" will go away.
![graph TD A["START/PAUSE"] --> B["TIME"] A --> C["TEMP"] D["CANCEL"] --> E["UPPER"] D --> F["LIGHT"] D --> G["LOWER"] H["AIR FRY"] --> I["turn"]](/content/2026/06/1404444/images/d77397e921f80ea963934710d938dad25f758bfd64dcb1df247420b8c6ad7975.jpg)
- When cooking is complete, the left display will show "End" and there will be 3 beeps. The food is now ready to be removed.

Lower Cavity Cooking (Oven)
- Insert the drip tray into the lower cavity.

- Evenly place food on the lower tray.
- Insert the grill tray into the lower cavity.

- Plug the air fryer oven into an appropriate power outlet and the air fryer will now be in standby mode.
- Touch LOWER to start programming a cooking cycle for the lower cavity.

- Rotate the knob to change the function and press the knob to select a function.

- The preset cook time will now be flashing. Rotate and push the knob to adjust and select a cook time. If you want to further adjust the temperature or time, touch or TIME and rotate/push the knob to adjust the temperature or time. Note: The function can still be changed by touching LOWER.

- Once the desired function, temperature, and time have been selected, touch the right START PAUSE to start cooking.

- Approximately half-way through cooking, the right display will show "Turn Food". If recommended by the recipe, turn, flip, or shake the food. After 30 seconds the "Turn Food" will go away.
![graph TD A["AIR FRY"] --> B["UPPER"] A --> C["LIGHT"] B --> D[" "] C --> D D --> E["LOWER"] E --> F["CANCEL"] F --> G["TIME"] G --> H["START/PAUSE"] H --> I["TEMP"]](/content/2026/06/1404444/images/a8fa5b85a293e8cbe3d973caa875c2c705fd3a866946b12fd1732d3e7deda103.jpg)
- When cooking is complete, the right display will show "End" and there will be 3 beeps. The food is now ready to be removed.

Two-Zone Cavity Cooking (Basket and Oven)
- Place the crisper plate into the basket (handle up) and evenly place food onto the crisper plate. Then, evenly place food on the lower tray.
- Insert the basket into the upper cavity and tray into the lower cavity.
- Plug the air fryer into an appropriate power outlet and the air fryer will now be in standby mode.
- Touch UPPER or LOWER to start programming a cooking cycle for the upper or lower cavity.

- Rotate the knob to change the function and press the knob to select a function.

- The preset cook time will now be flashing. Rotate and push the knob to adjust and select a cook time. If you want to further adjust the temperature or time, touch or TIME and rotate/push the knob to adjust the temperature or time. Note: The function can still be changed by touching UPPER or LOWER.

- Repeat steps 4-6 for the cavity (Upper or Lower) that has not been programmed.

- With SYNC FINISH: After programming both cavities, touch SYNC FINISH to activate the sync finish function. If the sync finish function is activated, "SYNC FINISH" will appear and touching either START PAUSE will start both cavities. The cavity with less cook time will display "Hold" until both cavities have the same remaining cook time.

- Without SYNC FINISH: After programming, touch SYNC FINISH to activate or deactivate the sync finish function. If sync finish is deactivated, the START button must be touched independently to start cooking in each cavity.

- Approximately half-way through cooking, the displays will show "Turn Food".
If recommended by the recipe, turn, flip, or shake the food. After 30 seconds the "Turn Food" will go away.
![graph TD A["AIR FRY"] --> B["turn"] B --> C["UPPER"] B --> D["LIGHT"] B --> E["SYNC FINISH"] B --> F["CANCEL"] B --> G["TIME"] B --> H["TEMP"] B --> I["START/PAUSE"] B --> J["SYNC FINISH"] B --> K["CANCEL"] B --> L["LOWER"] B --> M["TIME"] B --> N["TEMP"] B --> O["START/PAUSE"] B --> P["SYNC FINISH"…](/content/2026/06/1404444/images/83eeb74485cc61393dc4fa9fc246b708d2894251b45b935de372ac525106a695.jpg)
- When cooking is complete, the displays will show "End" and there will be 3 beeps. The food is now ready to be removed.
Is something missing or damaged?
Contact the customer advisor by calling 1-866-646-4332 and we will be happy to serve you.
WARNING
To avoid the risk of fire, property damage, and/or personal injury, do not place anything on top of the appliance, and do not block the air vents.
Cooking
• These cooking options give your meals all the rich and crispy flavor of deep frying with little to no oil. - The default time and temps are a starting point that you can experiment with to get the results you like best. - The function listed for each food is a recommendation for optimal cooking. Any function can be used in both the upper basket and lower oven cavities.
| Ingredient | Recommended function | Frozen | Upper Basket Setting | Lower Oven Setting | ||||||
| Amount | Cooking Temp | Time (Single) | Time (Dual) | Amount | Cooking Temp | Time (Single) | Time (Dual) | |||
| French Fries | Air Fry | Yes | 1.1 lbs | 370°F | 16min | 24min | 0.6 lbs | 400°F | 21min | 27min |
| Chicken Wings | Air Fry | Yes | 1.3 lbs | 370°F | 17min | 21min | 0.9 lbs | 19min | 22min | |
| Air Fry | No | 1.3 lbs | 370°F | 14min | 18min | 0.9 lbs | 400°F | 17min | 20min | |
| Chicken Thighs | Air Fry | Yes | 2.4 lbs | 36min | 42min | 360°F | 1.4 lbs | |||
| Air Fry | No | 2.4 lbs | 360°F | 19min | 23min | 1.4 lbs | 400°F | 20min | 24min | |
| Dehydrated Apples | Dehydrate | No | 1 piece | 195°F | 120min | 150min | 1 piece | 195°F | 120min | 150min |
| Beef Burgers | Grill | Yes | 1 piece | 350°F | 8min | 11min | 1 piece | 350°F | 8min | 11min |
| Asparagus | Roast | No | 0.88lbs | 355°F | 10min | 14min | 0.66lbs | 380°F | 12min | 14min |
| Chicken Breasts | Air Fry | Yes | 1.1 lbs | 37min | 39min | 360°F 1.1 | Ibs 37min | 39min | 400°F | |
| Air Fry | No | 1.1 lbs | 360°F | 21min | 22min | 1.1 lbs | 400°F | 21min | 22min | |
| Toast | Toast | No | 4 slices | 360°F | 6min | 10min | 4 slices | 400°F | 6min | 8min |
| Breaded Chicken | Air Fry | Yes | 2 pieces | 13min | 18min | 70°F pieces | 400°F | 15min | 20min | |
| Breaded Fish | Air Fry | Yes | 0.6 lbs | 370°F | 13min | 18min | 0.6 lbs | 400°F | 15min | 20min |
| Breaded Shrimp | Air Fry | Yes | 0.4 lbs | 370°F | 9min | 13min | 0.4 lbs | 400°F | 11min | 15min |
| French Toast Sticks | Toast | Yes | 0.3 lbs | 350°F | 5-9min | 6-10 min | 0.3 lbs | 380°F | 6-10 min | 6-10 min |
| Brussel Sprouts | Air Fry | No | 0.9 lbs | 9-12min | 375°F | 0.9 lbs | 16-24 min | 12-18 min | 16-22 min | |
| Chocolate Chip Cookies | Bake | No | 0.2 lbs | 8-13min | 9-15 min | 0.2 lbs | 350°F | 9-15 min | 9-16 min | |
| Pepperoni Pizza | Bake | Yes | 9 inch | 10min | 30min | 40min | 8min | |||
Hints
• Always place food evenly on the crisper plate and grill tray for best cooking results. • Overlapping food may result in uneven cooking performance. - To increase crispiness, small amounts of oil can be sprayed or brushed onto the food before cooking. - If the air fryer has been paused for more than 10 minutes, it will return to standby mode and clear all the existing settings. - For most foods, turning, shaking, or flipping half-way through cooking will achieve the best cooking results. - Time and Temp can be adjusted at any time during cooking process.

CAUTION
- To avoid the risk of fire, property damage and personal injury, DO NOT spray cooking oil into the cooking cavity.
- Do not place any objects on top of air fryer at any time.
Download the MSmartHome app
Download MSmartHome by scanning the QR code below or searching for MSmartHome on the Apple App Store or Google Play Store.

Register and log in
Open the MSmartHome app, and create a new account to start (you can also register through a third-party account). If you already have an existing account, use the account to log in.

Connect your devices to MSmartHome
① Please make sure your mobile phone is connected to a wireless network. If it is not, go to Settings and enable wireless networks and Bluetooth. ② Please power on your devices. ③ Open MSmartHome app on your phone. ④ If a message of "Smart devices discovered nearby" appears, click to add.

⑤ If no message appears, select "+" on the page and select your device in the list of nearby devices available. If your device is not listed, please add your device manually by the device category and device model.

⑥ Connect your device to the wireless network according to instructions on app. If the connection fails, please follow the instructions provided by the app to continue with the operation.

NOTE
- Make sure your devices are powered on.
- Keep your mobile phone close to your device when you are connecting your device to the network.
- Connect your mobile phone to the wireless network at home, and make sure you know the password of the wireless network.
- Check if your wireless router supports 2.4 GHz band and turn it on. If you are not sure whether the router supports 2.4 GHz band, please contact the router manufacturer.
- The device cannot connect to the wireless network that requires authentication, and it usually appears in public areas such as hotels, restaurants, etc. Please connect to a wireless network that does not require authentication.
- Turn off the WLAN+ (Android) or WLAN Assistant (iOS) function of your mobile phone when connecting your device to the network.
- If your device was previously connected to a wireless network but needs to reconnect, tap the “+” icon on the app's home page and add your device again by selecting the device category and model according to the in-app instructions.
CLEANING AND MAINTENANCE
- Clean the basket, crisper plate, and grill tray after each use. Always unplug the air fryer and allow it to cool to room temperature before cleaning. Never use harsh chemical detergents, scouring pads, or powders on any parts or components.
- Ensure all surfaces are thoroughly dry before use and before storage.
| Cleaning methodPart or accessory | |
| Upper basket | Clean the air fryer basket with a sponge or cloth and warm water and dish soap. then rinse well. Ensure that all grease and food debris are removed.DO NOT immerse the basket in water or any other liquid.DO NOT clean in the dishwasher. |
| Grill tray | Clean the grill tray with a cloth or sponge and warm water with dish soap.The grill tray has non-stick coating. To avoid damage to the non-stick coating, DO NOT use metal cleaning utensils.DO NOT clean in the dishwasher. |
| Crisper plate | Clean the crisper plate with a cloth or sponge and warm water with dish soap.The crisper plate has non-stick coating. To avoid damage to the non-stick coating, DO NOT use metal cleaning utensils.DO NOT clean in the dishwasher. |
| Drip tray | Clean the drip tray with a cloth or sponge and warm water with dish soap.The drip tray has non-stick coating. To avoid damage to the non-stick coating, DO NOT use metal cleaning utensils.DO NOT clean in the dishwasher. |
| Upper basket cavity/ Lower oven cavity | Clean the cooking cavity with a sponge or soft cloth and warm water and dish soap.To remove baked-on grease and food residue from cooking cavity, spray with a mixture of baking soda and vinegar and wipe clean with a damp cloth.For stubborn residue, allow the mixture to sit on the affected area for several minutes before scrubbing clean.Check the heating element for oil spatter and food debris.Clean the heating element with a damp cloth as needed.Ensure the heating element is completely dry before next use.DO NOT clean in the dishwasher. |
| Exterior | Clean with a soft and damp cloth or sponge and wipe dry. |
| Upper basket window/ Lower oven window | Clean the internal and external side of the windows with a cloth or sponge and warm water with dish soap. DO NOT use metal cleaning utensils. |
Any other servicing must be performed by an authorized representative.
WARNING
- Without proper cleaning, food and grease splatter may build up around the heating element. This can cause smoke, fire, and personal injury.
- If you see or smell smoke, press Cancel, unplug the appliance, and allow it to cool. Remove food residue or grease with a soft cloth and dish soap.
TROUBLESHOOTING
Operation of your appliance may lead to errors and malfunctions. The following tables list possible causes and notes for resolving an error message or malfunction. It is recommended to read the tables carefully to save time and money that might otherwise be spent on service center calls.
| Problem Cause Solutions | ||
| Product not working | Power isn't connected | Plug the power cord into a grounded outlet |
| E1/E2 displayed | Temperature sensor open/ Temperature sensor short circuit protection | Re-plug the power cord to the outlet or send to the designated service center for repair |
| OPEN displayed | Frying bucket isn't assembled in place | Pull out the frying bucket and push it back to the machine to assemble it in place |
| The fan does not run | Power isn't connected | Send to the designated service center for repair |
| The motor is damaged or other components are short-circuited | Send to the designated service center for repair | |
| Fan noise | Fan blade deformed | Send to the designated service center for repair |
| Unable to push the fryer into the product smoothly | Fryer edge deformed | Send to the designated service center for repair |
| White smoke | Greasy food is being baked | White smoke will leak when grilling greasy food, which is a normal phenomenon |
| The fryer still has grease residue from the previous bake | Be sure to clean the air fryer after baking each time | |
| Cause SolutionsProblem | ||
| No power | Improper power cord and outlet connection | Check that the power cord is firmly plugged into outlet. If this cannot solve the problem, please contact the Customer Service Center at +1-866-646-4332. |
| Display shows E1 or E2 | The unit is not operating properly | Contact the Customer Service Center at +1-866-646-4332. |
| Cannot activate Sync Finish | Both the upper basket and lower oven have not been programmed | To activate Sync Finish a function must be selected for both cavities. Then, the SYNC FINISH button will appear. If Sync Finish is activated the Sync Finish indicator SYNC FINISH will be lit up. See OPERATION INSTRUCTIONS. |
| Cannot select function | Not using knob | After touching UPPER or LOWER the knob can be rotated to change the function and pushed to select a function. The actual functions cannot be touched for selection. See OPERATION INSTRUCTIONS. |
| Cannot pause single cavity | Sync Finish is activated | While Sync Finish is activated, either START PAUSE button will start, pause, and resume both cavities to ensure that both cavities finish at the same time. If you wish to control each cavity independently, do not use Sync Finish. |
| Food undercooked | The upper basket and lower oven are operating at the same time | Overall, the Two-Zone Air Fryer Oven is faster than cooking two consecutive batches in the same air fryer.However, if the upper basket and lower oven are operating simultaneously, cook times will need to be increased. See COOKING. |
| Food not placed in an even layer | For best cooking performance, place food in an even layer with no overlapping. See COOKING. | |
| Food not crispy | ·Crisper plate not used in upper basket | For the best air frying performance, always use the crisper plate in the upper basket. The crisper plate allows air to flow underneath food and produces the best cooking results. |
| ·Food improperly prepped | For optimal crispiness, spray or brush small amounts of oil onto food before air frying. See COOKING. | |
| Lower oven improperly cooking | ·Grill tray placed in wrong slot | The grill tray can be placed into an upper or lower slot within the lower oven cavity. Ensure that the grill tray is placed in the proper slot before cooking. See COOKING. |
| ·Incorrect cook time or temperature | The lower oven is a unique design. Traditional cook times and temperatures may need to be adjusted for the lower oven. See COOKING. | |
| Difficult to see through windows | ·Improper window cleaning | Clean the interior and exterior of windows after each use. See CLEANING AND MAINTENANCE. |
| ·Light not activated | Before looking through a window, be sure to activate the lights by touching LIGHT. | |
| Difficult to remove or insert upper basket | ·Too much food within basket | Do not pile food too high or the food will contact the top of the upper cavity. This can result in difficulty inserting and removing the upper basket and may cause food to burn. |
| ·Debris on basket exterior or within upper cavity | Remove all debris from the basket exterior and within the upper cavity. See CLEANING AND MAINTENANCE. | |
1 YEAR LIMITED WARRANTY
This is the only express warranty for this product and is in lieu of any other warranty or condition. This product is warranted for one (1) year from the date of original purchase. During this period, your exclusive remedy is repair or replacement of this product or any component found to be defective, at our option; however, you are responsible for all costs associated with returning the product to us and our returning the product or component under this warranty to you. If the product or component is no longer available, we will replace it with a similar one of equal or greater value. This warranty does not cover wear from normal use, and damages to the product resulting from accident, alteration, abuse, or misuse. This warranty extends only to the original consumer purchaser or gift recipient. Keep the original sales receipt. This warranty is void if the product is used for other than single-family household use or subjected to any voltage and waveform other than specified. We exclude all claims for special, incidental, and consequential damages by breach of express or implied warranty. All liability is limited to the amount of the purchase price. Every implied warranty, including any statutory warranty or condition of merchantability, is limited to the duration of this written warranty, unless prohibited by law, in which case such warranty or condition is limited to the duration of this written warranty. Legal rights vary depending on where you live. Some states or provinces do not allow limitations on implied warranties or special, incidental, or consequential damages, so the foregoing limitations may not apply to you. Please note that failure to complete and submit this form does not diminish your warranty.
In the event of a warranty period claim, question, comments or if service is required for this product, please contact us at the following:
customerserviceusa@midea.com
1-866-646-4332
TRADEMARKS, COPYRIGHTS AND LEGAL STATEMENT
Midea logo, word marks, trade name, trade dress and all versions thereof are valuable assets of Midea Group and/or its affiliates (“Midea”), to which Midea owns trademarks, copyrights and other intellectual property rights, and all goodwill derived from using any part of an Midea trademark. Use of Midea trademark for commercial purposes without the prior written consent of Midea may constitute trademark infringement or unfair competition in violation of relevant laws.
This manual is created by Midea and Midea reserves all copyrights thereof. No entity or individual may use, duplicate, modify, distribute in whole or in part this manual, or bundle or sell with other products without the prior written consent of Midea.
All the described functions and instructions were up to date at the time of printing this manual. However, the actual product may vary due to improved functions and designs.
DATA PROTECTION NOTICE
For the provision of the services agreed with the customer,
we agree to comply without restriction with all stipulations of applicable data protection law, in line with agreed countries within which services to the customer will be delivered, as well as, where applicable, the EU General Data Protection Regulation (GDPR).
Generally, our data processing is to fulfil our obligation under contract with you and for product safety reasons, to safeguard your rights in connection with warranty and product registration questions. In some cases, but only if appropriate data protection is ensured, personal data might be transferred to recipients located outside of the European Economic Area.
Further information are provided on request. You can contact our Data Protection Officer via MideaDPO@midea.com. To exercise your rights such as right to object your personal date being processed for direct marketing purposes, please contact us via MideaDPO@midea.com. To find further information, please follow the QR Code.

make yourself at home
- TWO-ZONE AIR FRYER OVEN
- USER MANUAL
- THANK YOU LETTER
- CONTENTS
- IMPORTANT SAFEGUARDS
- INTENDED USE
- EXPLANATION OF SYMBOLS
- DANGER
- WARNING OF ELECTRICAL VOLTAGE
- WARNING
- CAUTION
- ATTENTION
- OBSERVE INSTRUCTIONS
- PLUG & CORD
- SAVE THESE INSTRUCTIONS
- SPECIFICATIONS
- HOW TO FIND THE MODEL NAME AND SERIAL NUMBER
- PRODUCT OVERVIEW
- PARTS AND ACCESSORIES
- NOTE
- OPERATING INSTRUCTIONS
- DISPLAY MESSAGES
- UPPER CAVITY COOKING (BASKET)
- LOWER CAVITY COOKING (OVEN)
- TWO-ZONE CAVITY COOKING (BASKET AND OVEN)
- IS SOMETHING MISSING OR DAMAGED
- COOKING
- HINTS
- DOWNLOAD THE MSMARTHOME APP
- REGISTER AND LOG IN
- CONNECT YOUR DEVICES TO MSMARTHOME
- CLEANING AND MAINTENANCE
- TROUBLESHOOTING
- YEAR LIMITED WARRANTY
- TRADEMARKS, COPYRIGHTS AND LEGAL STATEMENT
- DATA PROTECTION NOTICE
Brand : MIDEA
Model : MAD113MCAF
Category : Deep fryer