
BBQ155.02 - Barbecue TRAEGER - Free user manual and instructions
Find the device manual for free BBQ155.02 TRAEGER in PDF.


| Type of Product | Wood Pellet Grill |
| Brand | Traeger |
| Model | BBQ155.02 |
| Cooking Area | 572 sq in |
| Dimensions (L x W x H) | 48 x 30 x 36 inches |
| Weight | 85 lbs |
| Power Source | 120V AC, 60Hz |
| Temperature Range | 180°F - 450°F |
| Fuel Type | Wood Pellets |
| Hopper Capacity | 18 lbs |
| Ignition Type | Automatic Electric Ignition |
| Temperature Control | Digital Controller with Thermostat |
| Main Cooking Features | Grilling, Smoking, Roasting, Braising, BBQ |
| Construction Material | Heavy-Gauge Steel with Porcelain Enamel Coating |
| Cooking Grates | Porcelain Coated Wire Grates |
| Grease Management | Grease Bucket with Easy-Clean Tray |
| Mobility | All-Terrain Wheels with Locking Casters |
| Cleaning & Maintenance | Remove ash and grease after each use; deep clean every 6 months |
| Safety Features | Automatic Shut-Off, Fusible Link, Temperature Fuse |
| Spare Parts Availability | Auger, Controller, Igniter, Grates, Drip Tray, Pellet Hopper |
| Warranty | 3-Year Limited Warranty |
| Certifications | CSA, CE, UL |
| User Manual Languages | English, Spanish, French |
Frequently Asked Questions - BBQ155.02 TRAEGER
User questions about BBQ155.02 TRAEGER
0 question about this device. Answer the ones you know or ask your own.
Ask a new question about this device
Download the instructions for your Barbecue in PDF format for free! Find your manual BBQ155.02 - TRAEGER and take your electronic device back in hand. On this page are published all the documents necessary for the use of your device. BBQ155.02 by TRAEGER.
USER MANUAL BBQ155.02 TRAEGER
OWNER'S MANUAL
BBQ155.02
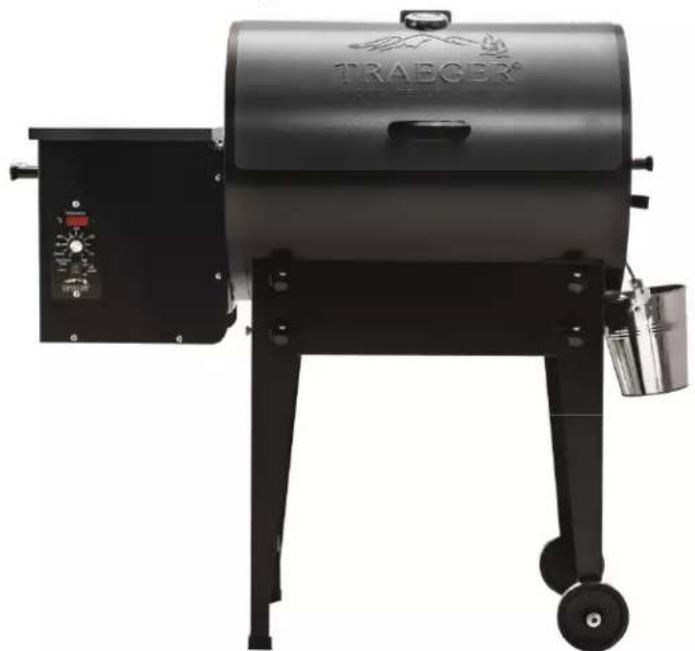
natural_image
Black Tracquer portable grill with visible branding and control panel (no text or symbols on body)RESIDENTIAL PELLET GRILL-SMOKER FOR OUTDOOR USE ONLY!
"TASTE THE DIFFERENCE"
Please read this entire manual before assembly, installation of your Traeger Pellet Grill. Failure to follow these instructions could result in property damage, bodily injury or even death. Contact your local building or fire official about restrictions and installation inspection requirements in your area.
SAVE THESE INSTRUCTIONS
A MAJOR CAUSE OF FIRES IS FAILURE TO MAINTAIN REQUIRED CLEARENCES (AIR SPACES) TO COMBUSTIBLES MATERIALS. IT IS OF UTMOST IMPORTANCE THAT THIS PRODUCT BE INSTALLED ONLY IN ACCORDANCE WITH THESE INSTRUCTIONS.

DANGER! Hazardous voltage is present which can shock, burn or cause death. Disconnect the power cord before servicing the Grill unless otherwise noted in the Owner's Manual.
DANGER! Never use or store flammable liquids near the Grill.
DANGER! Never use gasoline or lighter fluid to manually light your Grill. Use ONLY Alcohol Gel for this procedure AND according to the instructions in the Owner's Manual.
WARNING! When operating this Grill, maintain a MINIMUM distance of 12" from the Grill to combustibles.
WARNING! When operating this Grill under overhead combustibles a MINIMUM of 40 inches is required.

WARNING! Assemble and operate this Grill ONLY per the instructions in this Owner's Manual.
WARNING! This Grill is intended for OUTDOOR USE ONLY.
WARNING! Never use heating fuel pellets in the Grill, due to potential hazardous contaminants and additives that may be present.
WARNING! Use ONLY TRAEGER BRAND BBQ WOOD PELLETS, which are specifically made to work in our Grills. Traeger wood pellets are rated for 8500 BTU per LBS with an ash content of 2%.
CAUTION! Always store wood pellets in a dry location, away from heat-producing appliances and other fuel containers.
CAUTION! Keep the Grill clean – See the cleaning Instructions in this Owner's Manual.
CAUTION! Do not use accessories not specified for use with this Grill.
INTRODUCTION
Congratulations on your purchase of this Traeger Wood Pellet Grill, Model BBQ155.02. With proper set-up, operation and maintenance, the Grill will provide you with delicious food and years of cooking enjoyment.
NOTE: NUMBERS FOLLOWING PART NAMES THROUGHOUT THIS MANUAL REFER TO THE COMPONENT DIAGRAM.
When you un-box the Grill, make sure you have, and can identify all of the following parts:
(1) Bag of Nuts, Washers, and Bolts. These are for mounting the Legs (64, 65, 66, 67), Wheels (69) and Handles (13) to the Grill (1).
(1) Main Body (1)
(4) Legs (64, 65, 66, 67) and Axle Rod (68)
(1) Pellet Hopper/Burner (56)
(1) Porcelain Grill (135) Remove for assembly
(1) Heat Baffle (94). Remove from grill for assembly
(1) Grease Drain Pan (97). Remove from grill for assembly
(1) Grease Bucket (112)
(2) Wheels (69)
You will need to complete the assembly which includes:
1) Mounting the Legs (64, 65, 66, 67) onto the Grill Body (1)
2) Mounting the Axle Rod (68) and Wheels (69) to the Wheel Legs (66, 67)
3) Mounting the Pellet Hopper (56) onto the Grill Body (1)
4) Mounting Handles (13) to Door (9) and to right end of Grill (1). Do not over tighten. Damage to the handles could result.
5) Positioning the Heat Baffle (94) over the Firepot (10), and setting the Grease Drain Pan (97) in place.
6) Hanging the Grease Bucket (112) on the Bucket Hook located below the Grease Drain Tube opening on the right side of the Grill (1).
Follow these step by step instructions and you'll be cooking in no time!
TOOLS SUPPLIED FOR ASSEMBLY
3/8" / 1/2" combo wrench
7/16" / 1/2" combo wrench
Record your date of purchase here: ____
Record your serial number here: ____
SECTION ONE: ASSEMBLY INSTRUCTIONS
MOUNTING LEGS AND WHEELS:
- Insert Leg Left Front (64) onto Grill Frame Assembly (1) so the holes align and insert 2 each 1/4-20 x knob screws (72) into front hole. Insert 1 each 1/4-20 knurled screw (75) onto the side.
- Insert Leg Left Rear (65) onto Grill Frame Assembly (1) so the holes align and insert 2 each 1/4-20 x knob screws (72) into back hole. Insert 1 each 1/4-20 knurled screw (75) onto the side.
- Insert Leg Right Front (67) onto Grill Frame Assembly (1) so the holes align and insert 2 each 1/4-20 x knob screws (72) into front hole. Insert 1 each 1/4-20 knurled screw (75) onto the side.
- Insert Leg Right Rear (66) onto Grill Frame Assembly (1) so the holes align and insert 2 each 1/4-20 x knob screws (72) into back hole. Insert 1 each 1/4-20 knurled screw (75) onto the side.
- Insert Axle rod (68) into holes provided on both right legs (66, 67). Insert Wheel (69) onto Axle (68) then insert Washer (70) and Nut (71) onto Axle and tighten. Repeat the process on the other side of the Axle (68).
- Stand the grill up on its legs and then tighten the leg bolts. Do not over tighten the Screws.

MOUNTING PELLET HOPPER/BURNER:
NOTE: DO NOT remove the white, square Burner Gasket from the Hopper/Burner (56).
-
Locate the RTD plug-in connector coming from the mounted RTD inside the grill frame. Connect this with the mating connector located on the outside of the hopper burner assembly.
-
Remove the four hex bolts (62) and washer (63) from the hopper assembly (56). These will be used to mount the hopper to the grill Frame.
-
Slide the Hopper/Burner (56) square tube into the square opening located on the left side of the Grill Frame (1). Gently push the Hopper/Burner (56) into the Grill Frame (1) until the Hopper/Burner (56) is snug against the end of the Grill Frame (1).
-
Align the bolt holes in the Grill Frame (1) with the Nutzerts in the Hopper/Burner (56).
-
Install a Flat Washer (63) on each of the four Hex Head Bolts (62). From the inside of the Grill Frame (1) install these Bolts (62) with Washers (63) into the Hopper/Burner (56) Nutzerts. Tighten all four Bolts – DO NOT OVER TIGHTEN THE BOLTS.

INSTALLING DOOR HANDLE TO DOOR:
Insert handle (13) onto the two slots located in the Door (9).
Install Washer (16) and Nut (17) onto the Handle (13) bolt from inside the Door (9) and tighten the nut (17). Repeat the process on the other side.
CAUTION: Do not over tighten the nuts.

INSTALLING THE HEAT BAFFLE
Insert the Heat Baffle (94) onto the inside of the Grill Frame Assembly (1) and place onto the gap in the burner box and centered side to side over the firepot (10).
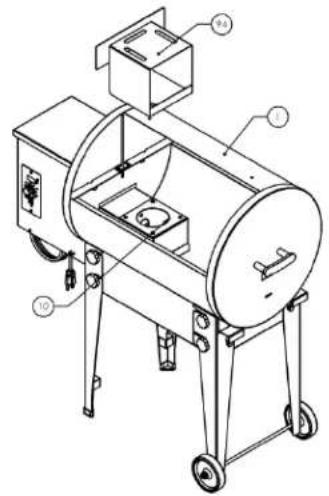

INSTALL GREASE DRAIN PAN:
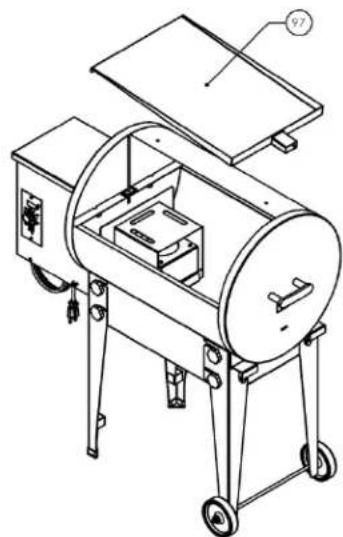
RECOMMENDATION for ease of clean-up: Line the Grease Drain Pan (97) with heavy-duty aluminum foil. Be sure the edges and ends of the foil are tight against the bottom of the Grease Drain Pan (97).
- Insert grease drain pan (97) onto the inside of the Grill Frame Body (1) and insert the tube into the hole provided on the right side of the Grill Frame Body (1). Then insert the Flange of the Grease Drain Pan (97) onto the flange on the Heat Baffle (94)

natural_image
Technical line drawing of a portable stove or mower unit with wheels and internal components (no text or symbols)POSITIONING THE PORCELAIN GRILL:
- Insert Porcelain Grill (135) into Grill Frame (1) and rest on angles centered front to back and side to side.

natural_image
Technical line drawing of a portable stove with a metal grate and wheels (no text or symbols)HANGING GREASE BUCKET
The Grease Bucket (112) hangs on the Bucket Hook located below the Grease Drain Tube opening on the right side of the Grill Frame (1).

SECTION TWO: INITIAL FIRING INSTRUCTIONS
(To be used on initial firing or anytime the Grill runs out of Pellets) In order to ensure proper operation of the Grill, you must first allow the Auger Tube to be “charged” with Pellets.
1) Open the Door and remove the Porcelain Grills, Grease Drain Pan and Heat Baffle from inside the Grill.
2) Make sure the Switch is in the OFF (o) position. Plug the Power Cord into an appropriate, grounded electrical outlet.
3) Open the Pellet Hopper Lid and locate the Auger. Make sure there are no foreign objects in the Auger. Turn the Switch ON (--) and the Temperature/dial to smoke look into the Pellet Hopper to confirm the Auger is turning. At the same time, place your fingers over the Firepot and feel the air movement from the Draft Inducer Fan. Look to see if the Hot Rod is getting hot (it will start to turn red). CAUTION! Do not touch it. Turn the Temperature/dial to SHUT DOWN CYCLE.
4) Fill the Pellet Hopper with TRAEGER BBQ PELLETS. WARNING! Use only TRAEGER BRAND BBQ PELLETS, which are specifically made to work in our Grills. Never use heating fuel pellets in the Grill. Turn the Temperature/Dial to HIGH. Note: During the initial charging of the Auger, it will take time for the Pellets to travel from the Pellet Hopper to the Firepot. When the Pellets begin to fall into the Firepot, turn the Temperature/Dial to Shut Down Cycle.
5) Set the Temperature/Dial to SMOKE. Let the Pellets come to full flame. Once you see flames come out of the Firepot, turn the Temperature/Dial to SHUT DOWN CYCLE, and let the Grill cool down.
Recommendation: For ease of clean-up, line the Grease Drain Pan with heavy-duty aluminum foil. Be sure the edges and ends of the foil are tight against the bottom of the Grease Drain Pan. Position the Heat Baffle, The foil lined Grease Drain Pan and Porcelain Grills in their proper locations.
6) With the Door open set the Temperature/Dial to SMOKE. In approximately 2 minutes you will notice whitish-gray smoke coming out of the Grill as the Pellets ignite. After assuring the Pellets have ignited, close the Door and set the Temperature/Dial to any cooking setting desired.
7) Note: Before cooking the first batch of food in your new Grill, you will need to season the Grill. Turn the Temperature/Dial to HIGH and run for 45 minutes at this setting with the Door closed. This must be done before cooking any food on the Grill.
8) The Grill should be allowed to preheat for approximately 10 minutes with the Door closed before placing food in the grill.
ALWAYS START THE GRILL ON SMOKE SETTING WITH THE DOOR OPEN
Once the Pellets are ignited, close the Door and set the Temperature Dial to any cooking temperature desired.
NOTE: When operating this Grill, maintain a minimum clearance of 12 inches from Grill to combustibles
SECTION THREE: SUBSEQUENT START-UP
With the Door open, turn the Switch ON (--) and the Temperature/Dial to SMOKE. In approximately 2 minutes you will notice whitish-gray smoke coming out of the Grill as the Pellets ignite. After assuring the Pellets have ignited, close the Door and set the Temperature/Dial to any cooking setting desired. The Grill should be allowed to pre-heat for approximately 10 minutes with the Door closed before placing food in the Grill.
WARNING! If at any time, the Grill fails to light or the fire in the Firepot goes out while cooking or smoking, when sufficient pellets are still in the Pellet Hopper, it is important to follow these steps. Failure to do so may cause a hazardous “over-firing” of your grill due to an excess of unburned pellets in the Firepot.
1) DANGER! Turn the Switch OFF (o) and disconnect the Power Cord. If the Grill is still hot, allow it to thoroughly cool. Open the Door and remove all food, the Porcelain Grills, Grease Drain Pan and the Heat Baffle.
2) WARNING! Remove all unburned pellets and ash from inside and around the Firepot. (See instructions for proper handling and disposal of ash in Section Five)
3) Before replacing the Heat Baffle, Grease Drain Pan and the Porcelain Grills, plug the power Cord into an appropriate, grounded electrical outlet and restart the Grill. Pellets should fall into the Firepot and the Hot Rod should begin to heat (it will start to turn red). CAUTION! Do not touch it.
4) If this procedure is successful, you will soon see flames come out of the Firepot. Then turn the Switch OFF (o), and let the Grill cool down. Position the Heat Baffle, the Grease Drain Pan and Porcelain Grill in their proper locations. With the Door open, turn the Switch ON (--) and the Temperature/Dial to SMOKE. In approximately 2 minutes you will notice whitish-gray smoke coming out of the Grill as the Pellets ignite. After assuring the Pellets have ignited, close the Door and set the temperature/Dial to any cooking setting desired.
5) If this procedure is not successful, see Section Six: FREQUENTLY ASKED QUESTIONS for troubleshooting tips or contact Traeger Technical Support (Section Seven) to help diagnose the problem before proceeding to the MANUAL LIGHTING INSTRUCTIONS below.
MANUAL LIGHTING INSTRUCTIONS:
If the Hot Rod only is not operating, the Grill can still be used to cook and smoke using the MANUAL LIGHTING PROCEDURE below:
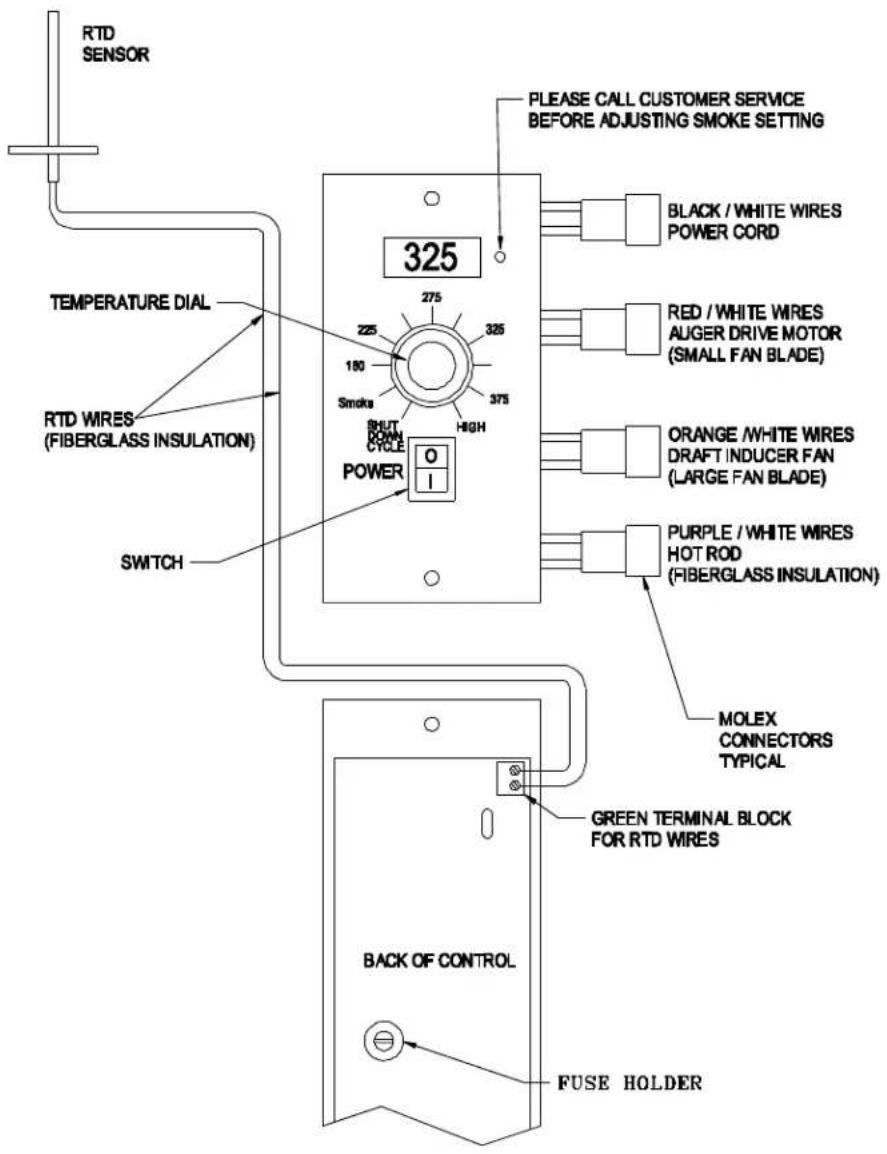
1) DANGER! Turn the Switch OFF (o) and disconnect the Power Cord. Allow the Grill to thoroughly cool if it is still hot. From beneath the Pellet Hopper, disconnect the Hot Rod (Purple / White wire pair as shown in the wiring diagram near the end of this manual). You will need to remove the Hopper Bottom Panel to access the wiring. Once the Hot Rod is disconnected, replace the Hopper Bottom Panel and plug the Power Cord back into an appropriate, grounded electrical outlet.
2) Open the Pellet Hopper and fill with TRAEGER BBQ PELLETS.
WARNING! USE ONLY TRAEGER BRAND BBQ WOOD PELLETS, which are specifically made to work in our Grills. NEVER use heating fuel pellets in the Grill due to potential hazardous contaminants and additives that may be present.
3) Remove the Porcelain Grills, Grease Drain Pan and Heat Baffle to expose the Firepot In the bottom of the Grill.
4) Pour 1/2 cup of TRAEGER BBQ PELLETS into the Firepot.
5) Squirt 2 tablespoons of Alcohol Gel fire lighter into the Firepot on top of the Pellets.
DANGER! Never use gasoline, gasoline-type lantern fuel, kerosene, charcoal lighter fluid or similar liquids to start or "freshen up" a fire in this Grill. Keep all such liquids well away from the Grill when in use.
6) Carefully light the Alcohol Gel with a fireplace match or a long-reach butane lighter.
DANGER! Never squirt Alcohol Gel into a burning fire or a hot Firepot. The Alcohol Gel bottle could explode and cause a fire, serious injury or death.
7) Let the Alcohol Gel and Pellets burn for approximately 4 minutes.
8) After assuring the Pellets have ignited, install the Heat Baffle, Grease Drain Pan and Porcelain Grills back in place.
CAUTION! You will now have a fire in the Firepot. Be careful not to burn yourself when you install these components. Gloves are recommended.
9) Turn the Switch ON (--) and the Temperature/Dial to any setting desired. With the Door closed, let the Grill pre-heat for approximately 10 minutes before placing food in the Grill.
Control Shutdown cycle
The control for this barbecue comes with an automatic shut down cycle. When finished cooking on your barbecue set the Temperature/Dial Knob to the Shutdown Cycle position, this will leave the Draft Induction Fan running for ten minutes to burn any excess pellets in the fire pot. After the fan runs for ten minutes the controller will power off and the fan and it will stop running. CAUTION! The main power switch will shut the power off to the controller and the Temperature/Dial Knob switch will cut off power to the grill components only. When servicing the controller or any parts ensure that the power supply is disconnected to avoid a shock hazard.
Control Safety Features
The controller comes equipped with 2 safety features that will help you to keep the grill operating correctly. The first of these is a low temperature alarm. If the grill stays below 125 degrees as read by the RTD temperature sensing device for a period of 10 minutes the control will go into an alarm state and the display will read “LEr”. This will shut off all power to the internal components of the grill. The display will stay in this state until you turn off the main power switch.
The second safety feature will be a high temperature alarm. If the grill obtains an internal temperature reading of 550 degrees as read by the RTD temperature sensing device the control will go into alarm state and the display will read "HEr". This will turn off all power to the internal components of the grill. The display will stay in this state until you turn off the main power switch.
Whenever either of these alarm conditions occurs you should check to see what caused this condition and fix the problem. Call customer service if you need help.
SECTION FOUR: OPERATING TIPS
1) The Temperature Dial can be changed at any time to increase or decrease the cooking temperature of the Grill. The HIGH/HIGHER temperature settings are for Grilling. The MEDIUM/MID RANGE temperature settings are for Slow Cooking. The SMOKE setting is for Smoking and adding Smoke Flavor to foods being cooked. The SMOKE setting can also be used to "hold" foods at approximately 180 to 200 degrees F.
2) WARNING! Your Traeger Pellet Grill should never be moved while it is hot. If you are transporting your Grill in a vehicle after cooking on it, make sure the fire is completely out and the Grill is cold before placing it in any vehicle. Never put water into the Firepot. It will jam the Auger.
3) Your Traeger Pellet Grill is designed to operate with the Door closed. Cooking with the Door open greatly lengthens your cooking time.
4) DANGER! Never add pellets by hand to a hot Firepot. This is dangerous and you may be seriously burned. If you run out of pellets and lose your fire while cooking, let the Grill completely cool and start again with the INITIAL FIRING INSTRUCTIONS.
5) CAUTION! Make sure the Heat Baffle is properly seated on its locating brackets. The long lips of the Heat Baffle should be pointing down over the Firepot. If not seated properly, direct heat and flame could come up out of the Firepot and cause a grease fire in the Grill.
6) When estimating cooking times, the outside temperature will be an important factor. If it is hot outside, it will take less time for food to cook. If it is cold, wet or windy, it will take longer.
7) Digital Thermostat Control Functions:
After selecting your cooking temperature (with the exception of "SMOKE") the Auger will operate continuously until the selected temperature is reached. From that point forward, the Digital Control will cycle the Auger off and on to maintain the selected temperature until the Temperature/Dial is changed. When operating in "Smoke" mode, the Auger will cycle on for 15 seconds and off for 65 seconds. There is no temperature control with the "Smoke" setting. This timed cycle setting for "Smoke" is a factory pre-set recommended by Traeger Pellet Grills to develop a "Smoking" temperature of 150 to 180 degrees F.
However you can change this timed cycle to suit your particular needs. Refer to the Wiring Diagram found near the end of this manual and locate the Smoke Adjustment. It is a switch inside a small hole on the face of the Digital Control to the right of the Readout. While the Digital Control is on, use a very small screwdriver or other pointed object (a bent paper clip works well) to gently depress the switch. When you depress the switch, the Readout will change from a temperature to "P" followed by a number. The factory pre-set mentioned earlier is P-2. The setting range is from P-0 to P-5. The "P" readout will change each time you depress the switch. With all "P" settings, the Auger on time remains constant at 15 seconds while the off time is influenced by the "P" setting. For example: A P-3 setting will result in an Auger on time of 15 seconds and an Auger off time of 75 seconds, an increase in the off time of 10 seconds from the P-2 setting. Each change in the "P" number -up or down- results in an increase or decrease of 10 seconds for the Auger off time. Increasing the number decreases Smoking Temperature. Decreasing the number increases Smoking Temperature. The Traeger Service Department recommends a setting no higher than P-4. Also, if you do make a Smoke Adjustment, the temperature on the Readout should be monitored. If the temperature is consistently below 160 degrees F. while "Smoking", decrease the "P" setting because there is a risk of losing the fire in the Firepot.
WARNING! If the fire in the Firepot goes out while smoking, when sufficient Pellets are still in the Pellet Hopper, it is important to follow these steps. Failure to do so may cause a hazardous “over-firing” of your grill due to an excess of unburned pellets in the Firepot. You may need to decrease the “P” setting to prevent your fire from going out in the “Smoke” mode.
a) DANGER! Turn the Switch OFF (o) and disconnect the Power Cord. Allow the Grill to thoroughly cool if it is still hot. Open the Door and remove all food, the Porcelain Grills, Grease Drain Pan and the Heat Baffle.
b) WARNING! Remove all unburned pellets and ash from inside and around the Firepot.
(See instructions for proper handling and disposal of ash in Section Five)
c) Before replacing the Heat Baffle, Grease Drain Pan and the Porcelain Grills, plug the Power Cord into an appropriate, grounded electrical outlet and turn the Switch ON (--). Pellets should fall into the Firepot and the Hot Rod should begin to heat (it will start to turn red). CAUTION! Do not touch it.
d) You will soon see flames come out of the Firepot. Then turn the Switch OFF (o), and let the Grill cool down. Position the Heat Baffle, the Grease Drain Pan and Porcelain Grills in their proper locations. With the Door open, turn the Switch ON (--) and the
Temperature/Dial to SMOKE. In approximately 2 minutes you will notice whitish-gray smoke coming out of the Grill as the Pellets ignite. After assuring the Pellets have ignited, close the Door and set the Temperature/Dial to any cooking setting desired.
8) CARBON MONOXIDE:
WARNING! Follow these guidelines to prevent this colorless, odorless gas from poisoning you, your family or others.
- Know the symptoms of carbon monoxide poisoning: headache, dizziness, weakness, nausea, vomiting, sleepiness and confusion. Carbon monoxide reduces the blood's ability to carry oxygen. Low blood oxygen levels can result in loss of consciousness and death.
- See a doctor if you or others develop cold or flu-like symptoms while cooking or in the vicinity of this Grill. Carbon monoxide poisoning, which can easily be mistaken for a cold or flu, is often detected too late.
- Alcohol consumption and drug use increase the effects of carbon monoxide poisoning. Carbon monoxide is especially toxic to mother and child during pregnancy, infants, the elderly, smokers and people with blood or circulatory problems, such as anemia or heart disease.
9) CAUTION! Grease fires are caused by not properly maintaining the Grill by failing to clean your Grease Drain Pan, V-shaped Grease Drain and Grease Drain Tube on a consistent basis. (See Section Five for maintenance instructions) In the unlikely event of a grease fire while cooking, turn the Switch OFF (o) and Keep the Door closed until the fire is completely out. Never keep the Door open during a grease fire. If it does not go out, lightly sprinkle baking soda on the fire. CAUTION! Be careful not to burn yourself. If this does not work then carefully remove the food from the Grill and keep the Door closed until the fire is completely out. Again, be careful not to burn yourself. When the Grill is completely cool, remove the Porcelain Grills and replace the foil on the Grease Drain Pan. Clean any grease accumulation from the V-shaped Grease Drain and the Grease Drain Tube. Replace the Grease Drain Pan and the Porcelain Grills in their proper positions, restart the Grill and resume cooking.
SECTION FIVE: MAINTAINING YOUR NEW GRILL
1) CREOSOTE AND GREASE: Formation and need for removal.
When wood pellets are burned slowly, they produce tar and other organic vapors that combine with expelled moisture to form creosote. The creosote vapors condense in the relatively cool flue exhaust of a slow burning fire. As a result, creosote accumulates on the flue lining. When ignited, creosote makes an extremely hot fire. Airborne grease particles will travel through the cooking chamber and some of this airborne grease will accumulate on the flue lining, similar to the creosote, which could be contributory to a fire.
The flue exhaust should be inspected at least twice a year to determine when a creosote and/or grease buildup has occurred.
Also, grease drippings from the food will fall onto the Grease Drain Pan and be channeled into the Grease Drain and then out of the Grill through the Grease Drain Tube, to be collected in the Grease Bucket. Grease will accumulate in all of these locations.
The Grease Drain, the Grease Drain Tube and the Grease Bucket should be inspected at least twice a year for signs of grease buildup.
When creosote or grease has accumulated, it should be removed to reduce the risk of fire.
Cleaning Grease from your Grill:
DANGER! Turn the Switch OFF (o) and disconnect the Power Cord.
CAUTION! Accumulated grease is easier to clean off when the Grill is still warm –not hot.
Be careful not to burn yourself. Gloves are recommended.
Periodically, clean the grease out of the Drain Pan Assembly and Grease Drain Tube. If too much grease is allowed to build up in the Grease Drain Tube, or is allowed to plug the Grease Drain Tube, a grease fire could result. We recommend cleaning these locations regularly.
Remove the Porcelain Grills and the Grease Drain Pan and the Heat Baffle. Wipe up any remaining grease residue inside the Grill Frame with paper towels or disposable rags. Paper towels or disposable rags can also be used to wipe some of the grease off of the interior surfaces of the Grill.
Line your Grease Bucket with aluminum foil for easy clean-up. Empty it occasionally, depending on amount of use. Change the aluminum foil on the Grease Drain Pan frequently (sometimes, after each use, depending upon what was cooked). Clean foil on the Grease Drain Pan will make your food taste better and reduce the risk of a grease fire.
2) Cleaning outside surfaces:
DANGER! Turn the Switch OFF (o) and disconnect the Power Cord.
Use a disposable rag or cloth, dampened with warm soapy water to wipe the grease from the outside of the Grill. DO NOT use oven cleaner, abrasive cleansers or abrasive cleaning pads on the outside Grill surfaces.
3) Outside Storage:
CAUTION! If the Grill is stored outside during the rainy season, care should be taken to ensure that water does not get into the Pellet Hopper. Wood pellets, when wet, expand greatly and will jam your Auger. A Traeger Grill Cover to protect the Grill is highly recommended! Covers are available from your Traeger Dealer, or log on to our Web Site – www.traegergrills.com.
4) Cleaning the Porcelain Grills:
CAUTION! The cleaning of the Porcelain Grills works best while they are still warm. Be careful not to burn yourself. We recommend keeping a long-handled cleaning brush near the Grill. After removing your food, give the Porcelain Grill a quick brushing. It takes only a minute and it will be ready the next time you want to use the Grill.
5) Cleaning the ash from inside and around the Firepot:
DANGER! Turn the Switch OFF (o) and disconnect the Power Cord.
WARNING! Make sure that the Grill is COLD before cleaning the ash.
WARNING! Disposal of ashes should be done only per the following instructions.
Excess ash in the Firepot may cause your fire to go out, especially in the "SMOKE" setting.
The Firepot should be inspected occasionally, and cleaned to remove the ash buildup.
Again, cleaning the ash from in and around the Firepot should be done only when the Grill is COLD.
Remove the Porcelain Grills, Grease Drain Pan and Heat Baffle to provide access to the Firepot and the interior of the Grill. Much of the ash outside of the Firepot can be swept to the open area at the right of the Firepot using a small whisk broom. It can be removed from the Grill with a small metal fireplace shovel or other similar tool. Dispose of the ashes per the following instructions.
WARNING! A vacuum cleaner is the best way to remove ashes from the Firepot but this must be done with extreme care to avoid the risk of fire. Again, cleaning the ash from the Firepot should be done only when the Grill is COLD.
A utility-type vacuum cleaner, having a metal collection canister without a bag would be best for this task. However, almost any vacuum cleaner will work safely if this procedure is properly followed.
After assuring that the ash in the Firepot is COLD, vacuum the ash from the inside of the Firepot.
A) If your vacuum cleaner is a bagless model, empty any previously accumulated debris from the collection chamber. Then vacuum the ash from the inside of the Firepot. Once the Firepot is clean, empty the collection chamber into the metal container described below without delay. Make sure that there is no remaining ash residue left in the collection chamber
B) If your vacuum cleaner is a model that uses a disposable bag, install an unused one in the machine. Then vacuum the ash from the inside of the Firepot. Once the Firepot is clean, remove the bag from the vacuum cleaner and place it in the metal container described below without delay.
DISPOSAL OF ASHES:
WARNING! Ashes should be placed in a metal container with a tight-fitting lid. The closed container of ashes should be placed on a non-combustible floor or on the ground, well away from all combustible materials, pending final disposal. When the ashes are disposed of by burial in soil or otherwise locally dispersed, they should be retained in the closed container until all cinders have thoroughly cooled.
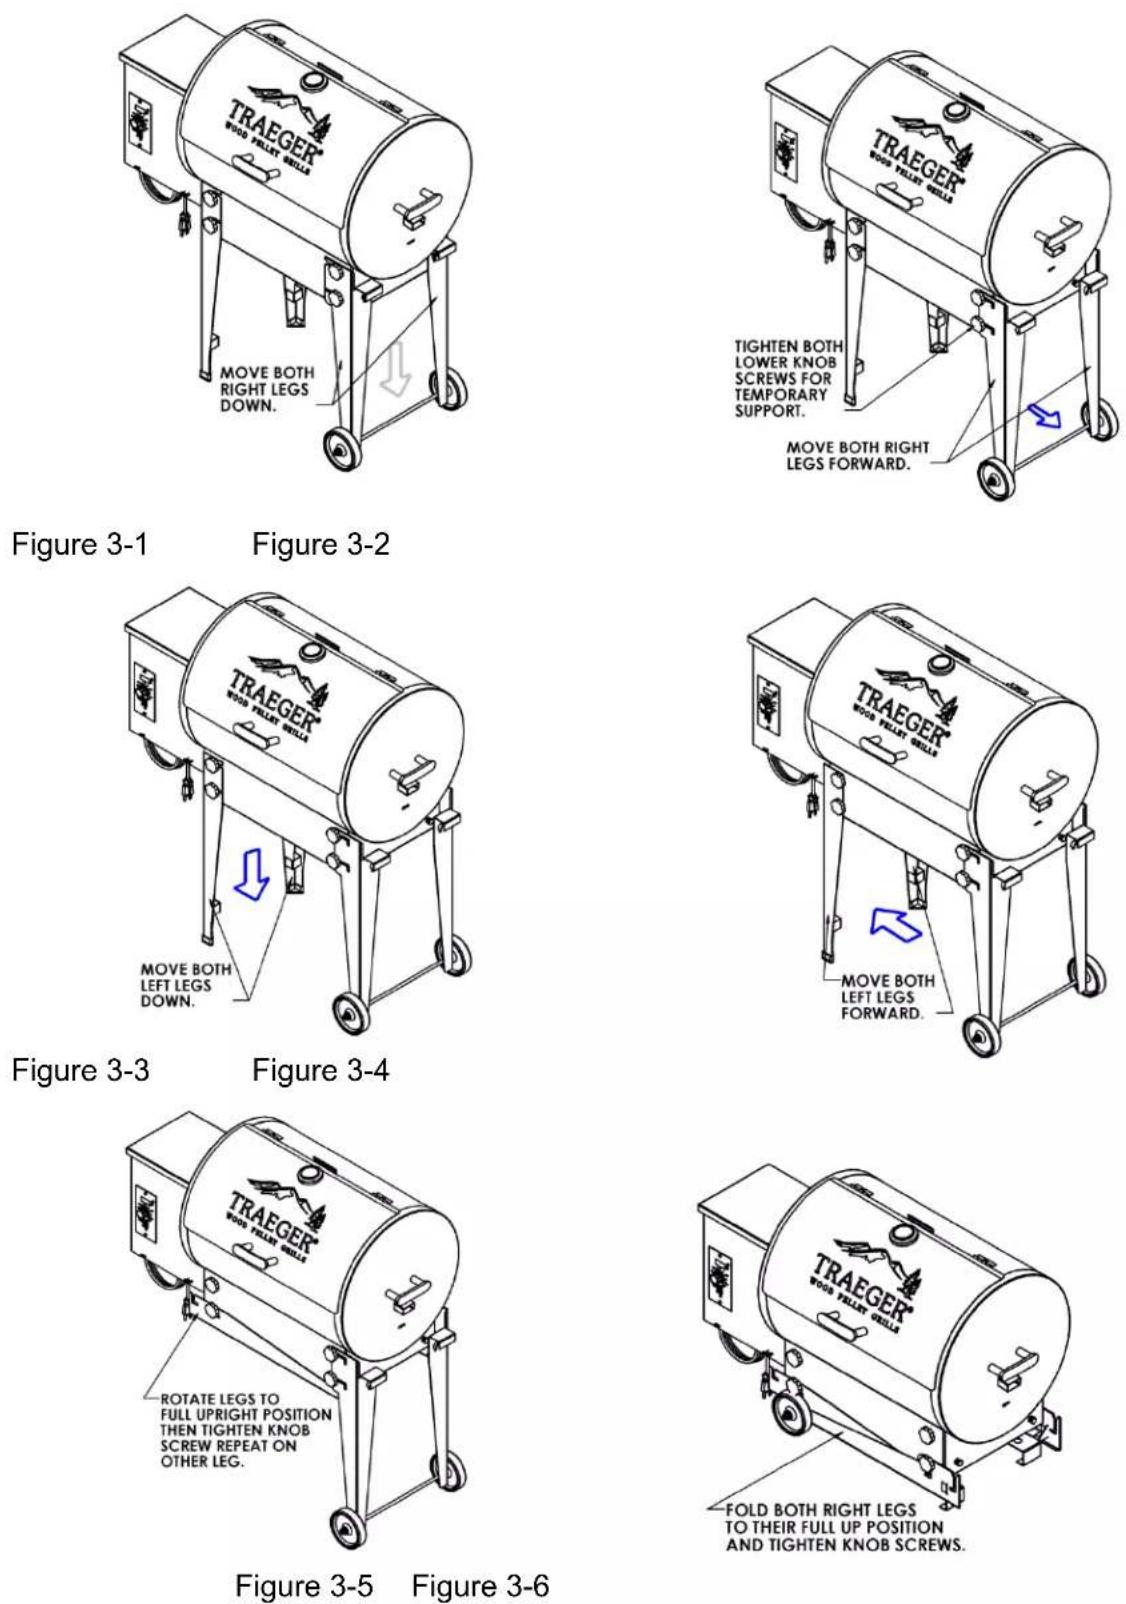
Folding legs
The legs on the BBQ155.02 can be folded down for storage and for easier transport. WARNING! Do not cook on a flammable surface with the legs folded down. The BBQ155.02 maximum temperature can make surfaces discolor or warp because of heat transfer on the bottom of the grill.
Folding the Legs Down:
We recommend that you remove the Porcelain grill, Drain pan, and the heat baffle to avoid scratching the interior of the grill during the leg folding process. Here are the steps to fold down the legs:
- Loosen all the knurled and knob screws for all 4 legs.
- Lift the right side of the grill removing the weight on the right legs. Pull the right front leg down until it stops then pull to the leg to the right until it stops. Do the same on the back right leg. Then temporarily tighten the lower knob screw on both right legs to secure the leg from moving. Set the grill back down on the ground. (See Figure 3-1 and 3-2)
- Lift up the left side of the grill by the handle on the hopper. Pull the front leg down until it stops (See figure 3-3) then pull the front leg to the left until it stops. (See figure 3-4) Then pivot the front leg until the leg comes into contact with the bottom of the skirt. Then tighten the bolts so they do not fall out. (See figure 3-5) Repeat the process on the back left leg. Set the grill down on the ground onto the hopper edge.
-
Lift the right side of the grill removing weight off the legs. Then loosen the lower knob screw on both right back and front legs. Then pivot the front right leg until it comes in contact with the folded down legs. Then tighten the knob screw to secure. Then fold up the back right leg until it comes in contact with the folded down legs. (See figure 3-6) Then tighten the thumb screw to secure. Then tighten the entire remaining knob and knurled screws so they will not come out.
-
Reverse the process to fold up the legs.
SECTION SIX: FREQUENTLY ASKED QUESTIONS
1) Verify power at the electrical outlet.
a) If Power Cord is connected to a GFI (Ground Fault Interrupter), check and reset if necessary.
b) Initiate startup.
Still no ignition – Proceed to step 2.
2) DANGER! Turn the Switch OFF (o) and disconnect the Power Cord.
a) Remove the Control and check the fuse on back. Replace the fuse if blown. Reinstall the Control!
b) Unplug Hot Rod connector (Purple/White wire pair), plug Power Cord into an appropriate, grounded electrical outlet and turn the Switch ON (--). NOTE: At this point the Grill will not ignite.
c) Check the Draft Inducer Fan and the Auger Drive Motor for operation. If both are operating -- the Hot Rod needs to be replaced. If one or both are not operating, contact Traeger Technical Support (Section Seven) for additional troubleshooting help. Contact your Traeger Dealer or the Traeger Parts Department (Section Seven) to place an order.
3) If the problem is identified to be a failed Hot Rod, the Grill can still be used to cook and smoke by following the MANUAL LIGHTING INSTRUCTIONS in Section Three of this OWNER'S MANUAL.
WHY ARE NO PELLETS BEING DELIVERED INTO THE FIREPOT?
1) Verify that there are Pellets in the Pellet Hopper. If this is the INITIAL FIRING or the Grill has run out of Pellets, allow sufficient time for the Pellets to travel from the Pellet Hopper to the Firepot (can take up to 7 minutes).
2) Initiate startup. See INITIAL FIRING INSTRUCTIONS in Section Two of this OWNER'S MANUAL.
Still no Pellets in the Firepot – Proceed to step 3.
3) DANGER! Turn the Switch OFF (o) and disconnect the Power Cord.
a) Unplug the Auger Drive Motor (Red/White wire pair connector) and the Draft Inducer Fan (Orange/White wire pair connector).
b) Reconnect the Draft Inducer Fan to the Red/White wire pair and the Auger Drive Motor to the Orange/White pair.
c) Plug the Power Cord into an appropriate, grounded electrical outlet and turn the Switch ON (--).
d) If the Auger Drive Motor is operating (check the small fan blade on the back of the motor), the problem is in the Three Speed or Digital Control, which will need to be replaced. Contact your Traeger Dealer or the Traeger Parts Department (Section Seven) to place an order.
4) If the Auger Drive Motor is not operating but the Draft Inducer Fan is operating, the problem is in the Auger system, which will need to be checked.
a) With the Switch OFF (o), locate the small fan blade on the back of the Auger Drive Motor.
b) CAUTION! While watching the fan blade, turn the Switch ON (--). If the fan blade does not turn, turn the Switch OFF (o). This indicates a defective Auger Drive Motor and it will
need to be replaced. Contact your Traeger Dealer or the Traeger Parts Department (Section Seven) to place an order.
c) If the fan blade turns a bit and then stops, continue watching and turn the Switch OFF (o). If the fan blade UNWINDS slightly, this indicates a jam in the Auger system which will need to be cleared.
d) DANGER! Turn the Switch OFF (o) and disconnect the Power Cord. Remove the Pellets from the Pellet Hopper. Check for foreign objects and wet or decomposed Pellets, both of which can cause a jam in the Auger system. The Auger will need to be removed to clear a jam in the Auger system. See "HOW DO I REMOVE THE AUGER IF IT JAMS?" section below.
HOW DO I REMOVE THE AUGER IF IT JAMS?
1) DANGER! Turn the Switch OFF (o) and disconnect the Power Cord.
2) CAUTION! If the Grill is still hot, allow it to thoroughly cool.
3) Remove any covers necessary to access the Auger Drive Motor.
4) Remove the screw connecting the Auger Drive Motor shaft to the Auger shaft and the screw retaining the Auger Bushing into the Auger Tube.
5) With a small pipe wrench or locking pliers on the Auger shaft, turn the Auger counter clockwise. It will turn hard until it breaks free, then the Auger will turn freely.
6) Remove the Auger and clean all Pellets, ash or foreign objects from the Auger, Auger Tube and Firepot. (See instructions for proper handling and disposal of ash in Section Five)
7) Sand the outside surfaces of the auger with medium grit sandpaper. Check the inside of the Auger Tube and sand it if needed. Vacuum the sanding grit out of the Auger Tube and Firepot when finished. Check that the Auger rotates freely.
9) Re-attach the Auger shaft to the Auger Drive Motor shaft.
WHY DOES MY GRILL FIRE GO OUT ON "SMOKE" SETTING?
The "P" number for the Smoke Adjustment on the Digital Control may be set too high.
Review the Digital Thermostat Control Functions in Section Four: Operating Tips to make an adjustment.
There may be excess ash in the Firepot which needs to be cleaned.
WARNING! If the fire in the Firepot goes out while smoking, when sufficient Pellets are still in the Pellet Hopper, it is important to follow these steps. Failure to do so may cause a hazardous “over-firing” of your grill due to an excess of unburned pellets in the Firepot.
a) DANGER! Turn the Switch OFF (o) and disconnect the Power Cord. If the Grill is still hot, allow it to thoroughly cool. Open the Door and remove all food, the Porcelain Grills, Grease Drain Pan and the Heat Baffle.
b) WARNING! Remove all unburned pellets and ash from inside and around the Firepot. (See instructions for proper handling and disposal of ash in Section Five)
c) Before replacing the Heat Baffle, Grease Drain Pan and the Porcelain Grills, plug the Power Cord into an appropriate, grounded electrical outlet and turn the Switch ON (--). Pellets should fall into the Firepot and the Hot Rod should begin to heat (it will start to turn red). CAUTION! Do not touch it.
d) If this procedure is successful, you will soon see flames come out of the Firepot. Then turn the Switch OFF (o), and let the Grill cool down. Position the Heat Baffle, the Grease
Drain Pan and Porcelain Grills in their proper locations. With the Door open, turn the Switch ON (--) and the Temperature/Dial to SMOKE. In approximately 2 minutes you will notice whitish-gray smoke coming out of the Grill as the Pellets ignite. After assuring the Pellets have ignited, close the Door and set the Temperature/Dial to any cooking setting desired. e) If this didn't remedy the problem, contact Traeger Technical Support (Section Seven) for additional troubleshooting help.
WITH THE TRAEGER DIGITAL CONTROL, WHAT DIAL SETTING IS RECOMMENDED FOR STARTING THE GRILL?
The auto-start procedure is the same for all Grill Controls. With the Door open, turn the Switch ON (--) and the Temperature/Dial to SMOKE. In approximately 2 minutes you will notice whitish-gray smoke coming out of the Grill as the Pellets ignite. After assuring the Pellets have ignited, close the Door and set the Temperature Dial to any cooking setting desired.
WHAT TEMPERATURE SETTINGS DO I USE WITH MY DIGITAL THERMOSTATCONTROL WHEN THE COOKBOOK RECIPES CALL FOR SMOKE, MEDIUM ANDHIGH?
This handy conversion chart will help you determine where to set the Thermostat when the recipes call for “Smoke”, “Medium” or “High” settings with the 3-Speed Smoker Control.
Remember: Grill temperature is affected by conditions such as outside temperature, precipitation and wind as well as altitude. Please keep this in mind when determining how long it will take food to cook on your Grill.
| 3-Speed Smoker Control Settings | Digital Thermostat Suggested Settings |
| Smoke | Smoke (150-180 F.) |
| Medium | 225-275 Degrees F. |
| High | 350-400 Degrees F. |
HOW DO I PROTECT MY PAINT FINISH?
1) Use a protective Cover on the Grill and touch-up paint to repair any scratches. A TRAEGER GRILL COVER to protect the Grill is highly recommended! Covers and touch-up paint are available from your Traeger Dealer, or log on to our Web Site – www.traegergrills.com.
2) Every 90 days, use a high quality car wax on the outside surfaces of the Grill. ONLY APPLY WAX TO A COLD GRILL.
WHERE CAN I GET A NEW PART FOR MY GRILL?
Check with your Traeger Dealer. They may have the part in stock or can order the part for you. Or you can contact the Traeger Parts Department (Section Seven) to place an order. In either case, please provide your name, phone number, address, Model and Serial Number of the Grill (located on a label inside the Hopper Lid), along with the part identification number from the Component Diagram.
SECTION SEVEN: TRAEGER SUPPORT
Parts are identified in the front of this manual on the COMPONENT DIAGRAM PAGE. To order parts: Call, E-mail or write to your Authorized Traeger Dealer or Traeger Pellet Grills. Please provide your name, phone number, address, Model and Serial Number of the Grill (located on a label inside the Hopper Lid), along with the part identification.
TRAEGER PELLET GRILLS, LLC
1215 Wilmington Ave Suite 200
Salt Lake City, UT 84106
TRAEGER TECHNICAL SUPPORT
Available 7 Days a Week 5AM to 7PM
Pacific Time
TRAEGER PARTS DEPARTMENT
Available Weekdays 8AM to 3:30PM
Pacific Time
TRAEGER SALES/ORDER DESK
Available Weekdays 8AM to 4:30PM
Pacific Time
TOLL-FREE TELEPHONE: 1-800-872-3437
E-mail: service@traegergrills.com
Website: www.traegergrills.com

natural_image
Silhouette of a mountain range with three pine trees beside it (no text or symbols)TRAEGER®
WOOD PELLET GRILLS
BBQ155.02 COMPONENTS LIST

BBQ155.02 HOPPER BURNER COMPONENTS

BBQ155.02 PARTS LIST
| Item | Qty | Description | P/N | Item | Qty | Description | P/N |
| 1 | 1 | Grill Frame Assembly | SUB434 | 42 | 1 | Digital Control W/SDC | BAC283 |
| 9 | 1 | Door Assembly | SUB540 | 43 | 1 | RTD 7” | BAC216 |
| 10 | 1 | Firepot Assembly | FAB310 | 49 | 1 | Draft Inducer Fan Assy | FAN209 |
| 11 | 1 | Auger Assembly 055 | SUB023 | 56 | 1 | Hopper Burner Assembly | SUB542 |
| 12 | 1 | Auger Tube Bushing | BRN109 | 61 | 1 | Hopper Bottom Cover | BCA198 |
| 13 | 3 | Door Handle | HDW106 | 62 | 4 | Bolt 1⁄4-20 x .750 Hex Zinc | HDW137 |
| 15 | 1 | Auger Drive Motor | BRN100 | 63 | 4 | Washer 1⁄4 Flat Zinc | HDW130 |
| 16 | 6 | Washer #10 flat | HDW135 | 64 | 1 | Front Left Leg Assembly | SUB407 |
| 17 | 6 | Nut 10-32 Hex Zinc | HDW136 | 65 | 1 | Rear Left Leg Assembly | SUB408 |
| 18 | 1 | Screw 6-32 x .750 Socket Hd | HDW116 | 66 | 1 | Rear Right Leg Assembly | SUB410 |
| 19 | 1 | Nut 6-32 Nylock Zinc | HDW111 | 67 | 1 | Front Right Leg Assembly | SUB409 |
| 20 | 1 | Screw 8-32 x .375 S-tap | HDW114 | 68 | 1 | Axle Rod | SCA030 |
| 21 | 1 | Hot Rod (Ignitor) | BAC199 | 69 | 2 | Wheel | HDW208 |
| 22 | 8 | Screw #8 x .5 Hex S-Tap | HDW119 | 70 | 2 | Washer 5/16 Flat Zinc | HDW120 |
| 23 | 1 | 3/8 x 3/16 Thick Gasket | BRN900 | 71 | 2 | Nut 5/16-20 Hex Zinc | HDW138 |
| 25 | 1 | Burner Box Assembly | SUB020 | 72 | 8 | Screw 1/4-20 Knob Screw | HDW267 |
| 26 | 1 | Power Cord 8' Ncma 120v | ELE203 | 74 | 2 | Leg Cap | HDW104 |
| 27 | 1 | Strain Relief | ELE210 | 75 | 4 | Screw 1/4-20 Knurled | HDW266 |
| 30 | 1 | Screw 8-32 x .500 PTHD Zinc | HDW117 | 94 | 1 | Heat Baffle | SUB024 |
| 33 | 1 | Hopper Assembly | SUB021 | 97 | 1 | Drain Pan Assembly | SUB025 |
| 35 | 1 | Hopper Lid Assembly | SUB544 | 112 | 1 | Grease Bucket | HDW152 |
| 39 | 2 | Screw 8-32 x .25 PPHD Zinc | HDW079 | 135 | 1 | Porcelain Grill | HDW196 |
| 40 | 2 | Nut 8-32 K-Lock Zinc | HDW108 | ||||
| 41 | 10 | Screw 6-32 x .375 S-Tap | HDW115 |
DIGITAL THERMOSTAT CONTROL WIRING DIAGRAM

- RESIDENTIAL PELLET GRILL-SMOKER FOR OUTDOOR USE ONLY!
- A MAJOR CAUSE OF FIRES IS FAILURE TO MAINTAIN REQUIRED CLEARENCES (AIR SPACES) TO COMBUSTIBLES MATERIALS. IT IS OF UTMOST IMPORTANCE THAT THIS PRODUCT BE INSTALLED ONLY IN ACCORDANCE WITH THESE INSTRUCTIONS.
- INTRODUCTION
- NOTE: NUMBERS FOLLOWING PART NAMES THROUGHOUT THIS MANUAL REFER TO THE COMPONENT DIAGRAM.
- TOOLS SUPPLIED FOR ASSEMBLY
- SECTION ONE: ASSEMBLY INSTRUCTIONS
- MOUNTING LEGS AND WHEELS:
- MOUNTING PELLET HOPPER/BURNER:
- INSTALLING DOOR HANDLE TO DOOR:
- INSTALLING THE HEAT BAFFLE
- INSTALL GREASE DRAIN PAN:
- POSITIONING THE PORCELAIN GRILL:
- HANGING GREASE BUCKET
- SECTION TWO: INITIAL FIRING INSTRUCTIONS
- ALWAYS START THE GRILL ON SMOKE SETTING WITH THE DOOR OPEN
- SECTION THREE: SUBSEQUENT START-UP
- MANUAL LIGHTING INSTRUCTIONS:
- Control Shutdown cycle
- Control Safety Features
- SECTION FOUR: OPERATING TIPS
- (See instructions for proper handling and disposal of ash in Section Five)
- 8) CARBON MONOXIDE:
- SECTION FIVE: MAINTAINING YOUR NEW GRILL
- DISPOSAL OF ASHES:
- Folding legs
- Folding the Legs Down:
- SECTION SIX: FREQUENTLY ASKED QUESTIONS
- WHY ARE NO PELLETS BEING DELIVERED INTO THE FIREPOT?
- Still no Pellets in the Firepot – Proceed to step 3.
- HOW DO I REMOVE THE AUGER IF IT JAMS?
- WHY DOES MY GRILL FIRE GO OUT ON "SMOKE" SETTING?
- WITH THE TRAEGER DIGITAL CONTROL, WHAT DIAL SETTING IS RECOMMENDED FOR STARTING THE GRILL?
- WHAT TEMPERATURE SETTINGS DO I USE WITH MY DIGITAL THERMOSTATCONTROL WHEN THE COOKBOOK RECIPES CALL FOR SMOKE, MEDIUM ANDHIGH?
- HOW DO I PROTECT MY PAINT FINISH?
- WHERE CAN I GET A NEW PART FOR MY GRILL?
- SECTION SEVEN: TRAEGER SUPPORT
- BBQ155.02 PARTS LIST
Brand : TRAEGER
Model : BBQ155.02
Category : Barbecue