41085 - Bread maker WestBend - Free user manual and instructions
Find the device manual for free 41085 WestBend in PDF.


| Product Type | Bread Maker |
| Brand | WestBend |
| Model | 41085 |
| Dimensions (H x W x D) | 12.6 x 10.2 x 13.4 inches (32 x 26 x 34 cm) |
| Weight | 11 lbs (5 kg) |
| Power Supply | 120V AC, 60Hz, 600W |
| Baking Capacity | 2 lb loaf (900g) |
| Programs | 12 preset cycles: Basic, Whole Wheat, French, Rapid, Dough, Jam, Cake, Gluten-Free, etc. |
| Crust Control | 3 settings: Light, Medium, Dark |
| Timer Delay | Up to 13 hours |
| Keep Warm | 60 minutes automatic |
| Display | LCD with backlight |
| Viewing Window | Yes, large transparent window |
| Baking Pan | Non-stick coated, removable |
| Kneading Paddle(s) | 1 or 2 (depending on model) |
| Cool-Touch Handle | Yes on lid |
| Power Failure Memory | Up to 10 minutes |
| Cleaning | Wipe exterior with damp cloth; pan and paddle hand wash only |
| Safety Features | Automatic shut-off at end of cycle; cool-touch surfaces |
| Repairability | User-replaceable pan and paddle; internal parts require service |
| Accessories Included | Measuring cup, spoon, recipe booklet, user manual |
Frequently Asked Questions - 41085 WestBend
User questions about 41085 WestBend
0 question about this device. Answer the ones you know or ask your own.
Ask a new question about this device
Download the instructions for your Bread maker in PDF format for free! Find your manual 41085 - WestBend and take your electronic device back in hand. On this page are published all the documents necessary for the use of your device. 41085 by WestBend.
USER MANUAL 41085 WestBend
Automatic Bread & Dough Maker
To prevent personal injury or property damage, read and follow the instructions and/or warnings in this care use instructional manual.
IMPORTANT SAFEGUARDS
When using electrical appliances, basic safety precautions should always be followed to reduce the risk of fire, property damage, electrical shock and/or personal injury, including the following:
- Read all instructions before using.
- Do not touch hot surfaces. Use handles or knobs. Always use potholders or oven mitts to handle hot bread pan or hot bread.
- Do not put hand inside oven chamber after bread pan is removed. Heating unit will still be hot.
• To protect against electric shock, do not place cord, plug or appliance in water or other liquid. - Close supervision is necessary when any appliance is used by or near children.
- Unplug from outlet when not in use and before cleaning. Allow to cool before putting on or taking off parts and before cleaning appliance.
- Avoid contacting moving parts.
- Do not operate appliance with a damaged cord or plug or after the appliance malfunctions or has been damaged in any manner.
- The use of accessory attachments not recommended by The West Bend Company may result in fire, electrical shock or personal injury.
- Do not use outdoors.
- Do not let cord hang over edge of table, counter or surface area, or touch hot surfaces.
- Do not place appliance on or near a hot gas or electrical burner, or in a heated oven.
- Do not use appliance for other than intended use.
• To disconnect power, press stop button to turn control off, then remove plug from wall outlet. Never pull on the cord.
• Extreme caution must be used when moving appliance during operation.
SAVE THESE INSTRUCTIONS
Your bread maker needs no special care other than cleaning. See warranty section in this booklet for service details. Do not attempt to repair it yourself. For household use only.
An off odor from motor may be noted with first use, which is normal and will disappear with use.
ELECTRIC CORD STATEMENT
CAUTION: Your bread maker has a short cord as a safety precaution to prevent personal injury or property damage resulting from pulling, tripping or becoming entangled with the cord. Do not allow children to be near or use this bread maker without close adult supervision. If you must use a longer cord set or an extension cord when using the bread maker, the cord must be arranged so it will not drape or hang over the edge of a counter-top, tabletop or surface area where it can be pulled on by children or tripped over. To prevent electrical shock, personal injury or fire, the electrical rating of the extension cord you use must be the same or more than the wattage of the bread maker (wattage is stamped on backside of bread maker).
IMPORTANT SAFETY INSTRUCTIONS
This appliance has a polarized plug (one blade is wider than the other). As a safety feature, this plug will fit in a polarized outlet only one way. If the plug does not fit fully in the outlet, reverse the plug. If it still does not fit, contact a qualified electrician. Never use with an extension cord unless plug can be fully inserted. Do not attempt to defeat this safety feature.
Your West Bend® Automatic Bread & Dough Maker was designed for use with 120 volt, 60 hz electrical service ONLY. Use of your bread and dough maker with a converter or transformer will destroy the electronic control and will void your warranty.
IMPORTANT INFORMATION ON PROTECTING ELECTRONIC CONTROL
To protect bread maker's electronic control against possible damage caused by surges in electrical power line, we recommend using a surge protector device, available in the electronic department of most discount/hardware stores. Simply plug surge protector into the electrical outlet, then plug bread maker cord into receptacle of surge protector.
HELPFUL HINTS FOR SUCCESSFUL BREAD BAKING
To ensure great baking results in your West Bend Bread and Dough Maker, please take a few minutes to review the following tips and read the basic instructions in the front section of this book. Please pay close attention on how to measure ingredients, as this is the most important step in bread machine baking and the difference between success and failure.
IMPORTANT TIPS TO KEEP IN MIND WHEN MAKING BREAD ARE:
- Make sure knead bar is in pan before adding ingredients. Simply match hole in bar with shape of shaft and slide on. You may need to twist bar slightly to slide all the way down on shaft.
• Always use fresh ingredients.
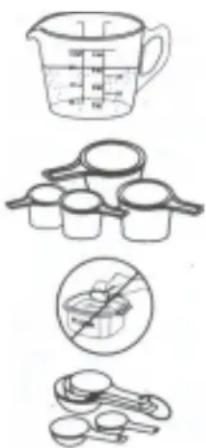
• Measure ingredients accurately using correct measuring cups and spoons:
natural_image
Illustration of four different cooking methods: measuring cup, adding cups into containers, using a brush (no text or symbols)USE see-through glass or plastic measuring cups with graduated markings for liquids. Measure liquids at eye level for accuracy.
USE set of solid, nesting type measuring cups for dry ingredients. ALWAYS SPOON DRY INGREDIENTS, especially bread flour, into measuring cups, then level with a knife.
DO NOT SCOOP measuring cups into flour as this will cause dough to be too dry and result in short loaves.
USE set of graduated measuring spoons for smaller quantities of ingredients, measuring level, not rounded or heaping.
- Add ingredients to pan in this order: 1) all liquid ingredients first including butter or margarine, 2) all dry ingredients, EXCEPT YEAST, putting salt in one corner of pan to keep away from yeast. 3) level dry ingredients in pan, 4) make a slight well in center and add yeast.
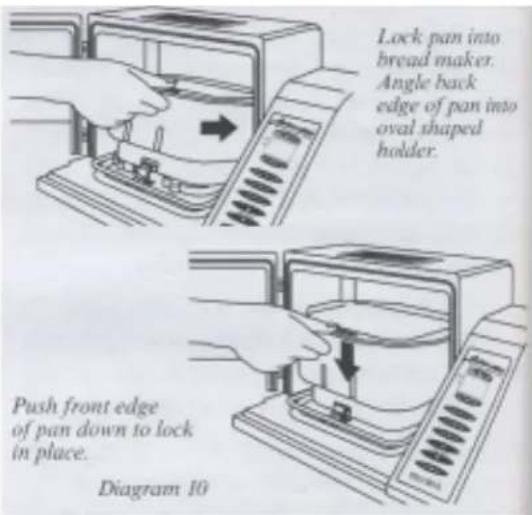
- Lock pan securely in machine. Simply hold pan with FRONT side facing you and angle back edge of pan into oval shaped holder to lock hooks into notches. Then push front of pan down to lock in place.
• Make bread and crust color and loaf size selections first, then turn machine on. - Feel free to check dough during knead cycle for any minor adjustment that may be needed. After 8-10 minutes of kneading, open cover to look at and touch dough. (Opening cover at this time does not affect performance). Dough should be in a ball between knead bars and feel a bit sticky. This is perfect and needs no adjustment. If dough is very sticky and clinging to sides or in one corner of pan, it is too wet and needs flour. Add 1 tablespoon flour at a time until dough forms into a soft ball. If dough is too dry and separates into 2 balls on knead bars, add lukewarm water, 12 tablespoon to 1 tablespoon at a time until dough becomes soft and elastic and a bit sticky to the touch. When making any adjustment, always allow flour or water to be blended into dough thoroughly, about 1 minute, before making any further adjustments.
"QUICK START" STEPS FOR MAKING FIRST LOAF OF BREAD
You are probably very anxious to start using your new bread maker without having the time to read this book from cover to cover. Follow these “Quick Start” steps for making that first loaf of bread, whether using the mix included with your bread maker or one of the recipes in this book. And while you are enjoying that first slice of freshly baked bread, sit back and read the book to ensure successful baking results each and every time. It contains very important information on the proper use of your bread maker.
"QUICK START" STEPS FOR USING BREAD MIX INCLUDED WITH BREAD MAKER
Unlock pan from machine by lifting up on front edge. Remove pan. Wash pan and knead bars as recommended in “CLEAN BEFORE USING” section. Make sure knead bars are positioned correctly on shafts in bottom of pan. See Diagram 8 on page 10.
- Measure 1¼ cups (10 ounces) lukewarm water in glass or plastic see-through measuring cup. Make sure water level is exactly at the 1¼ cup marking, at “EYE LEVEL”. Pour water into bread pan.
- Open bag of dry ingredients and pour into pan on top of water. Level ingredients with knife, pushing some into corners of pan.
- Make a well in center of dry ingredients; add yeast from packet included with mix.
- Lock pan into bread maker with FRONT side facing you. See Diagram 10 on page 11. Close door. Plug bread maker into electrical outlet.
- The bread maker is already preprogrammed for making the bread mix. After the machine is plugged in, indicator arrows will point to the basic/specialty bread setting, medium crust color and 1½ lb. loaf size. The process time of 3:30 (3 hours, 30 minutes) will appear in display as this is the time needed to make the bread mix. Press start/stop button to turn machine on. Red on light will glow, colon between hours and minutes will flash and time will count down in minutes so you always know how much time remains until bread is done.
As machine advances, an alert will sound during the knead cycle as a reminder to add any ingredients called for in a recipe. Ignore this alert when using the bread mix included with your machine as no additional ingredients need to be added.
When done, 0:00 will appear in display and audible alert will sound. Turn bread maker off by holding start/stop button down until red ON light goes out, about 4 seconds. Open door. Using hot pads or oven mitts, carefully lift front edge of bread pan up to unlock then lift pan out of machine. Shake bread out of pan. Cool on rack 15 to 30 minutes before slicing.
See “Clean After Each Use” section in this book for cleaning pan and knead bar.
"QUICK START" STEPS FOR MAKING A RECIPE IN THIS BOOK
Choose one of the many bread recipes included in this book and follow the basic steps that follow. Either a 112 or 2 pound loaf of bread can be made depending on the size loaf desired.
Unlock pan from machine by lifting up along front edge. Remove pan. Wash pan and knead bar as recommended in “Clean Before Using” section in this book.
- Read "MEASURING INGREDIENTS ACCURATELY" section in this booklet, as this is VERY IMPORTANT.
- Add all liquid ingredients to pan first then butter or margarine followed by the dry ingredients, except the yeast. Level dry ingredients pushing some into the corners of pan. Make a well in center of dry ingredients and add the recommended amount of yeast for the type being used and loaf size.
- Lock pan into bread maker with FRONT side facing you. See Diagram 10. Close door. Plug bread maker into electrical outlet.
- Press bread select button until arrow points to recommended bread setting given in recipe. Next, press crust color button until arrow points to desired crust color: LIGHT, MEDIUM or DARK. The press loaf size button until arrow points to the size loaf being prepared, 1½ lb. or 2 lb. The process time will appear in display for the program selected. Press start/stop button to turn machine on. Red on light will glow, colon between hours and minutes will flash and time will count down in minutes so you always know how much time remains until bread is done.
As machine advances, an alert will sound during the knead cycle as a reminder to add any ingredients called for in a recipe. If no additional ingredient(s) need to be added, simply ignore this alert.
When done, 0:00 will appear in display and audible alert will sound. Turn bread maker off by holding start/stop button down until red ON light goes out, about 4 seconds. Open door. Using hot pads or oven mitts carefully lift front edge of pan up to unlock, then lift pan out of machine. Shake bread out of pan. Cool on rack 15 to 30 minutes before slicing.
See “Clean After Each Use” section in this book for cleaning pan and knead bar.
OTHER TIPS TO KEEP IN MIND WHEN USING YOUR BREAD MAKER
- DO NOT REMOVE the bread pan or touch any moving parts when bread maker is in operation. If you need to stop the bread maker during operation, hold the start/stop button down for 4 seconds or until the red ON light goes out.
2 BE SURE to allow adequate ventilation around the bread maker when it is in operation. Keep it out of drafts and direct sunlight and at least 4 inches away from walls, cabinets and other appliances, especially heating and cooling appliances which can interfere with the internal bread maker temperatures and affect the loaf of bread being prepared. - DO NOT IMMERSE base of bread pan in water or other liquid as this can damage the bearings on the bottom of the pan that turns the knead bars. See “Clean After Each Use” section for further details.
- ALWAYS place bread maker on a DRY, STABLE, heatproof countertop or table during use. Since the bread maker contains a motor, some vibration occurs during the knead cycle.
- AVOID touching bread maker during the bake cycle as exterior surfaces become hot. ALWAYS use potholders when removing and handling the bread pan after baking.
- FOLLOW instructions as given for best results. THE MOST IMPORTANT STEP IN BREAD MAKING IS TO MEASURE INGREDIENTS ACCURATELY. See “MEASURING INGREDIENTS ACCURATLEY” section in this booklet.
- DO NOT EXCEED the ingredient capacity of the bread maker. See “Know Your Ingredients” section in this booklet. Use only fresh ingredients.
- ALWAYS ADD INGREDIENTS in the order listed in the recipes. Add liquid ingredients to the bread pan first, the butter or margarine next, followed by the dry ingredients and finally the yeast in the very center. Before adding the yeast, ALWAYS tap the pan to settle the dry ingredients, then level off the ingredients, pushing into the corners to prevent liquid from seeping up. Then add the yeast to the very center of the pan, making a slight well in the center of the dry ingredients. This sequence is very important, especially when using the delay start timer of your bread maker to prevent over fermentation of the yeast.
- IN THE EVENT OF A POWER OUTAGE, the bread maker will turn off and automatically resume where it left off in the cycle if power is restored within 5 to 10 seconds. If power is not restored in 5 to 10 seconds, the bread maker will remain off when power is restored. If this occurs, you will need to remove the contents from the bread pan and start over using fresh ingredients. The red ON light will remain off and the display will reset to the default setting; basic/specialty, medium crust, 1 12 lb. loaf, with 3:30 in display.
- DO NOT COVER bread maker with anything during operation as this can cause malfunction.
- DO NOT TOUCH control panel buttons after bread maker has been turned ON as this will interrupt the cycle. Turn bread maker OFF after completion of cycle.
- DO NOT LEAVE bread make plugged into electrical outlet when not in use to prevent it from being accidentally turned ON.
KNOW YOUR INGREDIENTS
Although bread making seems very basic, it is a science and the proportions of ingredients are critical. Read the following information to better understand the importance each ingredient plays in the bread making process. Also, always make sure your ingredients are fresh.
- FLOUR is the main ingredient in making bread. It provides structure and food for the yeast. Several different types of flour can be used in your bread maker, but DO NOT USE all-purpose flour, cake flour or self-rising flour as poor results will be obtained. BREAD FLOUR SHOULD be used in your bread maker as it contains more gluten-forming proteins than all-purpose flour and will provide tall, well formed loaves with good structure. Several different brands of bread flour are available for use in your bread maker.
- WHOLE WHEAT FLOUR can be used in your bread maker at the whole wheat setting. This flour contains the entire wheat kernel, including the bran and germ; therefore, breads made with 100% or a high percentage of whole wheat flour will be lower in height and heavier in texture than bread made with bread flour. The whole wheat setting on your machine has a longer knead time to better develop the structure of wheat breads for optimum results.
- RYE FLOUR can be used in combination with bread flour in the preparation of rye or pumpernickel bread. But, it cannot be used alone as it does not contain enough protein to develop adequate gluten for structure.
SPECIAL NOTE ON FLOUR
How to make minor adjustments for dough: All flours are affected by growing conditions, milling, storage, humidity and even the manufacturer. While not visibly different, you may need to make some minor adjustments when using different brands of flour as well as compensating for the humidity in your area. Always store flour in an airtight container. Store whole grain flours (whole wheat, rye) in refrigerator to prevent them from becoming rancid.
Measure the amount of flour as directed in each recipe but make any adjustment after the first 8 to 10 minutes of continuous kneading. Feel free to check the condition of the dough during the knead cycle as this is the only time you can make any minor adjustment:
- Open cover and touch dough. If it feels a little sticky and there is a slight smear under both knead bars, no adjustment is necessary.
- If dough is very sticky, clinging to the sides of pan or in one corner, and is more like a batter than a dough, add one tablespoon flour. Allow it to work in before making any further adjustment.
- If dough is dry and the machine seems to be laboring during kneading or the dough is not being kneaded between the two bars, add one tablespoon lukewarm water at a time. Once again, allow it to work in before making any further adjustments.
- The dough is just right near the end of the kneading cycle when it is soft to the touch, smooth in appearance and just a bit sticky, leaving a slight residue on your fingers-the feel of perfect dough. The bottom of the bread pan will also be clean of any dough residue.
- DO NOT EXCEED 4 cups of bread flour for the 2 pound loaf or 3 13 cups bread flour for the 1 12 pound loaf. Breads containing whole wheat, cereals or oats should not exceed a total of 3 12 cups for the 1 12 pound loaf or 4 12 cups for the 2 pound loaf.
•
CAUTION: Be careful to avoid knead bars as possible finger pinching could occur
- SUGAR AND OTHER SWEETENERS provide food for the yeast, add height and flavor to the bread and give the crust a golden color. Types of sweeteners that can be used include sugar, brown sugar, honey, molasses, maple syrup, corn syrup and fruits, whether dried or fresh. When using a liquid sweetener such as honey or molasses, the total amount of liquid in the recipe will need to be reduced slightly by the same measurement of liquid sweetener used. A special tip when measuring sticky liquid sweeteners is to coat the measuring spoon with vegetable oil before measuring. This will help the liquid sweeteners slide right out.
DO NOT USE ARTIFICIAL SWEETENERS as a substitute for sugar and other natural sweeteners as the yeast will not react properly and poor results will be obtained.
- MILK enhances flavor and increases the nutritional value of bread. Any type of milk (whole, 2%, 1%, skim, buttermilk or canned evaporated milk) can be used. Refrigerated milk must always be warmed to 75-85° F before adding to bread pan. Warm in a glass measuring cup in microwave or in a small pan on top of the range. DO NOT HEAT MILK ABOVE 100° F AS THIS COULD AFFECT THE YEAST.
- WATER used in combination with dry milk is a good substitute for regular milk and must be used when using the timer feature as regular milk can spoil when left at room temperature for several hours. Use lukewarm water, about 75 - 85^ , for best results. DO NOT USE WATER ABOVE 100^ AS THIS COULD AFFECT THE YEAST.
Using too much liquid can cause the bread to collapse during the bake cycle. During humid weather, slightly less liquid may be needed, as the flour will absorb moisture from the air. In dry weather, slightly more liquid may be needed as flour can lose moisture. When you experience a severe change in weather, it is best to check the condition of the dough during the knead cycle as noted in the FLOUR paragraph for any minor adjustment that may be needed.
Water and milk are mostly interchangeable in recipes. Eliminate dry milk in recipes when substituting milk for water. Check dough during the knead cycle for any minor adjustments. Slightly more milk may be needed when substituting for water.
- BUTTER, MARGARINE, OTHER FATS and OILS serve several purposes as they tenderize the bread, add flavor and richness and contribute to the storage life of bread by retaining moisture. An excess of fat, however, can inhibit rising, so accuracy is critical.
Butter, margarine and solid shortening are interchangeable in recipes. You may wish to cut butter and margarine into four (4) pieces for faster blending during the knead cycle. Low-fat or fat-free bread can be made by substituting equal amounts of unsweetened applesauce or plain nonfat yogurt for the amount of fat recommended in the recipe. Watch dough as it kneads for any minor adjustments, which may be necessary.
- EGGS add color, richness and leavening to bread. Use large eggs. No premixing is needed. Egg substitutes can be used in place of fresh eggs. One egg equals 14 cup of egg substitute. To reduce cholesterol, you can substitute two (2) egg whites for each large egg in the recipes without affecting the end result. Watch the dough during the knead cycle for any needed adjustments. A special tip when using eggs is to run them under warm water for about one minute before cracking, as this helps the egg slide out of the shell better.
- SALT has several functions in making bread. It inhibits the yeast growth while strengthening the gluten structure to make the dough more elastic, plus it adds flavor. Use ordinary table salt in your bread maker. Using too little or eliminating the salt will cause the dough to over-rise. Using too much can prevent the dough from rising as high as it should. “Light” salt can be used as a substitute for ordinary table salt, providing it contains both potassium chloride and sodium. Use same amount as recommended for table salt. When adding salt to pan, add to one corner to keep it away from yeast, especially when using timer as the salt can retard its growth.
- YEAST is a living organism, which, through fermentation, feeds on carbohydrates in flour and sugar to produce carbon dioxide gas, which makes the bread rise. Active dry, fast rising or bread machine yeast can be used in your bread maker. Use only the amount stated in the recipe. Using a little more can cause the dough to over-rise and bake into the top of bread maker. Fast rising yeast and bread machine yeast are virtually the same and interchangeable with one another.
DO NOT USE COMPRESSED CAKE YEAST. Recipes in this book were tested using only active dry, fast rising and bread machine yeast.
Keep yeast stored in the refrigerator. You may find it handy to purchase yeast in glass jars so as to measure the exact amount without having to waste any. If using yeast packed in a 14 -ounce foil envelope, it is best to open a fresh envelope every time you bake. If you save the unused amount from the open envelope, store in a dry, airtight container in the refrigerator. Date the container and use promptly. Do not mix old and new yeast in a recipe. A 14 -ounce foil envelope of yeast contains 214 teaspoons.
ALWAYS MAKE SURE YEAST IS FRESH AND HAS NOT EXPIRED THE "USE BY " DATE PRINTED ON THE JAR OR ENVELOPE.
- VITAL WHEAT GLUTEN is the gluten protein, which has been rinsed from wheat flour and then dried. Vital gluten will increase the protein content in flour to product a higher loaf of bread with lighter texture. About the only time you may wish to consider adding vital gluten is for 100% whole wheat bread or recipes containing a high percentage of whole wheat or other whole grain flours or cereals. As a guideline, add one (1) teaspoon vital gluten per cup of flour used in the recipe. Check the dough during kneading; you may need to add a little water as the vital gluten absorbs liquid. Vital gluten can be obtained at most health food stores. Do not use gluten flour, as this contains less protein and is less effective.
Or, to increase the protein content, you can use a large egg as a substitute for vital gluten. Just add it to the liquid in the bottom of pan and reduce the recommended amount of liquid in recipe by two (2) ounces ( 14 cup). Again, check the condition of the dough during the knead cycle.
- CINNAMON AND GARLIC: Adding too much cinnamon or garlic can affect the texture and size of the loaf. Cinnamon can break down the structure of the dough, affecting height and texture, and garlic can inhibit the yeast activity. Use only the amount of cinnamon and garlic recommended in the recipe; don't be generous.
MEASURING INGREDIENTS: THE KEY TO SUCCESSFUL BREAD MAKING
The most important part of bread making is to MEASURE THE INGREDIENTS PRECISELY AND ACCURATELY. You may need to adjust your measuring habits, but the rewards for doing so will be great. Follow these very important tips:
- READ the recipe first and organize the ingredients in the order in which they are added to the pan. Many bread disasters occur because an ingredient was left out or added twice.
• DO NOT EXCEED the ingredient capacity of the bread maker. Use only fresh ingredients. - ALWAYS ADD INGREDIENTS in the order listed: liquid ingredients first, then butter or margarine, dry ingredients next and finally yeast in the very center. Before adding yeast, ALWAYS tap the pan to settle dry ingredients into corners of pan to
prevent liquid from seeping up. Make a slight well in center of dry ingredients and place the yeast in the well. This sequence is very important, especially when using the timer to prevent yeast from getting wet before bread making begins.
- ALWAYS use standard glass or plastic "see-through" liquid measuring cups to measure liquids. Place cup on flat surface and measure at "eye level", not at an angle. The liquid level line MUST be right to the measurement marking, not above or below. A "looks close enough" measurement can spell disaster in bread making.
SPECIAL TIP: Place liquid measuring cup on inside of kitchen cabinet to measure at eye level.

Liquid level must be exact to markings on liquid measuring cups. Too much or too little liquid will affect the height of the loaf.
- ALWAYS use standard dry measuring cups (cups that nest together) to measure dry ingredients, especially flour. Dry measuring cups are those that nest together.
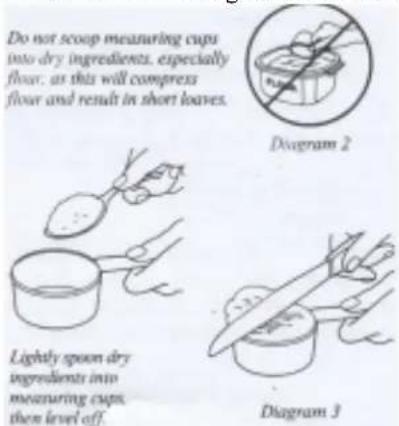
ALWAYS SPOON dry ingredients into the measuring cup, then level with a knife. DO NOT SCOOP measuring cups into dry ingredients, especially flour, as it compresses the ingredients into the cup and causes the dough to be dry and result in a short loaf. See Diagrams 2 and 3.
SPECIAL TIP: To lighten flour before measuring, move a spoon through it several times.
All ingredients measured in measuring spoons must be level, not rounded or heaping.
natural_image
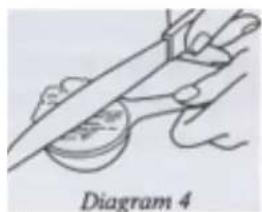
Line drawing of a hand holding a knife over a small object, labeled 'Diagram 4' (no text or symbols on the diagram itself)- ALWAYS use standard measuring spoons for ingredients such as yeast, salt, sugar, dry milk and small amounts of honey, molasses or water. The measurements MUST BE LEVEL, not rounded or heaping as a little difference can affect the bread. See Diagram 4. DO NOT USE TABLEWARE AS MEASURING SPOONS as these vary in size and will not be accurate.
USING BREAD MIXES IN YOUR BREAD MAKER
Pre-packaged bread mixes can be used in your bread maker. Follow the directions for making a 1½ pound loaf or 2 pound loaf. Use the basic/specialty bread setting for most mixes unless preparing a 100% whole wheat or natural grain mix, which would require the whole wheat bread setting. Add the recommended amount of liquid to the bread pan first, then flour mixture and finally the yeast. Select desired crust color, loaf size and start the bread maker. The time delay feature can be used with bread mixes providing no perishable ingredients are used such as milk and eggs, which can spoil when left at room temperature for several hours.
MAKE YOUR OWN MIXES
To save time, money and energy, you can prepare your own mixes and store them in the refrigerator until ready to use. Simply measure all dry ingredients in the recipes EXCEPT YEAST into a plastic bag or seal-able container. Label the type of bread and loaf size. When ready to use, let the flour mixture stand at room temperature 15 minutes. Add recommended liquids, then the dry flour mixture to pan. Level and add yeast to the center. Program and start the bread maker. Use time delay if recipe recommends its use.
| MEASUREMENT EQUIVALENT CHART | |||||
| CUP | FLUID= OUNCE = | TBSP. | = | TSP. | |
| 1 | = | 8 | = | 16 | =48 |
| 18 | = | 7 | = | 14 | =42 |
| 14 | = | 6 | = | 12 | =36 |
| 18 | = | 5 18 | = | 10 18 | =32 |
| 18 | = | 5 | = | 10 | =30 |
| 12 | = | 4 | = | 8 | =24 |
| 18 | = | 3 | = | 6 | =18 |
| 18 | = | 2 18 | = | 5 18 | =16 |
| 14 | = | 2 | = | 4 | =12 |
| 18 | = | 1 | = | 2 | =6 |
| 12 | = | 1 | =3 | ||
| 14 | = | 12 | =1 18 | ||
ADAPTING YOUR FAVORITE BREAD/DOUGH RECIPES
After you have prepared some of the recipes in this book, you may wish to adapt your own conventional bread recipes. Some experimentation will be required and you will need to check the condition of the dough during the knead cycle for any adjustments needed. Either use on of the recipes in this book that is similar to your recipe as a guide, or use this formula:
For each cup of flour used in recipe use:
For Example, based on the formula to the left using 4 cups of flour start with:
3 ounces liquid, 75-85° F 12 ounces liquid, 75-85° F
½ tablespoon sweetener 2 tablespoons fat
12 teaspoon salt 4 cups of bread flour
12 tablespoon fat (butter/margarine) 112 teaspoons salt
scant 3/4 teaspoon active dry or 2 tablespoons sweetener
½ teaspoon bread machine/fast rise yeast 2 teaspoons active dry yeast or bread machine/fast rise yeast
Add ingredients to pan in recommended sequence: liquids first, then fat, then all dry ingredients except yeast. Level dry ingredients in pan. Make a slight well and add yeast to well. Program for basic/specialty setting, medium crust and correct loaf size setting. After 8 to 10 minutes of continuous kneading, check the condition of dough. It should be soft, a bit sticky with a slight smear under the knead bars. If too wet and sticky, add one (1) tablespoon of flour at a time until dough gathers into a ball and does not cling to sides of pan. If too dry and motor is laboring, add one (1) tablespoon liquid at a time until the dough becomes more pliable. Do not exceed 4 cups of flour for a 2 lb. loaf; 3 to 3 13 cups of flour are needed for a 1 12 lb. loaf to evenly fill the pan.
HIGH ALTITUDE ADJUSTMENT
Reduced air pressure at high altitudes causes yeast gases to expand more rapidly and the dough to rise more quickly. The dough can rise so much that when it begins to bake, it will collapse due to overstretching of the gluten structure. To slow the rising of the dough at high altitudes, reduce the amount of yeast by 14 teaspoon at a time until you find the right amount. You can also reduce the amount of liquid by 2 to 3 teaspoons. Some experimentation will be needed when using your bread maker at high altitudes. Make notes on the amount of yeast and liquid used for future reference.
PARTS OF BREAD MAKER Diagram 5

BECOMING FAMILIAR WITH CONTROL PANEL
Before using your bread maker, it is important that you understand how to use the control panel as this is the “brains” of the machine. Review the following features to better understand what each button is designed to do and the options that are available to you when using this machine.
BREAD SELECT BUTTON
The BREAD SELECT button lets you choose two different bread settings as well as a dough setting. With each press of the BREAD SELECT button, the indicator arrow will point to a bread or dough setting on the control panel. The time required to complete each also appears in the display as follows:
basic/specialty 3:30 (medium crust)
whole wheat....3:40 (medium crust)
dough 1:40
The basic/specialty setting can be used for almost any bread recipe containing at least 50% bread flour. If a recipe contains less than 50% bread flour, then use the whole wheat settings as these settings feature a longer knead cycle, which is beneficial for whole grain flours.
The dough setting is used when you wish to make dough for hand shaping and baking in your own oven, such as dinner rolls.
When using the basic/specialty, whole wheat and dough settings, an audible alert will sound during the knead cycle as a reminder to add ingredients, such as nuts, raisins, etc. if recommended in recipe. If not adding extra ingredients, ignore this alert or use it as a checkpoint to check the condition of the dough for any minor adjustment that may be necessary.

Diagram 6
CRUST COLOR BUTTON
The crust color button lets you choose three different crust colors for yeast bread. With each press of the crust color button, the indicator arrow will point to light, medium or dark on the control panel. Select the desired crust color you wish for the bread recipe you are preparing. The crust color button does not apply to the dough setting.
LOAF SIZE BUTTON
The loaf size button lets you select between making 1½ and 2 pound loaves of bread and recipes for both sizes are included in this book. With each press of the loaf size button, the arrow indicator will alternately point to the 1½ lb. and 2 lb. setting on the control panel. Selecting the loaf size is important as the programming is different to ensure the optimum results for both sizes. The loaf size button does not apply to the dough setting.
TIME DELAY BUTTONS
The TIME DELAY buttons let you program the bread maker to start at a later time, which is especially convenient if you wish to wake up to a fresh loaf of bread in the morning or come home to a fresh loaf for dinner. The timer can be programmed to delay the start of the bread maker for up to 13 hours at all settings. When using the time delay feature, no perishable ingredients should be used, such as milk, eggs, cheese, yogurt, etc. as these foods can spoil when held at room temperature for several hours. Simply prepare the recipe you wish to make, place the bread into the bread maker, program the bread select, crust color and loaf size, then enter the number of hours and minutes from when you start the bread maker to when you want the bread done. The (up) ▲ time delay button will scroll up in 10 minute intervals, whereas the (down) ▼ time delay button will scroll down in 10 minute intervals. See “HOW TO USE TIME DELAY” section in this book for more details. The recipes with the Ⓣ symbol can be used in the time delay mode.
START/STOP BUTTON
Use the start/stop button to turn bread maker on and off. Before starting the machine, you must first program the bread select and crust color and loaf size if applicable, plus the time delay if being used. To start the bread maker, press start/stop button once.
When on, red signal light under the word ON will glow. To turn off, press and hold start/stop button down for about three (3) seconds or until the red ON light goes out.
Once you have started the bread maker, the colon between hours and minutes will flash and minutes will begin to count down.
When process time elapses, 0:00 will appear in display and audible alert will sound to let you know the bread is done. Turn off by pressing start/stop button until red light goes out. Remove bread pan using oven mitts and shake loaf out of pan onto cooling rack. Cool before slicing.
If the bread pan is not removed immediately after baking, machine will automatically go into keep warm mode for up to three (3) hours to keep bread warm. The red ON light will remain lit during this time. If machine is not turned off during keep warm period, machine will automatically turn off.
If using dough setting, machine will automatically turn off upon completion of cycle, red light will go out, alert will sound and display will reset to dough setting. Remove the pan containing the dough and shape/form as desired for conventional baking. Do not leave pan containing dough inside machine after completion of cycle as dough will continue to rise and could overflow the pan. See Dough section for more details.
TOO HOT/TOO COLD WARNING
If inside of oven chamber is too hot or too cold for bread making, the word "Hot" or "Col" will appear in display along with alert sounding to indicate that machine cannot be turned on. You will need to remove pan and allow chamber to cool or warm accordingly.
Typically “Hot” will appear in display when you make consecutive loaves and forget to turn machine off between loaves. Allow chamber to cool with door open 10 to 15 minutes or until machine can be turned on without warning going off. If “Col” appears in display, move bread maker to a warmer area for 15 minutes or until machine can be turned on without warning going off. If oven is too hot, the yeast can be killed; if too cold, the growth of the yeast will be retarded.
CLEAN BEFORE USING
Lift pan up along front edge to unlock from bread maker, then lift out.
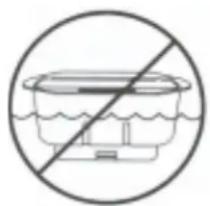
SPECIAL NOTE: The bread pan is not immersible and should never be washed in an automatic dishwasher. Immersing the pan in water can cause damage to the bearings that turns the knead bars. Dishwasher cleaning can reduce the non-stick qualities of the non-stick finish, causing the bread to stick in the pan.
natural_image
Simple line drawing of a bathtub with a diagonal line crossing it, no text or symbols present.Only two parts, the bread pan and knead bars, need to be cleaned before making bread. Simply fill bread pan with a small amount of warm water and dishwashing detergent. The knead bars lift off shafts in bottom of pan. You may need to twist the bars slightly to remove. Wash the inside of the pan and knead bar with a soft dishcloth or sponge. Empty the bread pan and rinse the inside and knead bars with warm water and dry with a soft cloth. Do not use any abrasive scouring pads or cleansers on bread pan or knead bar as damage to the non-stick coating can occur. Wipe the inside of chamber and outside surfaces of machine with a soft damp cloth if necessary, dry with a soft cloth.
CAUTION: To prevent personal injury or electric shock, do not immerse bread maker base, its cord or plug in water or other liquid.
HOW TO USE—BASIC STEPS IN MAKING BREAD
-
Position knead bars onto shafts in bottom of pan, matching hub shape to shaft shape. Make sure both knead bars are pushed down onto shafts all the way. You may need to twist bars slightly to drop in place. See Diagram 8.
-
Add ingredients to pan in order listed in recipe, MAKING SURE, to add any liquid ingredients first, followed by dry ingredients, then butter or margarine and lastly the yeast. After the dry ingredients are added to the pan, tap to settle, then level dry ingredients, pushing some of the dry mixture into the corners of the pan. This will prevent any liquid from seeping up from the corners. Make a slight well in center of dry ingredients and add the yeast to the well. This is especially important when using
the time delay to prevent the yeast from getting wet before the bread making process begins.

- Lock pan into bread maker by angling back edge of pan into oval shaped holder. Then firmly push front edge of pan down to lock in place. See Diagram 10 for more details. If pan does not lock securely, remove pan and reposition until secured. Pan must always be locked in place for bread maker to function properly. Always make sure the side of pan marked FRONT is positioned to the front. Close door.
-
Plug bread maker cord into a 120 volt AC electrical outlet ONLY. Press the bread select button for type of bread being made. Then press crust color button for desired color, light, medium or dark. Press loaf size button for the size loaf being prepared, 1 12 or 2 lb. The total process time for the selections made will appear in display. Program time delay if being used.
-
Press the start/stop button once to turn machine on. When on, red light will glow and colon between hours and minutes will flash. After bread maker has been turned on, programmed setting cannot be changed. To change settings, hold start/stop button down
until red light goes out. Then program control as desired and turn back on. The bread making process will then begin. You may hear faint clicking sounds which is normal as gentle heat is being provided to warm the pan and ingredients for best results. As cycle advances, an alert will sound during the knead cycle as a reminder to add any extra ingredients if the recipe recommends doing so.
Simply open door and add the ingredients to the pan on top of dough. The added ingredients will be mixed in during the remainder of the knead cycle. DO NOT STOP THE MACHINE TO ADD INGREDIENTS. If no ingredients are to be added, simply ignore this alert when it sounds or use it as a checkpoint to check the condition of the dough to make sure it is right.
CAUTION: To avoid burn injury, do not touch door, glass window, vent or sidewalls of bread maker during the bake cycle, as these surfaces are hot.
- When cycle is complete, 0:00 will appear in display and audible alert will sound. Turn bread maker off by holding start/stop button down until light goes out. The just completed program will reappear in display. Unplug cord from electrical outlet.
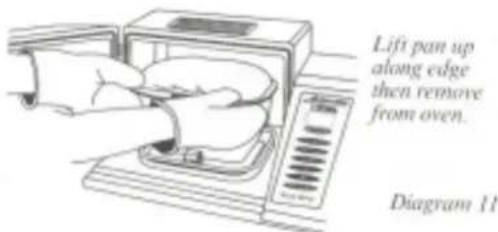
It is best to remove bread immediately from machine for a crispier crust. Open door and remove bread pan using oven mitts. To unlock pan, lift up along front edge to unlock then remove pan from machine. If pan does not unlock easily, tap upward along front
edge of pan until pan unlocks. Handle bread pan carefully as it is hot. See diagram 11.
CAUTION: To avoid burn injury, always use oven mitts to remove the hot bread pan from bread maker and when removing the baked loaf of bread from pan. Do not allow oven mitts to touch the hot heating element in bottom of bread maker when removing pan.

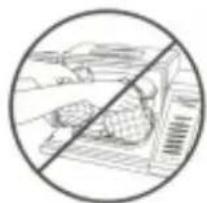
CAUTION: If using hot pads rather than oven mitts for removing hot bread pan from bread maker, be careful not to allow pads to touch hot heating elements as they can become singed or even start on fire if not careful. See diagram 12.
natural_image
Cross-sectional diagram of a building with diagonal line indicating construction or safety (no text or symbols)Do not let oven units or hot pads touch hot heating unit when removing pan after baking as they could start on fire.
Diagram 12
Invert bread pan and shake until loaf falls out on cooling rack. Knead bars will normally stay in pan when bread is removed, but may on occasion, slide out with bread. If bars are inside loaf, remove before slicing. Cool bread for at least 15 to 30 minutes. If bread is not removed right after cycle is complete, the bread maker will automatically go into a keep warm mode for up to three (3) hours. The on light will remain lit during this time and 0:00 will appear in display. When removing bread pan during keep warm period, always use oven mitts as pan will still be hot. Turn bread maker off by holding start/stop button down until on light goes out. Unplug cord from electrical outlet after use. If bread maker is not turned off during keep warm period, it will automatically shut itself off after three (3) hours and the on light will go out.
CAUTION: To avoid burn injury, do not put hands inside oven chamber or touch heating unit after completion of the bake cycle, as these surfaces are hot.
HOW TO USE DOUGH SETTING
The dough setting will prepare dough for hand shaping/forming and baking in your own oven. Use this setting when you wish to make dinner rolls, cinnamon rolls, donuts, bread sticks or your own favorite dough recipes. The time delay can be used with the dough setting. The crust color and loaf size buttons do not apply to the dough setting.
Follow these steps for using the DOUGH setting:
- Position knead bars onto shafts in bottom of bread pan. Make sure both knead bars are pushed down onto shafts. Twist slightly if needed to drop bars in place.
- Add ingredients to pan in order listed in recipe, MAKING SURE to add any liquid ingredients first, followed by dry ingredients, then butter or margarine and lastly the yeast. After dry ingredients are added to the pan, tap pan several times to settle the ingredients, then push some of the flour mixture into the corners of pan. This prevents liquid from seeping up from the corners. Make a slight well in center of flour and add the yeast to well. This is especially important when using the time delay to prevent the yeast from getting wet.
- Lock bread pan into bread make. Pan must always be locked in place for bread maker to function properly. Always make sure the side of pan marked FRONT is positioned to the front. Close door.
- Plug bread maker cord into a 120 volt AC electrical outlet ONLY. Press BREAD SELECT button until indicator arrow points to dough setting on control panel. The process time of 1:40 (1 hour, 40 minutes) will appear in display. Program time delay if desired.
- Press START/STOP button once to turn bread maker on. When turned on, the red light will glow and the colon between hours and minutes will flash. The dough will mix, then be kneaded and allowed to rise before being stirred down. At this time, 0:00 will appear in the display and an audible alert will sound to let you know the dough is done. Lift front edge of pan up and remove pan from machine. Complete recipe following instructions. The bread maker will automatically turn itself off upon completion of the dough cycle and the red light will go out. Unplug cord from electrical outlet after cycle is complete.
HOW TO USE TIME DELAY
The time delay can be used at all settings. Follow steps 1-4 for making bread or dough. Use only recipes with the symbol with the time delay as these recipes do not contain any perishable ingredients that will spoil when left at room temperature for several hours.
NEVER USE PERISHABLE INGREDIENTS (milk, eggs, cheese, yogurt, etc.) WITH THE TIME DELAY AS THESE INGREDIENTS CAN SPOIL WHEN HELD AT ROOM TEMPERATURE SEVERAL HOURS BEFORE THE BREAD MAKER TURNS ON.
After completing above-mentioned steps, continue with steps below:
- Count the number of hours and minutes between the time you will start the machine to when you want the bread or dough to be done.

For Example: You are ready to start the machine at 9:30 and want the bread done at 6:00. The number of hours and minutes between 9:30 and 6:00 is 8 12 hours or 8:30. 8:30 is the time you enter into the time delay. Hold the (up) ▲ time delay button down to scroll the time up in 10-minute increments until 8:30 appears in display. If you go past 8:30, use the (down) ▼ time delay button to scroll down
in 10-minute increments until you reach 8:30. The maximum time for timer is 13 hours (13:00). The bread or dough process time is automatically figured into the delay time, as this is the time from which you begin to count up.
- Press START/STOP button once to turn the bread maker on. The red light will glow, the colon between hours and minutes will flash and the timer will count down by 1-minute intervals. When the timer reaches the programmed bread or dough process time, the machine will begin making bread or dough. When the bread/dough is done, 0:00 will appear in the display and an audible alert will sound to let you know it is done. If in the bread mode, the bread maker will automatically go into the Keep Warm mode for up to 3 hours or until the bread maker is turned off. If in the Dough mode, the bread maker will automatically turn itself off when the dough is complete. Unplug cord from electrical outlet. Remove bread or dough from bread maker. Always use potholder or oven mitt when removing hot bread pan from bread maker after baking. Cool loaf on rack 15 to 30 minutes before slicing.
CAUTION: To avoid burn injury, do not touch cover, vent or sidewalls of bread maker during the bake cycles, as these surfaces are hot. Do not put hands inside oven chamber or touch the heating unit after completion of the bake cycle, as these surfaces are also hot.
SLICING BREAD
Always allow bread to cool at least 15 to 30 minutes before slicing. If you attempt to slice the bread immediately after baking, it will be very difficult to slice and will be sticky.
STORING BREAD
Since homemade bread contains no preservatives, it does not stay as fresh for as long as commercially made bread. Store your bread in a plastic bag to keep it from drying out. Keep the bread at room temperature or in the refrigerator for up to one week. For longer storage, put the bread in the freezer. Slice before freezing so you can remove only the number of slices you need at a time.
CLEAN AFTER EACH USE
DO NOT IMMERSE BOTTOM OF BREAD PAN IN WATER!
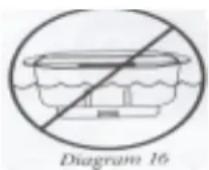
The bread pan is not immersible and should never be washed in an automatic dishwasher. This can cause damage to the bearings that turns the knead bars and reduce the non-stick qualities of the coating, causing the bread to stick.
-
Unplug cord from electrical outlet and allow bread maker to cool before cleaning.
-
The bread pan and knead bars must be cleaned after each use to ensure performance. After bread is removed from pan, fill pan half full with warm water and small amount of dish soap. Set pan in empty sink or on hot pad and allow to soak for 5 to 10 minutes or until knead bars can be lifted off shaft. Twist bar slightly to loosen. The knead bar must soak in water before it can be removed. Wash inside of pan and knead bars with a soft cloth, rinse and dry. Replace bars on shaft. Also, be sure that shafts in bottom of pan are kept clean to ensure that the knead bars fits properly. DO NOT use any type of utensil or tool to clean the gasket around the shafts as damage will occur and result in leakage. DO NOT use any abrasive scouring pads or cleansers on bread pan or knead bars as damage to finish can occur. The coating inside of bread pan may change color over time, which is normal and does not affect the bread or dough.
CAUTION: To prevent personal injury or electric shock, do not immerse bread maker base, its cord or plug in water or other liquid.
- Wipe inside of chamber and outside surfaces of bread maker with a damp cloth if necessary. The door is removable for cleaning if needed. Simply open it 90 degrees and lift up to disengage from hinge pins. Wipe cover with a damp, soapy cloth and dry. DO NOT immerse door in water or place in automatic dishwasher as water will get in between the parts and cause damage. After cleaning, replace door by aligning socket openings over hinge pins. Lower door onto pins. Door should move freely from side to side after being replaced.
So you know exactly what is going on inside the bread maker during the process time, the following chart breaks down the time in minutes that each cycle requires. These times are approximate and should be used only as a guide. The total process time is also given in hours and minutes depending on the crust selection made.
MIX – When the bread maker is turned on, it will mix the ingredients about 6 minutes. The knead bars will start and stop during the mixing action which is normal.
REST – After the initial mixing period, the dough is allowed to rest about 10 minutes before the kneading action begins. You may hear faint clicking sounds during this Rest period, which is normal and indicates the bread maker is working properly in keeping the dough warm.
KNEAD – The total knead time varies depending on the bread selection made and loaf size. Total kneading time at the basic/specialty setting ranges between 23 and 25 minutes; between 26 and 30 minutes at the whole wheat setting and 23 minutes at the dough setting. The longer knead times are required at the whole wheat setting to better develop the gluten in whole wheat flour.
SPECIAL NOTES:
An audible alert will sound during the knead cycle of all settings to let you know when to add ingredients such as raisins, nuts, cheese, etc. to prevent over mixing or crushing. Ignore alert if not adding ingredients.
If you need to make any adjustment to the recipe, such as adding a little more flour or liquid in order for the dough to form a ball and be of soft consistency, you must make this adjustment during this knead period. Use alert described above, or set a separate timer to remind you to check the dough during the kneading period to make any necessary adjustments.
RISE (1) – After the dough is kneaded, it is allowed to rise for a certain period of time. You may hear faint clicking sounds during the rise as gentle heat is being provided to keep the chamber warm.
STIR-DOWN (1) – after the dough has risen, it is then stirred down briefly by the knead bar to remove excess carbon dioxide gas created by the yeast. SPECIAL NOTE: If using the DOUGH setting, its cycle is complete at this time and ready for hand shaping, rising and baking in you own oven. An audible alert will sound and the bread maker will turn itself off after completion of the DOUGH cycle.
RISE (2) - The dough is then allowed to rise again, but for a shorter period time.
STIR DOWN (2) - after the shorter rise time, the dough is again stirred down by the knead bars to remove excess gas and also to shape the dough into a ball for the final rise. This final knead ensures that the bread will have good texture.
RISE (3) - The dough then goes into the final rise to achieve its maximum height. Again, you may hear faint clicking sounds during the rise as gentle heat is provided to keep the chamber warm.
BAKE – The bread is then baked for the specified time depending on the crust color selection made: light, medium or dark. An audible alert will sound when the bread is done and 0:00 will appear in the display. If the bread maker is not turned off, it will automatically go into the Keep Warm mode for up to 3 hours. After the bread is removed, turn bread maker off by holding down the START/STOP button for 4 seconds or until the red signal light goes out.
TROUBLESHOOTING GUIDE
Following are some typical problems that can occur when making bread in your bread maker. Please review the problems, their possible causes and the corrective action that should be taken to ensure successful bread making.
| PROBLEM | POSSIBLE CAUSE | SOLUTION |
| 1. Top inflated,mushroom-like in appearance. | -Too much yeast.-Too much sugar.-Too much flour.-Substituted active dry yeast for bread machine/fast-rising yeast.-Not enough salt.-Warm, humid weather.-May be caused by high altitude. | -Reduce yeast by 1⁄4 to 1⁄2 teaspoon.-Reduce sugar by 1 teaspoon.-Reduce flour by 2 to 3 tablespoons.-Use correct amount of bread machine/fast-rising ycast.-Use amount recommended in recipe.-Reduce liquid by 1 tablespoon and reduce yeast by 1⁄4 to 1⁄2 teaspoon.-Make recommended adjustment for high altitude baking by reducing yeast by 1⁄4 teaspoon and reducing liquid by 2 to 3 teaspoons. |
| 2. Top and sides cave in | -Too much liquid.-Too much yeast. | -Reduce liquid by 1 tablespoon.-Use amount recommended in recipe. |
| 3. Center of loaf is raw,not baked through. | -Too much liquid.-Power outage during operation.-Forgot to put knead bars in pan. | -Reduce liquid by 1 tablespoon.-If power goes out during operation for more than 10 seconds, bread maker will remain off when power is restored. You will need to remove unbaked loaf from pan and start over with fresh ingredients. If power is restored within about 10 seconds machine will resume operation where it left off.-Always put knead bars on shaft in pan before adding ingredients. |
| 4. Gnarly, knotted top,not smooth. | -Not enough liquid.-Too much flour. | -Increase liquid by 1 tablespoon.-Measure flour accurately, leveling off measuring cup. |
| 5. Dark crust color/toothick. | -DARK crust setting used. | -Use LIGHT or MEDIUM crust color setting the next time. |
| 6. Loaf is burned. -Bread | maker malfunctioning. -See Warranty section for servicing. | |
| 7. Crust too thick. -Bread | baked too long. -Use lighter crust color setting the next time to shorten bake time. | |
| 8. Knead bars cannot beremoved. | -Water must be added to bread pan for knead bars to soak before it can be removed. | -Follow cleaning instructions after use. You may need to twist bars slightly after soaking to loosen. |
| 9. Flat loaves, no rising | -Yeast omitted.-Yeast too old.-Liquid too hot.-Too much salt added.-Sugar or other sweetener omitted.-If using timer, yeast got wet before bread making process started. | -Add ingredients as listed in recipe-Check expiration date.-Use lukewarm liquid, about 80° F.-Use amount recommended.-Add ingredients as listed in recipe.-Push dry ingredients into corners of pan. Make well in center of dry ingredients for yeast to protect it from liquids. |
| 10. Collapsed while baking | -May be caused from baking in high altitude.-Exceeding capacity of bread pan.-Not enough salt used or omitted.-Too much yeast or wrong type used.-Warm, humid weather. | -Make recommended adjustment for high altitude baking by reducing yeast by 1⁄4 teaspoon and reducing liquid by 2 to 3 teaspoons.-Do not use more ingredients than recommended for 2 pound loaf.-Use amount of salt recommended in recipe.-Measure right type of yeast accurately.-Reduce liquid by 1 tablespoon and reduce yeast by 1⁄4 to 1⁄2 teaspoon. |
| 11. Collapsed while baking. | -May be caused by high altitude.-Exceeding capacity of bread pan.-Not enough salt used or omitted.-Too much yeast or wrong type used.-Warm, humid weather. | -Make recommended adjustment for high altitude baking by reducing yeast by 1⁄4 teaspoon and reducing liquid by 2 to 3 teaspoons.-Do not use more ingredients than recommended for 2 pound loaf.-Use amount recommended in recipe.-Measure right type of yeast accurately.-Reduce liquid by 1 tablespoon and reduce yeast by 4 to 1⁄2 teaspoon. |
| 12. Doesn’t slice well, very sticky. | -Sliced while too hot.-Not using proper knife. | -Allow bread to cool on rack at least 15 to 30 minutes before slicing to release steam.- Use a good bread knife or electric knife. |
| 13. Open, coarse, holcy texture. | -Sale omitted.- Too much yeast.- Too much liquid | -Assemble ingredients as listed in recipe.-Measure right amount of recommended yeast.-Reduce liquid by 1 tablespoon. |
| 14. Heavy, dense texture. | -Too much flour.-Not enough yeast.-Not enough sugar. | -Measure accurately. Leveling off measuring cup.-Measure recommended amount of yeast.-Measure accurately. |
| 15. Ingredients not mixed. | -Did not start bread maker.-Forgot to put knead bar in pan. | -After programming control panel, pressstart/stopbutton to turn machine on.-Knead bar must be on shaft in bottom of pan before adding ingredients. |
| 16. Burning odor noted during operation | -Ingredients spilled inside oven.-Pan leaks.-Exceeding capacity of bread pan. | -Be careful not to spill when adding to pan.Ingredients can burn onto heating unit and cause smoke.-Replacement pan may be ordered.-Do not use more ingredients than recommended in recipe and always measure accurately. |
| 17.Bread sticks to pan/difficult to shake out. | -Can happen over prolonged use. -Wipe inside of bread pan, from ribs down, lightly with vegetable oil or solid shortening. Or, add 1-teaspoon vegetable oil to liquid in pan before adding dry ingredients. Do not use a vegetable spray as sticking can worsen. Or, let bread sit in pan 10 minutes before shaking out.-Replacement pan may be ordered. | |
| 18. WHOOPS!Machine unplugged by mistake or power was lost.How can I save the bread? | -If machine in knead cycle, reprogram to same bread setting and color and turn machine back on.-If machine in rise cycle, remove dough from pan, shape and place in greased 9-by-5-inch loaf pan, cover and allow to rise until doubled. Bake in preheated conventional oven at 350°F for 40 to 45 minutes or until golden brown.-If in bake cycle, preheat conventional oven to 350°F and remove top rack. Carefully remove pan from machine and place on bottom oven rack. Bake until golden brown. | |
NUTRITIONAL INFORMATION
Nutritional information was calculated using butter and whole milk when called for in the recipes and is based on a 12 -inch thick slice of bread. For less calories and total fat, you may substitute margarine for butter and low-fat milk for whole milk.
| Country White Bread Total Calories: | French Bread Total Calories: | |||||
| 133.5 Total Fat(g):1.9 Total Carb(g):24.5 Total Protein(g):4.5 Fiber(g):0.9 Chol(mg):3.8 Sodium(mg):199.9 | 131.0 Total Fat(g):1.6 Total Carb(g):24.5 Total Protein(g):4.3 Sodium(mg):191.7 | |||||
| Classic Rye Bread Total Calories: | Italian Herb Bread Total Calories: 137.3 | |||||
| 124.3 Total Fat(g):1.3 Total Carb(g):24.1 Total Protein(g):4.1 Fiber(g):1.8 Chol(mg):2.0 Sodium(mg):213.7 | Total Fat(g):2.3 Total Carb(g):24.3 Total Protein(g):4.9 Sodium(mg):213.7 | |||||
| Honey Oatmeal Bread Total Calories: | Basic Dinner Rolls/Bread Sticks Total Calories: | |||||
| 134.1 Total Fat(g):2.0 Total Carb(g):24.7 Total Protein(g):4.5 Fiber(g):1.0 Chol(mg):3.8 Sodium(mg):199.7 | 115.5 Total Fat(g):2.5 Total Carb(g):19.8 Total Protein(g):3.7 Sodium(mg):146.8 | |||||
| Egg Bread Total Calories: | Cinnamon Rolls Total Calories: 177.3 | |||||
| 148.3 Total Fat(g):3.0 Total Carb(g):24.8 Total Protein(g):5.4 Fiber(g):0.9 Chol(mg):29.7 Sodium(mg):209.4 | Total Fat(g):7.9 Total Carb(g):22.8 Total Protein(g):5.5 Fiber(g):0.9 Chol(mg):28.6 Sodium(mg):126.2 | |||||
| 100% Whole Wheat Bread Total Calories: | Raisin Bread Total Calories:177.4 Total Fat(g): | |||||
| 127.5 Total Fat(g):2.0 Total Carb(g):23.5 Chol(mg):3.8 Protein(g):4.6 Fiber(g):3.4 Sodium(mg):202.4 | 3.4 Total Carb(g):32.7 Total Protein(g):5.1 Fiber(g):1.4 Chol(mg):3.8 Sodium(mg):231.3 | |||||
| Half Whole Wheat Bread Total Calories: | Cinnamon Oatmeal Raisin Bread Total Calories: | |||||
| 126.5 Total Fat(g):1.9 Total Carb(g):23.3 TotalProtein(g):4.3 Fiber(g):2.0 Chol(mg):3.8 Sodium(mg):200.9 | Total Fat(g):2.8 Total Carb(g):26.0 Total Protein(g):4.7 Fiber(g):1.21 Chol(mg):6.9 Sodium(mg):207.3 | |||||
| Apricot Almond Bread Total Calories: | Bran Bread Total Calories:146.3 Total Fat(g) | |||||
| 143.8 Total Fat(g):3.1 Total Carb(g):24.1 Chol(mg):3.8 Total Protein(g):4.7 Fiber(g):1.21 Sodium(mg):200.4 | 2.6 Total Carb(g):26.3 Total Protein(g):4.6 Fiber(g):1.4 Chol(mg):5.6 Sodium(mg) 228.2 | |||||
| Buttermilk Wheat Bread Total Calories: | Cheese Bread Total Calories: | |||||
| 125.8 Total Fat(g):2.1 Total Carb(g):22.2 Total Protein(g):4.8 Fiber(g):2.3 Sodium(mg):327.5 | 158.9 Total Fat(g):4.3 Total Carb(g):23.8 Total Protein(g):6.1 Sodium(mg):224.5 | |||||
| Cracked Wheat Bread Total Calories: | Croissants Total Calories: | |||||
| 133.0 Total Fat(g):1.7 Total Carb(g):25.3 Total Protein(g):4.4 Fiber(g):1.9 Sodium(mg):297.8 | 186.6 Total Fat(g):10.8 Total Carb(g):19.5 Total Protein(g):5.7 Sodium(mg):200.4 | |||||
Raised Doughnuts Total Calories:
Focaccia Total Calories:
173.2 Total Fat(g):5.5 Total Carb(g):25.2 Total 132.1 Total Fat(g):4.3 Total Carb(g):20.0 Total
Protein(g):5.6 Fiber(g):0.8 Chol(mg):19.4 Protein(g):4.0 Fiber(g):0.8 Chol(mg):6.1
Sodium(mg):158.5
Sodium(mg):211.7
Garlic Bread Total Calories:
Dill Bread Total Calories: 134.2
133.1 Total Fat(g):2.2 Total Carb(g):24.3 Total Total Fat(g):2.2 Total Carb(g):24.6 Total
Protein(g):4.6 Fiber(g):0.9 Chol(mg):3.8 Protein(g):4.6
Sodium(mg):200.2 Sodium(mg):200.5
Fiber(g):1.1 Chol(m
Shredded Wheat Bread Total Calories:
Multi-grain French Bread Total Calories:
141.5 Total Fat(g):1.9 Total Carb(g):26.4 Total 119.6 Total Fat(g):1.6 Total Carb(g):22.1 Total
Protein(g):4.7 Fiber(g):1.1 Chol(mg):3.8 Protein(g):4.1
Sodium(mg):200.3 Sodium(mg):198.3
Fiber(g):1.5 Chol(m
Panettone Total Calories:
Stollen Fruit Bread Total Calories: 183.8
183.4 Total Fat(g):4.3 Total Carb(g):32.2 Total Total Fat(g):3.3 Total Carb(g):34.3 Total
Protein(g):5.8 Fiber(g):1.3 Chol(mg):29.4 Protein(g):4.8 Fiber(g):1.4 Chol(mg):3.7
Sodium(mg):210.3 Sodium(mg):196.3
Old Fashioned White Bread Total Calories:
Pizza Dough Total Calories:65.7 Total Fat(g):
143.9 Total Fat(g):2.7 Total Carb(g):25.0 1.9 Total Carb(g):10.7 Total Protein(g):1.5 Fiber(g):0.5
Chol(mg):6.7 Protein(g):5.0 Fiber(g):0.9 Chol(mg):0.1 Sodium(mg):108.8
Sodium(mg):205.6
Whole Wheat Pizza Dough Total Calories:
Sourdough Wheat Bread Total Calories:
Total 64.6 Total Fat(g):1.1 Total Carb(g):11.5
136.6 Total Fat(g):1.0 Total Carb(g):27.1
Total Protein(g):2.3 Fiber(g):1.9 Chol(mg):0
TotalProtein(g):5.1 Fiber(g):2.1 Chol(mg):2.0
Sodium(mg):61.9
Sodium(mg):193.6
Traditional French Bread Total Calories:
107.3 Total Fat(g):1.2 Total Carb(g):20.2 1.9 Total Carb(g):24.4 Total Protein(g):4.4 Fiber(g):1.0
Chol(mg):1.8 Protein(g):3.6 Fiber(g):0.8 Chol(mg):3.8 Sodium(mg):201.7
Sodium(mg):158.1
Pumpernickel Rye Bread Total Calories:
Potato Bread Total Calories:132.6 Total Fat(g):
130.1 Total Fat(g):2.7 Total Carb(g):23.3 Total Fat(g):2.7 Total Carb(g):25.8 Total Protein(g):5.7
Fiber(g):2.0 Chol(mg):5.5 Total Protein(g):4.2 Total Fiber(g):2.6 Chol(mg):5.9 Sodium(mg):308.1
Sodium(mg):203.5
Rye Dinner Rolls Total Calories:
Sourdough Total Calories:141.5 Total Fat(g):
101.9 Total Fat(g):2.4 Total Carb(g):17.6 1.1 Total Carb(g):27.4 Total Protein(g):5.0 Fiber(g):1.0
Chol(mg):5.7 Protein(g):3.2 Fiber(g):1.7 Chol(mg):2.0 Sodium(mg):191.0
Sodium(mg):146.4
Wheat Dinner Rolls Total Calories:
105.3 Total Fat(g):2.5 Total Carb(g):18.1
Total Protein(g):3.7 Chol(mg):5.7 Fiber(g):1.6
Sodium(mg):147.3
BASIC/SPECIALTY BREAD SETTING
- The recipes in this section can be made at the basic/specialty bread setting. The time delay can be used with the recipes with the Ⓣ symbol.
- Active dry, bread machine or fast rising yeast may be used in the recipes. Use the recommended amount for the type of yeast being used. Bread machine and fast rising yeast are interchangeable. ALWAYS make a well in the center of dry ingredients for the yeast. This is especially important when using the time delay to prevent the yeast from becoming wet before the bread making process begins.
- Use LUKEWARM water, about 80^ F, to activate the yeast for best results. DO NOT USE HOT WATER, above 100^ F, as this can kill the yeast.
- MILK MUST BE WARMED to about 80^ F, in order to activate the yeast for best results. DO NOT USE MILK DIRECTLY FROM THE REFRIGERATOR. Gently warm milk in microwave at low power or in a pan on top of range over low heat, using a thermometer to measure correct temperature. DO NOT OVERHEAT MILK, above 100^ F, as this can kill the yeast. Allow to cool if too hot or add a little cold milk to cool it off.
- If cold butter or margarine is used, cut into four (4) pieces, placing in bottom of pan with liquid for faster blending.
- Start with medium crust color setting the first time you make a loaf. Make a comment at the bottom of each recipe if you wish to use the light or dark crust color setting the next time you prepare the recipe.
- An audible alert will sound during the knead cycle to let you know when to add ingredients if recipe recommends doing so. This will prevent these added ingredients from becoming over mixed or crushed. Simply open door when alert sounds and add the ingredients. Close door. Do not turn bread maker off when adding ingredients. If you are not adding ingredients, simply ignore this alert.
-If bread maker labors during the kneading period, the dough is too dry. Add one (1) tablespoon warm water at a time until the dough softens. Do not add too much extra water as this can cause the bread to collapse or be under baked. The bread dough should be soft and a bit sticky to the touch after kneading.
| OLD FASHIONED WHITE BREADMade with milk for a tender crust and fine texture. Bread just like Grandma used to make that now you can make, too! | ||
| 112 Pound Loaf | INGREDIENTS | 2 Pound Loaf |
| 11 ounces ( 114 cup + 2 Tbsp.)2 tablespoons 313 cups2 tablespoons 114 teaspoons2 teaspoons- or - 112 teaspoons | WATER, 80^ FBUTTER or MARGARINEBREAD FLOURSUGARSALTACTIVE DRY YEAST-or-BREAD MACHINE/FAST RISE YEAST | 13 ounces ( 112 cups+ 2 tbsp.)2 tablespoons4 cups 212 tablespoons 112 teaspoons 214 teaspoons-or-2 teaspoons |
| FOLLOW THESE INSTRUCTIONS FOR THIS RECIPE | ||
| BREAD SELECT SETTING TO USE: basic/specialty | ||
| 1. Add liquid ingredients and butter to pan.2. Add all dry ingredients, except yeast, to pan. Tap pan to settle dry ingredients, then level ingredients, pushing some of the mixture into the corners.3. Make a well in center of dry ingredients; add yeast. Lock pan into bread maker. | 4. Program for recommended bread select setting and desired crust color. Program time delay if being used. Start bread maker. When done, turn off, unlock pan and remove with oven mitts. Shake bread out of pan. Cool on rack before slicing. | |
| COUNTRY WHITE BREAD ^T | ||
| 1 12 Pound Loaf | INGREDIENTS | 2 Pound Loaf |
| 10 ounces (1 14 cups)2 tablespoons3 13 cups2 tablespoons2 tablespoons1 14 teaspoons2 teaspoons- or -1 12 teaspoons | WATER, 80° FBUTTER or MARGARINEBREAD FLOURDRY MILKSUGARSALTACTIVE DRY YEAST- or -BREAD MACHINE/FAST RISE YEAST | 12 ounces (1 12 cups)2 tablespoons4 cups2 tablespoons2 12 tablespoons1 12 teaspoons2 14 teaspoons-or-2 teaspoons |
| POTATO BREAD ^1 An old-time favorite, using instant potato flakes. Save liquid from cooking potatoes to replace water in this recipe for added flavor. | ||
| 1 12 Pound Loaf | INGREDIENTS | 2 Pound Loaf |
| 11 ounces (1 34 cups + 2 tbsp.)2 tablespoons3 14 cups 12 cup2 tablespoons2 tablespoons1 14 teaspoons1 34 teaspoons- or -1 14 teaspoons | WATER, 80° FBUTTER or MARGARINEBREAD FLOURINSTANT POTATO FLAKESDRY MILKSUGARSALTACTIVE DRY YEAST-or-BREAD MACHINE/FAST RISE YEAST | 13 ounces (1 12 cups + 2 tbsp.)2 tablespoons3 34 cups 23 cup2 tablespoons2 12 tablespoons1 12 teaspoons2 14 teaspoons-or-1 12 teaspoons |
| EGG BREAD | ||
| 112 Pound Loaf | INGREDIENTS | 2 Pound Loaf |
| 612 ounces ( 34 cup + 1 tbsp.)22 tablespoons 314 cups 112 tablespoons 114 teaspoons2 teaspoons- or - 112 teaspoons | WATER, 80^ FEGGS, largeBUTTER or MARGARINEBREAD FLOURSUGARSALTACTIVE DRY YEAST- or -BREAD MACHINE/FAST RISE YEAST | 912 ounces (1 cups + 3 tbsp.)22 tablespoons4 cups2 tablespoons 112 teaspoons 214 teaspoons-or-2 teaspoons |
| FOLLOW THESE INSTRUCTIONS FOR RECIPES ON THIS PAGE | ||
| BREAD SELECT SETTING TO USE: basic/specialty | ||
| 1. Add liquid ingredients and butter to pan.2. Add all dry ingredients, except yeast, to pan. Tap pan to settle dry ingredients, then level ingredients, pushing some of the mixture into the corners.3. Make a well in center of dry ingredients; add yeast. Lock pan into bread maker. | 4. Program for recommended bread select setting and desired crust color and loaf size. Program time delay if being used. Start bread maker. When done, turn off, unlock pan and remove with oven mitts. Shake bread out of pan. Cool on rack before slicing. | |
| HONEY OATMEAL BREAD ^1 Use old-fashioned or quick cooking oats in this recipe, but do not use instant oatmeal. | ||
| 11⁄2 Pound Loaf INGREDIENTS 2 Pound Loaf | ||
| 10 ounces (11⁄4 cups)2 tablespoons2 tablespoons21⁄3 cups1 cup2 tablespoons11⁄4 teaspoons2 teaspoons- or -11⁄2 teaspoons | WATER, 80° FHONEYBUTTER or MARGARINEBREAD FLOUROATS, quick or old-fashionedDRY MILKSALTACTIVE DRY YEAST- or -BREAD MACHINE/FAST RISE YEAST | 13 ounces (11⁄2 cups + 2 tbsp)2 tablespoons2 tablespoons31⁄2 cups1 cup2 tablespoons11⁄2 teaspoons21⁄4 teaspoons-or-2 teaspoons |
| ITALIAN HERB BREAD ^1 | ||
| 1 12 Pound Loaf | INGREDIENTS | 2 Pound Loaf |
| 10 ounces (1 14 cups)2 tablespoons3 13 cups2 tablespoons1 tablespoon1 tablespoon2 teaspoons1 14 teaspoons2 teaspoons- or -1 12 teaspoons | WATER, 80° FBUTTER or MARGARINEBREAD FLOURGRATED PARMESAN CHEESEDRY MILKSUGARITALIAN SEASONINGSALTACTIVE DRY YEAST-or-BREAD MACHINE/FAST RISE YEAST | 12 ounces (1 12 cups)2 tablespoons4 cups3 tablespoons1 12 tablespoons1 12 tablespoons2 12 teaspoons1 12 teaspoons2 14 teaspoons-or-2 teaspoons |
| DILL BREAD ^1 | ||
| 1 12 Pound Loaf INGREDIENTS 2 Pound Loaf | ||
| 10 ounces (1 14 cups)2 tablespoons3 13 cups1 12 tablespoons1 14 teaspoons1 tablespoon2 tablespoons2 teaspoons- or -1 12 teaspoons | WATER, 80° FBUTTER or MARGARINEBREAD FLOURSUGARSALTDILL WEEDDRY MILKACTIVE DRY YEAST- or -BREAD MACHINE/FAST RISE YEAST | 12 ounces (1 12 cups)2 tablespoons4 cups2 tablespoons1 12 teaspoons1 12 tablespoons2 tablespoons2 14 teaspoons-or-2 teaspoons |
| FOLLOW THESE INSTRUCTIONS FOR RECIPES ON THIS PAGE | ||
| BREAD SELECT SETTING TO USE: basic/specialty | ||
| 1. Add liquid ingredients and butter to pan.2. Add all dry ingredients, except yeast, to pan. Tap pan to settle dry ingredients, then level ingredients, pushing some of the mixture into the corners.3. Make a well in center of dry ingredients; add yeast. Lock pan into bread maker. | 4. Program for recommended bread select setting and desired crust color. Program time delay if being used. Start bread maker. When done, turn off, unlock pan and remove with oven mitts. Shake bread out of pan. Cool on rack before slicing. | |
| GARLIC BREAD ^T | ||
| 1 12 Pound Loaf INGREDIENTS 2 Pound Loaf | ||
| 10 ounces (1 14 cups)2 tablespoons3 13 cups2 tablespoons1 tablespoon1 12 tablespoons1 14 teaspoons 12 teaspoons2 teaspoons- or -1 12 teaspoons | WATER, 80° FBUTTER or MARGARINEBREAD FLOURDRY MILKDRIED PARSLEY FLAKESSUGARSALTGARLIC POWDERACTIVE DRY YEAST- or -BREAD MACHINE/FAST RISE YEAST | 12 ounces (1 12 cups)2 tablespoons4 cups2 tablespoons1 12 tablespoons2 tablespoons1 12 teaspoons 12-34 teaspoon2 14 teaspoons-or-2 teaspoons |
| CLASSIC RYE BREAD ^T | ||
| 1 12 Pound Loaf INGREDIENTS 2 Pound Loaf | ||
| 10 ounces (1 14 cups)1 12 tablespoons2 13 cups1 cup2 tablespoons1 12 tablespoons1 14 teaspoons1 teaspoon2 teaspoons- or -1 12 teaspoons | WATER, 80° FBUTTER or MARGARINEBREAD FLOURMEDIUM RYE FLOURDRY MILKSUGARSALTCARAWAY SEED, optionalACTIVE DRY YEAST- or -BREAD MACHINE/FAST RISE YEAST | 12 ounces (1 12 cups)2 tablespoons3 cups1 14 cups2 tablespoons1 12 tablespoons1 12 teaspoons1 12 teaspoons2 14 teaspoons-or-2 teaspoons |
| PUMPERNICKEL RYE BREAD ^T | ||
| 1 12 Pound Loaf INGREDIENTS 2 Pound Loaf | ||
| 10 ounces (1 14 cups)2 tablespoons3 tablespoons2 14 cups 12 cup 12 cup2 tablespoons1 14 teaspoons2 teaspoons- or -1 12 teaspoons | WATER, 80° FMOLASSESBUTTER or MARGARINEBREAD FLOURMEDIUM RYE FLOURWHOLE WHEAT FLOURCOCOA, unsweetenedSALTACTIVE DRY YEAST- or -BREAD MACHINE/FAST RISE YEAST | 12 ounces (1 12 cups)2 tablespoons3 tablespoons2 12 cups 12 cup 12 cup2 12 tablespoons1 12 teaspoons2 14 teaspoons-or-2 teaspoons |
| FOLLOW THESE INSTRUCTIONS FOR RECIPES ON THIS PAGE | ||
| BREAD SELECT SETTING TO USE: basic/specialty | ||
| 1. Add liquid ingredients and butter to pan.2. Add all dry ingredients, except yeast, to pan. Tap pan to settle dry ingredients, then level ingredients, pushing some of the mixture into the corners.3. Make a well in center of dry ingredients; add yeast. Lock pan into bread maker | 4. Program for recommended bread select setting and desired crust color. Program time delay if being used. Start bread maker. When done, turn off, unlock pan and remove with oven mitts. Shake bread out of pan. Cool on rack before slicing. | |
| SHREDDED WHEAT BREAD ^1 | ||
| 1 12 Pound Loaf INGREDIENTS 2 Pound Loaf | ||
| 11 ounces (1 14 cups + 3 tbsp.)2 tablespoons3 cups2 large biscuits, broken2 tablespoons2 tablespoons1 14 teaspoons2 teaspoons- or -1 12 teaspoons | WATER, 80° FBUTTER or MARGARINEBREAD FLOURSHREDDED WHEAT CEREALBROWN SUGAR, packedDRY MILKSALTACTIVE DRY YEAST- or -BREAD MACHINE/FAST RISE YEAST | 13 ounces (1 12 cups + 2 tbsp.)2 tablespoons3 14 cups2 large biscuits, broken3 tablespoons2 tablespoons1 12 teaspoons2 14 teaspoons-or-2 teaspoons |
| BRAN BREAD ^1 | ||
| 1 12 Pound Loaf INGREDIENTS 2 Pound Loaf | ||
| 10 ounces (1 14 cups)2 tablespoons2 tablespoons3 cups1 cup2 tablespoons1 14 teaspoons2 teaspoons- or -1 12 teaspoons | WATER, 80° FHONEYBUTTER or MARGARINEBREAD FLOURBRAN FLAKES CEREALDRY MILKSALTACTIVE DRY YEAST- or -BREAD MACHINE/FAST RISE YEAST | 12 ounces (1 12 cups)3 tablespoons2 tablespoons3 34 cups1 14 cups2 tablespoons1 12 teaspoons2 14 teaspoons-or-2 teaspoons |
| FRENCH BREAD ^T | ||
| 1 12 Pound Loaf INGREDIENTS 2 Pound Loaf | ||
| 10 12 ounces (1 14 cups + 1 tbsp.)1 tablespoon 12 tablespoon3 13 cups1 tablespoon1 14 teaspoons2 teaspoons- or -1 12 teaspoons | WATER, 80° FBUTTER or MARGARINEOLIVE or VEGETABLE OILBREAD FLOURSUGARSALTACTIVE DRY YEAST- or -BREAD MACHINE/FAST RISE YEAST | 12 12 ounces (1 12 cups + 1 tbsp.)1 tablespoon1 tablespoon4 14 cups1 12 tablespoons1 12 teaspoons2 14 teaspoons-or-2 teaspoons |
| FOLLOW THESE INSTRUCTIONS FOR RECIPES ON THIS PAGE | |
| BREAD SELECT SETTING TO USE: basic/specialty | |
| 1. Add liquid ingredients and butter to pan.2. Add all dry ingredients, except yeast, to pan. Tap pan to settle dry ingredients, then level ingredients, pushing some of the mixture into the corners.3. Make a well in center of dry ingredients; add yeast. Lock pan into bread maker | 4. Program for recommended bread select setting and desired crust color. Program time delay if being used. Start bread maker. When done, turn off, unlock pan and remove with oven mitts. Shake bread out of pan. Cool on rack before slicing. |
| MULTI-GRAIN FRENCH ^T | ||
| 1 12 Pound Loaf INGREDIENTS 2 Pound Loaf | ||
| 10 ounces (1 14 cups)1 tablespoon2 cups1 cup 12 cup1 14 teaspoons2 teaspoons- or -1 12 teaspoons | WATER, 80° FBUTTER or MARGARINEBREAD FLOURWHOLE WHEAT FLOUR7-GRAIN CEREALSALTACTIVE DRY YEAST- or -BREAD MACHINE/FAST RISE YEAST | 12 ounces (1 12 cups)1 12 tablespoons3 cups1 cup 12 cup1 12 teaspoons2 14 teaspoons-or-2 teaspoons |
| FOLLOW THESE INSTRUCTIONS FOR THE RECIPE ABOVE | |
| Bread Select Setting To Use: basic/specialty | |
| 1. Add liquid ingredients and butter to pan.2. Add all dry ingredients, except yeast, to pan. Tap pan to settle dry ingredients, then level ingredients, pushing some of the mixture into the corners.3. Make a well in center of dry ingredients; add yeast. Lock pan into bread maker | 4. Program for recommended bread select setting and desired crust color. Program time delay if being used. Start bread maker. When done, turn off, unlock pan and remove with oven mitts. Shake bread out of pan. Cool on rack before slicing. |
SOURDOUGH STARTER RECIPE
1 cup milk
3 tablespoons plain, nonfat yogurt
1 cup bread flour
-
In saucepan or microwave, heat milk to 100^ F. Remove from heat and stir in yogurt with a wooden or plastic spoon. Do not use metal utensils. Pour mixture into a warm glass, ceramic or plastic 6-cup bowl with a tight fitting lid. Do not use a metal bowl. Cover and let stand in a warm place 18 to 24 hours or until mixture is consistency of yogurt. When clear liquid forms on top of mixture, stir to blend in. If liquid turns pink in color, discard mixture and start over with fresh ingredients.
-
After mixture thickens, stir in 1 cup bread flour. Cover bowl tightly and let stand in warm place until mixture bubbles and has a sour smell, 2 to 5 days. Any clear liquid that forms on top of mixture can be stirred in. If the liquid turns pink in color, discard mixture and start over with fresh ingredients. Makes about 1 13 cups. Use starter immediately or cover and refrigerate until ready to use. See instructions below for proper use and maintenance of starter.
TO USE AND MAINTAIN SOURDOUGH STARTER
- Remove amount of room temperature starter as needed for recipe. If starter was refrigerated, allow to sit at room temperature 12 to 24 hours or until bubbly. Stir in clear liquid that forms and remove amount needed for recipe.
- Replenish starter every time some is removed with equal amounts of warm milk and bread flour. For example, if 1 cup of starter was removed to make bread, replenish remaining starter with 1 cup of warm, 100°F milk and 1 cup of bread flour. Stir well to blend, cover bowl and let stand in warm place until bubbly, 12 to 24 hours. Use immediately or cover and refrigerate until used, allowing to set at room temperature 12 to 24 hours before using as noted in Step 1 above. If at any time liquid on surface of mixture turns pink in color, discard mixture and start over with fresh ingredients.
SOURDOUGH TIPS:
- Do not use metal bowls or spoons to store and/or stir starter.
- If starter is not going to be used immediately cover and refrigerate. The clear liquid that forms on the surface should be stirred in once a week.
- If the liquid that forms on the surface of starter turns pink in color at any time, discard the starter and start over again with fresh ingredients.
- Starter should always be at room temperature before it is used.
- Thickness of starter will vary, therefore when making the first loaf of sourdough bread, observe dough during the kneading cycle. If the dough seems too dry, add 1 teaspoon of water at a time until dough is soft and elastic. If dough is too wet and does not form a ball of dough, add 1-tablespoon bread flour at a time until dough forms into a nice ball.
- The sour taste of the bread will vary with the tartness of the starter. Note that the recipes provide amounts of starter to use for mild and strong sourdough flavor. You may wish to start with the mild flavored recipe first.
- Sourdough bread made in a bread machine usually requires the addition of yeast as most starters are not strong enough to be used alone for proper rising of bread in the programmed times.
- To increase the supply of starter, feed with 2 cups of bread flour and 2 cups of 100^ milk.
-To share starter with a friend, give 2 cups away, 1 cup to use immediately and the second cup to feed and maintain supply.
| SOURDOUGH BREAD ^1 | ||
| 1 12 Pound Loaf INGREDIENTS 2 Pound Loaf | ||
| 5 12 ounces ( 23 cup)8 ounces (1 cup)1 tablespoon2 34 cups1 tablespoon1 14 teaspoons2 teaspoons- or -1 12 teaspoons | WATER, 80° F SOURDOUGH STARTER, room temp BUTTER or MARGARINE BREAD FLOUR SUGAR SALT ACTIVE DRY YEAST- or -BREAD MACHINE/FAST RISE YEAST | 6 12 ounces ( 34 cup + 1 tbsp.)10 ounces (1 14 cups)2 tablespoons3 12 cups1 12 tablespoons1 12 teaspoons2 14 teaspoons-or-2 teaspoons |
| FOLLOW THESE INSTRUCTIONS FOR THE RECIPES ON THIS PAGE | |
| Bread Select Setting To Use: basic/specialty | |
| 1. Add liquid ingredients and butter to pan.2. Add all dry ingredients, except yeast, to pan. Tap pan to settle dry ingredients, then level ingredients, pushing some of the mixture into the corners.3. Make a well in center of dry ingredients; add yeast. Lock pan into bread maker | 4. Program for recommended bread select setting and desired crust color and loaf size settings. Program time delay if being used. Start bread maker. When done, turn off, unlock pan and remove with oven mitts. Shake bread out of pan. Cool on rack before slicing.SPEICAL NOTE: The amount of starter used in these recipes will produce a mild tasting sour dough bread. If you would like a stronger taste, reduce the amount of water by 1 tablespoon and increase the amount of starter by 2 tablespoons for the 112 lb loaf and 4 tablespoons for the 2 pound loaf. |
| SOURDOUGH WHEAT BREAD ^T | ||
| 1 12 Pound Loaf INGREDIENTS 2 Pound Loaf | ||
| 5 ounces ( 12 cup + 2 tbsp.)8 ounces (1 cup)1 tablespoon1 tablespoon1 tablespoon 112 cups 112 cups 114 teaspoons2 teaspoons- or - 112 teaspoons | WATER, 80^ F SOURDOUGH STARTER, room temp BUTTER or MARGARINE HONEY MOLASSES BREAD FLOUR WHOLE WHEAT FLOUR SALT ACTIVE DRY YEAST · or -BREAD MACHINE/FAST RISE YEAST | 6 ounces ( 34 cup)10 ounces ( 114 cups)2 tablespoons1 tablespoon1 tablespoon 134 cups 114 cups 112 teaspoons 214 teaspoons-or-2 teaspoons |
| RAISIN BREAD ^1 | ||
| 1 12 Pound Loaf INGREDIENTS 2 Pound Loaf | ||
| 10 12 ounces (1 14 cups + 1 tbsp.)2 tablespoons3 13 cups2 tablespoons2 tablespoons1 12 teaspoons1 teaspoon2 teaspoons- or -1 12 teaspoons 34 cup 14 cup | WATER, 80° FBUTTER or MARGARINEBREAD FLOURDRY MILKSUGARSALTGROUND CINNAMONACTIVE DRY YEAST- or -BREAD MACHINE/FAST RISE YEASTRAISINS**CHOPPED NUTS, optional | 12 12 ounces (1 12 cups + 1 tbsp.)2 tablespoons4 cups2 tablespoons2 12 tablespoons1 34 teaspoons1 14 teaspoons2 14 teaspoons-or-2 teaspoons1 cup 13 cup |
| CINNAMON OATMEAL RAISIN BREAD | ||
| 1 12 Pound Loaf INGREDIENTS 2 Pound Loaf | ||
| 11 ounces (1 14 cups + 2 tbsp.)2 tablespoons2 34 cups 34 cup2 tablespoons1 14 teaspoons1 teaspoon2 teaspoons- or -1 12 teaspoons 12 cup | MILK, 80°F BUTTER or MARGARINE BREAD FLOUROATS, quick or old-fashioned BROWN SUGAR, packedSALTGROUND CINNAMONACTIVE DRY YEAST- or -BREAD MACHINE/FAST RISE YEASTRAISINS** | 13 ounces (1 12 cups + 2 tbsp.)2 tablespoons3 14 cups1 cup2 12 tablespoons1 12 teaspoons1 14 teaspoons2 14 teaspoons-or-2 teaspoons 33 cup |
| FOLLOW THESE INSTRUCTIONS FOR THE RECIPES ON THIS PAGE | |
| Bread Select Setting To Use: basic/specialty | |
| 1. Add liquid ingredients and butter to pan.2. Add all dry ingredients, except yeast, to pan. Tap pan to settle dry ingredients, then level ingredients, pushing some of the mixture into the corners.3. Make a well in center of dry ingredients; add yeast. Lock pan into bread maker | 4. Program for recommended bread select setting and desired crust color and loaf size settings. Program time delay if being used. Start bread maker. When done, turn off, unlock pan and remove with oven mitts. Shake bread out of pan. Cool on rack before slicing.SPEICAL NOTE: **To make raisin bread without being present to add the raisins, follow steps 1-3 above. Then place raisins around the outside edge of pan, on top of dry ingredients,awayfrom the yeast. Do not add raisins to the liquid in pan as the raisins will absorb too much liquid and a poor loaf of bread will be obtained. Continue with step 4. |
| CHEESE BREAD | ||
| 1 12 Pound Loaf INGREDIENTS 2 Pound Loaf | ||
| 8 12 ounces (1 cup + 1 tbsp.)12 tablespoons3 13 cups1 12 tablespoons1 14 teaspoons2 teaspoons- or -1 12 teaspoons 33 cup | WATER, 80° FEGG, largeBUTTER or MARGARINEBREAD FLOURSUGARSALTACTIVE DRY YEAST- or -BREAD MACHINE/FAST RISE YEASTSHREDDED SHARP CHEDDARCHEESE, frozen | 10 ounces (1 14 cups)12 tablespoons4 cups2 tablespoons1 12 teaspoons2 14 teaspoons-or-2 teaspoons1 cup |
| PANETTONE | ||
| 1 12 Pound Loaf INGREDIENTS 2 Pound Loaf | ||
| 6 12 ounces ( 34 cup + 1 tbsp.)2 14 teaspoon3 tablespoons3 13 cups3 tablespoons1 14 teaspoons2 teaspoons- or -1 12 teaspoons 13 cup 13 cup2 tablespoons1 tablespoon | WATER, 80° FEGGS, largeVANILLA EXTRACTBUTTER or MARGARINEBREAD FLOURSUGARSALTACTIVE DRY YEAST- or -BREAD MACHINE/FAST RISE YEASTRAISINSMIXED CANDIED FRUIT and PEELBLANCHED, SLIVERED ALMONDSGRATED LEMON RIND | 8 ounces (1 cup)2 12 teaspoon3 tablespoons4 cups3 tablespoons1 12 teaspoons2 14 teaspoons-or-2 teaspoons 12 cup 12 cup3 tablespoons2 tablespoons |
| FOLLOW THESE INSTRUCTIONS FOR THE RECIPES ON THIS PAGE | |
| Bread Select Setting To Use: basic/specialty | |
| 1. Add liquid ingredients and butter to pan.2. Add all dry ingredients, except yeast, to pan. Tap pan to settle dry ingredients, then level ingredients, pushing some of the mixture into the corners.3. Make a well in center of dry ingredients; add yeast. Lock pan into bread maker | 4. Program for recommended bread select setting and desired crust color and loaf size settings. Start bread maker. Add frozen cheese or fruit and nuts, depending on recipe being prepared, when alert sounds during the knead cycle. When done, turn off, unlock pan and remove with oven mitts. Shake bread out of pan. Cool on rack before slicing. |
| APRICOT ALMOND BREAD ^T | ||
| 1 12 Pound Loaf INGREDIENTS 2 Pound Loaf | ||
| 10 ounces (1 14 cups)2 tablespoons3 14 cups2 tablespoons2 tablespoons1 14 teaspoons 12 teaspoon2 teaspoons- or -1 12 teaspoons 12 cup 12 cup | WATER, 80° FBUTTER or MARGARINEBREAD FLOURDRY MILKBROWN SUGAR, packedSALTGROUND NUTMEGACTIVE DRY YEAST- or -BREAD MACHINE/FAST RISE YEASTCHOPPED, DRITED APRICOTSBLANCHED, SLIVERED ALMONDS | 11 12 ounces (1 14 cups + 3 tbsp.)2 tablespoons3 14 cups2 tablespoons3 tablespoons1 12 teaspoons 34 teaspoon2 14 teaspoons-or-2 teaspoons 73 cup 13 cup |
| FOLLOW THESE INSTRUCTIONS FOR THE RECIPE ABOVE |
| Bread Select Setting To Use: basic/specialty |
| 1. Add liquid ingredients and butter to pan.2. Add all dry ingredients, except yeast, to pan. Tap pan to settle dry ingredients, then level ingredients, pushing some of the mixture into the corners.3. Make a well in center of dry ingredients; add yeast. Lock pan into bread maker4. Program for recommended bread select setting and desired crust color and loaf size settings. Program time delay if being used. Start bread maker. Add fruit and nuts when alert sounds during the knead cycle. When done, turn off, unlock pan and remove with oven mitts. Shake bread out of pan. Cool on rack before slicing. |
| SPECIAL TIP: To make apricot almond bread overnight or without having to be present to add the fruit and nuts, follow steps 1-3. Then place apricots and almonds around the outside edge of pan, on top of dry ingredients away from yeast. Do not add these ingredients to the water in pan as they will absorb too much liquid and affect the consistency of the dough. Continue with step 4. Do not add more apricots than recommended as the consistency of the dough will be affected. |
| STOLLEN FRUIT BREAD | ||
| 1 12 Pound Loaf INGREDIENTS 2 Pound Loaf | ||
| 6 ounces ( 34 cups12 tablespoons3 cups2 tablespoons1 14 teaspoons2 teaspoons- or -1 12 teaspoons 14 cup 14 cup 14 cup3 tablespoons | WATER, 80° FEGG, largeBUTTER or MARGARINEBREAD FLOURSUGARSALTACTIVE DRY YEAST- or -BREAD MACHINE/FAST RISE YEASTRED CANDIED CHERRIESGREEN CANDIED CHERRIESBLANCHED, SLIVERED ALMONDS RAISINSBREAD FLOUR | 8 12 ounces (1 cup + 1 tbsp.)12 tablespoons3 34 cups3 tablespoons1 12 teaspoons2 14 teaspoons-or-2 teaspoons 13 cup 13 cup 13 cup 13 cup4 tablespoons |
| FOLLOW THESE INSTRUCTIONS FOR THE RECIPE ABOVE | |
| Bread Select Setting To Use: basic/specialty | |
| 1. Add liquid ingredients and butter to pan.2. Add all dry ingredients, except yeast, to pan. Tap pan to settle dry ingredients, level ingredients, pushing some of the mixture into the corners.3. Make a well in center of dry ingredients; add yeast. Lock pan into bread maker4. Program recommended bread select setting and desired crust color and loaf size settings. Turn bread maker on. | 5. Dust cherries, nuts and raisins with flour. Add when alert sounds during the knead cycle. When done, turn off, unlock pan and remove with oven mitts. Shake bread out of pan. Cool on rack before slicing. |
WHOLE WHEAT BREAD SETTING
-The recipes in this section can be made at the whole-wheat bread setting. The time delay can be used with the recipes with the symbol.
- Active dry, bread machine or fast rising yeast may be used in the recipes. Use the recommended amount for the type of yeast being used. Bread machine and fast rising yeast are interchangeable. ALWAYS make a well in center of dry ingredients for the yeast. This is especially important when using the time delay to prevent the yeast from becoming wet before the bread making process begins.
- Use LUKEWARM water about 80^ , to activate the yeast for best results. DO NOT USE HOT WATER, above 100^ , as this can kill the yeast.
- MILK MUST BE WARMED to about 80^ F, in order to activate the yeast for best results. DO NOT USE MILK DIRECTLY FROM THE REFRIGERATOR. Gently warm milk in microwave at low power or in a pan on top of range over low heat, using a thermometer to measure correct temperature. DO NOT OVERHEAT MILK, above 100^ F, as this can kill the yeast. Allow to cool if too hot or add a little cold milk to cool it off.
- If cold butter or margarine is used, cut into four (4) pieces, placing in bottom of pan with liquid for faster blending.
- Start with medium crust color setting the first time you make a loaf. Make a comment at the bottom of each recipe if you wish to use the light or dark crust color setting the next time you prepare the recipe.
- Recipes containing 50% or more whole grain flour, grains or cereals will benefit from the longer kneading time at the whole-wheat setting. If the bread collapses during the bake cycle, especially when using 100% whole grain flours, add 1 or 1½ tablespoons vital wheat gluten to the recipe the next time for the respective loaf size, or add one (1) large egg, reducing the recommended amount of liquid by two (2) ounces. Egg will add protein for better structure; and is available at most health food stores. Watch the dough during the knead cycle to see if any minor adjustment in liquid or flour is needed.
- Whole grain breads are typically shorter in height and denser in texture than breads made with bread flour.
- Stone-ground wheat flour is coarser than the steel-ground wheat flour and as a result, breads make with stone-ground flour will be shorter. You may want to add vital gluten to the dry ingredients if using stone-ground whole-wheat flour or other stone or coarse ground flours for best results. Add 1 tablespoon for the 1 12 lb loaf; 1 12 tablespoons for the 2 lb. loaf.
-If bread maker labors during the kneading period, the dough is too dry. Add one (1) tablespoon warm water at a time until the dough softens. Do not add too much extra water as this can cause the bread too collapse or be under baked. The bread dough should be soft and a bit sticky to the touch after kneading.
- An audible alert will sound during the knead cycle to let you know when to add ingredients if recipe recommends doing so. This will prevent these added ingredients from becoming over mixed or crushed. Simply open door when alert sounds and add the ingredients. Close door. Do not turn bread maker off when adding ingredients. If you are not adding ingredients, ignore the alert.
| WHEAT ‘N YOGURT BREAD | ||
| 1 12 Pound Loaf INGREDIENTS 2 Pound Loaf | ||
| 8 ounces (1 cup) 12 cup2 tablespoons1 13 cups2 cups2 tablespoons2 tablespoons1 14 teaspoons2 teaspoons- or -1 12 teaspoons | WATER, 80° FPLAIN NONFAT YOGURTBUTTER or MARGARINEBREAD FLOURWHOLE WHEAT FLOURDRY MILKBROWN SUGAR, packedSALTACTIVE DRY YEAST- or -BREAD MACHINE/FAST RISE YEAST | 9 ounces (1 cup + 2 tbsp.) 23 cup2 tablespoons1 12 cups2 34 cups2 tablespoons2 tablespoons1 12 teaspoons2 14 teaspoons-or-2 teaspoons |
| FOLLOW THESE INSTRUCTIONS FOR THE RECIPE ABOVE | |
| Bread Select Setting To Use: whole wheat | |
| 1. Add liquid ingredients and butter to pan.2. Add all dry ingredients, except yeast, to pan. Tap pan to settle dry ingredients, level ingredients, pushing some of the mixture into the corners.3. Make a well in center of dry ingredients; add yeast. Lock pan into bread maker | 4. Program for whole wheat and desired crust color and loaf size settings. Turn bread maker on. When done, turn off, unlock pan and remove with oven mitts. Shake bread out of pan and cool on rack before slicing. |
| 100% WHOLE WHEAT BREAD | ||
| 1 12 Pound Loaf INGREDIENTS 2 Pound Loaf | ||
| 9 ounces (1 cup + 2 tbsp.) | WATER, 80° F | 11 12 ounces (1 14 cups + 3 tbsp.) |
| 1 | EGG, large | 1 |
| 1 tablespoon | MOLASSES | 1 tablespoon |
| 1 tablespoon | HONEY | 2 tablespoons |
| 2 tablespoons | BUTTER or MARGARINE | 2 tablespoons |
| 3 13 cups | WHOLE WHEAT FLOUR | 4 14 cups |
| 2 tablespoons | DRY MILK | 2 tablespoons |
| 1 14 teaspoons | SALT | 1 12 teaspoons |
| 2 teaspoons | ACTIVE DRY YEAST | 2 14 teaspoons |
| - or - | - or - | -or- |
| 1 12 teaspoons | BREAD MACHINE/FAST RISE YEAST | 2 teaspoons |
| 50% WHOLE WHEAT BREAD ^T | ||
| 1 12 Pound Loaf INGREDIENTS 2 Pound Loaf | ||
| 10 12 ounces (1 14 cups + 1 tbsp.)1 tablespoon2 tablespoons1 23 cups1 23 cups2 tablespoons2 tablespoons1 14 teaspoons2 teaspoons- or -1 12 teaspoons | WATER, 80° FHONEYBUTTER or MARGARINEBREAD FLOURWHOLE WHEAT FLOURBROWN SUGAR, packedDRY MILKSALTACTIVE DRY YEAST- or -BREAD MACHINE/FAST RISE YEAST | 12 ounces (1 12 cups)1 12 tablespoons2 tablespoons2 cups2 cups2 tablespoons2 tablespoons1 12 teaspoons2 14 teaspoons-or-2 teaspoons |
| CRACKED WHEAT BREAD | ||
| 1 12 Pound Loaf INGREDIENTS 2 Pound Loaf | ||
| 10 ounces (1 14 cups)2 tablespoons2 cups1 cup 12 cup2 tablespoons1 14 teaspoons2 teaspoons- or -1 12 teaspoons | WATER, 80° FBUTTER or MARGARINEBREAD FLOURWHOLE WHEAT FLOURCRACKED WHEAT CEREALBROWN SUGAR, packedSALTACTIVE DRY YEAST- or -BREAD MACHINE/FAST RISE YEAST | 13 ounces (1 12 cups + 2 tbsp.)2 tablespoons2 12 cups1 13 cups 23 cup3 tablespoons1 12 teaspoons2 14 teaspoons-or-2 teaspoons |
| FOLLOW THESE INSTRUCTIONS FOR THE RECIPES ON THIS PAGE | |
| Bread Select Setting To Use: basic/specialty | |
| 1. Add liquid ingredients and butter to pan.2. Add all dry ingredients, except yeast, to pan. Tap pan to settle dry ingredients, then level ingredients, pushing some of the mixture into the corners.3. Make a well in center of dry ingredients; add yeast. Lock pan into bread maker. | 4. Program for whole-wheat setting and desired crust color and loaf size settings. Program time delay if being used. Start bread maker. When done, turn off, unlock pan and remove with oven mitts. Shake bread out of pan. Cool on rack before slicing. |
| BUTTERMILK WHEAT BREAD | ||
| 11⁄2 Pound Loaf INGREDIENTS 2 Pound Loaf | ||
| 12 ounces (11⁄2 cups)2 tablespoons2 cups11⁄4 cups2 tablespoons11⁄4 teaspoons11⁄4 teaspoon2 teaspoons- or -11⁄2 teaspoons | BUTTERMILK, 80® FBUTTER or MARGARINEWHOLE WHEAT FLOURBREAD FLOURBROWN SUGAR, packedSALTBAKING SODAACTIVE DRY YEAST- or -BREAD MACHINE/FAST RISE YEAST | 14 ounces (13⁄4 cups)2 tablespoons23⁄4 cups11⁄4 cups3 tablespoons11⁄2 teaspoons1⁄2 teaspoon21⁄4 teaspoons-or-2 teaspoons |
| FOLLOW THESE INSTRUCTIONS FOR THE RECIPE ABOVE | |
| Bread Select Setting To Use: whole wheat | |
| 1. Add liquid ingredients and butter to pan.2. Add all dry ingredients, except yeast, to pan. Tap pan to settle dry ingredients, then level ingredients, pushing some of the mixture into the corners.3. Make a well in center of dry ingredients; add yeast. Lock pan into bread maker | 4. Program for whole-wheat setting and desired crust color and loaf size settings. Program time delay if being used. Start bread maker. When done, turn off, unlock pan and remove with oven mitts. Shake bread out of pan. Cool on rack before slicing. |
DOUGH SETTING
- The recipes in this section can be made at the dough setting. The dough setting will prepare the dough for you by kneading it and then letting it rise about 56 minutes before being stirred down by the knead bars. You then remove the dough from the pan, shapes as desired and let it rise at room temperature before baking in your own oven.
- The time delay can be used with recipes with the symbol. The crust color and loaf size buttons cannot be activated at the dough setting as they do not apply to making dough.
• Active dry, bread machine or fast rising yeast may be used in the recipes. Use the recommended amount for the type of yeast being used. Bread machine and fast rising yeast are interchangeable. ALWAYS make a well in center of dry ingredients for the yeast. This is especially important when using the time delay to prevent the yeast from becoming wet before the dough making process begins. - Use LUKEWARM water, about 80°F, to activate the yeast for best results. DO NOT USE HOT WATER, above 100°F, as this can kill the yeast.
- MILK MUST BE WARMED to about 80°F, in order to activate the yeast for best results. DO NOT USE MILK DIRECTLY FROM THE REFRIGERATOR. Gently warm milk in microwave at low power or in a pan on top of range over low heat, using a thermometer to measure correct temperature. DO NOT OVER-HEAT MILK above 100°F, as this can kill the yeast. Allow to cool if too hot or add a little cold milk to cool it off.
• If cold butter or margarine is used, cut into four (4) pieces, placing in bottom of pan with liquid for faster blending. - An audible alert will sound during the knead cycle to let you know when to add ingredients if recipe recommends doing so. This will prevent these added ingredients, such as raisins and nuts, from being over mixed or crushed. Simply open door when alert sounds and add the ingredients. Close door. Do not turn bread maker off when adding ingredients. If you are not adding ingredients, ignore alert.
• Make sure to remove the dough from pan after completion of cycle. An audible alert will sound and the machine will automatically turn off when the dough cycle is complete. If the dough is left inside the machine, it will continue to rise and could over rise if left inside long enough, possible flowing into the oven chamber. - Most of your favorite yeast dough recipes can be prepared in your bread maker at the dough setting, however, do not exceed four (4) cups of flour as the dough may not be kneaded properly. Some minor adjustment may be needed during the knead period for proper condition of the dough.
- If bread maker labors during the kneading period, the dough is too dry. Add one (1) tablespoon warm water at a time until dough softens. Do not add too much extra water, as the dough can get too sticky. The dough should be soft to the touch after kneading.
- Dough can be refrigerated up to three (3) to four (4) days for later use if desired. Simply remove dough from pan and place into an oiled bowl, turn dough over to oil top and cover tightly. Or, put dough into an oiled plastic bag and seal. Check dough daily and punch down if needed. When ready to use, shape, rise and bake as recipe directs.
- To freeze dough, shape as recipe directs and wrap tightly. Dough can be frozen for up to one month. When ready to use, remove from freezer and thaw in refrigerator or at room temperature. Keep covered to prevent the dough from drying out. Once thawed, allow dough to rise until doubled in size, then bake as directed.
| BASIC DINNER ROLLS/BREAD STICKS ^T | ||
| INGREDIENTS | BREAD SELECT SETTING: dough | |
| 8 ounces (1 cup)3 tablespoons3 cups3 12 tablespoons2 tablespoons1 teaspoon2 teaspoons- or -1 12 teaspoons | WATER, 80° FBUTTER or MARGARINEBREAD FLOURSUGARDRY MILKSALTACTIVE DRY YEAST- or -BREAD MACHINE/FAST RISE YEASTSOFTENED BUTTER or SLIGHTLYBEATEN EGG WHITE | Makes between 2 and 3 dozen rolls depending on shape made. |
FOLLOW THESE INSTRUCTIONS FOR THE BASIC DINNER ROLLS/BREAD STICKS RECIPE
-
Add water and butter to pan.
-
Add all bread flour, sugar, dry milk and salt to pan. Tap pan to settle dry ingredients, level ingredients, pushing some of the mixture into the corners.
-
Make a well in center of dry ingredients; add yeast. Lock pan into bread maker
-
Program for dough. Program time delay if being used. Start bread maker. When done, unlock pan from bread maker. Place dough onto floured surface. Let rest 15 minutes.
-
Finish as desired, following shaping directions. Place on greased baking pans or sheets, cover and let rise in warm, draft-free place until double in size, about 45 minutes to 1 hour. Brush with butter or slightly beaten egg white and bake in preheated 350°F oven for 15 to 20 minutes or until golden brown. Serve warm.
HOW TO SHAPE DINNER ROLLS USING BASIC AND WHEAT DOUGH
CRESCENT ROLLS
- Divide dough into 4 equal pieces. Roll each piece into a circle 14 -inch thick.
- Cut each circle into 6 pie-shaped wedges. Roll each wedge from wide end to narrow tip.
- Curve ends to form crescent. Place 1 inch apart on greased cookie sheet. Continue recipe instructions.
Makes 2 dozen.
CLOVERLEAF ROLLS
- Divide dough into 54 equal-sized pieces. Roll each piece into a ball.
- Place 3 balls into greased muffin cup. Brush with softened butter.
Cover and let rise until double in size.
Makes 112 dozen.


FOUR-LEAF CLOVER ROLLS BREAD STICKS - Makes 2 dozen
-
Roll dough into a rectangle, 12 -inch thick. Cut into
-
Divide dough into 4 equal pieces. Divide each piece into 6 portions.
18 equal-sized pieces. 2. Roll each piece into a rope 8 inches long. Place 1 inch apart on
- Shape each piece into a ball. Place each ball into a greased cookie sheet.
greased muffin cup.
- With scissors, snip each ball completely into quarters.
Continue recipe instructions. Makes 1½ dozen.
- Brush with egg white/water mixture and sprinkle with sesame or poppy seeds, grated Parmesan cheese, garlic salt or other topping.
Continue recipe instructions. For drier breadsticks, reduce heat to
300°F after baking 10 minutes and bake 25 to 30 minutes longer.
FOR PARKER HOUSE ROLLS - Makes 3 dozen
- Roll dough into a circle 14 -inch thick. Cut dough into 3-inch circles using biscuit cutter. Brush with softened butter.
- Crease each biscuit through center with handle of wooden spoon.
- Fold biscuits over so top half overlaps bottom slightly. Place close together in a greased 13 x 9 and a
9 x 9 inch pan. Brush with softened butter. Cover and let rise until double in size.

natural_image
Simple line drawing of kitchen utensils and food items (no text or symbols)| WHEAT DINNER ROLLS ^T | ||
| INGREDIENTS | BREAD SELECT SETTING: dough | |
| 8 12 ounces (1 cup + 1tbsp.)3 tablespoons1 12 cups1 12 cups3 12 tablespoons2 tablespoons1 teaspoon2 teaspoons- or -1 12 teaspoons | WATER, 80° FBUTTER or MARGARINEBREAD FLOURWHOLE WHEAT FLOURBROWN SUGAR, packedDRY MILKSALTACTIVE DRY YEAST- or -BREAD MACHINE/FAST RISE YEASTSOFTENED BUTTER or MARGARINE | Makes about 1 12 dozen rolls depending on shape made. |
FOLLOW THESE INSTRUCTIONS FOR THE RECIPE ABOVE
| 1. Add water and butter to pan.2. Add all bread flour, sugar, dry milk and salt to pan. Tap pan to settle dry ingredients, level ingredients, pushing some of the mixture into the corners.3. Make a well in center of dry ingredients; add yeast. Lock pan into bread maker4. Program fordough. Program timedelayif being used. Start bread maker. When done, unlock pan from bread maker. Place dough onto floured surface. Let rest 15 minutes. | 5. Knead dough about 1 minute. Shape into cloverleaf or four-leaf clover rolls following shaping directions. Brush with softened butter or margarine, cover and let rise in warm, draft-free place until double in size, about 45 minutes to 1 hour. Bake in preheated 350^ F oven for 15 to 20 minutes or until golden brown. Serve warm. |
| RYE DINNER ROLLS ^T | ||
| INGREDIENTS | BREAD SELECT SETTING: dough | |
| 8 ounces (1 cup)2 tablespoons3 tablespoons 112 cups 112 cups2 tablespoons1 teaspoon2 teaspoons- or- 112 teaspoons1 | WATER, 80^ FHONEYBUTTER or MARGARINEBREAD FLOURMEDIUM RYE FLOURDRY MILKSALTACTIVE DRY YEAST- or -BREAD MACHINE/FAST RISE YEASTEGG WHITE, slightly beaten | Makes about 2 dozen. |
FOLLOW THESE INSTRUCTIONS FOR THE RYE DINNER ROLLS RECIPE
| 1. Add water and butter to pan.2. Add all bread flour, sugar, dry milk and salt to pan. Tap pan to settle dry ingredients, level ingredients, pushing some of the mixture into the corners.3. Make a well in center of dry ingredients; add yeast. Lock pan into bread maker4. Program fordough. Program time delay if being used. Start bread maker. When done, unlock pan from bread maker. Place dough onto floured surface. Let rest 15 minutes. | 5. Knead dough about 1 minute. Roll dough into a rectangle, abut 14 -thick. Cut into 6 strips, then cut each strip into 4 pieces. Roll each piece of dough into a 2-inch ball. Place on greased cookie sheet. Cover and let rise in warm, draft-free place, about 30 to 45 minutes or until double in size. brush with slightly beaten egg white and sprinkle with coarse salt or caraway seed or both. Bake in preheated 375^ F oven for 15 to 20 minutes or until golden brown. Serve warm. |
| PIZZA DOUGH ^T | ||
| Single Crust 12-14 inch | INGREDIENTS | Double Crust 2-12/14 inch |
| 7 12 ounces ( 34 cup + 3 tbsp.)2 tablespoons2 12 cups 12 teaspoon 12 teaspoon2 teaspoons- or -1 12 teaspoons6 to 8 ounces | WATER, 80° FVEGETABLE OILALL PURPOSE FLOURSUGARSALTACTIVE DRY YEAST- or -BREAD MACHINE/FAST RISE YEASTPIZZA SAUCEFAVORITE MEAT, TOPPINGS, CHEESE | 10 12 ounces (1 14 cups + 1 tbsp.)4 tablespoons4 cups1 teaspoon1 teaspoon2 12 teaspoons- or -2 teaspoons12 to 16 ounces |
| FOLLOW THESE INSTRUCTIONS FOR THE PIZZA DOUGH RECIPES | |
| 1. Add water and butter to pan.2. Add all bread flour, sugar, dry milk and salt to pan. Tap pan to settle dry ingredients, level ingredients, pushing some of the mixture into the corners.3. Make a well in center of dry ingredients; add yeast. Lock pan into bread maker4. Program fordough. Program time delay if being used. Start bread maker. When done, unlock pan from bread maker. Place dough onto floured surface. knead about 1 minute, then let rest 15 minutes. | 5. Roll dough out to fit 12 or 14-inch pizza pan. Place dough into greased pan, which has been sprinkled with cornmeal. Press dough into pan, forming an edge. Let dough rise in warm, draft-free place, about 20 to 25 minutes.6. Spread pizza sauce evenly over crust, then top with favorite meat, toppings and shredded cheese. Bake in preheated 425°F oven for 20 to 25 minutes or until golden brown. Let rest 5 minutes before cutting. |
| WHOLE WHEAT PIZZA DOUGH ^1 | ||
| Single Crust INGREDIENTS | Double Crust | |
| 8 12 ounces (1 cup + 1 tbsp.)1 tablespoon2 12 cups 12 teaspoon 12 teaspoon2 teaspoons- or -1 12 teaspoons6 to 8 ounces | WATER, 80° FVEGETABLE OILWHOLE WHEAT FLOURSUGARSALTACTIVE DRY YEAST- or -BREAD MACHINE/FAST RISE YEASTPIZZA SAUCEFAVORITE MEAT, TOPPINGS, CHEESE | 13 ounces (1 12 cups + 2 tbsp.)2 tablespoons4 cups1 teaspoon1 teaspoon2 12 teaspoons- or -2 teaspoons12 to 16 ounces |
| FOCACCIA ^1 | ||
| Bread Select Setting: dough INGREDIENTS | ||
| 7 12 ounces (3⁄4 cup + 3 tbsp.)3 tablespoons3 cups2 tablespoons3 12 tablespoons1 teaspoon2 teaspoons- or -1 12 teaspoons2 tablespoons2 tablespoons2 teaspoons1 teaspoon, or to taste | WATER, 80° FBUTTER or MARGARINEBREAD FLOURDRY MILKSUGARSALTACTIVE DRY YEAST- or -BREAD MACHINE/FAST RISE YEASTOLIVE OILGRATED PARMESAN CHEESEROSEMARY LEAVESGARLIC SALT | |
FOLLOW THESE INSTRUCTIONS FOR THE FOCACCIA RECIPE
| BREAD SELECT SETTING TO USE: dough1. Add water and butter to pan.2. Add all bread flour, sugar, dry milk and salt to pan. Tap pan to settle dry ingredients, level ingredients, pushing some of the mixture into the corners.3. Make a well in center of dry ingredients; add yeast. Lock pan into bread maker4. Program fordough. Program timedelayif being used. Start bread maker. When done, unlock pan from bread maker. Place dough onto floured surface. Let rest 15 minutes. | 5. Knead dough about 1 minute. Roll dough into a rectangle to fit jellyroll pan or large cookie sheet, about 15x10 inches. Place on greased pan and press dough evenly into pan forming an edge. Cover and let rise in warm, draft-free place for 20 to 30 minutes until slightly risen. With handle of wooden spoon, make indentations in dough at every inch. Brush dough with olive oil, then sprinkle with Parmesan cheese, rosemary leaves and garlic salt.6. Bake in preheated 400°F oven for 15 minutes or until golden brown. Cool slightly and cut into squares for serving. Serve warm. |
| TRADITIONAL FRENCH BREAD ^1 | ||
| Bread Select Setting: dough INGREDIENTS | Makes 1 large loaf | |
| 10 ounces (1 14 cups)1 tablespoon3 12 cups1 12 teaspoons1 14 teaspoons2 teaspoons- or -1 12 teaspoons11 teaspoon | WATER, 80° FBUTTER or MARGARINEBREAD FLOURSUGARSALTACTIVE DRY YEAST- or -BREAD MACHINE/FAST RISE YEASTEGG WHITE, slightly beatenWATERPOPPY or SESAME SEEDS for garnish | |
FOLLOW THESE INSTRUCTIONS FOR THE TRADITIONAL FRENCH BREAD RECIPE ABOVE
| BREAD SELECT SETTING TO USE: dough1. Add water and butter to pan.2. Add all bread flour, sugar, dry milk and salt to pan. Tap pan to settle dry ingredients, level ingredients, pushing some of the mixture into the corners.3. Make a well in center of dry ingredients; add yeast. Lock pan into bread maker4. Program fordough. Program time delay if being used. Start bread maker. When done, unlock pan from bread maker. Place dough onto floured surface. Let rest 15 minutes. | 5. Roll dough into a 15x12-inch rectangle. Roll up tightly from long side, seal and taper ends. Place seam side down on greased baking sheet sprinkled with cornmeal. Cover and let rise in warm, draft-free place for 45 to 55 minutes or until nearly double in size. With sharp knife, make 3 or 4 14 -inch deep diagonal cuts on top of loaf. Combine egg white with water and brush mixture on to0p of loaf. Sprinkle with poppy or sesame seeds if desired or leave plain.6. Bake in preheated 400° F oven for 45 minutes or until golden brown. Cool slightly before slicing. |
| CROISSANTS 1 | ||
| Bread Select Setting: dough INGREDIENTS | Makes 18 medium size croissants | |
| 8 ounces (1 cup)3 tablespoons3 cups2 tablespoons3 tablespoons 14 teaspoons3 teaspoons- or -2 teaspoons 34 cup ( 112 sticks)1 | WATER, 80^ FBUTTERBREAD FLOURDRY MILKSUGARSALTACTIVE DRY YEAST- or -BREAD MACHINE/FAST RISE YEASTCOLD BUTTER, sliced thinEGG WHITE, slightly beaten | |
FOLLOW THESE INSTRUCTIONS FOR THE CROISSANT RECIPE
BREAD SELECT SETTING TO USE: dough
- Add water and 3 tablespoons butter to pan.
- Add bread flour, sugar, dry milk and salt to pan. Tap pan to settle dry ingredients, level ingredients, pushing some of the mixture into the corners.
- Make a well in center of dry ingredients; add yeast. Lock pan into bread maker
- Program for dough. Program time delay if being used. Start bread maker. When done, unlock pan from bread maker. Place dough into a greased bowl. Cover and refrigerate 30 minutes.
-
Place dough onto lightly floured surface. Roll into a 15x12-inch rectangle. Cover 13 of dough with thinly sliced butter. Fold unbuttered third of dough over the center buttered third, then fold again, over the remaining buttered third. Seal ends and long side of dough. Place on lightly greased cookie sheet, cover with plastic wrap and place in refrigerator for 30 minutes.
-
Place dough on lightly floured surface, with long sides vertical to you. Roll out into a 15x12-inch rectangle. Fold in thirds, folding from end to end. Place back onto greased cookie sheet, cover with plastic wrap and refrigerate at least 4 hours or overnight. The longer refrigeration time will result in flakier croissants.
- Place dough on lightly floured surface, with long side vertical to you. Roll out into a 15x12-inch rectangle. Cut rectangle into thirds, both crosswise and lengthwise. Then cut each piece diagonally in half to form 18 triangles. Roll each triangle up, starting at wide end, to form crescent shape. Place croissants on greased cookie sheet, curving ends so they almost touch. Brush or spray lightly with water. Cover and let rise in warm, draft-free place 30 to 50 minutes or until double in size.
- Brush croissants with slightly beaten egg white. Bake in preheated 375^ F oven for 15 minutes to 20 minutes or until golden brown.
1
Roll dough into rectangle, 15 x 12-inches. Put butter slices on 13 of dough. Fold dough in thirds, bringing unbuttered part over buttered part. Seal edges and refrigerate.

flowchart
graph TD
    A["Rectangular object"] --> B["Folded package"]
    B --> C["Folded package"]
Diagram 2
Roll dough into rectangle. 15 x 12-inches. Fold in thirds from end to end. Seal edges and refrigerate.
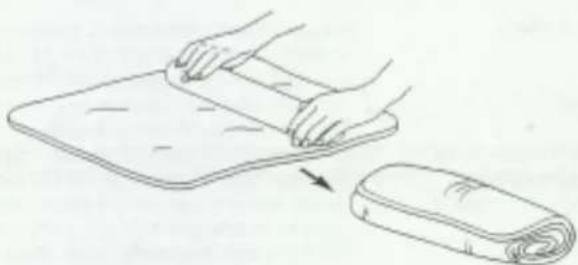
natural_image
Illustration showing hands rolling a blanket next to a rolled-up blanket (no text or symbols)D
Roll dough into rectangle, 15 x 12-inches. Cut into thirds lengthwise and crosswise. Cut each piece diagonally to form 18 triangles.
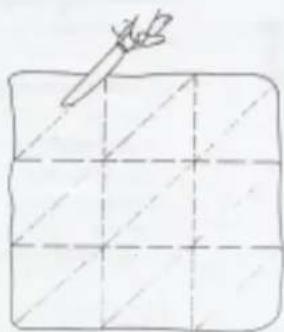
Diagram 4
Roll up each triangle, starting at wide end, to form crescent shape. Curve ends together so they almost touch.
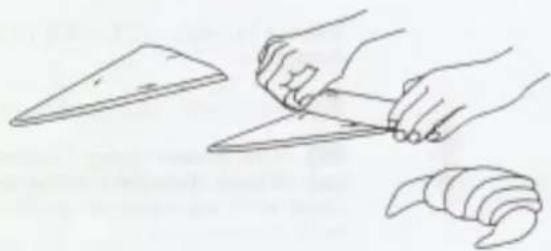
natural_image
Line drawing of hands cutting a knife and slicing a knife with a knife (no text or symbols)| CINNAMON ROLLS | ||
| Bread Select Setting: dough INGREDIENTS | ||
| 8 ounces (1 cup)14 tablespoons3 13 cups3 tablespoons 12 teaspoon2 teaspoons- or -1 12 teaspoonsFILLING: 14 cup 14 cup2 teaspoons 12 teaspoon 13 cup | MILK, 80° FEGG, largeBUTTER or MARGARINEBREAD FLOURSUGARSALTACTIVE DRY YEAST- or -BREAD MACHINE/FAST RISE YEAST | Makes 12 rolls. |
| BUTTER or MARGARINE, meltedSUGARGROUND CINNAMONGROUND NUTMEG, optionalCHOPPED NUTS | ||
FOLLOW THESE INSTRUCTIONS FOR THE CINNAMON ROLL RECIPE
| BREAD SELECT SETTING TO USE: dough1. Add milk, egg and butter to pan.2. Add bread flour, 3 tablespoons sugar and salt to pan. Tap pan to settle dry ingredients, level ingredients, pushing some of the mixture into the corners.3. Make a well in center of dry ingredients; add yeast. Lock pan into bread maker4. Program fordough. Start bread maker. When done, unlock pan from bread maker. Place dough on floured surface. Knead dough about 1 minute, then let rest 15 minutes.5. Roll dough into a rectangle, 15x10-inches. Spread 1⁄4 cup melted butter over dough to within 1 inch of edges. Then sprinkle 1⁄4 cup sugar, the cinnamon, nutmeg and chopped nuts evenly over dough. Roll dough up tightly on long side. Press edges to seal and form into a 12-inch long, evenly shaped roll. With a knife or 8-inch long piece of thread or dental floss, slide under roll and criss-cross tends to cut neatly through dough. Place rolls into a greased 13x9-inch baking pan. Cover and let rise in warm, draft-free place until double in size, about 30 to 45 minutes. | 6. Bake in preheated 375° F oven for 20 to 25 minutes or until golden brown. Cool in pan on rack for 10 to 15 minutes, then drizzle with powdered sugar icing made by combining 1 cup powdered sugar with 1 to 2 tablespoons milk and 1⁄2 teaspoon vanilla. Blend until smooth. If too thin or thick, add more powdered sugar or milk, respectively, until desired consistency is reached. Cut apart and remove from pan. |

| RAISED DOUGHNUTS | ||
| Bread Select Setting: dough INGREDIENTS | ||
| 6 ounces ( 34 cup)2 ounces ( 14 cup)14 tablespoons 312 cups 14 cup1 teaspoon2 teaspoons | MILK, 80^ FWATER, 80^ FEGG, largeVEGETABLE SHORTENINGALL PURPOSE or BREAD FLOURSUGARSALTBREAD MACHINE/FAST RISE YEASTVEGETABLE OIL, for frying donuts | Recipe makes 112 dozen. |
FOLLOW THESE INSTRUCTIONS FOR THE RAISED DOUGHNUTS RECIPE
BREAD SELECT SETTING TO USE: dough
- Add liquid ingredients and shortening to pan.
- Add flour, sugar and salt to pan. Tap pan to settle dry ingredients, level ingredients, pushing some of the mixture into the corners.
- Make a well in center of dry ingredients; add yeast. Lock pan into bread maker
- Program for dough. Start bread maker. When done, unlock pan from bread maker. Place dough on floured surface then let rest 15 minutes.
-
Roll dough into a rectangle, about 12 -inch thick. Cut with doughnut cutter. Leave on counter to rise, covered. Knead together scraps of dough, let rest 10 minutes and reroll. Cut into doughnuts. Let doughnuts rise, covered in warm, draft-free place for 30 to 45 minutes or until double in size.
-
Fry 3 to 4 doughnuts at a time in 3 inches of vegetable oil, preheated to 375^ F. Turn doughnuts over as they rise to the surface. Fry 2 to 3 minutes until golden brown on both sides. Remove and place on paper towel to drain. Continue frying doughnuts. Frost or sugar as desired.
**For best results, use FAST RISE or BREAD MACHINE YEAST for lighter, fluffier doughnuts. If Active Dry Yeast is used, additional rising time may be necessary. Use 3 teaspoons active dry yeast for this recipe.
90 DAY WARRANTY
Your West Bend® Warranty covers failures in the materials and workmanship of this Bread Maker for 90 days from the date of original purchase. Any failed part of the Bread Maker will be repaired or replaced without charge.
This warranty gives you specific legal rights and you may also have other rights, which vary from state to state. This warranty does not cover alleged damaged caused by misuse, abuse, accidents or alterations to the Bread Maker.
BONUS! RECIPE BOOK
A recipe book (book number L5146) containing dozens of recipes developed exclusively for West Bend® Bread Makers is available. To order, write to the address below. Include \$6.95 (plus your area tax for Wisconsin, Georgia and Illinois residents) with your request. Payment must accompany order. Make check or money order payable to The West Bend Company. Please allow two weeks for delivery. Prices subject to change without notice.
The West Bend Company SPECIFICATIONS: 120 V AC, 60 Hz
Attn: Housewares Customer Service Heater - 700 Watts
P.O. Box 2780
West Bend, WI. 53095-2780
Motor - 125 Watts
REPLACEMENTS PARTS AVAILABLE
Replacement bread pans and knead bars may be ordered directly from The West Bend Company. To order, write to the address above or order online at www.westbend.com . Be sure to include the catalog number of your Bread Maker (#410--), found on the back of your machine, a description of what you want and the quantity. Along with this information please include your name, mailing address (Post Office boxes will not be accepted as we ship via UPS and need a physical address) and your Visa, MasterCard or Discover credit card number (debit cards not accepted), expiration date, for the billing of the part(s) to you. (Your state's sales tax for Wisconsin, Illinois and Georgia residents) and a handling fee will be added to your total charge. Or, to send a check or money order, call 262-334-6949 to obtain purchase amount. Please allow 2 weeks for delivery.
L4979 NOT VALID IN MEXICO
WEST BEND®

- Automatic Bread & Dough Maker
- IMPORTANT SAFEGUARDS
- SAVE THESE INSTRUCTIONS
- ELECTRIC CORD STATEMENT
- IMPORTANT SAFETY INSTRUCTIONS
- IMPORTANT INFORMATION ON PROTECTING ELECTRONIC CONTROL
- HELPFUL HINTS FOR SUCCESSFUL BREAD BAKING
- IMPORTANT TIPS TO KEEP IN MIND WHEN MAKING BREAD ARE:
- "QUICK START" STEPS FOR MAKING FIRST LOAF OF BREAD
- "QUICK START" STEPS FOR USING BREAD MIX INCLUDED WITH BREAD MAKER
- "QUICK START" STEPS FOR MAKING A RECIPE IN THIS BOOK
- OTHER TIPS TO KEEP IN MIND WHEN USING YOUR BREAD MAKER
- KNOW YOUR INGREDIENTS
- SPECIAL NOTE ON FLOUR
- ALWAYS MAKE SURE YEAST IS FRESH AND HAS NOT EXPIRED THE "USE BY " DATE PRINTED ON THE JAR OR ENVELOPE.
- MEASURING INGREDIENTS: THE KEY TO SUCCESSFUL BREAD MAKING
- USING BREAD MIXES IN YOUR BREAD MAKER
- MAKE YOUR OWN MIXES
- ADAPTING YOUR FAVORITE BREAD/DOUGH RECIPES
- HIGH ALTITUDE ADJUSTMENT
- BECOMING FAMILIAR WITH CONTROL PANEL
- BREAD SELECT BUTTON
- CRUST COLOR BUTTON
- LOAF SIZE BUTTON
- TIME DELAY BUTTONS
- START/STOP BUTTON
- TOO HOT/TOO COLD WARNING
- CLEAN BEFORE USING
- HOW TO USE—BASIC STEPS IN MAKING BREAD
- HOW TO USE DOUGH SETTING
- HOW TO USE TIME DELAY
- NEVER USE PERISHABLE INGREDIENTS (milk, eggs, cheese, yogurt, etc.) WITH THE TIME DELAY AS THESE INGREDIENTS CAN SPOIL WHEN HELD AT ROOM TEMPERATURE SEVERAL HOURS BEFORE THE BREAD MAKER TURNS ON.
- SLICING BREAD
- STORING BREAD
- CLEAN AFTER EACH USE
- DO NOT IMMERSE BOTTOM OF BREAD PAN IN WATER!
- SPECIAL NOTES:
- TROUBLESHOOTING GUIDE
- NUTRITIONAL INFORMATION
- BASIC/SPECIALTY BREAD SETTING
- SOURDOUGH STARTER RECIPE
- TO USE AND MAINTAIN SOURDOUGH STARTER
- SOURDOUGH TIPS:
- WHOLE WHEAT BREAD SETTING
- DOUGH SETTING
- FOLLOW THESE INSTRUCTIONS FOR THE BASIC DINNER ROLLS/BREAD STICKS RECIPE
- HOW TO SHAPE DINNER ROLLS USING BASIC AND WHEAT DOUGH
- CRESCENT ROLLS
- CLOVERLEAF ROLLS
- FOUR-LEAF CLOVER ROLLS BREAD STICKS - Makes 2 dozen
- FOR PARKER HOUSE ROLLS - Makes 3 dozen
- FOLLOW THESE INSTRUCTIONS FOR THE CROISSANT RECIPE
- BREAD SELECT SETTING TO USE: dough
- 1
- D
- FOLLOW THESE INSTRUCTIONS FOR THE RAISED DOUGHNUTS RECIPE
- DAY WARRANTY
- BONUS! RECIPE BOOK
- REPLACEMENTS PARTS AVAILABLE
Brand : WestBend
Model : 41085
Category : Bread maker