
MCD715 - DVD player PHILIPS - Free user manual and instructions
Find the device manual for free MCD715 PHILIPS in PDF.


| Product Type | DVD Player |
| Brand | Philips |
| Model | MCD715 |
| Dimensions (W x H x D) | 360 x 55 x 260 mm |
| Weight | 2.5 kg |
| Power Supply | AC 220-240 V, 50/60 Hz |
| Power Consumption | 20 W (standby < 1 W) |
| Disc Compatibility | DVD, DVD±R/RW, CD, CD-R/RW, MP3-CD, WMA-CD, Picture CD |
| Video Output | Composite, S-Video, Component, HDMI |
| Audio Output | Stereo analog, Digital coaxial, Digital optical |
| Playback Features | Progressive scan, Zoom, Multi-angle, Parental control |
| Audio Decoding | Dolby Digital, DTS |
| Remote Control | Included (batteries not supplied) |
| Display | LED front panel |
| Connectivity | USB 2.0 (front), AUX input (front) |
| Languages supported | English, French, Spanish, German, Italian |
| Safety Features | CE marked, Class 1 laser product, Auto standby after 30 min |
| Cleaning Instructions | Use a soft dry cloth. Do not use liquid cleaners or abrasive pads. |
| Spare Parts Availability | Remote control, AC power cord, User manual |
| Environmental Conditions | Operating temperature: 5°C to 35°C, Humidity: 25% to 80% |
Frequently Asked Questions - MCD715 PHILIPS
User questions about MCD715 PHILIPS
0 question about this device. Answer the ones you know or ask your own.
Ask a new question about this device
Download the instructions for your DVD player in PDF format for free! Find your manual MCD715 - PHILIPS and take your electronic device back in hand. On this page are published all the documents necessary for the use of your device. MCD715 by PHILIPS.
USER MANUAL MCD715 PHILIPS
Register your product and get support at
www.philips.com/welcome
User manual
Instructions for use

Manufactured under license from Dolby Laboratories.
"Dolby", "Pro-logic", "Pro-logic II" and the double-D symbol are trademarks of Dolby Laboratories.
MANUFACTURED UNDER LICENSE FROM DIGITAL THEATER SYSTEMS, INC. US PAT. NO 5,451,942,5,956,674, 5,974,380, 5,978,762 AND OTHER WORLDWIDE
This product incorporates copyright protection technology that is protected by method claims of certain U.S. patents and other intellectual property rights owned by Macrovision Corporation and other rights owners. Use of this copyright protection technology must be authorized by Macrovision Corporation, and is intended for home and other limited viewing uses only unless otherwise authorized by Macrovision Corporation. Reverse engineering or disassembly is prohibited.
DivX, DivX Certified, and associated logos are trademarks of DivXNetworks, Inc and are used under license.
Windows Media is a trademark of Microsoft Corporation.


English 6
Chinese 43

General Information
Features 6
Supplied accessories 6
Environment information 6
Installation 6
Maintenance 7
Hearing safety 7
Connections
Step 1: Placing the speakers and subwoofer .. 8
Step 2: Connecting speakers ...... 9
Step 3: Connecting TV 9~11
Step 4: Connecting FM antenna .... 11
Step 5: Connecting the power cord ..... 12
Additional: Connecting additional equipment ... 12
Additional connection: Connecting a USB device or memory card .... 13
Functional Overview
DVD player and power amplifier 14
Remote control 15~16
Getting Started
Step 1: Inserting batteries into the Remote Control .... 17
Using the Remote Control to operate the Player
Step 2: Setting up the TV .... 17~18 Selecting the colour system that corresponds to your TV Setting up Progressive Scan feature To deactivate Progressive manually
Step 3: Setting the speakers .... 19
Step 4: Setting language preference ..... 19
Basic Functions
Switching the system on/off 20
Volume control 20
Sound control 20 DBB (Dynamic Bass Boost) DSC (Digital Sound Control) Selecting surround sound
Dimming the display screen 20
Demonstration mode 20
Disc Operations
Playable Discs 21
Playing discs 21
Using the Disc Menu 22
Basic playback controls 22~24
Pausing playback (DVD/VCD/CD/MP3/DivX/WMA)
Selecting a track/chapter/title (DVD/VCD/DivX/CD/MP3/WMA)
Resuming playback from the last stopped point (DVD/VCD/CD/MP3/WMA)
Zoom (DVD/VCD/DivX/JPEG)
Repeat (DVD/VCD/CD/MP3/DivX/WMA)
Repeat A-B (DVD/VCD/CD/MP3/DivX/WMA)
Slow Motion (DVD/VCD)
Program (not for Picture CD)
Forward/Reverse Searching (DVD/VCD/DivX/CD/MP3/WMA)
Time search & search by chapter/track number (DVD/VCD/CD/MP3/WMA)
Information display during playback (not for Picture CD)
Special disc features 24 Playing a Title (DVD)
Camera Angle (DVD)
Changing the Audio Language (for DVD recorded with multiple languages)
Changing the Audio Channel (for VCD only) Subtitles (DVD)
Playing MP3/WMA/JPEG Picture disc 24
Playing MP3/WMA disc 24 General operation Playback selection
Playing JPEG Picture CD 25 General operation Playback selection
Special JPEG features 25-26 Preview function (JPEG) Zoom picture (JPEG) Slide show playback modes (JPEG) Playback with multi-angles (JPEG)
Playing a DivX disc 26
System Menu Options
Basic Operations 27
General Setup Page 27-28
TV Display
OSD Lang
Screen Saver
DIVX(R) VOD registration code
Audio Setup Page 28-30
Speaker Setup
SPDIF Setup
Dolby Digital Setup
3D Processing
HDCD
Night mode
Video Setup Page.... 30~31
Component
TV Mode
Quality
Preference Page 31~33
Parental
Default
Password Setup
Other Functions
Radio reception 34
Tuning to radio stations
Presetting radio stations
Listening to preset radio stations
Setting the clock 34
Setting sleep/wake-up timer 35
Sleep timer setting
Wake-up timer setting
External Sources
Using a non-USB device.... 36
Using a USB mass storage device .... 36~37
Specifications 38
Troubleshooting 39~41
Glossary 42
Congratulations on your purchase and welcome to Philips!
To fully benefit from the support that Philips offers, register your product at www.philips.com/welcome.
Features
Your DVD Micro Theatre with 5.1 channel full digital amplifier creates the same dynamic sound qualities that you find in full-fledged cinemas and incorporates some of the best features in home theater technology.
Other features include:
Built-in Dolby Digital decoder, supporting Incredible Surround and DSC sound setting.
Additional Component Connections
Lets you connect other audio and audio/visual components to the DVD micro theatre.
Night mode
Lets you compress the dynamic range, reducing the difference in loudness between different sounds in Dolby Digital mode.
Parental Control (Rating Level)
Lets you set a ratings level so that your children cannot watch a DVD that has a rating higher than you set.
Sleep/Wake-up Timer
Enables the system to switch on/off automatically at a preset time.
Progressive Scan
Provides high quality flicker-free images for film based sources. When a picture refreshes, its vertical resolution can double to 525 lines.
Note:
To fully enjoy the progressive scan feature, you need a progressive scan TV.
Supplied accessories
– Remote control with two AAA batteries - FM wire antenna - Composite video cable (yellow) - This instruction booklet and a Quick Start Guide
If any item is damaged or missing, contact your retailer or Philips.
Environmental information
All unnecessary packaging has been omitted. We have tried to make the packaging easy to separate into three materials: cardboard (box), polystyrene foam (buffer) and polyethylene (bags, protective foam sheet).
Your system consists of materials which can be recycled and reused if disassembled by a specialised company. Please observe the local regulations regarding the disposal of packaging materials, exhausted batteries and old equipment.
Installation
- Place the player on a flat, hard, and stable surface. In a cabinet, allow about 10cm (4 inches) of free space all around the player for adequate ventilation.
- Do not expose your player to extreme temperatures or humidity. ●The apparatus shall not be exposed to dripping or splashing. ●No objects filled with liquids, such as vases, shall be placed on the apparatus. ●No naked flame sources, such as lighted candles, shall be placed on the apparatus. ● Install this unit near the AC outlet and where the AC power plug can be reached easily. ●The ventilation should not be impeded by covering the ventilation openings with items, such as newspapers, table-cloths, curtains, etc.
Maintenance
- When a disc becomes dirty, clean it with a cleaning cloth. Wipe the disc from the center out, in a straight line.

- Do not expose the player, batteries or discs to humidity, rain, sand or excessive heat (caused by heating equipment or direct sunlight). Always keep the disc tray closed to avoid dust on the lens.
- Do not use solvents such as benzene, thinner, commercially available cleaners, or anti-static spray intended for colour discs.
The lens may cloud over when the player is suddenly moved from cold to warm surroundings, making it impossible to play a disc. Leave the player in the warm environment until the moisture evaporates.
Hearing Safety
Listen at a moderate volume.
Using headphones at a high volume can impair your hearing. This product can produce sounds in decibel ranges that may cause hearing loss for a normal person, even for exposure less than a minute. The higher decibel ranges are offered for those that may have already experienced some hearing loss.
Sound can be deceiving. Over time your hearing "comfort level" adapts to higher volumes of sound. So after prolonged listening, what sounds "normal" can actually be loud and harmful to your hearing. To guard against this, set your volume to a safe level before your hearing adapts and leave it there.
To establish a safe volume level:
Set your volume control at a low setting.
Slowly increase the sound until you can hear it comfortably and clearly, without distortion.
Listen for reasonable periods of time:
Prolonged exposure to sound, even at normally "safe" levels, can also cause hearing loss.
Be sure to use your equipment reasonably and take appropriate breaks.
Be sure to observe the following guidelines when using your headphones.
Listen at reasonable volumes for reasonable periods of time.
Be careful not to adjust the volume as your hearing adapts.
Do not turn up the volume so high that you can't hear what's around you.
●You should use caution or temporarily discontinue use in potentially hazardous situations.
- Do not use headphones while operating a motorized vehicle, cycling, skateboarding, etc.; it may create a traffic hazard and is illegal in many areas.
![graph TD A["Front speaker (right)"] --> B["Center speaker"] B --> C["Subwoofer"] C --> D["FM antenna"] D --> E["Tekometer"] E --> F["Power cord"] F --> G["Power cord"] H["Surround speaker (left)"] --> I["Surround speaker (right)"] I --> J["Power cord"] K["Power cord"] --> L["Power cord"] M["Power co…](/content/2026/06/1403924/images/e8047ca7a49757f3e7feea84ffa57f3bca9be7581e34201002bccf3200030426.jpg)
IMPORTANT!
- The type plate is located at the bottom of the system.
- Before connecting the AC power cord to the wall outlet, ensure that all other connections have been made.
- Never make or change any connections with the power switched on.
Step 1: Placing the speakers and subwoofer
For best possible surround sound, all the speakers (except subwoofer) should be placed at the same distance from the listening position.
Place the front left and right speakers at equal distances from the TV and at an angle of approximately 45 degrees from the listening position. 2 Place the center speaker above the TV or the DVD system so that the center channel's sound is localized. 3 Place the rear speakers at normal listening ear level facing each other or hang on the wall. 4 Place the subwoofer on the floor near the TV.
Notes:
- To avoid magnetic interference, do not position the front speakers too close to your TV.
- Allow adequate ventilation around the DVD system.
Step 2: Connecting speakers![graph TD A["Front speaker (right)"] --> B["Center speaker"] B --> C["Subwoofer"] C --> D["Front speaker (left)"] D --> E["Surround speaker (left)"] E --> F["Front speaker (right)"] F --> G["Surround speaker (right)"] G --> H["Front speaker (right)"] H --> I["Subwoofer"] I --> J["Front speaker (left)…](/content/2026/06/1403924/images/854a08aef2efb37a8982ae7cf6ce54e735636e353cfafb98a7d7dc5b603e12af.jpg)
Connect the speaker wires to the SPEAKER terminals by matching the color and silkscreen, coloured (marked) wire to "+" and black (unmarked) wire to "−". Fully insert the stripped portion of the speaker wire into the terminal as shown.

Notes:
- For optimal sound performance, use the supplied speakers.
- Do not connect more than one speaker to any one pair of +/- speaker terminals.
- Do not connect speakers with an impedance lower than the speakers supplied. Please refer to the SPECIFICATIONS section of this manual.
Step 3: Connecting TV
IMPORTANT!
You only need to make one video connection from the following options, depending on the capabilities of your TV. Connect the DVD system directly to the TV.
Using Composite Video jack
Use the composite video cable (yellow) to connect the system's VIDEO OUT jack to the video input jack (or labelled as A/V In, Video In, Composite or Baseband) on the TV set. To listen to the TV channels through this DVD system, use the audio cables (white/red - not supplied) to connect AUX IN L/R jacks to the corresponding AUDIO OUT jacks on the TV.
Using Component Video jacks (Y Pb Pr)
IMPORTANT!
The progressive scan video quality is only possible when using Y Pb Pr, and a progressive scan TV is required.

Use component video cables (red/blue/green - not supplied) to connect the DVD system's Y Pb Pr jacks to the corresponding Component video input jacks (or labelled as Y Pb/Cb Pr/Cr or YUV) on the TV.
Pb Pr jacks to the corresponding Component video input jacks (or labeled as Y Pb/Cb Pr/Cr or YUV) on the TV.
2 To listen to the TV channels through this DVD system, use the audio cables (white/red, not supplied) to connect the AUX IN L/R jacks to the corresponding AUDIO OUT jacks on the TV.
3 If you are using a Progressive Scan TV (TV must indicate Progressive Scan or ProScan capability), to activate TV Progressive Scan, please refer to your TV user manual. For DVD system Progressive Scan function, see "Getting Started - Setting up Progressive Scan feature".
Note:
- If your TV does not support Progressive Scan, you will not be able to view the picture. Press SYSTEM MENU on the remote to exit the system menu and then DISC and "1" to exit progressive scan.
Using S-Video jack
IMPORTANT!
- If S-Video is used for DVD playback connection, the system's VIDEO OUT setting will need to be changed accordingly.

Use an S-Video cable (not supplied) to connect the DVD system's S-VIDEO jack to the S-Video input jack (or labeled as Y/C or S-VHS) on the TV.
2 To listen to the TV channels through this DVD system, use the audio cables (white/red-not supplied) to connect AUX IN L/R jacks to the corresponding AUDIO OUT jacks on the TV.
Using an accessory RF modulator
IMPORTANT!
- If your TV only has a single Antenna In jack (labeled as 75 ohm or RF In), you will need an RF modulator in order to view DVD playback on the TV. See your electronics retailer or contact Philips for details on RF modulator availability and operations.

Use the composite video cable (yellow) to connect the DVD system's VIDEO OUT jack to the video input jack on the RF modulator. 2 Use an RF coaxial cable (not supplied) to connect ANTENNA OUT or TO TV jack on the RF modulator to the Antenna IN jack on the TV. 3 Connect the Antenna or Cable TV service signal to the ANTENNA IN or RF IN jack on the RF modulator. (It may have been connected to your TV previously. Disconnect it from the TV.)
Step 4: Connecting FM antenna
- Connect the supplied FM antenna to the FM (75 Ω) jack. Extend the FM antenna and fix its end to the wall.
For better FM stereo reception, connect an external FM antenna (not supplied).

Note:
- Adjust the position of the antennas for optimal reception.
- Position the antennas as far as possible from your TV, VCR, or other radiation source to prevent unwanted interference.
Step 5: Connecting the power cord
After everything is connected properly, plug in the AC power cord to the power outlet.
Never make or change any connection with the power switched on.
Additional: Connecting additional equipment
IMPORTANT!
- Some discs are copy-protected. You cannot record the disc through a VCR or digital recording device.
- When making connections, make sure the colour of cables matches the colour of jacks.
- Always refer to the owner's manual of the other equipment for complete connection and usage details.

Viewing and listening to the playback of other equipment Ⓐ
- Connect the system's AUX IN (R/L) jacks to the AUDIO OUT jacks on the other audio/visual device (such as a TV, VCR, Laser Disc player or cassette deck). Before starting operation, press SOURCE on the front panel to select AUX or press AUX on the remote in order to activate the input source.
Using the VCR for recording DVDs Ⓑ
Connect one of the system's VIDEO jacks to the corresponding VIDEO IN jack and LINE OUT (R/L) jacks to the AUDIO IN jacks on the VCR. This will allow you to make analogue stereo (two channel, right and left) recordings.
Recording (digital) ©
- Connect the system's COAXIAL jack to the DIGITAL IN jack on a digital recording device. Before starting operation, set the DIGITAL OUT according to the audio connection. (See "DIGITAL OUT".)
Additional connection: Connecting a USB device or memory card
By connecting a USB mass storage device (including USB flash memory, USB flash players or memory cards) to the Hi-Fi system, you can enjoy the device's stored music through the powerful speakers of the Hi-Fi system.
- Insert the USB device's USB plug into the socket on the set.

For devices with USB cables:
1. Insert one plug of the USB cable (not supplied) into the socket on the set. 2. Insert the other plug of the USB cable into the USB output terminal of the USB device.
For the memory card:
1. Insert the memory card into a card reader (not supplied). 2. Use a USB cable (not supplied) to connect the card reader to the socket on the set.
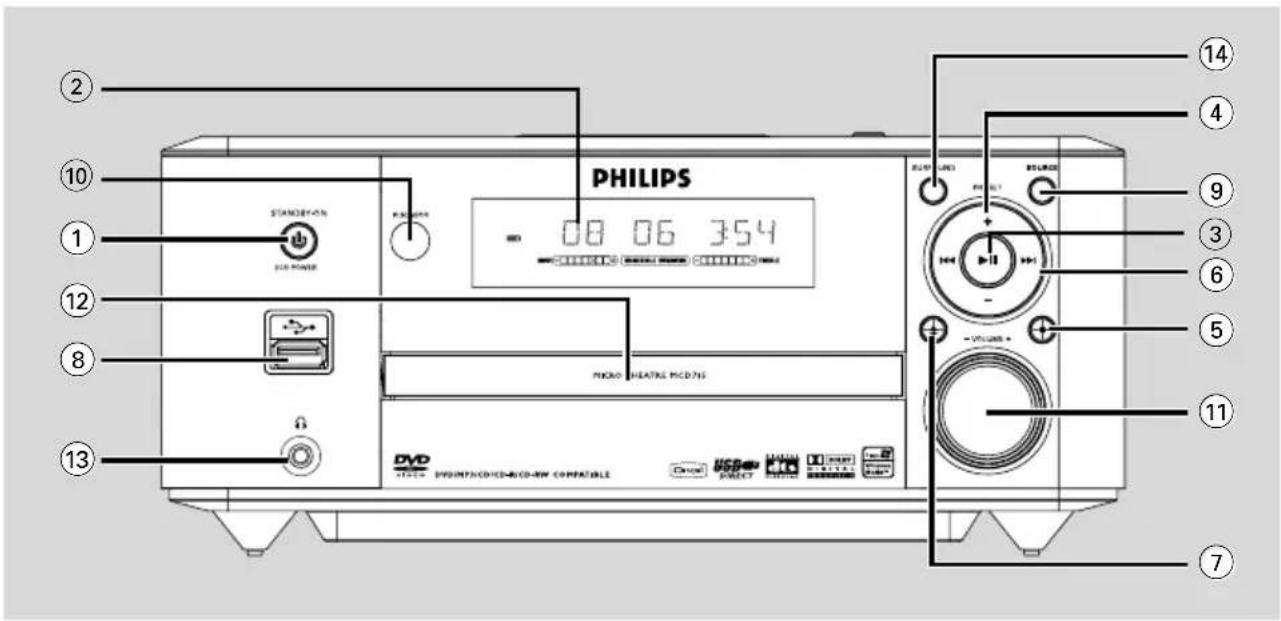
DVD player and power amplifier
① STANDBY-ON ⏻
- Switches the system on or to standby mode.
② Display
– Shows the current status of the DVD player.
③ ▶ II
— Starts or interrupts disc playback.
④ PRESET +/-
- in tuner mode, selects a preset radio station.
⑤
- stops disc playback or erases a program.
– in Demo mode (on the system only), activates/deactivates the demonstration.
⑥ |◀◀ / ▶▶
Disc:
- skips to the previous/next chapter/title/track. Tuner:
- tunes to a higher/lower radio frequency.
- press and hold, then release the key to start automatic search for a radio frequency downward/upward.
⑦
- opens or closes the disc tray.
⑧ USB DIRECT
- is the jack for the external USB mass storage device.
⑨ SOURCE
- to select the respective sound source: TUNER, DISC, USB or AUX.
- switches the system on.
⑩ IR SENSOR
- point the remote control towards this sensor.
⑪ VOLUME -/+
- adjusts the volume upward/downward.
- adjusts the hours and minutes in clock/timer setting mode.
- switches the set timer ON or OFF.
⑫ Disc door
⑬
- connects a headphone.
14 SURROUND
- selects 2.1 channel output (2.1CH) or 5.1 channel output (SUR5.1 or DVD5.1).
Remote control
① STANDBY-ON
- switches the system on or to standby mode.
— Picture CD: during playback, to select a slide show mode. - Tuner: programs preset radio stations.
④ SOURCE
- to select the respective sound source: TUNER, DISC, USB or AUX. ⑤ SYSTEM MENU (disc mode only)
- to enter or exit the system menu bar. ⑥ DISC MENU (disc mode only)
- DVD/VCD: enters or exits the disc contents menu.
- VCD2.0: switches the playback control mode on or off. ⑦
Tuner
- press to tune to a lower/higher radio frequency gradually.
- press and hold, then release the key to start automatic search for a radio frequency downward/upward.
Disc/USB
- searches fast backward/forward.
- In DISC mode, to select a movement direction in the disc menu or system menu bar.
⑧ ▲/▼
- In DISC mode, to select a movement direction in the disc menu or system menu bar. ⑨ OK
- to exit or confirm the selection.
10 |◀/▶|
- Disc: skips to the previous/next chapter/title/track.
- Tuner: selects a preset radio station.
⑪
- In DISC/USB mode, to stop playback or clear a program. 12
- In DISC/USB mode, to start or interrupt playback.
⑬ VOL +/-
- adjusts the volume upward/downward.
- adjusts the hours and minutes in clock/timer setting mode.
- selects a source in timer setting mode.
⑭ MODE
- selects various repeat modes or the shuffle play mode for a disc.
⑮ SUBTITLE
– selects a subtitle language.
⑯ SLEEP/TIMER Standby mode
- sets time for switching on the system automatically.
Power-on mode
- sets the sleep timer function (auto off).
⑰ LOUDNESS (unavailable for this version)
- enables or disables automatic loudness adjustment.
⑱ DSC
- selects different types of preset sound equalizer settings (CLASSIC, JAZZ, ROCK, POP or FLAT).
⑲ DBB
— enables or disables bass enhancement.
⑳ SURROUND
- selects 2.1 channel output (2.1CH) or 5.1 channel output (SUR5.1 or DVD5.1).
⑳ SLOW
- selects different slow playback modes for a VCD/SVCD/DVD.
22 A-B
- for VCD/CD/USB: to repeat a specific section within the same track.
- for DVD: to repeat a specific section in a disc.
23 DIM
- selects different levels of brightness for the display screen.
24 AUDIO
for VCD
- sets Stereo, Mono-Left or Mono-Right sound mode. for DVD
- selects an audio language.
25 ZOOM
- DVD/VCD/Picture CD: enlarges or reduces a picture or active image on the TV screen.
26 DISPLAY
- displays information on TV screen during playback.
27 GOTO
- In DISC mode, to fast search in a disc by entering a time, title, chapter or track.
⑳ CLOCK/RDS (RDS function unavailable for this version)
Standby mode
*— sets the system clock. Playback mode
– displays the system clock.
29
- ejects a disc from the disc loader.
30 ANGLE
– selects a DVD camera angle.
③1 MUTE
– to interrupt or resume sound reproduction.
Notes for remote control:
- First, select the source you wish to control by pressing one of the source select keys on the remote control (DISC or TUNER, for example).
- Then select the desired function (▶II, |◀, ▶| for example).
Step 1: Inserting batteries into the Remote Control

① Open the battery compartment. ② Insert two AAA batteries following the indications (+/-) inside the compartment. ③ Close the cover.
Using the Remote Control to operate the Player
Aim the Remote Control directly at the remote sensor (IR) on the front panel. Do not put any objects between the Remote Control and the DVD Player while operating the DVD Player.

CAUTION!
- Remove batteries if they are exhausted or if the Remote Control is not being used for a long time. - Do not use old and new or different types of batteries in combination. - Batteries contain chemical substances, so they should be disposed of properly.
Step 2: Setting up the TV IMPORTANT!
Make sure you have completed all the necessary connections. (See "Connecting TV").
① Switch the DVD system on and then select DISC source. (See "Switching the system on/off"). ② Turn on the TV and set to the correct video-in channel. You should see the blue Philips DVD background screen on the TV.
→Usually these channels are between the lowest and highest channels and may be called FRONT, A/V IN, or VIDEO. See your TV manual for more details. →Or, you may go to channel 1 on your TV, then press the Channel down button repeatedly until you see the Video In channel. →Or, the TV Remote Control may have a button or switch that chooses different video modes. →Or, set the TV to channel 3 or 4 if you are using an RF modulator.
Selecting the colour system that corresponds to your TV
This DVD Player is compatible with both NTSC and PAL. In order for a DVD disc to play on this Player, the colour system of the Disc, the TV and the DVD Player should match.
Press SYSTEM MENU in full stop mode. ② Press ◀▶ to select "Preference Page". ③ Use ◀ ▶ ▲ ▼ on the remote to navigate in the menu.
Move to "TV Type" and press ▶.
→ PAL: Select this if the connected TV is PAL system. It will change the video signal of a NTSC disc and output in PAL format. → Auto: Select this if the connected TV is compatible with both NTSC and PAL (multi-system). The output format will be in accordance with the video signal of the disc. → NTSC: Select this if the connected TV is NTSC system. It will change the video signal of a PAL disc and output in NTSC format.
④ Select an item and press OK.
Note: Before changing the current TV Type setting, ensure that your TV supports the selected TV Type.
Setting up Progressive Scan feature (for Progressive Scan TV only)
The progressive scan displays twice the number of frames per second than interlaced scanning (ordinary normal TV system). With nearly double the number of lines, progressive scan offers higher picture resolution and quality.
IMPORTANT!
Before enabling the progressive scan feature, you must ensure:
1) Your TV can accept progressive signals, a progressive scan TV is required. 2) You have connected the DVD player to your TV using Y Pb Pr (see "Connections-Step 3:
Connecting TV- Using Component Video jacks".)
Turn on your TV. 2 Turn off your TV progressive scan mode or turn on interlaced mode (refer to your TV user manual). 3 Press STANDBY-ON ⏻ to turn on the DVD player. 4 Select the correct Video Input channel.
→The DVD background screen appears on the TV.
5 Press SYSTEM MENU. 6 Press ◀▶ repeatedly to select "VIDEO SETUP PAGE". 7 Select "TV MODE" to "P-SCAN", then OK to confirm.
→The instruction menu appears on the TV.

8 Press ◀▶ to highlight OK in the menu and press OK to confirm.
There will be a distorted picture on your TV at this state until you turn on the progressive scan mode on your TV.
9 Turn on your TV progressive scan mode (refer to your TV user manual).
→The below menu appears on the TV.
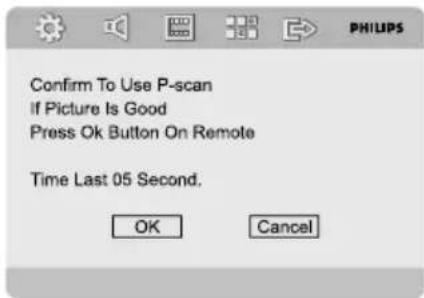
10 Press ◀▶ to highlight OK in the menu and press OK to confirm.
→The setup is complete now and you can start enjoying the high quality picture.
To deactivate Progressive manually
- When the distorted sign still appears on the TV, it may be due to the connected TV not accepting progressive signals, and progressive is set by mistake. You must reset the unit to interlace format.
1 Turn off your TV progressive scan mode or turn on to interlaced mode (refer to your TV user manual).
2 Press SYSTEM MENU on the remote to exit the system menu and then DISC and "1" to exit progressive scan.
→The DVD blue background screen will appear on the TV.
Note:
- During normal playback in the progressive scan mode, pressing DISC button and "1" will exit the progressive scan mode.
Step 3: Setting the speakers
You can adjust the delay effect (center, subwoofer and rear speakers only) and volume level for individual speakers. These adjustments let you optimize the sound according to your surroundings and setup.
Adjusting the delay effect

1 Press SYSTEM MENU. ② Use ▲▼ to select "Audio Setup Page". 3 Use ▲▼ on the remote to highlight "Channel Delay" and then press ▶ or OK to enter channel delay setting. 4 Press ▲▼ to highlight one speaker icon at a time to set the listening position/distance from the corresponding speaker.
→The options are as follows (distance in centimeters):
For center speaker: 0cm, 10cm, 20cm, 30cm, ..., 170cm.
For subwoofer and rear speakers: 0cm, 10cm, 20cm, 30cm, ..., 510cm.
5 Press ◀▶ to adjust the settings that best suit your surround sound needs.
To exit from the menu
●Press SYSTEM MENU again.
Step 4: Setting language preference
You can select your own preferred language settings. This DVD system will automatically switch to the selected language whenever you load a disc. If the language selected is not available on the disc, the disc's default language will be used instead. The OSD language in the system menu will remain once selected.
Setting the OSD Language
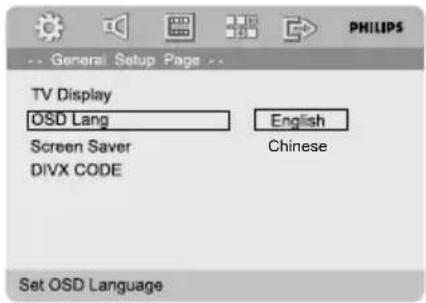
Press SYSTEM MENU. 2 Press ◀▶ to select "General Setup Page". 3 Use ◀▶▲▼ on the remote to navigate in the menu. Move to "OSD Lang" and press ▶. 4 Select a language and press OK.
To exit from the menu
- Press SYSTEM MENU again.
Setting the Audio, Subtitle and Disc Menu language

Press SYSTEM MENU in stop mode. 2 Press ◀▶ to select "Preference Page". 3 Press ▲▼ to highlight the following in the Preference Page.
- "Audio" (disc's soundtrack)
- "Subtitle" (disc's subtitles)
- "Disc Menu" (disc's menu)
4 Enter its submenu by pressing ▶. 5 Select a language and press OK. 6 Repeat steps 3~5 for other language settings.
To exit from the menu
●Press SYSTEM MENU again.
Switching the system on/off
Press STANDBY-ON
→ "HELLO" is displayed briefly. The system will switch to the last selected source.
- Press DISC, TUNER, USB or AUX on the remote.
→The system will switch to the selected source.
To switch the system to standby mode
- Press STANDBY-ON
→ "BYE BYE" is displayed briefly. The interactive sound settings, last selected source and tuner presets will be retained in the player's memory.
Volume control
Turn VOLUME (-/+ ) clockwise or anticlockwise (or press VOL +/- on the remote) to increase or decrease the volume level.
→ "VOL XX" is displayed on the display panel. "XX" denotes the volume level.
To switch off the volume temporarily
- Press MUTE on the remote.
→Playback will continue without sound and "MUTING" flashes.
● To activate sound reproduction, you can:
- press MUTE again; - adjust the volume controls; - change source.
To listen through the headphone
- Connect the headphone plug to the 📋 socket on the front panel.
→The speakers will be muted.
Sound control
DBB and DSC sound features cannot be activated at the same time.
DBB (Dynamic Bass Boost)
DBB enhances the bass response.
- Press DBB on the remote control to enable/disable DBB feature.
→Some discs might be recorded in high modulation, which causes a distortion at high volume. If this occurs, switch off DBB or reduce the volume.
DSC (Digital Sound Control)
DSC provides a different type of preset sound equalizer setting.
- Press DSC on the remote control repeatedly to select: FLAT, POP, JAZZ, CLASSIC or ROCK.
Selecting surround sound
IMPORTANT!
For proper surround sound, make sure the speakers and subwoofer are connected (see Connections - Step 1: Connecting speakers and subwoofer.)
- Press SURROUND to select surround or stereo mode.
→The availability of the various surround sound modes depends on the number of speakers used and the sound available on the disc. → The center and surround speakers operate only in Multi-channel surround mode. →The available output modes for multichannel include: Dolby Digital, Dolby Pro Logic or Dolby Pro Logic II surround sound. →Stereo broadcasts or recordings will produce some surround channel effects when played in a surround mode. However, monaural (single channel sound) sources will not produce any sound from the rear speakers.
Dimming the display screen
- Press DIM repeatedly to select different levels of brightness for the display screen.
Demonstration mode
The system has a demonstration mode that shows the various features offered by the system.
To activate the demonstration
- In standby mode, press ■ on the system to activate the demo mode.
→Demonstration will begin.
To deactivate the demonstration
●Press ■ on the system again.
→ "DEMO OFF" is displayed.
Note:
- Even if you remove the AC power cord and reconnect it to the wall socket, the demonstration will remain off until you activate it again.
IMPORTANT!
- Depending on the DVD or VIDEO CD, some operations may be different or restricted.
- Do not push on the disc tray or put any objects other than disc on the disc tray. Doing so may cause the disc player malfunction.
- If the inhibit icon (ø) appears on the TV screen when a button is pressed, it means the function is not available on the current disc or at the current time.
Playable Discs
Your DVD Player will play:
– Digital Video Discs (DVDs) - Video CDs (VCDs) — Super Video CDs (SVCDs) - Digital Video Discs + Rewritable (DVD+RW) - Compact Discs (CDs) — Picture (Kodak, JPEG) files on CDR(W) - DivX(R) disc on CD-R(W): - DivX 3.11, 4.x and 5.x - WMA
– Supported MP3-CD format.
• ISO 9660 / UDF format - Max. title/album name –12 characters Max. title number plus album is 255. • Max. nested directory is 8 levels. • The max. album number is 32. • The max. MP3 track number is 999. • Supported sampling frequencies for MP3 disc: 32 kHz, 44.1 kHz, 48 kHz. • Supported Bit-rates of MP3 disc are: 32, 64, 96, 128, 192, 256 (kbps). - Following formats can't be supported
- The files like *.VMA, *.AAC, *.DLF, *.M3U, *.PLS, *.WAV
• Non-English Album/Title name
• The discs recorded under Joliet format
• MP3 Pro and MP3 with ID3 tag

Region Codes
DVDs must be labeled for ALL regions or Region 6 in order to play on this DVD system. You cannot play discs that are labeled for other regions.

Note:
- If you are having trouble playing a certain disc, remove the disc and try a different one. Improperly formatted discs will not play on this DVD Player.
Playing discs
Connect the power cords of the system and TV (or any optional stereo or AV receiver) to a power outlet. 2 Turn on the TV power and set to the correct Video In channel. (See "Setting up the TV"). 3 Press STANDBY-ON
→You should see the blue Philips DVD background screen on the TV.
4 Press ▲ to open the disc tray and load in a disc, then press the same button again to close the disc tray.
→Make sure the label side is facing up.
5 Playback will start automatically (depending on the disc type).
→If a disc menu appears on the TV, see "Using the Disc Menu".
→If the disc is locked by parental control, you must enter your four-digit password. (See "Password Setup").
6 At any time, simply press ■ to stop playback.
Using the Disc Menu
Depending on the disc, a menu may appear on the TV screen once you load the disc.
To select a playback feature or item
Use ◀▶ ▲▼ and OK or Numeric Keypad (0-9) on the remote. →Playback will start automatically.
To access or exit from the menu
- Press DISC MENU on the remote.
For VCD with Playback Control (PBC) feature (version 2.0 only)
PBC playback allows you to play Video CDs interactively, following the menu on the display.
During playback, press DISC MENU.
→If PBC was ON, it will switch to OFF and continue playback.
→If PBC was OFF, it will switch to ON and return to menu screen.
Basic playback controls
Pausing playback (DVD/VCD/CD/MP3/DivX/WMA)
During playback, press ▶ II. →Playback will pause and sound will be muted.
Press ▶ II again to resume.
Selecting a track/chapter/title (DVD/VCD/DivX/CD)
Press ▶▶ on the system (or ▶ on the remote control) during playback to go to the next chapter/track.
Press ◀◀ on the system (or ◀ on the remote control) to go to the previous chapter/track.
To go directly to any chapter/track/title, enter the chapter/track/title number using the Numeric Keypad (0-9).
Resuming playback from the last stopped point (DVD/VCD/CD)
In stop mode and when a disc has not been removed, press ▶ II.
To cancel resume mode
In stop mode, press ■ again.
Zoom (DVD/VCD/DivX/JPEG)
Zooming allows you to enlarge or reduce the video image during playback.
Press ZOOM repeatedly to enlarge or reduce the playback video image.
Press ◀▶▲▼ to pan across the TV screen.
Repeat (DVD/VCD/CD/MP3/DivX/WMA)
For DVD/VCD/CD
Press MODE repeatedly to choose a repeat mode during playback.
CHAPTER (DVD)
– to repeat playback of the current chapter.
TRACK (CD/VCD)/TITLE (DVD)
– to repeat playback of the current track (CD/SVCD/VCD)/title (DVD).
ALL
– to repeat playback of all the disc.
SHUFFLE
– to repeat playback at random order.
For MP3/WMA/DivX
- Press MODE continuously to access different repeat modes.
→ Shuffle: play all files in the selected folder in random order.
→Repeat One: play an MP3/WMA file repeatedly.
→ Repeat All: play all files repeatedly.
→ Off: switches off the shuffle or repeat mode.
Repeat A-B (DVD/VCD/CD/MP3/DivX/WMA)
Press A-B at your chosen starting point.
2 Press A-B again at your chosen end point. →The section A and B can be set only within the same chapter/track. →The section will now repeat continuously.
3 To exit the sequence, press A-B again.
Slow Motion (DVD/VCD)
1 Press SLOW during playback to select the required speed: 1/2, 1/4, 1/8 or 1/16 (backward or forward). →Sound will be muted.
2 To return to normal speed, press ▶ II.
Note: — Slow backward is not possible on VCDs.
Program (not for Picture CD)
To select favourite tracks/chapters for playback in preferred sequence.
For DVD/VCD/CD

(DVD program for example)
1 Press PROGRAM on the remote control to enter the program mode. 2 Use the Numerical Keypad (0-9) to directly input the tracks or chapters (single track number with digit "0" in front, for example "05"). 3 Move the cursor by pressing ◀▶▲▼ to select START. 4 Press OK to start playback.
For MP3/WMA
In Stop mode, press DISC MENU to switch the menu between Album and Filelist. 2 When Filelist is on the screen, press ▲▼ to select the files and press PROGRAM to add the files to the program list. 3 Press DISC MENU to display the program list. 4 Press PROGRAM to delete unwanted files from the program list.
Forward/Reverse Searching (DVD/VCD/DivX/CD/MP3/WMA)
Press ◀/▶ on the remote control during playback to select the required speed: 2X, 4X, 8X, 16X or 32X (backward or forward). 2 To return to normal speed, press ▶ II.
Time search & search by chapter/track number (DVD/VCD/CD/MP3/WMA)
Press GOTO until the time or chapter/track edit box appears. 2 Enter hours, minutes and seconds from left to right in the time edit box using remote control numerical keypad.
OR
Enter your desired chapter/track number in the chapter/track edit box using remote control numerical keypad.
Information display during playback (not for Picture CD)
During playback, press DISPLAY to show disc information on the TV screen.
For DVD
→ Title/Chapter Elapsed: displays the elapsed time of the current title/chapter. → Title/Chapter Remain: displays the remaining time of the current title/chapter. → Display Off: switches time display off.
For Super VCD/VCD/DivX/CD
→ Single/Total Elapsed: displays the elapsed time of the current single/total track. → Single/Total Remain: displays the remaining time of the current single/total track. → Display Off: switches time display off.
Special disc features
Playing a Title (DVD)
Press DISC MENU.
→ The disc title menu appears on the TV screen.
2 Use ◀▶▲▼ or Numeric Keypad (0-9) to select a play option.
3 Press OK to confirm.
Camera Angle (DVD)
- Press ANGLE repeatedly to select different desired angle.
Changing the Audio Language (for DVD recorded with multiple languages)
- Press AUDIO repeatedly to select different audio languages.
Changing the Audio Channel (for VCD /DivX only)
- Press AUDIO to select the available audio channels provided by the disc (Mono Left, Mono Right or Stereo).
Subtitles (DVD)
- Press SUBTITLE repeatedly to select different subtitle languages.
Playing MP3/WMA/JPEG Picture CD
IMPORTANT!
You have to turn on your TV and set to the correct Video In channel. (See "Setting up the TV").
Playing MP3/WMA disc
IMPORTANT!
For DRM protected WMA files, use Windows Media Player 10 (or later) for CD burning/conversion. Visit www.microsoft.com for details about Windows Media Player and WM DRM (Windows Media Digital Rights Management).
General operation
Load an MP3/WMA disc.
The data disc menu appears on the TV screen.
2 Use ▲▼ to select an album and press OK to open the album.

3 Press ▲▼ or use the Numeric Keypad (0-9) to highlight a track.
4 Press OK to confirm.
The playback will start from the selected track to the end of the album.
Note:
- The disc reading time may exceed 10 seconds due to large number of songs compiled onto the disc.
Playback selection
During playback, you can:
- Press ◀◀/▶▶ on the system (or ◀◀/▶▶ on the remote control) to select another track in the current album.
●Press ▶ II repeatedly to pause/resume playback.
- Press DISC MENU on the remote to switch between Album and Filelist.
Playing JPEG Picture CD
General operation
1. Load a JPEG Picture CD.
The data disc menu appears on the TV screen.
2. Use ▲▼ to select a folder and press OK to open the folder.
3. Press ▲▼ or use the Numeric Keypad (0-9) to highlight a picture file.
4. Press OK to confirm.
The playback will start from the selected picture to the end of the folder.
Playback selection
During playback, you can:
- Press ◀◀/▶▶ on the system (or ◀/▶▶ on the remote control) to select another file in the current folder.
Use ◀▶▲▼ on the remote to rotate/flip the picture files.
- Press ▶ II repeatedly to pause/resume playback.
- Press DISC MENU on the remote to switch between Folder and Filelist.
Special JPEG features
Preview function (JPEG)
This function shows the content of the current folder or the whole disc.
1 Press ■ during playback.
→ Thumbnails of 12 pictures appear on the TV screen.


Slide Show Menu Prev Next
2 Use ◀▶▲▼ to highlight one of the pictures/ "Slide Show" and press OK to start playback/ slide show.
To enter the remote key function menu
Use ◀▶▲▼ to highlight "Menu" and press OK.

To display the other pictures on the previous/next page
1 Press ◀◀◀/▶▶ on the system (or ◀◀/▶▶ on the remote control).
2 Use ◀▶▲▼ to highlight "Prev" or "Next" and press OK.
Zoom picture (JPEG)
During playback, press ZOOM repeatedly to display the picture with different scales.
2 Use ◀▶ ▲▼ to view the zoomed picture.
Slide show playback modes (JPEG)
During playback, press PROGRAM on the remote control repeatedly to select different slide-show playback modes:
Mode 0: None
Mode 1: Wipe Top
Mode 2: Wipe Bottom
Mode 3: Wipe Left
Mode 4: Wipe Right
Mode 5: Diagonal Wipe Left Top
Mode 6: Diagonal Wipe Right Top
Mode 7: Diagonal Wipe Left Bottom
Mode 8: Diagonal Wipe Right Bottom
Mode 9: Extend From Center H
Mode 10: Extend From Center V
Mode 11: Compress To Center H
Mode 12: Compress To Center V
Mode 13: Window H
Mode 14: Window V
Mode 15: Wipe From Edge To Center
Mode 16: Move In From Top
Playback with multi-angles (JPEG)
During playback, press 1, 2, 3, or 4 to rotate the picture on the TV screen.
3: flip the picture vertically.
4: flip the picture horizontally.
1: rotate the picture anti-clockwise.
2: rotate the picture clockwise.
Playing a DivX disc
This DVD player supports the playback of DivX movies that you download from your computer onto a CD-R/RW (see "System Menu Options - DIVX(R) VOD registration code" for more information).
Load a DivX disc.
Playback will start automatically. If not, press ▶ II.
2 If the DivX movie contains external subtitles, the subtitle menu will appear on the TV screen for your selection.
2 If the DivX movie contains external subtitles, the subtitle menu will appear on the TV screen for your selection.
In this case, pressing SUBTITLE on the remote control will turn the subtitles on or off.
- If multilingual subtitles are embedded on the DivX disc, pressing SUBTITLE will change the subtitle language during playback.
Note:
- Subtitle files with the following filename extensions (.srt, .smi, .sub, .ssa, .ass) are supported but do not appear on the file navigation menu. - The subtitle filename must be the same as the filename of the movie.
Basic operations
1 Press SYSTEM MENU to enter the Setup Menu.
2 Press ◀▶ to select a page to be set.
3 Press ▲▼ to highlight an option.
4 Enter its submenu by pressing ▶ or OK.
5 Move the cursor by pressing ▲▼ to highlight the selected item.
→ In cases of value setting, press ◀▶ to adjust values.
6 Press OK to confirm.
To return to the upper-level menu
- Press ◀ or OK (in cases of value adjustment).
To exit from the menu
● Press SYSTEM MENU again.
The settings will be stored in the player's memory even if the player is switched off.
Note:
- Some of the features in the System Menu Options are described in "Getting Started".
General Setup Page
The options included in General Setup page are: "TV Display", "OSD Lang", "Screen Saver" and "DIVX CODE".
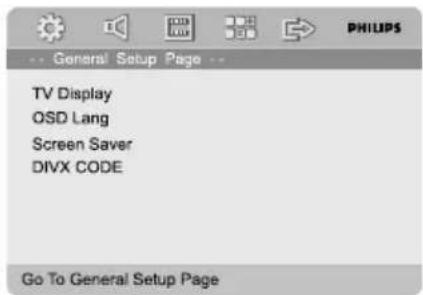
TV Display
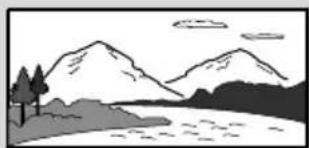
Set the aspect ratio of the DVD Player according to the TV you have connected.
→Normal/PS (panscan): If you have a normal TV and want both sides of the picture to be trimmed or formatted to fit your TV screen.

→Normal/LB (letterbox): If you have a normal TV. In this case, a wide picture with black bands on the upper and lower portions of the TV screen will be displayed.

→ Wide: If you have a wide-screen TV.
OSD Lang
See "Getting Started-Step 4: Setting language preference".
Screen Saver
This function is used to turn the screen saver on or off.

→ On: In STOP, PAUSE or No DISC mode, if no actions are performed about 3 minutes, the screen saver will be activated.
→Off: Screen saver is disabled.
DIVX(R) VOD registration code
Philips provides you the DivX® VOD (Video On Demand) registration code that allows you to rent and purchase videos using the DivX® VOD service.
For more information, visit us at www.divx.com/vod.
In 'General Setup Page', press ▲▼ to highlight
DIVX CODE, then press ▶ or OK to enter its submenu and press OK again to confirm.
→The registration code will appear.

2 Press OK to exit. 3 Use the registration code to purchase or rent the videos from DivX® VOD service at www.divx.com/vod. Follow the instructions and download the video onto a CD-R for playback on this DVD player.
Notes:
- All the downloaded videos from DivX® VOD can only be played back on this DVD player.
- Time search feature is not available during DivX movie playback.
Audio Setup Page
The options included in Audio Setup page are: "Speaker Setup", "SPDIF Setup", "Dolby Digital Setup", "3D Processing", "HDCD" and "Night Mode".

Speaker Setup
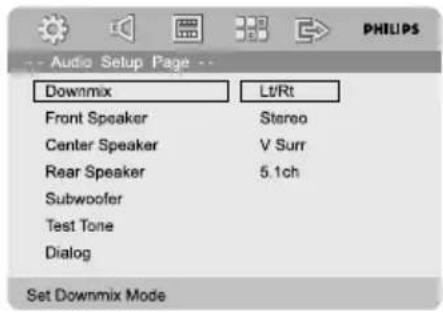
The options included in Speaker Setup page are: "Downmix", "Front Speaker", "Center Speaker", "Rear Speaker", "Subwoofer", "Test Tone" and "Dialog".
Downmix
This option allows you to set the stereo analog output of your DVD Player.
In 'Speaker Setup Page', press ▲▼ to highlight 'Downmix', then press ▶ or OK.
→ LT/RT: Select this option if your DVD Player is connected to a Dolby Pro Logic decoder. → Stereo: Select this option when output delivers sound from only the two front speakers. →V Surr Allows the DVD player to use virtual surround sound effects. → 5.1ch: Select this option for 5.1-channel sound output.
Front Speaker
Adjusts the volume levels for front speakers.
Options include "Large" and "Small".
Center Speaker
Adjusts the volume level for the center speaker. Options include "Large", "Small" and "Off".
Note:
- This option is available only when you select "5.1CH" under "Downmix".
Rear Speaker
Adjusts the volume levels for rear speakers.
Options include "Large", "Small" and "Off".
Note:
- This option is available only when you select "5.1CH" under "Downmix".
Subwoofer
Selects ON/OFF for the subwoofer.
Test Tone
The test tone will be automatically generated.
Note:
- This option is available only when you select "5.1CH" under "Downmix" and the disc tray is open.
Dialog
Adjusts the dialog level up or down so that you can hear the dialog more clearly during playback.
SPDIF Output
The options included in SPDIF (Sony/Phillips Digital Interface Format) Setup Page are: "SPDIF Off", "SPDIF/Raw" and "SPDIF/PCM".

→ SPDIF Off: Turns off the SPDIF output. → SPDIF/Raw: If you have connected your DIGITAL OUT (COAXIAL or OPTICAL) to a multi-channel decoder/receiver. → SPDIF/PCM: Only if your receiver is not capable of decoding multi-channel audio.
Dolby Digital Setup
The option included in Digital Audio Setup is: "Dual Mono".

Dual Mono
Select the setting that matches the number of speakers you have connected.
→ Stereo: Left mono sound will send output signals to Left speaker and Right mono sound will send output signals to Right speaker. → L-Mono: Left mono sound will send output signals to Left speaker and Right speaker. → R-Mono: Right mono sound will send output signals to Left speaker and Right speaker.
3D Processing
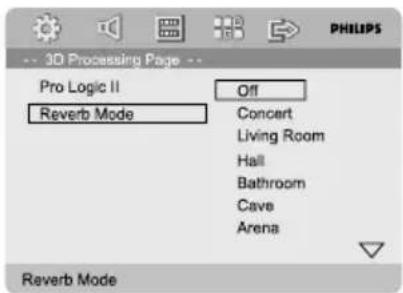
The options included in 3D Processing are: "Pro Logic II" and "Reverb Mode".
Pro Logic II
The options included in Pro Logic II Config page are: "Pro Logic II", "Mode", "Panorama", "Dimension" and "Center Width".

Pro Logic II
This function provides a convincing three-dimensional sound field on conventional stereo music recordings.
→ On: Turns on the Pro Logic II effect. → Off: Turns off the Pro Logic II effect. In this case, all options below "Pro Logic II" will be unavailable.
→ Auto: Allows automatic selection of the Pro Logic II effect depending on the discs being played back.
Mode
You can select your desired Pro Logic II mode here.
→ Music: When listening to music, you can experience sound effects as if you were listening to the actual performance. The options below "Mode" will be available only when this option is selected. → Movie: Is mainly intended for use with DTS discs. It can add realism to movie sound tracks. → Pro Logic: After selecting this, you will experience a realistic multi-channel effect even with just the front left and right speakers. → Auto: Allows automatic selection of the Pro Logic II mode depending on the discs being played back.
Panorama
Extends the front stereo image to include the surround speakers for a wraparound effect.
→On: Enables this function. →Off: Disables this function.
Dimension
Incrementally adjusts the sound field either towards the front or towards the rear speakers. The adjustable range is from -3 (towards the rear) to +3 (towards the front).
Center Width
Adjusts the center image from all front speakers to varying degrees. A larger value adjusts the center image towards the front left and right speakers. The adjustable range is from 0 (center channel sound is output only from center speaker) to 7 (center channel sound is output only from front left and right speakers).
Reverb Mode
Reverb mode provides a virtual surround sound experience using just two speakers.
→ Off, Concert, Living Room, Hall, Bathroom, Cave, Arena and Church.
HDCD
The option included in HDCD (High Definition Compatible Digital) is: "Filter".

Filter
Sets the audio output cutoff frequency point when playing an HDCD disc.
→ Off, 44.1K and 88.2K.
Night mode
In this mode, the high volume outputs are softened and low volume outputs are brought upward to an audible level. It is useful for watching your favourite action movie without disturbing others at night.
→ On: Select this to level out the volume. This feature is only available for movies with Dolby Digital mode. → Off: Select this when you want to enjoy the surround sound with its full dynamic range.
Video Setup Page
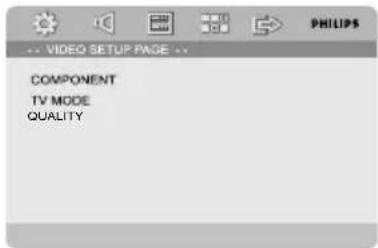
The options included in Video Setup page are: "Component", "TV Mode" and "Quality".
Component
Sets the video output according to your video connection. This setting is not required if you are using the VIDEO OUTPUT jack (yellow) to connect the DVD micro system to your TV.
→ S-Video: Select this if you have connected → Pr/Cr Pb/CbY: Select this if you have connected the DVD micro system to your TV using Component video jacks.
TV Mode
Selects interlace or P-SCAN video output mode when Pr/Cr Pb/Cb Y is selected.
→P-SCAN and Interlace.
In the progressive scan mode, you can enjoy the high quality picture with less flickers. It only works when you have connected the DVD player's Y Pb Pr jacks to your TV that supports the progressive video input. Otherwise, a distorted picture will appear on the TV. For proper progressive scan set up, see "Getting Started - Setting up Progressive Scan feature".
Quality
This menu helps you to set the video quality.
Press ▲ ▼ to highlight "Quality". 2 Press ▶ or OK to enter Video Quality Setup.
The options included in Video Quality Setup page are: "Sharpness", "Brightness", "Contrast", "Gamma", "Hue", "Saturation" and "Luma Delay".

Sharpness
Adjusts the sharpness level.
→ High, Medium and Low.
Brightness
Adjusts the brightness level. Range: -20-+20.
Contrast
Adjusts the contrast level. Range: -16-+16.
Gamma
Adjusts the gamma level.
→ High, Medium, Low and None.
Hue
Adjusts the hue level. Range: -9-+9.
Saturation
Adjusts the saturation level. Range: -9-+9.
Luma Delay
Adjusts the luma delay.
→0T and 1T.
Preference Page
The options included in the Preference page are: "TV Type", "Audio", "Subtitle", "Disc Menu", "Parental", "Default", and "Password Setup".

Note:
- Preference features can be selected only during "No Disc" condition or full STOP mode.
Parental
Some DVDs may have a parental level assigned to the complete disc or to certain scenes on the disc. This feature lets you set a playback limitation level.
The rating levels are from 1 to 8 and are country dependent. You can prohibit the playing of certain discs that are not suitable for your children or have certain discs played with alternative scenes.

● VCD, SVCD, and CD have no level indication, so the parental control function has no effect on those kinds of discs. This applies to most illegal DVD discs. Press ▲ ▼ to highlight "Parental". 2 Enter its submenu by pressing ▶. 3 Use ▲ ▼ to highlight a rating level for the disc inserted.
→ DVDs that are rated above the level you selected will not play unless you enter your four-digit password and choose a higher level rating.
Note:
- Some DVDs are not encoded with a rating though the movie rating may be printed on the disc cover. The rating level feature does not work for such discs.
Rating explanations
1 KID SAF
— Kids material; recommended especially for children and viewers of all ages.
2G
– General Audience; recommended as acceptable for viewers of all ages.
3 PG
- Parental Guidance suggested.
4 PG 13
– Material is unsuitable for children under age 13.
5-6 PGR, R
- Parental Guidance - Restricted;
recommended that parents restrict children under 17 from viewing or allow to view only when supervised by a parent or adult guardian.
7 NC-17
- No children under age 17; not recommended viewing for children under age 17.
8 Adult
- Mature materials; should be viewed only by adults due to graphic sexual material, violence or language.
Default
Setting the "Default" function will reset all options and your personal settings to the factory defaults and all your personal settings will be erased.
Caution!
- When this function is activated, all settings will be reset to factory defaults.
Password Setup
The options included in the Password Setup page are: "Password Mode" and "Password".
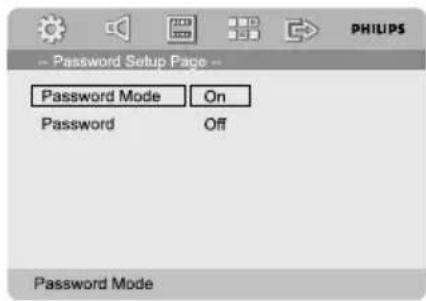
Password Mode
This feature is used to enable/disable the password by selecting "ON"/"OFF".
Password
Enter your four-digit password when a hint is displayed on the screen. The default password is 1234.
Press ▲ ▼ to highlight "Password". 2. Enter its submenu by pressing ▶. 3. Press OK to open the page for inputting a new password.

4. Enter the existing 4-digit code. 5. Enter the new 4-digit code. 6. Enter the new 4-digit code a second time to confirm.
→The new 4-digit code will take effect.
7. Press OK to exit.
Notes:
- If the password has been changed, the parental and disc lock codes will also be changed.
- The default password (1234) is always active even if the password has been changed.
Radio Reception
Tuning to radio stations
Press STANDBY-ON ⏻ to switch on the last selected source. 2 Press SOURCE (TUNER on the remote) to select TUNER (FM) mode. 3 Press and hold ◀◀/▶▶ on the system (or ◀/▶ on the remote control) until the frequency indication starts to change, then release.
→The system automatically tunes to the next strong radio station.
- To tune to a weak station, press ◀◀/▶▶ on the system (or ◀◀/▶ on the remote control) briefly and repeatedly until an optimal reception is found.
4 Repeat Step 3 if necessary until you find the desired radio station.
Presetting radio stations
You can preset up to 20 stations regardless of the reception.
Automatic programming
- Press PROGRAM on the remote control for more than two seconds to activate programming.
→All available stations are programmed.
Manual programming
①Tune to your desired radio station (refer to "Tuning to radio stations"). 2 Press PROGRAM on the remote.
→"PROG" icon flashes.
3 Press PRESET+/- (or ◀ / ▶ on the remote control) to select the desired preset number. → If "PROG" icon goes off before you select the desired preset number, press PROGRAM on the remote. 4 Press PROGRAM on the remote again to store the radio station. - Repeat steps 1-4 to store other radio stations.
Listening to preset radio stations
In tuner mode, press PRESET+/- (or ◀/▶ on the remote control) to select the desired preset number.
The preset number, radio frequency, and waveband are displayed.
Setting the clock
In Standby mode, press and hold CLOCK/RDS on the remote control until the time flashes on the display. "CLOCK SET" is displayed briefly. Then, the hour digits flash on the display screen. Turn VOLUME -/+ clockwise or anticlockwise, or press VOL +/- on the remote, to set the hours. Press CLOCK/RDS to confirm.
The minute digits flash on the display screen.
Turn VOLUME -/+ clockwise or anticlockwise, or press VOL +/- on the remote, to set the minutes. Press CLOCK/RDS again to confirm the clock setting.
Notes:
- This system only supports 24-hour mode.
- The clock setting will be erased when the system is disconnected from the power supply.
- The system will exit clock setting mode if no button is pressed within 30 seconds.
Setting sleep/wake-up timer
Sleep timer setting
In power-on mode, the sleep setting enables the system to switch to standby mode automatically at a preset time.
In power-on mode, press SLEEP/TIMER on the remote repeatedly to select a preset time.
The selections are as follows (time in minutes):
0 0 → 1 0 → 2 0 → 3 0 → 4 0 → 5 0 → 6 0 → 7 0
→ 8 0 → 9 0 → 0 0
2 When you reach the desired length of time, stop pressing SLEEP/TIMER.
→ "SLEEP" appears.
To deactivate the sleep timer
- Press SLEEP/TIMER repeatedly until "00" is displayed, or press STANDBY-ON.
In standby mode, the timer setting enables the system to switch on automatically at a set time.
Wake-up timer setting
IMPORTANT!
- Before setting the timer, ensure that the clock is set correctly.
1 Press and hold SLEEP/TIMER until the time flashes on the display.
→ "TIME SET" scrolls. Then, the hour digits flash on the display screen.
2 Turn VOLUME -/+ clockwise or anticlockwise or press VOL +/- on the remote to set the hours.
3 Press SLEEP/TIMER to confirm.
The minute digits flash on the display screen.
4 Turn VOLUME -/+ clockwise or anticlockwise or press VOL +/- on the remote to set the minutes.
5 Press SLEEP/TIMER to confirm the time setting.
"OFF" flashes on the display screen.
6 Turn VOLUME -/+ clockwise or anticlockwise or press VOL +/- on the remote to select "ON".
The lock icon appears on the display screen.
To deactivate the timer
Select "OFF" at Step 6.
Using a non-USB device
Connect the system's AUX-IN (L/R) jacks to the AUDIO OUT jacks on another audio/visual device (such as a VCR, Laser Disc player or cassette deck) using the audio cables (white/red).
2 Press AUX to select external equipment.
"AUX" is displayed.
Note:
- All the sound control features (DSC or DBB, for example) are available for selection.
- Refer to the operating instructions for the connected equipment for details.
Using a USB mass storage device
By connecting a USB mass storage device to the Hi-Fi system, you can enjoy the device's stored music through the powerful speakers of the Hi-Fi system.
Playing a USB mass storage device Compatible USB mass storage devices
With the Hi-Fi system, you can use:
- USB flash memory (USB 2.0 or USB 1.1)
- USB flash players (USB 2.0 or USB 1.1)
- Memory cards (requires an additional card reader to work with this Hi-Fi system)
Notes:
– In some USB flash players (or memory devices), the stored contents are recorded using copyright protection technology. Such protected contents will be unplayable on any other devices (such as this Hi-Fi system). - Compatibility of the USB connection on this product:
a) This product supports most USB Mass storage devices (MSD) that are compliant to the USB MSD standards.
i) Most common Mass storage class devices are flash drives, memory sticks, jump drives and etc. ii) If you see a "Disc Drive" show up on your computer after you plugged the mass storage device into your computer, most likely it is MSD compliant and it will work with this
product.
b) If your Mass storage device requires a battery/power source. Please make sure you have a fresh battery in it or charge the USB device first and then plug it into the product again.
– Supported Music type:
a) This device only supports unprotected music with the following file extension:
.mp3
.wma b) Music bought from online music stores is not supported because it is secured by Digital Rights Management protection (DRM). c) File name extensions that end with the following are not supported:
.wav; .m4a; .m4p; .mp4; .aac and etc.
- No direct connection can be made from the computer USB port to the product even if you have either or both mp3 or wma files in your computer.
Supported formats:
- USB or memory file format FAT12, FAT16, FAT32 (sector size: 512 bytes)
- MP3 bit rate (data rate): 32-320 Kbps and variable bit rate
- WMA v9 or earlier – Directory nesting up to a maximum of 8 levels – Number of albums/folders: maximum 99 – Number of tracks/titles: maximum 999
- ID3 tag v2.0 or later
- File name in Unicode UTF8 (maximum length: 128 bytes)
The system will not play or support the following:
– Empty albums: an empty album is an album that does not contain MP3/WMA files, and will not be shown in the display. - Non-supported file formats are skipped. This means that e.g.: Word documents .doc or MP3 files with extension .dlf are ignored and will not be played.
— AAC, WAV, PCM audio files - DRM protected WMA files – WMA files in Lossless format
How to transfer music files from PC to a USB mass storage device
By dragging and dropping music files, you can easily transfer your favorite music from PC to a USB mass storage device.
For the flash player, you can also use its music management software for the music transfer.
However, those WMA files may be unplayable for compatibility reasons.
How to organize your MP3/WMA files on the USB mass storage device
This Hi-Fi system will browse the MP3/WMA files in the folders/sub-folders/titles order. Example:
![graph TD A["Root"] --> B["Album 01"] B --> C["Album 02"] B --> D["Album 03"] C --> E["Title 001"] C --> F["Title 002"] C --> G["Title 003"] D --> H["Title 001"] D --> I["Title 002"] D --> J["Title 003"]](/content/2026/06/1403924/images/94787fbb1be7e8ae63ab2e5e1d7160730d6d53ec99a826c0080e50ada9f490a4.jpg)
Organize your MP3/WMA files in different folders or subfolders as required.
Notes:
- If you have not organized MP3/WMA files into any albums on your disc, an album "01" will be automatically assigned for all those files.
- Make sure that the file names of MP3 files end with .mp3. and the file names of WMA files end with .wma.
- For DRM protected WMA files, use Windows Media Player 10 (or later) for conversion. Visit www.microsoft.com for details about Windows Media Player and WM DRM (Windows Media Digital Rights Management).
Check the USB device has been properly connected. (See Installation: Connecting an additional appliance). 2 Press SOURCE (USB on the remote control) once or more to select USB.
- NO FILE appears if no audio file is found in the USB device.
3 Play the USB's audio files as you do with the albums/tracks on a CD (See Disc Operations).
Notes:
- For compatibility reasons, the album/track information may differ from what is displayed through flash players' music management software.
- File names or ID3 tags will be displayed as — if they are not in English.
SYSTEM
AC Power 220V / 50 Hz
Total output power 135W
Front 2×15W
Rear 2×15W
Center 30W
Subwoofer 45W
AUX input sensitivity .... ≤ 500mV
Channel Separation 40dB
Distortion 0.7%
Unit Dimensions ....
Frequency response ...... 20Hz-20kHz (±3dB)
Video output 1 V P-P
Horizontal definition.... 500 (TV)
Weight (with Amplifier) 1.96 kg
TUNER
FM Frequency range 87.5-108 MHz
FM Noise limit sensitivity .... ≤ 20mV/m
FM S/N 46dB
USB PLAYER
USB....12Mb/s,V1.1
...... support MP3 and WMA files
Number of albums/folders ...... maximum 99
Number of tracks/titles ...... maximum 999
SPEAKERS
Front Speakers
System 2-way shielded
Impedance.... 4 Ω
Speaker drivers 1x3" woofer
Weight 1.15 kg
Center Speaker
System 2-way shielded
Impedance 8 Ω
Speaker drivers 1x3" woofer, 2" tw
Weight 1.13 kg
Surround Speakers
System 2-way shielded
Impedance 4 Ω
Speaker drivers 1 x 3" woofer, Pieze
Weight 3.23 kg
SUBWOOFER
Subwoofer (not magnetically shielded design).... 6.5"
Impedance.... 4 Ω
Weight 3.78 kg
REMOTE
Distance 6m
Specifications subject to change without prior notice
WARNING
Under no circumstances should you try to repair the system yourself, as this will invalidate the warranty. Do not open the system as there is a risk of electric shock.
If a fault occurs, first check the points listed below before taking the system for repair. If you are unable to remedy a problem by following these hints, consult your dealer or Philips for help.
| Problem | Solution |
| No power. | ✓Check if the AC power cord is properly connected. ✓Press STANDBY-ON ⏻ turn on the power. |
| No picture. | ✓Check if the TV is switched on. ✓Check the video connection. ✓Press SOURCE on the top of the DVD player repeatedly to select “DVD” or press DISC on the remote. ✓Set your TV to the correct Video In channel. This channel is usually near channel 00. Or, you may have a button on the TV remote control that selects Auxiliary or A/V IN channel. See your TV owner's manual for details. Or, change channels at the TV until you see DVD screen on the TV. ✓If the progressive scan feature is activated but the connected TV does not support progressive signals or the cables are not connected accordingly, see “Getting started-Setting up Progressive Scan feature” for proper progressive scan setup or deactivate the progressive scan feature as below: 1) Turn off your TV progressive scan mode or turn on to interlaced mode. 2) Press SYSTEM MENU on the remote to exit the system menu and then DISC and “1” to exit progressive scan. |
| Distorted or poor picture. | ✓Sometimes a small amount of picture distortion may appear. This is not a malfunction. ✓Clean the disc. |
| Completely distorted picture or black/ white picture. | ✓TV has a colour system standard. If the disc's or DVD system's colour system is different than your TV's colour system, the picture may be distorted or colourless. |
The aspect ratio of the screen cannot be changed even though you have set the TV shape.
No sound or distorted sound.
There is no sound from the center and surround speakers.
The micro DVD player does not start playback.
The DVD micro system does not respond when the buttons are pressed.
Cannot activate some features, such as Angles, Subtitles, or multi-language Audio.
√The aspect ratio is fixed on the DVD disc.
√Depending on the TV, it may not be possible to change the aspect ratio.
√Adjust the volume.
√ Check that the speakers are connected correctly.
Replace the speaker cables.
Disconnect the headphones.
The system is in pause, slow motion, or fast forward/reverse mode. Press ▶ II to resume normal play mode.
Make sure the center and surround speakers are connected correctly.
Press SURROUND to select the correct surround sound setting.
Make sure the source you are playing is recorded or broadcast in surround sound (DTS, Dolby Digital, etc.).
Insert a readable disc with the playback side facing down.
Check the disc type, color system, and regional code. Check for any scratches or smudges on the disc.
Press SYSTEM MENU to turn off the setup menu screen.
Cancel the parental control rating function or change the rating level.
Moisture has condensed inside the system. Remove the disc and leave the system turned on for about an hour.
Disconnect the power plug from the outlet and insert it again.
Multi-language sound or subtitle is not recorded on the DVD.
Changing the language for the sound or subtitle is prohibited on the DVD.
The features may not be available on the disc.
Considerable noise in radio broadcasts.
The remote control does not function.
The display is dark.
Low hum or buzz sound.
Low bass response.
Unable to select Progressive Scan
Some files on the USB device are not displayed.
"DEVICE NOT SUPPORTED" scrolls on the display.
Tune in to the correct frequency. Connect the antennas. Fully extend the FM wire antenna. Position for best reception and secure to a wall. Connect an outdoor FM or MW antenna. Adjust the direction and position for best reception. Place the antenna farther away from any equipment that may be causing the noise. Increase the distance between the system and your TV or other equipment.
Select the correct source (DISC or TUNER, for example) before pressing the function button. Point the remote control at the remote sensor of the unit. Reduce the distance to the player. Remove any possible obstacles. Replace the batteries with new ones. Check that the batteries are loaded correctly.
Press DIM again.
Place the DVD micro system as far away as possible from electrical devices that may be causing interference.
Check all speakers for correct polarity.
Check that the output of the video signal is switched to 'Pr/Cr Pb/Cb Y'.
Check if the number of folders exceeds 99 or the number of titles exceeds 999.
Remove the USB mass storage device or select another source.
Analog: Sound that has not been turned into numbers. Analog sound varies, while digital sound has specific numerical values. These jacks send audio through two channels, the left and right.
Aspect ratio: The ratio of vertical and horizontal sizes of a displayed image. The horizontal vs. vertical ratio of conventional TVs is 4:3, and that of wide-screens is 16:9.
AUDIO OUT Jacks: Jacks on the back of the DVD System that send audio to another system (TV set, Stereo, etc.).
Bit Rate: The amount of data used to hold a given length of music; measured in kilobits per second, or kbps. Or, the speed at which you record. Generally, the higher the bit rate the better the sound quality. However, higher bit rates use more space on a Disc.
Chapter: Sections of a picture or a music piece on a DVD that are smaller than titles. A title is composed of several chapters. Each chapter is assigned a chapter number enabling you to locate the chapter you want.
Component Video Out Jacks: Jacks on the back of the DVD System that send high-quality video to a TV set that has Component Video In jacks (R/G/B, Y/Pb/Pr, etc.).
Disc menu: A screen display prepared for the selection of images, sound, subtitles, multi-angles, etc recorded on a DVD.
Digital: Sound that has been converted into numerical values. Digital sound is available when you use the DIGITAL AUDIO OUT COAXIAL or OPTICAL jacks. These jacks send audio through multiple channels, instead of just two channels as analog does.
Dolby Digital: A surround sound system developed by Dolby Laboratories containing up to six channels of digital audio (front left and right, surround left and right and center).
JPEG: A still-picture data compression system proposed by the Joint Photographic Expert Group, which features small decrease in image quality in spite of its high compression ratio.
MP3: A file format with a sound data compression system, "MPE" is the abbreviation of Motion Picture Experts Group 1 (or MPEG-1) Audio Layer 3. Through the MP3 format, one CD-R or CD-RW can contain about 10 times as much data volume as a regular CD can.
Multichannel: DVD is specified to have all sound tracks constitute one sound field. Multichannel refers to a structure of sound tracks having three or more channels.
Parental control: A function of the DVD to limit playback of the disc by the age of the users according to the limitation level in each country. The limitation varies from disc to disc; when it is activated, playback will be prohibited if the software's level is higher than the user-set level.
PCM (Pulse Code Modulation): A system for converting analog sound signal to digital signal for later processing without data compression.
Playback control (PBC): Refers to the signal recorded on video CDs or SVCDs for reproduction control. By using screen menus recorded on a Video CD or SVCD that supports PBC, you can enjoy interactive-type software as well as software having a search function.
Progressive Scan (P-Scan): It displays all the horizontal lines of a picture at one time, as a signal frame. This system can convert interlaced video from DVD into progressive format for connection to a progressive display. It dramatically increases the vertical resolution. A progressive scan TV set is needed to receive progressive scan output from the system.
Region code: A system allowing discs to be played only in preset regions. This unit will only play discs that have compatible region codes. You can find the region code of your unit from the product label. Some discs are compatible with more than one region (or ALL regions).
S-Video: Produces a clear picture by sending separate signals for luminance and the color. You can use S-Video only if your TV set has S-Video In jack.
Sampling Frequency: Frequency of data sampling when analog data is converted to digital data. Sampling frequency numerically represents how many times the original analog signal is sampled per second.
Surround: A system for users to create realistic three-dimensional sound fields full of realism by arranging multiple speakers around the listener.
Title: The longest section of a picture or music feature on DVD, music, etc., in video software, or the entire album in audio software. Each title is assigned a title number enabling you to locate the title you want.
VIDEO OUT jack: Jack on the back of the DVD System that sends video to TV.

- MANUFACTURED UNDER LICENSE FROM DOLBY LABORATORIES
- GENERAL INFORMATION
- CONNECTIONS
- FUNCTIONAL OVERVIEW
- GETTING STARTED
- BASIC FUNCTIONS
- DISC OPERATIONS
- SYSTEM MENU OPTIONS
- OTHER FUNCTIONS
- EXTERNAL SOURCES
- FEATURES
- OTHER FEATURES INCLUDE
- ADDITIONAL COMPONENT CONNECTIONS
- NIGHT MODE
- PARENTAL CONTROL (RATING LEVEL)
- SLEEP/WAKE-UP TIMER
- PROGRESSIVE SCAN
- NOTE
- SUPPLIED ACCESSORIES
- ENVIRONMENTAL INFORMATION
- INSTALLATION
- MAINTENANCE
- HEARING SAFETY
- LISTEN AT A MODERATE VOLUME
- TO ESTABLISH A SAFE VOLUME LEVEL
- LISTEN FOR REASONABLE PERIODS OF TIME
- BE SURE TO OBSERVE THE FOLLOWING GUIDELINES WHEN USING YOUR HEADPHONES
- IMPORTANT
- NOTES
- STEP 3: CONNECTING TV
- USING COMPONENT VIDEO JACKS (Y PB PR)
- USING S-VIDEO JACK
- USING AN ACCESSORY RF MODULATOR
- STEP 5: CONNECTING THE POWER CORD
- ADDITIONAL: CONNECTING ADDITIONAL EQUIPMENT
- VIEWING AND LISTENING TO THE PLAYBACK OF OTHER EQUIPMENT Ⓐ
- USING THE VCR FOR RECORDING DVDS Ⓑ
- RECORDING (DIGITAL) ©
- ADDITIONAL CONNECTION: CONNECTING A USB DEVICE OR MEMORY CARD
- FOR DEVICES WITH USB CABLES
- FOR THE MEMORY CARD
- DVD PLAYER AND POWER AMPLIFIER
- DISC
- REMOTE CONTROL
- ⑭ MODE
- ⑮ SUBTITLE
- ⑯ SLEEP/TIMER STANDBY MODE
- POWER-ON MODE
- ⑰ LOUDNESS (UNAVAILABLE FOR THIS VERSION)
- ⑱ DSC
- ⑲ DBB
- ⑳ SURROUND
- ⑳ SLOW
- A-B
- DIM
- AUDIO
- ZOOM
- DISPLAY
- GOTO
- ⑳ CLOCK/RDS (RDS FUNCTION UNAVAILABLE FOR THIS VERSION)
- ANGLE
- ③1 MUTE
- NOTES FOR REMOTE CONTROL
- STEP 1: INSERTING BATTERIES INTO THE REMOTE CONTROL
- USING THE REMOTE CONTROL TO OPERATE THE PLAYER
- CAUTION
- STEP 2: SETTING UP THE TV IMPORTANT
- SELECTING THE COLOUR SYSTEM THAT CORRESPONDS TO YOUR TV
- SETTING UP PROGRESSIVE SCAN FEATURE (FOR PROGRESSIVE SCAN TV ONLY)
- BEFORE ENABLING THE PROGRESSIVE SCAN FEATURE, YOU MUST ENSURE
- TO DEACTIVATE PROGRESSIVE MANUALLY
- STEP 3: SETTING THE SPEAKERS
- ADJUSTING THE DELAY EFFECT
- TO EXIT FROM THE MENU
- STEP 4: SETTING LANGUAGE PREFERENCE
- SETTING THE OSD LANGUAGE
- SETTING THE AUDIO, SUBTITLE AND DISC MENU LANGUAGE
- SWITCHING THE SYSTEM ON/OFF
- TO SWITCH THE SYSTEM TO STANDBY MODE
- VOLUME CONTROL
- TO SWITCH OFF THE VOLUME TEMPORARILY
- TO LISTEN THROUGH THE HEADPHONE
- SOUND CONTROL
- DBB (DYNAMIC BASS BOOST)
- DSC (DIGITAL SOUND CONTROL)
- SELECTING SURROUND SOUND
- DIMMING THE DISPLAY SCREEN
- DEMONSTRATION MODE
- TO ACTIVATE THE DEMONSTRATION
- TO DEACTIVATE THE DEMONSTRATION
- PLAYABLE DISCS
- REGION CODES
- PLAYING DISCS
- USING THE DISC MENU
- TO SELECT A PLAYBACK FEATURE OR ITEM
- TO ACCESS OR EXIT FROM THE MENU
- FOR VCD WITH PLAYBACK CONTROL (PBC) FEATURE (VERSION 2.0 ONLY)
- BASIC PLAYBACK CONTROLS
- PAUSING PLAYBACK (DVD/VCD/CD/MP3/DIVX/WMA)
- SELECTING A TRACK/CHAPTER/TITLE (DVD/VCD/DIVX/CD)
- RESUMING PLAYBACK FROM THE LAST STOPPED POINT (DVD/VCD/CD)
- TO CANCEL RESUME MODE
- ZOOM (DVD/VCD/DIVX/JPEG)
- REPEAT (DVD/VCD/CD/MP3/DIVX/WMA)
- FOR DVD/VCD/CD
- CHAPTER (DVD)
- TRACK (CD/VCD)/TITLE (DVD)
- ALL
- SHUFFLE
- FOR MP3/WMA/DIVX
- REPEAT A-B (DVD/VCD/CD/MP3/DIVX/WMA)
- SLOW MOTION (DVD/VCD)
- PROGRAM (NOT FOR PICTURE CD)
- (DVD PROGRAM FOR EXAMPLE)
- FOR MP3/WMA
- FORWARD/REVERSE SEARCHING (DVD/VCD/DIVX/CD/MP3/WMA)
- TIME SEARCH & SEARCH BY CHAPTER/TRACK NUMBER (DVD/VCD/CD/MP3/WMA)
- OR
- INFORMATION DISPLAY DURING PLAYBACK (NOT FOR PICTURE CD)
- FOR DVD
- FOR SUPER VCD/VCD/DIVX/CD
- SPECIAL DISC FEATURES
- PLAYING A TITLE (DVD)
- PRESS DISC MENU
- CAMERA ANGLE (DVD)
- CHANGING THE AUDIO LANGUAGE (FOR DVD RECORDED WITH MULTIPLE LANGUAGES)
- CHANGING THE AUDIO CHANNEL (FOR VCD /DIVX ONLY)
- SUBTITLES (DVD)
- PLAYING MP3/WMA/JPEG PICTURE CD
- PLAYING MP3/WMA DISC
- GENERAL OPERATION
- LOAD AN MP3/WMA DISC
- PLAYBACK SELECTION
- PLAYING JPEG PICTURE CD
- SPECIAL JPEG FEATURES
- PREVIEW FUNCTION (JPEG)
- TO ENTER THE REMOTE KEY FUNCTION MENU
- TO DISPLAY THE OTHER PICTURES ON THE PREVIOUS/NEXT PAGE
- ZOOM PICTURE (JPEG)
- SLIDE SHOW PLAYBACK MODES (JPEG)
- PLAYBACK WITH MULTI-ANGLES (JPEG)
- PLAYING A DIVX DISC
- BASIC OPERATIONS
- TO RETURN TO THE UPPER-LEVEL MENU
- GENERAL SETUP PAGE
- TV DISPLAY
- OSD LANG
- SCREEN SAVER
- DIVX(R) VOD REGISTRATION CODE
- AUDIO SETUP PAGE
- SPEAKER SETUP
- DOWNMIX
- FRONT SPEAKER
- CENTER SPEAKER
- REAR SPEAKER
- SUBWOOFER
- TEST TONE
- DIALOG
- SPDIF OUTPUT
- DOLBY DIGITAL SETUP
- DUAL MONO
- D PROCESSING
- PRO LOGIC II
- MODE
- PANORAMA
- DIMENSION
- CENTER WIDTH
- REVERB MODE
- HDCD
- FILTER
- VIDEO SETUP PAGE
- COMPONENT
- TV MODE
- QUALITY
- SHARPNESS
- BRIGHTNESS
- CONTRAST
- GAMMA
- HUE
- SATURATION
- LUMA DELAY
- PREFERENCE PAGE
- PARENTAL
- RATING EXPLANATIONS
- KID SAF
- G
- PG
- PGR, R
- NC
- ADULT
- DEFAULT
- PASSWORD SETUP
- PASSWORD MODE
- PASSWORD
- RADIO RECEPTION
- TUNING TO RADIO STATIONS
- PRESETTING RADIO STATIONS
- AUTOMATIC PROGRAMMING
- MANUAL PROGRAMMING
- LISTENING TO PRESET RADIO STATIONS
- SETTING THE CLOCK
- SETTING SLEEP/WAKE-UP TIMER
- SLEEP TIMER SETTING
- TO DEACTIVATE THE SLEEP TIMER
- WAKE-UP TIMER SETTING
- TO DEACTIVATE THE TIMER
- USING A NON-USB DEVICE
- USING A USB MASS STORAGE DEVICE
- PLAYING A USB MASS STORAGE DEVICE COMPATIBLE USB MASS STORAGE DEVICES
- PRODUCT
- SUPPORTED FORMATS
- THE SYSTEM WILL NOT PLAY OR SUPPORT THE FOLLOWING
- HOW TO TRANSFER MUSIC FILES FROM PC TO A USB MASS STORAGE DEVICE
- HOWEVER, THOSE WMA FILES MAY BE UNPLAYABLE FOR COMPATIBILITY REASONS
- HOW TO ORGANIZE YOUR MP3/WMA FILES ON THE USB MASS STORAGE DEVICE
- SYSTEM
- TUNER
- USB PLAYER
- SPEAKERS
- FRONT SPEAKERS
- SURROUND SPEAKERS
- REMOTE
- WARNING
- CONSIDERABLE NOISE IN RADIO BROADCASTS
- THE REMOTE CONTROL DOES NOT FUNCTION
- THE DISPLAY IS DARK
- LOW HUM OR BUZZ SOUND
- LOW BASS RESPONSE
- UNABLE TO SELECT PROGRESSIVE SCAN
- SOME FILES ON THE USB DEVICE ARE NOT DISPLAYED
Brand : PHILIPS
Model : MCD715
Category : DVD player