Tywell Starter - Smart Home DELTA DORE - Free user manual and instructions
Find the device manual for free Tywell Starter DELTA DORE in PDF.


| Product Type | Smart Home Controller |
| Brand | Delta Dore |
| Model | Tywell Starter |
| Dimensions | Approx. 120 x 80 x 30 mm |
| Weight | Approx. 150 g |
| Power Supply | 5V DC via USB adapter (included) |
| Connectivity | Wi-Fi 2.4 GHz, Bluetooth 4.0 |
| Compatible Protocols | Zigbee, Z-Wave (via additional modules) |
| Maximum Devices | Up to 50 connected devices |
| Range | Up to 30 m indoors |
| Operating Temperature | 0°C to 40°C |
| Storage Temperature | -10°C to 60°C |
| Main Functions | Remote control, scheduling, automation scenes, voice assistant compatibility |
| Voice Assistants | Amazon Alexa, Google Assistant |
| Mobile App | Tywell App (iOS/Android) |
| Installation | Plug and play, guided via app |
| Security | Encrypted communication, secure pairing |
| Maintenance | Clean with dry cloth; avoid liquids |
| Spare Parts | USB cable and power adapter available |
| Repairability | No user-serviceable parts; contact support |
| Certifications | CE, RoHS |
Frequently Asked Questions - Tywell Starter DELTA DORE
User questions about Tywell Starter DELTA DORE
0 question about this device. Answer the ones you know or ask your own.
Ask a new question about this device
Download the instructions for your Smart Home in PDF format for free! Find your manual Tywell Starter - DELTA DORE and take your electronic device back in hand. On this page are published all the documents necessary for the use of your device. Tywell Starter by DELTA DORE.
USER MANUAL Tywell Starter DELTA DORE
Tywell
www.deltadore.com
The Tywell has different use cases depending on the installation.
Identify your use case (1, 2, 3 or 4) from the information displayed on its home screen, then refer to the relevant paragraph in this manual.
① Thermostat or ② smart thermostat
Your Tywell Control displays:

③ Bioclimatic thermostat ④ Shutter manager
Your Tywell Control displays:

Your Tywell Control displays:

Contents
Use case: ① Thermostat or ② smart thermostat
1. Description....4
1.1 Tywell Control environment 4
1.2 Tywell Control presentation....4
2. Function of the Tywell Control....5
2.1 Selecting the operating mode....5
2.2 Selecting the program .... 5
2.3 Setting the temperatures of the zone 6
2.4 System settings 7
3. Heating control 8
3.1 Heating: changing the current set-point temperature....8
3.2 Air-conditioning: changing the current set-point temperature....8
4. Standby screen....9
5. Open window....9
6. Troubleshooting....10
6.1 Changing the batteries ....10
6.2 Errors....10
6.3 Troubleshooting (RF 6700 FP and RF 6050+ receiver) .....11
Use case: ③ Bioclimatic thermostat or ④ shutter manager
7. Description....13
7.1 Tywell Control environment ....13
7.2 Tywell Control presentation....14
8. Function of the Tywell Control .....15
8.1 Selecting the operating mode (use case 3)....15
8.2 Selecting the program (use case 3) .....15
8.3 Setting zone temperatures (use case 3)....17
8.4 Shutter autopilot....18
8.5 System settings 21
9. Shutter management ....22
9.1 If Tywell Control only controls shutters (use case 4)....22
9.2 If Tywell Control controls the heating/air conditioning and shutters (use case 3)....22
10. Heating control ....23
10.1 Heating: changing the current set-point temperature....23
10.2 Air-conditioning: changing the current set-point temperature....23
11. Absence mode....24
12. Standby screen....25
13. Notifications....26
13.1 Shutter autopilot....26
13.2 Open window (use case 3)....26
14. Troubleshooting....27
14.1 Changing the batteries ....27
14.2 Errors 28
14.3 Troubleshooting (RF 6700 FP and RF 6050+ receiver) ......29
Use cases ① and ②
1. Description
1.1 Tywell Control environment
Tywell Control, combined with a thermal receiver, controls the heating and air conditioning (depending on the installation) of a zone in the home.
The smart version is linked to a Tydom smart home hub.
1.2 Tywell Control presentation

①- Outside temperature
②- Weather service 🎨 or sensor 📞
③- Indoor temperature
④- Configuration
⑤- Shutters menu
⑥- Heating menu
⑦- Absence mode
⑧- Low-consumption digital display
⑨- Set-point temperature
⑩- System information
The function of the buttons and the information displayed on the screen may vary according to the application. Examples:
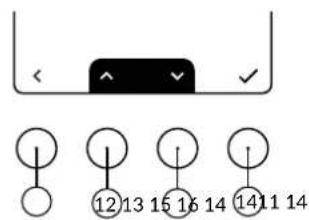


⑪- Back button
⑫- Scroll up
⑬- Scroll down
⑭- Confirm
⑮- Scroll left
⑯- Scroll right
⑰ - Cancel
⑱- Settings buttons
System information icons:

Battery error

Wireless error

Open window
2. Function of the Tywell Control
2.1 Selecting the operating mode
Choose the operating mode for your installation: Off / Heating / Air conditioning
i Tywell Control displays the menus available for your installation.
![graph TD A["13.7° 19.5°"] --> B["Tywell Control"] B --> C["Mode Off Heating Air conditioning"] C --> D["Mode Off Heating Air conditioning"]](/content/2026/06/1403736/images/922ba49737ae668e5aa7c442cd03ad317f534a38b37f0447f6a276151c65e9ed.jpg)
56% : Measuring the humidity level in the air.
2.2 Selecting the program
Choose from a range of preset programmes to suit your lifestyle. The preset programmes are based on your hours present in the home.
![graph LR A["19.5°"] --> B["Tywell Control 08/12/2022"] B --> C["Programme 78.8° ↑ 56% Mode"] C --> D["Tywell Control 08/12/2022"] D --> E["Programme 19.8° ↑ 56% Mode"] E --> F["Programming Manual mode Every day of the week AM, PM and wind AM, midday, PM and wind AM, PM/Wed and wind"] F --> G["Progra…](/content/2026/06/1403736/images/e6f401d943b2e29a2778d96d0eaf9ec0e56e22b6c560a9c2883380de786e9a74.jpg)
- The content of the programming screen may vary depending on your installation.
- If you have the Tydom application (use case 2), select "Manual mode" and programme your system from the application.
Up to 3 temperature ranges:
- Presence: the "presence" temperature set-point is applied, it corresponds to the programming of your so-called "comfort" temperature, when the zone is occupied.
- Night: the temperature reduction set-point is applied.
- Absence: the (short-term) "absence" temperature set-point is applied.
Example of a preset programme:

2.3 Setting the temperatures of the zone
Set the desired temperatures for the different operating periods.
These temperatures will be automatically applied when the installation changes mode:
Heating when present / Heating at night / Heating when absent (short-term)

Installation equipped with air conditioning.
Set the desired temperatures for the different operating periods,
Air conditioning when present / Air conditioning at night / Air conditioning when absent (short-term).
You can change the set-point, or turn off the air conditioning completely, for some or all of the time ranges.
This means you can keep the same programming for presence, night-time and (short-term) absence, summer and winter, with temperature settings that adapt whether the system is in heating or air conditioning mode.


These menus are not displayed if the installation is not equipped with air conditioning.
2.4 System settings
Download the user instructions
Scan the QR Code to access the information page dedicated to Tywell.
![graph LR A["19.5°"] --> B["Tywell Control 08/12/2022"] B --> C["Tywell Control 08/12/2022"] C --> D["Settings User manual\nControl with a smartphone Time and date Status"] D --> E["User manual Scan this code to download the user manual."]](/content/2026/06/1403736/images/e11e70fa3adf40056ddaebeab27c679825531cc0b2af6976f26678a6e5c48526.jpg)
Control with a smartphone
Scan the QR code to download the Tydom application.

Setting the time and date

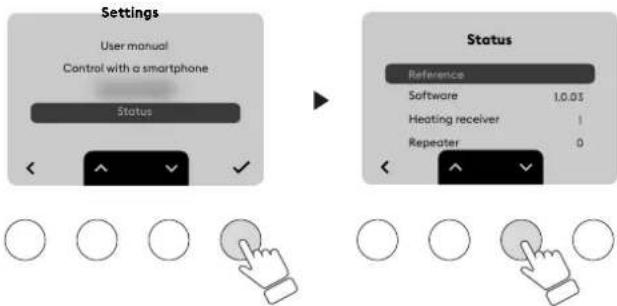
Status
Consult the information about your system.
- Your Tywell Control reference
- Software version
- Presence of a thermal receiver
- The number of repeaters in the installation
- If your Tywell Control is paired with a Tywell hub.
3. Heating control
3.1 Heating: changing the current set-point temperature
You can change the current set-point temperature at any time.
Press the + or - button:
![graph TD A["Current setpoint temperature"] --> B["Adjust the temperature"] B --> C["New set-point temperature"] C --> D["Setpoint temperature adjustment"] D --> E["New set-point temperature"] E --> F["Confirm Confirm CancelCancel"]](/content/2026/06/1403736/images/63bc1d516e89525a476be6972db2761f38b13f4f35fe4dc8d5462d4a27682900.jpg)
3.2 Air-conditioning: changing the current set-point temperature
You can change the current set-point temperature. Press the + or - button:
![graph TD A["Current setpoint temperature 25.0°"] --> B["Adjust the temperature 25.0°"] B --> C["New set-point temperature 23.0°"] C --> D["Setpoint temperature adjustment"] D --> E["New set-point temperature 23.0°"] E --> F["Beyond the maximum temperature setting (30 degrees), air conditioning in th…](/content/2026/06/1403736/images/45aa490a0682eed2c6051353609a5e0a3506a135c5c21e6e69588c9c5587dc80.jpg)
4. Standby screen
The standby screen is activated automatically when no buttons are pressed:
- after 1 minute 30 secs from the home screen,
- after 6 minutes from the settings screens.
In standby mode, only the room temperature will be displayed.
Press any key to exit standby mode:

Errors relating to batteries and wireless transmission may be displayed when they are detected.
5. Open window
If your windows are equipped with an opening sensor, the following screen will be displayed if the window is open :

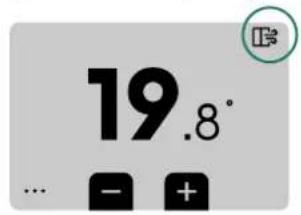
If your installation controls the air conditioning, this will also switch off.
6. Troubleshooting
6.1 Changing the batteries
You will receive an initial alert when the batteries are low.
When the batteries are completely depleted, a new alert prompts you to replace the batteries as soon as possible to prevent the system from shutting down.
This screen remains displayed even when the batteries are fully depleted.

① Unclip Tywell Control.
② Replace the batteries.
3 Place Tywell Control back on its base.

Tywell Control is powered by 3 x 1.5V - AAA LR03 batteries Do not use rechargeable or lithium batteries.
6.2 Errors
Tywell Control sensor error
Display in the event of a Tywell Control sensor error. Consult your installer.

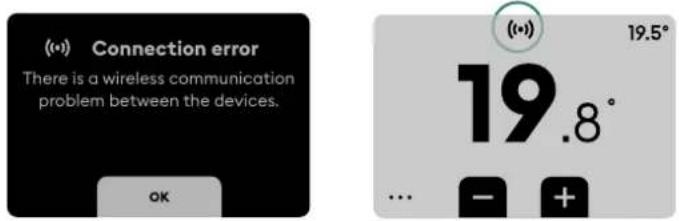
Wireless communication error
Display in the event of a wireless communication error.
The wireless communication error appears after 1h of continuous error status (e.g. insufficient wireless range, proximity of other wireless equipment around the transmitter or receiver).
Contact your installer if necessary.
6.3 Troubleshooting (RF 6700 FP and RF 6050+ receiver)
This Troubleshooting paragraph should be consulted if your Tywell Control is paired with an RF 6700 FP or RF 6050+ receiver.
What the receiver LEDs mean
| Signal type Diagnosis/Solutions | |
| The green light is constantly on Power supply is on. | |
| The red light is constantly on | The receiver is requesting heating (RF 6700 FP pilot wire output = Comfort) |
| The red LED is slowly flashing | The receiver is in pending pairing mode. |
| The red LED is flashing quickly | The deletion of the pairing between the receiver and a door/window sensor is pending. |
| The green LED is flashing | The receiver isn't paired. |
| Both LEDs are flashing simultaneously. | No signal has been received by the thermostat for 1 hour.The receiver is operating in backup mode (*).Turn the thermostat on by pressing a button.If the problem persists, make sure that the transmitter is not too far away and that you have followed the mounting/placement instructions properly.Note: after a mains power cut, the receiver operates in backup mode (*) until it receives information from the thermostat, up to max. 5 minutes. |
| The green light flashes slowly (only for the 6700 FP RF receiver) | Load-shedding in progress: you are exceeding the consumption allowed in your power subscription.The receiver starts up again automatically after a certain period of time. If an energy manager is also part of the installation, check that is permanently set to Comfort mode. |
| The 2 LEDs flash rapidly at the same time (only for the RF 6700 FP receiver). | Pilot wire error.Disconnect the power to the installation and check the cabling or contact your installer. |
(*) Function in backup mode:
- When switching to backup mode, if the receiver control was off, it stays off otherwise it switches to emergency Frost protection.
- In this backup mode, pressing the button authorises a manual override.
3 control types are available and are shown by means of the flashing of the LEDs:
- 1 flash: Off,
- 2 flashes: Emergency frost protection (heating 15% of the time),
- 3 flashes: Emergency Comfort (heating 75% of the time), 24 hour timer.
You can switch from one to the other by briefly pressing the button.
Indicator light off mode (RF 6700FP only)
This section should be consulted if your Tywell Control is paired with the RF 6700 FP receiver.
When the function for switching off the LEDs is active:
- When powering up (or restoring power), the LEDs are active.
- If the button has not been pressed after one minute, the LEDs switch off.
- A press of the button will authorise the illumination of the LEDS for one minute.
The backup and default pilot wire modes will still be signalled.
To enable/disable the function:
Press for 6 seconds, until the LED switches on without flashing.
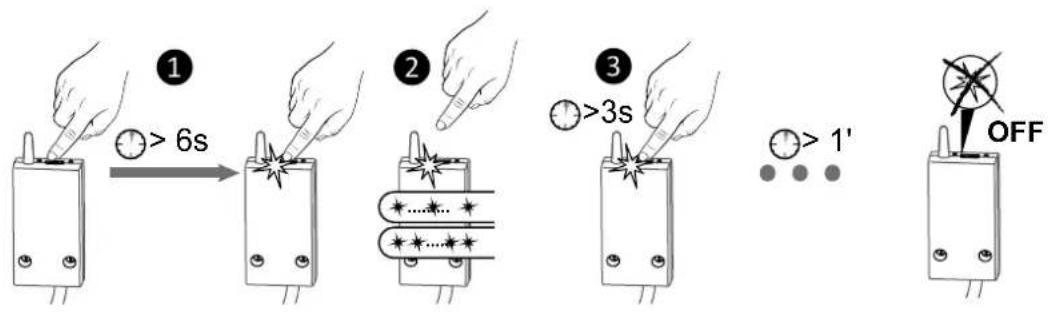
① Press the receiver button for 6 seconds until the red LED is on and steady.
Release the button.
② The LED is flashing: 1 flash: function disabled 2 flashes: function active. A short press enables you to switch from one to the other.
③ A 3-second press validates the selection and exits the mode.
The LEDs switch off after 1 minute of inaction.
Operation with a load-shedder (RF 6700 FP only)
This section should be consulted if your Tywell Control is paired with the RF 6700 FP receiver.
If a load-shedder is connected to the receiver, the heating will switch to Off during load-shedding requests. When load-shedding is in progress, the green LED on the receiver flashes.
Use cases ③ and ④
7. Description
7.1 Tywell Control environment
The Tywell Control operates devices, optimises energy use and makes spaces more comfortable in the home.
- Centralised control of shutters
(by zone or all, depending on configuration in the application). - Shutter autopilot.
- Heating and air conditioning management (use case 3).
- Switching to Absence mode.
![graph TD A["Tysense Thermo"] --> B["Or weather service data"] C["Tysense Sun"] --> D["Tydom application"] E["Tywell Control"] --> F["Thermal receiver (use case 3)"] G["Tywell Pro or Tywell Home"] --> H["Internal device with circuit board"] style A fill:#f9f,stroke:#333 style C fill:#f9f,stroke:#333…](/content/2026/06/1403736/images/c3d18d8560ad1d327b834e9143ba68dc6cdc41a716ab89f616f5ed1c14664cc5.jpg)
7.2 Tywell Control presentation
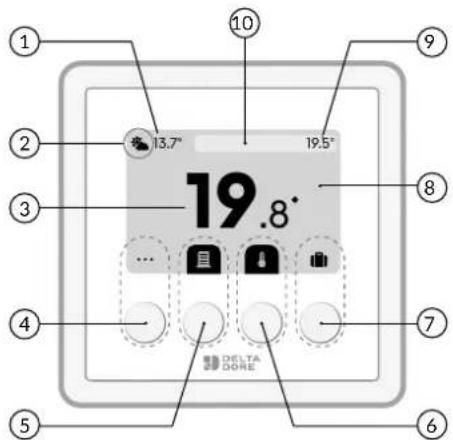
①- Outside temperature
②- Weather service 🍐 or sensor
③- Indoor temperature
④- Configuration
⑤- Shutters menu
⑥- Heating menu
⑦- Absence mode
⑧- Low-consumption digital display
⑨- Set-point temperature
⑩- System information
The function of the buttons and the information displayed on the screen may vary according to the application.
Examples:

⑪- Back button
⑫- Scroll up
⑬- Scroll down
⑭- Confirm
![graph TD A["Start"] --> B{Decision} B -->|Yes| C["Path 1"] B -->|No| D["Path 2"] C --> E["Path 3"] D --> F["Path 4"]](/content/2026/06/1403736/images/e21331df4e042640cb0b9479f54960442671c0f4425c3494cd6482a82a6a952e.jpg)
⑮- Scroll left
⑯- Scroll right
⑰ - Cancel
⑱- Settings buttons


System information icons:

Battery error

Wireless error

Open window

8.3°

13.7°
Outdoor temperature measured by the outdoor sensor.
Weather service

Some menus will only appear if the Tywell Control controls the thermal management (heating and/or air conditioning).
8. Function of the Tywell Control
8.1 Selecting the operating mode (use case 3)
Choose the operating mode for your installation:
Off / Heating / Air conditioning
i Tywell Control displays the menus available for your installation.
![graph TD A["13.7° 19.5°"] --> B["Tywell Control 08/12/2022"] B --> C["Mode Off Heating Air conditioning"] C --> D["Mode Off Heating Air conditioning"] D --> E["Change of mode This action applies to your entire installation."]](/content/2026/06/1403736/images/65470352ab750655e9fc310041a5a27139ba6c4073798322c222d94fc3e0fe3d.jpg)
56% : Measuring the humidity level in the air.
8.2 Selecting the program (use case 3)
Choose the programme that best suits your lifestyle from the preset programmes. The preset programmes are based on your hours present in the home:
![graph LR A["13.7°"] --> B["19.5°"] B --> C["19.8°"] C --> D["Tywell Control 08/12/2022"] D --> E["9:4E"] E --> F["Programme"] F --> G["Temperatures"] G --> H["Shutter"] H --> I["X < X > ✓"] I --> J["Tywell Control 08/12/2022"] J --> K["9:4E"] K --> L["Programme"] L --> M["Temperatures"] M --> N["Shu…](/content/2026/06/1403736/images/87c04443c746b75f3e85e5dc0d4fdfab4318c34d0f6c0b33f79c958a5068b72c.jpg)
- The content of the programming screen may vary depending on your installation.
Up to 3 temperature ranges:
- Presence: the "presence" temperature set-point is applied,
This corresponds to the programming of your "comfort" temperature, when the zone is occupied.
- Night: the temperature reduction set-point is applied.
- Absence: the (short-term) "absence" temperature set-point is applied.
Example of a preset programme:

You can also create a personalised programme for each day of the week using the Tydom application. In this case, select "Custom programming".
If you don't want any programming, select "Custom programming", with no further action required on the Tydom App.

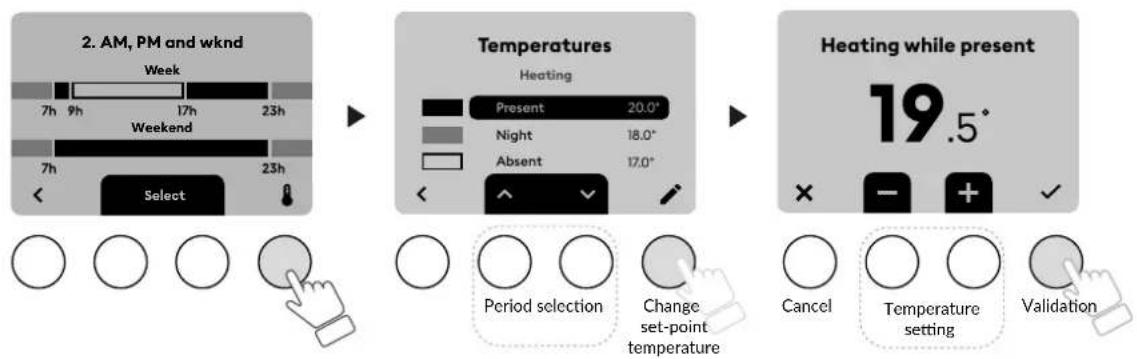
8.3 Setting zone temperatures (use case 3)
Set the desired temperatures for the different operating periods,
these temperatures will be automatically used when the installation changes mode:
Heating when present / Heating at night / Heating when absent (short-term) /
Frost Protection (absence mode [icon])
The Frost Protection set-point setting (absence mode) available depending on the version of your Tywell Control and the type of paired receiver. You can activate Absence mode from the Tywell Control interface or the Tydom application (see Absence mode section).
Installation equipped with air conditioning.
Set the desired temperatures for the different operating periods,
Air conditioning when present / Air conditioning at night / Air conditioning when absent (short-term).
You can change the set-point, or turn off the air conditioning completely, for some or all of the time ranges. This means you can keep the same programming for presence, night-time and (short-term) absence, summer and winter, with temperature settings that adapt whether the system is in heating or air conditioning mode.

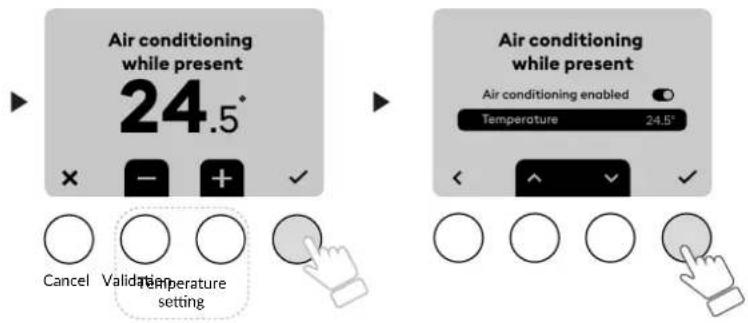
These menus are not displayed if the installation is not equipped with air conditioning.
8.4 Shutter autopilot
With shutter autopilot, your comfort is preserved by combining two functions: Heat protection and automatic shutter opening.

Heat Protection is active between sunrise and sunset, automatically controlling the shutters to keep the home cool. It is active throughout the year, with operating conditions specific to the season.
To operate, Heat Protection requires the following data :
- The indoor temperature measured by the Tywell Control.
- Sunshine data from the Tysense Sun sensor or the weather service.
- The outdoor temperature measured by the Tysense Thermo sensor or obtained from the weather service.
For optimum shutter autopilot results, a Tysense Sun sensor and a Tysense Thermo outdoor temperature sensor are recommended.
If the sensors are replaced by "weather service data" from the Tydom app, the Tywell hub must be connected to the internet.
Each day, a typical "seasonal" profile of the day is determined according to the outdoor temperature (transmitted by the Tysense Thermo sensor for greater precision or by the weather service).
Three types of "seasonality" (Summer, Mid-season, and Winter) have been defined to adapt the behaviour of the Heat Protection function to favour either heat protection or light, depending on indoor temperature and
- Function:
The system collects indoor temperature data, as well as data regarding the level of sunshine. Based on this information, and depending on the season, the Heat Protection function can automatically intervene regarding the position of the various controlled shutters, according to two different levels of protection (Low Protection, High Protection). A "Heat protection" notification is displayed on the screen.
| Types of shutters controlled Default protection position | |
| Shutters | Low protection level: 40% closedHigh protection level: 60% closed |
| Adjustable venetian blinds | Low protection level: Fully lowered apron with slats horizontalHigh protection level: Apron fully lowered with the slats oriented at 45° to the horizontal. |
The 2 "Low protection" and "High protection" levels can be customised from the Tydom application: Menu > Settings > Home selection > My devices > Choose the shutter to be configured
The heat protection function is compatible with percentage controllable devices paired with the Tywell hub via the "SHUTTERS" function.
- DELTA DORE Tymoov / Rollia roller shutters (all product references compatible with Tydom and other X3D motors).
- Other roller shutter brands using Tyxia 5630, Tyxia 5730 receivers.
- Adjustable venetian blinds with the Tyxia 5731 receiver
Automatic control by heat protection is applied to all shutters in the same passive zone (a passive zone is a set of shutters that react to the same indoor temperature and sunshine data, as defined in the Tydom application).
- Notes:
- Heat protection only works after first opening in the morning (automatic opening, programmed opening, or manual opening).
- The minimum time between 2 opposing Heat Protection commands is 2 hours.
- You will be able to observe up to two consecutive closing movements on the same shutter: at low protection level, then at high protection level, if the risk of overheating changes rapidly.
- In winter, automatic reopening after heat protection can take place less than two hours after closing, to give priority to light.
Stay in control
You can control your shutters manually at any time, as the shutter autopilot remains active and can always intervene on the shutters if necessary.
Passive zone
A passive zone is a group of shutters (roller shutters and blackout blinds) that react to the same indoor temperature and sun data. Heat protection can be managed for several different passive zones.
You can adjust the sensitivity level of the Heat Protection function (from "Very low" for more brightness to "Very high" for more protection), by selecting the level that suits you via the Tydom app.
Safe lowering function
If a window is fitted with a window magnetic contact, the autopilot of the paired shutter is suspended when the window is open. This function can be configured in the Tydom application.
Automatic opening
The shutters will automatically open in the morning and close in the evening based on sunrise and sunset times. If necessary, you can use the application to adjust the automatic opening and/or closing time by up to plus or minus 2 hours.
You can activate and deactivate this function directly from Tywell Control.

You can set a limit for opening and/or closing (for example: earliest opening time in the morning no earlier than 8:30 a.m., and latest closing time in the evening no later than 8 p.m.).
In the Tydom application, select:
Shutter autopilot > Set automatic opening > Activate the options (Minimum time in the morning and maximum time in the evening). Then configure the two selected schedules.

Activate automatic opening and heat protection from the application or via the Tywell Control.
With the Tydom application

From the Tydom application, select the settings menu, your home, then:
Shutter autopilot
Activate automatic opening
Activate heat protection
With the Tywell Control

Note: you can customise the position of shutters for Automatic Opening and Heat Protection via the Tydom application: Menu > Settings > Home selection > My devices > Choose the shutter device to be configured > "Automatic Opening" or "Heat Protection".
8.5 System settings
Download the user instructions
Scan the QR Code to access the information page dedicated to Tywell.
![graph LR A["13.7° 19.5°"] --> B["Tywell Control"] B --> C["08/12/2022"] C --> D["Tywell Control"] D --> E["08/12/2022"] E --> F["Settings"] F --> G["User manual\nScan this code to download the user manual."]](/content/2026/06/1403736/images/3f8ce483494fd875be115bdb138dd7a06d665d3775931ac0c004b85ee8076240.jpg)
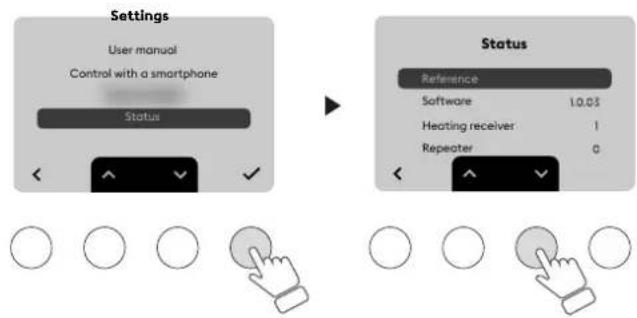
Control with a smartphone
Scan the QR code to download the Tydom application.

Scan the QR code to download the Tydom application.
Status.
Consult the information about your system.
- Your Tywell Control reference
- Software version
- Presence of a thermal receiver
- The number of repeaters in the installation
- If your Tywell Control is paired with a Tywell box.
9. Shutter management
9.1 If Tywell Control only controls shutters (use case 4)
You can operate your shutters manually at any time, shutter autopilot remains active and can always intervene automatically on the shutters if necessary.
Example:
The shutters in the zone are closed.
① Press the Up button.
② Tywell Control tells you that the action has been initiated. All shutters start moving. (You can choose to exclude certain shutters controlled using the Tydom application).
③ You have the option of stopping the shutters from raising by pressing the □ button.
![graph TD A["① Display"] --> B["② Weather Icon"] B --> C["③ Screen Icon"] D["Input Buttons: ○"] --> E["Arrow to Display"] F["Hand Click"] --> G["Arrow to Display"] H["Circle"] --> I["Arrow to Display"]](/content/2026/06/1403736/images/e1c561c5f0bda7e8f93f205aed0a5631cffd53789e48a9541d0a881fdc341cfb.jpg)
9.2 If Tywell Control controls the heating/air conditioning and shutters (use case 3)
Example:
The shutters in the zone are open.
① Press the shutter management button.
② Press the Down button.
③ Tywell Control tells you that the action has been initiated. All shutters start moving. (You can choose to exclude certain shutters controlled using the Tydom application). You have the option of stopping the shutters from lowering by pressing the □ button.
![graph TD A["①"] --> B["②"] B --> C["③"] A --> D["①: 13.7° 19.5°"] B --> E["②: 13.7° 19.5°"] C --> F["③: 13.7°"]](/content/2026/06/1403736/images/38682d2dc1c3680c058ada0effb8148a4622931e5e89ad8f1372875727b2e2d1.jpg)
10. Heating control
10.1 Heating: changing the current set-point temperature
You can change the current set-point temperature at any time.
Press the 🔊 key to change the setting:
![graph TD A["Current setpoint temperature 8.3°"] --> B["Adjust the temperature 19.0°"] B --> C["New set-point temperature 20.0°"] C --> D["Setpoint temperature adjustment"] D --> E["Confirm Confirm CancelCancel"] F["New set-point temperature 18.8°"] --> G["End"]](/content/2026/06/1403736/images/34bf16fc586e1e63ddab74ea7f33c864db27b1bd45e7b1eb9fd6c9dd63db13f1.jpg)
10.2 Air-conditioning: changing the current set-point temperature
You can change the current set-point temperature. Then press the button to change the set-point:

11. Absence mode
During your absence (long-term), this mode sets all the zones in your home to "Frost Protection" (Frost Protection set-point adjustable depending on devices).
In this mode, the thermal programming of the Tywell Control and the Tydom application is no longer taken into account. Tywell Control settings and heating and/or air conditioning controls are no longer available. Automatic opening and heat protection can be configured from the App to determine whether or not they are inactive while in Absence mode, while manual control remains possible.
Press the 📁 button and follow the instructions.
The return time is set to 00:00. From the application, you can enter or change the return date and time.
![graph TD A["①"] --> B["Time to leave\nDo you know your return date?\nYes\nNo"] B --> C["Return date\nFri. 15 may\n< - + ✓"] C --> D["Return date\nsat. 16 may\n< - + ✓"] D --> E["Confirm"] E --> F["②"] F --> G["Time to leave\nDo you know your return date?\nOui\nNon\n○ ○ ○ ○"] G --> H["Have a great tr…](/content/2026/06/1403736/images/395f65879fb43b1cb18a89f6bd1e8f3ef9e29b8ecb84a91dc82d17e4ceb92709.jpg)
Display absence mode
![graph TD A["If Tywell Control only controls the shutters (use case 4)"] --> B["Early return"] C["If Tywell Control controls both the shutters and the heating/cooling (use case 3)"] --> D["Early return"] B --> E["Welcome home!"] D --> E E --> F["OK"] G["Early return"] --> H["Display returns to normal…](/content/2026/06/1403736/images/94404d098a18765989b31e8d8445fece60662017b187eafe20ecbe1e76ad2c5f.jpg)
12. Standby screen
The standby screen is activated automatically when no buttons are pressed:
- after 1 minute 30 secs from the home screen,
- after 6 minutes from the settings screens.
For installations with heating/air conditioning control (use case 3), it displays:
- the outdoor temperature.
- the ambient temperature.
If Tywell Control only controls shutters (use case 4), the standby screen displays:
- the outdoor temperature.
- The "Roller shutter" symbol
Press any key to exit standby mode:

▶
Receipt of data from the installation

▶

Installation with roller shutter control only

▶

▶


Errors relating to batteries and wireless transmission may be displayed when they are detected.
13. Notifications
13.1 Shutter autopilot
You are informed by a notification displayed on the screen when an autopilot-related action is in progress on your installation.
There's no need to validate a notification, Tywell Control confirms that the action has been carried out after one minute.
Example: Heat protection.
- In summer, in periods of high heat, the shutters lower to keep the home cool.
![graph TD A["Hot protection\nThe shutters\nlower to keep the house cool."] --> B["1 minute"] B --> C["Stop"] C --> D["11.6° 20.0°"] D --> E["23.9°"] E --> F["Heat protection\nThe shutters have been\nopened to take advantage\nof natural heat and light."] F --> G["11.6° 20.0°"] G --> H["23.9°"]](/content/2026/06/1403736/images/4a9a0b399addfe8362ba6c9f741105c7a383bb1f99c9d2bc2cf6069b5582899d.jpg)
Pressing "Stop" suspends the current motion of all the shutters.
The notification remains displayed for 10 minutes, but can still be accessed from the "shutters" menu until the next action is applied to the shutters. It disappears when you press OK.

The operating principle described above is the same for all notifications displayed by Tywell Control.
13.2 Open window (use case 3)
If a window is open, the screen will display :
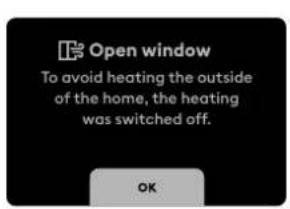

If your installation controls the air conditioning, it will also switch off.
14. Troubleshooting
14.1 Changing the batteries
You will receive an initial alert when the batteries are low.
When the batteries are completely depleted, a new alert prompts you to replace the batteries as soon as possible to prevent the system from shutting down.
This screen remains displayed even when the batteries are fully depleted.

① Unclip Tywell Control.
② Replace the batteries.
③ Place Tywell Control back on its base.


3 × 1,5V - AAA LR03

Tywell Control is powered by 3 x 1.5V - AAA LR03 batteries Do not use rechargeable or lithium batteries.
14.2 Errors
Lack of information regarding the outdoor temperature
If there is no weather service or outdoor sensor, the display shows --.-°
Using the Tydom application, check that the weather service is activated or that an outdoor temperature sensor is paired.

Tywell Control sensor error
Display in the event of a Tywell Control sensor error. Consult your installer.

Wireless communication error
Display in the event of a wireless communication error.
The wireless communication error appears after 1h of continuous error status (e.g. insufficient wireless range, proximity of other wireless equipment around the transmitter or receiver). Contact your installer if necessary.


14.3 Troubleshooting (RF 6700 FP and RF 6050+ receiver)
This Troubleshooting paragraph should be consulted if your Tywell Control is paired with an RF 6700 FP or RF 6050+ receiver.
What the receiver LEDs mean
| Signal type Diagnosis/Solutions | |
| The green light is constantly on Power supply is on. | |
| The red light is constantly on | The receiver is requesting heating (RF 6700 FP pilot wire output = Comfort) |
| The red LED is slowly flashing | The receiver is in pending pairing mode. |
| The red LED is flashing quickly | The deletion of the pairing between the receiver and a door/window sensor is pending. |
| The green LED is flashing | The receiver isn't paired. |
| Both LEDs are flashing simultaneously. | No signal has been received by the thermostat for 1 hour.The receiver is operating in backup mode (*).Turn the thermostat on by pressing a button.If the problem persists, make sure that the transmitter is not too far away and that you have followed the mounting/placement instructions properly.Note: after a mains power cut, the receiver operates in backup mode (*) until it receives information from the thermostat, up to max. 5 minutes. |
| The green light flashes slowly (only for the 6700 FP RF receiver) | Load-shedding in progress: you are exceeding the consumption allowed in your power subscription.The receiver starts up again automatically after a certain period of time. If an energy manager is also part of the installation, check that is permanently set to Comfort mode. |
| The 2 LEDs flash rapidly at the same time (only for the RF 6700 FP receiver). | Pilot wire error.Disconnect the power to the installation and check the cabling or contact your installer. |
(*) Function in backup mode:
- When switching to backup mode, if the receiver control was off, it stays off otherwise it switches to emergency Frost protection.
- In this backup mode, pressing the button authorises a manual override.
3 control types are available and are shown by means of the flashing of the LEDs:
- 1 flash: Off,
- 2 flashes: Emergency frost protection (heating 15% of the time),
- 3 flashes: Emergency Comfort (heating 75% of the time), 24 hour timer.
You can switch from one to the other by briefly pressing the button.
Indicator light off mode (RF 6700FP only)
This section should be consulted if your Tywell Control is paired with the RF 6700 FP receiver.
When the function for switching off the LEDs is active:
- When powering up (or restoring power), the LEDs are active.
- If the button has not been pressed after one minute, the LEDs switch off.
- A press of the button will authorise the illumination of the LEDS for one minute.
The backup and default pilot wire modes will still be signalled.
To enable/disable the function:
Press for 6 seconds, until the LED switches on without flashing.

① Press the receiver button for 6 seconds until the red LED is on and steady.
Release the button.
② The LED is flashing:
1 flash: function disabled
2 flashes: function active.
A short press enables you to switch from one to the other.
③ A 3-second press validates the selection and exits the mode.
The LEDs switch off after 1 minute of inaction.
Operation with a load-shedder (RF 6700 FP only)
This section should be consulted if your Tywell Control is paired with the RF 6700 FP receiver.
If a load-shedder is connected to the receiver, the heating will switch to Off during load-shedding requests. When load-shedding is in progress, the green LED on the receiver flashes.
- TYWELL
- ① THERMOSTAT OR ② SMART THERMOSTAT
- ③ BIOCLIMATIC THERMOSTAT ④ SHUTTER MANAGER
- CONTENTS
- USE CASE: ① THERMOSTAT OR ② SMART THERMOSTAT
- DESCRIPTION....4
- FUNCTION OF THE TYWELL CONTROL....5
- HEATING CONTROL 8
- STANDBY SCREEN....9
- OPEN WINDOW....9
- TROUBLESHOOTING....10
- USE CASE: ③ BIOCLIMATIC THERMOSTAT OR ④ SHUTTER MANAGER
- DESCRIPTION....13
- FUNCTION OF THE TYWELL CONTROL .....15
- SHUTTER MANAGEMENT ....22
- HEATING CONTROL ....23
- ABSENCE MODE....24
- STANDBY SCREEN....25
- NOTIFICATIONS....26
- TROUBLESHOOTING....27
- USE CASES ① AND ②
- DESCRIPTION
- 1.1 TYWELL CONTROL ENVIRONMENT
- 1.2 TYWELL CONTROL PRESENTATION
- SYSTEM INFORMATION ICONS
- FUNCTION OF THE TYWELL CONTROL
- 2.1 SELECTING THE OPERATING MODE
- 2.2 SELECTING THE PROGRAM
- UP TO 3 TEMPERATURE RANGES
- EXAMPLE OF A PRESET PROGRAMME
- 2.3 SETTING THE TEMPERATURES OF THE ZONE
- INSTALLATION EQUIPPED WITH AIR CONDITIONING
- 2.4 SYSTEM SETTINGS
- DOWNLOAD THE USER INSTRUCTIONS
- CONTROL WITH A SMARTPHONE
- STATUS
- HEATING CONTROL
- 3.1 HEATING: CHANGING THE CURRENT SET-POINT TEMPERATURE
- 3.2 AIR-CONDITIONING: CHANGING THE CURRENT SET-POINT TEMPERATURE
- STANDBY SCREEN
- OPEN WINDOW
- TROUBLESHOOTING
- 6.1 CHANGING THE BATTERIES
- 6.2 ERRORS
- TYWELL CONTROL SENSOR ERROR
- WIRELESS COMMUNICATION ERROR
- 6.3 TROUBLESHOOTING (RF 6700 FP AND RF 6050+ RECEIVER)
- (*) FUNCTION IN BACKUP MODE
- INDICATOR LIGHT OFF MODE (RF 6700FP ONLY)
- TO ENABLE/DISABLE THE FUNCTION
- OPERATION WITH A LOAD-SHEDDER (RF 6700 FP ONLY)
- USE CASES ③ AND ④
- 7.1 TYWELL CONTROL ENVIRONMENT
- 7.2 TYWELL CONTROL PRESENTATION
- 8.1 SELECTING THE OPERATING MODE (USE CASE 3)
- 8.2 SELECTING THE PROGRAM (USE CASE 3)
- 8.3 SETTING ZONE TEMPERATURES (USE CASE 3)
- 8.4 SHUTTER AUTOPILOT
- FUNCTION
- NOTES
- STAY IN CONTROL
- PASSIVE ZONE
- SAFE LOWERING FUNCTION
- AUTOMATIC OPENING
- 8.5 SYSTEM SETTINGS
- SHUTTER MANAGEMENT
- 9.1 IF TYWELL CONTROL ONLY CONTROLS SHUTTERS (USE CASE 4)
- 9.2 IF TYWELL CONTROL CONTROLS THE HEATING/AIR CONDITIONING AND SHUTTERS (USE CASE 3)
- 10.1 HEATING: CHANGING THE CURRENT SET-POINT TEMPERATURE
- 10.2 AIR-CONDITIONING: CHANGING THE CURRENT SET-POINT TEMPERATURE
- ABSENCE MODE
- NOTIFICATIONS
- 13.1 SHUTTER AUTOPILOT
- 13.2 OPEN WINDOW (USE CASE 3)
- 14.1 CHANGING THE BATTERIES
- 14.2 ERRORS
- LACK OF INFORMATION REGARDING THE OUTDOOR TEMPERATURE
- 14.3 TROUBLESHOOTING (RF 6700 FP AND RF 6050+ RECEIVER)
Brand : DELTA DORE
Model : Tywell Starter
Category : Smart Home