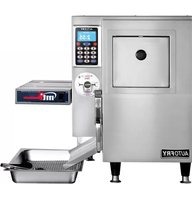
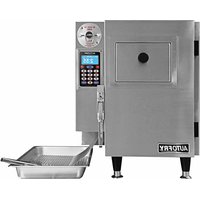
MTI-10XL-3 - Deep fryer AutoFry - Free user manual and instructions
Find the device manual for free MTI-10XL-3 AutoFry in PDF.


| Type of Product | Commercial Deep Fryer |
| Model | MTI-10XL-3 |
| Brand | AutoFry |
| Oil Capacity | 10 liters |
| Dimensions (W x D x H) | 400 x 500 x 300 mm |
| Weight | 12 kg |
| Power Supply | 220-240 V, 50/60 Hz, 3000 W |
| Temperature Range | 150°C - 190°C |
| Number of Baskets | 2 |
| Basket Material | Stainless steel with wire mesh |
| Control Type | Adjustable thermostat with indicator light |
| Safety Features | Overheat protection, cool-touch handles, safety switch |
| Cleaning | Removable oil tank, dishwasher-safe baskets |
| Maintenance | Regular oil filtration, drain valve for easy oil change |
| Construction Material | Stainless steel body |
| Included Accessories | 2 frying baskets, lid, cleaning brush |
| Certifications | CE, RoHS |
Frequently Asked Questions - MTI-10XL-3 AutoFry
User questions about MTI-10XL-3 AutoFry
0 question about this device. Answer the ones you know or ask your own.
Ask a new question about this device
Download the instructions for your Deep fryer in PDF format for free! Find your manual MTI-10XL-3 - AutoFry and take your electronic device back in hand. On this page are published all the documents necessary for the use of your device. MTI-10XL-3 by AutoFry.
USER MANUAL MTI-10XL-3 AutoFry
your source for innovative kitchen solutions
AUTOFRY Operator's Manual
Model MTI-10X / XL / XL-3
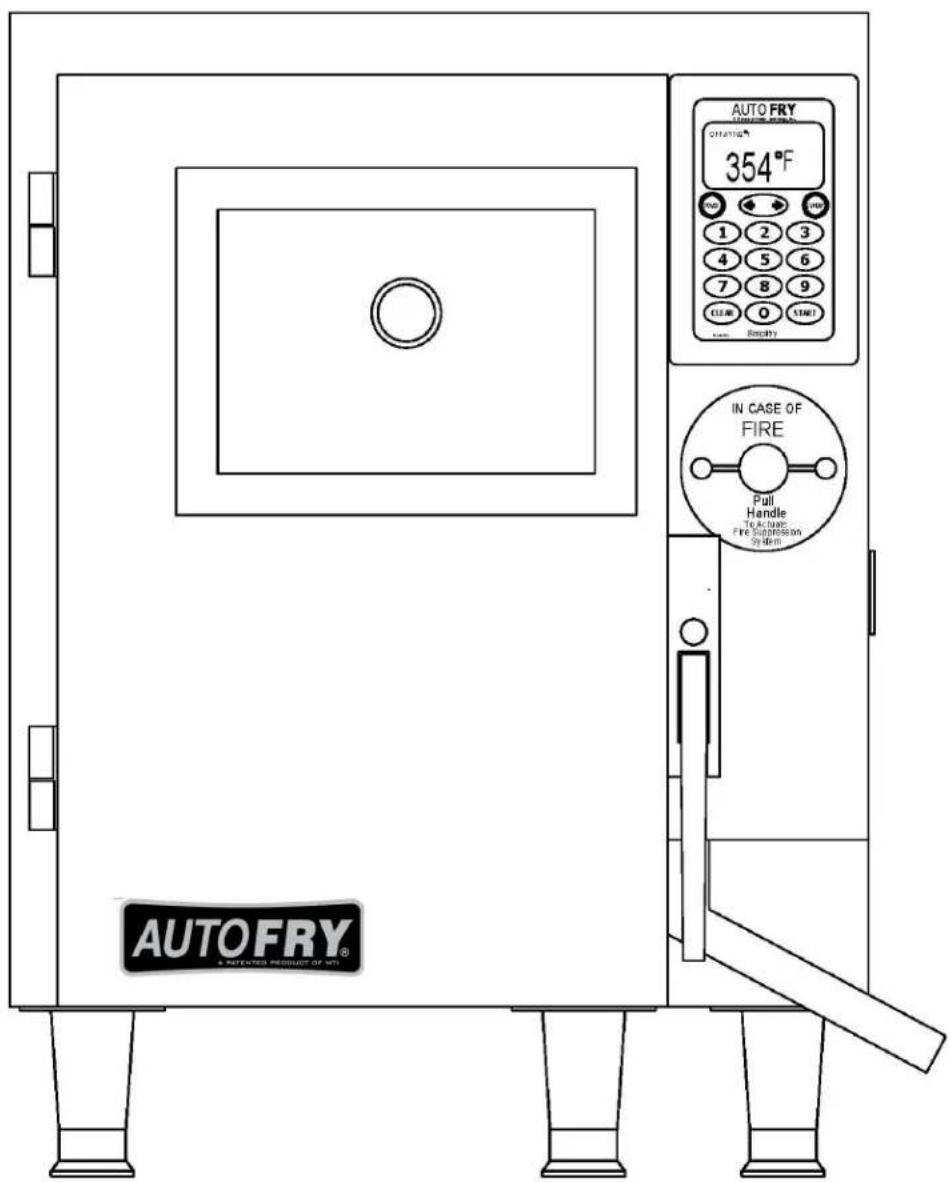
AUTOFRY
A Patented Product of
Motion Technology, Inc.
10 Forbes Road
Northborough, MA. 01532
Tel.: 800-348-2976
508-460-9800
Fax: 508-393-5750
AUTOFRY Model MTI-10 X / XL Operator's Manual
Table of Contents
Specifications 2
Warranty information 3
General Information 4
Safety Symbols 4
Prepare electrical service 5
Prepare counter top 5
AUTOFRY Installation 6
Unpacking 6
Leg installation 7
Initial cleaning 7&8
Install charcoal filter 8
Install oil pot and deflector 9
Install heater box 9
Install food exit chute 9
Add liquid shortening 10
Install wire cook basket 10
Power 10
Let's Get Cooking 10
Starting the AUTOFRY 10
Begin cooking 11
During cooking 11
AUTOFRY shutoff 12
Additional keypad functions 12
The Stand-by button 13
Maximum and repeat cook time 13
Clean mode 13
Programming cook times 14
Recommended cleaning schedule 16
Daily cleaning 16
Weekly cleaning 17
Quarterly cleaning 17
Charcoal filter 18
Second filter 18
Semi-annual cleaning and maintenance 18
Safety system test 19
Cooking oil disposal 19
Questions and Answers 20
Error Codes and Trouble Shooting Guide 22
Maintenance log 23
Wiring Diagram ____ inside rear panel of machine
AUTOFRY Model MTI-10 X / XL Operator's Manual
Table of Figures
Figure 1 Re-set high limit 5
Figure 2 Install legs 6
Figure 3a Remove food entry chute 6
Figure 3b Separate food entry chute 6
Figure 4 Filter cover plate 7
Figure 5 Charcoal filter 7
Figure 6 Oil pot and deflector installed 8
Figure 7 Install heater box assembly and deflector 8
Figure 8 Thermocouple plug 8
Figure 9 Install food exit chute 9
Figure 10a Basket rod and cam 9
Figure 10b Basket rod and receiver clip 9
Figure 11 Completed basket installation 10
Figure 12 MTI-10 fusible link and cable 15
Figure 13a Removable stack cover / fire damper 16
Figure 13b Fan section 16
Specifications
Electrical Specifications:
240 ACV Dedicated Grounded Circuit
Model 10X
5700 Watts, 1 Phase
23.75 Amps
NEMA 6-30 Plug with 6' cord cord
UL, cUL, CE and NSF
Model 10XL
7200 Watts, 1 Phase
30 Amps
NEMA 6-50 Plug with 6' cord
UL, cUL, CE and NSF
Model 10XL-3
8500 Watts, 3 Phase
20.47 Amps
NEMA 15-30 Plug with 6'
UL, cUL, CE and NSF

NEMA 6-30

NEMA 6-50

NEMA 15-30
Physical Specifications:
Dimensions:
Length 25-1/2" Width 21" Height 28-3/4"(with 4" legs)
Clearances:
Sides and Back: 0" Top: 24" Min.
Weight: 150 Lbs.
Materials: 304 Stainless Steel
Shipping Dimensions: 32" x 32" x 32"
Motion Technology, Inc. supports the European Parliament Directive 2002/96/EC for recycling of waste electrical and electronic equipment (WEEE).
When your AUTOFRY has reached the end of its life DO NOT DISPOSE OF IT IN THE MUNICIPAL WASTE. Most of the materials used in its construction can be recycled. Return to your distributor for preparation and recycling.

AUTOFRY Model MTI-10 X / XL Operator's Manual
Motion Technology, Inc. Limited Warranty
Nature of Warranty
This equipment is warranted to be free of manufacturing defects in workmanship and materials of construction for one (1) full year beginning from the date of original retail purchase and subject to the limitations set forth below. The controls package consisting of the main circuit board and keypad are warranted for three (3) years (parts only, excludes labor). Any part found to be defective during the warranty period will be replaced with new or rebuilt replacement parts free of charge by Motion Technology, Inc. (MTI). Shipping charges are the responsibility of the purchaser. Service labor is included for a period of one (1) full year beginning from the date of original retail purchase when performed by an authorized MTI service company or designated agent based on straight time rates for work performed during normal working hours. This labor coverage is limited to a fifty (50) mile radius (each way) and/or 1 hour travel time to a customers location. Any and all other service travel charges will be the responsibility of the customer.
Scope of Warranty
This warranty is extended to the original purchaser for products purchased and retained in the 50 states of the U.S.A. and District of Columbia. This warranty shall not be effective unless the equipment was purchased from a dealer or other person authorized by MTI to sell its equipment and is not transferable.
The attached warranty registration card must be fully completed and mailed within ten (10) days of receipt to assure the validity of this limited warranty.
Exclusions from Coverage of the Warranty
This warranty does not cover any damage to the equipment resulting from accident, misuse, abuse or negligence, failure to follow operating, cleaning and periodic maintenance instructions, mis-handling, alteration, failure to install in strict conformity with local fire and building codes and regulations, ordinary wear and tear resulting from use, failure to change filters using only manufacturers' supplied at the recommended
The equipment shall not have been previously altered, repaired or serviced by anyone other than a service facility authorized by MTI to render such service.
How to Obtain Service
Notification of a defect in the material or workmanship of the equipment, shall be to the MTI Factory Service department at the number shown below or the dealer from whom you purchased the equipment. We want you to be a satisfied customer. If a problem does come up that cannot be resolved to your satisfaction, please let us know. Write to Service Manager, Motion Technology, Inc. 10 Forbes Road, Northborough, MA. 01532. Please be sure to include the Model Number, Serial Number and the date of original purchase.
Exclusion of Incidental or Consequential Damage
Repair or replacement under this warranty is the purchasers sole and exclusive remedy. Neither MTI nor the dealer from whom you are purchasing this equipment will be responsible for any and all incidental or consequential damages, resulting from the use of the equipment or from breach of any express or implied warranty on this equipment. These warranties are in lieu of all other warranties, express or implied, including, but not limited to, the implied warranties of merchantability or fitness for a particular purpose.
Legal Rights of Warranty
Retain this warranty. It gives the purchaser specific legal rights. The purchaser may also have other rights which vary from state to state. MTI suggests that the dealer's dated bill of sale be retained as evidence of the date of purchase. Some states do not allow the exclusion or limitations on how long an implied warranty lasts, so the above limitations or exclusions may not apply to all purchasers.
Technical Service/Support: (800) 348-2976 ext. 112
intervals, or if the installation does not comply with set-up and installation instructions or any other circumstance beyond the control of MTI.
AUTOFRY Model MTI-10 X / XL Operator's Manual
General Notes:
These operation instructions contain important information about the handling of the AutoFry. Read this information carefully before using. Keep this manual available for more information.

Safety Symbols:

Caution—Important
CAUTION

Risk of Electric Shock

Danger of Slipping

Danger of Burnings

Risk of Fire

Caution—Hot

Operation Instruction
Designated use:

■ The AutoFry is designed for use in commercial kitchens.
■ Follow the safety instructions!
■ AutoFry should only be used by suitably trained staff.
Non designated use:
■ The nonobservance of the contents described in this manual can lead to damage or malfunction of the AutoFry.
- Do NOT use or store AutoFry outside. It will be damaged by rain or humidity.
- Do NOT touch the power cord with wet hands!
■ Do NOT jam or bend the line cord.
- Do NOT turn the AutoFry on with low or no oil!


AUTOFRY Model MTI-10 X / XL Operator's Manual

AUTOFRY Model MTI-10 X/XL Set-up and Installation
The AUTOFRY comes from the factory complete with everything you need to start cooking except food and oil. Following these simple instructions will have your AUTOFRY installed and ready to earn profits for you in as little as 30 minutes.
Motion Technology, Inc. is not responsible for local requirements that additional equipment and / or appliances may be required for a food preparation area in a store, which may include but not limited to type II hood, vent fan, grease interceptors and additional sinks. Check with your local building and / or health departments for specific requirements
Prepare electrical service.

A licensed electrician in accordance with the National Electrical Code (NEC) and all local codes must install the electrical service. Do not remove or otherwise alter the factory supplied power cord or plug. Never attach the AUTOFRY to an extension cord. Consult the identification tag for equipment wattage and voltage.
Motion Technology, Inc. will not assume responsibility for any injuries or equipment malfunctions resulting from non-conforming electrical installations.
Prepare counter top.

Choose a counter top location that is sturdy, level, easily cleanable and fire resistant. Stainless steel, fire resistant laminate or solid surface materials are acceptable. Never use a porous material to prepare food as bacterial contamination could result.
AUTOFRY Model MTI-10 X / XL Operator's Manual
AUTOFRY Installation.

You will need assistance to position and install the AUTOFRY. The approximate weight is 150 pounds.
- Remove and save the packing materials.
Be sure to inspect the AUTOFRY. It has left the factory in perfect condition and has been packaged to withstand rugged travel. In the event the machine is damaged during shipment notify the carrier immediately and have the driver note it on the bill of lading.
- Take out the removable components from inside the AUTOFRY.
■ 4 adjustable legs
■ Food exit chute
■ Teflon coated wire cook basket
■ Heater box assembly* DO NOT SPRAY OR SUBMERGE IN LIQUID
Oil pot
■ Deflector shield

*Check the red hi-limit re-set button on the bottom of the heater box assembly by fully depressing it with the eraser end of a pencil. If the switch has been tripped you will hear a click (fig. 1).

fig. 1
AUTOFRY Model MTI-10 X / XL Operator's Manual
3. Leg installation.

- The AUTOFRY is shipped with (4) 1/2-13 bolts installed in leg plates. Remove the bolts before installing the legs. To remove the shipping bolts, tilt the unit back while still on its pallet and loosen by turning the bolt counterclockwise.
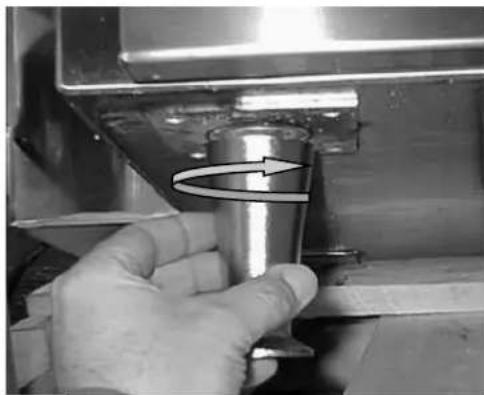
■ Install two of the adjustable legs by rotating them clockwise to hand tight in the front two leg plates (fig. 2)
■ Tilt the machine forward and repeat for the rear two legs.
natural_image
Close-up of a hand holding a metallic tool with a curved arrow indicating rotation (no text or symbols visible)fig. 2
4. Place the AUTOFRY on the counter.

■ Adjust the legs (as needed) to level the AUTOFRY.
■ Make sure that nothing is placed on top of the AUTOFRY which could obstruct the exhaust system.
5. Initial cleaning.

- Wash the oil pot, wire cook basket, and food exit chute in warm soapy water followed with a clear water rinse.
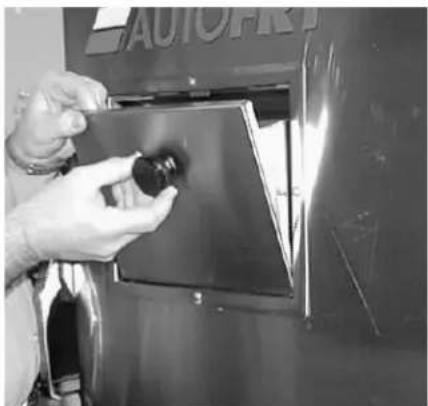
■ Remove the food entry chute by turning the food chute knob counterclockwise (fig. 3a).
natural_image
Person using a handheld device to press or inspect a metal panel (no visible text or symbols)fig. 3a

natural_image
Black-and-white photo of a hand holding a transparent container with an upward arrow, next to a metallic panel (no visible text or symbols)fig. 3b
- Separate the two-piece food entry chute and wash in warm soapy water followed with a clear water rinse (fig. 3b).
6. Sanitize the parts.

■ All parts must be sanitized.
■ Re-assemble and re-install the clean dry parts.
AUTOFRY Model MTI-10 X / XL Operator's Manual
7. Install the charcoal filter.

■ Remove the filter cover plate from the back interior wall of the cooking chamber by removing the two black plastic knobs securing the cover plate (fig. 5).
■ Remove the charcoal filter from the plastic bag. Insert it into the tracks above the second filter (fig. 4).
■ Re-install the filter cover plate and turn the filter cover knobs clockwise until hand tight. Verify that the word TOP on the filter cover plate is in the upper left-hand corner (fig. 5).

fig. 5
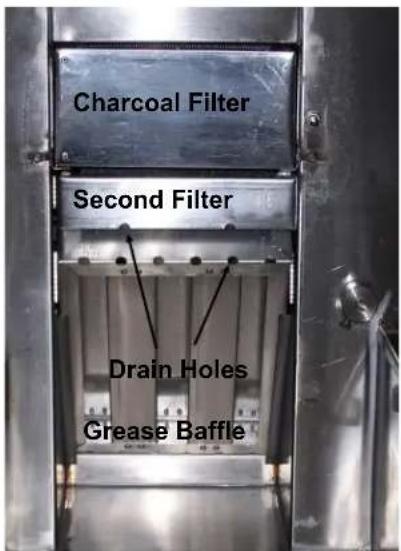
fig. 4
Both the grease baffle and the second filter have small holes along the one side of the frame.
These drain holes must be facing down in order for the filters to efficiently drain and clean the air (fig. 4).

8. Sanitize the interior.
■ All interior surfaces must be sanitized.

natural_image
Close-up of a metallic valve with a red handle, no visible text or symbolsDrain Valve
9. Install the oil pot.
- Place the oil pot in the cooking chamber. The square legs of the oil pot will sit against the back wall. Ensure that the drain valve is in the closed position.
A light application of AUTOFRY Shield brand soil shield on the exterior surfaces of the oil pot will prove helpful when it is time to clean the oil pot.
AUTOFRY Model MTI-10 X / XL Operator's Manual
10. Install the heater box assembly.

■ Place the heater box onto the heater box shelf (fig. 6 & 7).
■ The heater plug and thermocouple will connect to their respective sockets on the underside of the heater box and deck of the cabinet (fig. 6 & 7).
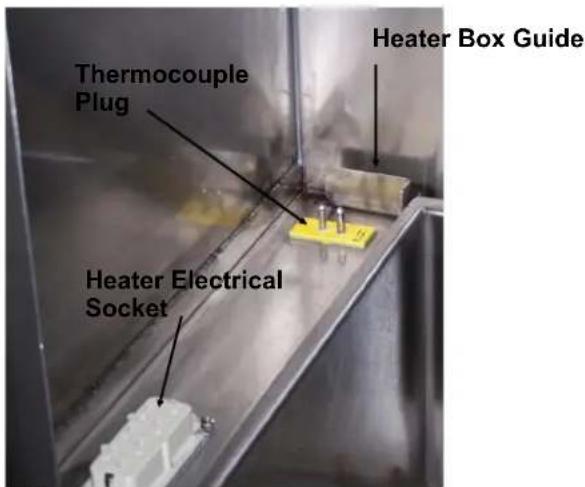
fig. 6

fig. 7

Ensure the Heater Box plugs are aligned with the plugs on the shelf. It is very important that these plugs are seated firmly into their sockets to prevent inaccurate temperature readings or damage to plugs.
11. Place the deflector over the heating element and onto the oil pot (fig. 8).

The deflector helps to contain splashing oil and aids in keeping the AUTOFRY cleaner.
12. Install the food exit chute.

■ Slide the food exit chute, flange side up, through the cut-out on the side of the AUTOFRY and slip the flange over the edge of the interior wall (fig. 9).

fig. 8

fig. 9
AUTOFRY Model MTI-10 X / XL Operator's Manual
13. Add commercial grade frying oil.

- With the drain valve closed, add oil to the oil pot. Fill to the lower fill line stamped on the interior of the oil pot.


It is simpler and safer to add cool oil to the oil pot than it is to remove hot oil. When heated the oil will expand. Only after this expansion has finished should the oil level be increased to the FILL level.
Over filling will result in excessive splashing. Under-filling will result in under-cooked food or poor and erratic temperature readings. Extreme low oil levels could cause smoking.
Always follow the oil manufacturers recommendations for oil use.
CAUTION!
NEVER operate the AUTOFRY with low or no oil.
14. Install the wire cook basket.

- Insert the flat end of the basket rod into the slot in the basket cam located on the back wall of the cook chamber (fig. 10a).
■ Install the round end of the basket rod into the receiver clip on the inside front of the cook chamber (fig. 10b).

fig. 10a
IMPORTANT

The completed installation will have the basket positioned at an angle out of the oil pot (fig. 11).

Do not force the basket down into the oil pot or damage to the basket motor will result.
When adding oil, never use the basket as a rest for the oil container.

fig. 10b
15. Power.

■ Close and lock the main door.
- Plug the AUTOFRY into the properly rated, grounded outlet.

You are now ready to start cooking.

natural_image
Interior view of a stainless steel kitchen with a mesh basket and piping (no visible text or symbols)fig. 11
AUTOFRY Model MTI-10 X / XL Operator's Manual
Let's Get Cooking!

Starting the AUTOFRY
- With the main door closed and locked, press the POWER button.
- The exhaust fan will start and the oil will begin heating. WAIT... HEATING, the heating icon and the current oil temperature will be displayed.
- When the oil temperature reaches 250°F, the wire cook basket will complete one test cycle. You will hear the basket hitting the sidewall of the AUTOFRY. This is normal.


WAIT... HEATING

82^ F
When the oil temperature reaches 300^ F, press POWER to turn the AUTOFRY off. Unlock and open the main door to check the oil level. Use caution, interior components will be hot. Add oil, if necessary, to the FILL line. Close and lock the main door and press POWER to re-start. The AUTOFRY will complete another test cycle.

It takes 15-20 minutes to heat the oil to 354^ . When the oil reaches the minimum cooking temperature of 325^ the display will show READY. You can begin cooking now however we recommend you wait until the temperature reaches 354^ .
READY
354^ F
Although the heating element is programmed to stop heating at 350^-354^ , the oil temperature can go as high as 365^ due to the circulation of the oil in the oil pot.
AUTOFRY Model MTI-10 X / XL Operator's Manual
Begin Cooking
Cooking with the AUTOFRY is as simple as
1-2-3


READY
02:30
START
During Cooking
WAIT... COOKING

02:10
READY
354^ F
Note:
Do NOT open the front entry chute after the timer counts down. The basket could be in motion and damage to the basket motor will result.
The food chute should only be opened when the display shows ready; or when the timer is still counting down.
- Enter a cook time by pressing buttons 0-9 on the keypad.
To cook for 2 minutes and 30 seconds: press 2, 3, and 0.
The display will read 02:30. If you enter the wrong time, press CLEAR and re-enter your cook time. Most food products will have recommended cook times printed on their packaging. Use those times as a starting point.
-
Open the food entry door and place the food in the food chute.
-
Close the food chute to drop the food into the cook basket and press START.
To cancel a cook cycle press CLEAR. You will be prompted to press CLEAR again to confirm. Note that this will cause a dump cycle to occur.
WAIT... COOKING will be displayed. The basket containing the food will automatically lower into the oil and the cook time will begin to count down.
If you have Comp set to yes you may notice the time on the display slow down. The cooking logic built into the AUTOFRY compensates for the drop in oil temperature so your product comes out perfect every time.
At the end of the cook cycle the basket will raise out of the oil and drain for 12 seconds. WAIT... will be displayed.
At the end of the drain cycle the basket will dispense the food down the exit chute. You will hear the sound of the basket hitting the sidewall. The dispense cycle is repeated to ensure all the food is emptied from the basket.
The basket will return to the ready position, the display will show READY and 4 quick beeps will signal the AUTOFRY is ready for the next order.
AUTOFRY Model MTI-10 X / XL Operator's Manual
AUTOFRY Shutoff Procedure

Press POWER.
POWER
■ The display will dim, OFF AT 192°F will be displayed and the oil will begin to cool.
The oil will remain hot for a long period. To assure continuous air cleaning, the fan will run for 2 hours or until the oil temperature falls below 192^ F.
OFF AT 192 °F
354^ F
Note:

If you remove the heating element from the AutoFry, the fan will continuously run until it is reinstalled. This is because AutoFry can no longer properly read the oil temperature so it assumes the oil is hot.
AUTOFRY Model MTI-10 X / XL Operator's Manual
Standby
STANDBY is used during off peak hours to conserve energy and maximize oil life.
To Use:
- Press STANDBY. STANDBY will appear on the display.
The heating element will shut off and the oil will cool to, and maintain at, 300^ F.

To Exit:
- Press CLEAR to heat the oil to the ready temperature. OR
■ Press POWER to turn the AUTOFRY off.
STANDBY cannot be entered during a cook cycle and a cook cycle cannot be started while the AUTOFRY is in STANDBY.
CLEAR
OR
POWER
Repeat Cook Time

■ Press START and your last cook time will be repeated.
This may be useful if you have a single product menu or multi-product menu
with identical cook times.
START
Maximum Cook Time

The AUTOFRY has a maximum cook time of 29 minutes and 59 seconds.
Clean Mode
To remove debris from the oil pot the clean mode will move the basket into the dispense position.
To Use:
■ Press POWER to turn the AUTOFRY off.
- Press and hold the STANDBY button for 5 seconds.
- CLEAN MODE will be displayed, the basket will raise to the dispense position and hold there.
POWER
To Exit:
STANDBY
- Press and hold the STANDBY button for 5 seconds.
■ The basket will return to the ready position and the AUTOFRY will turn off.
STANDBY
AUTOFRY Model MTI-10 X / XL Operator's Manual
Programming

Entering the programming mode.
- Press POWER to turn the AUTOFRY off.
- Press the 2 and the 0 together.
PASSWORD FOR ALL PROGRAMMING: 2,2,2 & START


The following parameters can now be accessed:
System Programming
- Presets
- Counters
- Parameters
- Tests
Presets

The presets let you program up to 18 preset cook cycles. It is a good idea to write down your most commonly used cook times prior to programming the AUTOFRY.
Press 1 to enter the presets. The following will appear;
Program Preset 0
1 Manual
2 Cook 0:00
3 Comp Yes
4 Shake Yes
Preset 0 is the manual cook cycle and will show the last cook time manually entered. Only the temperature compensation and the basket shake features can be changed in preset 0.
To change parameters do the following;
To change text - press the left or right arrow to position the cursor.
- press the 1 or 2 key to change the character.
- press the clear key to blank out a character and advance to the next position.
To change numbers - press the appropriate number to change the value.
- press the clear key to zero the value.
To change Yes / No - press any digit key to change the value.
■ Name Maximum 15 characters
■ Cook Maximum 29 mins. 59 secs.
■ Comp Yes or No
■ Shake Yes or No
AUTOFRY Model MTI-10 X / XL Operator's Manual
Use the ARROWS to move thru presets 1 through 18. These presets allow you to enter a product name, a cook time and edit the temperature compensation and basket shake feature.
Press START to save changes.
Comp

This feature compensates for the drop in oil temperature When food is cooking. It automatically adjusts the cook time so your food product comes out perfect every time.

Shake

This feature shakes the basket every 30 seconds during a cook cycle for less sticking and a higher quality cooked product.

To exit the programming mode.
- Press the POWER key from any level until the control is turned off.
Using the pre-programmed times.

■ Press and hold for 1 second the button (1-9) that corresponds to the cook
cycle you have programmed. The display will show the name of the preprogrammed product. Place the selected food into the food entry chute, close the entry chute door and press START. The display will count down the pre-programmed time.

OR
- Use the ARROW key to scroll through the presets. When you have made your choice, enter the food and press START to begin the cook cycle. Presets 10-18 can only be accessed using the ARROW key.

Counters

The counters allow you to view how many cook cycles have been entered for each preset and the manual cycle. This feature can be useful for inventory control.
Access the count feature from the System Programming screen by pressing 2.
To re-set the count press CLEAR. All Cycles and All Hours cannot be cleared.
To exit the count screen press POWER until the display turns off.


AUTOFRY Model MTI-10 X / XL Operator's Manual
Recommended Cleaning Schedule

IMPORTANT
To ensure compliance with state, local and national health and safety standards regular maintenance must be performed. Proper maintenance is important for your AUTOFRY to continue to operate without the need for a hood and duct system and it is important for the health and safety of your customers.

Regular oil changing, as part of your regular maintenance, will enhance the taste of your food product. Oil changing will vary widely depending on the use of the AUTOFRY. The use of a shortening monitor kit is the most accurate means of determining the status of the oil.
Daily Cleaning

- Remove and wash the following in warm soapy water followed by a clear water rinse:
u teflon coated wire cook basket
u food entry chute
- food exit chute
filter cover plate
grease baffle
second filter
- Thoroughly dry all parts
- Remove the charcoal filter and wipe down the exterior surfaces with a clean damp cloth or paper towel.
CAUTION
Never soak the charcoal filter or permanent damage to the charcoal media will result.
- Clean all interior surfaces to bare metal.
Use extreme caution when cleaning around the fire system actuation cables and fusible link in the interior cabinet. Accidental discharge of the fire system could result (fig. 12).
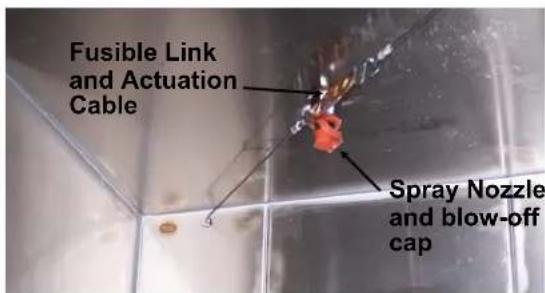
fig. 12
- Sanitize all part and interior surfaces.
- Polish the exterior surfaces using AUTOFRY Shine stainless steel polish and a soft cloth.
- Replace the clean dry components and add liquid shortening as needed.
AUTOFRY Model MTI-10 X / XL Operator's Manual
Weekly Cleaning

-
Repeat daily cleaning.
-
Remove the heater box assembly.
CAUTION
Never immerse the heater box or permanent damage will result. Use caution when cleaning around the temperature probes.

- Remove the oil pot.
■ Discard the oil in an environmentally safe manner.

■ Clean all surfaces to bare metal
■ Apply a thin even coating of AUTOFRY Shield to the exterior surfaces of the oil pot.
-
Clean all interior surfaces to bare metal.
-
Sanitize all part and interior surfaces.
-
Check the fire extinguisher gauge. If the indicator is not in the green the unit must be serviced immediately.
-
Check the spray nozzles and blow off caps. Replace if necessary.
Quarterly Cleaning and Maintenance

Disconnect (un-plug) the AUTOFRY from the main power
-
Perform weekly cleaning routine.
-
Remove and clean to bare metal the removable stack cover / fire damper and fan section with a clean dry cloth or absorbent paper towels (fig. 13a and 13b). If cleaning the fan make sure the AUTOFRY is unplugged or damage to the circuit board or injury could result.
-
Remove filters and clean to bare metal the entire AUTOFRY interior.
-
Re-install the clean dry stack cover / fire damper.
-
Replace the filters.

fig. 13a

fig. 13b
AUTOFRY Model MTI-10 X / XL Operator's Manual
IMPORTANT

In order for the AUTOFRY to continue to perform as a ventless cooking appliance the activated charcoal filter MUST be changed a minimum of every three months. This maintenance is required by your equipment warranty and requirements for ventless re-circulating cooking appliances.
While replacing the activated charcoal filter is easy there will be some charcoal dust present. Replacing the charcoal filter should be performed away from your food preparation areas.
■ Remove the used activated charcoal filter and replace with a new one.
Use replacement charcoal filters supplied by AUTOFRY. Filters can be ordered by calling 1-800-348-2976 x154.
Second Filter
The second filter must be replaced a minimum of once every 6 months. Heavy usage may require that the second filter be changed more frequently. If it appears the second filter can no longer be cleaned effectively then it should be replaced. Second filters can be ordered by calling 1-800-348-2976 x154.
Semi-Annual Cleaning and Maintenance.
Fire Suppression System
IMPORTANT

An inspection of the fire suppression system must be performed every six months in order to comply with NFPA 96, NFPA 17A, UL 710B and UL 197. A certified fire equipment maintenance company must perform this inspection.
Consult your fire suppression system manual that has been supplied with the AUTOFRY for details on the inspection and re-charge instructions.
The fusible links and s-hooks located in the cook chamber and exhaust stack must be replaced semi-annually. WHEN REPLACING FUSIBLE LINKS YOU MUST USE THE SAME RATED LINKS
AUTOFRY Model MTI-10 X / XL Operator's Manual
Safety System Test


The safety system must be tested a minimum of once every six months. A qualified equipment repair technician following these instructions should perform this inspection.
This test must be started with a full oil pot of clean cool oil.
- Open the main door of the AUTOFRY and press POWER.
■ The keypad will display SAFETY SWITCH and FRONT DOOR will blink and the AutoFry will beep.
■ Remove each of the following components one at a time.
-
filter cover plate
-
grease baffle
-
second filter
-
charcoal filter
-
removable fire damper / stack cover

Safety 354°F
Safety Switch Front Door
- Close the main door and press POWER.
■ The keypad will display SAFETY SWITCH and the individual switch that is open.

- After verifying a switch go to the next one until you have verified that all safety switches function properly.
The AUTOFRY is equipped with an airflow switch which must be tested for proper function.
- With the filters installed and the main door closed press POWER on the keypad.
-
Using a flat piece of cardboard or 1/4" plywood completely block the exhaust flow at the fire damper / stack cover.
-
The exhaust fan will operate for a short period of time. The switch will open due to the lack of airflow and the keypad will display SAFETY SWITCH and AIR FLOW.
If the oil is above 192^ F the fan will continue to operate until the oil cools.
Cooking Oil Disposal

Cooking oil must be disposed of in accordance with national, state and local regulations.
Included with this manual is a maintenance log to be signed and dated after the completion of the daily, weekly and quarterly maintenance and testing. Your local or state health and safety inspectors may require this log to be posted in a noticeable location.
AUTOFRY Model MTI-10 X / XL Operator's Manual
Frequently Asked Questions
Q: Can I cook more than fries in my AUTOFRY?
A: Yes. The AUTOFRY can prepare a wide variety of products. However, for best results we recommend pre-cooked frozen products.
Q: How often should I change my oil?
A: That depends on what and how much product you are cooking. Generally your oil should be changed at least once a week or as often as you feel necessary to keep your food tasting fresh. The use of shortening test strips will prove useful to determine the oil condition.
Q: I hear a thump just before and just after the food exits the AUTOFRY. Is there something wrong?
A: Nothing is wrong with the AUTOFRY. The sound you are hearing is the wire cook basket contacting the cabinet to ensure full delivery of the food.
Q: I've entered an order of food and nothing came out?
A: The two most common reasons are:
- The food was entered before the previous cook cycle was completed. Remember to wait for READY to illuminate before entering the next order.
- The wire food basket was not installed or not correctly installed.
Q: My customers are complaining of odor. What's wrong?
A: Nothing is wrong with the AUTOFRY. It is simply time to change or add oil or the charcoal filter needs to be changed. Occasionally food product will miss the food basket during entry and end up in the oil pot. If this does happen it will over-cook and cause excess odor and erratic temperature readings.
Q: I am in the middle of my lunchtime rush, the keypad displays NOT READY FOR 30 MINUTES and the AUTOFRY is beeping. What should I do?
A: First press the POWER button. If the display does not clear, un-plug the AUTOFRY to silence the beeping and clear the display. Re-plug and press the POWER button. The error message simply means the oil temperature has not reached 325^ F in 30 minutes. It could be the result of a heater plug that is not connected, loosely connected or grease laden. Check that the hi-limit, located on the underside of the heater box (see page 5, fig. 1) has not tripped.
AUTOFRY Model MTI-10 X / XL Operator's Manual
Frequently Asked Questions (cont.)
Q: There is a lot of oil on the inside floor of the AUTOFRY. Is the oil pot leaking?
A: Though not impossible it is unlikely that the oil pot is leaking. Check the following items first.
■ Is the drain valve open?
■ Is the oil pot over-filled?
■ Does your frozen product contain a lot of ice? Excessive ice will cause boil-over.
■ Does your frozen product contain a high level of water?
■ Are you over filling the food entry chute?
■ Are you entering a second order before the first order has dispensed?
Although the AUTOFRY is fully enclosed it is a deep fryer and splashing of oil is a normal condition.
Q: Why does my food come out oily and under-cooked?
A: First, check that you have entered the correct cook time. It may be that the temperature sensing plug has become fouled with oil or is not properly seated in its socket at the bottom of the heater box. Check that the hi-limit, located on the underside of the heater box (page 5, fig 1) has not tripped.
Q: My keypad is displaying Safety Switch and Could Not Find Home or Could Not Leave Home.
A: Press the POWER button or un-plug the AUTOFRY. This will clear the display and silence the beeping. These are error messages for the basket motor. One of several things can cause these:
- A wire cook basket that is not properly installed. Be sure the basket rod is seated correctly into the basket cam and the receiver clip.
- A power interruption during a cook cycle. Remove the basket, run the unit through a short cook cycle then replace the basket.
- Although the basket motor is very durable, it is a moving part. All moving parts are subject to malfunction. If this is the case please call the AUTOFRY service department.
Q: The keypad on the AUTOFRY displays a Temperature Alarm.
A: Press the POWER button on the keypad to clear the display.
■ Open Probe; Check the probe for a loose or damaged connection.
- Too High; The circuit senses a temperature higher than 401^ F. Check for loose, fouled or damaged plugs and sockets.
- Not ready for 30 Minutes; Oil temperature fails to reach the minimum 325^ F. Wait for the oil temperature to get above 325^ F before entering the next order of food. Check for dirty, loose or damaged plugs and sockets.
- Excessive Change; Any time the oil temperature fluctuates by 50^ in a five second period this error will be displayed. Check the oil level in the oil pot and add if necessary.
If the errors continue please call the AUTOFRY service department.
AUTOFRY Model MTI-10 X / XL Operator's Manual
Error Codes
| Fault / Condition | Troubleshooting | To Clear Display |
| Temperature Alarms; | ||
| Open ProbeToo High Check probe and conditionNot Ready for 30 MinutesExcessive Change | Check plug and socketof all cords and connections | Press POWER |
| Safety Switch Alarms; | ||
| Charcoal FilterGrease Baffle for proper function.2nd FilterFire DamperAir FlowFire SystemFront DoorFilter CoverSwitch 9 (spare)Switch 10 (spare) | Check the designated safety | Press POWER |
| Basket Motor Alarms; | ||
| Could Not Find HomeCould Not Leave Home | Check for broken gears. Check all wire connections. Check switches.Check switch cam tightness | Press POWER |
Our Service Technicians will always attempt to correct the problem over the phone. If this is not possible, a service company in your area will be contacted and dispatched to your location.
UNAUTHORIZED SERVICE ON THE AUTOFRY MAY VOID THE WARRANTY.
Maintenance Log
| DATE | Oil Changed | Weekly Cleaning | Quarterly Cleaning | Charcoal Filter Replaced | Second Filter Replaced | Stack Cover / Fire Damper | Semi - Annual Fire Inspection | Safety System Test | Signature |
Maintenance Log
| DATE | Oil Changed | Weekly Cleaning | Quarterly Cleaning | Charcoal Filter Replaced | Second Filter Replaced | Stack Cover / Fire Damper | Semi - Annual Fire Inspection | Safety System Test | Signature |
AUTOFRY Model MTI-10 X / XL Operator's Manual
Maintenance Record

- AUTOFRY Operator's Manual
- Model MTI-10X / XL / XL-3
- AUTOFRY Model MTI-10 X / XL Operator's Manual
- Table of Contents
- Table of Figures
- Specifications
- Electrical Specifications:
- ACV Dedicated Grounded Circuit
- Physical Specifications:
- Motion Technology, Inc. Limited Warranty
- Nature of Warranty
- Scope of Warranty
- Exclusions from Coverage of the Warranty
- How to Obtain Service
- Exclusion of Incidental or Consequential Damage
- Legal Rights of Warranty
- General Notes:
- Safety Symbols:
- CAUTION
- Designated use:
- Non designated use:
- Prepare electrical service.
- Prepare counter top.
- Leg installation.
- Place the AUTOFRY on the counter.
- Initial cleaning.
- Sanitize the parts.
- Install the charcoal filter.
- Sanitize the interior.
- Install the oil pot.
- Install the heater box assembly.
- Place the deflector over the heating element and onto the oil pot (fig. 8).
- Install the food exit chute.
- Add commercial grade frying oil.
- CAUTION!
- Install the wire cook basket.
- IMPORTANT
- Do not force the basket down into the oil pot or damage to the basket motor will result.
- Power.
- Let's Get Cooking!
- Starting the AUTOFRY
- Note:
- Standby
- To Use:
- To Exit:
- Repeat Cook Time
- Maximum Cook Time
- Clean Mode
- PASSWORD FOR ALL PROGRAMMING: 2,2,2 & START
- System Programming
- Program Preset 0
- Weekly Cleaning
- Quarterly Cleaning and Maintenance
- Frequently Asked Questions
- Frequently Asked Questions (cont.)
- Maintenance Record
Brand : AutoFry
Model : MTI-10XL-3
Category : Deep fryer