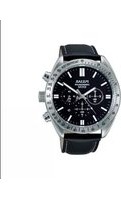
PT3613X1 - Wristwatch PULSAR - Free user manual and instructions
Find the device manual for free PT3613X1 PULSAR in PDF.


| Brand | Pulsar |
| Model | PT3613X1 |
| Product Type | Watch |
| Case Diameter | 45 mm (approximate) |
| Case Thickness | 10 mm (approximate) |
| Weight | 80 g (approximate) |
| Band Width | 22 mm (approximate) |
| Movement Type | Quartz |
| Battery Type | CR2016 |
| Water Resistance | 50 meters (5 ATM) |
| Crystal Material | Mineral glass |
| Case Material | Stainless steel |
| Band Material | Stainless steel or silicone (depending on variant) |
| Functions | Time, date, day, chronograph (stopwatch) |
| Display Type | Analog |
| Warranty | 2 years |
| Maintenance | Keep clean, avoid magnetic fields, service every 3-5 years |
| Cleaning Instructions | Wipe with soft cloth; avoid harsh chemicals |
| Safety Precautions | Do not expose to extreme temperatures; keep out of reach of children |
| Spare Parts Availability | Batteries, straps, and gaskets available from authorized service centers |
Frequently Asked Questions - PT3613X1 PULSAR
User questions about PT3613X1 PULSAR
0 question about this device. Answer the ones you know or ask your own.
Ask a new question about this device
Download the instructions for your Wristwatch in PDF format for free! Find your manual PT3613X1 - PULSAR and take your electronic device back in hand. On this page are published all the documents necessary for the use of your device. PT3613X1 by PULSAR.
USER MANUAL PT3613X1 PULSAR
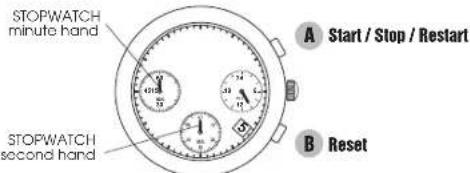
● Hour, minute and second hands
● Date displayed in numerals (VD53 only)
STOPWATCH
● Measures up to 60 minutes in one second increments.
DISPLAY AND CROWN/BUTTONS

SCREW DOWN CROWN
[for models with screw down crown]
Unlocking the crown
1 Turn Crown counterclockwise until you no longer feel the threads turning.
2 Crown can be pulled out.
Locking the crown
1 Push Crown back in to normal position.
2 Turn Crown clockwise while pressing it lightly until tight.


English
2

3
ADJUSTING THE STOPWATCH HAND POSITION
- Before setting the time, be sure to check that the STOPWATCH hands are in the "0" position when the STOPWATCH is reset (for resetting the STOPWATCH, see "STOPWATCH".)
* If either of the STOPWATCH hands is not at the '0' position, reset them, following the procedure below:
English

4
CROWN
Pull out to second click
A
Press A or B to reset the STOP-WATCH second and minute hands to the "0" position.
B
A: The hands move counterclockwise. B: The hands move clockwise.
CROWN
Push back in to normal position.
TIME SETTING
● Before setting the time, check that the stopwatch measurement is stopped.

CROWN
1 Pull out to first click, and turn clockwise until the previous day's date appears. (VD53 only)
2 Pull out to second click when the second hand is at the 12 o'clock position. The second hand will stop on the spot. And advance the hour and minute hands by turning the crown.
3 Turn clockwise until the desired date appears. (VD53 only)
4 Turn to set the hour and minute hands.
5 Push back in to normal position in accordance with a time signal.
English
STOPWATCH
● The stopwatch can measure up to 60 minutes in one second increments.
● The measured time is indicated by the STOPWATCH hands that move independently of the center and 24-hour hands.
- Before using the stopwatch, be sure to check that the crown is set at the normal position and that the STOPWATCH hands are reset to the "0" position.
* If the STOPWATCH hands do not return to the "0" position when the stopwatch is
* If the STOPWATCH hands do not return to the "0" position when the stopwatch is reset, follow the procedure in "STOPWATCH HAND POSITION ADJUSTMENT".
English
6

flowchart
graph TD
    A["Standard measurement"] --> B["A"]
    B --> C["START"]
    B --> D["STOP"]
    B --> E["RESET"]
    F["Accumulated elapsed time measurement"] --> G["A"]
    G --> H["START"]
    G --> I["STOP"]
    G --> J["RESTART"]
    J --> K["A -- →"]
    K --> L["STOP"]
    K --> M["RESET"]
    N["Split time measurement"] --> O["A"]
    O --> P["START"]
    O --> Q["SPLIT"]
    O --> R["RESTART"]
    R --> S["B -- →"]
    S --> T["A > B"]
    T --> U["STOP RESET"]
English
7
NOTES ON OPERATING THE WATCH
TIME SETTING
- Do not press any button when the crown is at the second click position, as this will move the STOPWATCH hands.
- When the time is set, the 24-hour hand move correspondingly with the hour and minute hands.
- When setting the hour hand, check that the 24-hour hand is correctly set.
- When setting the minute hand, first advance it 4 to 5 minutes ahead of the desired time and then turn it back to the exact minute.
(Date setting (VD53 only))
● It is necessary to adjust the date on the first day after a 30-day month and February
- Do not set the date between 9:00 p.m. and 1:00 a.m., as the date may not change properly. If it is necessary to set the date during that period of time, first change the time to any time outside of this period, set the date, and then reset to the correct time.
STOPWATCH
- Restart and stop of the stopwatch can be repeated by pressing button A.
● Measurement and release of split time can be repeated by pressing button B.
BATTERY CHANGE

Battery life : Approx. 2 years
Battery : SEIKO SR920SW
English
- If the stopwatch is used for more than 2 hours a day, the battery life may be less than the specified period.
- As the battery is inserted at the factory to check the function and performance of the watch, its actual life once in your possession may be less than the specified period.
- When the battery expires, be sure to replace it as soon as possible to prevent any malfunction.
- We recommend that you contact an AUTHORIZED PULSAR DEALER for battery replacement.
● After the battery is replaced with a new one, adjust the stopwatch hand position and set the time/calendar.
● Battery life indicator
English
When the battery nears its end, the second hand moves at two-second intervals instead of normal one-second intervals. In that case, have the battery replaced with a new one as soon as possible.
* The watch remains accurate while the second hand is moving at two-second intervals.
10
● Necessary procedure after battery change
After the battery is replaced with a new one, or in case any of the hands should move improperly, follow the procedure below to reset the STOPWATCHhands to "0" position.
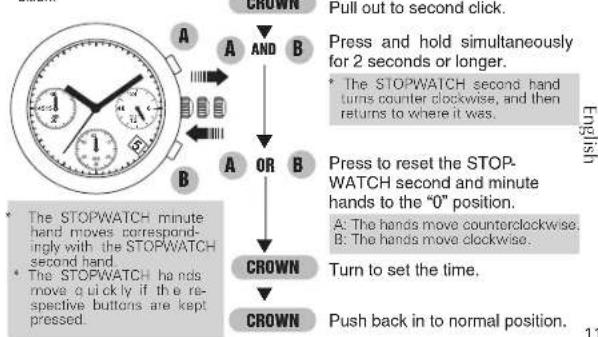
flowchart
graph TD
    A["STOPWATCH minute hand moves correspondingly with the STOPWATCH second hand. The STOPWATCH heads move a quickly if the respective buttons are kept pressed."] --> B{CROWN}
    B -->|AND| C["English"]
    B -->|OR| D["English"]
    B -->|PULL OUT TO SECOND CLICK.| E["English"]
    B -->|Press and hold simultaneously for 2 seconds or longer.| F["English"]
    B -->|Press to reset the STOPWATCH second and minute hands to the "0" position.| G["English"]
    B -->|Turn to set the time.| H["English"]
    B -->|Push back in to normal position.| I["English"]
English
flowchart
graph TD
    A["STOPWATCH minute hand moves correspondingly with the STOPWATCH second hand. The STOPWATCH heads move a quickly if the respective buttons are kept pressed."] --> B{CROWN}
    B -->|AND| C["English"]
    B -->|OR| D["English"]
    B -->|PULL OUT TO SECOND CLICK.| E["English"]
    B -->|Press and hold simultaneously for 2 seconds or longer.| F["English"]
    B -->|Press to reset the STOPWATCH second and minute hands to the "0" position.| G["English"]
    B -->|Turn to set the time.| H["English"]
    B -->|Push back in to normal position.| I["English"]
11

WARNING
- Do not remove the battery from the watch.
- If it is necessary to take out the battery, keep it out of the reach of children. If a child swallows it, consult a doctor immediately.
● Never short-circuit, tamper with or heat the battery, and never expose it to fire. The battery may burst, become very hot or catch fire.

CAUTION
● The battery is not rechargeable. Never attempt to recharge it, as this may cause battery leakage or damage to the battery.
TO PRESERVE THE QUALITY OF YOUR WATCH
WATER RESISTANCE
● Non-water resistant

If "WATER RESISTANT" is not inscribed on the case back, your watch is not water resistant, and
it wet as water may damage the movement. If the watch becomes wet, we suggest that you have it checked by an AUTHORIZED PULSAR DEALER or SERVICE CENTER.
● Water resistance (3 bar)

If "WATER RESISTANT" is inscribed on the case back, your watch is designed and manufactured to
dental contact with splashes of water or rain, but it is not designed for swimming or diving.
● Water resistance (5 bar)*

If "WATER RESISTANT 5 BAR" is inscribed on the case back, your watch is designed and manu-factured to withstand up to
5 bar and is suitable for swimming, yachting and taking a shower.
● Water resistance (10 bar/15 bar/20
bar)* If "WATER RESISTANT 10 BAR", "WATER RESISTANT 15 BAR" or "WATER RESISTANT 20 BAR" is inscribed on the case back, your bar WR
watch is designed and manufactured to withstand up to 10 bar/15 bar/20 bar and is suitable for taking a bath, shallow diving, but not for scuba diving. We recommend that you wear a PULSAR Diver's watch for scuba diving.
* Before using the water resistance 5, 10, 15 or 20 bar watch in water, be sure the crown is pushed in completely.
Do not operate the crown when the watch is wet or in water. If used in sea water, rinse the watch in fresh water and dry it completely.
* When taking a shower with the water resistance 5 bar watch, or taking a bath with the water resistance 10, 15 or 20 bar watch, be sure to observe the following:
- Do not operate the crown when the watch is wet with soapy water or shampoo.
- If the watch is left in warm water, a slight time loss or gain may be caused. This
condition, however, will be corrected when the watch returns to normal temperature.
NOTE:
Pressure in bar is a test pressure and should not be considered as corresponding to actual diving depth since swimming movement tends to increase the pressure at a given depth. Care should also be taken on diving into water.
TEMPERATURES

Your watch works with stable accuracy within a temperature range of 5°C and 35°C (41°F and 95°F).
Temperatures over 60°C (140°F) may cause battery leakage or short
en the battery life. Do not leave your watch in very low temperatures below -10^ C (+14° F) for a long time since the cold may cause a slight time loss or gain. However, the above conditions will be corrected when the watch returns to normal temperature.
MAGNETISM

Your watch will be adversely affected by strong magnetism. Keep it away from close contact with magnetic objects.
SHOCKS & VIBRATION

Light activities will not affect your watch, but be careful not to drop your watch or hit it against hard surfaces, as this damage.
CHEMICALS

Be careful not to expose the watch to solvents, mercury, cosmetic spray, detergents, adhesives or paints. Otherwise, the
case, bracelet, etc. may become discolored, deteriorated or damaged.
CARE OF CASE AND BRACELET

To prevent possible rusting of the case and bracelet caused by dust, moisture and perspiration, wipe them periodically with a soft dry cloth.
PERIODIC CHECK

It is recommended that the watch be checked once every 2 to 3 years. Have your watch checked by an AU T HO RIZ ED P ULS AR
DEALER or SERVICE CENTER to ensure that the case, crown, buttons, gasket and crystal seal remain intact.
PRECAUTION REGARDING CASE BACK PROTECTIVE FILM

If your watch has a protective film and/or a sticker on the case back, be sure to peel them off before using your watch.
- STOPWATCH
- SCREW DOWN CROWN
- Unlocking the crown
- Locking the crown
- ADJUSTING THE STOPWATCH HAND POSITION
- TIME SETTING
- CROWN
- NOTES ON OPERATING THE WATCH
- (Date setting (VD53 only))
- BATTERY CHANGE
- ● Battery life indicator
- ● Necessary procedure after battery change
- WARNING
- CAUTION
- TO PRESERVE THE QUALITY OF YOUR WATCH
- WATER RESISTANCE
- NOTE:
- TEMPERATURES
- MAGNETISM
- SHOCKS & VIBRATION
- CHEMICALS
- CARE OF CASE AND BRACELET
- PERIODIC CHECK
- PRECAUTION REGARDING CASE BACK PROTECTIVE FILM
Brand : PULSAR
Model : PT3613X1
Category : Wristwatch