
MMF-3.3 SE - Turntable Music Hall - Free user manual and instructions
Find the device manual for free MMF-3.3 SE Music Hall in PDF.


| Type | Belt-drive turntable |
| Motor | Electronic speed control |
| Speeds | 33 1/3, 45 RPM |
| Speed change | Manual |
| Platter | Damped acrylic, 300 mm |
| Tonearm | Straight, static-balanced, gimbal bearing |
| Effective tonearm length | 230 mm |
| Overhang | 15 mm |
| Cartridge included | Music Hall Tracker |
| Stylus type | Elliptical |
| Anti-skating | Adjustable spring mechanism |
| Tracking force | Adjustable, 1.5-2.0 g |
| Output | RCA phono (gold-plated) |
| Power supply | 12V DC, 500 mA adapter (included) |
| Dimensions (W x D x H) | 440 x 360 x 125 mm (17.3 x 14.2 x 4.9 in) |
| Weight | 6.8 kg (15.0 lbs) |
| Material | Composite plinth, acrylic platter |
| Accessories | Dust cover, felt mat, 45 rpm adapter |
| Cleaning | Wipe platter with dry cloth; clean stylus with brush |
| Safety | Place on level surface; avoid overheating; unplug when not in use |
| Replacement parts | Stylus, drive belt, cartridge available |
Frequently Asked Questions - MMF-3.3 SE Music Hall
User questions about MMF-3.3 SE Music Hall
0 question about this device. Answer the ones you know or ask your own.
Ask a new question about this device
Download the instructions for your Turntable in PDF format for free! Find your manual MMF-3.3 SE - Music Hall and take your electronic device back in hand. On this page are published all the documents necessary for the use of your device. MMF-3.3 SE by Music Hall.
USER MANUAL MMF-3.3 SE Music Hall
You have selected an exceptional turntable. Each component used in the construction of the mmf-3.3 was selected to provide you with superior performance and the highest level of sound reproduction available today. We know of no turntable that costs as much to produce yet sells for so little. The precise and elegant design of this turntable makes it easy to install and operate. Please take a few moments to read over the operating instructions to ensure that you get the best performance from your deck and years of trouble-free service.
SAFETY GUIDELINES
This product is designed and manufactured to strict quality and safety standards. However, you should be aware of the following installation and operation precautions:
1. Take heed of warnings and instructions
Read all the instructions before connecting or operating the turntable. Keep this manual so you can refer to these safety instructions. Heed all warnings and safety information in these instructions and on the turntable. Follow all operating instructions.
2. Water and Moisture
To reduce the risk of fire or electric shock, do not expose the turntable to moisture or water. If the turntable is exposed to moisture, immediately disconnect the power cord from the wall. Take the deck to an authorized music hall service center for inspection. Do not touch the turntable, power cord, or plug with wet hands.
3. Object or liquid entry
Do not allow foreign objects or liquids into the unit. If this happens, immediately disconnect the power cord from the wall and take the unit to an authorized music hall service center for inspection.
4. Heat
Keep the turntable away from naked flames, radiators, heat registers, stoves, or any other heat-producing appliances (including amplifiers).
5. Climate
The turntable has been designed for use in moderate climates. Do not attempt to use below 41 degrees Fahrenheit (5 degrees Celsius) or above 95 degrees Fahrenheit (35 degrees Celsius).
6. Racks and Stands
Place the turntable on a fixed, level surface strong enough to support its weight. Do not place it on a moveable cart that could tip over. We recommend only using
stands approved for use with audio equipment. See the SITING section for further suggestions.
7. Cleaning
Please refer to the MAINTENANCE section for detailed cleaning instructions.
8. Power Sources
Connect the turntable only to a power supply of the type and voltage described in the operating instructions or specified on the rear panel of the unit.
9. Power-cord protection
Connect the turntable to the power outlet only with the supplied power supply.
Do not modify the supplied power supply in any way. Do not attempt to defeat grounding and/or polarization provisions.
Do not use extension cords.
Do not route the power supply cord where it will be crushed, pinched, bent at severe angles, exposed to heat, or damaged in any way.
10. Non-use periods
If the deck is to be left unused for a long period of time, the power supply should be unplugged from the wall outlet and the belt removed.
11. Damage Requiring Service
Stop using the turntable immediately and have it inspected by an authorized music hall service center whenever:
- The power supply cord or plug has been damaged.
- Liquid has been spilled onto the motor or into the bearing well.
- The turntable has been exposed to rain.
- The turntable does not operate properly.
- The turntable has been dropped or damaged.
- Smoke or any unusual smell is detected from the turntable.


PARTS INVENTORY AND OPERATION CONTROL DIAGRAM
- 1 x electronic speed control
- 1 x platter with felt mat, packaged in bottom of box
- 1 x anti-skating weight, (packaged in a pink bag inside the parts bag)
- 1 x anti-skating rod
- 1 x anti-skating hanger
- 1 x tonearm
- 1 x tonearm rest
- 1 x tonearm lift lever/cueing lever
- 3 x transport screws
- 1 x drive belt, packaged in parts bag
- 1 x stepped motor pulley
- 1 x sub-platter
- 1 x tonearm counterweight (located in the bottom packing foam)
- 1 x head shell fitted with Ortofon 2M RED cartridge
- 2 x dust-cover hinges
- 4 x dust-cover hinge screws
- 1 x audio output connectors, earth connection
- 3 x feet
-
1 x DC power input socket
-
1 x dustcover
- 1 x belt changing tool packaged in parts bag
- 1 x on/off switch
Parts bag includes:
1 x single adapter
1 x drive belt (10)
1 x high quality interconnect
1 x cartridge alignment (tangency) guide
1 x anti-skate weight (3) (tiny weight attached to small piece of fishing line)
1 x belt changing tool (21)
1 x universal DC power supply
GETTING STARTED
Thank you for purchasing the music hall mmf-3.3 turntable. It is a 3-speed belt-driven, audiophile turntable that comes complete with a Ortofon cartridge mounted in a high-quality carbon tonearm. The alloy platter runs on a precision, stainless steel and brass bearing assembly to provide fluid and quiet operation. These features combine to ensure that the mmf-3.3 delivers superior audio performance that will provide years of enjoyment.
FOR YOUR INFORMATION
This manual provides valuable information that will help you get optimum performance from your system. Please contact your authorized music hall dealer for any additional clarifications you may require. Save the music hall mmf-3.3 shipping carton and all enclosed packing material for future use. Shipping or moving the mmf-3.3 in anything other than the original packing material may result in severe damage that is not covered by the warranty. Be sure to keep the original sales receipt; it is your best record of the date of purchase, which you will need in the event warranty service is required.
SET-UP
The music hall mmf-3.3 is supplied partially assembled and carefully packaged for safe transport. To assemble the turntable, please follow the instructions carefully.
- Clear a level (use a spirit level) and suitable workspace to assemble the turntable. This may be the final playing location.
-
Remove the turntable and all parts from the carton.
-
Remove three transport screws (9) from the top chassis.
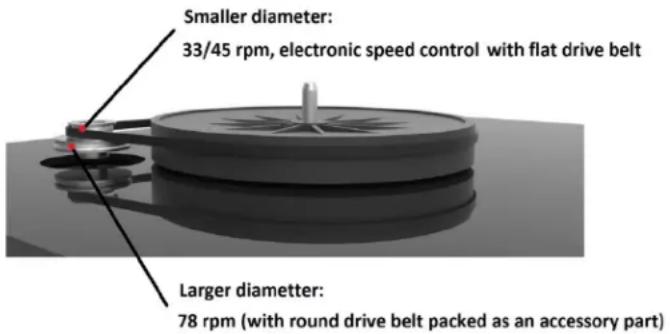
- Install the drive belt (10) for 33 1/3 and 45 rpm play. Loop the belt around the smaller diameter rim of the stepped motor pulley (11) and around the rim of the sub-platter (12). Change the speed by pressing speed control button on the chassis. (For 78 rpm. play, use the large diameter rim of the motor pulley and change the drive belt for round belt from the accessories).
- Center the platter (2) over the spindle of the sub-platter (12) and lower it until it rests securely on the sub-platter.
- Find the counterweight (13). It is in a cut-out in the bottom piece of packing foam. Place the counterweight (13) onto the tonearm. To do this, you are positioned in front of the turntable. Orient the counterweight so that the tracking force scale is closest to you. Carefully, screw the counterweight counterclockwise onto the back of the tonearm. Don't worry about the exact position of the counterweight or the tracking force scale, they will soon be adjusted.
- Remove the tonearm-locking strap. Place it in a safe position for possible future transport.
- Make sure the tonearm is in the tonearm rest (7). Carefully, remove the stylus guard (the piece of clear plastic on the bottom of the cartridge). Place it in a safe place for future use.
- You will now set the cartridge tracking force. The mmf-3.3 comes complete with a factory-installed Ortofon cartridge. We recommend a tracking force of 1.8g. Please note; the tracking force scale on the counterweight (13) has no decimal point. 10 on the tracking force scale is actually 1.0g. 15 is actually 1.5g, etc. 2.0g is 20 on the scale. To set the tracking force you must first balance (zero) the tonearm (6).
The objective of balancing or zeroing the tonearm is to get the tonearm to float parallel to the platter.
First, lower the cueing lever (8).
Using your left hand, lift, position, and hold the tonearm (6) between the tonearm rest (7) and the platter (2). To avoid damage, be careful not to allow the cartridge to contact the plinth (the turntable base).
With your free hand turn the counterweight counterclockwise or clockwise until the tonearm floats freely, without the aid of your hand, in mid-air and parallel to the platter. Don't worry about the number on the tracking force scale, you will soon calibrate and set it properly. Once you have balanced the tonearm, return it to the tonearm rest.
You are now going to set the ring with numbers on the counterweight to zero. This is called the tracking force scale.
The tracking force scale turns independently of the counterweight.
IMPORTANT
With your right hand, hold the rear part of the counterweight to make sure that it does not move.
With your left hand, lightly grip and turn the tracking force scale until the number zero is in the twelve o' clock position (dead center on top of the counterweight).
The tonearm is now zeroed. Check it, by once again floating the tonearm between the tonearm rest and the platter. If the tonearm doesn't float parallel to the platter at zero, return to the previous steps and make the necessary adjustments. Return the tonearm to the tonearm rest.
IMPORTANT
Do not touch the tracking force scale again.
Turn the counterweight counterclockwise with your right hand.
You will notice that the tracking force scale will also turn.
Turn it through numbers 5, 10, 15 to the position 18 on the scale. This is equivalent to 1.8grams. The correct tracking force has now been set.
Every arm and cartridge combination has an optimum tracking force. This can easily be set by ear. Increments of 0.1g can produce significant differences. Once the cartridge has run-in (usually about 24 -50 hours of playing time) feel free to experiment with a slightly higher or lower tracking force and pick the one you prefer.
- Locate the anti-skating weight (3). You will notice a small fishing line attached to the anti-skating weight (3). Slip the looped end of the fishing line
over the anti-skating rod (4) and into notch number 2 (See diagram below). Lift the anti-skating weight (3) over the anti-skating hanger (5) and feed the fishing line through the looped end of the anti-skating hanger (5). The anti-skating weight (3) should now be dangling in free space to the left of the hanger. If it is not dangling, simply bend the anti-skating hanger (5) by pushing it away from the tonearm pillar with your finger.

- Slide the dust cover (20) onto the dust cover hinges (15) on the back of the plinth. If necessary, adjust the tightness of the hinges by turning the dust cover hinge screws (16).
NOTE
If you are substituting another cartridge for Ortofon 2M Red, you may need to make the following further adjustments to the tonearm (6) and cartridge:
If you are a novice, music hall recommends getting professional help.
All cartridges with half inch mounting holes can be fitted. Leaving the stylus guard on, fit the cartridge to the head shell (14) using the screws supplied with the cartridge by passing one screw through each slot in the finger lift and the head shell (14). Snug the nuts.
Connect the tonearm (6) wires to the cartridge pins as follows:
white left channel positive (L+) red right channel pos. (R+) green right channel return (R-) blue left channel return (L-)
To achieve the best sound reproduction, the cartridge must be positioned precisely in the head shell. To do this, fit the tangency guide (you'll find this in the parts bag. It's a white rectangular piece of cardboard with black lines) over the spindle at point 'A' and onto the platter, black lines side up (See diagram below). Remove the stylus guard. Move the tonearm (6) (adjusted for the correct
tracking force of your cartridge) to the pattern. When the stylus tip of the cartridge is at two points shown on the guide, the front of the cartridge should be parallel to the lines on the pattern. If necessary, slide the cartridge back and forth until the stylus tip is positioned correctly. Tighten the cartridge mounting screws.

*Save all packing materials, parts, and screws for possible future transport.
SITING
FLOOR MOUNTING - Place the deck on a small, light, rigid table, e.g., coffee table. Ensure that the table is level on the floor and not rocking.
WALL MOUNTING - Wall mounting may be preferable when the floor is springy or when there is risk of damage by children or pets. The shelf should be light and rigid, and fully supported by, but not firmly screwed or glued to its brackets.
To allow the lid to open fully, a clearance of 3 inches (7.5 cm.) is required behind the plinth and at least 13 inches (33 cm.) above.
MAINS CONNECTION
Locate the wall transformer. It's in a small white box set into the underside of the packing foam. Plug the small male end of the wall transformer wire into the female receptacle on the DC power input (19) for the motor. The DC power input socket (19) for the motor is located on the underside of the turntable near the back. Plug the transformer into the wall. Turn the motor 'ON' (22) and check that the platter (2) spins.
AUDIO CONNECTION
The supplied Ortofon cartridge is a moving-magnet cartridge. Connect the interconnect cable to the audio output connectors (24) on the bottom of the turntable and connect the ground lead to the screw. Connect the other end of the interconnect cable and ground cable to the MM (Moving Magnet) phono input on your receiver, integrated amp, or pre-amplifier.
OPERATION
Place a record on the platter and push the mains switch (22) to the 'ON' position. Remove the stylus guard and lift up the tonearm with the cueing lever (8).
Position the cartridge stylus tip above the initial groove of the record. Gently lower the cueing lever (8) to drop the arm onto the record.
To stop play, lift the cueing lever (8) to raise the arm and then bring the tonearm back to the tonearm rest (7). Push the mains switch (22) to 'OFF'.
It is recommended to replace the stylus guard (optional) when the turntable is not in use.
MAINTENANCE
The mmf-3.3 is designed for a long operational life. To preserve the appearance of your deck and maintain its performance, you should note the following points when cleaning (Make sure the stylus guard is in place before you begin):
PLINTH - The plinth is constructed from medium density fiberboard, therefore it should not be subjected to extremes of temperature or direct sunlight. The finish may change slightly with age. A damp cloth or soft duster is ideal for cleaning the plinth; polish, particularly wax-based, can be hard to remove.
PLATTER - The alloy platter can be cleaned with a soft, dry, lint-free cloth.
MAT - Clean the felt mat with masking tape.
MOTOR - The motor is equipped with self-lubricating bearings. The motor pulley should be cleaned periodically to remove deposits of rubber shed by the belt. Remove the outer platter and belt. Gently clean with a cotton swab or lint-free cloth dampened with isopropyl alcohol.
BELT - The belt should last for many years. The belt can be cleaned at the same time as the pulley. The best way to clean the belt is to pull it gently through a damp cloth. If the turntable is not going to be used for a long period of time, it is advisable to remove the belt from the platter rim to prevent stretching.
OIL - The oil supplied for the main bearing provides life-long protection. If oil is lost from the bearing housing, replace it with a single drop of Mobil 1 or other 10w/40 synthetic oil containing Teflon.
DUST COVER - This can be cleaned using any commercial acrylic or plastic cleaners. The simplest approach is to remove any dust with a damp, lint-free cloth without rubbing and then use a soft duster. Covers are more often damaged in cleaning than in use.
STYLUS - Remove the stylus guard. We recommend a dry, vibrating-pad cleaner. Wet cleaners or soft stylus brushes are not recommended.
TECHNICAL SPECIFICATIONS:
Power Supply: 15V / 0-0.8mA DC, universal power supply
Power Consumption: 4W / 0W in stand-by
Speeds: 33½ rpm, 45 rpm (manual change to 78 rpm)
Speed deviation: ± 0.18%
Wow and flutter: ±0.11 %
Rumble Max: -68 db
Effective tonearm length: 8.6 in.(218.5mm)
Overhang: .73 inch (18.5mm)
Dimensions: 16.75 x 12.6 x 5.19 in. (415 x 230 x 132 mm)
Weight (including pkg.): 15lbs. (6.8 kg)
CARTRIDGE SPECIFICATIONS: Ortofon 2M RED
Frequency Response: 20Hz - 20kHz ± 3dB
Channel Balance: 1.5dB @ 1kHz
Channel Separation: 22dB @ 1kHz
Output: 5.5mV, 1kHz @ 5cm/sec
Vertical Tracking Angle: 20 degrees
Stylus Shape: Elliptical
Stylus Type: Replaceable
Load Impedance: 47,000 Ohm
Cartridge Weight: 7.2g
Fixing Center: 0.5" (12.7mm)
Playing Weight 1.6 - 2.0g (2.0g nom.)
Music Hall reserves the right to make technical modifications.
Check our website for the latest updates.
TROUBLESHOOTING
Music hall turntables are manufactured to the highest standards and undergo strict quality controls before leaving the factory. If, for some reason your turntable is not working properly, please take a few moments to review this list of potential causes.
THE PLATTER DOESN'T TURN, ALTHOUGH THE DECK IS SWITCHED ON:
- The turntable is not connected to the mains power supply.
- No mains at the socket.
• The belt is not fitted or has slipped off.
NO SIGNAL IN ONE OR BOTH CHANNELS:
- No connection between the turntable and amplifier.
- Phono input not selected at amplifier.
- Poor contact or broken connection.
- Amplifier not switched on.
- Amplifier or speakers defective or muted.
- Cartridge not wired into the head shell
- Loudspeakers not connected.
LOUD HUM ON PHONO INPUT:
- No earth connection from cartridge, tonearm, or audio cable to amplifier.
- Ground loop.
- Turntable too close to one or both speakers.
DISTORTED SOUND FROM ONE OR BOTH CHANNELS:
- MM/MC switch on pre-amp incorrectly set.
- Dust on the stylus.
- Needle or cantilever damaged.
- Wrong speed
- Dirty or over-stretched belt.
- Platter bearing dry, dirty or damaged.
- Record player connected to wrong input of amplifier.
SERVICE
Should you encounter a problem that you cannot solve, please contact your dealer. If the problem cannot be resolved by the dealer please contact music hall for further advice. Never return a record player without authorization and without making sure that is it safely disassembled and correctly packaged in the original packaging. Repairs will only be made under warranty if the unit is returned correctly packaged.
PACKING INSTRUCTIONS
Please remove and store the following parts: dust cover (20), anti-skating weight (3), platter (2), sub-platter (12), and belt (10).
Fit the stylus guard on the cartridge and lock the tonearm (18). Package the turntable carefully in its original box using thick, 1¼ inch Bubble Wrap.

WARRANTY
This entitles you to have the music hall mmf-3.3 repaired free of charge, at our discretion, for one year after the date of purchase, at any authorized music hall service center, provided the unit was purchased from an authorized dealer. Your original sales receipt is proof of purchase date. Music hall takes no responsibility for defects arising from accident, misuse, abuse, wear and tear, neglect or unauthorized repair and/or adjustment. Music hall cannot accept responsibility for damage or loss that occurs during transit.
The warranty does not cover transportation costs.
CLAIMS UNDER WARRANTY
The mmf-3.3 should be packed in the original packing and returned to the dealer from whom it was purchased, or, upon authorization, to a music hall service center. It should be sent by a reputable carrier, carriage prepaid. Do not send the turntable via USPS (United States Postal Service). Since no responsibility will be accepted for a unit in transit to the dealer, customer, or authorized service agent, customers are advised to insure against loss, damage, or theft.
FOR FURTHER INFORMATION CONTACT:
music hall
108 Station Road
Great Neck, NY 11023
Tel: 516-487-3663
Fax: 516-773-3891
http://www.musichallaudio.com


- SAFETY GUIDELINES
- TAKE HEED OF WARNINGS AND INSTRUCTIONS
- WATER AND MOISTURE
- OBJECT OR LIQUID ENTRY
- HEAT
- CLIMATE
- RACKS AND STANDS
- CLEANING
- POWER SOURCES
- POWER-CORD PROTECTION
- NON-USE PERIODS
- DAMAGE REQUIRING SERVICE
- PARTS INVENTORY AND OPERATION CONTROL DIAGRAM
- GETTING STARTED
- FOR YOUR INFORMATION
- SET-UP
- IMPORTANT
- NOTE
- SITING
- MAINS CONNECTION
- AUDIO CONNECTION
- OPERATION
- MAINTENANCE
- TECHNICAL SPECIFICATIONS
- CARTRIDGE SPECIFICATIONS: ORTOFON 2M RED
- TROUBLESHOOTING
- SERVICE
- PACKING INSTRUCTIONS
- WARRANTY
- CLAIMS UNDER WARRANTY
- FOR FURTHER INFORMATION CONTACT
Brand : Music Hall
Model : MMF-3.3 SE
Category : Turntable