
XT685ENT - Treadmills Spirit Fitness - Free user manual and instructions
Find the device manual for free XT685ENT Spirit Fitness in PDF.


| Product Type | Treadmill |
| Brand | Spirit Fitness |
| Model | XT685ENT |
| Dimensions (L x W x H) | 82 x 36 x 58 inches (208 x 91 x 147 cm) |
| Product Weight | 290 lbs (132 kg) |
| Maximum User Weight | 400 lbs (181 kg) |
| Motor Power | 3.5 CHP (continuous duty) |
| Speed Range | 0.5 - 12 mph (0.8 - 19.3 km/h) |
| Incline Range | 0% - 15% |
| Running Surface | 22 x 60 inches (56 x 152 cm) |
| Console Display | 7.5 inch blue backlit LCD |
| Heart Rate Monitoring | Pulse grip sensors + telemetry (Polar compatible) |
| Programs | 12 preset programs, 3 custom, 2 heart rate control |
| Folding Mechanism | SoftDrop folding system with gas shock |
| Power Supply | 120V, 15A dedicated circuit |
| Warranty | Lifetime frame and motor, 3 years parts, 1 year labor |
| Additional Features | Water bottle holder, accessory tray, cooling fan |
| Maintenance | Lubricate belt every 3 months; clean after each use |
| Safety Features | Safety key, automatic shutoff when idle |
Frequently Asked Questions - XT685ENT Spirit Fitness
User questions about XT685ENT Spirit Fitness
0 question about this device. Answer the ones you know or ask your own.
Ask a new question about this device
Download the instructions for your Treadmills in PDF format for free! Find your manual XT685ENT - Spirit Fitness and take your electronic device back in hand. On this page are published all the documents necessary for the use of your device. XT685ENT by Spirit Fitness.
USER MANUAL XT685ENT Spirit Fitness
natural_image
Line drawing of a treadmill with control panel and display (no text or symbols)XT685ENTTREADMILL
XT685ENT_685523_OM_20240717
Online Support

If you require assistance or are experiencing issues with your Spirit Machine, please contact customer care for additional help.

1-800-258-8511
questions@spiritfitness.com
Warranty Registration

Scan to quickly and easily register your new Spirit Fitness machine.
Table of Contents
Product Registration....3
Warning / Safety Instructions
Product Labels....4
Warnings, Compliance, and Notes......5
Safety Instructions 6
Electrical Safety....7
Grounding & Location Requirements......8
Parts and Assembly
Parts Included 9
Parts of Your Treadmill....10
Pre-Assembly 11
Assembly....12
Setting Up Your Unit....16
Safety Key....18
Technology and Features
About Your Machine....19
Console Screen - Overview....20
Console Screen - Touchscreen 21
Using the Spirit+ App....22
Features 23
Touchscreen Operation 25
Heart Rate Monitoring
Heart Rate Chest Strap 29
Chest Strap Warning....30
Heart Rate Exertion 31
Programs
Programs Intro....33
Programs 34
Maintenance
Maintenance & Care....43
Belt & Deck Cleaning 47
Exploded View Diagram 48
Parts List....49
Warranty & Troubleshooting
Warranty 53
Troubleshooting....56
PRODUCT REGISTRATION
Congratulations on your new treadmill, and welcome to the Spirit Fitness family!
Thank you for your purchase of this quality unit from Spirit Fitness. Your new unit was manufactured by one of the leading fitness manufacturers in the world and is backed by one of the most comprehensive warranties available. Through your dealer, Spirit Fitness will do all we can to make your ownership experience as pleasant as possible for many years to come.
If not purchased direct from Spirit Fitness, the local dealership where you purchased this unit is your administrator for all Spirit Fitness warranty and service needs. Their responsibility is to provide you with the technical knowledge and service personnel to make your experience more informed and any difficulties easier to remedy.
Please take a moment at this time to record the name of the dealer, their telephone number, and the date of purchase below to make any future, needed contact easy. We appreciate your support and we will always remember that you are the reason that we are in business.
| Serial Number | |
| Date of Purchase | |
| Dealer / Place of Purchase |
WARRANTY REGISTRATION

Use your smartphone to scan the QR code above to quickly and easily register your new Spirit Fitness machine.
You can also go to spiritfitness.com/warranty under the Support tab to register online.
Version: 10.0
Revision: 07/17/2024
PRODUCT LABELS


SERIAL NUMBER STICKER
This sticker will be found on the rear of the motor cover. Please record the number below the barcode for the purpose of registering your treadmill's warranty.
SAFETY WARNING STICKER
This sticker will be found on the interior side of your treadmill's upright. The same warning can be found in this manual. Please read and be aware of the precautions before operating your unit.
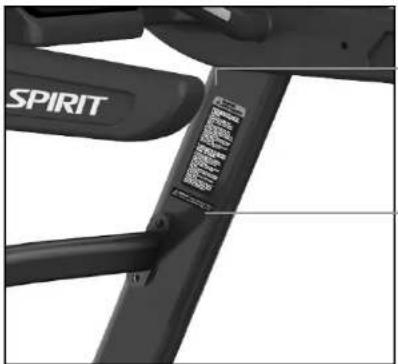
natural_image
Close-up of a black sports bike leg with 'SPIRIT' branding and a small label on the side (no readable text beyond logo)WARNING: Cancer and Reproductive Harm - www.P65Warnings.ca.gov
PROPOSITION 65 WARNING
This sticker will be found on the interior side of your treadmill's upright. The State of California requires us to inform you that this unit was manufactured using chemicals that could cause harm with improper use.

WARNING AVERTISSEMENT
SERIOUS INJURY COULD OCCUR IF THESE PRECAUTIONS ARE NOT OBSERVED.
- Consult your physician before use.
- Stop immediately if you become dizzy or experience chest pains and consult your physician.
Heart Rate monitoring systems can be inaccurate; use them for reference only
Read all warnings on the unit and be properly instructed or read the Owner's Manual on how to use before beginning. - Inspect this machine for damage prior to use.
- Keep body, clothing, and fitness accessories clear of moving parts.
- Risk of personal injury – Keep children under the age of 13 away from machine.
This product has been certified to meet the following standards:
- FCC part 15
• UL - Bluetooth (with FTMS)
This device complies with part 15 of the FCC Rules. Operation is subject to the following two conditions: (1) this device must not cause harmful interference, and (2) this device must not accept any interference received, including interference that may cause undesired operation.
NOTE: This equipment has been tested and found to comply with the limits for a Class B digital device, pursuant to Part 15 of the FCC Rules. These limits are designed to provide reasonable protection against harmful interference in a residential installation. This equipment generates, uses and can radiate radio frequency energy and, if not installed and used in accordance with the instructions, may cause harmful interference to radio communications. However, there is no guarantee that interference will not occur in a particular installation. If this equipment does cause harmful interference to radio or television reception, which can be determined by turning the equipment off and on, the user is encouraged to try to correct the interference by one or more of the following measures:
- Reorient or relocate the receiving antenna.
- Increase the separation between the equipment and receiver.
- Connect the equipment to an outlet on a circuit different from that to which the receiver is connected.
- Consult the dealer or an experienced radio/TV technician for help.
CAUTION:
- To comply with FCC RF exposure compliance requirements, a separation distance of at least 20 cm must be maintained between the antenna of this device and all persons.
- This transmitter must not be co-located or operating in conjunction with any other antenna or transmitter
SAFETY INSTRUCTIONS
When using an electrical appliance, basic precautions should always be followed, including the following:
Read all instructions before using this appliance.

DANGER - To reduce the risk of electric shock:
Always unplug this appliance from the electrical outlet immediately after using and before cleaning.

WARNING - To reduce the risk of burns, fire electric shock, or
injury to persons:
- An appliance should never be left unattended when plugged in. Unplug from outlet when not in use, and before putting on or taking off parts.
- Do not operate under blanket or pillow. Excessive heating can occur and cause fire, electric shock, or injury to persons.
- This exercise equipment is not intended for use by persons with reduced physical, sensory or mental capabilities, or lack of experience and knowledge.
- Use this appliance only for its intended use as described in this manual. Do not use attachments not recommended by the manufacturer.
- Never operate this appliance if it has a damaged cord or plug, if it is not working properly, if it has been dropped or damaged, or dropped into water. Return the appliance to a service center for examination and repair.
- Do not carry this appliance by supply cord or use cord as a handle.
- Keep the cord away from heated surfaces.
- Never operate the appliance with the air openings blocked. Keep the air openings free of lint, hair, and the like.
-
Never drop or insert any object into any opening.
-
Do not use outdoors.
- Do not operate where aerosol (spray) products are being used or where oxygen is being administered.
- Connect this appliance to a properly grounded outlet only. See Grounding Instructions.
- The appliance is intended for household use.
- To disconnect, turn all controls to the off position, then remove the plug from the outlet.
- Do not operate equipment on deeply padded, plush or shag carpet. Damage to both carpet and equipment may result.
- Before beginning this or any exercise program, consult a physician. This is especially important for persons over the age of 35 or persons with pre-existing health conditions.
- Keep hands away from all moving parts.
- The pulse sensors are not medical devices. Various factors, including the user's movement, may affect the accuracy of heart rate readings. The pulse sensors are intended only as exercise aids in determining heart rate trends in general.
- Do not attempt to use your equipment for any purpose other than for the purpose it is intended.
- Wear proper shoes. High heels, dress shoes, sandals or bare feet are not suitable for use on your equipment. Quality athletic shoes are recommended to avoid leg fatigue.
- User Weight Limit: 425 lbs.

Please ensure that you review and adhere to the user weight restrictions and power requirements of your new machine. Failure to do so may result in serious injury or damage to your machine.
ELECTRICAL SAFETY

WARNING!
Route the power cord away from any moving part of the unit including the elevation mechanism and transport wheels.
NEVER remove any cover without first disconnecting AC power. If voltage varies by ten percent (10%) or more, the performance of your unit may be affected. Such conditions are not covered under your warranty. If you suspect the voltage is low, contact your local power company or a licensed electrician for proper testing.
NEVER expose this unit to rain or moisture. This product is NOT designed for use outdoors, near a pool or spa, or in any other high humidity environment. The temperature specification is 40 degrees C, and humidity is 95%, non-condensing (no water drops forming on surfaces).
Circuit breakers: Avoid AFCI/GFCI circuit breakers if possible. These breakers may trip occasionally during exercise because of the high inrush currents of the unit drive electronics and motor. This is an issue that affects all unit brands. New laws in your area may require these breakers. If you do have these breakers and outlets in your home, and are experiencing nuisance tripping, you should check if there are any other devices plugged into the same circuit. Some examples of devices that may also cause tripping are fluorescent lights with electronic ballasts, coffee maker, space heater, hair drier.
Optimally the unit should be the only device plugged into the circuit. Our units have surge suppressors built in to help avoid nuisance tripping. We have tested several AFCI/GFCI breakers and outlets with our products. Brands we have tested are: Eaton (Cutler Hammer Series), Leviton (Smart lock pro) and Schneider Electric (Canadian home series). These breakers do not trip in our testing, when connected to our units, as long as no other devices are plugged into the same circuit.
- NEVER operate this unit without reading and completely understanding the results of any operational change you request from the computer.
- Understand that changes in speed and incline do not occur immediately. Set your desired work level on the computer console and release the adjustment key. The computer will obey the command gradually.
- NEVER use your unit during an electrical storm. Surges may occur in your household power supply that could damage unit components. Unplug the unit during an electrical storm as a precaution.
- Use caution while participating in other activities while walking on your unit; such as watching television, reading, etc. These distractions may cause you to lose balance which may result in serious injury.
- Do not use excessive pressure on console control keys. They are precision set to function properly with little finger pressure.
GROUNDING & LOCATION REQUIREMENTS
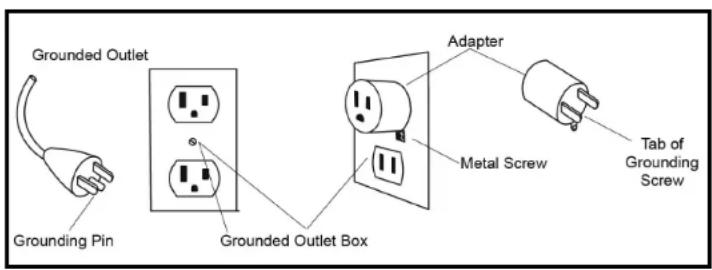
This product must be grounded. If the unit should malfunction or breakdown, grounding provides a path of least resistance for electric current, reducing the risk of electric shock. This product is equipped with a cord having an equipment-grounding plug. The plug must be plugged into an appropriate outlet that is properly installed and grounded in accordance with all local codes and ordinances.

DANGER - Improper connection of the equipment-grounding
conductor can result in a risk of electric shock. Check with a qualified electrician or serviceman if you are in doubt as to whether the product is properly grounded. Do not modify the plug provided with the product if it will not fit the outlet; have a proper outlet installed by a qualified electrician.
This product is for use on a nominal 110-volt circuit, and has a grounding plug that looks like the plug illustrated below. A temporary adapter that looks like the adapter illustrated below may be used to connect this plug to a 2-pole receptacle as shown below if a properly grounded outlet is not available. The temporary adapter should be used only until a properly grounded outlet, (shown below) can be installed by a qualified electrician. The green colored rigid ear-lug, or the like, extending from the adapter, must be connected to a permanent ground such as a properly grounded outlet box cover. Whenever the adapter is used, it must be held in place by a metal screw.
Location Requirements
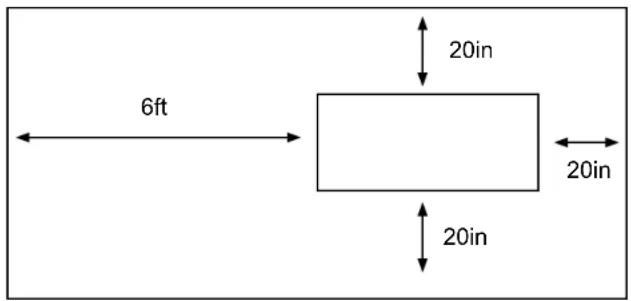
After assembling your treadmill, you'll need to make sure you've installed it in a safe area.
- We recommend that you leave an area of at least 20in on the front, and sides of your machine. The front of the unit is where the motor is located.
- We recommend that you leave an area of at least 6ft behind the treadmill.
• Install your treadmill in an area where children and pets cannot access it.
• Always keep the area around your treadmill clear of furniture, exercise equipment and other debris. - Do not install your treadmill on deeply padded, plush, or shag carpet.
PARTS INCLUDED
TOOLS INCLUDED:
□ L Allen Wrench
☐ Phillips Head Screwdriver
☐ Combination M5 Allen Wrench & Phillips Head Screwdriver
PARTS INCLUDED:
1 Main Frame
□ 2 Uprights
2 Console Mast Covers
2 Frame Base Covers
1 Console
1 Deck
1 Power Cord
□ 1 Lubricant
1 Hardware Kit
STEP 1.

79. 3/8" ×19 × 1.5T
Flat Washer (6 pcs)

86..∅10 × 2.0T
Split Washer (6 pcs)

100. 5/16" × 3/4" Button Head Socket Bolt (4pcs)

124.8 × 23 × 1.5T
Curved Washer (4 pcs)
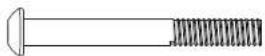
123. 3/8" x 2-1/2" Button Head Socket Bolt (6 pcs)
STEP 2.

86. ∅10 × 2T
Split Washer (4 pcs)
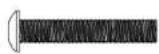
91. 3/8" x 1-1/2" Button Head Socket Bolt (4 pcs)

165. M5 x 45L Phillips Head Screw (4 pcs)
STEP 3.

100. 5/16" x 3/4"
Button Head Socket Bolt (4 pcs)
STEP 4.

127. M5 × 10L Phillips Head Screw (4 pcs)

125. 3.5 x 16L Sheet Metal Screw (8 pcs)

166. M5 × 25L Phillip Head Screw (3 pcs)
natural_image
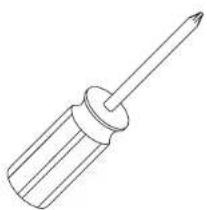
Line drawing of a screwdriver with a pointed tip (no text or symbols)126. Phillips Head Screw Driver

103. M5_ Combination M5 Allen Wrench & Phillips Head Screw Driver

104. M6_L Allen Wrench
PARTS OF YOUR TREADMILL

A. Tablet Holder
B. TouchScreen
C. Accessory tray
D. Console buttons
E. Safety stop key
F. Cup holders
G. Hand pulse sensors
H. Handlebar Speed/Incline
I. Uprights
J. Motor cover
K. Belt
L. Side rails
M. Levelers
N. Transport wheels
PRE-ASSEMBLY
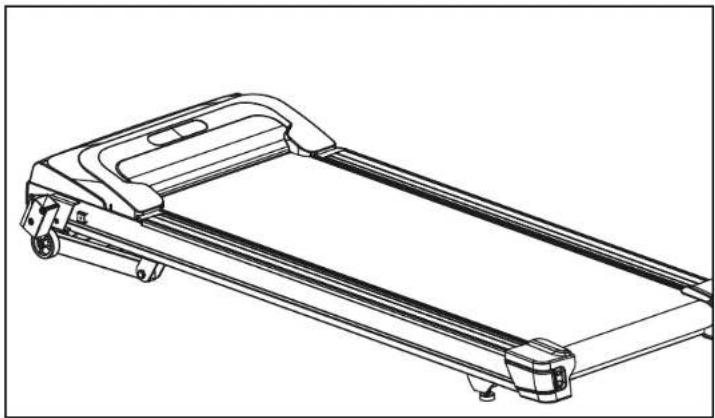
- Cut the straps, then lift the box over the unit and unpack.
- Carefully remove all parts from the carton and inspect for any damage or missing parts. If parts are damaged or missing, contact your dealer immediately.
- Locate the hardware package. Remove the tools first.
- Remove the hardware for each step as needed to avoid confusion. The numbers in the instructions that are in parenthesis (#) are the item number from the assembly drawing for reference.
natural_image
Line drawing of a treadmill with frame and wheels (no text or symbols)ASSEMBLY
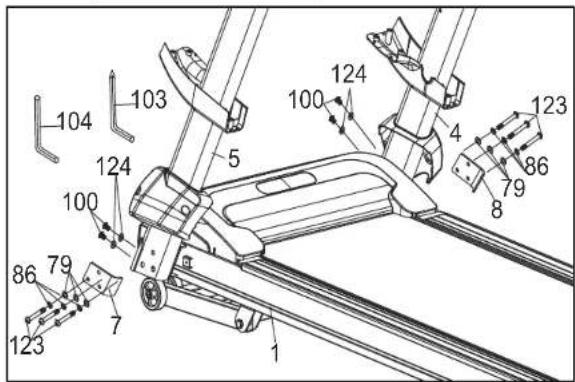
- Remove 4 pcs 3/8" × 2 1/4" Flat Head Socket Bolts (102) using the L Allen Wrench (104) and then remove the 2 Fixing Plate Stabilizers (101) on both sides of the unit.
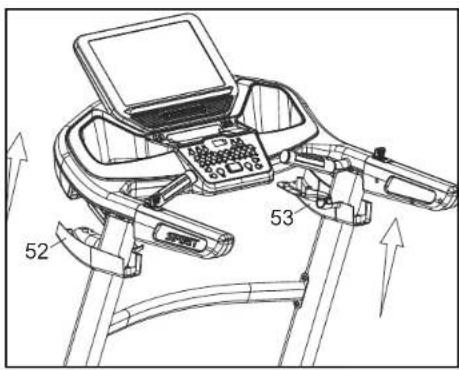
Install the Right and Left Uprights (4,5) into the Upright Cover (L,R) (52,53) and Console Mast Side Cap (L & R)(98,99). Connect the Computer Cable (Middle) (33) and Computer Cable (Lower)(32).
Insert the Right and Left Uprights (4, 5) onto the Mainframe (1) and use Combination Allen Wrench Head Screw Wrench (103) to tighten four 5/16" × 3/4" Button Head Socket Bolts (100) together with four ∅8 × 23 × 1.5T Curved Washers (124) then continue to use L Allen Wrench (104) to tighten the left and right Gusset (7, 8) with six 3/8" × 2 1/2" Button Head Socket Bolts (123) together with six ∅3/8" × ∅19 × 1.5T Flat Washers (79) and six ∅10 × 2.0T Spring Washers (86).


ASSEMBLY - CONTINUED
- Connect the Speed Cable (170-7) into the Handrail Wire (36-18).
Connect the Incline Cable (170-8) into the Handrail Wire (36-18).
Connect the Computer Cable(Middle) (33) and Computer Cable (Middle & Upper) (33-01).
Insert Console Assembly (36) into the Right and Left Uprights (4) and (5) and secure with 4 pcs of 3/8"×1 1/2" Button Head Socket Bolts (91) with 4 pcs of ∅ 10 × 2.0T Split Washers (86) by using L Allen Wrench (104).
NOTE: Please DON'T Tighten All Screws
Connect 400/350mm Handrail Wire (37-19) with Handrail Wire (36-18) and connect 12P Connecting Wire (37-12) with 12P Connecting Wire (36-16) and connect 6P
Connecting Wire (37-13) with 6P Connecting Wire (36-17) and connect 5P Connecting Cable (Upper) (37-28) with Connecting Cable (Middle & Upper) (33-01) and connect Ground Wire (37-20) with Console Ground Wire (180).
Place Console Assembly (Top) (37) to the Console Assembly (Bottom) (36) and use the Phillips Head Screw Driver (126) to tighten 4 pcs of M5 × 45mm Phillips Head Screws (165).


ASSEMBLY - CONTINUED
- Install the Handrails Support (3) between the Uprights (R, L)(4,5) with t he 4pcs of 5 5/16" x 3/4" Button Head Socket Bolt s (100) by using the Combination Allen Wrench Head Screw Wrench (103).

ASSEMBLY - CONTINUED
- Install Console Mast Side Cap (R) and (L), (99) and (98), on the Main Frame (1) and secure with 4 pcs of M5 × 10mm_Phillips Head Screws (127) by using the Phillips Head Screw Driver (126).
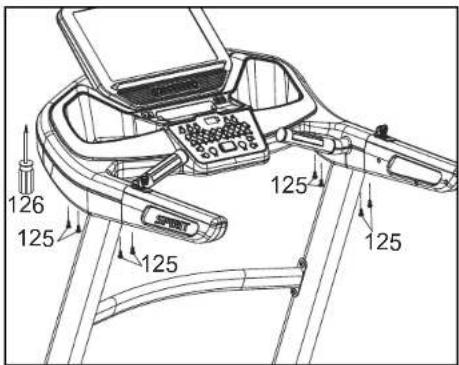
Install Upright Cover(L) and (R),(52) and (53), on the right and left Uprights (4) and (5) and Console Support (6) with 8 pcs of ∅ 3.5 × 16L_Sheet Metal Screws (125) by using Phillips Head Screw Driver (126).
Place the Tablet Holder (169) on Console Assembly(Top) (37) and use the Phillips Head Screw Driver (126) to tighten 3 pcs of M5 × 25mm Phillips Head Screw (166).
NOTE: Please Tighten All Screw After All Components Assembly Complete.



SETTING UP YOUR TREAD
Leveling
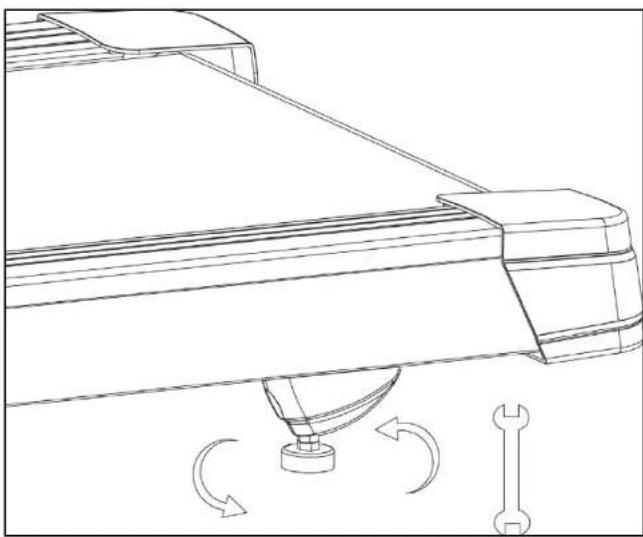
Use a M14 Wrench to adjust the height of the Leveling Feet.
natural_image
Technical line drawing of a mechanical device with rotating components and directional arrows indicating motion (no text or symbols)Plugging in and Powering On
Power the unit on by plugging it into an appropriate wall outlet, then turn on the power switch located at the front of the treadmill below the motor hood. Ensure that the Safety Key is installed, as the treadmill will not power on without it.
When it is first powered on, the console will perform an internal self-test. During this time all the lights will turn on. When the lights go off, the Message Window will show a software version (i.e.: VER 1.0) and the Distance window will display an odometer reading. The odometer reading displays how many virtual miles the fitness treadmill has gone. The Time window displays how many hours the treadmill has been used. The odometer and time will remain displayed for only a few seconds then the console will go to the startup display. The dot matrix display will be scrolling through the different workout profiles and the Message Window will scroll the start-up message. You may now begin to use the console.

natural_image
Line drawing of a mechanical or electrical component with no visible text, numbers, or symbolsSETTING UP YOUR TREAD - CONTINUED
Moving The Treadmill
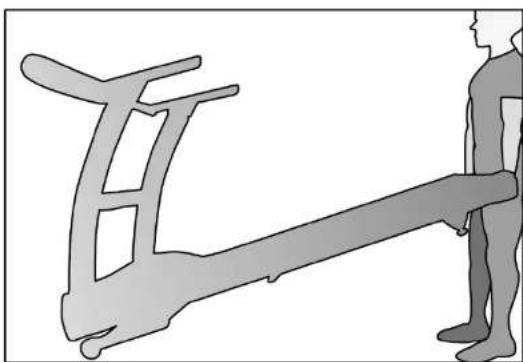
Carefully lift the treadmill at the rear roller area, grasping the two end caps, and roll the treadmill away.
natural_image
Silhouette of a person standing beside a large mechanical device (no text or symbols visible)SAFETY KEY

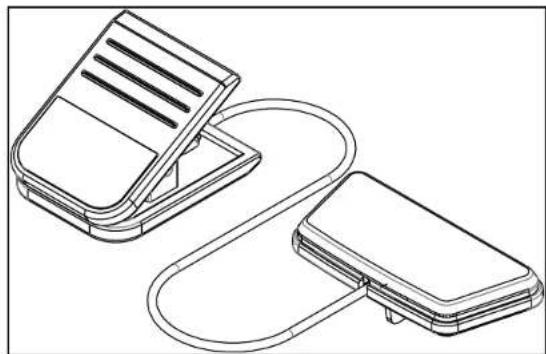
fety tether cord is provided with this unit.
It is a simple magnetic design that should be used at all times. It is for your safety should you fall or move too far back on the tread-belt.
Pulling this safety tether cord will stop tread-belt movement.
To Use:
- Place the magnet into position on the round metal portion of the console control head. Your unit will not start and operate without this. Removing the magnet also secures the unit from unauthorized use.
- Fasten the plastic clip onto your clothing securely to ensure good holding power. Note: The magnet has strong enough power to minimize accidental, unexpected stopping. The clip should be attached securely to make certain it does not come off. Be familiar with its function and limitations. The unit will stop, depending on speed, with a one to two step coast anytime the magnet is pulled off the console. Use the Stop / Pause switch in normal operation.
natural_image
Line drawing of two electronic devices connected by a cable, no text or symbols present
natural_image
Line drawing of a device with connectors and a cable inserted, no text or symbols presentABOUT YOUR MACHINE
Always use care and caution when operating your machine. Follow instruction in this manual to ensure safe operation and maintenance of your treadmill

Your new Spirit Fitness treadmill has Bluetooth connectivity to give you access to the most advanced workout experiences available. Follow the instructions on page 21, 22 and 25 to learn more about using the Bluetooth capabilities to their fullest potential.

Downloading the Spirit+ app will help unlock more features - such as tracking workouts and sharing data via Google
Fit and Apple Fitness. Simply search for "Spirit+" in the app store on your smartphone or tablet, or scan the QR code on the right
Did you know that you can personalize your experience with your new treadmill? Create a profile and save custom work-out programs by following the instructions on page 36.

The Spirit Fitness app is available on Google Play and the Apple App Store. Scan the QR Code below, and quickly and easily sign up to start taking your workout experience to a whole new level.

Be sure to follow Spirit Fitness on your favorite social media platforms to view and share the latest fitness videos, images, and news.
facebook.com/SpiritFitnessProducts
www.instagram.com/spirit/
youtube.com/user/SpiritFitnessOnline
CONSOLE SCREEN - OVERVIEW

TOUCHSCREEN

USING THE SPIRIT+ APP
In order to help you achieve your exercise goals, your new exercise machine comes equipped with a Bluetooth® transceiver that will allow it to interact with selected phones or tablet computers via the Spirit+ App. Just download the free Spirit+ App from the Apple Store or Google Play, and then follow the instructions in the App to sync with your exercise machine.
Press the "DISPLAY" button from the APP to view the display of the current workout data. When your exercise is complete, choose "END & SAVE WORKOUT" to store the workout data. The Spirit + App also allows you to sync your workout data with one of many fitness cloud sites we support: Apple Health, Google Fit, MapMyFitness or Fitbit, with more to come.
- Download the App by scanning the QR code on the right.
- Open the App on your device (phone or tablet) and make sure Bluetooth ® is enabled on your device (phone or tablet).
- In the App click the Bluetooth ® icon to search for your Spirit + equipment.
- Under the Bluetooth® scan result list, select the machine for connect. When the App and equipment are synced, the Bluetooth® icon on the equipment's console display will light up. Click "DISPLAY", you may now start using your Spirit + App.
- When your exercise is complete, choose "END & SAVE WORKOUT" to store the workout data. You will be prompted to sync your data with each available fitness cloud site. Please note, you will have to download the applicable compatible fitness App, such as Apple Health, Google Fit, MapMyFitness, Fitbit, etc., in order for the icon to be active and available.
Note: Your device will need to be running on a minimum operating system of IOS 13.1 or Android 8.0 for the spirit + App to operate properly.
The exercise equipment can also play music wirelessly via Bluetooth®. Turn on your mobile phone or tablet's Bluetooth® function. Search for the name "Bt-speaker" in your device's Bluetooth® menu. Tap to connect. Now your device can transmit music to the exercise equipment.



The icon lights up and the heart rate is displayed when successfully connected to a Bluetooth® heart rate chest strap. The icon will be off when the Bluetooth® heart rate chest strap is disconnected.
FEATURES
Handlebar Speed and Incline Controls
The XT685ENT treadmill allows you to make speed and incline changes using the speed and incline controls located on the handlebar. You can also choose to turn these off if you frequently hold on to these rails. This is achieved by pressing the Handrail Control Button which is located on the console next to the child lock button. When the indicator light is lit, the handlebar speed and incline controls are disabled. This allows you to use the full length of the handrails without fear of activating the speed or incline controls.
Direct Speed & Incline Buttons
You are able to set your speed and incline setting quickly by pressing the buttons on the console. Simply choose the desired speed and/or incline level from the console and the treadmill will automatically adjust to that level. This saves time because you don't have to press and hold or hold a button down until reaching the desired value.
Child Lock
Your machine is equipped with a child lock feature which disables the buttons on the console to prevent unauthorized use. To turn on, press Child Lock, then LED will light up. The treadmill will be in idle mode and cannot be operated. You must hold Child Lock for 3 seconds to unlock. After the LED light turns off, then press START to operate.
Pulse Grip Feature
Pulse (heart rate) on the screen shows the current value of the heart beats per minute. You must hold both left and right stainless steel sensors to measure the pulse. The pulse value will be shown on the screen continuously. You may use the hand pulse sensors while in Heart Rate Control. It will also pick up wireless heart rate transmitters that are Polar and Bluetooth compatible.
Note: Refer to Important Safety Instructions (page 6) concerning Pulse Grip operation.
Built-in Fan
The console includes a built-in fan to help keep you cool. To turn the Fan on, press the key on the left side of the console.
Audio Jack
There is an Audio output Jack on the front of the console and built-in speakers. The output jack is a headphone jack for private listening.
FEATURES - CONTINUED
Charge Portable Devices with USB port
Charge your personal device during your workout using the fitness equipment's on-console USB port. To charge your mobile electronics make sure the fitness equipment power is on.
Step 1: Connect your USB charging cable (not included) to the USB Power Port and to your device.
Step 2: Check to make sure your device icon indicates it is charging.
NOTE:
- USB charging cable is not included, make sure compatible USB charging cable is being used.
- The USB port on the console is capable of powering USB devices. It provides up to 5Vdc/1.0 amp of power and meets USB 2.0 regulations. You will not be able to save your workout data to a USB via this port; it is used for charging purposes only.
- ** Your device "charging" icon may or may not indicate it is charging. Depending on the amount of current your particular device requires for charging the icon may not be on but your device is still charging, but possibly at a lower charge rate.

natural_image
Close-up of a car's front panel showing a white horizontal bar and a circular button (no text or symbols visible)Incline
- Incline may be adjusted anytime after belt movement.
- Press and hold the +/- or Up/Down keys (console or handrail) to achieve desired level of effort. You may also choose a more rapid increase/decrease by simply pressing the desired level on the console.
- The display will indicate incline percent increases in increments of 0.5 as adjustments are made.
- The incline will return to zero unless the main power switch or safety key are turned off while at a higher setting.
TOUCHSCREEN
Use the touchscreen console to select from a variety of preset workout programs and fitness tests, and to enjoy media content of your choice while on the go.
Getting Started
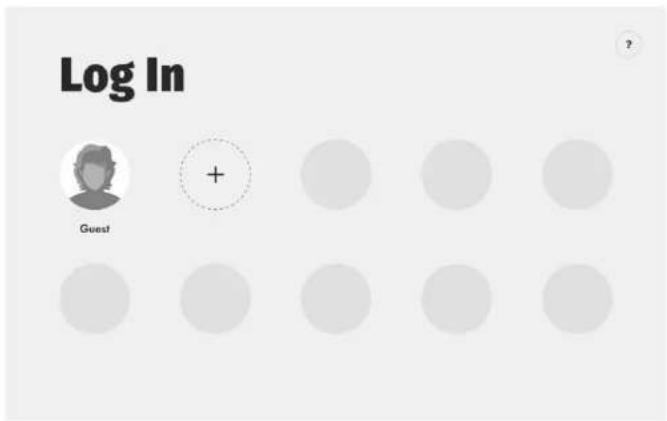
When launched for the first time, the console will prompt you to either enter as a guest, or create a new profile. It is recommended to set up your own profile: it allows your machine to remember your physical parameters and favorite programs; you will have your own custom programs with adjustable intensity patterns, and your workout records can be synchronized with the SPIRIT+ mobile app. Tap + to create a new profile. A maximum of 9 profiles can be created. Each profile can be protected with a passcode.
To link a SPIRIT+ account, scan the QR code on the console screen to download the mobile app first. Once the app is installed and the registration is complete, press "Link" on the bottom of the console screen, then open the QR code scanning camera in your SPIRIT+ app, and scan the QR code once again to link your local profile with the SPIRIT+ account. Please keep in mind that your console profile cannot be linked to multiple SPIRIT+ accounts at the same time. If you skip this step, you can access it again later in Profile settings.

TOUCHSCREEN - CONTINUED
Home Screen
The main screen of the Training section displays an overview of your activity, and offers shortcuts to the most frequently used training modes: an immediate Start, a manually controlled timed workout ("Set Timer"), and 3–6 programs that you have marked as your favorites are arranged on this page for your quick access (the amount depends on your display size).
If in the Guest mode, you can set your age and weight here; it will help the machine calculate your workout summary more accurately.

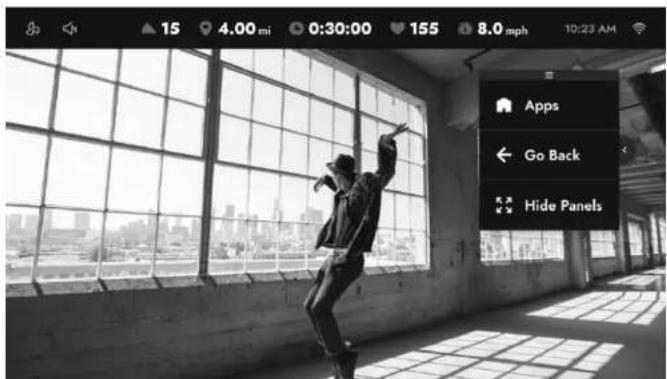
Tap on the right tab of the bottom panel to access the Media section. Choose from a variety of pre-installed third party Apps, or use the Mirroring function to cast the content from your smartphone directly to the console screen. For detailed instructions, press the ? icon.
Once the content is on, use the floating panel for navigation and operating full screen mode. Touch the panel's top edge and drag the panel around the screen to find the perfect place for it, where it will not prevent you from interacting with the content. Press Hide Panels to enter the full screen mode without stats on the top and tabs on the bottom. Press Show Panels to bring the stats and tabs back up. Use the arrow button on the right side of the panel to hide & show the text labels: it allows to further minimize the panel's size. Press "Apps" to go back to the content sources selection.

Training
Media
Training
Media
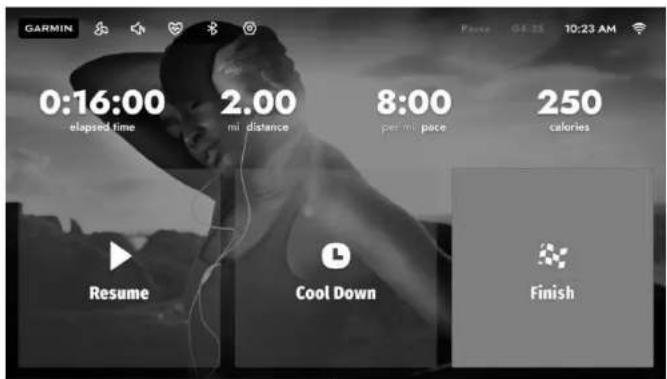
Once the workout has started, after the short countdown the console will appear in its workout mode. Warm-up and cool down phases may be skipped by pressing "Skip".
During the workout, switch between Stats, Charts and Track views of the Training section, or go to Media section to enjoy your favorite media content. In the Stats view, you can select parameters you would like to display by tapping on the number.
Please use physical keys to adjust speed and incline. Press the physical "STOP" key to pause the workout. Here, you can get back to running, start a cool down, or end your workout and see the summary. After 5 minutes of inactivity in the Pause mode, the workout will end automatically.

Training
Media
Training
Media
HEART RATE CHEST STRAP\* (NOT INCLUDED)
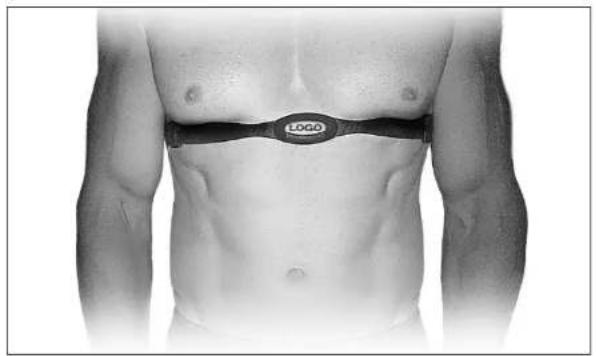
- Attach the transmitter to the elastic strap using the interlocking key.
- Adjust the strap as tightly as possible as long as the strap is not too tight to remain comfortable.
- Position the transmitter with the logo centered in the middle of your torso facing away from your chest (some people must position the transmitter slightly left of center). Attach the final end of the elastic strap by inserting the round end and, using the locking parts, secure the transmitter and strap around your chest.
- Position the transmitter directly below the pectoral muscles.
- Sweat is the best conductor to measure very minute heart beat electrical signals. However, plain water can also be used to pre-wet the electrodes (2 ribbed oval areas on the reverse side of the belt and both sides of the transmitter). It's also recommended that you wear the transmitter strap a few minutes before your work out. Some users, because of body chemistry, have a more difficult time in achieving a strong, steady signal at the beginning. After "warming up", this problem lessens.
- Your workout must be within range - distance between transmitter/receiver - to achieve a strong steady signal. The length of range may vary somewhat but generally stay close enough to the console to maintain good, strong, reliable readings. Wearing the transmitter directly on bare skin assures you of proper operation. If you wish, you may wear the transmitter over a shirt. To do so, wet the areas of the shirt that the electrodes will rest upon.
Note: The transmitter is automatically activated when it detects activity from the user's heart. Additionally, it automatically deactivates when it does not receive any activity. Although the transmitter is water resistant, moisture can have the effect of creating false signals, so you should take precautions to completely dry the transmitter after use to prolong battery life (estimated transmitter battery life is 2500 hours). The replacement battery is Panasonic CR2032.
natural_image
Front view of a muscular torso wearing a LOGO medical device on the chest (no text or symbols visible)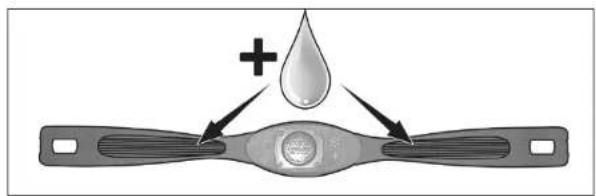
natural_image
Diagram of a mechanical component with a droplet and plus sign, no text or symbols presentCHEST STRAP WARNING\* (NOT INCLUDED)
Erratic Operation
Caution! Do not use this treadmill for Heart Rate programs unless a steady, solid Actual Heart Rate value is being displayed. High, wild, random numbers being displayed indicate a problem.
Areas to look for interference which may cause erratic heart rate:
- Microwave ovens, TV's, small appliances, etc.
- Fluorescent lights.
- Some household security systems.
- Perimeter fence for a pet.
- Some people have problems with the transmitter picking up a signal from their skin. If you have problems try wearing the transmitter upside down. Normally the transmitter will be oriented so the Spirit Fitness logo is right side up.
- The antenna that picks up your heart rate is very sensitive. If there is an outside noise source, turning the whole machine 90 degrees may de-tune the interference.
- Another Individual wearing a transmitter within 3' of your machine's console.
If you continue to experience problems contact Spirit Fitness.
HEART RATE EXERTION
The old motto, “no pain, no gain”, is a myth that has been overpowered by the benefits of exercising comfortably. A great deal of this success has been promoted by the use of heart rate monitors. With the proper use of a heart rate monitor, many people find that their usual choice of exercise intensity was either too high or too low and exercise is much more enjoyable by maintaining their heart rate in the desired benefit range.
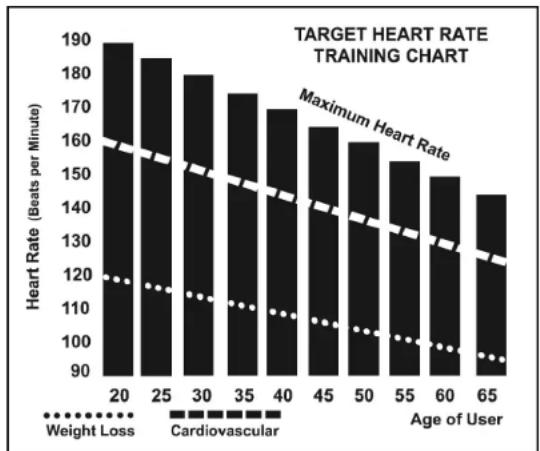
To determine the benefit range in which you wish to train, you must first determine your Maximum Heart Rate. This can be accomplished by using the following formula: 220 minus your age. This will give you the Maximum Heart Rate (MHR) for someone of your age. To determine the effective heart rate range for specific goals you simply calculate a percentage of your MHR. Your Heart rate training zone is 50% to 90% of your maximum heart rate. 60% of your MHR is the recommended for burning fat while 80% is recommended for strengthening the cardio vascular system. This 60% to 80% is the zone to stay in for maximum benefit.
For someone who is 40 years old their target heart rate zone is calculated:
220 - 40 = 180 (maximum heart rate)
180 x .6 = 108 beats per minute (60% of maximum)
180 X .8 = 144 beats per minute (80% of maximum)
So for a 40 year old the training zone would be 108 to 144 beats per minute.
If you enter your age during programming the console will perform this calculation automatically. Entering your age is used for the Heart Rate programs. After calculating your MHR you can decide upon which goal you would like to pursue.
The two most popular reasons for, or goals, of exercise are cardiovascular fitness (training for the heart and lungs) and weight control. The black columns on the chart represent the MHR for a person whose age is listed at the bottom of each column. The training heart rate, for either cardiovascular fitness or weight loss, is represented by two different lines that cut diagonally through the chart. A definition of the lines' goal is in the bottom left-hand corner of the chart. If your goal is cardiovascular fitness or if it is weight loss, it can be achieved by training at 80% or 60%, respectively, of your MHR on a schedule approved by your physician. Consult your physician before participating in any exercise program.
With this Spirit Fitness unit you may use the heart rate monitor feature without using the Heart Rate program. However, when using the heart rate monitor feature in conjunction with the Heart Rate programs, the machine will automatically adjust speed or incline to maintain the desired heart rate.
bar
| Age of User | Weight Loss | Cardiovascular | | ----------- | ----------- | -------------- | | 20 | 190 | 160 | | 25 | 185 | 155 | | 30 | 180 | 150 | | 35 | 175 | 145 | | 40 | 170 | 140 | | 45 | 165 | 135 | | 50 | 160 | 130 | | 55 | 155 | 125 | | 60 | 150 | 120 | | 65 | 145 | 115 |HEART RATE - PERCEIVED EXERTION
Heart rate is important but listening to your body also has a lot of advantages. There are more variables involved in how hard you should workout than just heart rate. Your stress level, physical health, emotional health, temperature, humidity, the time of day, the last time you ate and what you ate all contribute to the intensity at which you should workout. If you listen to your body it will tell you all of these things.
The rate of perceived exertion (RPE), also known as the Borg scale, was developed by Swedish physiologist G.A.V. Borg. This scale rates exercise intensity from 6 to 20 depending upon how you feel or the perception of your effort. The scale is as follows:
Rating Perception of Effort
| 6 Minimal | |
| 7 Very, Very Light | |
| 8 Very, Very Light + | |
| 9 Very Light | |
| 10 Very Light + | |
| 11 Fairly Light | |
| 12 Comfortable | |
| 13 Somewhat Hard | |
| 14 Somewhat Hard + | |
| 15 Hard | |
| 16 Hard + | |
| 17 Very Hard | |
| 18 Very Hard + | |
| 19 Very, Very Hard | |
| 20 Maximal |
You can get an approximate heart rate level for each rating by simply adding a zero to each rating. For example a rating of 12 will result in an approximate heart rate of 120 beats per minute. Your RPE will vary depending on the factors discussed earlier. If your body is strong and rested, you will feel strong and your pace will feel comfortable. When your body is in this condition, you are able to train harder and the RPE will support this. If you are feeling tired and sluggish, it is because your body needs a break. In this condition, your pace will feel difficult. Again, this will show up in your RPE and you will train at the proper level for that day.
PROGRAMS INTRO
Workout Programs
To access all available categories of programs, press "All Programs" on the Home screen. Once inside, switch between categories using the tabs on the top of the screen: Preset, Targets, Fitness Tests, Custom and Favorites.
Tap on any of the program cards to open a Program Setup page, where you can learn more about the program, set properties of your workout, or keep browsing by pressing on the arrow buttons in the upper top right corner of the screen. To adjust workout parameters, you can drag the ruler, tap on the + and - buttons, or tap on the number to open a numpad and input the value directly.

PROGRAMS
Manual
Manual (Timer) program is a timed workout with speed and incline controlled manually at any time during the run.

PROGRAMS - PRESET
Hill, Fatburn, Cardio, Strength, HIIT
The programs HILL, FATBURN, CARDIO, STRENGTH, HIIT feature preset speed and incline changing patterns. The Total Time and Max Speed settings define the duration and overall intensity of your workout.
The speed and incline levels for each segment of the programs are shown in the chart on page 36. Speed values represent a percentage of the max speed that was set before start. For instance, if the max speed was set to 10.0, and the value in the chart indicates 20, it means that this segment's speed will be 2.0. If the value in the chart indicates 100, this segment's speed will be equal to the max speed you have set before the workout. Incline values are absolute.

bar
| Metric | Value | | :--- | :--- | | total time (min) | -30 | | max speed (mph) | -8.0 | | Speed | 6.0 | | Incline | 6.5 |PROGRAMS PRESET - CONTINUED
| Program War | Warm-up 1 2 3 4 | 5 6 7 | 8 9 10 | 11 12 | 13 14 | 15 16 | 17 18 | 19 20 | COLDOWN | ||||||||||||||||||||||||||||||||
| Hill | Speed | 20 | 30 | 40 | 50 63 | 63 75 | 75 | 75 | 88 | 75 | 88 | 88 | 100 | 75 | 88 | 75 | 88 | 88 | 75 | 63 | 63 | 50 | 40 | 30 | 20 | ||||||||||||||||
| Incline | 0 | 0 | 0 | 0 | 1 | 2 | 2 | 2 | 3 | 2 | 3 | 3 | 4 | 2 | 3 | 2 | 3 | 4 | 3 | 2 | 1 | 1 | 0 | 0 | 0 | 0 | |||||||||||||||
| Fatburn | Speed | 20 | 30 | 40 | 50 | 63 | 63 | 75 | 88 | 100 | 100 | 100 | 100 | 100 | 100 | 100 | 100 | 100 | 100 | 100 | 100 | 88 | 75 | 63 | 50 | 40 | 30 | 20 | |||||||||||||
| Incline | 0 | 0 | 0 | 0 | 1 | 2 | 2 | 2 | 3 | 4 | 2 | 3 | 3 | 2 | 2 | 2 | 3 | 4 | 4 | 3 | 2 | 1 | 0 | 0 | 0 | 0 | |||||||||||||||
| Cardio | Speed | 20 | 30 | 40 | 50 | 63 | 63 | 75 | 75 | 88 | 75 | 75 | 88 | 63 | 75 | 88 | 75 | 75 | 100 | 75 | 88 | 63 | 63 | 50 | 40 | 30 | 20 | ||||||||||||||
| Incline | 0 | 0 | 0 | 0 | 1 | 1 | 2 | 2 | 2 | 2 | 2 | 2 | 1 | 2 | 2 | 2 | 2 | 3 | 2 | 2 | 1 | 1 | 0 | 0 | 0 | 0 | |||||||||||||||
| Strength | Speed | 20 | 30 | 40 | 63 | 63 | 75 | 75 | 75 | 75 | 88 | 88 | 88 | 100 | 100 | 88 | 88 | 88 | 75 | 75 | 75 | 63 | 63 | 63 | 40 | 30 | 20 | ||||||||||||||
| Incline | 0 | 0 | 0 | 0 | 1 | 2 | 3 | 4 | 7 | 6 | 4 | 4 | 3 | 2 | 2 | 3 | 4 | 6 | 6 | 4 | 2 | 1 | 0 | 0 | 0 | 0 | |||||||||||||||
| HITT | Speed | 20 | 30 | 40 | 50 | 63 | 63 | 75 | 88 | 63 | 63 | 88 | 63 | 75 | 100 | 63 | 75 | 100 | 63 | 75 | 88 | 63 | 63 | 50 | 40 | 30 | 20 | ||||||||||||||
| Incline | 0 | 0 | 0 | 0 | 1 | 2 | 2 | 4 | 2 | 2 | 4 | 2 | 2 | 6 | 2 | 2 | 7 | 2 | 2 | 4 | 2 | 1 | 0 | 0 | 0 | 0 | |||||||||||||||
PROGRAMS PRESET - CONTINUED
Fusion
This program takes you through high and low intensity periods followed by strength exercises using free weights; elevation will spike in different segments. Work and recovery time can be customized for this program.
| Interval warm-up | 1 2 3 4 5 | Cooldown | ||||||||||||||||||
| Cardio | Strength | Rest | Cardio | Strength | Rest | Cardio | Strength | Rest | Cardio | Strength | Rest | Cardio | Strength | Rest | ||||||
| Speed | 1 | 2 | 3 | max | 0 | 2 | max | 0 | 2 | max | 0 | 2 | max | 0 | 2 | max | 0 | 2 | 2 | 2 |
| Incline | 0 | 0 | 0 | incline | 0 | 0 | incline | 0 | 0 | incline | 0 | 0 | incline | 0 | 0 | incline | 0 | 0 | 0 | 0 |
5K or 10K Program
The 5K or 10K programs automatically set a target distance for your workout (5 km and 10 km, respectively). On the program setup page, the console will show the estimated total time for this run based on the selected target speed.


PROGRAMS
Target Programs
Heart rate, Time, Distance, and Calories are "target" programs, that end when the target set before start is reached.
Heart Rate Program
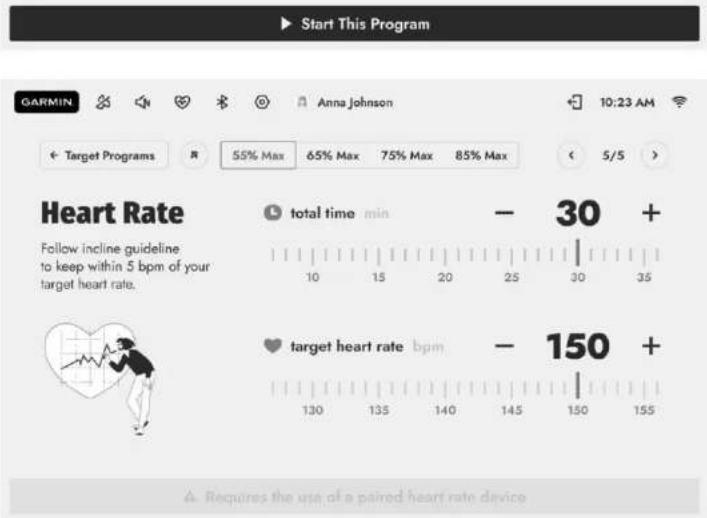
Heart Rate program uses incline to control your heart rate. The incline gradually increases until you reach your target heart rate, then adjusts automatically to keep you within 5 bpm of your goal. A heart rate monitor is required for this program.
On the program setup page, you can either set the target bpm directly or select 55%, 65%, 75% or 85% of your age-predicted maximum heart rate, allowing the machine to calculate your target automatically. When choosing the second option, make sure you have let the machine know how old you are, otherwise the calculations will be based on the default values. The program is finished when the time is up, or if your heart rate is significantly higher than the target.

PROGRAMS
Custom
Users can create up to 12 Custom programs, each with fully customizable speed and incline patterns. In the Custom tab, press "+ New program", then name your program and start editing. Mapping Speed profile is required, while Incline profile is optional. Connect dots to map your load throughout the program, from easiest on the bottom to hardest on the top. Each segment's duration depends on the selected total time — you can set it right before start.
Speed levels in the pattern are relative, and the maximum value can be set after the pattern is finished; all the segments will be adjusted proportionally. Incline values are absolute and vary from 0 to 15.


line
| x | y | |---|---| | 0 | 1 | | 1 | 1 | | 2 | 2 | | 3 | 3 | | 4 | 4 | | 5 | 5 | | 6 | 6 | | 7 | 7 | | 8 | 8 | | 9 | 9 | | 10 | 10 | | 11 | 11 | | 12 | 12 | | 13 | 13 | | 14 | 14 | | 15 | 15 | | 16 | 16 | | 17 | 17 | | 18 | 18 | | 19 | 19 | | 20 | 20 | | 21 | 21 | | 22 | 22 | | 23 | 23 | | 24 | 24 | | 25 | 25 | | 26 | 26 | | 27 | 27 | | 28 | 28 | | 29 | 29 | | 30 | 30 | | 31 | 31 | | 32 | 32 | | 33 | 33 | | 34 | 34 | | 35 | 35 | | 36 | 36 | | 37 | 37 | | 38 | 38 | | 39 | 39 | | 40 | 40 | | 41 | 41 | | 42 | 42 | | 43 | 43 | | 44 | 44 | | 45 | 45 | | 46 | 46 | | 47 | 47 | | 48 | 48 | | 49 | 49 | | 50 | 50 | | 51 | 51 | | 52 | 52 | | 53 | 53 | | 54 | 54 | | 55 | 55 | | 56 | 56 | | 57 | 57 | | 58 | 58 | | 59 | 59 | | 60 | 60 | | 61 | 61 | | 62 | 62 | | 63 | 63 | | 64 | 64 | | 65 | 65 | | 66 | 66 | | 67 | 67 | | 68 | 68 | | 69 | 69 | | 70 | 70 | | 71 | 71 | | 72 | 72 | | 73 | 73 | | 74 | 74 | | 75 | 75 | | 76 | 76 | | 77 | 77 | | 78 | 78 | | 79 | 79 | | 80 | 80 | | 81 | 81 | | 82 | 82 | | 83 | 83 | | 84 | 84 | | 85 | 85 | | 86 | 86 | | 87 | 87 | | 88 | 88 | | 89 | 89 | | 90 | 90 | | Note: The y-values are estimated based on the grid lines (x,y,z) and the dotted line y = x-y. There is no label for the data series. The y-axis label 'x' is not explicitly shown in the plot. The label 'y' is estimated based on the grid lines. The label 'z' is estimated based on the grid lines. The label 'B' is estimated based on the grid lines. The label 'C' is estimated based on the grid lines. The label 'D' is estimated based on the grid lines. The label 'E' is estimated based on the grid lines. The label 'F' is estimated based on the grid lines. The label 'G' is estimated based on the grid lines. The label 'H' is estimated based on the grid lines. The label 'I' is estimated based on the grid lines. The label 'J' is estimated based on the grid lines. The label 'K' is estimated based on the grid lines. The label 'L' is estimated based on the grid lines. The label 'M' is estimated based on the grid lines. The label 'N' is estimated based on the grid lines. The label 'O' is estimated based on the grid lines. The label 'P' is estimated based on the grid lines. The label 'Q' is estimated based on the grid lines. The label 'R' is estimated based on the grid lines. The label 'S' is estimated based on the grid lines. The label 'T' is estimated based on the grid lines. The label 'U' is estimated based on the grid lines. The label 'V' is estimated based on the grid lines. The label 'W' is estimated based on the grid lines. The label 'X' is estimated based on the grid lines. The label 'Y' is estimated based on the grid lines. The label 'Z' is estimated based on the grid lines. The label 'A' is estimated based on the grid lines. The label 'B' is estimated based on the grid lines. The label 'C' is estimated based on the grid lines. The label 'D' is estimated based on the grid lines. The label 'E' is estimated based on the grid lines. The label 'F' is estimated based on the grid lines. The label 'G' is estimated based on the grid lines. The label 'H' is estimated based on the grid lines; the label 'I' is estimated based on the grid lines; the label 'J' is estimated based on the grid lines; the label 'K' is estimated based on the grid lines; the label 'L' is estimated based on the grid lines; the label 'M' is estimated based on the grid lines; the label 'N' is estimated based on the grid lines; the label 'O' is estimated based on the grid lines; the label 'P' is estimated based on the grid lines; the label 'Q' is estimated based on the grid lines; the label 'R' is estimated based on the grid lines; the label 'S' is estimated based on the grid lines; the label 'T' is estimated based on the grid lines; the label 'U' is estimated based on the grid lines; the label 'V' is estimated based on the grid lines; the label 'W' is estimated based on the grid lines; the label 'X' is estimated based on the grid lines; the label 'Y' is estimated based on the grid lines; the label 'Z' is estimated based on the grid lines; the label 'A' is estimated based on the grid lines; the label 'B' is estimated based on the grid lines; the label 'C' is estimated based on the grid lines; the label 'D' is estimated based on the grid lines; the label 'E' is estimated based on the grid lines; the label 'F' is estimated based on the grid lines; the label 'G' is estimated based on the grid lines; the label 'H' is estimated based on the grid lines; the label 'I' is estimated based on the grid lines; the label 'J' is estimated based on the grid lines; the label 'K' is estimated based on the grid lines; the label 'L' is estimated based on the grid lines; the label 'M' is estimated based on the grid lines; the label 'N' is estimated based on the grid lines; the label 'O' is estimated based on both grids, and it's marked as an intermediate point (e.g., x,y,z).
line
| Speed (mph) | Value | |-------------|-------| | 8.0 | -8.0 |PROGRAMS
Favorites
Any program can be labeled as a Favorite. 3 to 6 favorite programs, depending on your display size, will appear right on the Home screen, so you can access them easier. To "like" a program, open the program setup page and tap on the "ribbon" icon in the upper left corner of the screen. You can find all of the labeled programs under the Favorites tab. To remove the label, press "Edit", or go to the program setup page directly and un-tap the "ribbon" icon.
Once you have decided on the program, press the "Start This Program" button on the screen, or the physical "START" key on the machine to begin your workout.
PROGRAMS
Fitness Tests
Choose from 7 options under the Fitness Tests tab. Tap on the test card to open the test setup page. Please make sure that the physical parameters displayed on this page are correct: this data may affect the course of the test and its results; if the data is not accurate, press "Edit Physical Data" to adjust the numbers.
Before the test:
- Make sure you are in good health; check with your physician before performing any exercise if you are over the age of 35 or have any pre-existing health conditions.
- Make sure you have warmed up and stretched before taking the test.
- Do not take in caffeine before the test.
Gerkin Protocol is a sub maximal VO2 (volume of oxygen) test, that increases speed and incline alternately until you reach 85% of your max heart rate (a heart rate monitor is required for this test). The time it takes for you to reach 85% determines the test score (VO2 Max). The test starts with a 3-minute warm-up at a lower speed.
Air Force, Army, Navy, Coast Guard, PEB and Marine Corps are
US military tests that measure the time required for you to cover a certain distance. The speed is controlled manually.
PROGRAMS
History
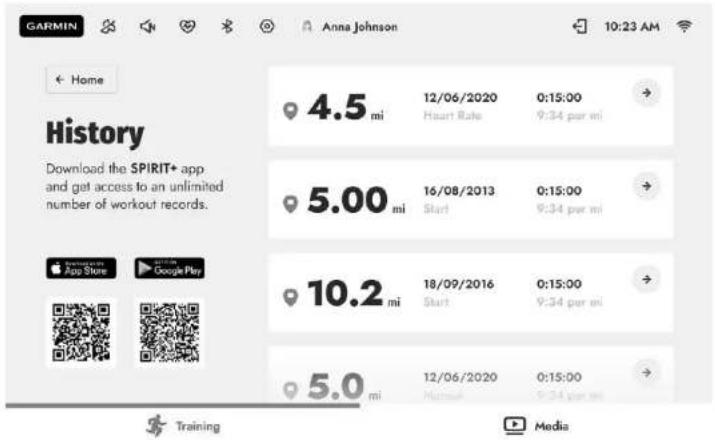
To see your latest workout records, press "History" on the main screen of the Training section. Up to 10 records can be stored locally on the console, but you can access your full workout history if you link your profile to the SPIRIT+ mobile app. Tap on the record preview to see the full summary. Each user can only see his or her workouts.

bar
Manual January 25, 2022 9:45 am | Metric | Value | | :--- | :--- | | Speed (mph) | 7.0 | | Peak Speed (mph) | 4.6 | | Incline (mph) | 5 | | Heart Rate (bpm) | 150 | | Heart Rate (bpm) | 165 | | Distance (mi) | 3.50 | | Time (0:30:06) | 0:30:06 | | Calories (08:54 per mi pace) | 08:54 | | Elevation Gain (65 ft) | 65 | | Elevated Gain (250 calories) | 250 | | METs (8 METs) | 8 |MAINTENANCE & CARE
Post-Workout Machine Care
- Store your machine according to the folding instructions when not in use.
- Use a slightly damp cloth to clean areas where sweat or oil made contact with the machine.
- Use a microfiber cloth to clean the touchscreen and remove unwanted oils and other things that may damage the screen.
- Avoid leaving paper or other small debris in the cupholders.
General Cleaning
Dirt, dust, and hair can block air inlets and accumulate on the running belt. Please vacuum underneath your unit on a monthly basis to prevent excess build-up of dirt that can get sucked up and get into the inner workings under the motor cover. Every other month, you should remove the motor cover and carefully vacuum out dirt and hair that may accumulate.

LUG THE POWER CORD BEFORE THIS TASK.
Sanitizing Your Spirit Fitness Equipment
- Unupholstered high-contact surfaces (hard plastics) can be sanitized using a 75% isopropyl alcohol solution and a clean, dry cloth. Spray surfaces to be sanitized, and use the dry cloth to wipe clean. Allow surfaces to dry before using.
- For upholstered or soft-plastic surfaces, use a conditioner after sanitizing. Be sure to follow the instructions provided by the conditioner manufacturer to ensure proper use of the conditioner.
• Alternatively, you can make your own spray by mixing the proper ratio of isopropyl alcohol and distilled water to reach a 75% solution. - For more details on sanitization, or to learn how to make your own spray solution, please visit: support.spiritfitness.com/hc/en-us/articles/4406787148564
BELT / DECK GENERAL MAINTENANCE
Your treadmill uses a 2-ply belt that is pre-lubed with a high-efficient proprietary liquid wax combination to minimize friction while extending the life of the belt and deck. Performance is maximized when the deck is kept as clean as possible. Use a soft, damp cloth, or paper towel, wipe the edge of the belt and the area between the belt edge and the frame. Also reach as far as practical directly under the belt edge. This should be done once a month to extend belt and deck life. A mild soap and water solution along with a nylon scrub brush will clean the top of the textured belt. Allow to dry before using.
If the original side of the deck shows significant wear, it needs to be flipped. Contact your service technician for assistance. Do not apply any type of lubricant or wax to the surface.
MAINTENANCE & CARE - CONTINUED
Treadbelt Tracking Adjustment
The treadmill is designed so that the tread-belt remains reasonably centered while in use. It is normal for some belts to drift near one side while in use, depending on a user's gait and if they favor one leg. But if during use the belt continues to move toward one side, adjustments are necessary.
SETTING TREAD-BELT TRACKING
An 6mm Allen wrench is provided for this adjustment. Make tracking adjustments on the left side bolt. Set belt speed at 3 mph. Be aware that a small adjustment can make a dramatic difference which may not be apparent right away.
If the belt is too close to the left side, then turn the bolt only a 1/4 turn to the right (clockwise) and wait a few minutes for the belt to adjust itself. Continue to make 1/4 turns until the belt stabilizes in the center of the running deck.
If the belt is too close to the right side, turn the bolt counter-clockwise. The belt may require periodic tracking adjustment depending on use and walking/running characteristics. Some users may affect tracking differently. Expect to make adjustments as required to center the tread-belt. Adjustments will become less of a maintenance concern as the belt is used. Proper belt tracking is an owner responsibility common with all treadmills.

Damage to the running belt resulting from improper tracking / tension adjustments is not covered under the Spirit Fitness warranty.


MAINTENANCE & CARE - CONTINUED
Belt Adjustments
Tread-belt Tension Adjustment - Belt tension is not critical for most users. It is very important though for joggers and runners in order to provide a smooth, steady running surface. Adjustment must be made from the rear roller with the 6mm Allen wrench provided in the parts package. The adjustment bolts are located at the end of the step rails as shown in the diagram below.
Tighten the rear roller only enough to prevent slippage at the front roller. Turn the tread-belt tension adjusting bolts 1/4 turn each and inspect for proper tension by walking on the belt and making sure it is not slipping or hesitating with each step. When an adjustment is made to the belt tension, you must be sure to turn the bolts on both sides evenly or the belt could start tracking to one side instead of running in the middle of the deck.

DO NOT OVERTIGHTEN – Over tightening will cause belt damage and premature bearing failure. If you tighten the belt a lot and it still slips, the problem could actually be the drive belt - located under the motor cover - that connects the motor to the front roller. If that belt is loose it feels similar to the walking belt being loose. Tightening the motor belt should be done by a trained service person.
BELT AND DECK CLEANING
Belt & Deck Cleaning
To clean your treadmill belt:
- Ensure that your machine is off, and that the power cord is unplugged to minimize risk of injury.
- Grab one edge of the treadmill belt, and lift slightly to expose the area between the top of the treadmill base and the running belt.
- Do a visual check for any dirt or debris accumulation.
- Should dirt and debris be present, slide a towel or cleaning cloth between the treadmill belt and top of the treadmill base until you can grasp one end on each side. (The cleaning cloth should be longer than the running belt is wide to achieve this.)
- Using both hands, drag the cleaning cloth up and down the length of the treadmill base 1-2 times.
- For excessive dirt accumulation, rotate the belt halfway, and repeat step 5. Continue until your cleaning cloth is no longer picking up any dirt.
- Remove cleaning cloth from treadmill before plugging back in.
EXPLODED VIEW DIAGRAM
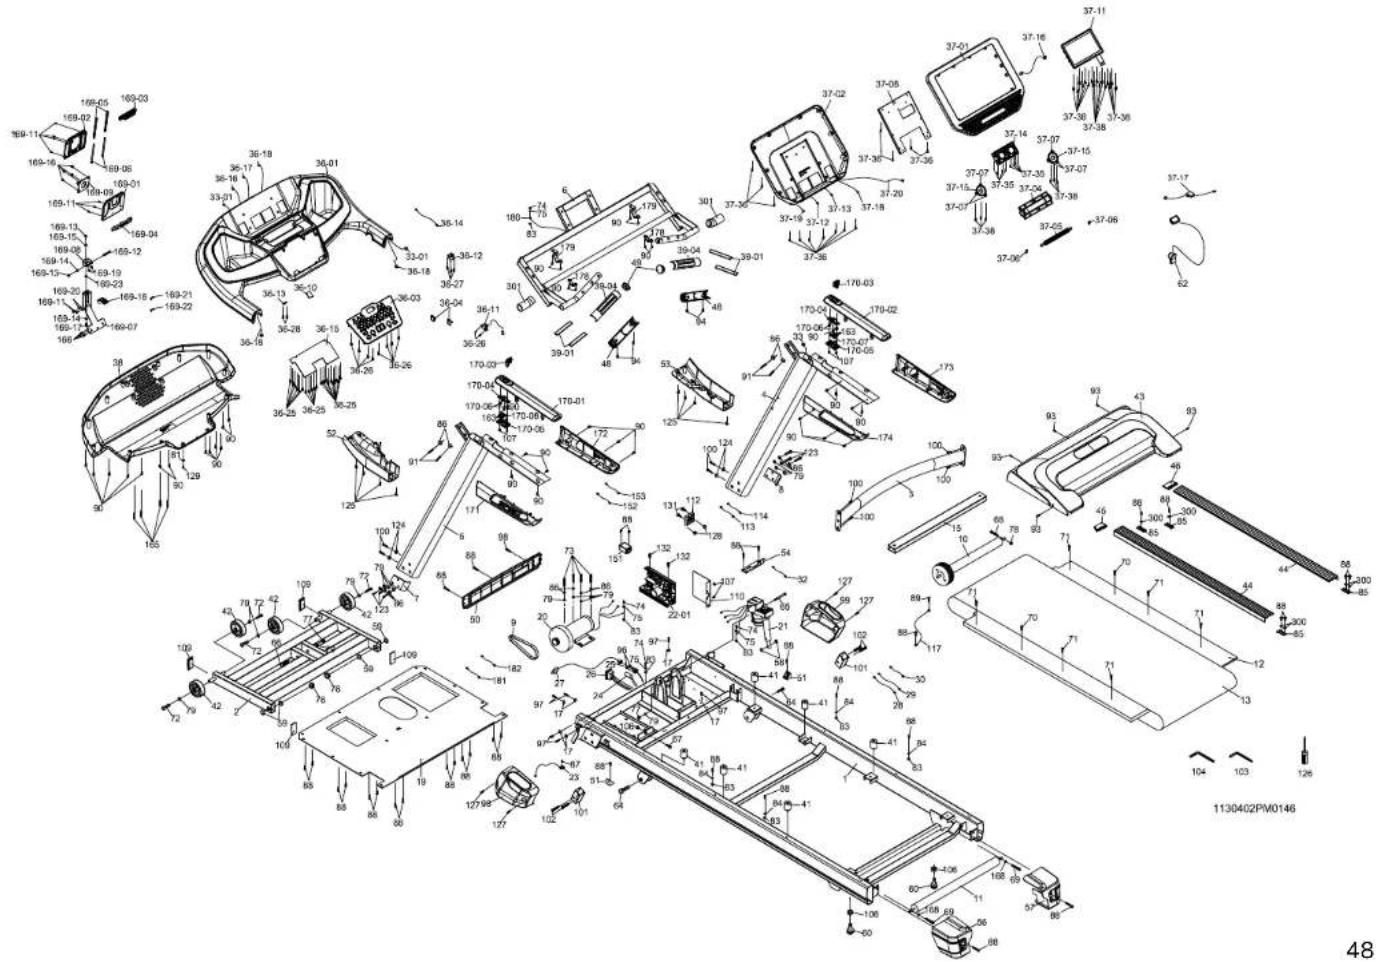
PARTS LIST
| 1 Main Frame 1 | |
| 2 Incline Bracket 1 | |
| 3 Handrail Support 1 | |
| 4 Right Upright 1 | |
| 5 Left Upright 1 | |
| 6 Console Support 1 | |
| 7 Gusset (L) 1 | |
| 8 Gusset (R) 1 | |
| 9 Drive Belt 1 | |
| 10 Front Roller W/Pulley 1 | |
| 11 Rear Roller 1 | |
| 12 Running Deck 1 | |
| 13 Running Belt 1 | |
| 15 Deck Cross Brace 1 | |
| 17 Wire Tie Mount 6 | |
| 19 Frame Cover 1 | |
| 20 Drive Motor 1 | |
| 21 Incline Motor 1 | |
| 22-01 Motor Control Box 1 | |
| 23 1200m/m_Sensor W/Cable 1 | |
| 24 Breaker 1 | |
| 25 Power Socket 1 | |
| 26 On/Off Switch 1 | |
| 27 Power Cord 1 | |
| 28 70m/m_Connecting Wire (Black) 1 | |
| 29 150m/m_Connecting Wire (White) 1 | |
| 30 150m/m_Connecting Wire (Black) 1 |
| 32 600m/m_Computer Cable(Lower) | 1 | ||
| 33 1250m/m_Computer Cable(Middle) | 1 | ||
| 33-01 | 1000m/m_Computer Cable (Middle Upper) | 1 | |
| 36 | Console Top Cover(big) | 1 | |
| 36-01 | Console Top Cover(big) | 1 | |
| 36-03 | Front Console Cover (Inner) | 1 | |
| 36-04 | Square Magnet Stop Plate | 2 | |
| 36-10 | Backlit Board | 1 | |
| 36-11 | 150m/m_Safety Switch Module W/ Cable | 1 | |
| 36-12 | USB Adapter | 1 | |
| 36-13 | Audio Board | 1 | |
| 36-14 | 550m/m_Connecting Wire(Lower) | 1 | |
| 36-15 | Key Board 1 | ||
| 36-16 | 500m/m_Connecting Wire(XHP-12) | 1 | |
| 36-17 | 500m/m_Connecting Wire(XHP-6) | 1 | |
| 36-18 | handrail Wire | 1 | |
| 36-25 | 2.3 × 6mm_Sheet Metal Screw | 20 | |
| 36-26 | 3.5 × 12mm_Sheet Metal Screw | 10 | |
| 36-27 | 3 × 10mm_Sheet Metal Screw | 3 | |
| 36-28 | 3 × 8mm_Sheet Metal Screw | 2 | |
| 37 Console Assembly | 1 | ||
| 37-01 | Console Top Cover | 1 | |
| 37-02 | Console Bottom Cover | 1 | |
| 37-04 | Wind Duct (R) | 1 | |
| 37-05 | Deflector Fan Grill | 1 | |
| 37-06 | Fan Grill Anchor | 2 | |
| 37-07 | Speaker Grill Anchor | 6 | |
| 37-08 | Gusset | 1 | |
| 37-11 | Console Display Board | 1 | |
PARTS LIST
| 37-12 350m/m_Connecting Wire(XHP-12) 1 | |
| 37-13 350m/m_Connecting Wire(XHP-6) 1 | |
| 37-14 500m/m_Fan Assembly 1 | |
| 37-15 450m/m_Speaker W/Cable 2 | |
| 37-16 450m/m_Connecting Wire(Upper) 1 | |
| 37-17 W/Receiver, HR 1 | |
| 37-18 300m/m_Computer Cable(Upper) 1 | |
| 37-19 400/350m/m_handrail Wire 1 | |
| 37-20 400mm_Ground Wire 1 | |
| 37-35 3.5 × 40mm_Sheet Metal Screw 8 | |
| 37-36 3.5 × 12mm_Sheet Metal Screw 14 | |
| 37-38 3 × 10mm_Sheet Metal Screw 22 | |
| 38 Console Bottom Cover(big) 1 | |
| 39-01 Handpulse Plate 4 | |
| 39-04 Handpulse Top Cover | 2 |
| 41 Cushion 6 | |
| 42 Transportation Wheel 4 | |
| 43 Motor Top Cover | 1 |
| 44 Aluminum Foot Rail 2 | |
| 45 Foot Rail Cap (L) 1 | |
| 46 Foot Rail Cap (R) 1 | |
| 48 Handpulse Bottom Cover 2 | |
| 49 Handpulse End Cap 2 | |
| 50 Front Motor Cover 1 | |
| 51 Motor Cover Anchor(D) 2 | |
| 52 Upright Cover(L) 1 | |
| 53 Upright Cover(R) 1 |
| 54 Fan Mounting Plate | 1 | |
| 56 Adjustment Base (L) | 1 | |
| 57 Adjustment Base (R) | 1 | |
| 58 ∅25 × ∅10 × 3T_Nylon Washer (A) | 2 | |
| 59 ∅50 × ∅13 × 3T_Nylon Washer (B) | 4 | |
| 60 Adjustment Foot Pad | 2 | |
| 62 Square Safety Key | 1 | |
| 64 1/2" × 57mm_Hex Head Bolt | 2 | |
| 65 3/8" × 4-1/2"_Socket Head Cap Bolt (Alloy Steel) | 1 | |
| 66 3/8" × 4"_Socket Head Cap Bolt (Alloy Steel) | 1 | |
| 67 3/8" × 1-3/4"_Hex Head Bolt | 1 | |
| 68 M8 × 60mm_Hex Head Bolt | 1 | |
| 69 M8 × 80mm_Socket Head Cap Bolt | 2 | |
| 70 M8 × 55mm_Flat Head Countersink Bolt | 2 | |
| 71 M8 × 35mm_Flat Head Countersink Bolt | 6 | |
| 72 3/8" × 3/4"_Button Head Socket Bolt | 4 | |
| 73 3/8" × 1-1/4"_Hex Head Bolt | 4 | |
| 74 M5 × 10mm_Phillips Head Screw | 4 | |
| 75 ∅5 × 1.5T_Split Washer | 4 | |
| 76 1/2" × 15T_Nylon Nut 2 | ||
| 77 3/8" × 7T_Nylon Nut | 2 | |
| 78 M8 × 7T_Nylon Nut | 1 | |
| 79 ∅3/8" × ∅19 × 1.5T_Flat Washer | 16 | |
| 81 ∅6.5 × ∅16 × 1.0T_Flat Washer | 1 | |
| 83 M5_Star Washer | 8 | |
| 84 ∅6 × ∅23 × ∅13 × 5.5T × 3T_Nylon Dished | 4 | |
| 85 ∅5.5 × 27 × 60 × 1.5T × 3.5H_Concave Washer | 4 |
PARTS LIST
| 86 ∅10 × | 2.0T_Split Washer 14 | |
| 87 5 × 19 | mm_Tapping Screw 1 | |
| 88 ∅5 × 1 | 6L_Tapping Screw 36 | |
| 89 4 × 12 | mm_Sheet Metal Screw 1 | |
| 90 3.5 × 1 | 6mm_Sheet Metal Screw 37 | |
| 91 3/8" × | 1-1/2" _Button Head Socket Bolt 4 | |
| 93 5 × 16 | mm_Tapping Screw 5 | |
| 94 M3 × 1 | 5mm_Tapping Screw 4 | |
| 96 3 × 10 | mm_Sheet Metal Screw 2 | |
| 97 3.5 × 1 | 6mm_Tapping Screw 6 | |
| 98 Console | Mast Side Cap (L) 1 | |
| 99 Console | Mast Side Cap (R) 1 | |
| 100 5/16" × | 3/4" _Button Head Socket Bolt 8 | |
| 101 Fixing | Plate Stabilizer 2 | |
| 102 3/8" × | 2-1/4" _Flat Head Socket Bolt 4 | |
| 103 Combination | Allen Wrench & Phillips Head Screw Driver | 1 |
| 104 L Allen | Wrench 1 | |
| 106 3/8" × | 7T_Nut 3 | |
| 107 3 × 10 | mm_Sheet Metal Screw 6 | |
| 109 25m/m × | 50m/m_Square End Cap 4 | |
| 110 | Controller Back Plate | 1 |
| 112 | Fan | 1 |
| 113 | 150/400m/m_Motor Fan Connecting Cable(Black) | 1 |
| 114 | 150/400m/m_Motor Fan Connecting Cable(White) | 1 |
| 117 | 600m/m_Ground Wire | 1 | |
| 123 3/8" × 2-1/2"_Button Head Socket Bolt | 6 | ||
| 124 ∅8 × 23 × 1.5T_Curved Washer | 4 | ||
| 125 ∅3.5 × 16L_Sheet Metal Screw | 8 | ||
| 126 Phillips Head Screw Driver | 1 | ||
| 127 M5 × 10mm_Phillips Head Screw | 4 | ||
| 128 M4 × 5T_Nylon Nut | 2 | ||
| 129 3.5 × 20mm_Sheet Metal Screw 1 | |||
| 131 M4 × 35mm_Phillips Head Screw | 2 | ||
| 132 5 × 32mm_Tapping Screw 2 | |||
| 151 Filter | 1 | ||
| 152 250m/m_Connecting Wire (White) | 1 | ||
| 153 250m/m_Connecting Wire (Black) | 1 | ||
| 163 2 × 10mm_Sheet Metal Screw 8 | |||
| 165 M5 × 45mm_Phillips Head Screw | 4 | ||
| 166 M5 × 25mm_Phillips Head Screw | 3 | ||
| 168 ∅8.5 × ∅16 × 1.5T_Flat Washer | 2 | ||
| 169-01 | IPAD Front Cover | 1 | |
| 169-02 | IPAD Rear Cover | 1 | |
| 169-03 | IPAD Cover (Top clip) | 1 | |
| 169-04 | IPAD Cover (Bottom clip) | 1 | |
| 169-05 | Spring | 2 | |
| 169-06 | spring column | 2 | |
| 169-07 | IPAD Tablet Holder Assembly | 1 | |
| 169-08 | Rotate Axle Bracket | 1 | |
| 169-09 | Console Holder Assembly | 1 | |
| 169-11 | 3.5 × 12mm_Sheet Metal Screw 9 | ||
| 169-12 | 5/16" × 2-1/2"_Hex Head Bolt | 1 | |
PARTS LIST
| 169-13 5/16" × 6T_Nylon Nut 2 | ||
| 169-14 ∅5/16" × 16 × 1.5T_Flat Washer 2 | ||
| 169-15 ∅8 × 1.5T_Split Washer 1 | ||
| 169-16 M5 × 12mm_Phillips Head Screw 4 | ||
| 169-17 5/16" × 15mm_Hex Head Bolt 1 | ||
| 169-18 Fixed block 1 | ||
| 169-19 8.2 × 16 × 0.6T_Flat Washer 2 | ||
| 169-20 ∅4 × 14 × 1T_Flat Washer 2 | ||
| 169-21 Foam One-sided Glue(28mm×9mm×4T) 1 | ||
| 169-22 Foam One-sided Glue(25mm×25mm×4T) 1 | ||
| 169-23 Pad 1 | ||
| 170 Handlebar Assembly 1 | ||
| 170-1 | Handlebar Cover (TOP,INCLINE+-) | 1 |
| 170-2 | Handlebar Cover (TOP,SPEED+-) | 1 |
| 170-3 | Handle Power Input Cover | 2 |
| 170-4 | Handle Power Linkage Casing | 2 |
| 170-5 | Handgrip Fixing block | 2 |
| 170-6 | Spring | 4 |
| 170-7 | 300m/m_Speed Cable | 1 |
| 170-8 | 300m/m_Incline Cable | 1 |
| 171 Handlebar Cover Outer(L) | 1 | |
| 172 Handlebar Cover Inner(L) | 1 | |
| 173 Handlebar Cover Outer(R) | 1 | |
| 174 Handlebar Cover Inner(R) | 1 | |
| 178 Holder Anchor | 2 | |
| 179 Support Anchor | 2 | |
| 180 400m/m_Console Ground Wire | 1 | |
| 181 400m/m_Connecting Wire (Blue | 1 | |
| 182 400m/m_Connecting Wire (Blue) | 1 | |
| 300 Rubber gasket | 6 | |
| 301 Handgrip Foam | 2 |
WARRANTY
Effective February 16, 2024- XT685ENT Treadmill LIMITED WARRANTY
Spirit Fitness Inc. warrants all its home use treadmill parts for a period of time listed below, from the date of retail sale, as determined by a sales receipt or in the absence of a sales receipt, eighteen (18) months from the original factory shipping date. Spirit Fitness's responsibilities include providing new or remanufactured parts, at Spirit Fitness's option, and technical support to our independent dealers and servicing organizations. In the absence of a dealer or service organization, these warranties will be administered by Spirit Fitness directly to a consumer. The warranty period applies to the following components:
Home Use Limited Warranty
| Warranty | Frame | Motor | Deck | Parts | Touchscreen | Labor |
| Residential | Lifetime | Lifetime | Lifetime | 10 Years | 2 Years | 1 Year |
Light Commercial Warranty*
*Prisons and correctional facilities are excluded from warranty coverage
| Warranty | Frame | Motor | Deck | Parts | Touchscreen | Labor |
| Light Commercial | Lifetime | 5 Years | 3 Years | 3 Years | 1 Year | 1 Year |
RESPONSIBILITIES OF THE CONSUMER
This warranty applies only to products in ordinary household use or light commercial use, and the consumer/facility is responsible for the items listed below:
- Proper use of the treadmill in accordance with the instructions provided in this manual
- Proper installation in accordance with instructions provided with the treadmill and with all local electric codes.
- Expenses for making the treadmill accessible for servicing, including any item that was not part of the treadmill at the time it was shipped from the factory.
- Damages to the treadmill finish during shipping, installation or following installation.
- Routine maintenance of this unit as specified in this manual.
WARRANTY - CONTINUED
What is not covered?
EXCLUSIONS
This warranty does not cover the following:
- CONSEQUENTIAL, COLLATERAL, OR INCIDENTAL DAMAGES SUCH AS PROPERTY DAMAGE AND INCIDENTAL EXPENSES RESULTING FROM ANY BREACH OF THIS WRITTEN OR ANY IMPLIED WARRANTY.
Note: Some states do not allow the exclusion or limitation of incidental or consequential damages, so this limitation or exclusion may not apply to you. - Service call reimbursement to the consumer. Service call reimbursement to the dealer that does not involve malfunction or defects in workmanship or material, for units that are beyond the warranty period, for units that are beyond the service call reimbursement period, for treadmill not requiring component replacement, or treadmill not in ordinary household or light commercial use.
- Damages caused by services performed by persons other than authorized Spirit Fitness service companies; use of parts other than original Spirit Fitness parts; or external causes such as corrosion, discoloration of paint or plastic, alterations, modifications, abuse, misuse, accident, improper maintenance, inadequate power supply, or acts of God.
- Products with original serial numbers that have been removed or altered.
- Products that have been: sold, transferred, bartered, or given to a third party.
- Spirit Fitness reserves the right to request proof of purchase if no warranty record exists for the product.
- THIS WARRANTY IS EXPRESSLY IN LIEU OF ALL OTHER WARRANTIES EXPRESSED OR IMPLIED, INCLUDING THE WARRANTIES OF MERCHANTABILITY AND/OR FITNESS FOR A PARTICULAR PURPOSE.
- Product use in any environment other than a residential setting or non-dues paying facility with 5 hours use or less per day.
- Warranties outside of the United States may vary. Please contact your local dealer for details.
Product features or specifications as described or illustrated are subject to change without notice. All warranties are made by Spirit Fitness, Inc. This warranty applies only in the 48 contiguous United States. NOTE: This does not include Alaska or Hawaii.
WARRANTY - CONTINUED
Responsibilities of the Owner
SERVICE
Keep your bill of sale. Twelve (12) months from the date on the bill of sale or eighteen (18) months from the date of factory shipping as determined by the serial number establishes the labor warranty period should service be required. If service is performed, it is in your best interest to obtain and keep all receipts. This written warranty gives you specific legal rights. You may also have other rights that vary from state to state. Service under this warranty must be obtained by following these steps, in order:
- Contact your selling authorized Spirit Fitness dealer. OR
- Contact your local authorized Spirit Fitness service organization.
- If there is a question as to where to obtain service, contact our service department at (870) 935-1107.
- Spirit Fitness' obligation under this warranty is limited to repairing or replacing, at Spirit Fitness' option, the product through one of our authorized service centers. All repairs must be preauthorized by Spirit Fitness. If the product is shipped to a service center freight charges to and from the service center will be the customer's responsibility. For replacement parts shipped while the product is under warranty, the customer will be responsible for shipping and handling charges. For in-home service, the customer will be responsible for a trip charge. There will be an additional trip charge if the customer is located over 100 miles from the nearest service center.
- The owner is responsible for adequate packaging upon return to Spirit Fitness. Spirit Fitness is not responsible for damages in shipping. Make all freight damage claims with the appropriate freight carrier. DO NOT SHIP ANY UNIT TO OUR FACTORY WITHOUT A RETURN AUTHORIZATION NUMBER. All units arriving without a return authorization number will be refused.
For any further information, or to contact our service department by mail, send your correspondence to:
Spirit Fitness, Inc.
P.O. Box 2037
Jonesboro, AR 72402-2037
Product features or specifications as described or illustrated are subject to change without notice. All warranties are made by Spirit Fitness, Inc. This warranty applies only in the 48 contiguous United States. NOTE: This does not apply to Alaska or Hawaii.
TROUBLESHOOTING
Service Checklist Diagnosis Guide
| Problem Solution/ Cause | |
| Display does not light 1. Tether cord not in position. | 2. Circuit breaker on front grill tripped. Push circuit breaker in until it locks.3. Plug is disconnected. Make sure plug is firmly pushed into 115 VAC wall outlet.4. Breaker panel circuit breaker may be tripped.5. Treadmill defect. Contact your Spirit Fitness dealer. |
| Tread-belt does not stay centered Treadmill belt hesitates when walked/ run on | The user may be walking while favoring or putting more weight on either the left or right foot. If this walking pattern is natural, track the belt slightly off-center to the side opposite from the belt movement. See the Maintenance & Care section on Tread-belt Tension. Adjust as necessary. |
| Motor is not responsive after pressing start | 1. If the belt moves, but stops after a short time and the display shows “E1”, run calibration.2. If you press Start and the belt never moves, then the display shows E1, contact service. |
| Treadmill will only achieve approximately 7mph but shows higher on the display | This indicates motor should be receiving power to operate. Low AC voltage to treadmill. Do not use an extension cord. If an extension cord is required it should be as short as possible and heavy duty 16 gauge minimum. Low voltage. Contact an electrician or your Spirit Fitness dealer. A minimum of 110 volt AC current is required. |
| Tread-belt stops quickly/suddenly when tether cord is pulled | High belt/deck friction. See Maintenance & Care section on cleaning the deck. If cleaning doesn’t prevent this from reoccurring, check to see if there is significant wear of the deck. If so, the deck may need to be flipped if it is on its original side |
| Treadmill trips on board 15 amp circuit | High belt/deck friction. See Maintenance & Care section. If cleaning doesn’t prevent this from reoccurring, check the amp draw of the motor. If this is high and there are signs of significant wear of the deck, it may need to be flipped if it is on its original side |
| Computer shuts off when console is touched (on a cold day) while walking/running | Treadmill may not be grounded. Static electricity is “crashing” the computer. Refer to Grounding Instructions. |
| Circuit breaker trips, but not the treadmill circuit breaker | Check that the treadmill is the only appliance in the circuit. See “Electrical Safety” section for more details. |
3000 Nestle Road Jonesboro, AR 72401 | Phone: 800-258-8511 | Fax: 870-935-7611
www.spiritfitness.com
©2024 All Rights Reserved. XT685ENT Owner's Manual
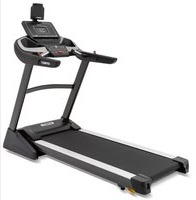


- Online Support
- Warranty Registration
- Table of Contents
- PRODUCT REGISTRATION
- PRODUCT LABELS
- SERIAL NUMBER STICKER
- SAFETY WARNING STICKER
- PROPOSITION 65 WARNING
- WARNING AVERTISSEMENT
- SERIOUS INJURY COULD OCCUR IF THESE PRECAUTIONS ARE NOT OBSERVED.
- CAUTION:
- SAFETY INSTRUCTIONS
- ELECTRICAL SAFETY
- WARNING!
- GROUNDING & LOCATION REQUIREMENTS
- Location Requirements
- PARTS INCLUDED
- TOOLS INCLUDED:
- PARTS INCLUDED:
- 3/8" ×19 × 1.5T
- 86..∅10 × 2.0T
- 5/16" × 3/4" Button Head Socket Bolt (4pcs)
- × 23 × 1.5T
- 3/8" x 2-1/2" Button Head Socket Bolt (6 pcs)
- ∅10 × 2T
- 3/8" x 1-1/2" Button Head Socket Bolt (4 pcs)
- M5 x 45L Phillips Head Screw (4 pcs)
- 5/16" x 3/4"
- M5 × 10L Phillips Head Screw (4 pcs)
- 3.5 x 16L Sheet Metal Screw (8 pcs)
- M5 × 25L Phillip Head Screw (3 pcs)
- Phillips Head Screw Driver
- M5_ Combination M5 Allen Wrench & Phillips Head Screw Driver
- M6_L Allen Wrench
- PARTS OF YOUR TREADMILL
- PRE-ASSEMBLY
- ASSEMBLY
- ASSEMBLY - CONTINUED
- SETTING UP YOUR TREAD
- Leveling
- Plugging in and Powering On
- SETTING UP YOUR TREAD - CONTINUED
- Moving The Treadmill
- SAFETY KEY
- To Use:
- ABOUT YOUR MACHINE
- TOUCHSCREEN
- USING THE SPIRIT+ APP
- FEATURES
- Handlebar Speed and Incline Controls
- Direct Speed & Incline Buttons
- Child Lock
- Pulse Grip Feature
- Built-in Fan
- Audio Jack
- FEATURES - CONTINUED
- Charge Portable Devices with USB port
- NOTE:
- Incline
- Getting Started
- TOUCHSCREEN - CONTINUED
- Home Screen
- HEART RATE CHEST STRAP\* (NOT INCLUDED)
- CHEST STRAP WARNING\* (NOT INCLUDED)
- Erratic Operation
- HEART RATE EXERTION
- HEART RATE - PERCEIVED EXERTION
- PROGRAMS INTRO
- Workout Programs
- PROGRAMS
- Manual
- PROGRAMS - PRESET
- Hill, Fatburn, Cardio, Strength, HIIT
- PROGRAMS PRESET - CONTINUED
- Fusion
- 5K or 10K Program
- Target Programs
- Heart Rate Program
- Custom
- Favorites
- Fitness Tests
- Before the test:
- Air Force, Army, Navy, Coast Guard, PEB and Marine Corps are
- History
- MAINTENANCE & CARE
- Post-Workout Machine Care
- General Cleaning
- Sanitizing Your Spirit Fitness Equipment
- BELT / DECK GENERAL MAINTENANCE
- MAINTENANCE & CARE - CONTINUED
- Treadbelt Tracking Adjustment
- SETTING TREAD-BELT TRACKING
- Belt Adjustments
- BELT AND DECK CLEANING
- Belt & Deck Cleaning
- EXPLODED VIEW DIAGRAM
- WARRANTY
- RESPONSIBILITIES OF THE CONSUMER
- WARRANTY - CONTINUED
- EXCLUSIONS
- SERVICE
- TROUBLESHOOTING
Brand : Spirit Fitness
Model : XT685ENT
Category : Treadmills