
DIMAGE EX SOFTWARE - Image Processing Software KONICA MINOLTA - Free user manual and instructions
Find the device manual for free DIMAGE EX SOFTWARE KONICA MINOLTA in PDF.

| Product type | Image processing software |
| Brand | Konica Minolta |
| Model | DIMAGE EX Software |
| Version | 1.0 (estimated) |
| Compatible platforms | Windows 98/Me/2000/XP, Mac OS 9/X (estimated) |
| Minimum configuration | Pentium III processor, 256 MB RAM, 100 MB hard disk |
| Available languages | French, English |
| Main functions | Image retouching, RAW conversion, color correction, cropping, resizing |
| Input formats | RAW (Minolta), JPEG, TIFF, BMP |
| Output formats | JPEG, TIFF, BMP, PSD |
| Power supply | Not applicable (software) |
| Case dimensions | Not applicable (software) |
| Weight | Not applicable (software) |
| Maintenance and cleaning | No physical maintenance required. Update via the Konica Minolta website. |
| Security | Use an up-to-date antivirus when downloading. |
| Spare parts and repairability | Software not repairable. Online technical support and updates available. |
| General information | 53-page PDF manual available on notice-facile.com |
Frequently Asked Questions - DIMAGE EX SOFTWARE KONICA MINOLTA
User questions about DIMAGE EX SOFTWARE KONICA MINOLTA
0 question about this device. Answer the ones you know or ask your own.
Ask a new question about this device
Download the instructions for your Image Processing Software in PDF format for free! Find your manual DIMAGE EX SOFTWARE - KONICA MINOLTA and take your electronic device back in hand. On this page are published all the documents necessary for the use of your device. DIMAGE EX SOFTWARE by KONICA MINOLTA.
USER MANUAL DIMAGE EX SOFTWARE KONICA MINOLTA
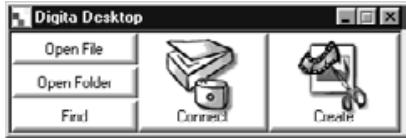
Thank you for purchasing the Minolta Dimâge EX with the Digita™ operating environment and the Digita Desktop™ software environment from FlashPoint Technology. The Digita Desktop™ software is the driver software for exchanging data between your computer and the Camera. The software lets you:
-
Display thumbnail previews of images on the computer monitor.
-
Copy images to the Camera, your hard disk, or removable media such as floppy disks.
-
Delete images stored on the CompactFlash™ card in the Camera.
-
Edit images copied to the hard drive. Perform cropping, rotating, adjusting brightness/contrast, or adding text to your images.
-
Print your images.
-
Save your images in a variety of convenient file formats.
-
Trigger the camera's shutter remotely with the computer (IrDA only).
-
Make digital slideshows with images downloaded from the Camera.
-
This instruction manual may not be copied in part or whole without prior permission from Minolta Co., Ltd. ©1998 Minolta Co., Ltd.
- Every necessary precaution has been taken to ensure the accuracy of this manual. Please contact us if you have any questions, find any mistakes, or notice missing information.
- Minolta is not responsible for loss, damage, or other results caused by operation.
- No part of books, magazines, music, or other productions that were released under a copyright may be used, copied, or changed without the prior permission from the author, copyright holder, or the successor to the copyright holder except for personal, home, or equivalent use.
Please take the time to read through this instruction manual so you will be able to take full advantage of the software features.
This manual assumes you have a working knowledge of Windows® and its operating conventions or the Macintosh and its operating conventions. Familiarity with the mouse and standard Windows® or Macintosh menus and commands is necessary before operating this software.
This manual does not instruct in the:
- basic use of personal computers.
- basic use of the Macintosh or its operating system.
- use of Windows® 95, Windows® 98, or Windows® NT.
The examples in this manual use Windows® 95. The appearance of some screens may differ from the examples when using other operating systems.
- Digita, the Digita logo, and Digita Desktop™ are licensed trademarks or registered trademarks of FlashPoint Technology, Inc. in the U.S. and other countries.
- Macintosh®, the Apple logo, Apple®, Power Macintosh®, QuickTime® and AppleTalk® are registered trademarks of Apple Computer, Inc.
- CompactFlash™ Is the registered trademark of SanDisk.
- MS, MS-DOS, Microsoft, Windows®, Windows® 95, Windows® 98 and Windows® NT are registered trademarks of Microsoft Corporation.
- The official name for Windows® is Microsoft® Windows® Operating system.
- i486 and Pentium are registered trademarks of Intel.
- Other company names and product names are the trademarks and registered trademarks of their respective companies.
TABLE OF CONTENTS
BEFORE YOU BEGIN 6
Checking the Packing List. 6
Software Registration 6
Terms Used in This Manual 7
System Requirements 8
INSTALLING THE SOFTWARE 10
Windows® 95/98/NT 10
Macintosh 12
CONNECTING THE DIGITAL CAMERA TO THE PC 15
Connecting with the PC Serial Adapter (SC-EX1) 15
IrDA (Windows® 98 and Windows® 95 only) 17
STARTING THE SOFTWARE 21
Windows 95/98/NT 21
Macintosh 23
QUICKGUIDE 25
SOFTWARE OPERATION
FOLDER PANEL 28
Operations Possible With the Folder Panel 28
Before Using the Folder Panel 28
Displaying Camera Images. 29
Displaying Hard Disk Images 30
Find 31
Downloading Images from the Camera 32
With Windows® 95/98/NT 32
With the Macintosh 33
Uploading Images from the PC to the Camera 34
With Windows® 95/98/NT 34
With the Macintosh 35
Viewing Image Information 36
Printing Thumbnail Images 37
Deleting Images in the Camera 38
Creating a New Group 40
Creating a New Folder 41
With Windows® 95/98/NT 41
With the Macintosh 42
Changing the Image Display. 43
Changing the Sorting Order 44
Quick View for Images 45
Changing the Name of an Image 47
Adding Audio to an Image (Macintosh only) 48
Drag and Drop Operation 50
IMAGE PANEL 51
Operations Possible with the Image Panel 51
Before Using the Image Panel 51
Displaying Camera Images. 52
Displaying Hard Disk Images 53
Cropping Images 54
Flipping an Image (horizontally or vertically) 55
Rotating an Image 56
Inserting text 57
Zoom In/Zoom Out 59
60
Adjusting Brightness and Contrast 60
Adjusting Colour Balance 61
Image Adjustment 62
Resizing. 64
TABLE OF CONTENTS - CONT'D
Digita DesktopTM Image Filters 65
Plug-in Filters. 65
Printing Images 66
Saving Images-File Formats 67
Saving Images 69
USING THE CAMERA PANEL 70
Operations Possible with the Camera Panel 70
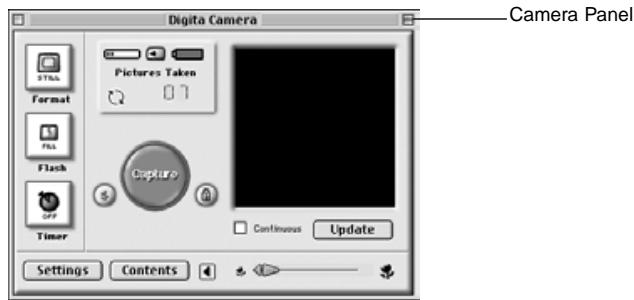
The Camera Panel 71
Camera Status Display. 72
Basic Camera Panel Operation. 73
Changing Camera Settings 74
Preferences 75
Media Settings 77
Extensions 79
Remote Photography (IrDA only) 80
SLIDESHOWS 81
Operations Possible With Slideshow 81
Producing a Slideshow 81
Starting a Slideshow 82
Adding an Image File 83
Adding a Folder 84
Changing the Display Method. 85
Changing the Display Order 86
Updating Slides 86
Removing Slides from the Slideshow 87
Adding Audio to a Slide 88
Adding Background Music 90
Slideshow Preferences 91
Presenting a Slideshow 92
Saving a Slideshow 93
Creating an AVI File (Macintosh:QuickTime Movie file) 94
APPENDIX 95
Verifying the DigitaTM Version 96
Verifying the Digita DesktopTM Version 97
LATE-BREAKING INFORMATION 100
Checking the Packing List
Check the packing list before you begin. If some parts are missing, contact your Camera dealer or a Minolta Service Facility listed on the back cover of this manual.
Dimage EX Camera body
Zoom 1500 lens unit or Wide 1500 lens unit
Camera Case CC-EX1
Hand Strap HS-V1
Video Cable VC-EX1
Compact Flash Card
AA Alkaline Batteries (4)
PC Serial Adapter SC-EX1#
Macintosh Adapter MA-EX1
Dimage EX CD-ROM
Instruction Manuals (Camera and Software) CD ROM
Warranty and Product & Software Registration Card
AdobeTM Photoshop™ LE
SOFTWARE REGISTRATION
Please register this software before using it.
You will receive technical support, as well as software upgrade and product information once this software is registered. Complete and return the enclosed Product & Software Registration form after detaching it from the Warranty. No postage is necessary.
The information provided in the questionnaire will only be used for Minolta customer service and product research and development. The information you provide will be kept private and confidential and you will not be contacted further.
Terms Used in This Manual
- This manual assumes that Windows® 95, Windows® 98, or Windows® NT, or the Macintosh OS, and the necessary software (eg device drivers) have already been installed on your computer.
- The screens used in this manual are primarily those displayed with the Windows® version of the software. There is very little difference between screens in the Windows® and Macintosh versions. An explanation is included when a screen is unique to the Macintosh version.
- This manual assumes use of a two-button, right-handed mouse. The terms 'click' and 'double-click' refer to a single or double-click with the left mouse button.
- The term 'drag' refers to moving the mouse while holding down the left mouse button. The action of holding down the right button while moving the mouse is explained separately in each case.
The following system environment is required to run this software.
| IBM PC/AT and compatibles | Apple Macintosh | |
| Computers | IBM PC/AT or compatible with i486 DX2 66MHz processor or better (Intel Pentium 75MHz or better with Windows® 98/NT), (no guarantees are made for home-built computers or proprietary brands). | Apple Macintosh (Power PC recommended) with processing capacity equal to or better than 68040 (no guarantees are made for Mac OS compatibles). |
| Operating system | Windows® 95 (including OSR2 version), or Windows® 98/NT4.0. | Mac OS 7.6~8.1 (QuickTime 2.5 or better, QuickTime 3.0 or better for slideshow function) |
| Memory | Minimum 16MB free memory (Windows® 95/95) Minimum 32MB free memory (Windows® NT4.0) | Minimum 16MB free memory |
| Hard disk capacity | Minimum 32MB free disk space | |
| Monitor | VGA (640x480 dots) or better, 256 colours or better (at least 32,000 colours recommended). | 13" (640x480 dots) or better, 256 colours or better (at least 32,000 colours recommended). |
| CD-ROM drive | Required (at installation) | |
| Interface | RS-232C, IrDA(Windows® 95,Windows® 98 only) | Serial (modem port, print-er port) |
Note
- When running this software with Windows® NT it should be set manually to a minimum of 100MB (this value will differ in accordance with the applications run concurrently, and is therefore only a recommended value). See the manual for your computer and the Windows® help screens for further details.
Install the software with the following procedure.
Windows® 95/98/NT
The following assumes that the CD-ROM drive is drive D, and the hard disk is drive C.
Switch the computer power ON, then start Windows® 95/98/NT.
2 Insert the supplied Dimage EX CD-ROM in the CD-ROM drive.
3 Select Start and Run, enter d:\English\Software\Setup.exe in the Open: window, then click on OK.
- Setup begins, and the Install Shield wizard appears.
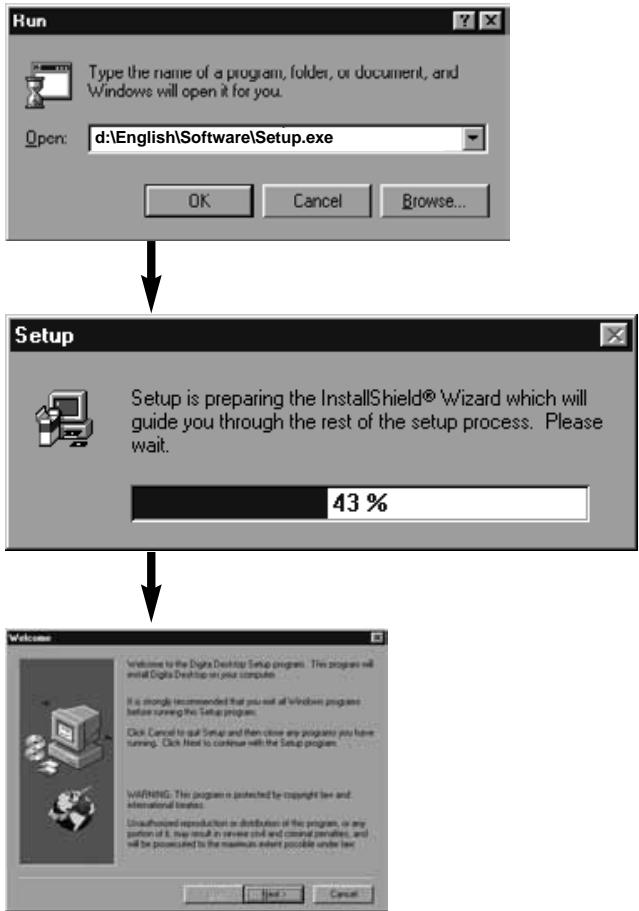
4 Click on Next.
- The Software License Agreement appears on the screen. Read the full content of the agreement before proceeding with setup.
- If you do not agree with the Software License Agreement, click on No to halt setup.

5 Click on Yes.
- The Choose Destination Location screen is displayed. If you wish to install the software in a different directory, click on Browse and select another directory.
6 Click on Next.
- Copying of the program begins. When the necessary files have been copied the following screen appears
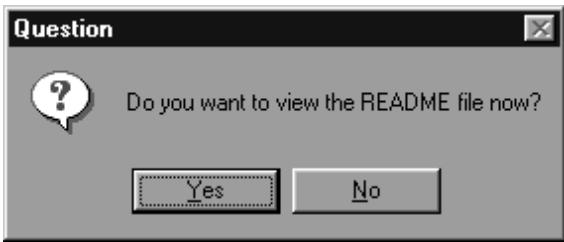
- Click on Yes to display the README file. Read the file carefully.
Macintosh
Before Installation
- The virus protection function expansion program and the control panel documentation may cause problems with operation of the installer. Either remove this software from the system prior to installation, or halt its operation temporarily during installation.
1 Start the Macintosh.
2 Close all applications.
3 Insert the supplied Dimage EX CD-ROM in the CD-ROM drive.
4 Double-click on the CD-ROM icon.
- The contents of the CD-ROM are displayed as follows.
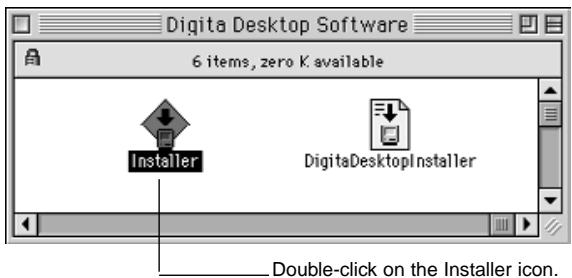
Double-click on the Installer icon.
- The Installer window appears.

6 Click on Continue.
- The Software License Agreement appears on the screen.
- Read this license carefully before installing the software.
- If you do not agree with the Software License Agreement, click on Do Not Agree to halt installation.
7 Click on Agree.
- The Easy Install screen appears. The drive and folder in which the software is to be installed is displayed at the bottom left of the screen.
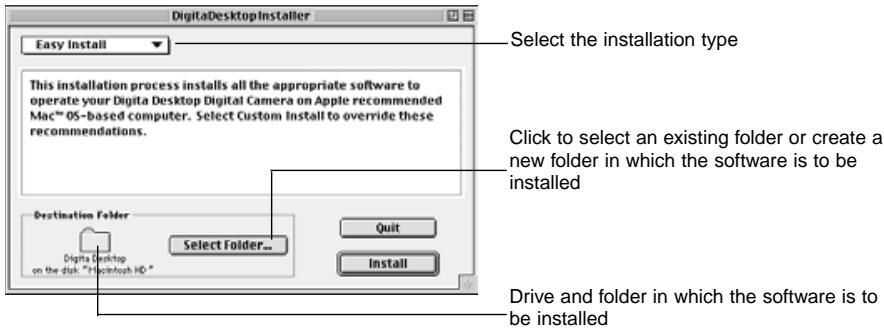
Confirm the selected folder. To change folders or create a folder, click on Select Folder...
9 Select the installation type from the pop-up menu.
-
The install setup screen at left appears if Custom Install is selected.
-
Click on the check box at the left of the file to be installed to place an X inside it. Click on the 'left' arrow to change it to a 'down' arrow and display a list of included files. Select each file in turn.
- Click on i at the right to display the information for the relevant file.
10 Click on Install.
- Installation begins. A display indicating the progress of installation appears on the screen. Follow the instructions on the screen.
The following window appears when installation is complete.

Installation was successful. You must now restart your Macintosh to use your new software.
Restart
11 Click on Restart.
WHERE TO FIND THE FILES
- User-selected Destination Folder
- Digita Desktop (application software)
- Goodies (folder)
- Extensions Folder
- Digital Camera (extension)
- All the files listed above will be copied to the drive if Easy Install is used. If Custom Install is used, only the user-selected files will be copied onto the drive.
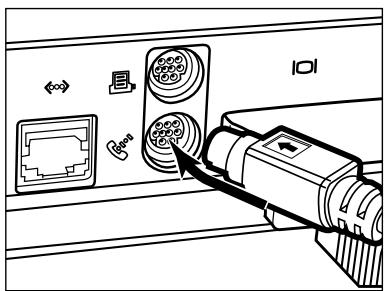
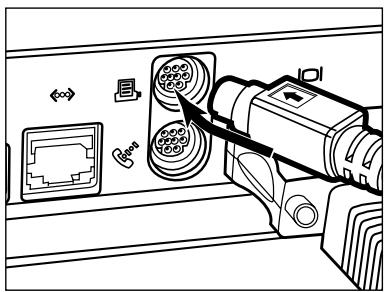
Serial Adapter SC-EX1
Connect the camera to the serial port of the PC via the PC Serial Adapter SC-EX1.
Switch the camera and PC power OFF.
2 Remove the camera lens unit.
Align the projection on the camera mount of the PC Serial Adapter SC-EX1 with the hole in the camera and press it in the direction of the arrow until a click is heard.
IBM PC/AT COMPATIBLE
4 Insert the D-Sub 9-pin connector on the PC Serial Adapter SC-EX1 into the serial port on the PC.
-
Align the pins on the male connector of the serial port with the holes in the female connector on the cable, press the two together firmly, then tighten the two screws.
-
When connecting to the Macintosh, use the Macintosh Adapter MA-EX1 in combination with the SC-EX1 cable, and insert it in the modem port (or printer port).
Macintosh
- Align the pins on the male connector of the cable with the holes in the female connector on the modem port (or printer port), press the two together firmly.
Most Macintosh desktop models are equipped with two serial ports, a modem port and a printer port. When possible, use the modem port to connect the camera.
The serial port allocated for LocalTalk (usually the printer port) may not operate normally with the camera connection. If your printer port is allocated for LocalTalk, turn AppleTalk "Off" (select Chooser in the menu) before connecting the camera via the printer port.
Some Macintosh models (PowerBook, PowerBook Duo) have only one serial port, the printer port.
With 68K series CPUs, always turn AppleTalk "Off" (select Chooser in the menu) before connecting the camera. - Macintosh OS 8 or later: Use the modem control panel to set the modem port to printer port.
Set the camera to the PC connection mode.
- Slide the Mode switch to PC.
IrDA (Windows® 98 and Windows® 95)
Infrared communications may be used in place of the serial cable to connect the camera and the PC.
IrDA is a wireless communications standard established by the IrDA (Infrared Data Association) using infrared radiation for communications. The Dimage EX is compatible with IrDA Ver. 1.0, and as such permits high-speed data communications at a maximum rate of 115kbps.
- The IrDA standard cannot be used in Windows® NT and Macintosh environments.
Check as follows to determine whether or not infrared communications can be used with your PC.
Check that your PC has a built-in infrared port or an external IrDA adapter.
2 Select Start Settings Control Panel.
3 Double-click the left button on the System icon, then click on the Device Manager tab.
4 Check that the Infrared item is available, then click on the + at left.
5 Check that Infrared port on laptops or desktop is available in the tree structure under Infrared.
- This screen will vary depending on the system used.
6 Click on OK to close the window.
7 Check that the Infrared Monitor icon is available. Double-click on this icon to open it.
Click on the Options tab.
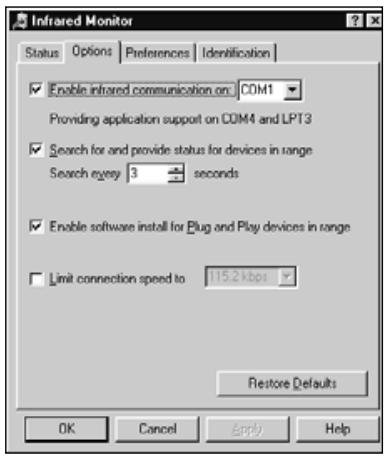
9 Ensure that the check boxes for Enable infrared communication on [Com port] and Search for and provide status for devices in range are checked.
10 Click on OK to close the window.
Connecting
Switch the PC ON, then start Windows® 98 or Windows® 95.
2 Switch the camera power ON.
3 Set the camera to the PC connection mode.
- Side the Mode switch to PC.
4 Face the IrDA window on the camera towards the built-in or external infrared port on the PC.
- See the diagram on page 20 for the positioning of the IrDA window on the camera and the built-in or external infrared port on the PC.
- The PC automatically detects the camera, and the connection is established.
- The PC emits a beep when normal communications are established between the camera and the PC.
5 When the Infrared Monitor displays the Condition window, the following screen appears if the connection is normal.
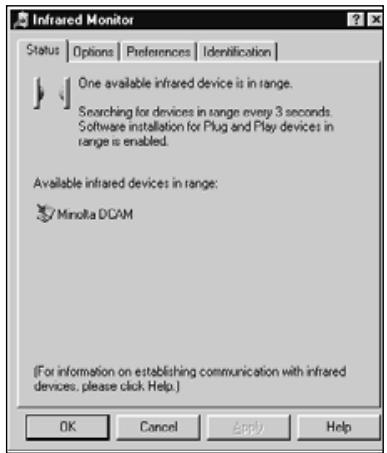
- The Condition window is displayed as follows.
1 Select Start / Settings / Control Panel.
2 Double-click the left button on the Infrared Monitor, and click the left button on the Condition tab.
CONNECTING THE CAMERA TO THE PC - CONT'D
The IrDA window on the front of the Dimâge EX should be positioned within a range of 30^ and within 30-60cm (11.8-23.6 in.) of the built-in or external infrared port on the PC.
[Side view]
IrDA window on the front of the Dimage EX
IrDA transfer unit on notebook PCs or IrDA adapter transfer unit
![KONICA MINOLTA DIMAGE EX SOFTWARE - [Side view] - 1](/content/2025/01/139677/images/11dbec54bd1742900b06e7bcf3db97b45101bdf7a51f6b1cab075cb6d8b2ba1d.jpg)
[Top view]
![KONICA MINOLTA DIMAGE EX SOFTWARE - [Top view] - 1](/content/2025/01/139677/images/4d7f41ae8317c4255b6f8c5c7731c97322598e3174b5a7e2937fe7898f6c69df.jpg)
- Be sure the IrDA transfer units face directly.
- The above figures are standard guide lines. Results may vary depending on the PC.
STARTING THE SOFTWARE
With Windows® 95/98/NT
1 Connect the camera and the PC (p. 15, p 17).
2 Switch the camera ON, then slide the Mode switch to PC.
3 Start the PC.
4 Select Start Program Digita Desktop Digita Desktop.
- The control strip appears when the application is started.
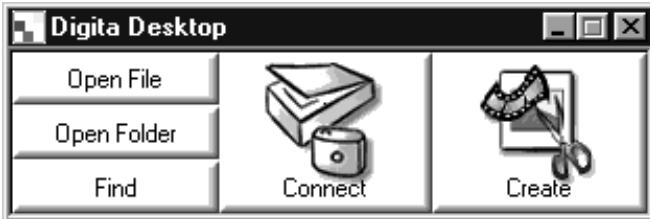
5 Click on Connect.
The following window appears.

Click on the connection method to be selected, and click on OK.
- Select either the serial or Infrared connection.
- The Camera Panel appears when the camera is connected.

- The Camera Panel does not appear if the connection fails.
Check the following if the Camera Panel is not displayed.
1 Are the camera and PC serial adapter connected correctly? (see page 15).
2 Is the PC serial adapter firmly plugged in? (see page 15).
3 Have you selected the correct connection method? (see pages 15 - 20).
4 Is the camera switched ON?
5 Is the compact flash card inserted in the camera?
6 Is the camera in the PC connection mode? (see page 16).
7 Check that the comport driver is installed correctly (refer to your windows help file or documentation).
8 Be sure there are no comport-blocking utilities loaded.
After checking the above, switch the camera off, then on again, then go through the procedure on page 20 again to restart the software.
With the Macintosh
1 Connect the camera to the Macintosh (p. 15-16).
2 Switch the camera ON, then Slide the Mode switch to PC.
3 Start the Macintosh.
4 Open the folder containing Digita Desktop™ (the folder selected at installation, or a newly created folder).
Double-click on the Diga DesktopTM icon.
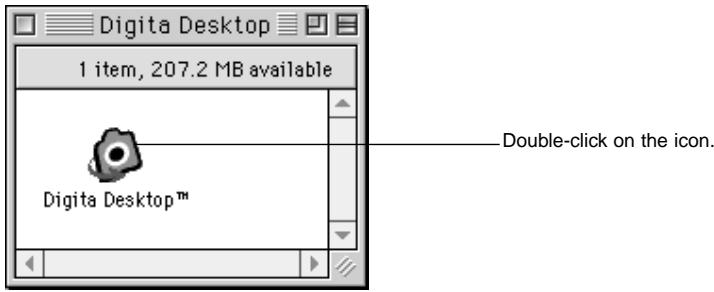
- Digita Desktop™ starts, and the Digita Desktop™ window appears.
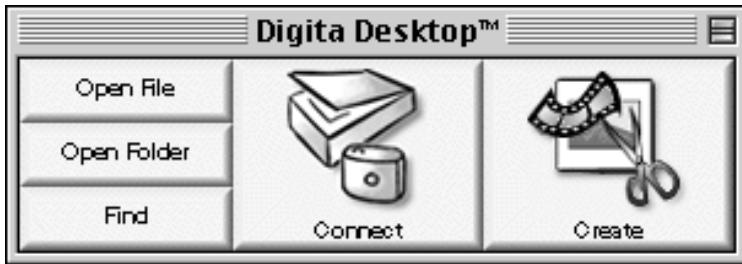
6 Click on Connect.
The camera is connected, and the camera panel appears.
- If the connection fails, a warning window appears in place of the camera panel.
Check the following if the camera panel is not displayed.
1 Are the camera and PC serial adapter connected correctly? (see page 15).
2 Check that the Macintosh Adapter MA-EX1 and the Serial Adapter SC-EX1 are properly connected.
3 Is the PC serial adapter firmly plugged in?
4 Is the camera connected to a serial port assigned to LocalTalk?
5 Macintosh OS 8: Check the modem port designation in the modem control panel (page 16)
6 Is the camera switched ON?
7 Is the compact flash card inserted in the camera?
8 Is the camera in the PC connection mode?
After checking the above, switch the camera OFF ON, and go through the procedure on page 23 again to restart the software.
If this does not solve the problem, reinstall the software in accordance with the procedure on page 12, then restart it.
Basic Operation (folder panel, image panel)
To view camera images and modify images on the PC.
Start the software (see p. 21, p. 23).

Functions of the folder panel
- Displays (in thumbnail format) images in the camera.
- Downloads all or some of the images in the compact flash card to the hard disk of the connected PC.
- Displays (in thumbnail format), and prints (in thumbnail format) images downloaded to the hard disk.
- Deletes all or some of the images in the camera.
See page 28 for further details.

Functions of the image panel
- Editing of the displayed image (control of brightness, contrast, colour, mirror imaging, rotating, and resizing (image resolution).
- Display reduction and enlargement.
- Printing of the displayed image.
See page 51 for further details.
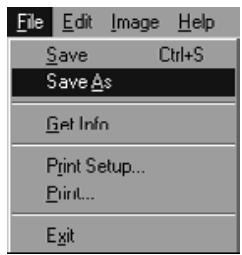
Select File Save As (p. 69).
Enter the file name, specify the folder it is to be saved in, select the image format, then click on OK.
The image is saved.
Saved images
- Saved images may be displayed on the folder panel.
- They may be used with other applications.
- They may be used in slideshows.
Software Operation
The folder panel is used to display (in thumbnail format) images on the Compact Flash card in the camera or images which have been downloaded to the hard disk of the PC (p. 32, p.33).
Operations Possible With the Folder Panel
- Download all or some of the images in the camera to the hard disk of the connected PC.
- Delete all or some of the images in the camera.
- Double-click on a thumbnail image and display it on the image panel (p. 52).
- Sort images downloaded to the hard disk by name and date (p. 44).
Before Using the Folder Panel
Camera Panel
Check that the camera panel is displayed.
Follow the instructions on pages 22 and 24 if the camera panel is not displayed.
Displaying Camera Images
Display images stored on compact flash card in the camera
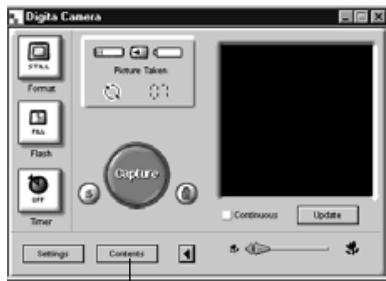
1 Click on the Contents button on the camera panel.
- The folder panel appears with a single icon representing all the camera images as a group.
Click on the Contents button.
2 Double-click on the group icon.
The folder panel will display thumbnails of all the images in the camera.
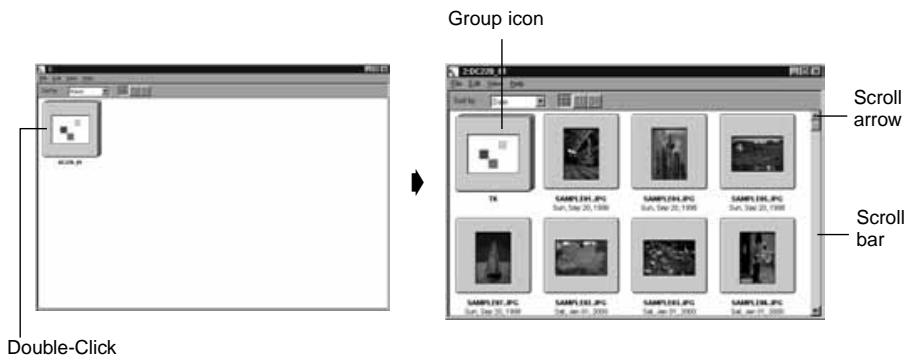
Timelapse, Burst, and Grouped images in the camera are represented by a single thumbnail image (see "Group Icon" above). Double-click on the group icon to View the images in the set.(Macintosh: The group icon displays the last image in the set instead of the Digita logo).
Displaying Hard Disk Images
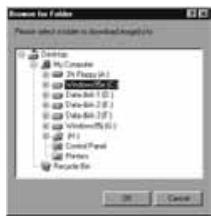
Display images saved on the hard disk
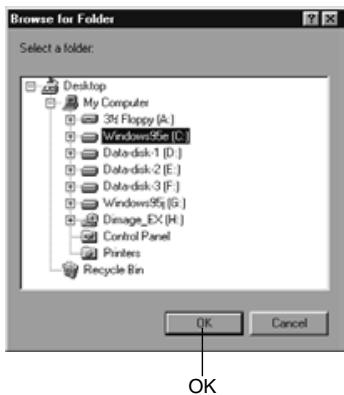
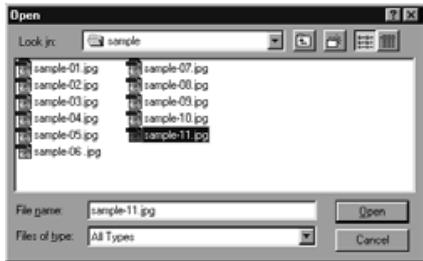
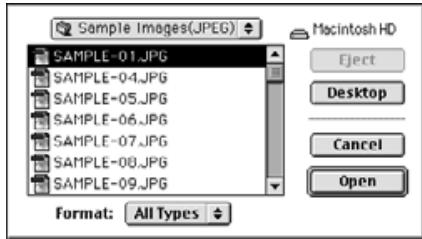
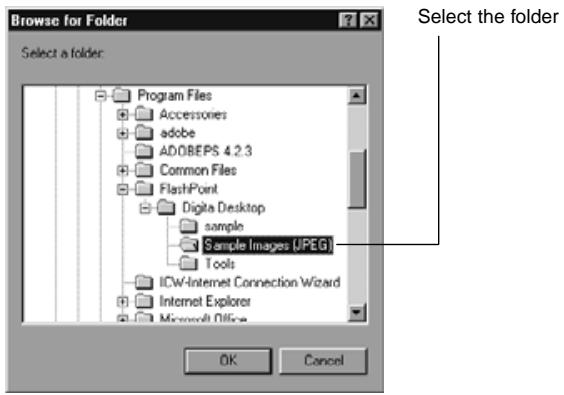
1 Click on the Open Folder button on the control strip.
2 Select the folder containing the saved images.
With Windows
With the Macintosh
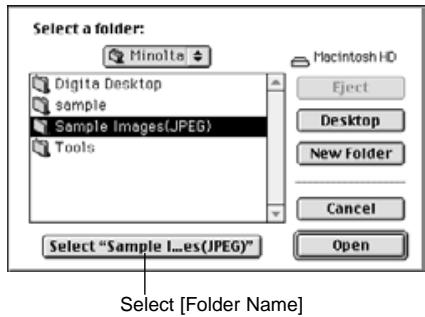
3 Click on OK (Macintosh: Select [folder name]) to open the folder panel and display the images in the folder in thumbnail format.
![KONICA MINOLTA DIMAGE EX SOFTWARE - Click on OK (Macintosh: Select [folder name]) to open the folder panel and display the images in the folder in thumbnail format. - 1](/content/2025/01/139677/images/39e670eedaaff5d342586fef9b1e7e86073422cc189752b4b8174b8c9ffde469.jpg)
- Double-click on a folder to open a new folder panel and display the images in the folder in thumbnail format.
- Deleting image files with Explorer (Macintosh: Desktop) while the folder panel is displayed may result in abnormal termination of the application (Digital Desktop™).
Close the folder panel by clicking on the Close button before deleting image files.
FIND
Select the desired images saved on the hard disk and display them in a list.
1 Click on the Find button on the control strip.
2 Enter the name of the desired file or directory in the file search window.
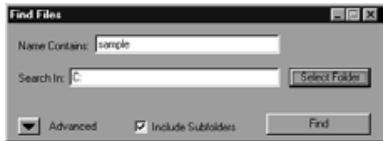
-
If, for example, the hard disk is to be searched for files named sample-01.jpg, sample-02.jpg etc, enter C: as the Search Destination, and click on Include Sub-folders.
-
Clicking on the Advanced search button expands the window and adds the date the file was last changed, the file size, and the file type as search conditions.
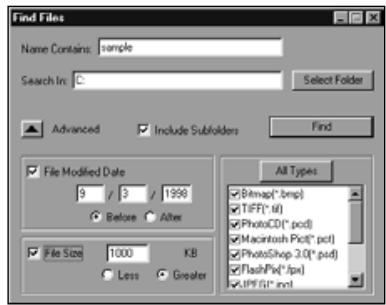
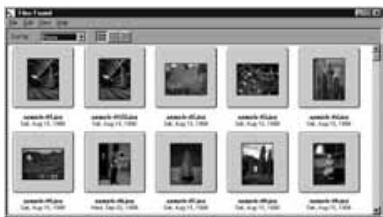
3 Click on Search to begin the search.
- The folder panel opens and the found files are displayed in thumbnail format.
-
Files from each folder are displayed in separate folder panels.
-
Double-click on a folder to open a new folder panel and display the images in the folder in thumbnail format.
- Deleting image files with Explorer or the Finder while the folder panel is displayed may result in abnormal termination of the application (Digital DesktopTM).
Downloading Images from the Camera
Download all or some of the images recorded in the camera to the hard disk of the connected PC.
With Windows® 95/98/NT
1 Display the camera images in the folder panel (p. 29).
- When a group is displayed, double-click on it to open a new folder panel and display the images in the group in thumbnail format.
2 Click on the desired image to select it.
- To select multiple images, click on the images in turn while holding down the Ctrl key.
- To cancel selection of images already selected, click on the selected images while holding down the Ctrl key.
- To select all images, select Select All from the Edit menu.
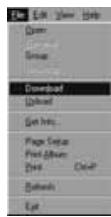
3 Select Download from the File menu.
s
4 Specify the location (directory and folder) to download the images to and the Image File Name.
- Click on Cancel to cancel downloading.
5 Click on OK.
- Downloading of the images begins. The screen returns to the folder panel when downloading is complete.
The downloaded images may be displayed on the folder panel (p. 53). Open the image panel for simple and effective image processing.
With the Macintosh
1 Display the camera images in the folder panel (p. 29).
- When a group is displayed, double-click on it to open a new folder panel and display the images in the group in thumbnail format.
2 Click on the desired image to select it.
- To download multiple images, click on the images in turn while holding down the Shift key.
- To select all images, select Select All from the Edit menu.
- To deselect images, click on the selected images while holding down the Shift key.
3 Select Copy Selected Images to Disk from the Viewer menu.
- Select Copy All Images to Disk from the Viewer menu to copy all files whether they have been selected or not.
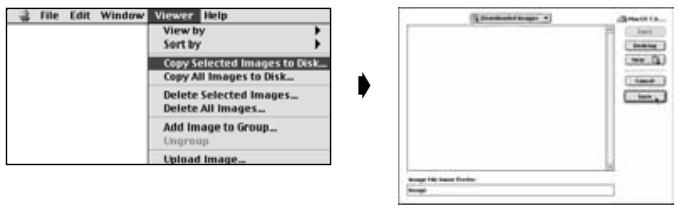
4 Specify the location (directory and folder) to download the images to and the Image File Name Prefix.
- Click on Cancel to cancel downloading.
5 Click on Save.
- Downloading of the images begins. The screen returns to the folder panel when downloading is complete.
The selected images are downloaded to the specified drive and directory in Image File Name Prefix: under files names which employ the frame numbers used in the camera.
For example, when Image is entered in Image File Name Prefix: and five images are downloaded, they are copied as Image001, Image002, Image003, Image004, and Image005.
The downloaded images may be displayed on the folder panel (p. 53).
Open the image panel for simple and effective image processing.
Uploading Images to the Camera
Upload images saved on the hard disk of the PC to the camera
With Windows® 95/98/NT
1 Display the camera images in the folder panel (p. 29).
2 Select Upload from the File menu.
The following window appears.

3 Select the image to be uploaded.
- Click on Cancel to cancel copying.
4 Click on Open.
- Uploading of the images begins. The screen returns to the folder panel when uploading is complete.
- The file name will be automatically converted to the DOS naming convention (8 characters, period, 3 character file extension).
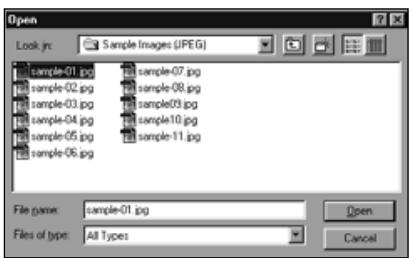
With the Macintosh
1 Display the camera images in the folder panel.
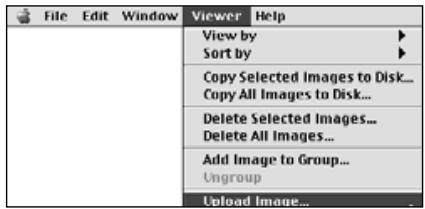
2 Select Upload Image... from the Viewer menu.
The following window appears.

3 Select the image to be uploaded.
- Click on Cancel to cancel copying
4 Click on Select.
- Uploading of the images begins. The screen returns to the folder panel when uploading is complete.
- The file name will be automatically converted to the DOS naming convention (8 characters, period, 3 character file extension).
Viewing Image Information
Image information (file format, size, date created, dated modified, number of colours, image width and height) is viewed with the following procedure.
1 Display the folder panel (p. 29, p. 30).
2 Click on the desired image to select it.
3 Select Get Info from the File menu.
The information window appears.

- Image information cannot be viewed for slideshows.
Printing,Th弹簧 Images
The display thumbnail images displayed on the folder panel may printed as required.
1 Display the folder panel (p. 29, p. 30).
- An album of images in the camera or the hard disk may be printed.
- Selected thumbnail images may be printed.
2 Select Print Album from the File menu (select Print Album from the File menu with the Macintosh).
The following window appears.
With Windows
With the Macintosh
3 Set the number of columns and rows, then click on the Print button.
- Printing begins.
- Click on Cancel to close the window without printing the thumbnail images.
Refer to your printer manual before printing.
Deleting Images in the Camera (compact flash card)
Deletes all or some of the images in the camera (compact flash card).
1 Display the camera images in the folder panel.
- When a group is displayed, double-click on it to open a new folder panel and display the images in the group in thumbnail format.
2 Click on the image to be deleted to select it.
- To select multiple images, click on the images in turn while holding down the Ctrl key (Macintosh:shift key).
- To select all images, select Select All from the Edit menu.
- To deselect, click on the selected images while holding down the Ctrl key (Macintosh:shift key).
3 Select Delete from the Edit menu (Macintosh:Delete selected Images... from the Viewer menu).
- Macintosh:Select Delete All Images From Camera? from the Viewer menu to delete all files whether they have been selected or not.
The following window appears.
With Windows
With the Macintosh
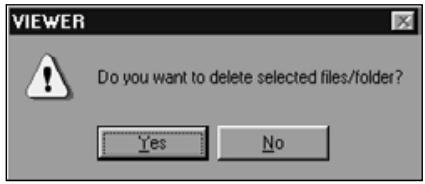
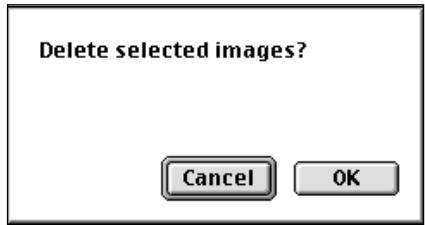
4 Click on Yes (Macintosh: OK) to delete the selected image(s).
- Click on No (Macintosh: Cancel) if the selected image(s) are not to be deleted, or if you have made a mistake.
- The screen returns to the folder panel when the selected image(s) have been deleted.
- Do not remove the compact flash card from the camera while deleting images.
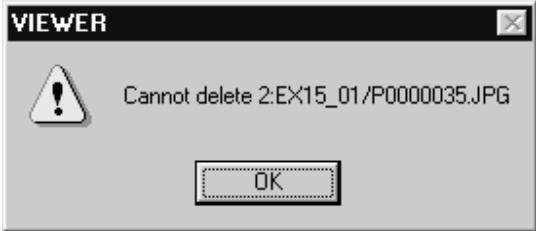
The following message appears if an attempt is made to delete a protected image (see protecting Images in the camera instruction manual).
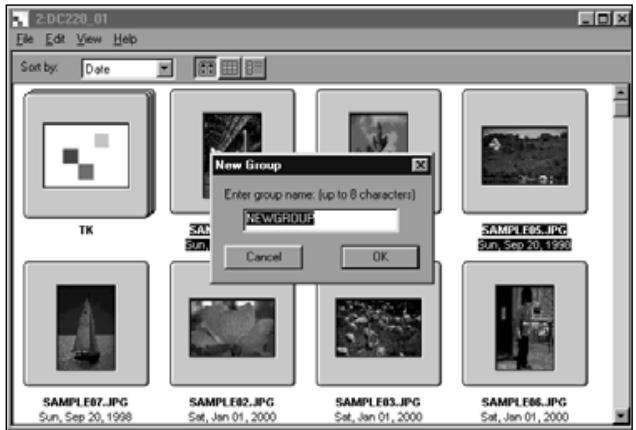
Creating a New Group
Creates a new group in the folder panel currently displaying the images in the camera.
1 Display the camera images in the folder panel.
- When a group is displayed, double-click on it to open a new folder panel and display the images in the group in thumbnail format.
2 Click on the images to be included in the group to select them, then select Group from the File menu (Macintosh: Add Image to Group... from the viewer menu).
- To select multiple images, click on the images in turn while holding down the Ctrl key (Macintosh: shift key).
3 Enter the name of the group in the window and click on OK.
- A new group is created containing the selected images.
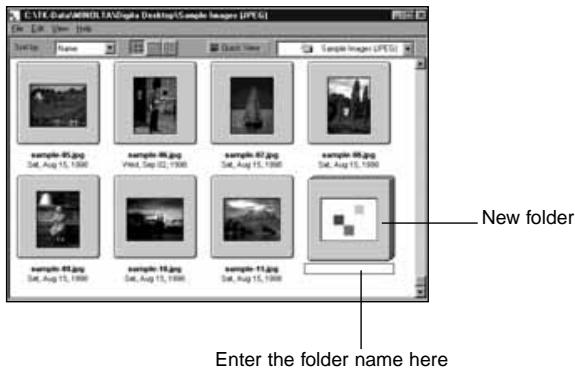
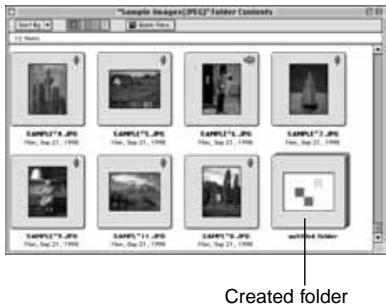
Creating a New Folder
Creates a new folder in the folder panel currently displaying the images on the hard disk.
With Windows® 95/98/NT
Display the hard disk images (p. 30).
2 Select Create New Folder from the File menu.
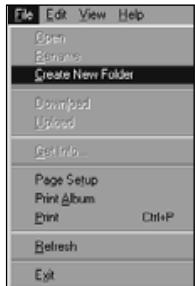
3 Enter the name of the new folder.
With the Macintosh
1 Display the hard disk images on the folder panel (p. 30).
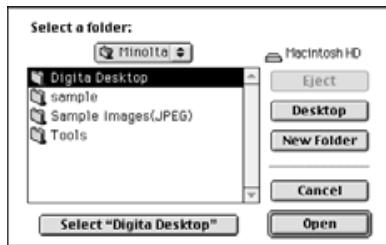
2 Select Open Folder from the File menu to open the folder selection window.
- Open the same folder that the current images that are displayed are stored.
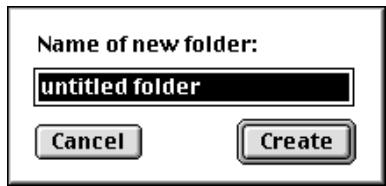
3 Click on New Folder and enter the folder name.
4 After entering the name, click on Create.
5 Clicking on Cancel to close the folder selection window displays the created folder.
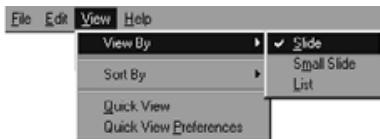
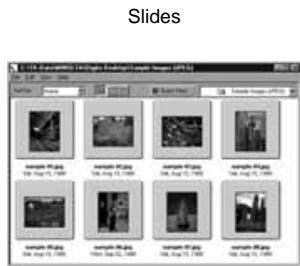
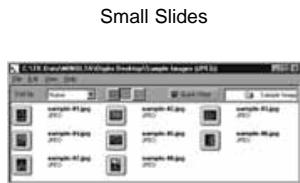
Changing the Image Display
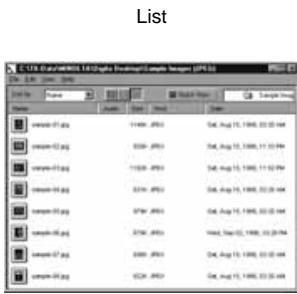
The thumbnail format image display in the folder panel may be changed to slides, small slides, or list display as required.
1 Display the folder panel (p. 29, p. 30).
- The display method may be changed for images in the camera (compact flash card), or images on the hard disk.
Windows
2 Select View By from the View menu, and then select Slide, Small Slide, or List as required.
With the Macintosh
2 Camera Images: Select View By from the Viewer menu, then select Slide, Small Slide, or List from the sub-menu. Hard Disk Images: Select View by from the View menu, then select Slide, Small Slide, or List from the sub-menu.
Windows® and Macintosh
Slide, Small Slide, or List may be selected by clicking on the icons on the toolbar.

- The thumbnail image display changes as shown below.
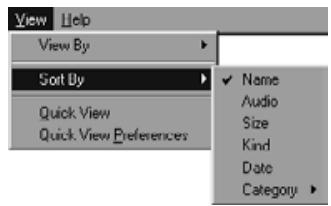
Changing the Sorting Order
The thumbnail images in the folder panel may be sorted by file name, date, size etc.
1 Display the folder panel (p. 29, p. 30).
- The sorting order may be changed for images in the camera or images on the hard disk.
Windows
2 Select View By from the View menu, and then select the sorting order from the sub-menu.
Macintosh
2 Camera images: Select Sort by from the Viewer menu, then select the sorting order from the sub-menu. Hard Disk images: Select Sort by from the View menu, then select the sorting order from the sub-menu.
Windows® and Macintosh
The sorting order may be changed by clicking on the selections in the drop down menu on the toolbar (pop-up menu with the Macintosh).

The sorting order may be selected from Name, Audio, Size, Kind, Date, and Category.
Name ........ ..Sorted alphabetically by file name
Audio ........ ..Sorted by audio attached and no audio attached
Size ........ ..Sorted from the earliest date each image was taken
Kind ........ ..Sorted alphabetically by file type
Date ........ ..Sorted by image size
Category ........ ..Sorted by user defined category (eg Friends, Pets)
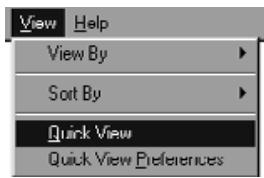
Quick View for Images
Playback of images on the hard disk in thumbnail format.
1 Display the hard disk images on the folder panel (p. 30).
2 Select Quick View from the View menu to start Quick View.
- Quick View may also be started by clicking on the button on the toolbar of the folder panel.
- The play back is run in accordance with the settings in Quick View Preferences (described below).
- The play back is halted by pressing any key (for example the space bar) on the keyboard.

[Quick View Preferences]
1 Select Quick View Preferences from the View menu .
- The Quick View Preferences window appears.
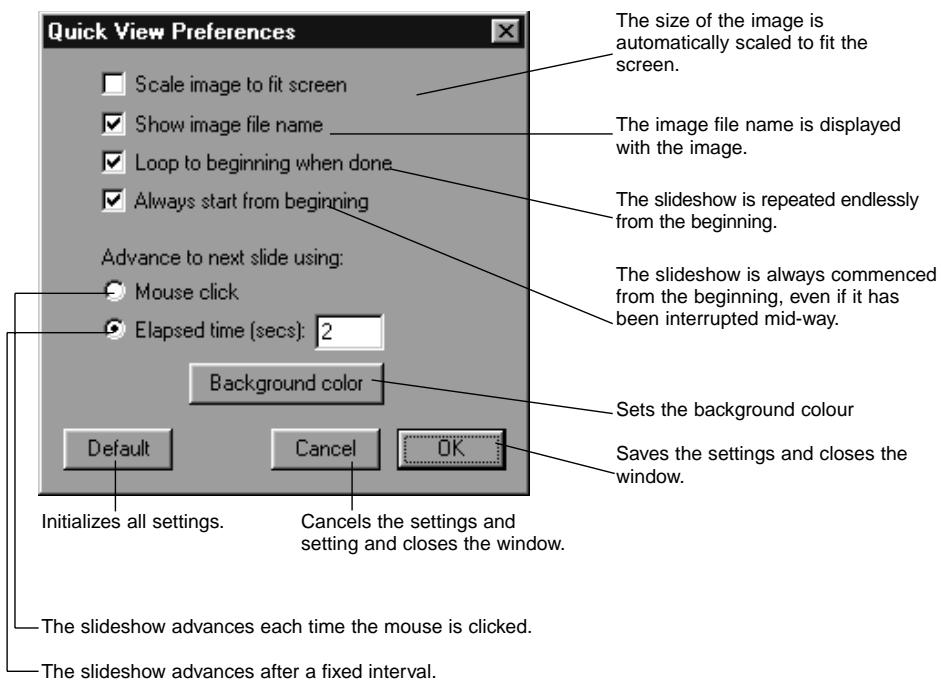
After all settings have been entered, click on OK to save them and close the window.
- Now run Quick View to confirm the settings.
Changing the Image Name
Changes the name of an image downloaded to the hard disk.
Note that the name of an image in the camera cannot be changed.
1 Display the hard disk images on the folder panel (p. 30).
2 Click on the image to select it.
3 Click on the image file name to display the cursor (Macintosh: double click).
- Windows: As the file extension cannot be changed, it disappears immediately the cursor is displayed.
sample-06
Click on the file name of a selected image to display the cursor (Macintosh: double-click).
Wed, Sep 02, 1998
4 Enter the new file name from the keyboard.
When the new file name has been entered from the keyboard, press the [Enter] key (Macintosh: [Return] key) to save it.
The new file name is displayed.
- Clicking on any part of the screen will save the new file name.
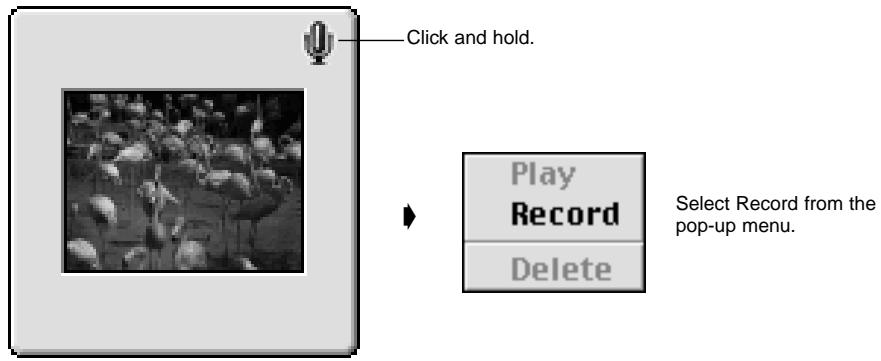
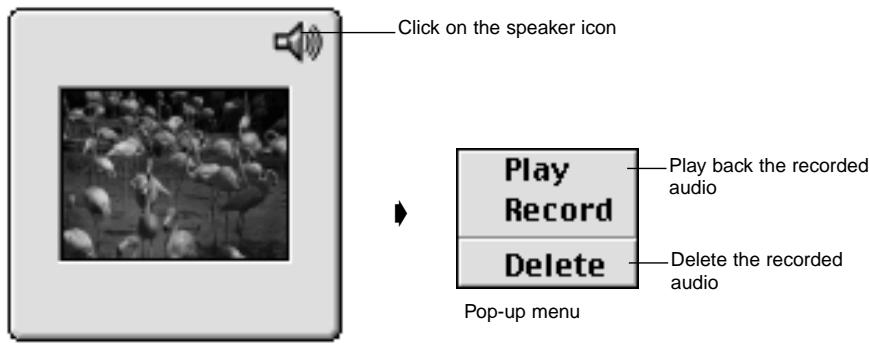
Adding Audio to an Image (Macintosh only)
Adds audio to images saved on the hard disk.
- The macintosh must have a built-in or attached microphone.
1 Display the hard disk images on the folder panel (p. 30).
2 Click and hold on the microphone icon at the top-right of the thumbnail image, and select Record from the pop-up menu.
The Record window appears.
SAMPLE-3.JPG
Mon, Sep 21, 1998
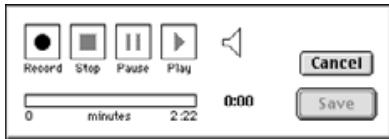
3 Record the audio with the Record window.
- Record the audio via the internal microphone or a microphone connected to the sound input port.
- Begin recording by clicking on the - (Record) button, and finish recording by clicking on the ■ (Stop) button.
- Click on the Play button to play back the recorded audio.
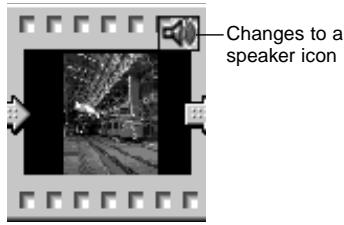
- You may re-record as many times as necessary.
4 Click on Save to save the recorded audio.
- When the audio has been recorded the microphone icon at the top-right of the thumbnail image changes to a speaker icon.
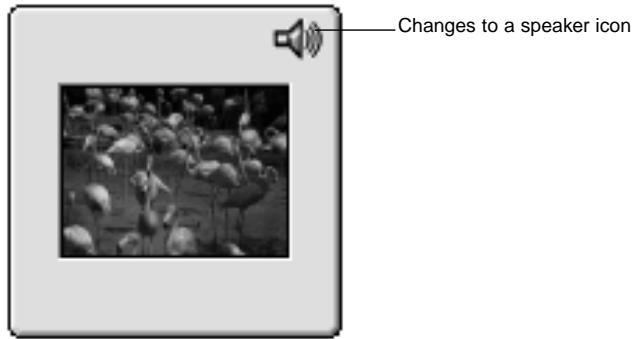
SAMPLE*3.JPG
Mon, Sep 21, 1998
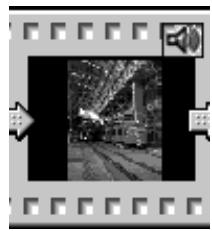
5 Click on the speaker icon to display the pop-up menu.
Select Play to play back the recorded audio.
Select Delete to delete the recorded audio.
SAMPLE*3.JPG
Mon, Sep 21, 1998
Drag and Drop Operation
Images may be copied and moved from the folder panel to Windows Explorer (the Desktop with the Macintosh) with drag and drop operation
1 Display the hard disk images on the folder panel (p. 30).
2 Start Explorer (Macintosh: Select Finder from the application menu), then select the drive and folder to copy or move the image to.
3 Drag the image to be copied or moved from the folder panel and drop it in Explorer (Macintosh: drop it onto the Desktop).
- When the folder displayed in the folder panel and the folder displayed in Explorer (Macintosh:
Desktop) are on the same drive the image file is moved. When they are on different drives it is copied. - When an image is taken from Explorer (Macintosh: Desktop) to the folder panel it is moved (or copied) in the reverse direction to that described above.
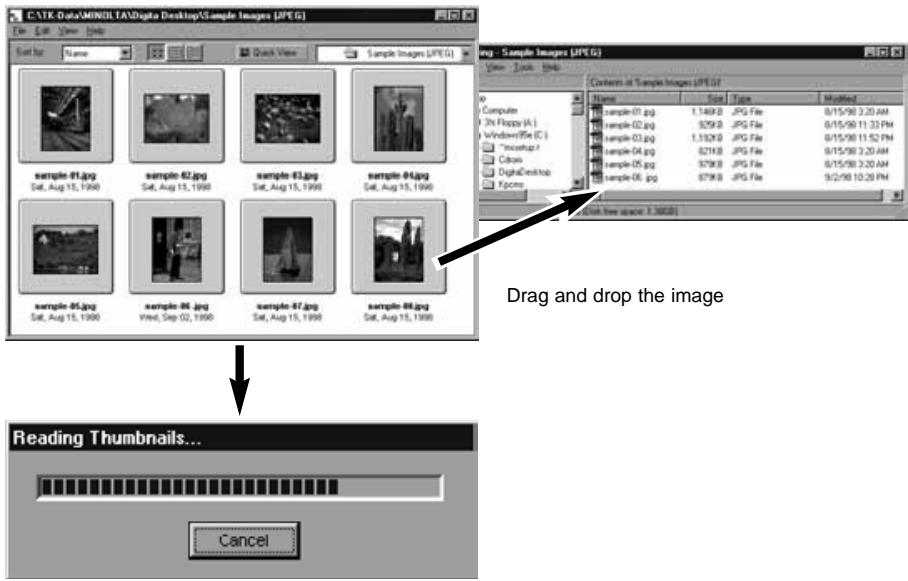
The file is moved (or copied)
The image panel is used to edit and print images, and save them in a variety of formats.
Operations Possible With the Image Panel
- Enlarge and reduce the displayed size of images (p. 59).
Images may be edited as follows.
Cropped
Brightness and contrast adjusted
Colour adjusted
Image smoothing (fine brightness adjustment, edge smoothing)
Image flipping
Image rotation
Change image size
mages (p. 66).
- Save images on the hard disk in the following formats.( pp. 67-69).
Windows
BMP, EXIF, JPEG, PICT, TIFF, Photoshop 3.0 (PSD), FlashPix
Macintosh
BMP, EXIF, JPEG, PICT, TIFF
Before Using the Image Panel
Check that the Camera panel is displayed.

Camera Panel
Follow the instructions on P21 if the Camera panel is not displayed.
Displaying Camera Images
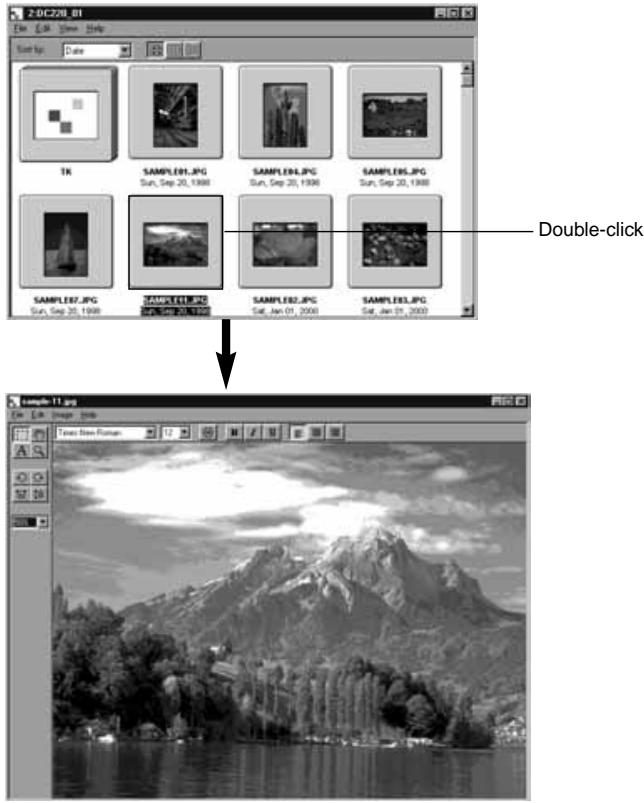
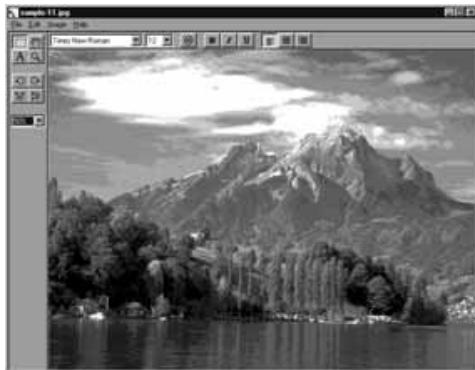
Used to display images in the Camera (compact flash card) in the image panel for editing and printing.
1 Display the camera images in the folder panel (p. 29).
- When a group is displayed, double-click on it to open a new folder panel and display the images in the group in thumbnail format.
2 Double-click on the desired image.
- The image will appear on the monitor in the image panel.
Displaying Hard Disk Images
Used to display images on the hard disk of the PC in the image panel for editing and printing.
1 Click on the Open File button on the control strip.
2 Select the image file to be displayed on the image panel from the window.
With Windows
With the Macintosh
3 Click on Open to open the image panel and display the selected image in full screen size.
Double-clicking on an image displayed in thumbnail format in the folder panel also displays it on the image panel.
Cropping Images
Used to crop a selected portion of an image.
1 Click on the selection tool in the tool palette.
·^+^ is used as the cursor.

2 Move the cursor to the portion of the image to be selected, and select that portion by dragging the cursor.
3 Select Crop from the Image menu.
The image is cropped.
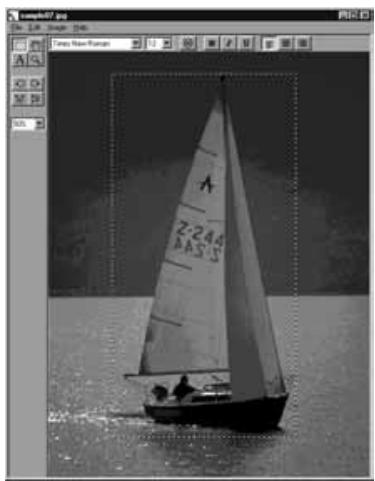
Select the boat
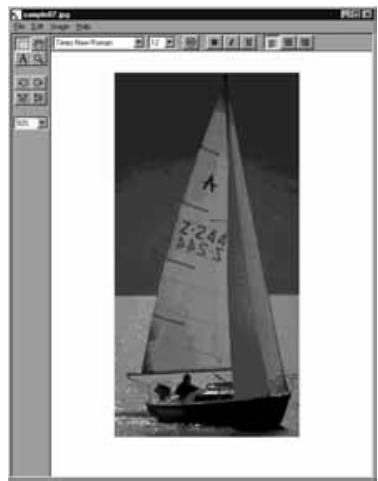
Select Crop from the Image menu.
Select Undo from the Edit menu to cancel the previous operation. This function may be used to cancel a number of previous operations in turn (Macintosh: last operation only). The number of operations depends upon the memory available and the type of operation.
Flipping an Image (horizontally or vertically)
Used to flip a displayed image either horizontally or vertically.
Select Flip from the Image menu, then select Horizontal or Vertical as required.
The displayed image is flipped.
- Clicking on the Horizontal or Vertical flip buttons on the tool palette has the same effect.
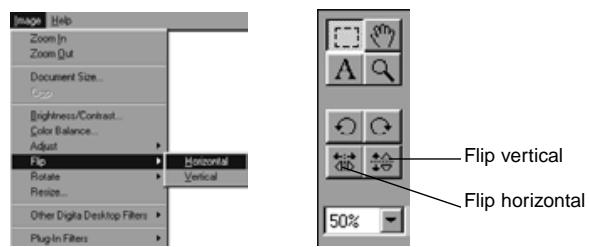

Select Undo from the Edit menu to cancel the previous operation. This function may be used to cancel a number of previous operations in turn (Macintosh: last operation only). The number of operations depends upon the memory available and the type of operation.
Rotating an Image
Used to rotate a displayed image to the left or right, by either 90^ or 180^ .
Select Rotate from the Image menu, and then select 90 Degrees Left, 90 Degrees Right, or 180 Degrees (Macintosh: 180 Degrees, 90^ counter clockwise, 90^ clockwise).
- The displayed image is rotated in the selected direction by the selected angle.
- Clicking on the 90 Degrees Left and 90 Degrees Right buttons on the tool palette has the same effect.
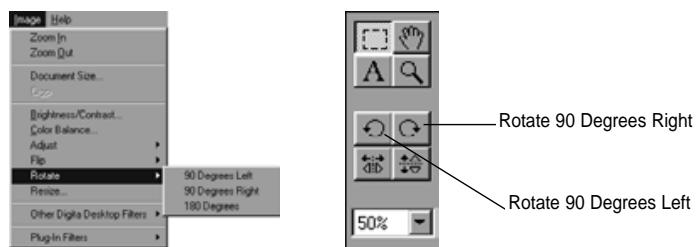
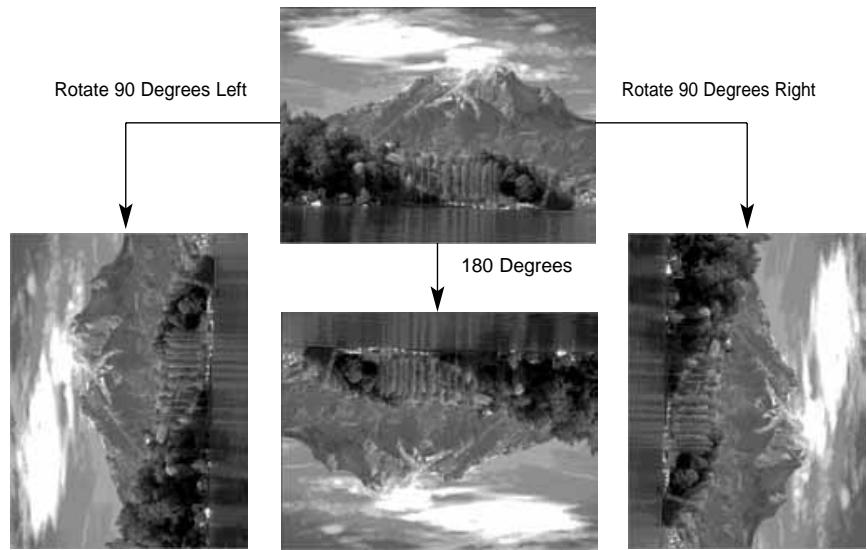
Select Undo from the Edit menu to cancel the previous operation. This function may be used to cancel a number of previous operations in turn (Macintosh: last operation only). The number of operations depends upon the memory available and the type of operation.
Inserting text
Inserts text in an image.
1 Select the text tool from the tool palette.
- 'I' is used as the cursor.
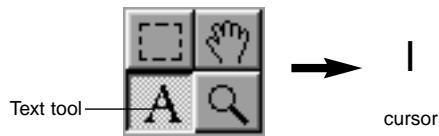
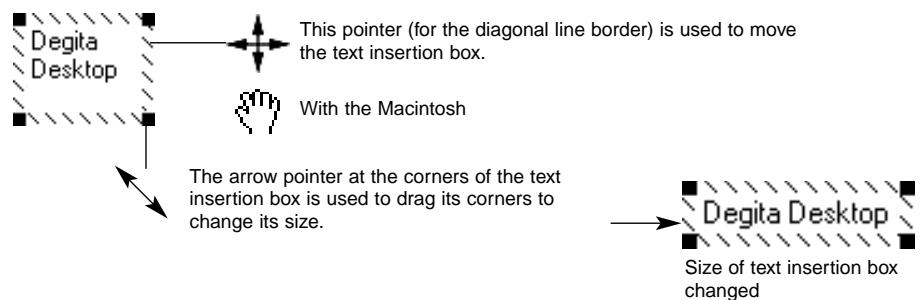
2 Move the cursor to the location at which the text is to be inserted, and click the mouse to display the text insertion box.
3 Enter the text from the keyboard.
- Macintosh: Skip step 4 and proceed to step 5.

4 When all the text has been entered, click outside the box.
- When the text has been saved the border of the box are shown in diagonal lines.
- Click inside the box to enter more text.
- If the border of the box disappears when the mouse is double-clicked, select Undo from the Edit menu to display the box again.

5 The arrow pointer at the corners of the text insertion box is used to drag its corners to change its size.
- The cursor for the diagonal line border of the text insertion box is used to move it.
6 The font, size, colour, shape, layout, and background colour (Macintosh only) may be changed from the toolbar.
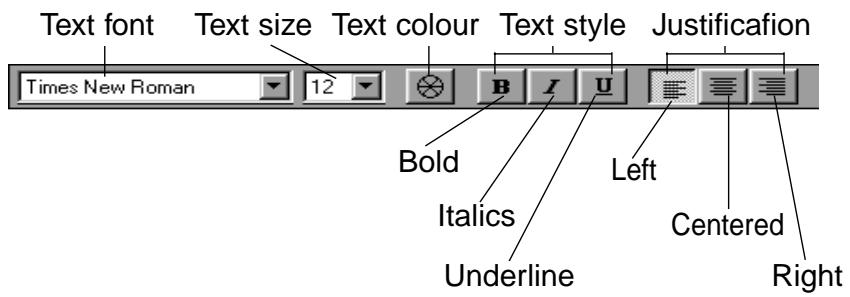
With Windows
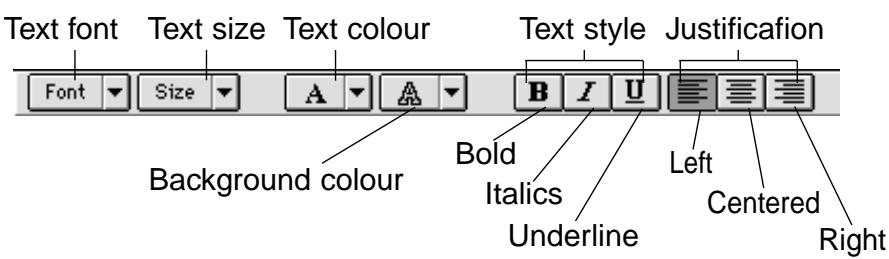
With the Macintosh
7 Double-click outside the text box when finished
The text box disappears.
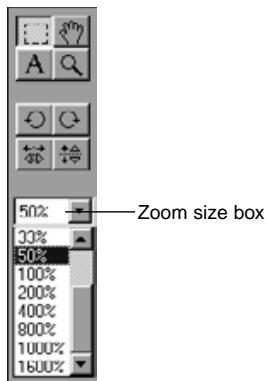
Zoom In/Zoom Out
Enlarges or reduces an image within a range of 1600 - 3% (400-25% with the Macintosh).
1 Click on the zoom tool on the tool palette.
- The cursor changes to the zoom icon.
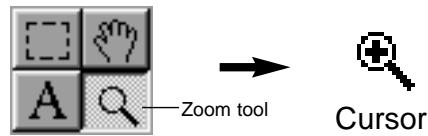
2 Place the cursor over the image and click to enlarge it. Click while holding down the Ctrl key (Option key with the Macintosh) to reduce it.
With Windows
- The image may be enlarged in four steps (200%, 400%, 800%, 1600%) from 100% (actual size).
- The image may be reduced in five steps (50%, 25%, 12%, 6%, 3%) from 100% (actual size).
With the Macintosh
- The image may be enlarged in four steps (150%, 200%, 300%, 400%) from 100% (actual size).
- The image may be reduced in three steps (75%, 50%, 25%) from 100% (actual size).
Other zoom methods
- Select the zoom percentage directly from the zoom size box on the tool palette.
- Select Zoom In or Zoom Out as necessary from the Image menu.

Scrolling an Image
Scrolls an image which is too large to fit on the screen.
1 Click on the Pan tool on the tool palette.
- The cursor changes to the hand icon.
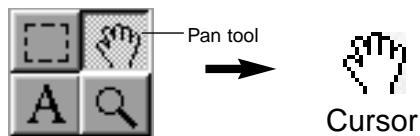
2 Place the cursor over the image and drag it across the screen as necessary.
Adjusting Brightness and Contrast
Adjusts the brightness and contrast of the displayed image.
1 Select Brightness/Contrast from the Image menu.
- The Brightness/Contrast adjustment window appears.

2 Drag the slider knobs with the mouse. The settings may also be entered directly in the boxes at the right.
- The brightness and contrast change as the knobs are dragged or as values are entered in the boxes.
3 Click on OK when you have completed the adjustments.
- Click on Cancel to cancel the adjustments and close the window.
Adjusting Colour Balance
Adjusts the balance in the displayed image.
1 Select Colour Balance from the Image menu.
The Colour Balance window appears.
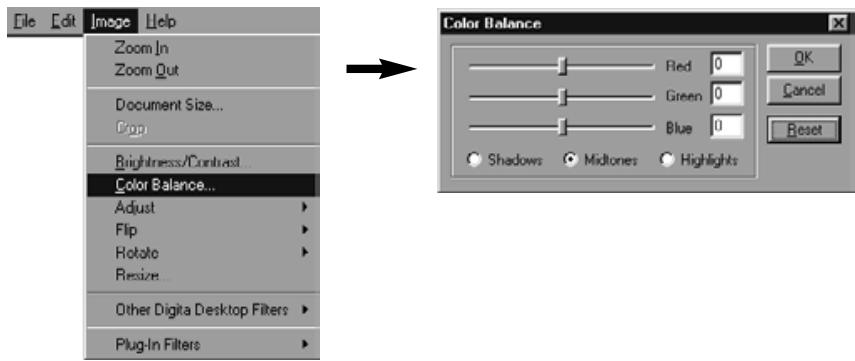
2 Use the option buttons to choose to adjust the shadows, midtones, or highlights of the image.
- Making corrections in the midtones first may eliminate the need for further corrections.
3 Drag the slider knobs with the mouse. The settings may also be entered directly in the boxes at the right.
- The colour balance of the image changes as the knobs are dragged or as values are entered in the boxes.
Red can subtract red (move left) or subtract cyan (move right). Green can subtract green (move left) or subtract magenta (move right). Blue can subtract blue (move left) or subtract yellow (move right).
4 Click on OK when you have completed the adjustments.
- Click on Cancel to cancel the adjustments and close the window.
Image Adjustment
Easy adjustment of image brightness and edges by simply selecting options from the menu.
Lighten and Darken
Select Adjust from the Image menu, and select Lighten or Darken from the sub-menu.
The brightness of the image changes.
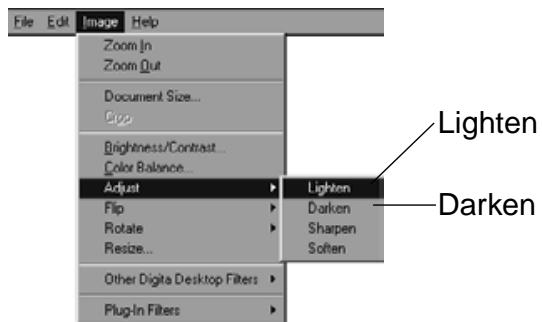
Select Undo from the Edit menu to cancel the previous operation. This function may be used to cancel a number of previous operations in turn (Macintosh: last operation only). The number of operations depends upon the memory available and the type of operation.
Sharpen and Soften
Select Adjust from the Image menu, and select Sharpen or Soften from the sub-menu.
- These functions produce varying degrees of effect from image to image.
Sharpen: This function "sharpens" edges. It will give a slightly out-of-focus image a crisp appearance. The nature of this function also makes image noise more visible.
Soften: This function creates a soft-focus effect. Small details in the image are diffused, making it popular for portraits. The nature of this function makes the entire image appear unsharp.
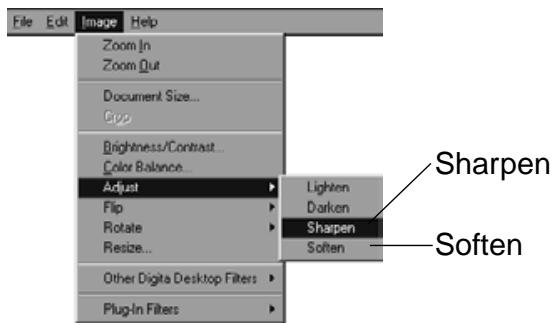
Select Undo from the Edit menu to cancel the previous operation. This function may be used to cancel a number of previous operations in turn (Macintosh: last operation only). The number of operations depends upon the memory available and the type of operation.
Resizing
Changing the size of the displayed image.
1 Select Resize from the Image menu.
The Resize window appears.
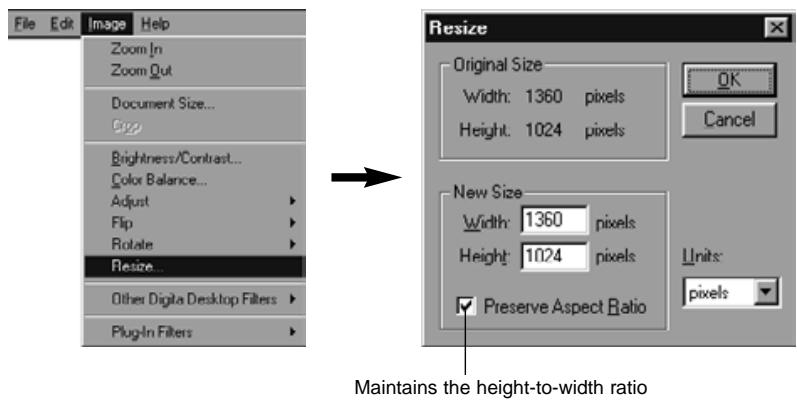
2 Select the units.
3 Enter the new values for width and height, and click on OK.
- If the Preserve Aspect Ratio (Macintosh: Maintain Aspect Ratio) option is checked the image is resized while maintaining its original aspect ratio. If a new width or height value is entered in the relevant box an adjusted value automatically appears in the other box.
- Click on Cancel to ignore resizing.
- Image quality will be reduced if the image is enlarged too much.
Select Undo from the Edit menu to cancel the previous operation. This function may be used to cancel a number of previous operations in turn (Macintosh: Last operation only). The number of operations which may be cancelled depends upon the memory available and the type of operation.
Digital Desktop™ Image Filters
Installation of a variety of filters expands the functionality of DigiTa DesktopTM.
Plug-in Filters
Installation of a variety of filters expands the functionality of Digita DesktopTM.
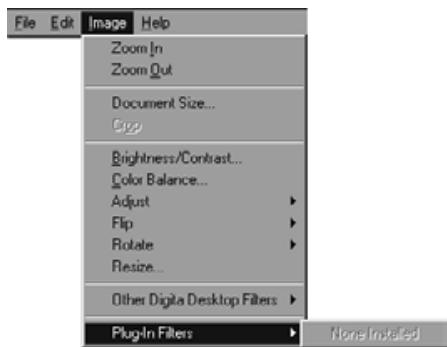
Printing Images
Printing the displayed image.
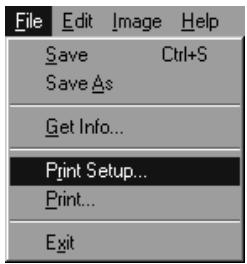
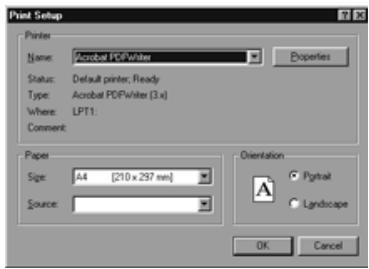
1 Select Print Setup from the File menu (Paper Setup from the File menu with the Macintosh).
The Print Setup window appears.
2 Select the printer, paper, and orientation etc, then click on OK.
3 Select Print from the File menu
The Print window appears.
- The content of the window differs with the printer used.
4 Set the print range and number of copies.
- The Print screen varies depending on the printer.
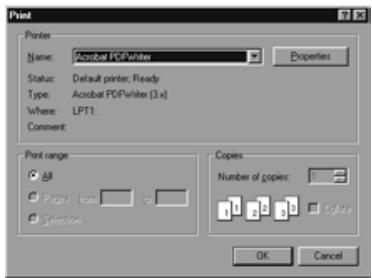
5 Click on OK (Print with the Macintosh) when setup is complete.
Saving Images
The displayed images may be saved on the hard disk in a variety of formats.
Image Formats
The images displayed on the image panel may be saved in the following formats.
BMP
The BMP format is supported as standard in Windows®. Image files saved in this format may be viewed with software such as Microsoft Paint (supplied with the Windows® operating system) without any special image processing software.
EXIF (EXIF 2.0)
An abbreviation of Exchangeable Image file Format. Images taken with the DImage EX are recorded in the compact flash card in this format. EXIF 2.0 is a development of EXIF 1.0 (which supports JPEG compression, simple structure, recording of supplementary information), which supports new information tags such as recording of audio information during photography, and photographic information. It also permits simple conversion of colour information and additional information quickly, without image deterioration, and without dropout).
JPEG
An abbreviation of Joint Photographic Experts Group. JPEG is an international standard for compression and expansion of static images and is independent of platform (as is the TIFF format described below), while providing for a greater compression ratio, and thus a wider range of application.
PICT
This format is widely used in Macintosh applications, and has become the de-facto image format for the Macintosh. Image files saved in this format may be viewed with software such as SimpleText (supplied with the Macintosh operating system) without any special image processing software.
Continued on Next Page.
TIFF
An abbreviation of Tag Image File Format. This format supports high resolution bit map files, and may be used with a variety of platforms. As such it may be used with the IBM PC/AT and compatibles, the Macintosh, and a number of other systems.
Photoshop 3.0 (PSD)
An image format developed for the Adobe Photoshop V3.0 image processing software developed and sold by Adobe Systems Corporation.
FlashPix
A file format developed jointly by Kodak, Microsoft, Hewlett Packard, and Live Picture Corporation. Currently developing as the international standard for PC image files, it supports the following features not available with other image file formats.
- All images are divided into 64x64-pixel tiles so that unnecessary data is not processed during enlargement and movement. Each tile is compressed with the JPEG format, this minimizing loss of image data.
- As each file contains multiple high-resolution files the image may be automatically displayed at the optimum resolution.
- As the image is displayed at the optimum resolution, and only the image data tiles for the displayed part of the image are processed, memory use and processing power required for display are minimized, thus permitting high-speed image display.
Saving Images
With Windows
1 Select Save As from the File menu.
- The Save As window appears (the standard file save window appears with the Macintosh).

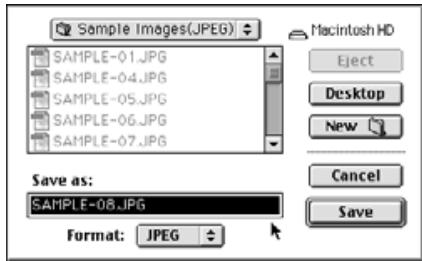
With the Macintosh
2 Select the folder in which to save the image.
- To create a new folder to save the image in, click on the Create New Folder icon (New with the Macintosh).
- Click on Cancel to cancel creation of a new directory.
3 Enter the file name.
4 Select the desired file format.
- The file extension appropriate to the selected file format is automatically added to the file name (Windows® only).
5 Click on Save.
- The image is saved in the specified folder in the specified format and the image panel appears again.
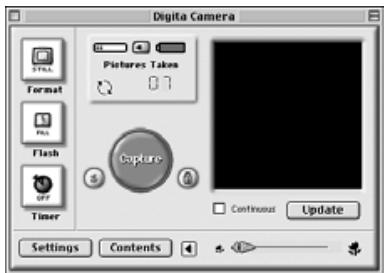
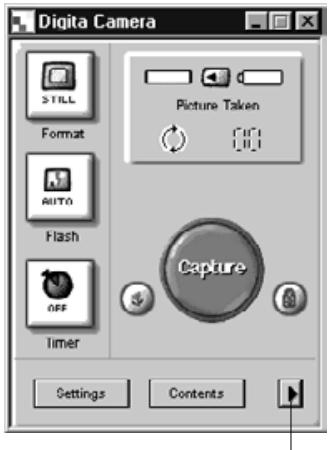
The camera panel is used to control the camera from the PC and monitor its status on the screen.
Operations Possible with the Camera Panel
- Display the status of the digital camera.
Control the Dimage EX from the PC.
Set the image type.
Set the flash mode.
Set the camera clock.
Set the camera name.
Set the counter in the camera.
Select the video output type.
Set the wait time for Instant Review.
Turn the system sounds off.
Select the image quality, size, and colour mode.
Set the interval for Burst and Timelapse.
Set the Digital Scene Selector.
Upload scripts and applications to the compact flash card in the camera.
Set the white balance.
Remote photography (when the IrDA is connected).
Photography with the self timer (when the IrDA is connected).
- Display images in the camera (compact flash card) on the folder panel.
Preview display (when the IrDA is connected).
The Camera Panel
- Some icons or labels may be slightly different from those used in the camera.
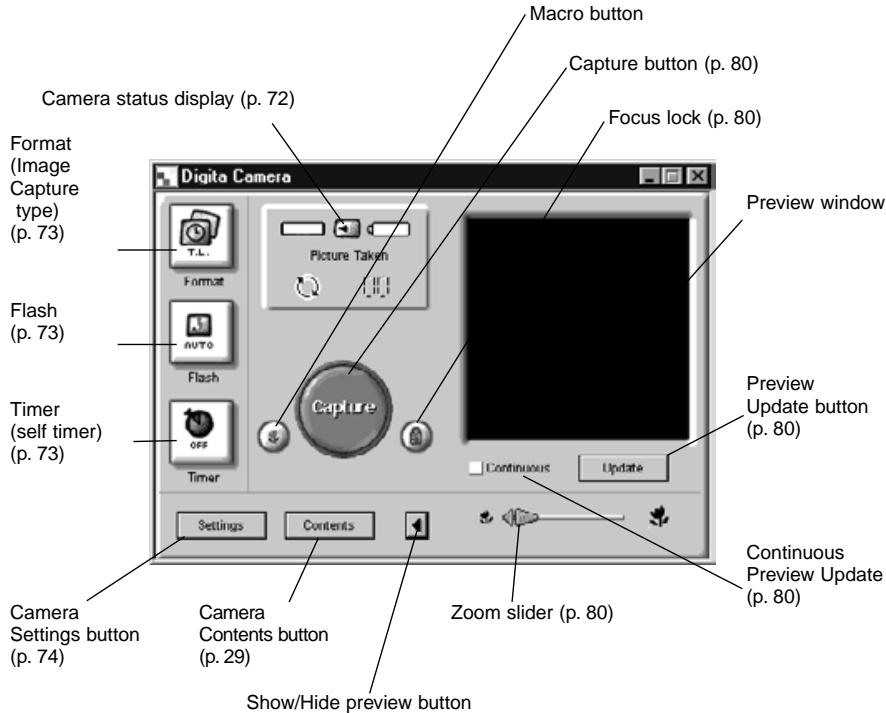
Click on this button to display the preview window.
Clicking on the Show/hide Preview button removes the preview window from the panel and reduces the camera panel size.
Camera Status Display
Displays the number of photos stored in the compact flash card in the camera and the remaining battery level.
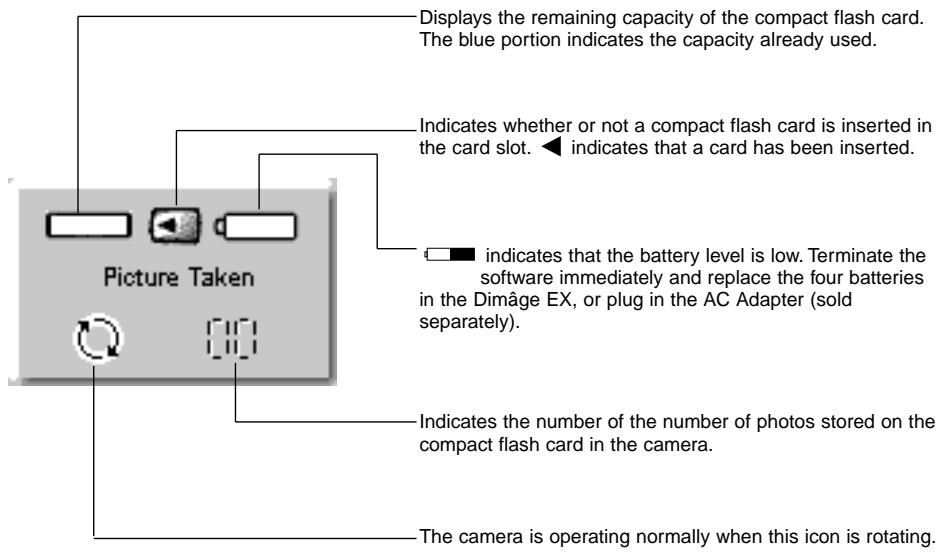
Basic Camera Panel Operation (three buttons)
These three buttons are used to set the image capture type, the flash mode, and the self-timer for remote photography.
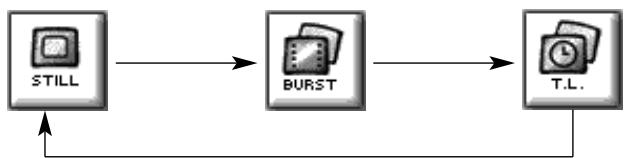
Format (Image Capture Type)
- The image capture type changes in the order shown below each time this button is clicked.
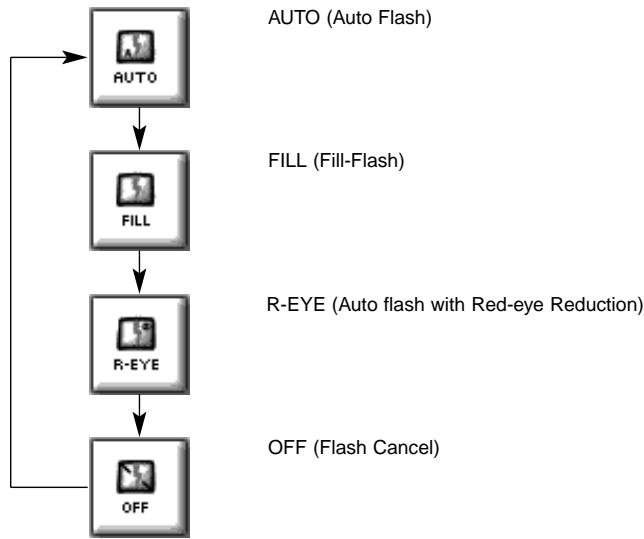
Flash
- The mode changes in the order shown below each time this button is clicked.
- Refer to the Built-in Flash section of the camera instruction manual for details.
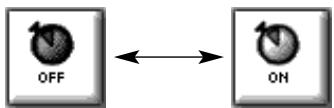
Timer (Self-timer)
- The self-timer is switched on/off each time this button is clicked.
- When ON, the self-timer delays release of the shutter for approximately 10 seconds.
- The self-timer is not available for Burst or Timelapse images.
Changing Camera Settings
Changes the settings for the camera from the PC. The majority of settings which may be made on the camera itself may also be made remotely from the PC.
Click on the Settings button to display the Camera Settings window.
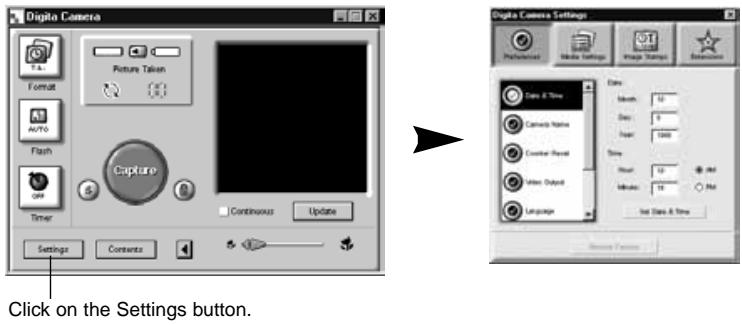
A large number of items may be set via the four buttons in the camera settings window. Click on a button to display a list of the related items.
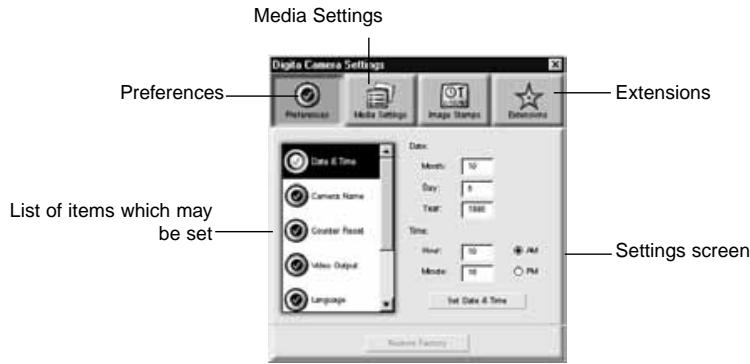

[Preferences]
Photography parameters, date and time, counter reset, camera name, and NTSC/PAL select.

[Media Settings]
File size of images taken with the camera, image quality, colour, interval between photographs, number of photographs.

[Extensions]
Click on the list of items to select the settings screen.
Preferences
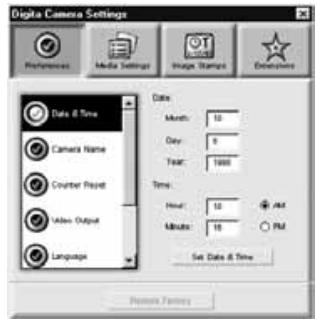
Set the Date and Time in the camera.
- Enter the desired settings for Month, Day, Year, Hour, and Minute.
- Click on the AM or PM radio button.
- Click on the Set Date or Time button.
- The camera's clock will be changed.
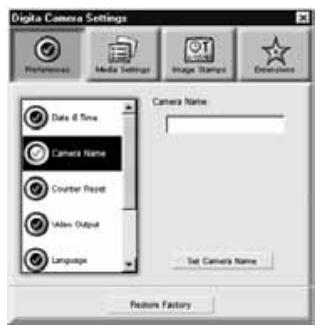
Set the camera name.
- Input the name in the text box.
-
Click on the Set Camera Name button.
-
See Camera Name in the camera instruction manual for more information.
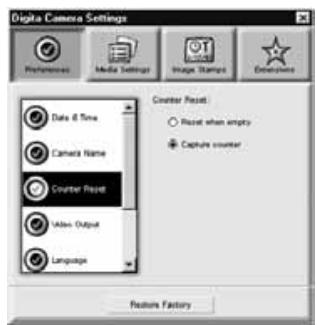
Set the Counter Reset.
Click on the desired radio button.
- See Counter Reset in the camera instruction manual for more information.
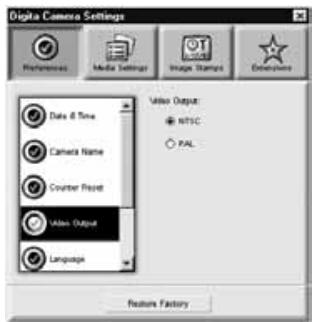

Set the Video Output.
Click on the radio button of the desired setting
- See Video Mode in the camera instruction manual for more information.
Select the Language.
- See the camera instruction manual for more information.
Click on the radio button of the desired setting
- Only the languages available in your camera can be selected.
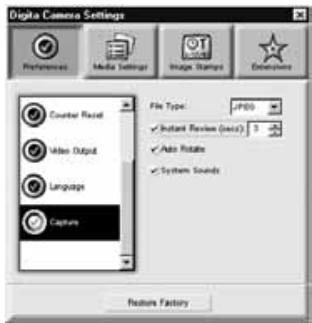
Set the Capture preferences.
- Set the amount of time Instant Review will wait for a command before saving an image.
- This option cannot be set by the camera.
- Click the check box to turn system sounds on or off.
- See System Sounds in the camera manual for mare information.
- The JPEG (EXIF) file type cannot be changed.
Media Settings
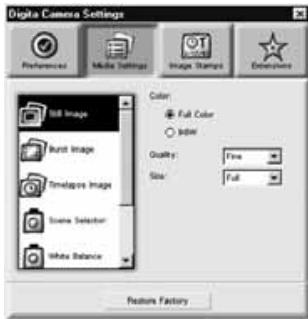
Set the Still Image Settings.
- Select the desired radio button for Colour or B&W.
- Select the desired image quality from the pull-down menu.
-
Select the desired size from the pull-down menu.
-
See the appropriate section in the camera instruction manual for more information.
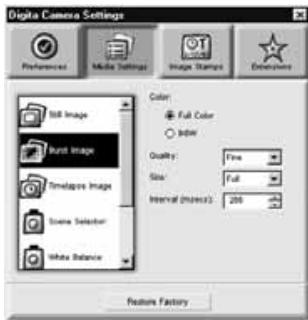
Set the Burst Image Settings.
- Select the colour, image quality, and image size.
See the appropriate section in the camera manual for more information. - Select the time interval between Burst images (in milliseconds).
- This operation cannot be done via the camera.
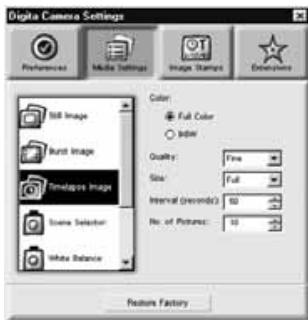
Set the Timelapse Image Settings.
- Select the colour, image quality, and image size.
- Select the timelapse interval.
- Select the number of pictures.
- See the appropriate section of the camera manual for more information.
Continued on Next Page.
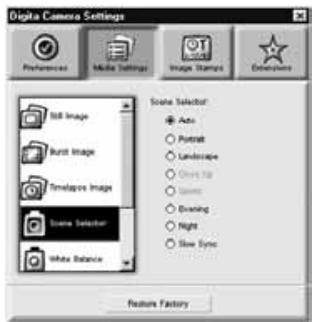
Select the Digital Scene Selector.
Click on the radio button for the desired setting.
- See the Digital Scene Selection section in the camera manual.
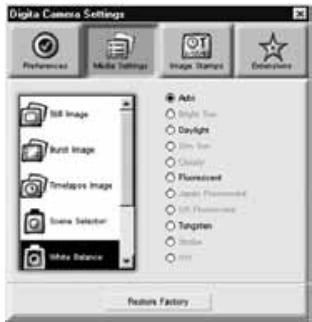
Set the White Balance.
Click on the radio button for the desired setting.
- See the White Balance section in the camera manual for more information.
Extensions
Upload a script or application to the compact flash card in the camera.
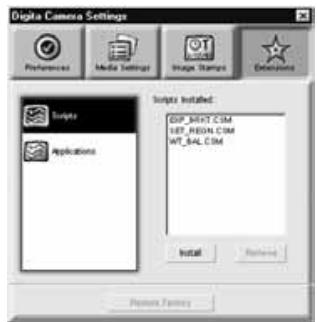
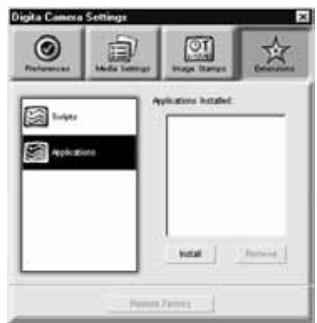
Upload a Script or Application.
- Click on the Extensions button in the camera settings panel.
- Click on Scripts or Application, whichever is to be uploaded.
-
Click on the Install button in the camera settings panel.
-
The Open window appears.
- Select the desired file, then click on Open.
- The script or extension will be installed on the CF card in the camera as a .csm file.
To delete an added csm file, select it in the camera settings panel, then click on Remove. - There are 3 permanent csm files which cannot be deleted.
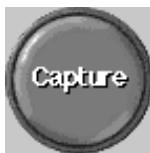
Remote Photography (IrDA only)
Remote photography with the camera from the PC is possible when running Windows® 95/98, provided the IrDA interface is connected.
1 Set the Format (Image capture type) and Flash mode (p. 73).
2 Click on the Update button to display the preview screen.
- Determine the framing from the preview screen.
- Drag the zoom slider until the object(s) are the desired size on the screen.
- The preview screen is automatically updated if Continuous has been checked.
Continuous Preview Update
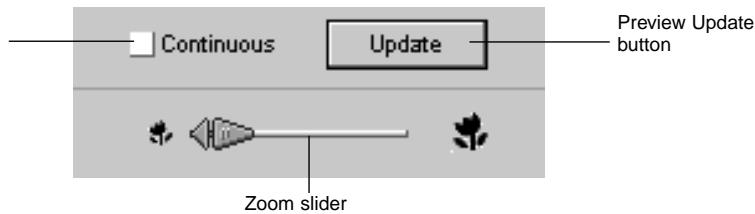
If the object(s) to be photographed are not in the center of the screen, click on the focus lock to switch it ON (red), and fix the focus temporarily to alter the framing.

Click on the focus lock
4 Click on the Capture button once all preparations have been completed.
Hard disk images may be selected for display as slides in a similar manner to a slide projector.
- Macintosh:Quick Time 3.0 or better is required to operate this function.
Operations Possible With Slideshows
- The interval between slides may be set, or the next slide displayed by clicking with the mouse (p. 91).
- Audio may be recorded for each image, and replayed during the slideshow (see p. 88).
- Background music may be added (p. 90).
- The slideshow may be saved as an AVI file (QuickTime movie with the Macintosh) (p. 94).
Producing a Slideshow
Display the slideshow window.
Add an image file to the slideshow window. Arrange the order in which the slides are to be displayed. Remove slides from the slideshow window as necessary. If you have altered the original image, update the slide. Record the audio for the image files. Specify the background music. Specify the background colour and method of selecting the Play the slideshow. Save the slideshow. Create an AVI file or QuickTime movie file.
Starting a Slideshow
1 Click on the Create button on the control strip.
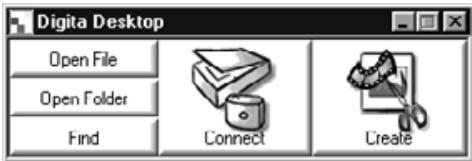
2 Click on Slideshow in the Select a document to create: window.
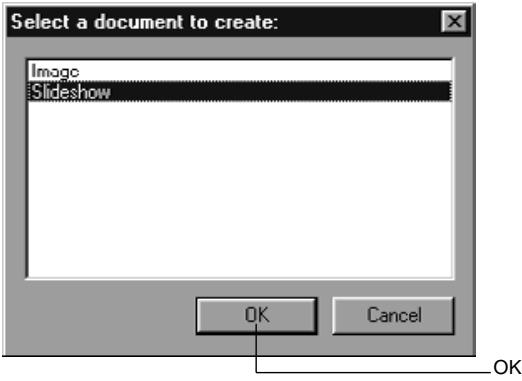
3 Click on OK to open the slideshow window.
Add an image file
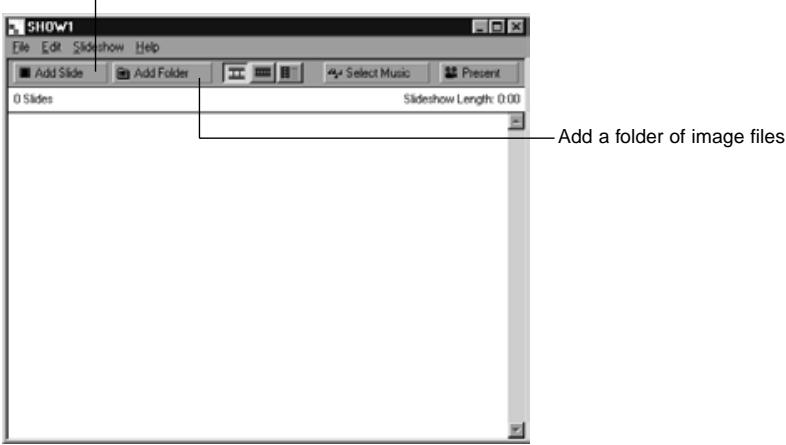
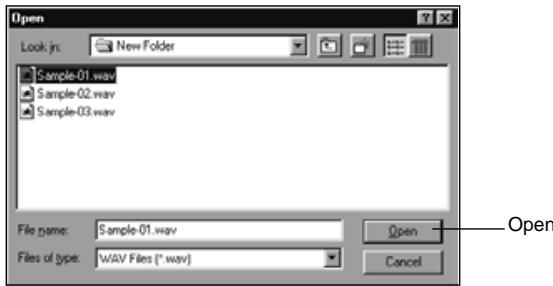
Adding an Image File
Adds a hard disk image file to be displayed in the slideshow to the slideshow window.
Display the slideshow window (p. 82).
2 Select Add Slide from the Slideshow menu.
- Clicking on Add Slide in the toolbar has the same effect.
The following window appears.
Click on the image file
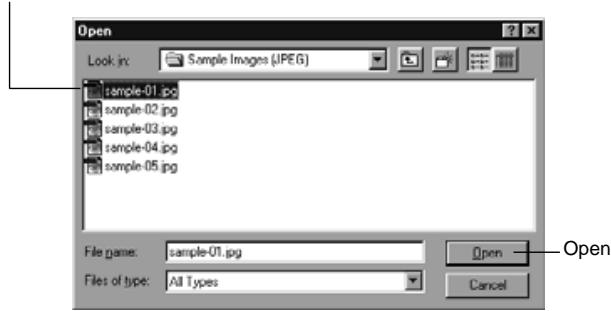
3 Select the desired file, then click or Open.
- The selected image file is added to the slideshow window.

Adding a Folder
Adds all the image files in a folder from the hard disk to the slideshow window.
Display the slideshow window (p. 82).
2 Select Add Folder of Slides from the Slideshow menu.
- Clicking on Add Folder in the toolbar has the same effect.
The following window appears.
3 Select the folder containing the image files to be added, then click on OK.
- All image files in the selected folder are added to the slideshow window as slides.
Number of added slides Length of the slideshow in seconds
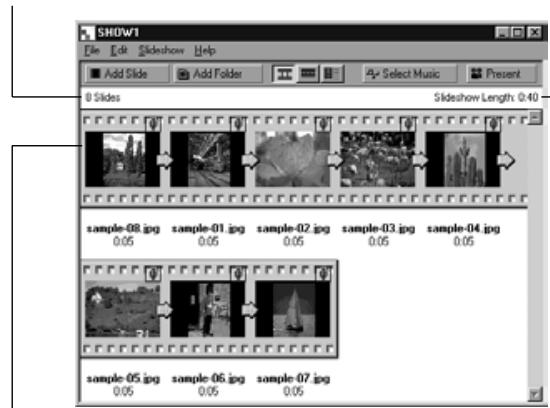
The image files are added to the slideshow.
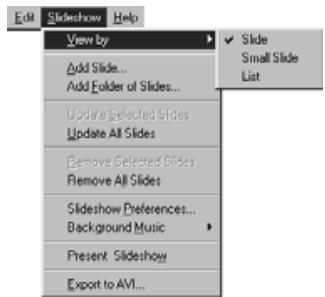
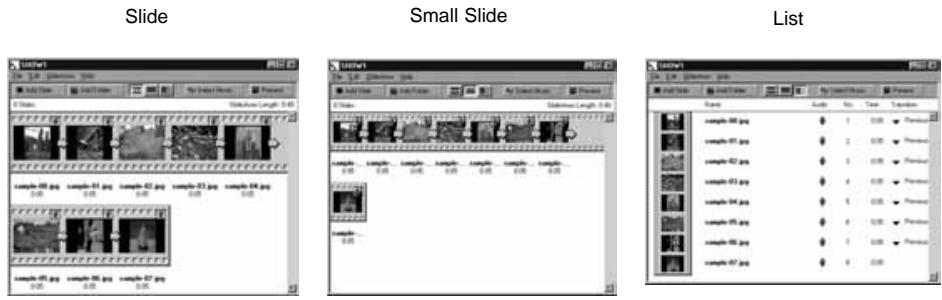
Changing the Display Method
The method of displaying the slides added to the slideshow may be changed to Slide, Small Slide, or List.
Select Slide, Small Slide, or List from the View By submenu on the Slideshowhow menu. Clicking on the relevant icon in the toolbar has the same effect.

The slide display changes as follows.
Changing the Display order
Changes the order in which the slides in the slideshow window are to be displayed.
Change the order in which the slides are to be displayed by dragging them to new positions with the mouse.
*Moves to the position of the arrow
Updating Slides (Windows® only)
When the original image files have been altered with the image panel, the slides must be updated and new thumbnail images created.
Select Update Selected Slides from the Slideshow menu.
- All slides will be updated, irrespective of which slides have been selected.
- The new thumbnails are created when the slides have been updated.
Removing Slides from the Slideshow Window
Removes all or some of the slides previously added to a slideshow. Note that the original image remains on the hard disk.
1 Move the cursor to the slide to be removed and click on it. To remove multiple slides, hold down the Ctrl key (the Shift key with the Macintosh) while clicking on the slides.
- The file name of the selected slides is displayed in reverse video.
- To cancel selection of an image, hold down the Ctrl key (the Shift key on the Macintosh) and click on that image.
2 Select Remove Selected Slides from the Slideshow menu.
- When Remove All Slides is selected from the Slideshow menu, all slides are removed irrespective of which slides have been selected.
The following window appears.
3 To remove all the slides, click on Yes.
- To cancel the selection when you have made a mistake etc, click on No.
Adding Audio to a Slide
Adds audio to image files in the slideshow window. With the Macintosh, audio added in the folder panel is used in the slideshow.
1 Click on the microphone icon at the top-right of the slide, and select Record from the pop-up menu.
The Record window appears.
- Clicking on the microphone icon when Small Slides or List has been selected has the same effect.
Click on the microphone icon

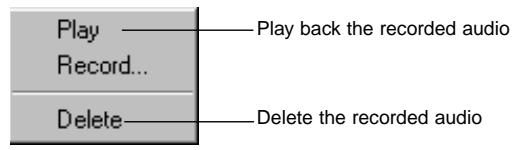
Play
Record...
Delete
Select Record from the pop-up menu
Record window
2 Record the audio with the Record window.
- Record the audio via the internal microphone, or a microphone connected to the sound input port.
- Begin recording by clicking on the (Record) button, and finish recording by clicking on the (Stop) button.
- Click on the Play button to play back the recorded audio.
- You may re-record as many times as necessary.
3 Click on Save to save the recorded audio.
- When the audio has been recorded the microphone icon at the top-right of the slide image changes to a speaker icon.
4 Click on the speaker icon to display the pop-up menu.
- Select Play to play back the recorded audio.
- Select Delete to delete the recorded audio.
Adding Background Music
Specifies a WAV format file (AIFF format with the Macintosh) as background music.
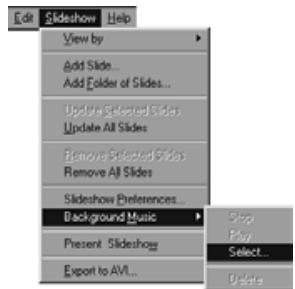
1 With the slideshow window displayed, select Background Music from the Slideshow menu, and select Select from the submenu.
- Clicking on Select Music on the slideshow window toolbar has the same effect.

The following window appears.
2 Click on the desired sound file to be used as background music (the file name is displayed in reverse video), and then click on Open.
- The selected sound file is set as the background music for the slideshow.

3 Select Background Music from the Slideshow menu, and select Play from the submenu.
- The selected sound is played.
- Click on Stop to stop playback.
- Click on Delete to remove the sound file as background music.
Slideshow Preferences
Establishes the settings for slideshow playback.
1 With the slideshow window displayed, select Slideshow Preferences from the Slideshow menu.
- The Slideshow Preferences window appears.
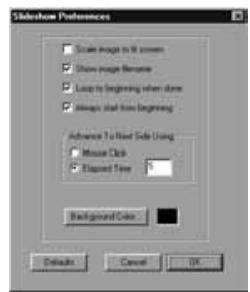
2 Set the preferences.
- Scale image to fit screen:
Enlarge or reduce the image to fit the screen
Show image file name:
Display the image file name.
- Loop to beginning when done:
Endlessly repeat the slideshow.
Always start from beginning:
Start from the beginning, or from the point at which the slideshow was previously halted.
- Advance To Next Slide Using:
Start the slideshow by clicking with the mouse, or automatically after a specified time has elapsed. If Elapsed Time is selected the time must be set in units of seconds in the box at right.
- Background Colour:
Sets the background colour for the slideshow. Click on Background Colour to display the Colour window.
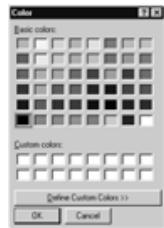
Colour Window
3 Click on OK to save the settings and close the Slideshow Preferences window.
- Click on Defaults to return to the initial settings.
- Click on Cancel to cancel the entered settings and close the Slideshow Preferences window.
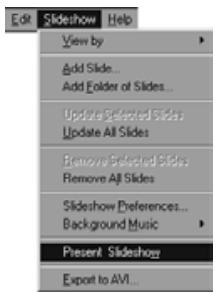
Presenting a Slideshow
Plays the slideshow you have created.
1 Select Present Slideshow from the Slideshow menu.
- Clicking on Present on the slideshow window toolbar has the same effect.
The slideshow presentation begins. - Press any key (eg the space bar) to halt the slideshow.

Saving a Slideshow
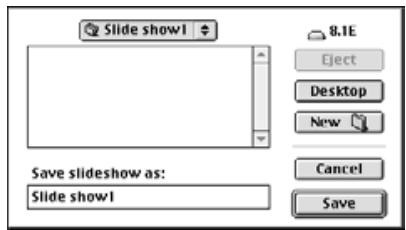
Saves a slideshow on the hard disk as a file.
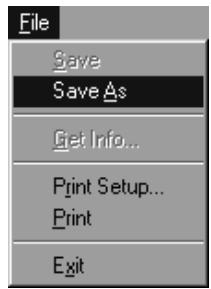
With Windows
1 With the slideshow window displayed, select Save As from the File menu.
- The Save As window appears (the standard file save window with the Macintosh).

With the Macintosh
2 Select the location (folder) in which to save the slideshow.
- Click on the Create New Folder icon (New with the Macintosh) if the slideshow is to be saved in a new folder.
- Click on Cancel to cancel creation of a new folder.
3 Enter the file name.
4 Click on Save.
- The slideshow is saved as a file in the specified folder.
To open (view) a saved slideshow, click on Open File on the control strip, and select the slideshow file.
Creating an AVI File (Macintosh: QuickTime movie file)
Converts a slideshow into an AVI file (a QuickTime file with the Macintosh).
The AVI file format is supported as standard under Windows. These files may be played with such standard software as Media Player included with the operating system, and therefore do not require the use of special applications software.
The QuickTime movie file format is supported as standard by the Macintosh. These files may be played with standard software included with the operating system, and therefore do not require the use of special applications software.
1 With the slideshow window displayed, select Export to AVI.
The Export to AVI window appears.
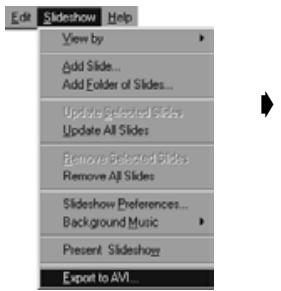
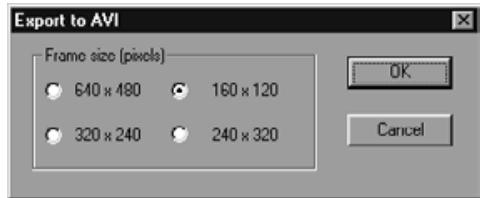
2 Select the frame size.
3 Click on OK.
The file save window will appear.
4 Select the save location and file name, then click on Save.
- The AVI file/QuickTime movie is created and saved.
- Macintosh: QuickTime movies can be played if QuickTime has been installed.
Appendix
The version number is displayed in the camera status screen. Press the Status button on the camera when in Record mode.
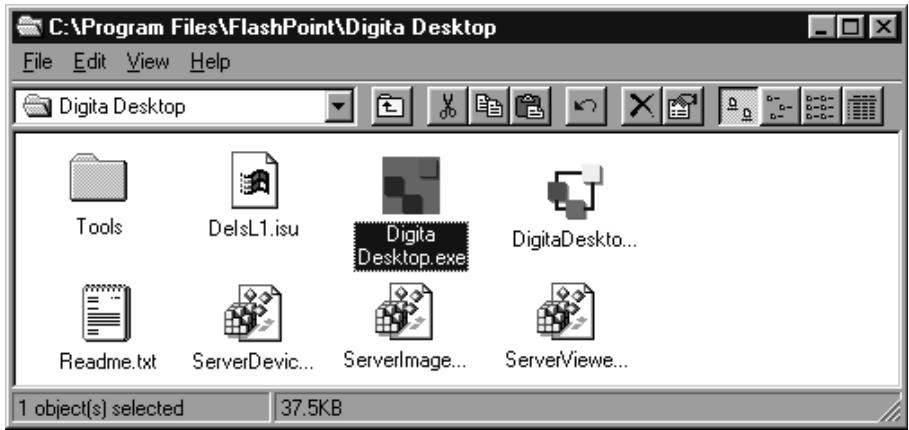
With Windows®
Switch the PC power supply ON and start Windows.
2 Click on the Diga Desktop.exe icon.
- If the software has been installed as per the instructions in the setup program, the Digits Desktop™.exe file will be in the [C:] → [Program Files] → [FlashPoint] → Digits Desktop] folder.
- The .exe identifier may not be displayed depending upon the display settings.
3 With the Digita Desktop.exe file selected, right-click on it.
4 Select Properties from the context menu which appears.
- The DigiTa Desktop Properties window appears.
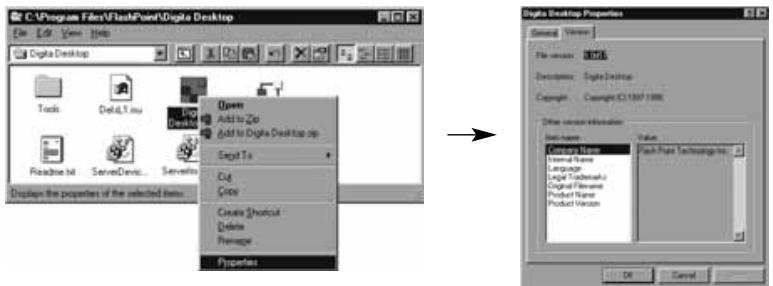
5 Click on the Version tag, then click on Product version under Item name: in the Other version information window.
The version number appears under Value:.
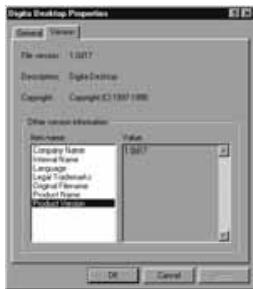
6 Click on OK.
With the Macintosh
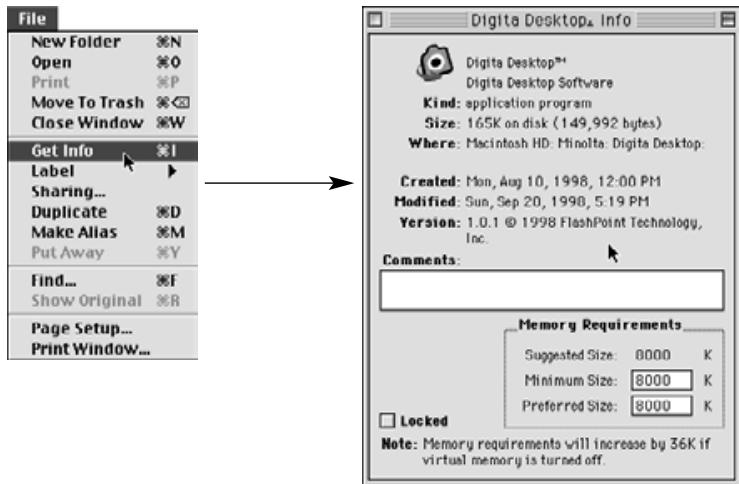
1 Turn on the Macintosh.
2 With the Digita DesktopTM icon selected, click on it.
- If the software has been installed as per the instructions in the setup program, the Digita DesktopTM icon will be in the folder specified folder at installation.
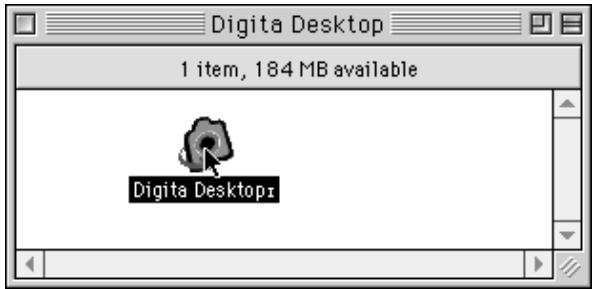
3 Select Get Info from the File menu.
- The Info window appears displaying the version number (circled below).
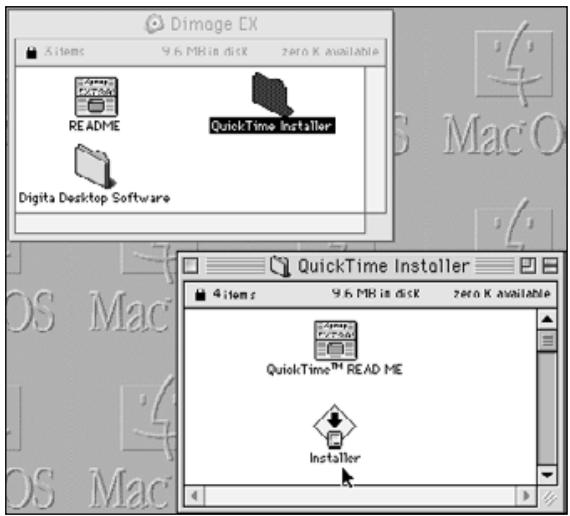
Installation of QuickTime 3.0
QuickTime™ 3.0 is necessary to run the Digita Desktop™ software on the Macintosh.
Install QuickTime 3.0 if it is not already installed on your system.
- Insert the Dimage EX CD-ROM into the CD-ROM drive.
- Double-click on the CD-ROM icon, then double-click on the QuickTime Installer folder.
- Double click on the Installer icon in the QuickTime Installer folder.
- Follow the instructions that appear on the screen.
DirectX Installation - Windows 98/Windows 95
DirectX is necessary to run Digita Desktop™ on a Windows based operating system.
Please install DirectX before installing Digita Desktop™. These instructions assume the CD-ROM drive is drive D.
- Insert the Dimage EX CD-ROM into the CD-ROM drive.
- Select Start Run. The Run dialog box will appear.
- Type D:\ImageEX\Dx6core.exe in the Open text box, then click on OK.
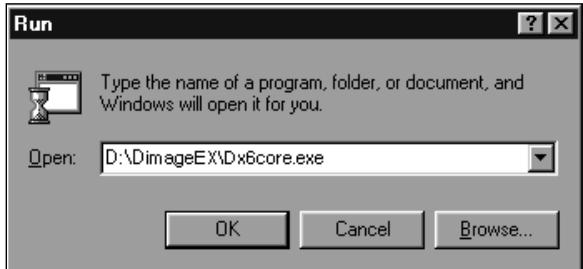
- Follow the directions that appear on the screen. Dx6core.exe will check for and automatically install DirectX if necessary.
DirectX Installation - Windows NT
Check the Windows NT start-up screen to determine which Service Pack is installed on your PC. Service Pack 3: DirectX is already installed.
Service Pack 1 or 2: Contact Microsoft for Service Pack 3 information.
IrDA COM Port - Windows 98/Windows 95
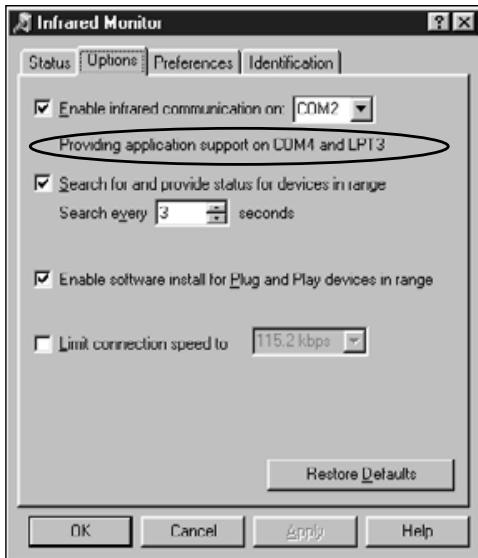
When the camera is connected to the computer via the IrDA connection, COM4 should be the Infrared Serial [COM] Connections Port.
To check the COM port:
- Select Start Settings
Control Panel.
- Click on the Infrared icon, then click on the Options tag.
- Check that COM4 appears in the "Providing application support..." line.
If COM4 does not appear, refer to Windows Help or your computer user's manual for instructions on how to change the Infrared Serial Connections Port.
Please contact your dealer for information regarding installation, SCSI-2 interface recommendations, or application compatibility. If you dealer is unable to help you, contact us toll free.
Technical Support
01908 208349
Monday - Friday 9:00 AM - 5:15 PM
Minolta (UK) Limited
Photographic Division
Rooksley Park
Precedent Drive
Rooksley
Milton Keynes
MK13 8HF
A Minolta Austria Ges.m.b.H
B Minolta Belgium Branch
Kontichsesteenweg 38, B-2630
CAN Minolta Canada Inc., Head Office 369 Britannia Road East,
Mississauga, Ontario L4Z 2H5, Canada
Tel. 0905 890 66 00 Fax: 0905 890 71 99
http://www.minolta.com
E-28100 Alcobendas/Madrid, Spain
Tel: 01 661 94 30 Fax: 01 661 94 30
http://www.minoltaeurope.com
F Minolta France S.A.
365, Route de Saint-Germain,
F-78420 Carrières-Sur-Seine, France
Tel: 0130 86 62 02 Fax: 0130 86 62 82
http://www.minolta.fr
FIN Minolta Finland Branch
Niittykatu 6, PL 37 SF-02201 Espoo,
Finland
Tel: 09423499
Fax: 09423116
http://www.minolta.fi
GB Minolta (UK) LTD. Photographic Division
Precedent Drive,
Rooksley, Milton Keynes, MK13 8HF
England
Tel: 01 908 208 349 Fax: 01 908 208 334
http://www.minolta.co.uk
IRL Photopak Sales
241 Western Industrial Estate, Naas
Road, Dublin 12, Ireland
Tel: 014566400 Fax: 014500452
http://www.minoltaeurope.com
I Rossi & C. S.p.A.
Via Ticino 40, Sesto Fiorentino-Firenze, I
- 50019 Osmannoro, Italy
Tel: 055 31 60 02 Fax: 055 37 52 87
http://www.minoltafoito.it
N Scandiafilm AS
P Minolta Portugal Lda
10 Teban Gardens Crescent, Singapore 2260
Tel: 56 35 533
Fax: 56 10 217
http://www.minolta.com
- TABLE OF CONTENTS
- BEFORE YOU BEGIN 6
- INSTALLING THE SOFTWARE 10
- CONNECTING THE DIGITAL CAMERA TO THE PC 15
- STARTING THE SOFTWARE 21
- QUICKGUIDE 25
- SOFTWARE OPERATION
- FOLDER PANEL 28
- IMAGE PANEL 51
- TABLE OF CONTENTS - CONT'D
- USING THE CAMERA PANEL 70
- SLIDESHOWS 81
- APPENDIX 95
- LATE-BREAKING INFORMATION 100
- Checking the Packing List
- SOFTWARE REGISTRATION
- Terms Used in This Manual
- Note
- Windows® 95/98/NT
- Click on Next.
- Click on Yes.
- Click on Next.
- Macintosh
- Click on Continue.
- Click on Agree.
- Click on Install.
- Click on Restart.
- WHERE TO FIND THE FILES
- Serial Adapter SC-EX1
- IBM PC/AT COMPATIBLE
- Set the camera to the PC connection mode.
- IrDA (Windows® 98 and Windows® 95)
- Click on the Options tab.
- Connecting
- CONNECTING THE CAMERA TO THE PC - CONT'D
- [Side view]
- [Top view]
- STARTING THE SOFTWARE
- With Windows® 95/98/NT
- Click on Connect.
- With the Macintosh
- Click on Connect.
- Basic Operation (folder panel, image panel)
- Functions of the folder panel
- Functions of the image panel
- Saved images
- Before Using the Folder Panel
- Displaying Camera Images
- Click on the Contents button on the camera panel.
- Double-click on the group icon.
- Displaying Hard Disk Images
- Click on the Open Folder button on the control strip.
- Select the folder containing the saved images.
- Click on OK (Macintosh: Select [folder name]) to open the folder panel and display the images in the folder in thumbnail format.
- FIND
- Click on the Find button on the control strip.
- Enter the name of the desired file or directory in the file search window.
- Click on Search to begin the search.
- Downloading Images from the Camera
- Display the camera images in the folder panel (p. 29).
- Click on the desired image to select it.
- Select Download from the File menu.
- Specify the location (directory and folder) to download the images to and the Image File Name.
- Click on OK.
- Select Copy Selected Images to Disk from the Viewer menu.
- Specify the location (directory and folder) to download the images to and the Image File Name Prefix.
- Click on Save.
- Uploading Images to the Camera
- Viewing Image Information
- Printing,Th弹簧 Images
- Deleting Images in the Camera (compact flash card)
- Display the camera images in the folder panel.
- Click on the image to be deleted to select it.
- Select Delete from the Edit menu (Macintosh:Delete selected Images... from the Viewer menu).
- Click on Yes (Macintosh: OK) to delete the selected image(s).
- Creating a New Group
- Click on the images to be included in the group to select them, then select Group from the File menu (Macintosh: Add Image to Group... from the viewer menu).
- Enter the name of the group in the window and click on OK.
- Creating a New Folder
- Changing the Image Display
- Windows
- Windows® and Macintosh
- Changing the Sorting Order
- Display the folder panel (p. 29, p. 30).
- Quick View for Images
- Display the hard disk images on the folder panel (p. 30).
- Select Quick View from the View menu to start Quick View.
- [Quick View Preferences]
- Select Quick View Preferences from the View menu .
- After all settings have been entered, click on OK to save them and close the window.
- Changing the Image Name
- Adding Audio to an Image (Macintosh only)
- Record the audio with the Record window.
- Click on Save to save the recorded audio.
- Click on the speaker icon to display the pop-up menu.
- Drag and Drop Operation
- Before Using the Image Panel
- Double-click on the desired image.
- Click on the Open File button on the control strip.
- Select the image file to be displayed on the image panel from the window.
- Click on Open to open the image panel and display the selected image in full screen size.
- Cropping Images
- Click on the selection tool in the tool palette.
- Flipping an Image (horizontally or vertically)
- Select Flip from the Image menu, then select Horizontal or Vertical as required.
- Rotating an Image
- Select Rotate from the Image menu, and then select 90 Degrees Left, 90 Degrees Right, or 180 Degrees (Macintosh: 180 Degrees, 90° counter clockwise, 90° clockwise).
- Inserting text
- Select the text tool from the tool palette.
- Move the cursor to the location at which the text is to be inserted, and click the mouse to display the text insertion box.
- Enter the text from the keyboard.
- When all the text has been entered, click outside the box.
- Zoom In/Zoom Out
- Other zoom methods
- Scrolling an Image
- Click on the Pan tool on the tool palette.
- Adjusting Brightness and Contrast
- Select Brightness/Contrast from the Image menu.
- Drag the slider knobs with the mouse. The settings may also be entered directly in the boxes at the right.
- Click on OK when you have completed the adjustments.
- Adjusting Colour Balance
- Select Colour Balance from the Image menu.
- Use the option buttons to choose to adjust the shadows, midtones, or highlights of the image.
- Drag the slider knobs with the mouse. The settings may also be entered directly in the boxes at the right.
- Click on OK when you have completed the adjustments.
- Image Adjustment
- Lighten and Darken
- Sharpen and Soften
- Select Adjust from the Image menu, and select Sharpen or Soften from the sub-menu.
- Resizing
- Select Resize from the Image menu.
- Select the units.
- Enter the new values for width and height, and click on OK.
- Digital Desktop™ Image Filters
- Plug-in Filters
- Printing Images
- Saving Images
- Image Formats
- BMP
- EXIF (EXIF 2.0)
- JPEG
- PICT
- TIFF
- Photoshop 3.0 (PSD)
- FlashPix
- Select Save As from the File menu.
- Select the folder in which to save the image.
- Enter the file name.
- Select the desired file format.
- The Camera Panel
- Camera Status Display
- Basic Camera Panel Operation (three buttons)
- Format (Image Capture Type)
- Flash
- Timer (Self-timer)
- Changing Camera Settings
- Click on the Settings button to display the Camera Settings window.
- Preferences
- Set the Date and Time in the camera.
- Set the camera name.
- Set the Counter Reset.
- Set the Video Output.
- Select the Language.
- Set the Capture preferences.
- Media Settings
- Set the Still Image Settings.
- Set the Burst Image Settings.
- Set the Timelapse Image Settings.
- Select the Digital Scene Selector.
- Set the White Balance.
- Extensions
- Upload a Script or Application.
- Remote Photography (IrDA only)
- Set the Format (Image capture type) and Flash mode (p. 73).
- Click on the Update button to display the preview screen.
- If the object(s) to be photographed are not in the center of the screen, click on the focus lock to switch it ON (red), and fix the focus temporarily to alter the framing.
- Click on the Capture button once all preparations have been completed.
- Operations Possible With Slideshows
- Producing a Slideshow
- Starting a Slideshow
- Adding an Image File
- Adding a Folder
- Changing the Display Method
- Changing the Display order
- Updating Slides (Windows® only)
- Select Update Selected Slides from the Slideshow menu.
- Removing Slides from the Slideshow Window
- Move the cursor to the slide to be removed and click on it. To remove multiple slides, hold down the Ctrl key (the Shift key with the Macintosh) while clicking on the slides.
- Select Remove Selected Slides from the Slideshow menu.
- To remove all the slides, click on Yes.
- Adding Audio to a Slide
- Click on the microphone icon at the top-right of the slide, and select Record from the pop-up menu.
- Record the audio with the Record window.
- Click on Save to save the recorded audio.
- Click on the speaker icon to display the pop-up menu.
- Adding Background Music
- Slideshow Preferences
- Presenting a Slideshow
- Select Present Slideshow from the Slideshow menu.
- Saving a Slideshow
- With the slideshow window displayed, select Save As from the File menu.
- Select the location (folder) in which to save the slideshow.
- Click on Save.
- Creating an AVI File (Macintosh: QuickTime movie file)
- With the slideshow window displayed, select Export to AVI.
- Select the frame size.
- Click on OK.
- Select the save location and file name, then click on Save.
- Appendix
- With Windows®
- Installation of QuickTime 3.0
- DirectX Installation - Windows 98/Windows 95
- DirectX Installation - Windows NT
- IrDA COM Port - Windows 98/Windows 95
Brand : KONICA MINOLTA
Model : DIMAGE EX SOFTWARE
Category : Image Processing Software