
RE215 - Wi-Fi repeater TP-LINK - Free user manual and instructions
Find the device manual for free RE215 TP-LINK in PDF.


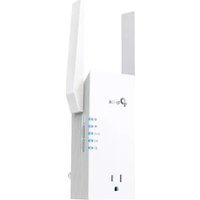
| Product Type | Wi-Fi Repeater |
| Brand | TP-Link |
| Model | RE215 |
| Wireless Standards | IEEE 802.11a/b/g/n/ac |
| Frequency Band | Dual Band (2.4 GHz & 5 GHz) |
| Maximum Speed | 2.4 GHz: 300 Mbps, 5 GHz: 867 Mbps (AC1200) |
| Ethernet Port | 1 x 10/100 Mbps Fast Ethernet |
| Dimensions (W x D x H) | 86 x 70 x 56 mm (3.4 x 2.7 x 2.2 in) |
| Weight | 200 g (7.1 oz) |
| Power Supply | 100-240V AC, 50/60 Hz (via power adapter) |
| Power Consumption | Typical: 5.6W, Maximum: 9.8W |
| LED Indicators | Power, Ethernet, 2.4 GHz, 5 GHz |
| Buttons | WPS, Reset |
| Wireless Security | WPA/WPA2-PSK, WPA3 (optional) |
| Setup Method | WPS, Web interface, Tether app |
| Key Features | Dual-band extension, one-touch WPS, compact design, intelligent signal indicator |
| Operating Temperature | 0°C to 40°C (32°F to 104°F) |
| Storage Temperature | -40°C to 70°C (-40°F to 158°F) |
| Humidity | 10% to 90% non-condensing |
| Maintenance & Cleaning | Wipe with a dry, soft cloth. Do not use liquids or sprays. |
| Safety Precautions | Do not disassemble. Use only the provided power adapter. Avoid heat sources. |
| Spare Parts & Reparability | Not user-serviceable. Contact TP-Link support for assistance. |
Frequently Asked Questions - RE215 TP-LINK
User questions about RE215 TP-LINK
0 question about this device. Answer the ones you know or ask your own.
Ask a new question about this device
Download the instructions for your Wi-Fi repeater in PDF format for free! Find your manual RE215 - TP-LINK and take your electronic device back in hand. On this page are published all the documents necessary for the use of your device. RE215 by TP-LINK.
USER MANUAL RE215 TP-LINK
AC1200/AC750 Wi-Fi Range Extender
RE315/RE215
Contents
About This Guide....1
Chapter 1. Get to Know About Your Extender .....2
- Product Overview....3 1.2. Appearance 3 1.2.1. LED Explanation....3
- Port and Button Description.... 4
Chapter 2. Set Up Internet Connection ....5
2.1. Power On the Extender 6 2.2. Set Up the Extender 6 2.2.1. Method 1: Via the TP-Link Tether App....6 2.2.2. Method 2: Via a Web Browser....8 2.2.3. Method 3: Via the WPS Button....12
Chapter 3. OneMesh with Seamless Roaming .... 15
3.1. What's a OneMesh Network....16 3.2. How to Set Up a OneMesh Network....17 3.2.1. Method 1: Via the TP-Link Tether App.... 17 3.2.2. Method 2: Via a Web Browser....18
3.3. Remove Extender from OneMesh Network 19 3.3.1. Method 1: Via the TP-Link Tether App.... 19 3.3.2. Method 2: Via a Web Browser....19
Chapter 4. TP-Link Cloud Service ...... 21
4.1. Register a TP-Link ID....22 4.2. Change Your TP-Link ID Information....22 4.3. Manage the User TP-Link IDs 23 4.3.1. Add TP-Link ID to Manage the Extender ..... 24 4.3.2. Remove TP-Link ID(s) from Managing the Extender ..... 24
- Manage the Extender via the TP-Link Tether App .... 25
Chapter 5. Customize Your Network.... 26
5.1. Check Internet Status....27 5.2. Configure Wireless Network 28 5.3. Change LAN Settings....30
5.4. Specify DHCP Server Settings....30 5.5. Set High Speed Mode....31 5.6. Set Access Control 32 5.7. Adjust Wi-Fi Coverage 34
Chapter 6. More Features of Your Extender.... 36
6.1. Use Your Extender as a Wireless Adapter....37 6.2. Transform Your Existing Wired Network to a Wireless One .... 37 6.2.1. To Set Up the Extender as an Access Point 37 6.2.2. To Connect Your Wireless Devices to the Extender via WPS.....38
Chapter 7. Manage Your Extender 41
7.1. Set System Time 42 7.2. Control LEDs 43 7.3. Set Power Schedule 43 7.4. Upgrade the Firmware 44 7.4.1. Online Upgrade 45 7.4.2. Local Upgrade 45
7.5. Backup and Restore Configuration Settings 45 7.6. Reboot the Extender....47 7.7. Change Login Password 48 7.8. Check System Log 48
FAQ 50
About This Guide
This guide is a complement to Quick Installation Guide. The Quick Installation Guide provides instructions for quick internet setup, while this guide contains details of each function and demonstrates how to configure them.
Features available in the range extender may vary by model and software version. The range extender availability may also vary by region or ISP. All images, steps, and descriptions in this guide are only examples and may not reflect your actual range extender experience.
Conventions
In this guide the following conventions are used:
| Convention Description | |
| Underline | Underlined words or phrases are hyperlinks. You can click to redirect to a website or a specific section. |
| Teal | Contents to be emphasized and texts on the web page are in teal, including the menus, items, buttons and so on. |
| > | The menu structures to show the path to load the corresponding page. For example, Advanced > Wireless > MAC Filtering means the MAC Filtering function page is under the Wireless menu that is located in the Advanced tab. |
| Note: | Ignoring this type of note might result in a malfunction or damage to the device. |
| Tip: | Indicates important information that helps you make better use of your device. |
More Info
The latest software, management app and utility are available from Download Center at https://www.tp-link.com/support/.
The Quick Installation Guide can be found where you find this guide or inside the package of the extender.
Specifications can be found on the product page at https://www.tp-link.com.
TP-Link Community is provided for you to discuss our products and share knowledge at https://community.tp-link.com.
Our Technical Support contact information can be found at the Contact Technical Support page at https://www.tp-link.com/support/.
Speed/Coverage Disclaimer
Maximum wireless signal rates are the physical rates derived from IEEE Standard 802.11 specifications. Actual wireless data throughput and wireless coverage are not guaranteed and will vary as a result of 1) environmental factors, including building materials, physical objects, and obstacles, 2) network conditions, including local interference, volume and density of traffic, product location, network complexity, and network overhead, and 3) client limitations, including rated performance, location, connection quality, and client condition.
Chapter 1
Get to Know About Your Extender
This chapter introduces what the extender can do and its appearance.
It contains the following sections:
- Product Overview
- Appearance
1.1 Product Overview
Bring Dead Zones Back to Life
Tired of Wi-Fi "dead zones"? The TP-Link extender is connected to your router wirelessly, strengthening its signal and expanding its coverage into areas that could not otherwise be reached.
Easy Installation & Quick Position
The extender works with any standard wireless router. Instantly connect the extender to a router by pressing the router's WPS button (if available) followed by the extender's WPS button. Alternatively, follow the Quick Setup instructions on the extender's web management page.
Once the extender is connected to a router, you can relocate it to your preferred location with no further configuration required. The intelligent signal light can help to find the best location.
Easy Management with the TP-Link Tether App
Tether provides a simple, intuitive way to access and manage your extender with your smart devices.
1.2 Appearance
1.2.1 LED Explanation

You can check the extender's working status by following the LED Explanation table.
| Name Status | Indication | |
| (Power) | On/Off The extender is on or off. | |
| Blinking The system is starting up or firmware is being upgraded. | ||
| (Signal) | Solid white | The extender is connected to your router's wireless network and is in a suitable location. |
| Solid red | The extender is experiencing poor signal strength. Try relocating it closer to your host router. | |
| Blinking WPS connection is in progress. | ||
| Off No wireless connection is established. | ||
| 2.4G On/Off | The extender is connected or not connected to the 2.4GHz wireless network of your host router. | |
| 5G On/Off | The extender is connected or not connected to the 5GHz wireless network of your host router. | |
1.2.2 Port and Button Description

| Button Description | |
| (WPS) | Press the WPS button on your host router, and immediately press this button on the extender for 1 second. The LED of the extender should change from blinking to solid on, indicating successful WPS connection. |
| Reset Use a pin to press the button for 1 second to reset the extender. | |
| Ethernet Port | Connect your Ethernet-only device to the Ethernet port of the extender to join the network. |
Chapter 2
Set Up Internet Connection
This chapter introduces how to boost your host wireless coverage. Please follow the step-by-step instructions to set up the internet connection.
It contains the following sections:
• Power On the Extender - Set Up the Extender
2.1. Power On the Extender
Plug the extender into an electrical outlet next to your router, and then wait until the Power LED turns solid on.

Note:
- The operating temperature should be between 0°C and 40°C (32°F - 104°F).
- For safety, only plug the extender in upright direction as shown below.


2.2. Set Up the Extender
There are three ways to set up the extender: via the TP-Link Tether app, via a web browser, or via the WPS button.
2. 2. 1. Method 1: Via the TP-Link Tether App
- Launch the Apple App Store or Google Play Store and search TP-Link Tether or simply scan the QR code to download and install the app.

OR


- Launch the Tether app and log in with your TP-Link ID.
Note:
If you don't have a TP-Link ID, create one first.

- Tap the + icon on the upper-right corner and select Range Extender.


- Follow app instructions to set up your extender.
- (Optional) Enable Join OneMesh to copy the router's wireless settings for seamless roaming. For more information about OneMesh, refer to OneMesh with Seamless Roaming.

Tip: It is recommended to enable Smart Connect on your host router to enjoy a seamless connection between dual-band networks. With Smart Connect enabled, your host router's 2.4GHz and 5GHz share the same SSID (network name) and password. Refer to your host router's user guide to enable Smart Connect.
- Relocate your extender for optimal Wi-Fi coverage and performance.
1) Plug in the extender about halfway between your router and the Wi-Fi dead zone. The location you choose must be within the range of your router. 2) Wait for about 2 minutes until the Signal LED turns solid white. If it doesn't, relocate the extender closer to the router to achieve better signal quality.

Tip: To minimize signal interference, please choose a location which is far away from Bluetooth devices and other household electronic devices, such as cordless phones, microwave ovens and baby monitors.
7. Enjoy! Connect to the extended network and enjoy the internet.
Tip:
For more intuitive location assistance, access extender settings via Tether and go to Tools > Location Assistant. You can also manage your extender via Tether, such as controlling LEDs, sharing passwords of your networks and blocking devices.
2.2.2. Method 2: Via a Web Browser
- Connect your computer to the extender via an Ethernet cable, or connect wirelessly as follows:
- For Windows Users
1) Unplug the Ethernet cable from your computer (if any). 2) Click the Wi-Fi icon on the taskbar and connect to the extender's wireless network: TP-Link_Extender.

- For Mac OS X Users
1) Unplug the Ethernet cable from your computer (if any). 2) Click the Wi-Fi icon in the top right corner of the screen, and connect to the extender's network: TP-Link_Extender.

- Follow the instructions of the Quick Setup Wizard to connect the extender to your host router.
1) Launch a web browser, enter http://tplinkrepeater.net or http://192.168.0.254 in the address bar, and then create a password to log in.
Note:
If the login window does not appear, please refer to FAQ.

2) Select your host router's 2.4GHz SSID (network name), enter its password (NOT the password you just created for management), and click NEXT.

3) Select your host router's 5GHz SSID (network name), enter its password (NOT the password you just created for management), and click NEXT.
Note:
- If your host router does not support 5GHz wireless network, please click SKIP to continue.
- It is recommended to enable Smart Connect on your host router to enjoy a seamless connection between dual-band networks. With Smart Connect enabled, your host router's 2.4GHz and 5GHz share the same SSID (network name) and password. Refer to your host router's user guide to enable Smart Connect.

4) Confirm your host network password.
![Please confirm your host network password. 2.4GHz Host Network: Host 2.4GHz SSID: TP-Link_1234, Host 2.4GHz Password: [input]. 5GHz Host Network: Host 5GHz SSID: TP-Link_1234_5GHz, Host 5GHz Password: [input].](/content/2026/06/1396531/images/9acd4f83ea0865c7a28bbbb7648dab5adb0a69e45113933614d28e1cd8e9c905.jpg)
5) Either keep the default SSIDs (network names) or customize them for the extended networks, and then click NEXT.
Tip:
If you connect the extender to a TP-Link OneMesh router, the extender will automatically join the router's OneMesh network and copy the router's wireless settings. For more information, refer to OneMesh with Seamless Roaming.

6) Follow web instructions to relocate your extender for optimal Wi-Fi coverage and performance, and then click DONE.
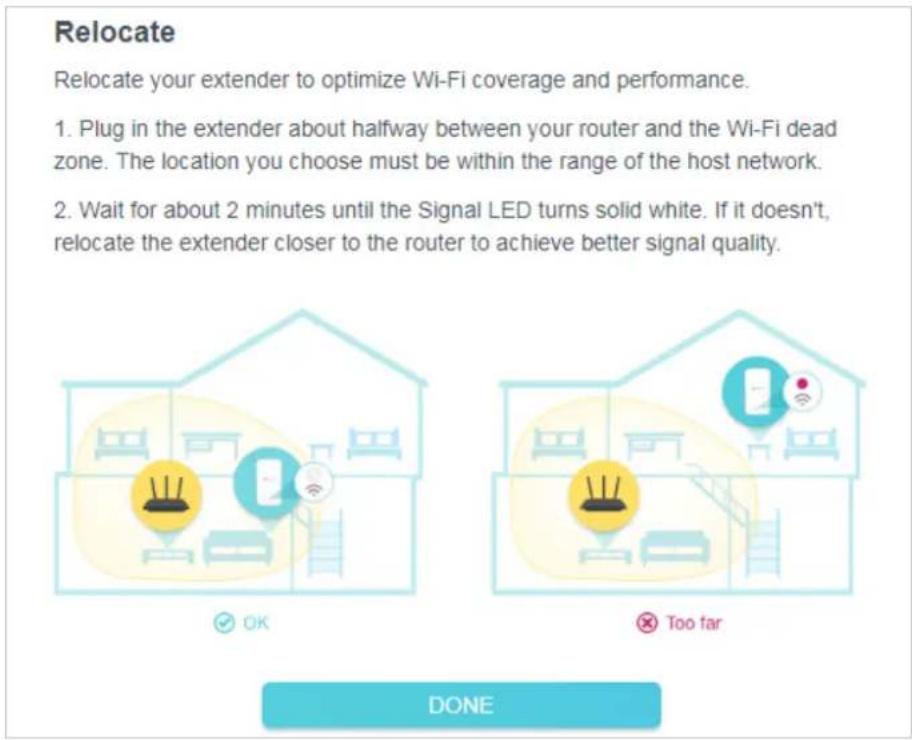
7) Enjoy! Connect to the extended network and click FINISH to enjoy the internet.
Now connect to the extended network, then click Finish.
Extended 2.4GHz SSID:TP-Link_1234_EXT
Extended 2.4GHz Password:tplink123
Extended 5GHz SSID:TP-Link_1234_5GHz_EXT
Extended 5GHz Password:tplink123

I have connected to the extended network.
FINISH
Tip:
If you connect the extender to a TP-Link OneMesh router and a success screen as below appears at the end of the setup, the extender has successfully joined the router's OneMesh network and copied the router's wireless settings. For more information, refer to OneMesh with Seamless Roaming.
All done! Now, enjoy seamless roaming in the mesh network.
Extended 2.4GHz SSID: TP-Link_3F04
Extended 2.4GHz Password:
Extended 5GHz SSID: TP-Link_3F04_5G
Extended 5GHz Password:
Tip: You can manage all mesh devices in the network on your router's web page at http://tplinkwifi.net.
2. 2. 3. Method 3: Via the WPS Button
Use this method if your router has a WPS button. The button might look like one of these:

- Press the WPS button on your host router, then press the WPS button on the extender for 1 second within 2 minutes.

Note: For more information about using the WPS button on your host router, refer to the router manufacturer's user guide.
- Wait until the Signal LED changes from blinking to solid on, indicating that the WPS connection is successful.
Note:
If the LED does not turn solid on, try again or refer to Method 1: Via the TP-Link Tether App or Method 2: Via a Web Browser.
- (Optional) If the extender connects to a dual-band router, repeat steps 1 and 2 above to connect to the other band.
- Relocate your extender for optimal Wi-Fi coverage and performance.
1) Plug in the extender about halfway between your router and the Wi-Fi dead zone. The location you choose must be within the range of your router. 2) Wait for about 2 minutes until the Signal LED turns solid white. If it doesn't, relocate the extender closer to the router to achieve better signal quality.

Tip: To minimize signal interference, please choose a location which is far away from Bluetooth devices and other household electronic devices, such as cordless phones, microwave ovens and baby monitors.
- Enjoy! Connect to the extended network and enjoy the internet.

Solid On
Extended Network Names:
Router's network name with _EXT at the end OR
Same as your OneMesh router
Passwords:
Same as your router
Note:
- If you want to customize the extended network name, refer to Configure Wireless Network.
- If you cannot find the network names with _EXT in your Wi-Fi network list, this means that the extender has been connected to a OneMesh router and automatically copied its wireless settings. For more information, refer to OneMesh with Seamless Roaming.
OneMesh with Seamless Roaming
This chapter introduces the TP-Link OneMesh™ feature.
It contains the following sections:
• What's a OneMesh Network • How to Set Up a OneMesh Network - Remove Extender from OneMesh Network
3.1. What's a OneMesh Network
TP-Link OneMesh router and TP-Link OneMesh extenders work together to form one unified Wi-Fi network. Walk through your home and stay connected with the fastest possible speeds thanks to OneMesh's seamless coverage.

Unified Wi-Fi Network
Router and extenders share the same wireless settings, including network name, password, access control settings and more.

Seamless Roaming
Devices automatically switch between your router and extenders as you move through your home for the fastest possible speeds.

Easy Setup and Management
Set up a OneMesh network with a push of WPS buttons. Manage all network devices on the Tether app or at your router's web management page.
To check full list of TP-Link OneMesh devices, scan the QR code, or visit https://www.tp-link.com/One-Mesh/compatibility.

Unified OneMesh Network
3.2. How to Set Up a OneMesh Network
Once the extender is connected to a TP-Link OneMesh router via web browser or WPS button, the extender will automatically join the router's OneMesh network and copy the router's wireless settings. You can manually join a OneMesh network during the configuration via the TP-Link Tether app. For more information about setting up the extender with OneMesh network, refer to Set Up the Extender.
If you have already set up the extender before joining the OneMesh network, choose one of the methods below to set up a OneMesh network:
Note:
Before setting up a OneMesh network, it is recommended to enable Smart Connect on your host router to enjoy a seamless connection between dual-band networks.
3.2.1. Method 1: Via the TP-Link Tether App
- Launch Tether and select the extender you want to join the OneMesh network.
- Go to Tools > OneMesh and enable OneMesh.
Tip:
If your host router does not support OneMesh, you need to reselect a host network first. Go to Tools > Host Network and click Reselect Host Network, and then follow the app instructions to complete the configuration.

- Follow the app instructions to join the OneMesh network.
3.2.2. Method 2: Via a Web Browser
- Visit http://tplinkrepeater.net, and log in with your TP-Link ID or the password you set for the extender.
- Go to Settings > OneMesh and enable Join OneMesh.
Tip:
If your host router does not support OneMesh, you need to reselect a host network first. Go to Wireless > Connect to Host Network and follow the instructions to complete the configuration.
OneMesh
Join OneMesh:

In a OneMesh network, your mobile device will seamlessly switch connection to the mesh router or extender that provides the fastest speed as you move through your home. Learn More


OneMesh Network


Common Network
- Follow the web instructions to join the OneMesh network. After that, you can view all the devices in OneMesh network in Basic >OneMesh on the web management page of your host router.
OneMesh
Tip: Enable Smart Connect to work with OneMesh for better seamless roaming.
Devices in OneMesh Network

RE
1C-FA-13-14-1C-E5

1 Clients
Available OneMesh Devices
No more OneMesh device to be added.
3. 3. Remove Extender from OneMesh Network
If you want to remove the extender from the OneMesh network, follow the steps below:
3. 3. 1. Method 1: Via the TP-Link Tether App
- Launch Tether and select the extender you want to remove from the OneMesh network.
- Go to Tools > OneMesh and disable OneMesh.
Or
- Launch Tether and select your host router of the OneMesh network.
- Go to Tools > OneMesh and select the extender you want to remove from the OneMesh network.
- Click Remove Device.
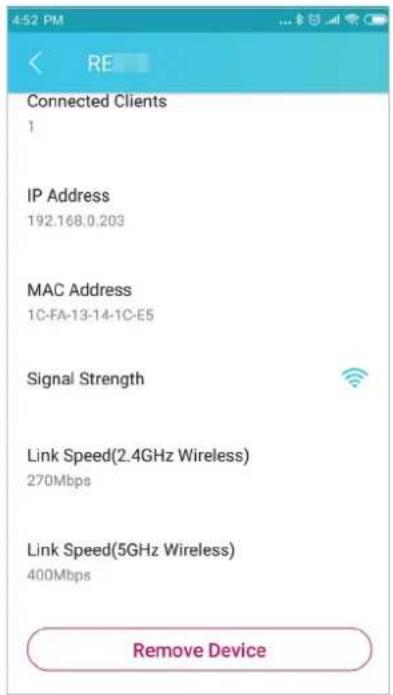
3. 3. 2. Method 2: Via a Web Browser
- Visit http://tplinkrepeater.net, and log in with your TP-Link ID or the password you set for the extender.
- Go to Settings > OneMesh and disable Join OneMesh.

TP-Link Cloud Service
TP-Link Cloud service provides a better way to manage your cloud devices. Log in to your cloud device with a TP-Link ID, and you can easily monitor and manage your home network when you are out and about via the Tether app on your smartphone or tablet. To ensure that your cloud device stays new and gets better over time, the TP-Link Cloud will notify you when an important firmware upgrade is available. Surely you can also manage multiple TP-Link Cloud devices with a single TP-Link ID.
This chapter introduces how to register a new TP-Link ID, bind or unbind TP-Link IDs to manage your cloud device, and the Tether app with which you can manage your home network no matter where you may find yourself.
It contains the following sections:
- Register a TP-Link ID • Change Your TP-Link ID Information
- Manage the User TP-Link IDs
- Manage the Extender via the TP-Link Tether App
4. 1. Register a TP-Link ID
When you log in after initial setup, the web page will ask whether you need TP-Link Cloud service. You can also access the TP-Link Cloud settings as follows:
- Visit http://tplinkrepeater.net, and log in with the password you set for the extender.
- Go to Settings > TP-Link Cloud.
- Click Sign Up and follow the instructions to register a TP-Link ID. The TP-Link ID used to log in to the extender for the first time will be automatically bound as an Admin.
![TP-Link ID. Log in to bind the range extender to your TP-Link ID. You can remotely manage your network via the Tether app, and more. TP-Link ID (Email): [input]. Password: [input]. Buttons: LOG IN & BIND, Sign Up, Forget Password?](/content/2026/06/1396531/images/979b6f388df3c9b2922d8b53fd39bf25dcd95117a5265785353f12e2b8ff0332.jpg)
Notes:
• To learn more about the Admin and User TP-Link ID, refer to Manage the User TP-Link IDs. - Once you have registered a TP-Link ID on the web management page, you can only register another TP-Link ID via the Tether APP. Please refer to Manage the Extender via the TP-Link Tether App to install the app and register a new one. - If you want to unbind the admin TP-Link ID from your extender, please go to Settings > TP-Link Cloud, and click Unbind in the Device Information section.
4.2. Change Your TP-Link ID Information
Follow the steps below to change your email address and password of your TP-Link ID as needed.
- Visit http://tplinkrepeater.net, and log in with your TP-Link ID or the password you set for the extender.
- Go to Settings > TP-Link Cloud, and focus on the Account Information section.
• To change your email address:
- Click behind the Email.
- Enter the password of your TP-Link ID, then a new email address. And click Save.

• To change your password:
- Click behind the Password.
- Enter the current password, then a new password twice. And click Save.

4.3. Manage the User TP-Link IDs
The TP-Link ID used to log in to the extender for the first time will be automatically bound as the Admin account. An admin account can add or remove other TP-Link IDs to or from the same extender as Users. All accounts can monitor and manage the extender locally or remotely, but user accounts cannot:
- Reset the extender to its factory default settings either on the web management page or in the Tether app.
- Add/remove other TP-Link IDs to/from the extender.
4.3.1. Add TP-Link ID to Manage the Extender
- Visit http://tplinkrepeater.net, and log in with your TP-Link ID or the password you set for the extender.
- Go to Settings > TP-Link Cloud, and focus on the Bound Accounts section.
- Click, enter another TP-Link ID as needed and click Save.
Note:
If you need another TP-Link ID, please register a new one via the Tether app. Please refer to Manage the Extender via the TP-Link Tether App to install the app and register a new TP-Link ID.

- The new TP-Link ID will be displayed in the Bound Accounts table as a User.

4. 3. 2. Remove TP-Link ID(s) from Managing the Extender
- Visit http://tplinkrepeater.net, and log in with your TP-Link ID or the password you set for the extender.
- Go to Settings > TP-Link Cloud, and focus on the Bound Accounts section.
- Tick the checkbox(es) of the TP-Link ID(s) you want to remove and click Unbind.

4. 4. Manage the Extender via the TP-Link Tether App
The Tether app runs on iOS and Android devices, such as smartphones and tablets.
- Launch the Apple App Store or Google Play store and search "TP-Link Tether" or simply scan the QR code to download and install the app.

OR


- Launch the Tether app and log in with your TP-Link ID.
Note: If you don't have a TP-Link ID, create one first. 3. Connect your device to the extender's or host router's wireless network. 4. Go back to the Tether app, select the model of your extender and log in with the password you set for the extender. 5. Manage your extender as needed.
Customize Your Network
This chapter guides you on how to configure network settings that are available for this extender.
It contains the following sections:
- Check Internet Status
- Configure Wireless Network
- Change LAN Settings
- Specify DHCP Server Settings
- Set High Speed Mode
- Set Access Control
- Adjust Wi-Fi Coverage
5.1. Check Internet Status
You can view the internet status of your extender to check whether you have successfully set up the extended network(s).
- Visit http://tplinkrepeater.net, and log in with your TP-Link ID or the password you set for the extender.
- Go to Network Map to view the internet status of your extender.
• The extender runs normally.
![graph LR A["Internet"] --> B["Router"] B --> C["RE"] C --> D["Clients"] style A fill:#f9f,stroke:#333 style B fill:#ccf,stroke:#333 style C fill:#cfc,stroke:#333 style D fill:#fcc,stroke:#333](/content/2026/06/1396531/images/5329991fef69624da0e6072b054509e6ddef0d04bd4b72b40f9765e5b5022017.jpg)
- The extender fails to connect to the host networks. Please go to Wireless > Connect to Host Network to check whether the host network passwords are correct. If the problem still exists, relocate the extender closer to the router to achieve better signal quality.
![graph LR A["Internet"] --> B["Router"] B --> C["RE"] C --> D["Clients"] style A fill:#f9f,stroke:#333 style B fill:#ccf,stroke:#333 style C fill:#cfc,stroke:#333 style D fill:#fcc,stroke:#333](/content/2026/06/1396531/images/503368757754154aa9f60f4148cd0344e05bba7e39907823c3561e97b45a76bf.jpg)
- The extender is connected to the host networks, but is not transmitting data. Please check the internet connection of your router.
![graph LR A["Internet"] --> B["Router"] B --> C["RE"] C --> D["Clients"] style A fill:#f9f,stroke:#333 style B fill:#ccf,stroke:#333 style C fill:#cfc,stroke:#333 style D fill:#fcc,stroke:#333](/content/2026/06/1396531/images/31d412ebab970c8607c59d1ea2496ec288ed5f33c71fa189c671ad0335f30c68.jpg)
- The extender is connected to the router abnormally. Please go to Settings > Network and try setting your extender to obtain an IP address automatically.
![graph LR A["Internet"] --> B["Router"] B --> C["RE"] C --> D["Clients"] style A fill:#f9f,stroke:#333 style B fill:#ccf,stroke:#333 style C fill:#cfc,stroke:#333 style D fill:#fcc,stroke:#333](/content/2026/06/1396531/images/4b47c5fedc29d2026b5e2ae8292b93a49ca83726461dc1179f1378480697a024.jpg)
Click the icon of the Internet/Router/Range Extender/Clients to view corresponding information.
5.2. Configure Wireless Network
If you want to extend another host network after Quick Setup, you can refer to this section. Moreover, you can change the wireless settings for your extended networks.
Visit http://tplinkrepeater.net, and log in with your TP-Link ID or the password you set for the extender.
• To extend another host network:
- Go to Wireless > Connect to Host Network.
- Enable Connect to 2.4GHz Network and click WIRELESS SCANNER to find all available networks.
Note:
It is unable to change host network settings when the extender is in a OneMesh network.

- Select the 2.4GHz host network you want to extend.
Note:
If the network you want to extend is on but not listed, please try the following steps.
- Move the extender closer to your router, and click Refresh in the top-right corner of the list.
- You can manually enter the SSID (network name) and password of the network you want to extend, and click SAVE.
- Once a host network is selected, the SSID and security type will be automatically filled in. If the selected network is encrypted, enter the password in the Password field.
- Click SAVE.
- To enable or disable the extended network:
- Go to Wireless > Extended Network.
- Extended networks are enabled by default. If you want to disable the wireless function of a certain band, just clear the Enable checkbox. In this case, all the wireless settings of this band will be invalid.
- Click SAVE.
• To change the wireless network name (SSID):
- Go to Wireless > Extended Network.
- Create a new SSID in Extended 2.4GHz SSID or click COPY HOST SSID. The value is case-sensitive.
- Click SAVE
Note:
If you have changed the wireless settings via a wireless device, you will be disconnected after the settings are applied. Please write down the new SSID for future use.
- To hide the SSID of the extended network:
- Go to Wireless > Extended Network.
- Select Hide SSID broadcast, and the corresponding SSID will not be displayed when wireless devices scan for local wireless networks. You need to manually enter the SSID to join the network.
- Click SAVE

5.3. Change LAN Settings
The extender is preset with a default LAN IP 192.168.0.254, with which you can log in to the web management page. The LAN IP address, together with the Subnet Mask, also defines the subnet that the connected devices are on. If the IP address conflicts with another device on your local network or your network requires a specific IP subnet, you can change it.
- Visit http://tplinkrepeater.net, and log in with your TP-Link ID or the password you set for the extender.
- Go to Settings > Network > LAN Settings.
- Select Use the following IP address.

- Enter a new IP Address as needed, and leave the Subnet Mask as the default settings.
- Enter the gateway that is in the same subnet as the IP Address. The gateway is usually the LAN IP address of your extender.
- Leave the primary and secondary DNS addresses as the default settings.
- Click SAVE.
5.4. Specify DHCP Server Settings
By default, the DHCP (Dynamic Host Configuration Protocol) Server is auto and the extender acts as a DHCP server and dynamically assigns TCP/IP parameters to client devices from the IP Address Pool when the router's DHCP server is disabled. You can change the settings of the DHCP Server if
necessary.
- Visit http://tplinkrepeater.net, and log in with your TP-Link ID or the password you set for the extender.
- Go to Settings > Network > DHCP Server.
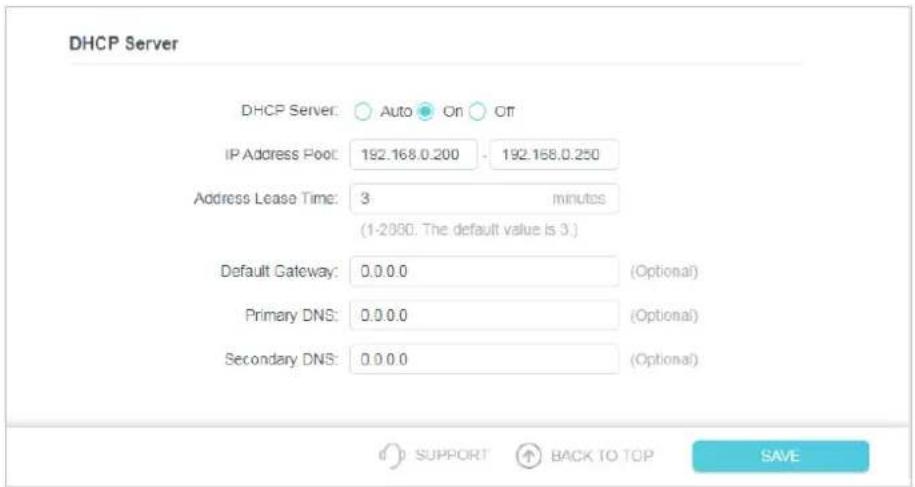
- Select On to enable the DHCP Server of the extender.
- Enter the starting and ending IP addresses in the IP Address Pool.
- Enter other parameters if the ISP offers. The Default Gateway is automatically filled in and is the same as the LAN IP address of the router.
- Click SAVE.
5.5. Set High Speed Mode
The High Speed feature switches off one of the wireless bands to leave one high-performance, super-fast network, ideal for HD streaming and gaming applications.
If most of your devices are connected to one wireless band, this feature can increase the overall performance of your wireless network.
Note:
Before enabling this feature, please go to Settings > Wireless > Extended Network and check that the 2.4GHz and 5GHz bands are both enabled. Additionally, if you are going to disable the 2.4GHz network, it's recommended to first make sure all your wireless devices support 5GHz network connection.
- Visit http://tplinkrepeater.net and log in with your TP-Link ID or the password you set for the extender.
- Go to Settings > Advanced Settings > High Speed.
- Enable High Speed Mode.
- Select a high speed mode as needed.
- Select the Auto mode. The extender will decide which band the high-speed network will work on based on its wireless connection to your host router. The other band will be disabled.
![graph LR A["Router"] --> B["5G"] B --> C["Repeater"] C --> D["2.4G"] D --> E["Clients"] F["Enable"] --> G["Auto"]](/content/2026/06/1396531/images/156c8553de8b2df2369b73feda835d5d8a1626eedcbe30ca2d5a437f695f5b23.jpg)
- Select the Manual mode and choose to transmit 2.4GHz band or 5GHz band only.
![graph LR A["Router"] -->|5G| B["Repeater"] B -->|2.4G| C["Clients"] D["Router"] -->|2.4G| E["Repeater"] E -->|5G| F["Clients"] style A fill:#fff,stroke:#000 style D fill:#fff,stroke:#000 style B fill:#fff,stroke:#000 style E fill:#fff,stroke:#000 note1["Transmit only the 2.4GHz band."] --> A note2["…](/content/2026/06/1396531/images/606919bf58e169e9343afcf19188b543555e518c4232992162b0d32192538a96.jpg)
- Click SAVE.
5.6. Set Access Control
Access Control allows you to permit or block specific devices from accessing the internet for a specific period.
Note:
Access Control is not available when your range extender is in a OneMesh network, where it automatically synchronizes network settings from your host router.
- Visit http://tplinkrepeater.net and log in with your TP-Link ID or the password you set for the extender.
- Go to Settings > Advanced Settings > Access Control.
- Enable Access Control.

• To block specific device(s):
Note:
Devices connected to the extender via an Ethernet cable cannot be blocked.
- Select Blacklist and click Add.
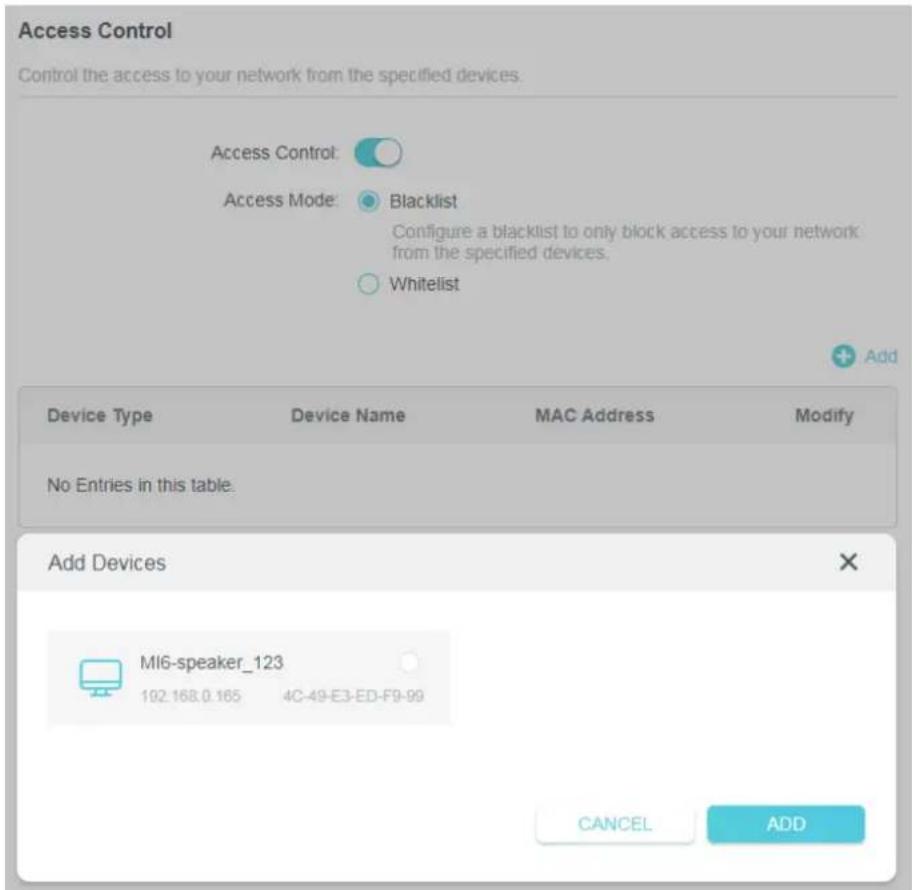
- Select the device to be blocked in the Add Devices table.
- Click ADD and the selected device(s) will be added to the Devices in Blacklist table.

• To permit specific device(s):
1. Select Whitelist and click Add.

2. Select from the Device List or add devices manually in the Add Devices table. Enter the Device Name and MAC Address if you add devices manually.

3. Click SAVE.
5.7. Adjust Wi-Fi Coverage
You can set the extender's Wi-Fi coverage depending on how large you want your Wi-Fi area to be.
- Visit http://tplinkrepeater.net and log in with your TP-Link ID or the password you set for the extender.
- Go to Settings > Advanced Settings > Wi-Fi Coverage.
- Select your desired Wi-Fi coverage level for the extender.
Wi-Fi Coverage
Set the Wi-Fi coverage of your extender as needed.


Maximum Coverage
The extender will provide a long-range Wi-Fi signal but use up more power.

Intermediate Coverage
The extender will provide a medium-range Wi-Fi signal.

Minimum Coverage
The extender will provide a short-range Wi-Fi signal and use up less power.
- Click SAVE.
More Features of Your Extender
This chapter explains how to use the extender as a wireless adapter and as an access point.
It contains the following sections:
• Use Your Extender as a Wireless Adapter • Transform Your Existing Wired Network to a Wireless One
6.1 Use Your Extender as a Wireless Adapter
The extender can be used as a wireless adapter to connect any wired-only device, such as a Blu-ray player, game console, DVR, or smart TV, to your wireless network.
After configuration, you can connect an Ethernet-enabled device to the extender via an Ethernet cable.

6.2 Transform Your Existing Wired Network to a Wireless One
The extender can work as an access point, transforming your existing wired network to a wireless one.
6.2.1 To Set Up the Extender as an Access Point
- Visit http://tplinkrepeater.net, and log in with your TP-Link ID or the password you set for the extender.
- Click Change Mode in the top right corner of the page. Select Access Point Mode and click OK. The extender will reboot and switch to Access Point mode.

- After rebooting, connect your smart phone to the extender's network TP-Link_Extender or TP-Link_Extender_5GHz.
- Visit http://tplinkrepeater.net, and log in with your TP-Link ID or the password you set for the extender.
- Go to Settings > Quick Setup to configure your extender.
1) Customize your wireless SSID and password and click NEXT.

2) Confirm the information and click FINISH.

- Connect the extender to your modem or wired router via an Ethernet cable. Now you can enjoy Wi-Fi.
6.2.2. To Connect Your Wireless Devices to the Extender via WPS
Wi-Fi Protected Setup (WPS) provides an easier way to set up a secure Wi-Fi connection.
Wireless devices that support WPS, including Android phones, tablets, and most USB network cards, can be connected to your extender through this method (not supported by iOS devices).
- Visit http://tplinkrepeater.net, and log in with your TP-Link ID or the password you set for the extender.
- Go to Wireless > WPS.
- Enable WPS.

- Connect via WPS:
- Client's PIN: Enable Client's PIN and enter your device's PIN in the blank, and then click CONNECT.

- AP's PIN: Enable AP's PIN and enter the PIN on your device. You can click GENERATE to get a new PIN or click DEFAULT to restore the PIN to its factory one.

- Push Button (Recommended): Click Start and push the WPS button on the client device within 2 minutes.
Method 2: Using the button below
Click the button below, then enable WPS on your personal device within 2 minutes.

- Push AP's WPS button: Press the AP's WPS button, then enable WPS on your device within 2 minutes.
Method 3: Using the AP's WPS button
Press the AP's WPS button, then enable WPS on your personal device within 2 minutes.
Manage Your Extender
This chapter presents how to manage and maintain your extender.
It includes the following sections:
- Set System Time
- Control LEDs
- Set Power Schedule
- Upgrade the Firmware
- Backup and Restore Configuration Settings
- Reboot the Extender
- Change Login Password
- Check System Log
7. 1. Set System Time
The System Time of the extender will be used for time-based functions such as the Power Schedule function. If you have enabled the Daylight Saving Time feature, the system time will be synchronized with the daylight saving time you configure.
- Visit http://tplinkrepeater.net, and log in with your TP-Link ID or the password you set for the extender.
- Go to Settings > System Tools > Time Settings.
• To get system time:
- Select your local Time Zone from the drop-down list.
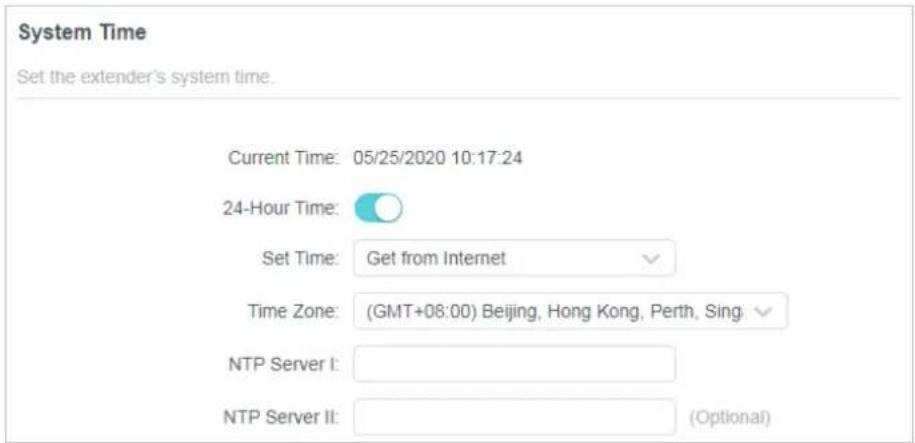
- Click SAVE.
• To set up Daylight Saving Time:
- Enable Daylight Saving Time.

- Select the Start and End date and time of the daylight saving time at your local time zone.
- Click SAVE.
7.2. Control LEDs
The LEDs of the extender indicate its activities and status. You can turn off LEDs when you don't need them.
- Visit http://tplinkrepeater.net, and log in with your TP-Link ID or the password you set for the extender.
- Go to Settings > Advanced Settings > LED Control.
• To turn off the LEDs:
Disable LED Status.
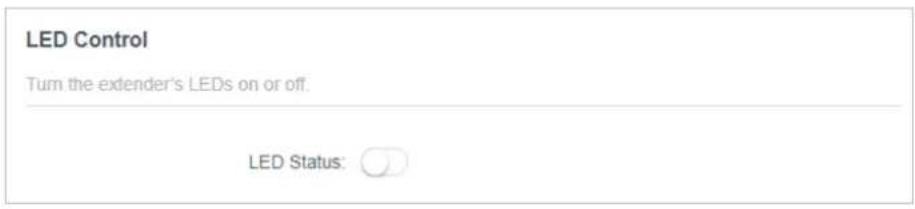
• To specify a time period when LEDs are off:
- Select Night Mode.
- Specify the LED off time period.
Note:
The effective LED off time is based on the time of the extender. You can go to Settings > System Tools > Time Settings to modify the time.
- Click SAVE.

7.3. Set Power Schedule
The Power Schedule feature allows you to specify a time period during which the extender is off.
- Visit http://tplinkrepeater.net, and log in with your TP-Link ID or the password you set for the extender.
- Go to Settings > Advanced Settings > Power Schedule.
• To specify a time period when the extender is off:
- Click Add.
- Specify the power off time period and repetitive days.
Note:
The effective power off time is based on the time of the extender. You can go to Settings > System Tools > Time Settings to modify the time.

- Click SAVE.
7.4. Upgrade the Firmware
TP-Link is committed to improving product features, giving you a better network experience. You can download the latest firmware file from the Support page at our website www.tp-link.com and upgrade the extender to the latest firmware version.
Note:
- Make sure the latest firmware file is matched with the hardware version (as shown in the download section of the Support page).
- Make sure that you have a stable connection between the extender and your computer. It is NOT recommended to upgrade the firmware wirelessly.
- Backup your extender configuration.
- Do NOT power off the extender during the firmware upgrade.
7.4.1. Online Upgrade
- Visit http://tplinkrepeater.net, and log in with your TP-Link ID or the password you set for the extender.
- Go to Settings > System Tools > Firmware Upgrade.
- Click CHECK FOR UPGRADE and follow the web instructions to upgrade online.

7.4.2. Local Upgrade
- Download the latest firmware file for the extender from our website www.tp-link.com.
- Visit http://tplinkrepeater.net, and log in with your TP-Link ID or the password you set for the extender.
- Go to Settings > System Tools > Firmware Upgrade.
- Click BROWSE to locate the downloaded new firmware file, and then click UPGRADE.

- Wait a few minutes for the firmware upgrade to complete and the extender to reboot.
7.5. Backup and Restore Configuration Settings
The configuration settings are stored as a configuration file in the extender. You can backup the configuration file and restore the extender to the previous settings from the backup file when needed. Moreover, if necessary, you can erase the current settings and reset the extender to the default factory settings.
- Visit http://tplinkrepeater.net, and log in with your TP-Link ID or the password you set for the extender.
- Go to Settings > System Tools > Backup & Restore.
- To backup configuration settings:
Click BACK UP to save a copy of the current settings to your local computer. A '.bin' file of the current settings will be stored on your computer.

- To restore previous settings from a saved file:
- Click BROWSE to locate the backup configuration file stored on your computer, and click RESTORE.

- Wait a few minutes for the restore and reboot.
Note: During the restore process, do not power off or reset the extender.
- To restore configuration settings
In Factory Default Restore, click RESTORE to restore all configuration settings to default values, except your login and cloud account information.
Note: During the restore process, do not power off or reset the extender.

- To reset the extender to factory default settings:
- Click FACTORY RESTORE to reset the extender.
Restore all configuration settings to default values.
FACTORY RESTORE
- Wait a few minutes for the reset and reboot.
Note:
- During the reset process, do not power off or reset the extender.
- We strongly recommend you backup the current configuration settings before resetting the extender.
7.6. Reboot the Extender
You can reboot your extender to clear cache and enhance running performance if needed.
- Visit http://tplinkrepeater.net, and log in with your TP-Link ID or the password you set for the extender.
- Go to Settings > System Tools > Reboot.
• To reboot the extender
Click REBOOT and wait a few minutes.

• To set up reboot schedule
Enable Reboot Schedule and set the corresponding settings.
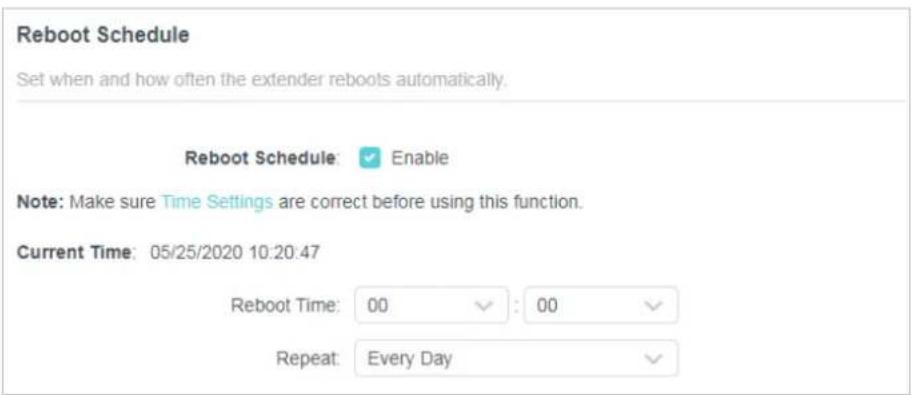
7.7. Change Login Password
The account management feature allows you to change your login username and password for the web management page.
- Visit http://tplinkrepeater.net and log in with your TP-Link ID or the password you set for the extender.
- Go to Settings > System Tools > Change Login Password.
- Enter the old password. Then enter the new password twice (case-sensitive) and click SAVE.

- Use the new password for future logins.
7.8. Check System Log
If the extender is not working properly, you can save the system log and send it to our technical support team.
- Visit http://tplinkrepeater.net and log in with your TP-Link ID or the password you set for the extender.
- Go to Settings > System Tools > System Log.
• To save the system log locally:
- Choose the type and level of the system log as needed.
- Click SAVE LOG to save the system logs to a local disk.
![System Log View a detailed record of system activities. Current Time: 05/25/2020 10:21:27 Log Type: ALL Search Refresh Clear All 1 EXCEPTION Exception:[2020-01-01 0:00:10] td_id = 805195D0 td_name = wlanInit td_sp = 80519210 td_pStackBase = 805195D0 td_stackCurrent = 3C0 td_pc = 801F7424 td_ra = 801…](/content/2026/06/1396531/images/d23e546b933ac481b6b572c209cbd618e25e906079dc0e01007a073c09c57e13.jpg)
FAQ
Q1. How to reset the extender to its factory default settings?
- With the extender powered on, use a pin to press the Reset button for 1 second. The extender will reboot.
- Log in to the extender's web management page. Go to Settings > System Tools > Backup & Restore and click FACTORY RESTORE.
Q2. What should I do if I forget my login password?
- If you are using a TP-Link ID to log in, or you have enabled the Password Recovery feature of the extender, click Forgot Password? on the login page and then follow the instructions to reset it.
- Refer to FAQ > Q1 to reset the extender, and then visit http://tplinkrepeater.net to create a new login password.
Note:
The extender must be reconfigured after a reset to access the internet. Please note down your login password for future logins.
Q3. What should I do if I forget my wireless password?
In Range Extender mode, the extender shares the same wireless passwords as those of your host networks.
In Access Point mode, please connect your computer to the extender using an Ethernet cable and follow the steps below:
- Visit http://tplinkrepeater.net, and log in with the password you set for the extender.
- Go to Wireless to retrieve or reset your wireless password.
Q4. What should I do if I can't access the web management page?
This can happen for a variety of reasons. Please try the methods below to log in again.
- If your computer is wirelessly connected, make sure that you have connected to the extender's SSID.
- If your computer is connected via an Ethernet cable, please make sure that the connection is stable.
- Make sure your computer is configured to obtain an IP address automatically and to obtain DNS server address automatically.
- Verify that http://tplinkrepeater.net is correctly entered in the web browser and press Enter.
- Use the IP address to access the extender. The default IP is 192.168.0.254. If the extender is connected to the router, you should go to your router's DHCP client list to obtain the extender's current IP address.
- Reset the extender. Then connect your computer to its wireless network, enter http://tplinkrepeater.net or http://192.168.0.254 in a web browser and press Enter.
Q5. I have enabled wireless MAC filter, wireless access control, or access control list (ACL) on my router. What should I do before configuring the extender?
When a device connects through the extender to your router, the MAC address of the device shown on the router is translated to another MAC address. If your router's MAC filter, wireless access control, or ACL is enabled, the devices connected to the extender cannot get an IP address from the extender and cannot access the Internet.
To solve this problem, please follow the steps below:
- Log in to your router and disable the MAC filter, wireless access control, or ACL.
Note: For more information about how to disable your router's MAC filter, wireless access control, or ACL, please refer to your router's user guide.
- Power on your extender, and run the Quick Setup to configure your extender.
- Connect all of your devices to the extended network, and make sure the router's Link LED remains lit.
- On your router, add all the Online Devices' MAC addresses to your router's MAC filter table.
- Enable the router's MAC filter, wireless access control, or ACL to complete the configuration.
FCC compliance information statement

Product Name: AC1200/ AC750 Wi-Fi Range Extender
Model Number: RE315/ RE215
Responsible Party:
TP-Link USA Corporation, d/b/a TP-Link North America, Inc.
Address: 145 South State College Blvd. Suite 400, Brea, CA 92821
Website: http://www.tp-link.com/us/
Tel: +1 626 333 0234
This equipment has been tested and found to comply with the limits for a Class B digital device, pursuant to part 15 of the FCC Rules. These limits are designed to provide reasonable protection against harmful interference in a residential installation. This equipment generates, uses and can radiate radio frequency energy and, if not installed and used in accordance with the instructions, may cause harmful interference to radio communications. However, there is no guarantee that interference will not occur in a particular installation. If this equipment does cause harmful interference to radio or television reception, which can be determined by turning the equipment off and on, the user is encouraged to try to correct the interference by one or more of the following measures:
- Reorient or relocate the receiving antenna.
- Increase the separation between the equipment and receiver.
- Connect the equipment into an outlet on a circuit different from that to which the receiver is connected.
- Consult the dealer or an experienced radio/TV technician for help.
This device complies with part 15 of the FCC Rules. Operation is subject to the following two conditions:
- This device may not cause harmful interference.
- This device must accept any interference received, including interference that may cause undesired operation.
Any changes or modifications not expressly approved by the party responsible for compliance could void the user's authority to operate the equipment.
Note: The manufacturer is not responsible for any radio or TV interference caused by unauthorized modifications to this equipment. Such modifications could void the user's authority to operate the equipment.
FCC RF Radiation Exposure Statement:
This equipment complies with FCC RF radiation exposure limits set forth for an uncontrolled environment. This device and its antenna must not be co-located or operating in conjunction with any other antenna or transmitter.
"To comply with FCC RF exposure compliance requirements, this grant is applicable to only Mobile Configurations. The antennas used for this transmitter must be installed to provide a separation distance of at least 20 cm from all persons and must not be co-located or operating in conjunction with any other antenna or transmitter."
This device is restricted in indoor environment only.
We, TP-Link USA Corporation, has determined that the equipment shown as above has been shown to comply with the applicable technical standards, FCC part 15. There is no unauthorized change is made in the equipment and the equipment is properly maintained and operated.
Issue Date: 2020-09-15
CE Mark Warning
CE
This is a class B product. In a domestic environment, this product may cause radio interference, in which case the user may be required to take adequate measures.
OPERATING FREQUENCY (the maximum transmitted power)
2400 MHz -2483.5 MHz (20dBm)
5150 MHz -5250 MHz (23dBm)
5250 MHz -5350 MHz (23dBm)
5470 MHz -5725 MHz (30dBm)
EU Declaration of Conformity
TP-Link hereby declares that the device is in compliance with the essential requirements and other relevant provisions of directives 2014/53/EU, 2009/125/EC, 2011/65/EU and (EU) 2015/863.
The original EU declaration of conformity may be found at http://www.tp-link.com/en/ce
RF Exposure Information
This device meets the EU requirements (2014/53/EU Article 3.1a) on the limitation of exposure of the general public to electromagnetic fields by way of health protection.
The device complies with RF specifications when the device used at 20 cm from your body.
Attention: This device may only be used indoors in all EU member states and EFTA countries.
 | AT | BE | BG | CH | CY | CZ | DE | DK |
| EE | EL | ES | FI | FR | HR | HU | IE | |
| IS | IT | LI | LT | LU | LV | MT | NL | |
| NO | PL | PT | RO | SE | SI | SK | UK |
Canadian Compliance Statement
This device contains licence-exempt transmitter(s)/receiver(s) that comply with Innovation, Science and Economic Development Canada's licence-exempt RSS(s). Operation is subject to the following two conditions:
- This device may not cause interference.
- This device must accept any interference, including interference that may cause undesired operation of the device.
- The device for operation in the band 5150–5250 MHz is only for indoor use to reduce the potential for harmful interference to co-channel mobile satellite systems.
DFS (Dynamic Frequency Selection) products that operate in the bands 5250-5350 MHz, 5470-5600 MHz, and 5650-5725 MHz.
Warning:
Radiation Exposure Statement:
This equipment complies with IC radiation exposure limits set forth for an uncontrolled environment. This equipment should be installed and operated with minimum distance 20 cm between the radiator and your body.
Industry Canada Statement
CAN ICES-3 (B)/NMB-3(B)
Korea Warning Statements
- Operating Temperature: 0°C to 40°C (32°F to 104°F)
- Keep the device away from water, fire, humidity, or hot environments.
- Do not attempt to disassemble, repair, or modify the device. If you need service, please contact us.
- Do not use the device where wireless devices are not allowed.
- The socket-outlet shall be installed near the equipment and shall be easily accessible.


CAUTION:
Double pole, neutral fusing. Disconnect mains before servicing.


ATTENTION:
Please read and follow the above safety information when operating the device. We cannot guarantee that no accidents or damage will occur due to improper use of the device. Please use this product with care and operate at your own risk.
Explanations of the symbols on the product label
| Symbol Explanation | |
| Class II equipment | |
| AC voltage | |
| Indoor use only | |
Symbol Explanation
| [0x27] | RECYCLINGThis product bears the selective sorting symbol for Waste electrical and electronic equipment (WEEE). This means that this product must be handled pursuant to European directive 2012/19/EU in order to be recycled or dismantled to minimize its impact on the environment.User has the choice to give his product to a competent recycling organization or to the retailer when he buys a new electrical or electronic equipment. |
 | Warning electric shock |
 | Fuse is used in neutral N |

- CONTENTS
- ABOUT THIS GUIDE
- CHAPTER 1. GET TO KNOW ABOUT YOUR EXTENDER
- CHAPTER 2. SET UP INTERNET CONNECTION
- CHAPTER 3. ONEMESH WITH SEAMLESS ROAMING
- CHAPTER 4. TP-LINK CLOUD SERVICE
- CHAPTER 5. CUSTOMIZE YOUR NETWORK
- CHAPTER 6. MORE FEATURES OF YOUR EXTENDER
- CHAPTER 7. MANAGE YOUR EXTENDER
- FAQ
- CONVENTIONS
- MORE INFO
- SPEED/COVERAGE DISCLAIMER
- CHAPTER
- GET TO KNOW ABOUT YOUR EXTENDER
- PRODUCT OVERVIEW
- BRING DEAD ZONES BACK TO LIFE
- EASY INSTALLATION & QUICK POSITION
- EASY MANAGEMENT WITH THE TP-LINK TETHER APP
- APPEARANCE
- LED EXPLANATION
- PORT AND BUTTON DESCRIPTION
- SET UP INTERNET CONNECTION
- POWER ON THE EXTENDER
- NOTE
- SET UP THE EXTENDER
- METHOD 1: VIA THE TP-LINK TETHER APP
- ENJOY! CONNECT TO THE EXTENDED NETWORK AND ENJOY THE INTERNET
- METHOD 2: VIA A WEB BROWSER
- FINISH
- TIP
- METHOD 3: VIA THE WPS BUTTON
- EXTENDED NETWORK NAMES
- PASSWORDS
- ONEMESH WITH SEAMLESS ROAMING
- WHAT'S A ONEMESH NETWORK
- UNIFIED WI-FI NETWORK
- SEAMLESS ROAMING
- EASY SETUP AND MANAGEMENT
- HOW TO SET UP A ONEMESH NETWORK
- ONEMESH
- REMOVE EXTENDER FROM ONEMESH NETWORK
- TP-LINK CLOUD SERVICE
- REGISTER A TP-LINK ID
- NOTES
- CHANGE YOUR TP-LINK ID INFORMATION
- MANAGE THE USER TP-LINK IDS
- ADD TP-LINK ID TO MANAGE THE EXTENDER
- REMOVE TP-LINK ID(S) FROM MANAGING THE EXTENDER
- MANAGE THE EXTENDER VIA THE TP-LINK TETHER APP
- CUSTOMIZE YOUR NETWORK
- CHECK INTERNET STATUS
- CONFIGURE WIRELESS NETWORK
- CHANGE LAN SETTINGS
- SPECIFY DHCP SERVER SETTINGS
- SET HIGH SPEED MODE
- SET ACCESS CONTROL
- SELECT WHITELIST AND CLICK ADD
- SELECT FROM THE DEVICE LIST OR ADD DEVICES MANUALLY IN THE ADD DEVICES TABLE. ENTER THE DEVICE NAME AND MAC ADDRESS IF YOU ADD DEVICES MANUALLY
- CLICK SAVE
- ADJUST WI-FI COVERAGE
- WI-FI COVERAGE
- MORE FEATURES OF YOUR EXTENDER
- USE YOUR EXTENDER AS A WIRELESS ADAPTER
- TRANSFORM YOUR EXISTING WIRED NETWORK TO A WIRELESS ONE
- TO SET UP THE EXTENDER AS AN ACCESS POINT
- TO CONNECT YOUR WIRELESS DEVICES TO THE EXTENDER VIA WPS
- MANAGE YOUR EXTENDER
- SET SYSTEM TIME
- CONTROL LEDS
- SET POWER SCHEDULE
- UPGRADE THE FIRMWARE
- ONLINE UPGRADE
- LOCAL UPGRADE
- BACKUP AND RESTORE CONFIGURATION SETTINGS
- REBOOT THE EXTENDER
- CHANGE LOGIN PASSWORD
- CHECK SYSTEM LOG
- Q1. HOW TO RESET THE EXTENDER TO ITS FACTORY DEFAULT SETTINGS
- Q2. WHAT SHOULD I DO IF I FORGET MY LOGIN PASSWORD
- Q3. WHAT SHOULD I DO IF I FORGET MY WIRELESS PASSWORD
- Q4. WHAT SHOULD I DO IF I CAN'T ACCESS THE WEB MANAGEMENT PAGE
- Q5. I HAVE ENABLED WIRELESS MAC FILTER, WIRELESS ACCESS CONTROL, OR ACCESS CONTROL LIST (ACL) ON MY ROUTER. WHAT SHOULD I DO BEFORE CONFIGURING THE EXTENDER
- FCC COMPLIANCE INFORMATION STATEMENT
- RESPONSIBLE PARTY
- FCC RF RADIATION EXPOSURE STATEMENT
- CE MARK WARNING
- CE
- OPERATING FREQUENCY (THE MAXIMUM TRANSMITTED POWER)
- EU DECLARATION OF CONFORMITY
- RF EXPOSURE INFORMATION
- CANADIAN COMPLIANCE STATEMENT
- WARNING
- RADIATION EXPOSURE STATEMENT
- INDUSTRY CANADA STATEMENT
- KOREA WARNING STATEMENTS
- CAUTION
- ATTENTION
- EXPLANATIONS OF THE SYMBOLS ON THE PRODUCT LABEL
Brand : TP-LINK
Model : RE215
Category : Wi-Fi repeater