
BIZHUB C30P - Color printer KONICA MINOLTA - Free user manual and instructions
Find the device manual for free BIZHUB C30P KONICA MINOLTA in PDF.


| Product type | Color laser printer |
| Brand | KONICA MINOLTA |
| Model | BIZHUB C30P |
| Dimensions (L × W × H) | 430 × 430 × 320 mm |
| Weight | 25 kg |
| Power supply | 220-240 V, 50/60 Hz |
| Power consumption | Printing: 600 W, standby: 10 W |
| Print speed | Up to 30 pages/min in color and black |
| Print resolution | 600 x 600 dpi |
| Paper capacity | Standard tray: 500 sheets, multi-purpose tray: 100 sheets |
| Print languages | PostScript 3, PCL6 |
| Connectivity | Ethernet 10/100/1000 Base-T, USB 2.0 |
| Main functions | Color printing, user and address management via PageScope Data Administrator |
| Security | User authentication, function access control, automatic application protection |
| Maintenance and cleaning | Regular cleaning of the drum and rollers; replacement of consumables based on usage |
| Spare parts and repairability | Parts available from authorized KONICA MINOLTA dealers |
| General information | User manual available in PDF format on the manufacturer's website |
Frequently Asked Questions - BIZHUB C30P KONICA MINOLTA
User questions about BIZHUB C30P KONICA MINOLTA
0 question about this device. Answer the ones you know or ask your own.
Ask a new question about this device
Download the instructions for your Color printer in PDF format for free! Find your manual BIZHUB C30P - KONICA MINOLTA and take your electronic device back in hand. On this page are published all the documents necessary for the use of your device. BIZHUB C30P by KONICA MINOLTA.
USER MANUAL BIZHUB C30P KONICA MINOLTA
1.1 System Requirements 1-1
1.2 Overview of Functions 1-2
2 Software Installation
2.1 PageScope Data Administrator 2-1
Installation 2-1
Uninstallation 2-1
3 PageScope Data Administrator
3.1 To Start 3-1
To Start 3-1
3.2 To Exit 3-1
To Exit 3-1
3.3 Screen Configuration 3-2
Main Screen 3-2
Menu Bar 3-3
Device List Screen 3-4
Menu Bar 3-5
Device Information Screen 3-6
Menu Bar 3-7
3.4 Device Registration 3-10
3.4.1 Search and Register Device 3-10
Register Found Devices 3-10
3.4.2 Specify IP Address and Register 3-12
Specify IP Address and Register 3-12
bizhub OpenAPI Settings 3-14
3.4.3 Register from Function Access Restriction File 3-15
Register from Function Access Restriction File 3-15
3.4.4 Register a Local File 3-17
Create a New Local File then Register 3-17
Register from Backup File 3-19
3.4.5 Edit Registration Information 3-20
Edit Registration Information 3-20
3.4.6 Delete Registration Information 3-23
Delete Registration Information 3-23
3.5 Setting a Search Range 3-24
Add a search range for devices. 3-25
3.6 Change Date and Time 3-27
Change Device Date and Time 3-27
3.7 Network default settings 3-29
Configure default settings for the registered device network .....3-29
3.8 LDAP Server Access Settings 3-32
Add LDAP Server Access Settings 3-32
Edit LDAP Server Access Settings 3-36
Delete LDAP Server Access Settings 3-38
3.9 Group Settings 3-39
Create a New Group 3-39
Edit a Group 3-40
Delete a Group 3-41
Set the Default Group 3-42
3.10 Single Device Settings 3-44
Import Information from Device 3-44
When the Administrator Password Is Displayed 3-47
When the SNMP Read Community Name Is Displayed 3-47
Import Abbreviated Address Data from CSV Files 3-48
Import Abbreviated Address Data from an LDAP server ......3-54
Import Abbreviated Address Data from a Previous Device ......3-58
Set Search Range 3-61
3.11 Bulk Copy of Settings 3-63
Copy Settings from One Device to Another Device 3-63
3.12 Automatic Creation of Boxes 3-68
Configure Automatic Box Creation 3-68
3.13 Auto Protect Settings 3-69
Set Auto Protect 3-69
Cancel Auto Protect 3-70
Change Time-out Period 3-71
Change the Password 3-72
3.14 Authentication Mode Template Settings 3-73
Create Authentication Mode Templates 3-73
Edit Authentication Mode Templates 3-75
Delete Authentication Mode Templates 3-77
3.15 User Template Settings 3-78
Create User Templates 3-78
Edit User Templates 3-80
Delete User Templates 3-82
Set Default User Templates 3-83
3.16 Account Template Settings 3-85
Create Account Templates 3-85
Edit Group Templates 3-87
Delete Account Templates 3-89
Set Default Account Templates 3-90
3.17 Weekly Timer Template Settings 3-92
Create Weekly Timer Templates 3-92
Edit Weekly Timer Templates 3-94
Delete Weekly Timer Templates 3-96
3.18 IP Filtering Template Settings 3-97
Create IP Filtering Templates 3-97
Edit IP Filtering Templates 3-100
Delete IP Filtering Templates 3-102
3.19 Function Access Restriction File Settings 3-103
Create a New Function Access Restriction File 3-103
Add a Device to a Function Access Restriction File 3-105
Edit Devices Registered in a Function Access Restriction
File 3-106
Delete a Function Access Restriction File 3-107
Add a Device from the Device List to a Function Access
Restriction File 3-107
Open a Function Access Restriction File 3-108
3.20 Start Network Application 3-109
Start Network Application 3-109
4 APPENDIX
4.1 Display Option Settings 4-1
Set Display Options 4-1
4.2 Authentication Mode Template Setting Items 4-2
4.3 Weekly Timer Template Setting Items 4-4
4.4 What Do I Do If this Message Is Displayed? 4-5
About this Product
PageScope Data Administrator V3 is an administration tool with which authentication data and addresses that are registered in the control panel of supported devices (multifunctional OA equipment) can be edited and changed from other computers on the network.
After importing and editing authentication lists and address lists from devices, it can be used to then export these lists to devices.
PageScope Data Administrator V3 can import address lists in formats such as XML, CSV, TAB, LDIF, and Lotus Notes Structured Text.
The LDAP protocol can be used to both search and browse destination data on directory servers such as Active Directory, and to import these addresses.
Trademarks
KONICA MINOLTA and the KONICA MINOLTA logo are trademarks of KONICA MINOLTA HOLDINGS, INC.
PageScope is a trademark of KONICA MINOLTA BUSINESS TECHNOLOGIES, INC.
Active Directory, Microsoft and Windows are either registered trademarks or trademarks of Microsoft Corporation in the United States and/or other countries.
Domino, Lotus Notes and Lotus are trademarks of IBM Corporation.
Intel and Pentium are trademarks or registered trademarks of Intel Corporation or its subsidiaries in the United States and other countries.
All other product names are trademarks or registered trademarks of their respective companies.

...
Note
Please be aware that devices and settings may result in the content of screens being different to as shown in this document.

...
Note
Unauthorized reproduction, translation or duplication of this document, whether in its entirety or in part, is strictly prohibited.
The content of this document is subject to change without notice.
Copyright © 2004 KONICA MINOLTA BUSINESS
TECHNOLOGIES, INC. All rights reserved.
1 Getting Started
1.1 System Requirements
Systems must have the following specifications in order to use this software.
- Operating System
Windows 2000 Professional (SP4)
Windows XP Professional (SP2) - Computer
PC/AT compatible, with 1GHz CPU or better - Memory (RAM)
128 MB or above - Unused hard drive capacity
100 MB or more - Display
800 × 600 pixel, 16 bit - color or better - Network
TCP/IP protocol - Applications
Microsoft Internet Explorer 6.0 (SP1) or later
Microsoft .NET Framework (SP1) or later
• Supported Devices
Please refer to the Readme file.

...
Note
In order to use this software, it is necessary to enable bizhub OpenAPI from the device panel by clicking Administration Settings, then System.
1.2 Overview of Functions
Below is a functional overview of PageScope Data Administrator.
- Detecting supported models on the network.
- Group settings for managed devices.
- Acquisition and configuration of management data, network data, authentication data, and address data registered on the device.
- Backup of management data, network data, authentication data, and address data registered on the device.
- Copying of authentication data and address data to another device.
- Bulk settings of user data, group data, and abbreviated address data.
- Setting of access restrictions on a per-function basis.
- Import of data (XML, CSV, LDIF, formats) saved in files.

Note
If multiple device screens are open, then address and other data can be copied and pasted to other devices.
2 Software Installation
2.1 PageScope Data Administrator
Install and uninstall PageScope Data Administrator (below: "Data Administrator") as follows:
Installation
1 Open the Data Administrator folder.
– Confirm the location to where you copied Data Administrator.
2 Double click Setup.exe. The installer starts.
3 Proceed with the install as indicated on the screen.
4 When the InstallShield Wizard Complete screen is displayed, click Finish.
Click Start, then Programs—KONICA MINOLTA—PageScope Data Administrator V3, and confirm that the PageScope Data Administrator V3 icon is there.
Uninstallation
1 Click Start, then Settings—Control Panel, to open the Control Panel.
2 Double-click Add/Remove Programs.
3 In the Currently installed programs field, select KONICA MINOLTA PageScope Data Administrator V3, and click Change/Remove.
4 When the Confirm Uninstall screen is displayed, click OK. Uninstall commences.
5 When the Maintenance Complete screen is displayed, click Finish.
3 PageScope Data Administrator
3.1 To Start
Start Data Administrator as follows.
To Start
→ Click Start, then Programs—KONICA MINOLTA—PageScope Data Administrator V3—PageScope Data Administrator V3. Data Administrator starts.
![PageScope Data Administrator - [Device list] File Device Processing Tool Window Help Device list: Group name Registered name Device name Device address SSL Address, Authentication, Administrator settings Backup(1) Font/Macro(2) Copy Protect/Stamp(3) Audit Log(4) Column option...](/content/2024/12/139629/images/7b7d2b98c2a2e1115998c1ade26e077f66785e6a60034dc30fbd2059d0cfa25b.jpg)

Note
At the time the application is first started, the Application protect settings screen is displayed. Refer to “Auto Protect Settings” on page 3-69 and carry out auto protect settings.
3.2 To Exit
Exit Data Administrator as follows.
To Exit
→ From the File menu, select Exit.
3.3 Screen Configuration
Main Screen
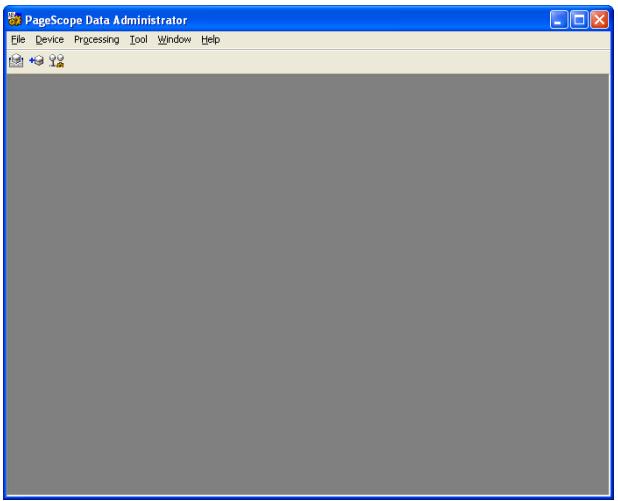
Menu Bar
| Menu | Explanation | ||
| File | Exit | Close the application. | |
| Device | Device registration | Start device registration. | |
| Edit group | Start group settings. | ||
| Device list | Display the device list. | ||
| Network default settings | Configure default settings for the registered device network. | ||
| Processing | Copy | Copy settings from one device to another device. | |
| Tool | User box option | Configure automatic box creation settings. | |
| LDAP server settings | Configure LDAP server settings. | ||
| Auto protect | Configure auto protect settings. | ||
| Template | Authentication | Configure authentication mode templates. | |
| User | Configure user data templates. | ||
| Account | Configure group data templates. | ||
| Weekly timer | Configure weekly timer templates. | ||
| IP filtering | Configure IP filtering templates. | ||
| Function access restriction | New | Create a function access restriction file. | |
| Open | Open an existing function access restriction file. | ||
| Window | Tile horizontally | Display screens inside the main screen tiled horizontally. | |
| Tile vertically | Display screens inside the main screen tiled vertically. | ||
| Cascade view | Display screens cascaded inside the main screen. | ||
| Help | Help | Display Help. | |
| Version information | Display the version of Data Administrator. | ||
Device List Screen
![PageScope Data Administrator - [Device list] File Device Processing Tool Window Help Device list: Group name Registered name Device name Device address SSL Address, Authentication, Administrator settings Backup(1) Font/Macro(2) Copy Protect/Stamp(3) Audit Log(4) Column option...](/content/2024/12/139629/images/d2a160e300ca68e2b86acd01ee4b8cc7b58e8b6022b0697e6e2c2e127df29446.jpg)
Menu Bar
| Menu | Explanation | ||
| File | Exit | Close the application. | |
| Device | Address, Authentication, Administrator settings | Start import of information from devices. | |
| Change device date time | Change the date and time of the device selected in the device list. | ||
| Device registration | Start device registration. | ||
| Edit group | Start group settings. | ||
| Device list | Display the device list. | ||
| Network default settings | Configure default settings for the registered device network. | ||
| Processing | Copy | Copy settings from one device to another device. | |
| Tool | User box option | Configure automatic box creation settings. | |
| LDAP server settings | Configure LDAP server settings. | ||
| Auto protect | Configure auto protect settings. | ||
| Template | Authentication | Configure authentication mode templates. | |
| User | Configure user data templates. | ||
| Account | Configure group data templates. | ||
| Weekly timer | Configure weekly timer templates. | ||
| IP filtering | Configure IP filtering templates. | ||
| Function access restriction | New | Create a function access restriction file. | |
| Open | Open an existing function access restriction file. | ||
| Start external tools | Start various related applications. | ||
| Window | Tile horizontally | Display screens inside the main screen tiled horizontally. | |
| Tile vertically | Display screens inside the main screen tiled vertically. | ||
| Cascade view | Display screens cascaded inside the main screen. | ||
| Help | Help | Display Help. | |
| Version information | Display the version of Data Administrator. | ||

...
Note
To configure items to display in the list, click Display options.
Refer to "Display Option Settings" on page 4-1 for details.
Device Information Screen
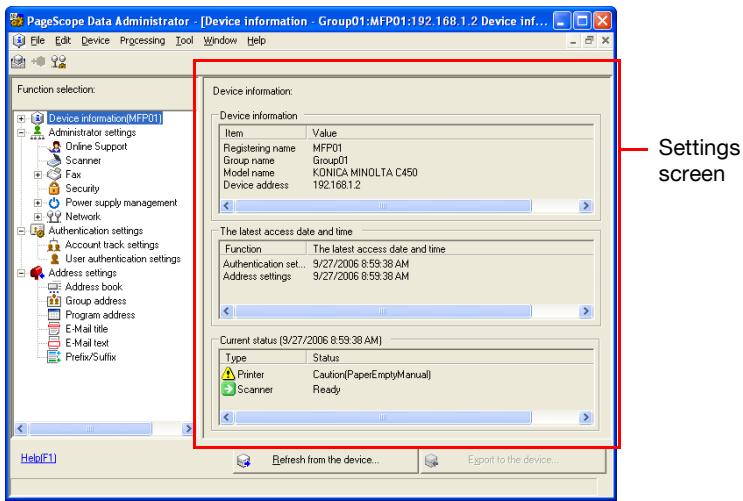
Menu Bar
| Menu | Explanation | ||
| File | Refresh from the device | Import from the device information from prior to editing. | |
| Export to the device | Export edited data to a device. | ||
| Import | Import each data from the file | Import data from individual settings files. | |
| Import (LDAP) | Import data from an LDAP server. | ||
| Import from the previous device | Import data from a previous device. | ||
| Import all data from file | Import all data from a file. | ||
| Export | Save account by the TabText type | Save account data in TabText format. | |
| Save the user list by the Tab-Text form | Save user list in TabText format. | ||
| Save address book by the TabText type | Save abbreviated address data in TabText format. | ||
| Save all data to the file | Save all device settings data to file. | ||
| Close device information | Close the device information screen. | ||
| Exit | Close the application. | ||
| Edit | Add | Add a user or group. | |
| Edit | Edit items that are selected in the right settings screen. | ||
| Delete | Delete items that are selected in the right settings screen. | ||
| Display options | Configure list display items. | ||
| Copy | Copy items that are selected in the right settings screen. | ||
| Paste | Paste copied items in the selected location. | ||
| Find | Search for items that are selected in the right settings screen. | ||
| Set default | Set defaults. | ||
| Max Allow-ance settings | User | Add maximum allowances for users in bulk. | |
| Account | Add maximum allowances for groups in bulk. | ||
| Clear coun-ter | User | Bulk clear of user counters. | |
| Account | Bulk clear of group counters. | ||
| Authentica-tion | Change au-thentication mode | Change authentication mode. | |
| Change coun-ter range | Change counter range. | ||
| Address set-tings | Clear all ad-dresses | Clear all addresses. | |
| Device | Device registration | Start device registration. | |
| Edit group | Start group settings | ||
| Device list | Display the device list. | ||
| Network default settings | Configure default settings for the registered de-vice network. | ||
| Process-ing | Copy | Copy settings from one device to another device. | |
| Tool | User box option | Configure automatic box creation settings. | |
| LDAP server settings | Configure LDAP server settings | ||
| Auto protect | Configure auto protect settings | ||
| Template | Authentication | Configure authentication mode templates. | |
| User | Configure user data templates. | ||
| Account | Configure group data templates. | ||
| Weekly timer | Configure weekly timer templates. | ||
| IP filtering | Configure IP filtering templates. | ||
| Function access restriction | New | Create a function access restriction file. | |
| Open | Open an existing function access restriction file. | ||
| Window | Tile horizontally | Display screens inside the main screen tiled horizontally. | |
| Tile vertically | Display screens inside the main screen tiled vertically. | ||
| Cascade view | Display screens cascaded inside the main screen. | ||
| Help | Help | Display Help. | |
| Version information | Display the version of Data Administrator. | ||
3.4 Device Registration
Register devices to configure in Data Administrator.

...
Note
To configure items to display in the list, click Column option. Refer to "Display Option Settings" on page 4-1 for details.
3.4.1 Search and Register Device
Search for and register devices within a specified network range. Additionally, the IP Address for found devices can be changed.
Register Found Devices
1 From the Device menu, select Device registration.
The Device registration screen is displayed.
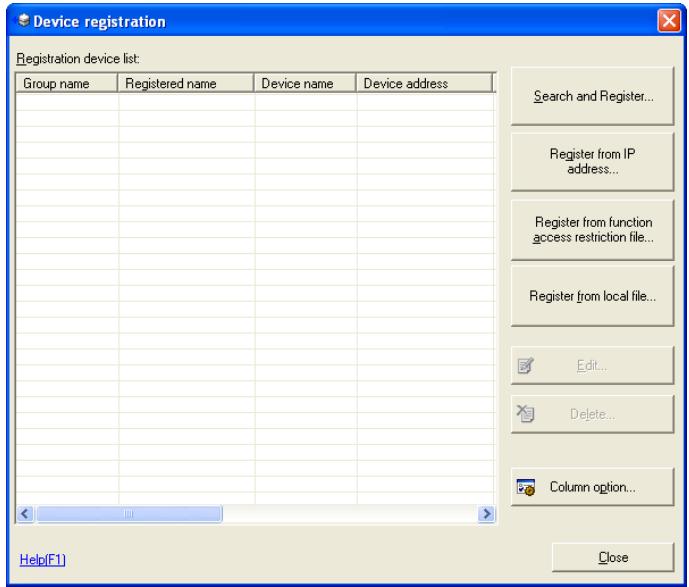
2 Click Search and Register.
A Start device searching? message will be displayed.
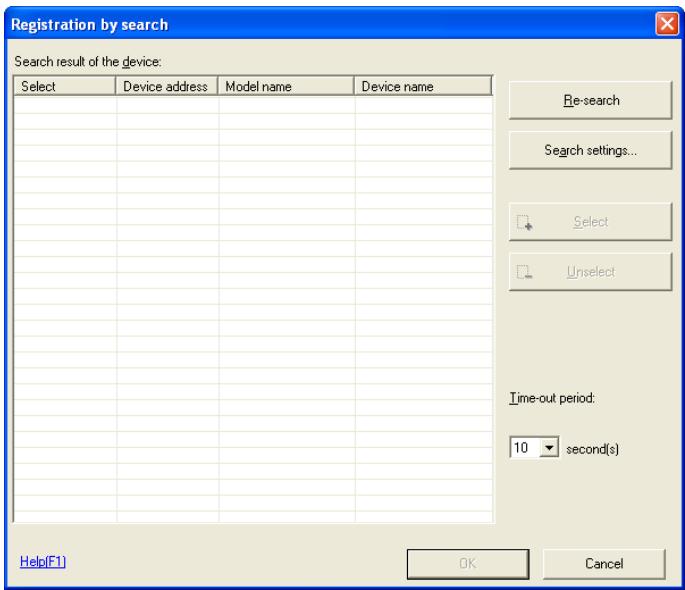
- If a device search range has not been configured, then the Start device searching? message will not be displayed. Instead, the Registration by search screen will be displayed. Click Search settings on the Registration by search screen, and add a search range. For details, please refer to “Setting a Search Range” on page 3-24.
3 Click Yes.
The device search starts, and devices that are found are displayed on the list on the Registration by search screen.
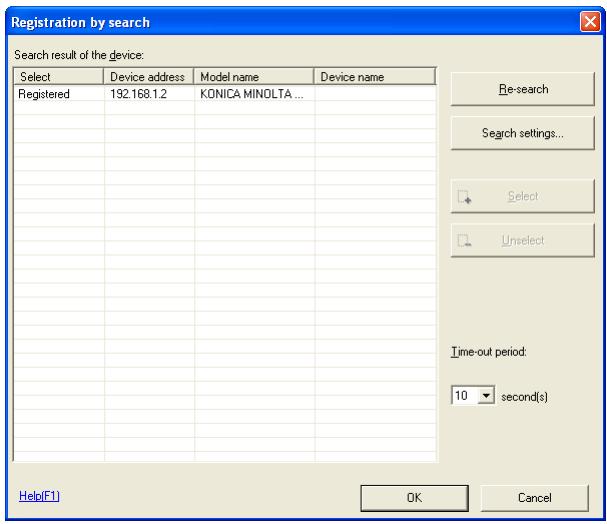
– Re-search: Search for devices within a specified search range.
– Search settings: Set the search range for devices.
- Select: Set the device to register. Select devices to register from the list, and click Select.
- Unselect: Cancel the selection of devices that have been selected for registration. Select devices to remove from the list, and click Unselect.
– Time-out period: Select the search timeout period.
4 Set the devices to register by clicking Select, and click OK.
The devices are registered.

Note
Up to a maximum of 100 device search ranges can be set.
3.4.2 Specify IP Address and Register
Directly input the IP address of the device and register.
Specify IP Address and Register
1 From the Device menu, select Device registration.
The Device registration screen is displayed.
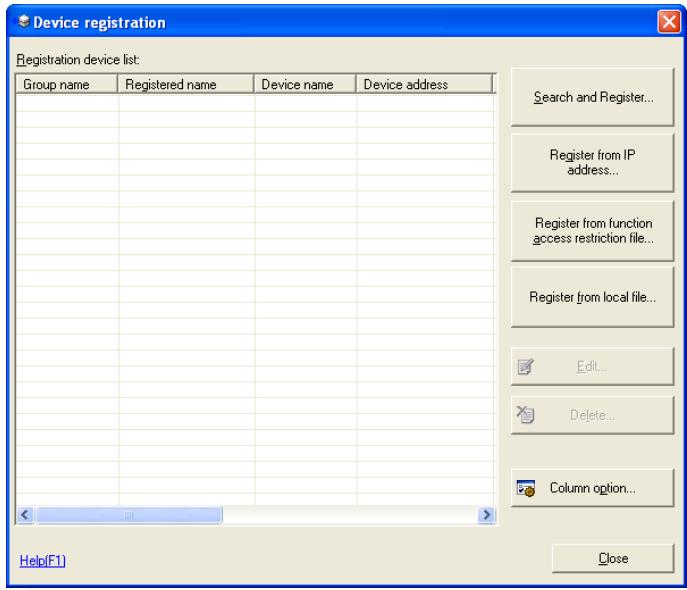
2 Click Register from IP address.
The Register from IP address screen is displayed.
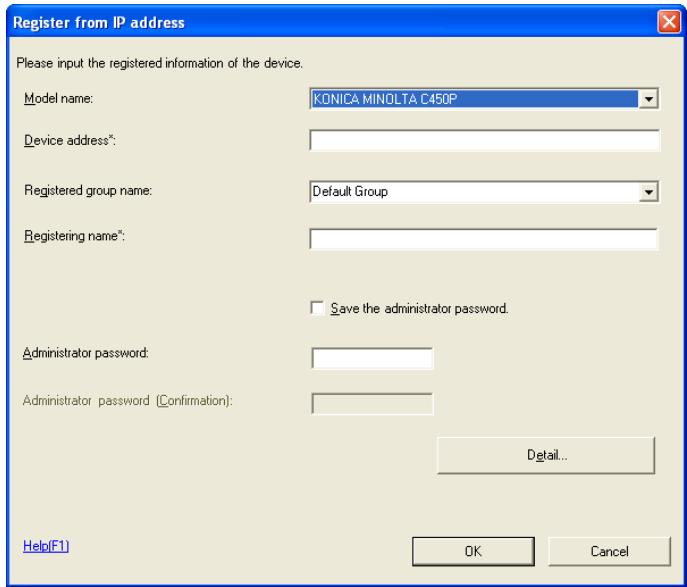
- Model name: Select the model name of the device to register.
- Device address: Input the IP address or DNS name of the device to register.
- Registered group name: Select or input the group name to register.
- Registering name: Input the name to register.
- Save the administrator password: Select this to save the administrator password.
- Administrator password: Input the device administrator password configured in the device.
- Administrator password (Confirmation): Retype the administrator password for confirmation.
- Detail: Click this to configure items relating to bizhub OpenAPI. Refer to "bizhub OpenAPI Settings" on page 3-14 for details.
3 Set the IP address, and click OK.
The devices are registered.

...
Note
Click OK to carry out a device connection test. Devices to which a connection can not be made can not be registered.
bizhub OpenAPI Settings
1 From the Register from IP address screen, click Detail. The Device detail settings screen is displayed.
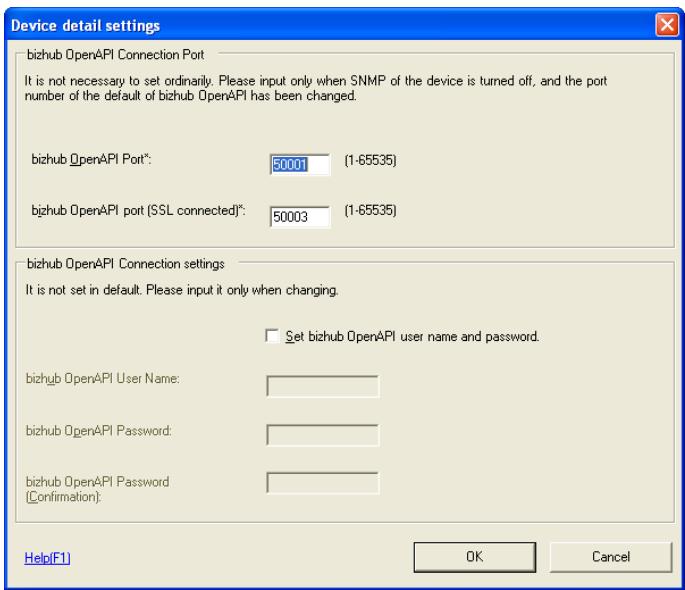
- bizhub OpenAPI Port: Input the bizhub OpenAPI port number.
- bizhub OpenAPI port (SSL connected): Input the bizhub OpenAPI port number for when connecting with SSL.
- Set bizhub OpenAPI user name and password: Select this to set an bizhub OpenAPI user name and password.
- bizhub OpenAPI User Name: Input the bizhub OpenAPI login user name.
- bizhub OpenAPI Password: Input the bizhub OpenAPI login password.
- bizhub OpenAPI Password (Confirmation): Retype the bizhub OpenAPI login password for confirmation.
2 Configure items relating to bizhub OpenAPI, and click OK.
Items relating to bizhub OpenAPI are configured.

Note
bizhub OpenAPI settings do not normally need to be configured. Change values to the same as those in the device only if the device has been changed.
3.4.3 Register from Function Access Restriction File
Register from items registered in a function access restriction file
Register from Function Access Restriction File
1 From the Device menu, select Device registration.
The Device registration screen is displayed.
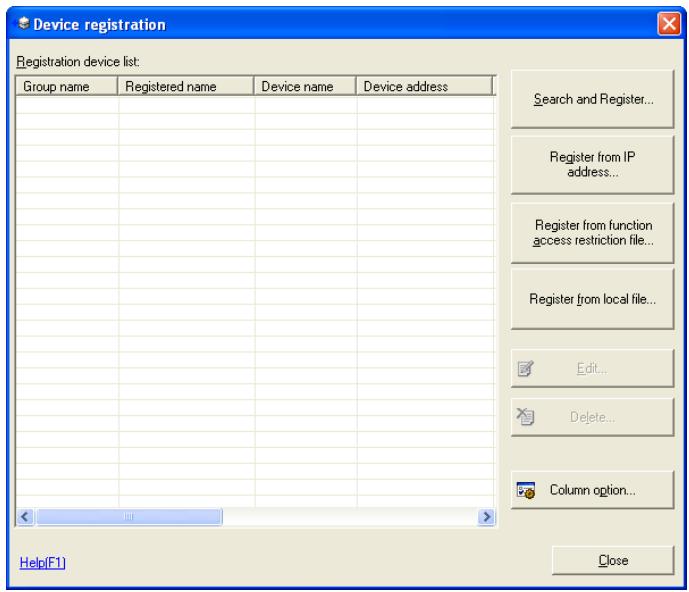
2 Click Register from function access restriction file.
The Open file screen is displayed.
3 Select the function access restriction file, and click Open.
The Input a decryption password screen is displayed
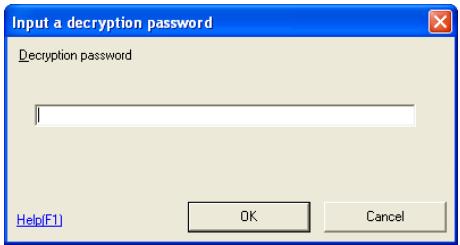
- Decryption password: Input the encryption password that was set when the function access restriction file was saved. Refer to “Function Access Restriction File Settings” on page 3-103 for details.
4 Input the password, and click OK.
The Register from function access restriction file screen is displayed.
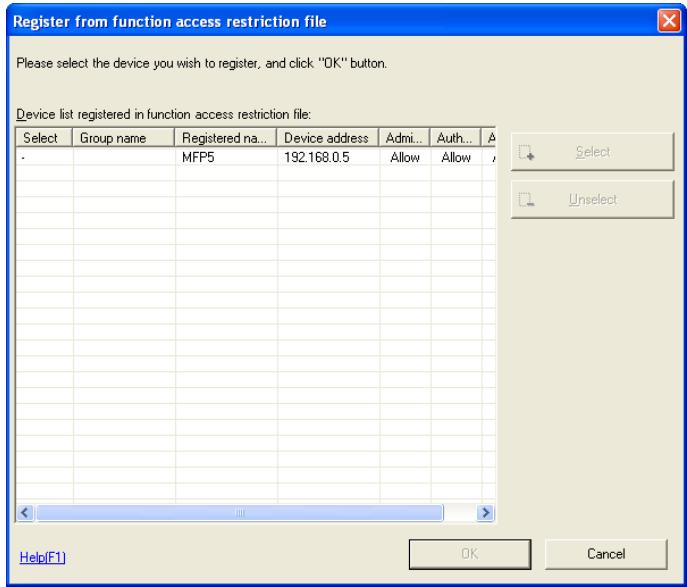
- Select: Set the device to register. Select devices to register from the list, and click Select.
- Unselect: Cancel the selection of devices that have been selected for registration. Select devices to remove from the list, and click Unselect.
5 Set the devices to register by clicking Select, and click OK.
The devices are registered.
3.4.4 Register a Local File
Registered settings data that is in a local file is registered without connecting the device.
Create a New Local File then Register
1 From the Device menu, select Device registration.
The Device registration screen is displayed.
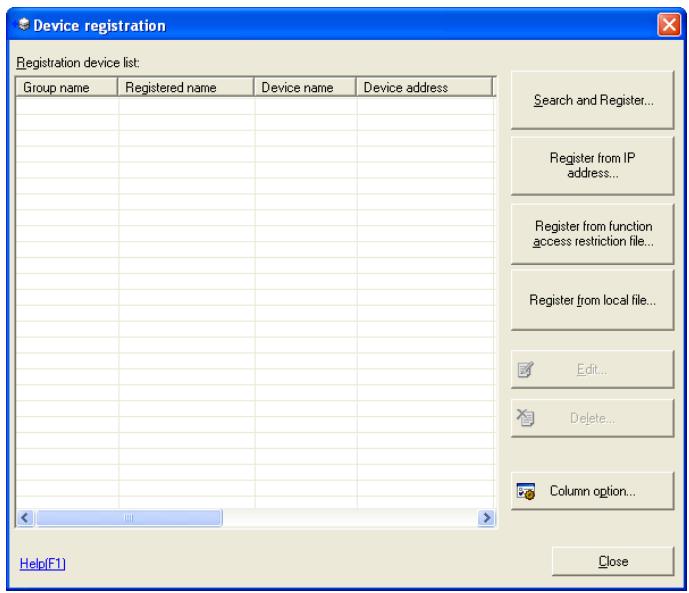
2 Click Register from local file.
The Register from local file screen is displayed.
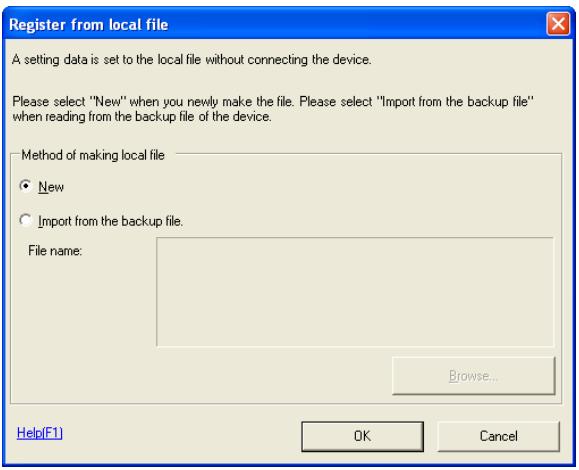
3 Select New, and click OK.
The Register from local file screen is displayed.
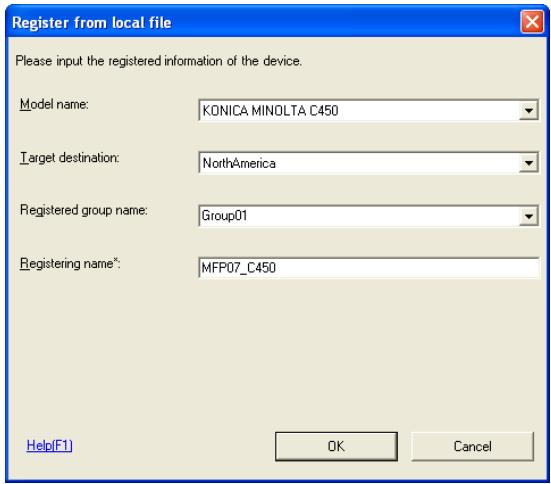
- Model name: Select the model name of the device to register.
- Target destination: Select the destination of the device to register.
- Registered group name: Select or input the group name to register.
- Registering name: Input the name to register.
4 Configure the information to register, and click OK.
The devices are configured.
Register from Backup File
1 Display the Register from local file screen.
For how to display the screen, refer to “Create a New Local File then Register” on page 3-17 for details.
2 Select Import from the backup file, and click File selection.
The Open file screen is displayed.
3 Select the backup file, and click Open.
4 Click OK.
The devices are registered.
3.4.5 Edit Registration Information
Edit device registration information that is registered with Data Administrator.
Edit Registration Information
1 From the Device menu, select Device registration. The Device registration screen is displayed.
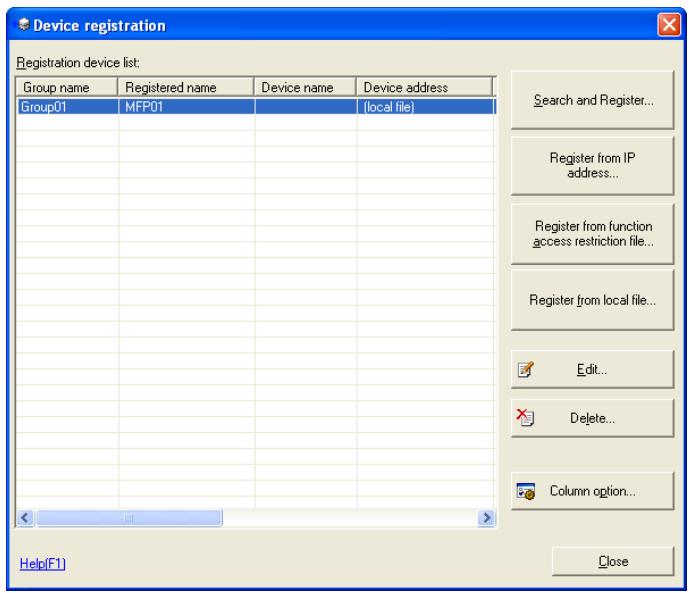
2 Select devices to edit from the list, and click Edit.
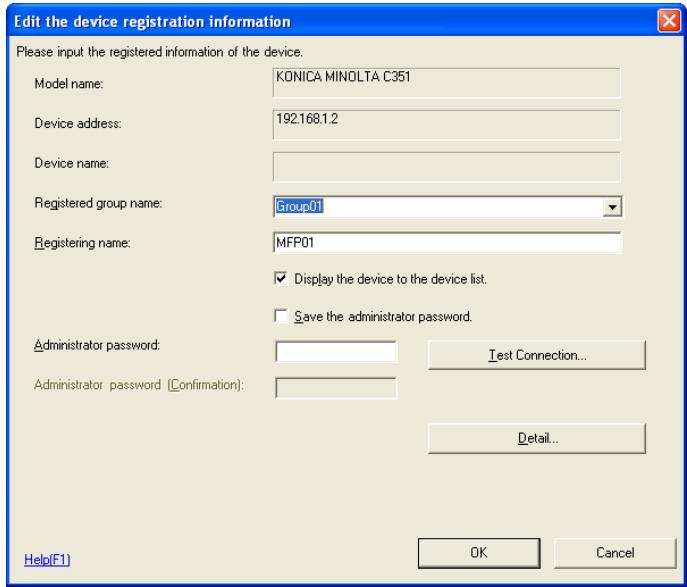
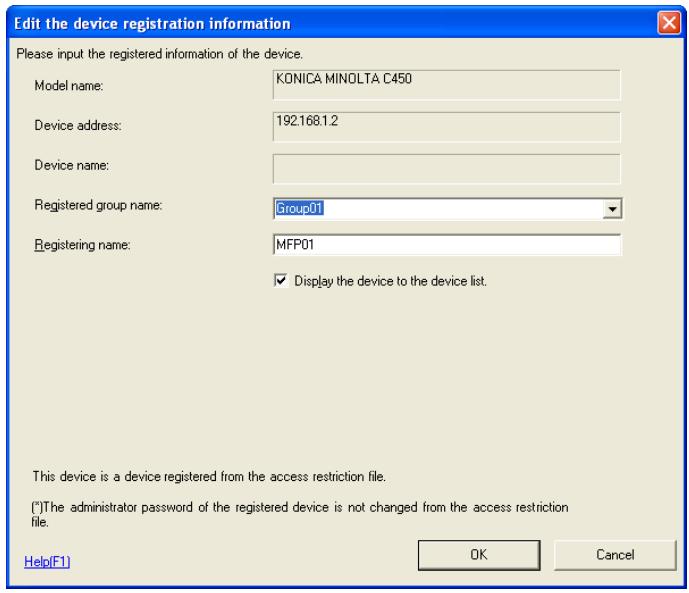
The Edit the device registration information screen is displayed.
For Devices Registered by Search, or Devices Registered by IP Address
For Devices Registered from Function Access Restriction File
For Devices Registered from Local File
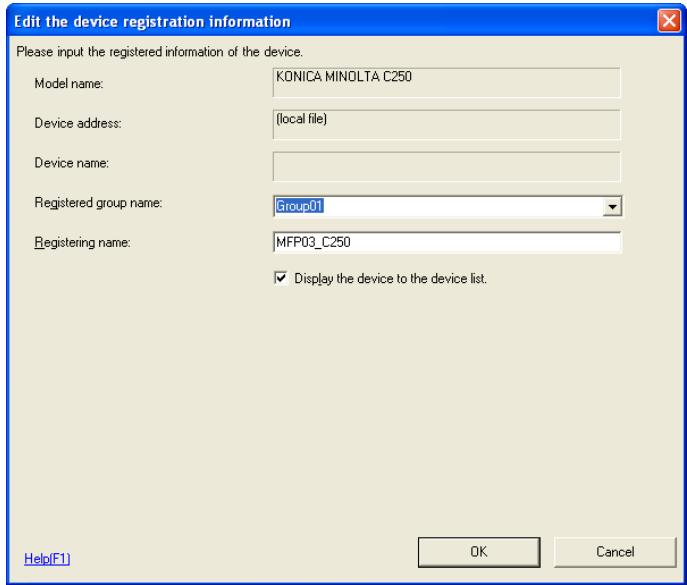
- Registered group name: Select or input the group name to register.
- Registering name: Input the name to register.
- Display the device to the device list: Select this to display the device on the device list screen.
- Save the administrator password: Select this to save the administrator password.
- Administrator password: Input the device administrator password.
- Administrator password (confirmation): Retype the administrator password for confirmation.
- Test Connection: Connect to the device and check the administrator password.
- Detail: Click this to configure items relating to bizhub OpenAPI. Refer to “bizhub OpenAPI Settings” on page 3-14 for details
3 Edit device registration information, and click OK.
The registration information is edited.
3.4.6 Delete Registration Information
Delete device registration information registered with Data Administrator.
Delete Registration Information
1 From the Device menu, select Device registration. The Device registration screen is displayed.
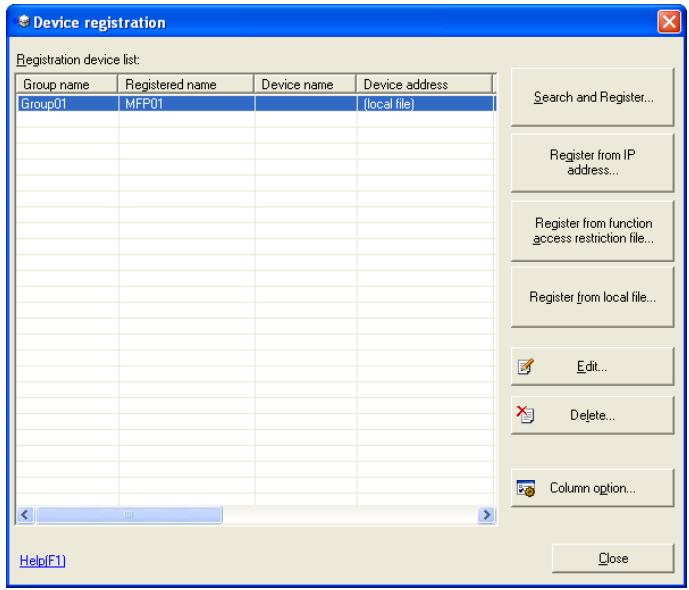
2 Select devices to delete from the list, and click Delete.
A confirmation screen is displayed.
The registration information is deleted.
3 Click Yes.
The registration information is deleted.
3.5 Setting a Search Range
If the target device is not displayed on the lists on the Registration by search screen or the Network default settings screen, then specify the device search range.

Note
For details on how to display the Registration by search screen, please refer to "Search and Register Device" on page 3-10.
For details on how to display the Network default settings screen, please refer to "Network default settings" on page 3-29.
Add a search range for devices.
1 Click Search settings on the Registration by search screen or the Network default settings screen.
The Device search settings screen is displayed.
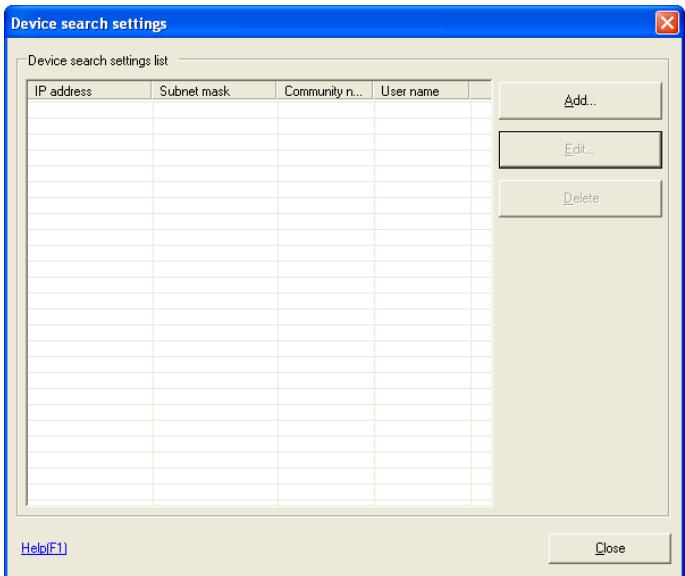
- Add: Add a search range for devices.
- Edit: Edit the selected search range for devices. Select search settings to edit from the list, and click Edit.
- Delete: Delete the selected search range for devices. Select the search settings to delete from the list, and click Delete.
2 Click Add.
The Device search settings screen is displayed.
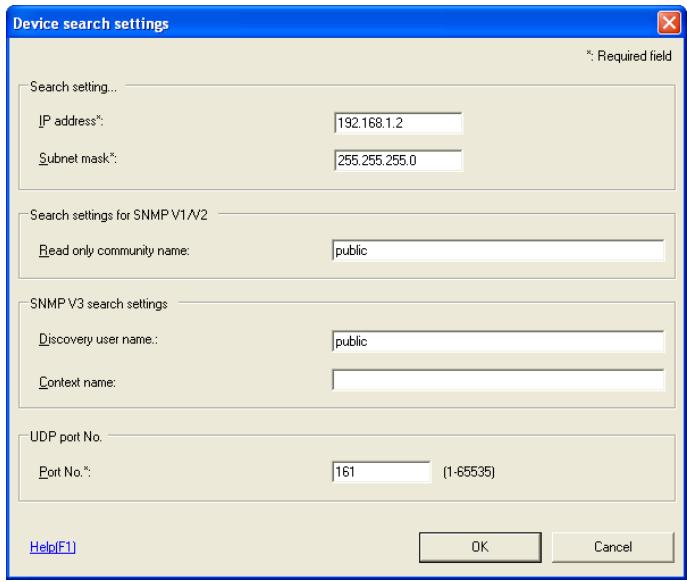
– IP Address: Input the start IP address of the search range.
- Subnet mask: Input the Subnet mask of the network to search.
- Read only community name: Input a community name.
– Discovery user name: Input a discovery user name.
– Context name: Input a context name.
- Port No: Input a port number.
3 Set the search range, and click OK.
Search settings are added.
3.6 Change Date and Time
Edit device date and time registered with Data Administrator.

...
Note
This may not be supported by all devices.
Change Device Date and Time
1 From the Device menu, select Device list.
The Device list screen is displayed.
![PageScope Data Administrator - [Device list] File Device Processing Tool Window Help Device list: Group name Registered name Device name Device address SSL Group01 MFP01 192.168.1.2 Off Address, Authentication, Administrator settings Backup(1) Font/Macro(2) Copy Protect/Stamp(3) Audit Log(4) Column option...](/content/2024/12/139629/images/040cea36f40ad5b1806eac2bde11bab1b9e099f153442606ed8e86868444d8d2.jpg)
2 Select the device to change from the list, and from the Device menu, select Change device date time.
The Change the date and time of the device screen is displayed.
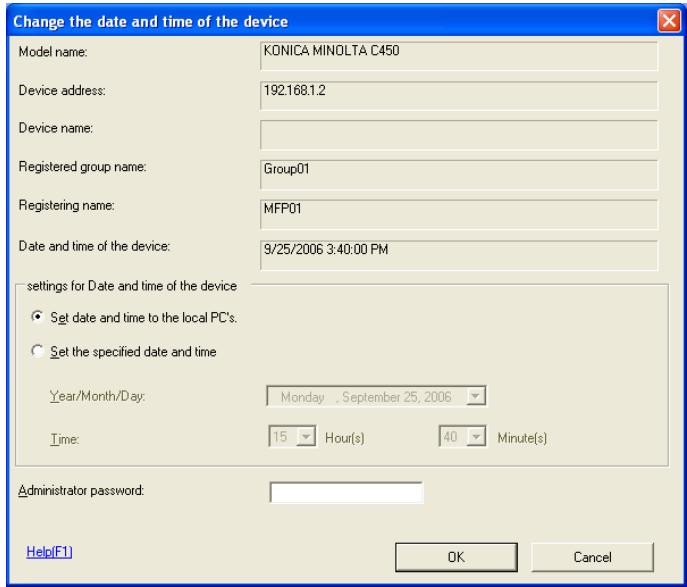
- Set date and time to the local PC's: Select this to set the date and time to that of the PC upon which Data Administrator is being used.
- Set the specified date and time: Select this to manually set the date and time.
– Year/Month/Day: Select the date.
– Hour(s): Input the time (hours).
– Minute(s): Input the time (minutes). - Administrator password: Input the device administrator password.
3 Set the date and time, and click OK.
The date and time are changed.
3.7 Network default settings
Search for devices on the network, and carry out default network settings.
Configure default settings for the registered device network
1 From the Device menu, select Network Initial Setting. A Start device searching? message will be displayed.
- If a device search range has not been configured, then the Start device searching? message will not be displayed. Instead, the Network Initial Setting screen will be displayed. Click Search settings on the Network Initial Setting screen, and add a search range. For details, please refer to “Setting a Search Range” on page 3-24.
2 Click Yes.
The device search starts, and devices that are found are displayed on the list on the Network Initial Setting screen.

3 Select devices from the list for which to configure network default settings, and click Network settings.
The Network settings screen is displayed.
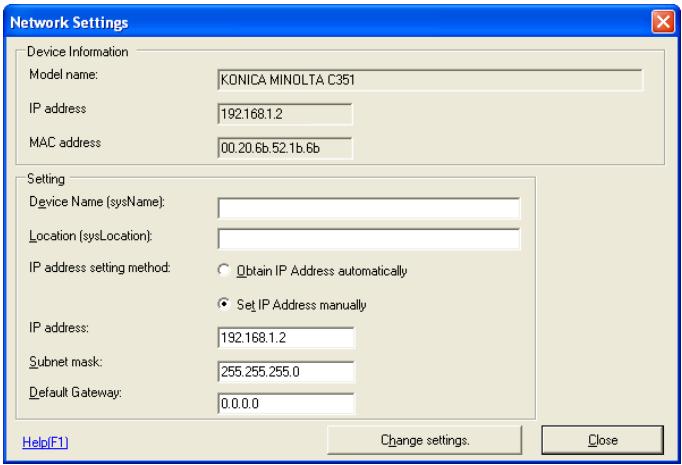
- Device Imfomation: Displays currently set device Model name, IP address, and MAC address settings.
– Device Name (sysName): Input the device name. - Location (sysLocation): Input the location where the device is installed.
- Obtain IP Address automatically: Select this to have the device IP address automatically set by the DHCP server.
- Set IP Address manually: Select this to enable the following text boxes, enabling specification of device IP addresses.
– IP Address: Input the IP address of the device. - Subnet mask: Input the Subnet mask of the device.
- Default Gateway: Input the default gateway of the device.
4 Set required items, and click Change settings.
A Change network settings? message will be displayed.
5 Click Yes.
A Network settings changed. message will be displayed.
6 Click OK.
A Please register this device in order to manage this device using PSDA. message will be displayed.
7 Click OK.
This returns to the Network settings screen.
8 Click Close.

Note
Configuring network default settings in itself does not allow administration of devices using Data Administrator. In order to administrator devices, first register them with Data Administrator. For details, please refer to "Device Registration" on page 3-10.
3.8 LDAP Server Access Settings
Register the LDAP server that reads address information to register on a device.
Add LDAP Server Access Settings
1 From the Device menu, select Device list. The Device list screen is displayed.
![PageScope Data Administrator - [Device list] File Device Processing Tool Window Help Device list: Group name Registered name Device name Device address SSL Group01 MFP01 192.168.1.2 Off Address, Authentication, Administrator settings Backup(1) Font/Macro(2) Copy Protect/Stamp(3) Audit Log(4) Column option...](/content/2024/12/139629/images/9eba0e7c9376a35cb49ae172aaf9f0cc57c9930ac6ca15cf66b3b026fa67561c.jpg)
2 From the Tool menu, select LDAP server settings. The LDAP directory list screen is displayed.
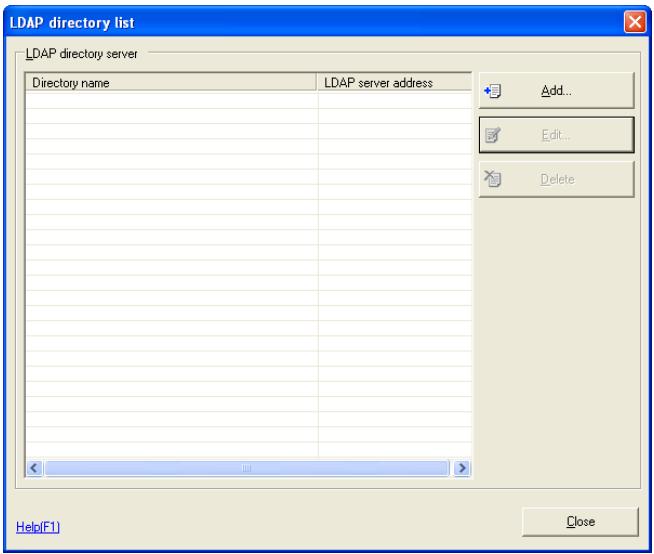
3 Click Add.
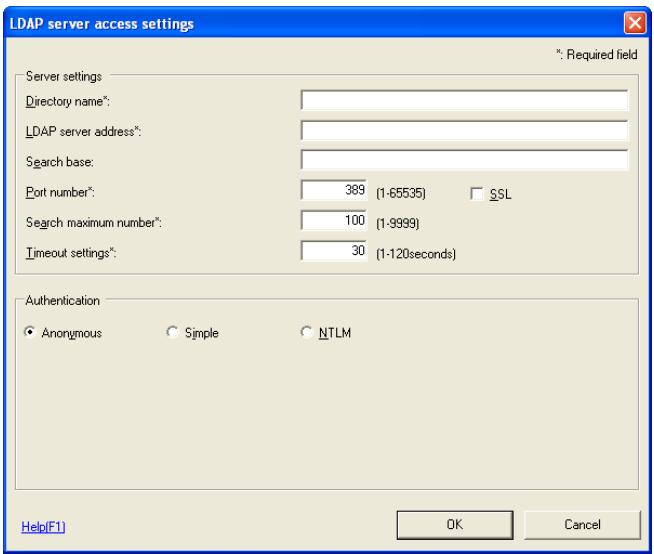
The LDAP server access settings screen is displayed.
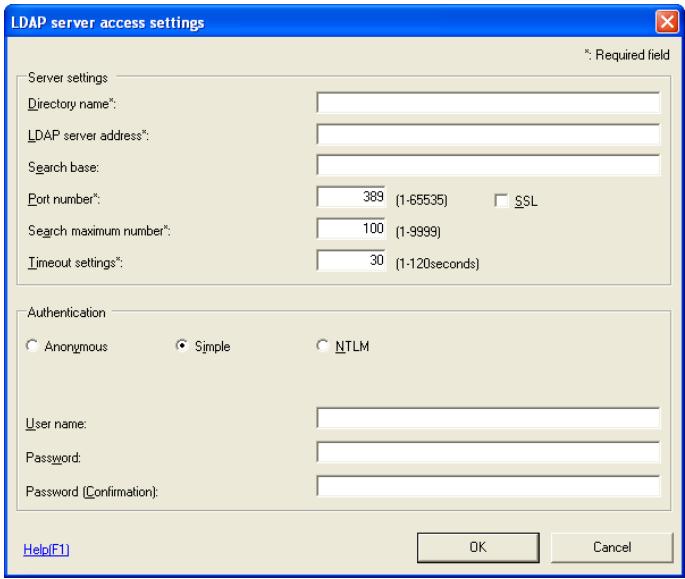
When Simple is selected
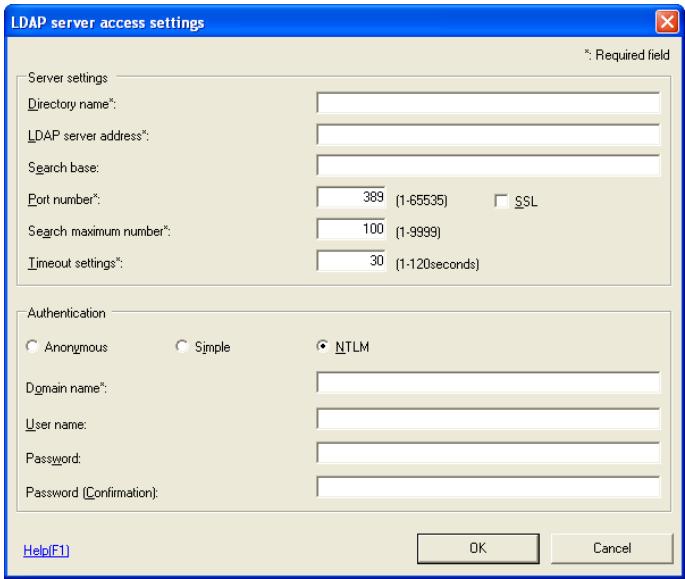
When NTLM is selected
- Directory name: Input a name for the current details.
- LDAP server address: Input the IP address or DNS name of the directory server. If using SSL, input the DNS name.
- Search base: Input the search base. (Up to 512 characters)
(E.g.) ou=sales division, dc=ABCDEFG, dc=com
Consult with the LDAP administrator about search bases to input. - Port number: Specify the port number to be used when accessing LDAP servers.
- SSL: Select when using SSL for LDAP communications.
It is recommended that you use SSL for secure transmission. Not using SSL means that LDAP data will be transmitted over the network in unsafe ASCII format. - Search maximum number: Specify the maximum number of items to show when searching.
- Timeout settings: Specify the transmission timeout for the LDAP server. (1-120 sec)
- Authentication (Anonymous, Simple, NTLM): Select the BIND type for the LDAP server. Select NTLM when connecting to an Active Directory.
– Domain name: Input the domain name.
Input Domain Name when connecting to an Active Directory. - User name: This field can be entered when authentication is not set to Anonymous.
- Password: This field can be entered when authentication is not set to Anonymous.
– Password (Confirmation): Re-input password for confirmation.
4 Set LDAP server access settings, and click OK.
The LDAP server access settings are added.
Edit LDAP Server Access Settings
1 Display the LDAP directory list screen.
For how to display the screen, refer to “Add LDAP Server Access Settings” on page 3-32 for details.
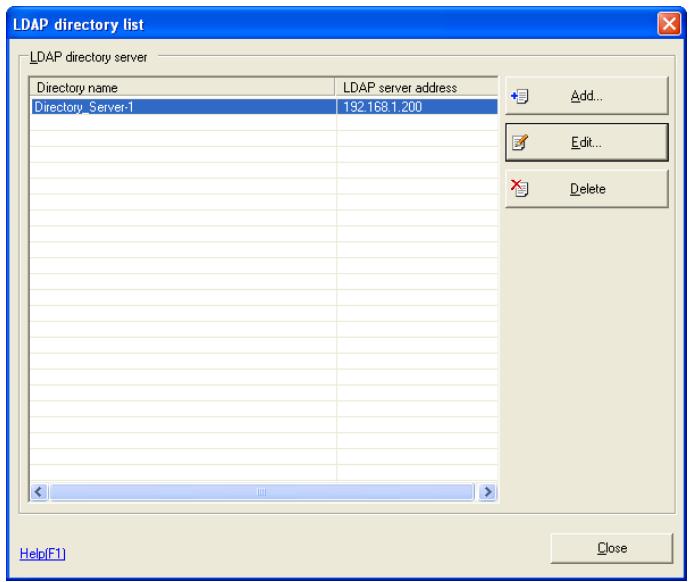
2 Select access settings to edit from the list, and click Edit. The LDAP server access settings screen is displayed.
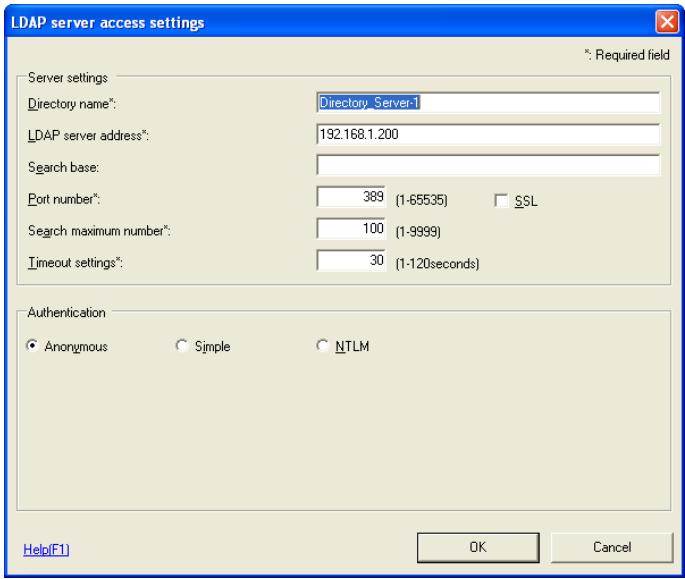
- For settings methods, refer to "Add LDAP Server Access Settings" on page 3-32 for details.
3 Edit LDAP Server Access Settings, and click OK. The LDAP server access settings are edited.
Delete LDAP Server Access Settings
1 Display the LDAP directory list screen.
For how to display the screen, refer to “Add LDAP Server Access Settings” on page 3-32 for details.
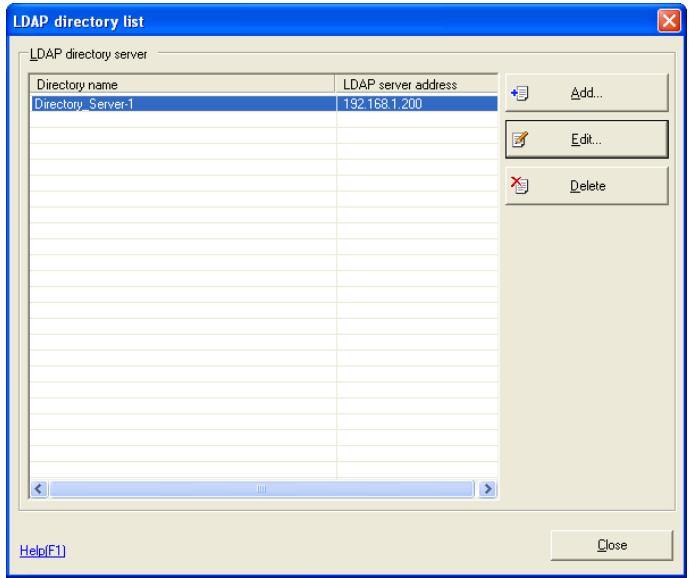
2 Select access settings to delete from the list, and click Delete.
A Do you want to delete? message will be displayed.
3 Click Yes.
The LDAP server access settings are deleted.
3.9 Group Settings
Register groups to be managed in Data Administrator. If groups are configured and many devices are being managed, sorting the device list makes arranging items easier. Additionally, up to a maximum of 100 groups can be set.
Create a New Group
1 From the Device menu, select Edit group.
The Group settings screen is displayed.
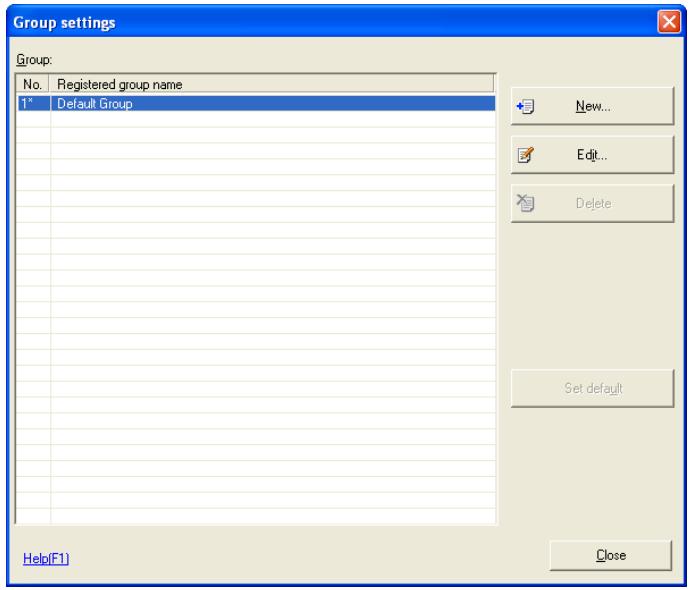
2 Click New.
The Edit group screen is displayed.

- Registered group name: Input the new group name.
3 Set the Group name, and click OK.
A group is created.
Edit a Group
1 Display the Group settings screen.
For how to display the screen, refer to “Create a New Group” on page 3-39 for details.
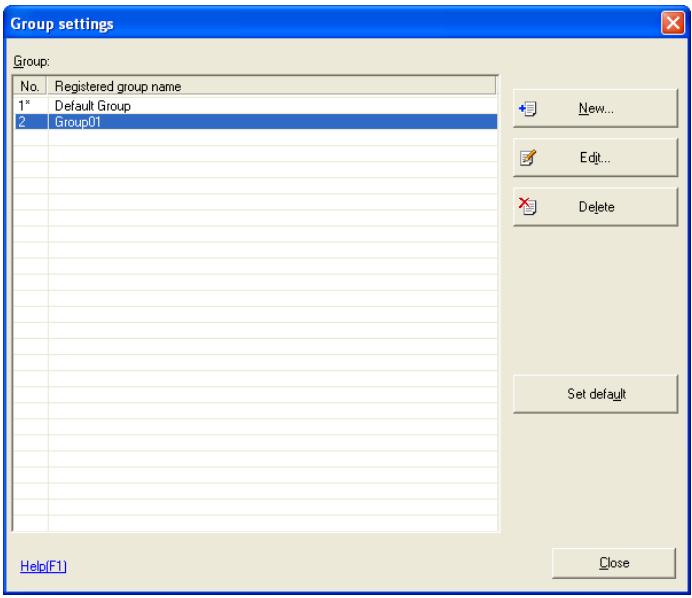
2 Select a group to edit from the list, and click Edit.
The Edit group screen is displayed.
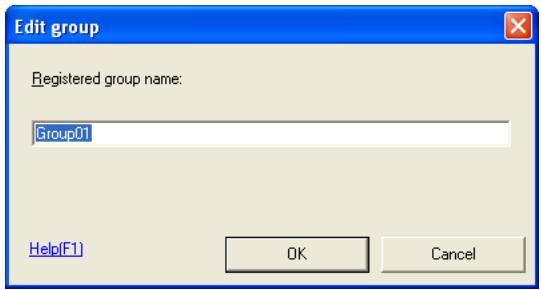
3 Edit the group name, and click OK.
The group name is edited.
Delete a Group
1 Display the Group settings screen.
For how to display the screen, refer to “Create a New Group” on page 3-39 for details.
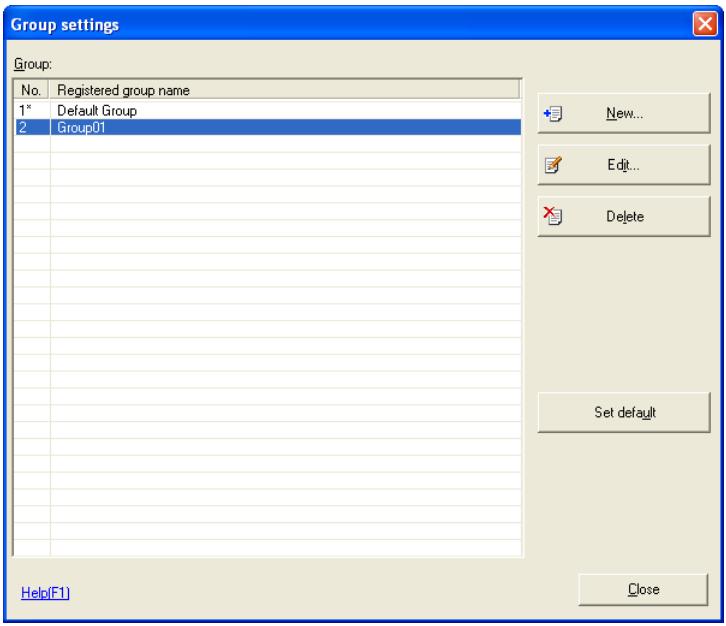
2 Select groups to delete from the list, and click Delete.
A Do you want to delete the selected data? message will be displayed.
3 Click Yes.
The group is deleted.
Set the Default Group
1 Display the Group settings screen.
For how to display the screen, refer to “Create a New Group” on page 3-39 for details.
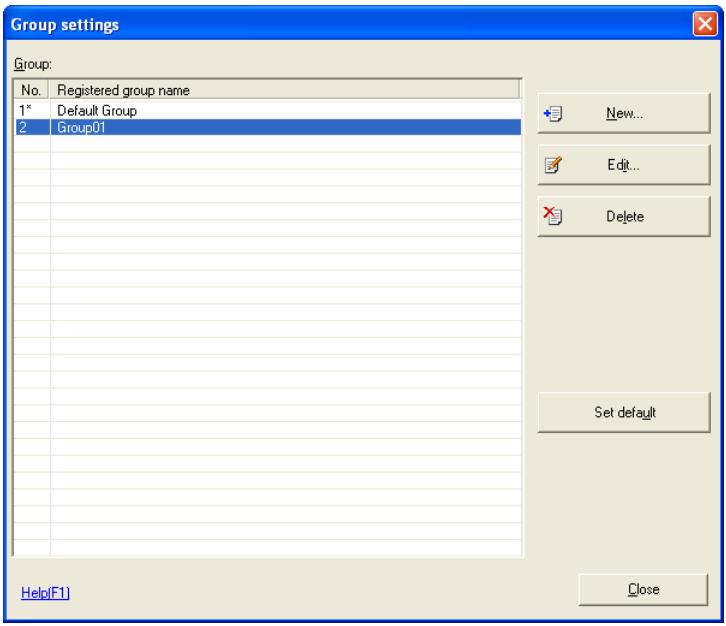
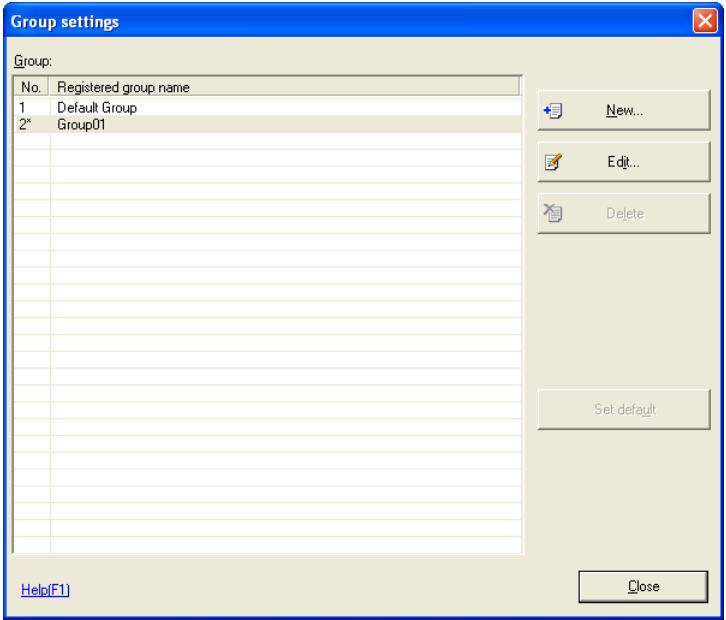
2 Select a group to make default from the list, and click Set default. The default group is set.

...
Note
The default group is indicated with a “*”.
The default group is the initial group displayed when registering a device.
3.10 Single Device Settings
Set abbreviated addresses and other data registered with Data Administrator.
Settings items and procedures may vary between devices.
This gives an example using the bizhub C450. For settings items and procedures for other devices, refer to Help.

Note
Settings items and procedures may vary between devices. Refer to Help for details.
Import Information from Device
1 From the Device menu, select Device list.
The Device list screen is displayed.
![PageScope Data Administrator - [Device list] File Device Processing Tool Window Help Device list Group name Registered name Device name Device address SSL Group01 MFP01 192.168.1.2 Off Address, Authentication, Administrator settings Backup(1) Font/Macro(2) Copy Protect/Stamp(3) Audit Log(4) Column option...](/content/2024/12/139629/images/1ec6d5e88717dd7d19d56bb5f0151ef5d5aac9dc4e8d154f0726a590c7644be9.jpg)
2 Select devices from which to implement information from the list, and click Address, Authentication, Administrator settings.
The Import device information screen is displayed.
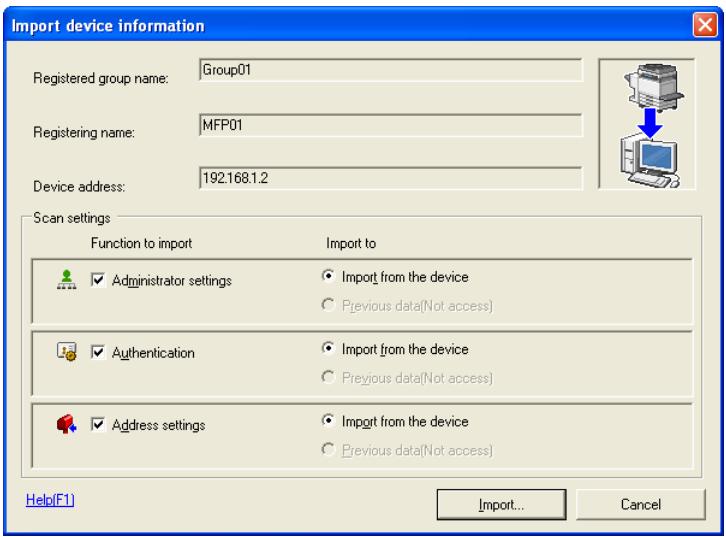
- Administrator settings: Select this to read administrator settings from a device.
- Authentication: Select this when importing authentication settings from devices.
- Address settings: Select this when importing address settings from devices.
- Import to: To connect devices and import the most recent data, select Import from the device, and to import data from the last access from a local file, click Previous data.
3 Set import of device data, and click Import. The Device information screen is displayed.
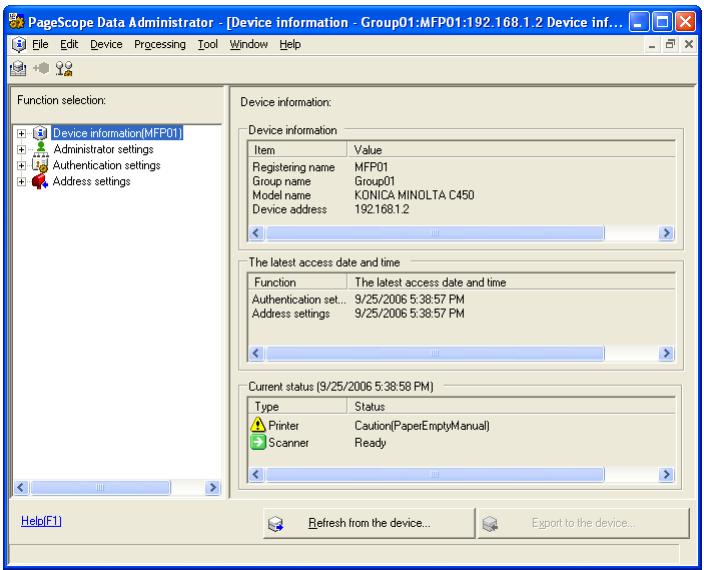
4 From the Device information screen, select the items to configure. For details on settings for each device item, refer to Help.
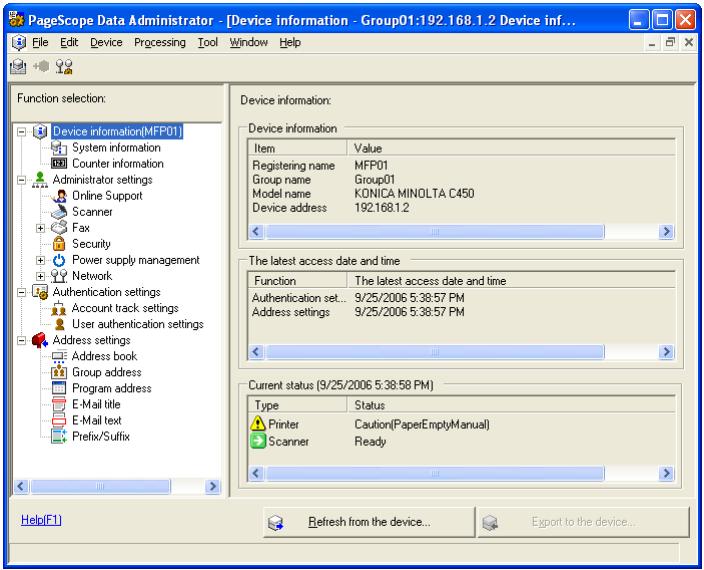

...
Note
To connect devices, if input of the administrator password is required, then the Input an administrator password screen is displayed. Input the Administrator password, and click OK.
If the SNMP read community name has changed, the Input SNMP read community name will be displayed. Input the read community name, and click OK.
When the Administrator Password Is Displayed
→ Input the Administrator password.
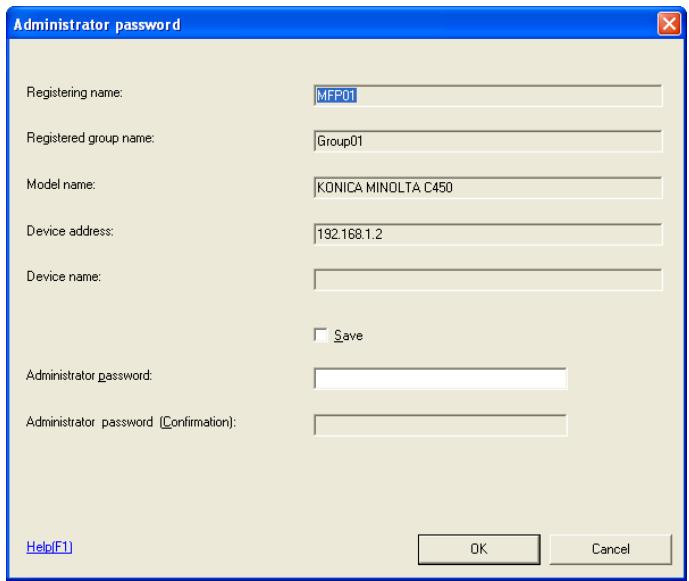
- Administrator password: Input the device administrator password.
- Administrator password (Confirmation): Retype the administrator password for confirmation.
When the SNMP Read Community Name Is Displayed
→ Input the SNMP Read community name.
- Read community name : Input the SNMP Read community name.
Import Abbreviated Address Data from CSV Files
1 Display the Device information screen.
For how to display the screen, refer to “Import Information from Device” on page 3-44 for details.
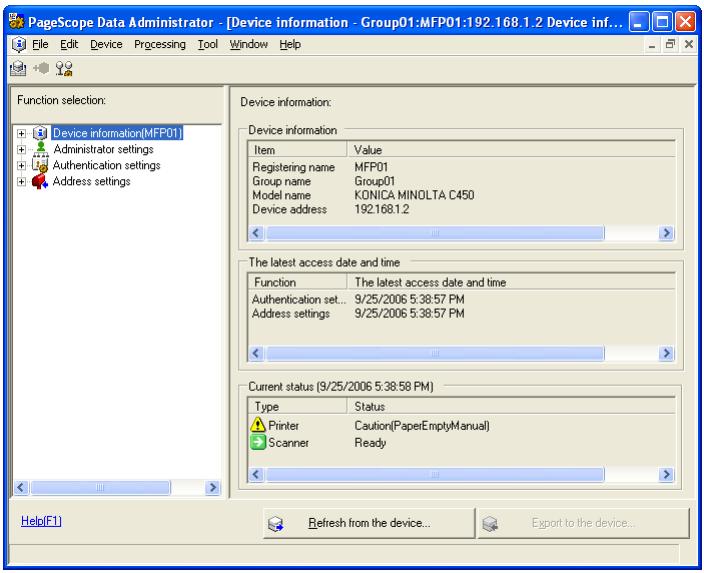
2 From the Function list, select Address book.
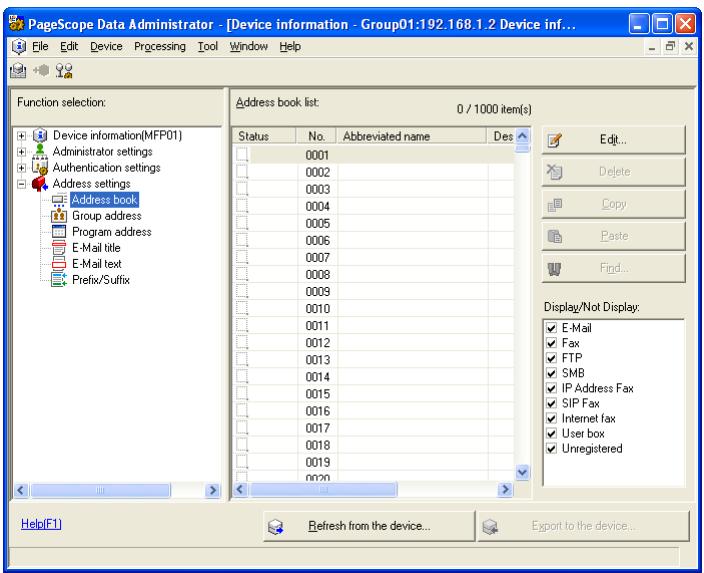
3 From the File menu, select Import — Import each data from the file. The Open screen is displayed.
4 Select the import file, and click Open.
The Import wizard from file screen is displayed.
5 Set the starting position, and click Next.
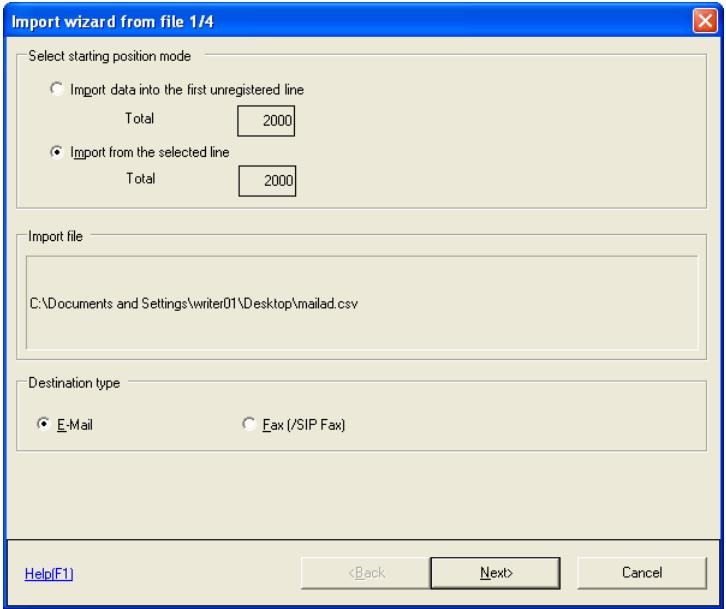
- Select starting position mode: To start import from first line of the displayed file, select Import data into the first unregistered line, and to start import from a selected line of the displayed file, select Import from the selected line.
- Destination type: Select the destination type. Items that can be selected may differ depending on the device type and options.
6 Set the import method, and click Next.
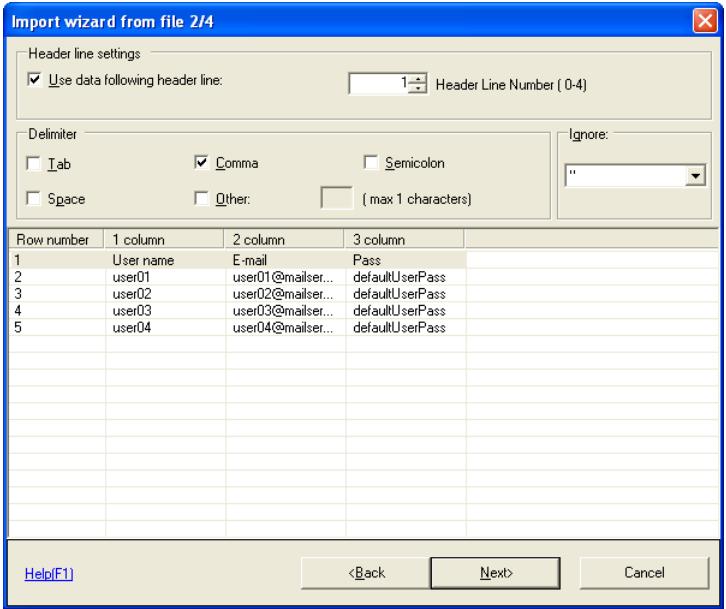
- Use data following header line: Select this to use data from following the header line.
– Header Line Number: Specify the header line. - Tab: Select this when the data to import is delimited with a TAB.
- Comma: Select this when the data to import is delimited with a comma.
- Semicolon: Select this when the data to import is delimited with a semicolon.
- Space: Select this when the data to import is delimited with a space.
- Other: Select this when the data to import is delimited with a different delimiter.
- (max. 1 characters): If Other is specified, specify the character to use as a delimiter.
– Ignore: Select an ignore.
7 Set Item names for data to import in each row, and click Next.
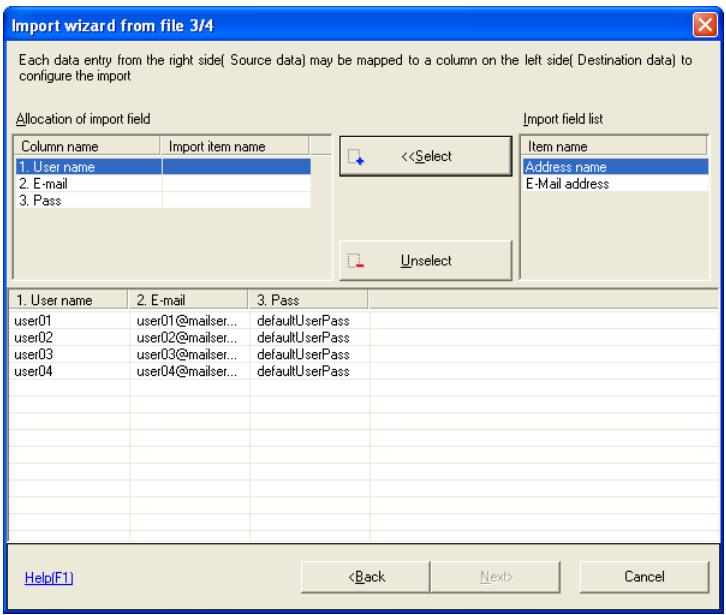
- Select: Select allocation of import field list items.
– Unselect: Deselect allocation of import field list items.
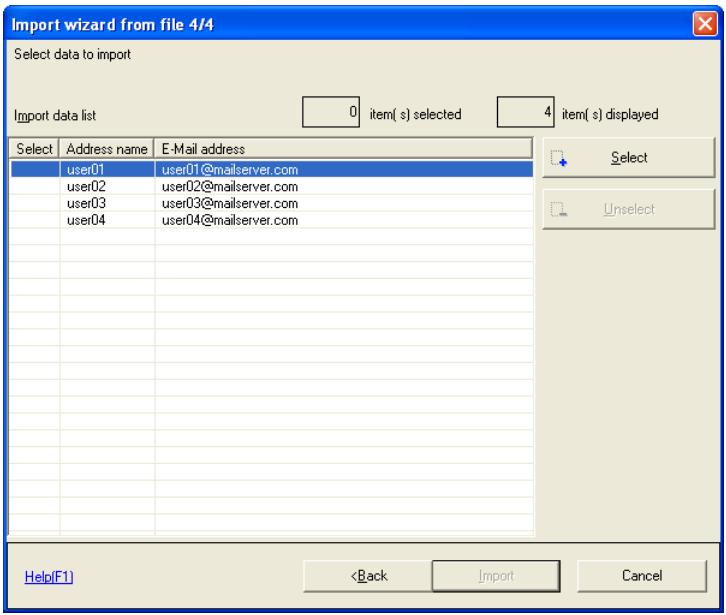
8 Set data to import, and click Import.
2 From the Function list, select Address book.
 3 From the File menu, select Import — Import (LDAP). The Search wizard of LDAP directory screen is displayed. 4 Set the starting position, and click Next.  - Select starting position mode: To start import from first line of the displayed file, select Import data into the first unregistered line, and to start import from a selected line of the displayed file, select Import from the selected line. - Destination type: Select the destination type. Items that can be selected may differ depending on the device type and options.5 Set the search filters, and click Find.
 - Directory name: Select the LDAP server to search. - LDAP configuration: Configure LDAP server settings. Refer to "LDAP Server Access Settings" on page 3-32 for details. – Filter: Search filters include items, conditions, and search words. - Find: Searches the LDAP server using the conditions set in the filters.6 Confirm search results, and click Next.
7 Set data to import, and click Import.
2 From the Function list, select Address book.
 3 From the File menu, select Import — Import from the previous device. The Import from a device screen is displayed. 4 Set devices from which to import abbreviated address data, and click Import data.  – Password: Input the administrator password.6 Set the import conditions, and click Next.
 \- To start import from first line of the displayed file, select Import data into the first unregistered line, and to start import from a selected line of the displayed file, select Import from the selected line.7 Set data to import, and click Import.
 – SNMP community name: Input the SNMP community name. - Start IP: Input the start IP address of the search range. - End IP: Input the end IP address of the search range. - Add: Add a search range for devices. - Delete: Delete a search range for devices. Select the search range to delete from the list, and click Delete. 2 Set the search range, and click OK.3.11 Bulk Copy of Settings
Bulk copy authentication settings and address settings from one device to multiple devices. Set by following the directions on the bulk copy wizard screen.  ...Note
These functions may not be available depending on the device or firmware version.Copy Settings from One Device to Another Device
1 From the Processing menu, select Copy. 2 Select the functions to copy, and click Next.  - Authentication: Select this when copying authentication settings. This clears the user counter and group counter of the target device. - Address: Select this when copying address settings. The program can be copied if the model and version are the same. Additionally, if option configuration and destinations on the copy source and copy target devices differ, then this will be registered with import settings and communication settings turned OFF. – Reference Allowed Group: Select this when copying a group that can be referenced for the copy source device. The reference group for the copy target will be cleared.3 Select the copy source device, and click Next.
 - Select: Select the copy source device. Select the copy source device from the list, and click Select. - Change password: Change the administrator password for the registered device. - Import option: To copy the latest data from the copy source device, select Get the most recent data, and to copy previous data read from the device, select Use imported data last time.4 Select the copy target device, and click Next.
When copying authentication functions, only copy target devices that have their authentication settings turned OFF can be selected. Furthermore, devices that have been registered in a local file can not be selected as copy targets.  - Select: Select the copy target device. Select the copy target device from the list, and click Select. - Unselect: Cancel the selection of devices. Select devices to delete from the list, and click Unselect. - Change password: Change the administrator password for the registered device. - Clicking [Next] button to export data to the device.: Select this to start writing to the device without confirming details to copy. Selecting this and clicking Next will start writing to the device. In these cases, if the Administrator password specified for the device is wrong, then writing to that device will be aborted.5 Confirm details to copy, and click Start.
Please be aware that when copying address settings, address information for the copy target is cleared and overwritten.  \- If Clicking [Next] button to export data to the device. is selected in the Please select a target device. screen, then this screen will not be displayed. 6 When Normal end is displayed in the Target device list processing results, click Finished.  \- Display a log: Displays a log file for the bulk copy function.3.12 Automatic Creation of Boxes
Configure the automatic creation of boxes when users are added. This setting can be used for both single device settings and bulk copy.Configure Automatic Box Creation
1 From the Tool menu, select User box option. The User box option screen is displayed.  - Enable automatic user box creation: Select this to enable automatic creation of boxes when users are added. Enabling this function when very large numbers of users (for example several hundred) are added will make writing operations take a very long time. When large numbers of users are being written to the device, it is recommended that this function be disabled. - Disable automatic user box creation: Select this to disable automatic creation of boxes when users are added. 2 Select the box settings, and click OK. Box settings are configured. Note
Box settings are automatically created with the following settings. User Box Name: User box ID Password: Not set Search key: etc3.13 Auto Protect Settings
Data Administrator is set so that at both startup, and after a specified period of non-use, input of a password is required in order that the program can be used.Set Auto Protect
1 From the Tool menu, select Auto protect.
The Auto protect settings screen is displayed. 2 Select Once the timeout settings has passed, the password input dialog is displayed.
The Application protect settings screen is displayed.  – Password: Input the password used to cancel auto protect. - Confirm password: Retype the password for confirmation. - Timeout: Select the timeout period after which auto protect will activate.3 Set the password and timeout, and click OK.
Auto protect is configured.Cancel Auto Protect
1 From the Tool menu, select Auto protect.
The Auto protect settings screen is displayed. 2 De-select Once the timeout settings has passed, the password input dialog is displayed.
The Stop protection screen is displayed.  \- Password: Input the password to stop protection.3 Input the password, and click OK.
Auto protect is canceled.Change Time-out Period
1 From the Tool menu, select Auto protect.
The Auto protect settings screen is displayed. 2 Click Change.
The Change protection settings screen is displayed.  - Time-out period: Select the timeout period after which auto protect will activate. - Current password: Input the current password to stop protection.3 Set the timeout period, and click OK.
The timeout period is changed.Change the Password
1 From the Tool menu, select Auto protect.
The Auto protect settings screen is displayed. 2 Click Change password.
The Change application protect password screen is displayed.  - Current password: Input the current password to stop protection. - New password: Input the new password to stop protection. - New password (Confirmation): Retype the new password to stop protection for confirmation.3 Set the password, and click OK.
The password is changed.3.14 Authentication Mode Template Settings
Create a template for when configuring the device authentication mode. Up to a maximum of 100 items can be registered in templates, and 5 system templates are pre-configured.Create Authentication Mode Templates
1 From the Tool menu, select Template — Authentication.
The Authentication mode template screen is displayed. 2 Click New.
The Create authentication mode template newly screen is displayed.  - Authentication mode: In Authentication mode, User Authentication only, User Authentication and Account Track, and Account Track only can be selected. - Account Track: If Account Track only is selected in Authentication mode, then The input method is Account name and password, and The input method is only password can be selected.3 Set the Authentication mode, and click OK.
The Edit the authentication mode template screen is displayed.  - Template name: Input the name of the template to create. - Settings: Set the authentication mode. Refer to “Authentication Mode Template Setting Items” on page 4-2 for details.4 Configure the template, and click OK.
The template is created.Edit Authentication Mode Templates
1 From the Tool menu, select Template — Authentication.
The Authentication mode template screen is displayed.  2 Select templates to edit from the list, and click Edit. The Edit the authentication mode template screen is displayed.  \- For settings methods, refer to "Create Authentication Mode Templates" on page 3-73 for details. 3 Configure the template, and click OK. The template is edited.  ...Note
The names of the 5 system templates can not be changed.Delete Authentication Mode Templates
1 From the Tool menu, select Template — Authentication. The Authentication mode template screen is displayed.  2 Select templates to delete from the list, and click Delete. A deletion confirmation screen is displayed.  3 Click Yes. The Authentication mode template is deleted. Note
The 5 system templates can not be deleted.3.15 User Template Settings
Create a template for when configuring users. Up to a maximum of 100 items can be registered in templates, and 1 system template is pre-configured.Create User Templates
1 From the Tool menu, select Template — User.
The User template screen is displayed. 2 Click Add.
The Edit user template screen is displayed.  - Template name: Input the name of the template to create. - Function restriction: Select permissions for each function restriction. - Total: Select this to configure the total number of pages that can be printed by the user. Selecting this will deselect Color and Black. - Color: Select this to configure the total number of color pages that can be printed by the user. Selecting this will deselect Total. - Black: Select this to configure the total number of black pages that can be printed by the user. Selecting this will deselect Total. – Max Allowance: Input the maximum allowance for each counter.3 Configure the template, and click OK.
The template is created.  ...Note
The range of maximum values for maximum allowances may vary depending on the device. An error may occur when selecting and adding a template in the Import device information screen. In these cases, ensure that the maximum allowance is within the maximum range for the device.Edit User Templates
1 From the Tool menu, select Template — User.
The User template screen is displayed. 2 Select templates to edit from the list, and click Edit. The Edit user template screen is displayed.
 \- For settings methods, refer to "Create User Templates" on page 3-78 for details.3 Configure the template, and click OK. The template is edited.
Delete User Templates
1 From the Tool menu, select Template — User.
The User template screen is displayed. 2 Select templates to delete from the list, and click Delete.
A deletion confirmation screen is displayed. 3 Click Yes.
The User template is deleted.  ...Note
System templates can not be deleted.Set Default User Templates
1 From the Tool menu, select Template — User.
The User template screen is displayed.  2 Select a template to make default from the list, and click Set default. The default template is set.  Note
The default template is indicated with a “\*”. If When the user is added, a default template is automatically applied is selected, the default user template will be applied when creating a new user, and the screen for selecting a template will not be displayed.3.16 Account Template Settings
Create a template for when configuring groups. Up to a maximum of 100 templates can be set.Create Account Templates
1 From the Tool menu, select Template — Account.
The Account template screen is displayed. 2 Click Add.
The Edit account template screen is displayed.  - Template name: Input the name of the template to create. - Function restriction: Select permissions for each function restriction. - Total: Select this to configure the total number of pages that can be printed by the account. Selecting this will deselect Color and Black. - Color: Select this to configure the total number of color pages that can be printed by the account. Selecting this will deselect Total. - Black: Select this to configure the total number of black pages that can be printed by the account. Selecting this will deselect Total. – Max Allowance: Input the maximum allowance for each counter.3 Configure the template, and click OK.
The template is created.  ...Note
The range of maximum values for maximum allowances may vary depending on the device. An error may occur when selecting and adding a template in the Import device information screen. In these cases, ensure that the maximum allowance is within the maximum range for the device.Edit Group Templates
1 From the Tool menu, select Template — Account.
The Account template screen is displayed. 2 Select templates to edit from the list, and click Edit. The Edit account template screen is displayed.
 \- For settings methods, refer to "Create User Templates" on page 3-78 for details.3 Configure the template, and click OK. The template is edited.
Delete Account Templates
1 From the Tool menu, select Template — Account.
The Account template screen is displayed. 2 Select templates to delete from the list, and click Delete.
A deletion confirmation screen is displayed. 3 Click Yes.
The Group template is deleted.Set Default Account Templates
1 From the Tool menu, select Template — Account.
The Account template screen is displayed.  2 Select a template to make default from the list, and click Set default. The default template is set.  Note
The default template is indicated with a “\*”. If When the account is added, a default template is automatically applied is selected, the default group template will be applied when creating a new group, and the screen for selecting a template will not be displayed.3.17 Weekly Timer Template Settings
Create a template for when configuring device weekly timers. The Weekly timer template can be used for Administrator settings' Power supply management settings and for Weekly timer settings. Additionally, up to a maximum of 100 templates can be set.Create Weekly Timer Templates
1 From the Tool menu, select Template — Weekly timer. The Weekly Timer template screen is displayed. 2 Click Add.
The Edit Weekly Timer template screen is displayed.  - Template name: Input the name of the template to create. - Settings: Configure the weekly timer. Refer to "Weekly Timer Template Setting Items" on page 4-4 for details on settings items.3 Configure the template, and click OK.
The template is created.Edit Weekly Timer Templates
1 From the Tool menu, select Template — Weekly timer. The Weekly Timer template screen is displayed.  2 Select templates to edit from the list, and click Edit. The Edit Weekly Timer template screen is displayed.  \- For settings methods, refer to "Create Weekly Timer Templates" on page 3-92 for details. 3 Configure the template, and click OK. The template is edited.Delete Weekly Timer Templates
1 From the Tool menu, select Template — Weekly timer. The Weekly Timer template screen is displayed.  2 Select templates to delete from the list, and click Delete. A deletion confirmation screen is displayed.  3 Click Yes. The Weekly timer template is deleted.3.18 IP Filtering Template Settings
Create a template for when configuring device IP filtering. The IP Filtering Templates can be used for Administrator settings' Network settings, TCP-IP settings, and IP filtering settings. Up to a maximum of 100 templates can be set.Create IP Filtering Templates
1 From the Tool menu, select Template — IP filtering.
The IP filtering template screen is displayed. 2 Click Add.
The Edit IP filtering template screen is displayed.  \- Template name: Input the name of the template to create.  \- Enable IP address permission settings: select this to enable configuration of IP address filtering. - Edit: configure permitted IP address ranges. The Edit IP address range screen is displayed. Input the start and end IP addresses, and click OK. - Clear: Clear the permitted IP address range. Select the permitted IP address range from the list, and click Clear.  - Enable the IP address exclusion settings: select this to enable exclusion settings for IP address filtering. - Edit: configure IP address exclusion ranges. The Edit IP address range screen is displayed. Input the start and end IP addresses, and click OK \- Clear: Clear the IP address exclusion range. Select the IP address exclusion range from the list, and click Clear.3 Configure the template, and click OK.
The template is created.Edit IP Filtering Templates
1 From the Tool menu, select Template — IP filtering.
The IP filtering template screen is displayed.  2 Select templates to edit from the list, and click Edit. The Edit IP filtering template screen is displayed.  \- For settings methods, refer to "Create IP Filtering Templates" on page 3-97 for details. 3 Configure the template, and click OK. The template is created.Delete IP Filtering Templates
1 From the Tool menu, select Template — IP filtering. The IP filtering template screen is displayed.  2 Select templates to delete from the list, and click Delete. A deletion confirmation screen is displayed.  3 Click Yes. The IP filtering template screen is deleted.3.19 Function Access Restriction File Settings
Register a device in a function access restriction file. Use of a function access restriction file means that some device functions (address settings, etc.) can be configured without the input of an administrator password.Create a New Function Access Restriction File
1 From the Tool menu, select Function access restriction — New. The Edit function access restriction file screen is displayed.  - Add: Add a device to a function access restriction file. Refer to "Add a Device to a Function Access Restriction File" on page 3-105 for details. - Edit: Edit devices registered in a function access restriction file. Refer to "Edit Devices Registered in a Function Access Restriction File" on page 3-106 for details. - Delete: Delete devices registered in a function access restriction file. Select devices registered in a function access restriction file to delete from the list, and click Delete. - Select: Add a device registered in the device list to the function access restriction file. Refer to "Add a Device from the Device List to a Function Access Restriction File" on page 3-107 for details. - Name and save: Save the function access restriction file. 2 Configure the function access restriction file, and click Name and save. The Save file screen is displayed. 3 Specify the file name and location to save, and click Save. The Input an encryption password screen is displayed.  - Encryption password: Input the password to use to open the function access restriction file. - Encryption password (Confirmation): Retype the password for confirmation. - Editing password: Input the editing password to use to edit the function access restriction file. - Editing password (Confirmation): Retype the editing password for confirmation. 4 Input the password, and click OK. The function access restriction file is saved.Add a Device to a Function Access Restriction File
1 From the Edit function access restriction file screen, click Add. The Edit device of function access restriction file screen is displayed.
 - Model name: Select the model name of the device to register. - Device address: Input the IP address or DNS name of the device to register. – Group name: Select or input the group name to register. - Registering name: Input the registering name into the function access restriction file. - Administrator password: Input the device administrator password for the device to register. - Administrator password (Confirmation): Retype the administrator password for confirmation. - Test Connection: Connect to the device and check that the administrator password is correct. - Detail: Click this to configure items relating to bizhub OpenAPI. Refer to "bizhub OpenAPI Settings" on page 3-14 for details. - Administrator settings: Select this to allow access to administrator settings. - Authentication: Select this to allow access to authentication settings. – Address settings: Select this to allow access to address settings. 2 Configure the function access restriction file, and click OK. The function access restriction file device is added.Edit Devices Registered in a Function Access Restriction File
1 From the Edit function access restriction file screen, select the function access restriction file to edit from the list, and click Edit. The Edit device of function access restriction file screen is displayed.  \- For settings methods, refer to "Add a Device to a Function Access Restriction File" on page 3-105 for details. 2 Configure the function access restriction file, and click OK. The function access restriction file device is edited.Delete a Function Access Restriction File
1 From the Edit function access restriction file screen, select the function access restriction file to delete from the list, and click Delete. A deletion confirmation screen is displayed.  2 Click Yes. The function access restriction file is deleted.Add a Device from the Device List to a Function Access Restriction File
1 From the Edit function access restriction file screen, select the function access restriction file to add from the list, and click Select. The Select from the device list screen is displayed.  - Select: Select devices to add to the function access restriction file. Select devices to add from the list, and click Select - Unselect: Cancel the selection of devices. Select devices to delete from the list, and click Unselect. 2 Set devices to add, and click OK. The devices are added.Open a Function Access Restriction File
1 From the Tool menu, select Function access restriction — Open. The Open screen is displayed. 2 Select the function access restriction file, and click Open. The Input a decryption password screen is displayed.  \- Decryption password: Input the encryption password that was set when the function access restriction file was saved. 3 Input the password, and click OK. The Input an editing password screen is displayed.  \- Please input an editing password: Input the editing password that was set when the function access restriction file was saved. 4 Input the editing password, and click OK. The function access restriction file is opened.3.20 Start Network Application
Start various related applications. In order to use this function, it is necessary to first install the network applications. Additionally, the device must be supported by these applications.Start Network Application
→ From the Tool menu, select Start external tools, then select that application. The selected application will start. For details, please refer to the applications' user guides.4 APPENDIX
4.1 Display Option Settings
Set items to display in lists such as registered device lists, etc.Set Display Options
1 Click column option.
The Column option screen is displayed.  - Display: Click this to display selected items. - Not Display: Click this to not display selected items. - Up: Move the selected items up. - Down: Move the selected items down.2 Set display options, and click OK.
4.2 Authentication Mode Template Setting Items
| Settings item name | Details |
| When number of jobs reach maximum | Select Job skip to suspend only that job, and to continuing normal processing of other jobs when the number of jobs reaches the maximum. |
| Select Stop to suspend all subsequent jobs when the number of jobs reaches the maximum. | |
| The ratio of the number of users and accounts | Set the ratio of the number of users and the number of accounts between 1 and 999. |
| Synchronize user and account | To synchronize users and accounts, select Synchronize. |
| To not synchronize users and accounts, select Do not synchronize. | |
| Print the non-authenticated user or account | To synchronize printing of non-authenticated users or accounts, select Allow. |
| To not synchronize printing of non-authenticated users or accounts, select Restrict. | |
| Display the user list in the panel | To display the user list in the device panel, select On. |
| To not display the user list in the device panel, select Off. | |
| Public user | To permit public users, select Allow. |
| To not permit public users, select Restrict. | |
| Permit copy function for public user | To permit copy functions for public users, select Allow. |
| To not permit copy functions for public users, select Restrict. | |
| Permit scan function for public user | To permit scan functions for public users, select Allow. |
| To not permit scan functions for public users, select Restrict. | |
| Permit fax function for public user | To permit fax functions for public users, select Allow. |
| To not permit fax functions for public users, select Restrict. | |
| Permit user box access for public user | To permit box access for public users, select Allow. |
| To not permit box access for public users, select Restrict. | |
| Permit print function for public user | To permit print functions for public users, select Allow. |
| To not permit print functions for public users, select Restrict. | |
| Permit print for transmit function for public user | To permit print for transmit functions for public users, select Allow. |
| To not permit print for transmit functions for public users, select Restrict. | |
| Permit color function for public user | To permit color print functions for public users, select Allow. |
| To not permit color print functions for public users, select Restrict. | |
| Permit black function for public user | To permit black print functions for public users, select Allow. |
| To not permit black print functions for public users, select Restrict. | |
| Permit color transmit function for public user | To permit color image transmit functions for public users, select Allow. |
| To not permit color image transmit functions for public users, select Restrict. | |
| Authentic method | To authenticate on the device, select Device local authentication. |
| To authenticate on a network server, select User Authentication (Network server). | |
| External sever type settings | To authenticate on the SMB server, select SMB. |
| To authenticate on the NDS server, select NDS. | |
| To authenticate on the Active Directory server, select Active Directory. | |
| Domain name (ActiveDirectory) | If “Active Directory” is selected as the external server type, then input the Active Directory domain name. |
| Domain name (SMB) | If “SMB” is selected as the external server type, then input the SMB domain name. |
| NDS tree name | If “NDS” is selected as the external server type, then input the NDS tree name. |
| NDS context name | If “NDS” is selected as the external server type, then input the NDS context name. |
| Permit copy function of network user (default) | To permit copy functions for public users authenticated on a network server, select Allow. |
| To not permit copy functions for public users authenticated on a network server, select Restrict. | |
| Permit scan function of network user (default) | To permit scan functions for public users authenticated on a network server, select Allow. |
| To not permit scan functions for public users authenticated on a network server, select Restrict. | |
| Permit fax function of network user (default) | To permit fax functions for public users authenticated on a network server, select Allow. |
| To not permit fax functions for public users authenticated on a network server, select Restrict. | |
| Permit box function of network user (default) | To permit box functions for public users authenticated on a network server, select Allow. |
| To not permit box functions for public users authenticated on a network server, select Restrict. | |
| Allow printing by network users | To permit printing by users authenticated on a network server, select Allow. |
| To not permit printing by users authenticated on a network server, select Restrict. | |
| Permit print for transmit function of public user (default) | To permit print for transmit functions for public users authenticated on a network server, select Allow. |
| To not permit print for transmit functions for public users authenticated on a network server, select Restrict. |
4.3 Weekly Timer Template Setting Items
| Settings item name | Details |
| Mon. ~ Sun. | Set timer individually for each day.Restrict usage times: Select this to configure the timer for this day.Usage start: set from 00: 00 to 23: 59.Usage end: set from 00: 00 to 23: 59. |
| Off function settings at lunchtime | Specify whether or not to turn the device power off at the specified time.Off at lunchtime: Select this in order to turn the device power off at the specified time.Lunchtime OFF: set from 00: 00 to 23: 59.Restart time: set from 00: 00 to 23: 59. |
| Set a password for using during off-hours | Set this in order to enable use of the device while the weekly timer has turned the device power off.Use during off-hours: Select this in order to enable use of the device while the weekly timer has turned the device power off.Password: Input the password with a maximum of 8 characters. |
4.4 What Do I Do If this Message Is Displayed?
| Message | Details of Error |
| Please input appropriate IP address | Incorrect IP address range. Change the end IP value. |
| Duplication error | Identical data is already registered. Identical data can not be registered. |
| LDAP connection error | Confirm that LDAP server data in the LDAP server settings is correct. |
| Failed to update XXX | Failure in refreshing XXX device data. Confirm that the device is ready, and try again. |
| Failed to delete XXX | Failure in deleting XXX device data. Confirm that the device is ready, and try again. |
| Failed to set XXX | Failure in writing XXX device data. Confirm that the device is ready, and try again. |
| Failed to get XXX | Failure in acquiring XXX device data. Confirm that the device is ready, and try again. |
| A data is empty | Displayed if there is no data in the device to be read, when importing data from a device using the import from device function. |
| The password is different | The input password and that input for confirmation do not match. Input both passwords again. |
| File format error | A file that can not be imported has been selected. This file format is not supported by this application. |
| A file format is not right | The file format is incorrect. Confirm that the backup data is for this device model, and that it is not data stored in a different location. |
| Log-in error | You can not log in to the device. Check the password (and username) and try again. |
| No searching data | The corresponding data does not exist. Select a different file (or change LDAP search filters). |
| Selected file format error | The selected file is invalid. Select another file. |
| Communication error | Communication error with the device. Confirm that network cables are connected, and that the device is switched on. |
| Failed to import data | Failure in importing data from the device. Confirm the connection with the device, and attempt import again. |
| Input error | Characters that can not be input have been used. Input characters that are permitted. |
| Data length error | The permissible input range is exceeded. Input the permitted number of characters. |
| A value is empty | Required input fields are missing. Ensure you input all required fields. |
| Multiple applications cannot be started simultaneously | More than one instance of this software can not be started on the same PC at the same time. |
| Error: Device locked: If any one of the following events occurs, it is not able to write in the device. Please confirm the situation and retry it. Job is suspended in the device. Log into the device by an administrator. Job is doing in the device. | If any of the circumstances at left apply, then resolve the issue, and then write to the device. (For example, if jobs are backed up on the device, then either remove these jobs, or wait for all jobs to complete before attempting to write to the device.) |
| Failed to change the user box owner | Failure in processing a change in the box owner. Reconfigure settings. |
| The change authentication mode wizard is not able to boot up because data are updated. Please retry after writing it to the device | If Change authentication mode and Change counter range functions are different to settings for the device and its applications, then the functions can not be run. Write data that is being updated or added, or refresh device information, then run the application. |
| Device data is changed from other application | Settings on the device were changed when editing with PageScope Data Administrator. In this state, writing to the device is not possible. Import from the device again, and edit. |
| Device of non-SSL communication is detected. Continue? (If you want to activate SSL, visit Page-Scope Web Connection and activate the SSL settings of ‘bizhub IS OpenAPI’.) | With non-SSL transmission, data is transmitted across the network in a non-encrypted form. It is recommended that you enable SSL for devices in PSWC (PageScope Web Connection), and then configure. |
| Required field error | Required input fields are missing. Ensure you input all required fields. |
| Error: Input length over | The input text string exceeds permissible lengths. Input a text string that does not exceed these limits. |
| Error: unavailable character is used | Characters that can not be used have been used. Input characters that are permitted. |
| Error: the numerical value is not set | Input numerical values. |
| Error: range over | Input numerical values within the range. |
| The object is not chosen | Select a device from the list. |
| Duplicate device IP addresses exist | The same device is already in the list. The same device can not be displayed in the list. |
| Timeout error | Timeout error. Check the network connection, and that the device is switched on. |
| There is a possibility that the SNMP read community name is changed. Please input a correct community name. | This is displayed if the SNMP read community name has been changed. Input a correct SNMP community name for the device. |
| It is not able to be started up because the necessary DLL is not able to be loaded | Check that the application is correctly installed. Additionally, check that the supported plugins on the device that is being used to carry out settings are correctly installed. |
| There is no external application | In order to start HDD Backup Utility and other network tools, these tools need to be installed. Install these tools, and try again. |
| Fail to change IP address. | Try again, or configure using the device operations panel. |
| Model is different | To register a device in “Register from IP address”, ensure that the device model is correct. In this case, delete the device from device registration, and carry out registration again. |
| Unknown error | An unknown error has occurred. Close the application, then reconfigure settings. |
| Since “Password Rule” of a device's administrator settings is “ON”, please set up the password of eight or more characters. Moreover, it cannot set to the password of only the same character. | When password rules are turned ON in device administration settings, then passwords that have under 8 characters, or that have all the same characters may not be used. To use passwords such as these, ensure that password regulations are turned OFF. |
KONICA MINOLTA
http://konicaminolta.com- Software Installation
- PageScope Data Administrator
- User Template Settings 3-78
- Account Template Settings 3-85
- Weekly Timer Template Settings 3-92
- IP Filtering Template Settings 3-97
- Function Access Restriction File Settings 3-103
- Start Network Application 3-109
- APPENDIX
- Display Option Settings 4-1
- Authentication Mode Template Setting Items 4-2
- Weekly Timer Template Setting Items 4-4
- What Do I Do If this Message Is Displayed? 4-5
- About this Product
- Trademarks
- Note
- Getting Started
- System Requirements
- Overview of Functions
- PageScope Data Administrator
- Installation
- Uninstallation
- To Start
- To Start
- To Exit
- To Exit
- Screen Configuration
- Main Screen
- Device List Screen
- Device Information Screen
- Device Registration
- Search and Register Device
- Register Found Devices
- Click Search and Register.
- Click Yes.
- Set the devices to register by clicking Select, and click OK.
- Specify IP Address and Register
- Specify IP Address and Register
- From the Device menu, select Device registration.
- Click Register from IP address.
- Set the IP address, and click OK.
- bizhub OpenAPI Settings
- From the Register from IP address screen, click Detail. The Device detail settings screen is displayed.
- Configure items relating to bizhub OpenAPI, and click OK.
- Register from Function Access Restriction File
- Register from Function Access Restriction File
- Click Register from function access restriction file.
- Select the function access restriction file, and click Open.
- Input the password, and click OK.
- Set the devices to register by clicking Select, and click OK.
- Register a Local File
- Create a New Local File then Register
- Click Register from local file.
- Select New, and click OK.
- Configure the information to register, and click OK.
- Register from Backup File
- Edit Registration Information
- Edit Registration Information
- Select devices to edit from the list, and click Edit.
- For Devices Registered from Local File
- Edit device registration information, and click OK.
- Delete Registration Information
- Delete Registration Information
- Setting a Search Range
- Add a search range for devices.
- Click Search settings on the Registration by search screen or the Network default settings screen.
- The Device search settings screen is displayed.
- Click Add.
- Set the search range, and click OK.
- Change Date and Time
- Change Device Date and Time
- From the Device menu, select Device list.
- Select the device to change from the list, and from the Device menu, select Change device date time.
- Set the date and time, and click OK.
- Network default settings
- Configure default settings for the registered device network
- Select devices from the list for which to configure network default settings, and click Network settings.
- Set required items, and click Change settings.
- Click Yes.
- Click OK.
- Click OK.
- Click Close.
- LDAP Server Access Settings
- Add LDAP Server Access Settings
- Click Add.
- Set LDAP server access settings, and click OK.
- Edit LDAP Server Access Settings
- Display the LDAP directory list screen.
- Delete LDAP Server Access Settings
- Group Settings
- Create a New Group
- From the Device menu, select Edit group.
- Click New.
- Set the Group name, and click OK.
- Edit a Group
- Display the Group settings screen.
- Select a group to edit from the list, and click Edit.
- Edit the group name, and click OK.
- Delete a Group
- Select groups to delete from the list, and click Delete.
- Set the Default Group
- Single Device Settings
- Import Information from Device
- Select devices from which to implement information from the list, and click Address, Authentication, Administrator settings.
- Set import of device data, and click Import. The Device information screen is displayed.
- From the Device information screen, select the items to configure. For details on settings for each device item, refer to Help.
- When the Administrator Password Is Displayed
- When the SNMP Read Community Name Is Displayed
- Import Abbreviated Address Data from CSV Files
- Display the Device information screen.
- From the Function list, select Address book.
- Set the starting position, and click Next.
- Set the import method, and click Next.
- Set Item names for data to import in each row, and click Next.
- Set data to import, and click Import.
- Import Abbreviated Address Data from an LDAP server
- Set the search filters, and click Find.
- Confirm search results, and click Next.
- Set data to import, and click Import.
- Import Abbreviated Address Data from a Previous Device
- Input the password, and click OK.
- Set the import conditions, and click Next.
- Set Search Range
- From the Import from device screen, click Search settings. The Device search settings screen is displayed.
- Bulk Copy of Settings
- Copy Settings from One Device to Another Device
- Select the copy source device, and click Next.
- Select the copy target device, and click Next.
- Confirm details to copy, and click Start.
- Automatic Creation of Boxes
- Configure Automatic Box Creation
- Auto Protect Settings
- Set Auto Protect
- From the Tool menu, select Auto protect.
- Select Once the timeout settings has passed, the password input dialog is displayed.
- Set the password and timeout, and click OK.
- Cancel Auto Protect
- De-select Once the timeout settings has passed, the password input dialog is displayed.
- Input the password, and click OK.
- Change Time-out Period
- Click Change.
- Set the timeout period, and click OK.
- Change the Password
- Click Change password.
- Set the password, and click OK.
- Authentication Mode Template Settings
- Create Authentication Mode Templates
- From the Tool menu, select Template — Authentication.
- Set the Authentication mode, and click OK.
- Configure the template, and click OK.
- Edit Authentication Mode Templates
- Delete Authentication Mode Templates
- User Template Settings
- Create User Templates
- From the Tool menu, select Template — User.
- Configure the template, and click OK.
- Edit User Templates
- Select templates to edit from the list, and click Edit. The Edit user template screen is displayed.
- Configure the template, and click OK. The template is edited.
- Delete User Templates
- Select templates to delete from the list, and click Delete.
- Set Default User Templates
- Account Template Settings
- Create Account Templates
- From the Tool menu, select Template — Account.
- Edit Group Templates
- Select templates to edit from the list, and click Edit. The Edit account template screen is displayed.
- Delete Account Templates
- Set Default Account Templates
- Weekly Timer Template Settings
- Create Weekly Timer Templates
- Edit Weekly Timer Templates
- Delete Weekly Timer Templates
- IP Filtering Template Settings
- Create IP Filtering Templates
- From the Tool menu, select Template — IP filtering.
- Edit IP Filtering Templates
- Delete IP Filtering Templates
- Function Access Restriction File Settings
- Create a New Function Access Restriction File
- Add a Device to a Function Access Restriction File
- From the Edit function access restriction file screen, click Add. The Edit device of function access restriction file screen is displayed.
- Edit Devices Registered in a Function Access Restriction File
- Delete a Function Access Restriction File
- Add a Device from the Device List to a Function Access Restriction File
- Open a Function Access Restriction File
- Start Network Application
- Start Network Application
- Display Option Settings
- Set Display Options
- Click column option.
- Set display options, and click OK.
- Authentication Mode Template Setting Items
- Weekly Timer Template Setting Items
- What Do I Do If this Message Is Displayed?
- KONICA MINOLTA
Brand : KONICA MINOLTA
Model : BIZHUB C30P
Category : Color printer