Gratical Eye - Photo accessory Zacuto - Free user manual and instructions
Find the device manual for free Gratical Eye Zacuto in PDF.


| Product Type | Electronic Viewfinder (EVF) |
| Brand | Zacuto |
| Model | Gratical Eye |
| Display Type | OLED microdisplay |
| Resolution | 1920 x 1080 pixels |
| Magnification | 0.7x (approx.) |
| Diopter Adjustment | -5 to +5 diopters |
| Input | HDMI (Type A) |
| Power Source | Battery (Sony NP-F series) or USB-C |
| Battery Life | Up to 3 hours (with NP-F550) |
| Dimensions | 108 x 75 x 58 mm (approx.) |
| Weight | 220 g (without battery) |
| Mounting | 1/4-20 thread, cold shoe, arm support |
| Main Functions | Peaking, zebra, false color, waveform, histogram, frame guides, LUT support |
| Cleaning | Use a soft, dry cloth on the exterior; clean lens with microfiber cloth |
| Safety Precautions | Avoid exposure to moisture, extreme temperatures, and direct sunlight |
| Spare Parts | Eyecup, HDMI cable, arm mount, USB-C cable, battery charger |
| Repairability | Modular design; parts replaceable by authorized service centers |
| General Information | Designed for professional cinema cameras; firmware updatable |
Frequently Asked Questions - Gratical Eye Zacuto
User questions about Gratical Eye Zacuto
0 question about this device. Answer the ones you know or ask your own.
Ask a new question about this device
Download the instructions for your Photo accessory in PDF format for free! Find your manual Gratical Eye - Zacuto and take your electronic device back in hand. On this page are published all the documents necessary for the use of your device. Gratical Eye by Zacuto.
USER MANUAL Gratical Eye Zacuto
Micro-OLED Electronic Viewfinder Full Digital Manual
ZACUTO
GRATICAL EYE
Table of Contents
Gratical Features 3
Connecting Power Sources....4
HD-SDI Connection....4
Operating Lens Door 5
Removing/ Installing Lens Protection ....6
Operating Menus 7
Display Calibration 8
LUTs....9
Color Bars....10
Scopes 11
Scopes Settings 12
Overlays 13
False Color 13
Focus Assist (Red Line) 14
Peaking 14
Exposure Assist (Zebras) 14
Frame Line 15
Time Code 15
Record Light 15
Tally Light 15
Menu Settings 16
Meters 15
Pixel to Pixel 17
DSLR Scaling 17
Anamorphic 18
Frame Store 18
Function Buttons 19
User Features (Proximity Sensor)....19
Lock Buttons 20
Update....21
About....21
Precautions....22
Limited Warranty 22
GRATICAL EYE
Gratical Features
- Joystick
- Lens Door
- Focusing Ring 7. Two Pin Lemo Power Jack
- 1/4" 20 Rosette (Either Polarity)
- Proximity Sensor 8. HD-SDI Input
- Eye Cup 9. USB Port

2

3


5 6 7
GRATICAL EYE
Connecting to Power Source
Connect your Two Pin Lemo to the jack on the bottom of the Gratical Eye. Align the red dot on the Lemo Cable with the red dot on the Gratical, making sure it's securely in place.
Connect the P-Tap on the opposite end of the power cord to either your camera or an external power source.

Power & Video Cable (Sold Separately)


Connecting to HD-SDI
Connect your HD-SDI to the port on the bottom of the Gratical Eye, making sure it's securely in place.

GRATICAL EYE
Opening Eyecup Lens Door Hands Free
Position your head next to the lens door tab. Apply pressure with your head to the lens door tab, slide your head from left to right opening the door.
See video at www.zacuto.com/gratical-support
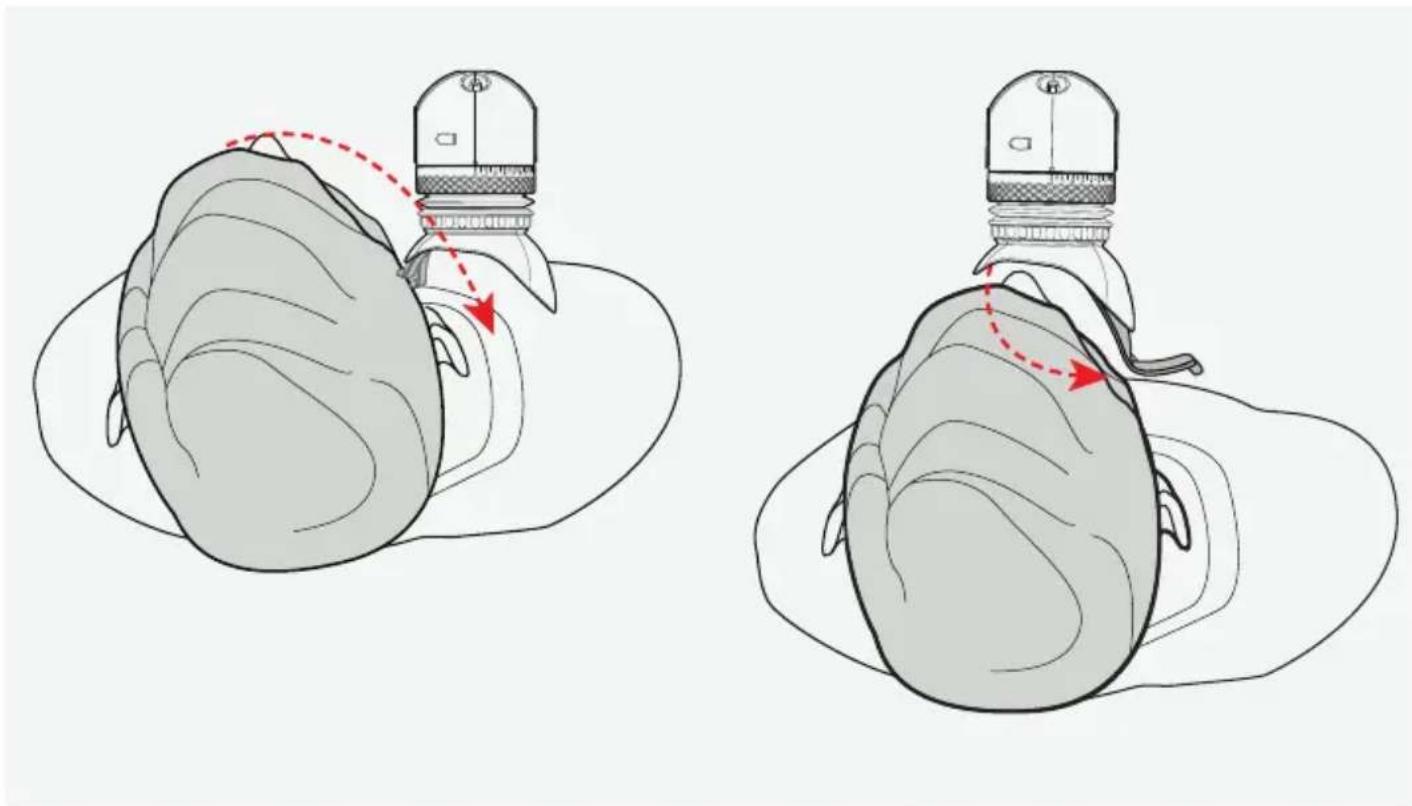
Opening Eyecup to keep Lens Door open
The eyecup can be folded over on itself so that the lens door remains open.
Reminder: When the lens door does not automatically close, your Gratical is exposed to the sun.

Removing & Installing Level 1 Fog Protection
Level 1 Fog Protection Anti-Fog Coated Diopter offers mild fog protection. Good for average conditions, comes pre-installed.
- To replace the diopter, remove three Phillips screws and remove the diopter.
- Install new diopter and tighten 3 Phillips screws back into place.
Installing Level 2 Fog Protection
Level 2 Fog Protection Anti-Fog Shield offers extreme fog protection. Included with Gratical, but does not come pre-installed.
- To install Level 2 Fog Protection, peel off protective layer from both sides of the level 2 fog protection. Lay on top of the lens lip and remount eyecup.
Place the eyecup on one side of the Gratical lens lip, and then push down around the rest.


GRATICAL EYE
Operating Menus
![MAIN MENU DISPLAY CALIBRATION LUTS COLOR BARS SCOPES OVERLAYS METERS PIXEL TO PIXEL (ZOOM) DSLR SCALING [Auto/Playback] ANAMORPHIC [NORMAL] FRAME STORE FUNCTION BUTTONS UPDATE ABOUT Current Selection (In Red) Current Setting Sub-Menu Indicator Timecode Battery Meter Audio Meter Waveform or Vectorsco…](/content/2026/06/1394812/images/e23a09da5659de0fee540a19016d1e4d67e84f3f3064ce43420e2cf7abf0fd49.jpg)
The menu screen reveals itself over the current video display to show real-time updates of changes made. Menu will disappear after 30 seconds of inactivity.
- To open menu press in joystick. Navigate menu using up, down, left, right. Press in to select. Left will return you to the previous menu or make the menu disappear when on main menu.
With the menu off, the joystick can be pre-programmed with functions. These joystick functions can be changed through the menu.
Factory Default Settings
Up- Focus Assist
Down- Battery Meter
Left- None
Right- Toggle Waveform/ Vector

Display Calibration
Use these settings to adjust the calibration of the Micro OLED Display.
BRIGHTNESS: [-100 to 100]
CONTRAST: [-100 to 100]
RED: [-100 to 100]
GREEN: [-100 to 100]
BLUE: [-100 to 100]
RGB: [-100 to 100]
GAMMA: [0.2 to 2.6]
- Your settings may be saved and recalled with the SAVE PRESET and RECALL PRESET functions.
- Select RESTORE DEFAULT to restore factory default settings.
LUTs

Import Custom LUT
- To import a custom LUT, insert a USB stick into the Gratical and select import custom LUT from the LUT menu. Select the LUT you wish to import from the list of available LUTs. Currently compatible with 1D LUTs (.cube, .csm file types)
Select Preset EVF LUT
• To use a preset LUT for the Gratical, select a LUT from the list of available preset LUTs.
Select Custom EVF LUT
- To select a custom LUT, you must first create or import a LUT to the Gratical. Once you have imported a custom LUT, select a LUT from the list available custom LUTs.
Create LUT
- You can create your own LUT from within the CREATE CUSTOM LUT menu. Saved custom LUTs can be found in the SELECT CUSTOM LUT menu. Note that when preset LUTs have been selected, you will be able to see the values of those LUTs in the CREATE CUSTOM LUT menu. This allows you to tweak and modify the preset values. Saving an altered version of a preset LUT will not overwrite the original.
GRATICAL EYE
Color Bars
- The SMPTE HD, MACBETH, and BLUE ONLY features can be used to calibrate your Gratical.

GRATICAL EYE
Scopes

The Gratical offers three different scopes: Histogram, Waveform, and Vectorscope.
Histogram
• (Luminance): The luma Histogram shows all luminance values in the image, from black to white. - (RGB): The RGB Histogram shows histogram analyses for each color, Red, Green, Blue. This lets you compare the relative distribution of each color. • (Scale): Select to show the histogram in a linear or logarithmic scale.
Waveform (Luminance):
• Shows exposure in IRE at a given location in the image, left to right.
Vectorscope (Saturation):
• Measures the chrominance in the image, including saturation and hue.
Scope Settings
- TOGGLE SCOPES: Select to toggle scopes ON/OFF. All scopes off defaults image to the center.
- WAVEFORM/VECTORSCOPE: Select to toggle waveform or vectorscope. Only one can be active at a time.

- SCOPES LOCATION: Select to change the location of the scopes. Scopes can be positioned on either the bottom or top of the image.
- SCOPES SOURCE: The scopes can reflect data based on the raw input signal from the camera, pre LUT, or from a LUT applied image, POST LUT. • See Function Buttons Section p18 to assign to a function button.
Overlays
Note that all overlay features can only see pre LUT applied image. When using a LUT, these features will work off the original, non LUT image.

False Color
- Select FALSE COLOR to see feature ON/OFF. Use False Color to aid in obtaining the correct exposure of your scene.
- The chart below may be used as a key to determine which areas of your frame are overexposed, underexposed, or exposed properly.

Overexposed: Objects will be displayed RED. Properly Exposed: Objects will display in Pinks and Greens. Underexposed: Objects will display Blue to Dark Blue. See Function Buttons Section p18 to assign to a function button.
GRATICAL EYE
Focus Assist (Red-Line)
- Select RED-LINE ENABLE to see feature ON/OFF.
- Select COLOR to change the color of the focus assist lines.
- Select LEVEL to change the intensity of the focus assist lines.
Peaking
PEAKING ENABLE: Select to toggle ON/OFF.

Exposure Assist (Zebras)
ENABLE: Select to see feature ON/OFF. Select the HIGH IRE LEVEL to change the exposure level at which the zebra lines will appear. This value must be higher than the LOW IRE LEVEL value or you will receive a Zebra setting error. Select the HIGH COLOR to change the color of the HIGH IRE LEVEL zebra lines.

Select the LOW IRE LEVEL to change the exposure level at which the zebra lines will appear.
- Select the LOW COLOR to change the color of the LOW IRE LEVEL zebra lines.
- LOW IRE +/-: Select to adjust the range of the LOW IRE zebra, 1-25. See Function Buttons Section p18 to assign to a function button.
GRATICAL EYE
Frame Line
- Select to choose the frame lines and/or action safe lines you wish to overlay on the image.
Time Code
• TIME CODE: Select to toggle time code ON/OFF
Record Light
- RECORD LIGHT: Select to toggle record light ON/OFF. This is an SDI only feature and your camera must have a record light trigger enabled in its menu for the Gratical to detect it.
- RECORD LIGHT TYPE: Select the appropriate camera manufacturer for the type of camera you are using: Canon, Sony, RED. If your camera manufacturer is not listed you can attempt to use one of the three previously mentioned, or you can use the TIMECODE option. Please note that using the TIMECODE option while your camera is set to free run time code may cause the record light to also activate.
Tally Light
- Select to toggle tally light ON/OFF. This is an SDI only feature and your camera must have a record light trigger enabled in its menu for the Gratical to detect it.


GRATICAL EYE
Menu Settings
- MENU LOCATION: Select to move the menu to one of six locations.
- MENU TRANSPARENCY: Select to set the menu transparency, 1-5

Meters (Audio & Battery)
• AUDIO METERS: Select to toggle the Audio Meters ON/OFF. • BATTERY LEVEL: Select to toggle Battery Meter ON/OFF.

GRATICAL EYE
Pixel to Pixel
- Select ENABLE to see feature On/Off. While ON, use the joystick to scroll around the image.
- Select CENTER to re-center the picture while zoomed in.
- Select PAN to change the number of pixels at which you will scroll while zoomed in.
- When Pixel to Pixel is assigned to a function button, press in the joystick to return to normal zoom level.

DSLR Scaling
- AUTO/PLAYBACK allows the EVF to scale and format the image by automatically detecting the camera's output (Default).
- Choose CAMERA PRESETS to activate an included camera preset.
- When creating a user preset, the ACTIVE VIDEO (Red Line) represents what will be shown full frame on the screen while the FRAME LINE (Green Line) tells the Gratical where the picture area of the recorded video image will be.

Creating a user preset may be useful if you are trying to view camera data on the screen while it's scaled.
GRATICAL EYE
Anamorphic
Select the anamorphic de-squeeze factor corresponding to your lens.

Frame Store
- Toggle Show ON/OFF to display the stored frame in the selected memory bank. If no frame has been stored in the selected bank, a warning message will appear "Frame (X) has not been stored!"
- Within SHOW STYLE you may choose for the saved frame to be overlaid as OPAQUE or TRANSP allowing you to match up your live video with the stored frame.

- Toggle the CAPTURE menu to ON and you will be prompted with a message "Press any Function button to store frame..." Press a Function button on the side of the EVF and a frame from the current video on screen will be stored to the next available memory bank.
• See Function Buttons Section p18 to assign to a function button.
Function Buttons
- The Gratical has four function buttons that can be assigned by the user. These include the four directions of the joystick (UP, DOWN, LEFT RIGHT). Function buttons come preprogrammed but can be changed at any time.
- To change the function assigned to each button, select the function button you wish to change. From the subsequent menu, choose the desired function you wish to be assigned to the function button. It can now be activated by pressing the appropriate
function button on the side of the Gratical without the use of the menu system.

• Function buttons can only be used when the menu is not displayed.
User Features
The proximity sensor will detect movement approximately 2-3 inches away from the sensor. This distance can vary during boot up but will normalize shortly after being powered on. Once the PROXIMITY TIMEOUT value has expired, the display will begin to fade out. The display will instantly reactivate when movement is detected.
• PROXIMITY SENSOR: Select to toggle ON/OFF • PROXIMITY TIMEOUT SEC: Set the time it takes until the display fades out, 3-30 Seconds.

GRATICAL EYE
Lock Buttons
- Select to lock the Gratical's buttons. While locked, the buttons will not respond to user input. To unlock, push in the joystick and hold for 5 seconds.
![MAIN MENU DISPLAY CALIBRATION LUTS COLOR BARS SCOPES OVERLAYS METERS PIXEL TO PIXEL (ZOOM) DSLR SCALING [Auto/Playback] ANAMORPHIC DE-SQUEEZE [NORMAL] FRAME STORE FUNCTION BUTTONS USER FEATURES LOCK BUTTONS UPDATE ABOUT Pixel to Pixel off 00:00:00:00 FrameLine off LUT off Zebra off Peaking off -24dB…](/content/2026/06/1394812/images/64d7ae756baca232051981b80f9c32422d00e19efbbf4334af5ab3ea41c7ebc7.jpg)
GRATICAL EYE
Update
- To update your Gratical with the latest firmware, first format your USB thumb drive to FAT32 on a PC, MD-DOS on a Mac.
- Download the firmware update from www.zacuto.com.
- Insert your USB drive into the Gratical's USB port, select UPDATE from the menu and select USB DRIVE. Select START UPDATE and follow the on screen instructions. The current firmware version can be confirmed in the ABOUT menu.

About
- Choose ABOUT to view the EVF firmware version on your device. • SYSTEM INFO is used for developer and debugging.

GRATICAL EYE
Gratical Precautions

- OLED displays can be affected by burn in or image retention if a static image is displayed for prolonged periods of time. We advise that you use the Gratical's scopes instead of the camera's whenever possible and shut off the overlay camera data when it is not needed.
- Do not allow sunlight to enter the Gratical. The light can be magnified by the lens and potentially cause damage to the Gratical screen.
- Make sure to close eyecup lens door when not using to help prevent unwanted light from entering the EVF.
- Do not disassemble or modify the EVF, as this may damage the product.
- Do not use batteries, power cords, or accessories that are not specified for use with this product.
- Do not store the product in a dusty, humid, or hot environment as damage may occur.
- When the product is mounted on a camera, do not lift or move the camera by grabbing the product. This may cause damage to the product or the camera mount.
- This product is not waterproof. If the product is dropped in water, do not turn on the unit. Contact Zacuto for service.
- Do not attempt to power another device by using the Gratical as a power source.
- To report bugs, features, and ideas, please contact Zacuto.
Limited Warranty
Zacuto USA electronic devices come with a limited one-year hardware warranty. The limited hardware warranty covers defects in workmanship and materials of our products for up to one year. This warranty does not cover any damage to this product that results from improper installation, accidents, abuse, misuse, negligence, natural disaster, insufficient or excessive electrical supply (if applicable), abnormal mechanical or environmental conditions, dust, or any unauthorized disassembly, repair, or modification.
For more support, call us at 888-294-FILM
or email us at sales@zacuto.com

- GRATICAL EYE
- TABLE OF CONTENTS
- GRATICAL FEATURES
- CONNECTING TO POWER SOURCE
- CONNECTING TO HD-SDI
- OPENING EYECUP LENS DOOR HANDS FREE
- OPENING EYECUP TO KEEP LENS DOOR OPEN
- REMOVING & INSTALLING LEVEL 1 FOG PROTECTION
- INSTALLING LEVEL 2 FOG PROTECTION
- OPERATING MENUS
- FACTORY DEFAULT SETTINGS
- LUTS
- IMPORT CUSTOM LUT
- SELECT PRESET EVF LUT
- SELECT CUSTOM EVF LUT
- CREATE LUT
- SCOPES
- HISTOGRAM
- WAVEFORM (LUMINANCE)
- VECTORSCOPE (SATURATION)
- SCOPE SETTINGS
- OVERLAYS
- FALSE COLOR
- FOCUS ASSIST (RED-LINE)
- PEAKING
- EXPOSURE ASSIST (ZEBRAS)
- FRAME LINE
- TIME CODE
- RECORD LIGHT
- TALLY LIGHT
- MENU SETTINGS
- METERS (AUDIO & BATTERY)
- PIXEL TO PIXEL
- DSLR SCALING
- ANAMORPHIC
- FRAME STORE
- FUNCTION BUTTONS
- USER FEATURES
- LOCK BUTTONS
- UPDATE
- ABOUT
- GRATICAL PRECAUTIONS
- LIMITED WARRANTY
Brand : Zacuto
Model : Gratical Eye
Category : Photo accessory