
Ronin 4D - Video camera DJI - Free user manual and instructions
Find the device manual for free Ronin 4D DJI in PDF.


| Product Type | Cinema Camera with Integrated Gimbal |
| Brand | DJI |
| Model | Ronin 4D |
| Sensor Size | Full-Frame (35.9 x 23.9 mm) |
| Max Resolution | 6K at 60fps (6048 x 4032) |
| Lens Mount | DL Mount (compatible with Leica M, PL via adapter) |
| Stabilization | 4-Axis (ActiveTrack, Pan/Tilt/Roll/Z-axis) |
| Dimensions (Body) | 309 x 290 x 277 mm |
| Weight (Body only) | 4.67 kg |
| Battery Type | DJI TB50 (22.8V, 4280 mAh) |
| Battery Life | Approx. 2.5 hours |
| Power Input | 14-28 V DC via V-mount or Gold Mount (optional) |
| Recording Media | CFexpress Type B, SD UHS-II |
| Video Formats | ProRes 422 HQ, H.264, H.265 |
| Key Functions | Dual Native ISO (800/4000), 9-axis Stability, Focus Tracking, Wireless Sync |
| Connectivity | Wi-Fi 6, Bluetooth 5.1, HDMI 2.1, USB-C, SDI |
| Maintenance | Clean body and lens mount with soft, dry cloth; keep away from dust |
| Safety | Read full manual before use; avoid extreme temperatures and moisture |
| Spare Parts & Repairability | Contact DJI authorized service for parts and repair |
| General Information | Designed for professional filmmaking; manual available in PDF |
Frequently Asked Questions - Ronin 4D DJI
User questions about Ronin 4D DJI
0 question about this device. Answer the ones you know or ask your own.
Ask a new question about this device
Download the instructions for your Video camera in PDF format for free! Find your manual Ronin 4D - DJI and take your electronic device back in hand. On this page are published all the documents necessary for the use of your device. Ronin 4D by DJI.
USER MANUAL Ronin 4D DJI
User Manual v1.2 2022.02


Searching for Keywords
Search for keywords such as "battery" and "install" to find a topic. If you are using Adobe Acrobat Reader to read this document, press Ctrl+F on Windows or Command+F on Mac to begin a search.

Navigating to a Topic
View a complete list of topics in the table of contents. Click on a topic to navigate to that section.

Printing this Document
This document supports high resolution printing.
Using this Manual
Legend

Warning Important Hints and Tips Reference

Before You Begin
The following documents have been produced to help you safely operate and make full use of your DJI™ RONIN™ 4D.
- DJI Ronin 4D Quick Start Guide
- DJI Ronin 4D User Manual
- DJI Ronin 4D Safety Guidelines
Read the entire quick start guide and user manual and watch the tutorial videos on the product page of the DJI official website (http://www.dji.com/ronin-4d). Read the safety guidelines to understand your legal rights and responsibilities.
Contact DJI or a DJI authorized dealer if you have any questions or issues during installation, maintenance, or use of this product.
Watching the Tutorial Videos
Visit the link below to watch the tutorial videos, which demonstrate how to use DJI Ronin 4D safely:
https://www.dji.com/ronin-4d/video

Downloading DJI Assistant 2 (Ronin Series)
Download DJI Assistant 2 via the link below to activate and update Ronin 4D:
https://www.dji.com/ronin-4d/downloads
Contents
Using this Manual 2
Legend 2
Before You Begin 2
Watching the Tutorial Videos 2
Downloading DJI Assistant 2 (Ronin Series) 2
Product Profile 5
Ronin 4D Diagram 6
Getting Started 7
Mounting the Lens (Using DL Lens as an example) 7
Mounting the LiDAR Range Finder 9
Balancing 10
Attaching the Hand Grips 11
Attaching the Intelligent Battery 12
Inserting the Storage Media 12
Activating DJI Ronin 4D 14
Auto Tune 15
Balancing the Z-Axis 16
DJI Zenmuse X9 Gimbal and Camera 18
Gimbal 19
Camera 21
Z-Axis 26
Main Body 27
Hand Grips 29
Top Handle 31
High-Bright Main Monitor 32
Button and Port Features 32
Camera View 34
Menu and Functions 40
Recording 40
Video 40
Display 43
User Settings 49
Storage 51
System 53
Lens 54
Stabilizer 58
Transmission 61
Intelligent Battery 63
Intelligent Features 66
ActiveTrack Pro 66
Focus Control 67
Firmware Update 68
Maintenance 69
Specifications 70
Appendix 74
Using DJI Force Pro and DJI Master Wheels with Ronin 4D 74
Dimensions 74
Product Profile
DJI Ronin 4D is a ground-based cinematography system, which combines a cinema camera, four-axis gimbal, LiDAR focusing, and wireless transmission in one. The system consists of a Zenmuse X9 gimbal and camera, LiDAR range finder, Z-axis, main body, left and right hand grips, high-bright main monitor, top handle, and battery system.
- The X9 gimbal and camera is available in both X9-8K and X9-6K. Both provide three-axis stabilization and support internal recording of Apple ProRes RAW*, Apple ProRes 422 HQ, and H.264 video. Although the camera comes with a standard DL mount, it can also be interchanged with other lens mounts such as the DJI M mount and the third-party E mount. The camera can control the aperture and focus of the DL lens** as well as both manual and auto focus on a manual lens when used with the X9 Focus Motor and LiDAR range finder.
- The LiDAR range finder uses LiDAR waveform to quickly locate focus points and allows precise focus adjustments, making auto and manual focusing easier and providing automated manual focus that is convenient, flexible, and accurate.
- Additionally, the Z-axis effectively decreases vertical shake in the camera and offers a stabilization performance on par with a dolly. The four axes work together with the downward ToF sensors, forward and downward dual-visual sensor, and a built-in IMU and barometer to provide overall stabilization.
- The main body and the left and right hand grips provide a wide range of function buttons, making it easier than ever for one person to control shooting, focusing, and camera settings.
- Features and settings are easy to access and a wide range of shooting requirements can be fulfilled thanks to the high-bright main monitor. The monitor comes with a 5.5-inch, 1,000-nit touchscreen, boasts a user friendly UI and a variety of buttons, and can be attached to multiple positions on Ronin 4D. • Using the TB50 Intelligent Battery, Ronin 4D is able to provide an operating time of up to 150 minutes***.
In addition, Ronin 4D supports an HDMI 1080p/60fps output, internal microphone and 3.5mm stereo audio input, and is compatible with various accessories such as the DJI High-Bright Remote Monitor, DJI Master Wheels, and DJI Force Pro.
* DJI Ronin 4D will no longer support Apple ProRes RAW internal recording from February 16, 2022. ** Visit the official DJI website https://www.dji.com/ronin-4d/lens to check compatible lenses. *** Measured in an environment of 26° C (77° F) with a fully charged TB50 battery, the gimbal balanced, the equipment in a level and stationary state, the Z-axis disabled, and while continuously recording in ProRes RAW. Operating time is reduced when Ronin 4D is in motion or the Z-axis is enabled.
Ronin 4D Diagram

- Gimbal and Camera
- Z-Axis
- Base Plate
- Left Hand Grip
- Top Handle
- LiDAR Range Finder

- High-Bright Main Monitor
- TB50 Intelligent Battery and Battery Compartment
- Main Body
- Right Hand Grip
Getting Started
Follow the steps below to prepare Ronin 4D for shooting.
Mounting the Lens (Using DL Lens as an example)
The X9 gimbal and camera supports various lenses. Visit the official DJI website at http://www.dji.com/ronin-4d/lens to check compatible lenses.
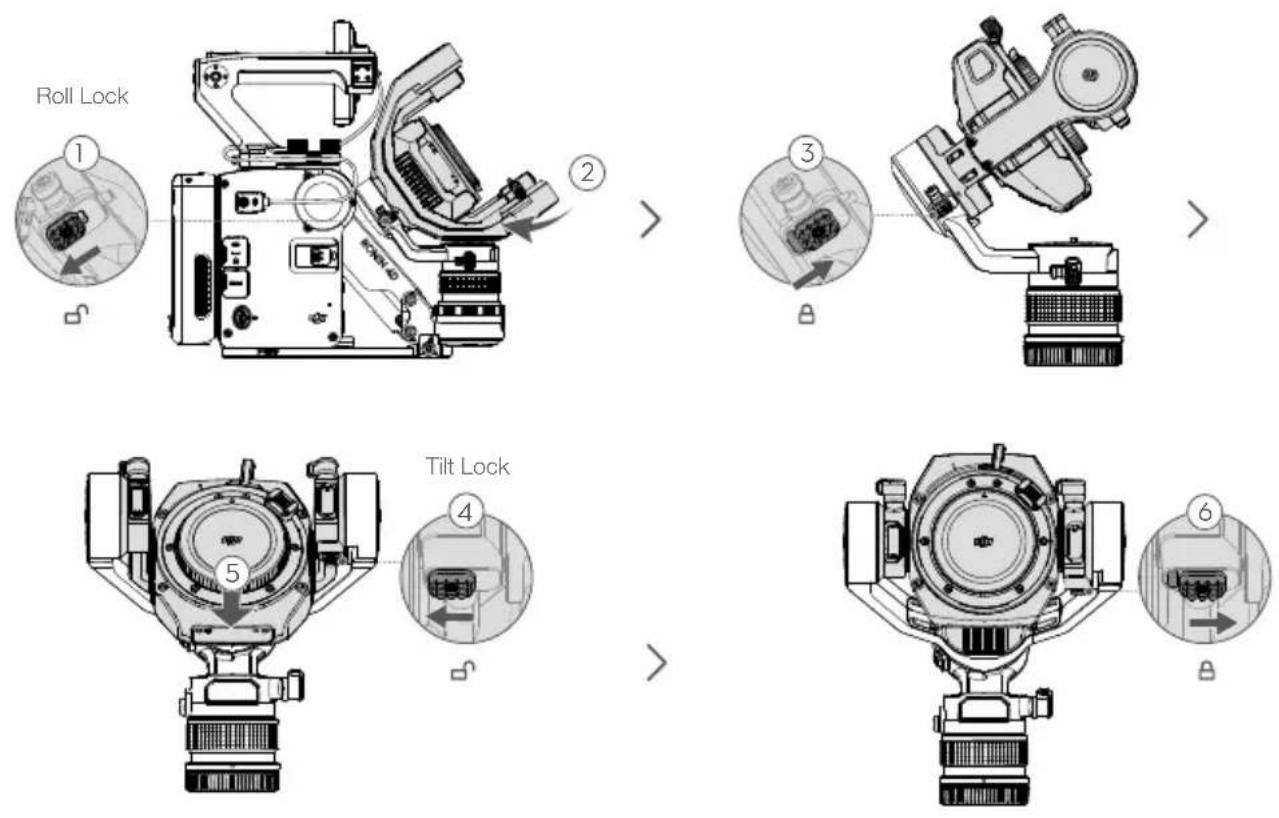
- The gimbal is folded by default. Unfold the roll and tilt axes before mounting the lens. Toggle the roll axis lock to the unlocked position, adjust the roll axis as shown, and lock the roll axis. Toggle the tilt axis lock to the unlocked position, adjust the tilt axis as shown, and lock the tilt axis.
- Press and hold the release button and rotate the DL mount body cap counter-clockwise to remove.
- Align the red marks on the lens and the DL mount. Insert and rotate the lens clockwise until there is a clicking sound.


An M mount is required when attaching an M mount lens. Follow the steps below to attach an M mount. Refer to the DJI Zenmuse X9 M Mount Unit User Guide for more information.
- Press and hold the release button on the camera lever, rotate the lever counter-clockwise until it is positioned left of the white mark, and remove the DL mount.

- Align the positioning notch on the M mount lens adapter with the guiding pin on the camera and insert the adapter. Rotate the camera lever clockwise until it is tight and secure. Attach the M mount lens to the lens adapter.

Mounting the LiDAR Range Finder
- Loosen the locking knob and attach the LiDAR range finder to the holder.
- Make sure to slide the LiDAR range finder to the end of the holder before tightening the locking knob.
- Use the LiDAR range finder/focus motor cable to connect the power and communication port of the LiDAR range finder and the LiDAR port of the gimbal. Make sure to plug the end with the 90° connector into the gimbal port and tighten both screws on the cable.

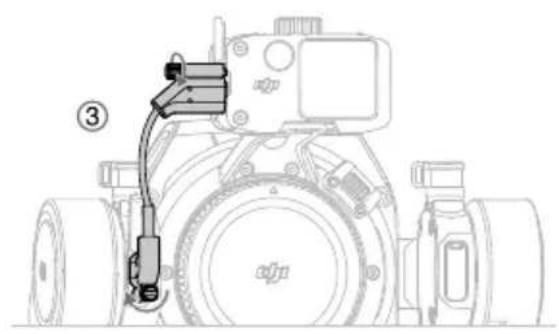
Use the LiDAR range finder with DJI Zenmuse X9 Focus Motor to control the focus of manual lens. Refer to the DJI Zenmuse X9 Focus Motor Product Information for more information. It is recommended to mount the counterweight (106g) for optimal balancing if the X9 Focus Motor is not being used. Use the provided M3-6 screw to secure the counterweight on the gimbal as shown.


- Do not bend the LiDAR range finder/focus motor cable excessively. Otherwise, the connection may be affected.
- Using the LiDAR range finder without either the X9 Focus Motor or the counterweight (106g) may cause the gimbal to shake.
Balancing
Proper balancing is essential for optimal performance when using Ronin 4D. Proper balance is critical for shots with Ronin 4D where subjects move suddenly and at fast speeds and also offers longer battery runtimes. Two of the axes must be properly balanced before powering on Ronin 4D and setting up the parameters.
Before Balancing
- The camera must be fully configured before installing and balancing the camera on the gimbal. This includes all connected cables and accessories such as the X9 focus motor, LiDAR range finder, lens, and counter weight. Remove any lens cap from the camera before balancing.
- Make sure to select the focal length before balancing if using a varifocal lens. Make sure Ronin 4D is powered off or in sleep mode before balancing.
Balancing Steps
- Balancing the Tilt Axis
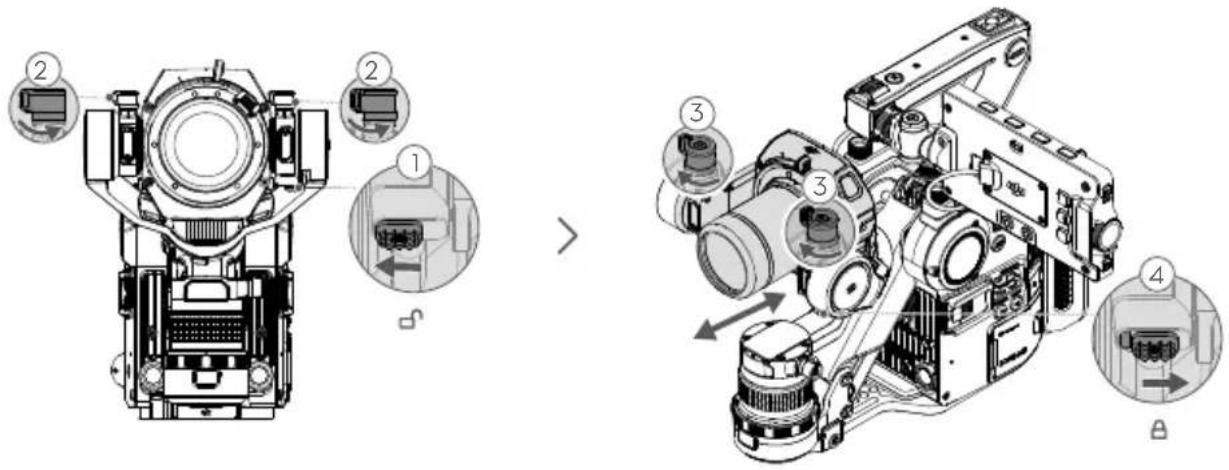
a. Toggle the tilt axis lock to the unlocked position① and loosen the knobs ② on both sides of the tilt axis. b. Check to make sure the camera is not front- or back-heavy. Move the camera backward if front-heavy and forward if back-heavy. c. The tilt axis is balanced when the camera is steady while tilted forward. Tighten the knobs ③. d. Lock the tilt axis ④.
2. Balancing the Pan Axis
a. Toggle the pan lock to the unlocked position① and loosen the knobs on the pan motor ②. b. Tilt Ronin 4D towards you while holding the top handle. Check the movement of the pan axis. If the camera lens rotates to the left, push the pan axis to the right. If the camera lens rotates to the right, push the pan axis to the left. c. The pan axis is balanced if the camera is steady when the pan axis is rotated by tilting the top handle. Tighten the knob ③.


Attaching the Hand Grips
Make sure the lever is in the unlocked position. Insert the left hand grip into the mounting port on the main body ① until there is a clicking sound and push the lever all the way down ②.
Attach the right hand grip following the same instructions.
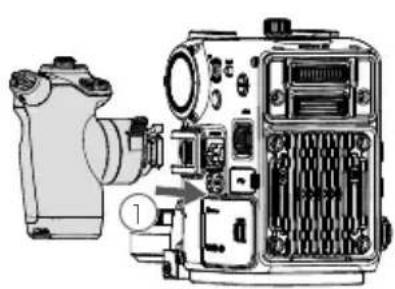

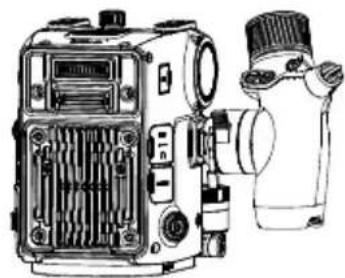

The left and right hand grips are not interchangeable.
Attaching the Intelligent Battery
Align the Intelligent Battery with the battery compartment and push the battery down until there is a clicking sound.

Inserting the Storage Media
Ronin 4D supports the DJI PROSSD 1TB when used with the DJI PROSSD Mount, CFexpress2.0 Type-B cards, and USB 3.1 Type-C SSDs*. The DJI PROSSD 1TB supports internal recording of the highest format and the footage can be read in the computer directly through the provided USB-C to USB-C cable. No card reader is required.
Attaching the DJI PROSSD Mount and the DJI PROSSD 1TB: The DJI PROSSD Mount is mounted on Ronin 4D-8K by default. Attach the DJI PROSSD 1TB to the DJI PROSSD Mount.

* Visit https://www.dji.com/ronin-4d/faq to learn more about supported CFexpress 2.0 Type-B cards and USB 3.1 Type-C SSDs. Make sure to use the original cable of the USB-C SSD for optimal performance.
Ronin 4D-6K also supports the DJI PROSSD Mount and the DJI PROSSD 1TB but they are not included in the package. Attach the DJI PROSSD Mount before attaching the DJI PROSSD 1TB.
- Open the card compartment cover ①, press the clip ② inside, and remove the cover.
- Locate the arrow on the CFexpress card plug and insert it into the card slot of Ronin 4D based on the direction of the arrow.

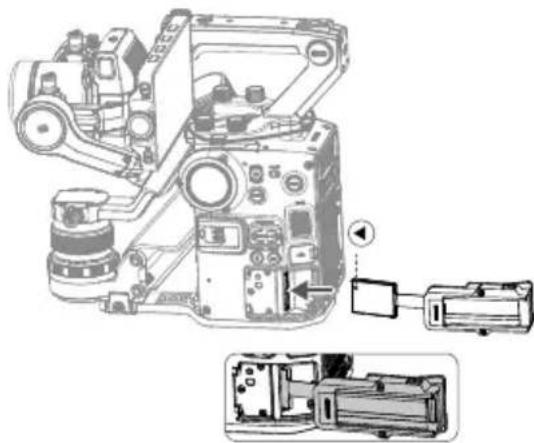
- Remove the two M2×5 screws ① on Ronin 4D, align the PROSSD mount with the screw holes, and attach using the two M2×22 screws ② included with the PROSSD mount.


Attaching CFexpress2.0 Type-B Card: Open the card compartment cover and insert the card.


Attaching the USB 3.1 Type-C SSD: Open the USB-C port cover and attach the SSD to Ronin 4D. Make sure the SSD is secure during usage.

Activating DJI Ronin 4D
Ronin 4D must be activated through DJI Assistant 2 (Ronin Series) before using for the first time. Follow the steps below to activate Ronin 4D:
- Before powering on Ronin 4D, make sure the LOCK switch is in the unlocked position and the three axes of the gimbal are unlocked. Otherwise, Ronin 4D cannot work properly. Press and hold the power button for 1 second to power on Ronin 4D.
- Use the provided USB-A to USB-C cable to connect the USB-C port on the main body with a computer. Launch DJI Assistant 2 (Ronin Series), select Ronin 4D, and follow the steps to activate.
- Do not power off Ronin 4D or disconnect Ronin 4D and the computer before activation is completed.

USB-C Port
Auto Tune
Make sure to autotune Ronin 4D before using to ensure optimal performance. Tap HOME on the high-bright main monitor and select Stabilizer, Gimbal Calibration, and Auto Tune.

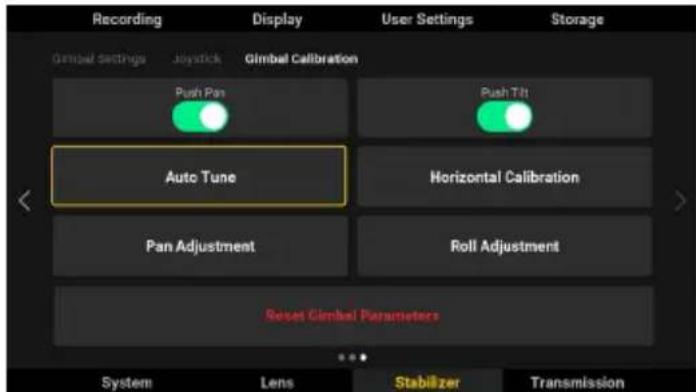

• Make sure the three axes of the gimbal are unlocked and the GIMBAL MODE is toggled to FOLLOW or LOCK before auto tune. • Make sure Ronin 4D is placed on a flat and steady surface before autotuning. It is normal for the gimbal to vibrate and emit sounds during autotune. - Ronin 4D must be autotuned each time the camera lens or the payload is changed.
The gimbal balance icon on the high-bright main monitor is white 🔒 if the balance is suitable for shooting. If the icon is orange 🔒, it is recommended to rebalance the gimbal for optimal performance. The gimbal must be rebalanced if the icon is red 🔒 Tap the gimbal balance icon and balance the gimbal according to the tips on the screen. The camera is front-heavy if the left side of the bar below the pan or tilt axis is red and the axis needs to be adjusted backward. The camera is back-heavy if the right side of the bar below the pan or tilt axis is red and the axis needs to be adjusted forward.

Balancing the Z-Axis
Make sure the total payload of the Z-axis is less than 2 kg including the X9 Gimbal and Camera, X9 Focus Motor, counter weight, and LiDAR range finder.
Power on Ronin 4D and enable the Z-axis before balancing the Z-axis.
- Loosen the Z-axis lock ① and press the Z-axis switch ② to enable the Z-axis.

- To switch the Z-axis mode to Follow, press the HOME button on the high-bright main monitor to enter the menu and select Stabilizer, Gimbal Settings, Z-Axis Mode, and Follow.
- When the Z-axis needs to be balanced, the red 🔔 or orange 🔔 icon will appear on the screen. Tap to display the on-screen balancing guide and turn the adjustment knob ③ accordingly.
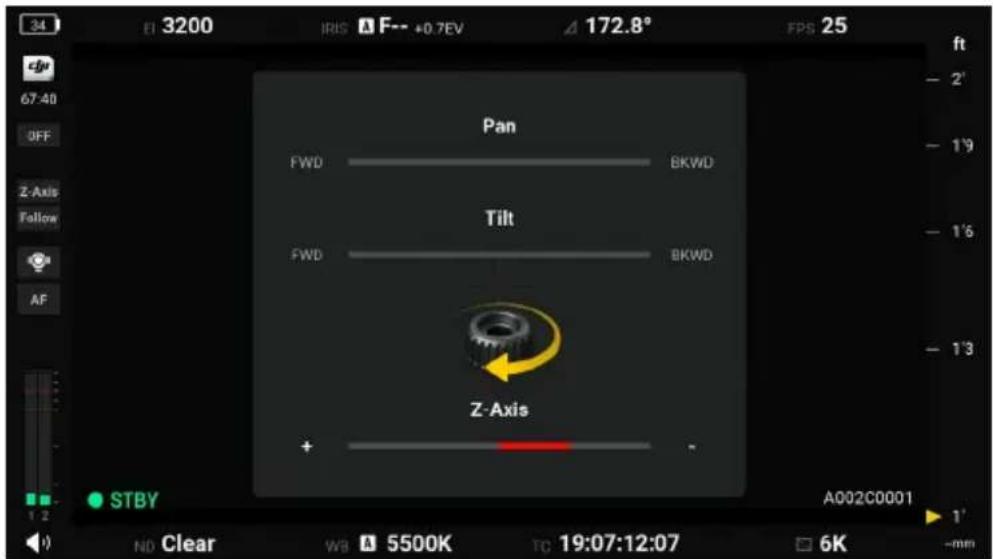
- The Z-axis is balanced if there are no red bars or arrows displayed on the screen.
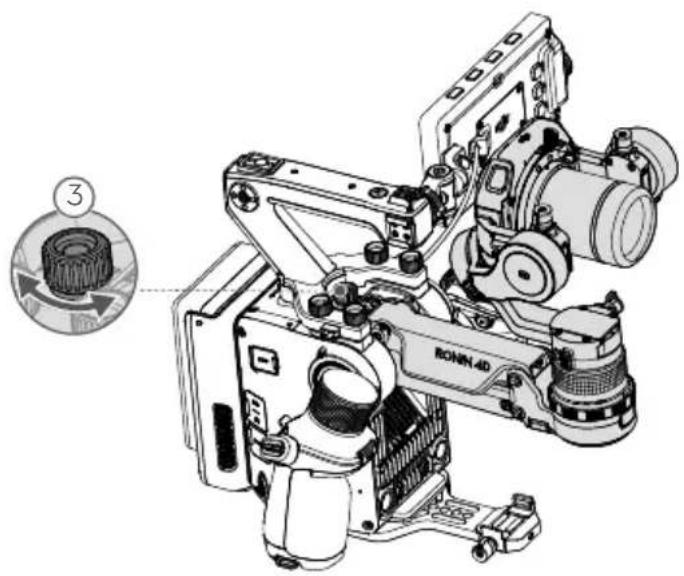

- Keep Ronin 4D horizontal and steady during balancing.
- The Z-axis cannot be balanced when Ronin 4D is upside down.
DJI Zenmuse X9 Gimbal and Camera

- Camera
- Lens Mount
Attach the lens after removing the lens cap.
- X9 Focus Motor Port
For connecting the X9 Focus Motor and Ronin 4D using the DJI LiDAR range finder/X9 focus motor cable.
- Tilt Motor
For controlling the tilt axis.
- Tilt Lock
For locking the tilt axis. The tilt axis can be locked at two angles for balancing and storage.
- Roll Motor
For controlling the roll axis.
- Pan Motor For controlling the pan axis.
- Gimbal Connector
- Gimbal Release Button
Press the release button to remove the gimbal.
10.PanLock
For locking the pan axis.
11.RollLock
For locking the roll axis. The roll axis can be locked at two angles for balancing and storage.
- LiDAR Range Finder Port
For connecting the LiDAR Range Finder and the gimbal using the DJI LiDAR range finder/X9 focus motor cable.
Gimbal
Gimbal Mode
The gimbal modes include Lock, Pan Follow, Pan and Tilt Follow, FPV, and Custom modes.
Lock Mode: The gimbal will not follow the movement of the main body.
Pan Follow: Only the pan axis follows the movement of the main body.
Pan and Tilt Follow: Both the pan and tilt axes follow the movement of the main body.
FPV: All three axes follow the movement of the main body.
Custom Mode: Any axis follow can be enabled or disabled.
Select the gimbal mode via the GIMBAL MODE toggle or go to high-bright main monitor menu and select Stabilizer, Gimbal Settings, and Gimbal Mode. When not using ActiveTrack, press and hold the trigger of the left hand grip to enter Lock mode.
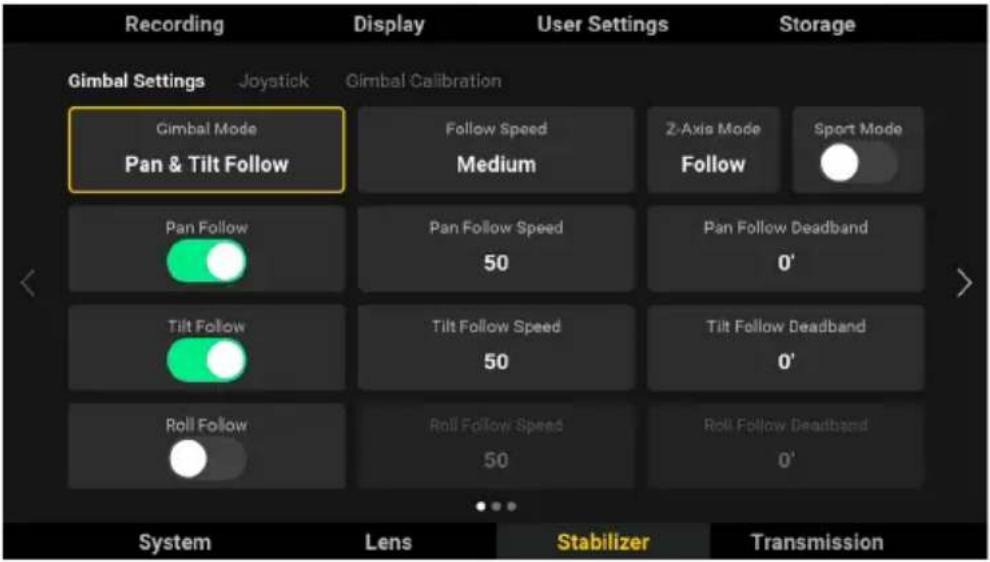
In Follow mode, press and hold the M button of the left hand grip or the top handle to enter Sport Mode. In Sport Mode, the follow speed of the gimbal increases greatly. It is suitable for shooting in scenarios where subjects move suddenly and at fast speeds. Release the M button to exit Sport Mode.
Sport mode can also be entered or exited by pressing the M button on the left hand grip or top handle twice. After entering Sport mode by pressing the M button twice, press and hold the M button to switch to follow mode and release to return to Sport mode.
Controlling the Gimbal
Push the left hand grip joystick or the top handle tilt slider up or down to control the tilt axis by default. Push the left hand grip joystick up or down to control the pan axis by default.
The control settings can be changed in the high-bright main monitor menu by selecting Stabilizer and then Joystick.

To control the pan and tilt axis manually, enter the high-bright main monitor menu, select Stabilizer, and then Gimbal Calibration to enable Push Pan/Tilt.

Attaching and Detaching the Gimbal
The gimbal is attached to the main body by default. To detach the gimbal, loosen the gimbal ring ① and press the release button ② while rotating the gimbal counter-clockwise ③.

To attach the gimbal, align the red marks of the gimbal and the gimbal connector ①, insert the gimbal, and rotate the gimbal clockwise ②. Tighten the gimbal ring ③ after there is a clicking sound, which indicates the gimbal is locked.


- Refer to the Stabilizer section for more information on the gimbal settings.
- Do not detach the gimbal and camera unless necessary. The X9 gimbal and camera do not support hot-swapping. Make sure to power off the Ronin 4D before attaching or detaching the gimbal and camera. Make sure the gimbal and camera is mounted firmly.
Camera
The X9 has 14+ stops of dynamic range while the X9-6K camera supports recording at up to 6K/60fps video and dual native ISO of 800/4000 and the X9-8K camera supports up to 8K/75fps and 800/5000. The high-quality built-in 9-stop ND filters (ND 2 to ND 512, or ND 0.3 to ND 2.7) can be quickly and easily switched thanks to the internal motorized system.
X9-6K Recording Specifications
DCI 17:9 DCI 2.39:1
| Codec Resolution Image Area Sensor FPS (MB/s) | ||||||||||||||||
| 23.976 | 24 | 25 | 29.97 | 30 | 48 | 50 | 59.94 | 60 | 72 | 75 | 96 | 100 | 120 | |||
| ProRes RAW | 6K | Full Frame | 218 | 218 | 227 | 272 | 272 | 436 | 360 | 432 | 432 | - - | - - | - | ||
| 4K | Super 35 | 101 | 101 | 105 | 127 | 127 | 203 | 211 | 253 | 253 | 304 | - | 405 | 384 | 401 | |
| ProRes 422HQ | 6K | Full Frame | 193 | 193 | 201 | 242 | 242 | 387 | 320 | 384 | 384 | - - | - - | - | ||
| 4K | Full Frame | 90 | 90 | 94 | 112 | 112 | 180 | 149 | 178 | 178 | - - | - - | - | |||
| Super 35 90 | 90 94 112 | 112 180 | 188 225 | 225 225 | 270 | - | 360 | 297 | 356 | |||||||
| 2K | Full Frame 24 | 24 25 30 | 30 48 | 50 60 | 60 72 | - | 96 | 100 | 120 | |||||||
| Super 35 24 | 24 25 30 | 30 48 | 50 60 | 60 72 | - | 96 | - | - | ||||||||
| H.264 | 4K | Full Frame 18 | 18 18 18 | 18 25 | 25 25 25 | - - | - - | - | ||||||||
| Super 35 18 | 18 18 18 | 18 25 | 25 125 | 25 36 | - | 36 | 36 | 36 | ||||||||
| 2K | Full Frame 7 | 7 7 7 7 11 | 11 11 | 11 18 | - | 18 | 18 | 18 | ||||||||
| Super 35 7 7 | 7 7 | 7 11 11 | 11 11 | 18 | - | 18 | - | - | ||||||||
X9-6K EI Grayscale
X9-6K Sensor Resolution
Apple ProRes RAW Full Frame 6K 17:9 - 6008×3168 Apple ProRes RAW Full Frame 6K 2.39:1 - 6008×2512 Apple ProRes RAW Super 35 4K 17:9 - 4096×2160 Apple ProRes RAW Super 35 4K 2.39:1 - 4096×1712 Apple ProRes 422 HQ Full Frame 6K 17:9 - 6008×3168 Apple ProRes 422 HQ Full Frame 6K 2.39:1 - 6008×2512 Apple ProRes 422 HQ Full Frame 4K 17:9 - 4096×2160 Apple ProRes 422 HQ Full Frame 4K 2.39:1 - 4096×1712 Apple ProRes 422 HQ Full Frame 2K 17:9 - 2048×1080
Apple ProRes 422 HQ Super 35 4K 17:9 - 4096×2160
Apple ProRes 422 HQ Super 35 4K 2.39:1 - 4096×1712
Apple ProRes 422 HQ Super 35 2K 17:9 - 2048×1080
H.264 Full Frame 4K 17:9 - 4096×2160
H.264 Full Frame 4K 2.39:1 - 4096×1712
H.264 Full Frame 2K 17:9 - 2048×1080
H.264 Super 35 4K 17:9 - 4096×2160
H.264 Super 35 4K 2.39:1 - 4096×1712
H.264 Super 35 2K 17:9 - 2048×1080
X9-6K Sensor Size
Apple ProRes RAW Full Frame 6K 17:9 - 35.68×18.82 mm
Apple ProRes RAW Full Frame 6K 2.39:1 - 35.68×14.92 mm
Apple ProRes RAW Super 35 4K 17:9 - 24.33×12.83 mm
Apple ProRes RAW Super 35 4K 2.39:1 - 24.33×10.17 mm
Apple ProRes 422 HQ Full Frame 6K 17:9 - 35.68×18.82 mm
Apple ProRes 422 HQ Full Frame 6K 2.39:1 - 35.68×14.92 mm
Apple ProRes 422 HQ Full Frame 4K 17:9 - 35.68×18.82 mm
Apple ProRes 422 HQ Full Frame 4K 2.39:1 - 35.68×14.92 mm
Apple ProRes 422 HQ Full Frame 2K 17:9 - 35.68×18.82 mm
Apple ProRes 422 HQ Super 35 4K 17:9 - 24.33×12.83 mm
Apple ProRes 422 HQ Super 35 4K 2.39:1 - 24.33×10.17 mm
Apple ProRes 422 HQ Super 35 2K 2.39:1 - 24.33×12.83 mm
H.264 Full Frame 4K 17:9 - 35.68×18.82 mm
H.264 Full Frame 4K 2.39:1 - 35.68×14.92 mm
H.264 Full Frame 2K 17:9 - 35.68×18.82 mm
H.264 Super 35 4K 17:9 - 24.33×12.83 mm
H.264 Super 35 4K 2.39:1 - 24.33×10.17 mm
H.264 Super 35 2K 17:9 - 24.33×12.83 mm
X9-8K Recording Specifications
DCI 17:9 DCI 2.39:1
| Codec Resolution | Image Area | Sensor FPS (MB/s) | ||||||||||||||
| 23.976 | 24 | 25 | 29.97 | 30 | 48 | 50 | 59.94 | 60 | 72 | 75 | 96 | 100 | 120 | |||
| ProRes RAW | 8K | Full Frame | 405 | 405 | 422 | 253 | 253 | 405 | 422 | 506 | 506 | 482 | 502 | -- | - | |
| 5.5K Super 35 | 188 188 | 196 235 | 235 377 | 392 | 235 235 | -- | -- | - | ||||||||
| ProRes 422HQ | 8K Full Frame | 360 360 | 375 450 | 450 | -- | -- | -- | -- | ||||||||
| 4K | Full Frame | 90 90 | 94 112 | 112 | 180 188 | 225 225 | -- | -- | - | |||||||
| Super 35 | 90 | 94 112 | 112 | 180 188 | 225 225 | -- | -- | - | ||||||||
| H.264 4K | Full Frame | 18 | 18 | 18 | 25 | 25 | 25 | -- | -- | - | ||||||
| Super 35 | 18 | 18 | 18 | 25 | 25 | 25 | -- | -- | - | |||||||
X9-8K El Grayscale
X9-8K Sensor Resolution
Apple ProRes RAW Full Frame 8K 17:9 - 8192×4320 Apple ProRes RAW Full Frame 8K 2.39:1 - 8192×3424 Apple ProRes RAW Super 35 5.5K 17:9 - 5576×2952 Apple ProRes 422 HQ Full Frame 8K 17:9 - 8192×4320 Apple ProRes 422 HQ Full Frame 4K 17:9 - 4096×2160 Apple ProRes 422 HQ Super 35 4K 17:9 - 4096×2160 H.264 Full Frame 4K 17:9 - 4096×2160 H.264 Super 35 4K 17:9 - 4096×2160
X9-8K Sensor Size
Apple ProRes RAW Full Frame 8K 17:9 - 36×19 mm Apple ProRes RAW Full Frame 8K 2.39:1 - 36×15.06 mm Apple ProRes RAW Super 35 5.5K 17:9 - 24.5×12.98 mm
Apple ProRes 422 HQ Full Frame 8K 17:9 - 36×19 mm
Apple ProRes 422 HQ Full Frame 4K 17:9 - 36×19 mm
Apple ProRes 422 HQ Super 35 4K 17:9 - 24.5×12.98 mm
H.264 Full Frame 4K 17:9 - 36×19 mm
H.264 Super 35 4K 17:9 - 24.5×12.98 mm

Refer to the Recording section for more information on camera settings.
Z-Axis
1. Lock Knob
Loosen the lock knob before enabling the Z-axis.
2. Z-Axis Arm
3. Balance Adjustment Knob
Balance the Z-axis by turning the adjustment knob.

Usage
Make sure the payload of the Z-axis is within 2 kg, including the gimbal and camera, lens, counter weight, LiDAR range finder, and X9 Focus Motor. The Z-Axis is disabled by default. Power on Ronin 4D before enabling the Z-axis. Loosen the lock knob, press the Z-axis switch on the main body or press the right hand grip trigger twice to enable the Z-axis.

Make sure the Z-axis is balanced before usage. Refer to the Balancing the Z-Axis section for more information.
Operation Modes
The three operation modes of the Z-axis are Follow, Lock, and Car Mount mode. The operation mode can be set by selecting Stabilizer, Gimbal Settings, and Z-Axis Mode.
Follow Mode: The Z-axis follows the vertical movements of the main body and the arm always returns to the center position. It is recommended to use follow mode shooting scenes that involve running, going up and down steps, and other scenarios that involve large fluctuations in vertical movement.
Lock Mode: The Z-axis will not follow the main body movement within a ±6 cm range and remains at a certain level. It is recommended to use Lock mode when the camera needs to remain at a certain level during shooting.
Car Mount Mode: The Z-axis will follow the vertical movement of the main body while filtering high-frequency shake caused by cars or moving devices to obtain optimal stabilization. It is recommended to use Car Mount mode when attaching Ronin 4D to a device that will cause high frequency shake such as a car or cableway camera system.
When the Z-axis is in Follow or Lock mode, press the C2 button on the main body to switch between Follow and Lock mode. When the Z-axis is in Follow mode, press and hold the trigger of the right hand grip to enter Lock mode and release the trigger to exit Lock mode.
When the Z-axis is in follow mode, press and hold the M button of the left hand grip or top handle to enter Sport mode and release to exit. The Z-axis will remain in the center as much as possible. This mode is suitable for shooting scenes that require sudden movements with the main body.
Sport mode can also be entered or exited by pressing the M button on the left hand grip or top handle twice. After entering Sport mode by pressing the M button twice, press and hold the M button to switch to follow mode and release to return to Sport mode.
Main Body

1. Power Indicator
Glows solid white when Ronin 4D is powered on and blinks for three seconds before powering off. If the Lock button is in the locked position, Ronin 4D cannot be powered on when pressing the power button and the power indicator will blink three times before turning off.
2. Power Button
Press and hold for 1 second to power on. Press and hold for 3 seconds to power off.
3. Lock Button
To prevent accidental operation during transportation or shooting, toggle the Lock button to the right to disable Ronin 4D.
4. Record Button
Press once to start or stop recording. The button glows solid red during recording and is off when not recording.
5. Z-Axis Switch
Press once to enable or disable the Z-axis.
6. Battery Release Button
Press once and remove the battery.
7. Multi-Function Dial
Turn to adjust focus by default.
8. Gimbal Mode
Off: Sleep mode.
Follow: With PF, the pan axis will follow the movement of the main body. In PT, the pan and tilt axes will follow the movements of the main body. In FPV, the three axes follow the movements of the main body.
Lock: The gimbal will not follow the movement of the main body.
9. USB-C Port
Use to connect an external storage media or computer to activate Ronin 4D or update firmware. The port includes a single screw hole and can be connected with a USB-C cable with a single screw locking plug. It is recommended to connect an external storage media when using this type of cable.
10. Storage Media Compartment
Use to insert a CFexpress 2.0 Type B card or DJI PROSSD Mount.
11. CFE Indicator
Blinks fast when installing a CFexpress card, blinks slowly when recording, and remains off when not recording.
12. C1 & C2 Buttons
Press the C1 button to recenter the gimbal. Press the C2 button to switch between Follow and Lock mode of the Z-axis when the Z-Axis mode is set to Follow or Lock in the high-bright main monitor menu.
13. Left Built-in Microphone
For recording audio.
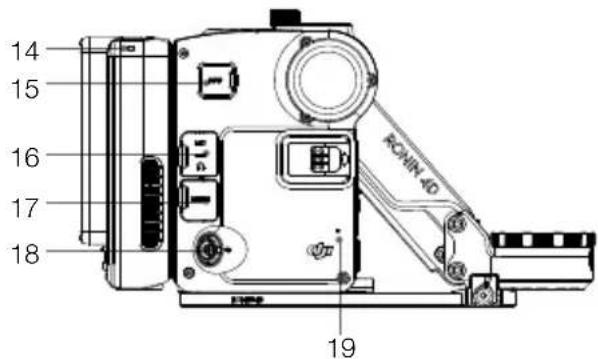
14. Tally Light
Glows solid red when recording and off when not in record.
15. Display Port
Used to connect the high-bright main monitor.
16. Audio Port
Includes a 3.5mm microphone port for microphone and line level input. There is 3V voltage bias when using a microphone and the line level input is lower than the microphone. Choose the appropriate input according to the device. The max line input is 10 dBu. The microphone port comes with a M6×P0.5 screw thread and supports a 3.5mm connector with screw lock.
The 3.5mm stereo headphone port can output audio when using playback or monitor audio during recording.
17. HDMI Port
A HDMI Type-A port that can be used for 1080p/60fps HDMI output.
18. DC-IN Port
A 6-pin 1B DC-IN power supply input port and has an input voltage of 12-30 V.
19. Right Built-In Microphone
For recording audio.
- Forward Dual-Vision Sensors
- Downward ToF Sensors
- Downward Dual-Vision Sensors

Hand Grips
Left Hand Grip
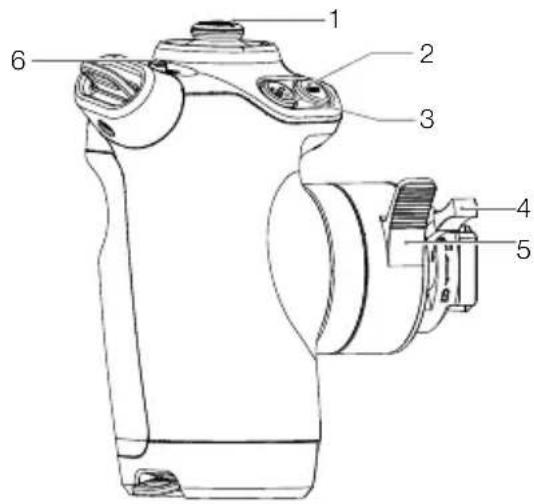

1. Joystick
Move the joystick left and right to pan the gimbal, and up and down to tilt the gimbal by default. To access joystick settings, go to the high-brightness main monitor and select Stabilizer, then Joystick.
2. Exposure Assist Button
Press to enable or disable the exposure display.
3. ActiveTrack Button
Press and hold for 1 second to enter or exit ActiveTrack. Press to confirm the subject after entering ActiveTrack.
4. Hand Grip Lock Lever
Used to lock the hand grip in place.
5. Hand Grip Angle Adjustment Lever
Press and hold the lever to adjust the angle of the hand grip. The hand grip will lock in place once the lever is released. Do not adjust the left and right hand grips simultaneously.
6. Joystick Lock
The gimbal will not respond to joystick operations when the joystick lock is in the locked position.
7. Trigger
Press twice to center the subject in the center of the camera view after enabling ActiveTrack. Press twice to recenter the gimbal when not in ActiveTrack.
Press and hold to start ActiveTrack when in Smart mode with a selected subject. When not in Smart mode, press and hold to switch between Follow and Lock mode.
8. M Button
Press and hold to enter Sport mode and release to exit Sport mode. Alternatively, press twice to enter or exit Sport mode.
9. Safety Lock
Release the safety lock before detaching the hand grip.
Right Hand Grip

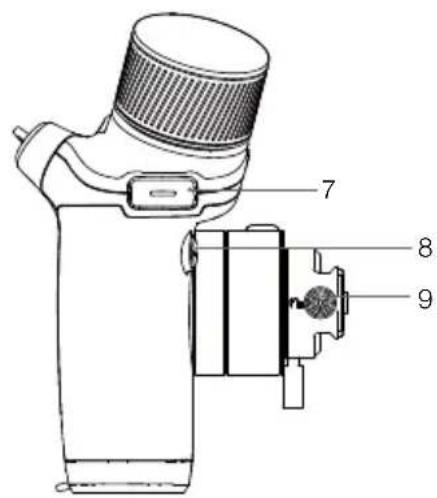
1. Dial
Turn to adjust focus, ND, EI, or aperture and to scroll through options on the high-bright main monitor. Turn the dial to control focus by default and press the mode button to scroll through the options. The dial uses continuous damping when controlling aperture and contact damping when controlling EI or ND.
2. Record Button
Press once to start or stop recording. The button glows solid red during recording and is off when not recording.
3. Hand Grip Angle Adjustment Lever
Press and hold the lever to adjust the angle of the hand grip. The hand grip will lock once the lever is released. Do not adjust the left and right hand grips simultaneously.
4. Hand Grip Lock Lever
Used to lock the hand grip.
5. Focus Peak Button
Press once to enable or disable the focus assist display.
6. Mode Button
Press once to switch the function of the dial from controlling focus, ND, EI, or aperture. Press and hold to switch to controlling focus.
7. Trigger
Press twice to enable or disable the Z-axis.
When Z-axis is enabled and in follow mode, press and hold to enter lock mode.
8. Focus Button
Press once to switch between manual focus and auto focus.
9. Safety Lock
Release the safety lock before detaching the hand grip.
Top Handle
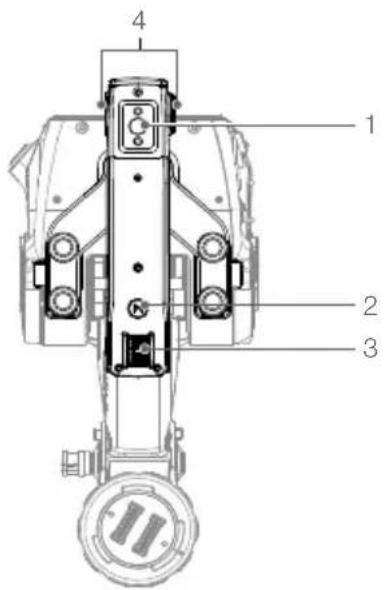
1. Top Screw Hole
3/8"-16 with a depth of 10 mm.
2. M Button
Press and hold to enter Sport mode. Release to exit from Sport mode. Alternatively, press twice to enter or exit Sport mode.
3. Tilt Slider
Used to control the tilt of the gimbal by default. To change the settings, enter the high-bright main monitor menu and select Stabilizer and then Joystick.
4. Side Screw Hole
1/4"-20 with a depth of 9 mm and a positioning hole. A screen protector is mounted on one of the side screw holes to protect the high-bright main monitor.
Attaching and Detaching the Top Handle
Loosen the four screws to detach the top handle. Align with the positioning hole and the pins before tightening the four screws when attaching the top handle.

High-Bright Main Monitor
Button and Port Features


Numbers 1 to 8 are buttons for adjusting parameters and the features are related to the onscreen menu. If the screen rotation feature is enabled and the onscreen display is turned upside down, the button features will change accordingly with the rotation of the onscreen display. The descriptions below use the default display as an example.
- EI Adjustment/Recording Settings Button
Press once to adjust EI in the liveview and enter Recording when on the menu screen.
- Aperture Adjustment/Display Settings Button
Press once to adjust Aperture in the liveview and enter Display when on the menu screen.
- Shutter Adjustment/User Settings Menu Button
Press once to adjust Shutter and press and hold to display the shutter settings in the liveview and enter User Settings when on the menu screen.
- Frame Rate Adjustment/Storage Settings Button
Press once to adjust Frame Rate in the liveview and enter Storage when on the menu screen.
- ND Filter Adjustment/System Settings Button
Press once to adjust the ND filter in the live view, or to enter System settings when on the menu screen.
- White Balance Adjustment/Lens Settings Button
Press once to adjust white balance, or press and hold to display white balance settings in the live view, or to enter Lens settings when on the menu screen.
- Time Code Settings/Stabilizer Settings Button
Press once to adjust time code, or press and hold to display time code settings in the live view, or to enter Stabilizer settings when on the menu screen.
- Resolution Settings/Transmission Settings Button
Press once to adjust resolution in the live view, or to enter Transmission settings when on the menu screen.
- Playback Button
Press once to access playback and play the last recorded video. Press and hold to enter or exit full screen.
- Dial
Rotate the dial to scroll through options, and press once to confirm.
11. Home Button
Press once to enter or exit the menu screen.
12. Tally Light
Glows solid red during recording and is off when not recording.
13. Focus Peak Button
Press once to enable or disable the focus assist display.
14. LUT Button
Press once to enable or disable the LUT display. The feature will take effect in the liveview or during recording. When the monitor LUT is set to non D-Log, press the button once to switch between D-Log and monitor LUT. When the monitor LUT is set to D-Log, press the button once to switch between D-Log and Rec.709.
15. EXP Button
Press once to enable or disable the exposure display.
16. Mounting Hole
The high-bright main monitor can be mounted in different positions through the mounting hole as shown.


Camera View

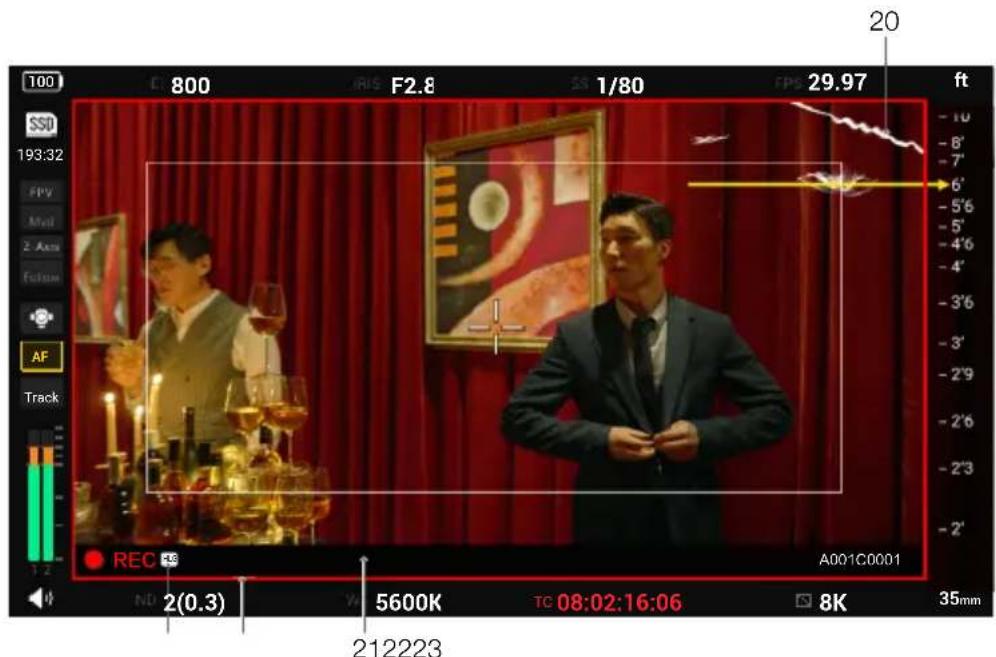
1. Battery Level
Displays the battery level (displays the voltage when using a DC power supply for Ronin 4D). The icon becomes red 10 when the battery level is lower than 10% . An exclamation mark will appear in the icon. Then the battery level is critically low. Charge the battery immediately.
2. El
Displays the EI. Tap or press the button above to access settings. The camera is in Low Gain mode when the EI is less than 4000 and High Gain mode when it is more than 4000. Use High Gain mode to obtain a purer dark noise performance when the lighting condition is not sufficient.
3. Iris
Displays the iris value. "F- -" will be displayed when the lens is not recognized. Tap the icon or the button above to access settings. The EV can be adjusted manually after enabling Auto. The setting range is -3 to +3. Metering will be based on the center area and the iris will be adjusted automatically. The iris will be adjusted prior to shutter speed when both the aperture and shutter speed or angle are set to auto.
4. Shutter Speed/Angle
Tap the icon or press the button above to adjust shutter speed or shutter angle. The EV can be adjusted manually after enabling Auto. The setting range is -3 to +3. Press and hold the icon or button for advanced settings. Tap Add to add custom shutter speed or angle to the list. The range of the shutter speed is 1/30 s to 1/8000 s and the range of the shutter angle is 11.2° to 358°. Tap Shutter Unit to select Angle or Speed. Tap Delete to delete the shutter speed or angle from the list. The current shutter speed or angle cannot be deleted.
The EV value will be adjusted automatically when switching between the shutter speed and angle.
The iris will be adjusted prior to shutter speed when both the iris and shutter speed or angle are set to auto.
5. Frame Rate
Displays the frame rate. Tap the icon or press the button above to set the frame rate. Once Slow is enabled, the project frame rate and sensor frame rate can be set separately. The camera will record in slow motion and the audio cannot be recorded when the sensor frame rate is double or more of the project frame rate.
Note that some frame rate changes will cause the image area and recording codec to change. The max project frame rate is 60fps. Slow must be enabled to shoot at a frame rate higher than 60fps.
Refer to the Frame Rate Setting table below to learn more.
√ 17:9 √ 2.39:1
| X9-8K Sensor FPS | ||||||||||||||||
| Codec | Resolution | Image Area | 23.976 | 24 | 25 | 29.97 | 30 | 48 | 50 | 59.94 | 60 | 72 | 75 | 96 | 100 | 120 |
| ProRes RAW | 8K | FF | √ | √ | √ | √ | √ | √ | √ | √ | √ | √ | √ | |||
| 5.5K | S35 | √ | √ | √ | √ | √ | √ | √ | √ | √ | ||||||
| ProRes 422HQ | 8K | FF | √ | √ | √ | √ | √ | |||||||||
| 4K | FF | √ | √ | √ | √ | √ | √ | √ | √ | √ | ||||||
| S35 | √ | √ | √ | √ | √ | √ | √ | √ | √ | |||||||
| H.264 | 4K | FF | √ | √ | √ | √ | √ | √ | √ | √ | √ | |||||
| S35 | √ | √ | √ | √ | √ | √ | √ | √ | √ | |||||||
| X9-6K Sensor FPS | ||||||||||||||||
| ProRes RAW | 6K | FF | √ | √ | √ | √ | √ | √ | √ | √ | √ | |||||
| 4K | S35 | √ | √ | √ | √ | √ | √ | √ | √ | √ | √ | √ | √ | √ | ||
| ProRes 422HQ | 6K | FF | √ | √ | √ | √ | √ | √ | √ | √ | √ | |||||
| 4K | FF | √ | √ | √ | √ | √ | √ | √ | √ | √ | ||||||
| S35 | √ | √ | √ | √ | √ | √ | √ | √ | √ | √ | √ | √ | √ | |||
| 2K | FF | √ | √ | √ | √ | √ | √ | √ | √ | √ | √ | √ | √ | √ | ||
| S35 | √ | √ | √ | √ | √ | √ | √ | √ | √ | √ | √ | |||||
| H.264 | 4K | FF | √ | √ | √ | √ | √ | √ | √ | √ | √ | |||||
| S35 | √ | √ | √ | √ | √ | √ | √ | √ | √ | √ | √ | √ | √ | |||
| 2K | FF | √ | √ | √ | √ | √ | √ | √ | √ | √ | √ | √ | √ | √ | ||
6. MF Readings
The MF readings will be displayed when using a DL lens or after other lens has been calibrated. The MF readings will move up and down along with the focal position. The yellow triangle indicates the current focal position. In MF (Manual Focus) or AMF (Automated Manual Focus) mode, turn the multi dial on the main body or the dial of the right hand grip to control the focus manually. The minimum focus distance of Ronin 4D is 1 foot (approx. 0.3 m). Select Lens, Focus, and Unit in the high-bright
main monitor menu to set to an imperial or metric unit.
Depth of field within the yellow dash line can be displayed on MF readings and LiDAR waveform when the aperture has been read.
7. Current Reel Information
Display the reel information of the latest footage.
8. Resolution
Tap to select the resolution. Note that some resolution changes will cause the image area and recording codec to change. Refer to the Frame Rate Setting table for more information.
9. Timecode/Clip Duration
Tap to switch between displaying the timecode and clip duration. The timecode display format is "hour: minute: second: non-drop frame" or "hour: minute: second; drop frame". The clip duration display format is "hour: minute: second. centisecond". The timecode and clip duration are displayed in red while recording. Tap and hold the icon or press and hold the button below to enter advanced settings.
Run Mode
The Run mode can be set to Free Run or REC Run. When set to Free Run, the time code will add one frame for every frame the sensor generates regardless of whether the camera is recording or not. When the project frame rate is different from the sensor frame rate, the camera will automatically switch to REC Run as the time code frame rate cannot match the sensor frame rate. When set to REC Run, the time code will only add one frame for every frame generated by the sensor during recording and the time code will be continuous throughout all recorded footage.
Mode
Mode can be set to Regen, Preset, or Jam Synced. Regen can only be selected in REC Run mode. The timecode will continue on from the time code of the last frame to ensure the timecode follows the footage continuously. Preset can be selected in both run modes. In Preset mode, tap TC settings or Reset TC to customize the initial value. Jam Synced can only be selected in Free Run mode and requires an SN external timecode synchronizer and the DJI Ronin 4D Expansion Plate (NDI/XLR/TC).
Count Mode
Count mode can be set to Drop Frame or Non-Drop Frame. In Drop Frame mode, the timecode will skip the first two frames of each minute except every 10th minute. The Drop Frame will be used when the project frame rate is 29.97fps or a multiple of 29.97fps. In Non-Drop Frame mode, the timecode will count every frame the sensor generates.
TC Settings and Reset TC
The timecode can be customized and is only available in Preset mode.
10. Center Marker
The Center Marker can be set to Off, Small, or Large by entering the menu and selecting Display, Monitor, and Center Marker.
11. White Balance
Tap or press the button to set the color temperature. The color temperature can help to analyze white color and other colors. The default color temperature list includes 3200K, 4000K, 5600K, and 6500K. Tap and hold to access advanced settings. Tap Add to set the color temperature and color cast. The color temperature can be set from 2000K to 11000K. The higher the value, the warmer the color, and vice versa. The color cast can be set from -99 to +99. The positive number is magenta gain and the negative number is green gain. Tap Add to List to add the color temperature
to the list. Ronin 4D can support up to 10 preset color temperatures.
Measure WB: Tap Measure WB. The camera will measure the color temperature of the current environment. To obtain an accurate color temperature, point the camera to a neutral single color surface such as a white or gray wall and focus. Tap Confirm to add the measured color temperature to the list.

12. ND Settings
Tap to select ND filter. The ND values are listed below: 2(0.3), 4(0.6), 8(0.9), 16(1.2), 32(1.5), 64(1.8), 128(2.1), 256(2.4), 512(2.7).
13. Camera Status
Displays the camera status as standby, recording, or camera busy. Recording can start when the camera status is standby. The camera cannot record if there is no icon displayed.
14. Audio Volume
Displays the real-time input audio volume level. Tap to enter settings. Channel gain and monitor headphone volume can be adjusted by moving the slider. CH1 is the audio channel of the left microphone of the main body and CH2 is the audio channel of the right microphone of the main body. Tap the lock icon and it will turn yellow. This indicates the gain of the two audio channels can be adjusted simultaneously while the margin stays the same.
15. ActiveTrack Button
The ActiveTrack button is displayed when ROI mode is set to Smart. Tap to enable ActiveTrack. Refer to the ActiveTrack Pro section for more information.
16. AF/MF Button
The default focus mode is MF (Manual Focus). Tap to switch to AF (Auto Focus) and the icon becomes yellow. In AF mode, go to the menu and select Lens and then Focus to switch to AF or AMF. Auto focus is only available when Ronin 4D is used with the LiDAR range finder.
17. Gimbal Balance Detection
| Icon | Description |
 | Indicates Ronin 4D requires auto tune such as when using for the first time or after resetting gimbal parameters. Tap the icon to enter auto tune. |
 | The icon is white when the gimbal is properly balanced and can work normally. |
| The icon is orange if the gimbal is not balanced properly. It is recommended to rebalance the gimbal. | |
| The icon is red when the gimbal is severely unbalanced and cannot work normally. The gimbal must be rebalanced. | |
| The icon appears with a yellow exclamation mark when the gimbal axes are locked. Tap the icon and follow the instructions on screen to operate. | |
| The icon appears orange when the Z-axis is slightly unbalanced. It is recommended to rebalance the Z-axis in this scenario. | |
| The icon appears red when the Z-axis is severely unbalanced and cannot work normally. The Z-axis must be rebalanced in this scenario. |
18. Gimbal Mode/Speed
Displays the gimbal mode, gimbal speed, and the Z-Axis mode. Refer to the table below for more information.
| Gmibal Mode Gimbal Speed Z-Axis Mode | |||||
| Lock | Lock Mode | Fast | Fast | Follow | Follow Mode |
| PF | Pan Follow | Med | Medium | Lock | Lock Mode |
| PT | Pan and Tilt Follow | Slow | Slow | Car | Car Mount Mode |
| FPV | Pan, Tilt, and Roll Follow | Cust | Custom | Sport | Sport Mode |
| Sport | Sport Mode | ||||
19. Storage Media Remaining Time
Displays the remaining recording time of the selected storage media. To select storage media, go to menu and select Recording, Video, and Storage.
| Icon | Description |
| 00:00 | The storage icon and remaining recording time are in red when the storage is full. |
| 13:32 | The storage icon is white and the remaining recording time is red when the storage is insufficient. |
| 53:32 | The storage icon is white and the remaining time is yellow when the storage is almost insufficient. |
| No storage media | |
| Abnormal status detected | |
| Loading |
20. LiDAR Waveform
Go to the menu and select Display, Focus Assistant, and LiDAR Waveform to enable LiDAR Waveform. Alternatively, assign the PEAK Button Function to LiDAR Waveform. Refer to the Focus Assistant section for more information.
The LiDAR range finder uses laser focusing and can cast up to 43,200 ranging points. All the ranging points information will be displayed in LiDAR waveform from the top view.
The yellow line indicates the current focus point when the focus mode is set to AF or MF. The yellow line indicates the current focus point and the green line indicates the auto focus when the focus mode is set to AMF. The green zone of the LiDAR Waveform indicates the selected focus zone.
21. Frame Guide
The frame guide ratio can be set in the menu. Select Display, Monitor, and Frame Guide. The frame guide can be customized and the frame guide transparency can be adjusted. The frame guide will only be displayed in the liveview of the monitor and will not appear in the actual recording.
22. Recording Red Frame
The red frame will only appear during recording.
23. LUT Icon
The LUT icon will appear when the Rec LUT is set to non-D-Log. The LUT will affect the actual recording.
Menu and Functions
Press the HOME button to enter the menu.
Recording
The recording menu consists of the three sub menus of Video, Audio, and Settings.
Video

Image Area
The image area can be set to Full Frame or Super 35. The sensor size is shown below.
8K: Full Frame 36×19 mm; Super 35 24.5×13 mm
6K: Full Frame 35.7×18.8 mm; Super 35 24.3×12.8 mm
X9-6K
Full Frame
17:9
6K/4K/2K
2.39:1
6K/4K
Super 35
17:9
4K
2.39:1
4K

X9-8K
Full Frame
17:9
8K/4K
2.39:1
8K
Super 35
17:9
5.5K/4K
Recording Codec/Resolution/Sensor FPS
Refer to the Frame Rate Setting table for more information.
Storage
Storage can be selected when the DJI PROSSD 1TB or CFexpress card and USB-C SSD is used.
Rec LUT
Tap to choose from Rec.709, D-Log, HLG, or LOOK. LOOK is the custom LUT from the user. Refer to LOOK section for more information. The Rec LUT will apply to the recorded footage. The monitor LUT and recording LUT can be set independently. The monitor LUT will not affect the recorded footage. Select Display, Monitor, and then Monitor LUT to set the Monitor LUT.
Camera Index
Tap to set the camera index, which can be set from A to Z. The camera index will be included in the footage name and the camera name when using Broadcast mode.
Next Reel Count
Tap to set the reel index of the next storage media. The setting range is 1 to 999 and the reel index will be included in the name of the footage.
In the following scenarios, the camera will recognize the storage media as a new storage. The current reel index will be used in the next reel count when the recording begins and continue from the previous reel count.
- The selected storage did not record anything in this camera using this camera index.
- The selected storage is empty after formatting.
Clip
Displays the last recorded clip number with the camera using the current camera index. The clip number range is 0000 to 9999 and cannot be set.
The folder name of the footage consists of the reel index, clip number, and the suffix of Ronin 4D serial number. The filename of the footage consists of the camera index, reel index, clip number, date, and the suffix of Ronin 4D serial number. The filename B021C0001_BD13 is used as an example to explain below.
![graph TD A["B021 C0001_21 1212_ BD13.MOV"] --> B["Camera Index"] A --> C["Reel Index"] A --> D["Clip Number"] A --> E["Year"] A --> F["Date"] A --> G["Month"] A --> H["Ronin 4D SN"]](/content/2026/06/1387805/images/79eac4ed2f8b100bd172507fbf670ff8938c46fb7b0f04a94a597fd4b258522e.jpg)
If the recording exceeds 3 hours, the footage will be stored as a new file and the name of the file will be the following clip number.
Audio

Tap Audio to set the CH1/CH2 Source, Gain, and check the real-time volume.
CH1/CH2 Source: Supports Main Mic L/R (main body left and right microphone), 3.5 Mic L/R (main body 3.5mm microphone port input), and 3.5 Line L/R (main body 3.5 microphone port line level input). Note that Main Mic L, 3.5 Mic L, and 3.5 Line L cannot be selected simultaneously and the Main Mic R, 3.5 Mic R, and 3.5 Line R cannot be selected simultaneously, and only one of 3.5 Mic and 3.5 Line can be selected simultaneously. Source inputs that cannot be selected will be displayed in grey. These source inputs can still be selected, but if so then the originally selected source will be replaced.
CH1/CH2 Gain: The setting range is -50 dB to +24 dB and the default value is 0. The volume will appear in the yellow or red zone when there is sound distortion and the gain needs to be reduced.
Real-Time Volume: Displays the volume of the audio source. The volume is green when the volume of the sound source is safe, yellow when it is close to distortion, and red when it is distorted. The unit of volume is dBFS.
Settings

Image Sharpness and Noise Reduction can be set when recording at Full Frame/Super 35 Apple ProRes 422 HQ and H. 264 and cannot be set when recording at Apple ProRes RAW.
Image Sharpness: The default setting is 0 and can be set from -2 to 2. Image Sharpness will affect the definition of the footage.
Noise Reduction: The default setting is 0 and can be set from -2 to 2. Noise Reduction can reduce the majority of noise in dark areas of the footage while retaining the texture and detail of the image.
It is recommended to set the Image Sharpness and Noise Reduction to 0 for optimal image quality. The Image Sharpness and Noise Reduction are disabled when the value is set to -2.
Rec Sound Alert: After enabling Rec Sound Alert, the alert will sound when starting or stopping recording and the sound will be included in the actual recording.
Tally Light: After enabling the tally light, the recording indicator glows solid red during recording.
Display
Tap to set exposure assistant, focus assistant, monitor, and LOOK settings.
Exposure Assistant

Tap to set the exposure assistant. Users can choose from Zebra Stripes, Waveform, and False Color, but they cannot be selected simultaneously.
The exposure assistant will perform metering based on the LUT of the main monitor. When using D-Log, metering will be based on D-Log.
Zebra Stripes: The area will be displayed in zebra stripes if the exposure exceeds the set level. The zebra level can be set from 50% to 100%, with a default setting of 50%.

Zebra Stripes Effect Image
Waveform: Indicates the luminance relation of the image using a waveform. The left to right of the waveform corresponds to the image from left to right. The brightness will be shown as a waveform. The waveform is divided into four grids. The top indicates overexposure, and the bottom indicates pure darkness. The waveform size can be set to 1/3 or 1/4 of the viewfinder. The waveform is not transparent and cannot be moved.
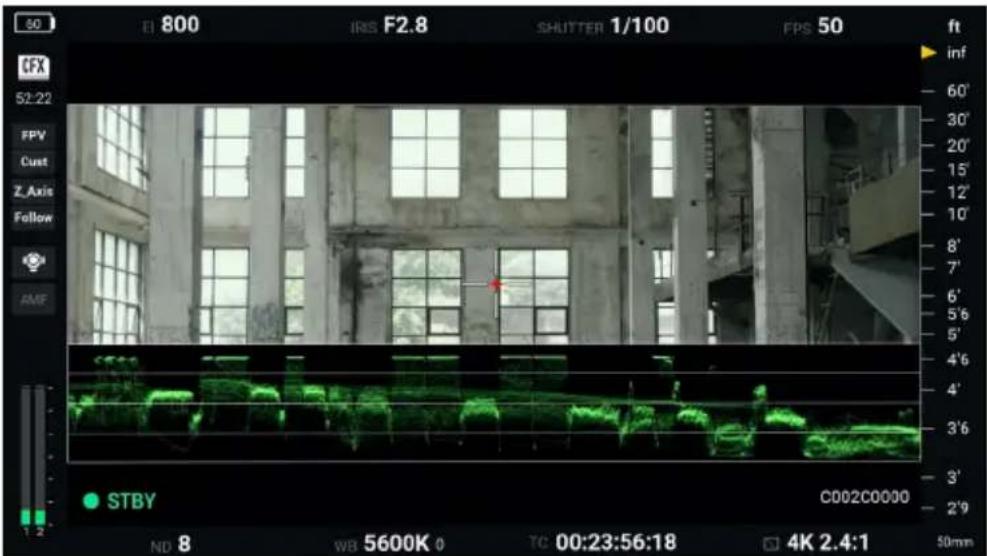
Waveform Effect Image
False Color: False color will overlap the image to indicate the exposure value. For example, magenta indicates the best exposure for light skin color, and green indicates the best exposure for dark skin color. Check the pink or green to obtain consistent skin color when recording people. The color changes from yellow to red to indicate that the image is overexposed. Refer to the False Color Table for more information.

False Color Effect Image
False Color Table

| 0-3.5% Purple 52%-56% Magenta | |
| 3.5-5% Blue 97%-99% Yellow | |
| 38%-42% Green 99%-100% Red |
Press the exposure assistant button on the left hand grip or the high-bright main monitor to enable or disable the exposure assistant feature.
Focus Assistant

The function of the PEAK button is set to Focus Peaking by default and can be switched to LiDAR Waveform and Focus Magnify (2x and 4x).
After enabling focus peaking, the focus area will be shown in sharp focus but will not affect the recording footage. Peaking mode can be set to Color or Aperture, Peaking Color can be set to red, green, or blue, and the peaking level can be set to high, medium, or low.
After enabling LiDAR Waveform, the measurement distance information within the focus area will be shown as the top view in the high-bright main monitor screen.
Press the PEAK button on the right hand grip or the high-bright main monitor to enable or disable focus assistant. When the function of the PEAK button is set to Focus Mag, it is used to magnify the focus area. When it is set to LiDAR Waveform, the PEAK button is used to enable or disable LiDAR Waveform. LiDAR Waveform cannot be used when recording in certain resolutions. Peaking Focus, Focus Mag, and LiDAR Waveform can be enabled simultaneously.
Monitor
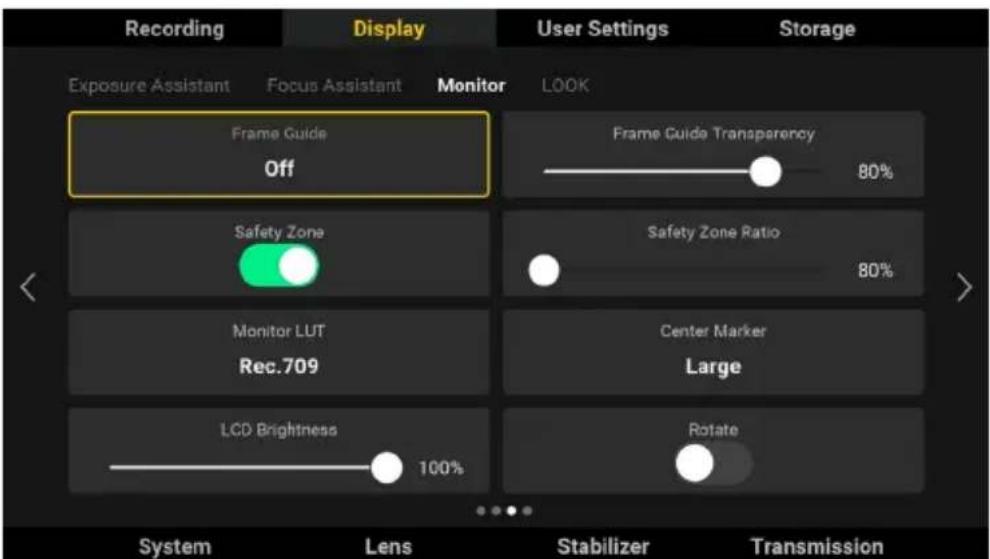
Tap to set the Frame Guide, Frame Guide Transparency, Safety Zone, Safety Ratio, Monitor LUT, Center Marker, LCD Brightness, and Rotate in the Monitor.
Frame Guide: The Frame Guide can be enabled or disabled in the liveview and the settings will not affect the recorded footage. The Frame Guide is only used to monitor the liveview and adjust the frame. The Frame Guide consists of different aspect ratios which can be adapted to film and television standards. The default frame guide includes: 16:9, 17:9, 2.35:1, 2.39:1. Tap Manage to edit the frame guide list. Frame guides can be customized. Tap Add, input the frame guide, and tap Add to List.
Frame Guide Transparency: Slide the bar to adjust the transparency of the frame guide. The range is from 0 to 100%, ranging from pure dark to transparent.
Safety Zone: The safety zone is enabled by default. The safety zone is helpful when adjusting the frame, allowing users to reserve space for added information such as captions or icons.
Safety Zone Ratio: Indicates the ratio of the frame guide and can be set from 80% to 100% by adjusting the slider. The default ratio is 80% and the step value is 1%. The safety zone is the same as the frame guide when the safety zone ratio is set to 100%.
Monitor LUT: Tap to set the monitor LUT. Monitor LUT can only affect the main monitor and the HDMI output of the main body. Set Recording LUT for LUT of recorded video. LUT color includes Rec.709, HLG, D-Log, and LOOK. Refer to the LOOK section for more information.
Center Marker: Indicates the center position of the liveview. The Center Marker is set to off by default and can be switched to Small or Large.
LCD Brightness: Tap to adjust the brightness of the main monitor.
Rotate: Tap Rotate to turn the display upside down. Note that the button features will change according to the rotation.
LOOK

Supports custom LUT. Tap LOOK to select and manage a LUT. Ronin 4D has the following preset LUTs:
HLG: A large dynamic range and accurate bright and dark levels can be shown when displaying an HLG video on an HDR device that is compatible with the HLG standard.
Rec.709: Color standard that is compatible with high definition TV and used for standard broadcast monitors.
D-Log: Designed for cinematic imaging and providing 15 stops of dynamic range. Preserve the details of dark and bright areas even in challenging environments. The X9-6K/8K supports up to 14 stops of dynamic range. The most amount of color can be preserved when using D-Log and recording at ProRes 422 HQ.
LOOK: Supports custom LUT from user. The custom LUT will be applied when LOOK is selected.
Import Custom LUT
Copy the 33 point 3D LUT file name with .CUBE to the root directory of the storage and attach the storage to the main body. Only use letters or numbers to name the LUT file and do not use special characters or a space. Make sure the storage has been formatted before saving the custom LUT.
Enter LUT File Settings to view the LUT file for adding or deleting the LUT file. To delete a LUT file, select the file, tap delete, and then cancel to check the updated list. To add a LUT file, select import and select the LUT file.
Ronin 4D supports up to 16 LUT files for read and display. Tap Exit to exit LUT file settings. The LUT file has been imported to LOOK list. View the LUT file by tapping Display, Monitor, and then Monitor LUT. Press the LUT button on the main monitor to enable or disable LUT display.
Record LUT can be set by tapping Recording and Rec LUT.
User Settings

Tap to view and manage the user profile. Only use letters, numbers, or underline to name the profile. Do not use special characters or a space.
Tap User Profile Settings to import, export, overwrite, add, or delete user profile.
The user profile contains the camera parameters, gimbal parameters, and lens calibration information.
After setting up the camera parameters and gimbal parameters, tap User Profile Settings to manage the user profile.
Import: Tap import and Ronin 4D will read the user profile in the storage. Select the profile and tap import to add to list.

Export: Tap Export. Ronin 4D will export the camera parameters, gimbal parameters, and lens calibration information to a user profile and store to the storage device.

Exit: Tap to exit user profile settings.
Overwrite: Tap to overwrite the user profile using the current camera parameters, gimbal parameters, and lens information.
Add: Tap and input the user profile name and tap Confirm to save the file to list. Only use letters, numbers, or underline to name the profile. Do not use special characters or a space.
Delete: Tap to delete the user profile.
Storage

Displays the remaining capacity and recording time of the storage device. Format the storage by tapping Format.
Press and hold the button to finish formatting after confirming in the prompts.


- Make sure all footage is backed up before formatting.
- DJI PROSSD 1TB can only be formatted when connected to Ronin 4D. Do not disconnect the DJI PROSSD 1TB from Ronin 4D or power off Ronin 4D during formatting.
- Without the DJI PROSSD Mount, the DJI PROSSD 1TB can only be used as a low speed storage card.
- Do not disconnect the storage media during recording.
Recording Format of the Storage Media
| DJI PROSSD 1TB Recording Format No restriction on recording format | |
| CFexpress 2.0 Type-B Recording Format | ProRes 422 HQ:6K: 23.976/24/25/29.97/30fpsC4K: 23.976/24/25/29.97/30/48/50/59.94/60/72/96/100/120fps2K: 23.976/24/25/29.97/30/48/50/59.94/60/72/96/100/120fpsH.264:C4K: 23.976/24/25/29.97/30/48/50/59.94/60/72/96/100/120fps2K: 23.976/24/25/29.97/30/48/50/59.94/60/72/100/120fps |
| USB-C Recording Format | ProRes 422 HQ:C4K: 23.976/24/25/29.97/30/48/50/59.94/60fps2K: 23.976/24/25/29.97/30/48/50/59.94/60fpsH.264:C4K: 23.976/24/25/29.97/30/48/50/59.94/60fps2K: 23.976/24/25/29.97/30/48/50/59.94/60fps |
System

Tap System to reset to default settings, view the system version, and set the Fan Mode, System Time, and Language.
Fan Mode
The three fan modes of Ronin 4D are Rec Low, Normal, and Low Noise.
Rec Low: Rec Low mode is available when the Z-axis is disabled. The fan of Ronin 4D will be turned off during recording and Fan mode will switch to Normal when the temperature of Ronin 4D reaches the threshold.
Normal: The fan will run at a constant speed in normal mode.
Low Noise: The fan will run at a low speed to reduce the fan noise to the maximum extent while dissipating heat.
System Time
Tap to set the system date and time. The date will be added to the footage and affects the filename.
Language
The language of the main monitor can be set to English or Chinese.
About
Tap to view the firmware version, module firmware versions, and the serial number of Ronin 4D. Tap “...” to access static-frame capture. Tap the icon to capture a static-frame, which is saved as a JPEG photo. The captured static-frame cannot be viewed in Playback. It will be named as “DJI_RONIN_4D_static-frame number” and saved in the file named “camera_dump”, which is stored in the root directory of the storage media.
Export Log
Logs with operation information can be exported to the selected storage media.
Factory Reset
Tap Factory Reset to restore all settings to the default factory settings including custom settings. Tap and hold the onscreen button to reset.
Lens
Focus

Tap Focus to set AF Mode, ROI Mode, AFC Sensitivity, and Unit.
AF Mode
The two autofocus modes are AF (Auto Focus) and AMF (Automated Manual Focus).
When set to AF mode, tap the AF button on the liveview of the main monitor or press the AF button on the right hand grip to enable autofocus. The camera will auto focus according to the ROI mode. When set to AMF mode, the camera will auto focus according to the ROI mode, the dial of right hand grip will rotate automatically according to the focal position, and the focus can be controlled by turning the dial at any time.
The DJI LiDAR Range Finder is required in order to use AF.
ROI Mode
Includes Spot, Wide, and Smart.
Spot Mode: The camera will focus at the center marker by default and users can tap any position on the liveview to focus on. Spot mode area appears when AF begins. The focus area will be hidden by default.
Wide Mode: There will be a yellow box at the center of the liveview when set to Wide mode. The camera will recognize the nearest and most recognizable subject and focus automatically within the yellow box. The camera will prioritize recognizing faces.
Smart Mode: When set to Smart mode, the camera recognizes the focus area automatically. The camera recognizes people as a priority and the camera will focus at the liveview center if there are no people. The camera recognizes human faces and bodies and selects the person who is nearest to be the center of the liveview with a yellow box displayed on the head of the selected person. Tap the yellow box or press the ActiveTrack button to confirm and the yellow box will turn green, indicating ActiveTrack and AF are available. In Smart mode, any subject can be selected by dragging a box around it. The selection may fail if the box is too large or small.
AFC Sensitivity: AFC sensitivity can be set to high, medium, or low. Set the AFC sensitivity to high for low latency. For smooth focus switch, set to medium or low.
Unit: The unit for the MF readings can be set to inch or mm.
Calibration

When using a non-DJI lens, the lens needs to be calibrated in order to use autofocus.
Lens Calibration Information: Displays the saved lens calibration information. Tap to select a lens and the focus motor will start calibrating the lens. NA appears if there is no lens calibration information. Ronin 4D cannot autofocus and calibrate the lens within 1 foot of the subject currently due to the limitation of the LiDAR range finder minimum focusing distance.
It is recommended to use the dial on the right hand grip or the dial on main body to focus manually at a distance less than 1 foot. In this situation, switch the Lens Calibration Information to NA.
Focus Motor Initialize: Tap to initialize when using a manual lens and with the X9 Focus Motor mounted. Initialization cannot be used if no X9 Focus Motor is detected. Make sure the gear of the X9 Focus Motor is properly aligned with the lens gear.
Manual Calibration
Manual focus and autofocus are supported when using a manual lens with the LiDAR range finder and X9 Focus Motor mounted. Refer to the Lens Compatibility List for supported lenses. Choose Manual Calibration if using a manual lens. Users can also select Manual Calibration for an auto lens that cannot focus accurately or is not included in the Lens Compatibility List. Follow the steps below to calibrate a lens.
Calibration Steps:
- Input the lens name.

- Input the lens focal length.

- Motor initialization will start automatically when using a manual lens with the X9 Focus Motor mounted.
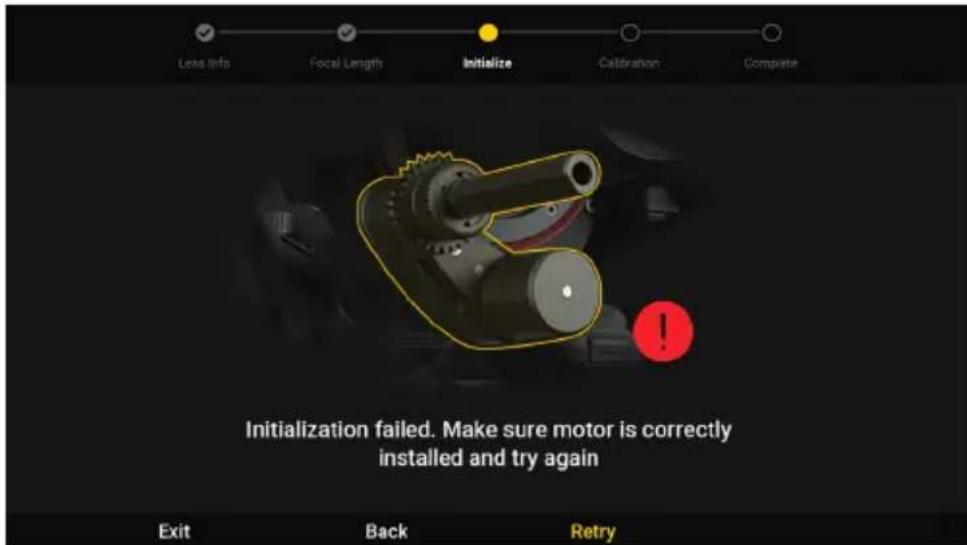
- Turn the dial of the right hand grip to adjust the focus to infinity after motor initialization is completed. Focus to infinity and press the record button of the right hand grip or tap the record button on the main monitor to complete calibration. There will be four calibration zones divided by white and gray displayed on the right side of the MF Readings. It is recommended to calibrate one point for each zone for optimal calibration. Turn the dial to focus on the next white zone and select a flat surface or subject that is nearby with a clear texture to calibrate. Press the PEAK button once or tap + on the screen to magnify the liveview up to 4x. Press the PEAK button again or tap - on the screen to zoom out. The zone will turn green once calibrated. Calibrate at least two points before using a manual lens, including one point at infinity and one point that is the minimum focus distance. It is recommended to calibrate five points for optimal focus performance. Tap Delete to delete the last recorded calibration point. Re-calibration is also supported.
- Tap Finish to complete calibration. Once calibrated, the focus can be controlled by turning the dial of the right hand grip or the main body.
Auto Calibration
Select Auto Calibration when using an auto focus lens. Enter the lens information and wait for auto calibration to be completed.

Watch the Focus Control tutorial video at the official DJI website for calibration process:
https://www.dji.com/ronin-4d/video


- Set the shutter to auto before lens calibration.
- DO NOT disconnect the LiDAR range finder or the focus motor during calibration.
- The calibration information is saved automatically. It is not necessary to calibrate the lens again after restarting Ronin 4D if the position of the X9 Focus Motor, LiDAR range finder, and the lens remain the same and Ronin 4D was powered off.
- Do not direct the camera at a subject with a reflective surface such as metal or glass. Otherwise, the focus accuracy of the LiDAR range finder will be reduced.
Stabilizer
Tap Stabilizer for Gimbal Settings, Joystick, and Gimbal Calibration.
Gimbal Settings

Includes settings for Gimbal Mode, Follow Speed, Z-Axis Mode, and Follow, Follow Speed, and Follow Deadband for the three axes.
Gimbal Mode: The gimbal modes include Lock, Pan Follow, Pan & Tilt Follow, FPV, and Custom. The follow mode for the three axes can be set separately. Refer to the X9 Gimbal and Camera sections for more information. The gimbal mode settings in the main monitor and the settings of gimbal mode toggle of main body have priority. Ronin 4D will follow the settings that were last set. Ronin 4D will follow the settings of the gimbal mode toggle after restarting.
Follow Speed: Indicates the follow speed of each axis. The Follow speed for the three axes can be set simultaneously by selecting Custom, Slow (25), Medium (50), and Fast (100). The follow speed of each axis can also be set independently.
Follow, Lock, and Car Mount mode can be selected for the Z-axis. Refer to the Z-Axis section for more information.
Sport Mode: Tap to enable or disable Sport mode.
Deadband: The deadband determines how much movement the gimbal tolerates before translating the pan, tilt, and roll movement of the camera. Set the deadband for three axes independently.
Joystick
Tap to set the Speed, Control Mode, Max Speed, Expo Curve, and Smoothing for the left hand grip and the top handle joystick.

Set the Speed to Fast (100), Medium (50), Slow (25) for the speed that the three axes will rotate to in response to the max input of the joystick.
Invert Joystick Up/Down: After enabling this switch, the corresponding assigned axis rotational direction will be inverted when pushing the joystick of the left hand grip or the top handle up or down.
Joystick Up/Down: Push the joystick of the left hand grip up or down to control the tilt by default. This operation can also be assigned to pan or roll.
Joystick Left/Right: Push the joystick of the right hand grip left or right to control the pan by default. The operation can also be assigned to tilt or roll.
Top Handle Joystick: Push the top handle joystick up and down to control tilt by default. This operation can also be assigned to pan or roll.
Max Speed: Max Speed determines the remote-controlled rotational speed. The higher the value, the faster the rotation.
Expo Curve: Expo Curve determines the rotational speed based on the different joystick input. When the value is set to Slow, the rotational speed remains almost the same no matter how much the joystick is pushed. When the value is set to Medium, the relationship of the rotational speed and the joystick input is linear. When the value is set to High, the relationship of the rotational speed and the joystick input is quadratic. The control experience will vary depending on the expo curve and applies to all the remote devices of Ronin 4D.
Smoothing: When this value increases, the movement will be smoother and slower when the joystick input is released. If smoothing is set to 0, the movement will be translated to an abrupt stop. This setting applies to all the remote devices of Ronin 4D.
For a larger roll rotational angle, set the gimbal mode to Lock or PF, tilt the main body forward, and tilt the pan axis 80° to the ground. In this scenario, push the joystick right or left continuously to rotate the roll angle.
Gimbal Calibration
Includes settings for Push Pan/Tilt, Auto Tune, Horizontal Calibration, Pan/Tilt Adjustment, and Reset Gimbal Parameters.
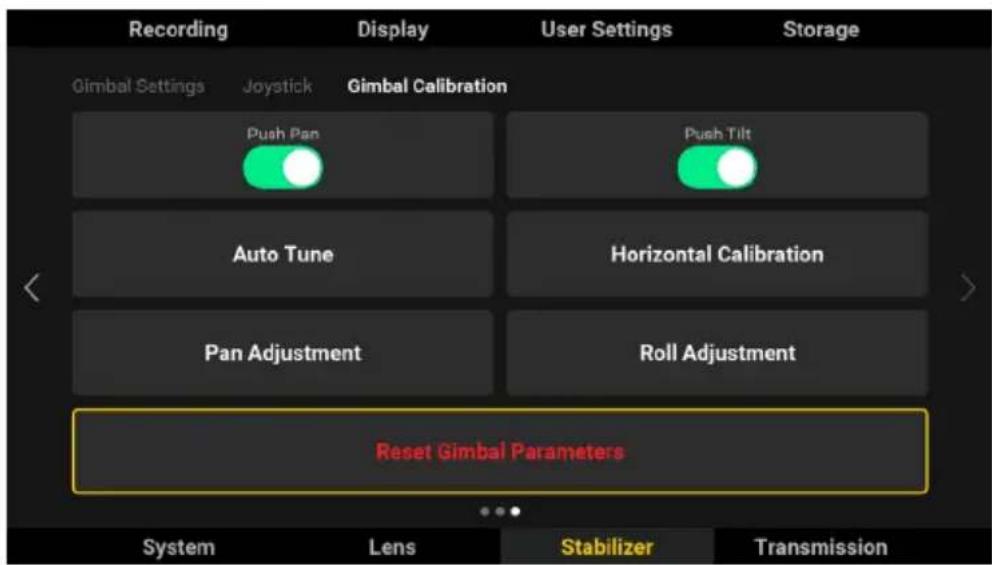
Push Pan/Tilt: The pan and tilt axes can be pushed directly by hand after Push Pan/Tilt is enabled.
Auto Tune: The stiffness value is determined by the gimbal payload. Use Auto Tune to obtain the proper stiffness value automatically each time the payload is changed and balanced. The stiffness values may not be accurate without auto tune and lead to the gimbal to shake. Keep Ronin 4D stationary and steady during auto tune.
Horizontal Calibration: It is recommended to perform horizontal calibration if the camera view is not level when the gimbal is steady. Make sure the gimbal axes are unlocked, the gimbal mode is not off, and the gimbal is upright and placed on a steady flat surface. Do not move Ronin 4D during horizontal calibration.
Pan/Tilt Adjustment: Adjust the pan or tilt offset by using pan/tilt adjustment. Tap to enter settings and rotate the dial on the main monitor or tap + or - on the screen to adjust the offset. Tap Confirm to save the offset value. Tap Reset to reset the pan and tilt position to default.

Reset Gimbal Parameters: All gimbal parameters can be reset to default settings. Note that auto tune is required after the gimbal parameters are reset. Otherwise, the gimbal may not work properly.
Transmission

The two transmission modes of Ronin 4D are Control mode and Broadcast mode. In Control mode, two remote monitors can be used to control the main monitor menu. There is no limit to the number of remote monitors in Broadcast mode. Ronin 4D will enter Control mode by default if Broadcast mode is disabled. Mirror Control mode can be enabled when the Ronin 4D is in Broadcast mode or Control mode. In Mirror Control mode, the high-bright remote monitor can view the liveview of the high-bright main monitor. In addition, the parameters of Ronin 4D can be adjusted when the high-bright remote monitor is in Control mode.
In transmission settings, you can view the link status, link a remote monitor, and enable or disable Broadcast mode or Mirror Control Mode.
Control Monitor A/B
Display the link status of the remote monitor. The status is displayed as Connected if a remote monitor is linked with Ronin 4D.
Link Device
Follow the steps below to link a remote monitor.
- Power on the high-bright remote monitor. Tap ••• to enter System Settings and then Connection Settings. In Control mode, select Control Monitor A/B for the remote monitor and tap Link Control Monitor A/B.
- In Transmission on the high-bright main monitor, tap Link Device to enter linking status.
- The remote monitor and main monitor will be displayed as Connected after the linking process is completed.
Using Broadcast Mode
- Enable Broadcast Mode in Transmission on the high-bright main monitor. At least one remote monitor must be connected to Ronin 4D before enabling Broadcast mode.
- Power on the high-bright remote monitor and tap •••• to enter System Settings and then Connection Settings. Tap Broadcast mode and the remote monitor will search for Ronin 4D automatically. The camera name will display on the screen with the initials representing the camera index of Ronin 4D. Tap to select a camera and the liveview will display on the remote monitor. Tap the camera index shown on the right side of the remote monitor to switch between cameras.
Using Mirror Control Mode
Tap to enable Mirror Control mode and Ronin 4D will reboot automatically. The high-bright main monitor to be displayed on the high-bright remote monitor and the Ronin 4D parameters can be adjusted when the high-bright remote monitor is in Control mode. Tap again to disable Mirror Control mode and Ronin 4D will reboot again.

The transmission performance will be affected after enabling Broadcast mode. Broadcast Mode will be disabled after restarting Ronin 4D.
Intelligent Battery
The TB50 Intelligent Battery has a capacity of 4280 mAh, a voltage of 22.8 V, and a variety of power management functions.

Intelligent Battery Functions
- Battery Level Display: the battery level LEDs display the current battery level.
- Auto-Discharging Function: to prevent swelling, the battery automatically discharges to below 70% of total power when it is idle for more than 10 days. To exit the idle state, press the Battery Level button to check the battery level. It takes approximately three days to discharge the battery to 65%. It is normal to feel moderate heat emitting from the battery during the discharge process.
- Balancing Function: automatically balances the voltage of each battery cell when charging.
- Overcharge Protection: the battery stops charging automatically once fully charged.
- Temperature Detection: to prevent damage, the battery only charges when the temperature is between 5°C and 45°C (41°F and 113°F).
- Overcurrent Protection: the battery stops charging when an amperage of more than 10 A is detected.
- Over-Discharge Protection: to prevent serious damage to the battery, the current output will be cut off when the battery cell is discharged to 2.8 V and not in use. To extend operating times, overcharging protection is disabled as batteries discharge during usage. In this instance, a battery voltage below 2 V may cause a safety hazard such as a fire when charged. To prevent this, the battery will not be able to charge if the voltage of a single battery cell is below 2 V. Avoid using any batteries matching this description and make sure to avoid over-discharging to prevent permanent battery damage.
- Short Circuit Protection: the power supply is automatically cut if a short circuit is detected.
- Battery Cell Damage Protection: a warning prompt will appear in DJI Assistant 2 when a damaged battery cell is detected.
- Sleep Mode: the battery enters sleep mode when not in use to save power.
- Communication: the battery voltage, capacity, current, and other relevant information is provided to Ronin 4D.
- Heating: the batteries are self-heating, enabling them to work in cold weather conditions.

Read the user manual and all battery stickers before use. Users take full responsibility for all operations and usage.
Charging the Batteries
Insert the charging adapter into the battery port and charge the battery with the provided charger. It takes approximately 1.5 hours to fully charge the battery.
The battery level indicators display the battery level during charging and usage. Press the battery level button to check battery level when not in use.


| Battery Level Indicators while Charging | ||||
| LED1 LED2 LED3 LED4 Battery Level | ||||
| ○ | 0%-50% | |||
| 50%-75% | ||||
| 75%-100% | ||||
| ○ | ○ | Fully charged | ||
| Battery Level Indicators for Battery Protection | ||||
| LED1 | LED2 | LED3 | LED4 Blinking Pattern Battery Protection Description | |
| ○ | ○ | LED2 blinks twice per second Overcurrent detected | ||
| ○ | ○ | LED2 blinks three times per second Short circuit detected | ||
| ○ | LED3 blinks twice per second Overcharge detected | |||
| ○ | LED3 blinks three times per second Charger overvoltage detected | |||
| ○ | LED4 blinks twice per second Charging temperature is too low | |||
| ○ | LED4 blinks three times per second Charging temperature is too high | |||
After resolving one of the battery issues listed above, press the battery level button to cancel the LED indicator protection indicator, and unplug and plug the charger again to resume charging. If the charging temperature is abnormal, wait for the charging temperature to return to normal and the battery will automatically resume charging without the need to unplug and plug the charger again.

DJI does not take any responsibility for damage caused by third-party chargers.
Attaching Intelligent Battery
Align the Intelligent Battery with the battery compartment and push the battery down until there is a clicking sound.

Checking the Battery Level
Press the battery level button once to check battery level. The battery level indicator glows and Ronin 4D cannot be powered on during this time. Wait for the indicators to turn off before powering on Ronin 4D.
Heating the Battery
Manual Heating: when the battery is powered off, press and hold the battery level button for 3 seconds to warm up the battery. The battery will warm up if the temperature is below 15°C (59°F). As it warms, LED 1 and 2 and LED 3 and 4 will blink alternately. The battery will stop warming up when it reaches 20°C (68°F). The temperature of the battery will remain between 15° to 20°C (59°F to 68°F). When the temperature is above 15°C (59°F), LED 1 and LED 4 blink alternately for approximately 30 minutes before Ronin 4D powers off automatically.
Auto Heating: Insert the batteries into the battery mount and power on. When the temperature of the battery is below 15°C (59°F), it will warm up automatically.
Low Temperature Notice
- The performance of the Intelligent Battery is significantly reduced in environments with a temperature below 5°C (41°F). Make sure that the battery is fully charged and the cell voltage is 4.35 V before use.
- In extremely cold weather, the battery temperature may not be high enough even after warming up. In such scenarios, make sure the battery is insulated.
- To ensure optimal performance, keep the temperature of the Intelligent Battery above 20°C (68°F) when in use.
Warnings
- Do not use the battery when the environment temperature is too high or too low.
- The ideal storage temperature is 22° to 28°C (71.6° to 82.4°F).
- DO NOT store the battery for an extended period after fully discharging. Otherwise, the battery may over-discharge and cause irreparable damage.
- The battery life may be reduced if the battery is not used for an extended period. Fully charge and discharge the battery at least once every three months to ensure the performance of the battery.
Intelligent Features
ActiveTrack Pro
With ActiveTrack Pro, Ronin 4D is able to track any kind of subject, and can recognize human faces and limbs and track continuously. The frame can be adjusted anytime during tracking.
Using ActiveTrack Pro
Make sure gimbal mode is set to follow or lock. The lens must be calibrated in advance if using a third-party lens.
- Enable Smart Mode: Press the HOME button of the main monitor to enter menu, select Select Lens, Focus, ROI Zone, and Smart. Alternatively, press and hold the ActiveTrack button on the left hand grip to enable Smart mode. The Track button on the screen will display in white.
- Ronin 4D recognizes the face and limbs of people in the center area of camera view. A yellow box will appear on the recognized subject, which indicates Ronin 4D is ready to track the subject. Tap the subject in the yellow box or press the ActiveTrack button on the left hand grip to confirm the subject. The yellow box turns green, which indicates Ronin 4D will follow the subject. Users can also drag a box on the subject. If the box is too small or the subject is obscure, adjust the frame and select again. The camera can be adjusted for better composition after the subject is confirmed.
- Tap the Track button to start tracking. The track icon will be yellow while tracking. Ronin 4D will track the subject within the green box automatically. The subject position in the liveview will remain within a certain range and the position can be adjusted at any time during tracking via the joystick. When the gimbal mode is set to follow, press the ActiveTrack button to cancel the selected subject, and Ronin 4D will recognize the next nearest subject in the center of the liveview. Press the ActiveTrack button again to confirm the new subject. Press the trigger of the left hand grip twice or press the C1 button once on the main body to recenter the gimbal.
Press and hold the trigger of the left hand grip to enable or disable ActiveTrack quickly. This is convenient for tracking between several subjects.
Focus Control
Ronin 4D provides Manual Focus, Auto Focus, and Automated Manual Focus. Auto Focus and Automated Manual Focus requires the LiDAR range finder. Controlling the focus of the manual lens requires the X9 Focus Motor and lens calibration.
Manual Focus
When using a third-party lens, manual focus can be used after calibrating the lens via the dial of the right hand grip or the main body with the MF Readings on the main monitor screen. Press the Focus Peak button on the right hand grip or the main monitor to enable or disable focus assistant.

With the LiDAR range finder mounted, the LiDAR sensor scans forward and displays objects on a depth map. Subjects can be quickly located using the MF readings.
Auto Focus
Auto focus can be used via the AF/MF button on the screen or AF button on the right hand grip when using a third-party lens that has been calibrated.
Press Focus button on the right hand grip or tap AF on the main monitor to enable Autofocus.

Automated Manual Focus
Go to the menu, select Lens, and AMF. During AMF, Ronin 4D will focus automatically and the user can use the dial or DJI 3-Channel Follow Focus to manually adjust focus at any time.
Firmware Update
Update Ronin 4D firmware via the DJI Assistant 2 (Ronin Series).
How to update firmware:
- Launch DJI Assistant 2 (Ronin Series) and log in with a DJI account.
- Power on Ronin 4D and connect the USB-C port to the computer using a USB-C cable.
- Click Ronin 4D and Update.
- Select the firmware version.
- DJI Assistant 2 (Ronin Series) will download and update the firmware automatically.

- Do not disconnect from the internet while updating firmware. Otherwise, the update will fail.
- Make sure the battery level of Ronin 4D is at least 40% before starting the update.
- It is normal for Ronin 4D to restart while updating.
Maintenance
Do not disassemble Ronin 4D. Otherwise, the warranty will be voided.
Protect the Ronin 4D from dust and water. Make sure to operate in a dust-free environment if attaching or detaching the X9 Gimbal and Camera, X9 Focus Motor, LiDAR range finder, lens mount, lens, battery, storage media, or hand grips. The lens or ports may be harmed and usage may be affected if they come into contact with sand or dust.
Note that the X9 Gimbal and Camera and LiDAR range finder do not support hot swapping. The X9 Focus Motor, DJI PROSSD 1TB, main monitor, hand grips, lens, lens mount, and top handle support hot swapping.
Keep the sensor or lens clean, clean Ronin 4D with a soft dry cloth, and do not spray Ronin 4D with any cleaning liquids.
When not in use, detach the lens or hand grips, and fold the Ronin 4D correctly before placing into the storage case. Make sure Ronin 4D is not squeezed in any way during storage or transportation.

Folded in Transportation Operating Status
Specifications
| General | |
| Main Body Dimensions(length×width×height) | 235×115×160 mm |
| Overall Dimensions(length×width×height) | 309×290×277 mm (Measured when 6K Combo is fully set up with the main monitor attached and the Z-Axis off) |
| Gimbal Weight Approx. 1.04 kg | |
| Main Body Weight Approx. 1.45 kg | |
| Overall Weight | Approx. 4.67 kg (After installing all modules in the combo, excluding lens and storage media) |
| Max Operating Time | Approx. 150 min (Measured with a fully charged TB50 Battery and Ronin 4D in a still state with the gimbal balanced, the Z-Axis off, and continuously recording in ProRes RAW. Gimbal movements or use of the Z-axis will reduce operating time.) |
| Intelligent Features | ActiveTrack Pro, Autofocus (Supports human face/body recognition and framing of any subject) |
| Storage Temperature -20° to 60°C (-4° to 140°F) | |
| Operating Temperature -10° to 40°C (14° to 104°F) | |
| Camera | |
| Sensor Size 35mm full-frame CMOS image sensor | |
| Base Lens Mount DX Mount, and support for other mount units | |
| Supported Lens Mounts DL Mount (standard), M Mount, and E Mount | |
| DL Lens | DJI DL 24mm F2.8 LS ASPH |
| DJI DL 35mm F2.8 LS ASPH | |
| DJI DL 50mm F2.8 LS ASPH | |
| Dynamic Range 14+ stops | |
| White Balance Manual 2,000-11,000 Kelvin and tint adjustment, supports AWB | |
| Gamma D-Log, Rec.709, HLG | |
| EI Range | X9-8K: EI 200-12800, Dual Native ISO 800/4000 |
| X9-6K: EI 200-12800, Dual Native ISO 800/5000 | |
| Shutter Speed Electronic Rolling Shutter 1/24s-1/8000s | |
| ND | Built-in 9-stop ND filters:Clear, 2 (0.3), 4 (0.6), 8 (0.9), 16 (1.2), 32 (1.5), 64 (1.8), 128 (2.1), 256 (2.4), 512 (2.7) |
| Focus Control | Autofocus, Manual Focus, Automated Manual Focus(Autofocus on manual lenses requires DJI Zenmuse X9 Focus Motor) |
| X9-6K Max Bit Rate | 6008×3168, 48fpsRAW 3.4Gbps |
| X9-8K Max Bit Rate | 8192×4320, 60fpsRAW 3.95Gbps |
| Supported File System exFAT | |
| Recording Format | Apple ProRes RAW HQ/Apple ProRes RAWApple ProRes 422 HQ/Apple ProRes 422 (Supported through a future firmware update)H.264 (4:2:0 10-bit) |
| Storage Media DJI PROSSD 1TB, CFexpress 2.0 Type B, USB-C SSD | |
| DJI PROSSD 1TB Recording Format | No restriction on recording format |
| CFexpress 2.0 Type B Recording Format (Use recommended CFexpress cards) | ProRes 422 HQ:6K: 23.976/24/25/29.97/30fpsC4K: 23.976/24/25/29.97/30/48/50/59.94/60/72/96/100/120fps2K: 23.976/24/25/29.97/30/48/50/59.94/60/72/96/100/120fpsH.264:C4K: 23.976/24/25/29.97/30/48/50/59.94/60/72/96/100/120fps2K: 23.976/24/25/29.97/30/48/50/59.94/60/72/100/120fps |
| USB-C SSD Recording Format (Use recommended USB-C SSD) | ProRes 422 HQ:C4K: 23.976/24/25/29.97/30/48/50/59.94/60fps2K: 23.976/24/25/29.97/30/48/50/59.94/60fpsH.264:C4K: 23.976/24/25/29.97/30/48/50/59.94/60fps2K: 23.976/24/25/29.97/30/48/50/59.94/60fps |
| Built-in Mic Built-in 2-ch stereo | |
| Audio Format LPCM 2-ch, 24-bit 48kHz | |
| Gimbal | |
| Mechanical Range | Pan: ±330°Tilt: -75° to 175°Roll: -90° to 230°Z-Axis Range: approx 130mm (Stabilization range of the Z-axis is subject to change based on Z-axis modes and usage scenarios and may be smaller than the mechanical range) |
| Controllable Range | Pan: ±285°Tilt: -55° to +155°Roll: ±35° |
| Max Control Speed (°/s) | DJI Master Wheels or DJI Force Pro:Tilt: 360°/sRoll: 360°/sPan: 360°/sRonin 4D Hand Grip:Tilt: 120°/sRoll: 120°/sPan: 120°/s |
| Maximum Z-axis Payload 2000 g (including 1040 g gimbal) | |
| Angular Vibration Range ±0.01° | |
| LiDAR Range Finder | |
| Weight 88 g | |
| Dimensions(length×width×height) | 71×47×34 mm |
| Operating Temperature -10° to 40° | C (14° to 104° F) |
| LiDAR Range Measurement Precision | 0.3-1 m (±1%)1-10 m (±1.5%) |
| FOV* | 30 cm to 3 m @>18% reflectivity 60° (horizontal) × 45° (vertical)30 cm to 10 m @>18% reflectivity 60° (horizontal) × 7° (vertical) |
| Safety Rating Class 1 (IEC 60825-1):2014) (safe for human eyes) | |
| Operating Environment | Use in environments with diffuse reflective surfaces (>10%, such as walls, trees, people, etc.)DO NOT use in environments with dense fog or aim it at or through glass surfaces. |
| Laser Wavelength 940 nm | |
| Single Pulse Width Two kinds of pulses emit in circulation: 5 ns and 33.4 ns. | |
| Max Laser Power 6 W | |
| Main Monitor | |
| Screen Size 5.5 in (diagonal) | |
| Resolution 1920×1080 | |
| Refresh Rate 60 Hz | |
| Max Brightness 1000 cd/m2 | |
| Screen Rotational LCD touchscreen | |
| Battery | |
| Battery Type TB50 Intelligent Battery | |
| Capacity 4280 mAh | |
| Energy 97.58 Wh | |
| Voltage 22.8 V | |
| Max Charging Voltage 26.1 V | |
| Max Charging Power 180 W | |
| Charging Temperature Range 5° to 40°C (41° to 104°F) | |
| Charging Time | Approx. 1.5 hours (with standard 86W power adapter) |
| DJI O3 Pro Video Transmission | |
| Max Transmission Distance(Unobstructed, free of interference.) | 20,000 ft (approx. 6 km, FCC-compliant) |
| Max Transmission Resolution and Frame Rate | 1920×1080 @60fps |
| Minimum End-to-End Latency | 100 ms or 68 ms(100 ms is measured at 4K/24fps, 68 ms is measured at 4K/60fps.) |
| Wireless Frequency | Non-DFS frequency band:2.400-2.483 GHz5.150-5.250 GHz5.725-5.850 GHzDFS Frequency Band:5.250-5.350 GHz5.470-5.600 GHz5.650-5.725 GHz(Some frequency bands may not be available depending on the legal policies of the region the monitor was activated in) |
| Transmitter Power (EIRP) | 2.400-2.4835 GHz: ≤33 dBm (FCC); ≤20 dBm (SRRC/CE/MIC)5.150-5.250 GHz: <23 dBm (FCC/SRRC/MIC)5.250-5.350 GHz: <30 dBm (FCC); <23 dBm (SRRC/MIC)5.470-5.600 GHz, 5.650-5.725 GHz: <30 dBm (FCC); <23 dBm (CE/MIC)5.725-5.850 GHz: <33 dBm (FCC/SRRC); <14 dBm (CE) |
| Max Bandwidth | 40 MHz |
| Max Bitrate | 50 Mbps |
| Interface | |
| Main Body | 3.5mm TRS Stereo Input Jack × 1 (supports mic, plug-in power mic, and line inputs)3.5mm Stereo Output Jack × 1USB 3.1 Type-C Data Port × 16-pin 1B DC-IN (DC 12-30 V) × 1Battery Mount Power Port (female) × 14D Expansion Plate Data Port (female) × 1High-Bright Main Monitor Port × 1Hand Grips Port × 2Top Handle Port × 1HDMI Type-A Video Output Port × 1 (Currently supports HDMI 1.4 and will support HDMI 2.0 in a future firmware update) |
| X9 Gimbal LiDAR Range Finder/Focus Motor Port × 2 | |
| TB50 Battery Mount | Battery Mount Power Port (male) × 1TB50 Battery Port × 1 |
| 4D Video Transmitter | |
| Dimensions 89×21×137 mm | |
| 4D Video Transmitter Port | 4D Expansion Plate Data Port (male) × 1SMA Antenna Connector × 4USB 3.1 Type-C Data Port × 1Battery Mount Power Port (female) × 1Battery Mount Power Port (male) × 1 |
| Remote Monitor | |
| Dimensions 216×58×166 mm (Includes monitor cage) | |
| Screen Size 7 inches (Diagonal) | |
| Max Brightness 1500 cd/m2 | |
| Screen Resolution 1920×1200 | |
| Refresh Rate 60 Hz | |
| Max Battery Life | Approx. 2 hours (Measured at 50% screen brightness with DJI WB37 battery) |
| Operating Temperature 0° to 40°C | (32° to 104°F) |
| Storage Temperature -20° to 60°C | (-4° to 140°F) |
| Power System DJI WB37 Battery/NP-F Series Battery (Requires NP-F battery adapter) | |
| Remote Monitor Port | 3.5mm Stereo Jack × 1microSD Card Slot × 1 (This port is currently not available. Will support internal recording in a future firmware update)HDMI Type-A Video Input Port × 1 (This port is currently not available. Will support HDMI 1.4 in a future firmware update)Remote Monitor Expansion Plate High-Speed Port (female) × 1Remote Monitor Accessory Expansion Port × 1USB 3.1 Type-C Data Port × 1 |
| Remote Monitor Expansion Port | Remote Monitor Expansion Plate High-Speed Port (male) × 1HDMI 1.4 Type-A Video Output Port × 16-pin 1B DC-IN (DC 6.8-17.6 V) × 13G-SDI (Level A) BNC Video Output Port × 1 |
Appendix
Using DJI Force Pro and DJI Master Wheels with Ronin 4D
To control Ronin 4D via DJI Force Pro or DJI Master Wheels requires DJI Ronin 4D Video Transmitter, DJI High-Bright Remote Monitor, DJI High-Bright Remote Monitor Controller Cable, and DJI Ronin 4D Expansion Plate (SDI/XLR/TC). Make sure to update the firmware to the latest version for Ronin 4D, DJI High-Bright Remote Monitor, DJI Force Pro, and DJI Master Wheels.
Follow the steps below to use DJI Force Pro and DJI Master Wheels with Ronin 4D.
- Detach the cover on the back of the DJI High-Bright Remote Monitor and attach the DJI Remote Monitor Expansion Plate (SDI/HDMI/DC-IN) to the back of the DJI High-Bright Remote Monitor and tighten the four screws.
- Connect the DC-OUT port of the DJI Master Wheels or DJI Force Pro and the DC-IN port of the DJI Remote Monitor Expansion Plate mounted on the DJI High-Bright Remote Monitor using the DJI High-Bright Remote Monitor Controller Cable.
- In the high-bright main monitor menu, tap Transmission and Link Device or press the linking button on the DJI Ronin 4D Video Transmitter for five seconds to enter linking status. Tap ... on the high-bright remote monitor and select Control Settings and Link Monitor A/B to link Ronin 4D.
- Power on the DJI Force Pro or DJI Master Wheels and switch the gimbal control to Ronin 4D. Switching the Gimbal Control:
For DJI Master Wheels: Set the Switch function for a custom button of the DJI Master Wheels to Ronin 4D and press the button to switch. The DJI Master Wheels supports movement control, recenter control, recording control, max speed, smoothing, and direction settings for pan, tilt, and roll axes of Ronin 4D (other features are not supported currently).
For DJI Force Pro: Go to Settings on DJI Force Pro and select Custom, Switch, and Ronin 4D. DJI Force Pro supports movement control, recenter control, and max speed settings for pan, tilt, and roll axes of Ronin 4D (other features are not supported currently).
Dimensions
Ronin 4D

Unit: mm
Main Body Unit: mm
High-Bright Main Monitor Mounting Hole
Unit: mm
Base Plate
Counter Weight and Focus Motor Mounting Hole

Unit: mm
Top Handle Mounting Hole

Unit: mm
Dovetail Slot of Main Body

Dovetail Slot of Hand Grip
Unit: mm
- USER MANUAL V
- SEARCHING FOR KEYWORDS
- NAVIGATING TO A TOPIC
- PRINTING THIS DOCUMENT
- USING THIS MANUAL
- LEGEND
- BEFORE YOU BEGIN
- WATCHING THE TUTORIAL VIDEOS
- DOWNLOADING DJI ASSISTANT 2 (RONIN SERIES)
- CONTENTS
- PRODUCT PROFILE
- GETTING STARTED
- DJI ZENMUSE X9 GIMBAL AND CAMERA
- Z-AXIS
- MAIN BODY
- HAND GRIPS
- TOP HANDLE
- HIGH-BRIGHT MAIN MONITOR
- RONIN 4D DIAGRAM
- MOUNTING THE LENS (USING DL LENS AS AN EXAMPLE)
- MOUNTING THE LIDAR RANGE FINDER
- BALANCING
- BEFORE BALANCING
- BALANCING STEPS
- BALANCING THE PAN AXIS
- ATTACHING THE HAND GRIPS
- ATTACHING THE INTELLIGENT BATTERY
- INSERTING THE STORAGE MEDIA
- ACTIVATING DJI RONIN 4D
- AUTO TUNE
- BALANCING THE Z-AXIS
- GIMBAL
- GIMBAL MODE
- CONTROLLING THE GIMBAL
- ATTACHING AND DETACHING THE GIMBAL
- CAMERA
- X9-6K RECORDING SPECIFICATIONS
- X9-6K SENSOR RESOLUTION
- X9-6K SENSOR SIZE
- X9-8K RECORDING SPECIFICATIONS
- X9-8K SENSOR RESOLUTION
- X9-8K SENSOR SIZE
- LOCK KNOB
- Z-AXIS ARM
- BALANCE ADJUSTMENT KNOB
- USAGE
- OPERATION MODES
- POWER INDICATOR
- POWER BUTTON
- LOCK BUTTON
- RECORD BUTTON
- Z-AXIS SWITCH
- BATTERY RELEASE BUTTON
- MULTI-FUNCTION DIAL
- USB-C PORT
- STORAGE MEDIA COMPARTMENT
- CFE INDICATOR
- C1 & C2 BUTTONS
- LEFT BUILT-IN MICROPHONE
- TALLY LIGHT
- DISPLAY PORT
- AUDIO PORT
- HDMI PORT
- DC-IN PORT
- RIGHT BUILT-IN MICROPHONE
- JOYSTICK
- EXPOSURE ASSIST BUTTON
- ACTIVETRACK BUTTON
- HAND GRIP LOCK LEVER
- HAND GRIP ANGLE ADJUSTMENT LEVER
- JOYSTICK LOCK
- TRIGGER
- M BUTTON
- SAFETY LOCK
- RIGHT HAND GRIP
- DIAL
- FOCUS PEAK BUTTON
- MODE BUTTON
- FOCUS BUTTON
- TOP SCREW HOLE
- TILT SLIDER
- SIDE SCREW HOLE
- ATTACHING AND DETACHING THE TOP HANDLE
- BUTTON AND PORT FEATURES
- HOME BUTTON
- LUT BUTTON
- EXP BUTTON
- MOUNTING HOLE
- CAMERA VIEW
- BATTERY LEVEL
- EL
- IRIS
- SHUTTER SPEED/ANGLE
- FRAME RATE
- MF READINGS
- CURRENT REEL INFORMATION
- RESOLUTION
- TIMECODE/CLIP DURATION
- RUN MODE
- MODE
- COUNT MODE
- TC SETTINGS AND RESET TC
- CENTER MARKER
- WHITE BALANCE
- ND SETTINGS
- CAMERA STATUS
- AUDIO VOLUME
- AF/MF BUTTON
- GIMBAL BALANCE DETECTION
- GIMBAL MODE/SPEED
- STORAGE MEDIA REMAINING TIME
- LIDAR WAVEFORM
- FRAME GUIDE
- RECORDING RED FRAME
- LUT ICON
- MENU AND FUNCTIONS
- RECORDING
- VIDEO
- IMAGE AREA
- X9-6K
- FULL FRAME
- SUPER
- X9-8K
- RECORDING CODEC/RESOLUTION/SENSOR FPS
- STORAGE
- REC LUT
- CAMERA INDEX
- NEXT REEL COUNT
- CLIP
- AUDIO
- SETTINGS
- DISPLAY
- EXPOSURE ASSISTANT
- FALSE COLOR TABLE
- FOCUS ASSISTANT
- MONITOR
- LOOK
- IMPORT CUSTOM LUT
- USER SETTINGS
- SYSTEM
- FAN MODE
- SYSTEM TIME
- LANGUAGE
- ABOUT
- EXPORT LOG
- FACTORY RESET
- LENS
- FOCUS
- AF MODE
- ROI MODE
- CALIBRATION
- MANUAL CALIBRATION
- AUTO CALIBRATION
- STABILIZER
- GIMBAL CALIBRATION
- TRANSMISSION
- CONTROL MONITOR A/B
- LINK DEVICE
- USING BROADCAST MODE
- USING MIRROR CONTROL MODE
- INTELLIGENT BATTERY
- INTELLIGENT BATTERY FUNCTIONS
- CHARGING THE BATTERIES
- ATTACHING INTELLIGENT BATTERY
- CHECKING THE BATTERY LEVEL
- HEATING THE BATTERY
- LOW TEMPERATURE NOTICE
- WARNINGS
- INTELLIGENT FEATURES
- ACTIVETRACK PRO
- USING ACTIVETRACK PRO
- FOCUS CONTROL
- MANUAL FOCUS
- AUTO FOCUS
- AUTOMATED MANUAL FOCUS
- FIRMWARE UPDATE
- HOW TO UPDATE FIRMWARE
- MAINTENANCE
- APPENDIX
- USING DJI FORCE PRO AND DJI MASTER WHEELS WITH RONIN 4D
- DIMENSIONS
Brand : DJI
Model : Ronin 4D
Category : Video camera