
BP-70M36 - Photocopier SHARP - Free user manual and instructions
Find the device manual for free BP-70M36 SHARP in PDF.


| Product Type | Monochrome Photocopier |
| Brand | Sharp |
| Model | BP-70M36 |
| Copy Speed | 36 pages per minute (A4) |
| Maximum Paper Size | A3 |
| Paper Capacity (Standard) | 600 sheets (2 x 300) |
| First Copy Time | Approx. 4.5 seconds |
| Resolution (Copy) | 600 x 600 dpi |
| Dimensions (W x D x H) | 670 x 670 x 1100 mm |
| Weight | Approx. 100 kg |
| Power Supply | AC 220-240V, 50/60 Hz |
| Power Consumption (Max) | 1.5 kW |
| Main Functions | Copy, Print, Scan (optional) |
| Maintenance | Toner replacement, drum replacement, paper jam clearance |
| Safety Features | Auto shutdown, overheat protection |
| Spare Parts | Toner cartridge (BP-70MT36), drum unit |
| Repairability | Modular design, field-replaceable units |
| General Information | Designed for high-volume office copying |
Frequently Asked Questions - BP-70M36 SHARP
User questions about BP-70M36 SHARP
0 question about this device. Answer the ones you know or ask your own.
Ask a new question about this device
Download the instructions for your Photocopier in PDF format for free! Find your manual BP-70M36 - SHARP and take your electronic device back in hand. On this page are published all the documents necessary for the use of your device. BP-70M36 by SHARP.
USER MANUAL BP-70M36 SHARP
Functions of the machine and procedures for placing originals and loading paper
Operation of the touch screen and customisation of the user interface
Using the copy function
Using the printer function
Using the fax function
Using the scan / Internet fax function
Storing jobs as files on the local drive
Useful features of this machine
Configuring settings to make the machine easier to use
Questions and answers and care instructions
About the specifications
Click to go to chapter index
HOW TO USE THIS MANUAL
Click a button below to move to the page that you wish to view.
The following explanation assumes that Adobe Reader is being used (Some buttons do not appear in the default state.).
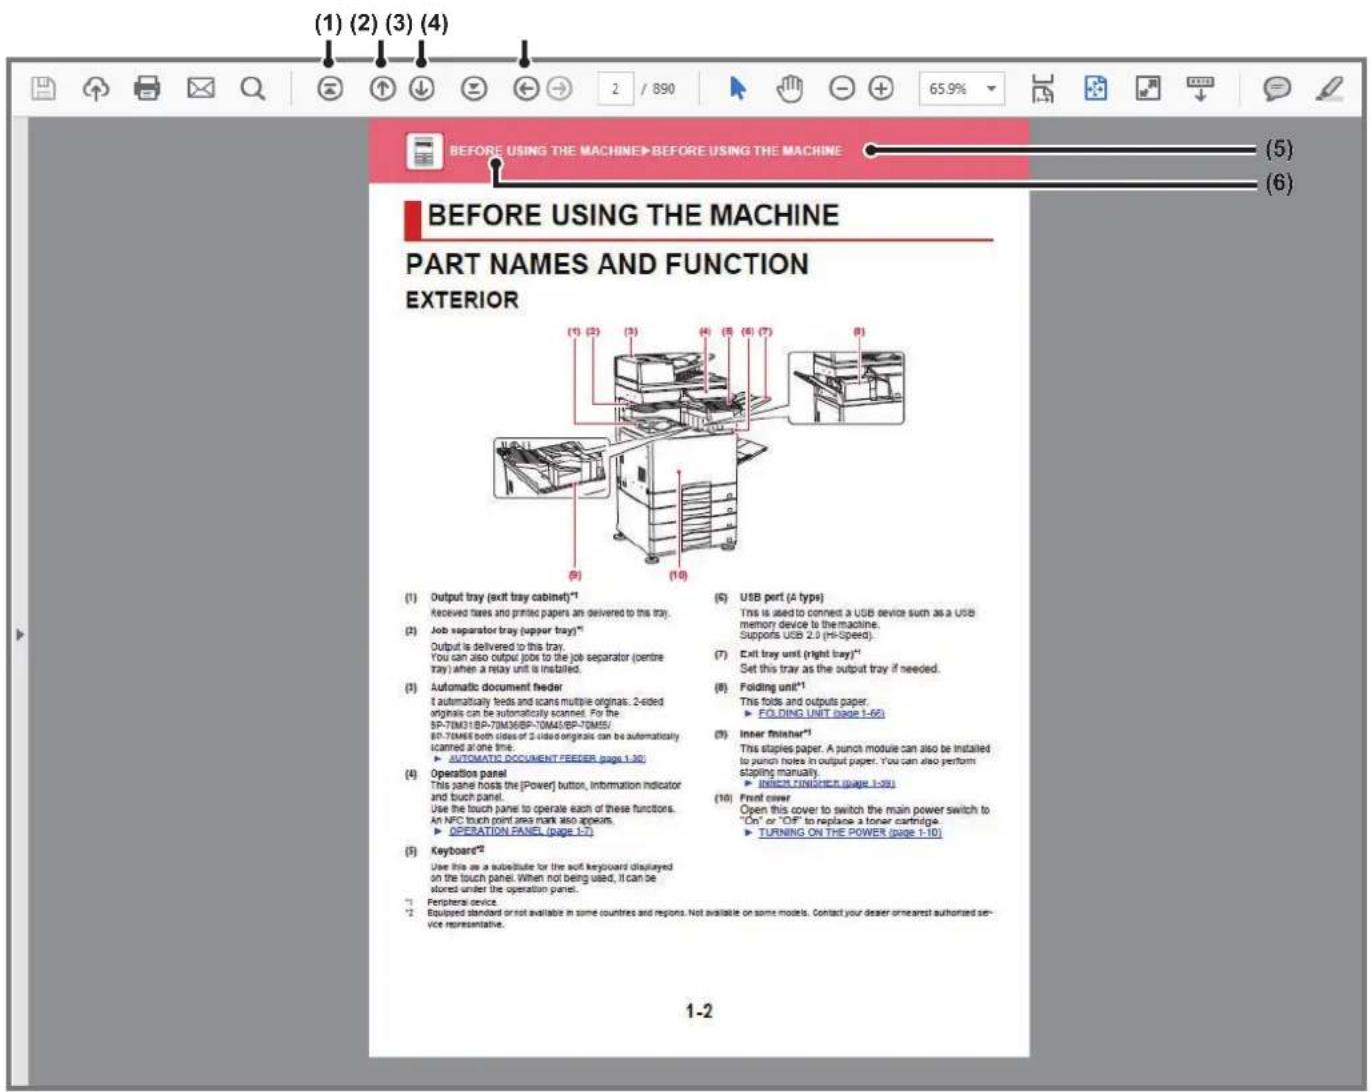
(1) Return to top page button
If an operation does not proceed as expected, click this button to start over again.
(2) Back one page button
Displays the previous page.
(3) Forward one page button
Displays the next page.
(4) Return to previously displayed page button
Displays the page that was displayed before the current page.
(5) Title button
Displays the page of the title indicated by the button.
(6) Contents button
Displays the contents of each chapter.
For example, if the current page is part of the printer chapter, the table of contents of the printer chapter appears.

If a button does not appear, refer to Adobe Reader Help to display the button.
ABOUT OPERATION MANUAL
This manual explains how to use the BP-50M26/BP-50M31/BP-50M36/BP-50M45/BP-50M55/BP-50M65/BP-70M31/BP-70M36/BP-70M45/BP-70M55/BP-70M65 digital multifunctional system.
Please note
- For information on installing the drivers and software cited in this manual, please refer to the Software Setup Guide.
- For information on your operating system, please refer to your operating system manual or the online Help function.
- The explanations of screens and procedures in a Windows environment are primarily for Windows® 10. The screens may be different depending on the version of the operating system or the software application.
- The explanations of screens and procedures for use in a macOS environment generally assume that macOS 11 is being used and a PPD driver is installed. The screens may be different depending on the version of the operating system or the software application.
- Wherever "BP-xxxx" appears in this manual, please substitute your model name for "xxxxx".
- This manual contains references to the fax function. However, please note that the fax function is not available in some countries and regions.
- Considerable care has been taken in preparing this manual. If you have any comments or concerns about the manual, please contact your dealer or nearest authorised service representative.
- This product has undergone strict quality control and inspection procedures. In the unlikely event that a defect or other problem is discovered, please contact your dealer or nearest authorised service representative.
- Aside from instances provided for by law, SHARP is not responsible for failures occurring during the use of the product or its options, or failures due to incorrect operation of the product and its options, or other failures, or for any damage that occurs due to use of the product.
Warning
- Reproduction, adaptation or translation of the contents of the manual without prior written permission is prohibited, except as allowed under copyright laws.
- All information in this manual is subject to change without notice.
Illustrations and the operation panel and touch panel shown in this manual
The peripheral devices are generally optional, however, some models include certain peripheral devices as standard equipment. The explanations in this manual assume that a paper drawer is installed on the BP-70M65.
For some functions and procedures, the explanations assume that devices other than the above are installed.
The display screens, messages, and key names shown in the manual may differ from those on the actual machine due to product improvements and modifications.
Icons used in the manuals
The icons in the manuals indicate the following types of information:
 | This alerts you to a situation that could result in death or serious personal injury. This alerts you to a situation that could result in personal injury or damage to properties. |  | This explains how to stop or correct an operation. |
 | This alerts you to a situation where there is a risk of machine damage or failure. |  | This describes a routine work relevant to setting mode. |
 | This supplements function or operation procedure. |
BEFORE USING THE MACHINE
PART NAMES AND FUNCTION.... 1-2
EXTERIOR 1-2
INTERIOR 1-4
AUTOMATIC DOCUMENT FEEDER AND DOCUMENT
GLASS 1-5
SIDE AND BACK 1-6
OPERATION PANEL 1-7
INFORMATION INDICATOR 1-8
NAMES AND LOCATIONS OF TRAYS 1-11
THE DEFINITION OF "R" IN PAPER SIZE ..... 1-11
APPLICABLE PAPER TYPES 1-12
TRAY 1 - 4 (when a stand/550/2x550/3x550/ 550&2100
sheet paper drawer is installed)....1-15
LOADING ENVELOPE IN TRAY 1. 1-17
TRAY 3 - 4 (when a stand/550&2100 sheet paper
drawer is installed) 1-18
LOADING PAPER IN THE LARGE-CAPACITY TRAY
(when a large capacity tray is installed) 1-20
LOADING PAPER INTO THE BYPASS TRAY.....1-22
HOW TO LOAD THE PAPER....1-22
LOADING TAB PAPER 1-22
INSERTING TRANSPARENCY FILM 1-23
LOADING ENVELOPES 1-23
HOW TO PLACE THE LONG PAPER GUIDE.....1-27
HOW TO PLACE THE ORIGINAL
SELECTING A PROCEDURE FOR PLACING THE
ORIGINAL DEPENDING ON THE TYPE AND STATUS
OF THE ORIGINAL....1-28
DETECTABLE ORIGINAL SIZES 1-28
AUTOMATIC DOCUMENT FEEDER....1-30
PREVENTIVE LIGHT TO INDICATE ORIGINAL LEFT
BEHIND 1-33
ORIGINAL SETTING INDICATOR....1-34
SKEW FEED PREVENTION 1-34
DOUBLE FEED DETECTION 1-34
DOCUMENT GLASS....1-35
PERIPHERAL DEVICES
PERIPHERAL DEVICES 1-37
INNER FINISHER....1-39
PART NAMES....1-39
HOW TO STAPLE MANUALLY 1-40
SUPPLIES....1-41
INNER FINISHER MAINTENANCE .....1-41
FINISHER....1-43
PART NAMES. 1-43
SUPPLIES....1-44
HOW TO STAPLE MANUALLY 1-47
SUPPLIES. 1-48
FINISHER (LARGE STACKER) MAINTENANCE.....1-48
SADDLE STITCH FINISHER....1-50
PART NAMES....1-50
SUPPLIES....1-51
SADDLE STITCH FINISHER MAINTENANCE .....1-51
SADDLE STITCH FINISHER (LARGE STACKER)....1-54
PART NAMES. 1-54
HOW TO STAPLE MANUALLY 1-55
SUPPLIES....1-56
SADDLE STITCH FINISHER (LARGE STACKER)
MAINTENANCE 1-56
PUNCH MODULE 1-60
DISCARDING PUNCH WASTE 1-60
FOLDING UNIT 1-66
PART NAMES....1-66
MAINTENANCE
REGULAR MAINTENANCE 1-67
CLEANING THE DOCUMENT GLASS AND
AUTOMATIC DOCUMENT FEEDER .....1-67
CLEANING THE BYPASS FEED ROLLER .....1-70
CLEANING THE PAPER FEED ROLLER. 1-71
REPLACEMENT OF TONER CARTRIDGE .....1-72
REPLACEMENT MESSAGE....1-72
REPLACING THE TONER COLLECTION
CONTAINER 1-75
REPLACING THE STAMP CARTRIDGE 1-77
WHEN USING THE BP-70M31 / BP-70M36 /
BP-70M45 / BP-70M55 / BP-70M65 ..... 1-77
WHEN USING THE BP-50M26 / BP-50M31 /
BP-50M36 / BP-50M45 / BP-50M55 / BP-50M65 .....1-79
BEFORE USING THE MACHINE
PART NAMES AND FUNCTION EXTERIOR

(1) Output tray (exit tray cabinet) *1
Received faxes and printed papers are delivered to this tray.
(2) Job separator tray (upper tray) *2
Output is delivered to this tray. You can also output jobs to the job separator (centre tray) when a relay unit is installed.
(3) Automatic document feeder
It automatically feeds and scans multiple originals. 2-sided originals can be automatically scanned. For the BP-70M31/BP-70M36/BP-70M45/BP-70M55/BP-70M65 both sides of 2-sided originals can be automatically scanned at one time. ▶ AUTOMATIC DOCUMENT FEEDER (page 1-30)
(4) Operation panel
This panel hosts the [Power] button, Information indicator and touch panel. Use the touch panel to operate each of these functions. An NFC touch point area mark also appears. ▶ OPERATION PANEL (page 1-7)
(5) Keyboard *3*
Use this as a substitute for the soft keyboard displayed on the touch panel. When not being used, it can be stored under the operation panel.
(6) USB port (A type)
This is used to connect a USB device such as a USB memory device to the machine. Supports USB 2.0 (Hi-Speed).
(7) Exit tray unit (right tray) *2
Set this tray as the output tray if needed.
(8) Folding unit *2
This folds and outputs paper. ▶ FOLDING UNIT (page 1-66)
(9) Inner finisher *2*
This staples paper. A punch module can also be installed to punch holes in output paper. You can also perform stapling manually. ▶ INNER FINISHER (page 1-39)
(10) Front cover
Open this cover to switch the main power switch to "On" or "Off" to replace a toner cartridge. ▶ TURNING ON THE POWER (page 1-10)

(11) Saddle Stitch Finisher (large stacker) *1
This staples and folds paper.
A punch module can also be installed to punch holes in output paper.
You can also perform stapling manually.
▶ SADDLE STITCH FINISHER (LARGE STACKER) (page 1-54)
(12) Paper pass unit *1
Relay between the machine and the finisher, finisher (large stacker), saddle stitch finisher or saddle stitch finisher (large stacker).
(13) Motion sensor *2
This sensor detects the presence of a person that approaches the machine, and automatically wakes the machine from sleep mode. (Motion Sensor Mode Only)
(14) Utility table *2
You can use this as a work platform, or temporarily place originals or a mobile device.

- Do not place anything that weighs more than 5kg or otherwise apply a load.
- Do not place a container that contains water or other liquid. Risk of fire and electrical shock if the liquid spills and enters the machine.
- Working on the table while the machine is in operation may cause poor image quality or other problems.
(15) Bypass tray
Use this tray to feed paper manually. When loading paper larger than A4R or 8-1/2" x 11"R, pull out the extension guide. ▶ LOADING PAPER INTO THE BYPASS TRAY (page 1-22)
(16) Tray 5 (when a large capacity tray is installed) *1
Store paper in this tray.
▶ LOADING PAPER IN THE LARGE-CAPACITY TRAY (when a large capacity tray is installed) (page 1-20)
(17) Finisher *1
This staples paper. A punch module can also be installed to punch holes in output paper. ▶ FINISHER(page 1-43)
(18) Saddle stitch finisher *1
This staples and folds paper. A punch module can also be installed to punch holes in output paper. ▶ SADDIE STITCH FINISHER (page 1-50)
*1 Peripheral device. Equipped standard or not available in some countries and regions. Not available on some models. Contact your dealer or nearest authorised service representative. *2 This device can only be equipped on the BP-70M31/BP-70M36/BP-70M45/BP-70M55/BP-70M65.
(19) Finisher (large stacker) *1
This staples paper. A punch module can also be installed to punch holes in output paper. You can also perform stapling manually. ▶ FINISHER (LARGE STACKER)(page 1-46)
(20) Punch module *1
This is used to punch holes in output. Requires an inner finisher, finisher, finisher (large stacker), saddle stitch finisher or saddle stitch finisher (large stacker).
(21) Tray 1
Store paper in this tray.
TRAY 1 - 4 (when a stand/550/2x550/3x550/550&2100 sheet paper drawer is installed) (page 1-15)
(22) Tray 3 (when a stand/2x550/3x550 sheet paper drawer is installed) *1
Store paper in this tray.
TRAY 1 - 4 (when a stand/550/2x550/3x550/550&2100 sheet paper drawer is installed) (page 1-15)
(23) Tray 4 (when a stand/3x550 sheet paper drawer is installed) *1 Store paper in this tray.
TRAY 1 - 4 (when a stand/550/2x550/3x550/550&2100 sheet paper drawer is installed) (page 1-15)
(24) Tray 2 (when a low stand/550 sheet paper drawer or stand/550/2x550/3x550/550&2100 sheet paper drawer is installed) *1
Store paper in this tray.
TRAY 1 - 4 (when a stand/550/2x550/3x550/550&2100 sheet paper drawer is installed) (page 1-15)
(25) Tray 4 (when a stand/550&2100 sheet paper drawer is installed) *1 Store paper in this tray.
TRAY 3 - 4 (when a stand/550&2100 sheet paper drawer is installed) (page 1-18)
(26) Tray 3 (when a stand/550&2100 sheet paper drawer is installed) *1 Store paper in this tray.
TRAY 3 - 4 (when a stand/550&2100 sheet paper drawer is installed) (page 1-18)
INTERIOR
(9) (10) (11) (12)
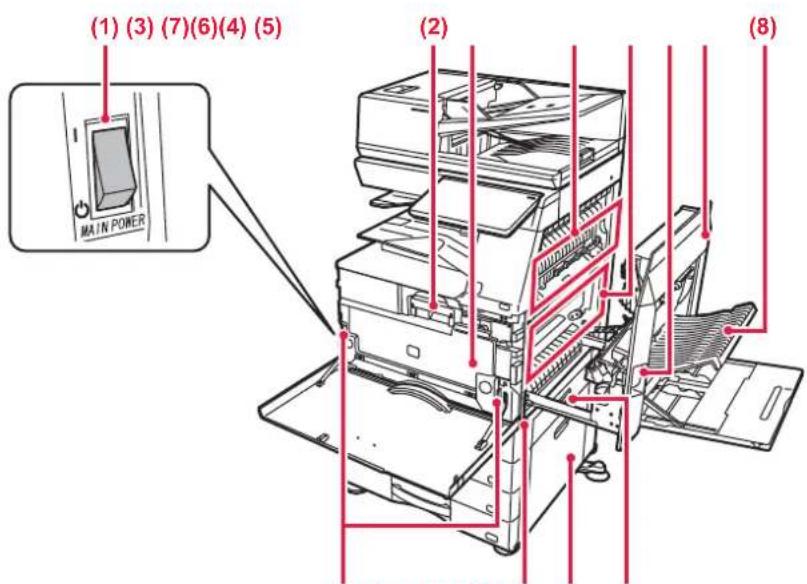
(1) Main power switch
Use this switch to turn on the power for the machine. When using the fax or Internet fax functions, always keep this switch in the "1" position.
▶ TURNING ON THE POWER (page 1-10)
(2) Toner cartridge
This cartridge contains toner. When the toner in a cartridge runs out, replace it with a new one.
REPLACEMENT OF TONER CARTRIDGE (page 1-72)
(3) Toner collection container
This container collects excess toner that remains after printing.
REPLACING THE TONER COLLECTION CONTAINER (page 1-75)

A service technician collects replaced toner collection containers.
(4) Fusing unit
Heat is applied here to fuse the transferred image onto the paper.

The fusing unit is hot.
Take care not to burn yourself when removing a misfeed.
(5) Photoconductive drum
Images are formed on the photoconductive drum.

Do not touch, damage the photoconductive drum, or expose it to direct sunlight or other strong light. This may cause a defective image.
(6) Right side cover release lever
To remove a paper misfeed, pull and hold this lever up to open the right side cover.
(7) Right side cover
Open this cover to remove a paper misfeed.
(8) Paper reversing section cover
This unit is used for reversing paper when 2-sided printing is performed. Open this cover to remove a paper misfeed.
(9) Toner collection container release button
Press this button when you need to release the Toner collection container lock to replace the Toner collection container.
REPLACING THE TONER COLLECTION CONTAINER (page 1-75)
(10) Handle
Pull this out and grasp it when moving the machine.
(11) Stand/550/2x550/3x550/550&2100 sheet paper drawer right-side cover
Open this to remove a paper misfeed in tray 2, 3 and 4.
(12) Paper tray right side cover
Open this to remove a paper misfeed in tray 1.
AUTOMATIC DOCUMENT FEEDER AND DOCUMENT GLASS
BP-50M26/BP-50M31/BP-50M36/BP-50M45/BP-50M55/BP-50M65

BP-70M31/BP-70M36/BP-70M45/BP-70M55/BP-70M65

(1) Paper feed roller
This roller rotates to automatically feed the original.
(2) Document feeding cover
Open this cover to remove an original misfeed.
This cover is also opened to clean the paper feed roller.
▶ CLEANING THE PAPER FEED ROLLER(page 1-71)
(3) Original guides
These guides help ensure that the original is scanned correctly.
Adjust the guides to the width of the original.
(4) Document feeder tray
Place the original.
Place the original with the print side facing up.
AUTOMATIC DOCUMENT FEEDER (page 1-30)
(5) Original exit tray
The original is discharged to this tray after scanning.
ORIGINAL SETTING INDICATOR (page 1-34)
(6) Original setting indicator
This indicator lights when the document is correctly loaded on the document feeder tray.
▶ ORIGINAL SETTING INDICATOR (page 1-34)
(7) Scanning area
Originals placed in the automatic document feeder are scanned here.
▶ CLEANING THE DOCUMENT GLASS AND AUTOMATIC DOCUMENT FEEDER (page 1-67)
(8) Original size detector
This unit detects the size of an original placed on the document glass.
▶ DOCUMENT GLASS (page 1-35)
(9) Document glass
If you want to scan books or other thick originals that cannot be fed through the automatic document feeder, place them on this glass.
▶ DOCUMENT GLASS (page 1-35)
SIDE AND BACK

(1) External phone socket (TEL) *
When the fax function of the machine is used, an external phone can be connected to this socket.
(2) Telephone line socket (LINE)
When the fax function of the machine is used, the telephone line is connected to this socket.
(3) USB port (A type)
This is used to connect a USB device such as a USB memory device to the machine.
Supports USB 2.0 (Hi-Speed) and USB3.0 (SuperSpeed).
* Peripheral device
(4) USB port (B type)
The machine does not use this connector.
(5) LAN connector
Connect the LAN cable to this connector when the machine is used on a network. Use a shielded LAN cable.
(6) Power plug
OPERATION PANEL
This section describes the names and functions of the respective parts of the operation panel.

(1) Information indicator
This indicator illuminates when the power to the machine is turned on, and when a user logs in to the machine.
▶ INFORMATION INDICATOR(page 1-8)
(2) Touch panel
Messages and keys appear on the touch panel display. Operate the machine by directly tapping the displayed keys.
TOUCH PANEL(page 2-2)
(3) Main power indicator
This indicator lights up when the machine's main power switch is in the " " position.
Blinks blue during the time that the [Power] button does not operate immediately after the main power switch is switched on.
This indicator will also blink blue when receiving printer data.
This indicator blinks yellow during Auto Power Shut-Off mode.
▶ TURNING ON THE POWER (page 1-10)
(4) [Power] button
Use this button to turn the machine's power on and off.
▶ TURNING ON THE POWER (page 1-10)
(5) NFC touch point area
You can easily connect a mobile device to the machine by touching the mobile device.
CONNECTING BY NFC (page 8-37)

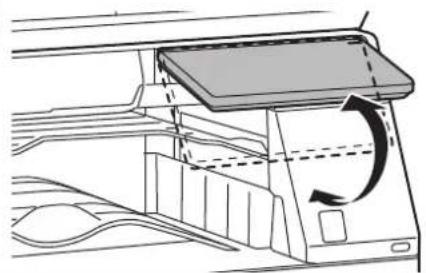
You can change the angle of the operation panel.

- The touch panel is a capacitance type.
- Use your finger to operate the touch panel. If you operate it with a pen, it may not work properly. Also, be aware that precious metals such as accessories may cause unintended touch movements.
- Do not touch the touch panel while the unit is starting up. If you touch the touch panel, it may not operate normally. Example:
Turn on the main power switch, press the [Power] button, and wait until the home screen is displayed. Returning from auto power shutoff.
INFORMATION INDICATOR
When turning the machine power ON/OFF; at user authentication when the user has logged in using IC card or NFC; when connecting USB memory to the machine; when starting a job on the machine control panel; or during image adjustment or when adding toner; a fax is being received or an error has occurred in the machine, the LED lights blue, white and orange in response to the request/operation from the user to communicate to the user the machine status.

This light is used to communicate with users in front of the machine, therefore it is not lit as a result of remote operations.
Lighting patterns
Lighting patterns differ depending on status.
| Lighting colour | Lighting patterns | Status |
| Blue | Lighting pattern 1 | When the power is turned on by user operation or motion sensor, when the power is turned off by user operation, when the power is restored from sleep mode*1, when the power is shifted to sleep mode*1, and when a job (copy, scan, fax) is started by the operation panel. |
| Lighting pattern 2 | During user authentication, at user login using an IC card or NFC Insertion of USB memory into the machine | |
| Lighting pattern 3 | When users are made to wait, during image quality adjustment or adding toner | |
| White | Blinks | A fax is being received. when the job separator (upper tray) or exit tray unit (right tray) is used for output, this blinks until the output is removed. |
| Orange Solidly *2 | Errors that do not stop machine operation, such as replacement timing of the toner collection container. | |
| Errors that stop machine operation, such as misfeeds and out of toner. | ||
*1 The information lamp lights up when the power is turned on or off directly by the user, or when the machine is restored from sleep mode. The information lamp does not light up when the printer is not operated directly by the user, such as when receiving a print job or when the scheduled auto power shut-off is turned on or off. *2 If the lighted state and the blinking state overlap, the blinking state takes priority.
Lighting pattern 1
After lighting sporadically, all lights come on together, and then turn off.
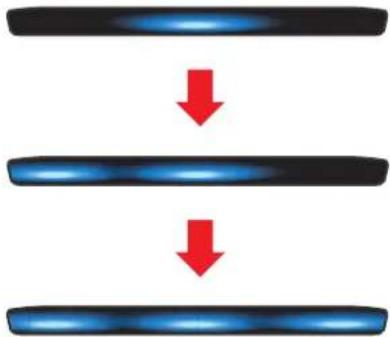
Lighting pattern 2
The centre light comes on, the left and right lights come on, then the centre light turns off.

Lighting pattern 3
Lights come on in succession, from the left lamp to the right lamp.


If there are multiple lighting patterns for the information indicator, then that which is later has priority. The previous information indicator lighting pattern turns off, then the information indicator lights in accordance with the later generated lighting pattern.
However, if lighting pattern 3 and another lighting pattern overlap, then lighting pattern 3 will have priority, and the other pattern will not be received until lighting pattern 3 is completed.
This section describes how to turn on/off the machine's power and how to restart the machine.
Operate two power switches: the main power switch inside the front cover, located in the lower left corner, and the [Power] button on the operation panel.
![Main power indicator [Power] button MAIN POWER](/content/2026/06/1378048/images/ae96bbfddcfcdb844d5be909d7321e0aa7fa42ea9c13ff0e2a59c2c0778e650d.jpg)
Main power switch

- When turning off the main power switch, be sure to press the [Power] button on the operation panel, tap the [Turn off] key on the touch panel, and then set the main power switch to the "position.
- In a sudden case of main power outage, turn the power for the machine back on and then turn it off in the correct order. If the machine is left for a long time with the main power having been turned off prior to the [Power] button being turned off, abnormal noises, degraded image quality or other problems may result.
- Turn off both the [Power] button and the main power switch and unplug the power cord if you suspect a machine failure, if there is a bad thunderstorm nearby, or when you are moving the machine.

- When using the fax or Internet fax function, always keep the main power switch in the " | " position.
- If the fax function will be used, and in particular if reception or timer transmission will take place at night, do not turn the main power off.
- In order for some settings to take effect, the machine must be restarted. In some states of the machine, restarting with the [Power] button may not make the settings take effect. In this case, turn off the main power switch and then turn it on again.
- Turn the main power switch to the "1" position.
- When the main power indicator lights in blue, press the [Power] button.
After pressing the [Power] button, tap the [Turn off] key on the touch.
To turn off the power for a long time, press the [Power] button to turn off the power, and after the screen display on the operation panel disappears, set the main power switch to the "↑" position.
RESTART THE MACHINE
Press the [Power] button to turn off the power, and then tap the [Turn off] key on the touch panel. After that, press the [Power] button again to turn on the power.
LOADING PAPER
IMPORTANT POINTS ABOUT PAPER
NAMES AND LOCATIONS OF TRAYS

THE DEFINITION OF "R" IN PAPER SIZE
To indicate the landscape setting, "R" is added to the end of the name of a paper size enabled for both landscape and portrait settings.
| Paper that can be set either in the portrait or landscape orientation Paper that can only be set in the landscape orientation | ||
| A4, B5, 8-1/2" x 11" | A3W, A3, B4, 12" x 18", 11" x 17", 8-1/2" x 14", 8-1/2" x 13" | |
Paper set in the landscape orientation  | Paper set in the portrait orientation  | Can be placed only in the landscape orientation  |
APPLICABLE PAPER TYPES
This section describes paper types that can be used and those that cannot be used.
All types of paper other than plain paper are referred to as special media.

- Various types of paper are commercially available, some of which cannot be used on the machine. Before using any paper, consult the dealer or nearest authorised service representative.
- The image quality and toner fusibility of paper may change due to ambient conditions, operating conditions, and paper characteristics, resulting in image quality inferior to that of Sharp standard paper. Before using any paper, consult the dealer or nearest authorised service representative.
- The use of non-recommended or non-usable paper may result in skewed feeding, misfeeds, poor toner fusing (the toner does not adhere to the paper well and can be rubbed off), or machine failure.
- The use of non-recommended paper may result in misfeeds or poor image quality. Before using non-recommended paper, check whether printing can be performed properly.
Useable paper
Specifications of plain paper, heavy paper and thin paper
| Plain Paper* | Plain Paper 1 | 60 g/m2 to 89 g/m2 (16 lbs. bond to 24 lbs. bond) |
| Plain Paper 2 | 90 g/m2 to 105 g/m2 (24 lbs. bond to 28 lbs. bond) | |
| Heavy paper | Heavy paper 1 | 106 g/m2 to 176 g/m2 (28 lbs. bond to 65 lbs. cover) |
| Heavy paper 2 | 177 g/m2 to 220 g/m2 (65 lbs. cover to 80 lbs. cover) | |
| Heavy paper 3 | 221 g/m2 to 256 g/m2 (80 lbs. cover to 140 lbs. index) | |
| Heavy paper 4 | 257 g/m2 to 300 g/m2 (140 lbs. index to 110 lbs. cover) | |
| Thin paper 55 g/m | 2 to 59 g/m2 (13 lbs to 16 lbs) | |
* If the paper that you normally use is Recycled, Pre-Punched, Pre-Printed, Letter Head, Colour, or User Type 1 to 7, set an appropriate paper weight in "Settings" – [System Settings] → [Common Settings] → [Paper Settings] → [Paper Tray Settings] → [Paper Weight].

- The category of "Useable paper" is based on Sharp standard paper.
- If non-recommended paper is used, print quality may be affected even if a paper type setting that accords with the above paper divisions is selected. In that case, try setting the paper type to a type that is slightly heavier or slightly lighter than normal. For more information, consult the dealer or nearest authorised service representative.
- For paper specifications, see the specifications in the "Start Guide". • Recycled paper, coloured paper and pre-punched paper must meet the same specifications as plain paper. Before using any paper, consult the dealer or nearest authorised service representative.
- If the paper that was output is significantly curled, remove the paper from the cassette, turn the paper over so it is face down, and resume use.
Paper that can be used for the fax function
A5, A5R, B5, B5R, 8-1/2" x 11", 8-1/2" x 11" R, A4, A4R, 8-1/2" x 13", 8-1/2" x 13-2/5", 8-1/2" x 13-1/2", B4, A3
(5-1/2" x 8-1/2"R, 8-1/2" x 11", 8-1/2" x 11"R, 8-1/2" x 13", 8-1/2" x 13-2/5", 8-1/2" x 14", 11" x 17", A4, A4R)
Specifications of paper that can be used for two-sided printing
| Paper Type | Plain, Recycled, Colour, Letter Head, Pre-Printed, Punched, Heavy Paper (106 g/m2(28 lbs. bond) to 256 g/m2(140 lbs. index)) |
| Paper Size | A3W, A3, B4, A4, A4R, B5, B5R, A5R, 12" x 18", 11" x 17", 8-1/2" x 14", 8-1/2" x 13-1/2", 8-1/2" x 13-2/5", 8-1/2" x 13", 8-1/2" x 11", 8-1/2" x 11"R, 5-1/2" x 8-1/2"R |
Types of paper that can be set in each tray

- For detailed information on the sizes and types of paper that can be loaded into each tray of the machine, see "SPECIFICATIONS" in the "Start Guide" and "Paper Tray Settings (page 9-132)". • Recycled paper, coloured paper and pre-punched paper must meet the same specifications as plain paper. Before using any paper, consult the dealer or nearest authorised service representative.
| Tray 1 Tray 2 | *1Tray 3+2 Tray 4+3 | Tray 3Tray 4+4 | Trays 5+5 | Bypass tray | |
| Plain Paper 1*6 | Permitted | Permitted | Permitted | Permitted | Permitted |
| Plain Paper 2*6 | Permitted | Permitted | Permitted | Permitted | Permitted |
| Heavy Paper 1*7 | Permitted | Permitted | - | Permitted | Permitted |
| Heavy Paper 2*7 | Permitted | Permitted | - | Permitted | Permitted |
| Heavy Paper 3*7 | Permitted Permitted | -- Permitted | |||
| Heavy Paper 4*7 | Permitted Permitted | -- Permitted | |||
| Thin Paper*8 | ---- Permitted | ||||
| Pre-Printed | Permitted | Permitted | Permitted | Permitted | Permitted |
| Recycle Paper | Permitted | Permitted | Permitted | Permitted | Permitted |
| Letter Head | Permitted | Permitted | Permitted | Permitted | Permitted |
| Pre-Punched | Permitted | Permitted | Permitted | Permitted | Permitted |
| Colour | Permitted | Permitted | Permitted | Permitted | Permitted |
| Labels ---- Permitted | |||||
| Glossy Paper | ---- Permitted | ||||
| Transparency | ---- Permitted | ||||
| Tab Paper | ---- Permitted | ||||
| Envelope*9 | Permitted*10 | --- Permitted | |||
*1 When a stand/550 sheet paper drawer/stand/2x550 sheet paper drawer/stand/3x550 sheet paper drawer/stand/550&2100 sheet paper drawer is installed. *2 When a stand/2x550/3x550 sheet paper drawer is installed *3 When a stand/3x550 sheet paper drawer is installed *4 When a stand/550&2100 sheet paper drawer is installed *5 When a large capacity tray is installed. *6 "Plain Paper 1" is plain paper 60 to 89 g/m² (16 to 24 lbs. bond), "Plain Paper 2" is plain paper 90 to 105 g/m² (24 to 28 lbs. bond). *7 "Heavy Paper 1" is heavy paper up to 176 g/m² (65 lbs. cover), "Heavy Paper 2" is heavy paper up to 220 g/m² (80 lbs. cover), "Heavy Paper 3" is heavy paper up to 256 g/m² (140 lbs. index), and "Heavy Paper 4" is heavy paper up to 300 g/m² (110 lbs. cover). *8 Thin paper of A6R size cannot be used. *9 For envelopes that can be used, see "Paper Tray Settings (page 9-132)". *10 Some envelopes may not be usable due to the shape of the flap or the type of envelope. Depending on the countries or regions, envelopes may not be available.
Setting orientation of the print side
The setting orientation varies for the print side of paper, depending on the tray used. For "Letter Head" and "Pre-Printed", set the paper in the reverse orientation.
Place with the print side facing the direction indicated below.
| Tray In normal | status | With letter head or pre-printed paper set |
| Trays 1 - 4 Facing up Facing down | ||
| Bypass, Tray 5 Facing down Facing up | up |

When [Disabling of Duplex] is set for "Letter Head" or "Pre-Printed", set the print side in the same orientation as for the ordinary operation.
Paper that cannot be used
- Embossed
- Special media for an ink jet printer (fine paper, glossy paper, glossy film, etc.) • Carbon paper or thermal paper
- Pasted paper
- Paper with clips • Paper with fold marks
- Torn paper • Oil-feed transparency film • Thin paper less than 55 g/m² (15 lbs) • Heavy paper as thick as 300 g/m² (110 lbs. cover) over
- Irregularly shaped paper
- Stapled paper
- Damp paper
- Curled paper
- Paper with a wave-like pattern due to moisture absorption • Paper with creases
- Paper with dust
- Paper whose print side or reverse side has been already printed on by printer or multifunction device.
Non-recommended paper
- Iron-on transfer paper
- Perforated paper
TRAY 1 - 4 (when a stand/550/2x550/3x550/550&2100 sheet paper drawer is installed)
A maximum of 550 sheets of paper from size A6R to A3W (5-1/2" x 8-1/2"R to 12" x 18") can be loaded into trays 1. A maximum of 550 sheets of paper from size A5 to A3W (5-1/2" x 8-1/2"R to 12" x 18") can be loaded into trays 2 to 4. Envelopes can be loaded up to 50 sheets or the height of the indicator line, or up to 200 sheets for 106 g/m² to 220 g/m² (28 lbs. bond to 80 lbs. cover) heavy paper and up to 100 sheets for 221 g/m² to 300 g/m² (80 lbs. cover to 110 lbs. cover) heavy paper in Tray 1.

- If you loaded paper of a different type or size from the paper previously loaded, be sure to check the settings in "Settings (administrator)". Incorrect settings affect automatic paper selection action. It may cause print failure, printing on paper of a wrong size or type, or paper misfeeds.
- Depending on the country or region, envelopes may not be available.

Do not place heavy objects on the tray or press down on the tray.
1
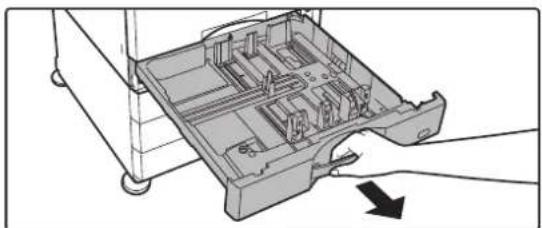
Pull out the paper tray.
Gently pull the tray out until it stops. To load paper, go to step 3. To load a different size of paper, go to the next step.

Pull the handle until the lock is released.
2

Adjust guide plates A and B to match the longitudinal and transversal dimensions of the paper to be loaded.
The guide plates A and B are slidable. Squeeze the separator plate lever and slide to the desired paper size. Adjust to the non-standard paper size so that the paper will not be too loose or too tight.
3

Fan the paper.
Fan the paper well before loading it. If the paper is not fanned, multiple sheets may feed at once and cause a misfeed.
4

Insert the paper into the tray.
- Load the paper with the print side facing up. The stack must not be higher than the indicator line (maximum of 550 sheets).
- Fan the paper well before loading it. If the paper is fed while overlapping, it may cause a paper jam.
- After loading the paper, close the guides to the paper width not to leave the gap from the guides A and B. Do not load the paper as shown below.

5

Close the tray slowly.
Push the tray into the machine slowly.
Forcefully inserting the paper may cause skewed feeding and paper misfeeds.
LOADING ENVELOPE IN TRAY 1
Load the paper with the copy and print side facing up. The diagram shows an example of printing on the front side. The maximum number of sheets (50) may not exceed the indicator line.
Envelopes with triangular flaps cannot be used in tray 1.

Cautions when placing envelopes
- Removing curling
- Ensure these are flat, containing no air
- Ensure the four folded edges are pressed flat (for items with flaps, three edges)
- Align on a flat surface

- Before printing envelopes in tray 1, print a trial print to check the results.
- If the envelope is not folded tightly, is warped or bent, it may cause misfeeds.
- HOW TO USE THIS MANUAL
- ABOUT OPERATION MANUAL
- PLEASE NOTE
- WARNING
- ILLUSTRATIONS AND THE OPERATION PANEL AND TOUCH PANEL SHOWN IN THIS MANUAL
- ICONS USED IN THE MANUALS
- BEFORE USING THE MACHINE
- HOW TO PLACE THE ORIGINAL
- PERIPHERAL DEVICES
- MAINTENANCE
- PART NAMES AND FUNCTION EXTERIOR
- SADDLE STITCH FINISHER (LARGE STACKER)
- PAPER PASS UNIT
- MOTION SENSOR
- UTILITY TABLE
- BYPASS TRAY
- TRAY 5 (WHEN A LARGE CAPACITY TRAY IS INSTALLED)
- FINISHER
- SADDLE STITCH FINISHER
- FINISHER (LARGE STACKER)
- PUNCH MODULE
- TRAY
- TRAY 3 (WHEN A STAND/2X550/3X550 SHEET PAPER DRAWER IS INSTALLED)
- TRAY 4 (WHEN A STAND/3X550 SHEET PAPER DRAWER IS INSTALLED) *1 STORE PAPER IN THIS TRAY
- TRAY 2 (WHEN A LOW STAND/550 SHEET PAPER DRAWER OR STAND/550/2X550/3X550/550&2100 SHEET PAPER DRAWER IS INSTALLED)
- TRAY 4 (WHEN A STAND/550&2100 SHEET PAPER DRAWER IS INSTALLED) *1 STORE PAPER IN THIS TRAY
- TRAY 3 (WHEN A STAND/550&2100 SHEET PAPER DRAWER IS INSTALLED) *1 STORE PAPER IN THIS TRAY
- INTERIOR
- MAIN POWER SWITCH
- TONER CARTRIDGE
- TONER COLLECTION CONTAINER
- FUSING UNIT
- PHOTOCONDUCTIVE DRUM
- RIGHT SIDE COVER RELEASE LEVER
- RIGHT SIDE COVER
- PAPER REVERSING SECTION COVER
- TONER COLLECTION CONTAINER RELEASE BUTTON
- HANDLE
- STAND/550/2X550/3X550/550&2100 SHEET PAPER DRAWER RIGHT-SIDE COVER
- PAPER TRAY RIGHT SIDE COVER
- AUTOMATIC DOCUMENT FEEDER AND DOCUMENT GLASS
- SIDE AND BACK
- OPERATION PANEL
- INFORMATION INDICATOR
- TOUCH PANEL
- MAIN POWER INDICATOR
- [POWER] BUTTON
- NFC TOUCH POINT AREA
- LIGHTING PATTERNS
- LIGHTING PATTERN
- RESTART THE MACHINE
- LOADING PAPER
- IMPORTANT POINTS ABOUT PAPER
- NAMES AND LOCATIONS OF TRAYS
- THE DEFINITION OF "R" IN PAPER SIZE
- APPLICABLE PAPER TYPES
- USEABLE PAPER
- PAPER THAT CAN BE USED FOR THE FAX FUNCTION
- SPECIFICATIONS OF PAPER THAT CAN BE USED FOR TWO-SIDED PRINTING
- TYPES OF PAPER THAT CAN BE SET IN EACH TRAY
- SETTING ORIENTATION OF THE PRINT SIDE
- PAPER THAT CANNOT BE USED
- NON-RECOMMENDED PAPER
- TRAY 1 - 4 (WHEN A STAND/550/2X550/3X550/550&2100 SHEET PAPER DRAWER IS INSTALLED)
- PULL OUT THE PAPER TRAY
- ADJUST GUIDE PLATES A AND B TO MATCH THE LONGITUDINAL AND TRANSVERSAL DIMENSIONS OF THE PAPER TO BE LOADED
- FAN THE PAPER
- INSERT THE PAPER INTO THE TRAY
- CLOSE THE TRAY SLOWLY
- LOADING ENVELOPE IN TRAY
- CAUTIONS WHEN PLACING ENVELOPES
Brand : SHARP
Model : BP-70M36
Category : Photocopier