
C401 - Telephone ZEBRA - Free user manual and instructions
Find the device manual for free C401 ZEBRA in PDF.


| Product Type | Cordless Phone |
| Model | C401 |
| Brand | Zebra |
| Technology | DECT 6.0 |
| Frequency Band | 1.9 GHz |
| Display | LCD with backlight |
| Dimensions (handset) | 160 x 50 x 30 mm |
| Weight (handset) | 130 g |
| Power Supply | 2 x AAA NiMH rechargeable batteries |
| Charger | AC adapter (input: 100-240V, output: 6V DC) |
| Talk Time | Up to 10 hours |
| Standby Time | Up to 100 hours |
| Indoor Range | Up to 50 meters |
| Outdoor Range | Up to 300 meters |
| Phonebook Capacity | Up to 100 entries |
| Caller ID | Supported |
| Speakerphone | Yes |
| Keypad | Backlit |
| Redial | Last 10 numbers |
| Mute Function | Yes |
| Maintenance | Clean with dry cloth; avoid liquids |
| Safety | Use only included charger; keep away from water |
| Spare Parts | Battery, charger, handset |
| Repairability | Replaceable battery; contact support |
Frequently Asked Questions - C401 ZEBRA
User questions about C401 ZEBRA
0 question about this device. Answer the ones you know or ask your own.
Ask a new question about this device
Download the instructions for your Telephone in PDF format for free! Find your manual C401 - ZEBRA and take your electronic device back in hand. On this page are published all the documents necessary for the use of your device. C401 by ZEBRA.
USER MANUAL C401 ZEBRA
Digital Cordless Phone For C401, C402, C403 and C404
Warning
Charge the handset for 24 hours before use.
Welcome...
to your new Motorola C4 Digital Cordless Phone!
- All handsets are fully cordless for locating anywhere within range.
• 50 Name and Number phonebook. - Speakerphone for hands-free conversations.
- Caller ID shows you who's calling and see details of the last 40 callers in a Calls list.*
- Redial up to 10 of the last numbers called.
- Register up to 5 handsets to a single base and register each handset with up to 4 different bases.
- Make internal calls and transfer external calls between handsets.
- Choose from 10 different ringer melodies for internal and external calls as well as numbers stored in the phonebook.
*You must subscribe to your network provider's Caller ID or Call Waiting service for these features to work. A subscription fee may be payable.
Please note that this equipment is not designed for making emergency telephone calls when the power fails. Alternative arrangements should be made for access to emergency services.
Need help?
If you have any problems setting up or using your C4, please contact Customer Services on 659-1818.
Alternatively, you may find the answer in the 'Help' section at the back of this guide.
This User Guide provides you with all the information you need to get the most from your phone.
Before you make your first call, you need to set up your phone. Follow the simple instructions in ‘Getting Started’, on the next few pages.
IMPORTANT
Only use the telephone line cord supplied.
This equipment is not designed for making emergency telephone calls when the power fails. Alternative arrangements should be made for access to emergency services.
Got everything?
C4 handset
C4 base
- User guide

ECOMOTO™
• 2 x AAA NiMH rechargeable batteries
• Power adaptor for the base
- Telephone line cord
If you have purchased a C4 multiple pack you will also have the following additional items:
• C4 handset & charger
- 2 x AAA NiMH rechargeable batteries
• Power adaptor for the charger
ECOMOTO: a convergence of efforts by marketing, design, research, engineering, and supply chain management that leads to better products for everyone. A holistic view that focuses on both social and environmental responsibility.
A passion and a shared point of view.
The right thing to do.
1) Meets and/or exceeds EMEA environmental regulatory requirements.
2) Eco friendly packaging with a minimum 20% post consumer recycled content.
3) Phone housing is built with a minimum of 25% post consumer recycle content plastic.
4) Energy efficient charger that meets EU Code of Conduct and Energy Star requirements.
5) ECO mode function which reduces the transmitted power and energy consumption, please refer to page 23.

MOTOROLA
- Getting started 6
- Getting to know your phone ....9
- Using the phone....13
3.1 Switch the handset on / off 13
3.2 Calls.... 13
3.2.1 Make a call 13
3.2.2 Preparatory dialling 13
3.2.3 End a call 13
3.2.4 Receive a call 13
3.3 Adjust the earpiece volume 13
3.4 Secrecy.... 13
3.5 Intercom.... 14
3.5.1 Make an internal call 14
3.5.2 Receive an internal call 14
3.5.3 Transfer a call 14
3.5.4 3-way conference call 14
3.6 Hands-free speakerphone 15
3.6.1 Make a hands-free call 15
3.6.2 Answer a call hands-free 15
3.6.3 Switch to hands-free during a call ..... 15
3.7 Redial 15
3.7.1 View or dial an entry 15
3.7.2 Copy a Redial list number to the phonebook 15
3.7.3 Delete an entry 16
3.7.4 Delete the entire Redial list 16
3.8 Lock/unlock the keypad ....16
3.9 Paging/Find handset 16
- Phonebook ....17
4.1 Store a name and number....17
4.2 View or dial an entry.....17
4.3 Edit a name and number 18
4.4 Delete an entry 18
- Handset settings ...... 19
5.1 Handset ringer volume 19
5.2 Handset ringer melody 19
5.3 Auto answer 19
5.4 Handset name ......19
5.5 Language 20
5.6 Key beep 20
5.7 Battery low warning beep 20
5.8 Out of range warning beep....20
5.9 Keypad lock using the menu 21
- Base settings 21
6.1 Base ringer volume .....21
6.2 Base ringer melody .....21
6.3 Change base PIN code 22
6.4 Dial mode 22
6.5 Recall mode 22
6.6 Restore default settings....22
6.7 Emergency default 23
6.8 Eco mode 23
6.9 Default settings ......24
7. Clock & alarm 24
7.1 Set the date....24
7.2 Set the time 24
7.3 Set alarm 25
7.4 Switch off alarm ring....25
8. Caller ID and the Calls list.... 25
8.1 Caller ID 25
8.2 Calls list....26
8.2.1 View the Calls list 26
8.2.2 Dial a number in the Calls list 26
8.2.3 Modify and dial a number in the
Calls list 26
8.2.4 Copy a Calls list number to the phonebook....27
8.2.5 Delete an entry 27
8.2.6 Delete the entire Calls list 27
9. Using additional handsets 28
9.1 Registering an additional handset....28
9.2 Register a different make of handset to your C4 base 29
9.3 Select a base .....29
9.4 De-register a handset....29
- Help....30
- General information ......31

MOTOROLA
1. Getting started
WARNING
Do not place your C4 in the bathroom or other humid areas.
Location
You need to place your C4 base within 2 metres of the mains power and telephone wall sockets so that the cables will reach. The socket-outlet shall be installed near the equipment and shall be easily accessible.
Make sure that it is at least 1 metre away from other electrical appliances to avoid interference. Your C4 works by sending radio signals between the handset and base. The strength of the signal depends on where you place the base. Placing it as high as possible ensures the best signal.
HANDSET RANGE
The unit has a range of up to 300 metres outdoors when there is a clear line of sight between the base and handset. Any obstruction between the base and handset will reduce the range significantly. With the base indoors and the handset either indoors or outdoors, the range will normally be up to 50 metres. Thick concrete walls can severely affect the range.
SIGNAL STRENGTH
The icon on your handset indicates that you are within range of the base. When out of range of the base, the icon flashes. If you are on a call, you will hear a warning beep.
The line will hang up if the handset moves out of range of the base. Move closer to the base. The handset will automatically reconnect to the base.
Setting up
IMPORTANT
The base station must be plugged into the mains power at all times. Do not connect the telephone line cord into the wall socket until the handset is fully charged. Use only the power adaptor and telephone line cord supplied with the product.
WHICH POWER ADAPTOR?
The power adaptor with a clear connector is for the base unit and the power adaptor with a red colour connector is for the charger unit (for multi-pack only).
Connecting the base
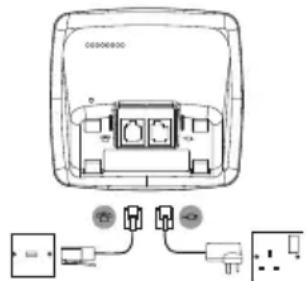
- Plug the telephone line cord into the socket marked

on the underside of the base.
- Plug the power adaptor with clear connector into the socket marked —□ on the underside of the base and plug the other end into the mains power wall socket. Switch on the mains power.
Installing and charging the handset
Remove the battery cover from the back of the handset and insert the 2 x AAA NiMH rechargeable batteries supplied. Please note the '+' and '-' markings inside the battery compartment and insert in the correct direction.
- Slide the battery cover back into place.
- If you are charging the batteries for the first time, place the handset on the base to charge for at least 24 hours continuously.
- When the handset is fully charged, will appear steadily on the display. Plug the other end of the telephone line cord (make sure that one end is already plugged into the base) into the telephone wall socket.
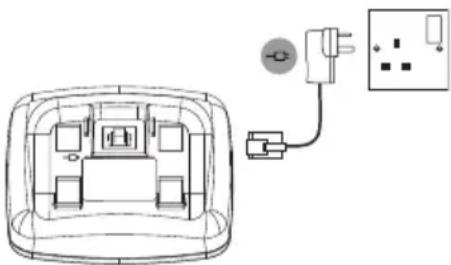
Connecting the handset and charger (for multi-pack only)
If you have purchased a multiple pack, you will need to carry out this process for all the handsets and chargers.
- Plug the power adaptor with red connector into the socket marked -enthe underside of the charger and plug the other end into the mains power wall socket.
natural_image
Diagram of a device with an electrical outlet connected to a plug, showing internal components without any text or symbols.- Remove the battery cover from the back of the handset and insert the 2 x AAA NiMH rechargeable batteries supplied. Please note the '+' and '-' markings inside the battery compartment and insert in the correct direction.
- Slide the battery cover back into place.
- If you are charging the batteries for the first time, place the handset on the charger to charge for at least 24 hours continuously.
- When the handset is fully charged, 100n will appear steadily on the display. The display will show the time and handset number (e.g. 2) to indicate that it is registered to the base.
IMPORTANT
Warning! Use only the approved rechargeable Ni-MH battery cells (2 x AAA Ni-MH 550mA rechargeable batteries) supplied with your C4.

MOTOROLA
BATTERY LOW WARNING
If co flashes on the display and you hear a warning beep every minute during a call, you will need to recharge the handset before you can use it again.
When charging, look will scroll on the display.
BATTERY PERFORMANCE
In ideal conditions, fully charged batteries should give up to 12 hours talk time and up to 250 hours standby time on a single charge*.
Note that new batteries do not reach their full capacity until they have been put to normal use for several days.
To keep your batteries in the best condition, leave the handset off the base for a few hours at a time.
Running the batteries right down at least once a week will help them last as long as possible.
The charge capacity of rechargeable batteries will reduce with time as they wear out, giving the handset less talk/standby time. Eventually they will need to be replaced.
After charging your handset for the first time, subsequent charging time is about 6–8 hours a day. Batteries and handset may become warm during charging. This is normal.
* All talk and standby times are approximate and depend on features selected and usage pattern.
Date and time
If you have subscribed to Caller ID Service, the date and time is set automatically for all handsets when you receive your first call.
If you do not have Caller ID service, you can set the date and time manually.
Set the date manually
- Press OK, scroll to DATE-TIME and press OK. The display shows DATE SET.
- Press OK to select.
- Enter the date (e.g. 12--08 for 12th of August) and press to confirm.
Set the time manually
- Press OK, scroll to DATE-TIME and press OK.
- Scroll ▼ to CLOCK SET and press OK.
- Enter the time in 24 hour format (e.g. 18--30 for 6:30pm) and press OK to confirm.
Your C4 is now ready for use.
2. Getting to know your phone Overview of your handset

A Earpiece
B Display
See page 10 for an overview of the display icons.
C Secrecy / Clear / Back
During a call, press to switch Secrecy on/off, page 13. In menu mode, press to return to previous menu or press and hold to return to standby. In editing mode, press to delete characters and digits. When viewing the redial/calls list, press to delete the displayed entry or press and hold to delete all entries.
D Menu / OK
Press to open the Menu, page 11. Press to select menu options and to confirm a displayed option.
E Redial / Up
In standby mode, press to open the redial list, page 15. During a call, press to increase earpiece volume, page 13. When the phone is ringing, press to increase the handset ringer volume, page 19. Press to scroll through the menu options, redial list, calls list and phonebook entries.
F Calls list / Down
In standby mode, press to open the calls list, page 26. During a call, press to decrease earpiece volume, page 13. When the phone is ringing, press to decrease the handset ringer volume, page 19. Press to scroll through the menu options, redial list, calls list and phonebook entries.
G Phonebook / Exit
In standby mode, press to open the phonebook menu, page 17. When viewing the redial/calls list or when editing, press to exit and return to standby.

MOTOROLA
H Hands-free
During a call, press to switch hands-free on and off, page 15.
I Talk / End call
Press to make, receive and end calls, page 13.
J \* / Keypad lock
Press and hold to lock the keypad, page 16.
To unlock, press any key and follow the on screen instructions.
K Intercom
Used to make internal calls and transfer calls to other C4 handsets registered to the base, page 14.
L Recall / Power on/off
Use with switchboard/PABX services and some network services.
Press and hold to switch the handset on/off, page 13.
Handset LCD Display
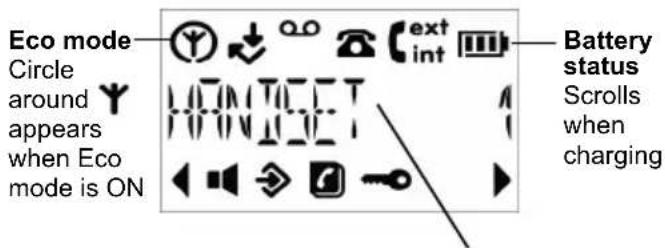
Time or Handset name
In standby mode, press and hold 0 to switch handset idle screen between handset name or time.
Display icons
ext Flashes to indicate an incoming external call
ext External call in progress
int Flashes to indicate an incoming internal call
int Internal call in progress
ext 3-way call in progress or transfer an external call to another C4 handset registered to the base
Eco mode is ON
Flashes to indicate new voicemail messages received Off when you have no voicemail messages
Y Indicates signal strength Flashes when handset is not registered to the base or if you go out of range
Hands-free mode is ON
Menu is opened
Phonebook is opened
Flashes to indicate new calls list entries received*
Answered call (when viewing the Calls list)*
↓ Unanswered call (when viewing the Calls list)*

Keypad is locked

Displayed number is longer than 12 digits
The approximate power levels of your battery are indicated as follows:

Battery is fully charged

Battery is partially charged

Battery is running low
Flashes when battery is almost fully discharged
* For this feature to work, you must subscribe to Caller ID Service from your network operator. A subscription fee may be payable.
Overview of the base

A Paging Key
In standby mode, press to ring the handset(s), page 16. Press and hold to enter registration mode when registering handsets, page 28.
Navigating the menus
Your C4 has an easy to use menu system.
Each menu has a list of options, which you can see on the menu map on the following page.
When the handset is switched on and in standby:
- Press OK to open the main menu.
- Then use ⬆ or ⬇ buttons to scroll through the available options.
- Press OK to select an option. To return to the previous menu level, press ◀. To exit the menu and return to standby, press and hold ▼.
NOTE
If no buttons are pressed for 30 seconds, the handset returns to standby automatically.
Menu map
| PHONEBOOK | SETUP | HANDSET | DATE - TIME | REGISTER |
| ADD ENTRY | BASE VOLUME | BEEP | DATE SET | SELECT BASE |
| MODIFY ENTRY | BASE MELODY | INT RING VOL | CLOCK SET | REG BASE |
| DELETE ENTRY | DEL HANDSET | EXT RING VOL | ALARM SET | |
| PIN CODE | INT MELODY | |||
| DIAL MODE | EXT MELODY | |||
| RECALL | AUTO ANSWER | |||
| DEFAULT | NAME | |||
| ECO MODE | LANGUAGE | |||
| KEYLOCK ? |
3. Using the phone
NOTE
Your handset will automatically time the duration of all external calls. The call timer will display after the first 15 seconds of your call. When the call ends, the total duration of your talk time is shown for 5 seconds.
3.1 Switch the handset on / off
Press ☐ R to switch the handset on or off.
3.2 Calls
3.2.1 Make a call
-
Press ↗.
-
When you hear the dial tone, dial the number.
3.2.2 Preparatory dialling
-
Dial the number first. If you make a mistake press ☑ to delete the last digit.
-
Press ↗ to dial.
NOTE
If the number dialled matches an entry in the phonebook, the name is displayed.
3.2.3 End a call
Press ↗, or place the handset back on the base or charger.
3.2.4 Receive a call
When you receive an external call, the phone rings and ext icon flashes on the display.
- Press ☑ to answer the call, or simply lift up the handset to answer the call.
NOTE
If you prefer to press √ when you lift up the handset to answer a call, you will need to switch Auto answer off, see page 19.
3.3 Adjust the earpiece volume
During a call, press ▲ or ♂ to increase or decrease the volume.
3.4 Secrecy
You can mute your handset so that you can talk to someone nearby without your caller hearing.
-
During a call, press 🔑. The display shows MUTE and your caller cannot hear you.
-
Press ▼ again to resume your call.

MOTOROLA
3.5 Intercom
3.5.1 Make an internal call
If you have more than one handset registered to the base, you can make internal calls between two handsets.
int icon is displayed to indicate an internal call.
- Press INT followed by the number (1-5) of the handset you want to call.
3.5.2 Receive an internal call
When you receive an internal call, icon flashes and the handset number that is calling you is displayed.
- Press ↗ to answer the call.
3.5.3 Transfer a call
You can transfer an external call to another handset registered to the base.
During an external call:
-
Press INT followed by the handset number (1-5) that you want to transfer to.
-
When the other handset answers, press ☑ to complete the transfer.
TIP
If there is no answer from the other handset and you wish to return to your external caller, press INT.
Your external call resumes automatically after 30 seconds if there is no answer.
3.5.4 3-way conference call
You can hold a 3-way conference call between 2 internal callers and 1 external caller.
During a call with an external caller:
- Press INT followed by the handset number (1-5) that you want to establish a conference call.
- When the other handset answers, press #_s to connect all three callers to begin the conference call.
ext int icon is displayed. - If there is no answer from the other handset, press to return to your external caller.
- Press ↗ to end the call.
3.6 Hands-free speakerphone
Hands-free lets you talk to your caller without holding the handset. It also enables other people in the room to listen to the conversation over the loudspeaker.
3.6.1 Make a hands-free call
- Dial the number then press ☐.
■ icon is displayed and you will hear the call over the handset loudspeaker. - Press ☐ to switch the call between the earpiece and the loudspeaker.
- Press ↗ to end the call.
TIP
During a hands-free call, press ▲ or ▼ to adjust the volume.
3.6.2 Answer a call hands-free
When the phone rings, press ☐ to answer the call.
3.6.3 Switch to hands-free during a call
During a call, press ☐ to put the call on the loudspeaker.
To switch hands-free off and return the call to the earpiece, press 📄 again.
3.7 Redial
The last 10 entries dialled are stored in the redial list.
3.7.1 View or dial an entry
- Press ⬆ to open the Redial list.
- Scroll ▲ or ♂ to the entry you want.
- Press ☑ to dial the displayed entry or press ☑ to return to standby.
TIP
If the caller's number exactly matches an entry stored in the phonebook, the name is displayed. Press OK to see the caller's number.
3.7.2 Copy a Redial list number to the phonebook
- Press ⬆ to open the Redial list.
- Scroll ▲ or ♂ to the entry you want.
- Press OK.
The display shows ADD ?.
- Press OK again.
The display shows NAME ?.
- Enter the name and press OK. The number is displayed.
- Edit the number if necessary, then press OK.

MOTOROLA
- Press ▲ or ♂ to select the ringer melody you want and press OK. The number is stored.
NOTE
See "ENTERING NAMES" and "WRITING TIPS" on page 17.
3.7.3 Delete an entry
- Press ⬆ to open the Redial list.
- Scroll ▲ or ♂ to the entry you want and press ▼. The display shows DELETE ?.
- Press OK to confirm or ▼ to cancel.
3.7.4 Delete the entire Redial list
- Press ⬆ to open the Redial list.
- Press and hold ▼. The display shows DELETE ALL ?.
- Press OK to confirm or ▶ to cancel.
3.8 Lock/unlock the keypad
You can lock the keypad so that it cannot be operated accidentally while carrying it around.
NOTE
When the keypad is locked, you can still answer incoming calls and operate the handset as normal. When the call ends, the keypad lock comes on again.
- Press and hold ☑*.
icon is displayed. - To unlock the keypad, press any key on your handset. The display shows PRESS *.
- Press ☐* within 3 seconds.
3.9 Paging/Find handset
You can alert a handset user that they are wanted or locate a missing handset.
Paging calls cannot be answered by a handset.
- Press ⬙ on the base. All handsets registered to the base will ring.
- To stop the ringing, press ⏻ on the base again or press any button on the handset.
4. Phonebook
You can store up to 50 names and numbers in the phonebook. Names can be up to 12 characters long and numbers up to 24 digits. You can also select different ringer melodies for the phonebook entries.
4.1 Store a name and number
If you have subscribed to Caller ID Service and wish to display the name of your caller instead of the number, save the full telephone number including the area code to your phonebook.
You can store multiple entries with the same number. However, to prevent unnecessary duplicated entries, you can only store the same name once.
- Press OK.
The display shows PHONEBOOK. - Press OK to select.
The display shows ADD ENTRY. - Press OK to select.
The display shows NAME ?. -
Enter the name and press OK.
The display shows NUMBER ?. -
Enter the number and press OK.
The display shows MELODY 1. -
Press ▲ or ▼ to select the ringer melody you want and press OK.
The display shows ADD ENTRY. -
Enter the next name and number entry that you wish to store in your phonebook or press twice to return to standby.
ENTERING NAMES
Use the keypad letters to enter names, e.g. to store TOM:
Press 8_tUN once to enter T .
Press 6_MND three times to enter O.
Press 6_MND once to enter M.
WRITING TIPS
Press ☑ to delete the last character or digit.
Press ⬆ or ⬇ to move between characters/digits.
Press 1 to insert a space.
Use 1 twice to insert a dash.
4.2 View or dial an entry
- Press
icon is displayed.

MOTOROLA
- Scroll ▲ or ♂ to the entry you want.
OR
Enter the first letter of the name to search alphabetically.
The first name that starts with this letter or the nearest letter in the alphabet will be displayed.
Scroll ▲ or ♂ to the entry you want.
- Press ☑ to dial or ▼ to return to standby.
TIP
When the name is displayed, you can switch between the name and number by pressing OK.
4.3 Edit a name and number
- Press OK.
The display shows PHONEBOOK.
-
Press OK to select.
-
Scroll ▼ to MODIFY ENTRY and press OK.
-
Scroll ▲ or ⬆ to the entry you want to edit, or search alphabetically and press OK.
The existing name is displayed.
- Press ☑ to delete the name if required, then enter the new name and press OK.
The existing number is displayed.
-
Press ▼ to delete the number if required, then enter the new number and press OK.
-
Scroll ▲ or ♂ to select a new ringer melody and press OK.
The display shows ADD ENTRY.
- Enter the next name and number entry you wish to store in your phonebook or press ▼ twice to return to standby.
4.4 Delete an entry
- Press OK.
The display shows PHONEBOOK.
-
Press OK to select.
-
Scroll ▼ to DELETE ENTRY and press OK.
-
Scroll ▲ or ▼ to the entry you want to delete, or search alphabetically and press OK. The display shows CONFIRM ?.
-
Press OK to confirm or ▼ to cancel.
5. Handset settings
5.1 Handset ringer volume
You can adjust the ring volume and set different volume levels for your internal and external calls. Choose from 5 volume levels or Off.
- Press OK, scroll ▼ to HANDSET and press OK.
- Press ▲ or ▼ to select INT RING VOL or EXT RING VOL and press OK.
- Press ▲ or ♂ to select the volume (1 - 5 or OFF).
- Press OK to confirm or ↙ to return to the previous menu.
TIP
When the phone is ringing, you can adjust the ringer volume by pressing ▲ or ♂.
5.2 Handset ringer melody
You can set different ringer melodies for your internal and external calls. Choose from 10 different ringer melodies.
You will hear a sample ring as you scroll to each ring melody.
- Press OK, scroll ▼ to HANDSET and press OK.
- Press ▲ or ▼ to select INT MELODY or EXT MELODY and press OK.
-
Press ▲ or ♂ to select the ringer melody (1 - 10).
-
Press OK to confirm or ▼ to return to the previous menu.
NOTE
Calls from the numbers that you have stored in the phonebook will ring using the ringer melody you have set when you store the entry.
5.3 Auto answer
Your phone is set to answer calls by lifting the handset off the base or charger. You can switch this feature off so that calls can only be answered by pressing √.
- Press OK, scroll to HANDSET and press OK.
- Scroll ▼ to AUTO ANSWER and press OK.
- Press ▲ or ⬇ to select ON or OFF and press OK to confirm.
5.4 Handset name
If you are using more than one handset with your C4 base, you can set a personalized name for each handset to easily distinguish between them.
A name can be up to 10 characters long.
- Press OK, scroll to HANDSET and press OK.
- Scroll ▼ to NAME and press OK.
- Enter the new handset name and press OK to confirm.

MOTOROLA
NOTE
The handset name will only be displayed for approximately 20 seconds when no button is pressed. If you make a mistake, press ▼ to delete the last character or digit.
See "ENTERING NAMES" and "WRITING TIPS" on page 17.
5.5 Language
- Press OK, scroll ▼ to HANDSET and press OK.
- Scroll ▼ to LANGUAGE and press OK.
- Press ▲ or ▼ to select your preferred language and press OK to confirm.
5.6 Key beep
When you press a button on the handset keypad, you will hear a beep. You can switch these beeps on or off.
- Press OK, scroll to HANDSET and press OK. The display shows BEEP.
- Press OK to select. The display shows KEYTONE.
- Press OK to select.
- Press ▲ or ⬆ to select ON or OFF and press OK to confirm.
5.7 Battery low warning beep
When the battery is almost fully discharged, you will hear a warning beep every minute during a call. You can switch these beeps on or off.
- Press OK, scroll to HANDSET and press OK. The display shows BEEP.
- Press OK to select.
- Scroll ▼ to LOW BATTERY and press OK.
- Press ▲ or ▼ to select ON or OFF and press OK to confirm.
5.8 Out of range warning beep
If the handset goes out of range, you will hear warning beeps during a call. You can switch these beeps on or off.
- Press OK, scroll to HANDSET and press OK. The display shows BEEP.
- Press OK to select.
- Scroll ▼ to OUT RANGE and press OK.
- Press ▲ or ▼ to select ON or OFF and press ⏻ to confirm.
5.9 Keypad lock using the menu
You can use the menu to lock the keypad.
-
Press OK, scroll to HANDSET and press OK.
-
Scroll ▼ to KEYLOCK ? and press OK to confirm.
icon is displayed.
TIP
To unlock the keypad, press any button on the keypad, then press ☐* within 3 seconds.
6. Base settings
6.1 Base ringer volume
Choose from 5 volume levels or Off.
-
Press OK, scroll ▼ to SETUP and press OK. The display shows BASE VOLUME.
-
Press OK.
-
Press ▲ or ♂ to select the volume (1 - 5 or OFF).
-
Press OK to confirm or to return to the previous menu.
6.2 Base ringer melody
Choose from 5 different base ringer melodies.
You will hear a sample ring as you scroll to each ringer melody.
-
Press OK, scroll ▼ to SETUP and press OK.
-
Scroll ▼ to BASE MELODY and press OK.
-
Press ▲ or ♂ to select the ringer melody (1 - 5).
-
Press OK to confirm or to return to the previous menu.

MOTOROLA
6.3 Change base PIN code
Some functions are protected by a 4 digit PIN code which must be entered if you want to change the settings. The default PIN is 0000. You can change this to your own preferred number.
When you enter a PIN, the digits are shown as ****.
- Press OK, scroll ▼ to SETUP and press OK.
- Scroll ▼ to PIN CODE and press OK.
- Enter the 4 digit PIN code (default = 0000) and press OK.
- Re-enter the new PIN again and press OK to confirm.
IMPORTANT
If you change the PIN code, please keep a record of the new number.
6.4 Dial mode
Your C4 is set to tone dialling. You should only need to change this if connected to an older type of switchboard/PBX which requires Pulse dialling.
- Press OK, scroll ▼ to SETUP and press OK.
- Scroll ▼ to DIAL MODE and press OK.
- Press ▲ or ▼ to select TONE DIAL or PULSE DIAL and press OK to confirm.
6.5 Recall mode
Depending on your country and network operator, your C4 has the recall time set as 600 ms (RECALL 2). It is unlikely that you need to change this setting unless advised to do so.
- Press OK, scroll to SETUP and press OK.
- Scroll ▼ to RECALL and press OK.
- Press ▲ or ▼ to select RECALL 1 (short flash time) or RECALL 2 (long flash time) and press OK to confirm.
6.6 Restore default settings
You can restore your C4 to its default (original) settings.
All the handsets that are registered to the base will be retained.
WARNING
Resetting your phone to its default settings will delete all entries in the Phonebook and Calls list. All handset and base settings will also be reset.
- Press OK, scroll to SETUP and press OK.
- Scroll ▼ to DEFAULT and press OK.
- Enter the 4 digit PIN code (default = 0000) and press OK. The display shows CONFIRM ?.
- Press OK to confirm or ▶ to return to the previous menu. Your C4 will restart automatically.
6.7 Emergency default
If you have lost your PIN code, you can still restore your C4 to its default settings.
- Remove the batteries from the handset.
- Press and hold ☐ while replacing the batteries. The display shows DEFAULT.
- Press OK to confirm. Your C4 will restart automatically.
6.8 Eco mode
Your C4 offers ECO mode function which reduces the transmitted power and energy consumption when switched on. This feature is set to OFF by default.
To switch Eco mode on:
- Press OK, scroll to SETUP and press OK.
-
Scroll ▼ to ECO MODE and press OK.
-
Press ▲ or ▼ to select ON or OFF and press OK to confirm.

When Eco mode is switched off, the circle around disappears.
NOTE
When ECO mode is set to ON, the handset range will be reduced.

MOTOROLA
6.9 Default settings
Low battery beeps ON
Out of range warning beeps ON
Key beep ON
Auto answer ON
Internal melody 1
Internal volume 3
External melody 3
External volume 3
Ear volume 3
Base melody 2
Base ringer volume 3
Phonebook Empty
Calls list Empty
Redial list Empty
PIN code 0000
Dial mode Tone
Recall mode RECALL 2 (600 ms)
Eco mode OFF
Keypad lock OFF
7. Clock & alarm
If you have subscribed to Caller ID Service, the date and time will be set on all your handsets whenever a call is received. You can also manually set the date and time on the individual handsets.
7.1 Set the date
-
Press OK, scroll to DATE-TIME and press OK. The display shows DATE SET.
-
Press OK to select.
-
Enter the date (e.g. 12--08 for 12th of August) and press OK to confirm.
7.2 Set the time
-
Press OK, scroll to DATE-TIME and press OK.
-
Scroll ▼ to CLOCK SET and press OK.
-
Enter the time in 24 hour format (e.g. 18--30 for 6:30pm) and press OK to confirm.
7.3 Set alarm
Each handset can have a different alarm setting.
- Press OK, scroll to DATE-TIME and press OK.
- Scroll ▼ to ALARM SET and press OK.
- Press ▲ or ⬤ to select ON or OFF and press OK to confirm.
- If you select ON, enter the time in 24 hour format (e.g. 07--30 for 7:30am) and press OK to confirm.
7.4 Switch off alarm ring
When the alarm sounds, press any button to switch it off.
NOTE
If you are using the handset to make a call when the alarm ring is due, you will hear a beep in the earpiece.
8. Caller ID and the Calls list
IMPORTANT
To use Caller ID, you must first subscribe to the service from your network provider. A subscription fee may be payable.
To ensure that the caller's name is displayed, make sure you have stored the full telephone number, including the area code in the phonebook.
If the caller's number is stored in the phonebook, the name assigned to it will be displayed.
If the call is a withheld call, WITHHELD will be displayed.
If the number is unavailable, UNAVAILABLE will be displayed. If the call is from an international number, INTERNATIONAL will be displayed.
If the call is from the operator, OPERATOR will be displayed.
If the call is from a payphone, PAYPHONE will be displayed.
If the call is from a ringback request, RINGBACK will be displayed.
8.1 Caller ID
If you have subscribed to a Caller ID Service, you will be able to see your caller's number on your handset (provided it is not withheld) prior to answering the call. The display can show the first 12 digits or characters of the phone numbers and names.

MOTOROLA
If your caller's name and number are stored in the phonebook and a name/number match is found, you will see the caller's name on the display instead.
8.2 Calls list
The Calls list stores details of your last 40 received calls, including the phone number and date and time of the call.
The Calls list also alerts you when you have unanswered calls.
The caller's details are stored in the Calls list whether or not you have answered the call. The list is shared by all handsets registered to the base. When the list is full, and a new call is received, the oldest entry will be deleted automatically.
When a new call is received in the Calls list, 📞n will flash on the display in standby mode to alert you. When you have viewed the new call, 📞n disappears but icon↓ will remain.
8.2.1 View the Calls list
-
Press ▼ to open the Calls list. If there are no calls in the list, the display shows EMPTY.
-
Press ▲ or ♂ to scroll through the list.
- If the call was answered, ↓ icon is displayed as you scroll to the entry. If the call was unanswered, ↓ icon is displayed as you scroll to the entry. When you reach the end of the list, the handset will beep.
- If the caller's number exactly matches an entry stored in the phonebook, the display will alternate between the name and the number. Press OK to see the caller's number.
- If the telephone number is longer than 12 digits, icon is displayed. Press OK to see the remaining digits.
- Press OK again to see the time and date of the call.
- Press OK again to access the option to store the entry in your phonebook.
8.2.2 Dial a number in the Calls list
- Press ▼ to open the Calls list.
- Scroll ▲ or ♂ to the entry you want.
- Press ↗ to dial the displayed entry.
8.2.3 Modify and dial a number in the Calls list
- Press ▼ to open the Calls list.
- Scroll ▲ or ♂ to the entry you want.
- Press OK repeatedly until the display shows MODIFY ENTRY ? .
- Press OK again. The display shows NUMBER.
-
Press ▲ or ▼ to move the cursor to edit or delete number.
-
Press Digit key to input a number or ☑ to delete a number.
- Press ☑ to dial out using the modified number.
NOTE
The edited entry cannot be saved in the Calls list.
8.2.4 Copy a Calls list number to the phonebook
- Press ▼ to open the Calls list.
- Scroll ▲ or ♂ to the entry you want.
- Press OK repeatedly until the display shows ADD?
- Press OK again.
The display shows NAME ?.
- Enter the name and press OK.
The number is displayed. - Edit the number if necessary, then press OK.
- Press ▲ or ▼ to select the ringer melody you want and press OK. The number is stored.
NOTE
See "ENTERING NAMES" and "WRITING TIPS" on page 17.
8.2.5 Delete an entry
- Press ▼ to open the Calls list.
- Scroll ▲ or ♂ to the entry you want and press √. The display shows DELETE ?.
- Press OK to confirm or ▶ to cancel.
8.2.6 Delete the entire Calls list
- Press ▼ to open the Calls list.
- Press and hold ▼. The display shows DELETE ALL ?.
- Press OK to confirm or ▼ to cancel.

MOTOROLA
9. Using additional handsets
You can register up to five handsets to your C4 base to extend your phone system without having to install extension sockets for each new phone.
Each C4 handset can be registered with up to four bases. You can then select the base you prefer to use.
If you have purchased a C4 multiple pack, all additional handsets come pre-registered to the base.
If you have purchased an additional handset separately, you must register it to your C4 base before it can be used.
9.1 Registering an additional handset NOTE
Handset batteries must be fully charged before you start to register. Hold your handset close to the base during the registration process.
Handsets that were supplied with your C4 base are already pre-registered.
On the base:
- Press and hold Ⓧ for 3 seconds until you hear two beeps. The base will remain in registration mode for 90 seconds.
On the handset:
- Press OK, scroll ▼ to REGISTER and press OK.
- Scroll ▼ to REG BASE and press OK.
- Enter the base number (1 - 4). The base numbers that are already in use flashes. The display shows SEARCHING...
- When the handset finds the base signal, the display shows SEARCHING...X, where X indicates the base identification number.
- The display will ask for the PIN to be entered. Enter the 4 digit PIN code (default = 0000) and press OK. You will hear a beep if the registration is successful. The handset is automatically assigned an available handset number. Use this number when making internal calls.
NOTE
If registration is not successful the first time, please repeat the process again in case the base registration period ran out of time. If the base is not found after a few seconds, the handset returns to standby. Try registering again.
If there are already 5 handsets registered to the base, the registration will fail. You must de-register another handset before you can register a new one.
9.2 Register a different make of handset to your C4 base
IMPORTANT
DECT GAP Profile only guarantees that basic calling functions will work correctly between different makes/types of handset and base. There is a possibility that certain devices such as Caller ID will not work correctly.
On the base:
- Press and hold ⏻ for 3 seconds until you hear two beeps. The base will remain in registration mode for 90 seconds.
On the handset:
Follow the registration instructions given in your handset's user guide.
9.3 Select a base
If your C4 handset is registered to more than one base (e.g. one at work and one at home), you can select which base to use.
Each handset can be registered with up to four bases.
-
Press OK, scroll to REGISTER and press OK. The display shows SELECT BASE.
-
Press OK. All the bases that your handset has been registered to will be displayed, e.g. BASE 1 2 3 4. The currently selected base number flashes.
- Enter the base number that you want to use. Alternatively, press ⬆ or ⬇ to scroll to AUTO.
- Press OK to confirm. You will hear a confirmation beep and the display will return to the previous menu.
TIP
If you select AUTO, your handset will automatically search for and connect to the base with the strongest signal.
9.4 De-register a handset
Use one handset to de-register another. You cannot de-register the handset that you are using.
- Press OK, scroll ▼ to SETUP and press OK.
- Scroll ▼ to DEL HANDSET and press OK.
- Enter the 4 digit PIN code (default = 0000) and press OK.
- Enter the handset number that you want to de-register. You will hear a confirmation beep and the display will return to the previous menu.
10. Help
No dial tone
- Use only the telephone line cord supplied.
- Check that the telephone line cord is connected properly.
- Check that the mains power is connected properly and switched on.
No display
- Check that the batteries are inserted correctly and fully charged. Use only approved rechargeable batteries supplied.
- Check that the handset is switched on. Press and hold ☐ R.
- Reset the base by removing the batteries and disconnecting the mains power. Wait for around 15 seconds before connecting it again. Allow up to one minute for the handset and base to synchronize.
Y icon flashes
- Handset is out of range. Move closer to the base.
- Make sure that the handset is registered to the base, see page 28.
- Check that the mains power is connected properly and switched on.
Keypad does not seem to work
- Check that the keypad lock is not on, see page 16.
icon is not scrolling during charge
- Adjust the handset slightly on the base.
- Clean the charging contacts with a cloth moistened with alcohol.
- Check that the mains power is connected properly and switched on.
- The battery is full. When the handset is fully charged, icon will appear steadily on the display.
No Caller ID
- Check your subscription with your network operator, see page 25.
- The caller may have withheld their number.
- The record cannot be found in your phonebook. Check that you have the correct name/number stored in your phonebook, with the full area code.
I have forgotten my PIN!
- Restore your C4 to its default settings, see "6.7 Emergency default", page 23.
Cannot register a handset to the base
- You can register up to a maximum of 5 handsets to a C4 base. You must de-register a handset in order to register a new one, see page 29.
- Check that you have entered the correct PIN code (default = 0000).
- Check that you are at least one metre away from other electrical equipment to avoid interference when registering.
Handset does not ring
- The handset ringer volume may be set to Off, see page 19.
Base unit does not ring
- The base ringer volume may be set to Off, see page 21.
Noise interference on my phone or on other electrical equipment nearby
- Place your C4 at least one metre away from electrical appliances or any metal obstructions to avoid any risk of interference.
11. General information
IMPORTANT
This equipment is not designed to make emergency telephone calls when the power fails. Alternative arrangements should be made for access to emergency services.
This product is intended for connection to analogue public switched telephone networks and private switchboards in Philippines.
Important safety instructions
Follow these safety precautions when using your phone to reduce the risk of fire, electric shock, and injury to persons or property:
- Keep all slits and openings of the phone unblocked. Do not set the phone on a heating register or over a radiator. Ensure that proper ventilation is provided at the installation site.
- Do not use while wet or while standing in water.
- Do not use this product near water (for example, near a bath tub, kitchen sink, or swimming pool).
- Do not allow anything to rest on the power cord. Place the power cord so that it will not be walked on.
- Never insert objects of any kind into the product vents as that may result in fire or electric shock.

MOTOROLA
- Unplug this product from the wall outlet before cleaning. Do not use liquid cleaners or aerosol cleaners. Use a damp cloth for cleaning.
- Do not disassemble this product. If service or repair work is required, contact the customer service helpline found in this user's Guide.
- Do not overload wall outlets and extension cords.
- Avoid using during an electrical storm. Use a surge protector to protect the equipment.
- Do not use this phone to report a gas leak, especially if you are in the vicinity of the gas line.
CAUTION
To reduce the risk of fire, use only the supplied power adaptor.
Unplug this cordless phone immediately from an outlet if:
- The power cord or plug is damaged or frayed.
• Liquid has been spilled on the product. - The product has been exposed to rain or water. Do not retrieve the handset or base until after you have unplugged the power and phone from the wall. Then retrieve the unit by the unplugged cords.
- The product has been dropped or the cabinet has been damaged.
- The product exhibits a distinct change in performance.
Installation Guidelines
- Read and understand all instructions and save them for future reference.
- Follow all warnings and instructions marked on the product.
- Do not install this product near a bath tub, sink, or shower.
- Operate this phone using only the power source that is indicated on the marking label. If you are unsure of the power supply to your home, consult with your dealer or local power company.
- Do not place this product on an unstable cart, stand, or table. This product may fall, causing serious damage to the product.
- Adjust only those controls that are covered by the operating instructions. Improper adjustment of other controls may result in damage and will often require extensive work to restore the product to normal operation.
- Clean this product with a soft, damp cloth. Do not use chemicals or cleaning agents to clean this phone.
- Use only the power supply that came with this unit. Using other power supplies may damage the unit.
-
Because this phone operates on electricity, you should have at least one phone in your home that could operate without electricity in the case the power in your home goes out.
-
To avoid interference to nearby appliances, do not place the base of the phone on or near a TV, microwave oven, or VCR.
Battery Safety Instructions
- Do not burn, disassemble, mutilate, or puncture the battery. The battery contains toxic materials that could be released, resulting in injury.
CAUTION
There is a risk of explosion if you replace the battery with an incorrect battery type. Use only the battery pack that came with your phone or an authorized replacement recommended by the manufacturer.
- Keep battery packs out of the reach of children.
- Remove battery packs if storing over 30 days.
- Do not dispose of battery packs in fire, which could result in explosion.
- The rechargeable battery packs that power this product must be disposed of properly and may need to be recycled. Refer to your battery's label for battery type. Contact your local recycling center for proper disposal methods.
SAVE THESE INSTRUCTIONS
Cleaning
- Clean the handset and base (or charger) with a damp (not wet) cloth, or an anti-static wipe.
- Never use household polish as this will damage the product. Never use a dry cloth as this may cause static shock.
Environmental
- Do not expose to direct sunlight.
- The handset may become warm when the batteries are being charged or during prolonged periods of use. This is normal. However, we recommend that to avoid damage, do not place the product on antique/veneered wood.
- Do not place your product on carpets or other surfaces which generate fibres, or place it in locations preventing the free flow of air over its surfaces.
- Do not submerge any part of your product in water and do not use it in damp or humid conditions, such as bathrooms.
- Do not expose your product to fire, explosives or other hazardous conditions.
- There is a slight chance that your phone could be damaged by an electrical storm. We recommend that you unplug the power and telephone line cord during an electrical storm.
Product disposal instructions
Product disposal instructions for residential users
When you have no further use for it, please remove any batteries and dispose of them and the product according to your local authority's recycling processes. For more

MOTOROLA
information, please contact your local authority or the retailer where the product was purchased.
Product disposal instructions for business users
Business users should contact their suppliers and check the terms and conditions of the purchase contract and ensure that this product is not mixed with other commercial waste for disposal.
Consumer Products and Accessories Warranty
Thank you for purchasing this Motorola branded product manufactured under license by Suncorp Technologies Limited, 3001-3005 China Resources Building, 26 Harbour Road, Wan Chai, Hong Kong. ("SUNCORP")
What Does this Warranty Cover?
Subject to the exclusions contained below, SUNCORP warrants that this Motorola branded product ("Product") or certified accessory ("Accessory") sold for use with this product that it manufactured to be free from defects in materials and workmanship under normal consumer usage for the period outlined below. This Limited Warranty is your exclusive warranty and is not transferable.
Who is covered?
This warranty extends only to the first consumer purchaser, and is not transferable.
What will SUNCORP do?
SUNCORP or its authorized distributor at its option and within a commercially reasonable time, will at no charge repair or replace any Products or Accessories that does not conform to this limited warranty. We may use functionally equivalent reconditioned/ refurbished/ pre-owned or new Products, Accessories or parts.
What Other Limitations Are There?
ANY IMPLIED WARRANTIES, INCLUDING WITHOUT LIMITATION THE IMPLIED WARRANTIES OF MERCHANTABILITY AND FITNESS FOR A PARTICULAR PURPOSE, SHALL BE LIMITED TO THE DURATION OF THIS LIMITED WARRANTY, OTHERWISE THE REPAIR OR REPLACEMENT PROVIDED UNDER THIS EXPRESS LIMITED WARRANTY IS THE EXCLUSIVE REMEDY OF THE CONSUMER, AND IS PROVIDED IN LIEU OF ALL OTHER WARRANTIES, EXPRESS OF IMPLIED. IN NO EVENT SHALL MOTOROLA OR SUNCORP BE LIABLE, WHETHER IN CONTRACT OR TORT (INCLUDING NEGLIGENCE) FOR DAMAGES IN EXCESS OF THE PURCHASE PRICE OF THE PRODUCT OR ACCESSORY, OR FOR ANY INDIRECT, INCIDENTAL, SPECIAL OR CONSEQUENTIAL DAMAGES OF ANY KIND, OR LOSS OF REVENUE OR PROFITS, LOSS OF BUSINESS, LOSS OF INFORMATION OR OTHER FINANCIAL LOSS ARISING OUT OF OR IN CONNECTION WITH THE ABILITY OR INABILITY TO USE THE PRODUCTS OR ACCESSORIES
TO THE FULL EXTENT THESE DAMAGES MAY BE DISCLAIMED BY LAW.
Some jurisdictions do not allow the limitation or exclusion of incidental or consequential damages, or limitation on the length of an implied warranty, so the above limitations or exclusions may not apply to you. This warranty gives you specific legal rights, and you may also have other rights that vary from one jurisdiction to another.
| Products Covered Length of Coverage | |
| Consumer Products One | (1) year from the date of the products original purchase by the first consumer purchaser of the product. |
| Consumer Accessories (battery, power supply(s) and line cords) | Ninety (90) days from the date of the accessories original purchase by the first consumer purchaser of the product. |
| Consumer Products and Accessories that are Repaired or Replaced | The balance of the original warranty or for ninety (90) days from the date returned to the consumer, whichever is longer. |
Products Covered Length of Coverage
Exclusions
Normal Wear and Tear. Periodic maintenance, repair and replacement of parts due to normal wear and tear are excluded from coverage.
Batteries. Only batteries whose fully charged capacity falls below 80% of their rated capacity and batteries that leak are covered by this limited warranty.
Abuse & Misuse. Defects or damage that result from: (a) improper operation, storage, misuse or abuse, accident or neglect, such as physical damage (cracks, scratches, etc.) to the surface of the product resulting from misuse; (b) contact with liquid, water, rain, extreme humidity or heavy perspiration, sand, dirt or the like, extreme heat, or food; (c) use of the Products or Accessories for commercial purposes or subjecting the Product or Accessory to abnormal usage or conditions; or (d) other acts which are not the fault of Motorola or SUNCORP, are excluded from coverage.
Use of Non-Motorola branded Products and
Accessories. Defects or damage that result from the use of Non-Motorola branded or certified Products or Accessories or other peripheral equipment are excluded from coverage.
Unauthorized Service or Modification. Defects or damages resulting from service, testing, adjustment, installation, maintenance, alteration, or modification in any way by someone other than Motorola, SUNCORP or its authorized service centers, are excluded from coverage.

MOTOROLA
Altered Products. Products or Accessories with (a) serial numbers or date tags that have been removed, altered or obliterated; (b) broken seals or that show evidence of tampering; (c) mismatched board serial numbers; or (d) nonconforming or non-Motorola branded housings, or parts, are excluded from coverage.
Communication Services. Defects, damages, or the failure of Products or Accessories due to any communication service or signal you may subscribe to or use with the Products or Accessories is excluded from coverage.
How to Obtain Warranty Service or Other Information?
To obtain service or information, please call: 659-1818.
You will receive instructions on how to ship the Products or Accessories at your expense and risk, to a SUNCORP Authorized Repair Center.
To obtain service, you must include: (a) the Product or Accessory; (b) the original proof of purchase (receipt) which includes the date, place and seller of the Product; (c) if a warranty card was included in your box, a completed warranty card showing the serial number of the Product; (d) a written description of the problem; and, most importantly; (e) your address and telephone number.
Technical Information
How many telephones can I have?
All items of telephone equipment have a Ringer Equivalence Number (REN), which is used to calculate the number of items which may be connected to any one telephone line. Your C4 has a REN of 1. A total REN of 4 is allowed. If the total REN of 4 is exceeded, the telephones may not ring. With different telephone types, there is no guarantee of ringing, even when the REN is less than 4.
Any additional handsets and chargers that you register have a REN of 0.
R&TTE
This equipment complies with the essential requirements for the Radio Equipment and Telecommunications Terminal Equipment Directive 1999/5/EC.
Connecting to a switchboard
This product is intended for use within Philippines for connection to the public telephone network.
Recall
You may need to use the recall function if you are connected to a switch. Contact your PABX supplier for further information.
Suncorp
Declaration of Conformity (DoC)
Suncorp declares that the following products:
Brandname: Motorola
Brandname: Motorola
Descriptions: DECT phone without telephone answering machine (C40x) and their
multi-handset versions.
to which this declaration related is in conformity with the essential requirements of the following directives of the Council of the European Communities:
- R&TTE Directive (1999/5/EC)
- Ecodesign Directive (2005/32/EC)
The products are compliant with the following standards:
Safety: EN60950-1:2006
EMC: EN301489-1 v1.8.1 and EN301489-6 v1.2.1
RF Spectrum: EN301406 v1.5.1
Ecodesign: EC No 278/2009, 6 April 2009
For and on behalf of Suncorp Technologies Limited,
CW

+08'00'
Printed name & Position: CW Cheung - Chief Technical Officer
Date: ^st June 2010
Place: 3001-3005 China Resources Building, 26 Harbour Road,
Wan Chai, Hong Kong

MOTOROLA
Manufactured, distributed or sold by Suncorp Technologies Ltd., official licensee for this product. MOTOROLA and the Stylized M Logo are trademarks or registered trademarks of Motorola Trademark Holdings, LLC. and are used under license. All other trademarks are the property of their respective owners. © 2011 Motorola Mobility, Inc. All rights reserved.
Version 2 (PH)



- Welcome...
- to your new Motorola C4 Digital Cordless Phone!
- Need help?
- This User Guide provides you with all the information you need to get the most from your phone.
- Before you make your first call, you need to set up your phone. Follow the simple instructions in ‘Getting Started’, on the next few pages.
- IMPORTANT
- Got everything?
- ECOMOTO™
- MOTOROLA
- Clock & alarm 24
- Caller ID and the Calls list.... 25
- Using additional handsets 28
- Getting started
- WARNING
- Location
- HANDSET RANGE
- SIGNAL STRENGTH
- Setting up
- WHICH POWER ADAPTOR?
- Connecting the base
- Installing and charging the handset
- Connecting the handset and charger (for multi-pack only)
- BATTERY LOW WARNING
- BATTERY PERFORMANCE
- Date and time
- Set the date manually
- Set the time manually
- Getting to know your phone Overview of your handset
- H Hands-free
- I Talk / End call
- J \* / Keypad lock
- K Intercom
- L Recall / Power on/off
- Display icons
- Navigating the menus
- NOTE
- Using the phone
- Switch the handset on / off
- Calls
- Make a call
- Preparatory dialling
- End a call
- Receive a call
- Adjust the earpiece volume
- Secrecy
- Intercom
- Make an internal call
- Receive an internal call
- Transfer a call
- TIP
- 3-way conference call
- Hands-free speakerphone
- Make a hands-free call
- Answer a call hands-free
- Switch to hands-free during a call
- Redial
- View or dial an entry
- Copy a Redial list number to the phonebook
- Delete an entry
- Delete the entire Redial list
- Lock/unlock the keypad
- Paging/Find handset
- Phonebook
- Store a name and number
- ENTERING NAMES
- WRITING TIPS
- View or dial an entry
- Edit a name and number
- Delete an entry
- Handset settings
- Handset ringer volume
- Handset ringer melody
- Auto answer
- Handset name
- Language
- Key beep
- Battery low warning beep
- Out of range warning beep
- Keypad lock using the menu
- Base settings
- Base ringer volume
- Base ringer melody
- Change base PIN code
- Dial mode
- Recall mode
- Restore default settings
- Emergency default
- Eco mode
- Default settings
- Clock & alarm
- Set the date
- Set the time
- Set alarm
- Switch off alarm ring
- Caller ID and the Calls list
- Caller ID
- Calls list
- View the Calls list
- Dial a number in the Calls list
- Modify and dial a number in the Calls list
- Copy a Calls list number to the phonebook
- Delete an entry
- Delete the entire Calls list
- Using additional handsets
- Registering an additional handset NOTE
- On the base:
- On the handset:
- Register a different make of handset to your C4 base
- Select a base
- De-register a handset
- Help
- No dial tone
- No display
- Y icon flashes
- Keypad does not seem to work
- icon is not scrolling during charge
- No Caller ID
- I have forgotten my PIN!
- Cannot register a handset to the base
- Handset does not ring
- Base unit does not ring
- Noise interference on my phone or on other electrical equipment nearby
- General information
- Important safety instructions
- CAUTION
- Unplug this cordless phone immediately from an outlet if:
- Installation Guidelines
- Battery Safety Instructions
- SAVE THESE INSTRUCTIONS
- Cleaning
- Environmental
- Product disposal instructions
- Product disposal instructions for residential users
- Product disposal instructions for business users
- Consumer Products and Accessories Warranty
- What Does this Warranty Cover?
- Who is covered?
- What will SUNCORP do?
- What Other Limitations Are There?
- TO THE FULL EXTENT THESE DAMAGES MAY BE DISCLAIMED BY LAW.
- Exclusions
- Use of Non-Motorola branded Products and
- How to Obtain Warranty Service or Other Information?
- Technical Information
- How many telephones can I have?
- R&TTE
- Connecting to a switchboard
- Recall
- Suncorp
- Declaration of Conformity (DoC)
Brand : ZEBRA
Model : C401
Category : Telephone