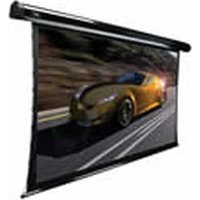
CineTension2 TE120HW2-E20 - Projection screen Elite Screens - Free user manual and instructions
Find the device manual for free CineTension2 TE120HW2-E20 Elite Screens in PDF.


| Brand | Elite Screens |
| Model | CineTension2 TE120HW2-E20 |
| Product Type | Motorized Tab-Tension Projection Screen |
| Screen Diagonal | 120 inches (304.8 cm) |
| Aspect Ratio | 16:9 |
| Screen Material | MaxWhite 2 (matte white, 1.1 gain) |
| Viewing Angle | 160° (80° each side) |
| Resolution Support | 4K Ultra HD / 8K compatible |
| Tab-Tension System | Yes, tensioned side tabs for flat surface |
| Motor Type | Quiet tubular motor |
| Control Methods | IR remote, included wall switch, optional 12V trigger / RS232 |
| Power Supply | AC 100-240V, 50/60Hz |
| Power Consumption | Standby: <0.5W, Operation: ~150W |
| Screen Dimensions (W x H) | Approx. 105 x 59 inches (266.7 x 149.9 cm) |
| Overall Dimensions (Case) | Approx. 112 x 4.5 x 4.5 inches (284.5 x 11.4 x 11.4 cm) |
| Net Weight | Approx. 55 lbs (24.9 kg) |
| Black Drop / Borders | Top and bottom black borders, side masking |
| Mounting | Ceiling or wall mount, brackets included |
| Safety Features | Motor overload protection, auto-stop at limits |
| Cleaning & Maintenance | Gently dust with soft cloth, avoid liquid cleaners |
| Spare Parts & Repairability | Motor and remote replaceable; professional repair recommended |
| Warranty | 2 years limited |
Frequently Asked Questions - CineTension2 TE120HW2-E20 Elite Screens
User questions about CineTension2 TE120HW2-E20 Elite Screens
0 question about this device. Answer the ones you know or ask your own.
Ask a new question about this device
Download the instructions for your Projection screen in PDF format for free! Find your manual CineTension2 TE120HW2-E20 - Elite Screens and take your electronic device back in hand. On this page are published all the documents necessary for the use of your device. CineTension2 TE120HW2-E20 by Elite Screens.
USER MANUAL CineTension2 TE120HW2-E20 Elite Screens
natural_image
Abstract black and white graphic symbol resembling a stylized 'S' or wave (no text or symbols)ELITE SCREENS
Tab-tensioned Electric Motorized Projection Screen CineTension 2 Series
User's Guide

natural_image
Close-up of a monarch butterfly perched on a pink flower, no text or symbols visibleImportant Safety & Warning Precautions
Make sure to read this user's guide and follow the procedure below.
- Please retain this user's guide for future reference.
- To avoid damaging the unit, do not use with any unauthorized accessories not recommended by the manufacturer.
- Handle the unit carefully during transportation to avoid any damages.
- To ensure safe and reliable operation, direct connection to a properly grounded power source is advised.
- The power outlet supplying power to the unit should be close to the unit and easily accessible.
- Do not install the unit on uneven or inclined surfaces.
- Do not place any heavy objects over the power cord.
- Position the power cord properly to avoid creating a trip obstacle.
- To avoid an electrical shock or fire, due to a loose contact or short circuit, do not overload the power cord.
- The internal & external parts of this unit are not end user serviceable. Do not attempt to disassemble this unit by yourself. No one except authorized technicians can open and make repairs to this unit.
• Make sure the power source that this unit is connected to has a continuous power flow. - If there is need to use an extension cord, make sure the cord has an equal rating as the appliance to avoid over heat.
- Do not handle the power plug when your hands are wet or your feet are in contact with water.
Do not use this unit under the following circumstances.
- Disconnect the power cord under the conditions of heavy rain, wind thunder or lightning.
- Avoid direct sun light, rain shower and moisture.
- Keep away from fire sources and high temperature to prevent this device from overheating.
- Cut off the power supply first before transportation or maintenance.
- To avoid possible injury and/or an electric shock, do not attempt to use this screen if there is obvious damage or if there are any evident broken parts.
Installation Warning
Due to various installation environments, the instructions provided in this user's guide are for reference only. Please consult a professional installation company for further installation and safety advice. The installer must insure that proper mounting hardware is used to provide adequate strength suitable for the installation. Elite Screens is not liable for any faulty installations. For limit adjustment instructions, please contact our Technical Support Department at (877) 511-1211 Ext. 604.
The Screen's Top Black Drop is already set to its maximum drop distance. There is NO extra top black drop in the roller. Please be aware of this as it will void the limitation of your warranty.
Individual modifications to this product are prohibited and will void the warranty with the manufacturer. Please contact Elite Screens Customer Service for any questions.
NOTE:
This equipment has been tested and found to comply with the limits for a Class B digital device, pursuant to Part 15 of the FCC Rules.
These limits are designed to provide reasonable protection against harmful interference in a residential installation. This equipment generates and can radiate radio frequency energy and, if not installed and used in accordance with the instructions, may cause harmful interference to radio communications.
However, there is no guarantee that the interference will not occur on a particular installation. If this equipment causes harmful interference to radio or television reception, which can be determined by turning the equipment off and on, the user is encouraged to try to correct the interference by one or more of the following measures.
√ Reorient or relocate the receiving antenna of the device which may be casing the interference.
√ Increase the separation between the screen and the device's receiver.
√ Connect the equipment into a different power outlet other than the device.
Pre-Installation
- Carefully unpack the screen.
- Always handle the screen in a leveled position on a clean surface.
- In order to protect the screen from exposure to stains, keep the screen out of contact with foreign particles such as dust, sawdust, and/or liquids.
NOTE
Regardless of the mounting method, the screen should be securely supported so that the vibration or pulling on the viewing surface will not cause the casing to become loose or fall. The installer must insure that the fasteners used are of adequate strength and suitable for the installation location.
Accessories for CineTension 2 Series
Please make sure all accessories listed below are included before proceeding.

natural_image
Line drawing of a portable electronic device with a circular vent and labeled 'IR' (no text or symbols beyond the label)A. IR Remote
natural_image
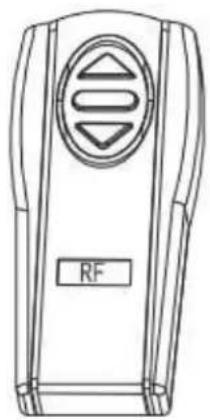
Line drawing of a device with a circular vent and labeled 'RF' (no text or symbols beyond label)B. C.
D.
RF Remote 3 Way Wall Switch

natural_image
Simple line drawing of a medical or electrical device with a coiled cable and a control panel (no text or symbols)IR Eye Receiver

natural_image
Simple line drawing of a vertical pole with a U-shaped base and internal components (no text or symbols)
E. 12V Trigger

F. AAA Batteries
natural_image
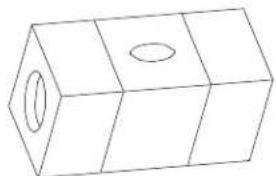
Simple line drawing of a 3D rectangular prism with an oval cutout on one face (no text or symbols)G. Bubble Level
Control System for CineTension 2 Series
- 5-12V Trigger: The built-in 5-12V trigger input allows your screen to synchronize its drop & rise with the projector's power cycle. The screen deploys when the projector powers up and will retract when the projector powers down. The 5-12 volt adaptor connects to your projector's trigger output via a separate cable that may or may not be provided by the manufacturer of the projector. The trigger feature will not work without an output cable from the projector, but it can be tested by connecting the Red (+) and Green (-) cable to a 9-volt battery.

-
3-Way Wall Switch: The 3-way wall switch is a wall mount control box with an up/stop/down button and plugs directly into the screen's RJ-45 input.
-
IR "Eye" Receiver: The IR "Eye" Receiver plugs directly into the screen's RJ-45 input to present a low profile line-of-sight control option for your IR remote control even in a recessed ceiling installation.
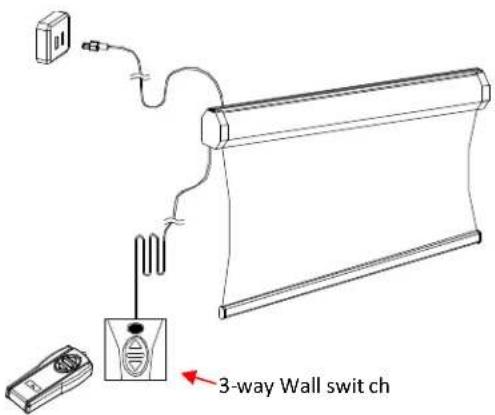
- IR Remote Control: The Infrared functions by direct line of sight contact with a beam range of 30 feet.

- RF Remote Control: The radio waves eliminate the need for a direct line of sight with a range of 150 feet.

Hardware Parts List for CineTension 2 Series
Please make sure all items listed below are included before proceeding with the installation.
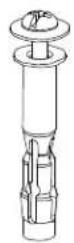
A

B

C

D
120" & above x 3 brackets
| Hardware Parts List | QTY |
| A. Screw & Dry Wall Anchor | 2EA. |
| B. Bolt | 2 |
| C. Masonry Screw & Anchor | 2EA. |
| D. Extruded Hanging Bracket | 2 or 3 |
Installation Instructions
Please consult a professional installer. Elite Screens is not liable for any faulty installations.
- Insert each Bolt (B) through the right & left slide channel located on the top of the screen's case.

natural_image
Technical line drawing of a mechanical assembly with two components and a red arrow indicating direction (no text or symbols)- Slide the Extruded Hanging Bracket (D) through the rail located below the slide channel until it meets with the top of the Bolt (B) and slightly secure the lug-nuts located on the top & bottom of the bolt to attach the bracket.

- Mark the installation location to drill your hole. Insert the proper screw and secure the bolts to the bracket.

- Example of the CineTension 2 installed to a wall, ceiling and enclosed.
Flush mount to wall

Flush mount to ceiling
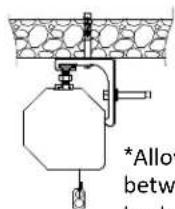
Enclosed installation
*Allow 2" of spacing between the front and back of the screen casing.

natural_image
Pure mechanical diagram showing a valve or actuator inside a housing with directional arrows indicating flow (no text or symbols)Adjusting the Tension String
This adjustment is not required. The screen's tension has been set to achieve its best performance. Please contact Elite Screens for assistance to avoid damaging the screen and voiding your warranty.
- If the tension string is loose, pull and turn the tension knob clockwise to tighten the string. To release the tension, pull and turn the knob counter-clockwise.

Troubleshooting & FAQ'S
For additional information, please contact Elite Screens at techsupport@elitescreens.com
- If your screen does not move, please check the power supply. The screen will understandably not move without power.
- Make sure the power cord is firmly plugged to the power outlet.
- Make sure that all cable connections are secure.
-
If the screen works well with the line switch but not with the remote control, please make sure the remote controls have fresh batteries. Change the batteries every 6 months to ensure proper operation of the remotes.
-
Q: Why does my screen no longer function?
A: Make sure your wall plug has power and that the screen is properly plugged. The fuse on the screen will also need to be checked. Please contact techsupport@elitescreens.com for the location. The tubular motor in this screen is equipped with a thermal relay. This feature will automatically shut off the screen in the event of the motor becoming too hot. This will prevent the motor from overheating. If you should experience this, please let the screen's temperature decrease for 10-15 min. before usage.
- Q: How is the screen material cleaned?
A: The screen material can be cleaned with mild soap and water.
- Q: What type of batteries do the remote controls require?
A: The IR and RF remote controls use AAA alkaline batteries.
- Q: Can you manually pull down the screen?
A: No, manually pulling down the screen will damage the electronic motor rolling system and void your warranty.
- Q: How could I setup my Screens IR receiver to work with my learning remote control system. Do you have any IR codes I can use to achieve this?
A: Our IR remote controls have been evaluated and entered in to the databases of some Universal remote control manufacturers. Please contact the manufacturer of your remote to inquire about your remotes ability to function with ours. If they have not evaluated our remote control then the following list of Binary codes will be used for most remote setups.
For Spectrum, VMAX2 (Plus), Home2 and CineTension 2 Series
Up: 1111 0000 0001
Stop: 1111 0000 0010
Down: 1111 0000 0100
- Q: What is the gain on the matte white screen material?
A: The matte white material has a gain of 1.1. For detailed information, please visit www.elitescreens.com/cinetension2
CineTension 2 Dimension Table
| Unit Inch | |||||||||||||||||||||||
| Model | Case Length (A) | Screen Width (A1) | View Width (A2) | Weight Bar Length (A3) | Bottom Edge (B4) | material to weight bar height (B2) | View Height (B3) | Overall Height (B1) | Height with bracket (B) | Case Height (B5) | (B6) | Case Width (C) | Case End to Screen (C1) | (C2) | G1 | G2 | G3 | G4 | G5 | G6 | G7 | G8 | N.W (LBS) |
| TE84H | 89.0 | 80.2 | 73.2 | 84.3 | 3.4 | 50.4 | 41.2 | 54.8 | 56.3 | 37 | 4.1 | 3.8 | 0.8 | 5.2 | 2.8 | 1.5 | 0.9 | 0.5 | 2.9 | 1.6 | 0.8 | 0.4 | 27.0 |
| TE84H-E30 | 89.0 | 80.2 | 73.2 | 84.3 | 3.4 | 74.6 | 41.2 | 79.0 | 80.5 | 37 | 4.1 | 3.8 | 0.8 | 5.2 | 2.8 | 1.5 | 0.9 | 0.5 | 2.9 | 1.6 | 0.8 | 0.4 | 27.0 |
| TE92H | 96.0 | 87.2 | 80.2 | 92.3 | 3.8 | 54.9 | 45.1 | 60.2 | 62.2 | 46 | 6.9 | 5.0 | 0.9 | 5.2 | 3.4 | 1.9 | 1.4 | 0.7 | 4.1 | 2.2 | 0.8 | 0.4 | 42.5 |
| TE100H | 103.0 | 94.2 | 87.2 | 96.7 | 3.8 | 58.6 | 49.0 | 64.1 | 66.1 | 46 | 6.9 | 5.0 | 0.9 | 5.2 | 3.4 | 1.9 | 1.4 | 0.7 | 4.1 | 2.2 | 0.8 | 0.4 | 45.8 |
| TE100H-E24 | 103.0 | 94.2 | 87.2 | 96.7 | 3.8 | 76.8 | 49.0 | 82.3 | 84.3 | 46 | 6.9 | 5.0 | 0.9 | 5.2 | 3.4 | 1.9 | 1.4 | 0.7 | 4.1 | 2.2 | 0.8 | 0.4 | 45.8 |
| TE106H | 109.1 | 99.4 | 92.4 | 103.3 | 3.8 | 61.6 | 52.0 | 67.0 | 69.0 | 46 | 6.9 | 5.0 | 0.9 | 5.2 | 3.4 | 1.9 | 1.4 | 0.7 | 4.1 | 2.2 | 0.8 | 0.4 | 47.7 |
| TE105H-E24 | 109.1 | 99.4 | 92.4 | 103.3 | 3.8 | 79.7 | 52.0 | 85.2 | 87.1 | 46 | 6.9 | 5.0 | 0.9 | 5.2 | 3.4 | 1.9 | 1.4 | 0.7 | 4.1 | 2.2 | 0.8 | 0.4 | 47.7 |
| TE110H | 113.5 | 102.9 | 95.9 | 107.2 | 3.8 | 63.5 | 53.9 | 68.9 | 70.9 | 46 | 6.9 | 5.0 | 0.9 | 5.2 | 3.4 | 1.9 | 1.4 | 0.7 | 4.1 | 2.2 | 0.8 | 0.4 | 47.1 |
| TE110H-E24 | 113.5 | 102.9 | 95.9 | 107.2 | 3.8 | 81.7 | 53.9 | 87.2 | 89.2 | 46 | 6.9 | 5.0 | 0.9 | 5.2 | 3.4 | 1.9 | 1.4 | 0.7 | 4.1 | 2.2 | 0.8 | 0.4 | 47.1 |
| TE120H | 122.6 | 111.6 | 104.6 | 115.9 | 3.8 | 66.5 | 58.8 | 71.9 | 73.9 | 46 | 6.9 | 5.0 | 0.9 | 5.2 | 3.4 | 1.9 | 1.4 | 0.7 | 4.1 | 2.2 | 0.8 | 0.4 | 52.5 |
| TE120H-E20 | 122.6 | 111.6 | 104.6 | 115.9 | 3.8 | 82.6 | 58.8 | 88.1 | 90.1 | 46 | 6.9 | 5.0 | 0.9 | 5.2 | 3.4 | 1.9 | 1.4 | 0.7 | 4.1 | 2.2 | 0.8 | 0.4 | 52.5 |
| TE135H | 135.5 | 124.7 | 117.7 | 128.1 | 3.8 | 73.8 | 66.2 | 79.3 | 81.2 | 46 | 6.9 | 5.0 | 0.9 | 5.2 | 3.4 | 1.9 | 1.4 | 0.7 | 4.1 | 2.2 | 0.8 | 0.4 | 52.8 |
| TE135H-E12 | 135.5 | 124.7 | 117.7 | 128.1 | 3.8 | 82.6 | 66.2 | 88.1 | 90.1 | 46 | 6.9 | 5.0 | 0.9 | 5.2 | 3.4 | 1.9 | 1.4 | 0.7 | 4.1 | 2.2 | 0.8 | 0.4 | 52.8 |
| TE150H | 149.8 | 137.7 | 130.7 | 142.1 | 3.8 | 81.2 | 73.5 | 86.6 | 88.6 | 46 | 6.9 | 5.0 | 0.9 | 5.2 | 3.4 | 1.9 | 1.4 | 0.7 | 4.1 | 2.2 | 0.8 | 0.4 | 58.3 |
| TE84V | 83.0 | 74.2 | 67.2 | 78.5 | 3.4 | 59.6 | 50.4 | 64.0 | 65.6 | 37 | 4.1 | 3.8 | 0.8 | 5.2 | 2.8 | 1.5 | 0.9 | 0.5 | 2.9 | 1.6 | 0.8 | 0.4 | 27.5 |
| TE84V-E30 | 83.0 | 74.2 | 67.2 | 78.5 | 3.4 | 83.8 | 50.4 | 88.2 | 89.8 | 37 | 4.1 | 3.8 | 0.8 | 5.2 | 2.8 | 1.5 | 0.9 | 0.5 | 2.9 | 1.6 | 0.8 | 0.4 | 27.5 |
| TE92V | 89.0 | 80.6 | 73.6 | 84.3 | 3.4 | 64.6 | 55.2 | 69.0 | 70.6 | 37 | 4.1 | 3.8 | 0.8 | 5.2 | 2.8 | 1.5 | 0.9 | 0.5 | 2.9 | 1.6 | 0.8 | 0.4 | 29.0 |
| TE100V | 99.3 | 87.5 | 80.0 | 90.2 | 3.8 | 69.6 | 80.0 | 74.5 | 77.0 | 46 | 6.7 | 5.0 | 0.9 | 5.2 | 3.4 | 1.9 | 1.4 | 0.7 | 4.1 | 2.2 | 0.8 | 0.4 | 44.0 |
| TE100V-E12 | 99.3 | 87.5 | 80.0 | 90.2 | 3.8 | 75.8 | 80.0 | 80.5 | 82.5 | 46 | 6.9 | 5.0 | 0.9 | 5.2 | 3.4 | 1.9 | 1.4 | 0.7 | 4.1 | 2.2 | 0.8 | 0.4 | 43.0 |
| TE120V | 113.5 | 103.0 | 96.0 | 107.3 | 3.8 | 79.6 | 72.0 | 85.0 | 87.0 | 46 | 6.9 | 5.0 | 0.9 | 5.2 | 3.4 | 1.9 | 1.4 | 0.7 | 4.1 | 2.2 | 0.8 | 0.4 | 47.7 |
| TE135V | 125.5 | 115.0 | 108.0 | 115.7 | 3.8 | 88.6 | 81.0 | 94.1 | 96.0 | 46 | 6.9 | 5.0 | 0.9 | 5.2 | 3.4 | 1.9 | 1.4 | 0.7 | 4.1 | 2.2 | 0.8 | 0.4 | 51.4 |
| TE150V | 138.2 | 127.0 | 120.0 | 132.5 | 3.8 | 97.6 | 90.0 | 103.1 | 105.0 | 46 | 6.9 | 5.0 | 0.9 | 5.2 | 3.4 | 1.9 | 1.4 | 0.7 | 4.1 | 2.2 | 0.8 | 0.4 | 56.3 |
| TE94X | 96.0 | 86.7 | 79.7 | 90.4 | 3.8 | 59.4 | 49.8 | 64.8 | 66.8 | 46 | 6.9 | 5.0 | 0.9 | 5.2 | 3.4 | 1.9 | 1.4 | 0.7 | 4.1 | 2.2 | 0.8 | 0.4 | 37.4 |
| TE106X-E24 | 109.2 | 97.4 | 89.9 | 100.1 | 3.8 | 84.0 | 56.2 | 88.7 | 90.7 | 47 | 6.7 | 4.8 | 0.9 | 5.2 | 3.4 | 1.9 | 1.4 | 0.7 | 4.1 | 2.2 | 0.8 | 0.4 | 46.3 |
| TE116X | 115.5 | 105.4 | 98.4 | 109.1 | 3.8 | 71.1 | 61.5 | 76.5 | 78.5 | 46 | 7.0 | 5.0 | 0.9 | 5.2 | 3.4 | 1.9 | 1.4 | 0.7 | 4.1 | 2.2 | 0.8 | 0.4 | 50.2 |
| TE128X-E12 | 127.8 | 116.0 | 108.5 | 118.8 | 3.8 | 83.6 | 67.8 | 88.3 | 90.3 | 47 | 6.7 | 4.8 | 0.9 | 5.2 | 3.4 | 1.9 | 1.4 | 0.7 | 4.1 | 2.2 | 0.8 | 0.4 | 55.1 |
| TE139X | 135.5 | 124.9 | 117.9 | 128.1 | 3.8 | 81.1 | 73.7 | 85.7 | 87.7 | 46 | 6.9 | 5.0 | 0.9 | 5.2 | 3.4 | 1.9 | 1.4 | 0.7 | 4.1 | 2.2 | 0.8 | 0.4 | 56.8 |
| TE85C-E30 | 91.7 | 85.7 | 78.2 | 89.2 | 3.4 | 66.7 | 33.3 | 71.0 | 72.6 | 37 | 4.1 | 3.8 | 0.8 | 5.2 | 2.8 | 1.5 | 0.9 | 0.5 | 2.9 | 1.6 | 0.8 | 0.4 | 28.2 |
| TE96C-E24 | 105.1 | 95.8 | 88.3 | 99.4 | 3.8 | 65.4 | 37.6 | 70.8 | 72.8 | 46 | 6.9 | 5.0 | 0.9 | 5.2 | 3.4 | 1.9 | 1.4 | 0.7 | 4.1 | 2.2 | 0.8 | 0.4 | 40.9 |
| TE103C-E24 | 113.5 | 102.3 | 94.8 | 107.3 | 3.8 | 68.1 | 40.3 | 73.5 | 75.5 | 46 | 6.9 | 5.0 | 0.9 | 5.2 | 3.4 | 1.9 | 1.4 | 0.7 | 4.1 | 2.2 | 0.8 | 0.4 | 44.0 |
| TE115C-E24 | 122.5 | 113.3 | 105.8 | 116.8 | 3.8 | 72.8 | 45.0 | 78.2 | 80.2 | 46 | 6.9 | 5.0 | 0.9 | 5.2 | 3.4 | 1.9 | 1.4 | 0.7 | 4.1 | 2.2 | 0.8 | 0.4 | 48.0 |
| TE125C-E20 | 131.7 | 122.5 | 115.0 | 126.0 | 3.8 | 72.7 | 48.9 | 78.1 | 80.1 | 46 | 6.9 | 5.0 | 0.9 | 5.2 | 3.4 | 1.9 | 1.4 | 0.7 | 4.1 | 2.2 | 0.8 | 0.4 | 51.5 |
| TE138C-E16 | 143.7 | 134.5 | 127.0 | 138.0 | 3.8 | 73.8 | 54.0 | 79.2 | 81.2 | 46 | 6.9 | 5.0 | 0.9 | 5.2 | 3.4 | 1.9 | 1.4 | 0.7 | 4.1 | 2.2 | 0.8 | 0.4 | 56.3 |
| TE153C-E12 | 157.5 | 148.3 | 140.8 | 151.8 | 3.8 | 75.7 | 59.9 | 81.1 | 83.1 | 46 | 6.9 | 5.0 | 0.9 | 5.2 | 3.4 | 1.9 | 1.4 | 0.7 | 4.1 | 2.2 | 0.8 | 0.4 | 51.6 |
*Measurement dimensions are intended as a reference only and subject to change without notice. Note: Data Error may be ±1"

Warranty Policy
- Two (2) Year parts and labor warranty from defects in workmanship from purchase date as follows (except for refurbished units as specified below).
- Three (3) Year parts and labor warranty from defects in workmanship for GEMR (Government, Educational, Military, & Religious) purchases of new product only.
• Refurbished Units carry a 90-DAY parts and labor warranty.
• Each party will be responsible for one way shipping during the warranty period.
- A RMA (Return Merchandise Authorization) number must be issued in order to process a replacement or to authorize a return for warranty repair. Elite Screens will, at its sole option replace or repair the defective unit with a replacement *(see exceptions below) after the defective unit or parts have been received. Once the product is received, Elite Screens will send out a replacement *unit to the customer by ground service (subject to inventory availability).
- Do Not Return Any Unauthorized Items to Elite Screens, as they will be refused and returned at your expense. The RMA Number must be included on the outside label of your shipping box. Our warehouse is not authorized to accept returns without an RMA number on the shipping label.
• RMA Numbers are valid for 45 days from the date issued.
- Missing Parts must be reported within 7 days of receipt. If reported after 7 days, the customer will be responsible for shipping and handling fees. If reported after 30 days of receipt, the customer will be responsible for cost of parts and shipping & handling fees.
*A New or refurbished replacement will be send out to the customer depending on the type of purchase (new or refurbished) and based on stock availability.
North America only U.S. and Canada
For Warranty and Service requests, please submit an RMA/Service Form at: www.elitescreens.com/warrantysupportform
Please visit this link for full Warranty information: www.elitescreens.com/warranty
For Customer Service and Technical questions, please contact Elite Screens at:
Telephone: (877) 511-1211 service@elitescreens.com
Fax: (562) 926-8433 techsupport@elitescreens.com
REMEMBER TO REGISTER YOUR PRODUCT AT:
WWW.ELITESCREENS.COM
Contact Information
US & Canada Tech Support & Warranty Claim
Please contact us at service@elitescreens.com or call +1 877-511-1211 #3 or fax +1-562-926-8433
Europe Tech Support & Warranty Claim
Please contact us at service@elitescreens.eu or call +49-(0) 40-30392958
Asia Tech Support & Warranty Claim
Please contact us at service@elitescreens.com.cn or call +86-(0) 755-8461-7989
Taiwan Tech Support & Warranty Claim
Please contact us at service@elitescreens.com.tw or call +866+2+8990-1999
America: Europe:
Elite Screens Inc Elite Screens Europe
| 16410 Manning Way | Lübecker Straße 1 | |
| Cerritos, CA 90703 USA | 22087 Hamburg, Germany | |
| Tel: +1-877-511-1211 | Tel: +49-4030392494 | |
| Fax: +1-562-926-8433 | Fax: +49-40-49219200 | |
| info@elitescreens.com | info@elitescreens | |
| www.elitescreens.com | www.elitescreens.eu |
Asia:
Elite Screens China Corp. 11, Allée William Penn
Longxi Duimianling Industry Zone 92150 Surenes, France
Longcheng Longgang District, Tel: +33-1-45064735
ShenZhen GuangDong, China Fax: +33-1-45064735
Tel: +86-(0)755-8461-7989 info.fr@elitescreens.com
Fax: +86-(0)755-8461-7669 www.elitescreens.com/fr
info@elitescreens.com.cn
www.elitescreens.com.cn
Elite Screens France S.A.S
Japan:
Taiwan: Elite Screens Japan Corp.
Elite Screens Taiwan Corp. 467-2-606 Tsuruma, Machida-shi,
4F., No. 42-1 Wuguan Rd. Wugu Township Taipei Tokyo, 194-0004 Japan
County 248, Taiwan (Wugu Industrial Park) Tel: 0120-07-0008
Taiwan (R.O.C) Fax: +81(0)42-706-9130
Tel: +886+2+8990-1999 info@elitescreens.jp
Fax: +886+2+8990+1366 www.elitescreens.jp
info@elitescreens.com.tw
Latin America Contact:
Info.la@elitescreens.com
East Asia Contact:
Info.ea@elitescreens.com
India Contact:
Info.india@elitescreens.com
- Tab-tensioned Electric Motorized Projection Screen CineTension 2 Series
- Important Safety & Warning Precautions
- Do not use this unit under the following circumstances.
- Installation Warning
- NOTE:
- Pre-Installation
- NOTE
- Accessories for CineTension 2 Series
- Control System for CineTension 2 Series
- Hardware Parts List for CineTension 2 Series
- Installation Instructions
- Adjusting the Tension String
- Troubleshooting & FAQ'S
- CineTension 2 Dimension Table
- Warranty Policy
- North America only U.S. and Canada
- REMEMBER TO REGISTER YOUR PRODUCT AT:
- WWW.ELITESCREENS.COM
- Contact Information
- America: Europe:
- Elite Screens Inc Elite Screens Europe
- Asia:
- Elite Screens France S.A.S
- Japan:
Brand : Elite Screens
Model : CineTension2 TE120HW2-E20
Category : Projection screen