
RE350K - Wi-Fi repeater TP-LINK - Free user manual and instructions
Find the device manual for free RE350K TP-LINK in PDF.


| Product Type | Wi-Fi Repeater |
| Brand | TP-Link |
| Model | RE350K |
| Wireless Standards | IEEE 802.11ac/n/g/b/a |
| Frequency Band | Dual Band: 2.4 GHz & 5 GHz |
| Max Speed | 300 Mbps (2.4 GHz) + 867 Mbps (5 GHz) |
| Antennas | 2 x External Antennas |
| Ethernet Port | 1 x 10/100/1000 Mbps Gigabit Port |
| Dimensions | 110 x 66 x 78 mm (4.3 x 2.6 x 3.1 in) |
| Weight | 200 g (7.1 oz) |
| Power Supply | 100-240V AC, 50/60 Hz |
| Power Consumption | 7.5 W (max) |
| Operating Temperature | 0°C to 40°C (32°F to 104°F) |
| Security | WEP, WPA/WPA2, WPA-PSK/WPA2-PSK |
| Modes | Range Extender, Access Point |
| WPS Button | Yes |
| Reset Button | Yes |
| LED Indicators | Power, Signal Strength, Ethernet |
| Certification | CE, FCC, RoHS |
| Package Contents | RE350K, Quick Installation Guide, Ethernet Cable |
| Warranty | 2 Years Limited |
Frequently Asked Questions - RE350K TP-LINK
User questions about RE350K TP-LINK
0 question about this device. Answer the ones you know or ask your own.
Ask a new question about this device
Download the instructions for your Wi-Fi repeater in PDF format for free! Find your manual RE350K - TP-LINK and take your electronic device back in hand. On this page are published all the documents necessary for the use of your device. RE350K by TP-LINK.
USER MANUAL RE350K TP-LINK
Specifications are subject to change without notice. TP-LINK®
is a registered trademark of TP-LINK TECHNOLOGIES CO., LTD. Other brands and product names are trademarks or registered trademarks of their respective holders.
No part of the specifications may be reproduced in any form or by any means or used to make any derivative such as translation, transformation, or adaptation without permission from TP-LINK TECHNOLOGIES CO., LTD. Copyright © 2015 TP-LINK TECHNOLOGIES CO., LTD.
All rights reserved.
www.tp-link.com
Introduction 4
Product Overview....4
What does the Range Extender actually do? 4
Support for the 802.11ac wireless technology....4
Main features....5
Appearance....5
Connect the Extender to the Internet 7
Before You Begin 7
Where should I place my Range Extender? 7
Safety Information 8
Quick Setup 8
Setup Using the Mobile App 8
Setup Using a Computer.... 10
Manage the Range Extender 14
Manage via Web Interface 14
Changing admin account 14
Dashboard 15
Extending another Wi-Fi network.... 16
Extended Network Settings 17
Wi-Fi Access Control 18
Changing the IP address 20
DHCP Server....21
Other Functions....22
Wireless Adapter....22
Status LED Control 23
Maintain the Range Extender 24
Firmware Upgrade....24
Backup and Restore....25
Factory Defaults 26
System Log....27
Reboot....28
Log out 28
Appendix 29
Factory Defaults Settings....29
Troubleshooting FAQs....30
Specifications....31
Glossary....31
1
Introduction
This chapter covers the following topics:
Product Overview - Appearance
Product Overview
What does the Range Extender actually do?
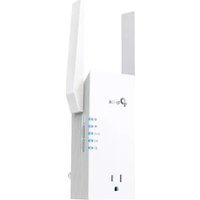
TP-LINK's AC1200 Wi-Fi Range Extender, model RE350K, is a compact, wall-plug extender that provides a robust Wi-Fi signal extension to expand wireless connectivity to those hard-to-reach areas throughout your home and Small Office/Home Office (SOHO) environment. With super-fast speed, the extender delivers up to 1200Mbps, providing reliable connections for bandwidth-intensive needs such as HD/4K video streaming and online gaming.
The Range Extender provides two easy-to-use setup options to extend your existing Wi-Fi network.
Option One: Setup Using the Mobile App
Option Two: Setup Using a Computer
Before connecting the extender to your network, please read through this user guide to familiarize yourself with the AC1200 Wi-Fi Range Extender.
Support for the 802.11ac wireless technology
With IEEE 802.11ac-supported wireless technology, the range extender can transmit wireless data at the rate of up to 300Mbps with 2.4GHz and 867Mbps with 5GHz; it's 3 times faster than the standard 802.11n speed. The range extender is also compatible with all IEEE 802.11n, IEEE 802.11a, IEEE 802.11b, and IEEE 802.11g products.
Main features
Complies with IEEE 802.11ac ◆ Supports built-in DHCP server ◆ Supports firmware update ◆ Supports web-based management ◆ Supports mobile app management
Appearance
Buttons
LED: Press this button to turn the status LEDs on or off. Power I/O Switch: Slide the Power switch to turn the extender on or off. - App-Config: Press this button for 2 seconds until the 2.4GHz and 5GHz LEDs blink to initiate the App-Config process. - Reset: Press this button for 2 seconds until all LEDs blink once to reset the Range Extender to factory defaults.
Introduction 5
Ethernet Port: The 10/100Mbps RJ45 Ethernet port is used to add wireless connectivity to an Ethernet-enabled device such as Internet TV, DVR, or game console. Please note that this port cannot be used to connect the extender directly to the router.
LED Indicators
| Name | Status | Indication |
| Power | Blinking Green | The extender is initializing or updating firmware. |
| Green | The extender is ready for use. | |
| Off | The extender is powered off. | |
| 2.4GHz | Blinking Green | App-Config is initiated. |
| Green | The extender is connected to the primary network over 2.4GHz. | |
| Amber | The extender is connected but too far away from the router. | |
| Off | No connection. |
| 5GHz | Blinking Green | App-Config is in progress. |
| Green | The extender is connected to the primary network over 5GHz. | |
| Amber | The extender is connected but too far away from the router. | |
| Off | No connection. |

Connect the Extender to the Internet
This chapter covers the following topics:
Before You Begin Safety Information Quick Setup
Before You Begin
Where should I place my Range Extender?
The operating distance range of your wireless connection can vary significantly depending on the physical position of the wireless devices. Factors that can weaken signals by getting in the way of your network's radio waves are motor-driven appliances or obstructions, and walls. Typical ranges vary based on the types of materials and background RF (Radio Frequency) noise in your home or office.
In order to optimize the performance of the AC1200 Wi-Fi Range Extender, please read through the information below that describes the ideal location to place your Range Extender. Make sure that the extender is always within the wireless coverage of the wireless router.
- Halfway – Generally, the ideal placement for the extender is halfway between your wireless router and wireless devices. If the wireless signal is not satisfactory, you should relocate the extender closer to the router.

- No Obstacles – Clear obstacles around the extender or place it in an open corridor or a spacious location.
- No Interference – To minimize signal interference, choose a location away from Bluetooth® devices and other household electronics such as cordless phones, microwave ovens, and baby monitors, etc.
Keep away from


Safety Information
Please read and observe the following information for the safe and proper use of the Range Extender to prevent any unanticipated damage.
Place the extender in a well-ventilated location, far from direct sunlight or any heat sources. Leave at least 2 inches (5cm) of space around the extender for heat dissipation. - Turn off and unplug the extender during a lightning storm to avoid electronic shock or fire. Operating temperature of the extender should be 0°C\~40°C (32°F\~104°F). Operating humidity of the extender should be 10%\~90% RH (Non-condensing).
Quick Setup
There are two easy setup options to extend your Wi-Fi network.
Setup Using the Mobile App

The Kasa app requires a mobile device running iOS 8 or later; or Android 4.1 or later. The extender can also be configured for a web browser.
1 Download TP-LINK Kasa app
Search for and download the Kasa mobile app in the App Store or Google Play, or simply scan the QR code.

OR
→
2 Connect to your Wi-Fi Network
Go to your mobile device's Settings and connect to your home Wi-Fi network that you wish to extend.
ios
Android
3 Extend your Wi-Fi Network
Launch Kasa and follow the app instructions to extend your Wi-Fi network.
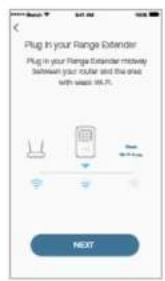


If the 2.4GHz and 5GHz LEDs do not change from blinking to solid, please refer to Setup Using a Computer.
4 Connect to Extended Network
Unless you customized the extended network names during the configuration, the extender adds _EXT to the end of the main network's SSIDs and uses the same Wi-Fi password.
Setup Using a Computer
1 Plug In
Plug in the Range Extender to an electrical wall outlet near your router. Toggle the Power switch to On and wait until the Power ⏻ LED is lit and solid green.

2 Connect via Wireless
Disconnect the Ethernet (wired) connection from your computer (if any). Click the 📋 (Wi-Fi) icon on the taskbar and connect to the extender's network (e.g. TP-LINK_2G_EXT or TP-LINK_5G_EXT). No password is needed to connect.
Mac OS X Windows

3 Log In
Launch a web browser and type: http://tplinkrepeater.net (or http://192.168.0.254) into the URL field. Enter admin (all lowercase) for both username and password to log in.
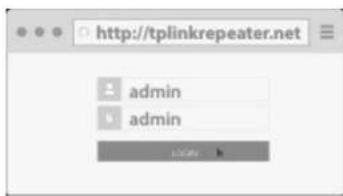

If this is your first time logging into the extender's web-based interface, you are prompted to create a new username and password. Please do so, or you can change the admin account at a later time. Refer to Changing admin account.

4 Extend your Wi-Fi Network
Follow the Quick Setup wizard to extend your 2.4GHz and 5GHz Wi-Fi networks.
a) Select your region and click
NEXT


Per FCC regulations, all wireless products marketed in the U.S. are fixed to the U.S. region.
b) Select your router's 2.4GHz network and enter your Wi-Fi password,
then click NEXT


If your network name (SSID) is hidden, click OTHER... to enter your 2.4GHz network settings.
c) Select your router's 5GHz network and enter your Wi-Fi password, then click NEXT.


If your network name (SSID) is hidden, click OTHER... to enter your 5GHz network settings.
If your router does not support 5GHz wireless band, click SKIP to continue.
d) On the Wireless Settings screen, you can either copy and use the same SSIDs as your main (host) networks, or create new names for the extended networks, then click NEXT.


To prevent your SSIDs from being seen by others, select the Hide SSID broadcast checkbox.
e) Verify your extended wireless settings and click FINISH. The extender applies the settings and automatically reboots. Once the connection is established, the 2.4GHz and 5GHz LEDs on the extender should turn on and stay solid.


2.4GHz and 5GHz Wi-Fi LEDs
Green: Good connection.
Amber: Connection is established, but the extender is too far away from the main (host) router.
Off: No connection.
b) Wait for the extender to reconnect and both Wi-Fi (2.4GHz and 5GHz) LEDs are lit a solid green. If not, relocate the extender closer to the router.
Unless you customized the extended network names during the configuration (step 4d), the extender adds _EXT to the end of the main network's SSIDs and uses the same Wi-Fi password.
For example: If the SSIDs of your main Wi-Fi network are MyHome (for 2.4GHz) and MyHome_5G (for 5GHz). The extended network's SSIDs will be MyHome_EXT and MyHome_5G_EXT.

5 Relocate your Extender
a) Plug in the extender to an electrical outlet around the midpoint between your router (Host Network) and the weak signal area.
3
Manage the Range Extender
This chapter covers the following section:
- Manage via Web Interface Other Functions
Manage via Web Interface
The Range Extender's web-based interface allows you to do more advanced configuration for your extended network. Please make sure that you connect your computer or mobile device to the extended network before any configuration.
Changing admin account
The default admin account credentials to log into the extender's web interface are admin (all lowercase) for both username and password. It is strongly recommended that you change the default to something unique.
1) Launch a web browser and type: http://tplinkrepeater.net in the URL field. 2) Log in using the admin credentials. 3) Go to Settings > System Tools > Admin Account.

Manage the Range Extender
4) Enter your current username and password into the Old Username and Old Password fields respectively. 5) Enter your new username and password into the New Username and New Password fields, then enter the password again to confirm.
6) Click SAVE to confirm the changes.

You will be prompted to log back in using the new admin account.
Dashboard
After the initial setup, you will be taken to the dashboard (or control panel) of the Range Extender every time you log in. The dashboard displays the current status of your extended networks. To view the additional information about the main (host) network or see who's currently connected to your extended network, simply click on the icon.
To access the dashboard:
1) Launch a web browser and type: http://tplinkrepeater.net in the URL field, then log in using the admin credentials. 2) You should be redirected to the dashboard automatically. If not, go to Settings > Status.

• Normal network connection status.
![graph LR A["Internet"] --> B["Router"] B --> C["Range Extender"] C --> D["Clients"] style A fill:#f9f,stroke:#333 style B fill:#ccf,stroke:#333 style C fill:#cfc,stroke:#333 style D fill:#fcc,stroke:#333](/content/2026/06/1371286/images/ddbe19fbcd3de9ee280116356b6b0b6c03b85682578232e4d5fdcda377b0303f.jpg)
The Range Extender is not connected to the router.

- The Range Extender is connected to the router, but Internet is not available.
![graph LR A["Internet"] --> B["Router"] B --> C["Range Extender"] C --> D["Clients"] style A fill:#f9f,stroke:#333 style B fill:#ccf,stroke:#333 style C fill:#cfc,stroke:#333 style D fill:#fcc,stroke:#333](/content/2026/06/1371286/images/72f38c95a8b377e1328e80e735b12595e5c5afd3dad6f0a08ba2cab4ebea1733.jpg)
- The Range Extender is partially connected to the router. Make sure the extender is set to obtain an IP address automatically under Settings > Network > Network Settings.
![graph LR A["Internet"] --> B["Router"] B --> C["Range Extender"] C --> D["Clients"] style A fill:#f9f,stroke:#333 style B fill:#ccf,stroke:#333 style C fill:#cfc,stroke:#333 style D fill:#fcc,stroke:#333](/content/2026/06/1371286/images/7d51b989193552eaba91a6124fa69e6850b7d14d928ce95eb1ee0969ca276217.jpg)
Wi-Fi icon indicators for 2.4GHz and 5GHz:
| Wi-Fi Icon | Indication |
| A secure Wi-Fi connection. | |
| A non-secure Wi-Fi connection. | |
| 2.4GHz 5GHz | No Wi-Fi connection. |
Extending another Wi-Fi network
If you want to change the extender's connection to another Wi-Fi network, you can either go through the Quick Setup again or follow the steps below without using the Quick Setup.
To extend another Wi-Fi network without using Quick Setup:
1) Launch a web browser and type: http://tplinkrepeater.net in the URL field, then log in using the admin credentials.
2) Go to Settings > Wireless > Connect to Network.

3) Select the Connect to 2.4GHz Network checkbox to extend the 2.4GHz band of the main (host) network. 4) Click WIRELESS SCANNER to scan for available 2.4GHz networks near you. 5) Select the Wi-Fi network that you wish to extend from the list.


If your Wi-Fi network doesn't appear on the list, its SSID may be hidden. Click ✗ to close the list and enter the SSID, Security, and Password of the main (host) network. These fields are case-sensitive.
6) Enter the Wi-Fi password of the selected network. 7) If your router supports the 5GHz band, repeat steps 3 to 6 to extend the 5GHz network. 8) Click SAVE to apply your settings.
Extended Network Settings
You can change or hide the network name (SSID) of the extended network. However, you cannot change the extender's Wi-Fi security. You must use the same Wi-Fi password of the main (host) network to connect to the extended network.
To change the extended network's SSID:
1) Launch a web browser and type: http://tplinkrepeater.net in the URL field, then log in using the admin credentials. 2) Go to Settings > Wireless > Extended Network. 3) Change the following Wi-Fi settings.

a) Extended 2.4GHz and Extended 5GHz: The extended network is enabled by default. Deselect Enable if you do not want to use the extender's 2.4GHz or 5GHz band. b) Extended 2.4GHz SSID and Extended 5GHz SSID: You can either enter a new name or click COPY HOST SSID to use the same SSID of the main (host) network. c) Hide SSID broadcast: Select this checkbox to hide the extender's SSID from the Wi-Fi network list.
4) Click SAVE to save the extended network settings.
Wi-Fi Access Control
By default, any wireless devices can connect to the extended network through the SSID. To increase network security, you can restrict access to the Wi-Fi network of your extender using the Access Control function.

It is strongly recommended that you use a computer with a wired connection to configure and enable the Access Control function.
If you use a wireless device to manage the Access Control, make sure that you add the device to the Whitelist first.
To restrict access:
1) Launch a web browser and type: http://tplinkrepeater.net in the URL field, then log in using the admin credentials. 2) Go to Settings > Wireless > Access Control. 3) Toggle On to enable the Access Control function.

4) Under Access Mode, select Blacklist or Whitelist.

- Blacklist: The devices in this list are not allowed to connect to the extended network.
- Whitelist: Only the devices in this list are allowed to connect to the extended network.
5) Click SAVE
To add one or more wireless devices (clients) to the Blacklist:
1) In the Online Devices list, displaying all wireless device(s) that are currently connected to the extended network.
• To block a device, click the 🔒 (Block) icon on the row of the device.
Manage the Range Extender 18
It will be added to the Device in Blacklist.
- To block multiple devices, select the checkboxes of the devices and click BLOCK at the top-right of the listing. Those devices will be added to the Devices in Blacklist.
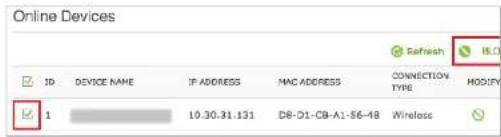
To manually add a device to the Blacklist or Whitelist:
1) Under the Devices in Blacklist or Devices in Whitelist, click + Add.

2) Enter the Device Name. 3) Enter the device's MAC Address in hexadecimal format (0-9, a-f, A-F) separated by a dash (for example, 00-FC-E9-98-7E-A0). 4) Click OK
To modify the device's name or its MAC address, or remove a device from the Blacklist or Whitelist, click the ☑ (Edit) icon or the ⏻ (Trash) icon on the row of the device.

To remove multiple devices, select the checkboxes of the devices and click
Delete at the top-right of the listing.

Changing the IP address
By default, the extender is configured to obtain its IP address automatically from your wireless router or Access Point (AP) that it connects to. If the wireless router does not have a DHCP server or its DHCP server is disabled, you can assign a static IP address to the extender.

We do NOT recommend that you change the Range Extender's IP address unless you are an experienced network administrator with strong knowledge of IP addressing, subnetting, and DHCP. Incorrect configuration can cause performance and network connection issues.
To change the extender's IP address:
1) Launch a web browser and type: http://tplinkrepeater.net in the URL field, then log in using the admin credentials. 2) Go to Settings > Network > Network Settings. 3) Select Use the following IP address and enter the static IP addresses in dotted-decimal notation into the following fields.

a) IP Address: The IP address to be assigned to the extender. b) Subnet Mask: The subnet mask that matches the static IP address entered above. c) Default Gateway: The gateway address of your Wi-Fi network.
4) Click
SAVE
to apply your configuration.

You will be disconnected from the extender. To continue to configure the extender, log into the extender using the new IP address.
DHCP Server
By default, the Range Extender is configured as a DHCP (Dynamic Host Configuration Protocol) server to automatically allocate dynamic IP addresses to DHCP clients connected to your extended networks.
To change the DHCP Server Settings:
1) Launch a web browser and type: http://tplinkrepeater.net in the URL field, then log in using the admin credentials. 2) Go to Settings > Network > DHCP Server Settings.

3) Under DHCP Server, select one of the following options:
- Auto: This option is selected by default to automatically allocate IP addresses to devices.
- On: If you want the extender to allocate IP addresses from an IP address pool, select this option and enter the following:
a. IP Address Pool: Enter the starting and ending IP addresses in dotted-decimal notation. These addresses must be in the same subnet as the main (host) network. b. Address Lease Time: Enter the time duration that an IP address is leased to the client between 1 and 2880 minutes. The default is 1 minute. c. Default Gateway: Enter the LAN IP address of your main (host) network. This field is optional. d. Primary DNS: Enter the primary DNS address of your main (host) network. This field is optional. e. Secondary DNS: Enter the secondary DNS address of your main
(host) network. This field is optional.
- Off: If selected, you must have another DHCP server within your LAN; otherwise, you have to assign an IP address for each client manually.
4) Click
SAVE
to save your DHCP Server configuration.
DHCP Client List
The DHCP Client List displays the following information of each DHCP client that is currently connected to the extended network. Use the Refresh button to update the client list.
| DHCP Client List | ||||
| Client Number: 0 | ||||
| ID | CLIENT NAME | MNC ADDRESS | ASSIGNED IP ADDRESS | LEASE TIME |
| -- | -- | -- | -- | -- |
- Client Name: The name of the DHCP client. MAC Address: The DHCP client's MAC address.
- Assigned IP Address: The IP address that is allocated to the DHCP client by the DHCP server.
- Lease Time: The time duration that the IP address is leased to the DHCP client.
Other Functions
Wireless Adapter
The Range Extender can also be used as a wireless adapter to connect any Ethernet-only device, such as a Blu-ray® player, game console, DVR, or Smart TV, to your Wi-Fi network.
Once the extender is successfully connected to your Wi-Fi networks, simply plug the Ethernet cable from the Ethernet-only device directly into the extender's Ethernet port.
By default, the Ethernet port connects to the 5GHz wireless network. If you want the Ethernet-only device to connect to the 2.4GHz wireless network, follow the steps below.
1) Launch a web browser and type: http://tplinkrepeater.net in the URL field, then log in using the admin credentials. 2) Go to Settings > Network > Ethernet Traffic (Wired Network). 3) Select 2.4GHz.
| Ethernet Traffic (Wired Network) | ||
| Host Network for the Ethernet port: | 2.4GHz | 5GHz |
4) Click

to apply your changes.
Status LED Control
You can conveniently turn off and on the Status LEDs (Power, 2.4GHz, and 5GHz) by pressing the LED button on the extender. However, the LEDs can also be set to turn off and on at a specific time every day.

Before enabling the Night Mode feature, make sure that the extender's time zone is set to your proper time zone under Settings > System Tools > Time Settings.
To set the time to turn off and on the LEDs:
1) Launch a web browser and type: http://tplinkrepeater.net in the URL field, then log in using the admin credentials. 2) Go to Settings > System Tools > LED Control.

3) Select Night Mode to enable the LED Control feature. 4) Under LED Off Time, select the time range (from and to) during which the LEDs will be off in 24-hour time. 5) Click SAVE to apply your settings.
4
Maintain the Range Extender
This chapter covers the following topics:
- Firmware Upgrade
- Backup and Restore
- Factory Defaults System Log Reboot Log out
Firmware Upgrade
Upgrading the Range Extender's firmware is necessary to improve the current performance of the device and fix the issues that the previous firmware version may have.
Before upgrading the firmware, you need to download the latest firmware from the TP-LINK Support website to your computer.

IMPORTANT: To prevent upgrade failure, please note the following:
- Make sure the latest firmware file is matched with the hardware version as shown under the Settings > System Tools > Firmware Upgrade page. • Make sure you have a stable connection between the extender and your computer.
- Backup your current configuration.
- Do NOT switch off or unplug the extender during the firmware upgrade.
To upgrade the extender's firmware:
1) Launch a web browser and type: http://tplinkrepeater.net in the URL field, then log in using the admin credentials. 2) Go to Settings > System Tools > Firmware Upgrade.
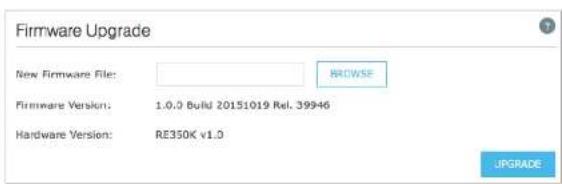
3) Click

to locate and select the downloaded firmware file.
4) Click


The firmware upgrade takes a few minutes to complete. Please DO NOT power off or unplug the extender. After the firmware upgrade is finished, the extender will automatically reboot.
Backup and Restore
It is highly recommended to backup your current configurations on a regular basis, before factory resetting or firmware upgrading. In the case of network failure or poor performance, you will be able to restore the Range Extender to its previous state.

Please DO NOT power off or unplug the extender during the backup or restore process.
To backup your current configuration:
1) Connect your computer to the extended network. 2) Launch a web browser and type: http://tplinkrepeater.net in the URL field, then log in using the admin credentials. 3) Go to Settings > System Tools > Backup & Restore. 4) Under Backup, click BACKUP to save a copy of your current configuration as a "config.bin" file on your computer.


Make sure that you save the backup file in a safe location where you can retrieve it when needed.
To restore the extender to its previous state:
1) Connect your computer to the extended network. 2) Launch a web browser and type: http://tplinkrepeater.net in the URL field, then log in using the admin credentials. 3) Go to Settings > System Tools > Backup & Restore. 4) Under Restore, click BROWSE to locate and select the saved "config.bin" file.

5) Click
RESTORE

The restore process takes a few minutes to complete. After reverting back to a previous state is finished, the extender will automatically reboot.
Factory Defaults
Resetting the Range Extender back to factory defaults can be done with a single click of the button on the extender's web-based interface. Alternatively, you can factory reset by pressing the Reset button on the extender for 2 seconds.

Factory reset will erase all your configurations that have been made to the extender and revert it back to the original state.
To factory reset via the web-based interface:
1) Launch a web browser and type: http://tplinkrepeater.net in the URL field, then log in using the admin credentials. 2) Go to Settings > System Tools > Backup & Restore. 3) Under Factory Default Restore, click FACTORY RESTORE and confirm at the prompt.
Revert all settings to factory defaults.
FACTORY RESTORE
To factory reset via the Reset button:
1) With the extender powered on, use a pin to press and hold the recessed Reset button until all LEDs start flashing multiple times, then release the button.


The factory reset takes a few minutes to complete. The extender will automatically reboot when the factory reset is finished.
To log back into the extender, enter admin for both username and password.
System Log
The System Log displays a list of the most recent activities (events) of the Range Extender. You can define which type of logs and/or the level of logs you want to view. You also have the ability to export the system log as a text file to your computer.
To view the System Log:
1) Launch a web browser and type: http://tplinkrepeater.net in the URL field, then log in using the admin credentials. 2) Go to Settings > System Tools > System Log. 3) Under Log Filter, select the type of logs and/or the log level you want to view. All is the default for log type and log level.

- Click Refresh to update the system log.
- Click Delete All to permanently remove all system logs.
- Click SAVE LOG to export the system log as a text (*.txt) file to your computer.
Reboot
If you are having a problem with the extended network, you can simply reboot the extender. There are two ways to reboot the extender:
- Toggle the Power Switch to Off. Wait for 10 seconds then switch it back on.
- Log into the extender's web-based interface and click (REBOOT) on the top right corner of the dashboard.
Log out
To log out of the extender's web-based interface, simply click → (LOG OUT) on the top right corner of the dashboard.
5
Appendix
This chapter covers the following topics:
• Factory Defaults Settings Troubleshooting FAQs - Specifications Glossary
Factory Default Settings
The following are the factory default settings of the Range Extender.
| Admin Account: | |
| Username: | admin |
| Password: | admin |
| Wireless Info: | |
| Default SSIDs: | 2.4GHz: TP-LINK_2G_EXT5GHz: TP-LINK_5G_EXT |
| Security: | None |
| Access Control: | Disabled |
| Extender IP Info: | |
| IP Address: | 192.168.0.254 |
| Subnet Mask: | 255.255.255.0 |
| Domain: | http://tplinkrepeater.net |
| Quick Setup: | Enabled |
Troubleshooting FAQs
Q1. How do I restore my extender's configuration to its factory default settings?
There are two options to factory reset the extender:
- Option One: With the extender powered on, use a pin to press and hold the RESET button until all LEDs turn off and turn back on (about 2 seconds), then release the button.
- Option Two: Restore the default settings from the extender's web-based interface. Go to System Tools > Restore & Backup.

Factory resetting your range extender will erase the current configuration settings.
Q2. I forgot my password, what should I do?
There are two types of passwords: Wi-Fi password and admin account's password.
Wi-Fi Password: The Wi-Fi password of your extended network is the same as your main (host) network. - Admin account's Password
The default admin password, which is used to access the extender's web-based interface, is admin (all lowercase). If you have changed and forgotten the admin password, you will have to factory reset the extender to its original state. Refer to the Factory
Defaults section for instructions.
Q3. The App-Config process fails during the initial setup, what should I do?
Follow Kasa's instructions to reinitiate the App-Config process or use Option 2 to set up the extender using a computer.
Q4. What should I do if I cannot access the extender's web-based interface?
• Make sure that http://tplinkrepeater.net is entered correctly. • Make sure that you only use either Ethernet or Wi-Fi connection when accessing the extender's web-based interface but not both. • If you use a computer to access the extender's web-based interface, make sure that it is configured to obtain an IP address automatically (DHCP). • If the problem still persists, contact our technical support.
Q5. How do I check the Wi-Fi signal strength of my extended networks?
An easy way to check the signal strength is to access the dashboard of the extender. Go to Settings > Status, the Uplink Signal and the Uplink Speed are shown under both of your extended networks.
Q6. Why the 2.4GHz and 5GHz LEDs on the extender are lit in amber?
Amber indicates that the extender is connected, but it is far away from the main (host) router (or AP). You should relocate it closer to the router or use the Location Assistant feature on the Kasa mobile app to find a best location to place the extender.
Specifications
| General | |
| Standards and Protocols | IEEE 802.3, IEEE 802.3u, IEEE 802.11a, IEEE 802.11n, IEEE 802.11b, IEEE 802.11g, IEEE 802.1x, IEEE 802.11e, IEEE 802.11i, IEEE 802.11ac, TCP/IP, DHCP |
| Safety & Emission | CE |
| Ports | One 10/100/1000M Auto-Negotiation LAN RJ45 port |
| Wireless | |
| Frequency Band | 2.4GHz: 2.4~2.4835GHz5GHz: 5.15~5.25GHz |
| Radio Data Rate | 2.4GHz:11n: Up to 450Mbps11g: 54/48/36/24/18/12/9/6Mbps11b: 11/5.5/2/1Mbps5GHz:11ac: Up to 1300Mbps11n: Up to 450Mbps11a: 54/48/36/24/18/12/9/6Mbps |
| Security | WEP, WPA-PSK, WPA2-PSK |
| Physical and Environment | |
| Working Temperature | 0°C~40°C (32°F~104°F) |
| Working Humidity | 10% ~ 90% RH, Non-condensing |
| Storage Temperature | -40°C~70°C(-40°F~158°F) |
| Storage Humidity | 5% ~ 95% RH, Non-condensing |
Glossary
802.11b - The 802.11b standard, also known as Wi-Fi, which provides speeds up to 11 Mbps using direct-sequence spread-spectrum (DSSS) technology and operating in the unlicensed radio spectrum at 2.4GHz, and WEP encryption for security. - 802.11g - The 802.11g specification is for wireless networking at 54 Mbps using direct-sequence spread-spectrum (DSSS) technology, using OFDM modulation and operating in the unlicensed radio spectrum at 2.4GHz, and backward compatibility with IEEE 802.11b devices, and WEP encryption for security. 802.11n – 802.11n builds upon previous 802.11 standards by adding MIMO (multiple-input multiple-output). MIMO uses multiple transmitter and receiver antennas to allow for increased data throughput via spatial multiplexing and increased range by exploiting the spatial diversity, perhaps through coding schemes like Alamouti coding. The Enhanced Wireless Consortium (EWC) was formed to help accelerate the IEEE 802.11n development process and promote a technology specification
for interoperability of next-generation wireless local area networking (WLAN) products.
- Access Point (Range Extender) – A wireless LAN transceiver or "base station" that can connect a wired LAN to one or many wireless devices. Access points can also bridge to each other. DNS (Domain Name System) – An Internet Service that translates the names of websites into IP addresses.
- Domain Name - A descriptive name for an address or group of addresses on the Internet.
- DSL (Digital Subscriber Line) – A technology that allows data to be sent or received over existing traditional phone lines.
- ISP (Internet Service Provider) – A company that provides access to the Internet. MTU (Maximum Transmission Unit) – The size in bytes of the largest packet that can be transmitted.
- SSID – A Service Set Identification is a thirty-two character (maximum) alphanumeric key identifying a wireless local area network. For the wireless devices in a network to communicate with each other, all devices must be configured with the same SSID. This is typically the configuration parameter for a wireless PC card. It corresponds to the ESSID in the wireless Access Point and to the wireless network name.
- WEP (Wired Equivalent Privacy) – A data privacy mechanism based on a 64-bit or 128-bit or 152-bit shared key algorithm, as described in the IEEE 802.11 standard.
- Wi-Fi – A trademark of the Wi-Fi Alliance and the brand name for products using the IEEE 802.11 family of standards.
- WLAN (Wireless Local Area Network) – A group of computers and
associated devices communicate with each other wirelessly, which network serving users are limited in a local area.
- WPA (Wi-Fi Protected Access) – WPA is a security technology for wireless networks that improves on the authentication and encryption features of WEP (Wired Equivalent Privacy). In fact, WPA was developed by the networking industry in response to the shortcomings of WEP. One of the key technologies behind WPA is the Temporal Key Integrity Protocol (TKIP). TKIP addresses the encryption weaknesses of WEP. Another key component of WPA is built-in authentication that WEP does not offer. With this feature, WPA provides roughly comparable security to VPN tunneling with WEP, with the benefit of easier administration and use. This is similar to 802.1x support and requires a RADIUS server in order to implement. The Wi-Fi Alliance will call this, WPA-Enterprise. One variation of WPA is called WPA Pre Shared Key or WPA-Personal for short - this provides an authentication alternative to an expensive RADIUS server. WPA-Personal is a simplified but still powerful form of WPA most suitable for home Wi-Fi networking. To use WPA-Personal, a person sets a static key or "passphrase" as with WEP. But, using TKIP, WPA-Personal automatically changes the keys at a preset time interval, making it much more difficult for hackers to find and exploit them. The Wi-Fi Alliance will call this, WPA-Personal.
FCC STATEMENT

This equipment has been tested and found to comply with the limits for a Class B digital device, pursuant to part 15 of the FCC Rules. These limits are designed to provide reasonable protection against harmful interference in a residential installation. This equipment generates, uses and can radiate radio frequency energy and, if not installed and used in accordance with the instructions, may cause harmful interference to radio communications. However, there is no guarantee that interference will not occur in a particular installation. If this equipment does cause harmful interference to radio or television reception, which can be determined by turning the equipment off and on, the user is encouraged to try to correct the interference by one or more of the following measures:
• Reorient or relocate the receiving antenna. - Increase the separation between the equipment and receiver. - Connect the equipment into an outlet on a circuit different from that to which the receiver is connected. Consult the dealer or an experienced radio/TV technician for help.
This device complies with part 15 of the FCC Rules. Operation is subject to the following two conditions:
1) This device may not cause harmful interference. 2) This device must accept any interference received, including interference that may cause undesired operation.
Any changes or modifications not expressly approved by the party responsible for compliance could void the user's authority to operate the equipment.
Note: The manufacturer is not responsible for any radio or TV interference caused by unauthorized modifications to this equipment. Such modifications could void the user's authority to operate the equipment.
FCC RF Radiation Exposure Statement
This equipment complies with FCC RF radiation exposure limits set forth for an uncontrolled environment. This device and its antenna must not be co-located or operating in conjunction with any other antenna or transmitter.
"To comply with FCC RF exposure compliance requirements, this grant is applicable to only Mobile Configurations. The antennas used for this transmitter must be installed to provide a separation distance of at least 20 cm from all persons and must not be co-located or operating in conjunction with any other antenna or transmitter."
The device operates in 5.15 ~ 5.25GHz / 5.745 ~ 5.85 GHz frequency range. It is restricted in indoor environment only. This device meets all the other requirements specified in Part 15E, Section 15.407 of the FCC Rules.
CE Mark Warning
CE1588①
This is a class B product. In a domestic environment, this product may cause radio interference, in which case the user may be required to take adequate measures.
RF Exposure Information
This device meets the EU requirements (1999/519/EC) on the limitation of exposure of the general public to electromagnetic fields by way of health protection.
The device complies with RF specifications when the device used at 20 cm from your body.
National Restrictions
This device is intended for home and office use in all EU countries (and other countries following the EU directive 1999/5/EC) without any limitation except for the countries mentioned below:
| Country | Restriction | Reason/remark |
| Belarus Not Implemented | ||
| Norway | Implemented | This subsection does not apply for the geographical area within a radius of 20 km from the centre of Ny-Ålesund on Svalbard. |
| Italy | Implemented | The public use is subject to general authorisation by the respective service provider. |
| Russian Federation | Limited implementation | 1. SRD with FHSS modulation1.1. Maximum 2.5 mW e.i.r.p.1.2. Maximum 100 mW e.i.r.p. Permitted for use SRD for outdoor applications without restriction on installation height only for purposes of gathering telemetry information for automated monitoring and resources accounting systems. Permitted to use SRD for other purposes for outdoor applications only when the installation height is not exceeding 10 m above the ground surface.1.3.Maximum 100 mW e.i.r.p. Indoor applications.2. SRD with DSSS and other than FHSS wideband modulation2.1. Maximum mean e.i.r.p. density is 2 mW/MHz. Maximum 100 mW e.i.r.p.2.2. Maximum mean e.i.r.p. density is 20 mW/MHz. Maximum 100 mW e.i.r.p. It is permitted to use SRD for outdoor applications only for purposes of gathering telemetry information for automated monitoring and resources accounting systems or security systems.2.3. Maximum mean e.i.r.p. density is 10 mW/MHz. Maximum 100 mW e.i.r.p. Indoor applications. |
| Ukraine | Limited implementation | e.i.r.p. ≤100 mW with built-in antenna with amplification factor upto 6 dBi. |
ATTENTION: Due to EU law, the country settings must be identical to the country where the device is operating (important due to non-harmonised frequencies in the EU). Restricted to indoor use.
Canadian Compliance Statement
This device complies with Industry Canada license-exempt RSSs. Operation is subject to the following two conditions:
1) This device may not cause interference, and 2) This device must accept any interference, including interference that may cause undesired operation of the device.
1) The device for operation in the band 5150–5250 MHz is only for indoor use to reduce the potential for harmful interference to co-channel mobile satellite systems. 2) For devices with detachable antenna(s), the maximum antenna gain permitted for devices in the band 5725-5850 MHz shall be such that the equipment still complies with the e.i.r.p. limits specified for point-to-point and non-point-to-point operation as appropriate; and
The high-power radars are allocated as primary users (i.e. priority users) of the bands 5250-5350 MHz and 5650-5850 MHz and that these radars could cause interference and/or damage to LE-LAN devices.
Warning
Industry Canada Statement
CAN ICES-3 (B)/NMB-3(B)
Radiation Exposure Statement:
This equipment complies with IC radiation exposure limits set forth for an uncontrolled environment. This equipment should be installed and operated with minimum distance 20cm between the radiator & your body.
Korea Warning Statements
- When product has power button, the power button is one of the way to shut off the product; when there is no power button, the only way to completely shut off power is to disconnect the product or the power adapter from the power source.
- Don't disassemble the product, or make repairs yourself. You run the risk of electric shock and voiding the limited warranty. If you need service, please contact us.
- Avoid water and wet locations.
This product can be used in the following countries:
| AT | BG | BY | CA | CZ | DE | DK | EE |
| ES | FI | FR | GB | GR | HU | IE | IT |
| LT | LV | MT | NL | NO | PL | PT | RO |
| RU | SE | SG | SK | TR | UA | US |
DECLARATION OF CONFORMITY
For the following equipment:
Product Description: AC1200 Wi-Fi Range Extender
Model No.: RE350K
Trademark: TP-LINK
We declare under our own responsibility that the above products satisfy all the technical regulations applicable to the product within the scope of Council Directives:
Directives 1999/5/EC, Directives 2004/108/EC, Directives 2006/95/EC, Directives 1999/519/EC, Directives 2011/65/EU
The above product is in conformity with the following standards or other normative documents
EN 300 328 V1.8.1
EN 301 893 V1.7.1
EN 301 489-1 V1.9.2:2011 & EN 301 489-17 V2.2.1:2012
EN 55022:2010+AC:2011
EN 55024:2010
EN 60950-1: 2006 + A11: 2009 + A1: 2010 + A12: 2011 + A2: 2013
EN 50385: 2002
The product carries the CE Mark:

TP-LINK TECHNOLOGIES CO., LTD.
Building 24 (floors 1, 3, 4, 5), and 28 (floors 1-4) Central Science and Technology Park, Shennan Rd, Nanshan, Shenzhen, China
TP-LINK TP-LINK TECHNOLOGIES CO., LTD
Person responsible for marking this declaration:

Yang Hongliang
Product Manager of International Business
Date of issue: 2015-11-10
TP-LINK TECHNOLOGIES CO., LTD.
Building 24 (floors 1, 3, 4, 5), and 28 (floors 1-4) Central Science and Technology Park, Shennan Rd, Nanshan, Shenzhen, China

- INTRODUCTION
- PRODUCT OVERVIEW
- WHAT DOES THE RANGE EXTENDER ACTUALLY DO
- SUPPORT FOR THE 802.11AC WIRELESS TECHNOLOGY
- MAIN FEATURES
- BUTTONS
- CONNECT THE EXTENDER TO THE INTERNET
- BEFORE YOU BEGIN
- WHERE SHOULD I PLACE MY RANGE EXTENDER
- SAFETY INFORMATION
- QUICK SETUP
- SETUP USING THE MOBILE APP
- DOWNLOAD TP-LINK KASA APP
- CONNECT TO YOUR WI-FI NETWORK
- EXTEND YOUR WI-FI NETWORK
- CONNECT TO EXTENDED NETWORK
- SETUP USING A COMPUTER
- PLUG IN
- CONNECT VIA WIRELESS
- LOG IN
- RELOCATE YOUR EXTENDER
- MANAGE THE RANGE EXTENDER
- MANAGE VIA WEB INTERFACE
- CHANGING ADMIN ACCOUNT
- DASHBOARD
- TO ACCESS THE DASHBOARD
- EXTENDING ANOTHER WI-FI NETWORK
- EXTENDED NETWORK SETTINGS
- TO CHANGE THE EXTENDED NETWORK'S SSID
- WI-FI ACCESS CONTROL
- TO RESTRICT ACCESS
- TO ADD ONE OR MORE WIRELESS DEVICES (CLIENTS) TO THE BLACKLIST
- TO MANUALLY ADD A DEVICE TO THE BLACKLIST OR WHITELIST
- CHANGING THE IP ADDRESS
- TO CHANGE THE EXTENDER'S IP ADDRESS
- DHCP SERVER
- TO CHANGE THE DHCP SERVER SETTINGS
- DHCP CLIENT LIST
- OTHER FUNCTIONS
- WIRELESS ADAPTER
- STATUS LED CONTROL
- TO SET THE TIME TO TURN OFF AND ON THE LEDS
- MAINTAIN THE RANGE EXTENDER
- FIRMWARE UPGRADE
- TO UPGRADE THE EXTENDER'S FIRMWARE
- BACKUP AND RESTORE
- TO BACKUP YOUR CURRENT CONFIGURATION
- TO RESTORE THE EXTENDER TO ITS PREVIOUS STATE
- FACTORY DEFAULTS
- TO FACTORY RESET VIA THE WEB-BASED INTERFACE
- TO FACTORY RESET VIA THE RESET BUTTON
- SYSTEM LOG
- TO VIEW THE SYSTEM LOG
- REBOOT
- LOG OUT
- APPENDIX
- FACTORY DEFAULT SETTINGS
- TROUBLESHOOTING FAQS
- Q1. HOW DO I RESTORE MY EXTENDER'S CONFIGURATION TO ITS FACTORY DEFAULT SETTINGS
- Q2. I FORGOT MY PASSWORD, WHAT SHOULD I DO
- Q3. THE APP-CONFIG PROCESS FAILS DURING THE INITIAL SETUP, WHAT SHOULD I DO
- Q4. WHAT SHOULD I DO IF I CANNOT ACCESS THE EXTENDER'S WEB-BASED INTERFACE
- Q5. HOW DO I CHECK THE WI-FI SIGNAL STRENGTH OF MY EXTENDED NETWORKS
- Q6. WHY THE 2.4GHZ AND 5GHZ LEDS ON THE EXTENDER ARE LIT IN AMBER
- GLOSSARY
- FCC STATEMENT
- FCC RF RADIATION EXPOSURE STATEMENT
- CE MARK WARNING
- CE1588①
- RF EXPOSURE INFORMATION
- NATIONAL RESTRICTIONS
- CANADIAN COMPLIANCE STATEMENT
- WARNING
- INDUSTRY CANADA STATEMENT
- RADIATION EXPOSURE STATEMENT
- KOREA WARNING STATEMENTS
- DECLARATION OF CONFORMITY
- TP-LINK TP-LINK TECHNOLOGIES CO., LTD
Brand : TP-LINK
Model : RE350K
Category : Wi-Fi repeater