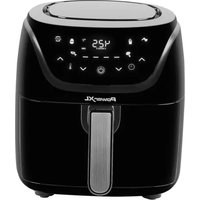
Vortex Pro Air Fryer AF-E6001-CA - Deep fryer PowerXL - Free user manual and instructions
Find the device manual for free Vortex Pro Air Fryer AF-E6001-CA PowerXL in PDF.


| Product Type | Air Fryer / Deep Fryer |
| Model | Vortex Pro AF-E6001-CA |
| Brand | PowerXL |
| Capacity | 6 quarts (5.7 liters) |
| Dimensions (W x D x H) | Approx. 12.2 x 13.8 x 14.6 inches |
| Weight | Approx. 14.5 lbs (6.6 kg) |
| Power Source | 120V AC, 60Hz |
| Wattage | 1700 watts |
| Temperature Range | 175°F – 400°F (80°C – 204°C) |
| Timer | 1–60 minutes |
| Main Functions | Air frying, roasting, baking, reheating, dehydrating |
| Preset Programs | French fries, chicken, steak, fish, bacon, and more |
| Display Type | Touchscreen control panel with digital display |
| Basket Material | Non-stick coated |
| Dishwasher Safe Parts | Yes (basket and crisper tray) |
| Cleaning Instructions | Wipe with damp cloth; do not immerse in water |
| Safety Features | Automatic shut-off, cool-touch handle, overheat protection |
| Spare Parts Available | Replacement basket, crisper tray, and accessories |
| Repairability | Moderate; user-replaceable basket and tray; professional repair for electronics |
| Warranty | 1 year limited manufacturer warranty |
| Certifications | ETL listed, FDA compliant |
| Manual Languages | English, French, Spanish |
Frequently Asked Questions - Vortex Pro Air Fryer AF-E6001-CA PowerXL
User questions about Vortex Pro Air Fryer AF-E6001-CA PowerXL
0 question about this device. Answer the ones you know or ask your own.
Ask a new question about this device
Download the instructions for your Deep fryer in PDF format for free! Find your manual Vortex Pro Air Fryer AF-E6001-CA - PowerXL and take your electronic device back in hand. On this page are published all the documents necessary for the use of your device. Vortex Pro Air Fryer AF-E6001-CA by PowerXL.
USER MANUAL Vortex Pro Air Fryer AF-E6001-CA PowerXL
Owner's Manual
Save These Instructions - For Household Use Only
MODELS: AF-E6001-L, AF-E6001-CA
When using electrical appliances, basic safety precautions should always be followed. Do not use the PowerXL® Vortex Pro Air Fryer until you have read this manual thoroughly.
PowerXL™
VORTEX PRO AIR FRYER
IMPORTANT SAFEGUARDS ....4
Parts & Accessories......8
Using the Control Panel 10
Instructions for Use....12
General Cooking Guidelines....16
Troubleshooting....18
Frequently Asked Questions....20
Cleaning & Storage 21
Money-Back Guarantee ....22
Appliance Specifications
| Model Numbers | AF-E6001-L, AF-E6001-CA |
| Temperature Range | 90°F-430°F |
| Exterior Dimensions | 10.63" x 11.26" x 11.22"(270 x 286 x 285 mm) |
| Internal Cavity Dimensions | 9.45" x 8.23" x 5.39"(240 x 209 x 137 mm) |
| Power Cord Length | 35.43"(0.9 m) |
| Plug Type | 2-prong |

WARNING
PREVENT INJURIES! CAREFULLY READ ALL INSTRUCTIONS BEFORE USE!
When using electrical appliances, basic safety precautions should be followed, including the following:
- READ ALL INSTRUCTIONS.
- This appliance is not intended for use by persons (including children) with reduced physical, sensory, or mental capabilities or lack of experience and knowledge unless they are given supervision or instruction concerning use of the appliance by a person responsible for their safety.
- Close supervision is necessary when any appliance is used by or near children.
- DO NOT place on or near a hot gas or electric burner or in a heated oven.
- DO NOT place your appliance on a cooktop, even if the cooktop is cool, because you could accidentally turn
the cooktop on, causing a fire, damaging the appliance, your cooktop, and your home.

- DO NOT place or use this appliance near water.
- When cooking, DO NOT place the appliance against a wall or within 5 inches of other appliances. DO NOT place anything on top of the appliance.
- A fire may occur if this appliance is covered by or touching flammable material, including curtains, draperies, walls, and the like, when in operation.
-
DO NOT use outdoors.
-
DO NOT place the appliance in any container or small confined space while the appliance is heated or in operation.
- ALWAYS operate the appliance on a horizontal surface that is level, stable, and noncombustible with adequate space for airflow.
- Before using your appliance on any countertop surface or other fragile surface, such as a glass tabletop, check with your countertop manufacturer or installer for recommendations about using appliances on your surfaces. Some manufacturers and installers may recommend protecting your surface by placing a hot pad or trivet under the appliance for heat protection. Your manufacturer or installer may recommend that hot pans, pots, or electrical appliances should not be used directly on top of the countertop. If you are unsure, place a trivet or hot pad under the appliance before using it.
- DO NOT operate any appliance if it has a damaged cord or plug, if it is not working properly, or if it has been damaged or dropped. Return the appliance to an authorized service facility for examination, repair, or adjustment.
- This appliance should be serviced ONLY by qualified service technicians. Contact Customer Service using the information located on the back of this manual.
-
NEVER immerse the main unit housing in water. If the appliance falls or accidentally becomes immersed in water, unplug from electrical outlet immediately. Do not reach into liquid if the appliance is plugged in and immersed.
-
To protect against electrical shock, DO NOT immerse the cord or plugs, or expose the electrical components to water or other liquid.
- DO NOT plug in the power cord or operate the appliance controls with wet hands.
- ALWAYS make sure the plug is attached to the appliance first, and then plug the cord into the electrical outlet. To disconnect, press the Power button to turn the appliance off and then remove the plug from the electrical outlet.
- MAKE SURE the appliance is properly plugged into a dedicated electrical outlet without any other appliances on the same outlet.
- KEEP the appliance and its power cord out of the reach of children when it is in operation or in the cooling down process.
- NEVER plug the appliance into an outlet below the surface where the appliance is placed.
- DO NOT let the power cord hang over the edge of a table or counter or touch hot surfaces.
- DO NOT clean with metal scouring pads. Pieces can break off the pad and touch electrical parts, creating risks of electric shock.
- Should the appliance emit smoke, UNPLUG IMMEDIATELY and wait for smoking to stop before handling the appliance. Allow the appliance to cool and wipe excess oil and grease from the appliance.
- Cooking appliances should be positioned in a stable location with the handles (if any) positioned to avoid the spillage of hot liquids.
-
NEVER operate the appliance unattended.
-
The use of accessory attachments not recommended by the appliance manufacturer may cause injuries.
- Avoid touching moving parts.
- UNPLUG the appliance from outlet when not in use and before cleaning. ALLOW 30 minutes to cool before handling, putting on or taking off parts, cleaning, or storing.
- DO NOT cover the Air Intake Vent or Hot Air Outlet Vent while the appliance is operating. Doing so will prevent even cooking and may overheat or damage the appliance.
- When in operation, hot air and steam are released through the Hot Air Outlet Vent. KEEP YOUR HANDS AND FACE at a safe distance from the Hot Air Outlet Vent and KEEP the Vent clear of obstructions.
- While cooking, the internal temperature of the appliance reaches several hundred degrees Fahrenheit. To avoid personal injury, NEVER place hands inside the appliance unless it is thoroughly cooled.
- The appliance's outer surfaces and accessories may become hot during use. WEAR OVEN MITTS when handling the appliance during and after use and to protect against hot steam and air released when opening the appliance.
- DO NOT touch hot surfaces. Use handles or knobs.
-
EXTREME CAUTION MUST BE USED when moving an appliance containing hot oil or other hot liquids or when removing accessories or disposing of hot grease. This appliance is not intended for deep-frying foods.
-
Oversized foods, metal foil packages, or utensils MUST NOT be inserted in the appliance as they may involve a risk of fire or electric shock. DO NOT overfill the appliance.
- DO NOT store any materials, other than manufacturer-recommended accessories, in this appliance when not in use.
- DO NOT place any of the following materials in the appliance: paper, cardboard, plastic.
- NEVER pour oil into the appliance or accessories. Fire and personal injury could result.
- DO NOT use aerosol cooking sprays. These sprays will build up on cookware and become difficult to remove while reducing the nonstick cooking performance.
- DO NOT expose the appliance to corrosive chemicals or vapors.
- DO NOT use sharp utensils with the appliance. These implements can damage the appliance's protective nonstick coating.
- This appliance is for home use only. If the appliance is used improperly or for professional or semi-professional purposes or if it is not used according to the instructions in the user manual, the guarantee becomes invalid and Empower Brands, LLC will not be held liable for damages. DO NOT use this appliance for anything other than its intended use.

CAUTION
- NEVER connect this appliance to an external timer switch or separate remote-control system.
- When ready to start, plug the hardwired cord into a electrical outlet. To disconnect, press the Power Button to turn the appliance off and then remove the plug from the electrical outlet.
- NEVER rest anything on the basket while it is open.
- DO NOT leave the basket open for an extended period.
- ALWAYS ensure that nothing is protruding out of the appliance before closing the basket.
- ALWAYS close the basket gently; NEVER slam the basket closed. ALWAYS use the handle when opening and closing the basket.
- NEVER operate the appliance with the basket open.
- When the cooking time has completed, cooking will stop and the fan will continue to run for 10-20 seconds to cool down the appliance.
- The appliance is equipped with an internal microswitch that automatically shuts down the fan and heating element when the basket is removed.
SAVE THESE INSTRUCTIONS - FOR HOUSEHOLD USE ONLY
POLARIZED PLUG
This appliance has a polarized plug (one blade is wider than the other). To reduce the risk of electric shock, this plug is intended to fit into a polarized outlet only one way. If the plug does not fit fully into the outlet, reverse the plug. If it still does not fit, contact a qualified electrician. Do not attempt to modify the plug in any way.
a. A short power-supply cord is provided to reduce the risk resulting from becoming entangled in or tripping over a longer cord.
b. Longer detachable power-supply cords or extension cords are available and may be used if care is exercised in their use.
c. If a longer detachable power-supply cord or extension cord is used:
-
The marked electrical rating of the cord set or extension cord should be at least as great as the electrical rating of the appliance;
-
The cord should be arranged so that it will not drape over the countertop or tabletop where it can be pulled on by children or tripped over unintentionally.
Electric Power
This appliance should be operated on a dedicated electrical outlet. If the electrical outlet is overloaded with other appliances, your new appliance may not operate properly.
Automatic Shut-Off
The appliance has a built-in shut-off device that will automatically shut off the appliance when the cooking time has completed. You can manually switch off the appliance by pressing the Power Button. The fan will continue running for 10-20 seconds to cool down the appliance.
Overheating Protection
Should the inner temperature control system fail, the overheating protection system will be activated and the appliance will not function. Should this happen, unplug the appliance. Allow time for the appliance to cool completely before restarting or storing.
Electromagnetic Fields
This appliance complies with all standards regarding electromagnetic fields. If handled properly and according to the instructions in the user manual, the appliance is safe to use based on scientific evidence available today.

WARNING: For California Residents
This product can expose you to chemicals including Di(2-ethylhexyl)phthalate, which is known to the State of California to cause cancer and birth defects or other reproductive harm. For more information, go to www.P65Warnings.ca.gov.
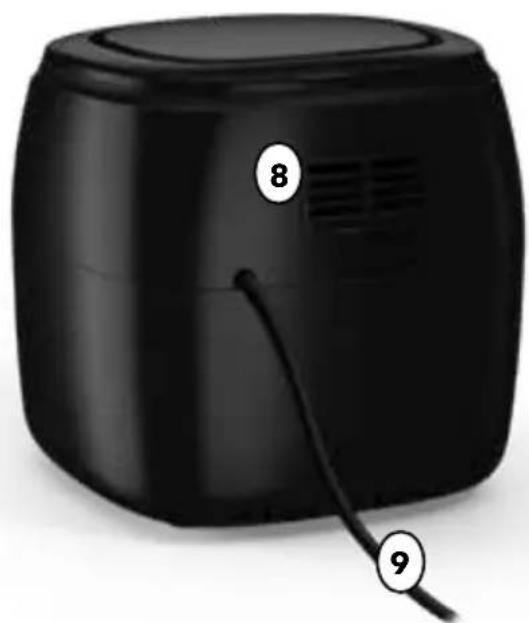
Parts & Accessories
- FRY TRAY
- SILICONE BUMPERS*
- BASKET
- HANDLE
- CONTROL PANEL
- AIR INLET VENT
- MAIN UNIT HOUSING
- HOT AIR OUTLET VENT
- POWER CABLE

NOTE: Unpack all listed contents from the packaging. Contents vary by model. Please remove any clear or blue protective film on the components before use.
*Removing the bumpers is not recommended.
IMPORTANT: Please make sure that your PowerXL® Vortex Pro Air Fryer has been shipped with the components that you ordered (some accessories may be sold separately). Check everything carefully before use. If any part is missing or damaged, do not use this product. Contact Customer Service.


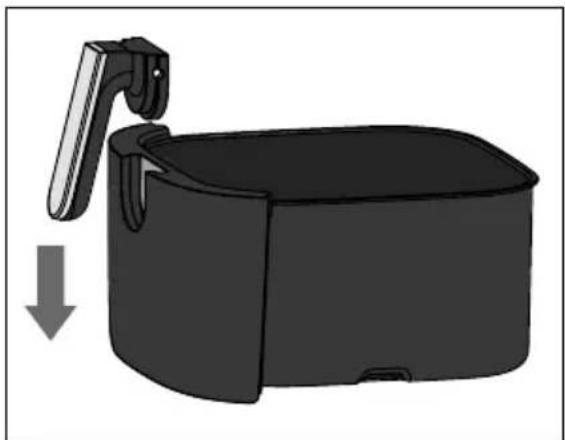
Attaching the Fry Basket Handle
Your Fry Basket Handle might come disassembled in your appliance's packaging. To attach the Fry Basket Handle:
- Remove the paper label. Pull the Fry Basket out of the appliance.
- Slide the attachment point on the handle downward until it clicks into place.
- The Fry Basket Handle should lock into place and should not detach once it is locked into place.


Using the Control Panel

TO START: Plug the Power Cord into the electrical outlet. The Digital LED Display will illuminate and a series of dashes (running lights) will display.
-
Power Button: Once the Basket and Fry Tray are properly placed in the Main Unit Housing, the Control Panel will be illuminated. Pressing the Power Button once will set the appliance to a default cooking temperature of 375° F and time of 15 minutes. Pressing the Power Button a second time will start the cooking process. Pressing the Power Button during the cooking cycle will turn the appliance off.
-
Cooking Presets: Press the cooking preset buttons to choose from up to ten cooking presets (presets vary by model). See the Preset Chart for the cooking times and temperatures associated with each preset. The running lights on the Control Panel will illuminate when the cooking cycle begins and will stay illuminated for up to 20 seconds after the cooking cycle is complete.
-
Timer Control Buttons: The + and - symbols enable you to increase or decrease cooking time 1 minute at a time (30 minutes at a time for Dehydrate). Keeping the Button held down will rapidly change the time. Time control range: 1-60 minutes (Dehydrate time control range: 2-24 hours).
-
Temperature Control Buttons: The + and - symbols enable you to increase or decrease cooking temperature 5°F at a time. Keeping a button held down will rapidly change the temperature. Temperature control range: 180°F-430°F (Dehydrate temperature control range: 90°F-170°F).
-
Time and Temperature Display: This display will keep track of the temperature and remaining cook time.
Shake Indicator: The Shake Indicator will illuminate when the cooking cycle has reached its halfway point. This halfway timer gives you the opportunity to shake or flip your food in the appliance, which helps ensure even cooking (see the "Shaking" section).
Preset Chart
Once you are familiar with the appliance, you may want to experiment with your own recipes. Simply choose the time and temperature that suits your personal taste.
| Preset Temperature Time Shake* | Low Fan | ||
| [SWDA] | French Fry | 400°F 18 mins. Yes | |
 | Vegetable | 380°F 8 mins. Yes | |
 | Bake | 320°F 30 mins. No On | |
 | Fish | 390°F 10 mins. No | |
 | Eggs | 250°F 18 mins. No | |
 | Chicken | 350°F 40 mins. Yes | |
 | Broil | 400°F 12 mins. Yes | |
 | Reheat | 240°F 12 mins. Yes | |
 | Defrost | 180°F 15 mins. Yes On | |
 | Dehydrate | 120°F 2 hrs. No On | |
*Shake Function Programming: Halfway through the cooking cycle, the appliance will beep five times, indicating that food can be shaken or flipped over (see the "Shaking" section).
Before First Use
- Read all material, warning stickers, and labels.
- Remove all packing materials, stickers, and labels from the appliance.
- Please go to www.prodprotect.com/powerxl to register your warranty
- Before initial use, wipe the inside and outside of the appliance with a warm, moist cloth and mild detergent. Handwash all cooking accessories.
- Place appliance on a heat-resistant surface or use heat protection. Do not place the appliance on a surface that is not heat resistant. Ensure that the appliance is used in an area with adequate air circulation. Do not place on the stove top.
- Before cooking food, preheat the appliance for a few minutes to allow the appliance to burn off the manufacturer's protective coating of oil. Wipe the appliance with warm, soapy water and a dishcloth after this burn-in cycle.

FIG. A
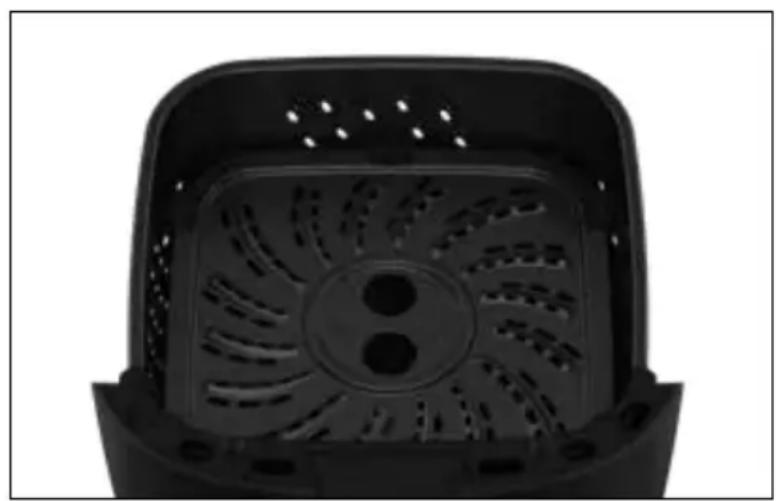
FIG. B
Inserting the Fry Tray
- Place the Fry Tray in the Basket. The Fry Tray's adjustable tray height lets you place food closer to the heating element for broiling. You can also use it to make the total size of the basket smaller when cooking smaller quantities of food.
- To raise the Fry Tray closer to the heating element, position the edges of the Fry Tray (see Fig. A) on the Fry Tray Holders (see Fig. B). To use the Fry Tray on the bottom of the Basket, rotate the Fry Tray so that the Fry Tray's edges slide past the Fry Tray Holder, and push the Fry Tray to the bottom of the Basket (see Fig C).
- Slide the Basket into the appliance. If the Basket is placed properly, it will click into place.
NOTE: This appliance cooks using hot air. Do not fill the Basket with oil or frying fat.
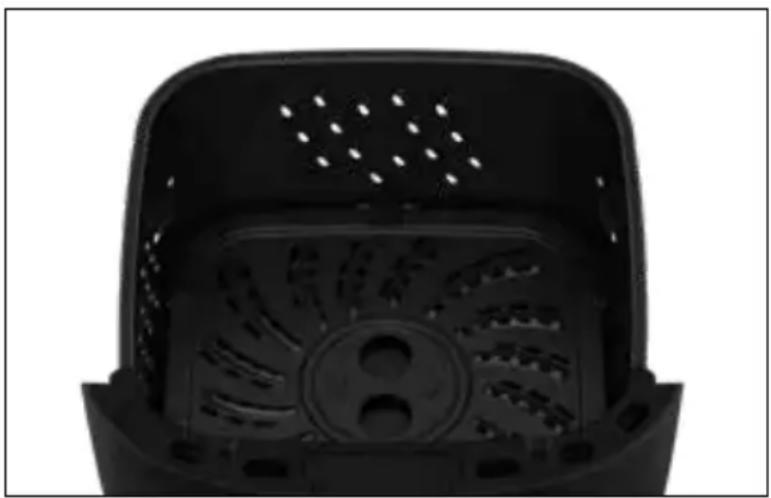
FIG. C
Using the Appliance
- Plug the appliance into a dedicated electrical outlet.
- Pull the Basket out of the appliance and place the ingredients inside. Do not touch the Basket directly because the Basket becomes very hot during operation. Only hold the Basket by its handle. Insert the Basket into the appliance. NOTE: Always use the Fry Tray with the Basket.
- Press the Power Button. Set the appropriate time and temperature for the ingredients you are cooking.
- When the timer beeps five times, either the set cooking time has elapsed or the appliance is reminding you to shake your food (see "Shaking" in "Instructions for Use"). Pull the Basket out of the
appliance and place it on a heat-resistant surface.
- When removing food from the basket, avoid contact with hot excess oil or the hot drip tray. To avoid being burned, use silicone-tipped tongs or tip out the basket contents carefully. The Fry Tray is not secured and can fall out. Hot oil can be inside the basket.
- If the food is not fully cooked, simply slide the Basket back into the appliance and add a few minutes to the cooking time.
- The appliance is instantly ready for preparing another batch.
Shaking
To ensure even cooking, some foods require shaking or flipping during the cooking process. Some of this appliance's presets include a halfway timer, which is a timer that will beep and the Shake icon on the Control Panel will blink when the cooking cycle has reached its halfway point.
At the halfway point in the cycle,
carefully use oven mitts to remove the hot Basket from the appliance. Gently shake.
NOTE: If you do not remove the Basket and shake the food, the Shake light on the Control Panel will remain illuminated.
Tips
- Foods that are smaller in size usually require a slightly shorter cooking time than larger foods.
- Shaking smaller-sized foods halfway through the cooking process ensures that all the pieces are fried evenly.
-
Adding a bit of vegetable oil to breaded items is suggested for a crispier result. When adding oil, do so just before cooking and add only a small amount onto the breaded items.
-
Snacks normally cooked in an oven can also be cooked in the appliance.
- Use premade dough to prepare filled snacks quickly and easily. Premade dough also requires a shorter cooking time than homemade dough.
- You can use the appliance to reheat foods. Simply set the temperature and time to however warm you want your food.
General Cooking Guidelines
NOTE: Keep in mind that these settings are guidelines. Since ingredients differ in origin, size, shape, and brand, we cannot guarantee the best settings for your ingredients.
| Food Size Temperature | Cook Time Preheat | Shake or Flip | Spray with Oil | |
| FROZEN FOOD | ||||
| French fries | 400°F 18 mins. | √ | ||
| Sweet potato fries | 400°F 22 mins. | √ | ||
| Chicken nuggets 400°F 14 mins. | √ | |||
| CHICKEN | ||||
| Breaded cutlets | 6 oz 400°F 10 mins. | √ | √ | √ |
| Wings 400°F 25 mins. | √ | √ | ||
| Chicken breast 6 oz 400°F 8 mins. | √ | |||
| BEEF | ||||
| Burgers | 6 oz 400°F 10 mins. | √ | √ | |
| Hot dogs 8 pc 375°F 5 mins. | √ | √ | ||
| NY strip steaks 8 oz 400°F 12 mins. | √ | √ | ||
| Meatballs, 1 inch | 1.5 lb 375°F 10 mins. | √ | √ | |
| PORK | ||||
| Pork chops | 400°F 12 mins. | √ | √ | |
| Sausages | 350°F 15 mins. | √ | √ | |
| FISH | ||||
| Salmon filets | 6 oz 390°F 12 mins. | √ | ||
| Shrimp (16-20 size) | 12 oz 390°F 10 mins. | √ | √ | |
General Cooking Guidelines
| Food item Size Temperature | Cook Time Preheat | Shake or Flip | Spray with Oil | |
| VEGETABLES | ||||
| Asparagus | 1 lb 380° F 8 min | √ | √ | |
| Broccoli 8 oz 380° F 8 min | √ | √ | ||
| Corn on the cob 2 pc 380° F 8 min | √ | √ | ||
| PREPARED FOOD | ||||
| Hard-boiled eggs, shell on | 250° F 18 min | |||
| Cake 320° F 20 min | ||||
| Grilled cheese sandwich | 1 pc 375° F 6 min | √ | √ | |
Internal Temperature Meat Chart
Use this chart and a food thermometer to ensure that meat, poultry, seafood, and other cooked foods reach a safe minimum internal temperature.
*For maximum food safety, the U.S. Department of Agriculture recommends 165° F for all poultry; 160° F for ground beef, lamb, and pork; and 145° F, with a 3-minute resting period, for all other types of beef, lamb, and pork. Also review the USDA Food Safety Standards.
| Food | Type | Internal Temp.* |
| Beeel & Voeal | Ground | 160°F |
| Steaks, roasts: medium | 145°F | |
| Steaks, roasts: rare | 125°F | |
| Chicken & Turkey | Breasts | 165°F |
| Ground, stuffed | 165°F | |
| Whole bird, legs, thighs, wings | 165°F | |
| Fish & Shellfish | Any type | 145°F |
| Lamb | Ground | 160°F |
| Steaks, roasts: medium | 140°F | |
| Steaks, roasts: rare | 130°F | |
| Pork | Chops, ground, ribs, roasts | 160°F |
| Fully cooked ham | 140°F |
Symptom Possible Cause Solution
| The appliance does not work | The appliance is not plugged in. | Plug the Power Cable into an electrical outlet. |
| The appliance is plugged into an outlet that is shared with other devices. | Plug the appliance into a dedicated electrical outlet. | |
| The appliance has not been turned on by setting the preparation time and temperature. | Press the Power Button.Select a time and temperature. Press the Power Button again and cooking will begin. | |
| The appliance might have been turned off.If the Power button is pressed while cooking, the Auto Shut-Off mode will be triggered. | Press the Power Button. Select a time and temperature. Press the Power Button again and cooking will begin. | |
| Food is not cooked | The Basket is overloaded. Use smaller batches for more even frying. | |
| The temperature is set too low. Raise temperature and continue cooking. | ||
| Food is not fried evenly | Some foods need to be shaken during the cooking process. | See “Shaking” section in “instructions for Use”. |
| Basket will not slide into appliance properly | The Basket is overloaded. Do not fill the Basket above the Maximum line. | |
| The Fry Tray is not placed in the Basket correctly. | Gently push the Fry Tray into the Basket until it clicks. | |
Symptom Possible Cause Solution
| Smoke coming from appliance | Too much oil is being used. Wipe down to remove excess oil | |
| The Basket has grease residue from the previous operation. | Clean the Basket after each use. | |
| French fries are not fried evenly | Potatoes are not propped properly. Consult a recipe for potato type and prop. | |
| Fries are not cut evenly. Cut fries thinner or reshape fries. | ||
| Fries are too crowded. Spread fries out or cook a smaller batch. | ||
| Potatoes are not inseed properly during preparation. | Pa. dry to remove excess starch. | |
| Fries are not crispy Raw fries have too much water. | Dry potato sticks properly before misting oil. | |
| Cut sticks smaller. | ||
| Add a bit more oil. | ||
| Error code displayed on Control Panel | Γ1 - Broken circuit of the thermal sensor | Call Customer Service |
| E2 - Short circuit of the thermal sensor | ||
- Can I prepare foods other than fried dishes with my appliance?
You can prepare a variety of dishes, including steaks, chops, burgers, and baked goods. See the recipe guide.
- Is the appliance good for making or reheating soups and sauces?
Never cook or reheat liquids in the appliance.
- Is it possible to shut off the appliance at any time?
Yes. Press the Power Button once or remove the Basket.
- What do I do if the appliance shuts off while cooking?
As a safety feature, the appliance has an Auto Shut-Off device that prevents damage from overheating. Remove the Basket and set it on a heat-resistant surface. Remove the Power Cable from the outlet. Allow the appliance to cool down. Once cool, plug the Power Cable into the outlet. Restart by pressing the Power Button.
- Does the appliance need time to heat up?
Most recipes do not require preheating. If you are cooking from a cold start and your recipe requires preheating, add 3 minutes to the cooking time to compensate.
- Can I check the food during the cooking process?
You can remove the Basket at any time while cooking is in progress. During this time, you can shake the contents in the Basket if needed to ensure even cooking.
- Is the appliance dishwasher safe?
Only the Fry Tray is dishwasher safe. The appliance itself, which contains the heating coil and electronics, should never be submerged in liquid of any kind or cleaned with anything more than a warm, moist cloth or nonabrasive sponge with a small amount of mild detergent.
- What happens if the appliance still does not work after I have tried all the troubleshooting suggestions?
Never attempt a home repair. Contact customer service and follow the procedures set forth by the guarantee. Failure to do so could render your warranty null and void.
Cleaning
Clean the appliance after each use. The Basket and Fry Tray are coated with a special nonstick surface. Never use abrasive cleaning materials or utensils on these surfaces.
- Remove the Power Cable from the electrical outlet and be certain the appliance is thoroughly cooled before cleaning.
- Wipe the outside of the appliance with a warm, moist cloth and mild detergent.
- Clean the Basket and Fry Tray, with hot water, a mild detergent, and a nonabrasive sponge. The Fry Tray is dishwasher safe, but hand-washing is recommended. For difficult-to-remove food, soak in hot, soapy water for 10 minutes.
- NOTE: If the Silicone Bumpers on the Fry Tray need to be cleaned, they can be removed
and reattached. To remove the bumpers, locate the capped end of the bumper and push the capped end off of the Fry Tray. There will be some resistance, but keep pushing until the bumper slide off of the Fry Tray. To reattach the bumper, slide each bumper onto the slot on the Fry Tray.
-
Clean the inside of the appliance with hot water, a mild detergent, and a nonabrasive sponge.
-
If necessary, remove unwanted food residue from the heating element with a soft cleaning brush.
-
Rinse the appliance with a clean, damp cloth. Use a clean, dry cloth to dry the appliance interior. Do not leave standing water in the appliance.
-
If any other service needs to be performed, contact Customer Service.
Storage
Place the cooled, dry appliance in a clean, dry place.
Do not stack objects on top of the appliance.
PowerXL™
VORTEX PRO AIR FRYER
One-Year Limited Warranty
(Applies only in the United States and Canada)
For service, repair, or any questions regarding your appliance, call the appropriate 800 number listed within this section. Please DO NOT return the product to the place of purchase. Also, please DO NOT mail the product back to manufacturer and DO NOT bring it to a service center. You may also want to consult the website listed on the cover of this manual.
What does it cover?
Any defect in material or workmanship provided; however, Empower Brands, LLC's liability will not exceed the purchase price of product.
For how long?
One year from the date of original purchase with proof of purchase.
What will we do to help you?
Provide you with a reasonably similar replacement product that is either new or factory refurbished.
How do you get service?
Save your receipt as proof of date of sale. Visit the online service website at www.prodprotect.com/powerxl, or call toll-free 1-800-577-1557, for general warranty service.
If you need parts or accessories, please call 1-800-738-0245.
How does state law relate to this warranty?
This warranty gives you specific legal rights. You may also have other rights that vary from state to state or province to province.
PowerXL™
VORTEX PRO AIR FRYER
What does your warranty not cover?
• Damage from commercial use.
• Damage from misuse, abuse, or neglect.
• Products that have been modified in any way.
- Products used or serviced outside the country of purchase.
• Glass parts and other accessory items that are packed with the product.
- Shipping and handling costs associated with the replacement of the product.
- Consequential or incidental damages (please note, however, that some states do not allow the exclusion or limitation of consequential or incidental damages, so this limitation may not apply to you).
Are there additional warranty exclusions?
This warranty shall not be valid where it is contrary to U.S. and other applicable laws or where the warranty would be prohibited under any economic sanctions, export control laws, embargos, or other restrictive trade measures enforced by the United States or other applicable jurisdictions. This includes, without limitation, any warranty claims implicating parties from, or otherwise located in, Cuba, Iran, North Korea, Syria and the disputed Crimea region.
PowerXL™
VORTEX PRO AIR FRYER
Distributed by: Empower Brands, LLC
Middleton, WI 53562
® Registered Trademark and ™ Trademark of Empower Brands, LLC
© 2023 Empower Brands, LLC, all rights reserved.
3/23 29669
Made in China
T22-9003388-A
E
- OWNER'S MANUAL
- POWERXL™
- VORTEX PRO AIR FRYER
- WARNING
- PREVENT INJURIES! CAREFULLY READ ALL INSTRUCTIONS BEFORE USE
- CAUTION
- SAVE THESE INSTRUCTIONS - FOR HOUSEHOLD USE ONLY
- POLARIZED PLUG
- ELECTRIC POWER
- AUTOMATIC SHUT-OFF
- OVERHEATING PROTECTION
- ELECTROMAGNETIC FIELDS
- WARNING: FOR CALIFORNIA RESIDENTS
- PARTS & ACCESSORIES
- ATTACHING THE FRY BASKET HANDLE
- USING THE CONTROL PANEL
- PRESET CHART
- BEFORE FIRST USE
- INSERTING THE FRY TRAY
- USING THE APPLIANCE
- SHAKING
- TIPS
- GENERAL COOKING GUIDELINES
- INTERNAL TEMPERATURE MEAT CHART
- CLEANING
- STORAGE
- ONE-YEAR LIMITED WARRANTY
- (APPLIES ONLY IN THE UNITED STATES AND CANADA)
- WHAT DOES IT COVER
- FOR HOW LONG
- WHAT WILL WE DO TO HELP YOU
- HOW DO YOU GET SERVICE
- HOW DOES STATE LAW RELATE TO THIS WARRANTY
- WHAT DOES YOUR WARRANTY NOT COVER
- ARE THERE ADDITIONAL WARRANTY EXCLUSIONS
Brand : PowerXL
Model : Vortex Pro Air Fryer AF-E6001-CA
Category : Deep fryer