DJ Wheeler - Professional lighting MARTIN - Free user manual and instructions
Find the device manual for free DJ Wheeler MARTIN in PDF.


| Product Type | Direct Drive DJ Turntable |
| Dimensions (W x D x H) | 450 mm x 350 mm x 100 mm |
| Weight | 4.5 kg |
| Power Supply | AC 100-240V, 50/60 Hz, 15W |
| Motor Type | High-torque direct drive |
| Speed Range | 33⅓, 45, 78 RPM |
| Pitch Control | ±8%, ±16% with reset |
| Key Functions | Play/Pause, Cue, Pitch Bend, Start/Stop |
| Outputs | RCA line output, grounding terminal |
| Tonearm | S-shaped, static balanced, with hydraulic lift |
| Cartridge | Moving magnet (replaceable) |
| Included Accessories | Slipmat, counterweight, headshell, RCA cables, power cord |
| Maintenance | Clean with dry cloth; do not use liquids |
| Safety Precautions | Keep away from moisture; unplug during storms |
| Spare Parts Availability | Stylus, slipmat, drive belts (if applicable) |
| Reparability | User-replaceable cartridge and stylus; professional service for motor |
| General Information | User manual included; supports direct connection to mixer or amplifier |
Frequently Asked Questions - DJ Wheeler MARTIN
User questions about DJ Wheeler MARTIN
0 question about this device. Answer the ones you know or ask your own.
Ask a new question about this device
Download the instructions for your Professional lighting in PDF format for free! Find your manual DJ Wheeler - MARTIN and take your electronic device back in hand. On this page are published all the documents necessary for the use of your device. DJ Wheeler by MARTIN.
USER MANUAL DJ Wheeler MARTIN
natural_image
Black industrial machine component with visible branding and mounting bracket (no readable text or symbols)
© 1998, 1999 Martin Professional A/S, Denmark.
All rights reserved. No part of this manual may be reproduced, in any form or by any means, without permission in writing from Martin Professional A/S, Denmark.
Printed in Denmark.
P/N 35000068, Rev. B
Thank you for selecting this product from the Martin DJ Series. The Wheeler is a powerful but compact lighting effect producing a stunning and colorful display.
The Wheeler features:
• Bright 300 W halogen lamp.
- Dichroic color filters.
• Built-in microphone with automatic gain control (A.G.C.).
- Sound-activated beam, light, and color change.
- Effective fan cooling.
- Adjustable mounting bracket.
SAFETY INFORMATION
Warning! This product is not for household use. It presents risks of lethal or severe injury due to fire, heat, electric shock and falls.
Read this manual before powering or installing the fixture, follow the safety precautions listed below and observe all warnings in this manual and printed on the fixture. If you have questions about how to operate the fixture safely, please contact a Martin distributor for assistance.
To protect yourself and others from electric shock
- Disconnect the fixture from AC power before removing or installing the lamp, fuses, or any part, and when not in use.
- Always ground (earth) the fixture electrically.
- Use only a source of AC power that complies with local building and electrical codes and has both overload and ground-fault protection.
- Do not expose the fixture to rain or moisture.
- Refer all service to a qualified technician.
- Never operate the fixture with missing or damaged lenses and/or covers.
To protect yourself and others from burns and fire
- Never attempt to bypass the thermostatic switch or fuses. Always replace defective fuses with ones of the specified type and rating.
- Keep all combustible materials at least 0.1 meters (4 inches) away from the fixture. Keep flammable materials well away from the fixture.
- Do not illuminate surfaces within 0.3 meters (12 inches) of the fixture.
-
Provide a minimum clearance of 0.1 meters (4 inches) around fans and air vents.
-
Replace the lamp if it becomes defective or worn out. When replacing the lamp, allow the fixture to cool for at least 15 minutes before opening the fixture or removing the lamp. Protect your hands and eyes with gloves and safety glasses.
- Never place filters or other materials over the lenses or mirror drums.
- Allow the fixture to cool for 15 minutes before handling.
- Do not operate the fixture if the ambient temperature (Ta) exceeds 40°C ( 104°F ).
To protect yourself and others from injury due to falls
- When suspending the fixture above ground level, verify that the structure can hold at least 10 times the weight of all installed devices.
- Verify that all external covers and rigging hardware are securely fastened and use an approved means of secondary attachment such as a safety cable.
- Block access below the work area whenever installing or removing the fixture.
LAMP INSTALLATION
Use only the lamp specified for your model.
Model Lamp Output/Life Martin P/N
| Wheeler EU 300W/230V 7300 lm, 50 h 97000203 | |
| Wheeler UK 300W/240-250V (M38) 5200 lm, 2000 h 97000200 | |
| Wheeler US 300W/120V (DRA) 7700 lm, 75 h 97000201 |
Warning! Make sure the fixture is disconnected from AC power before removing the lamp box. Allow hot lamps to cool for 15 minutes before replacing.
1 Locate the lamp box with the four lenses in the center of the unit. Support it in one hand while removing the two thumbscrews on the top, and remove the lamp box.
2 Hold the lamp by the ceramic base or in a clean cloth, taking care not to touch the glass, and then push the lamp firmly into the lamp socket. If you do touch the glass part of the lamp you must clean it thoroughly with alcohol before use.
3 As you replace the lamp box, lead the wires through the corner opening so as not to pinch them. Replace the thumbscrews and tighten them securely by hand.
WARNING! The fixture must be grounded (earthed).
The fixture may be delivered without a plug on the power cord. A 3-prong grounding-type plug must be installed. Following the manufacturer's instructions:
1 Connect the BROWN wire to the LIVE pin.
2 Connect the BLUE wire to the NEUTRAL pin.
3 Connect the YELLOW/GREEN wire to the GROUND (EARTH) pin.
INSTALLATION
The fixture may be installed by fastening the mounting bracket directly to a structural support or with a rigging clamp.
WARNING! Always use an approved safety cable.
1 If using a rigging clamp, bolt the clamp to the bracket with an M12 bolt and lock nut through the 13 mm hole in the mounting bracket.
2 If fastening the bracket directly to the structure, make sure that the attachment hardware is adequate to hold the fixture securely.
3 Verify that the structure can support the weight of all installed fixtures, clamps, cables, auxiliary equipment, etc.
4 Working from a stable platform, fasten the fixture to the structure.
5 Install a safety cable that can hold at least 10 times the weight of the fixture through/over the support and through the mounting bracket.
6 Loosen the locks on both sides of the bracket and tilt the fixture to the desired angle. Tighten the tilt locks.
OPERATION
Important! Electric dimmers may damage the electronic components.
Do not attempt to dim the Wheeler. Use a suitable switch-pack or the 0 and 100 percent levels of a dimmer pack if you need to switch the fixture remotely.
To operate the Wheeler, apply power and set the mode switch to the “lamp on” or “flash” position. Sounds are picked up by a built-in microphone and an Automatic Gain Control circuit adjusts the gain when the average sound pressure alters.
LAMP ON
In “lamp on” mode, the lamp stays on and drum rotation is sound activated. If there is no sound, drum rotation stops.
FLASH
In “flash” mode, both the lamp and rotation are sound activated. If there is no sound, the lamp turns off after 5 seconds. There is no difference between the 2 “flash” positions.
FUSE REPLACEMENT
1 Disconnect the fixture from AC power.
2 Remove the fuse holder - located next to the power cord - with a flat-tip screwdriver.
3 Replace the fuse with one of the same size and rating. The rating is shown on the serial number label.
4 Replace the fuse holder.
TROUBLESHOOTING
| problem probable cause(s) suggested remedy | ||
| No light | No power to the fixture Check connections | |
| Blown fuse Replace fuse | ||
| Burned out lamp Install new lamp | ||
| Fixture to hot Allow to cool | Improve air flow around fixture | |
| No action | Sound too low to activate control circuit | Increase volumeMove speakers closer |
| Electrical malfunction Refer to service technician | ||
Fuse blows repeatedly Electrical malfunction Refer to service technician
If these remedies do not solve the problem, contact your Martin dealer for service.
PHYSICAL
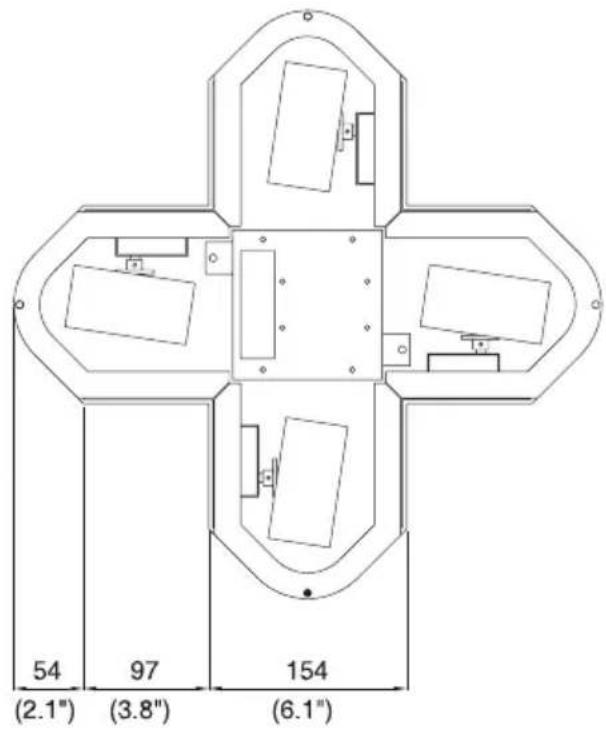
Size (LxWxH) 456 x 456 x 321 mm (18.0 x 18.0 x 12.6 in.)
Weight....8.5 kg (18.7 lbs)
ELECTRICAL: EU AND UK MODELS
Power consumption....350 W
Fuse 2 AF/250 V
Operating voltage and frequency....220 - 240 V, 50 - 60 Hz
ELECTRICAL: US MODEL
Power consumption....350 W
Fuse 4 AF/250 V
Operating voltage and frequency....100 - 130 V, 50 - 60 Hz
CONSTRUCTION
Housing ......steel and aluminum
Finish.... electrostatic powder coating
THERMAL
Maximum surface temperature ....65°C (149°F)
Maximum operating environment temperature....40°C (104°F)
ACCESSORIES
Martin DMX Switch Pack, 210-245 V.....P/N 90758200
Martin DMX Switch Pack, 100-130 V.....P/N 90758300
Half-coupler clamp....P/N 91602004
G clamp P/N 91602003
- SAFETY INFORMATION
- Warning! This product is not for household use. It presents risks of lethal or severe injury due to fire, heat, electric shock and falls.
- To protect yourself and others from electric shock
- To protect yourself and others from burns and fire
- To protect yourself and others from injury due to falls
- LAMP INSTALLATION
- Warning! Make sure the fixture is disconnected from AC power before removing the lamp box. Allow hot lamps to cool for 15 minutes before replacing.
- WARNING! The fixture must be grounded (earthed).
- INSTALLATION
- WARNING! Always use an approved safety cable.
- OPERATION
- Important! Electric dimmers may damage the electronic components.
- LAMP ON
- FLASH
- FUSE REPLACEMENT
- TROUBLESHOOTING
- PHYSICAL
- ELECTRICAL: EU AND UK MODELS
- ELECTRICAL: US MODEL
- CONSTRUCTION
- THERMAL
- ACCESSORIES
Brand : MARTIN
Model : DJ Wheeler
Category : Professional lighting