
DDW24G9000AP - Washing machine Dacor - Free user manual and instructions
Find the device manual for free DDW24G9000AP Dacor in PDF.


| Product Type | Washing Machine |
| Brand | Dacor |
| Model | DDW24G9000AP |
| Installation Type | Built-in / Freestanding |
| Width | 24 inches (61 cm) |
| Height | 34 inches (86.4 cm) |
| Depth | 24 inches (61 cm) |
| Weight | 150 lbs (68 kg) |
| Power Supply | 120 V, 60 Hz, 15 A |
| Capacity | 2.4 cu. ft. (68 L) |
| Maximum Spin Speed | 1400 RPM |
| Wash Programs | Normal, Delicate, Quick, Heavy Duty, Sanitize, Steam |
| Key Features | Steam Cleaning, Stainless Steel Drum, Child Lock, Delay Start, Energy Star Certified |
| Noise Level (Wash/Spin) | 50 dB / 72 dB |
| Annual Energy Consumption | 180 kWh/year |
| Annual Water Consumption | 8,000 gallons/year (30,283 L) |
| Safety Features | Door Lock, Overflow Protection, Unbalanced Load Detection |
| Maintenance | Clean filter monthly, descale every 3 months, check hoses annually |
| Spare Parts | Door seal, drum belt, drain pump, control board |
| Repairability Index | 8.0 / 10 |
Frequently Asked Questions - DDW24G9000AP Dacor
User questions about DDW24G9000AP Dacor
0 question about this device. Answer the ones you know or ask your own.
Ask a new question about this device
Download the instructions for your Washing machine in PDF format for free! Find your manual DDW24G9000AP - Dacor and take your electronic device back in hand. On this page are published all the documents necessary for the use of your device. DDW24G9000AP by Dacor.
USER MANUAL DDW24G9000AP Dacor
What you need to know about the safety instructions 4 Important safety symbols 4 Before using your dishwasher 7 Regulatory notice 8
Installation 11
What's included 11 Installation requirements 15 Dimensions and specifications 17 Step-by-step installation 18
Before you start 35
Dishwasher at a glance 35 Basic use of racks 37 Loading precautions 41 Detergent compartment 48 Rinse aid reservoir 50 Salt storage 51
Operations 52
Touchpad responsiveness 52
Control panel 53
Cycle overview 56
Simple steps to start your dishwasher 58
Settings 59
SmartThings 62
Maintenance 64
Cleaning 64
Cleaning the drain pump 68
Long-term care 68
2 English
Troubleshooting 69
Checkpoints 69
Information codes 74
Cycle chart 76
Appendix 79
Helping the environment 79 Specifications 79
Warranty 80
United States - Warranty 80
CANADA - Warranty 83
Safety information
Congratulations on your new Dacor dishwasher. This manual contains important information on the installation, use and care of your appliance. Please take time to read this manual to take full advantage of your dishwasher's many benefits and features.
What you need to know about the safety instructions
Warnings and Important Safety Instructions in this manual do not cover all possible conditions and situations that may occur. It is your responsibility to use common sense, caution, and care when installing, maintaining, and operating your dishwasher.
Important safety symbols
What the icons and signs in this user manual mean:
WARNING
Hazards or unsafe practices that may result in severe personal injury or death.
To reduce the risk of fire, explosion, electric shock, or personal injury when using your dishwasher, follow these basic safety precautions:
CAUTION
Hazards or unsafe practices that may result in minor personal injury or property damage.
These warning signs are here to prevent injury to you and others.
Please follow them explicitly.
After reading this section, keep it in a safe place for future reference.
SAVE THESE INSTRUCTIONS
English4
California Proposition 65 Warning

WARNING: Cancer and Reproductive Harm - www.P65Warnings.ca.gov

WARNING
When using your dishwasher, follow basic precautions, including the following:
- Read all instructions before using the dishwasher.
- Use the dishwasher only for its intended function.
- Use only detergents or wetting agents recommended for use in a dishwasher and keep them out of the reach of children.
- When loading items to be washed:
- locate sharp items so that they are not likely to damage the door seal, and
- load sharp knives with the handles up to reduce the risk of cut-type injuries.
-
Do not wash plastic items unless they are marked "dishwasher safe" or the equivalent. For plastic items not so marked, check the manufacturer's recommendations.
-
Do not touch the HEATING ELEMENT during or immediately after use.
-
Do not operate your dishwasher unless all ENCLOSURE panels are properly in place.
-
Do not tamper with controls.
-
Do not abuse, sit on, or stand on the door or dish rack of the dishwasher.
-
To reduce the risk of injury, do not allow children to play in or on a dishwasher.
-
Under certain conditions, hydrogen gas may be produced in a hot-water system that has not been used for two weeks or more. HYDROGEN GAS IS EXPLOSIVE. If the hot-water system has not been used for such a period, before using the dishwasher turn on all hot-water faucets and let the water flow from each for several minutes. This will release any accumulated hydrogen gas. As the gas is flammable, do not smoke or use an open flame during this time.
-
Remove the door to the washing compartment when removing an old dishwasher from service or discarding it.
SAVE THESE INSTRUCTIONS
English
Safety information
CAUTION
• After unpacking the dishwasher, keep the packaging out of the reach of children.
- The dishwasher is extremely heavy. Do not attempt to move or carry the dishwasher by yourself. Two or more people are needed to move a dishwasher and avoid potential injuries.
- As with any equipment using electricity, water, and moving parts, potential hazards exist.
- Do not install the dishwasher near electrical components. Keep the dishwasher away from open flames.
• Install and level your dishwasher on an uncarpeted floor that can support its weight.
- Your dishwasher must be properly grounded. Never connect it to an ungrounded outlet. See page 7 for more information on grounding your dishwasher.
- Connect the ground wire to the green ground connector in the terminal box.
- After the dishwasher is installed, check that the drain hose is properly connected and that there is no leakage from the hose connectors. If the drain hose is loose, it may cause property damage.
- The water supply line is susceptible to breakage. As time goes by, it becomes less flexible. Check the line periodically. If it is swollen, torn, cut, or there is a water leak, replace it immediately.
- To safely operate this appliance, familiarize yourself with its operations and exercise care when using it.
- Do not put gasoline, solvents, or other flammable materials inside the dishwasher. Do not wash dishes exposed to these materials.
- Keep your dishwasher detergent out of the reach of children. Detergent has an adverse effect on human organs. It contains elements for polishing and is corrosive. Avoid letting the detergent come into contact with your skin and eyes.
- Do not push or place pressure on the door when it is open, as this may damage the dishwasher or cause harm.
- Do not allow children to play in or on the dishwasher. They may harm themselves or damage the dishwasher.
- Disconnect the power cable (or set the circuit breaker to off) before servicing your dishwasher.
- Do not repair, replace, or service any part of your dishwasher yourself. Disassembly, repairs, and modifications are permitted by authorized service technicians only. Work done by an unauthorized person may void your warranty.
SAVE THESE INSTRUCTIONS
English6
- Before disposing of your dishwasher, remove the door of the washing compartment or the door latch so that children or small animals cannot get trapped inside.
- If the dishwasher is left unused for an extended period of time, turn off the water supply.
- This dishwasher is intended for residential use only.
Before using your dishwasher

WARNING

Tip-Over Hazard
- Do not use the dishwasher until it is correctly installed.
- Do not push down on an open door.
- Do not place excessive weight on the open door.

Electric Shock Hazard
Failure to follow these instructions can result in death, fire, or electric shock:
• Electrically ground the dishwasher
- Connect the ground wire to the green ground connector in the junction box.
- Do not use an extension cord.
SAVE THESE INSTRUCTIONS
English
Safety information
Regulatory notice
FCC Notice
FCC CAUTION:
Any changes or modifications not expressly approved by the party responsible for compliance could void the user's authority to operate the equipment.
This device complies with Part 15 of FCC Rules. Operation is Subject to following two conditions:
(1) This device may not cause harmful interference, and
(2) This device must accept any interference received including interference that cause undesired operation.
For product available in the USA/Canada market, only channel 1\~11 can be operated. Selection of other channels is not possible.
FCC STATEMENT:
This equipment has been tested and found to comply within the limits for a Class B digital device, pursuant to part 15 of the FCC Rules. These limits are designed to provide reasonable protection against harmful interference in a residential installation.
This equipment generates, uses, and can radiate radio frequency energy and, if not installed and used in accordance with the instructions, may cause harmful interference to radio communications. However, there is no guarantee that interference will not occur in a particular installation. If this equipment does cause harmful interference to radio or television reception, which can be determined by turning the equipment off and on, the user is encouraged to try to correct the interference by one or more of the following measures:
- Reorienting or relocating the receiving antenna
- Increasing the separation between the equipment and receiver
- Connecting the equipment to an outlet that is on a different circuit than the radio or TV.
- Consulting the dealer or an experienced radio/TV technician for help.
SAVE THESE INSTRUCTIONS
English8
FCC RADIATION EXPOSURE STATEMENT:
This equipment complies with FCC radiation exposure limits set forth for an uncontrolled environment. This equipment should be installed and operated so there is at least 8 inches (20 cm) between the radiator and your body. This device and its antenna(s) must not be co-located or operated in conjunction with any other antenna or transmitter.
IC Notice
The term "IC" before the radio certification number only signifies that Industry Canada technical
specifications were met. Operation is subject to the following two conditions: (1) this device may not cause interference, and (2) this device must accept any interference, including interference that may cause undesired operation of the device.
This Class B digital apparatus complies with Canadian ICES-003.
For product available in the USA/Canada market, only channel 1\~11 can be operated. Selection of other channels is not possible.
IC RADIATION EXPOSURE STATEMENT:
This equipment complies with IC RSS-102 radiation exposure limits set forth for an uncontrolled environment. This equipment should be installed and operated so there is at least 8 inches (20 cm) between the radiator and your body. This device and its antenna(s) must not be co-located or operated in conjunction with any other antenna or transmitter.
SAVE THESE INSTRUCTIONS
English
Safety information
Open Source Announcement
The software included in this product contains open source software.
The following URL http://opensource.samsung.com/opensource/SMART_TP1_0/seq/0 leads to open source license information as related to this product.

SAVE THESE INSTRUCTIONS
English10
Installation
Follow these instructions carefully to ensure proper installation of the dishwasher and to prevent accidents when washing dishes.
What's included
Make sure all the parts are included in the product package. If you have a question about the dishwasher or the parts, contact a local Dacor customer center or your retailer. The actual appearance of the dishwasher may differ, depending on your model and country.

CAUTION
After unpacking the dishwasher, keep the packaging materials out of children's reach to ensure their safety.

Top brackets (2) ∅4 X 12 screws (8) Protective sticker Sub foot
∅4 X 16 screws (12)
Kick plate brackets (2)
Plastic caps (4) Custom panel fixers- Top (2)
Kick plate ∅4 X 8 screws (2) Badge
Custom panel fixers- Bottom (2)
Installation
Installation kit (not provided)

Electrical tape & Standard duct tape

Hot water line 90°Fitting (

^3/_4 ) Tube fittings

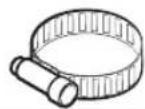


Hose clamp Air gap Rubber connector Teflon tape or
sealing compound
WARNING
Do not use plastic tubing. Plastic tubing can deteriorate over time and cause a leak inside the tube fitting.
NOTE
- For the hot water line, we strongly recommend using ^3/_8 minimum O.D. copper tubing with a compression fitting or a flexible stainless steel braided hot water supply line.
- You also need a 90°Fitting with ^3/_4 " N.P.T. external pipe threads on one end and a fitting sized to fit your hot water line (copper tubing/compression fitting or braided hose) on the other.
- For the power cable, we recommend a jacketed grounded 12-2 cable. Note that some local codes may require the cable to have a BX style metal jacket.
English12

Tools required (not provided)

Electric drill Safety glasses Gloves Flashlight
Adjustable wrench Torx T20 Pliers Nipper
Tape measure Pencil Phillips screwdriver Flat head
screwdriver
Tubing cutter Cutting knife Level Hole saw
Hex L-wrench Vernier calipers Steel ruler
English 13
Installation
Unpacking
Unpack the dishwasher in an open area free of obstruction. We recommend keeping all the packing materials until the dishwasher is completely installed.
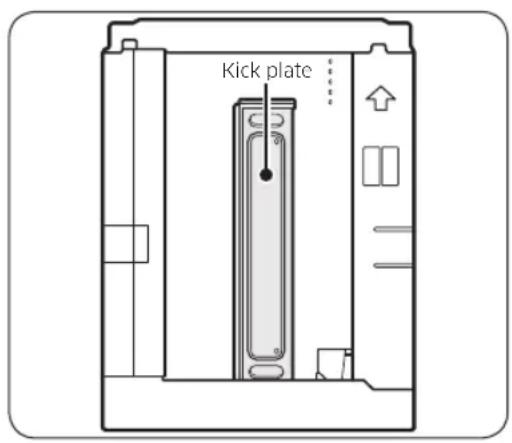
- Position the carton right-side-up with the top arrows pointing upwards.
- Unbuckle or cut the straps securing the packaging.
- Unpack the product packaging with care.
- Inspect every component for any signs of damage.
- Locate and set aside the dishwasher's kick plate. The kick plate is attached beside of the dishwasher.
- Lift the dishwasher from the packing material, and then place it on the floor.
NOTE
- There are also packing materials inside the dishwasher. Leave them in place until the dishwasher is installed.
- Do not remove the sound-absorbent padding that surrounds the exterior of the dishwasher.
English14

Installation requirements
To prevent a risk of fire, electric shock, or personal injury, all wiring and grounding must be done by a qualified technician.
Power supply
- To prevent the risk of fire, electric shock, or personal injury, all wiring and grounding must be performed in accordance with the National Electrical Code ANSI/FNPA, No. 70 Latest Revision and local codes and ordinances. It is the personal responsibility of the appliance owner to provide adequate electrical service for this appliance.
- When preparing for installation, make sure that your power supply provides an individual 120 Volt, 60 Hz branch circuit serving only your dishwasher with a 15 AMP fuse or circuit breaker.
- Your dishwasher must be grounded. If your dishwasher malfunctions or breaks down, grounding will reduce the risk of electric shock by providing a path of least resistance for the electric current.
Grounding
For permanent grounding, the dishwasher must be properly grounded to a grounded metal or permanent wiring system. The grounding conductor must be run with the circuit conductors and then connected to the grounding terminal or lead on the dishwasher.
WARNING
- Do not connect the ground wire to plastic plumbing, gas lines, or hot water pipes. Improperly connected grounding conductors may cause electric shock.
- Do not modify the power plug of the dishwasher. If the power plug does not fit the outlet, have a proper outlet installed by a qualified electrician.
WARNING
- Do not use an extension cord.
- Use only the power plug that comes with the dishwasher.
Installation
Water supply
- The hot water supply line must support water pressures between 20 psi and 120 psi (140-830 kPa).
• Water temperatures must be between 120^ F ( 49^ C) and 149^ F ( 65^ C).
To reduce a risk of leaks:
- Make sure water taps are easily accessible.
- Turn the water tap off when the dishwasher is not in use.
- Check for any leaks at the water hose fittings on a regular basis.
Flooring
For safety, the dishwasher must be installed on a solidly constructed floor. Wooden floors may need to be reinforced to minimize vibrations. Avoid installing on carpet or soft tile. Carpeting and soft tile may cause vibrations and may cause your dishwasher to move slightly while operating.
WARNING
Do not install the dishwasher on a poorly supported structure.
English16
Dimensions and specifications
- This dishwasher is designed to be enclosed on the top and on both sides by a standard, residential kitchen cabinet.
- The installation enclosure must be clean and free of any obstructions.
Dishwasher

| A 28 | ^3/_4-29^7/_8" (730-760 mm) |
| B | ^11/_16^-7/_8" (18-22 mm)Recommend ^13/_16" (20 mm) |
| C 21 | ^3/_4" (552 mm) |
| D 23 | ^3/_8" (595 mm) |
| E 32 | ^1/_8" (815 mm) |
| F Total Height | |
| 32^1/_8-33^7/_8" (815-860 mm)(Without SUB FOOT) | |
| 33^7/_8-35^1/_4" (860-895 mm)(With SUB FOOT) | |
| G 23 | ^3/_8" (594 mm) |
| H 2 | ^1/_8-5^1/_8" (55-130 mm)(Without SUB FOOT) |
| 3^7/_8-6^1/_2" (100-165 mm)(With SUB FOOT) | |
| I 3 | ^1/_2 " (90 mm) |
| J Leg Height0- 1^3/_4 (0-45 mm)(Without SUB FOOT) 1^3/_4-3^1/_8 " (45-80 mm)(With SUB FOOT) | |
| K 2" (50 mm) | |
| L 4 | ^7/_8 " (125 mm) |
| M 23 | ^5/_8-23^1/_8 " (600-608 mm) |
| N 22 | ^5/_8 " (575 mm) |
| O 32 | ^1/_4-35^1/_4 (820-895 mm) |
| P 3 | ^7/_8 " (100 mm) |
| Q 2" (50 mm) | |
English 17
Installation
Step-by-step installation
The installation procedure may differ depending on the model.
STEP 1 Select a location
Select a location that meets the following conditions.
- The location must have a solid floor that can support the weight of the dishwasher.
- The location must be near a sink (9.8 ft/3 m) with easy access to the water supply, drain system, and electrical outlet.
- The location must let you load dishes into the dishwasher easily.
- The location must have sufficient space for the dishwasher door to open easily and provide enough space between the dishwasher and the cabinet sides (at least 0.1 inch/2 mm).
• The rear wall must be free of obstructions.
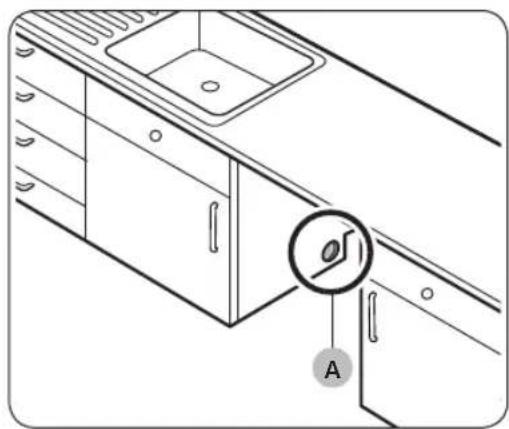
Installation in a new location
natural_image
Line drawing of a kitchen sink with a circular dial indicator and labeled component A (no text or symbols beyond labels)
natural_image
Technical line drawing of a kitchen sink with piping and a labeled component (B), no text or symbols present.If you install the dishwasher in a new location, follow these instructions before installing the dishwasher.
- Using a hole saw, cut a hole into the side of the cabinet that holds the sink (A).
- If the base inside the sink cabinet is raised above the kitchen floor and is higher than the connections on the dishwasher, make a hole in the base inside the cabinet and in the cabinet side (B).
NOTE
- If you are replacing an old dishwasher, check the existing connections for compatibility with the new dishwasher and replace the connections as needed.
- You may need to cut a hole in the opposite side of the cabinet according to the location of the electrical outlet.
English18-

natural_image
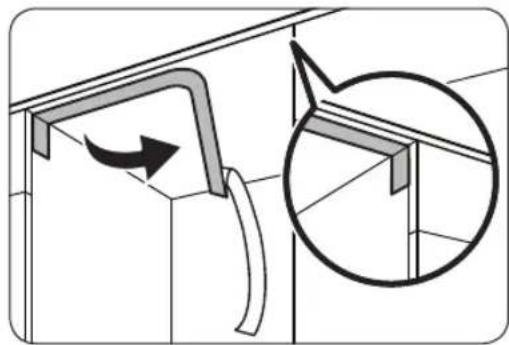
Line drawing of a hand holding a small object above a window (no text or symbols)- Clean the bottom of the countertop.
natural_image
Diagram showing a mechanical assembly with an arrow indicating direction and a magnified inset of a bracket detail (no text or symbols)- Attach the protective sticker as shown.
STEP 2 To replace the rear foot
If the distance between the floor and the bottom of the counter top is more than 33^7/_8 (860 mm), replace the rear foot with the sub foot provided before starting installation.

natural_image
Technical line drawing of a mechanical housing or enclosure with two circular annotations highlighting specific components (no text or symbols present)- Lay the dishwasher on its back.

CAUTION
Do not lay down the dishwasher to a side. Water may leak.
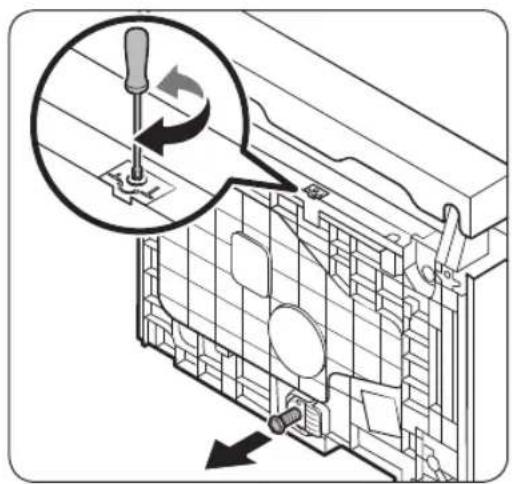
- Locate the rear foot at the rear bottom of the dishwasher.
Installation
Installation
natural_image
Technical diagram of a mechanical assembly with a screwdriver inserted, showing internal components and directional arrows (no text or symbols)- Turn the Torx T20 screwdriver counter clockwise as shown to remove the rear foot.
natural_image
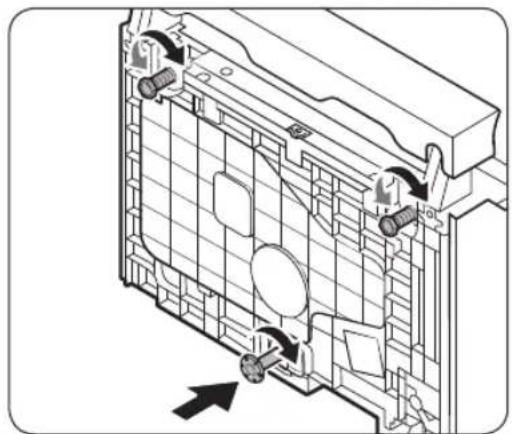
Technical diagram of a battery pack assembly with mounting holes and internal compartments (no text or labels)- Find the sub foot in the installation kit. Insert the sub foot into the hole of the rear foot's place, and then turn the screwdriver clockwise to tighten the sub foot.
- When the sub foot is fixed, turn the front foot to align with the sub foot. Fine-tuning will be done in STEP 8.
CAUTION
Use caution when moving the dishwasher. Do not drag the dishwasher on the floor. This can damage the front and sub foot.
English20
STEP 3 Connect the hot water line
- The water line pressure must be between 20 psi and 120 psi (140–830 kPa).
- Make sure that the water temperature is delivered between 120 °F and 149 °F (49-60 °C). Exceeding this limit may cause the dishwasher to malfunction.
- Make sure that the circuit breaker and water valve is turned off before connecting the water supply line to the dishwasher.
- Make sure the water line is properly connected. Wrap Teflon tape around every connection and joint to prevent water leaks.

- Insert the 34 " 90-degree fitting into the inlet valve. Tighten the fitting until it points towards the water-hose channel in the base of the dishwasher. Do not overtighten.
- Connect the hot water line to the fitting.
- If you want to secure the dishwasher to the side wall for extra stability, bend the brackets of the left and right housings by referring to the figure.
Installation
STEP 4 Arrange the hoses
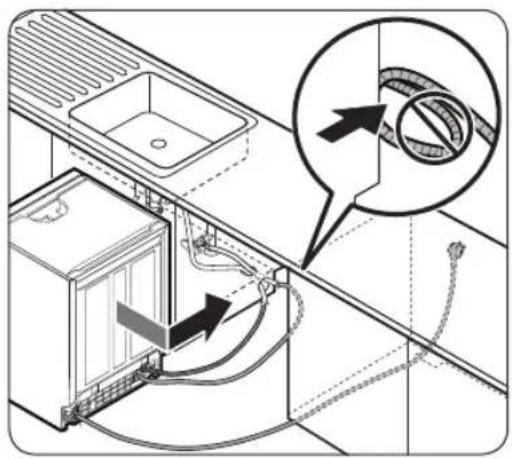
- Arrange the power cable and the drain hose so that they move together.
- Gently move the dishwasher to the installation space under the sink. While moving the dishwasher, pull any excess portions of the water line, drain hose, and power cable into the space.
CAUTION
- Use caution not to kink or step on the power plug or the hoses.
- The drain hose can be extended up to 118^1/8 (3 m).
English22-
STEP 5 Install the custom panel
natural_image
Diagram of a mechanical component with directional arrows indicating flow or movement, labeled 'A' at the end (no text or symbols on the diagram itself)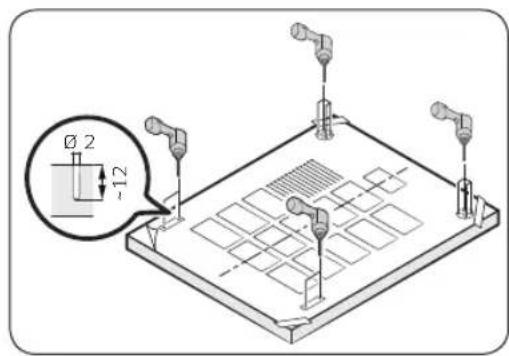
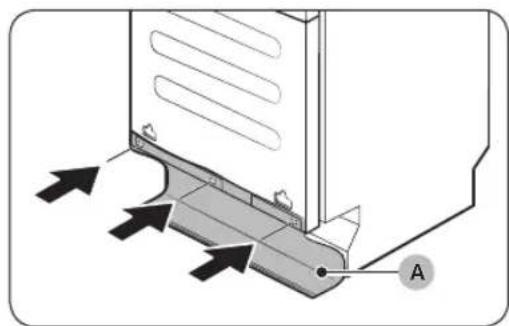
- Insert the supplied rubber skirt (A) into the 3 holes at the bottom of the door.
- Put the installation template on the back of the custom panel and fix it temporarily using transparent tape. Note that the rear of the custom panel will be attached to the dishwasher door.
CAUTION
- The top end of the custom panel must be aligned with the top end of the installation template.
• Use a custom panel between 9-44 lbs. - Pre-drill the 12 points marked on the installation template using a 2-pi drill bit to a depth of 38 - 12'' (10-12 mm).
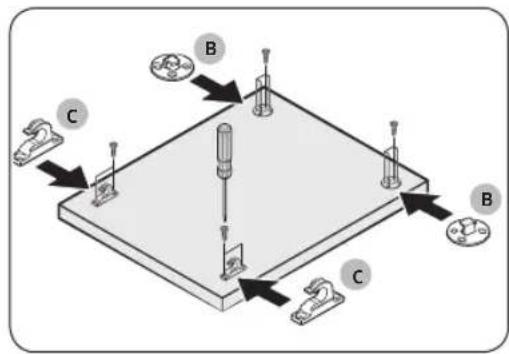
- Remove the installation template and tighten the Custom panel fixers - Top (B) / Custom panel fixers - Bottom (C) at the top with 12 screws (C, ∅4 X 16) as shown.
CAUTION
Be sure to check the direction of the Custom panel fixers - Top (B) / Custom panel fixers - Bottom (C) before installing.
Installation

- While holding the custom panel, attach it to the door and insert the Custom panel fixers - Top (B) / Custom panel fixers - Bottom (C) into the corresponding holes at the top of the door as shown.
- Push the custom panel downward to fix.
CAUTION
Open and close once or twice to check that it is working correctly.
STEP 6 Attach the badge

Attach the badge to the dishwasher's door as shown.
English24
STEP 7 Level the dishwasher


natural_image
Diagram showing a screwdriver inserted into a panel with directional arrows indicating motion (no text or symbols)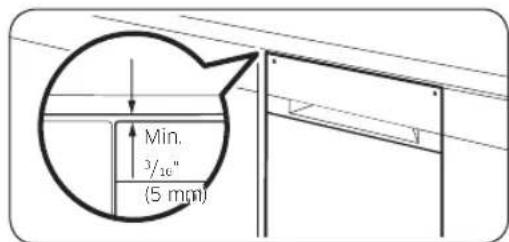
natural_image
Diagram showing two views of a mechanical component with arrows indicating direction (no text or symbols)You can adjust the height of the dishwasher to level it. Note that in these steps, the dishwasher is currently inserted halfway.
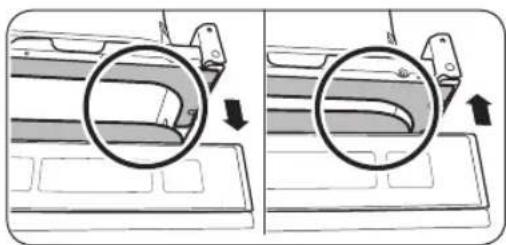
- Use the level to check if the dishwasher is level.
- Before adjust the height, Must change Rear Foot to Sub Foot. And then adjust Front Foot between 1^7/_8 " and 3".
• To lower the height, turn the foot clockwise.
• To raise the height, turn the foot counter clockwise.
3. To adjust the rear height, insert the Torx T20 screwdriver in the bottom center of the dishwasher.
• To lower the height, turn the screwdriver clockwise.
• To raise the height, turn the screwdriver counter clockwise.
-
Leave at least a ^3/_16 " space between the top of the dishwasher and the bottom of the countertop.
-
When levelling is complete, check if the door opens and closes properly.
Installation
STEP 8 Secure the dishwasher
Correct positioning
Before securing the dishwasher, make sure the dishwasher is positioned in the center.

To the countertop
You can use the brackets to secure the dishwasher to the countertop. Alternatively, you can drill the side holes to secure the dishwasher to the cabinet sides.
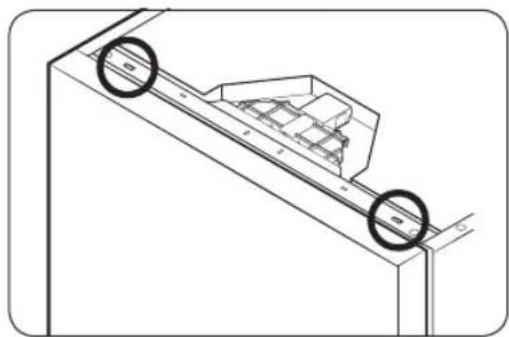
natural_image
Technical line drawing of a mechanical assembly with two circular annotations highlighting features (no text or symbols present)- Put a large towel on the bottom of the dishwasher (covering the sump) to prevent wood shavings or screws from falling into the dishwasher sump.
- Insert the provided brackets into the top front holes of the dishwasher as shown.
- Insert the dishwasher fully into place under the countertop.

natural_image
Technical diagram of a mechanical component with an arrow indicating direction (no text or symbols present)English26-

natural_image
Technical line drawing of a mechanical clamp or bracket with wires and a clip (no text or symbols)
- If the installation brackets on the front of the dishwasher are too long cut them down using a pliers.
- Carefully drill 2 screw holes into the bottom of the countertop from beneath, one for each countertop bracket.
• Make sure the hole you drill is smaller than the diameter of the screw.
6. Insert the provided screws into the hole of brackets, and then tighten to secure the dishwasher to the countertop.
NOTE
Use a magnetic screwdriver to help prevent screws from falling into the dishwasher.
7. Insert the provided screws into the brackets, and then tighten to secure the dishwasher to the countertop.
NOTE
- If the provided brackets are too long, cut them down using pliers.
- Use a magnetic screwdriver to help prevent screws from falling into the dishwasher.
- Connect the water hose, but do not open the water tap until installation is complete.
Installation
To the side walls
installation

natural_image
Pure electrical circuit lines without any symbols

natural_image
Diagram showing a screwdriver inserted into a door panel with an arrow indicating direction (no text or symbols)-
Put a large towel on the bottom of the dishwasher (covering the sump) to prevent wood shavings or screws from falling into the dishwasher sump.
-
To prevent damage to the drain hose through the water supply line, slightly pull out the dishwasher and bend the built-in ear brackets of the left and right housings by 316 " (5 mm). When done, reinsert the dishwasher with its center aligned.
NOTE
Skip this process if you have performed it in Step 2 above.
- Drill one hole into both sides of the kitchen cabinet, totaling 2 screw holes.
• Make sure the hole you drill is smaller than the diameter of the screw.
• Make sure the drill bit does not strike the sides of the spacer cap holes.
-
Tighten the provided screws into the holes to secure the dishwasher to the cabinet.
-
Insert the provided plastic caps to the 4 places where screws are fastened.
English28-
STEP 9 Connect the drain hose
There are several ways to insert the drain hose into the drain hose connector of the sink. You must connect the drain hose in accordance with the water pipe installation regulations in your region.

Without disposal Without an air gap With an air gap/without disposal
Drain system with no waste-disposal

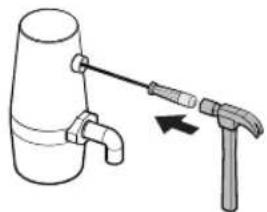
natural_image
Simple line drawing of a pipe valve with a hammer, no text or symbols presentKnock out plug in garbage disposal before connecting the drain hose.
Drain system with a waste-disposal
Installation
Installation

natural_image
Diagram of a pipe outlet with a coiled hose and valve (no text or symbols)
natural_image
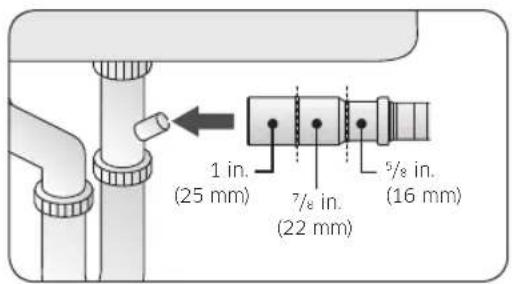
Technical line drawing of two mechanical components: a pin-like tool and a helical spring (no text or symbols)- Check the size of the sink's drain hose connector. If needed, cut the drain hose so its end fits into the sink connector.
NOTE
- If the drain hose does not fit into the sink connector, you can purchase an adaptor at a plumbing/hardware store.
- The drain hose can be extended up to 118^1/8 (3 m).
-
Insert the drain hose into the sink connector, slide the hose clamp to the end of the hose, and then tighten the hose clamp.
-
If the sink does not have an air gap, detach the hose holder from the dishwasher, and then cut off the protruding part from the holder as shown.
English30-

-
When drilling a hole for the drain hose on the cabinet wall, use caution not to damage the drain hose on the sharp edges of the hole.
-
On wooden walls, use sand paper to soften the edges.
-
On metal walls, use insulation tape or duct tape to cover the sharp edges around the hole.
-
Secure the drain hose to the sink wall using cable ties or other fastening materials.
CAUTION
- Use caution not to damage the drain hose when installing the dishwasher.
• Install the drain system properly so that the drain hose does not disconnect from the drain outlet in the draining process. - Make sure that the drain hose, supply hose, or power cord is not kinked or folded.
• Make sure to unplug the food disposal.
Installation
STEP 10 Final check
- Remove all foam, paper packaging, and unnecessary parts from inside the dishwasher.
- Turn the circuit breaker on.
- Open the water valve to supply water to the dishwasher.
- Plug in the dishwasher.
- Turn the dishwasher on, and then select and run a cycle.
- Check if the dishwasher turns on normally and if there are any water leaks while the dishwasher is operating. Make sure to check for water leaks on both ends of the water line and the drain hose connector.
- Check if the kick plate gasket is attached to the bottom of the kick plate. To install the kick plate, see the Kick plate section below.
To fix leaks
You may encounter leaks during the final check. If this is the case, follow these instructions.

natural_image
Technical diagram of a mechanical assembly with a tool inserted, showing internal components and a highlighted section (no text or symbols)- If an information code of LC appears on the control panel, press and hold Start for more than 3 seconds to start draining. When the draining is complete, unplug the dishwasher and close the water valve.
- Check if the inlet valve leaks. If so, reconnect the 90°Fitting with the hot water line because they were not properly connected.
English32-
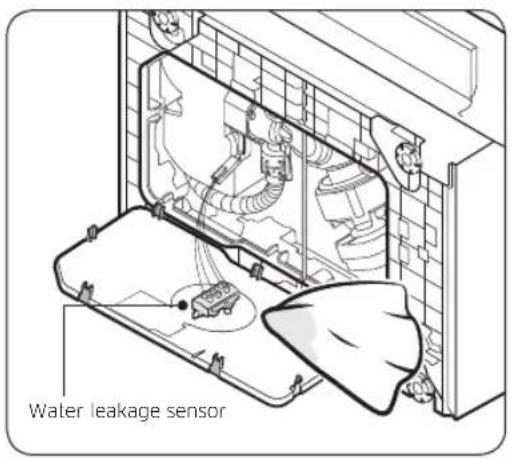
Kick plate
If you want to install the kickplate, follow these instructions.
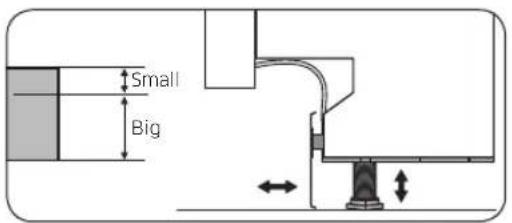
- Once the leak is stopped, lay down the dishwasher as shown, and wipe out moisture from the water leakage sensor.
- Plug in the dishwasher. Then, open the water valve and start a cycle.
-
If the LC information code continues to appear, contact a local Dacor service center.
-
Turn the front legs of the dishwasher to adjust the height so that the kick plate fits in.
NOTE
- For dishwasher models without the adjustable legs, turn the kick plate upside down so that the kick plate fits in.
- Dishwashers whose height is under 34" (864 mm) do not support installation of the kick plate. Use the furniture plate instead.
Installation
installation


natural_image
Diagram showing a mechanical assembly with a bracket and an arrow indicating direction (no text or symbols present)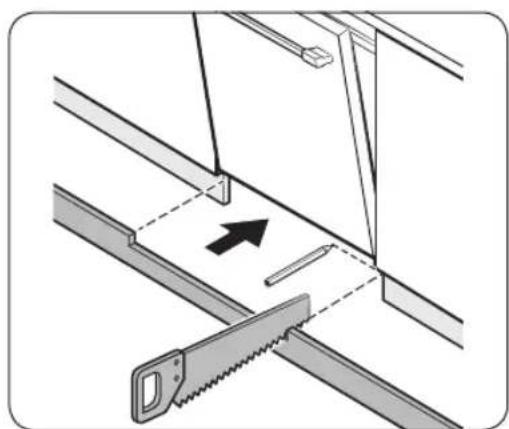
natural_image
Diagram showing a saw cutting through metal beams with an arrow indicating direction (no text or symbols)-
Attach the kickplate to the dishwasher using the kickplate brackets. Make sure the kickplate brackets are in the correct direction. See the figure for details.
-
If you use the furniture plate instead of the kickplate, cut out the portion of the furniture plate that interrupts with the door before attaching the furniture plate to the dishwahser.
English34
Before you start
Follow these instructions carefully to ensure proper installation of the dishwasher.
- Carefully unpack the product package and check for any damage. If the dishwasher has been damaged, make note of it on the waybill and keep a copy. Do not install the dishwasher, and contact a local Dacor customer center.
- If there is no damage to the product, you can proceed with the installation. If you are going to install the dishwasher yourself, make sure to read the Installation section and follow the instructions.
- Keep the packaging material out of children's reach to ensure their safety.
Dishwasher at a glance
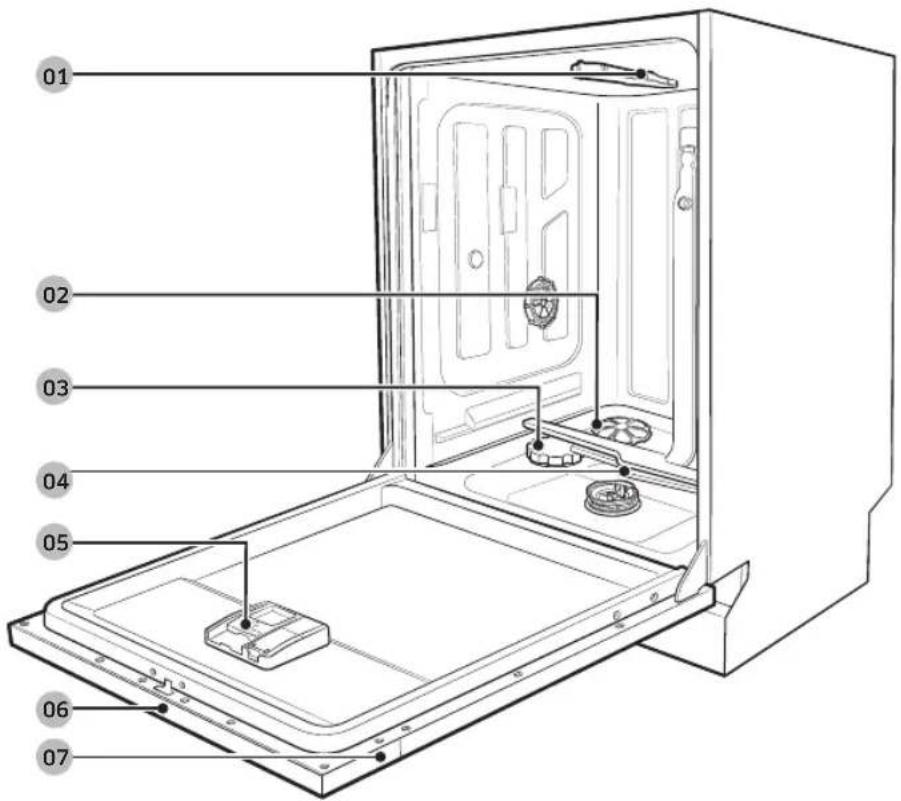
01 Top nozzle 02 Storm Wash
03 Salt storage
04 Lower nozzle
05 Dispenser
06 Control panel
07 Door
Before you start
Accessories

Others


Installation kit (User manual included)
Kick plate
English36
Basic use of racks
Angle of the plate supports
In the Lower rack, you can easily fold down the fold-down tines to make room for large items such as pots and pans in the StormWash+ area. Remove the rack from the dishwasher, and then fold down the tines one at a time. See the illustration below.

flowchart
graph TD
    A["Initial State"] --> B["Reformational Formation"]
    B --> C["Final State with Rebar Structure"]
    style A fill:#f9f,stroke:#333
    style B fill:#ccf,stroke:#333
    style C fill:#cfc,stroke:#333
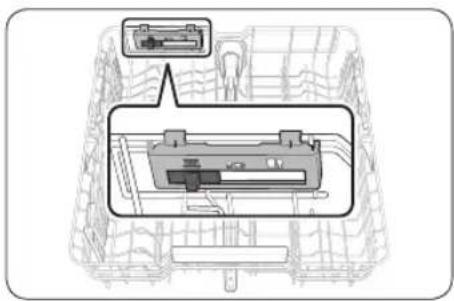
In the Upper rack, you can adjust the angle of the tines to two different positions to match the size and shape of your dishes. To adjust the tines, grasp the handle at the front of the rack, and then push it left or right. See the illustration below.
natural_image
Technical diagram of a mechanical component with internal structure and a close-up inset (no text or symbols)
natural_image
Three identical diagrams of a battery pack with internal components, shown from top to bottom (no text or symbols)Before you start
Height adjustment
You can adjust the height of the upper rack so that the lower rack can accommodate larger sized dishes. Depending on the height of the upper rack, the lower rack can accommodate plates up to 12 inches (30 cm) in diameter, and the upper rack can accommodate plates up to 9 in. (22.5 cm) or 12 in. (30 cm, without 3rd rack) in diameter.


natural_image
Diagram of a device with a prohibition symbol and internal structure, no readable text or labels present.To raise the upper rack
Hold the upper rack's left and right frame handles and pull upward. The adjustable lever will latch, and the upper rack will raise. You can set from Level 1 (low) to Level 3 (high).
To lower the upper rack
Hold both the left and right frame handles for the upper rack and raise the right lever to lower that side. The upper rack may suddenly fall if you pull the lever without holding the left and right frame handles. You can set from Level 1 (low) to Level 3 (high).
CAUTION
- Adjust the height of the upper rack before loading dishes into the rack. Adjusting the rack after loading the dishes may damage the dishes.
- You must level the left and right sides of the upper rack. Otherwise, the dishwasher door may not close properly or the dishwasher may not wash properly.
To remove the upper rack
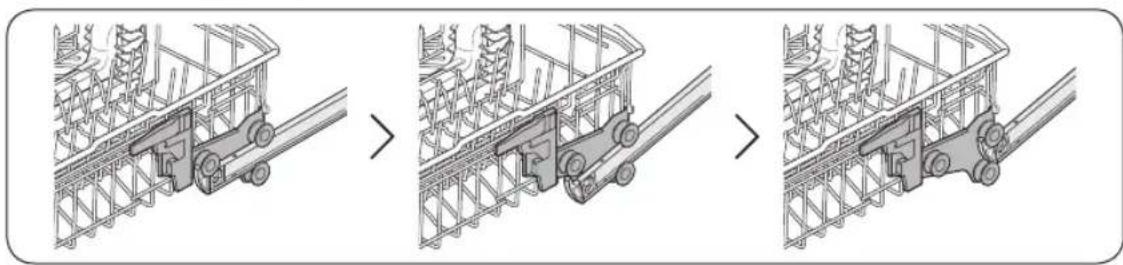
natural_image
Three sequential illustrations showing a train on a conveyor belt system, with no visible text or symbols.To remove the upper rack, pull the upper rack to the front until it is fully extended, and then lift it slightly to remove. See the figures above for the illustrated steps.
CAUTION
- Do not operate the dishwasher without the upper rack. Otherwise, noises occur and the dishwasher does not operate properly.
- Since the upper rack is removable, insert the upper rack properly to ensure the dishwasher operates normally.
Before you start
To remove the 3^rd Rack

natural_image
Diagram of a door handle with an arrow indicating direction (no text or symbols present)
natural_image
Illustration of a hand holding a connector with internal components (no text or symbols visible)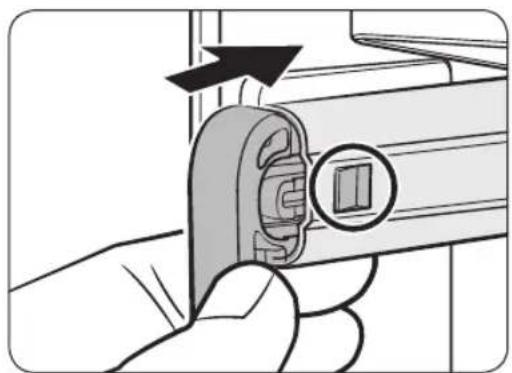
natural_image
Illustration of a hand holding a device with a close-up view of the internal component (no text or symbols visible)- Stand facing the dishwasher, and then pull the 3 ^rd rack out so that the handles at the ends of the rack supports (dark grey in the illustration) are even with the end of the rack.
- With your right thumb, find the small indentation on the inside of the left rack support that houses the tab for the handle lock.
- Push the handle lock tab in (i.e. to your left) with the tip of your thumb, and then pull the handle towards you until it disengages from the support.
- Repeat this process with the right handle using your left thumb.
-
When the handles are removed, remove the 3 ^rd rack from the dishwasher.
-
Reverse the order of removal to re-insert the 3^rd rack.
CAUTION
Make sure the hook-shaped part of the handle faces downward and the handle lock (circled) re-engages when reinserting the handle into the rail.
English40
Loading precautions
Unsuitable items for the dishwasher
Wash only items such as glass, porcelain, and cutlery which the manufacturer declares as dishwasher safe. Do not wash aluminium (e.g. grease filters). The dishwasher may damage aluminium, or in extreme cases, it can cause a severe chemical reaction.
Do not wash the following items in the dishwasher.
- Acrylic or aluminum items: These can discolor dishes with printed gold-rim decoration and mar other items.
- Dishes treated with adhesive: Treated plastics can come apart. Wood, ivory, copper, and tin glued to dishes can come loose.
- Plastics with a temperature tolerance less than 194^ (90 °C): Thin plastics wash and dry poorly, and may be damaged due to elevated wash temperatures.
- Tin: Tin items must be washed by hand and dried immediately. Otherwise, it can rust.
- Wooden utensils: Wooden items can crack.
CAUTION
- Do not wash items that are covered with ash, sand, wax, lubricating grease or paint.
- These materials will damage the dishwasher. Ash does not dissolve and will spread inside the dishwasher.

natural_image
Illustration of a bone structure emerging from a circular base (no text or symbols)- Remove remaining food such as large bits of food, bones, fruit seeds, etc. and waste such as toothpicks, paper napkins, etc. from your dishes. Food remnants and waste can interfere with washing, make noise, cause the dishwasher to malfunction, and damage your dishes and dishwasher.
Before you start
Loading dishes
Into the lower rack

natural_image
Technical line drawing of a mechanical assembly with internal components (no text or symbols)10 plate settings
Load cookware (pots, pans, etc.) up to 12 inches (30 cm) in diameter into the lower rack. The lower rack is specially designed for dinner dishes, soup bowls, plates, pots, lids, and casserole dishes. Load plates into the centre column of the rack so that the top of a plate faces the bottom of the next plate. Load large items such as pans and pots into the dishwasher so their inner cavities face downwards. We recommend loading cups, stemware, and small plates into the upper rack. See the recommended loading cases below.

natural_image
Technical line drawing of a mechanical assembly with gears and housing (no text or symbols)12 plate settings
English42-
Loading the Storm Wash ^+ Area

natural_image
Technical line drawing of a mechanical assembly with gears and housing (no text or symbols)For more effective cleaning, load large items into the Storm Wash area on the left side of the lower rack.
When you select Storm Wash ^1 , the dishwasher supplies additional power to reinforce the water jet in the Storm Wash area.
Make sure pot handles and other items do not interfere with the rotation of the nozzles.
Before you start
Into the upper rack
natural_image
Technical line drawing of a mechanical component with multiple cylindrical parts and a central handle (no text or symbols)10 plate settings

natural_image
Technical line drawing of a mechanical component with multiple cylindrical and oval features (no text or symbols)12 plate settings
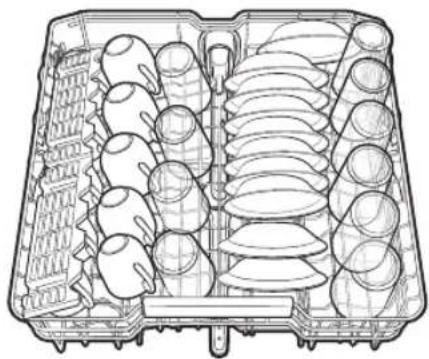
The upper rack is for small plates, mugs, glasses, and plastic items. Make sure the loaded dishes do not interfere with the rotation of the nozzle which is located at the bottom of the upper rack. (Check this by rotating the nozzle by hand.)
When loading dishes, pull the upper rack out so you can load it without striking the counter above.
The upper rack release position is at Level 1 (low).
- Level 1 (low) is a suitable position for loading tall cups and plates in the middle.
- Level 2 (mid) is a suitable position for typical dishes. The rack position must also be set to Level 2 when measuring energy.
- Level 3 (high) is a suitable position for loading large bowls or long cooking utensils on the bottom.
CAUTION
Ensure that there is no interference with the operation of the central rotor before starting the dishwasher.
English44
Using the glass support
The glass support is used for cups, small items, and long cookware, and especially suited for wine glasses. Hang wine glasses onto the pegs of the cup shelves. Fold the glass support back when it is not being used.

flowchart
graph TD
    A["Architectural Panel"] --> B["Structural Structure"]
    B --> C["Reformational Change"]
    C --> D["Final Section"]

    style A fill:#f9f,stroke:#333
    style B fill:#ccf,stroke:#333
    style C fill:#cfc,stroke:#333
    style D fill:#fcc,stroke:#333
CAUTION
- Do not adjust the level of the upper rack with the glass support propped up. This will make it impossible to push the glass support in the upper rack.
- Check whether cups are interfering with the 3rd rack when pushing in the upper rack after loading cups onto the glass support. Cups may be damaged or displaced.
3rd rack

natural_image
Line drawing of a toolbox containing various dental tools and dental implants (no text or labels)The 3rd rack is best for flatware and cooking or serving utensils. Use the 3rd rack to organize flatware or utensils.
NOTE
- For best results, place heavily soiled items in the standard 3rd rack.
- The 3rd rack can be removed if you need more space on the upper rack to clean larger items.
The rack will stand if items are placed as suggested above. Refer to the figures below and match the numbers on the left with the numbers on the right.
Before you start
Loading the Cutlery rack
The cutlery rack consists of two compartments.
You can place each knife, spoon, or fork separately into the spoon stands in the basket's covers to prevent chipping and discoloration. See the illustrations below.
You can use the cutlery rack with the cover open.

natural_image
Cross-sectional diagram of a mechanical component with internal gear-like structures (no text or symbols)
natural_image
Cross-sectional diagram of a mechanical or electrical component with layered internal structure (no text or symbols)10 plate settings 12 plate settings
The spoon stands as seen from above with the suggested placement of cutlery items. Match the numbers in the diagram to the numbers in the list of cutlery items below.

English46-

natural_image
Technical line drawing of a rectangular mechanical component with internal grid structure and two labeled circular features (no text or symbols)NOTE
Do NOT let any item extend through the bottom. Do not load chopsticks in this rack, which should be loaded in the 3rd rack.

- Forks
- Tea spoons
- Dinner spoons
- Knives
- Serving spoons and Serving forks
- Remaining items
Before you start
Detergent compartment
All dishwasher cycles require detergent in the detergent compartment. Apply detergent as recommended for the selected cycle to ensure best performance.
WARNING
- Do not place dishwasher detergent in your mouth. Avoid breathing in detergent fumes. Dishwasher detergent contains irritants and caustic chemicals that can induce respiratory conditions. If you have consumed dishwasher detergent or inhaled detergent fumes, seek medical attention immediately.
- Keep dishwasher detergent out of children's reach.
CAUTION
Use dishwasher detergent only. Other types of detergent produce excessive foam, which may decrease the dishwasher's performance or cause it to malfunction.

natural_image
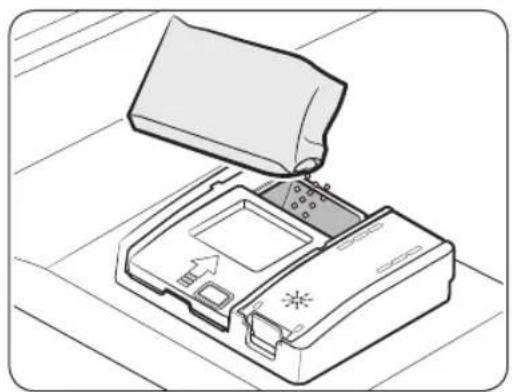
Illustration of a hand inserting a device into a device housing (no text or symbols visible)- Open the detergent dispenser cap by pressing the detergent dispenser catch.
NOTE
The cap remains open at the end of a cycle.
natural_image
Line drawing of a device with an open lid and internal components, no text or symbols present- Add the recommended amount of detergent to the main wash detergent compartment.
NOTE
There is no separate button that is specific to using tablet detergents.
English48-

natural_image
Isometric illustration of a device with a handle and internal components, showing no text or symbols.
natural_image
Illustration of a mechanical device with a container and a lever pouring particles into it (no text or symbols)-
Close the lid by sliding it up.
-
If the items are heavily soiled, pour a small amount of detergent onto the door for better cleaning results.
NOTE
- The additional detergent will activate during the pre-wash process.
- When testing for the energy label, detergent was only used in the main wash and not in the prewash.
The cover opens automatically to dispense the detergent during the wash.
Before you start
Rinse aid reservoir
Rinse aid improves the drying performance of the dishwasher. When the Rinse Refill indicator lights up on the control panel, refill with rinse aid. Only use liquid rinse aid. Powdered rinse aid will clog the reservoir opening and cause the dishwasher to malfunction.
CAUTION
- Do not apply any type of detergent to the rinse aid reservoir.
- Do not excessively fill the reservoir. Excessive rinse aid may overflow during a cycle.
Filling the rinse aid

natural_image
Diagram of a device casing with internal components and directional arrows indicating flow or movement (no text or symbols)- Open the rinse aid reservoir cap.

natural_image
Illustration of a bottle pouring liquid into a plastic container (no text or symbols)- Fill the rinse aid reservoir with rinse aid.
CAUTION
Do not fill the reservoir above the full level indicator. Excess rinse aid can overflow during the wash cycle.

natural_image
Isometric view of a device casing with an arrow pointing to a component, no text or symbols present- Close the rinse aid reservoir cap.
English50-
Salt storage

CAUTION
- Use dishwasher-specific salt only. Do not use any other type of salt or solvent. This may damage the salt storage and the water softening system.
- To prevent corrosion due to an excessive amount of salt or salty water, always fill the salt storage before a washing cycle gets started.
Filling the salt storage

natural_image
Diagram showing a gear mechanism interacting with a mechanical component (no text or symbols)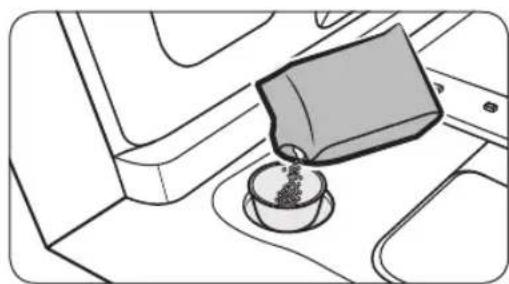
natural_image
Line drawing of a coffee cup pouring liquid into a container on a tray (no text or symbols)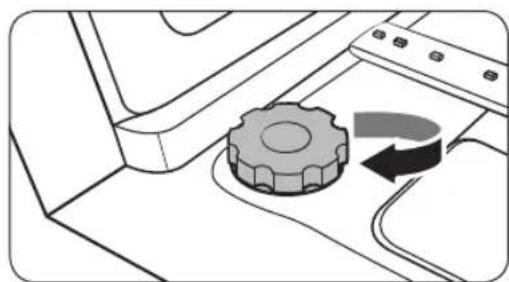
natural_image
Diagram of a mechanical component with a gear and curved arrow indicating rotation (no text or symbols)- Open the door.
- Turn the cap counterclockwise to open.

NOTE
When you open the softener lid, clean water stored for about one minute may run out. Add salt to stop the water from leaking out.
-
Fill the salt storage with water (only required when using the dishwasher for the first time).
-
Apply dishwasher salt.

CAUTION
- The maximum capacity is about 1 kg. Do not exceed the capacity.
-
Exceeding the capacity may affect the dishwasher performance.
-
Turn the cap clockwise to close.

NOTE
- To clean excess salt or salt water from dishwasher, run the Express 60 cycle.
- Depending on the size of the salt grains, it may take a while for the salt to dissolve and the indicator (→) to turn off.
Salt notice
The notice turns on if there is not enough salt for the next several cycles.
Operations
Touchpad responsiveness
To prevent the touch-enabled controls from losing responsiveness, follow these instructions.
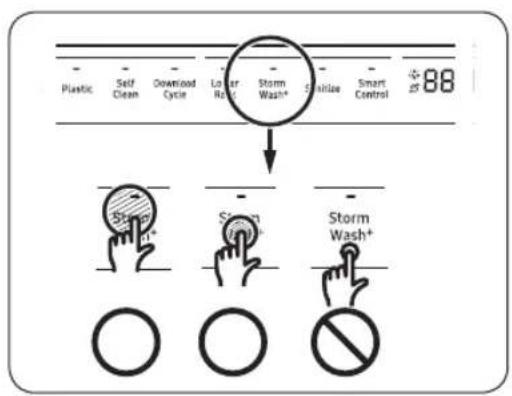
- Touch the center of each button with one finger.
- Do not touch more than one button at a time, except as directed.
- Clean the surface of the control panel regularly with a soft, damp cloth.
English52-
Control panel

| 01 Power | When you press thePowerbutton, the Cycle On light for the most recently started cycle turns on. When the selected cycle is complete, the dishwasher powers off automatically. |
| 02 Cycle Selector | Select the appropriate wash cycle depending on the soil level of your dishes. After you select a cycle, the Cycle On light for that cycle lights.If you want to change the cycle once it has started, press thePowerbutton. Then, turn on the dishwasher again and select a new cycle. |
| 03 Lower Rack | If selected, only the lower rack nozzle is activated to reduce both the cycle time and power consumption. Use this cycle to wash a small load of dishes or glasses in the lower rack. To wash heavily soiled items, select theStorm Wash*option. |
| 04 Storm Wash+ | Use this option when you want to wash pots and pans, durable serving bowls, and other large, very dirty, hard to clean dishes.To use Storm Wash+, place the dishes face down in the storm wash nozzle up area in the lower basket. |
Operations
| 05 Sanitize | With the Sanitize option selected, the water temperature is increased to 167 °F (75 °C) in the final rinse cycle for high temperature sanitization.If you select the Sanitize option, the "Sanitize" lamp blinks when the water temperature reaches the sanitary temperature (over 155 °F (68 °C)), and then remains illuminated until the Sanitize option ends.When you open the door or press the Power button, the "Sanitize" lamp turns off.NOTEOnly Normal cycle with the Sanitize option has been designed to meet the requirements for soil removal and sanitization efficacy in NSF 184. Certified residential dishwashers are not intended for licensed food establishments.For the Sanitize mode, the amount of detergent as 34 oz (20 g) in Main wash dispenser and 13 oz (10 g) on the door for pre-wash is used. |
| 06 Smart Control | You can monitor and control the dishwasher remotely through a Wi-Fi connection. To connect the dishwasher to your smart phone for the first time, press and hold Smart Control. For more information, see the "SmartThings" section on page 62. |
| 07 Display | Displays information about the current cycle including the cycle time, remaining time, Delay Start settings, and other cycle-specific information.If a problem occurs during operation, an information code will appear with a warning sound. Refer to the information codes on page 74. |
| 08 Delay Start | Delay a cycle for up to 24 hours in one-hour increments. To increase the delay start time, press or hold the Delay Start button.The hour displayed indicates the time at which the wash will start.- After setting the delay time, press the Start button, and then close the door to start the cycle.- To change the delay time after the dishwasher has started, first turn the dishwasher off and turn it back on. Then, select a new cycle and change the delay time settings. |
English54
| 09 Start | To start a cycle, press the Start button before closing the door.Cancel & Drain: To cancel a currently running cycle and drain the dishwasher, press and hold the Start button for three (3) seconds.Once the dishwasher is reset, select a cycle and option, and then press Start to restart the dishwasher. |
Indicators

| Rinse Refill indicator Lights up if the dishwasher runs out of rinse aid. | ||
| Salt Refill Indicator Lights up if Salt refill is activated. | ||
| AI Energy mode indicator | • AI Energy mode becomes active when the SmartThings app allows it to be enabled.• With the AI Energy mode enabled, the indicator turns on if an AI Energy mode compatible cycle is selected.• Not all cycles are available with this mode.The indicator turns off if an AI Energy mode incompatible cycle is selected.• AI Energy mode helps reduce power consumption.However, it takes a longer cycle time. | |
| Smart Control | Lights up if SmartThings is activated. | |
Operations
Cycle overview

| 01 Auto | This cycle detects the level of soil and automatically initiates the optimal cycle after a few minutes of operation. |
| 02 Normal | Use this cycle for normally soiled dishes.The energy-usage label is based on this cycle. |
| 03 Heavy Use this cycle | for heavily soiled dishes. |
| 04 Delicate | Use this cycle for soiled, fragile items such as fine glassware and crystal glass (wine glass). Do not use this cycle for other glassware because clouding or etching may occur. |
| 05 Express 60' | Use this cycle when you need to wash dishes quickly. It takes about 1 hour. |
| 06 Pre Blast | Use this cycle for dislodging large food debris roughly in a quick time and preventing caking. No detergent or rinse is applied. |
| 07 Plastic | Appropriate for cleaning plastic dishes that are vulnerable to heat and temperature. |
| 08 Self Clean | Use this cycle to clean the dishwasher's tub.Be sure to run the Self Clean cycle with the dishwasher empty, and never use it as a wash cycle to clean dishes.You can get notifications through the SmartThings app when self-cleaning is needed. |
| 09 Download Cycle | Beside the default cycles, you can download and use additional cycles on your phone. |
English56
Download Cycle
Beside the default cycles, you can download and use additional cycles on your phone.
-
Press Power button, and then select the Download Cycle.
-
Select a downloadable cycle on your phone app.
Cycles available: Pots Pans, Baby Care, Night.
- The default cycle is Pots Pans.
-
You can save the downloaded cycle for future use.
-
Press Start button, and close the door of the dishwasher.
| Pots Pans | Appropriate for cleaning cookware such as pans and pots that are likely to be soiled heavily. |
| Baby Care | Use this cycle to rinse dishes with high-temperature water before drying. No detergent is applied. |
| Night | Use this cycle for normal dishwashing after a meal. This cycle takes longer time but makes less noise compare to the Normal cycle |
Operations
Simple steps to start your dishwasher
- Open the door, and then load the dishwasher. Make sure dishes are empty.
- If applicable, put the dishes in the lower rack. If adding the Storm Wash ^+ option, put the dishes in the left side of the lower rack.
- Add detergent to the detergent dispenser. For better results, add rinse aid to the rinse aid compartment.
NOTE
You should use rinse aid for better drying performance. You can further improve drying performance by also selecting the Sanitize option.
- Press Power, and then select a cycle with necessary options (Lower Rack, Storm Wash ^+ , Sanitize). If you change the cycle after selecting an option, the option is released.
- Press Start, and then close the door within 3 seconds. The dishwasher starts the cycle after draining for a few seconds.
NOTE
- To change the cycle after it has started, press and hold Start for 3 seconds to cancel the cycle. Then, select a new cycle.
- To resume after you have opened the door to stop the dishwasher while operating, simply press Start first, then close the door.
English58
Settings
You can change the Sound, Auto Release™ Dry alert, Rinse aid amount, Water Hardness, Auto Release™ Dry settings and Sabbath mode to your preference. To change the settings, press the Sanitize and Delay Start buttons simultaneously for 3 seconds. Press Sanitize to navigate through the sub menus, and then press Delay Start to confirm your changes.

After setting is finished, press Power button or Sanitize and Delay Start buttons.
Sound
Press Sanitize until 'U0' or 'U1' is displayed. To mute the dishwasher, select 'U0', and then press the Sanitize and Delay Start buttons at the same time or the Power button. To unmute, select 'U1', and then press the Sanitize and Delay Start buttons at the same time or the Power button.
Auto Release™ Dry alert
You can enable or disable the setting that alerts you when the door opens to start the Auto Release™ Dry function.
Press Sanitize until 'J1' or 'JO' is displayed. To disable the Auto Release™ Dry alert, select 'JO', and then press the Sanitize and Delay Start buttons at the same time or the Power button. To enable, select 'J1', and then press the Sanitize and Delay Start buttons at the same time or the Power button.
Rinse aid amount
Press Sanitize until 'F0\~F6' is displayed. The higher the number, the more rinse aid the dishwasher uses. To improve drying performance, select a higher number.
If your dishes appear discolored after a wash, switch to a lower number.
The factory default level is 'F4'.
Water Hardness
• Find the Water Hardness option.
- Select a water hardness level from Level 0 to Level 5 (default: Level 0)
NOTE
If the water hardness level in your area is 0, you do not need to use dishwasher-specific salt. However, you must set the water hardness setting for the dishwasher to 0.
Operations
Auto Release™ Dry
The Auto Release ^™ Dry function, which is designed to improve drying performance, automatically opens the dishwasher's door 1 to 15 minutes before a cycle ends.
You can enable or disable Auto Release ^™ Dry in two ways: Using the Setting Mode or using the switch keys. Both methods are described as shown below.

natural_image
Technical line drawing of a mechanical component with two circular annotations highlighting features (no text or symbols present)Press Sanitize until "A1" or "A0" is displayed. Then, press Delay Start to enable (A1) or disable (A0) Auto Release™ Dry.
Using the switch Keys :
Press the Lower Rack + Sanitize button for 3 second to enable (A1) or disable (A0) Auto Release™ Dry.
NOTE
- Once the door opens on the Auto Release™ Dry mode, the door cannot be closed manually for the next 2 minutes.
- Disabling (A0) “Auto Release™ Dry” can affect the drying results. Enable (A1) “Auto Release™ Dry” for better drying result.
• After a cycle is complete, the door automatically opens to let steam out. This is normal and not a product malfunction.
Sabbath mode
Press Sanitize until 'H0' or 'H1' is displayed and turn off the dishwasher.
In Sabbath mode (H1), the dishwasher operates as follows:
- Interior lights and floor lights are off regardless of the door status.
- There is no sound regardless of sound settings.
Default level : H0 (Sabbath mode off)
NOTE
- Settings are saved even if the unit is turned off.
- Sabbath mode must therefore be turned off (H0) to activate light and sound.
English60
Water hardness level
| Level | Water hardness Regeneration | softening/washing cycle | Salt injection | |||
| °dH °TH mmol/L | Range | |||||
| 0 <6 <10 <1.0 | No recycle | No No | ||||
| 1 6-14 10-25 1-2.5 1/8 Yes Yes | ||||||
| 2 | 14-23 | 25-40 | 2.5-4.0 | 1/5 | Yes | Yes |
| 3 | 23-31 | 40-55 | 4.0-5.5 | 1/3 | Yes | Yes |
| 4 | 31-40 | 55-70 | 5.5-7.0 | 1/2 | Yes | Yes |
| 5 | >40 | >70 | >7.0 | 1/1 | Yes | Yes |
We recommend using soft water for better results. Hard water contains impurities that can reduce the washing performance. You will need to soften the water if the supplied water is harder than 1.0 mmol/L (6 °d - German scale).
- To soften the water, you need dishwasher-specific salt and configuration of the water hardness level according to your area. For more information about the water hardness level in your area, contact your local water department.
- If the hardness level of the supplied water supply is unsteady, set the dishwasher to the highest measurement. For example, if the water hardness reading ranges from 6.7 mmol/L to 9.0 mmol/L, set the dishwasher to 9.0 mmol/L.
- The dishwasher's default water hardness level is 4 (5.5-7.0 mmol/L). If this setting matches the water hardness level in your area, you do not need to change it.
- Regeneration will be operated in dry phase with an additional 2.3-2.7 L of water being used and 22-27 minutes taken for the cycle. The energy used may be increase however this should be by an insignificant amount.
Operations
SmartThings
Wi-Fi connection
On your smartphone, go to Settings, and then connect to your home Wi-Fi network.
Download
On an app market (Google Play Store, Apple App Store, Samsung Galaxy Apps), find the SmartThings app using "SmartThings" as the search term. Download and install the app on your device.
NOTE
- The SmartThings app is designed for Android 6.0 (Marshmallow) or later, iOS 10.0 or later, iPhone 6 or later, and is optimized for Samsung smartphones (Galaxy S and Galaxy Note series).
- For improved performance, the SmartThings app is subject to change without notice, or discontinued support according to the manufacturer's policy.
Log in
You must first log into SmartThings using your Samsung account. To create a new Samsung account, follow the instructions on the app. You don't need a separate app to create your account.
NOTE
If you have a Samsung account, use the account to log in. A registered Samsung smartphone user automatically logs in.
English62
To register your device to SmartThings
- Make sure your smartphone is connected to a wireless network.
- Run SmartThings on your smartphone. iPhone users are required to provide the login information each time they access the app.
- When a message of "A new device is found.", select Add.
- If no message appears, select + and then select your dishwasher in a list of devices available. If your dishwasher is not listed, select Device Type > Specific Device Model, and then add your dishwasher manually.
- Follow the on screen instructions to complete the connection process for your dishwasher. Press and hold Smart Control for more than 5 seconds until the "AP" message appears on the display. Your dishwasher will be registered with the app.
- When the process is complete, your dishwasher will appear in the list of devices on your SmartThings App.
- Tap the dishwasher icon to open the dishwasher page.
- When a network connection is established, the Wi-Fi icon lights up on your dishwasher.
Maintenance
Cleaning
Keep the dishwasher clean to improve performance, reduce unnecessary repairs, and lengthen the lifecycle.
Exterior
Clean spills on the surface of the dishwasher immediately. Use a soft, damp cloth on the control panel to gently wipe away spills and dust.
CAUTION
- Do not use benzene, wax, thinner, chlorine bleach, alcohol, or other chemical substances. These materials may discolour the surface of the dishwasher and cause stains.
- The dishwasher has electric parts inside. Do not spray water directly onto the dishwasher. Protect electrical components from water.
- For a stainless-steel door panel, use a stainless steel cleaner for home appliances and a clean, soft cloth.
Interior
Clean the interior of the dishwasher on a regular basis to remove any dirt or food particles. Wipe inside the dishwasher and inside the door with a wet dishcloth.
CAUTION
- Do not remove the front seal (the long rubber seal enclosing the opening of the dishwasher). The seal keeps the inner side of the dishwasher sealed.
- Use a damp cloth to remove lime scale or grease deposits inside the dishwasher. Alternatively, apply some detergent, and then run an empty cycle using the highest rinse temperature.
English64
Nozzles
To prevent the nozzles from being clogged or if the nozzles are clogged, remove and clean each nozzle. Use caution when removing the nozzles as they may break.
Top nozzle

natural_image
Diagram showing a device inside a cabinet with an inset close-up of the component (no text or symbols)Upper nozzle

natural_image
Technical diagram of a mechanical assembly with an inset showing a circular component being inserted (no text or symbols present)Lower nozzle

natural_image
Diagram of a kitchen sink with a lever and mechanical component, showing an upward arrow (no text or symbols present)- Open the door, and then pull out the upper rack. The top nozzle is visible on the top.
- Turn counter clockwise and remove the nozzle cap, and then remove the nozzle.
- Unclog and clean the nozzle.
- Reinsert the nozzle, and then tighten the cap clockwise.
-
Rotate the nozzle by hand to make sure the nozzle is engaged correctly.
-
Open the door, and then pull out the upper rack to reveal the upper nozzle.
- Loosen and remove the nut, and then remove the nozzle.
- Unclog and clean the nozzle.
- Reinsert the nozzle, and then tighten the nut by hand.
-
Rotate the nozzle by hand to make sure the nozzle is engaged correctly.
-
Open the door, and then pull out the lower rack. The lower nozzle is visible on the bottom.
-
Unclog and clean the nozzle.
-
Reinsert the nozzle.
-
Rotate the nozzle by hand to make sure the nozzle is engaged correctly.
Maintenance
Internal Cleaning
We recommend internal cleaning every month. You can use the Self Clean cycle or the Intensive cycle without putting in dishes.
If your tap water is hard, you can prevent limescale inside the dishwasher by adding citric acid to the detergent when operating the dishwasher.
Filter
We recommend cleaning the filter every month.

natural_image
Diagram of a mechanical component with a rotating arrow, no text or symbols present-
Open the door, and then remove the lower rack first.
-
Turn the filter handle counterclockwise to unlock the Coarse filter.
-
Remove the Coarse filter, and then the cylindrical micro filter underneath.

natural_image
Diagram showing a mechanical component with an arrow indicating direction, no text or symbols present
natural_image
Diagram showing a mechanical device with rotating components and a cylinder, no text or symbols present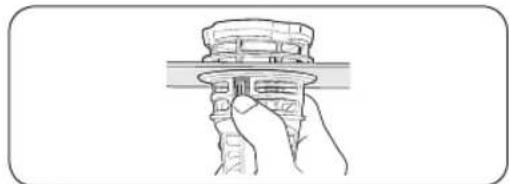
natural_image
Line drawing of a hand holding a mechanical component (no text or symbols)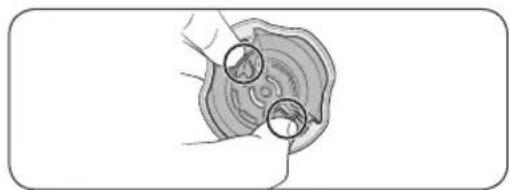
natural_image
Illustration of a hand holding a tree trunk with two circular annotations highlighting the areas of interest (no text or symbols present)English66-


natural_image
Line drawing of a sink with a bucket and mechanical components, no text or symbols present
natural_image
Illustration of a sink with a hand washing it, no text or symbols present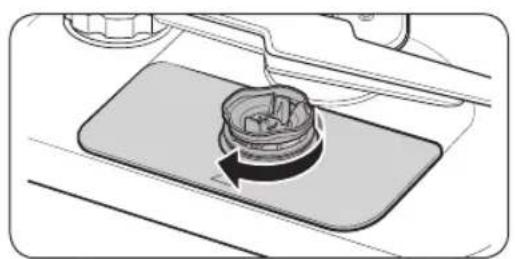
natural_image
Diagram of a mechanical component with a rotating knob and base plate (no text or symbols)- Remove any dirt and impurities from the micro filter and the Coarse filter.
-
Rinse both filters with running water, and then dry well.
-
Reinsert the filter, and then the Coarse filter.
- Turn the filter handle clockwise to lock.
- Reinsert the filter, and then the Coarse filter.
- Turn the filter handle clockwise to lock.
CAUTION
Make sure the Coarse filter is closed properly. A loose cover can reduce the filtering performance.

natural_image
Illustration of a hand using a tool to press or install a component on a workbench (no text or symbols visible)CAUTION
When removing the filter, the hand can caught between the rotor and filter.
Maintenance
Cleaning the drain pump
If the dishwasher fails to drain (5C is displayed) because the drain pump is clogged with a foreign matter or there is an abnormal noise coming from the drain pump, you must unclog and clean the drain pump as instructed below.
natural_image
Mechanical component diagram showing a piston assembly inside a car wheel (no text or symbols)
natural_image
Mechanical component diagram showing a bracket with a numbered label (2) and an arrow indicating direction, no readable text or symbols present.- Remove the lower rack.
- See the "Filter" section to remove the cylindrical micro filter.
- Remove any moisture from the filter using a sponge.
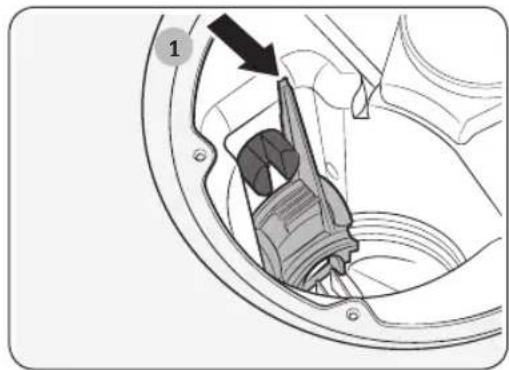
- Remove the drain-pump cover by pushing its handle in the direction of the arrow (1), and then pulling up (2).
- Check the impeller to see if it's in good condition. Then, remove any foreign matter from the pump.
- Reinsert the drain-pump cover and then press down until you hear a click.
Long-term care
If you will not use the dishwasher for an extended period of time, first drain the unit completely, and then disconnect the water hose. Shut off the water supply valve and the circuit breaker. Water remaining in the hoses or the internal components can damage the dishwasher.
English68-
Troubleshooting
Checkpoints
If you encounter an issue to check with the dishwasher, first check the table below and try the suggestions.
| Symptom Possible Cause Action | ||
| The dishwasher does not start. | The door is not completely closed. | Make sure the door is latched and completely closed.Make sure the upper rack is properly joined with the duct nozzle.Make sure the upper rack is properly assembled. |
| The Start (Reset) Button is not selected. | Make sure the door is latched and completely closed. Then, press Start. | |
| No cycle is selected. Select a cycle. | ||
| The power cord is not connected. | Connect the power cord. | |
| Water is not being supplied. | Make sure the water supply valve is open. | |
| The dishwasher takes too long to start operation. | The dishwasher is connected to a cold water supply. | To work properly, the dishwasher must be connected to a hot water supply. If connected to a cold water supply, additional time is required to heat the cold water. |
Troubleshooting
| Symptom Possible Cause Action | ||
| The dishwasher has bad odours. | Water remains from the previous cycle. | With the dishwasher empty, add detergent, and then run the Normal cycle to clean the dishwasher. |
| The drain hose is obstructed. | Contact a qualified service technician to remove any obstruction from the drain hose. | |
| The dishwasher is not used daily or soiled dishes are left in unit too long. | With the dishwasher empty and no detergent, place a glass with 8 ounces of vinegar upright into the lower rack, and then run the Normal cycle. | |
| Water remains in the dishwasher after a cycle has finished. | The drain hose is folded or clogged. | Straighten and unclog the hose. |
English70
| Symptom Possible Cause Action | ||
| Food remains on dishes | An incorrect cycle was selected. | Select a cycle according to the soil level of the dishes as instructed in this manual. |
| The filters or nozzles are clogged or not correctly fastened. | Clean the filters or nozzles.Make sure the filters are correctly fastened. See theCleaningsection on page 64. | |
| An insufficient amount of detergent or no detergent was used. | Use the correct amount of detergent for each load. We recommend using a powdered or gel type of detergent. | |
| The water pressure is low. | Make sure the pressure is between 20 psi and 120 psi (140-830 kPa). | |
| The water temperature is low. | Connect the water supply line to a hot water supply. For best performance, the temperature of the supplied water must reach 120 °F (49 °C). | |
| Dishes improperly loaded or overloaded. | Arrange the dishes so they do not interfere with the nozzles and/or the detergent dispenser.See theLoading dishessection on page 42. | |
| The water is too hard. | Use a commercial dishwasher cleaner.Use high-quality, fresh detergent with rinse aid.Clean the filter at least once per month.Use a water softener additive designed for dishwashers featuring the water softener. | |
| Upper rack unbalanced. | Level the left and right sides of the upper rack. See theHeight adjustmentsection on page 38. | |
Troubleshooting
| Symptom Possible Cause Action | ||
| Dishes are not dried well. | There is no rinse aid in the dispenser, or not enough rinse aid was used. | · Add a liquid type of rinse aid. Check the rinse aid settings. |
| The water temperature is low when the dishwasher is operating. | · Connect the water supply line to a hot water source. Use rinse aid with the Sanitize option. | |
| Too many dishes have been loaded. | · Proper loading of items can affect drying performance. Load your dishes as recommended. See the Loading dishes section on page 42. | |
| Glasses and cups spilled water onto other dishes while being unloaded. | · Empty the lower rack first, and then the upper rack. This will avoid water dripping from the upper rack onto the dishes in the lower rack. | |
| Auto ReleaseTM Dry is turned off. | · Check if Auto ReleaseTM Dry is turned off in Settings mode. If so, turn it on. | |
| The dishwasher is too noisy. | The dishwasher makes a sound when the dispenser cover is open and the drain pump has just started. | · This is normal. |
| The dishwasher is not level. | · Make sure the dishwasher is level. | |
| Foreign material (screws, plastic pieces) is in the pump chamber. | · Contact a qualified service technician to remove foreign materials from the pump chamber. | |
| The nozzle bumps against the dishes, creating a chopping sound. | · Rearrange the dishes. | |
| Upper rack unbalanced. | · Level the left and right sides of the upper rack. See the Height adjustment section on page 38. | |
English72-
| Symptom Possible Cause Action | ||
| Leaves glasses with a light film. | ·The water supplied is soft and too much detergent was used.·Aluminium dishes were included in the wash load. | ·Underload the dishwasher and use a rinse aid to reduce the detergent.·Remove the marks on the dishes using a low sensitivity cleaner. |
| Yellow or brown film remains on dishes. | Coffee and tea soils. | ·Remove the soils using a spot cleaner. |
| The nozzle does not rotate smoothly. | The nozzle is clogged with food particles. | ·Clean the nozzle. See the Cleaning section on page 64. |
| The nozzle is blocked by a dish or pot and cannot rotate. | ·After placing the dishes into the racks, rotate the nozzle by hand to check whether any of the dishes interfere with the nozzle. | |
| Upper rack unbalanced. | ·Level the left and right sides of the upper rack. See the Height adjustment section on page 38. | |
| Water won't pump out of the dishwasher. | The drain system is clogged. | ·Clean the drain pump by removing the drain pump cover. See the Drain pump section on page 68. |
| The upper rack is bent after dishes are loaded. | The dishes are not loaded properly. | ·Arrange the dishes as recommended. See the Loading dishes section on page 42. |
Troubleshooting
Information codes
If the dishwasher fails to operate, you may see an information code on the display. Check the table below and try the suggestions.
| Code Action | |
| LC | Leakage checkClose the water supply valve. Go to your home's circuit breaker panel, and set the dishwasher's circuit breaker switch to off. Then, contact the installer to repair. If the issue continues, contact a local Dacor customer center. |
| 4C | Water supply checkCheck if the water supply valve is closed, if the water supply is suspended, or if the water inlet valve or line is frozen or clogged by foreign particles. If the issue continues, contact a local Dacor customer center. |
| 5C | Drain checkClose the water supply valve. Check if the drain hose is clogged or folded. Check if the drain hole inside the pump is clogged. If the issue continues, contact a local Dacor customer center. |
| HC | High temperature heating checkFunctional check. With the dishwasher empty, add detergent, and then run a cycle. If the issue continues, go to your home's circuit breaker panel, and set the dishwasher's circuit breaker switch to off. Then, contact a local Dacor customer center. |
| 3C | Pump operation checkFunctional check. Turn off the dishwasher and restart. If the issue continues, contact a local Dacor customer center. |
| AP | Connect with a smart phone.When the control panel displays 'AP', press and holdSmart Controlon the control panel to connect your dishwasher with your smart phone. |
English74
| Code Action | |
| 1C | Low-water level checkCheck if the filter is clogged.Make sure to use dishwasher detergent.Make sure that the dishes are loaded evenly.Turn the dishwasher off and turn it on again. Then, try again.If the problem continues, contact a local Dacor service center. |
| 9C9 | The IPM is overheatingUnplug the appliance and contact a Dacor customer center. |
Cycle chart
| Cycle Auto Normal | |||
| Cycle sequence | Prewash ▶ Mainwash ▶ Rinse ▶ Hot Rinse ▶ Dry ▶ End | Prewash ▶ Mainwash ▶ Rinse ▶ Hot Rinse ▶ Dry ▶ End | |
| Temp [°F (°C)] | Main wash 131 | -149 °F (55-65 °C) 113-145 °F (45-63 °C) | |
| Hot Rinse *Sanitize 167 °F (75 °C) | 140-149 °F (60-65 °C) 129-144 °F (54-62 °C) | ||
| Water consumption [gal(ℓ)] | 4.08-5.34 (15.45-20.2 L) | 2.64-5.26 (10.00-19.9 L) | |
| Cycle time [min] 113-135 112-127 | |||
| Available Option | Lower rack | ○ | ○ |
| Storm Wash+ | ○ | ○ | |
| Sanitize | ○ | ○ | |
| Delay Start | ○ | ○ | |
| Cycle Heavy Delicate | |||
| Cycle sequence | Prewash ▶ Mainwash ▶ Rinse ▶ Hot Rinse ▶ Dry ▶ End | Prewash ▶ Mainwash ▶ Rinse ▶ Hot Rinse ▶ Dry ▶ End | |
| Temp [°F (°C)] | Main wash 149 °F (65 °C) 122 °F (50 °C) | ||
| Hot Rinse *Sanitize 167 °F (75 °C) | 145 °F (63 °C) 131 °F (55 °C) | ||
| Water consumption [gal(ℓ)] | 5.49 (20.8 L) | 4.33 (16.4 L) | |
| Cycle time [min] 140 79 | |||
| Available Option | Lower rack | ○ | ○ |
| Storm Wash+ | ○ | × | |
| Sanitize | ○ | × | |
| Delay Start | ○ | ○ | |
English76
| Cycle Express 60 Pre Blast | |||
| Cycle sequence | Mainwash RinseHot Rinse Dry End | Prewash End | |
| Temp[°F (°C)] | Main wash 131 °F (55 °C) - | ||
| Hot Rinse*Sanitize167 °F (75 °C) | 131 °F (55 °C) - | ||
| Water consumption[gal(θ)] | 2.93(11.1 L) | 1.03(3.9 L) | |
| Cycle time [min] 60 10 | |||
| AvailableOption | Lower rack | ○ | × |
| Storm Wash | ○ | × | |
| Sanitize | ○ | × | |
| Delay Start | ○ | ○ | |
| Cycle Plastic Self Clean | |||
| Cycle sequence | Mainwash RinseHot Rinse Dry End | Prewash MainwashRinse Hot Rinse DryEnd | |
| Temp[°F (°C)] | Main wash 140 °F (60 °C) 163 °F (73 °C) | ||
| Hot Rinse*Sanitize167 °F (75 °C) | 136 °F (58 °C) 149 °F | (65 °C) | |
| Water consumption[gal(l)] | 3.45(13.05 L) | 4.49(17 L) | |
| Cycle time [min] 94 116 | |||
| AvailableOption | Lower rack | ○ | × |
| Storm Wash | × | × | |
| Sanitize | × | × | |
| Delay Start | ○ | ○ | |
Cycle chart
| Cycle Pots Pans Baby Care Night | ||||
| Cycle sequence | Prewash ▶Mainwash ▶Rinse ▶Hot Rinse ▶ Dry ▶ End | Rinse ▶ Dry ▶ End | Prewash ▶Mainwash ▶Rinse ▶Hot Rinse ▶ Dry ▶ End | |
| Temp [°F (°C)] | Main wash 158 °F (70 °C) - 140 °F (60 °C) | |||
| Hot Rinse *Sanitize 167 °F (75 °C) | 149 °F (65 °C) 163 °F (73 °C) 129 °F (54 °C) | |||
| Water consumption [gal(l)] | 5.46(20.65 L) | 0.98(3.7 L) | 5.06(19.15 L) | |
| Cycle time [min] 148 89 | 154 | |||
| Available Option | Lower rack | ○ × ○ | ||
| Storm Wash+ | ○ × ○ | |||
| Sanitize | ○ × ○ | |||
| Delay Start | ○ ○ ○ | |||

NOTE
- When you select the Auto or Normal cycle, you can eliminate optional steps depending on the soil level of the dishes.
- The water consumption and cycle time varies depending on the steps or options you add, and on the pressure and temperature of the supplied water.
- The cycle temperature in the SmartThings app indicates the highest temperature that can reach during the cycle.
English78-
Appendix
Helping the environment
- Your dishwasher is manufactured from recyclable materials. If you decide to dispose of it, please observe local waste disposal regulations. Cut off the power cable so that the appliance cannot be connected to a power source.
- Remove the door so that animals and small children cannot get trapped inside the appliance.
- Do not exceed the detergent quantities recommended in the detergent manufacturers' instructions.
Specifications
Specifications are subject to change without notice for improved quality. The actual appearance of the dishwasher may differ from the illustrations in this manual.
MODEL DDW24G9000AP
Power 120 V / 60 Hz AC only, 15 A circuit breaker
Water pressure 20-120 psi (140-830 kPa)
Wash capacity 14 place settings
Rated power
Wash Motor: 60-100 W
Heater: 1200 W
Dimension
(Width x Depth x Height)
23^3/8 " X 21^3/4 " X 32^1/_8 " (595 X 552 X 815 mm)
Weight (Unpacked) 95 lb (43 kg)
Warranty
Customer Service
Before you request help or schedule service:
- Try the Solutions offered in the Problem–Solution table in the "Troubleshooting" section.
- Become familiar with the warranty terms and conditions of your product.
- If none of these tips or suggestions resolves your problem, visit dacor.com or call our Customer Service center at (833) 353-5483 (United States), (844) 509-4659 (Canada)
United States - Warranty
CERTIFICATE OF WARRANTY ON DACOR DISHWASHER - UNITED STATES:
FULL TWO-YEAR WARRANTY
This warranty covers any defects in materials or workmanship in the Dacor-branded new appliance purchased from a Dacor Authorized Dealer or other seller authorized by Dacor.
This full warranty runs for two years starting from the date of delivery or closing date for new construction, whichever period is longer. Dacor will repair or replace your product.
LIMITED WARRANTY
After the Full Warranty period has ended, this product is warranted against defects in materials or workmanship reported to us during the applicable warranty periods as follows:
Years 25 of your ownership – Parts only on rust-through of stainless steel tank and door.
For the twenty-five years of your ownership, we will pay for factory-specified parts only to correct defects in rust-through of stainless steel tank and door.
Cosmetic Defects. In addition, for 60 days from the date of delivery, your product is warranted to be free from cosmetic defects in material and workmanship (such as scratches of stainless steel, paint/porcelain blemishes, chip, dents, or other damage to the finish). Color variations are excluded, and display, floor-model, "as-is" or refurbished products are specifically excluded.
COVERAGE LIMITATIONS
Service will be provided by a Dacor designated service company during regular business hours. Please note service providers are independent entities and are not agents of Dacor.
The owner must provide proof of purchase, proof of delivery and/or a closing statement for new construction upon request. All Dacor products must be accessible for service.
English80
Warranty will be null and void on product that has altered, defaced, or missing serial numbers and tags.
Warranty is null and void if non-CSA approved product is transported from the U.S.A.
WHAT IS NOT COVERED
| ·Due to differences in painted parts, kitchen lighting, product placement, and other factors; this warranty does not apply to color variation. | ·Service calls to educate the customer on proper use and care of the product. |
| ·Service fees for travel to islands and remote areas, which include but are not limited to, ferries, toll roads, or other travel expenses. | ·Consequential or incidental damage, including but not limited to: food or medicine loss, time away from work, or restaurant meals. |
| ·Commercial, business, or rental use, or any application other than residential consumer use. | ·Failure of the product caused by improper product installation. |
| ·Replacement of house fuses, fuse boxes, or resetting of circuit breakers. | ·Damage caused by accident, fire, flood, power interruption, power surges, or acts of God. |
| ·Liability or responsibility for damage to surrounding property including cabinetry, floors, ceilings and other structures or objects. | ·Breakage, discoloration or damage to glass, metal surfaces, plastic components, trim, paint, or other cosmetic finish caused by improper usage, care, abuse, or neglect. |
| ·Except as noted above, consumable parts such as filters and light bulbs are not covered and are the responsibility of the purchaser. |
Warranty
THE REMEDIES PROVIDED IN THE ABOVE EXPRESS WARRANTIES ARE THE SOLE AND EXCLUSIVE REMEDIES. THEREFORE, NO OTHER EXPRESS WARRANTIES ARE MADE, AND OUTSIDE THE FIFTY STATES OF THE UNITED STATES AND CANADA, ALL IMPLIED WARRANTIES, INCLUDING BUT NOT LIMITED TO, ANY IMPLIED WARRANTY OF MERCHANTABILITY OR FITNESS FOR A PARTICULAR USE OR PURPOSE, ARE LIMITED IN DURATION TO ONE YEAR FROM THE DATE OF ORIGINAL PURCHASE. IN NO EVENT SHALL DACOR BE LIABLE FOR INCIDENTAL EXPENSE OR CONSEQUENTIAL DAMAGES. IN THE EVENT DACOR PREVAILS IN ANY LAWSUIT, DACOR SHALL BE ENTITLED TO REIMBURSEMENT OF ALL COSTS AND EXPENSES, INCLUDING ATTORNEY'S FEES, FROM THE DACOR CUSTOMER. NO WARRANTIES, EXPRESS OR IMPLIED, ARE MADE TO ANY BUYER FOR RESALE.
Some states do not allow limitations on how long an implied warranty lasts, or do not allow the exclusion or limitation of inconsequential damages, therefore the above limitations or exclusions may not apply to you. This warranty gives you specific legal rights, and you may also have other rights that vary from state-to-state.
Warrantor: Samsung Electronics America, Ridgefield Park, NJ, 07660
English82
CANADA - Warranty
CERTIFICATE OF WARRANTY ON DACOR DISHWASHER - CANADA:
This Limited Warranty covers only those Products supplied and distributed in Canada by us and delivered new, in the original carton or packaging, to the original consumer purchaser that are purchased from an authorized reseller or distributor, except as otherwise stated herein. Except where prohibited by applicable provincial law, only the original consumer purchaser of the Product has any rights under this Limited Warranty and this Limited Warranty may not be transferred or assigned.
Any additional statements such as dealer advertising or presentation, whether oral or written, that make additional warranties or modifications to this Limited Warranty do not constitute warranties by us and should not be relied upon.
1. WHAT IS COVERED AND FOR HOW LONG
We warrant to the original purchaser (“Purchaser”) that your Dacor Dishwasher purchased from an authorized reseller or distributor in Canada (the “Products”) is free from defects in material and workmanship encountered in normal use for the warranty period identified below, effective as of the date of purchase or closing date for new construction, whichever period is longer.
| Dacor Product or Part Warranty Period and Warranty Coverage | |
| Dishwasher rust-through of stainless steel tank and door. | Twenty-five (25) Years : Parts Only |
Cosmetic Defects. For sixty (60) days from the date of purchase, the Product is warranted to be free from cosmetic defects in material and workmanship (such as scratches of stainless steel, paint/porcelain blemishes, chip, dents, or other damage to the finish). Color variations are excluded, and display, floor-model, “as-is” or refurbished products are specifically excluded.
Warranty
2. COVERAGE LIMITATIONS
If the Product fails to operate according to the Product's specifications during the applicable warranty period and the failure is due to improper workmanship or defective material, we will repair or replace, at our sole option, and without charge to the Purchaser, the Product or any defective component part of the Product. We may, at our sole option, use rebuilt, reconditioned, or new parts or components when repairing any Product. If the same model Product or part is not available for replacement, we may, at our sole option, replace the Product or part with any rebuilt, refurbished, reconditioned or new Product or part of similar utility and value to the Product or part being replaced.
We expressly reserve the exclusive right, at our sole option, and in lieu of any service, repair or replacement of a Product under this Limited Warranty, to offer the Purchaser a partial refund of the original purchase price paid by the Purchaser for that Product (a "Partial Refund"). The amount of any Partial Refund to be offered shall be determined in our discretion based on the fair market value of the Product given its age and condition. If Purchaser accepts that offer of a Partial Refund, the Purchaser shall be deemed to have released us from any claim or liability whatsoever under this Limited Warranty or under any other applicable express or implied warranty or condition in respect of that Product.
All repaired parts or replaced Products will be warranted for a period equal to the remainder of the original Limited Warranty on the original Product or for 90 days, whichever is longer.
3. WHAT IS NOT COVERED
The remedies provided for in this Limited Warranty are available only within Canada.
This Limited Warranty does not cover any defect, malfunction, failure or damage caused by or resulting from any of the following:
(a) removal, installation, re-installation, maintenance, or service of the Product that was not authorized by us; (b) accident, fire, flood, power interruption, power surges, incorrect line voltage or supply or electrical current, fuses, house wiring, circuit breakers, connectors not supplied by us, unusual electrical or electromechanical stress, acts of God, or acts of nature; (c) misuse, abuse, neglect, mishandling, misapplication, alteration or modification of the Product or any part of the Product; (d) use of the Product in conjunction with products, equipment, utilities, services, parts, supplies, accessories, applications, external wiring, connectors, or ancillary or peripheral equipment not supplied or authorized by us; (e) uses for which the Product was not intended.
English84
Further, this Limited Warranty does not cover: (i) any Product or part from which the serial number has been removed or on which the serial number has been made illegible. Removing the serial number on any Product or rendering it illegible on any Product will immediately void the Limited Warranty for that Product; (ii) any damage whatsoever that occurs during shipment of the Product once the Product has been accepted by the Purchaser; (iii) any damage whatsoever resulting from any failure to follow operating, maintenance or environmental instructions contained in any instruction booklet or owner's manual available in connection with the Product; (iv) service fees for travel to islands and remote areas, which include but are not limited to, ferries, toll roads, or other travel expenses; (v) replacement of house fuses, fuse boxes, or resetting of circuit breakers; (vi) liability or responsibility for damage to surrounding property including cabinetry, floors, ceilings and other structures or objects; (vii) the cost of service calls for instructions, for the correction of installation errors, for customer adjustments that are explained in the Product owner's manual, or where the Product operates according to the Product's specifications. There may be a service charge for service calls made for issues not covered under this Limited Warranty; (viii) breakage, discoloration or damage to glass, metal surfaces, plastic components, trim, paint, or other cosmetic finish caused by improper usage, care, abuse, or neglect; (ix) except as noted above, consumable parts such as filters and light bulbs are not covered and are the responsibility of the Purchaser; (x) commercial, business, or rental use, or any application other than residential consumer use; (xi) colour variation due to differences in painted parts, kitchen lighting, product placement, and other factors;
We do not warrant or guarantee uninterrupted or error-free operation of the Product.
4. WHAT ARE THE LIMITATIONS ON IN-HOME WARRANTY SERVICE?
In-home service is subject to availability, and it is not available in all areas of Canada. In-home service will only be provided if the Product is unobstructed and easily accessible from floor level to service personnel. If repair cannot be completed during in-home service or if in-home service is not available in your area, you may be directed to deliver the Product to a Dacor Authorized Service Center for warranty service. The cost of transportation of the Product to and from a Dacor Authorized Service Centre shall be paid by the Purchaser unless we elect to provide that transportation at our discretion.
To receive in-home service, the Purchaser must first contact Dacor Customer Care for problem determination and service procedures. All in-home warranty repairs must be performed by a Dacor Authorized Service Center. Valid proof of purchase must be presented to us at the time that service is requested and before warranty services are rendered.
When in-home service is not available, the Purchaser must return the Product to a Dacor Authorized Service Center for analysis. Assistance on where to deliver the Product can be obtained by contacting our Customer Service center. The cost of transporting the Product to or from the Authorized Service Center must be paid by the Purchaser.
Warranty
5. WHAT ARE THE LIMITS OF OUR LIABILITY?
EXCEPT AS EXPRESSLY SET FORTH IN THIS LIMITED WARRANTY, OUR LIABILITY IS SUBJECT TO THE FOLLOWING LIMITATIONS:
(A) THE PURCHASER TAKES THE PRODUCT "AS IS" AND WE MAKE NO WARRANTY OR REPRESENTATION OF ANY KIND WHATSOEVER WITH RESPECT TO THE PRODUCT.
(B) THERE ARE NO CONDITIONS, EXPRESS OR IMPLIED, STATUTORY OR OTHERWISE, WITH RESPECT TO THE PRODUCT
(C) IN PARTICULAR, AND WITHOUT LIMITING THE GENERALITY OF THE FOREGOING PARAGRAPHS (A) AND (B), WE MAKE NO WARRANTY, CONDITION OR REPRESENTATION AS TO ANY OF THE FOLLOWING: (i) THE MERCHANTABILITY OF THE PRODUCT OR ITS FITNESS FOR ANY PARTICULAR PURPOSE OR USE; (ii) TITLE OR NON-INFRINGEMENT; (iii) DESIGN, CONDITION, QUALITY, OR PERFORMANCE OF THE PRODUCT; (iv) THE WORKMANSHIP OF THE PRODUCT OR THE COMPONENTS CONTAINED THEREIN; (v) COMPLIANCE OF THE PRODUCT WITH THE REQUIREMENTS OF ANY LAW, RULE, SPECIFICATION OR CONTRACT PERTAINING TO THE PRODUCT.
(D) NOTHING CONTAINED IN ANY INSTRUCTION MANUAL OR OWNER'S MANUAL SHALL BE CONSTRUED TO CREATE AN EXPRESS WARRANTY OF ANY KIND WHATSOEVER WITH RESPECT TO THE PRODUCT.
THE PROVISIONS FOUND IN PARAGRAPHS (E) AND (F) BELOW DO NOT APPLY IN CIRCUMSTANCES WHERE THIS LIMITED WARRANTY IS GOVERNED BY THE LAWS OF THE PROVINCE OF QUEBEC.
(E) ALL IMPLIED WARRANTIES AND CONDITIONS THAT MAY ARISE BY OPERATION OF LAW, INCLUDING ANY APPLICABLE IMPLIED WARRANTY OR CONDITION OF MERCHANTABILITY OR FITNESS FOR A PARTICULAR PURPOSE, ARE HEREBY LIMITED TO THE SAME DURATION OF TIME AS THIS LIMITED WARRANTY. SOME PROVINCES PROHIBIT LIMITATIONS ON HOW LONG AN IMPLIED WARRANTY LASTS, AND THE LIMITATION ON THE DURATION OF THE IMPLIED WARRANTY WILL NOT APPLY TO THE EXTENT THAT THE LIMITATION IS PROHIBITED BY APPLICABLE PROVINCIAL LAW.
English86
(F) WE SHALL NOT BE LIABLE FOR DAMAGES OF ANY KIND (INCLUDING, WITHOUT LIMITATION, ANY INCIDENTAL, SPECIAL, CONSEQUENTIAL OR SIMILAR DAMAGES) THAT RESULT OR ARISE DIRECTLY OR INDIRECTLY FROM ANY OF THE FOLLOWING: (i) THE PURCHASE, USE, OR MISUSE OF THE PRODUCT; (ii) ANY LOSS OF USE OF THE PRODUCT OR INABILITY TO USE THE PRODUCT; (iii) ANY BREACH OF THE EXPRESS WARRANTY; (iv) ANY LOSS OF ANTICIPATED PROFITS OR BENEFITS; (v) ANY LOSS OF FOOD OR CONSUMABLES; (vi) ANY TORT (INCLUDING NEGLIGENCE OR GROSS NEGLIGENCE) OR FAULT COMMITTED BY US, ITS AGENTS OR EMPLOYEES; (vii) ANY BREACH OF CONTRACT; (viii) ANY CLAIM BROUGHT AGAINST THE PURCHASER BY ANY OTHER PARTY. SOME PROVINCES PROHIBIT THE EXCLUSION OR LIMITATION OF INCIDENTAL OR CONSEQUENTIAL DAMAGES, AND THE ABOVE EXCLUSION OF INCIDENTAL OR CONSEQUENTIAL DAMAGES WILL NOT APPLY TO THE EXTENT THAT THE EXCLUSION IS PROHIBITED BY APPLICABLE PROVINCIAL LAW.
(G) THIS WARRANTY GIVES YOU SPECIFIC LEGAL RIGHTS, AND YOU MAY ALSO HAVE OTHER RIGHTS, WHICH VARY FROM PROVINCE TO PROVINCE. THIS LIMITED WARRANTY STATES THE PURCHASER'S EXCLUSIVE REMEDY. EXCEPT WHERE PROHIBITED BY APPLICABLE PROVINCIAL LAW, THIS LIMITED WARRANTY IS NOT TRANSFERABLE WITHOUT OUR EXPRESS CONSENT.
(H) IF ANY PORTION OF THIS LIMITED WARRANTY IS HELD ILLEGAL OR UNENFORCEABLE BY REASON OF ANY LAW, SUCH PARTIAL ILLEGALITY OR UNENFORCEABILITY SHALL NOT AFFECT THE ENFORCEABILITY FOR THE REMAINDER OF THIS LIMITED WARRANTY.
If the Product is purchased from a non-authorized reseller or distributor or purchased outside of Canada, this Limited Warranty does not apply except that the above limitations specified in Sections 5(A) through 5(I) shall apply.
Warrantor in Canada: Samsung Electronics Canada Inc., Mississauga, ON, L5N 0B9 Canada
OUTSIDE THE UNITED STATES AND CANADA:
TWO-YEAR LIMITED WARRANTY
If your Dacor product fails to function within two years of the original date of purchase due to a defect in material or workmanship, Dacor will furnish a new part, F.O.B. factory to replace the defective part.
All delivery, installation, labor costs, and other service fees are the responsibility of the purchaser.


DD68-00250L-00
dacor.

- Installation 11
- Before you start 35
- Operations 52
- Maintenance 64
- English
- Troubleshooting 69
- Cycle chart 76
- Appendix 79
- Warranty 80
- Safety information
- What you need to know about the safety instructions
- Important safety symbols
- WARNING
- CAUTION
- SAVE THESE INSTRUCTIONS
- California Proposition 65 Warning
- Before using your dishwasher
- Tip-Over Hazard
- Electric Shock Hazard
- Regulatory notice
- FCC Notice
- FCC CAUTION:
- FCC STATEMENT:
- IC Notice
- Open Source Announcement
- Installation
- What's included
- Installation kit (not provided)
- NOTE
- Tools required (not provided)
- Unpacking
- Installation requirements
- Power supply
- Grounding
- Water supply
- To reduce a risk of leaks:
- Flooring
- Dimensions and specifications
- Step-by-step installation
- STEP 1 Select a location
- STEP 2 To replace the rear foot
- STEP 3 Connect the hot water line
- STEP 4 Arrange the hoses
- STEP 5 Install the custom panel
- STEP 7 Level the dishwasher
- STEP 8 Secure the dishwasher
- Correct positioning
- To the countertop
- STEP 9 Connect the drain hose
- STEP 10 Final check
- To fix leaks
- Kick plate
- Before you start
- Basic use of racks
- Angle of the plate supports
- Height adjustment
- To raise the upper rack
- To lower the upper rack
- Loading precautions
- Unsuitable items for the dishwasher
- Loading dishes
- Using the glass support
- 3rd rack
- Loading the Cutlery rack
- Detergent compartment
- Rinse aid reservoir
- Filling the rinse aid
- Salt storage
- Filling the salt storage
- Salt notice
- Operations
- Touchpad responsiveness
- Control panel
- Indicators
- Cycle overview
- Download Cycle
- Simple steps to start your dishwasher
- Settings
- Sound
- Auto Release™ Dry alert
- Rinse aid amount
- Water Hardness
- Auto Release™ Dry
- Using the switch Keys :
- Sabbath mode
- SmartThings
- Wi-Fi connection
- Download
- Log in
- To register your device to SmartThings
- Maintenance
- Cleaning
- Exterior
- Interior
- Nozzles
- Top nozzle
- Upper nozzle
- Lower nozzle
- Internal Cleaning
- Filter
- Cleaning the drain pump
- Long-term care
- Troubleshooting
- Checkpoints
- Information codes
- Cycle chart
- Appendix
- Helping the environment
- Specifications
- Warranty
- Customer Service
- United States - Warranty
- CERTIFICATE OF WARRANTY ON DACOR DISHWASHER - UNITED STATES:
- FULL TWO-YEAR WARRANTY
- LIMITED WARRANTY
- COVERAGE LIMITATIONS
- CANADA - Warranty
- CERTIFICATE OF WARRANTY ON DACOR DISHWASHER - CANADA:
- WHAT IS COVERED AND FOR HOW LONG
- COVERAGE LIMITATIONS
- WHAT IS NOT COVERED
- WHAT ARE THE LIMITATIONS ON IN-HOME WARRANTY SERVICE?
- WHAT ARE THE LIMITS OF OUR LIABILITY?
- OUTSIDE THE UNITED STATES AND CANADA:
- TWO-YEAR LIMITED WARRANTY
Brand : Dacor
Model : DDW24G9000AP
Category : Washing machine