
S713N60X1G - Dishwasher NEFF - Free user manual and instructions
Find the device manual for free S713N60X1G NEFF in PDF.


| Product Type | Dishwasher |
| Brand | Neff |
| Model | S713N60X1G |
| Width | 60 cm |
| Height | 81.5 cm |
| Depth | 57 cm |
| Weight | Approx. 45 kg |
| Energy Efficiency Class | A++ |
| Water Consumption per Cycle | 9.5 L |
| Noise Level | 44 dB(A) |
| Place Settings | 13 |
| Programs | Eco, Intensive, Quick, Delicate, Auto, Glass, Pre-rinse |
| Main Functions | AquaStop, Load sensor, VarioSpeed, Time delay, Half load |
| Safety Features | Water protection system, child lock, overflow protection |
| Maintenance | Clean filters regularly, rinse aid refill, salt refill, descaling |
| Spare Parts Availability | Filters, spray arms, racks, detergent dispenser, door seal |
| Repairability Index | 7.5/10 |
| Power Supply | 220-240 V, 50 Hz, 10 A |
| Year of Manufacture | 2021 |
| Manual Language | English |
Frequently Asked Questions - S713N60X1G NEFF
User questions about S713N60X1G NEFF
0 question about this device. Answer the ones you know or ask your own.
Ask a new question about this device
Download the instructions for your Dishwasher in PDF format for free! Find your manual S713N60X1G - NEFF and take your electronic device back in hand. On this page are published all the documents necessary for the use of your device. S713N60X1G by NEFF.
USER MANUAL S713N60X1G NEFF
Dishwasher
User manual
S...
en
Table of contents
Safety 4
General information 4
Intended use.... 4
Restriction on user group...... 4
Safe installation.... 5
Safe use 6
Damaged appliance.... 8
Risk to children.... 9
Safety systems.... 10
Preventing material damage...... 11
Safe installation.... 11
Safe use 11
Childproof lock 1 12
Door lock.... 12
Environmental protection and saving energy 13
Disposing of packaging 13
Saving energy.... 13
AquaSensor 1 13
Installation and connection ...... 13
Scope of supply.... 13
Installing and connecting the appliance.... 14
Drainage connection.... 14
Drinking water connection.... 14
Electrical connection.... 15
Familiarising yourself with your appliance 16
Appliance 16
Controls.... 17
Programmes 19
Information for test institutes ...... 21
Additional functions 21
Features...... 22
Top basket 22
Bottom basket 23
Cutlery basket 24
Cutlery drawer 24
Etagere.... 25
Folding prongs 25
Small items holder 26
Knife shelf 26
Basket heights.... 26
Before using for the first time...... 27
Performing initial start-up 27
Water softening system.... 27
Overview of water hardness settings 27
Setting water softening system...... 28
Special salt 28
Switching off water softening system.... 29
Regeneration of the water softening system 29
Rinse aid system 30
Rinse aid 30
Setting the amount of rinse aid ..... 30
Switching rinse aid system off ..... 30
Detergent.... 31
Suitable detergents 31
Unsuitable detergents 32
Information on detergents 32
Adding detergent 32
Tableware 33
Damage to glass and tableware ..... 33
Arranging tableware.... 34
Removing tableware 35
Basic operation 35
Opening appliance door 35
Switching on appliance 35
Setting a programme 35
Setting additional functions ...... 36 Setting timer programming...... 36 Starting the programme 36 Interrupting programme 36 Terminate programme 36 Switching off appliance 36
Basic settings.... 38
Overview of basic settings 38
Changing basic settings.... 39
Cleaning and servicing.... 40
Cleaning the tub 40
Self-cleaning interior 1 40
Cleaning products 40
Tips on appliance care 40
Easy Clean 40
Filter system 41
Cleaning spray arms.... 42
Troubleshooting 43
Appliance safety 43
Error code / Fault display / Signal ... 43
Washing results 45
Information on display panel 51
Malfunctions 51
Mechanical damage 52
Noise.... 53
Clean wastewater pump.... 54
Transportation, storage and disposal.... 54
Removing the appliance 54
Protect appliance from frost 54
Transporting the appliance...... 55
Disposing of old appliance 55
Customer Service 55
Product number (E-Nr.) and production number (FD)...... 56
AQUA-STOP guarantee 1 ...... 56
Technical data 56

Safety
Please read the safety information to ensure that you use the appliance safely.
General information
You can find general information about this instruction manual here.
- Read this instruction manual carefully. Only this ensures you will use the appliance safely and efficiently. ■ This manual is intended for the user of the appliance. ■ Follow the safety instructions and warnings.
- Keep the instruction manual and the product information safe for future reference or for the next owner.
- Check the appliance after unpacking it. Do not connect the appliance if it has been damaged in transit.
Intended use
Please read the information on intended use to ensure you use the appliance correctly and safely.
Only use this appliance:
■ As specified in this instruction manual. ■ For cleaning household tableware. ■ In private households and in enclosed spaces in a domestic environment. ■ Up to an altitude of max. 4000 m above sea level.
Restriction on user group
Avoid risks to children and vulnerable persons.
This appliance may be used by children aged 8 or over and by people who have reduced physical, sensory or mental abilities or inadequate experience and/or knowledge, provided that they are supervised or have been instructed on how to use the appliance safely and have understood the resulting dangers.
Do not let children play with the appliance.
Cleaning and user maintenance must not be performed by children unless they are being supervised.
Keep children under the age of 8 years away from the appliance and power cable.
Safe installation
Follow these safety instructions when installing the appliance.
⚠ WARNING – Risk of injury!
Improper installation may cause injury.
- When installing and connecting the appliance, follow the instructions in the manual and installation instructions.
⚠ WARNING – Risk of electric shock!
Improper installation is dangerous.
- Connect and operate the appliance only in accordance with the specifications on the rating plate.
- Connect the appliance to a power supply with alternating current only via a properly installed socket with earthing.
- The protective conductor system of the domestic electrical installation must be properly installed.
▶ Never equip the appliance with an external switching device, e.g. a timer or remote control.
- When the appliance is installed, the mains plug of the power cord must be freely accessible. If free access is not possible, an all-pole isolating switch must be installed in the permanent electrical installation according to the installation regulations.
- When installing the appliance, check that the power cable is not trapped or damaged.
⚠ WARNING – Risk of fire!
It is dangerous to use an extended power cord and non-approved adapters.
▶ Do not use extension cables or multiple socket strips. ▶ If the power cord is too short, contact Customer Service. ▶ Only use adapters approved by the manufacturer.
⚠ WARNING – Risk of electric shock!
Cutting through the supply hose or immersing the Aqua-Stop valve in water is dangerous.
▶ Never immerse the plastic housing in water. The plastic housing on the supply hose contains an electric valve. ▶ Never cut through the supply hose. The supply hose contains electric power cables.
⚠ WARNING – Risk of injury!
Hinges move when opening and closing the appliance door and can cause injury.
▶ If built-under or integrable appliances are not in a cavity so that one side is accessible, the hinge area must be covered at the side. Covers are available from Customer Service or specialist outlets.
⚠ WARNING – Risk of tipping!
Improper installation may cause the appliance to tip up.
▶ Only install built-under or integrable appliances under a continuous worktop that is securely connected to adjacent cabinets.
⚠ WARNING – Risk of burns!
If the appliance is not installed properly, this may result in burns.
- With free-standing appliances, ensure that they are installed with the back panel against a wall.
Safe use
Follow these safety instructions when using the appliance.
⚠ WARNING – Risk of serious harm to health!
Failure to comply with safety instructions and directions for use on packagings of detergent and rinse aid products may cause serious harm to health.
▶ Follow the safety instructions and directions for use on the packagings of detergent and rinse aid products.
⚠ WARNING – Risk of explosion!
Adding solvents to the interior of the appliance may cause explosions.
Never add solvents to the interior of the appliance.
Highly caustic alkaline or highly acidic cleaning agents in conjunction with aluminium parts in the interior of the appliance may cause explosions.
Never use highly caustic alkaline or highly acidic cleaning agents, in particular commercial or industrial products, e.g. for the Machine Care programme, in conjunction with aluminium parts.
Do not put any aluminium parts in the interior of the appliance.
⚠ WARNING – Risk of injury!
Leaving the appliance door open may result in injury.
Only open the appliance door to load or unload tableware in order to prevent accidents, e.g. through tripping.
Do not sit or stand on the appliance door when open.
Knives and utensils with sharp points can cause injuries.
Arrange knives and utensils with sharp points in the cutlery basket with the points downwards, on the knife shelf or in the cutlery drawer.
⚠ WARNING – Risk of scalding!
If you open the appliance door while the programme is running, hot water may splash out of the appliance.
Open the appliance door carefully if the programme is still running.
⚠ WARNING – Risk of tipping!
Overfilling the Baskets may cause the appliance to tip up.
▶ Never overfill the Baskets with free-standing appliances.
⚠ WARNING – Risk of electric shock!
■ An ingress of moisture can cause an electric shock.
▶ Only use the appliance in enclosed spaces.
▶ Never expose the appliance to intense heat or humidity.
en Safety
- Do not use steam- or high-pressure cleaners to clean the appliance.
■ If the insulation of the power cord is damaged, this is dangerous.
▶ Never let the power cord come into contact with hot appliance parts or heat sources. ▶ Never let the power cord come into contact with sharp points or edges. ▶ Never kink, crush or modify the power cord.
Damaged appliance
Follow the safety instructions if the appliance is damaged.
⚠ WARNING – Risk of electric shock!
■ If the appliance or the power cord is damaged, this is dangerous.
▶ Never operate a damaged appliance. ▶ Never operate an appliance with a cracked or fractured surface. ▶ Never pull on the power cord to unplug the appliance. Always unplug the appliance at the mains. ▶ If the appliance or the power cord is damaged, immediately unplug the power cord or switch off the fuse in the fuse box and turn off the water tap. ▶ Call Customer Service. → Page 55 ▶ Repairs to the appliance should only be carried out by trained specialist staff.
■ Improper repairs are dangerous.
▶ Repairs to the appliance should only be carried out by trained specialist staff.
▶ Only use genuine spare parts when repairing the appliance.
▶ If the power cord of this appliance is damaged, it must be replaced with a special connection cable, which is available from the manufacturer or his Customer Service.
Risk to children
Follow the safety instructions if there are children in your home.
⚠ WARNING – Risk of suffocation!
■ Children may put packaging material over their heads or wrap themselves up in it and suffocate. - Keep packaging material away from children. ▶ Do not let children play with packaging material. ■ Children may breathe in or swallow small parts, causing them to suffocate. - Keep small parts away from children. ▶ Do not let children play with small parts.
⚠ WARNING – Risk of harm to health!
Children can lock themselves in the appliance, thereby putting their lives at risk.
- With redundant appliances, unplug the power cord. Then cut through the cord and damage the lock on the appliance door beyond repair so that the appliance door will no longer close.
⚠ WARNING – Risk of crushing!
With higher-level appliances, children can become crushed between the appliance door and cabinet doors underneath.
- Keep an eye on children when opening and closing the appliance door.
⚠ WARNING – Risk of chemical burns!
Rinse aid and detergent may cause chemical burns to the mouth, throat and eyes.
- Keep children away from detergent and rinse aid products.
- Keep children away from the appliance when open. The water in the interior of the dishwasher is not drinking water. It may contain residues of detergents and rinse aid.
Safety
⚠ WARNING – Risk of injury!
Children may get their fingers caught in the slots of the tablet collecting tray and injure themselves.
- Keep children away from the appliance when open.
⚠ WARNING – Risk of suffocation!
Children may become trapped in the appliance and suffocate.
▶ Use the childproof lock if fitted.
▶ Never let children play with or operate the appliance.
Safety systems
Protect children from possible hazards resulting from the appliance.
Depending on the features of the model, the appliance comes with a
→ "Childproof lock", Page 12.
Preventing material damage
Follow these instructions to prevent material damage to your appliance, accessories or other objects in your kitchen.
Safe installation
Follow the instructions when installing the appliance.
ATTENTION!
■ Improper installation of the appliance may cause damage.
If the dishwasher is installed above or below other domestic appliances, follow the information on installation in combination with a dishwasher in the installation instructions for the individual appliances. If there is no information or if the installation instructions do not include the relevant information, contact the manufacturer of these appliances to check that the dishwasher can be installed above or below these appliances. ▶ If no information is available from the manufacturer, the dishwasher should not be installed above or below such appliances. ▶ To ensure the safe operation of all domestic appliances, continue following the installation instructions for the dishwasher. - Do not install the dishwasher under a hob. - Do not install the dishwasher near heat sources, e.g. radiators, heat storage tanks, ovens or other appliances that generate heat.
■ Modified or damaged water hoses may result in material damage and damage to the appliance.
▶ Never kink, crush, modify or cut through water hoses. ▶ Only use the water hoses supplied with the appliance or genuine spare hoses. ▶ Never re-use water hoses that have been used before.
■ If the water pressure is too high or too low, this may impair functioning of the appliance.
▶ Make sure that the water pressure in the water supply system is min. 50 kPa (0,5 bar) and max. 1000 kPa (10 bar). - If the water pressure exceeds the maximum value specified, a pressure-reducing valve must be installed between the drinking water connection and the hose set of the appliance.
Safe use
Follow the instructions when using the appliance.
ATTENTION!
■ Escaping water vapour can damage fitted units.
- When the programme ends, leave the appliance to cool down for a while before opening the door.
■ Special salt can damage the tub due to corrosion.
- To make sure that any special salt that escapes is washed out of the tub, add the special salt to the dispenser for special salt immediately before the programme starts.
■ Detergent may damage the water softening system.
▶ Only fill the dispenser of the water softening system with special dishwasher salt.
en Childproof lock
■ Unsuitable cleaning agents may damage the appliance.
- Do not use a steam cleaner. - So as not to scratch the finish on the appliance, do not use sponges with a rough surface or abrasive cleaning agents.
- To prevent corrosion, do not use sponge cloths on dishwashers with a stainless steel front or rinse such cloths thoroughly several times before using them for the first time.
Childproof lock 1
The childproof lock lets you protect children from possible hazards resulting from the appliance.
Depending on the features of the model, the appliance comes with a door lock.
Door lock
The door lock is a mechanical safety system and makes it more difficult to open the appliance door.
You can activate or deactivate the door lock.
WARNING
Risk of suffocation!
Children may become trapped in the appliance and thus suffocate.
▶ Activate the door lock and close the appliance door.
→ "Opening appliance door", Page 35
Activating the door lock
Note: The door lock remains activated until it is deactivated manually.
- Open the appliance door.
- Pull the catch of the childproof lock forwards ① and close the appliance door ②

Deactivating the door lock
- Open the appliance door.
- Push the catch of the childproof lock to the right ① and slide it backwards ②.

- Close the appliance door.
Environmental protection and saving energy
Help protect the environment by using your appliance in a way that conserves resources and by disposing of re-usable materials properly.
Disposing of packaging
The packaging materials are environmentally compatible and can be recycled.
- Sort the individual components by type and dispose of them separately. Information about current disposal methods is available from your specialist dealer or local authority.
Saving energy
If you follow these instructions, your appliance will use less electricity and less water.
Use the Eco 50° programme.
- The Eco 50° programme is energy efficient and environmentally friendly. → "Programmes", Page 19
If you do not have much tableware to wash, use the additional Half Load function. 1
+ The programme will adjust to a lower load and consumption will be reduced.
→ "Additional functions", Page 21
AquaSensor 1
The AquaSensor is an optical measuring device (light barrier) which measures the turbidity of the washing water. You can save water with the AquaSensor.
Use of the AquaSensor depends on the programme. If the soiling level is low, the washing water is used in the next wash cycle, so reducing water consumption by 3-6 litres. If the soiling level is greater, the washing water is drained off and replaced with fresh water. In the automatic programmes the temperature and running time are additionally adjusted to the level of soiling.
Installation and connection
To ensure proper operation, connect the appliance to the power and water supply correctly. Observe the specified criteria and the installation instructions.
Scope of supply
After unpacking all parts, check for any damage in transit and completeness of the delivery.
If you have any complaints, contact the dealer who sold you the appliance or our Customer Service.
Note: The appliance was tested at the factory to check it is in working order. It is possible that water has left marks on the appliance. These marks will disappear after the first wash cycle.
The delivery consists of the following:
■ Dishwasher ■ Instruction manual ■ Installation instructions ■ Warranty 1
en Installation and connection
■ Installation material ■ Steam guard plate 1 ■ Rubber apron ■ Mains cable ■ Quick reference guide
Installing and connecting the appliance
You can position your built-under or integrable appliance in a fitted kitchen between wooden and plastic walls. If you subsequently install your dish-washer as a free-standing appliance, you must stop it from tipping over, e.g. by screwing it to the wall or installing it under a continuous worktop that is securely connected to adjacent cabinets.
- Follow the safety instructions. → Page 4
- Follow the instructions for electrical connection. → Page 15
- Check the Scope of supply → Page 13 and the condition of the appliance.
- Consult the installation instructions for the installation dimensions required.
- Make the appliance level using the height-adjustable feet. Make sure that the appliance is standing on the floor securely.
- Install the drainage connection. → Page 14
- Install the drinking water connection. → Page 14
- Connect the appliance to the electricity supply.
Drainage connection
Connect your appliance to drainage connection so dirty water is discharged via the wash cycle.
Installing the drainage connection
- Consult the installation instructions supplied for the steps required here.
- Connect the wastewater hose to the outlet connection of the siphon using the enclosed parts.
- When doing so, check that the wastewater hose is not kinked, crushed or twisted.
- Also check that there is no cover in the drainage system preventing the wastewater from being discharged.
Drinking water connection
Connect your appliance to a drinking water connection.
Installing the drinking water connection
Note: If you are replacing the appliance, you must use a new water supply hose.
- Consult the installation instructions supplied for the steps required here.
- Connect the appliance to the drinking water connection using the enclosed parts. Observe the Technical data → Page 56.
- When doing so, check that the drinking water connection is not kinked, crushed or twisted.
Electrical connection
Connect your appliance to the power supply.
Connecting the appliance to the electricity supply
Notes
■ Follow the Safety instructions → Page 5. ■ Connect the appliance to alternating current only, in the range of 220 - 240 V and 50 Hz or 60 Hz. ■ Please note that the water safety system is only functional if there is a power supply.
- Insert the non-heating appliance plug of the power cable into the appliance.
- Insert the mains plug of the appliance into a nearby socket. The connection data for the appliance can be found on the rating plate.
- Check that the mains plug is inserted properly.
Familiarising yourself with your appliance
Familiarise yourself with the parts of your appliance.
Appliance
You can find an overview of the parts of your appliance here.

1
Rating plate Rating plate with E number and FD number → Page 56.
The data you need for Customer Service → Page 55.
| 2 | Detergent dispenser Detergent → Page 31 is added to the detergent dispenser. | |
| 3 | Bottom basket Bottom basket → Page 23 | |
| 4 | Dispenser for special salt Add special salt for the Water softening system → Page 27 to the dispenser for special salt. | |
| 5 | Lower spray arm The lower spray arm washes the tableware in the bottom basket.If the tableware has not been washed properly, clean the spray arms.→ "Cleaning spray arms", Page 42 | |
| 6 | Tablet collecting tray During the wash cycle tablets automatically fall out of the detergent dispenser into the tablet collecting tray where they can fully dissolve. | |
| 7 | Top basket Top basket → Page 22 | |
| 8 | Cutlery drawer1 | Cutlery drawer → Page 24 |
| 9 | EmotionLight1 | Interior lighting of the appliance.→ "Overview of basic settings", Page 38 |
| 10 | Etagere Etagere → Page 25 | |
| 11 | Upper spray arm The upper spray arm washes the tableware in the top basket.If the tableware has not been washed properly, clean the spray arms.→ "Cleaning spray arms", Page 42 | |
| 12 | Filter system Filter system → Page 41 | |
| 13 | Cutlery basket1 | Cutlery basket → Page 24 |
| 14 | Dispenser for rinse aid | Add rinse aid for the Rinse aid system → Page 30 to the dispenser for rinse aid. |
1 Depending on the appliance specifications
Controls
The controls are used to configure all functions of your appliance and to obtain information about the operating status.
With some buttons you can perform different functions.
en Familiarising yourself with your appliance
| 1 | ON/OFF button ① | Switching on the appliance → Page 35 Switching off the appliance → Page 36 |
| 2 | Programme buttons Programmes → Page 19 | |
| 3 | Water supply display Display for water supply lights up → Page 44 | |
| 4 | Special salt refill indicator Water softening system → Page 27 | |
| 5 | Rinse aid refill indicator Rinse aid system → Page 30 | |
| 6 | Programme buttons and additional functions | Programmes → Page 19 Additional functions → Page 21 |
| 7 | Start button Start reset button Reset 3 sec. | Starting the programme → Page 36 Terminating the programme → Page 36 |
| 8 | Timer programming Setting timer programming → Page 36 | |
| 9 | Door opener¹ | Opening the appliance door → Page 35 |
| 10 | Display The display shows information about the remaining running time or the basic settings. You can change the basic settings via the display and the setting buttons. → "Changing basic settings", Page 39 | |
1 Depending on the appliance specifications
Programmes
You can find an overview of the programmes that can be selected here.
Different programmes, which can be found on the control panel of your appliance, are available depending on the appliance configuration.
The running time may vary depending on the programme selected. The running time depends on the water temperature, the quantity of tableware, the level of soiling and the Additional func-
tion → Page 21 selected. The running time will change if the rinse aid system is switched off or rinse aid needs to be added.
The consumption values can be found in the quick reference guide. The consumption values relate to normal conditions and a water hardness of 16 - 20°
°E. Different influencing factors such as water temperature or pipe pressure may result in deviations.
Programme Use Programme sequence Additional functions
| Chef 70 | Tableware: Washing pots and pans, non-fragile tableware and cutlery.Level of soiling:Removing stubborn burned or dried-on food remnants containing starch and protein.When using powder detergent, you can also apply a little to the inside of the appliance door. | Intensive: PreRinseCleaning 70 °CIntermediate rinseRinsing 72 °CDrying | All→ "Additional functions",Page 21 |
| Auto45-65° | Tableware: Cleaning mixed tableware and cutlery.Level of soiling:Removing common household food remnants lightly dried-on. | Sensor-controlled: Optimised by sensors depending on the soiling of the washing water. | All→ "Additional functions",Page 21 |
| Eco50° | Tableware: Cleaning mixed tableware and cutlery.Level of soiling:Removing common household food remnants lightly dried-on. | Most economical pro-gramme: Pre-RinseCleaning 50 °CIntermediate rinseRinsing 66 °CDrying | All→ "Additional functions",Page 21 |
| Programme Use Programme sequence Additional functions | ||||
 SilenceSilence 50 SilenceSilence 50 | Tableware:■ Cleaning mixed table-ware and cutlery.Level of soiling:■ Removing common household food remnants lightly dried-on. | Reduced noise:■ PreRinse■ Cleaning 50 °C■ Intermediate rinse■ Rinsing 65 °CDrying | IntensiveZoneHalf LoadHygienePlusExtraDryShine & Dry→ "Additional functions",Page 21 | |
 Glass 40° Glass 40° | Tableware:■ Cleaning delicate tableware, cutlery, temperature-sensitive plastics, glasses and stemware in the stemware basket.Level of soiling:■ Removing lightly adhering fresh food remnants. | Particularly gentle:■ PreRinse■ Cleaning 40 °C■ Intermediate rinse■ Rinsing 60 °CDrying | IntensiveZoneVarioSpeedPlusHalf LoadExtraDryShine & Dry→ "Additional functions",Page 21 | |
 Quick 65° Quick 65° | Tableware:■ Cleaning mixed table-ware and cutlery.Level of soiling:■ Removing common household food remnants lightly dried-on. | Time-optimised:■ Cleaning 65 °C■ Intermediate rinse■ Rinsing 70 °CDrying | ExtraDryShine & Dry→ "Additional functions",Page 21 | |
 1 hr Programme 1 hr Programme | Tableware:■ Cleaning mixed table-ware and cutlery.Level of soiling:■ Removing common household food remnants lightly dried-on. | Time-optimised:■ Cleaning 65 °C■ Intermediate rinse■ Rinsing 70 °CDrying | ExtraDryShine & Dry→ "Additional functions",Page 21 | |
| [4BSA]Quick 45° | Tableware:■ Cleaning delicate tableware, cutlery, temperature-sensitive plastics and glasses.Level of soiling:■ Removing lightly adhering fresh food remnants. | Time-optimised:■ Cleaning 45 °C■ Intermediate rinse■ Rinsing 55 °C | ExtraDryShine & Dry→ "Additional functions",Page 21 | |
Programme Use Programme sequence Additional functions
| Tableware:■ Cleaning all types of tableware. | Cold rinse suitable:■ Pre-Rinse | None | |
| PreRinse | Level of soiling:■ Cold rinsing, intermediate cleaning. | ||
| Easy Clean | - Machine Care 70 °C None | ||
| Easy Clean |
Information for test institutes
Test institutes are provided with information for comparability tests, e.g. according to EN60436.
These are the conditions for conducting the tests, however they are not the results or consumption values.
E-mail enquiries to: dishwasher@test-appliances.com
The product number (E-Nr.) and the production number (FD) are required here. They can be found on the rating plate on the appliance door.
Additional functions
You can find an overview of the additional functions that can be selected here. Different additional functions, which can be found on the control panel of your appliance, are available depending on the appliance configuration.
Additional func- Use tion
| L+ |
| VarioSpeedPlus |
■ The running time is shortened by 20% to 66% depending on the washing programme.
■ Energy and water consumption are increased.
| Additional function | Use |
| Half Load | Switch on with small loads.It is recommended adding less detergent to the detergent dispenser than for a full machine load.The running time is shortened.Energy and water consumption are reduced. |
| HygienePlus | To ensure a higher hygiene status for the appliance and tableware, the temperature is raised and maintained for an extra-lengthy period.Especially suitable for cleaning chopping boards or baby bottles.Continuous use of this function increases the hygiene status.This will increase the running time and energy consumption. |
| IntensiveZone | Switch on with mixed loads containing tableware with different soil-ing levels, e.g. place very soiled pots and pans in the bottom basket and normally soiled tableware in the top basket.The spray pressure in the bottom basket is increased and the maximum programme temperature held longer. This will increase the running time and energy consumption. |
| ExtraDry | For a better drying result the final rinse temperature is increased and the drying phase extended.Especially suitable for drying plastic parts.There is a slight increase in energy consumption and the running time is extended. |
| Shine & Dry | To avoid marks and improve drying, the quantity of water is increased and the drying phase extended.Energy consumption increases.Use rinse aid. |
Features
You can find an overview of the possible features of your appliance and how to use them here.
These features depend on the model of your appliance.
Top basket
Arrange cups and glasses in the top basket.

Knife shelf a 1
You can adjust the height of the top basket to make room for larger items of tableware.
Adjusting top basket with side levers
To wash large items of tableware in the baskets, adjust the shelf position of the top basket.
- Pull out the top basket.
- To prevent the basket from suddenly dropping down, hold the side of the basket by the top edge.
- Press in the levers on the right and left on the outside of the basket.

The basket can then slip down slightly.
- Raise or lower the basket evenly to the right level.
→ "Basket heights", Page 26

Check that the basket is level on both sides.
- Slide the basket back in.
Adjusting top basket with pairs of rollers
To wash large items of tableware in the baskets, adjust the shelf position of the top basket.
- Pull out the top basket.
- Remove the basket.

- Insert the basket at the right basket height.
→ "Basket heights", Page 26

Check that the basket is level on both sides.
- Slide the basket back in.
Bottom basket
Arrange pans and plates in the bottom basket.
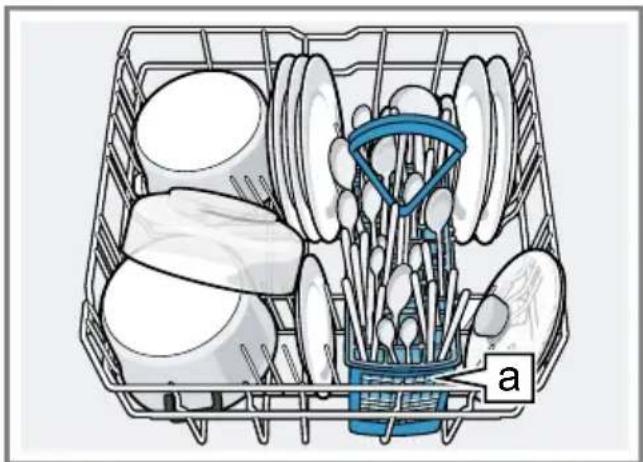
Cutlery basket a 1
Large plates up to a diameter of 31/34 cm¹ can be arranged as shown.

Cutlery basket
Arrange cutlery in the cutlery basket, always without sorting it and with the sharp points downwards.
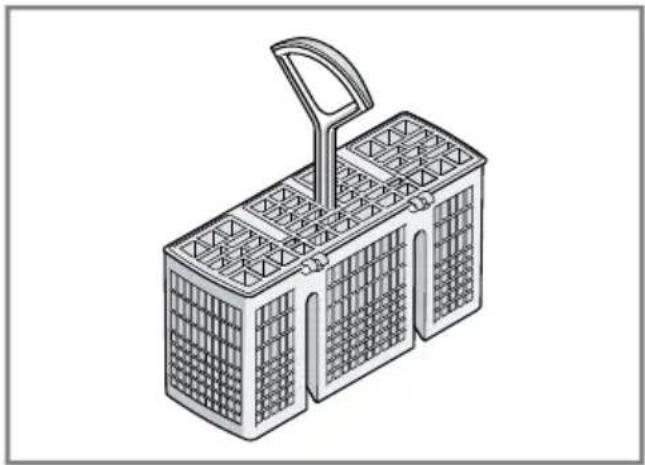
Cutlery drawer
Arrange cutlery in the cutlery drawer.

Arrange cutlery with the points and sharp edges downwards.
You can reorganise the cutlery drawer to make more space for longer/wider items of cutlery.¹
Reorganising cutlery drawer¹
You can fold down the side shelves and front prongs to make more space for longer/wider items of cutlery.
- To fold down a side shelf, push the lever forwards ① and fold down the side shelf ②
- To fold down the front prongs, push the lever forwards and fold down the prongs③

Tip
If you want to return the cutlery drawer to the original position, fold the side shelf back up until it clicks into position.

Shelf
Use the shelf and space underneath for small cups and glasses or for large items of cutlery, e.g. wooden spoons or serving cutlery.

You can adjust the height of the etagere. 1
If you do not need the etagere, you can fold it up.
Adjusting etagere 1
You can adjust the height of the etagere.
- Position the etagere vertically and pull it upwards ①

- Position the etagere at a slight angle and move to the right height ②
- Push the etagere down.
√ The etagere clicks into position.
Folding prongs
Use the folding prongs to position tableware securely, e.g. plates.
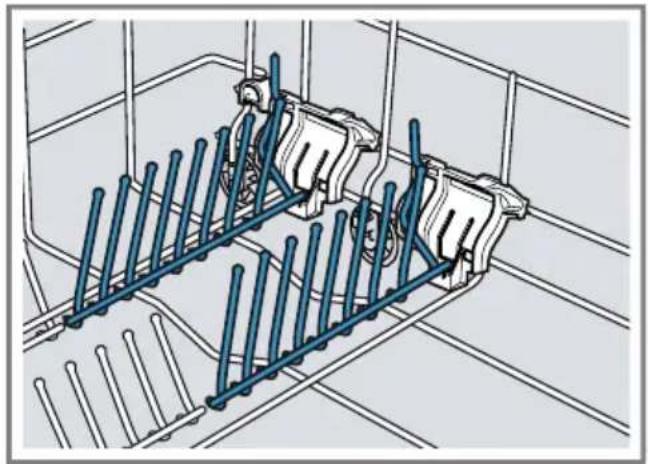
You can fold the prongs down to position pans, bowls and glasses better. 1
Folding down prongs 1
If you do not need the prongs, fold them down.
- Push the lever forwards ① and fold down the prongs ②

- To use the folding prongs again, fold them back up.
The folding prongs click into position.
Features
Small items holder
Use the small items holder to position small items of tableware, e.g. light plastic parts.

Knife shelf
Use the knife shelf for long, sharp objects and long items of cutlery.

Basket heights
Set the baskets at the right height.
Appliance height 81.5 cm with cutlery basket
| Level Top basket Bottom basket | |
| 1 max. ø 22 cm 31 cm | |
| 2 max. ø 24.5 cm 27.5 cm | |
| 3 max. ø 27 cm 25 cm | |
Appliance height 81.5 cm with cutlery drawer
| Level Top basket Bottom basket | |
| 1 max. ø 16 cm 31 cm | |
| 2 max. ø 18.5 cm 27.5 cm | |
| 3 max. ø 21 cm 25 cm | |
Appliance height 86.5 cm with cutlery basket
| Level Top basket Bottom basket | |
| 1 max. ø 24 cm 34 cm | |
| 2 max. ø 26.5 cm 30.5 cm | |
| 3 max. ø 29 cm 28 cm | |
Appliance height 86.5 cm with cutlery drawer
| Level Top basket Bottom basket | |
| 1 max. ø 18 cm 34 cm | |
| 2 max. ø 20.5 cm 30.5 cm | |
| 3 max. ø 23 cm 28 cm | |
Before using for the first time
Configure the settings for initial start-up.
Performing initial start-up
On initial start-up or after a reset to the factory settings, you will need to make settings.
Requirement: The appliance has been installed and connected. → Page 13
- Add special salt. → Page 28
- Add rinse aid. → Page 30
- Switch on the appliance. → Page 35
- Set the water softening system. → Page 28
- Set the amount of rinse aid to be dispensed. → Page 30
Tip: You can change these settings and other Basic settings → Page 38 at any time.
Water softening system
Hard water leaves limescale on the tub and tableware and parts of the appliance may become blocked.
To ensure good dishwashing results, you can treat the water with special salt and the water softening system. To avoid damage to the appliance, water with a hardness above 9 °E must be softened.
Overview of water hardness settings
You can find an overview of the water hardness values that can be selected here. You can find out how hard your water is from your local water company or by using a water hardness tester.
| Water hardness °E Hardness range mmol/l Setting value |
| 0 - 8 Soft 0 - 1.1 H:00 |
| 9 - 10 Soft 1.2 - 1.4 H:01 |
| 11 - 12 Medium 1.5 - 1.8 H:02 |
| 13 - 15 Medium 1.9 - 2.1 H:03 |
| 16 - 20 Medium 2.2 - 2.9 H:04 |
| 21 - 26 Hard 3.0 - 3.7 H:05 |
| 27 - 38 Hard 3.8 - 5.4 H:06 |
| 39 - 62 Hard 5.5 - 8.9 H:07 |
Note: Set the water hardness determined on your appliance.
→ "Setting water softening system", Page 28
With a water hardness of 0 - 8 °E you can dispense with special salt and switch off the water softening system.
→ "Switching off water softening system", Page 29
Setting water softening system
Set the water hardness on your appliance.
- Determine the water hardness and the appropriate setting value. → "Overview of water hardness settings", Page 27
- Press ①
- Hold programme button A and press Start repeatedly until the display shows H:xx.
- Release programme button A and Start.
√ Programme button A flashes and the display shows H:04.
- Press programme button C repeatedly until the right water hardness has been set.
- Press Start to save the setting.
Special salt
You can use special salt to soften water.
Adding special salt
If the special salt refill indicator lights up, add special salt to the dispenser for special salt just before the programme starts. The amount of special salt required depends on the water hardness: the higher the water hardness, the greater the amount of special salt required.
ATTENTION!
■ Detergent may damage the water softening system. ▶ Only fill the dispenser of the water softening system with special dishwasher salt. ■ Special salt can damage the tub due to corrosion. To make sure that any special salt that escapes is washed out of the tub, add the special salt to the dispenser for special salt immediately before the programme starts.
- Unscrew the lid of the dispenser for special salt and remove.
- On initial start-up: Fill the dispenser right up with water.
- Note: Only use special salt for dishwashers.
Do not use salt tablets.
Do not use table salt.
Add the special salt to the dispenser.
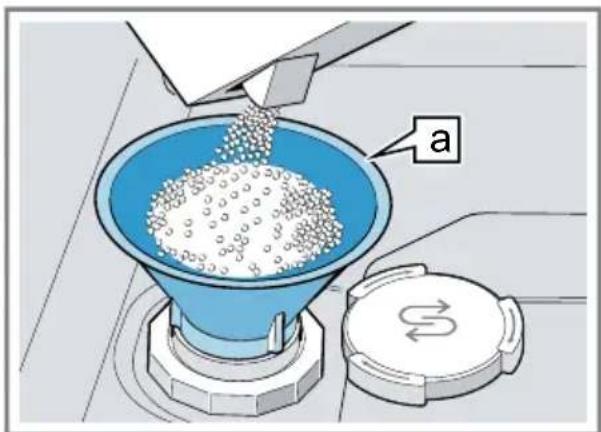
Funnel a 1
Fill the dispenser right up with special salt. The water in the dispenser is displaced and forced out.
- Place the lid back on the dispenser and turn to close.
Switching off water softening system
Note
To avoid damage to the appliance, only switch off the water softening system in the following cases:
■ The water hardness is max. 26 °E and you are using combined detergents with salt replacement substances. According to manufacturers, combined detergents with salt replacement substances can generally only be used up to a water hardness of 26°E without adding special salt. ■ The water hardness is 0 - 8°E. You do not need to use special salt.
- Press ①
- Hold programme button A and press Start repeatedly until the display shows H:xx.
- Release programme button A and Start. √ Programme button A flashes and the display shows H:04.
- Press programme button C repeatedly until the display shows H:00.
- Press Starsave the setting. √ The water softening system is switched off and the salt refill indicator is deactivated.
Regeneration of the water softening system
In order to obtain fault-free function of the water softening system, the appliance performs reheating of the water softening system at regular intervals. Regeneration of the water softening system takes place before the end of the main rinse cycle in all programmes. It will increase the run time and consumption values, e.g. water and electricity.
Overview of consumption values with regeneration the water softening system
Here you can find an overview of the maximum additional running time and consumption values during regeneration of the water softening system.
You can find the column applicable to your model in the quick reference guide according to its water consumption in the Eco 50° programme.
| Water consumption in litres (depending on model) | Regeneration of the water softening system after x rinse cycles | Additional running time in minutes | Additional water consumption in litres | Additional power consumption in kWh |
| 6.5 / 6.7 8 7 5 0.05 | ||||
| 7.5 / 7.7 7 7 5 0.05 | ||||
| 9.5 6 7 5 0.05 | ||||
| above 10.5 5 7 5 0.05 |
The consumption values specified are laboratory measurements determined in accordance with the currently applicable standard and using the Eco 50° programme and the factory value of the water hardness is set to 16 - 20°E.
able standard and using the Eco 50° programme and the factory value of the water hardness is set to 16 - 20°E.
You can use the rinse aid system and rinse aid to get tableware and glasses rinsed perfectly without marks.
You can use the rinse aid system and rinse aid to get tableware and glasses rinsed perfectly without marks.
For optimum drying results, use rinse aid.
Only use rinse aid for domestic dishwashers.
Adding rinse aid
If the rinse aid refill indicator lights up, top up with rinse aid. Only use rinse aid for domestic dishwashers.
If the rinse aid refill indicator lights up, top up with rinse aid. Only use rinse aid for domestic dishwashers.
- Press the catch on the rinse aid dispenser lid ① and lift it ②.

- If rinse aid spills out, remove it from the tub.

- Spilled rinse aid can cause excessive frothing during the wash cycle.
Spilled rinse aid can cause excessive frothing during the wash cycle.
- Close the lid of the rinse aid dispenser.
The lid clicks into position.
Setting the amount of rinse aid
If there are streaks or water marks on tableware, change the amount of rinse aid.
- Press Ⓘ
- Hold programme button A and press Start repeatedly until the display shows H:xx.
- Release programme button A and Start.
Programme button A flashes and the display shows H:04.
- Press programme button A repeatedly until the display shows the value set at the factory r:05.
- Press programme button C repeatedly until the right amount of rinse aid has been set.
- A low setting adds less rinse aid during the wash cycle and reduces streaking on tableware.
- A higher setting adds more rinse aid during the wash cycle, reduces water marks and improves the drying result.
- Press Start to save the setting.
Switching rinse aid system off
If you find the rinse aid refill indicator irritating, e.g. when using combined detergents with a rinse aid component, you can switch the rinse aid system off.
Tip: The function of rinse aid is limited with combined detergents. You will generally get better results using rinse aid.
- Press Ⓘ
- Hold programme button A and press Start repeatedly until the display shows H:xx.
- Release programme button A and Start.
√ Programme button A flashes and the display shows H:04. 4. Press programme button A repeatedly until the display shows the value set at the factory r:05. 5. Press programme button C repeatedly until the display shows r:00. 6. Press Start to save the setting. √ The rinse aid system is switched off and the rinse aid refill indicator is deactivated.
Detergent
Find out which detergents are suitable for your appliance.
Suitable detergents
Only use detergents that are suitable for dishwashers. Both separate and combined detergents are suitable. For optimum washing and drying results, use separate detergent, adding Special salt → Page 28 and Rinse aid → Page 30 separately. Modern, powerful detergents mainly use a low-alkaline formulation with enzymes. Enzymes break down starch and remove protein. Oxygen-based bleaching agents are generally used to remove coloured marks, e.g. tea or ketchup.
Note: Follow the manufacturer's instructions for each detergent.
| Detergent Description | |
| Tabs Tabs are suitable for all cleaning functions and do not need to be measured out. With shorter Programmes tabs sometimes do not dissolve entirely and leave residues of detergent. This may impair the cleaning effect. | |
| Powder detergent Powder detergent is recommended for shorter Programmes. The dosage can be adjusted to the level of soiling. | |
| Liquid detergent Liquid detergent works faster and is recommended for shorter Programmes without PreRinse. Sometimes liquid detergent may leak out despite the detergent dispenser being closed. This is not a fault and is non-critical if you remember the following: Only choose a programme without PreR-inse.Do not select timer programming for starting the programme.The dosage can be adjusted to the level of soiling. |
Tip: Suitable detergents are available online via our website or from Customer Services → Page 55.
Separate detergents
Separate detergents are products that do not contain components other than detergent, e.g. powder detergent or liquid detergent.
With powder and liquid detergent the dosage can be individually adjusted to the level of soiling of the tableware.
For better washing and drying results and to avoid damage to the appliance, please additionally use Special salt → Page 28 and Rinse aid → Page 30.
Combined detergent
Besides conventional separate detergents, a number of products are available with additional functions. These products contain not only detergent but also rinse aid and salt replacement substances (3in1) and, depending on the combination (4in1, 5in1, ...), additional components such as glass protection or stainless steel cleaner. According to manufacturers, combined detergents generally only function up to a water hardness of 26°E. With a water hardness above 26°E you will need to add special salt and rinse aid. For the best washing and drying results we recommend using special salt and rinse aid from a water hardness of 17°E. If you are using combined detergent, the washing programme is adjusted automatically to ensure the best possible washing and drying result.
Unsuitable detergents
Do not use detergent which could cause damage to the appliance or present a risk to health.
| Detergent Description | |
| Hand washing-up liquid | Hand washing-up liquid can cause increased frothing and damage the appliance. |
| Detergent containing chlorine | Chlorine residue on table-ware may present a risk to health. |
Information on detergents
Follow the instructions on detergents in everyday use.
■ Detergents marked as "organic" or "ecological" (environmentally friendly) generally contain lower
levels of active agents or completely dispense with certain substances. The cleaning effect may be restricted here.
■ Set the rinse aid and the water softening system to the separate detergent or combined detergent in use. - According to manufacturers, combined detergents with salt replacement substances can only be used up to a certain water hardness, usually 26 °E, without adding special salt. For the best washing and drying results we recommend using special salt from a water hardness of 17 °E. ■ To prevent sticking, only touch detergents in a water-soluble pouch with dry hands and only ever place them in a dry detergent dispenser. ■ Even if the rinse aid and special salt refill indicators light up, washing programmes will run properly with combined detergents. ■ The function of rinse aid is limited with combined detergents. You will generally get better results using rinse aid. ■ Use tablets with a special drying performance.
Adding detergent
- To open the detergent dispenser, press the locking latch.
- Add the detergent to the dry detergent dispenser.


If you are using tablets, one is enough. Insert the tablets in a horizontal position.
If you are using powder or liquid detergent, follow the manufacturer's instructions and quantities for dosage in the detergent dispenser.
20 ml - 25 ml detergent is sufficient for normal soiling. If tableware is only lightly soiled, slightly less than the amount of detergent specified is usually sufficient.
- Close the lid of the detergent dispenser.

√ The lid clicks into position. √ The detergent dispenser will open automatically at the optimum time during the programme. Powder or liquid detergent will spread around the washing tank and dissolve there. Tablets will fall into the tablet collecting tray and dissolve in the right dosage. In order to ensure that tablets can dissolve evenly, do not place any other objects in the tablet collecting tray.
Tableware
Only clean tableware that is suitable for dishwashers.
Note: Decorated glassware and parts made of aluminium or silver may fade or discolour with dishwashing. Delicate types of glass may turn cloudy after a few washing cycles.
Damage to glass and tableware
Avoid damage to glass and tableware.
Cause Recommendation
| The following tableware is not dishwasher-safe:Items of cutlery and tableware made from woodDecorated glassware, antique and hand-crafted tablewarePlastic parts not resistant to heatTableware made from copper or tinTableware soiled with ash, wax, lubricating grease or paintVery small items of tableware | Only put tableware in the dishwasher if it is marked as dishwasher-safe by the manufacturer. |
| Glass and tableware was not dishwasher-safe. | Only put glasses and china in the dishwasher if it is marked as dishwasher-safe by the manufacturer. |
| The chemical composition of the detergent causes damage. | Use a detergent marked as gentle on tableware by the manufacturer. |
Cause Recommendation
| Highly caustic alkaline or highly acidic cleaning agents, in particular commercial or industrial cleaning agents, are not suitable for dishwashers in conjunction with aluminium. | If you are using highly caustic alkaline or highly acidic cleaning agents, in particular commercial or industrial cleaning agents, do not put aluminium parts in the dishwasher interior. |
| The water temperature of the programme is too high. | Select a programme with lower temperatures.After the programme has ended, take glassware and cutlery out of the appliance without delay. |
Arranging tableware
Arrange the tableware correctly to optimise the dishwashing result and prevent damage to both the appliance and tableware.
Tips
■ Using the appliance allows you to save energy and water compared to washing-up by hand. ■ See our website for examples of how to arrange load your appliance efficiently, free of charge. ■ To save energy and water, do not load more place settings than the number specified.
→ "Technical data", Page 56
■ For better washing and drying results, position items with curves or recesses at an angle so the water can run off.

- Remove large remnants of food from your tableware.
Prerinsing under running water is not necessary - nor is this a good idea in terms of saving energy.
- Observe the following when arranging tableware:
- Put heavily soiled tableware in the bottom basket, e.g. pans. The more powerful the spray jet, the better the dishwashing result will be.
- To prevent damage to tableware, arrange it so it is stable and cannot tip over.
- To prevent injury, arrange cutlery with the points and sharp edges downwards.
- Position containers with the openings facing down so no water can collect in them.
- Do not block the spray arms - make sure that they can turn freely.
- Do not place small parts in the tablet collecting tray and do not block it with tableware so as not to obstruct the lid of the detergent dispenser.

Removing tableware
WARNING Risk of injury!
Hot tableware can cause burns to the skin. When hot, tableware is sensitive to shock, may crack and can result in injury.
- When the programme has ended, do not empty the appliance until the tableware has cooled down for a while.
- To prevent water dripping on the tableware, unload it starting at the bottom and working up.
- Check the tub and accessories for soiling and clean if necessary. → "Cleaning and servicing", Page 40
Basic operation
You can find out everything you need to know about operating your appliance here.
Opening appliance door
- If the childproof lock 1 is not activated, open the appliance door.
- If the childproof lock is activated, press the catch of the lock to the right ① and open the appliance door ②.

Switching on appliance
▶ Press Ⓘ
The Eco 50° programme is set by default.
The Eco 50° programme is an especially environmentally friendly programme and ideal for normally soiled tableware. It is the most efficient programme for the combination of energy/water consumption for this type of tableware and evidences conformity with the EU Ecodesign Order.
If you do not perform any actions on the appliance for 15 minutes, the appliance will automatically switch off.
Setting a programme
To adjust the wash cycle to the soiling level of the tableware, select a suitable programme.
▶ Press the right programme button. → "Programmes", Page 19
√ The programme is set and the programme button flashes.
Setting additional functions
You can set additional functions to complete the washing programme selected.
Note: The additional functions which can be used depend on the programme selected.
→ "Programmes", Page 19
- Press the button for the relevant additional function. → "Additional functions", Page 21 √ The additional function is set and the additional function button flashes.
Setting timer programming
You can delay the start of the programme by up to 24 hours.
- Press + ▼ "h:01" appears in the display.
- Use or to set the required start time for the programme.
- Press Start √ This activates timer programming.
Note: To deactivate timer programming, press or repeatedly until "h:00" appears in the display.
Starting the programme
▶ Press Start √ The programme has ended when the display shows "0:00".
Notes
■ If you want to add more tableware while the appliance is running, do not use the tablet collecting tray as a handle for the top basket. You might touch the partially dissolved tablet.
■ You can only change a programme when running if you cancel it.
→ "Terminate programme", Page 36
■ The appliance switches off automatically 1 minute after the end of the programme to save energy. If you open the appliance door immediately after the programme has ended, the appliance will switch off after 4 seconds.
Interrupting programme
Note: When you open the appliance door once the appliance has heated up, leave the door slightly ajar for a few minutes and then close it. This will help prevent excess pressure building up in the appliance and stop the appliance door bursting open.
- Press Ⓘ √ The programme is saved and the appliance switches off.
- Press ① to resume the programme.
Terminate programme
To end a programme early or to switch from a programme that has already started, you will need to terminate it first.
- Open the appliance door.
- Press Reset approx. 3 seconds.
- Close the appliance door. √ The programme is terminated and ends after approx. 1 minute.
Switching off appliance
- Please note the information on Safe use → Page 11.
- Press ①
- To prevent damage from dripping water, turn the water tap off tight (not applicable to appliances with Aqua-Stop).
Tip: If you press ① during the wash cycle, the programme currently running will be interrupted. When you switch the appliance back on, the programme continues automatically.
Basic settings
You can configure the appliance to meet your needs.
Overview of basic settings
The basic settings depend on the features of your appliance.
| Basic setting Display text Selection Description | ||
| Water hardness H:04 | 1 | H:00 - H:07 Set the water softening system to your water hardness.→ "Setting water softening system",Page 28Level H:00 switches the water softening system off. |
| Rinse aid dispensing r:05 | 1 | r:00 - r:06 Set the amount of rinse aid to be dispensed.→ "Setting the amount of rinse aid",Page 30Switch the rinse aid system off with level r:00. |
| Intensive drying d:00 | 1 | d:00 - d:01 The temperature is increased during the final rinse, which improves the drying result. This may increase the running time slightly.Note: Not suitable for delicate items of tableware.Switch Intensive drying on "d:01" or off "d:00". |
| Hot water A:00 | 1 | A:00 - A:01 Set cold water or hot water connection. Only set the appliance to hot water if this can be prepared with little energy and a suitable installation is available, e.g. solar heating system with circulation line. The water temperature should be at least 40 °C and max. 60 °C.Switch hot water on "A:01" or off "A:00". |
| 1 Factory setting (may vary according to model) | ||
| TimeLight S:01 | 1 | S:00 - S:02 Switch TimeLight on or off.While the programme is running,status information is projected ontothe floor below the appliance door relating to timer programming, the programme or the time remaining. If thebase panel is pulled forwards or if theappliance is installed at eye level withthe cabinet front fitted flush, the display is not visible.Level "S:00" switches TimeLight off. |
| InfoLight I:01 | 1 | I:00 - I:01 Switch InfoLight on or off.While the programme is running, a spot of light is projected onto the floorbelow the appliance door. This lightwill not be visible if the appliance is installed at eye level with the cabinetfront fitted flush. If the appliance dooris not completely closed, the spot oflight will flash. The programme hasended when the spot of light is nolonger visible on the floor.Level "I:00" switches InfoLightoff. |
| Tone volume b:02 | 1 | b:00 - b:03 Adjustment of tone volume.End of programme indicated by an audible signal tone.Level "b:00" switches the signal toneoff. |
1 Factory setting (may vary according to model)
Changing basic settings
- Open the appliance door.
- Press ①
- Hold programme button A and press Start repeatedly until the display shows H:xx.
- Release programme button A and Start.
Programme button A flashes and the display shows H:04.
- Press programme button A repeatedly until the display shows the required setting.
- Press programme button C repeatedly until the display shows the right value. You can change several settings.
- Press Start to save the setting.
- Close the appliance door.
Cleaning and servicing
To keep your appliance working efficiently for a long time, it is important to clean and maintain it carefully.
Cleaning the tub
WARNING
Risk of harm to health!
Using detergents containing chlorine may result in harm to health.
▶ Never use detergents containing chlorine.
- Remove any coarse soiling in the interior with a damp cloth.
- Add detergent to the detergent dispenser.
- Select the programme with the highest temperature. → "Programmes", Page 19
- Start the programme without tableware. → Page 36
Self-cleaning interior 1
To remove deposits, the appliance self-cleans the interior at regular intervals. The programme sequence is automatically adjusted for self-cleaning, e.g. the cleaning temperature is briefly increased. Consumption values, e.g. water and electricity, may also increase. If the interior is no longer self-cleaned adequately and deposits occur, see this information:
→ "Cleaning the tub", Page 40.
Cleaning products
Only use suitable cleaning products to clean your appliance.
→ "Safe use", Page 11
Tips on appliance care
Follow the tips on appliance care to make sure your appliance functions properly at all times.
Action Benefit
| Wipe the door seals, the front of the dish-washer and the control panel regularly using a damp cloth and washing-up liquid. | This ensures the parts of the appliance will remain clean and hy-gienic. |
| If the appliance is not going to be used for a while, leave the door slightly ajar. | This will prevent unpleasant odours. |
Easy Clean Easy Clean 1
Deposits can cause your dishwasher to malfunction, e.g. due to grease or limescale. To avoid such faults and reduce odours, we recommend cleaning your appliance at regular intervals. Easy Clean used in combination with commercially available machine care products is a suitable programme for cleaning your dishwasher. Run Easy Clean without tableware if the indicator for Easy Clean lights up on the control panel or if advised to do so by the display. The indicator will go out after you have run Easy Clean. If your appliance does not have a reminder function, follow the directions for use on the machine care products.
Performing Easy Clean
Run the Easy Clean programme if the indicator for Easy Clean lights up on the control panel or if advised to do so by the display.
Notes
■ Run the Easy Clean programme without any tableware in the dishwasher. ■ Only use suitable machine care products specially designed for dishwashers and not dishwasher detergent. Observe the manufacturer's instructions. ■ Make sure that there are no aluminium parts in the interior of the appliance. ■ If you have not run Easy Clean after 3 washing cycles, the indicator for Easy Clean will go out automatically. ■ Follow the safety instructions and the directions for use on the packagings of the machine care products. 1. Remove any coarse soiling in the interior with a damp cloth. 2. Clean filters. 3. Add the machine care product to the appliance. 4. Press Easy Clean 5. Press Start
√ Easy Clean is run.
√ As soon as machine care has finished, the indicator for Easy Clean goes out.
Filter system
The filter system removes coarse soiling from the dishwashing cycle.

| 1 | Micro filter |
| 2 | Fine filter |
| 3 | Coarse filter |
Cleaning filters
Soiling in the dishwashing water may block the filters.
- After each wash check the filters for residue.
- Turn the coarse filter anticlockwise ① and remove the filter system ②
- Check that no foreign objects fall into the sump.

- Pull down the micro filter to remove.

- Press the locking catches ① together and lift the coarse filter out ②
en
Cleaning and servicing

- Clean the filter elements under running water.
Carefully clean the rim of dirt between the coarse and the fine filter.
- Re-assemble the filter system.
Make sure that the locking catches on the coarse filter click into position.
- Insert the filter system into the appliance and turn the coarse filter clockwise.
Make sure that the arrow markings match up.
Cleaning spray arms
Limescale and soiling in the dishwashing water may block the nozzles and bearings on the spray arms. Clean the spray arms regularly.
- Unscrew the upper spray arm ① and pull down to remove ②

- Pull up the lower spray arm to remove.

- Check the outlet nozzles on the spray arms for blockages under running water and remove any foreign bodies.
- Insert the lower spray arm.
√ The spray arm clicks into position.
- Insert the upper spray arm and screw it firmly in place.
Troubleshooting
You can rectify minor faults on your appliance yourself. Read the troubleshooting information before contacting Customer Service. This will avoid unnecessary costs.

WARNING
Risk of electric shock!
Improper repairs are dangerous.
▶ Repairs to the appliance should only be carried out by trained specialist staff. ▶ Only use genuine spare parts when repairing the appliance. - If the power cord of this appliance is damaged, it must be replaced with a special connection cable, which is available from the manufacturer or his Customer Service.
Appliance safety
| Errors Cause Troubleshooting | ||
| Appliance door will not open or cannot be opened easily. | Childproof lock is activated. | ► Open the appliance door. → Page 35 |
Error code / Fault display / Signal
| Errors Cause Troubleshooting | ||
| E:12 lights up. | Heating element is furred up. | 1. Descale the appliance.2. Operate the appliance with the Water softening system. |
| E:14 lights up. Water protection system is ac- tivated. | 1. Turn off the water tap.2. Call Customer Service → Page 55. | |
| E:15 lights up. Water protection system is ac- tivated. | 1. Turn off the water tap.2. Call Customer Service → Page 55. | |
| E:16 lights up. Water is continuously running into the appliance. | 1. Turn off the water tap.2. Call Customer Service → Page 55. | |
| E:18 or indicator for water supply lights up. | Supply hose is kinked. | ► Install the supply hose without kinks. |
| Water tap is turned off. | ► Turn on the water tap. | |
| Water tap is jammed or furred up. | ► Turn on the water tap.The flow rate must be at least 10 l/ min when the water supply is open. | |
| Filter in the water supply is blocked. | 1. Switch off the appliance.2. Pull out the mains plug.3. Turn off the water tap.4. Unscrew the water connection. | |
| E:18 or indicator for water supply lights up. | 5. Remove the filter from the supply hose 6. Clean the filter.7. Re-insert the filter in the supply hose.8. Screw the water connection back on.9. Check the water connection for leaks.10. Restore the power supply.11. Switch the appliance on. 6. Clean the filter.7. Re-insert the filter in the supply hose.8. Screw the water connection back on.9. Check the water connection for leaks.10. Restore the power supply.11. Switch the appliance on. | |
| E:22 lights up. Filters are soiled or blocked. | ▸ Clean the filters.→ "Cleaning filters", Page 41 | |
| E:24 lights up. Wastewater hose is blocked or kinked. | 1. Reposition the wastewater hose without kinks.2. Remove residues. | |
| Siphon connection is still sealed. | ▸ Check the connection to the siphon and open if necessary. | |
| Cover of the wastewater pump is loose. | ▸ Secure the cover of the Wastewater pump → Page 54 so it clicks into position. | |
| E:25 lights up. Wastewater pump is blocked. | ▸ Clean the wastewater pump.→ "Clean wastewater pump", Page 54 | |
| Cover of the wastewater pump is loose | ▸ Secure the cover of the Wastewater pump → Page 54 so it clicks into position. | |
| E:27 lights up. Mains voltage is too low. This is not a fault on the appliance. | ||
| 1. Contact an electrician.2. Have the mains voltage and electrical installation checked by an electrician. | ||
Errors Cause Troubleshooting
| Another error code appears on the display.E:01 to E:30 | A technical fault is present. 1. | Press ➊2. Unplug the appliance or switch off the fuse.3. Wait at least 2 minutes.4. Insert the mains plug of the appliance in a socket or switch on the fuse.5. Switch the appliance on.6. If the problem occurs again:- Press ➊- Turn off the water tap.- Pull out the mains plug.- Contact Customer Service → Page 55 and give the er-ror code. |
Washing results
| Errors Cause Troubleshooting | ||
| Tableware is not dry. No rinse aid used or dosage set too low. | 1. Add Rinse aid → Page 30.2. Set the amount of rinse aid to be dispensed. | |
| Selected programme has no drying phase | ► Select a programme with drying. | |
| Water collects in recesses of the tableware or cutlery. | ► Position tableware at an angle where possible. | |
 | ||
| The combined detergent used has a poor drying performance. | 1. Use rinse aid to improve drying performance.2. Use a different combined detergent with a better drying performance. | |
| Extra Dry not activated to improve drying performance. | ► Activate Extra Dry. | |
| Tableware is not dry. Tableware removed too early or drying process not yet ended. | 1. Wait until the programme ends.2. Only remove tableware 30 minutes after the programme has ended. | |
| Rinse aid used has a limited drying performance. ▶ Use a name-brand rinse aid.Eco products may have limited effectiveness. | ||
| Plastic tableware is not dry. Not a fault. As plastic does not store heat so well, it also does not dry as well. | ▶ No remedial action possible. | |
| Cutlery is not dry. Cutlery not arranged properly in the cutlery basket or cutlery drawer. | 1. Arrange the cutlery properly.→ "Arranging tableware", Page 342. Arrange cutlery individually where possible.3. Avoid points of contact. | |
| Appliance interior still wet after wash cycle. | Not a fault. The condensation drying principle causes water droplets in the tub - they are indeed desirable here. The moisture in the air condenses on the inside walls, runs off and is pumped out. | No action required. |
| Remnants of food on tableware. | Tableware was placed too close together. | 1. Arrange tableware with sufficient space in between.The spray jets must reach the surfaces of the tableware.2. Avoid points of contact. |
| Basket is overfilled. 1. Arrange tableware with sufficient space in between.The spray jets must reach the surfaces of the tableware.2. Avoid points of contact. | ||
| Spray arm rotation is blocked. | ▶ Arrange tableware so that it does not obstruct spray arm rotation. | |
| Spray arm nozzles are blocked. | ▶ Clean the Spray arms → Page 42. | |
| Filters are soiled. | ▶ Clean the filters.→ "Cleaning filters", Page 41 | |
| Filters are inserted incorrectly and/or not engaged. | 1. Insert the filters properly.→ "Filter system", Page 412. Engage the filters. | |
| Remnants of food on tableware. | Washing programme selected too weak. | Select a more intensive washing programme.Adjust the sensitivity of the sensors. |
| Tableware has been pre-cleaned too intensely. The sensors chose a weaker programme. Stubborn soiling cannot be entirely removed. | Only remove large remnants of food and do not prerinse tableware.Adjust the sensitivity of the sensors. | |
| Tall narrow receptacles in corner areas are not rinsed adequately. | Do not position tall narrow receptacles at too great an angle or in corner areas. | |
| Top baskets on right and left are not set to same height. | Set the top baskets on the left and right to the same level.→ "Top basket", Page 22 | |
| Detergent residue in the appliance | Lid of the detergent dispenser is blocked by items of tableware parts and will not open. | Arrange tableware in the top basket tableware so the tab collecting tray is not obstructed by tableware.→ "Arranging tableware", Page 34Items of tableware are blocking the dispenser lid.Do not place tableware or fragrance dispensers in the tablet collecting tray. |
| The lid of the detergent dispenser is blocked by the tab and will not open. | Position the tab in the detergent dispenser crosswise, not vertically. | |
| Tabs are used in the quick or short programme. Dissolving time of the tab is not attained. | Select a more intensive Programme or use Powder detergent → Page 31. | |
| Washing effect and dissolving performance are reduced after a prolonged storage time or detergent is very lumpy. | Change your detergent → Page 31. | |
| Water marks on plastic parts. Due to laws of physics droplet formation on plastic surfaces is unavoidable. After drying water marks are visible. | Select a more intensive programme.Position tableware at an angle.→ "Arranging tableware", Page 34Use rinse aid.→ "Rinse aid", Page 30Set the water softening system higher. | |
| Wipeable or water-soluble coatings are present inside the appliance or on the door. | Detergent substances are deposited there. These coatings cannot generally be removed with chemicals. | ▶ Change your detergent → Page 31.▶ Clean the appliance mechanically. |
| White coating is deposited in the appliance interior. | 1. Set the water softening system correctly.In most cases you will need to increase the setting.2. Change your detergent if required. | |
| Special salt dispenser is not screwed tight. | ▶ Screw the special salt dispenser tight. | |
| Stubborn white coatings are present on tableware, inside the appliance or the door. | Detergent substances are deposited there. These coatings cannot generally be removed with chemicals. | ▶ Change your detergent → Page 31.▶ Clean the appliance mechanically. |
| The hardness range is set incorrectly or the water hardness is greater than 62°°E (8,9 mmol/l). | ▶ Set the Water softening system → Page 27 to the water hardness or add special salt. | |
| 3in1/organic/eco detergent is not effective enough. | ▶ Set the Water softening system → Page 27 to the water hardness and use separate detergents (proprietary detergent, special salt, rinse aid). | |
| Too little detergent is being used. | ▶ Increase the amount of detergent used or change Detergent → Page 31. | |
| Washing programme selected too weak. | ▶ Select a more intensive washing programme.▶ Adjust the sensitivity of the sensors. | |
| Tea residue or lipstick marks on tableware. | Washing temperature is too low. | ▶ Select a programme with a higher washing temperature. |
| Too little detergent is being used or is unsuitable. | ▶ Use a suitable Detergent → Page 31 and follow the manufacturer's instructions for the amount to be used. | |
| Tableware has been pre-cleaned too intensely. The sensors chose a weaker programme. Stubborn soiling cannot be entirely removed. | ▶ Only remove large remnants of food and do not prerinse tableware.▶ Adjust the sensitivity of the sensors. | |
| Coloured coatings (blue, yellow, brown) that are difficult or impossible to remove are present inside the appliance or on stainless steel tableware. | The formation of films is due to substances contained in vegetables (cabbage, celery, potatoes, noodles, etc.) or tap water (manganese). | ▸ Clean the appliance.You can remove deposits with Mechanical cleaning → Page 40 or a machine cleaning product. It may not always be possible to completely remove deposits but they are harmless to health. |
| The formation of films is due to metal components on silver or aluminium tableware. | ▸ Clean the appliance.You can remove deposits with Mechanical cleaning → Page 40 or a machine cleaning product. It may not always be possible to completely remove deposits but they are harmless to health. | |
| Coloured deposits (yellow, orange, brown) that are easy to remove are present inside the appliance (mainly at the bottom). | The formation of films is due to ingredients of food remnants and tap water (limescale) "soaplike". | 1. Check the setting of the water softening system.→ "Setting water softening system", Page 282. Add special salt.→ "Adding special salt", Page 283. If you are using combined detergents (tabs), activate the water softening system.Follow the information about detergents.→ "Information on detergents", Page 32 |
| Plastic parts inside the appliance are discoloured. | Plastic parts inside the appliance may become discoloured during the life of the dishwasher. | ▸ Discolouration can come about and will not impair functioning of the appliance. |
| Plastic parts are discoloured. Washing temperature is too low. | ▸ Select a programme with a higher washing temperature. | |
| Tableware has been pre-cleaned too intensely. The sensors chose a weaker programme. Stubborn soiling cannot be entirely removed. | ||
| Removable streaks are present on glasses, glassware with a metallic appearance and cutlery. | Amount of rinse aid to be dispensed is set too high. | ▸ Set the rinse aid system to a lower setting. |
| No rinse aid has been added. | ▸ → "Adding rinse aid", Page 30 | |
| Removable streaks are present on glasses, glassware with a metallic appearance and cutlery. | Detergent residue is present in the final rinse. Lid of the detergent dispenser is blocked by tableware items and will not open fully. | 1. Arrange tableware in the top basket tableware so the tab collecting tray is not obstructed by tableware.→ "Arranging tableware", Page 34Items of tableware are blocking the dispenser lid.2. Do not place tableware or fragrance dispensers in the tablet collecting tray. |
| Tableware has been pre-cleaned too intensely. The sensors chose a weaker programme. Stubborn soiling cannot be entirely removed. | ► Only remove large remnants of food and do not prerinse tableware.► Adjust the sensitivity of the sensors. | |
| Irreversible clouding of glassware. | Glasses are not dishwasher-proof, only suitable for dish-washers. | ► Use dishwasher-proof glasses.► Avoid a lengthy steam phase (standing time after wash cycle ends).► Use a programme with a lower temperature.► Set the softening system to the water hardness.► Use detergent with a glass protection component. |
| Rust spots on cutlery. Cutlery is not sufficiently rust-resistant. Knife blades are often more severely affected. | ► Use rust-resistant tableware. | |
| Cutlery may also rust if washed together with rusting items. | ||
| Salt content in washing water is too high. | ||
| Detergent residue is present in the detergent dispenser or the tablet collecting tray. | Spray arms were blocked by tableware so detergent was not rinsed out. | ► Check that the spray arms are not blocked and can rotate freely. |
| Detergent dispenser was damp when detergent was added. | ► Only add detergent to a detergent dispenser when dry. | |
| Excessive formation of foam occurs. | Hand washing-up liquid is present in dispenser for rinse aid. | ▶ Immediately add rinse aid to the dispenser.→ "Adding rinse aid", Page 30 |
| Rinse aid has been spilled. | ▶ Remove the rinse aid with a cloth. | |
| Detergent or appliance care product used causes excessive foaming. | ▶ Change the brand of detergent. | |
Information on display panel
| Errors Cause Troubleshooting | ||
| Special salt refill indicator lights up. | Insufficient special salt. | ► Add Special salt → Page 28. |
| Sensor does not detect special salt tablets. | ► Do not use special salt tablets. | |
| Refill indicator for special salt does not light up. | Water softening system is switched off. | ► Setting water softening system → Page 28 |
| Refill indicator for rinse aid lights up. | Insufficient rinse aid. | 1. Add Rinse aid → Page 30.2. Set the amount of rinse aid to be dispensed. |
| Refill indicator for rinse aid does not light up. | Rinse aid system is switched off. | ► → "Setting the amount of rinse aid", Page 30 |
| Display flashes. Appliance door is not closed properly. | ► Close the appliance door.- Arrange the tableware so that no parts project beyond the basket and prevent the appliance door from closing properly. | |
Malfunctions
| Errors Cause Troubleshooting | ||
| Water is left in the appliance at the end of the programme. | Filter system or area under the filters is blocked. | 1. Clean the Filters → Page 41.2. Clean the Wastewater pump → Page 54. |
| Programme has not yet ended. | ▸ Wait until the programme ends or cancel the programme with reset.▸ → "Terminate programme", Page 36 | |
| Appliance cannot be switched on or operated. | Appliance functions have failed. | 1.Pull out the mains plug or switch off the fuse.2.Wait at least 2 minutes.3.Connect the appliance to the power supply.4.Switch the appliance on. |
| Appliance does not start. The mains fuse has tripped. | ▸ Check the relevant fuse. | |
| Mains cable is not inserted.1.Check whether the socket works.2.Check whether the mains cable is properly inserted in the socket and on the rear of the appliance. | ||
| Appliance door is not closed properly.▸ Close the appliance door. | ||
| Programme starts automatically. | You did not wait until programme ended. | ▸ → "Terminate programme", Page 36 |
| Appliance stops during the programme or cuts out. | Appliance door is not closed properly. | ▸ Close the appliance door. |
| Power and/or water supply has been interrupted. | 1.Check the power supply.2.Check the water supply. | |
| Top basket is pressing against inner door and preventing appliance door from being closed securely. | ▸ Check whether the rear panel of the appliance is being pressed in by a socket or hose holder that has not been removed.▸ Arrange the tableware so that no parts project beyond the basket and prevent the appliance door from closing properly. | |
Mechanical damage
| Errors Cause Troubleshooting | ||
| Appliance door cannot be closed. | Door lock has been activated. | ▸ Close the appliance door with greater force. |
| Door cannot be closed due to installation method. | ▸ Check whether the appliance has been installed properly.When closed, the appliance door, its decor or attached parts should not knock against adjacent cabinets or the worktop. | |
| Lid on the detergent dispenser cannot be closed. | Detergent dispenser or lid are blocked by sticky detergent residue. | ▸ Remove detergent residue. |
Noise
| Errors Cause Troubleshooting | ||
| Filling valves making knocking noises. | Caused by the domestic installation. No appliance fault present. Does not affect functioning of the appliance. | ► Can only be remedied in the domestic installation. |
| Knocking or rattling noise. Spray arm is striking tableware. | ► Arrange tableware so that the spray arms do not strike tableware. | |
| With a small load the water jets directly strike against the tub. | ||
| Light items of tableware move about during the wash cycle. | ||
Transportation, storage and disposal
Clean wastewater pump
Large remnants of food or foreign bodies can block the wastewater pump. As soon as the washing water no longer drains properly, the wastewater pump must be cleaned.
WARNING
Risk of injury!
Sharp and pointed objects or fragments of glass may block the waste water pump and cause injury.
- Remove any foreign bodies carefully.
- Disconnect the appliance from the power supply.
- Remove the top and bottom basket.
- Remove the filter system.
- Scoop out any water. Use a sponge if necessary.
- Pry off the pump cover using a spoon and grip it by the crosspiece.

- Lift the pump cover inwards at an angle and remove.
- Remove any remnants of food and foreign bodies in the area of the impeller.
- Insert the pump cover ① and press down ②

√ The pump cover clicks into position. 9. Install the filter system. 10. Insert the top and bottom basket.
Transportation, storage and disposal
You can find out here how to prepare your appliance for transportation and storage. You will also find out how to dispose of old appliances.
Removing the appliance
- Disconnect the appliance from the power supply.
- Turn off the water tap.
- Detach the drainage connection.
- Detach the drinking water connection.
- Loosen any screws fastening the appliance to cabinet parts.
- Remove the base panel if fitted.
- Pull the appliance out carefully, along with the hose behind it.
Protect appliance from frost
If there is a risk of frost where the appliance will be standing, e.g. in a holiday home, empty the appliance completely.
▶ Empty the appliance. → Page 55
Transporting the appliance
To avoid damage to the appliance, empty it before transporting.
Note: Always transport the dishwasher upright to prevent residual water getting into the machine's controls and damaging the appliance.
- Remove tableware from the appliance.
- Secure loose parts.
- Turn on the water tap.
- Switch on appliance. → Page 35
- Select the programme with the highest temperature. → "Programmes", Page 19
- Start the programme. → Page 36
- To drain the appliance, terminate the programme after approx. 4 minutes. → "Terminate programme", Page 36
- Switch off the appliance. → Page 36
- Turn off the water tap.
- To empty the residual water out of the appliance, detach the supply hose and let the water drain out.
Disposing of old appliance
Valuable raw materials can be reclaimed by recycling.
WARNING
Risk of harm to health!
Children can lock themselves in the appliance, thereby putting their lives at risk.
- With redundant appliances, unplug the power cord. Then cut through the cord and damage the lock on the appliance door beyond repair so that the appliance door will no longer close.
- Unplug the appliance from the mains.
- Cut through the power cord.
- Dispose of the appliance in an environmentally friendly manner.

This appliance is labelled in accordance with European Directive 2012/19/EU concerning used electrical and electronic appliances (waste electrical and electronic equipment - WEEE). The guideline determines the framework for the return and recycling of used appliances as applicable throughout the EU.
Customer Service
If you have any queries, are unable to rectify faults on the appliance yourself or if your appliance needs to be repaired, contact Customer Service. You can solve many problems yourself by consulting the information on troubleshooting in these instructions or on our website. If this is not the case, contact our Customer Service. We will always find an appropriate solution and try to avoid unnecessary visits being made by a Customer Service technician.
With any warranty claims we will make sure that your appliance is repaired by trained Customer Service technicians using genuine spare parts, including after the manufacturer's warranty has expired.
For safety reasons repairs to the appliance should only be carried out by trained specialist staff. The warranty claim becomes void if repairs or interventions have been carried out by persons not authorised by us for that purpose or if our appliances have been fitted with spare, supplementary or accessory parts that were not genuine parts and then resulted in a defect.
Function-relevant genuine spare parts according to the corresponding Eco-design Order can be obtained from Customer Service for a period of at least 10 years from the date on which your appliance was placed on the market within the European Economic Area.
Note: Under the terms of the manufacturer's warranty the use of Customer Service is free of charge.
Detailed information about the warranty period and terms of warranty in your country are available from Customer Service, your dealer or our website. When contacting Customer Service, you will need the product number (E-Nr.) and the production number (FD) of your appliance.
The contact details for Customer Service can be found in the enclosed Customer Service directory or on our website.
Product number (E-Nr.) and production number (FD)
The product number (E-Nr.) and the production number (FD) can be found on the rating plate of the appliance. The rating plate is located inside the appliance door.
Make a note of your appliance's details and the Customer Service telephone number to find them again quickly.
AQUA-STOP guarantee 1
In addition to warranty claims against the seller under the purchase agreement and in addition to our manufacturer's warranty, we will provide a replacement under the following conditions.
■ If our Aqua-Stop system is defective and causes water damage, we will make good the damage for private users. To ensure protection from water damage, the appliance must be connected to the power supply. ■ The liability guarantee is valid for the service life of the appliance. ■ A claim can only be made under the guarantee if the appliance has been correctly installed and connected with Aqua-Stop according to our instructions; this also includes correctly fitting the Aqua-Stop extension (genuine accessory). Our guarantee does not cover defective supply lines or fittings up to the Aqua-Stop connection on the tap. If your appliance is fitted with Aqua-Stop, you can leave your appliance unattended during operation and the tap turned on afterwards. The tap only needs to be turned off if you are away from home for a long period, e.g. on holiday for several weeks.
Technical data
Facts and figures for your appliance can be found here.
Weight Max.: 60 kg
Voltage 220 - 240 V, 50 Hz or
60 Hz
Power rating 2000 - 2400 W
Fuse 10 - 16 A
| Power consumption Off mode/standby |
| mode: 0.10 W |
| Left-on mode: 0.10 W |
| Networked standby: - W |
| Time in left-on mode: 0 min |
| Time after which appli-ance is switched to net-worked standby mode: - min |
| Complies with the latest regulations (EU) for energy label and ecological design at the time of placing on the market. |
| Additional functions and settings may increase power con-sumption and times. |
| Water pressure ■ | Min. 0.05 MPa(0.5 bar)■ Max. 1 MPa(10 bar) |
Inlet rate Min. 10 l/min
| Water temperature Cold water. |
| Hot water max.: 60 °C |
Capacity 12 - 15 place settings
More information about your model can be found online at https://www.bsh-group.com/energylabel 1 . This web address is linked to the official EU EPREL product database. At the time of printing its web address had not yet been published. Please then follow the instructions on searching for models. The model identifier is made up of the characters before the slash in the product number (E-Nr.) on the rating plate. Alternatively you can also find the model identifier in the first line of the EU energy label.

REGISTER YOUR PRODUCT ONLINE NEFF-HOME.COM
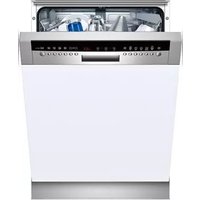
- EN
- TABLE OF CONTENTS
- SAFETY
- PREVENTING MATERIAL DAMAGE
- CHILDPROOF LOCK
- ENVIRONMENTAL PROTECTION AND SAVING ENERGY
- INSTALLATION AND CONNECTION
- FAMILIARISING YOURSELF WITH YOUR APPLIANCE
- PROGRAMMES
- ADDITIONAL FUNCTIONS
- FEATURES
- BEFORE USING FOR THE FIRST TIME
- WATER SOFTENING SYSTEM
- RINSE AID SYSTEM
- DETERGENT
- TABLEWARE
- BASIC OPERATION
- BASIC SETTINGS
- CLEANING AND SERVICING
- TROUBLESHOOTING
- TRANSPORTATION, STORAGE AND DISPOSAL
- CUSTOMER SERVICE
- TECHNICAL DATA
- GENERAL INFORMATION
- INTENDED USE
- RESTRICTION ON USER GROUP
- SAFE INSTALLATION
- ⚠ WARNING – RISK OF INJURY
- ⚠ WARNING – RISK OF ELECTRIC SHOCK
- ⚠ WARNING – RISK OF FIRE
- ⚠ WARNING – RISK OF TIPPING
- ⚠ WARNING – RISK OF BURNS
- SAFE USE
- ⚠ WARNING – RISK OF SERIOUS HARM TO HEALTH
- ⚠ WARNING – RISK OF EXPLOSION
- ⚠ WARNING – RISK OF SCALDING
- EN SAFETY
- DAMAGED APPLIANCE
- RISK TO CHILDREN
- ⚠ WARNING – RISK OF SUFFOCATION
- ⚠ WARNING – RISK OF HARM TO HEALTH
- ⚠ WARNING – RISK OF CRUSHING
- ⚠ WARNING – RISK OF CHEMICAL BURNS
- SAFETY SYSTEMS
- ATTENTION
- EN CHILDPROOF LOCK
- DOOR LOCK
- WARNING
- RISK OF SUFFOCATION
- ACTIVATING THE DOOR LOCK
- DEACTIVATING THE DOOR LOCK
- DISPOSING OF PACKAGING
- SAVING ENERGY
- AQUASENSOR
- SCOPE OF SUPPLY
- EN INSTALLATION AND CONNECTION
- INSTALLING AND CONNECTING THE APPLIANCE
- DRAINAGE CONNECTION
- INSTALLING THE DRAINAGE CONNECTION
- DRINKING WATER CONNECTION
- INSTALLING THE DRINKING WATER CONNECTION
- ELECTRICAL CONNECTION
- CONNECTING THE APPLIANCE TO THE ELECTRICITY SUPPLY
- NOTES
- APPLIANCE
- CONTROLS
- INFORMATION FOR TEST INSTITUTES
- TOP BASKET
- ADJUSTING TOP BASKET WITH SIDE LEVERS
- ADJUSTING TOP BASKET WITH PAIRS OF ROLLERS
- BOTTOM BASKET
- CUTLERY BASKET
- CUTLERY DRAWER
- REORGANISING CUTLERY DRAWER¹
- TIP
- SHELF
- ADJUSTING ETAGERE
- FOLDING PRONGS
- FOLDING DOWN PRONGS
- SMALL ITEMS HOLDER
- KNIFE SHELF
- BASKET HEIGHTS
- APPLIANCE HEIGHT 86.5 CM WITH CUTLERY DRAWER
- PERFORMING INITIAL START-UP
- OVERVIEW OF WATER HARDNESS SETTINGS
- SETTING WATER SOFTENING SYSTEM
- SPECIAL SALT
- ADDING SPECIAL SALT
- SWITCHING OFF WATER SOFTENING SYSTEM
- NOTE
- REGENERATION OF THE WATER SOFTENING SYSTEM
- OVERVIEW OF CONSUMPTION VALUES WITH REGENERATION THE WATER SOFTENING SYSTEM
- YOU CAN USE THE RINSE AID SYSTEM AND RINSE AID TO GET TABLEWARE AND GLASSES RINSED PERFECTLY WITHOUT MARKS
- FOR OPTIMUM DRYING RESULTS, USE RINSE AID
- IF THE RINSE AID REFILL INDICATOR LIGHTS UP, TOP UP WITH RINSE AID. ONLY USE RINSE AID FOR DOMESTIC DISHWASHERS
- SETTING THE AMOUNT OF RINSE AID
- SWITCHING RINSE AID SYSTEM OFF
- SUITABLE DETERGENTS
- SEPARATE DETERGENTS
- COMBINED DETERGENT
- UNSUITABLE DETERGENTS
- INFORMATION ON DETERGENTS
- ADDING DETERGENT
- DAMAGE TO GLASS AND TABLEWARE
- ARRANGING TABLEWARE
- TIPS
- REMOVING TABLEWARE
- WARNING RISK OF INJURY
- OPENING APPLIANCE DOOR
- SWITCHING ON APPLIANCE
- SETTING A PROGRAMME
- SETTING ADDITIONAL FUNCTIONS
- SETTING TIMER PROGRAMMING
- STARTING THE PROGRAMME
- INTERRUPTING PROGRAMME
- TERMINATE PROGRAMME
- SWITCHING OFF APPLIANCE
- OVERVIEW OF BASIC SETTINGS
- CHANGING BASIC SETTINGS
- CLEANING THE TUB
- RISK OF HARM TO HEALTH
- SELF-CLEANING INTERIOR
- CLEANING PRODUCTS
- TIPS ON APPLIANCE CARE
- EASY CLEAN EASY CLEAN
- PERFORMING EASY CLEAN
- FILTER SYSTEM
- CLEANING FILTERS
- CLEANING SPRAY ARMS
- RISK OF ELECTRIC SHOCK
- APPLIANCE SAFETY
- ERROR CODE / FAULT DISPLAY / SIGNAL
- CLEAN WASTEWATER PUMP
- RISK OF INJURY
- REMOVING THE APPLIANCE
- PROTECT APPLIANCE FROM FROST
- TRANSPORTING THE APPLIANCE
- DISPOSING OF OLD APPLIANCE
- PRODUCT NUMBER (E-NR.) AND PRODUCTION NUMBER (FD)
- AQUA-STOP GUARANTEE
Brand : NEFF
Model : S713N60X1G
Category : Dishwasher