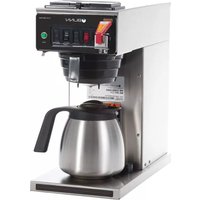
CWTF-DV-TC - Coffee machine Bunn - Free user manual and instructions
Find the device manual for free CWTF-DV-TC Bunn in PDF.


| Product Type | Coffee Machine |
| Brand | Bunn |
| Model | CWTF-DV-TC |
| Dimensions (W x D x H) | 19.5 x 14.0 x 17.8 inches |
| Weight | 28 lbs |
| Power Supply | 120V AC / 240V AC, 1500W |
| Brew Capacity | 3.5 liters (up to 15 cups) |
| Brew Time | Approximately 3 minutes per full batch |
| Water Temperature | 200°F (93°C) optimal brew temperature |
| Type | Commercial drip coffee maker with thermal carafe |
| Dual Voltage Capability | Yes (120V/240V switchable) |
| Programmable Features | Automatic shut-off, brew timer, adjustable brew strength |
| Water Filtration | Compatible with Bunn filter cartridges (sold separately) |
| Construction | Stainless steel and high-impact plastic |
| Warranty | 2 years limited commercial warranty |
| Cleaning / Descaling | Recommended every 3 months with Bunn descaler |
| Replacement Parts | Available: brew basket, carafe, spray head, heating element |
Frequently Asked Questions - CWTF-DV-TC Bunn
User questions about CWTF-DV-TC Bunn
0 question about this device. Answer the ones you know or ask your own.
Ask a new question about this device
Download the instructions for your Coffee machine in PDF format for free! Find your manual CWTF-DV-TC - Bunn and take your electronic device back in hand. On this page are published all the documents necessary for the use of your device. CWTF-DV-TC by Bunn.
USER MANUAL CWTF-DV-TC Bunn
C, CT, CWTF Series Including DV, APS/TC/TS, Single CW & Twins
Supercedes Operating Manuals: 10690.#####; 10737.#####; 10841.0000; 28182.0000; 36102.0000
natural_image
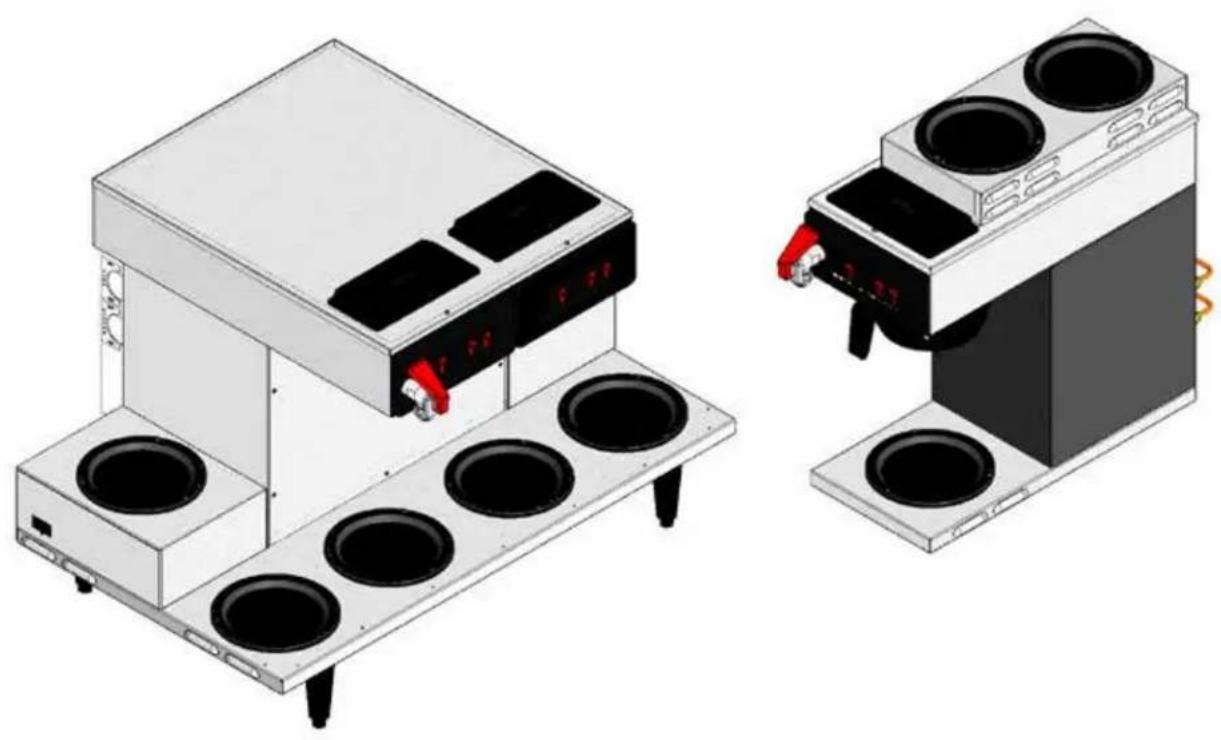
Technical illustration of two industrial electrical appliances with cooling fans and heat sinks (no text or symbols)INSTALLATION & OPERATING GUIDE
BUNN-O-MATIC CORPORATION
POST OFFICE BOX 3227 SPRINGFIELD, ILLINOIS 62708-3227 PHONE: (217) 529-6601 FAX: (217) 529-6644
To ensure you have the latest revision of the Operating Manual, or to view the Illustrated Parts Catalog, Programming Manual, or Service Manual, please visit the Bunn-O-Matic website, at www.bunn.com. This is absolutely FREE, and the quickest way to obtain the latest catalog and manual updates. For Technical Service, contact Bunn-O-Matic Corporation at 1-800-286-6070.
BUNN-O-MATIC COMMERCIAL PRODUCT WARRANTY
Bunn-O-Matic Corp. ("BUNN") warrants equipment manufactured by it as follows:
1) Airpots, thermal carafes, decanters, GPR servers, iced tea/coffee dispensers, MCP/MCA pod brewers thermal servers and Thermofresh servers (mechanical and digital)- 1 year parts and 1 year labor.
2) All other equipment - 2 years parts and 1 year labor plus added warranties as specified below:
a) Electronic circuit and/or control boards - parts and labor for 3 years.
b) Compressors on refrigeration equipment - 5 years parts and 1 year labor.
c) Grinding burrs on coffee grinding equipment to grind coffee to meet original factory screen sieve analysis - parts and labor for 4 years or 40,000 pounds of coffee, whichever comes first.
These warranty periods run from the date of installation BUNN warrants that the equipment manufactured by it will be commercially free of defects in material and workmanship existing at the time of manufacture and appearing within the applicable warranty period. This warranty does not apply to any equipment, component or part that was not manufactured by BUNN or that, in BUNN's judgment, has been affected by misuse, neglect, alteration, improper installation or operation, improper maintenance or repair, non periodic cleaning and descaling, equipment failures related to poor water quality, damage or casualty. In addition, the warranty does not apply to replacement of items subject to normal use including but not limited to user replaceable parts such as seals and gaskets. This warranty is conditioned on the Buyer 1) giving BUNN prompt notice of any claim to be made under this warranty by telephone at (217) 529-6601 or by writing to Post Office Box 3227, Springfield, Illinois 62708-3227; 2) if requested by BUNN, shipping the defective equipment prepaid to an authorized BUNN service location; and 3) receiving prior authorization from BUNN that the defective equipment is under warranty.
THE FOREGOING WARRANTY IS EXCLUSIVE AND IS IN LIEU OF ANY OTHER WARRANTY, WRITTEN OR ORAL, EXPRESS OR IMPLIED, INCLUDING, BUT NOT LIMITED TO, ANY IMPLIED WARRANTY OF EITHER MERCHANTABILITY OR FITNESS FOR A PARTICULAR PURPOSE. The agents, dealers or employees of BUNN are not authorized to make modifications to this warranty or to make additional warranties that are binding on BUNN. Accordingly, statements by such individuals, whether oral or written, do not constitute warranties and should not be relied upon.
If BUNN determines in its sole discretion that the equipment does not conform to the warranty, BUNN, at its exclusive option while the equipment is under warranty, shall either 1) provide at no charge replacement parts and/or labor (during the applicable parts and labor warranty periods specified above) to repair the defective components, provided that this repair is done by a BUNN Authorized Service Representative; or 2) shall replace the equipment or refund the purchase price for the equipment.
THE BUYER'S REMEDY AGAINST BUNN FOR THE BREACH OF ANY OBLIGATION ARISING OUT OF THE SALE OF THIS EQUIPMENT, WHETHER DERIVED FROM WARRANTY OR OTHERWISE, SHALL BE LIMITED, AT BUNN'S SOLE OPTION AS SPECIFIED HEREIN, TO REPAIR, REPLACEMENT OR REFUND.
In no event shall BUNN be liable for any other damage or loss, including, but not limited to, lost profits, lost sales, loss of use of equipment, claims of Buyer's customers, cost of capital, cost of down time, cost of substitute equipment, facilities or services, or any other special, incidental or consequential damages.
392, AutoPOD, AXIOM, BrewLOGIC, BrewMETER, Brew Better Not Bitter, BrewWISE, BrewWIZARD, BUNN Espress, BUNN Family Gourmet, BUNN Gourmet, BUNN Pour-O-Matic, BUNN, BUNN with the stylized red line, BUNNlink, Bunn-OMatic, Bunn-O-Matic, BUNNserve, BUNNSERVE with the stylized wrench design, Cool Froth, DBC, Dr. Brew stylized Dr. design, Dual, Easy Pour, EasyClear, EasyGard, FlavorGard, Gourmet Ice, Gourmet Juice, High Intensity, iMIX, Infusion Series, Intellisteam, My Café, Phase Brew, PowerLogic, Quality Beverage Equipment Worldwide, Respect Earth, Respect Earth with the stylized leaf and coffee cherry design, Safety-Fresh, savemycoffee.com, Scale-Pro, Silver Series, Single, Smart Funnel, Smart Hopper, SmartWAVE, Soft Heat, SplashGard, The Mark of Quality in Beverage Equipment Worldwide, ThermoFresh, Titan, trifecta, Velocity Brew, A Partner You Can Count On, Air Brew, Air Infusion, Beverage Bar Creator, Beverage Profit Calculator, Brew better, not bitter., BUNNSource, Coffee At Its Best, Cyclonic Heating System, Daypart, Digital Brewer Control, Nothing Brews Like a BUNN, Pouring Profits, Signature Series, Tea At Its Best, The Horizontal Red Line, Ultra are either trademarks or registered trademarks of Bunn-O-Matic Corporation.
INTRODUCTION
This equipment will brew one or two half-gallon batches of coffee simultaneously into awaiting dispensers (with just the press of a button). One side may include a hot water faucet for allied beverage use. It is only for indoor use on a sturdy counter.
USER NOTICES 4
ELECTRICAL REQUIREMENTS....5
PLUMBING REQUIREMENTS (CURRENT SINGLES)......6
PLUMBING REQUIREMENTS (CURRENT TWINS)....7
PLUMBING REQUIREMENTS (EARLY SINGLES) 8
PLUMBING REQUIREMENTS (EARLY TWINS)....9
INITIAL SET-UP....10
ADJUSTING BREW VOLUMES 11
Explanation of codes:
15 - All components in machine are rated for 120 Volts ac, (15 Amps)
20 - All components in machine are rated for 120 Volts ac, (20 Amps)
35 (120/240V) - Tank heater rated for 240 volts ac, all other components rated for 120 volts ac (20 Amps)
DV - Dual Voltage. 2 tank heaters with toggle switch
MV - Multi Voltage. 2 tank heaters with terminal block. (Replaced by DV)
A - All components in machine are rated for 240 volts ac.
B - All components are rated for either 100 volts ac, or 200 volts ac.
C - Canadian models only
CE - European models only.
TWIN - 2 brewers in 1 chassis.
APS - Airport Server (No warmers)
TC - Thermal Carafe (No warmers)
TS - Thermal Server (No warmers)
USER NOTICES
Carefully read and follow all notices in this manual and on the equipment. All labels on the equipment should be kept in good condition. Replace any unreadable or damaged labels.
As directed in the International Plumbing Code of the International Code Council and the Food Code Manual of the Food and Drug Administration (FDA), this equipment must be installed with adequate backflow prevention to comply with federal, state and local codes. For models installed outside the U.S.A., you must comply with the applicable Plumbing/Sanitation Code for your area.
00656.0001

03408.0002

00658.0000
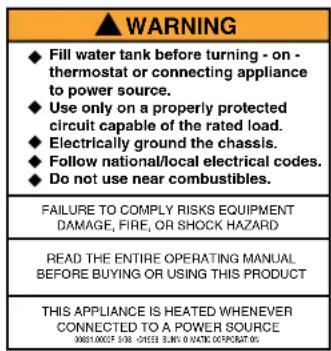
00831.0000

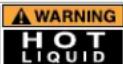
03409.0002

37881.0000
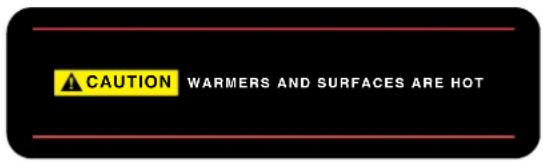
02765.0000
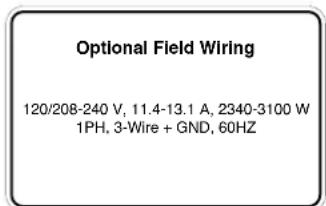
34955.0000
APS MODELS

00824.0002

34955.0001
ONE WARMER MODELS

34955.0002
TWO WARMER BREWERS

34955.0003
THREE WARMER BREWERS


34056.0000
VOLTAGE SELECTOR SWITCH
ELECTRICAL REQUIREMENTS
CAUTION - The brewer must be disconnected from the power source until specified in Initial Set-Up.
Model 15 has an attached cordset and requires 2-wire grounded service rated 120 volts ac, 15 amp, single phase, 60 Hz.

Model 20
Requires 2-wire, grounded service rated 120 volts ac, 20 amp, single phase, 60 Hz. Proceed as follows:

Model 35
Note: This electrical service consists of 3 current carrying conductors (Neutral, L1 and L2) and a separate conductor for earth ground.

230V ac 3 phase models
Note: This electrical service consists of 3 current carrying conductors (L1, L2 and L3) and a separate conductor for earth ground.

200 or 230V ac single phase models
Note: This electrical service consists of 2 current carrying conductors (L1 and L2) and a separate conductor for earth ground.
NOTE: Some Twins require two individual power cords.
CE REQUIREMENTS:
- This appliance must be installed in locations where it can be overseen by trained personnel.
- For proper operation, this appliance must be installed where the temperature is between 5^ to 35^ .
- Appliance shall not be tilted more than 10^ for safe operation.
- An electrician must provide electrical service as specified in conformance with all local and national codes.
- This appliance must not be cleaned by water jet.
- This appliance is not intended for use by persons (including children) with reduced physical, sensory or mental capabilities, or lack of experience and knowledge, unless they have been given instructions concerning use of this appliance by a person responsible for its safety.
- Children should be supervised to ensure they do not play with the appliance.
- If the power cord is ever damaged, it must be replaced by the manufacturer or authorized service personnel with a special cord available from the manufacturer or its authorized service personnel in order to avoid a hazard.
- Machine must not be immersed for cleaning..
ELECTRICAL HOOK-UP
CAUTION – Improper electrical installation will damage electronic components.
- An electrician must provide electrical service as specified.
-
Using a voltmeter, check the voltage and color coding of each conductor at the electrical source.
-
Place the heater switche(s) at the rear of the brewer in the "OFF" lower position.
-
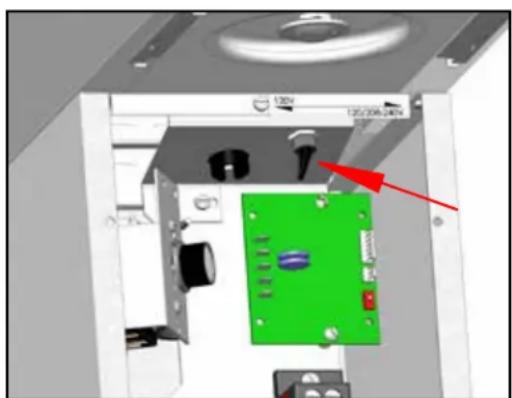
Remove the front panel beneath the sprayheads. (On Dual Volt models, place the voltage select toggle switch to the corresponding voltage position being used. FIG 5-1).
-
Feed the cord through the strain relief(s) and connect it to the terminal block(s).
-
Connect the brewer to the power source and verify the voltage at the terminal block before proceeding. Replace the front panel.
-
If plumbing is to be hooked up later be sure the brewer is disconnected from the power source. If plumbing has been hooked up, the brewer is ready for Initial Set-Up.
natural_image
3D interior view of an electronic device with green circuit board and labeled ports (no readable text or symbols)FIG. 5-1 Dual Volt Switch Position
PLUMBING REQUIREMENTS-CURRENT SINGLES
As directed in the International Plumbing Code of the International Code Council and the Food Code Manual of the Food and Drug Administration (FDA), this equipment must be installed with adequate backflow prevention to comply with federal, state and local codes. For models installed outside the U.S.A., you must comply with the applicable Plumbing /Sanitation Code for your area.
MODEL C:
This model is completely portable and requires no attached plumbing.
MODELS CT, CTF, CWT, CWTA, CWTB, CWTF, CWTFA & CWTFB, SINGLE CW & SINGLE CWF
These brewers must be connected to a cold water system with operating pressure between 20 and 90 psi (138 to 620kPa) from a 12 " or larger supply line. A shut-off valve should be installed in the line before the brewer. Install a regulator in the line when pressure is greater than 90 psi (620kPa)to reduce it to 50 psi (345kPa). The water inlet fitting is 14 " flare.
NOTE - Bunn-O-Matic recommends 14 " copper tubing for installations of less than 25 feet and 38 " for more than 25 feet from the 12 " water supply line. A tight coil of tubing in the water line will facilitate moving the brewer to clean the countertop. Bunn-O-Matic does not recommend the use of a saddle valve to install the brewer. The size and shape of the hole made in the supply line by this type of device may restrict water flow.

natural_image
Diagram of a mechanical or electrical component with orange and yellow tubing, no visible text or symbols
natural_image
Diagram of a mechanical assembly showing a connector inserted into a wall-mounted cable (no text or symbols present)Models CT & CWTModels CTF & CWTF
PLUMBING REQUIREMENTS-CURRENT TWINS
TWINS
These brewers must be connected to a cold water system with operating pressure between 20 and 90 psi (138 and 620 kPa) from a 12 " or larger supply line. A shut-off valve should be installed in the line before the brewer. Install a regulator in the line when pressure is greater than 90 psi (620 kPa) to reduce it to 50 psi (345 kPa). The water inlet fitting is 38 " flare.
- Remove six screws securing rear utility cover (if equipped). FIG 7-1
- Remove cap from the flared fitting on the bottom of the center tube assembly.
- Flush the water line and securely attach it to the flare fitting on the center tube assembly. FIG 7-2
- Turn on the water supply.
- Re-install rear utility cover. FIG 7-3
- On models with faucet, place an empty vessel beneath the faucet and lift the handle until water is dispensed.
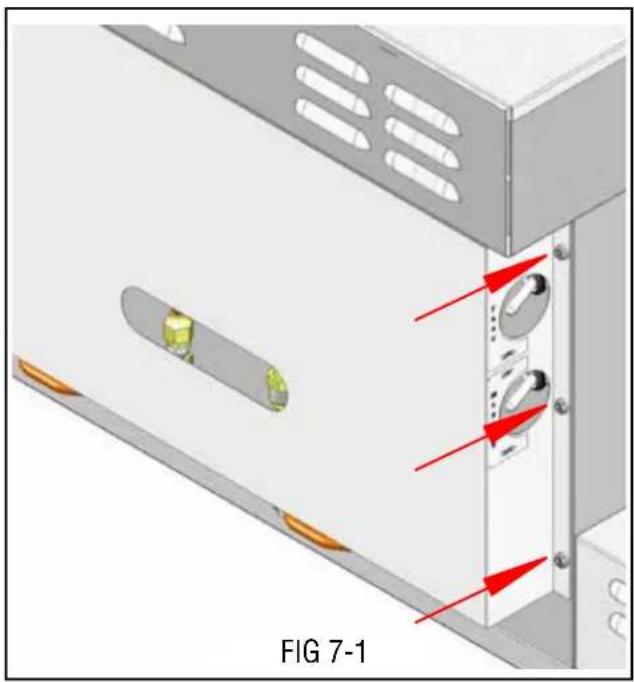
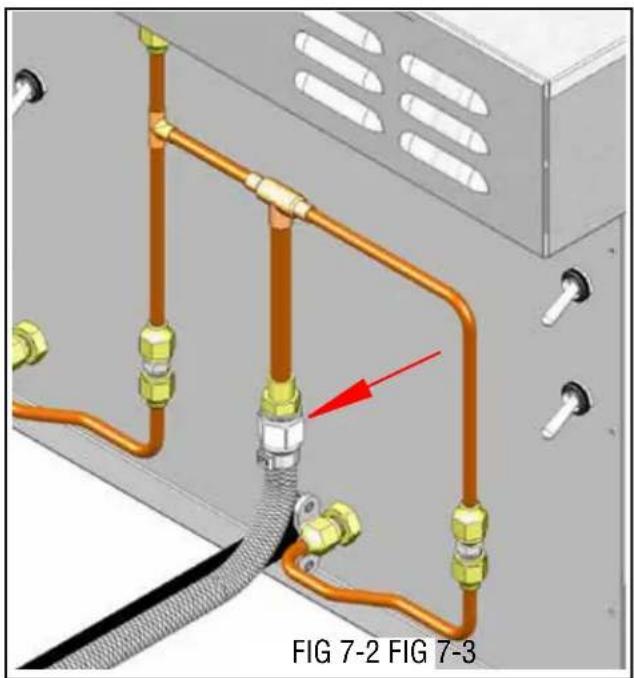
natural_image
3D diagram of a mechanical or electrical component with orange and yellow pipes, no visible text or symbols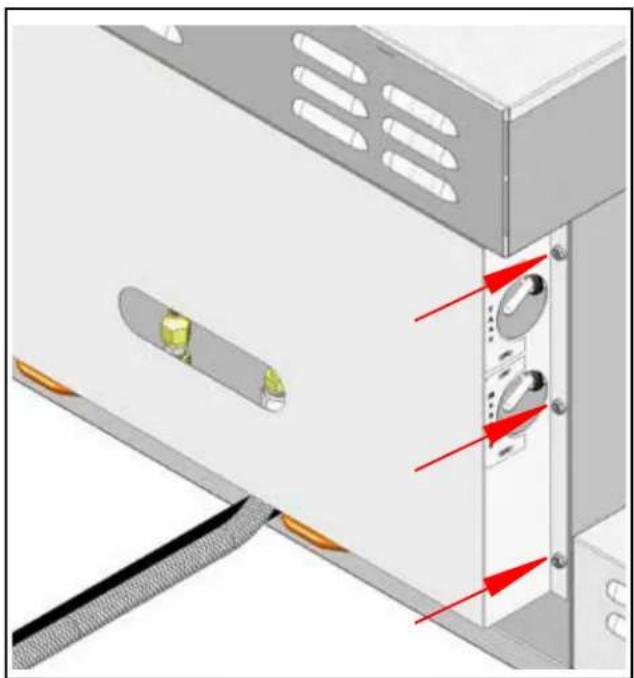
natural_image
3D diagram of a server rack with labeled components and directional arrows indicating movement (no text or symbols present)PLUMBING REQUIREMENTS-EARLY SINGLES
As directed in the International Plumbing Code of the International Code Council and the Food Code Manual of the Food and Drug Administration (FDA), this equipment must be installed with adequate backflow prevention to comply with federal, state and local codes. For models installed outside the U.S.A., you must comply with the applicable Plumbing /Sanitation Code for your area.
MODEL C:
This model is completely portable and requires no attached plumbing.
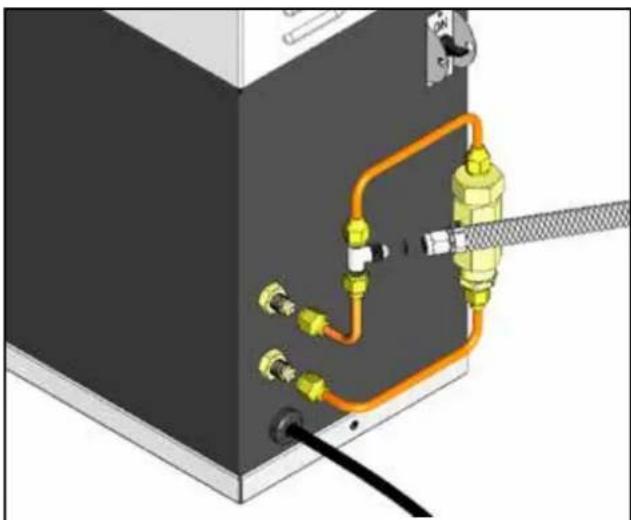
MODELS CT, CTF, CWT, CWTA, CWTB, CWTF, CWTFA & CWTFB, SINGLE CW & SINGLE CWF
These brewers must be connected to a cold water system with operating pressure between 20 and 90 psi (138 to 620kPa) from a 12 " or larger supply line. A shut-off valve should be installed in the line before the brewer. Install a regulator in the line when pressure is greater than 90 psi (620kPa)to reduce it to 50 psi (345kPa). The water inlet fitting is 14 " flare.
NOTE - Bunn-O-Matic recommends 14 " copper tubing for installations of less than 25 feet and 38 " for more than 25 feet from the 12 " water supply line. A tight coil of tubing in the water line will facilitate moving the brewer to clean the countertop. Bunn-O-Matic does not recommend the use of a saddle valve to install the brewer. The size and shape of the hole made in the supply line by this type of device may restrict water flow.
natural_image
3D diagram of a mechanical or electrical component with orange and yellow pipes, no visible text or symbolsFIG 8-1 FIG 8-2

natural_image
3D diagram of a mechanical assembly with yellow and black components, no visible text or symbolsModels CT & CWTModels CTF & CWTF
PLUMBING REQUIREMENTS-EARLY TWINS
TWINS
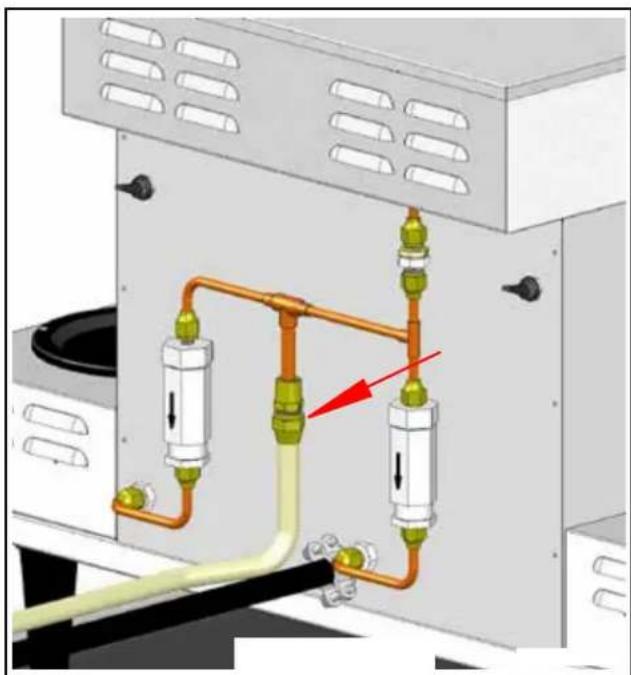
These brewers must be connected to a cold water system with operating pressure between 20 and 90 psi (138 and 620 kPa) from a 12 " or larger supply line. A shut-off valve should be installed in the line before the brewer. Install a regulator in the line when pressure is greater than 90 psi (620 kPa) to reduce it to 50 psi (345 kPa). The water inlet fitting is 38 " flare.
TWINS
- Remove six screws securing rear utility cover (if equipped). FIG 9-1
- Remove cap from the flared fitting on the bottom of the center tube assembly.
- Flush the water line and securely attach it to the flare fitting on the center tube assembly. FIG 9-2
- Turn on the water supply.
- Re-install rear utility cover. FIG 9-3
- On models with faucet, place an empty vessel beneath the faucet and lift the handle until water is dispensed.

natural_image
Diagram of a gasifier or condenser unit with pipes and valves, showing internal connections and airflow direction (no text or labels)
INITIAL SET-UP
CAUTION - The brewer must be disconnected from the power source throughout the initial set-up, except when specified in the instructions.
- Insert an empty funnel into the funnel rails.
- Place an empty dispenser under the funnel.
- Place the heater switch at the rear of the brewer in the "OFF" lower position and connect the brewer to the power source.
- Fill the tank with water as directed:
4A. Model C
Pour three pitchers of tap water into the screened area on top of the brewer. Allow approximately two minutes between pitchers for water to flow into the tank. While the third pitcher of water is entering the tank, the tank will fill to capacity and the excess will flow from the sprayhead, out of the funnel, and into the dispenser.
4B. Models CT, CTF, CWT, CWTA, CWTB, CWTF, CWTFA, CWTFB, SINGLE CW & SINGLE CWF
Connect the brewer to the power source, place the "ON/OFF" switch in the "ON" upper position, and momentarily press and release the start switch. Water will begin flowing into the tank. When water stops flowing into the tank, initiate a second and a third brew cycle. During the third brew cycle the tank will fill to its capacity and the excess will flow from the sprayhead, out of the funnel, and into the dispenser.
- When the flow of water from the funnel stops, place the heater switch at the rear of the brewer in the "ON" upper position and wait approximately twenty minutes for the water in the tank to heat to the proper temperature. Some water will drip from the funnel during this time; this is due to expansion and should not occur thereafter.
- Empty the dispenser and initiate another brew cycle as directed:
6A. Model C
Pour one pitcher of tap water into the screened area on top of the brewer.
6B. Models CT, CTF, CWT, CWTA, CWTB, CWTF, CWTFA, CWTFB, SINGLE CW & SINGLE CWF
Place the "ON/OFF" switch in the "ON" upper position, and on models SINGLE CW and SINGLE CWF place the batch selector switch in the "1 GAL" position. Momentarily press and release the start switch.
- Place the "ON/OFF" switch in the lower "OFF" position after water has stopped flowing from the funnel, and let the water in the tank reheat to the proper temperature.
- Empty the dispenser; place the "ON/OFF" switch in the "ON" upper position, and momentarily press and release the start switch. Check the water volume in the dispenser after water has stopped flowing from the funnel. It should be 64 ounces for all models except SINGLE CW and SINGLE CWF should be 128 ounces.
- Models SINGLE CW and SINGLE CWF only, place the batch selector switch in the "1/2 GAL" position, and momentarily press and release the start switch. Check the water volume in the dispenser after water has stopped flowing from the funnel. It should be 64 ounces.
- If water volumes are not correct, adjust the brew timer as required. See Adjusting Brew Volumes. Allow the water to reheat. Start, and measure another brew cycle.
- Repeat step 10 until correct water volume is achieved.
NOTE: For all Twins, repeat steps 1 through 10 for the other side.
- The brewer is now ready for use in accordance with the coffee brewing instructions.
ADJUSTING BREW VOLUMES
NOTE: Check that the brewer is connected to water supply, the tank is properly filled, and a funnel and server or decanter are in place, prior to setting or modifying batch sizes.
- Modifying batch sizes. To modify a batch volume, first check that the SET/LOCK switch is in the "SET" position on the circuit board. If the brewer has a batch selector switch, position it to the size to be changed.
0 To increase a batch size, Press and hold the START or BREW switch until three clicks are heard. Release the switch (Failure to release the switch within two seconds after the third click causes the volume setting to be aborted and previous volume setting will remain in memory) and press it again one or more times. Each time
the switch is pressed, two seconds are added to the brew time period. Allow the brew cycle to finish in order to verify that the desired volume has been achieved.
To decrease a batch size, Press and release the START or BREW switch once for every two-second interval to be removed from the total brew time period; then immediately press and hold down the START or BREW switch until three clicks are heard. Release the switch. (Failure to release the switch within two seconds after the third click causes the volume setting to be aborted and previous volume setting will remain in memory). Allow the brew cycle to finish in order to verify that the desired volume has been achieved.
- Setting batch sizes. To set a batch volume, first check that the SET/LOCK switch is in the “SET” position on the circuit board. Press and hold the START or BREW switch until three distinct clicks are heard (this will take approximately ten seconds), and then release the switch. (Failure to release the switch within two seconds after the third click causes the volume setting to be aborted and previous volume setting will remain in memory). View the level of the liquid being dispensed. When the desired level is reached, turn the ON/OFF switch to “OFF”. The brewer remembers this volume and will continue to brew batches of this size until the volume setting procedure is repeated. Empty server(s), turn selector switch to positions that have yet to be set, and repeat batch setting procedure until all batch sizes are set.
NOTE: When brewing coffee, batch volumes will decrease due to absorption by the coffee grounds.
- Setting programming disable feature. If it becomes necessary to prevent anyone from changing brew times once programmed, you can set the SET/LOCK switch to the "LOCK" position. This will prevent any programming to be done.
NOTE: If the clicks can not be heard, lightly grip the incoming water line to feel when the valve cycles on and off.
THERMOSTAT
In most locations the thermostat should be turned to the full clockwise position (200°F) for optimum brewing temperature. In areas of high altitude you may have to turn it down (counterclockwise) to prevent boiling.

| NOTICE | ||
| Brew water temperature is factory set at 200°F (93.3°C)Areas of high altitude will require lowering this tempera-ture to prevent boiling. This chart should be used as a guide when readjusting the brew water temperature. | ||
| Altitude(Feet) | Boiling pointof water°F °C | Recommendedwater temperature°F °C |
| -1000 213.8 101.0 200 93.3 | ||
| -500 212.9 100.5 200 93.3 | ||
| 0 212.0 100.0 200 93.3 | ||
| 500 211.1 99.5 200 93.3 | ||
| 1000 210.2 99.0 200 93.3 | ||
| 1500 209.3 98.5 200 93.3 | ||
| 2000 208.4 98.0 200 93.3 | ||
| 2500 207.4 97.4 200 93.3 | ||
| 3000 206.5 96.9 199 92.8 | ||
| 3500 205.6 96.4 198 92.2 | ||
| 4000 204.7 95.9 197 91.7 | ||
| 4500 203.8 95.4 196 91.1 | ||
| 5000 202.9 94.9 195 90.6 | ||
| 5500 201.9 94.4 195 90.6 | ||
| 6000 201.0 93.9 194 90.0 | ||
| 6500 200.1 93.4 193 89.4 | ||
| 7000 199.2 92.9 192 88.9 | ||
| 7500 198.3 92.4 191 88.3 | ||
| 8000 197.4 91.9 190 87.8 | ||
| 8500 196.5 91.4 189 87.2 | ||
| 9000 195.5 90.8 188 86.7 | ||
| 9500 194.6 90.3 187 86.1 | ||
| 10000 193.7 89.8 186 85.6 | ||
35665.0000A 05/04 © 2004 Bunn-O-Matic Corporation
OPERATING CONTROLS
ON/LOWER SWITCH
Placing the "ON/LOWER" switch in the "OFF" (lower) position stops brewing. Stopping a brew cycle after it has been started, will not stop the flow of water into the funnel until the tank siphons down to its proper level. Placing the switch in the "ON" (upper) position enables the brew circuit and on all (except APS/TC models) supplies power to the brew station warmer.
START SWITCH
Momentarily pressing and releasing the switch starts a brew cycle. DO NOT HOLD START SWITCH. NOTE – The "ON/OFF" switch must be in the "ON" upper position to initiate and complete a brew cycle. NOTE – Some TWINS are equipped with auxiliary brew start switches on each side of brewer. Use care not to place other items too close to start switches so they don't block or accidentally start a brew cycle! FIG 11-1
FLIP LID (POUR IN FEATURE)
Place server under brew funnel. Open flip lid to pour in (water only). DO NOT POUR IN COFFEE! WARNING: DO NOT USE THE POUR IN FEATURE AND START SWITCH SIMULTANEOUSLY, OVER FLOWING OF HOT WATER WILL OCCUR!

OPERATING CONTROLS
MASTER ON/OFF SWITCH(S)
The master ON/OFF switch disables power the entire brewer (including tank heaters). NOTE – TWINS with 2 power cords will have 2 power switches, (one left, one right).
TANK HEATER ON/OFF SWITCH(S)
The tank heater ON/OFF switch disables power to the tank heater circuits only. Power to brew timer and warmer circuits are not affected. All Twins have 2 tank heater switches. NOTE: Leaving the tank heater switch(s) off will result in brewing with cold water.
LATE MODEL SWITCHS
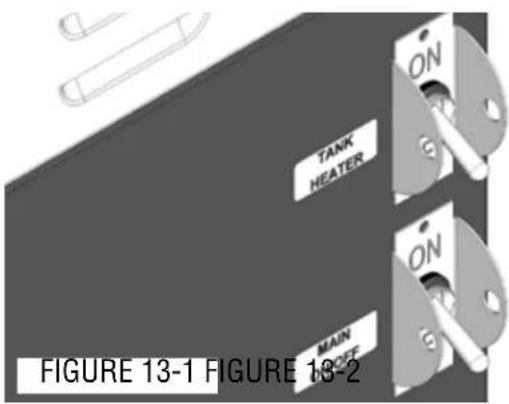
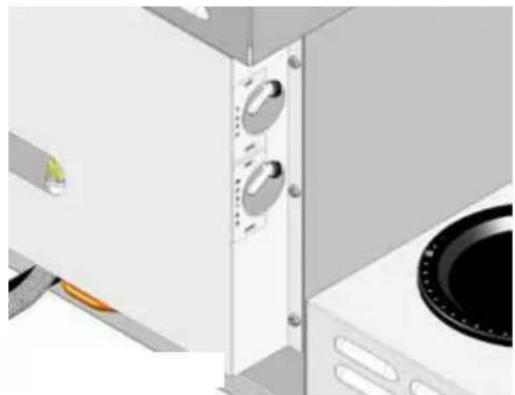
natural_image
Exterior view of a kitchen appliance with a door panel and fan (no visible text or symbols)EARLY MODEL SWITCHS

natural_image
3D rendering of a mechanical device with two circular components and a base, labeled FIGURE 13-3 and FIGURE 13-4 (no text on the device itself)
natural_image
3D rendering of a mechanical device with two circular components and mounting base (no visible text or symbols)COFFEE BREWING
- Insert a BUNN ^® filter into the funnel.
- Pour the fresh coffee into the filter and level the bed of grounds by gently shaking.
- Slide the funnel into the funnel rails.
- Place an empty dispenser beneath the funnel.
- Place the "ON/OFF" switch in the "ON" upper position. Momentarily press and release the start switch.
- When brewing is completed, simply discard the grounds and filter.
HOT WATER FAUCET
The hot water faucet may be used to dispense a cup of hot water at any time. Not intended for filling carafes, pitchers, etc. Attempting to dispense more than 8-10 ounces will result in cool water. NOTE – Faucet will not work with the pour in feature, brewer must be plumbed to a working water supply line.

natural_image
Illustration of a BUNN gas washing machine with a blue mug and red valve, no text or symbols present.CLEANING
- The use of a damp cloth rinsed in any mild, non-abrasive, liquid detergent is recommended for cleaning all surfaces on Bunn-O-Matic equipment. Use care when cleaning around the heater switch with a cloth, so as not to accidentally turn off the tank heater!
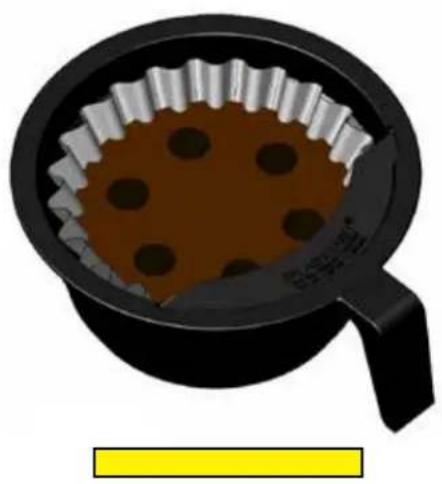
- Clean out the sprayhead holes. A properly cleaned sprayhead will leave a dimple in the bed of coffee grounds for each hole. Example: 6 holes = 6 dimples. FIG 15-1/2
- With the sprayhead removed, insert the deliming spring (provided) all the way into the sprayhead tube. When inserted properly, no more than two inches of spring should be visible. Saw back and forth five or six times. FIG 15-3. NOTE – In hard water areas, this may need to be done daily. It will help prevent liming problems in the brewer and takes less than a minute.
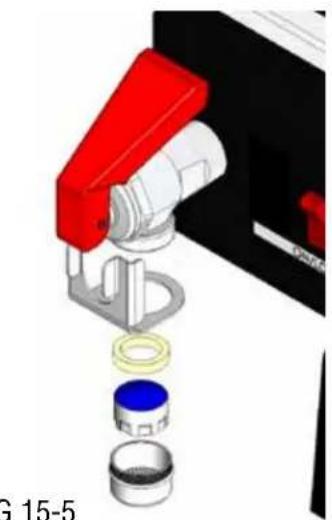
- The faucet aerator may be removed for cleaning. Unscrew aerator assembly (counterclockwise from bottom) FIG 15-5
WARNING: DO NOT ATTEMPT TO DISASSEMBLE REMAINDER OF FAUCET ASSEMBLY UNTIL BREWER IS DISCONECTED FROM WATER LINE.
natural_image
Illustration of a chocolate batter being poured into a black baking pan with a paper liner (no text or symbols)
natural_image
Illustration of a chocolate batter being poured into a black baking pan (no text or symbols)
natural_image
Circular metallic object with four small holes, no visible text or symbolsFIG 15-3
Clean Sprayhead Holes
Plugged Sprayhead Hole Normal pattern

Twist deliming spring while pushing in
natural_image
3D illustration of a red-handled mechanical device with a blue and yellow component, showing internal components (no text or symbols)Aerator disassembly
TROUBLESHOOTING
A troubleshooting guide is provided to suggest probable causes and remedies for the most likely problems encountered. If the problem remains after exhausting the troubleshooting steps, contact the Bunn-O-Matic Technical Service Department.
- Inspection, testing, and repair of electrical equipment should be performed only by qualified service personnel.
- All electronic components have 120 volt ac and low voltage dc potential on their terminals. Shorting of terminals or the application of external voltages may result in board failure.
- Intermittent operation of electronic circuit boards is unlikely. Board failure will normally be permanent. If an intermittent condition is encountered, the cause will likely be a switch contact or a loose connection at a terminal or crimp.
- Solenoid removal requires interrupting the water supply to the valve. Damage may result if solenoids are energized for more than ten minutes without a supply of water.
- The use of two wrenches is recommended whenever plumbing fittings are tightened or loosened. This will help to avoid twists and kinks in the tubing.
- Make certain that all plumbing connections are sealed and electrical connections tight and isolated.
- This brewer is heated at all times. Keep away from combustibles.
WARNING - • Exercise extreme caution when servicing electrical equipment.
- Unplug the brewer when servicing, except when electrical tests are specified.
- Follow recommended service procedures
- Replace all protective shields or safety notices
| PROBLEM | PROBABLE CAUSE | REMEDY |
| Brew cycle will not start | 1. ON/LOWER Switch is off. | Turn on switch. |
| 2. No power | (A) Turn on main power switch.(B) Check that the power cord is securely plugged into outlet.(C) Check circuit breakers or fuses. | |
| 3. No water | (A) Water lines and valves to the brewer must be open.(B) Check for plugged water filter | |
| Water is not hot | 1. Heater switch turned off. | Turn on switch |
| Inconsistent beverage level | 1. Lime Build-up | (A) Use deliming spring.(B) Clean sprayhead. (Page 11) |
| 2. Water Pressure fluctuating. | Have a pressure regulator In-stalled. | |
| Consistently low or high bever-age level. | 1. Timer adjustment. | Adjust timer (Page 10) |
| Spitting or excessive steaming | 1. Lime Build-up | (A) Use deliming spring.(B) Clean sprayhead. (Page 11) |
| Dripping from sprayhead | 1. Syphon System | The brewer must be level or slightly lower in front to syphon properly. |
| Brew cycle starts when ON/LOWER Switch is turned on. | Auxiliary brew start switch on TWINS inadvertently activated. | Move objects away from brewer. |
| Weak beverage | 1. Filter Type | BUNN® paper filters must be used for proper extraction. |
| 2. Coffee Grind | A fine or drip grind must be used for proper extraction. | |
| 3. Sprayhead | A clean spray-head must be used for proper extraction. | |
| 4. Funnel Loading | The BUNN® paper filter must be centered in the funnel and the bed of ground leveled by gentle shaking. | |
| 5. Water Temperature | Place an empty funnel on an empty dispenser beneath the sprayhead. Initiate a brew cycle and check the water temperature immediately below the sprayhead with a thermometer. The reading should not be less than 195°F (76°C). Adjust the control thermostat to increase the water temperature. Replace if necessary. | |
| Dry coffee grounds remain in the funnel | 1. Funnel Loading | The BUNN® paper filter must be centered in the funnel and the bed of grounds leveled by gently shaking. |
| 2. Sprayhead | A clean spray-head must be used for proper extraction. |

- C, CT, CWTF Series Including DV, APS/TC/TS, Single CW & Twins
- INSTALLATION & OPERATING GUIDE
- BUNN-O-MATIC COMMERCIAL PRODUCT WARRANTY
- INTRODUCTION
- Explanation of codes:
- USER NOTICES
- 00656.0001
- 03408.0002
- 00658.0000
- 00831.0000
- 03409.0002
- 37881.0000
- 02765.0000
- 34955.0000
- 00824.0002
- 34955.0001
- 34955.0002
- 34955.0003
- 34056.0000
- ELECTRICAL REQUIREMENTS
- NOTE: Some Twins require two individual power cords.
- CE REQUIREMENTS:
- ELECTRICAL HOOK-UP
- PLUMBING REQUIREMENTS-CURRENT SINGLES
- MODEL C:
- MODELS CT, CTF, CWT, CWTA, CWTB, CWTF, CWTFA & CWTFB, SINGLE CW & SINGLE CWF
- PLUMBING REQUIREMENTS-CURRENT TWINS
- TWINS
- PLUMBING REQUIREMENTS-EARLY SINGLES
- PLUMBING REQUIREMENTS-EARLY TWINS
- INITIAL SET-UP
- 4A. Model C
- 4B. Models CT, CTF, CWT, CWTA, CWTB, CWTF, CWTFA, CWTFB, SINGLE CW & SINGLE CWF
- 6A. Model C
- 6B. Models CT, CTF, CWT, CWTA, CWTB, CWTF, CWTFA, CWTFB, SINGLE CW & SINGLE CWF
- ADJUSTING BREW VOLUMES
- THERMOSTAT
- OPERATING CONTROLS
- ON/LOWER SWITCH
- START SWITCH
- FLIP LID (POUR IN FEATURE)
- MASTER ON/OFF SWITCH(S)
- TANK HEATER ON/OFF SWITCH(S)
- COFFEE BREWING
- HOT WATER FAUCET
- CLEANING
- WARNING: DO NOT ATTEMPT TO DISASSEMBLE REMAINDER OF FAUCET ASSEMBLY UNTIL BREWER IS DISCONECTED FROM WATER LINE.
- TROUBLESHOOTING
Brand : Bunn
Model : CWTF-DV-TC
Category : Coffee machine