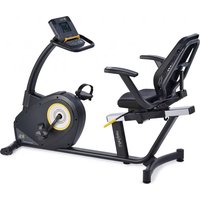
R3i - Indoor bike trainer LifeSpan - Free user manual and instructions
Find the device manual for free R3i LifeSpan in PDF.


| Product Type | Indoor Bike Trainer |
| Brand | LifeSpan |
| Model | R3i |
| Dimensions (L x W x H) | 60 x 50 x 30 cm (23.6 x 19.7 x 11.8 in) |
| Weight | 16 kg (35.3 lbs) |
| Max User Weight | 120 kg (265 lbs) |
| Resistance Type | Magnetic |
| Connectivity | Bluetooth ANT+ |
| Display | LCD with backlight |
| Power Source | Battery (2 AA) |
| Number of Programs | 12 |
| Heart Rate Monitor | Compatible with chest strap |
| Pedal Type | Standard platform pedals with straps |
| Frame Material | High-grade steel |
| Foldable | No |
| Warranty | 2 years limited |
| Maintenance | Clean with dry cloth; check bolts regularly |
| Safety | Stable base; ensure placement on flat surface |
| Spare Parts & Repairability | Replacement parts available via customer support |
| General Information | Designed for home use with quiet magnetic resistance |
Frequently Asked Questions - R3i LifeSpan
User questions about R3i LifeSpan
0 question about this device. Answer the ones you know or ask your own.
Ask a new question about this device
Download the instructions for your Indoor bike trainer in PDF format for free! Find your manual R3i - LifeSpan and take your electronic device back in hand. On this page are published all the documents necessary for the use of your device. R3i by LifeSpan.
USER MANUAL R3i LifeSpan
Congratulations in taking a step forward to increase your level of physical activity or add variety to your current exercise program. Physical activity is now more than ever a necessity to keep your body healthy and fit. Whether your motivation is to Lose Weight, manage a Chronic Disease like diabetes, train for a sporting event or just live a Healthy Lifestyle, LifeSpan products can help you achieve your health and fitness goals.
The LifeSpan Home series of cardio equipment is designed for the more than 60% of consumers who say they prefer to exercise in the comfort and privacy of their own homes. Each Home series product is designed and manufactured to exceed your expectations for quality and durability, simple assembly and ease of operation.
Please read this manual thoroughly before assembly and operation of your new LifeSpan equipment. It includes information on proper operation, safety precautions, product assembly and ongoing maintenance.
Remember that some types of services should only be performed by a qualified service technician. In the instance that service is required, please contact your authorized LifeSpan retailer or log onto our website and select the Customer Support option. Complete the information requested and we will respond to your inquiry within 2 business days or you can call us directly at 801.973.9993 and select the option for Customer Service.
PCE Health and Fitness
PO Box 981316
Park City, Utah 84098-1316
Phone: 801.973.9993
Fax: 801.973.9923
www.lifespanfitness.com
Neither PCE Health and Fitness nor its representatives can accept responsibility for any damages or injury incurred as a result of information presented in this manual except under the terms of the product warranty.
Table of Contents
- Welcome 3
• Limited Home Use Warranty 5 - Specifications 6
• Important Safety Precautions 7
• Starting an Exercise Program 8
• Assembly Instructions 9
• Display Console Overview 21
• Operating Your Bike 23
• Custom User Setup Programs 25
• Reading Your Heart Rate and Special Features 26
• Program Overview 27
• Leveling and Moving 36 - Seat Adjustments 37
• Engineering Mode, Troubleshooting and Maintenance 38
• Extended Warranty 39 - Serial Number Information 40
Limited Home Use Warranty
The LifeSpan R3i Interactive Trainer comes with the following warranty, which applies only for home use, or light commercial purposes.
| Residential | Commercial (4 hr/day) | |
| Frame: | Lifetime | 5 Years |
| Parts: | 5 Years | 2 Years |
| Labor: | 2 Years | 1 Year |
PCE Health and Fitness warrants that the equipment it manufactures is free from defects in material workmanship under normal use and service. The periods above are based on the date of purchase. During these periods, PCE Health and Fitness will repair or replace any defective part. Free labor is included as outline above on all parts that are not normally assembled or replaced by the customer. The customer may be responsible to pay for the Service Technician's travel time where travel in excess of 20 miles is required.
If within the time frames specified above, any part fails to operate properly, log on to our web site at www.lifespanfitness.com, click on Customer Support and complete the form to request assistance, or call 877-654-3837 x4 for a customer support agent.
PCE Health and Fitness reserves the right to make changes and improvements to our products without incurring any obligations to similarly alter any product purchased. In order to insure our product warranty and to ensure the safe and efficient operation of your LifeSpan product, only authorized parts can be used. The warranty is void if any parts other than those provided by PCE Health and Fitness are used.
Exclusions and Limitations:
- This warranty does not apply to any defects caused by negligence, misuse, improper assembly or maintenance, accident, or an "act of god".
• This warranty does not apply to discoloration of paint or plastics. - PCE Health and Fitness shall not be responsible for incidental or consequential damages.
- This warranty is nontransferable from the original owner.
Registration
You must register your LifeSpan product before a warranty claim can be processed. To complete your registration online go to www.lifespanfitness.com and click on Register Products, or fill out the warranty card provided and mail it today. Registration cards must be received by PCE Fitness within 30 days of purchase to activate the Product Warranty. Product Warranties are not valid unless the registration is properly completed and received within 30 days.
Specifications
| R3i | ||
| ConsoleReadouts | Program Name, Date and Time, Workout Time, Calories, RPMDistance, Heart Rate, Speed, Resistance Level (Load), Watts | |
| DisplayPrograms | Multi-Color LCDManual, Preset (17), User Set-up (2), Heart Rate Control (2) | |
| Program MatrixLevels of ResistanceProgram Buttons | 16 Rows by 20 Columns16 Levels5 Program Group Buttons for Heart Rate Control, Healthy Living, Sports Training, Weight Loss and User Set-up Programs | |
| AudioHeart Rate | Audio Center with in / out jacks and integrated speakersGrip Pulse and Receiver (chest strap is not included) | |
| Mechanics and PerformanceSeatSeat AdjustmentSeat BackSeat Back AdjustmentResistance SystemPedalsFlywheel WeightMax. User WeightDimensionsTransport Wheels | Molded with chair style armrest14" Infinite PositionBreathableAdjustable AngleMagnetic - Eddy CurrentSelf balancing18 lbs400 lbs73" x 28" x 46"Front Mounted | |
| WarrantyFramePartsLabor | Residential Lifetime 5 Years5 Years 2 Years2 Years 1 Year | Commercial5 Years2 Years1 Year |
Important Safety Precations
When using exercise equipment, basic precautions should always be followed, including:
- Never drop or insert any object into any opening.
- Never operate your bike if it has been damaged.
- Do not use outdoors, near swimming pools or in areas of high humidity.
- Keep products on a solid, level surface. Do not operate on deeply padded, plush or shag carpet. Damage to the carpeting may result.
- Use the exercise product for its intended use as described in the Owners Manual.
- Do not use attachments that are not recommended by LifeSpan.
- Wear shoes with rubber or high traction soles.
- Do not use shoes with heels, leather soles, cleats or spikes.
- Keep hands and feet away from moving parts.
- Use caution while participating in other activities while using your bike such as watching television or reading. These distractions may cause you to lose balance which may result in injury.
Children and Pets
- Keep children off your bike at all times.
- When in use, children and pets should be kept at least 10 feet away.
Other Safety Tips
• Always consult a physician before beginning this or any exercise program.
- If you experience chest pains, nausea, dizziness or shortness of breath, stop exercising immediately and consult your physician before continuing.
Cleaning
- Clean only with mild soap and a slightly damp cloth. Never use solvents when cleaning.
Note: Read all instructions before beginning use.
LifeSpan
Starting an Exercise Program
Starting an exercise program can sound like a daunting task, but just remember that your main goal is to boost your health by meeting the basic physical activity recommendations.
Before you begin an exercise program, or substantially increase your level of activity, be sure to consult your primary care physician. In preparation for a visit you may also want to take the PAR-Q Assessment. This Physical Activity Readiness Questionnaire (PAR-Q) will help you determine your suitability for beginning an exercise program and prepare you for discussing your physical activity program with your physician.
- Has your doctor ever said that you have a heart condition or that you should participate in physical activity only as recommended by a doctor?
- Do you feel pain in your chest during physical activity?
- In the past month, have you had chest pain when you were not doing physical activity?
- Do you lose your balance because of dizziness?
- Do you ever lose consciousness?
- Do you have a bone or joint problem that could be made worse by a change in your physical activity?
- Is your doctor currently prescribing drugs for your blood pressure or a heart condition?
- Do you know of any reason you should not participate in physical activity?
If you answered yes to one or more of the questions, if you are over 40 years of age and have been inactive or if you are concerned about your health, consult a physician before beginning an exercise program or substantially increasing your physical activity. If you answered no to each question, then it's likely you can begin an exercise program.
Pre-Exercise Resting Heart Rate Check
Before beginning your exercise program it is recommended that you check your resting heart rate. Your resting heart rate should be taken in a seated, relaxed position. Find your resting pulse and begin your count with "zero" on the first heart beat. Continue counting each time you feel your pulse until you have counted for a full 30 seconds. Next, double the number that you counted for 30 seconds and you now have your pre-exercise resting heart rate. Remember this number as we also recommend taking a post-exercise resting heart rate after you have completed your exercise program and you will want to remember your pre-exercise heart rate so you can compare the two heart rate measurements.
Assembly
At LifeSpan we strive to make our equipment easy to assemble and start using. Parts that can be pre-assembled are always assembled and tested on the production line.
Since your recumbent bike is a heavy piece of equipment it is recommended you use two people during assembly and follow these assembly instructions to reduce any problems that could occur.

| Item# | description |
| 1 | Main Frame |
| 2 | Front Support |
| 3 | Rear Support |
| 4 | Seat Rail Assembly |
| 5 | Seatback/Armrest |
| 6 | Seatback Shock |
| 7 | Top Shock Cover |
| 8 | Bottom Shock Cover |
| 9 | Seat Bottom |
| 10 | Console Upright |
| 11 | Upright Cover |
| 12 | Left Pedal |
| 13 | Right Pedal |
| 14 | Seat Mount |
Hardware
Located in hardware bag


Pre-installed hardware
Hardware will need to be removed and re-installed during the installation process


Step 1: Remove Components from Box
A. Remove plastic bags and lay all parts out on the floor.
B. Locate the hardware bag.
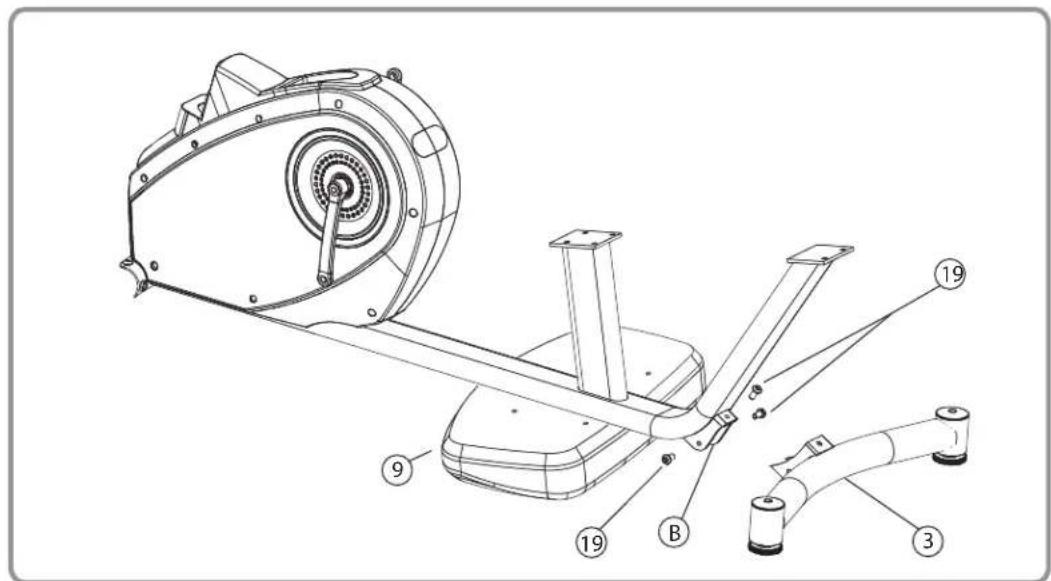
Step 2: Rear Support Assembly
A. Align the rear support assembly (3) with thear bracket (B).
B. Set the rear of the main frame assembly on the seat (9) with bolts facing upward as shown below, this will raise the frame making it easier to install the rear support assembly.
C. Install three M8 bolts (19) through the rear support assembly (3) and into the rear bracket (B). Do not fully tighten the bolts until all three bolts are installed.
D. Securely tighten the top bolt first, and then the two side bolts.
LifeSpan
Step 3: Front Support Assembly
A. Move the seat (9) forward so it is located in the position as shown below.
B. Align the front support assembly (2) with the front bracket (A).
C. Install two M8 bolts (15) and curve washers (16) through the front support assembly (2) and into the front bracket (A). Tighten these bolts prior to starting step D.
D. Insert two M8 bolts (19) through the top of the front bracket (A) and into the front support assembly (2).

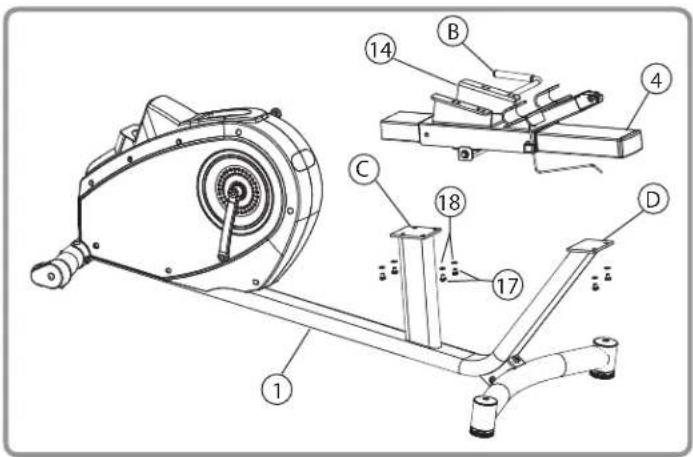
Step 4: Seat Rail Assembly
A. Check that the Seat Mount (14) is centered along the seat rail assembly (4), and tighten the Seat Mount stop lever (B) to lock the seat mount on the rail.
B. Align the seat rail assembly (4) with its front (C) and rear (D) brackets on the main frame assembly (1).
C. Install six M8 bolts (17) and washers (18) through the brackets (C and D) into the threaded holes on the seat rail assembly (4). Do not tighten any bolts until all are installed.
D. Once all six bolts (4 in front and 2 in rear) are installed, fully tighten.
Note: Remove wire tie from the connectors (E) and (F).
E. Plug connector(s) (E) into connector(s) (F).
Note: It does not matter which connector(s) plug into each other as long as both connector(s) are plugged in.
F. Push the excess wire into the hole in the main frame assembly (1) until the plastic grommet (G) is fully seated in the frame.


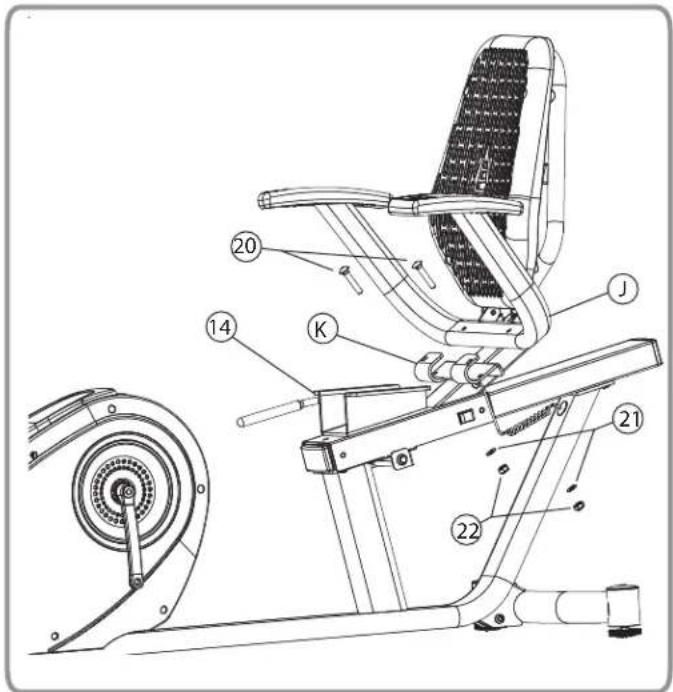
Step 5: Seatback / Armrest Assembly
Note: Make sure seat is locked and remove wire ties from connectors (H) and (I).
A. Plug connectors (H) from the top of seat mount (14) to connectors (I) from the base of the seatback/armrest assembly (5).
Note: It does not matter which connectors plug into each other as long as both connectors are plugged in.
B. Push excess wiring into the seatback/armrest assembly (5) wire hole.
Note: Be careful not to pinch the wiring when securing the seatback assembly (5) to the seat mount (14).
C. Align the armrest tube (J) with the corresponding bracket (K) and insert into the bracket.
D. Install the two M10 carriage bolts (20) through the bracket (K), the armrest tube (J).
E. Install the two M10 washers (21) and M10 nuts (22) onto M10 carriage bolts (20) and securely tighten.

Step 6: Seatback Shock Assembly
A. Align the shock assembly (6) to the lower shock bracket (L), handle should be on the lower right side.
B. Install one bolt (23) through the lower shock bracket (L) and shock assembly (6).
C. Install the M6 washer (28) and nut (25) onto the M8 bolt and tighten securely.

LifeSpan
Step 6: Seatback Shock Assembly (Continued)
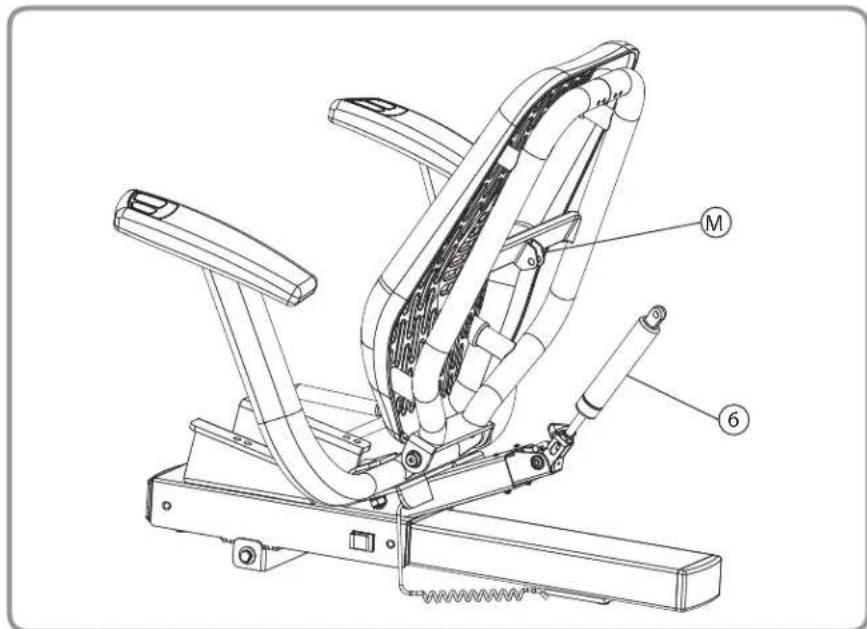
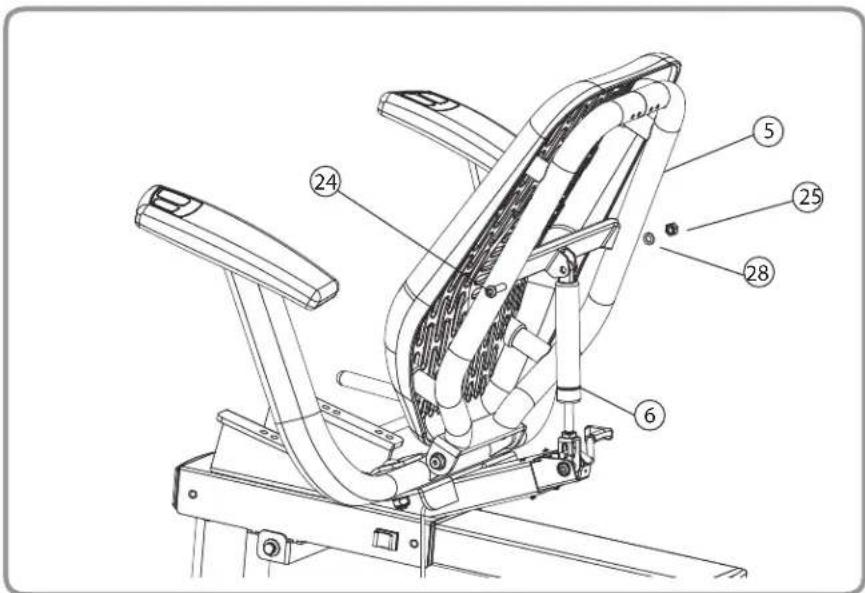
E. Align the top of the shock assembly (6) with the upper shock bracket (M) on the seatback/armrest assembly (5).
F. Install the bolt (24) through the upper shock bracket (M) and the top of the shock assembly (6).
G. Install the M6 washer (28) and nut (25) onto the bolt and tighten.
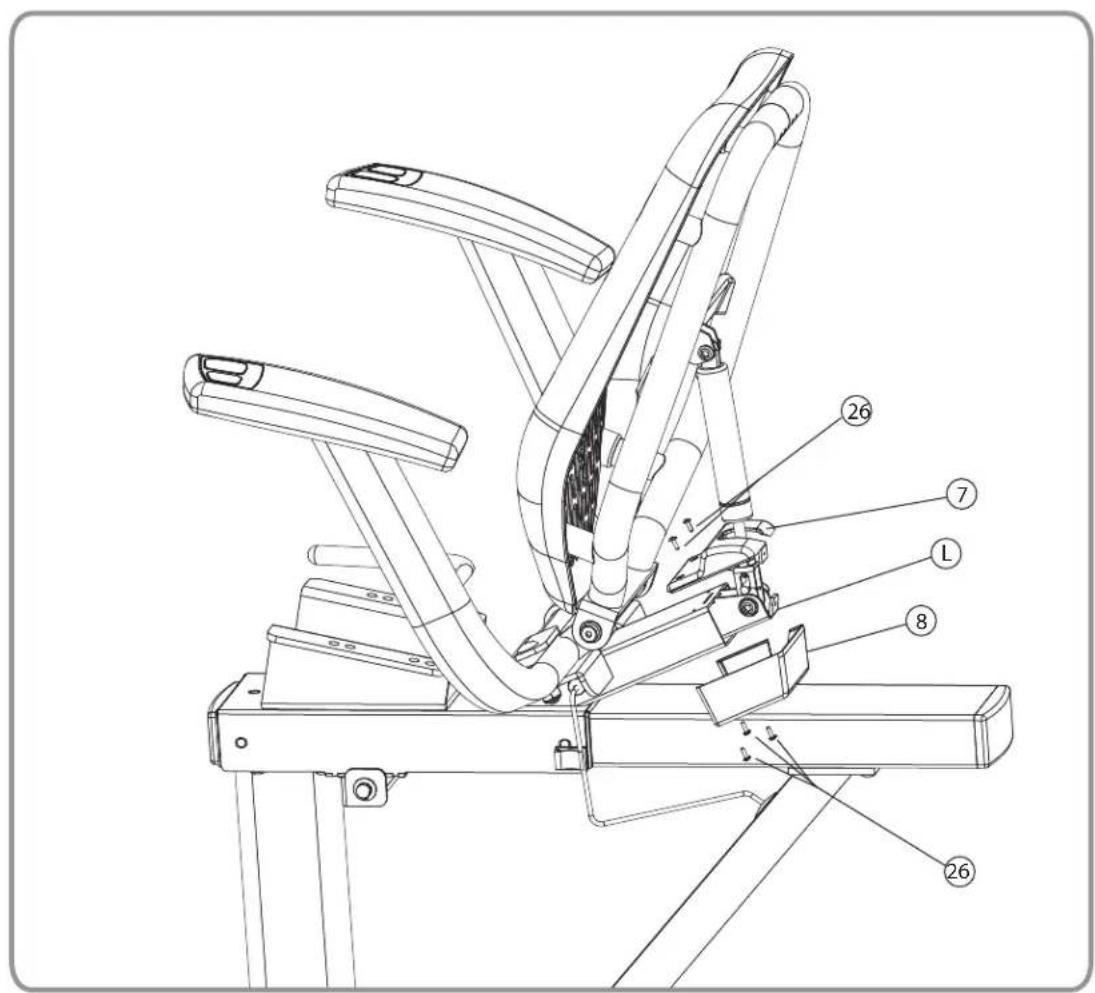
Step 7: Shock Assembly Covers
A. Align the bottom shock cover (8) with the bottom of the lower shock bracket (L).
B. Install the three M3 Screws (26) through the bottom shock cover (8) into the bottom of the lower shock bracket (L) and tighten securely.
C. Align top shock cover (7) with the top screw holes in the lower shock bracket (L).
D. Install two M3 Screws (26) through the top shock cover (7) into the lower shock bracket (L).
LifeSpan
Step 8: Seat Bottom Assembly
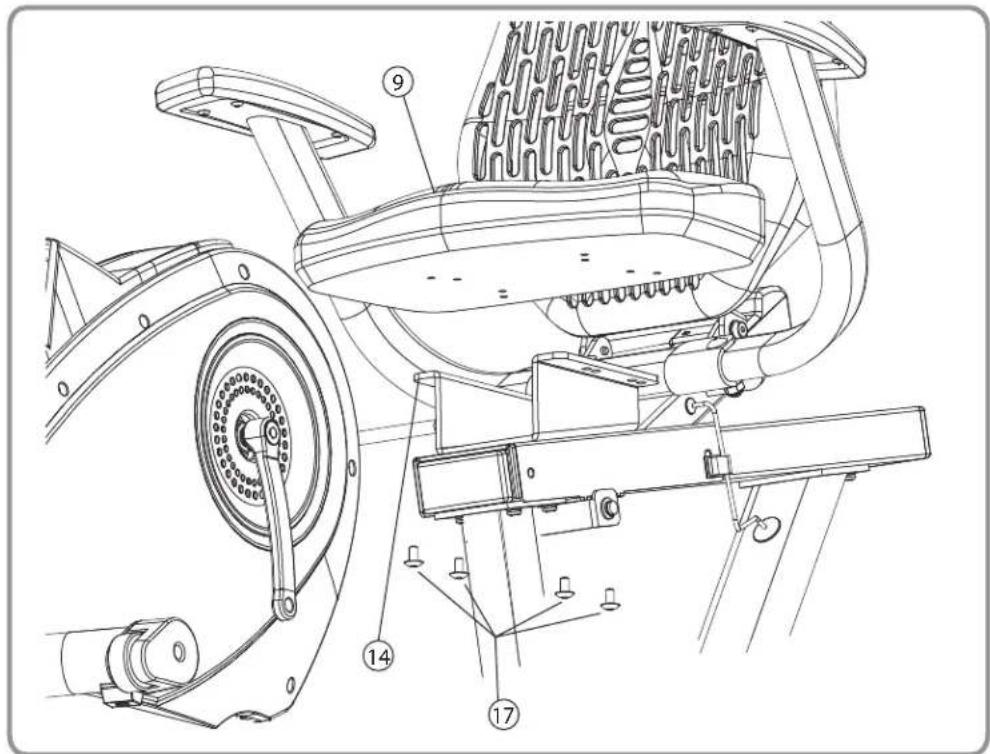
A. Place seat bottom (9) on the seat mount (14).
B. Align the four inner holes on the seat bottom (9) with four holes on the seat mount (14). For a larger person use the four front holes and for a smaller person use the rear holes in the seat mount (14).


C. Install four M8 bolts (17) through the seat mount (14) into the seat bottom (9). Be sure to install all four bolts before tightening.
Step 9: Console Upright Assembly
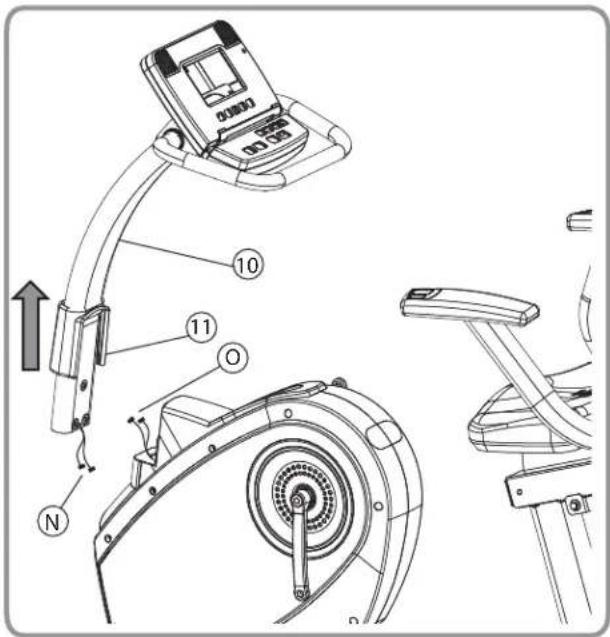
A. Slide the upright cover (11) a third of the way up the console upright assembly (10) as shown below.
Note: Remove wire ties from connectors (N) and (O).
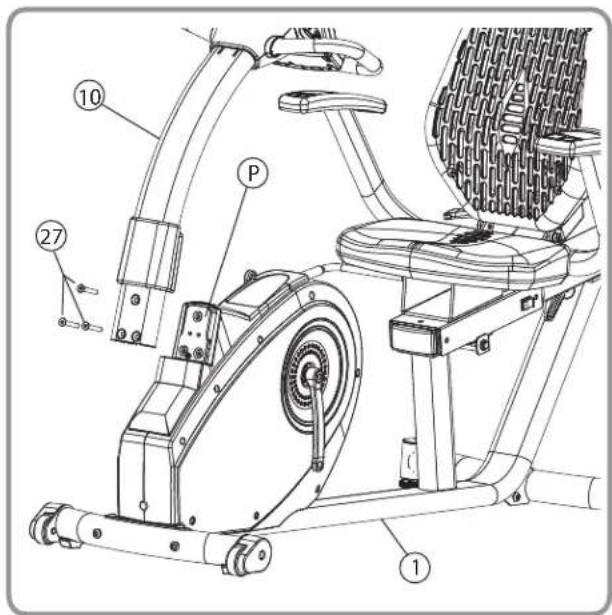
B. Align the console upright assembly (10) with the console upright bracket (P) on the main frame assembly (1). Plug the two connectors (N) from the console upright assembly (10) into the two connectors (O) coming from the main frame assembly (1).
C. Tuck excess wiring into the bottom tube of the console upright assembly (10).
Note: Be Careful not to pinch the wiring when securing the upright assembly (10) to the console upright bracket (P).
D. Install three M8 bolts (27) through the console upright assembly (10) and into the console upright bracket (P). Do not tighten until all three bolts are installed.
E. Slide the upright cover (11) down the console upright assembly (10) to cover the mounting bolts and bracket. Press down firmly to snap into place.
LifeSpan
Step 10: Right and Left Pedal Assembly
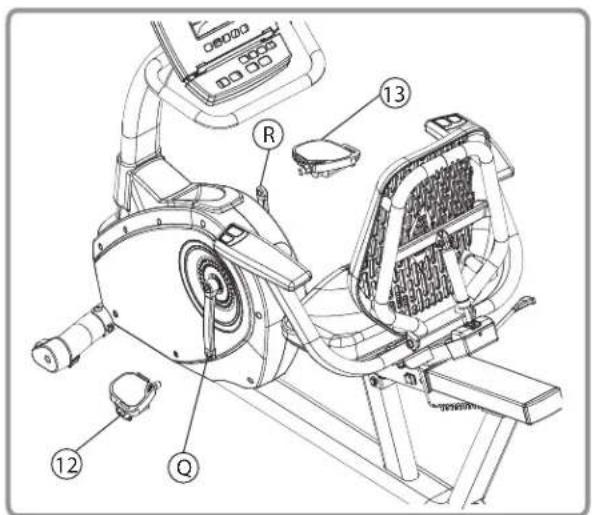
A. Identify which pedal goes on the right side and which goes on the left side by locating the "R" on the bolt of the right pedal (13) and the "L" on the bolt of the left pedal (12).
B. Hand tighten the right pedal (13) into the right crank arm (R) by turning clockwise.
C. Hand tighten the left pedal (12) into the left crank arm (Q) by turning counter clockwise. Be careful not to cross thread the threads.
D. Tighten both pedals with the provided 15mm wrench (28).

Step 11: Setting Date and Time
To set the date and time of day in your console follow these steps:
- Press any of the quick resistance buttons for 3 seconds to initiate the date and time set up mode. Press ENTER
- Press the UP / DOWN buttons to set the correct YEAR. Press Enter
- Press the UP / DOWN buttons to select the correct MONTH. Press Enter
- Press the UP / DOWN buttons to select the correct DAY. Press ENTER
- Press the UP / DOWN buttons to set the HOUR. Press ENTER
- Press the UP / DOWN buttons to set the MINUTES. Press ENTER
Display Console Overview
Console Buttons
The R3i comes with our innovative Intelli-Key feature that will prompt you through console operations by using intelligent lights on the buttons that automatically flash when they need to be pressed to continue operations.
Quickstart: Press the START button to begin a Manual workout without having to set any individual information. When the program begins your workout time will start counting up from 00:00 and you can manually adjust the resistance using the UP and DOWN arrows.

Pause: If you need to temporarily stop your workout, press the START button to PAUSE. To RESTART the workout, press the START button. After 5 minutes of no activity the console will reset.
Reset: To RESET the console, press and hold the START button for 3 seconds.
Enter: The ENTER button is used to Select each piece of information needed during program setup, including Program, Workout Level, Workout Time, and Your Weight, which is used to more accurately calculate calories burned. If you do not enter a Weight, the system will use a default weight of 150lbs to calculate calories burned.
Arrows: These buttons are used to modify the value of each selection entered during the setup process and to change the workout resistance during use.
Program Buttons: The R3i has Program Group buttons. These are designed to help you add variety to your exercise program while staying consistent with your exercise goals. To quickly select a specific program that matches your workout objective use one of the program buttons. These 5 buttons group the programs into Heart Rate Training, Healthy Living, Sports Training, Weight Loss and Custum User Programs. Depending on which button you select, there are multiple programs in each. To look at the next program within each group just press the Program Group button again to scroll to the next option.
Quick Resistance Buttons: The R3i comes with 4 quick change resistance buttons allowing you to select resistance level 4, 8, 12, or 16 without scrolling. If you are using a preset program you can also use these buttons to adjust the entire profile of the program, making the program eaiser or more difficult to complete.
Display Console Overview (Continued)

Alpha Numeric Window: The R3i comes with a 16 character alpha window that is used to show the program name and set user functions like date and time.
Workout Feedback: The R3i display window will simultaneously display the following workout information:
Speed: The speed you are traveling in Miles Per Hour (this reading can be changed to Kilometers by using the Engineering Mode.)
Calories: Estimated calories burned since the beginning of the workout
RPM: Number of Pedal Revolutions per minute
Pulse: Your measured heart rate using the hand pulse sensors located on the handlebars
Distance: Total distance traveled in miles or kilometers since the beginning of the workout
Time: The workout time elapsed or the workout time remaining
Misc. Information Display: The R3i will also show the following information. This information will be used as part of the USB feature to save your workout information on the date and time of your workout.
Date: The date is presented as the year / month / day below the program matrix.
Time: The time of day is shown in the bottom center window when the console is not in use.
Name/Sex/Height/Weight/Age: Used with your Interactive Health Partner Account, when you insert your USB flash drive the console will read your name, sex, height, weight and age. Your name will appear in the alpha display at the top and your sex, height, weight and age will appear below the program matrix.
This information is used to more accurately calculate calories.
Operating Your R3i Bike
Setting the Date and Time:
To set the date and time of day in your console follow these steps:
- Press any of the quick resistance buttons for 3 seconds to initiate the date and time set up mode. Press ENTER
- Press the UP / DOWN buttons to set the correct YEAR. Press Enter
- Press the UP / DOWN buttons to select the correct MONTH. Press Enter
- Press the UP / DOWN buttons to select the correct DAY. Press ENTER
- Press the UP / DOWN buttons to set the HOUR. Press ENTER
- Press the UP / DOWN buttons to set the MINUTES. Press ENTER
Starting in Manual Mode
The quickest way to get started is to press the START button. Pressing the START button will select the Manual program and the TIME will start counting up from 00:00. You can also press ENTER to select the Manual program. Using the ENTER button will allow you to set a specific workout TIME, and set your WEIGHT for more accurate calorie calculation.
Starting a Preset Program
- Select Program - Use the Program buttons to select your desired Exercise Program. Each program button has multiple programs that you can scroll through. Each time you press the program button you will move to the next program option. Once you find the desired program press enter.
- Set Program Level - There are 2 levels of intensity with each preset program (1 being the easiest and 2 being the most difficult).
Use the UP / Down arrows to make the selection then Press Enter. - Set Time - Set the program TIME of your workout using the UP / DOWN arrow keys. Press Enter.
- Set Weight - Set your WEIGHT in the console for more accurate calorie calculation using the UP / DOWN arrow keys. Press Enter
- Press the START button to begin your workout.
Custom User Set-up Programs
User programs need to be set-up before they can be used. To set up a user program:
- Select USER1 or USER2 Programs - Use the UP / DOWN arrow keys to select the USER1 or USER2 programs. Press Enter.
- Set Time - Set the program TIME of your workout using the UP / DOWN arrow keys. Press Enter.
- Set Weight - Set your WEIGHT in the console for more accurate calorie calculation using the UP / DOWN arrow keys. Press Enter
- Set Level - Select the level for each segment in the exercise program. Press Enter and repeat until all 20 segments are complete.
- START – press the START button.
Once the program has been set up, simply scroll to the USER1 or USER2 program and press START.
Operating Your R3i Bike (Continued)
Using Heart Rate Control Programs
The constant Heart Rate Control program requires that you set a heart rate that the display console will maintain throughout the workout and the Interval requires that you set a LOW and a HIGH heart rate.
HRC - Constant:
- Select HRC1 - Use the UP / DOWN arrow keys to select the HRC1 program. Press the Enter button to select.
- Set Time - Set the program TIME using the UP / DOWN arrow keys. Press Enter. Remember that the program will include 3 minutes of warm up and 3 minutes of cool down.
- Set Weight – enter your weight using the UP / DOWN arrow keys. Press Enter
- Set Age- enter your age using the UP / DOWN arrow keys. Press Enter
- Set Target Heart Rate - set your target heart rate using the UP / DOWN arrow keys. Press Enter
- Press the START button to begin your workout.
HRC - Interval:
- Select HRC2 - Use the UP / DOWN arrow keys to select the HRC2 program. Press the Enter button to select.
- Set Time - Set the program TIME using the UP / DOWN arrow keys. Press Enter. Remember that the program will include 3 minutes of warm up and 3 minutes of cool down.
- Set Weight – enter your weight using the UP / Down arrow keys. Press Enter
- Set Age- enter your age using the UP / DOWN arrow keys. Press Enter
- Set HIGH Target Heart Rate - Set your HIGH Interval training rate using the UP / DOWN arrow keys. Press Enter.
- Set LOW Target Heart Rate - Set your LOW Interval training rate using the UP / DOWN arrow keys. Press Enter.
- Press the START button to begin your workout.
Operations
While exercising you can change the Resistance Level by pressing the UP / DOWN buttons. To pause your exercise program press the START button and to reset your program, press the START button for 3 seconds.
Custom User Set-up Programs
There are two user programs provided on the LifeSpan R3i bike. These programs provide you with the ability to establish a customized program profile specific to your workout requirements. For each user set-up program you can select the resistance level for each of the 20 program matrix columns by pressing the up/down buttons to adjust the desired level of resistance and then the enter button to select that specific level.
Once a program is set up, simply scroll to the User program and push the start button. To modify the program after it is established, select the program and then push the Enter button.
My Zone Heart Rate Control Programs
The R3i has 2 MyZone Heart Rate control programs. In each of these programs you will set your target heart rate and the console will automatically adjust the resistance to maintain your heart rate at either a CONSTANT level or at an alternating LOW and HIGH level.
You will need to use the hand pulse sensor to receive your heart rate throughout the course of the work-out. You can also purchase a chest strap for a wireless heart rate readout.
Constant Heart Rate Control (HRC1): The "Constant" program lets you select a single heart rate that you want to maintain throughout your workout. Typically for Weight Loss set the target at 65% of your predicted maximum heart rate and for Cardio Training set the target at 80% of your predicted maximum. After 3 minutes of warm up, the pedaling resistance will automatically be adjusted every 10 seconds to get your heart rate up to the preset level that you selected and then maintain your heart rate during the workout. Refer to the Heart Rate Training section of this manual to determine your optimal training zones based on your age and exercise objectives or visit:
http://www.lifespanfitness.com/article_weight_calc2.asp.
Interval Heart Rate Control (HRC2): The "Interval" program is designed to help you increase your aerobic endurance and improve heart rate recovery. This program lets you select a LOW or recovery target heart rate and a HIGH target. After a 3 minute warm-up the console will adjust the pedaling resistance every 10 seconds to maintain your heart rate at the LOW or recovery target for 2 minutes. Then the console will adjust the resistance to raise your heart rate to the HIGH target that you selected and once again keep it at this level for 2 minutes. After holding your heart rate at this HIGH setting for 2 minutes the resistance will be reduced every 10 seconds until you reach the LOW level and then repeat the process until the end of the workout. It is recommended that you set the workout time to 25 minutes or higher to use this program effectively.
LifeSpan
Reading Your Heart Rate
Contact Heart Rate Sensors are built into the stationary hand grips of the R3i to monitor your heart rate during exercise. To use, grasp the sensors with a comfortable grip with the palms of your hands placed over the sensors. If the sensors are having difficulty picking up your heart rate you may consider using aloe or a moisturizer on your hands, or you can warm up as you exercise to increase the moisture in your hands. Dry hands do not transfer your pulse as effectively as moist hands.
Do not squeeze tightly as this can cause your blood pressure to rise. It will take a few seconds for the console to calculate your heart rate accurately.

Remember that to use the MyZone Heart Rate Control Programs you will need to keep your hands on the sensors
Special Features
Audio Package: Included are audio in and audio out jacks to use with MP3 players or other audio devices with standard input jacks.
USB Port: The R3i includes a USB port that works with the Interactive Health Partner online health management system. Simply insert your USB flash drive into the console, after loading your profile from the IHP system onto the flash drive. The USB will read your personal information and then save your workout data every 20 seconds onto the flash drive. Information saved includes your heart rate, workout start and finish time, distance traveled, calories burned and RPM's. This information can then be uploaded into your account, summarized over time and used to compare your results with the goals you set in your personal IHP account. Prior to using your USB, make sure your refer to the "Getting Started Guide" and the "Success Guide" found in your membership kit, located in your owner's manual packet.
Do not remove the USB flash drive while the LED light is flashing red - you may lose your workout information
Program Overview
The R3i comes with an assortment of programs that will give you the variety you need to get the maximum results from your exercise program. Each program has 2 levels of difficulty that you can select from during the set up process.
Sports Training
Long Slow Distance: (default to 40 minutes)
Long Slow Distance is a great workout for everyone! Beginners can ease into their

exercise program with this workout, being sure to do this workout at least a minimum of once a week to maximize overall cardiovascular endurance development. Long Slow Distance workouts are also great for experienced exercisers to do on days following a harder, higher intensity workout.
| Level 1 | 1 | 1 | 1 | 2 | 2 | 3 | 3 | 3 | 3 | 3 | 3 | 3 | 3 | 3 | 3 | 2 | 2 | 1 | 1 | 1 |
| Level 2 | 2 | 2 | 2 | 3 | 3 | 4 | 4 | 4 | 4 | 4 | 4 | 4 | 4 | 4 | 4 | 3 | 3 | 2 | 2 | 2 |
Short Interval: (20 minute workout default)
Short Intervals are ideal for beginning exercisers that want to start gaining the benefits of interval workouts but aren't quite

ready for a harder and longer intensity interval workout. Short Intervals are also ideal for experienced exercisers to develop their speed and anaerobic fitness. Short Interval workouts are fun to do after you have had a few days exercising for a longer duration at a slower pace. Remember, it is important to vary your exercise intensity and exercise durations to maximize your overall fitness development so be sure to include some interval workouts in your exercise program at least once or twice a week.
| Level 1 | 1 | 1 | 2 | 2 | 3 | 1 | 3 | 1 | 3 | 1 | 3 | 1 | 3 | 1 | 3 | 1 | 2 | 2 | 1 | 1 |
| Level 2 | 2 | 2 | 3 | 3 | 4 | 2 | 4 | 2 | 4 | 2 | 4 | 2 | 4 | 2 | 4 | 2 | 3 | 3 | 2 | 2 |
Program Overview
Moderate Interval: (30 minute workout default)
As you begin to exercise on a regular basis and feel your fitness improving you will be ready to begin doing "Moderate Intensity
Interval" workouts. You should begin with an intensity that is easy and then progress to an exercise intensity that is challenging but not too difficult. Remember in this workout you alternate between an easy recovery interval followed by a higher intensity interval. You should feel comfortable to push yourself as you do this workout as you are never too far away from an easier recovery interval.
This workout will improve your overall aerobic endurance while also maximizing your anaerobic fitness development.
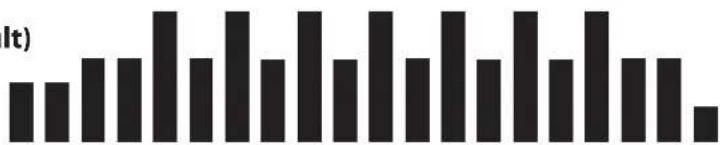
| Level 1 | 1 | 1 | 2 | 2 | 4 | 2 | 4 | 2 | 4 | 2 | 4 | 2 | 4 | 2 | 4 | 2 | 2 | 1 |
| Level 2 | 2 | 2 | 3 | 3 | 5 | 3 | 5 | 3 | 5 | 3 | 5 | 3 | 5 | 3 | 5 | 3 | 3 | 1 |
Long Interval: (40 minute workout default)
Long Interval workouts are great to maximize calorie burn and improve your anaerobic fitness, your ability to exercise

harder, at a higher intensity level. As in the Moderate Interval workouts, remember you have a recovery period after each higher intensity interval so you can comfortably push yourself to exercise at a progressively higher level.
| Level 1 | 1 | 1 | 2 | 2 | 4 | 1 | 4 | 1 | 4 | 1 | 4 | 1 | 4 | 1 | 4 | 1 | 4 | 2 | 2 | 1 |
| Level 2 | 2 | 2 | 3 | 3 | 5 | 2 | 5 | 2 | 5 | 2 | 5 | 2 | 5 | 2 | 5 | 2 | 5 | 3 | 2 | 1 |
Program Overview
Negative Interval-1: (30 minute default)
The Negative Interval 1 workout will provide you with all the benefits of the steady pace workout but push you to slowly obtain a

progressively higher steady state exercise intensity and then allow you to slowly decrease the exercise intensity. As you improve your overall health and fitness you can slowly and of course always comfortably push yourself to a higher peak in your overall exercise intensity in this workout.
| Level 1 | 1 | 1 | 1 | 2 | 2 | 2 | 3 | 3 | 3 | 4 | 4 | 3 | 3 | 3 | 2 | 2 | 2 | 1 | 1 | 1 |
| Level 2 | 2 | 2 | 2 | 3 | 3 | 3 | 4 | 4 | 4 | 5 | 5 | 4 | 4 | 4 | 3 | 3 | 3 | 2 | 2 | 2 |
Neg. Interval-2 (30 minute default)
The Negative Interval 2
workout has been designed
to provide your body with a workout that

begins with a slight increase in exercise intensity, then continues the workout at a set intensity, and ends with a progressive decrease in exercise intensity. A workout with an increase and decrease in exercise intensity at the beginning and end of the workout will most ideally develop your overall aerobic cardiovascular endurance. A workout that decreases in intensity is also ideal for maximizing calorie burn, but most ideally when done for a longer duration, such as 40 or 50 minutes.
| Level 1 | 2 | 2 | 2 | 4 | 4 | 4 | 6 | 6 | 5 | 5 | 5 | 4 | 4 | 4 | 3 | 3 | 3 | 2 | 2 | 2 |
| Level 2 | 3 | 3 | 3 | 5 | 5 | 5 | 7 | 7 | 6 | 6 | 5 | 5 | 5 | 4 | 4 | 4 | 3 | 3 | 3 | 2 |
Program Overview
Fartlek
Varying your exercise intensity with a constantly changing interval workout that starts out at an easy pace and then increases to a moderate or higher intensity pace will add some great variety into your workouts, make your workouts go by faster than you ever imagined while providing your body and mind with great fitness benefits. Constantly varying intensities in a workout have been found in brain research to have great benefits on improving overall brain fitness. Increasing your exercise intensity at constantly changing intervals and then dropping that intensity to just a slightly lower level, and then returning to the higher level has great anaerobic cardiovascular fitness development on the body. You know you are adequately pushing yourself in the higher intensity intervals if you find you can still talk during the exercise, but if you can "sing" you might consider pushing yourself a bit harder.

| Level 1 | 2 | 4 | 2 | 6 | 3 | 7 | 4 | 4 | 8 | 2 | 6 | 3 | 8 | 2 | 6 | 2 | 5 | 4 | 6 | 1 |
| Level 2 | 3 | 5 | 3 | 7 | 4 | 8 | 5 | 5 | 9 | 3 | 7 | 9 | 3 | 7 | 3 | 6 | 5 | 8 | 4 | 2 |
Program Overview
Healthy Living
Uphill Climb
Gradually increase the intensity of your exercise with this fun Uphill Climb workout. The goal of the Uphill Climb workout is to stimulate your body to improve your overall cardiovascular fitness, while also maximizing muscle cell development in working muscles.

The LifeSpan Uphill Climb workout has been designed to start out at a very slow, comfortable pace and gradually increase to a peak intensity then gradually decrease in intensity back down to your starting level. You will maximize overall calorie burn during the peak intensity levels of this workout while allowing your body to exercise for a longer duration and still benefit from the higher intensity workout as you gradually slow down towards the end of this workout and return to your starting level.
| Level 1 | 1 | 1 | 2 | 2 | 3 | 3 | 4 | 4 | 5 | 5 | 6 | 7 | 6 | 5 | 4 | 4 | 3 | 2 | 1 | 1 |
| Level 2 | 2 | 2 | 3 | 3 | 4 | 4 | 5 | 5 | 6 | 6 | 7 | 8 | 7 | 6 | 5 | 5 | 4 | 4 | 3 | 2 |
Pyramid Climb:
Gradual increases in intensity during your workouts are ideal to stimulate your body to improve overall cardiovascular fitness, while also maximizing muscle cell development in working muscles. The Pyramid Climb workout has been designed to start out at a very slow, comfortable pace and gradually increase to a peak intensity then gradually decrease in intensity back down to your starting level. You will maximize overall calorie burn during the peak intensity levels of this workout while allowing your body to exercise for a longer duration and still benefit from the higher intensity workout as you gradually slow down in this workout and return to your starting level.
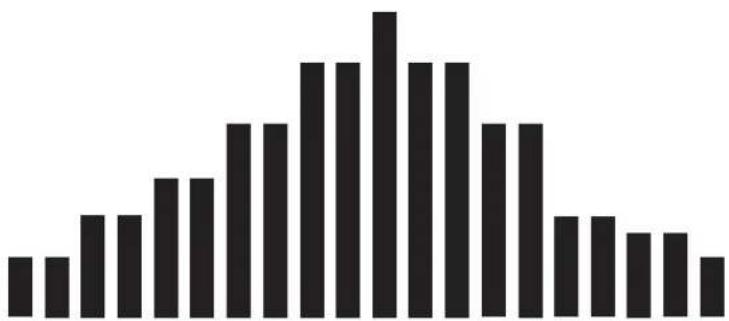
| Level 1 | 1 | 1 | 2 | 2 | 3 | 3 | 4 | 4 | 5 | 5 | 6 | 5 | 5 | 4 | 4 | 3 | 3 | 2 | 2 | 1 |
| Level 2 | 2 | 2 | 3 | 3 | 4 | 4 | 5 | 5 | 6 | 6 | 7 | 6 | 6 | 5 | 5 | 4 | 4 | 3 | 3 | 2 |
LifeSpan
Program Overview
Plateau Climb:
A Plateau Climb workout will provide you with all the benefits of the other steady state workouts, but push you to maintain a higher steady state intensity exercise level. As you improve your overall health and fitness you can slowly and of course always comfortably push yourself to higher overall exercise intensity for longer periods of time. Remember, if you simply get on your elliptical and go at the same pace, for the same amount of time every day when you workout, your body will only improve to the level of the workouts you are currently pushing yourself to do. In order to improve your overall health and fitness, you need to always “change” your workouts so you don’t do the same workout within one week, while at the same time slowly increase your overall exercise intensity while also increasing your overall exercise time.

| Level 1 | 1 | 1 | 2 | 3 | 4 | 5 | 5 | 5 | 5 | 5 | 5 | 5 | 5 | 5 | 4 | 3 | 2 | 2 | 1 | 1 |
| Level 2 | 2 | 2 | 3 | 4 | 5 | 6 | 6 | 6 | 6 | 6 | 6 | 6 | 6 | 6 | 5 | 4 | 3 | 2 | 2 | 1 |
Ladder
One of the greatest benefits
of exercise are the direct benefits exercise has on the heart and cardiovascular system.

The Heart Health Ladder has been specifically designed to provide your heart
and cardiovascular system with a series of progressively harder exercise intensity's that will improve your overall aerobic endurance, while also stimulating your anaerobic endurance. Remember as you go through this workout that it may be challenging for a few minutes, but each progression has been carefully timed to also provide recovery intervals after the highest intensity interval, so you can feel good as you exercise and comfortably push yourself to improve your cardiovascular fitness.
| Level 1 | 2 | 2 | 3 | 4 | 5 | 2 | 3 | 4 | 5 | 2 | 3 | 4 | 5 | 2 | 3 | 4 | 5 | 3 | 2 | 2 |
| Level 2 | 4 | 4 | 5 | 6 | 7 | 4 | 5 | 6 | 7 | 4 | 5 | 6 | 7 | 4 | 5 | 6 | 7 | 4 | 3 | 3 |
Program Overview
Uphill Interval
Uphill interval workouts are unique in that they provide your body with the benefits of an interval workout, with the added benefit of gradually increasing the overall intensity of the maximum level intervals throughout the workout. In this workout you should begin at a level that is comfortable, and then you will gradually increase the intensity during each maximum interval, pushing yourself to a slightly higher intensity each time knowing that you have a recovery interval as soon as you complete the maximum intensity interval. During this workout you will also maximize overall calorie burn during each of your higher intensity intervals, while at the same time working on improving your overall anaerobic fitness.

| Level 1 | 1 | 1 | 2 | 1 | 3 | 1 | 4 | 1 | 5 | 1 | 6 | 1 | 7 | 1 | 8 | 1 | 2 | 2 | 1 | 1 |
| Level 2 | 2 | 2 | 3 | 2 | 4 | 2 | 5 | 2 | 6 | 2 | 7 | 2 | 8 | 2 | 9 | 2 | 3 | 3 | 2 | 2 |
Weight Management
Steady Pace:
Improve your fitness while also stimulating your body to burn more fat with this workout. Steady Pace workouts are great for helping

you establish an improved overall endurance base. Most "Steady Pace" workouts focus on maintaining one set workload level throughout the entire workout. As you begin the Steady Pace workout your intensity level will start out at a very slow pace, then increase to a moderate pace for the duration of your workout. Your goal is to be sure you are exercising within a low moderate intensity to a high moderate intensity during the workout. The goal of this workout is to maintain a steady pace from within a set minimum and maximum effort range that has been selected to target ideal calorie utilization throughout the workout.
| Level 1 | 1 | 1 | 2 | 2 | 2 | 2 | 2 | 2 | 2 | 2 | 2 | 2 | 2 | 2 | 2 | 2 | 2 | 1 | 1 |
| Level 2 | 2 | 2 | 3 | 3 | 3 | 3 | 3 | 3 | 3 | 3 | 3 | 3 | 3 | 3 | 3 | 3 | 3 | 2 | 2 |
Long Slow Distance: (default to 40 minutes)
Long Slow Distance is a great workout for everyone! Beginners can ease into their exercise program with this workout, being

sure to do this workout at least a minimum of once a week to maximize overall cardiovascular endurance development. Long Slow Distance workouts are also great for experienced exercisers to do on days following a harder, higher intensity workout.
| Level 1 | 1 | 1 | 1 | 1 | 1 | 1 | 1 | 1 | 1 | 1 | 1 | 1 | 1 | 1 | 1 | 1 | 1 | 1 | 1 | 1 |
| Level 2 | 2 | 2 | 2 | 2 | 2 | 2 | 2 | 2 | 2 | 2 | 2 | 2 | 2 | 2 | 2 | 2 | 2 | 2 | 2 | 2 |
Cardio Ride is a steady pace workout but at a higher intensity than the "Long Slow Distance" workout. Cardio Ride is a more intermediate or advanced workout,

designed to motivate you to achieve a more challenging steady pace and maintain that pace for the full duration of the workout. Cardio Ride is a great workout if you are training for a special event, such as a 5k run or just striving to improve your overall cardiovascular fitness.
| Level 1 | 1 | 1 | 3 | 3 | 3 | 3 | 3 | 3 | 3 | 3 | 3 | 3 | 3 | 3 | 3 | 3 | 3 | 3 | 1 | 1 |
| Level 2 | 2 | 2 | 4 | 4 | 4 | 4 | 4 | 4 | 4 | 4 | 4 | 4 | 4 | 4 | 4 | 4 | 4 | 4 | 2 | 2 |
Program Overview
Short Interval: (20 minute default)
Short Interval workouts have been found in research studies to be ideal for those striving to increase their weight loss, and improve

their overall cardiovascular fitness. Varying your exercise intensity during a workout from a moderately slow level to a high intensity for a set period of time and repeating that progression for a complete workout will maximize the total number of calories burned during a workout. A second benefit is the individual will not be forced to maintain a high intensity exercise level throughout the entire workout. The short interval recovery periods allows the body to more successfully exercise at a higher intensity than might otherwise be comfortable for the individual for a complete workout duration.
| Level 1 | 1 | 2 | 3 | 4 | 2 | 4 | 2 | 4 | 2 | 4 | 2 | 4 | 2 | 4 | 2 | 4 | 2 | 4 | 3 | 2 |
| Level 2 | 2 | 3 | 4 | 5 | 3 | 5 | 3 | 5 | 3 | 5 | 3 | 5 | 3 | 5 | 3 | 5 | 3 | 5 | 4 | 3 |
Uphill Climb
The Uphill Climb gradually increases the intensity of your exercise peaking at a high intensity. The goal of the Uphill Climb work-out is to stimulate your body to improve your overall cardiovascular fitness, while also

maximizing muscle cell development in working muscles. The Uphill Climb workout has been designed to start out at a slow, comfortable pace and gradually increase to a peak intensity then with a quick decrease in intensity back down to a recovery level. You will maximize overall calorie burn during the peak intensity levels of this workout while allowing your body to exercise for a longer duration.
| Level 1 | 1 | 1 | 2 | 2 | 3 | 3 | 4 | 4 | 5 | 5 | 6 | 6 | 7 | 7 | 8 | 8 | 6 | 2 | 2 | 2 |
| Level 2 | 2 | 2 | 3 | 3 | 4 | 4 | 5 | 5 | 6 | 6 | 7 | 7 | 8 | 8 | 9 | 9 | 7 | 2 | 2 | 2 |
LifeSpan
Leveling
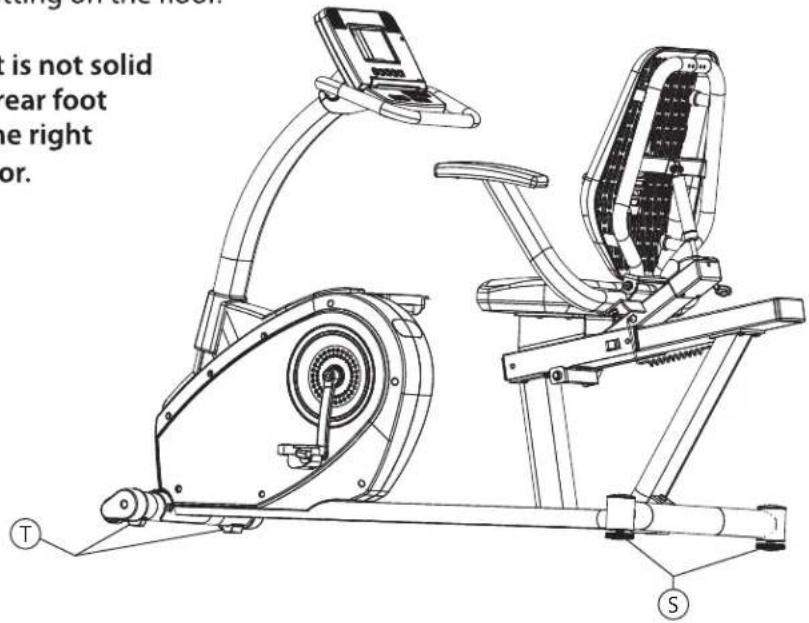
Your R3i bike comes with two leveling feet (S) in the back and two stationary feet (T) in the front. Gently rock the bike back and forth to see if any of the feet are not sitting on the floor. Adjust the rear feet (S) until all 4 feet are sitting on the floor.
Hint: if the right front foot is not solid on the floor, turn the left rear foot counterclockwise to tilt the right front foot down to the floor.
Moving
Your R3i bike is equipped with two transport wheels (U) located on the front support. Carefully lift the back of the bike up until the transport wheels make contact with the floor and roll the bike to the desired location. Be sure to bend your knees and use proper lifting techniques while moving this product. It may be difficult to roll the bike in plush carpeting.

Seat Adjustments
Seat Fore/Aft Adjustment
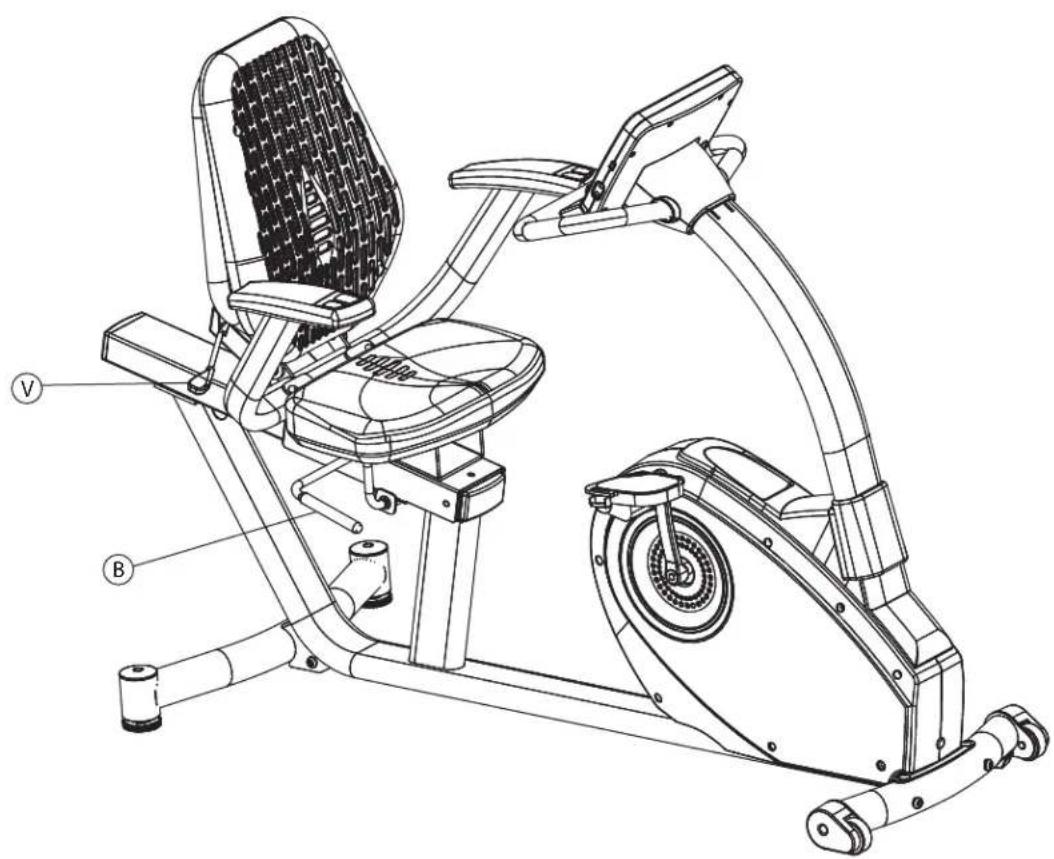
Your R3i bike comes with 14" of seat travel. The seat can be moved by pulling up on the seat lock handle (B) and sliding the seat forward or back to the desired location. To lock the seat, simply push down on the seat lock handle.
Seat Back Tilt Adjustment
Your R3i bike comes with the ability to adjust the tilt of the seat back. To tilt the seat back, pull up on the seat back adjustment lever (V) and push back on the seat back. When the desired position is reached, release the seat back adjustment lever. To adjust the seat back forward, pull up on the seat back adjustment lever (V) and allow the seat back to tilt forward. When the desired position is reached, release the seat back adjustment lever.
Engineering Mode
To Enter Engineering Mode, Press and hold the Enter Button and the Up button for 3 seconds. The console will beep and display Engineering Mode.
Function
Display
| Engineering Mode | |
| Press Enter. The display will show Roller. This is something that does not need adjustment | Roller1380 |
| Press Enter. The display will show Select the units. Press the up or down buttons to change between Si (metric) or EN English modes. | Select the UnitsSi or EN |
| Press Enter. The display will show Set calendar On or Off. Use the Up or down buttons to change between on or off. | Set Calendar On/Off |
| Press Enter. The display will show Electricity On or Off. To set the console to go into sleep mode set Electricity to On. For the console to be lit at all times set it to off. | Electricity On/Off |
| Press Enter. The display will show Total Distance. It will show 1 digit on the left and 3 digits on the right for a total of 4 digits. This is the total number or miles or Kilometers accumulated. | Total Distance000 |
| Press Enter. The display will show Total Hours. It will show 1 digit on the left and 3 digits on the right for a total of 4 digits. This is the total number of hours the bike has been used. | Total Hours000 |
| Press Enter | Console goes back to normal operating mode |
Troubleshooting
Problem: Unit is unstable or rocks while in use.
Solution: Make sure unit is on a solid, level surface. Adjust the rear adjustment feet until all 4 feet are sitting solid on the floor.
Problem: No power at console.
Solution: Try using another outlet or testing something else at the outlet being used to make sure there is power at the outlet. If still a problem contact LifeSpan Customer Service.
Problem: Rough feeling in pedals when in use.
Solution: If everything is tight, contact LifeSpan Customer Service for replacement pedals
Problem: Excess play in the handlebars or frame components.
Solution: Using the provided assembly tools, go over the R3i to make sure all assembly hardware is tight.
General Maintenance
- Keep the unit clean and dry. It is a good idea to wipe the unit down after each workout to keep it clean.
- If the unit is not going to be used for any extended period of time it is a good idea to unplug the unit and store in a clean environment.
Up to 4 Years of Coverage for just Pennies a Day

Treadmill Doctor's 360 Degree Guarantee
Extended Service Plan program is a money saver for YOU!
√ We will Extend your original Manufacturer's warranty for parts & labor coverage.*
√ We will cover failures due to normal wear and tear.*
√ We will replace your machine if we can't repair it.*
√ We provide unlimited on-site visits!*
√ We will cover failures due to power surges.
√ Your coverage is transferable.
√ Over 3,000 certified technicians.
√ National toll-free repair hotline.
√ Simple repair claim procedure & no claim forms.
Did You Know
a single repair can cost TWICE the amount of a 3 year service plan?
That is because a single repair is not one service trip it is two! One trip for the diagnosis and one for the repair after parts have been ordered.
| Labor Cost -\$260 Parts Cost -\170 | |
| ○ | Total Repair Cost -\430 |
3 Year Treadmill Doctor Service Plan \$169.99
Get your 360 Guarantee NOW
ONE OF THE INDUSTRY'S BEST GUARANTEES!
Copyright © 2010. TreadmillDoctor.com, Inc. All rights reserved. Treadmill Doctor and 360 Degree Guarantee are registered trademarks of TreadmillDoctor.com, Inc. All rights reserved.
Enroll Now:
360 guarantee.com/Lifespan
You will need the following information:
Purchase Date*
Model Number*
Serial Number*
Retailer/ Etailer Name
* Required Field
| Purchase Price | 1 Year | 2 Year | 3 Year | 4 Year |
| 300-999 | 99.99 | 129.99 | 169.99 | 229.99 |
| 1000-1999 | 129.99 | 149.99 | 229.99 | 299.99 |
| 2000-2999 | 169.99 | 199.99 | 299.99 | 399.99 |
| 3000-3999 | 199.99 | 249.99 | 399.99 | 499.99 |
| 4000-4999 | 299.99 | 399.99 | 599.99 | 899.99 |

LifeSpan Fitness
785 West 1700 South
Salt Lake City, UT 84104
* Limitations and exclusions apply. See terms and conditions available online at 360guarantee.com/Lifespan for full agreement details.
Contract begins at the expiration of the manufacturer's labor warranty.
LifeSpan by PCE HEALTH & FITNESS
RECUMBENT MODEL NUMBER - R3i
SERIAL NUMBER :
MADE IN TAIWAN

- TABLE OF CONTENTS
- LIMITED HOME USE WARRANTY
- EXCLUSIONS AND LIMITATIONS
- REGISTRATION
- IMPORTANT SAFETY PRECATIONS
- CHILDREN AND PETS
- OTHER SAFETY TIPS
- CLEANING
- LIFESPAN
- STARTING AN EXERCISE PROGRAM
- PRE-EXERCISE RESTING HEART RATE CHECK
- ASSEMBLY
- HARDWARE
- PRE-INSTALLED HARDWARE
- STEP 1: REMOVE COMPONENTS FROM BOX
- STEP 2: REAR SUPPORT ASSEMBLY
- STEP 3: FRONT SUPPORT ASSEMBLY
- STEP 4: SEAT RAIL ASSEMBLY
- STEP 5: SEATBACK / ARMREST ASSEMBLY
- STEP 6: SEATBACK SHOCK ASSEMBLY
- STEP 7: SHOCK ASSEMBLY COVERS
- STEP 8: SEAT BOTTOM ASSEMBLY
- STEP 9: CONSOLE UPRIGHT ASSEMBLY
- STEP 10: RIGHT AND LEFT PEDAL ASSEMBLY
- STEP 11: SETTING DATE AND TIME
- DISPLAY CONSOLE OVERVIEW
- CONSOLE BUTTONS
- DISPLAY CONSOLE OVERVIEW (CONTINUED)
- OPERATING YOUR R3I BIKE
- SETTING THE DATE AND TIME
- STARTING IN MANUAL MODE
- STARTING A PRESET PROGRAM
- CUSTOM USER SET-UP PROGRAMS
- OPERATING YOUR R3I BIKE (CONTINUED)
- USING HEART RATE CONTROL PROGRAMS
- HRC - CONSTANT
- HRC - INTERVAL
- OPERATIONS
- MY ZONE HEART RATE CONTROL PROGRAMS
- READING YOUR HEART RATE
- SPECIAL FEATURES
- PROGRAM OVERVIEW
- SPORTS TRAINING
- LONG SLOW DISTANCE: (DEFAULT TO 40 MINUTES)
- SHORT INTERVAL: (20 MINUTE WORKOUT DEFAULT)
- MODERATE INTERVAL: (30 MINUTE WORKOUT DEFAULT)
- LONG INTERVAL: (40 MINUTE WORKOUT DEFAULT)
- NEGATIVE INTERVAL-1: (30 MINUTE DEFAULT)
- NEG. INTERVAL-2 (30 MINUTE DEFAULT)
- FARTLEK
- HEALTHY LIVING
- UPHILL CLIMB
- PYRAMID CLIMB
- PLATEAU CLIMB
- LADDER
- UPHILL INTERVAL
- WEIGHT MANAGEMENT
- STEADY PACE
- SHORT INTERVAL: (20 MINUTE DEFAULT)
- LEVELING
- MOVING
- SEAT ADJUSTMENTS
- SEAT FORE/AFT ADJUSTMENT
- SEAT BACK TILT ADJUSTMENT
- ENGINEERING MODE
- TROUBLESHOOTING
- GENERAL MAINTENANCE
- UP TO 4 YEARS OF COVERAGE FOR JUST PENNIES A DAY
- TREADMILL DOCTOR'S 360 DEGREE GUARANTEE
- DID YOU KNOW
- GET YOUR 360 GUARANTEE NOW
- ONE OF THE INDUSTRY'S BEST GUARANTEES
- ENROLL NOW
Brand : LifeSpan
Model : R3i
Category : Indoor bike trainer