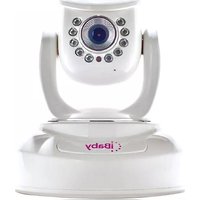
M3 - Surveillance Camera iBaby - Free user manual and instructions
Find the device manual for free M3 iBaby in PDF.


| Product Type | Baby Monitor / Surveillance Camera |
| Brand | iBaby |
| Model | M3 |
| Dimensions | 10.5 x 7.2 x 12.8 cm (4.1 x 2.8 x 5.0 in) |
| Weight | 320 g (11.3 oz) |
| Power Supply | DC 5V/1A via micro USB adapter (included) |
| Video Resolution | 720p HD (1280 x 720) |
| Field of View | 110° wide angle |
| Night Vision | Infrared LEDs up to 5 meters (16 ft) |
| Audio | Two-way talk with noise cancellation |
| Connectivity | Wi-Fi 2.4 GHz 802.11 b/g/n |
| Compatible OS | iOS 8.0+ / Android 4.0+ |
| Motion Detection | Push notifications with sensitivity adjustment |
| Temperature Sensor | Built-in, range 0–50°C (32–122°F) |
| Storage | MicroSD card up to 32 GB (not included) / Cloud subscription |
| Pan/Tilt | Remote pan (350°) & tilt (120°) via app |
| Maintenance | Clean lens with dry microfiber cloth; avoid liquids |
| Safety Certifications | FCC, CE, RoHS compliant |
| Spare Parts / Repairability | Power adapter (model iBaby-PA05); user-replaceable SD card; professional repair advised for internal issues |
| General Information | Designed for monitoring infants, pets, or home; requires app download and Wi-Fi setup |
Frequently Asked Questions - M3 iBaby
User questions about M3 iBaby
0 question about this device. Answer the ones you know or ask your own.
Ask a new question about this device
Download the instructions for your Surveillance Camera in PDF format for free! Find your manual M3 - iBaby and take your electronic device back in hand. On this page are published all the documents necessary for the use of your device. M3 by iBaby.
USER MANUAL M3 iBaby
"The manufacturer is not responsible for any legal liability caused by negligence."
Index
1 INTRODUCTION 4
1.1 PACKAGE CONTENTS....4
1.2 FUNCTION AND FEATURES....4
1.3 PRODUCT SPECIFICATIONS 5
2 APPEARANCE AND INTERFACE....6
2.1 APPEARANCE....6
2.2 BACK PANEL OF THE iBABY MONITOR 7
3 ACCESSING THE IBABY MONITOR OVER A LOCAL AREA NETWORK....7
3.1 LOCAL AREA NETWORK CONNECTION....7
3.2 ACCESSING THE IBABY MONITOR FROM AN IPOD TOUCH, IPHONE OR IPAD ....8
3.3 CONFIGURING THE iBABY MONITOR FROM A WINDOWS OC: IP ADDRESS....8
3.4 ACCESSING THE iBABY MONITOR FROM A PC....10
4 ACCESSING THE iBABY MONITOR OVER THE INTERNET....13
4.1 INTERNET CONNECTION....13
4.2 PORT FORWARDING....13
4.3 DDNS....13
4.3.1 Manufacturer's DDNS....13
4.3.2 Third Party DDNS....14
5 OTHER SETTINGS....15
5.1 NETWORK SETTINGS....15
5.1.1 Basic Network Settings....15
5.1.2 WiFi Settings....15
5.1.3 ADSL Settings....16
5.1.4 UPnP Settings....16
5.1.5 DDNS Settings....17
5.1.6 MSN Settings....17
5.2 ALARM SETTINGS....17
5.2.1 Alarm Settings....17
5.2.2 Mail Service Settings 19
5.2.3 FTP Service Settings....20
5.2.4 Alarm Server 21
5.3 ADVANCED SETTINGS 21
5.3.1 User Settings....21
5.3.2 Multi Device Settings....22
5.3.3 Other Settings 22
5.4 MAINTAINENCE 23ERROR! BOOKMARK NOT DEFINED.
5.4.1 Device Information 23
5.4.2 Time Setting....23
5.4.3 Firmware Upgrade 24
5.4.4 Restore Factory Default 24
5.4.5 User Browsing Log....24
6 CENTRALIZATION CONTROL....24
7 FAQ 25
1 Introduction
Your iBaby monitor combines a high-quality digital camera with network connectivity and a clear image to your iPod Touch, iPhone or iPad, or to a PC. You can connect from a Local Area Network or over the Internet.
1.1 Package contents
√ Camera
√ User manual and utility CD
√ Power adapter
√ Bracket
√ Cable
√ Antenna
√ Quick installation guide
√ Set of screws
1.2 Function and Features
√ Supports 802.11b/g/n protocols for wireless monitoring.
√ Supports TCP/IP network protocols with a built-in Web server. Users can view streaming video from an iBaby Monitor using an iPod Touch, iPhone or iPad, as well as from a PC running Internet Explorer or similar browsers.
√ A built-in microphone allows users to listen to the room being monitored. Users can also connect the camera to a speaker to support a two-way intercom.
√ The iBaby monitor's pan/tilt function allows horizontal panning of 350^ and vertical movement of 70^ .
√ The design is attractive and the device is easy to install and use.
√ Infrared LED for night vision covers 16 feet (5 meters) of area, for 24-hour monitoring, even in the dark.
√ Motion detection, sound detection and alert pins can be connected to external sensors for warnings.
√ A record of alarms can be sent via email, and also stored on a server.
√ Supports Universal Plug and Play (UPnP), allowing for automatic router port forwarding.
√ A Dynamic Domain Name Service (DDNS) address provided with the camera, with an easy-to-read label at the bottom of each unit, allowing users to monitor their iBaby monitor over the Web.
1.3 Product Specifications
| Image CapturePan/Tilt | Sensor | CMOS sensor |
| Total pixels | 300k | |
| Minimum illumination | 0 Lux(IR on automatically) | |
| Lens | f=3.6mm, F=2.0, Fixed iris | |
| Pan coverage | 350° | |
| Tilt coverage | 70° | |
| Assistant | Lighting | 10pcs 850nm infrared LEDs, 16 feet (5 meters) of distance |
| Lighting control | Auto control | |
| Video and Audio | Resolution | 640*480(VGA)/320*240(QVGA)/160*120(QQVGA) |
| Compression | MJPEG | |
| Frame rate | 30 fps | |
| Bit rate | 128 kbps ~ 5 Mbps | |
| Image rotation | Mirror /Flip | |
| Audio compression | ADPCM | |
| Network | Basic protocols | TCP/IP, UDP/IP, HTTP, SMTP,FTP, DHCP, DDNS, UPnP, NTP,PPPOE |
| Other protocols | 802.11b/g/n | |
| Other Features | Video control | Supported |
| Dual-way audio | Supported | |
| Motion detection | Supported | |
| Sound detection | Supported | |
| Triggered actions | Email/FTP/external alarm/send message to alarm server | |
| User access authority | Three levels | |
| Date / time setting | Supported | |
| Upgrades | Upgrade over the network | |
| DDNS | Included | |
| Hardware Interface | Ethernet | 10Base-T/100base-TX |
| Alarm in | 1 channel | |
| Alarm out | 1 channel | |
| Audio in | Internal Mic and External Mic socket x 1 | |
| Audio out | Audio Line-out socket x 1 | |
| Physical Index | Weight | 11.5 ounces (358 grams) |
| Main body | 111mm(L) X 110mm(W) X 126mm(H) | |
| Power | DC 5V | |
| Power consumption | <6W | |
| Operating temperature | 104°F (0°C~40°C) | |
| Operating humidity | 10% ~ 80% non-condensing | |
| Software (iPod Touch, iPhone or iPad) | iOS 4.0 or later | Can be downloaded for free from the Apple App store |
| Software (PC) | OS Supported | Microsoft Windows 98, 2000, XP, Vista, Windows 7 or higher. iOS 4.0 or later |
| Browser | Internet Explorer 6.0 or higher, or equivalent browser, such as Firefox. | |
| Application software | IPCMonitor.exe included |
2 Appearance and interface
2.1 Appearance
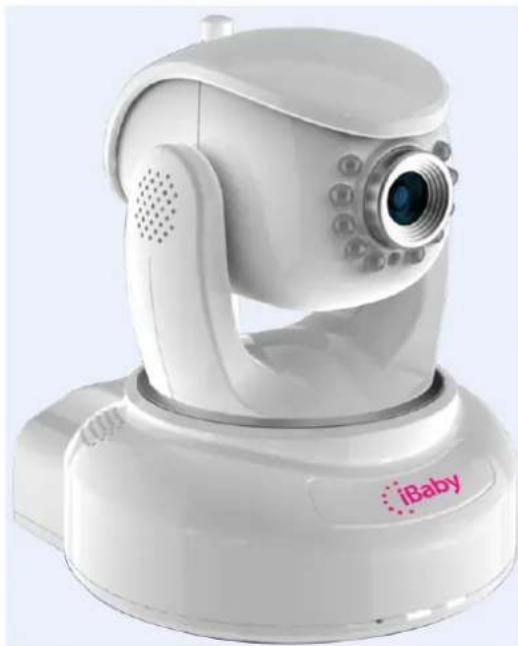
natural_image
White iBaby mobile phone with camera lens and antenna (no visible text or symbols on device body)Figure 1
2.2 Back panel of the iBaby monitor

Figure 2
1) Power Input Socket: Connection for power adaptor. The adaptor's output is 5 volts, 1.5 amps.
2) RESET Button: Press the RESET button and hold for 10 seconds. The iBaby monitor will restart with its factory default settings restored.
3) Wi-Fi Antenna Connector: For installing a Wi-Fi antenna.
4) RJ45 Ethernet Socket: The RJ45 Ethernet socket automatically configures itself for speeds of either 10 MB or 100 MB.
5) Audio Input Socket: For connecting an external microphone. The built-in microphone is turned off whenever an external microphone is plugged-in.
6) Audio Output Socket: For use with a headphone or speakers.
7) Alarm Output Socket
8) Alarm Input Pin
3 Accessing the iBaby monitor over a Local Area Network
3.1 Local Area Network connection

Figure 3

flowchart
graph LR
    A["Robot 1"] -->|Network cable| B["Router"]
    C["Robot 2"] -->|Network cable| B
    B --> D["iPhone"]
    B --> E["Computer"]
Figure 4
3.2 Accessing the iBaby monitor from an iPod Touch, iPhone or iPad
You first need to install the iBaby monitor App from the Apple App Store. (Find it by searching for "iBaby monitor BM.") THIS IS A FREE DOWNLOAD. (Before downloading, first confirm the iOS on your device is version 4.0 or later. If not, update your iOS.)
After the app has been installed, this icon should appear:

Launch the iBaby monitor App. The App will search for the camera automatically. Select the “Set Up” button and follow instructions.
3.3 Configuring the iBaby monitor from a Windows PC: IP Address
Run "BSearch_en.exe" in the CD. You will see the setting interface shown in Figure 5.

Figure 5
Operation Steps:
1) Click "Search (F3)"
2) Choose the device
3) Change the IP address of the camera according to the information in the red frame on the left. The numbers in the red circles should not match, as your iBaby monitor should have a different IP number than your PC.
4) For Authentication, enter a user name and password. (The default settings are user name "admin" and password "123456").
5) Click "Update"
6) Click "Search (F3)", choose the device, and then click "Browse (F4)". You will be able to view the camera, as shown in Figure 6.
NOTES:
1) If you don't know what IP address to use for "IP config," check "Set IP automatically," and the software will fill it in for you.
2) When you run the BSearch_en.exe, any firewall software you might have installed on your PC may ask you whether the BSearch_en.exe program should be blocked or not. Choose "unblocked."

Figure 6
3.4 Accessing the iBaby monitor from a Windows PC
We suggest using Internet Explorer to view your iBaby monitor. First, you will need to install the player plug-in. To do so, click "Download and install player (first use)". You'll then see a dialogue box, as shown in Figure 7. Click Run.

Figure 7
After installing the plug-in, click the "Mode 1 to view" link, shown in Figure 6, to view the video.
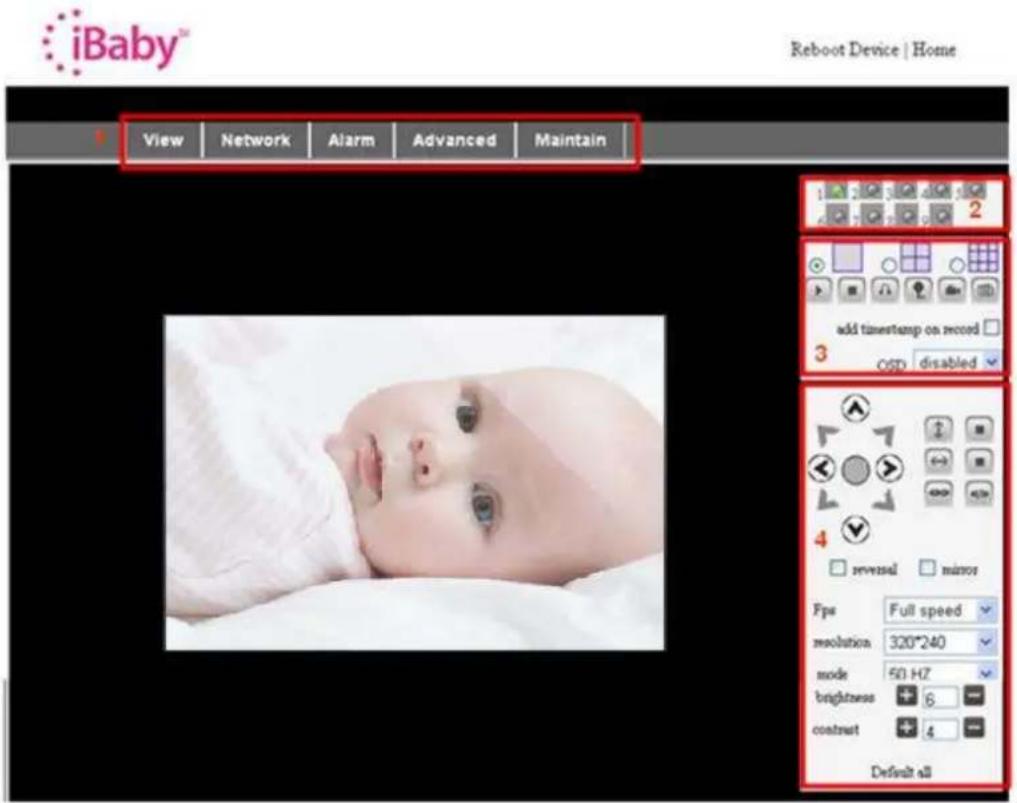
Figure 8
1) Main Menu
The main menu provides links to the different sub-menus of the iBaby monitor software.
2) Status Display Area
This is in the upper right-hand corner of the screen. It shows the status of the device.
◆ Gray: Not connected.
◆ Green: Connected.
◆ Yellow: Improperly configured.
◆ Red: Alarm.
3) Multi Channel displaying area
Several iBaby monitors can be connected as part of the same system. (See Section
5.3.2 of these instructions.) Video from additional devices will be shown here. Select the device you wish to control by clicking on it.

These buttons, in the order shown, indicate play, stop, audio, talk, record and take a snapshot.
Other Settings shown in Figure 9.

Figure 9
4) Pan/Tilt and video control
Using the icons in the Pan/Tilt control area, user can move their iBaby monitor up, down, left and right. Other controls are available, such as middle, horizontal cruise, vertical cruise and stop.

These are used to Open IO output and Close IO output.
User can also set the device frame rate, resolution, brightness, contrast and other parameters.
4 Accessing the iBaby monitor over the Internet
4.1 Internet connection

flowchart
graph TD
    A["User"] -->|cable| B["Router"]
    B -->|ADSL| C["Internet"]
    D["User"] -->|cable| E["Router"]
    E -->|ADSL| C
    F["Remote Computer"] --> C
    G["iPod Touch"] --> C
    H["iPhone"] --> C
    I["iPad"] --> C
Figure 10
4.2 Port forwarding
Most current routers have UPnP, or Universal Plug and Play. The default within the iBaby monitor is for UPnP to be on, meaning that the software takes care of port forwarding automatically. To configure a port manually, you must first connect to it over your LAN.
Please consult your router's User Manual for port forwarding configuration information. Once port-forwarding is configured, your iBaby Monitor should be accessible over the Web.
4.3 DDNS
DDNS stands for Dynamic Domain Name Service. Think of it as a URL assigned to your specific iBaby monitor that allows you to view the monitor from any computer connected to the Web.
4.3.1 Manufacturer's DDNS
The device manufacturer has provided a free DDNS. You can find it in the Network menu, as shown in Figure 11, and on a sticker at the base of the unit.

Figure 11
4.3.2 Third Party DDNS
You can also use a DDNS supplied by a third party. To do so, obtain the DDNS and fill it in as shown in Figure 12.

Figure 12
Note: If your third-party DDNS does not use Port 80, you need to specify the port when entering in the DDNS. Do this by appending a colon and then the port number following the entry for the DDNS. The manufacturer DDNS is not needed to add PORT.
5 Other Settings
5.1 Network Settings
5.1.1 Basic Network Settings
Figure 13 shows how to set up the Basic Network Settings to have an IP address assigned to your iBaby monitor automatically.

Figure 13
5.1.2 Wi-Fi Setting
If your iBaby monitor is going to be set up over Wi-Fi, use the configuration menu shown in Figure 14. First, click the "Scan" button to see the available networks. Highlight the one you wish to use, then check "Using Wireless Lan." Then fill in the SSID, encryption method and share key or password; you can get this information from your router. Click "Set" when finished.
![Wireless Settings Wireless Network List ChinaNet-TbkR[00255e1e5d08] infra WPA/WPA2-PSK wifi[001e58f37857] infra WPA/WPA2-PSK netview[002586697046] infra WPA/WPA2-PSK Scan Using Wireless Lan ✓ SSID wifi Encryption WPA2 Personal (AES) Share Key 8939038200](/content/2026/06/1362257/images/94aaca0f2023747088f108513e07349c7cc1f936a77d324f673f7a04eacfa5b4.jpg)
Figure 14
Note 1: When the device is connected to both a Wi-Fi and wired network, it will first try to connect to the wired network. If that connection fails, it will switch to Wi-Fi. The IP address and port is the same in either case.
Note 2: The iBaby monitor needs to be connected by cable to your router before the wireless settings described above can be put in place. Once the Wi-Fi settings have been saved, you can remove the cable, and the wireless connection will begin operating.
5.1.3 ADSL Settings
Users with ADSL Dialup should configure their device as shown in Figure 15. The user name and password should be obtained directly from your ADSL service provider.
Once the settings are saved, connect the iBaby monitor directly to the ADSL modem, and it will be connected to the Internet.

Figure 15
5.1.4 UPnP Setting
If you enable UPnP by checking its box as shown in Figure 16, the iBaby monitor, upon power-up, will communicate with the router and handle port-forwarding automatically.

Figure 16
Before using UPnP, please make sure your router's UPnP function has been enabled. Note that since not all UPnP implementations are the same, and you may discover that your router doesn't properly support the iBaby monitor. Should this occur, disable UPnP and assign port-forwarding manually.
5.1.5 DDNS Settings
Please refer Section 4.3.
5.1.6 MSN Settings
| MSN Config | |
| User | test1@ hotmall.com |
| Password | ●●●●●●●● |
| MSN Friends List | friend1@ hotmall.com |
Figure 17
iBaby monitor users with an MSN email account can fill in this section if they wish. Fill in User and Password with respective settings from MSN. Then, fill in any email address to receive iBaby monitor alerts.
5.2 Alarm Settings
5.2.1 Alarm Settings
1) Motion Detection
The alert on your iBaby monitor can be triggered if motion is detected. The sensitivity of the motion detector needs to be set, using a number between 1 and 10, with 10 being the most sensitive.
Users have the option of connecting an external alert to their device with the Alarm Output Socket shown in Figure 2. Once this external alert is connected, users should check the "Alarm Input Armed" box. If the external alert detector is "always on" switch alarm, use the "open" option. If the external alert detector is "always off," choose "close".
The iBaby monitor alert can also be triggered when sounds are detected. Set the sensitivity of the device; the higher the number, the more sensitive to noise it will be.

Figure 18
2) Alarm Actions
Several things can happen when an alert is triggered, depending on whether the box for that action is checked, as shown in Figure 18.
IO Linkage on Alarm: This triggers whatever external alarm might be plugged into the iBaby Monitor.
Send Mail on Alarm. Send an email notification to the supplied email address.
Upload Image to FTP. This sends still pictures from the camera via FTP. Users can control the interval at which pictures are sent.
➢ Enable Alarm Server.
3) Scheduler
Your iBaby monitor can also be set to automatically trigger an alert action at a scheduled time, including "All the time". Figure 19 shows how to set up this feature.

Figure 19
5.2.2 Email Service Settings
The iBaby monitor can send an alert to an email address if it is configured as shown in Figure 20. Be sure to click Save, and then test the system to see if the address is working properly. Note that after every restart, the device will send its IP address to the specified email address.
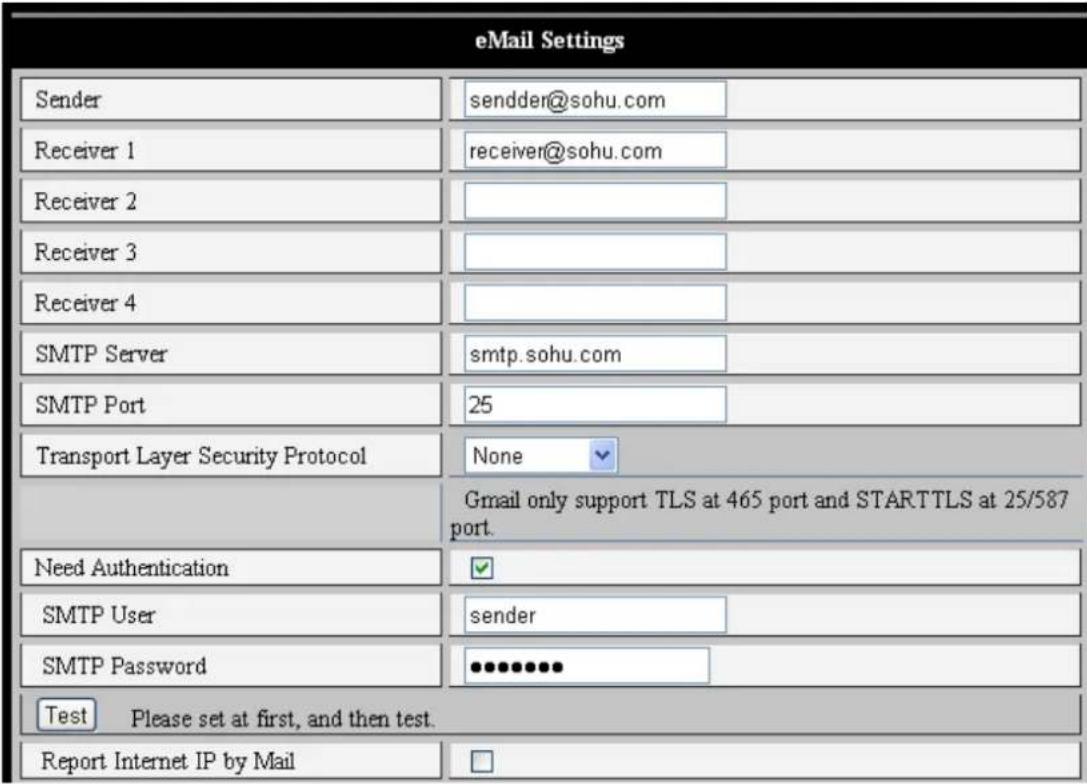
Figure 20
5.2.3 FTP Service Settings

Figure 21
When the alarm is triggered, the iBaby monitor can be configured to snap a picture and send the image to FTP server. Set up the server information as shown in Figure 21. Click "Test" to see if the system is configured properly.
The "Upload Image Periodically" setting, if checked, will send an image to the FTP server periodically, even when no alert has been triggered.
In order to use the FTP function, users need to supply the username and password associated with the FTP site. They should also provide the path name required for any files that need be stored, and be sure that proper permissions have been set on the server.
5.2.4 Alarm Server
| Alarm server | |
| Server Address: | 192.168.0.78 |
| Server Port: | 1000 |
| User Name: | test |
| Password: | ●●●●● |
Figure 22
This section is intended for users who wish to extend alarm notifications to other devices, such as mobile phones via SMS messaging. The alarm message format is as follows:
GET /api/alarm.asp?
username=username&
userpwd=password&
rea=alarm type (1=Motion Detection, 2=Alarm from Alarm in port)&
io=0
5.3 Advanced
5.3.1 User Settings
Three user settings are possible. An "Administrator" can change any settings. An "Operator" can operate the camera but can't change any settings. A "Visitor" can watch the video, but is unable to either change settings or control the camera. By default, the administrator's user name is "admin", password: "123456".

Figure 23
5.3.2 Multi Device Settings
| Multi-Device Settings | |
| Device List in Lan | anonymous(192.168.0.247) 002alcl(192.168.0.67) 002abyc(192.168.0.239) 002aqvc(192.168.0.241) |
| Refresh | |
| The 1st Device | This Device |
| The 2nd Device | None |
| The 3rd Device | None |
| The 4th Device | None |
| The 5th Device | None |
| The 6th Device | None |
| The 7th Device | None |
| The 8th Device | None |
| The 9th Device | None |
| attention: If you want to access the device from internet, be sure the host and port that you set can be accessed from internet. Submit Refresh | |
Figure 24
As indicated in Figure 24, users can add an unlimited amount of iOS devices connected to the iBaby monitor and viewed simultaneously. When a new device is added, click the "Refresh" button, and then highlight the new device. Use the menu that pops up to enter information for the new camera, as shown in Figure 25. Finally, click "Save."

Figure 25
5.3.3 Other settings
Figure 26 shows several other advanced settings.
* You can choose to turn on or off the indicator LED.
* With PTZ (or Pan/Tilt/Zoom) settings, selecting "Yes" for "PTZ Center on Start" will cause the camera, upon startup, to move to the center and then stop.
* You can also set the Horizontal and Vertical patrol keys.
* In the setting for the Manual PTZ Rate; the lower the number, the quicker the speed.
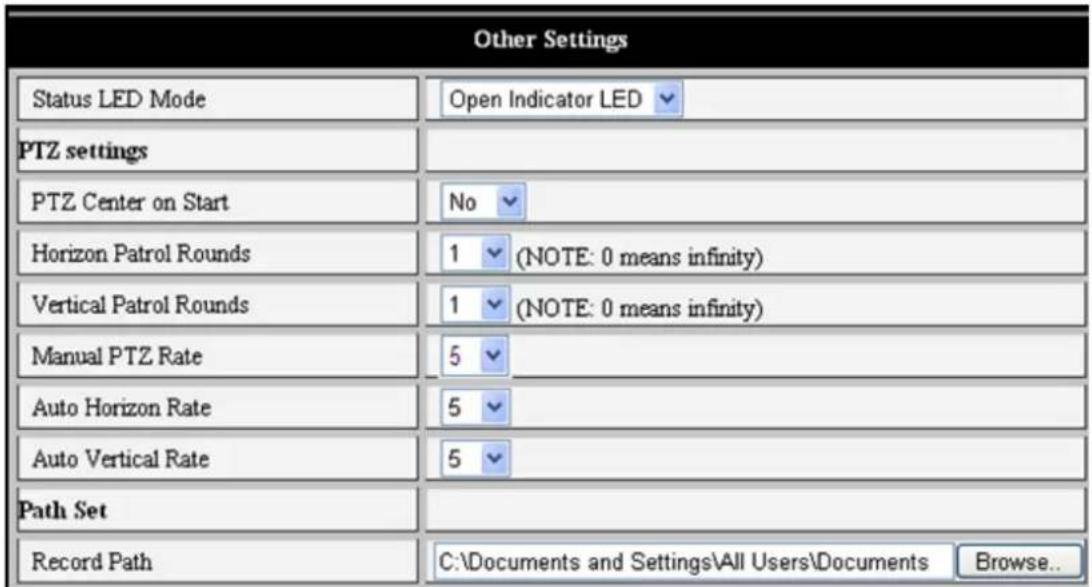
Figure 26
5.4 Maintenance
5.4.1 Device Information
| Device Info | |
| Device ID | 107aaaa |
| Device Firmware Version | 21.37.2.41 |
| Device Embedded Web UI Version | 0.28.4.19 |
| MAC | 00:00:E3:02:0F:01 |
| Alarm Status | None |
| Third Party DDNS Status | No Action |
| UPnP Status | No Action |
| MSN Status | No Action |
Figure 27
5.4.2 Time Setting
If the device is connected to the Internet, you can take advantage of the Web's NTP server to select the proper time zone and keep the correct time. Or, you can synch the time from your PC.
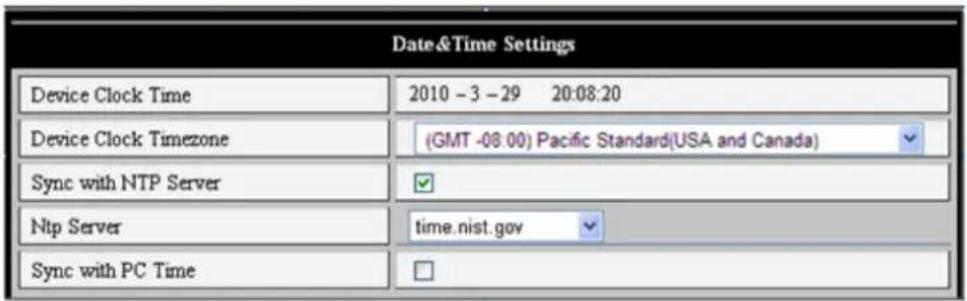
Figure 28
5.4.3 Firmware upgrades
The device runs two kinds of programs: One in system firmware, the other in application firmware. They can each be upgraded separately.

Figure 29
5.4.4 Restore Factory Defaults
Click "Restore Factory Default." A confirmation dialogue will appear, allowing the user to restore all factory defaults. The unit then reboots.
5.4.5 User Browsing Log
As shown in Figure 30, this shows you who has viewed video from your iBaby monitor, and the time the viewing occurred.
| Log | |||||
| Mon, 2010-03-29 19:05:20 admin 192.168.0.175 access | |||||
| Mon, 2010-03-29 19:43:33 user 192.168.0.175 access | |||||
| Mon, 2010-03-29 19:47:51 user 192.168.0.175 access | |||||
| Mon, 2010-03-29 19:49:02 guest 192.168.0.175 access | |||||
| Mon, 2010-03-29 19:57:40 admin 192.168.0.175 access |
Figure 30
6 Centralization Control
This allows you to browse several devices on a LAN or over the Web at the same time. Other features are also supported; see Figure 31.

Figure 31
7 FAQ
1) Can I use any adaptor with my iBaby monitor? No, an unmatched power adapter can severely damage the equipment.
2) Why is my browser slow when I look at video from my camera? That may occur if your Web connection isn't fast enough to support the MJEPG video compression used by the iBaby monitor. The typical bandwidth uses situation as below:
640x480@10fps : 4.0 Megabits \~ 5.0 Megabits
320x240@30fps : 1.2 Megabits \~ 1.6 Megabits
3) I can't find my iBaby monitor after I have connected it to a LAN
Make sure the monitor and your PC are on the same LAN. Make sure your firewall is not blocking signals from the device.
4) I can see my camera listed, but I can't access it. Make sure both the camera and the PC have the same Network Segment in their IP address. (This is the first three numbers of the address.) If the IP address of your PC, for example, is 192.168.0.100, it can only access equipment with IP addresses between 192.168.0.1 and 192.168.0.255.
5) I can access the monitor via its public IP address, but I can't visit it via the manufacturer's domain name
Make sure the DNS settings are the same as on your PC.

Figure 32


- Index
- INTRODUCTION 4
- APPEARANCE AND INTERFACE....6
- ACCESSING THE IBABY MONITOR OVER A LOCAL AREA NETWORK....7
- ACCESSING THE iBABY MONITOR OVER THE INTERNET....13
- OTHER SETTINGS....15
- Introduction
- Package contents
- Function and Features
- Appearance and interface
- Appearance
- Back panel of the iBaby monitor
- Accessing the iBaby monitor over a Local Area Network
- Local Area Network connection
- Accessing the iBaby monitor from an iPod Touch, iPhone or iPad
- Configuring the iBaby monitor from a Windows PC: IP Address
- Operation Steps:
- NOTES:
- Accessing the iBaby monitor from a Windows PC
- 1) Main Menu
- 2) Status Display Area
- 3) Multi Channel displaying area
- 4) Pan/Tilt and video control
- Accessing the iBaby monitor over the Internet
- Internet connection
- Port forwarding
- DDNS
- Manufacturer's DDNS
- Third Party DDNS
- Other Settings
- Network Settings
- Basic Network Settings
- Wi-Fi Setting
- ADSL Settings
- UPnP Setting
- DDNS Settings
- MSN Settings
- Alarm Settings
- Alarm Settings
- 1) Motion Detection
- 2) Alarm Actions
- 3) Scheduler
- Email Service Settings
- FTP Service Settings
- Alarm Server
- Advanced
- User Settings
- Multi Device Settings
- Other settings
- Maintenance
- Device Information
- Time Setting
- Firmware upgrades
- Restore Factory Defaults
- User Browsing Log
- Centralization Control
- FAQ
Brand : iBaby
Model : M3
Category : Surveillance Camera