
EL75R2 - Monitor Elmo - Free user manual and instructions
Find the device manual for free EL75R2 Elmo in PDF.


| Product Type | Monitor |
| Brand | Elmo |
| Model | EL75R2 |
| Screen Size (Diagonal) | 75 inches |
| Resolution | 3840 x 2160 (4K UHD) |
| Brightness | 350 cd/m² |
| Contrast Ratio | 1000:1 |
| Response Time | 8 ms |
| Viewing Angle (Horizontal/Vertical) | 178°/178° |
| Refresh Rate | 60 Hz |
| Aspect Ratio | 16:9 |
| Connectivity | HDMI (2), DisplayPort, USB-C, VGA, Audio Out |
| Built-in Speakers | Yes, 2 x 10W |
| VESA Mount Compatible | Yes, 400 x 400 mm |
| Power Consumption | 120 W (max) |
| Stand Adjustments | Tilt, Swivel, Height Adjust |
| Weight (with stand) | Approximately 25 kg |
| Dimensions (W x H x D with stand) | 1670 x 1060 x 350 mm |
| Cleaning Instructions | Use a soft, dry microfiber cloth. Do not use liquid cleaners. |
| Safety Features | Anti-glare screen, low blue light mode, Kensington lock slot |
| Spare Parts Availability | Power supply, remote control, stand parts available from Elmo |
| Warranty | 3 years limited |
Frequently Asked Questions - EL75R2 Elmo
User questions about EL75R2 Elmo
0 question about this device. Answer the ones you know or ask your own.
Ask a new question about this device
Download the instructions for your Monitor in PDF format for free! Find your manual EL75R2 - Elmo and take your electronic device back in hand. On this page are published all the documents necessary for the use of your device. EL75R2 by Elmo.
USER MANUAL EL75R2 Elmo
xSync Board / ELMO Board
EL55R2/EL65R2/EL75R2/EL86R2
Ver.01
Table of contents
1 Before Use....7
1.1 Package Contents....7
1.2 Part Names and Functions......8
1 Front....8
2 Side and Bottom....9
3 Touch pen and Eraser 10
4 Remote Control 11
◆Preparation 12
1.3 Installation 13
1 Installation Conditions.... 13
◆ Attachment of the Display Monitor to the Stand 14
1.4 Turning On or Off the Power...... 15
1 Connecting the Power Cord ..... 15
2 Turning On the Power 15
◆ Initial Startup ...... 16
3 Turning Off the Power 17
4 Standby Mode 18
2 Basic Operations ...... 19
2.1 Touch Operations 19
2.2 Basic Screen Operations ...... 20
◆Home Screen 20
◆ Shortcuts of Apps.... 21
◆ Uninstallation of Apps ...... 22
◆ Connection Status Icons on the Home Screen 23
◆ Displaying the Side Menu Bar...... 24
3 Using Apps 25
3.1 Using ELMO Note (Whiteboard).... 25
◆ Startup 25
◆ Initial Startup ...... 25
◆Basic Operations 26
◆Screen Description 27
◆ Pen Menu.... 28
◆Eraser menu 29
◆Selection Menu 29
◆ Shapes Menu.... 30
◆ Functions Available in the Operation Mode .... 30
◆ Background Menu 31
◆ Background Image Menu ...... 31
◆Page Operation Menu 32
◆ Add Page Menu ...... 32
◆ Functions Available When Selecting an Object.... 33
◆Menu Operations 34
◆ Split Screen Mode...... 35
◆ Saving Images ...... 36
3.2 Using Overlay Function ...... 37
◆ Startup 37
◆ Toolbar Description ...... 37
3.3 Using Camera Roll Function...... 38
◆ Startup 38
◆ Screen Description ...... 38
◆ Comparing Images and Videos ..... 39
◆Pasting to ELMO Note (whiteboard)....39
3.4 Using a USB Camera 40
◆ Startup 40
◆ Screen Description .... 40
◆USB Camera Settings Screen...... 41
3.5 Viewing Web Page (E Browser) .... 42
◆ Startup 42
◆ Screen Description ...... 42
◆ Popup Display Settings...... 44
3.6 Using ELMO Timer Function......45
◆ Startup 45
◆ Basic Operations (Timer) ...... 45
◆ Basic Operations (Stopwatch) ..... 45
◆ Creating Tasks using Timer...... 46
◆Timer List Screen 48
◆ Task List Screen 49
◆Timer Settings Screen 49
◆ Minimizing the Screen .... 50
◆Stopwatch Screen....50
3.7 Using Wireless Casting Function (Transcreen) 51
◆ Preparation .... 51
◆ Using on Windows OS ...... 52
◆ Using on iOS or MacOS...... 52
◆ Using on Chrome OS .... 53
◆ Using on Android OS .... 53
◆ Mirroring Screen 53
3.8 Using Anti-Virus Function (Avira Security) 54
◆ Startup 54
◆ Initial Startup 54
◆Basic Operations 54
3.9 Using ELMO Play 55
◆ Startup 55
3.10 Using File Manger Function...... 56
◆ Startup 56
◆ Screen Description .... 56
◆ Cloud Account Settings...... 58
◆ Uploading Files to Cloud...... 60
3.11 Using Utilities Function ...... 61
◆ Startup 61
◆ Screen Description ...... 61
4 Using with External Devices...... 62
4.1 Connecting Devices 62
◆ Displaying the Computer Screen (Video and Audio) ...... 62
◆ Controlling the Product from a Computer (Serial Control).... 65
◆ Displaying the Screen of the Connected Device
(Video and Audio) 66
◆ Playing the Audio of the Product through Other Devices .... 66
◆ Operation ...... 67
◆Configuring the Source Settings ... 68
5 Configuring the Settings ..... 70
◆ Startup 70
◆ Before Configuring the Settings .... 70
◆ Network and Connection...... 70
◆ System Settings 75
6 Optional Item....80
6.1 Easy Controller 80
◆ Easy Controller Buttons ...... 81
7 Troubleshooting and Maintenance 82
7.1 Troubleshooting....82
◆ The product does not operate properly....82
◆ The image of the input source cannot be output correctly.... 82
◆ No audio is output from the speaker. 83
◆ Touch operations do not work properly....83
◆Cannot connect to the network. .... 83
7.2 Maintenance....84
◆Cleaning of the LCD display ..... 84
8 Specifications 85
8.1 Product Specifications.... 85
9 After-Sales Service 87
9.1 Product Warranty.... 87
9.2 Repair Procedure 87
SAFETY INSTRUCTIONS
Make sure to read the "SAFETY INSTRUCTIONS" in this guide before using this product.
WARNING
- Failure to follow the installation instructions included with the display could result in injury and product damage which may not be covered by the warranty.
- Do not open or disassemble the display. You risk electrical shock from the high voltage inside the casing. Opening the casing also voids the warranty.
- Do not stand (or allow children to stand) on a chair to touch the surface of the display. Rather, mount the product at the appropriate height.
- To reduce the risk of fire or electric shock, do not expose the display to rain or moisture.
- If the display requires replacement parts, make sure the service technician uses replacement parts specified by ELMO or parts with the same characteristics as the original.
- Ensure that any cables that cross the floor to the display are properly bundled and marked to avoid a trip hazard.
- Do not insert objects inside the cabinet ventilation holes, because they could touch dangerous voltage points and cause electric shock, fire or product damage which may not be covered by the warranty.
- Do not place heavy objects on the power cable. Damage to the cable could cause shock, fire or product damage which may not be covered by the warranty.
- Use only extension cords and outlets that can fully accommodate the display's polarized plug.
- Use the power cable provided with the display. If a power cable is not supplied, contact your supplier. Use only power cables that match the AC voltage of the power outlet and that comply with your country's safety standards.
- If the glass is broken, do not touch the liquid crystal. To prevent injury, handle glass fragments with care when disposing of them.
- Do not move or mount the display by connecting rope or wire to its handles. The display is heavy, and failure of the rope, wire or handle could lead to injury. - Use only VESA®-approved mounts if using a mount other than the one supplied with the display.
- Disconnect all of the display's power cables from the wall outlet and seek assistance from qualified service personnel if any of the following occur:
* The power cable or plug is damaged. * Liquid is spilled into the display. * Objects fall into the display.
* The display is dropped. * Structural damage, such as cracking, occurs
* The display behaves unexpectedly when you follow operating instructions
CAUTION
- Turn off the display before cleaning its screen.
Otherwise, you may scramble the desktop icons or inadvertently activate applications when you wipe the screen. - Avoid setting up and using the display in an area with excessive levels of dust, humidity, and smoke.
- Make sure an electrical socket is near the display and remains easily accessible during use.
- The display should be used only with European TN and TT power distribution systems. It is not suitable for older, IT-type power distribution systems found in some European countries. This system (IT-type) is widely used isolated from earth, in some installations in France, with impedance to earth, at 230/400V, and in Norway, with voltage limiter, neutral not distributed, at 230V line-to-line. Contact qualified personnel if you're uncertain of the type of power system available where you're installing the display.
- You must connect the USB cable that came with the display to a computer that has a USB compliant interface and that bears the USB logo.
In addition, the USB source computer must be compliant with IEC 60950-1 and/or IEC 62368-1. The source computer must be CE marked and carry safety certification marks for Canada and USA. This is for operating safety and to avoid damage to the display.
- Read Instructions - All the safety and operating instructions should be read before the appliance is operated.
- Retain Instructions - The safety and operating instructions should be retained for future reference.
- Heed Warnings - All warnings on the product and in the operating instructions should be adhered to. - Follow Instructions - All operating and use instructions should be followed.
- Cleaning - Unplug this product from the wall outlet before cleaning. Do not use liquid cleaners or aerosol cleaners. Use a damp cloth for cleaning.
- Attachments - Do not use attachments not recommended by the product manufacturer as they may cause hazards.
- Water and Moisture -Do not use this product near water - for example, near a bath tub, wash bowl, kitchen sink, or laundry tub, in a wet basement, or near a swimming pool, and the like.
- Placement - Do not place this product on an unstable cart, stand, tripod, bracket, or table. The product may fall, causing serious injury to a child or adult, and serious damage to the product. Use only with a cart, stand, tripod, bracket, or table recommended by the manufacturer, or sold with the product. Any mounting of the product should follow the manufacturer's instructions, and should use a mounting accessory recommended by the manufacturer.
- Ventilation - Slots and openings in the cabinet are provided for ventilation and to ensure reliable operation of the product and to protect it from overheating, and these openings must not be blocked or covered. The openings should never be blocked by placing the product on a bed, sofa, rug, or other similar surface. This product should not be placed in a built-in installation such as a bookcase or rack unless proper ventilation is provided or the manufacturer's instructio ns have been adhered to.
• Lightning - For added protection for this product during a lightning storm, or when it is left unattended and unused for long periods of time, unplug it from the wall outlet and disconnect the antenna or cable system. This will prevent damage to the product due to lightning and power-line surges.
• Overloading -Do not overload wall outlets, extension cords, or integral convenience receptacles as this can result in a risk of fire or electric shock.
- A product and cart combination should be moved with care. Quick stops, excessive force, and uneven surfaces may cause the product and cart combination to overturn.

- Servicing - Do not attempt to service this product yourself as opening or removing covers may expose you to dangerous voltage or other hazards. Refer all servicing to qualified service personnel.
- Safety Check - Upon completion of any service or repairs to this product, ask the service technician to perform safety checks to determine that The product is in proper operating condition.
- Heat - The product should be situated away from heat sources such as radiators, heat registers, stoves, or other products (including amplifiers) that produce heat.
IMPORTANT
The following are the normal operating requirements for the display (not including OPS):
| MODEL | Power requirements | |
| EL55R2 | AC100V~240V | 300W max |
| EL65R2 | AC100V~240V | 300W max |
| EL75R2 | AC100V~240V | 330W max |
| EL86R2 | AC100V~240V | 450W max |
For additional requirements and other information, refer to the display's specifications.
Federal Communication Commission interference statement
FCC
Suppliers Declaration of Conformity
47 CFR § 2.1077 Compliance Information
Unique Identifier: EL55R2, EL65R2, EL75R2, EL86R2
Responsible Party – U.S. Contact Information
ELMO USA CORP.
6851 Jericho Turnpike, Suite 145
Syosset, NY 11791
This device complies with Part 15 of the FCC Rules. Operation is subject to the following two conditions:
- This device may not cause harmful interference, and
- This device must accept any interference received, including interference that may cause undesired operation.
NOTE
This equipment has been tested and found to comply with the limits for a Class B digital device, pursuant to part 15 of the FCC Rules. These limits are designed to provide reasonable protection against harmful interference when the equipment is operated in a commercial environment. This equipment generates, uses, and can radiate radio frequency energy and, if not installed and used in accordance with the instruction manual, may cause harmful interference to radio communications. Operation of this equipment in a residential area is likely to cause harmful interference in which case the user will be required to correct the interference at his own expense.
CAUTION
Any changes or modifications not expressly approved by the party responsible for compliance could void the user's authority to operate this equipment.
Restriction
Operations in the 5.15-5.25GHz band are restricted to indoor usage only.
IEEE 802.11b or 802.11g operation of this product in the USA is firmware limited to channels 1 through 13.
CAUTION
i. the device for operation in the band 5150-5250 MHz is only for indoor use to reduce the potential for harmful interference to co-channel mobile satellite systems;
ii. the maximum antenna gain permitted for devices in the bands 5250-5350 MHz and 5470-5725 MHz shall comply with the e.i.r.p. limit; and
iii. the maximum antenna gain permitted for devices in the band 5725-5825 MHz shall comply with the e.i.r.p. limits specified for point-to-point and non point-to-point operation as appropriate.
iv. Users should also be advised that high-power radars are allocated as primary users (i.e., priority users) of the bands 5250-5350 MHz and 5650-5850 MHz and that these radars could cause interference and/or damage to LE-LAN devices.
Radiation exposure statement
This equipment complies with FCC radiation exposure limits set forth for an uncontrolled environment. This equipment should be installed and operated with minimum distance of 20 cm between the antenna of this device and all nearby persons.
This transmitter must not be co-located or operated in conjunction with any other antenna or transmitter.
EU declaration of conformity
Hereby TECHNO HORIZON CO., LTD. declares that the radio equipment type Interactive displays model EL55R2, EL65R2, EL75R2, EL86R2 are in compliance with directive 2014/53/EU.
WARNING
Operation of this equipment in a residential environment this equipment may could cause radio interference.
The frequency band and the maximum transmitted power in EU are listed below:
| Transmitting Band (MHz) | 2402-2483.5 | 5150-5350 | 5470-5725 |
| Maximum Transmit Power EIRP (dBm) | 19 | 23 | 23 |
Restrictions in
AT/BE/BG/CZ/DK/EE/FR/DE/IS/IE/IT/EL/ES/CY/LV/LI/LT/LU/HU/MTNL/NO/PL/PT/RO/SI/SK/TR/FI/SE/CH/UK/HR—5150MHz-5350MHZ is for indoor use only
CAUTION: EXPOSURE TO RADIO FREQUENCY RADIATION
This equipment complies with EU radiation exposure limits set forth for an uncontrolled environment.
This equipment should be installed and operated with minimum distance 20 cm between the radiator and your body.


The lightning flash with arrowhead symbol, within an equilateral triangle, is intended to alert the user to the presence of uninsulated "dangerous voltage" within the product's enclosure that may be of sufficient magnitude to constitute a risk of electric shock to persons.

The exclamation point within an equilateral triangle is intended to alert the user to the presence of important operating and maintenance (servicing) instructions in the literature accompanying the product.

This symbol [crossed-out wheeled bin WEEE Annex IV] indicates separate collection of waste electrical and electronic equipment in the EU countries. Please do not throw the equipment into the domestic refuse. Please use the return and collection systems available in your country for the disposal of this product.
WARNING
TO REDUCE THE RISK OF FIRE OR ELECTRIC SHOCK, DO NOT EXPOSE THIS PRODUCT TO RAIN OR MOISTURE.
The connection of a non-shielded equipment interface cable to this equipment will invalidate the FCC Certification or Declaration of this device and may cause interference levels which exceed the limits established by the FCC for this equipment. It is the responsibility of the user to obtain and use a shielded equipment interface cable with this device. If this equipment has more than one interface connector, do not leave cables connected to unused interfaces.
Changes or modifications not expressly approved by the manufacturer could void the user's authority to operate the equipment.
USER-INSTALLER
CAUTION:
Your authority to operate this FCC verified equipment could be voided if you make changes or modifications not expressly approved by the party responsible for compliance to Part 15 of the FCC rules.
BEFORE YOU USE
- Be sure to use the cable supplied with the product.
- The supplied power cord are designed for exclusive use with this product. Do not use them with other products.
- Do not strongly press the touchscreen or press it with sharp objects. This may result in damage or malfunction to the touchscreen.
- Be sure to use the power cord applicable to your local power specifications. It may be discolored, deformed, or damaged.
- Do not place this product in any humid, dusty, salt bearing wind, or vibrating locations. Use it under the following environmental conditions:
Temperature : 0°C \~ 40°C
Humidity : 30% \~ 85%(No condensation) - Use a soft, dry cloth for cleaning. Do not use any volatile solvent such as thinner or benzene.
- If this product is used for longer than the warranty period, its performance and quality may deteriorate due to the lifetime of its parts. For parts replacement (on chargeable basis), consult the dealer from whom you purchased this product or our branch/office near your location.
• Copyright Unless used for personal use, it is prohibited strictly under copyright law to use any photo files without the prior consent of the copyright holder. - It is prohibited under copyright law to use or copy any part or the whole of this document without our prior written consent.
- ELMO shall not be liable for any claim for damage or loss of earnings or any claim raised by a third person due to the use, malfunction or repair of this product.
ELMO is registered trademarks of TECHONO HORIZON CO., LTD.
All other company/product names described in this manual are trademarks or registered trademarks of their respective companies.
1 Before Use
1.1 Package Contents
The items below are included with this product. If any item is missing, contact the dealer from whom you purchased this product.
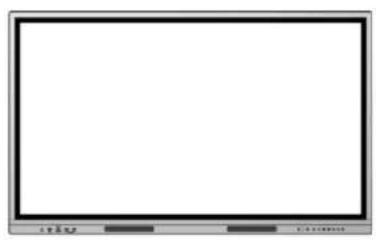
natural_image
Front view of a blank whiteboard with control buttons at the bottom (no text or symbols on the board)Display monitor

Remote control
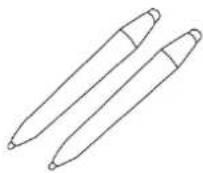
Touch pen x2

Eraser

Power cord x3 (3m) (TypeA/TypeC/TypeBF)

USB cable
※TypeB-TypeA (3m)

HDMI cable (3m)
Quick Start Guide

Important Safeguards
1.2 Part Names and Functions
1 Front
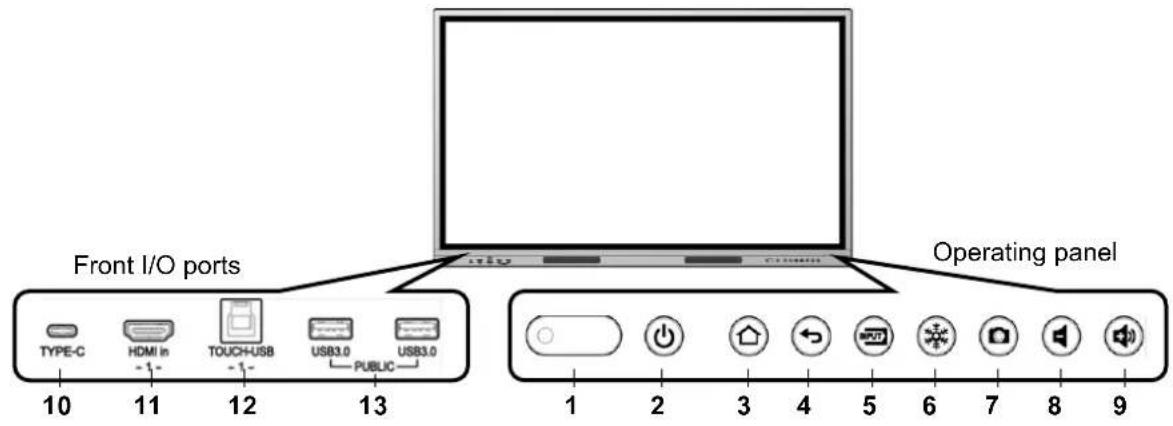
Operating panel
| No. | Mark | Name | Function |
| 1 |  | IR receiver | IR receiver for the remote control. |
| Power LED | To indicate the power status. On: Green Off: Red | ||
| 2 |  | Power | Long press: To turn on or off the power.Short press: To enter or cancel the standby mode. |
| 3 | [WAW8] | Home | To display the Home screen.(⇒P.20) |
| 4 |  | Return | To go back to the previous screen. |
| 5 |  | Input select | To display the Source Settings screen.(⇒P.67) |
| 6 |  | Freeze | To pause the input video (HDMI / Display Port / USB Type-C / VGA). Press this button again to restart. |
| 7 |  | Screenshot | To capture the currently displayed screen and save it.The captured image will be saved in the CameraRoll folder. |
| 8 |  | Volume down | To decrease the volume. |
| 9 |  | Volume up | To increase the volume. |
Front I/O ports
| No. | Name | Function |
| 10 | Type-C(USB Type-C) | To connect to a USB Type-C device to input video and audio into the product. It is possible to charge some devices.When connected to a computer, you can control the computer from the product by touching the screen of the display monitor. |
| 11 | HDMI in(HDMI Type-A) | To connect the supplied HDMI cable to input video and audio into the product. |
| 12 | TOUCH-USB(USB Type-B) | To connect the supplied USB cable to control the computer from the product by touching the screen of the display monitor. |
| 13 | USB3.0(USB Type-A) | To connect a device (such as a USB flash drive, USB mouse, USB keyboard, or USB camera) that supports USB3.0 and USB2.0. |

Side I/O ports
| No. | Name | Function |
| 1 | LAN(RJ-45) | To connect to the network using a LAN cable. |
| 2 | HDMI in (HDMI Type-A) | To connect the supplied HDMI cable to input video and audio into the product. |
| 3 | TOUCH-USB (USB Type-B) | To connect the supplied USB cable to perform touch operation for the connected computer on the display monitor of the product. |
| 4 | USB2.0 (Type-A) | To connect a USB device (such as a USB flash drive, USB mouse, USB keyboard, or USB camera) that supports USB2.0. |
| 5 | Display Port in | To input video and audio into the product. |
| 6 | USB3.0 (USB Type-A) | To connect a device (such as a USB flash drive, USB mouse, USB keyboard, or USB camera) that supports USB3.0 and USB2.0. |
Bottom I/O ports
| No. | Name | Function |
| 7 | RS-232C | To control the product from a computer via RS-232C. |
| 8 | VGA in | To connect a video source device using a VGA cable to input video into the product. |
| 9 | AUDIO in | To connect an audio source device to input audio into the product. [ 3.5mm jack (monaural)] |
| 10 | SPDIF out | To connect an optical digital cable to output audio of the product. |
| 11 | AUDIO out | To connect an audio output device such as a headphone or active speaker to output audio of the product. [ 3.5mm jack (monaural)] |
| 12 | MIC in | To connect an external microphone to input audio into the product. [ 3.5mm jack (monaural)] |
| 13 | HDMI out | To connect the supplied HDMI cable to output video and audio of the product. |
※ KL55R2(HOL),KL65R2(HOL),KL75(HOL),KL86(HOL) is a model without HDMI-out.
3 Touch pen and Eraser
Thin pen nib

Thick pen nib

Eraser
You can perform touch operations using the supplied Touch pen.
With ELMO Note, it is possible to make different settings for the thick pen nib and the thin pen nib and draw different lines. Drawn lines can be deleted with the Eraser. (⇒P.28)
The Touch pen and the Eraser are equipped with magnets and can be attached to the attachment surface under the display monitor.

Note
- If you place your finger near the nib of the Touch pen, it may malfunction.
- If you use the thick pen nib away from the touchscreen, it may be recognized as a thin pen nib.
- Do not press the pen nib anywhere other than the screen. It may not work properly.
- When using multiple Touch pens, touch positions and pen information may be swapped, and line breaks may occur.
- If the pen nib becomes worn or damaged, replace the Touch pen. For purchasing a Touch pen, contact the dealer where you purchased the product.
- Do not attach anything other than the supplied Touch pen to the attachment surface.
- There are two attachment surfaces for EL65R2, EL75R2, and EL86R2, and one for EL55R2. Not all included Touch pens or Erasers can be attached.
- The supplied Touch pen has a built-in magnet. Keep the pen away from watches and magnetic cards.

| No. | Name | Function |
| 1 | Power button | Long press: To turn on or off the power.Short press: To enter or cancel the standby mode. |
| 2 | Enter button | To decide the selection in a dialog box. |
| 3 | Home button | To display the Home screen. (⇒P.20) |
| 4 | Freeze button | To pause the input video (HDMI / Display Port / USB Type -C / VGA). Press this button again to restart. |
| 5 | OPS button | To display the screen of the PC unit (Windows).※Optional |
| 6 | Input select button | To display the Source Settings screen. (⇒P.67) |
| 7 | Direction buttons | To move the selection item up, down, left, and right. |
| 8 | Return button | To go back to the previous screen. |
| 9 | Whiteboard button | To start the whiteboard app (ELMO Note). (⇒P.25) |
| 10 | Screenshot button | To capture the currently displayed screen and save it. |
| 11 | Volume down button | To decrease the volume. |
| 12 | Volume up button | To increase the volume. |
| 13 | Mute button | To mute the audio output.Press this button again to release the mute. |
Note
Save destination of the image captured by the Screenshot button:
Local > CameraRoll
◆ Preparation
- Inserting batteries
- Slide and open the cover in the back of the remote control.
- Insert 2pcs of AAA batteries.
Pay attention to the polarity, which is printed inside the remote control.
- Firmly close the cover.

natural_image
Three black remote control devices with white arrows indicating internal components, shown in red and open states (no text or symbols)Note
- Use manganese AAA batteries for the batteries.
- When battery power becomes low, replace them with new batteries as soon as possible.
- If you do not use the remote control for a long time, remove the batteries from the remote control.
Operable Range of the Remote Control
If there is no obstruction between the IR receiver of the display monitor and the remote control, the operable range of the remote control is as follows:
Distance: within 5m
Angle: within 30^ up, down, left, and right

1.3 Installation
1 Installation Conditions
- Use the product in the following conditions.
| Temperature | 0~40°C |
| Humidity | 20~80% |
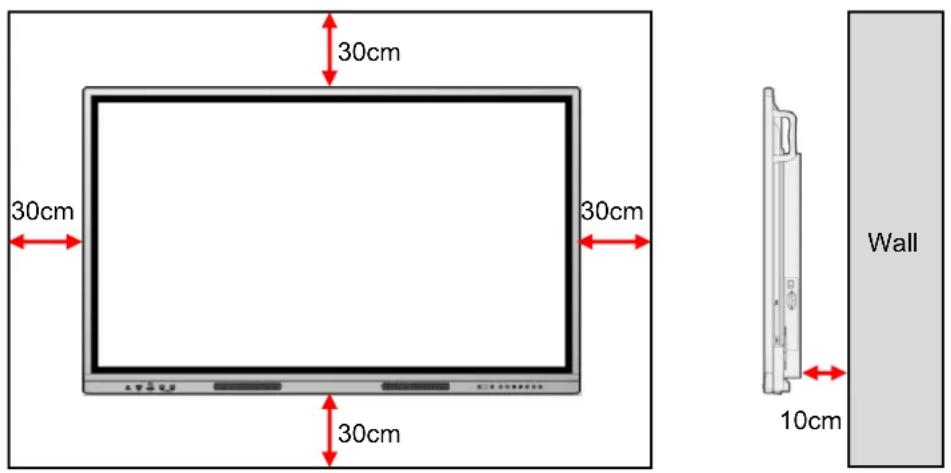
- To prevent internal heat buildup, install the display monitor in a well-ventilated place, keeping the distance as specified in the following figure from the surrounding area.
Use the following screws to attach the VESA brackets.
For EL65R2·EL75R2·EL86R2: M8 screws with a length of 20 mm
For EL55R2: M6 screws with a length of 20 mm

Caution
- Since the display monitor is heavy, consult the dealer from whom you purchased this product when installing, removing or moving it.
- Installation must be done by professional service engineers. Otherwise, injury may occur by improper installation.
- If you want to mount the display monitor on a wall or suspend it from the ceiling, ask a specialist for installation work.
ELMO is not responsible for any accident or damage caused by improper installation.
- If you need to move the display monitor after it is attached to the stand, always move the product with 2 or more people.
- Be careful not to block the ventilation holes when installing. The heat will be trapped inside and may cause a malfunction or a fire.
- Do not install the display monitor in a place where it may be exposed to rain or spray, or in a place with high humidity.
- Do not install the display monitor near the air outlet of the air conditioner.
Condensation may form due to sudden temperature changes, which may corrode the inside and cause a malfunction.
◆ Attachment of the Display Monitor to the Stand
You can attach the display monitor to the stand.
The positions of the screw holes are as shown in the following figure.
For the assembly of the stand, refer to the instruction manual of the stand.
55 inch: VESA 400x400
65 inch : VESA 600x400
75 inch : VESA 800x400
86 inch : VESA 800x600

1.4 Turning On or Off the Power
1 Connecting the Power Cord
Connect the supplied power cord to the power supply socket on the side and plug the power plug into an outlet.


Caution
● Always use the supplied power cord.
- Use the power cord usable in your country.
2 Turning On the Power
1 Press “-” on the Main power switch on the bottom.
Location of the Main power switch:
For EL55R2 and EL65R2: Side
For EL75R2 and EL86R2: Bottom

2 Long-press the Power button on the front.
The power can also be turned on by long-pressing the Power button on the remote control.

◆ Initial Startup
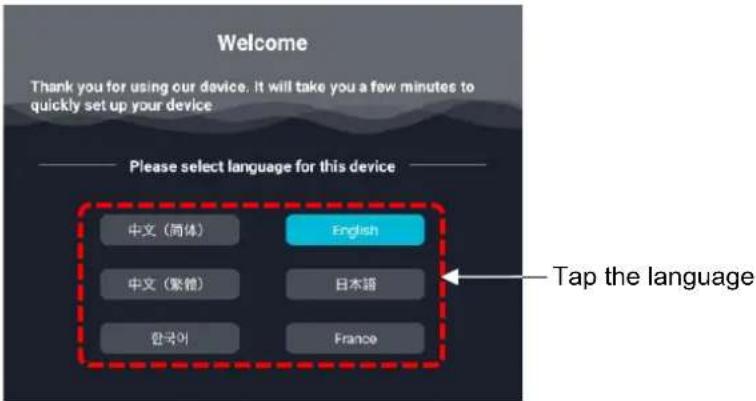
At initial startup, the Settings screen will appear in the order of "Language setting", "Date and time setting", and "Network setting".
Settings after "Language setting" can be skipped by tapping "Skip and start immediately" or "Next".

To go back to the previous screen
To skip all subsequent steps and complete the settings
To go to the next page
1 Language setting
2 Date and Time setting

3 Network setting
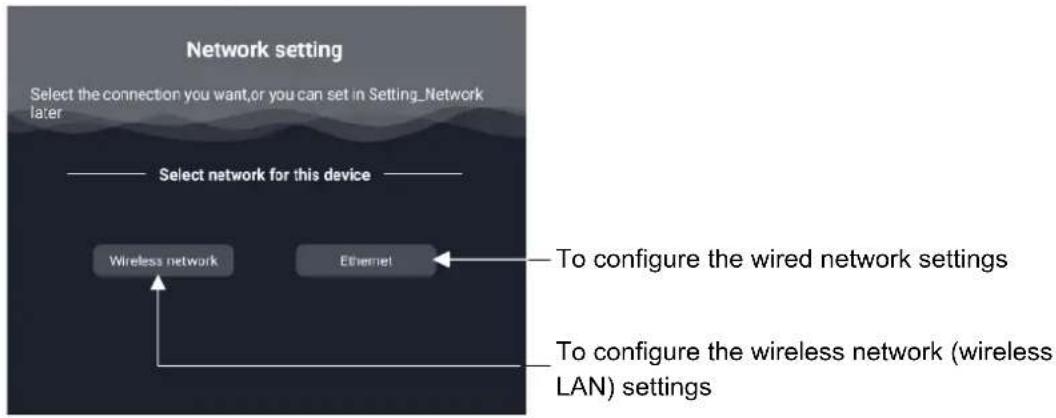
flowchart
graph TD
    A["Select the connection you want, or you can set in Setting_Network later"] --> B["Select network for this device"]
    B --> C["Wireless network"]
    B --> D["Ethernet"]
    C --> E["To configure the wired network settings"]
    D --> F["To configure the wireless network (wireless LAN) settings"]

- For the Network setting, set either Wireless network or Ethernet.
- If you want to set the proxy in the Wireless network settings, or if you want to connect to a stealth access point, set them after displaying the Home screen. It is not possible to set them from the initial startup screen. (⇒P.70)
- Language setting, Date and time setting, and Network setting can be reset.
4 Home screen
The Home screen will appear after completing all the settings.

3 Turning Off the Power
1 Long-press the Power button on the front

The power can also be turned off by long-pressing the Power button on the remote control.
2 Select "Sure" in the Shutdown confirmation dialog.
Select "Cancel" if you want to cancel the shutdown.
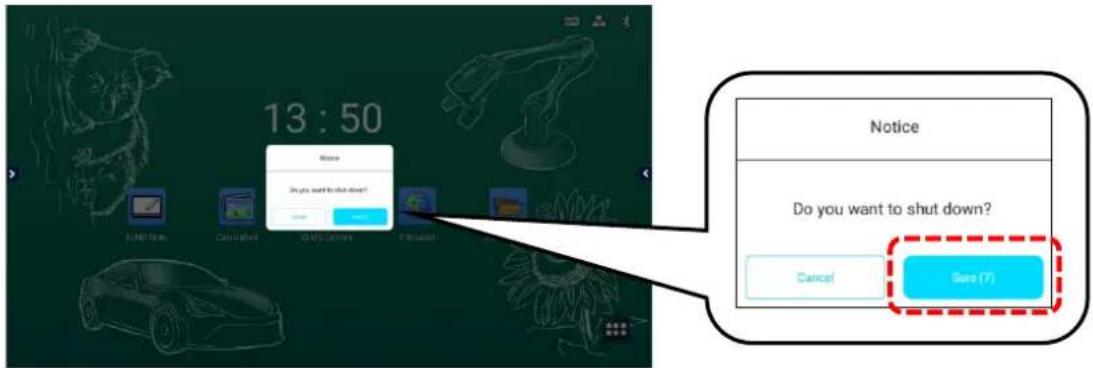
3 Press "O" on the Main power switch on the bottom.
- If there is no operation after the Shutdown confirmation dialog is displayed and the countdown timer reaches zero, the product will automatically shut down.
- Do not press "O" on the Main power switch on the back before shutting down the product. By doing so may cause a malfunction.
- If you do not use the product, shut it down.
- If the product freezes or is unstable, try shutting it down.
4 Standby Mode
Press the Power button on the front while the product is turned on to enter the Standby mode. To cancel the Standby mode, press the Power button again.


- The Power LED turns green in the Standby mode.
- The Power LED turns red when the product is shutdown.
2 Basic Operations
2.1 Touch Operations
You can perform touch operations with your finger or the supplied Touch pen.
For details on Windows touch operations, refer to Windows Help.
| Name | Function | Finger movements |
| Single tap (Tap) | Touch once briefly.Works as the left click of a mouse. | 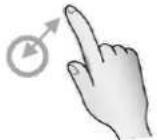 |
| Double tap | Touch same place twice quickly.Works as the double click of a mouse. | 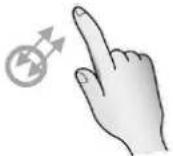 |
| Long-press | Touch and hold.Works as the right click of a mouse. |  |
| Drag and drop | Touch and hold the icon or slide and move it. Then release the finger at the specified position.Works as the drag and drop of a mouse. |  |
| Swipe / Flick | Swipe: Move the finger while touching the screen.Flick: Touch the screen and brush the finger quickly across the screen. |  |
| 2-finger press | Touch and hold with two fingers.The distance between two points should be 2-5 cm. | 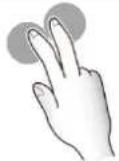 |
| Zoom in (Enlarge) | Touch two points at the same time and move fingers away from each other.To be used in the screen where zooming operation is possible. |  |
| Zoom out (Shrink) | Touch two points at the same time and move fingers closer to each other.To be used in the screen where zooming operation is possible. |  |
2.2 Basic Screen Operations
Home Screen
The Home screen will appear when the power is turned on.
Tap the List of apps icon at the bottom right of the screen to display a list apps installed on the product.
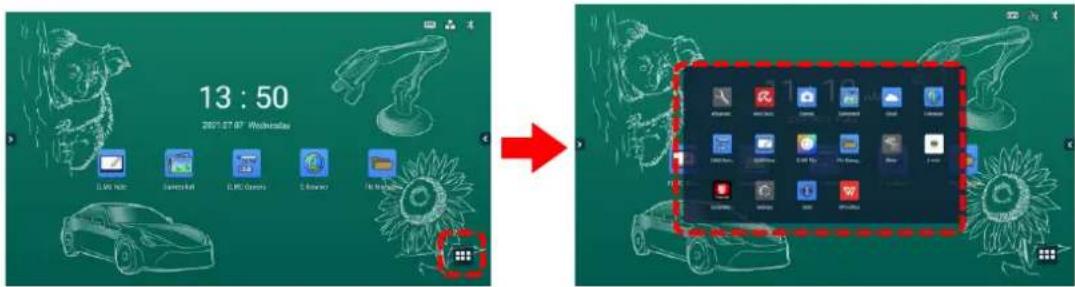
Main Apps
| Icon | Name | Function |
 | ELMO Note | To start ELMO Note (whiteboard). (⇒P.25) |
 | Camera Roll | To start Camera Roll. (⇒P.38) |
 | ELMO Camera | To start a USB camera. (⇒P.40) |
 | E-Browser | To start E Browser. (⇒P.42) |
 | File Manager | To start File Manager. (⇒P.56) |
 | Timer | To start ELMO timer. (⇒P.45) |
 | Screen Mirror(Transcreen) | To share the screen of other device such as a tablet.(⇒P.51) |
 | Avira Security | To perform a virus scan or cleanup of internal memory.(⇒P.54) |
 | ELMO Play | To start ELMO Play. (⇒P.55) |
 | Menu | To configure the Source Settings. (⇒P.67) |
 | Settings | To configure the settings of the product. (⇒P.70) |
 | Advanced Setting | To set the proxy settings or connection settings to the stealth access point when connecting to the wireless network.(⇒P.71) |
 | WPS Office | To create/view/edit/save Office documents or browse PDF files. |
 | Cloud | To start Cloud.You can select between “Google Drive” and “One Drive”. |
◆ Shortcuts of Apps
You can add, delete, or change the position of app icons (app shortcuts) on the Home screen.

You need to set "Allow home screen editing" in the Security Settings to ON before editing the app icons.
Settings > Security Settings > Allow home screen editing (⇒P.76)
1 Display a list of apps.
2 Long-press the app icon that you want to add to the Home screen.
3 Drag and drop the app icon to a desired position on the Home screen.
A new app shortcut will be added on the Home screen.

〈Moving an App Shortcut〉
1 Long-press the app icon that you want to move on the Home screen.
2 Drag and drop the app icon to a desired position.
The app icon will be moved to the dropped position. If the icon is dragged to the right edge of the screen, a new page will be added to the right.

1 Long-press the app icon that you want to remove from the Home screen.
2 Drag and drop the app icon to the "X" mark at the top left of the Home screen.
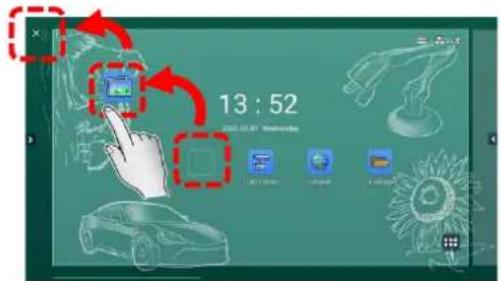
◆ Uninstallation of Apps
1 Long-press the app icon that you want to uninstall on the Home screen. A popup of "Uninstall app" will appear.
2 Tap "Uninstall app".
A confirmation dialog box will appear.
3 Tap "OK".
The app will be uninstalled from the product.

◆ Connection Status Icons on the Home Screen
The icons displayed at the top right of the Home screen provide information about the status of the network connection of the product.
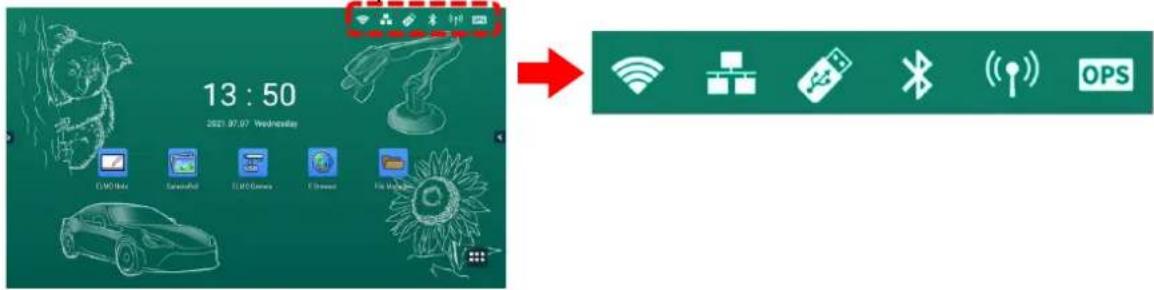
| Icon | Name | Function | |
 | OPS | This icon appears when the product is connected with OPS (sold separately). | |
 | Hotspot | This icon appears when the Hotspot setting is on. | |
 | Bluetooth | This icon appears when the product is connected with a Bluetooth device. | |
 | USB flash drive | This icon appears when the product is connected with a USB flash drive. | |
 | Ethernet | This icon appears when the wired network setting is on.A diagonal line appears over the icon when the product is not connected to the Internet. | |
 | Wireless | This icon appears when the wireless network (Wi-Fi) setting is on.The number of bars indicates the strength of the wireless signal. (Max. 4 bars)A diagonal line appears over the icon when the product is not connected to the Internet. | |
◆ Displaying the Side Menu Bar
Touch < or > on either edge of the Home screen to display the side menu bar.


The position of [>][<] icons can be changed by swiping them up and down.
| Icon | Name | Function | |
 | Return | To go back to the previous screen. | |
 | Home | To display the Home screen. (⇒P.20) | |
 | Task view | To display a thumbnail list of the running apps.Press “X” at the top right corner of the task to close the task.Press “CLEAR ALL” to close all the tasks. | 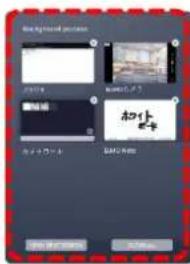 |
 | Overlay | To start the Overlay app. (⇒P.37) | |
 | ELMO Note | To start ELMO Note (whiteboard). (⇒P25) | |
 | E-Browser | To start E Browser. (⇒P.42) | |
 | ELMO Camera | To start a USB camera. (⇒P.40) | |
 | Utilities | To start pre-installed utilities. (⇒P.61) | |
 | Menu | To display the Source Settings screen. (⇒P67) | |
3 Using Apps
3.1 Using ELMO Note (Whiteboard)
You can use the screen like a whiteboard or blackboard.
You can draw lines and diagrams, and place images and videos.
◆ Startup
Tap the ELMO Note icon in the list of apps or the side menu bar.

◆ Initial Startup
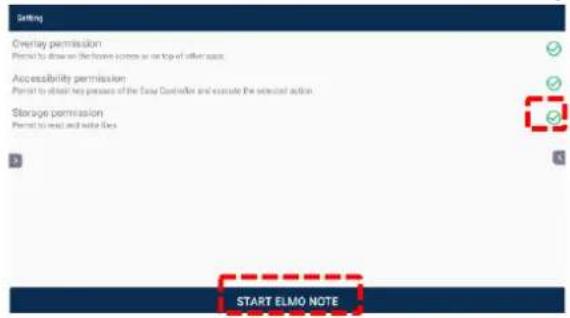
When you start ELMO Note or Overlay app for the first time, the initial settings screen will appear. Enable "Accessibility Permission" and "Storage Permission" settings before start. They may have been set depending on the version you are using.
1 Configuring the Accessibility Permission Setting
Tap "SETTING" in the Setting screen.
Tap "ELMO Note" and set the "Use service" setting to ON

Press the Return button on the Operating panel to go back to the Setting screen.

2 Configuring the Storage Permission Setting
Tap "SETTING" in the Setting screen. Then tap "Allow" to allow ELMO Note to access the storage.

3 Tap "START ELMO NOTE" after completing all the settings.
◆ Basic Operations
Drawing lines and shapes

Tap the Pen icon and trace on the screen with your finger or Touch pen.
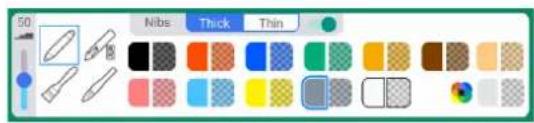
When the Pen icon is double-tapped, you can change the line color and thickness. ( P.28)
Deleting the lines

Tap the Eraser icon and rub the screen to delete the lines.
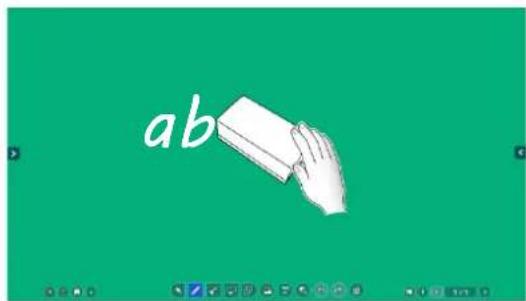
You can also delete the lines using the supplied Eraser.
Editing the lines

Tap the Select icon and circle the line that you want to edit.
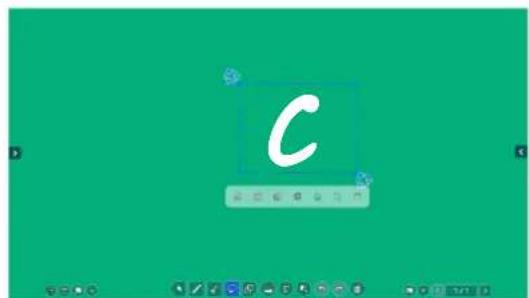
The selected object can be copied, deleted, and moved by dragging. (⇒P.33)
◆ Screen Description

| No. | Name | Function |
| 1 | Pen | To draw free-hand lines. (⇒P.28) |
| 2 | Eraser | To delete the lines and objects. (⇒P.29)If you tap this icon while an object is selected, the selected object will be deleted. |
| 3 | Select | To select the lines and objects on the screen. (⇒P.29) |
| 4 | Shapes | To draw various shapes. (⇒P.30) |
| 5 | Operation | To pan and zoom the whole area. (⇒P.30) |
| 6 | Background | To change the background of the whiteboard.Various colors, patterns, and designs can be selected. (⇒P.31) |
| 7 | Add page | To add a new page to the next page of the currently displayed page.(Max. 30 pages can be added.)The same background as the selected page will be applied to the added page. (⇒P.32) |
| 8 | Page operation | To display thumbnails of each page.Tap the thumbnail to move to the page of the tapped thumbnail.Tap the Page back button and Page forward button to move between pages. (⇒P.32) |
| 9 | Page back | To move to the previous page. |
| 10 | Page forward | To move to the next page. |
| 11 | Menu | To open the menu. (⇒P.34) |
| 12 | Exit | To end ELMO Note. |
| 13 | Save | To display the Save dialog box. (⇒P.36) |
| 14 | Hide toolbar | To hide the toolbar.Tap this icon again to show the toolbar. |
| 15 | Camera Roll | To start the Camera Roll app.Images and videos can be attached to ELMO Note. (⇒P.38) |
| 16 | USB camera | To start the ELMO Camera app. (⇒P.40) |
| 17 | Enlarge | To enlarge the area selected by dragging operation.Using icons "+" and "-" , you can change the magnification ratio between 100% and 2400%.In the Operation mode, you can change the magnification ratio between 50% and 2400%. |
| 18 | Undo | To undo the last operation. |
| 19 | Redo | To cancel the undo operation. |
| 20 | Clear all | To delete all the drawings and shapes. The background will not be deleted. |
◆ Pen Menu
The Pen menu will appear when the Pen icon in the toolbar is tapped again in the Pen mode.

| No. | Name | Function |
| 1 | Normal pen | To draw with a normal pen. |
| 2 | Instruction pen | To draw lines that will disappear in 3 seconds. |
| 3 | Paint brush | To draw with a pen with a vertical rectangular nib. |
| 4 | Ink brush | To draw with a pen whose thickness changes with speed. |
| 5 | Line thickness | To set the line thickness of the pen. |
| 6 | Pen nib settings | To configure the settings of the supplied Touch pen when the Normal pen is selected.Thick: to configure the settings of the thick nib.Thin: to configure the settings of the thin nib.You can enable or disable the thin nib with the switch on the right.(When the Thin nib setting is disabled, the Thick nib setting w ill be applied to both thin nib and thick nib of the Touch pen.) |
| 7 | Pen color | To select the color of the pen. |
| 8 | Color palette | To display the color palette.You can select any color in the color palette. |

Eraser menu
The Eraser menu will appear when the Eraser icon in the toolbar is tapped again in the Eraser mode.

flowchart
graph TD
    A["1"] --> B["Blue Box"]
    C["2"] --> D["Icon 1"]
    E["3"] --> F["Icon 2"]
    G["Icon 3"] --> H["Icon 4"]
| No. | Name | Function |
| 1 | Normal eraser | To delete a portion of the drawing touched by the Eraser icon.There are 3 different sizes of icons available: Small, Medium, Large |
| 2 | Partial eraser | To delete a portion of the drawing touched by your finger while dragging on the screen. |
| 3 | Area eraser | To delete the drawing in the area selected by dragging on the screen. |
Note
Deleting with the palm of your hand or the supplied Eraser
When your palm (an area of contact exceeding a predetermined size) or the supplied Eraser is detected, the Eraser icon will appear on the screen, and you can delete a portion of the drawing touched by the Eraser icon.
To prevent a deletion failure, ensure to perform the deleting operation only after the Eraser icon is displayed.

Caution
Shapes (excluding lines) and images cannot be deleted using the "Normal eraser" function, the palm of your hand, or the supplied Eraser. Use the "Partial eraser" function or the "Area eraser" function.

Selection Menu
The Selection menu will appear when the Select icon in the toolbar is tapped again in the Selection mode.

flowchart
graph LR
    A["1"] --> B["Blue Square"]
    B --> C["Dashed Circle"]
    C --> D["Square"]
    D --> E["All"]
    E --> F["3"]
| No. | Name | Function |
| 1 | Lasso selection | To select the objects within the range specified by the lasso.You can also select by tapping each object. |
| 2 | Rectangular selection | To select the objects within the range specified by dragging.You can also select by tapping each object. |
| 3 | Select all | To select all the objects on the screen. |
◆ Shapes Menu
The Shapes menu will appear when the Shapes icon in the toolbar is tapped again in the Shapes mode.

| No. | Name | Function |
| 1 | 2D·3D | To switch between 2D and 3D for the shape. |
| 2 | Line | To select the color of the line. |
| 3 | Fill | To select the color of the shape. |
| 4 | Color | To select the color. |
| 5 | Transparent | To make the color transparent. |
| 6 | Color palette | To display the color palette.You can select any color in the color palette. |
| 7 | File | To start the File Manager app.You can paste images and videos onto the whiteboard. |
◆ Functions Available in the Operation Mode
The product will enter the Operation mode when the Operation icon in the toolbar is tapped.
| No. | Name | Function |
| 1 | Enlarge | To change the magnification ratio during zoom in/out operations.The screen will be enlarged, centering on where you originally touched.To enlarge the area selected by dragging operation.Using icons “+” and “-”, you can change the magnification ratio between 100% and 2400%.In the Operation mode, you can change the magnification ratio between 50% and 2400%. |
| 2 | +- | To change the magnification ratio between 100% and 2400%.“+” and “-” icons will not appear when the magnification ratio is 100%. |
| 3 | Scroll | To scroll the enlarged area of the screen by dragging.This function is disabled if the magnification ratio is 100% or less. |
◆ Background Menu
The Background menu will appear when the Background icon in the toolbar is tapped.

| No. | Name | Function |
| 1 | Background | To select the background.Tap any background design to change the background. |
| 2 | Fill | To select the color of the background.You can also select the color from the color palette. |
| 3 | Line | To select the color of the line.You can also select the color from the color palette. |
| 4 | Background image | To display the Background image menu. |
◆ Background Image Menu
The Background image menu will appear when the Background image icon [ ] at the bottom right of the screen in the Background menu is tapped.

| No. | Name | Function |
| 1 | Add new background image | To add an image file to be displayed as the background from the File Manager. |
| 2 | Background image | To select a pre-installed background image as the background. |
| 3 | Fill | To select the color of the background.You can also select the color from the color palette. |
| 4 | Return | To go back to the Background menu. |
◆ Page Operation Menu
The Page operation menu will appear when the icon [x /y] in the toolbar is tapped.
Up to 5 pages are displayed as thumbnails at the same time. If there are more than 6 pages, you can switch the display by scrolling the menu with a swipe action.
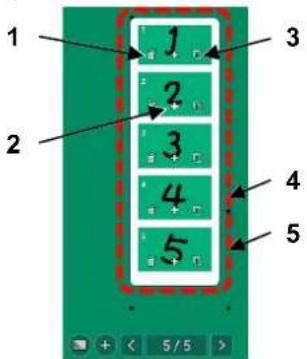
| No. | Name | Function |
| 1 | Delete page | To delete the selected page. |
| 2 | Add page | To add a new page to the next page of the selected page. The same background as the selected page will be applied to the added page. |
| 3 | Copy page | To copy the selected page and add to the next page of the selected page. The same background as the selected page will be applied to the copied page. |
| 4 | Change page order | To change the page order by drag and drop action. |
| 5 | Move to selected page | To go back to the whiteboard and move to the selected page by tapping the thumbnail. |
◆ Add Page Menu
The Add page menu will appear when the Page forward icon in the last page is tapped.

| No. | Name | Function |
| 1 | Add page with same background | To add a new page with the same background as the last page. |
| 2 | Add page with different background | To add a new page with the background selected in the Background menu. |
◆ Functions Available When Selecting an Object
Tap the Select icon in the toolbar to select an object (shape, image, and video).
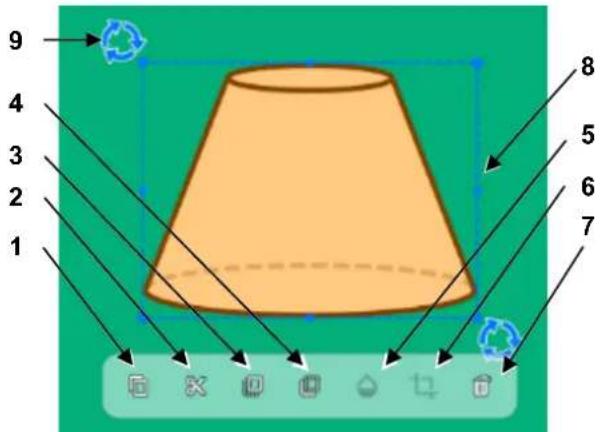
| No. | Name | Function |
| 1 | Copy | To copy the selected object.The Paste icon will appear when any part of the screen other than the object is tapped.Tap the Paste icon to paste the copied object. |
| 2 | Cut | To cut the selected object.The Paste icon will appear when any part of the screen other than the object is tapped.Tap the Paste icon to paste the cut object. |
| 3 | Bring to front | To bring the selected object to the front. |
| 4 | Bring to back | To bring the selected object to the back. |
| 5 | Transparent | To make the selected object transparent. (only for images and materials)When this icon is tapped, a slider will appear to adjust the level of transparency. |
| 6 | Trim | To trim the selected object. (only for images and materials)When this icon is tapped, a frame will appear around the object to adjust the trimming area. |
| 7 | Delete | To delete the selected object. |
| 8 | Change size | To change the size of the selected object by dragging the frame.Shapes such as circles and stars will be scaled up or down while maintaining a 1: 1 aspect ratio. |
| 9 | Rotate | To rotate the selected object by dragging the Rotate icon. |
| - | Move | To move the object by dragging. |
| - | Free transform | To freely change the size and rotate by pinching two points. |
■ Video Object Operations
Tap the Operation icon in the toolbar to operate a video object.

Video in pause mode
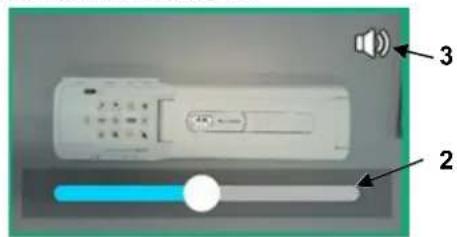
Video in playback mode
| No. | Name | Function |
| 1 | Playback / Pause | To play the video. The Playback mode and the Pause mode can be switched by tapping on the video object. During playback, the video will be stretched to fit the object size. |
| 2 | Seek bar | To change the playback position. The seek bar will disappear over time. Tap the screen to display it again. |
| 3 | Volume bar | To display the volume bar by tapping on the video object.The volume decreases as the bar is dragged to the left. |
◆ Menu Operations

| No. | Name | Function | |
| 1 | Split screen | To enter the Split screen mode. (⇒P.35) | |
| 2 | Open | To open files.All pages will be loaded for pdf files with multiple pages and note format files.Image data files will be loaded as the background image file. | |
| 3 | Cue | To play the video from the beginning. This function is not available when there is no video. | |
| 4 | Play in sync | To play two videos at the same time. This function is not available when there is no video. | |
| 5 | New note | To create a new note. | |
| 6 | Version | To display version information and license information.Scroll down to read all information. | 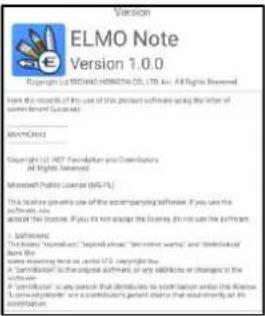 |
Split Screen Mode
In the Split screen mode, two or three users can draw or delete lines at the same time.
1 Tap the Split screen icon in the menu.
2 A dialog box will appear. Select "Two split screen" or "Three split screen" and tap "OK".
The screen will be split as selected.
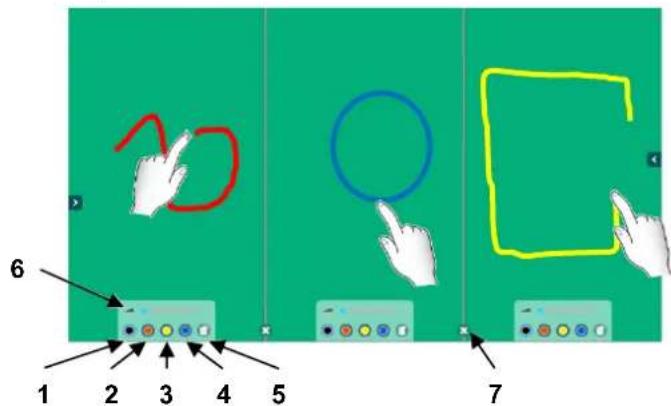
| No. | Name | Function |
| 1 | Black pen | To select Black pen. |
| 2 | Red pen | To select Red pen. |
| 3 | Yellow pen | To select Yellow pen. |
| 4 | Blue pen | To select Blue pen. |
| 5 | Delete screen | To delete all drawings on your split screen only. |
| 6 | Pen thickness | To adjust the thickness of the line. |
| 7 | Exit | To end the Split screen mode.All drawings made will be put together before ending the Split screen mode. |

The drawings can be deleted using the palm of your hand or the supplied Eraser. Multiple uses can perform the deleting operation at the same time.
◆ Saving Images
Tap the Save icon to save the drawing as an image in either PNG format, PDF format, or Note format.

| No. | Name | Function |
| 1 | File name | To enter the file name to save. |
| 2 | Save type | To select the save format. |
| 3 | Range | To select the page to save. |
| 4 | Path to save | To select the location to save the file.Tap to select the local save location. |
- The following 9 characters cannot be used for the saved image data. 「< > : * ? "/¥ | 」
- When all pages are saved in PNG format, page numbers such as "_001" and "_002" will be added to the file name in sequence.
- The saving process may fail when saving a large amount of data that exceeds 10 pages in PDF format. If ELMO Note is closed unexpectedly, restore the data and save it again, or save it in another format.
- When USB flash drive is selected as the save destination, the image data will be saved in the root folder of the USB flash drive (located directly under the USB flash drive). If the USB flash drive is not inserted, the image data will be saved in the local storage.
- Writing to the USB flash drive may still be in progress even after the image data is saved. In order to prevent data corruption, wait about 10 seconds before removing the USB flash drive.
- The background will be saved in association with the object. If it is not possible to save the background, change the position of the object.
- Cloud cannot be used as the storage in the initial version. It will be supported in future version upgrades.
- For Cloud, you can select "Google Drive" or "One Drive". You need to have your account to use them. (⇒P.58)
- You can also upload the file to Cloud from the File Manager. After saving the file in the local storage, start the File Manager from the list of apps to upload to Cloud.
$$ (\Rightarrow \mathrm{P}. 6 0) $$
3.2 Using Overlay Function
You can draw on the entire surface of the external input video or browser screen in the same way as ELMO Note.
◆ Startup
Tap the Overlay icon in the list of apps or the side menu bar.
◆ Toolbar Description
When toolbar is displayed

When toolbar is hidden (in the Operation mode)

natural_image
Abstract green background with blurred circular elements and bokeh effects (no text or symbols)| No. | Name | Function |
| 1 | Operation functions | Same functions as ELMO Note (whiteboard) are available.Refer to page P.27 for details. |
| 2 | Screenshot | To capture and save the screen image.The captured screen image will be saved in the Camera Roll folder in png format. |
| 3 | Hide toolbar | To hide the toolbar. Tap this icon again to show the toolbar.The product is in the Operation mode when the toolbar is hidden. |
| 4 | Exit | To end the Overlay app. |

- To temporarily end the overlay function and operate the product, put the Overlay app in the Operation mode. (The toolbar will disappear and a finger icon will appear.)

- If you use the enlarge function in the Overlay app, the captured screen will be enlarged. Therefore, on-screen operations such as video playback, camera image output, and screen mirroring will temporarily stop. The magnification ratio will be from 100% to 2400%. - In the Operation mode, all drawings will be deleted. The deleted drawings can be displayed again by tapping "Return". - When switching from the Enlarge mode to the Operation mode, the drawings will be deleted. The deleted drawings cannot be displayed again even by tapping "Return".
3.3 Using Camera Roll Function
You can display saved images and videos in a list to compare them or paste to ELMO Note.
◆ Startup
Tap the Camera Roll icon in the list of apps.
◆ Screen Description
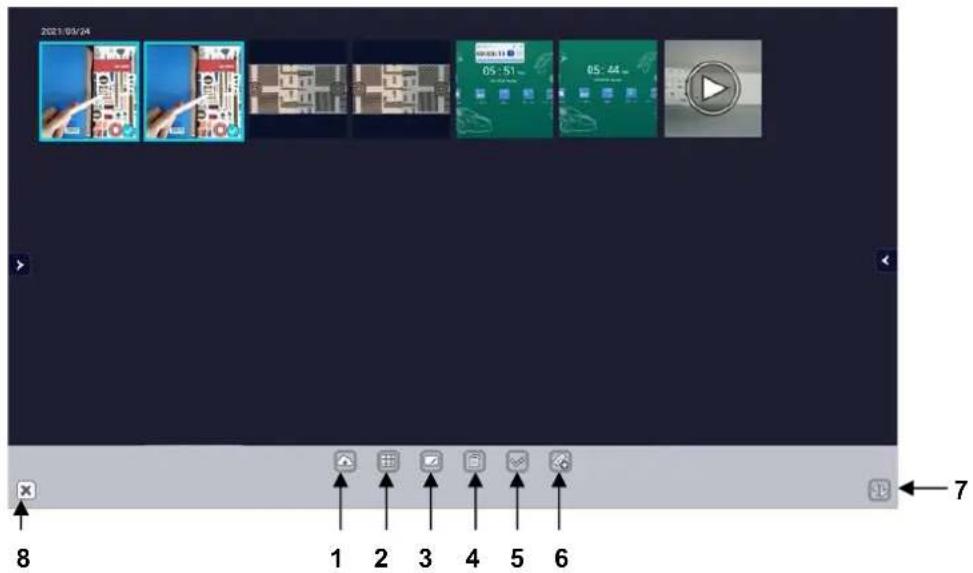
| No. | Name | Function |
| 1 | Cloud | To upload images and videos to Cloud.This function is not available in the initial version. It will be supported in future version upgrades. |
| 2 | Compare | To compare the selected images and videos. (⇒P.39) |
| 3 | ELMO Note | To paste the selected images and videos to ELMO Note (whiteboard) |
| 4 | Delete | To delete the selected images and videos. |
| 5 | Deselect | To deselect all the selected items. |
| 6 | Load from USB | To load images and videos from a USB flash drive to display in the Camera Roll. |
| 7 | Sort in ascending / descending order | To sort files in ascending / descending order of date and time. |
| 8 | Exit | To end the Camera Roll app. |
- The following images and videos can be loaded from a USB flash drive: Image: jpeg / jpg / gif / bmp, Video: mp4 / mov Some files may not be viewed or played.
- For Cloud, you can select "Google Drive" or "One Drive". You need to have your account to use them. (⇒P.58)
- You can also upload the file to Cloud from the File Manager. Start the File Manager from the list of apps to upload to Cloud.(⇒P.60)
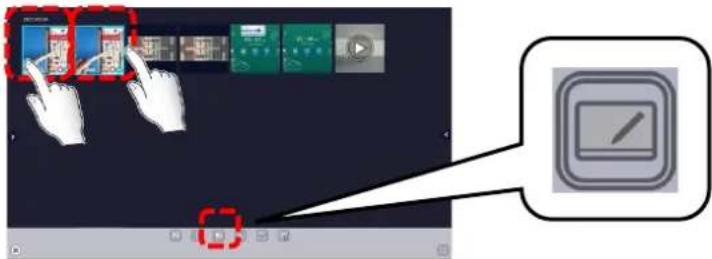
◆ Comparing Images and Videos
1 Select images and videos to compare and tap the Compare icon.
Select 2 to 9 images and videos in total.
If you want to include videos, select no more than two videos.
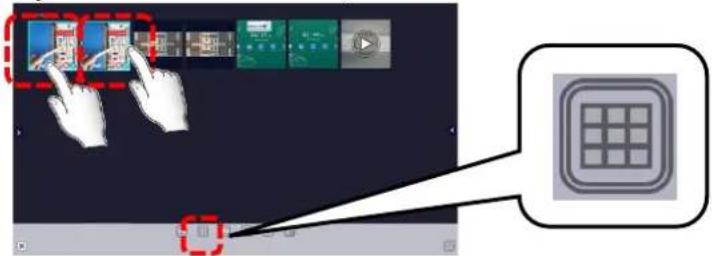
2 The selected images and videos will be displayed side by side.
Depending on the number of images and videos selected, the screen will be split in 2, 4, 6, or 9 sections.

natural_image
Two identical hand-drawn images showing a person interacting with a blue screen displaying a grid of icons (no text or symbols visible)3 Drag the handle between the images.
The size of the images will be enlarged or reduced according to the position of the handle. The size can be initialized with the Return icon at the bottom right of the screen.

◆ Pasting to ELMO Note (whiteboard)
1 Select images and videos and tap the ELMO Note icon.
2 ELMO Note (whiteboard) will start and the selected images and videos will be pasted.
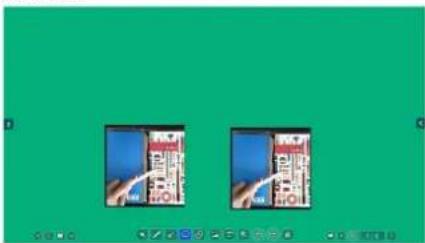
natural_image
Two identical images showing hands interacting with a circuit board on a green background (no text or symbols visible)
Up to 2 videos can be pasted to ELMO Note.
Up to 9 images and videos can be pasted at the same time.
3.4 Using a USB Camera
You can operate or set a USB camera by connecting it to the USB3.0 port or USB2.0 port of the display monitor.
◆ Startup
Tap the ELMO Camera icon in the list of apps or the side menu bar.

◆ Screen Description
Tap the icon either at the bottom right of bottom left of the screen to display the menu bar.

| No. | Name | Function |
| 1 | Camera control | To adjust the level of zoom, brightness, and AF of the USB camera.You can operate ELMO document cameras. |
| 2 | Image rotation | To rotate the camera image. |
| 3 | Freeze | To pause the camera image. Tap this icon again to restart the camera image. |
| 4 | Recording settings | To configure the recording settings of the camera image.● Image: To capture the current screen image.● Video: To record a video.Maximum recording time is 30 minutes. Audio cannot be recorded.● Interval shooting: To record a series of still images automatically at set intervals. |
| 5 | Record | To record the camera image.For video recording, tap this icon again to stop the recording.The recorded still images and videos will be saved in the CameraRoll folder. |
| 6 | Keystone correction | To perform keystone correction on the image. A rectangle will appear. Correct the deformation of the image by moving 4 points.The corrected image will be saved in the CameraRoll folder. |
| 7 | 4 split screen | To divide the screen into 4 sections. The upper left section shows the live camera image.Each time you tap the Screenshot button, the captured image will appear in the order of upper right section, lower left section, and lower right section. |
| 8 | Camera Roll | To start the Camera Roll app.(⇒P.38) |
| 9 | Minimize | To display a minimized screen.The screen can be enlarged or reduced by pinch-in and pinch-out gesture. |
| 10 | Camera select | To switch between the USB camera images.This icon appears when more than 2 USB cameras are connected. |
| 11 | Settings | To display the USB camera settings screen.(⇒P.41) |
| 12 | Hide menu bar | To hide the menu bar. |
◆ USB Camera Settings Screen

| No. | Name | Function |
| 1 | Resolution | To set the resolution of the USB camera. |
| 2 | Frame Rate | To set the frame rate of the USB camera. |
| 3 | Interval | To set the interval for the interval shooting. |
| 4 | Rotation Angle | To set the rotation angle for the image rotation. |
| 5 | Framing Grid | To display grid-like frame lines on the screen. |
| 6 | DETAILED SETTINGS | To configure the detailed settings such as the contrast setting and saturation setting. |
| 7 | Information | To display the version information and license information of the USB Camera app. |
Caution
- The following products can be controlled with the Camera control function on the menu bar:
L-12F, L-12W, L-12iD, MA-1, MO-2, MX-P3, MX-P, OX-1, PX-30E, etc. For details about models that support the Camera control function, contact the dealer from whom you purchased the product or the nearest ELMO sales office. - The MX-P2 does not support USB3.0. When using the MX-P2, connect it to the USB 2.0 port on the side of the display monitor. When connecting to the USB3.0 port, use a USB 2.0 cable. The zoom and brightness of the MX-2 cannot be controlled by the Camera control function on the menu bar. Use the buttons of the MX-P2 to control the zoom and brightness of the MX-P2.
- Depending on the USB camera, it may not be possible to output images.
- To record when using the Overlay app (⇒P.37), use the Screenshot icon on the overlay toolbar or the Screenshot button on the front of the display monitor.
- In rare cases, the ELMO Camera app may freeze when the USB camera is disconnected. In that case, restart the app.
3.5 Viewing Web Page (E Browser)
You can view web pages with E Browser.
An Internet connection is needed to view web pages.
◆ Startup
Tap the E Browser icon in the list of apps or the side menu bar.

◆ Screen Description
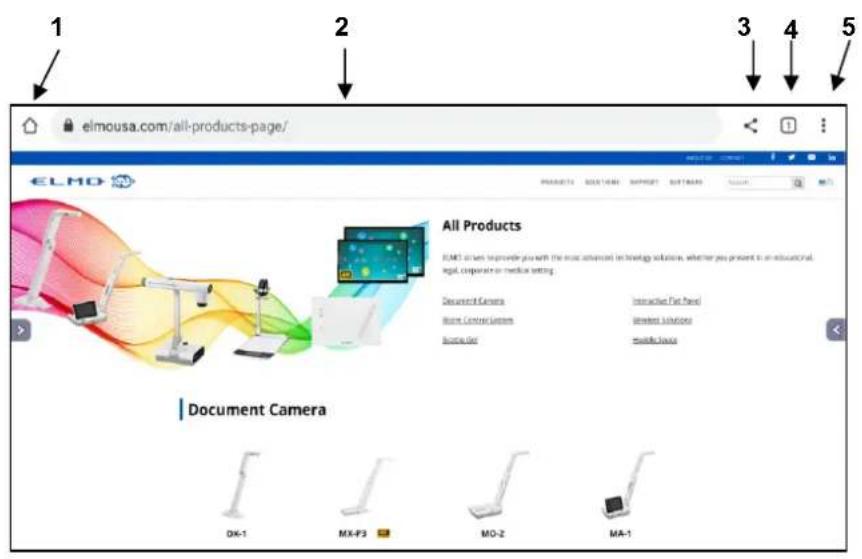

| No. | Name | Icon | Function |
| 1 | Home | To display the Home screen of the browser. | |
| 2 | Address bar | To enter URL by tapping the screen. | |
| 3 | Share URL | To share the URL of the page being viewed. | |
| 4 | List of tabs | To display a list of open tabs. | |
| 5 | Menu | To display the menu. |

- xSync Board / ELMO Board
- EL55R2/EL65R2/EL75R2/EL86R2
- Table of contents
- Before Use....7
- Package Contents....7
- Part Names and Functions......8
- Installation 13
- Turning On or Off the Power...... 15
- Basic Operations ...... 19
- Touch Operations 19
- Basic Screen Operations ...... 20
- Using Apps 25
- Using ELMO Note (Whiteboard).... 25
- Using Overlay Function ...... 37
- Using Camera Roll Function...... 38
- Using a USB Camera 40
- Viewing Web Page (E Browser) .... 42
- Using ELMO Timer Function......45
- Using Wireless Casting Function (Transcreen) 51
- Using Anti-Virus Function (Avira Security) 54
- Using ELMO Play 55
- Using File Manger Function...... 56
- Using Utilities Function ...... 61
- Using with External Devices...... 62
- Connecting Devices 62
- Configuring the Settings ..... 70
- Optional Item....80
- Easy Controller 80
- Troubleshooting and Maintenance 82
- Troubleshooting....82
- Maintenance....84
- Specifications 85
- Product Specifications.... 85
- After-Sales Service 87
- SAFETY INSTRUCTIONS
- WARNING
- CAUTION
- IMPORTANT
- Federal Communication Commission interference statement
- NOTE
- Restriction
- Radiation exposure statement
- EU declaration of conformity
- Restrictions in
- CAUTION: EXPOSURE TO RADIO FREQUENCY RADIATION
- TO REDUCE THE RISK OF FIRE OR ELECTRIC SHOCK, DO NOT EXPOSE THIS PRODUCT TO RAIN OR MOISTURE.
- USER-INSTALLER
- CAUTION:
- BEFORE YOU USE
- Before Use
- Package Contents
- Part Names and Functions
- Front
- Touch pen and Eraser
- ◆ Preparation
- - Inserting batteries
- Operable Range of the Remote Control
- Installation
- Installation Conditions
- ◆ Attachment of the Display Monitor to the Stand
- Turning On or Off the Power
- Connecting the Power Cord
- Turning On the Power
- ◆ Initial Startup
- Language setting
- Date and Time setting
- Network setting
- Home screen
- Turning Off the Power
- Long-press the Power button on the front
- Select "Sure" in the Shutdown confirmation dialog.
- Press "O" on the Main power switch on the bottom.
- Standby Mode
- Basic Operations
- Touch Operations
- Basic Screen Operations
- Home Screen
- ◆ Shortcuts of Apps
- 〈Moving an App Shortcut〉
- ◆ Uninstallation of Apps
- ◆ Connection Status Icons on the Home Screen
- ◆ Displaying the Side Menu Bar
- Using Apps
- Using ELMO Note (Whiteboard)
- ◆ Startup
- Configuring the Accessibility Permission Setting
- Configuring the Storage Permission Setting
- Tap "START ELMO NOTE" after completing all the settings.
- ◆ Basic Operations
- Drawing lines and shapes
- Deleting the lines
- Editing the lines
- ◆ Pen Menu
- Eraser menu
- Deleting with the palm of your hand or the supplied Eraser
- Selection Menu
- ◆ Shapes Menu
- ◆ Functions Available in the Operation Mode
- ◆ Background Menu
- ◆ Background Image Menu
- ◆ Page Operation Menu
- ◆ Add Page Menu
- ◆ Functions Available When Selecting an Object
- ■ Video Object Operations
- ◆ Menu Operations
- Split Screen Mode
- ◆ Saving Images
- Using Overlay Function
- ◆ Toolbar Description
- Using Camera Roll Function
- ◆ Screen Description
- ◆ Comparing Images and Videos
- Select images and videos to compare and tap the Compare icon.
- The selected images and videos will be displayed side by side.
- Drag the handle between the images.
- ◆ Pasting to ELMO Note (whiteboard)
- Select images and videos and tap the ELMO Note icon.
- ELMO Note (whiteboard) will start and the selected images and videos will be pasted.
- Using a USB Camera
- ◆ USB Camera Settings Screen
- Viewing Web Page (E Browser)
- ◆ Popup Display Settings
- Using ELMO Timer Function
- ◆ Basic Operations (Timer)
- ◆ Basic Operations (Stopwatch)
- ◆ Creating Tasks using Timer
- ■ Maximizing or Minimizing the Screen
- ◆ Timer List Screen
- ◆ Task List Screen
- ◆ Timer Settings Screen
- ◆ Minimizing the Screen
- ◆ Stopwatch Screen
- Using Wireless Casting Function (Transcreen)
- Connect a device such as a tablet to the network.
- Install the Transcreen app on the device.
- ◆ Using on Windows OS
- ◆ Using on iOS or MacOS
- ◆ Using on Chrome OS
- ◆ Using on Android OS
- ◆ Mirroring Screen
- Using Anti-Virus Function (Avira Security)
- Virus Scanning
- ■ Cleanup of the Internal Memory
- Using ELMO Play
- Some Examples of Apps Compatible with the Product
- Perfect Piano
- Programming Zemi
- Using File Manger Function
- File Edit Mode
- File Paste Mode
- ◆ Cloud Account Settings
- Select "Google Drive" or "One Drive", then login (authentication process) to it.
- Once you successfully login to your account, your account information will appear in the upper right corner.
- After logging in to your account, follow the steps 1 to 3 to display the Browser app settings. Then check the option "E-Browser".
- ◆ Uploading Files to Cloud
- Using Utilities Function
- Startup
- List of Utilities
- Using with External Devices
- Connecting Devices
- ◆ Displaying the Computer Screen (Video and Audio)
- ■ Connecting via USB Type-C
- ■ Connecting via HDMI (Use the ports on the front)
- ■ Connecting via HDMI(Use the ports on the side)
- ■ Connecting with VGA cable and Audio cable
- ◆ Controlling the Product from a Computer (Serial Control)
- ■ Controlling via RS-232C Commands
- Controlling via LAN
- ◆ Displaying the Screen of the Connected Device (Video and Audio)
- Connecting via HDMI
- ◆ Playing the Audio of the Product through Other Devices
- ◆ Operation
- Tap the Menu icon in the list of apps or the side menu bar.
- Select the thumbnail of the screen that you want to display, and then tap it.
- ◆ Configuring the Source Settings
- Tap "Admin Setting" and enter the administrator password.
- The Source Settings menu will appear.
- Configuring the Settings
- ◆ Before Configuring the Settings
- ◆ Network and Connection
- ■ Configuring the Wireless Network (Wi-Fi) Settings (with the Settings App)
- Configuring the Wireless Network (Wi-Fi) Settings (with the Advanced Setting App)
- ■ Configuring the Wired Network (LAN) Settings
- Tap "Network and Connection" and tap "Ethernet". Set the slide switch to ON.
- - Configuring the HotSpot Settings
- - Configuring the Bluetooth Settings
- ◆ System Settings
- Wallpaper
- Language and Input Method
- Power Settings
- Application
- Optional Item
- Easy Controller
- Troubleshooting and Maintenance
- Troubleshooting
- ◆ No audio is output from the speaker.
- ◆ Touch operations do not work properly.
- ◆ Cannot connect to the network.
- Maintenance
- ◆ Cleaning of the LCD display
- Specifications
- After-Sales Service
- Product Warranty
- Repair Procedure
- Within warranty period
- After warranty period
- Repair charge
- Trademarks
- テクノホライゾン株式会社 エルモカンパニー
- OVERSEAS SUBSIDIARY COMPANIES
- ELMO USA CORP.
- ELMO Europe SAS
- TECHNO HORIZON CO., LTD.
Brand : Elmo
Model : EL75R2
Category : Monitor