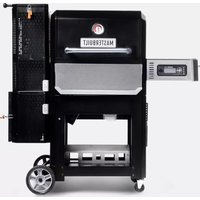
MB20042221 - Barbecue Masterbuilt - Free user manual and instructions
Find the device manual for free MB20042221 Masterbuilt in PDF.


| Product Type | Charcoal Barbecue Grill |
| Model | MB20042221 |
| Brand | Masterbuilt |
| Overall Dimensions (L x W x H) | 48 x 24 x 36 inches |
| Cooking Diameter | 24 inches |
| Primary Cooking Area | 400 sq. in. |
| Weight | 55 lbs |
| Material | Heavy-gauge steel with porcelain-coated lid and firebox |
| Fuel Type | Charcoal |
| Ignition Type | Manual (charcoal chimney recommended) |
| Temperature Gauge | Built-in lid thermometer |
| Air Dampers | Bottom ash door damper and lid damper for temperature control |
| Ash Management | Removable ash pan for easy cleanup |
| Grill Grate | Porcelain-coated wire cooking grates |
| Wheels | 2 locking caster wheels for mobility |
| Side Shelves | 2 foldable side shelves for prep space |
| Assembly Required | Yes, detailed instructions and tools included |
| Warranty | 1-year limited warranty |
| Cleaning | Hand wash with mild detergent; season grates before first use |
| Safety Features | Heat-resistant handles, stable base, and lid lock for transport |
| Spare Parts Availability | Replacement grates, ash pan, and thermometer available via Masterbuilt |
Frequently Asked Questions - MB20042221 Masterbuilt
User questions about MB20042221 Masterbuilt
0 question about this device. Answer the ones you know or ask your own.
Ask a new question about this device
Download the instructions for your Barbecue in PDF format for free! Find your manual MB20042221 - Masterbuilt and take your electronic device back in hand. On this page are published all the documents necessary for the use of your device. MB20042221 by Masterbuilt.
USER MANUAL MB20042221 Masterbuilt
Welcome to the family. Let's get started.
GRAVITY SERIES™ 560
Digital Charcoal Grill + Smoker

natural_image
Line drawing of a master-built machine with wheels and control panel (no text or symbols)
Two people recommended for assembly
Manual applies to the following model number(s)
MB20041020
Mfg. Date - Serial NumberYour model number
These numbers are located on the rating label of the grill.
IMPORTANT
PLEASE RECORD THIS INFORMATION IMMEDIATELY AND KEEP IN A SAFE PLACE FOR FUTURE USE.
FOR OUTDOOR USE ONLY. NOT FOR COMMERCIAL USE.

WARNING

- This manual contains important information necessary for the proper assembly and safe use of the appliance.
- Read and follow all warnings and instructions before assembling and using the appliance.
- Keep this manual for future reference.
- WARNING! Do not use spirit or petrol for lighting or re-lighting! Use only firelighters complying to EN 1860-3!
WARNING! This barbecue will become very hot, do not move it during operation.

Failure to follow these instructions could result in fire, explosion or burn hazard which could cause property damage, personal injury, or death.


CARBON MONOXIDE HAZARD

- Burning wood chips, wood chunks, wood pellets, charcoal and propane gives off carbon monoxide, which has no odor and can cause death.
- DO NOT burn wood chips, wood chunks, wood pellets, charcoal or propane inside homes, vehicles, tents, garages or any enclosed areas.
- USE ONLY OUTDOORS where it is well ventilated.
- Do not use the barbecue in a confined and/or habitable space e.g. houses, tents, caravans, motor homes, boats. Danger of carbon monoxide poisoning fatality.

WARNINGS AND IMPORTANT SAFEGUARDS

READ ALL INSTRUCTIONS
• Always use grill in accordance with all applicable local, state, and federal fire codes.
- Before each use check all nuts, screws, and bolts to make sure they are tight and secure.
- Never operate grill under combustible overhead construction such as roof coverings, carports, awnings, or overhangs.
- Grill is for OUTDOOR HOUSEHOLD USE ONLY.
- Do not use grill indoors.
- Never use inside enclosed areas such as patios, garages, buildings, or tents.
- Never use inside or on recreational vehicles or boats.
- Maintain a minimum distance of 10ft (3m) from overhead construction, walls, rails or other structures.
- Keep a minimum 10ft (3m) clearance of all combustible materials such as wood, dry plants, grass, brush, paper, or canvas.
- Never use grill for anything other than its intended use. This grill is NOT for commercial use.
- Accessory attachments not supplied by Masterbuilt Manufacturing, LLC are NOT recommended and may cause injury.
- Use of alcohol, prescription, or non-prescription drugs may impair user's ability to properly assemble or safely operate grill.
- Keep a fire extinguisher accessible at all times while operating grill.
- When cooking with oil or grease, have a type BC or ABC fire extinguisher readily available.
- In the event of an oil or grease fire do not attempt to extinguish with water. Immediately call the fire department. A type BC or ABC fire extinguisher may, in some circumstances, contain the fire.
- The barbecue has to be installed on a secure level base prior to use.
- Use grill on a level, non-combustible, stable surface such as dirt, concrete, brick, or rock. An asphalt surface (blacktop) may not be acceptable for this purpose.

WARNINGS AND IMPORTANT SAFEGUARDS

- Grill MUST be on the ground. Do not place grill on tables or counters. DO NOT move grill across uneven surfaces.
- Do not use grill on wooden or flammable surfaces.
- Keep grill clear and free from combustible materials such as gasoline and other flammable vapors and liquids.
- Do not leave grill unattended.
- Keep children and pets away from grill at all times. Do NOT allow children to use grill. Close supervision is necessary when children or pets are in the area where grill is being used.
- Do NOT allow anyone to conduct activities around grill during or following its use until it has cooled.
- Never use glass, plastic, or ceramic cookware in grill. Never place empty cookware in grill while in use.
- Never move grill when in use. Allow grill to cool completely (below 115^ (45^) ) before moving or storing.
- Do not store grill with hot ashes or charcoal inside grill/hopper. Store only when fire is completely out and all surfaces are cold.
- Never use grill as a heater (READ CARBON MONOXIDE HAZARD).
- The grill and hopper heat shields are HOT while in use and will remain HOT for a period of time afterwards and during cooling process. Use CAUTION. Wear protective gloves/mitts.
- Do not cook before the grill has a coating of ash.
- Be careful when removing food from grill. All surfaces are HOT and may cause burns. Use protective gloves/mitts or long, sturdy, cooking tools for protection from hot surfaces or splatter from cooking liquids.
- DO NOT bump or impact the grill to prevent personal harm, damage to grill, or spillage/splashing of hot cooking liquid.
- Do not touch HOT surfaces
- Grill is hot during use. To avoid burns, keep face and body away from door(s) and vents. Steam and hot air are expelled during use.
- Hopper heat shield, hopper lid and latch, hopper ash door and latch are HOT while the grill is in use and during cooling. Wear protective gloves when working with and around these components.
- Grill has an open flame. Keep hands, hair, and face away from flame. Do NOT lean over grill when lighting. Loose hair and clothing may catch fire.
• DO NOT obstruct flow of combustion and ventilation. - Do not cover cooking grates with metal foil. This will trap heat and may cause damage to the grill.
- Never leave HOT coals or ashes unattended.
- Do not remove ashes while ashes and charcoal are HOT.
- Keep hands, hair, and face away from the burning charcoal. Be careful of loose hair and clothing during operation as they could catch fire.
- Use protective gloves when handling this grill or working with fire. Use protective gloves or long, sturdy fireplace tools when adding wood or charcoal.
- Never use charcoal lighting fluid, gasoline, alcohol or other highly volatile fluids to ignite charcoal. These fluids can explode causing injury or death. Always follow specific lighting instructions for this grill.
- Never overfill charcoal hopper. This can cause serious injury as well as damage to the grill.
- Dispose of cold ashes by placing them in aluminum foil, soaking with water, and discarding in a non-combustible container.
- When using electrical appliances, basic safety precautions should always be followed including the following: 1) Do not plug in the appliance until fully assembled and ready for use. 2) Use only approved grounded electrical outlet. 3) Do not use during an electrical storm. 4) Do not expose appliance to rain or water at any time.
- To protect against electrical shock do not immerse cord, plug or control panel in water or other liquid.
- Do not operate any appliance with a damaged cord or plug, or after appliance malfunctions or has been damaged in any manner.

WARNINGS AND IMPORTANT SAFEGUARDS

- Extension cords may be used if care is exercised in their use. If an extension cord is used: 1) The marked electrical rating of the extension cord should be at least as great as the electrical rating of the appliance; and 2) the cord should be arranged so that it will not drape over the counter top or tabletop where it can be pulled by children or tripped over unintentionally.
- The extension cord must be a grounding-type 3-wire cord.
- Outdoor extension cords must be used with outdoor use products and are marked with suffix "IP" and with the statement "Suitable for Use with Outdoor Appliances."
- CAUTION - To reduce the risk of electric shock, keep extension cord connection dry and off the ground.
- Do not let cord hang on or touch hot surfaces.
- Do not place cord on or near a gas or electric burner or in a heated oven.
- To disconnect, turn controller "OFF" then remove plug from outlet.
- Unplug from outlet when not in use and before cleaning. Allow appliance to cool completely before adding/removing internal components.
- Do not clean this product with a water sprayer or the like.
- Grill should only be rolled on smooth surface.
- Grill should never be rolled up/down stairs or uneven surface.
- Potential damage to grill or harm to user may result from failure to follow warnings.
- Never open hopper during use. If it is necessary to refill charcoal during use follow the specific reload instructions for this grill and always wear protective gloves.
- Never operate the grill with the temperature probe removed. This can cause the grill to overheat and cause serious personal injury and/or damage to the grill.
• Install heat intake and air intake slides after every use. - Remove heat intake and air intake slides before every use.
- Never operate the grill with the heat intake and air intake slides installed in the grill. This can damage the grill.
- This appliance can be used by children aged from 8 years and above and persons with reduced physical, sensory or mental capabilities or lack of experience and knowledge if they have been given supervision or instruction concerning use of the appliance in a safe way and understand the hazards involved
• Children shall not play with the appliance - Cleaning and user maintenance shall not be made by children without supervision
SAVE THESE INSTRUCTIONS
Structural Proximity and Safe Usage Recommendations
REMINDER: Maintain a minimum distance of 10 feet from rear and sides to walls, rails or other combustible construction. This clearance provides adequate space for proper combustion, air circulation and venting.


Charcoal does not come with this product.
Parts Diagram
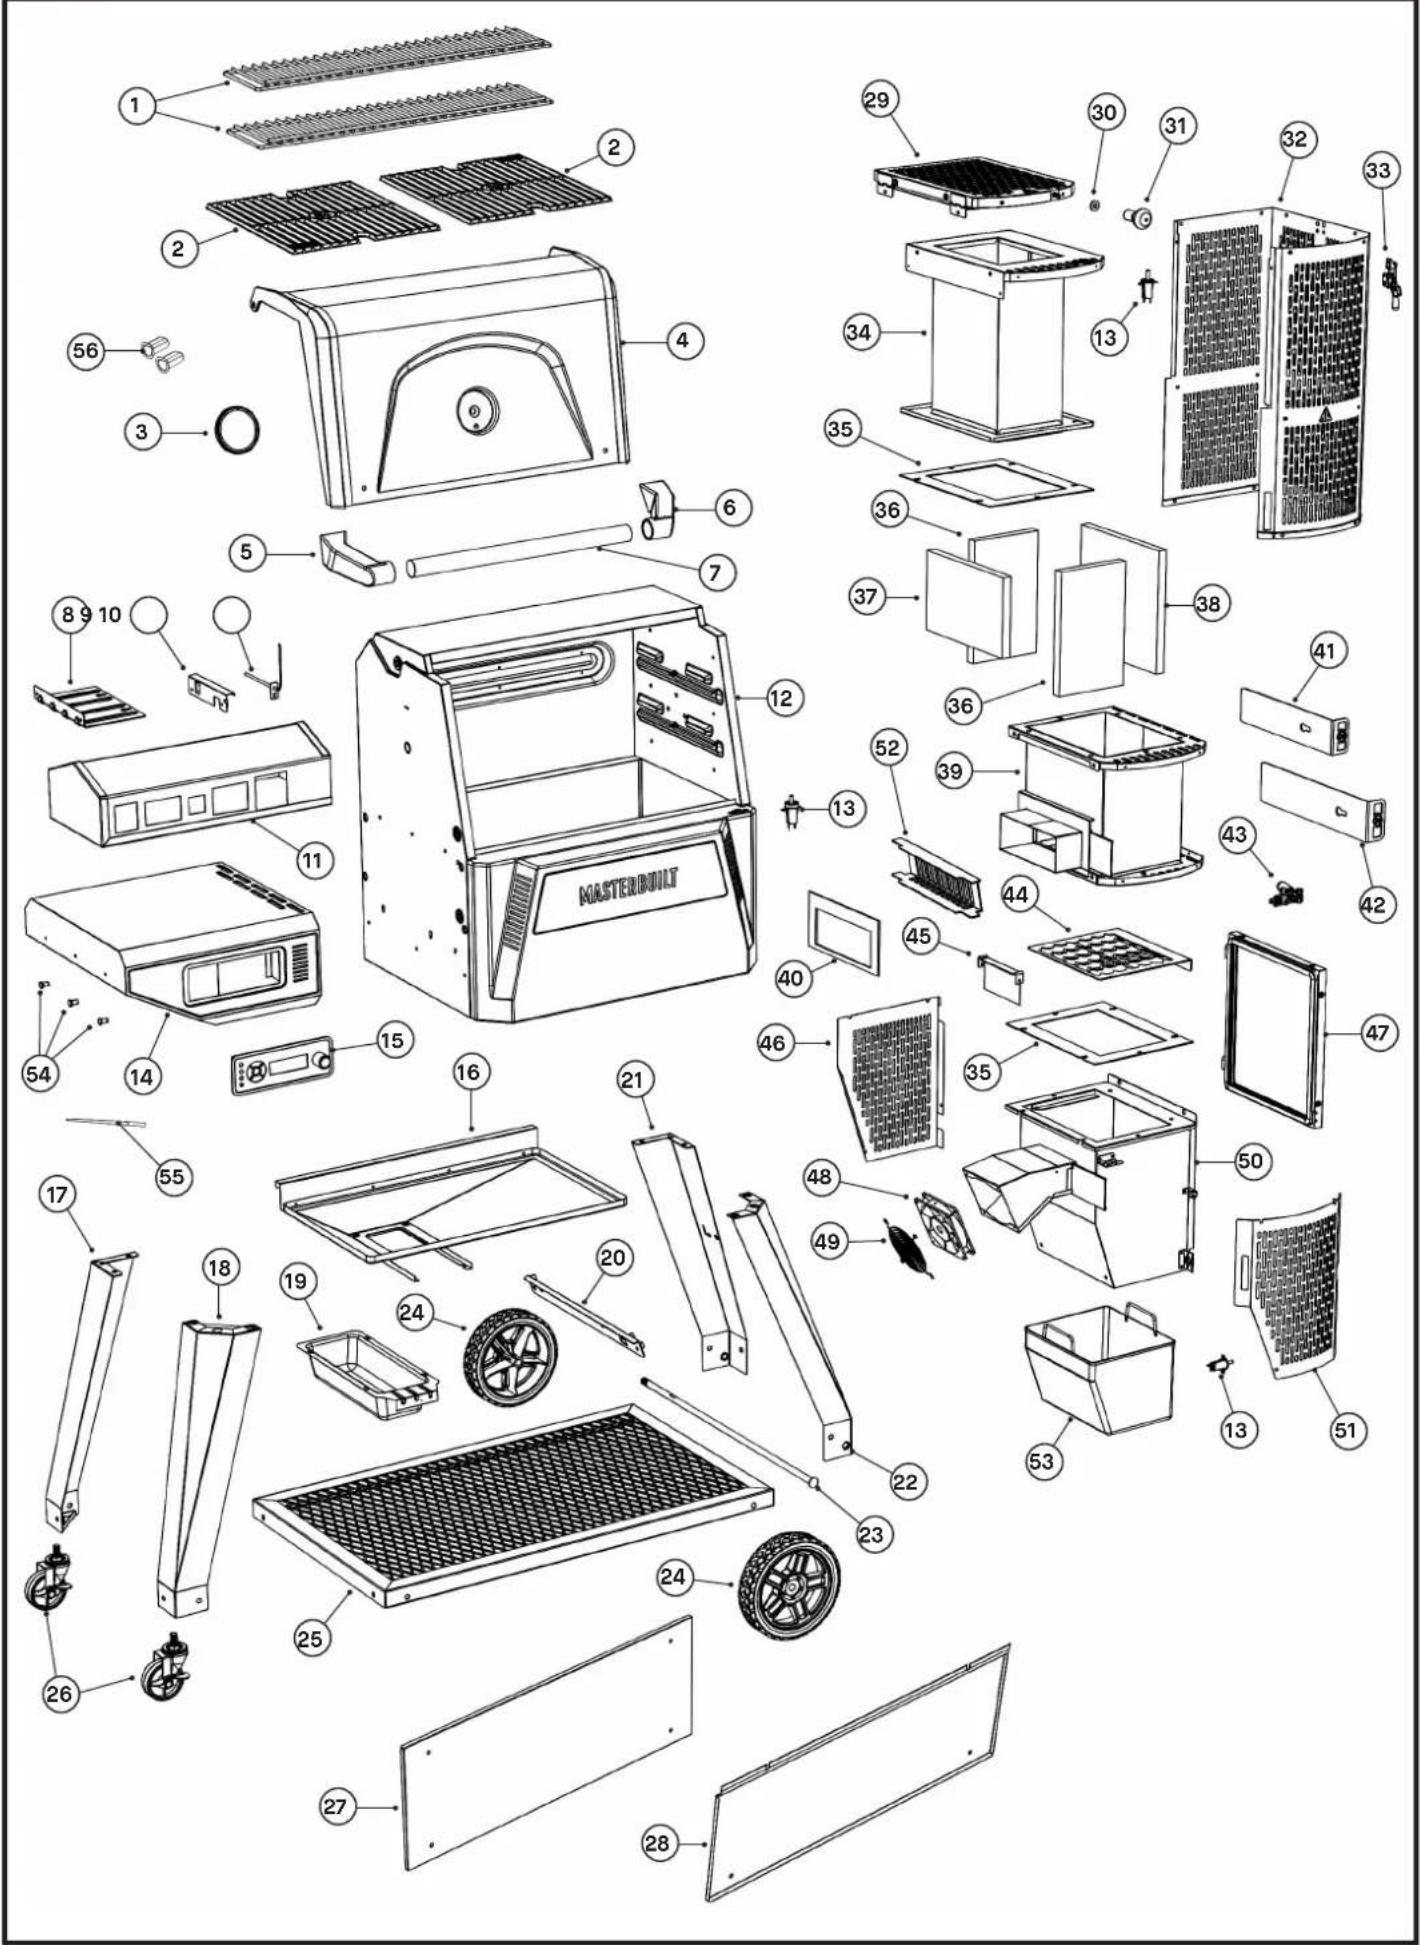
Parts List
| NO. | QTY. | DESCRIPTION | NO. | QTY. | DESCRIPTION |
| 1 | 2 | Smoking/Warming Racks | 30 | 1 | Hopper Lid Handle Washer |
| 2 | 2 | Smoke + Sear Grates | 31 | 1 | Hopper Lid Handle |
| 3 | 1 | Temperature Gauge | 32 | 1 | Hopper Heat Shield - Top |
| 4 | 1 | Lid Assembly | 33 | 1 | Hopper Lid Latch |
| 5 | 1 | Handle Mount, Left | 34 | 1 | Hopper Assembly - Top |
| 6 | 1 | Handle Mount, Right | 35 | 2 Hopper Gasket | |
| 7 | 1 | Handle Tube | 36 | 2 Front/Rear Fire Brick | |
| 8 | 1 | Heat Manifold Support | 37 | 1 | Left Fire Brick |
| 9 | 1 | Temperature Probe Bracket | 38 | 1 | Right Fire Brick |
| 10 | 1 | Temperature Probe | 39 | 1 | Hopper Assembly - Middle |
| 11 | 1 | Heat Manifold Assembly | 40 | 1 | Grill Heat Intake Fiber Spacer |
| 12 | 1 | Body Assembly | 41 | 1 Heat Intake Slide (Large) | |
| 13 | 3 | Lid/Door Switch | 42 | 1 | Air Intake Slide (Small) |
| 14 | 1 Side Shelf Assembly | 43 | 1 | Hopper Door Latch | |
| 15 | 1 | Controller Assembly | 44 | 1 | Charcoal Grate Assembly |
| 16 | 1 | Bottom Tray Assembly | 45 | 1 | Air Intake Flap/Bracket |
| 17 | 1 | Left Rear Leg Assembly | 46 | 1 | Hopper Heat Shield - Bottom Rear |
| 18 | 1 | Left Front Leg Assembly | 47 | 1 | Hopper Door Assembly |
| 19 | 1 | Grease Tray | 48 | 1 | Fan |
| 20 | 1 | Hopper/Cart Support | 49 | 1 | Fan Guard |
| 21 | 1 | Right Rear Leg | 50 | 1 | Hopper Assembly - Bottom |
| 22 | 1 | Right Front Leg | 51 | 1 | Hopper Heat Shield - Bottom Front |
| 23 | 1 | Wheel Axle with Lock Nut | 52 | 1 | Grill Heat Intake Grate |
| 24 | 2 8" Wheel | 53 | 1 | Ash Tray Assembly | |
| 25 | 1 | Bottom Shelf Assembly | 54 | 3 Tool Hanger | |
| 26 | 2 3" Caster | 55 | 1 | Antenna | |
| 27 | 1 | Rear Inner Liner | 56 | 2 Handle Sleeve | |
| 28 | 1 | Front Inner Liner | 1 Meat Probe - not pictured | ||
| 29 | 1 | Hopper Lid Assembly | 1 Power Cord + 3pcs Plugs - not pictured |
- BEFORE ASSEMBLY READ ALL INSTRUCTIONS CAREFULLY.
- Assemble on a clean flat surface.
- Recommend assembling on cardboard to avoid oil residue on floors or scratches.
- Gloves recommended for assembly. Hopper gasket is fiberglass and will irritate skin.
- Tools needed: Phillips head screwdriver, adjustable wrench, 19mm socket wrench.
- Approximate assembly time: 1 hour, 45 minutes.
- Recommend two people assemble to increase ease and reduce assembly time.
- Actual product may differ from picture shown.
- It is possible that some assembly steps have been completed in the factory.
- Remove all printed labels from the grill and hopper before use.
STOP
DO NOT RETURN TO RETAILER for assembly assistance, missing or damaged parts. Please contact MASTERBUILT Customer Service at service.europe@masterbuilt.com in Europe. Please have the model number and serial number available. These numbers are located on the silver rating label on the grill.
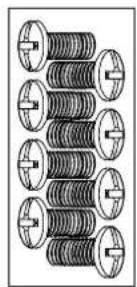
Hardware
A

natural_image
Diagram of a coiled spring assembly with multiple circular components (no text or labels)B
natural_image
Illustration of multiple screwdrivers arranged in a row (no text or symbols)A

natural_image
Diagram of multiple spring-loaded components arranged in a grid (no text or symbols)E

natural_image
Technical line drawing of a mechanical component with multiple springs and flanges (no text or symbols)C

D
natural_image
Pure electrical circuit lines without any symbolsExtra Hardware

natural_image
Technical line drawing of various bolt and screw components (no text or labels)KEY QTY. DESCRIPTION
| A 34 M6x15 Screw |
| B 8 M4x10 Screw |
| C 2 M5x12 Screw |
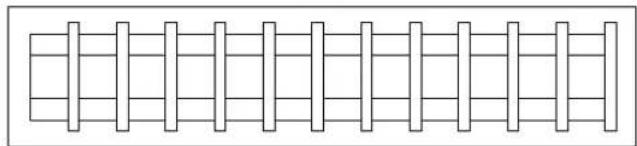
| D 12 M6 Hex Nut |
| E 2 M6x15 Screw with lock and flat washer |
SAFETY FEATURES
Lid Switch – Prevents grill from overheating.
- If the set temperature is above 260°C the controller will regulate the grill temperature to 260°C when the grill lid is opened. Once the lid is closed the grill will return to the set temperature.
- If the set temperature is below 260°C the controller will continue to regulate the grill at the set temperature when the grill lid is opened.
Hopper Switches – Reduces chimney effect when hopper is opened.
- Hopper Lid Switch: The fan will stop when the hopper lid is opened. The fan will restart when the hopper lid is closed.
- Hopper Ash Door Switch: The fan will stop when the hopper ash door is opened. The fan will restart when the hopper ash door is closed.
Assembly
1
Remove bottom tray and all components from inside of grill before beginning assembly

natural_image
Technical line drawing of a mechanical device with internal components and mounting base (no text or symbols)
Keep hopper lid closed and latched for remainder of assembly. Do not add hopper lid handle until step 21.

On the hopper, bend the circled piece up away from the fan toward the hopper. Note: Only bend this piece as necessary. Bending it too many times could damage it.

natural_image
Technical line drawing of a mechanical device with a fan and fan assembly, showing internal components and mounting brackets (no text or symbols)
natural_image
Technical line drawing of a mechanical device with fan and ventilation slots, showing internal structure and mounting bracket (no text or symbols)

To avoid personal injury and damage to grill, have someone help you lift the grill on its back onto cardboard to avoid scratches.
HINT: Use several pieces of double-sided tape (not included) to hold hopper gasket in place.

Assembly

Assembly
7
A
X3
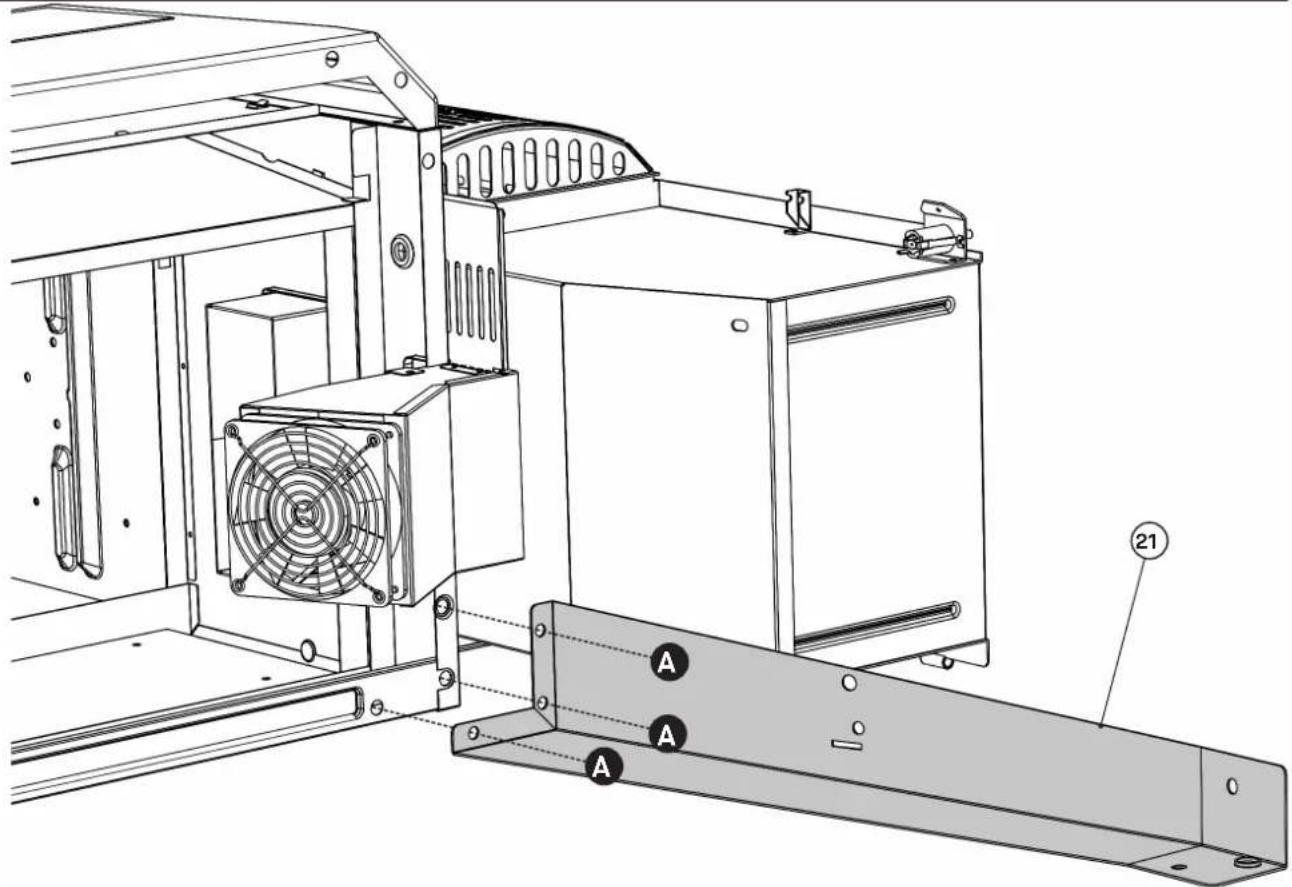
Do not fully tighten screws.
8
A
X6

Assembly


X6

X6

Do not fully tighten screws.
Fully tighten all leg and bottom shelf screws/nuts at this time.


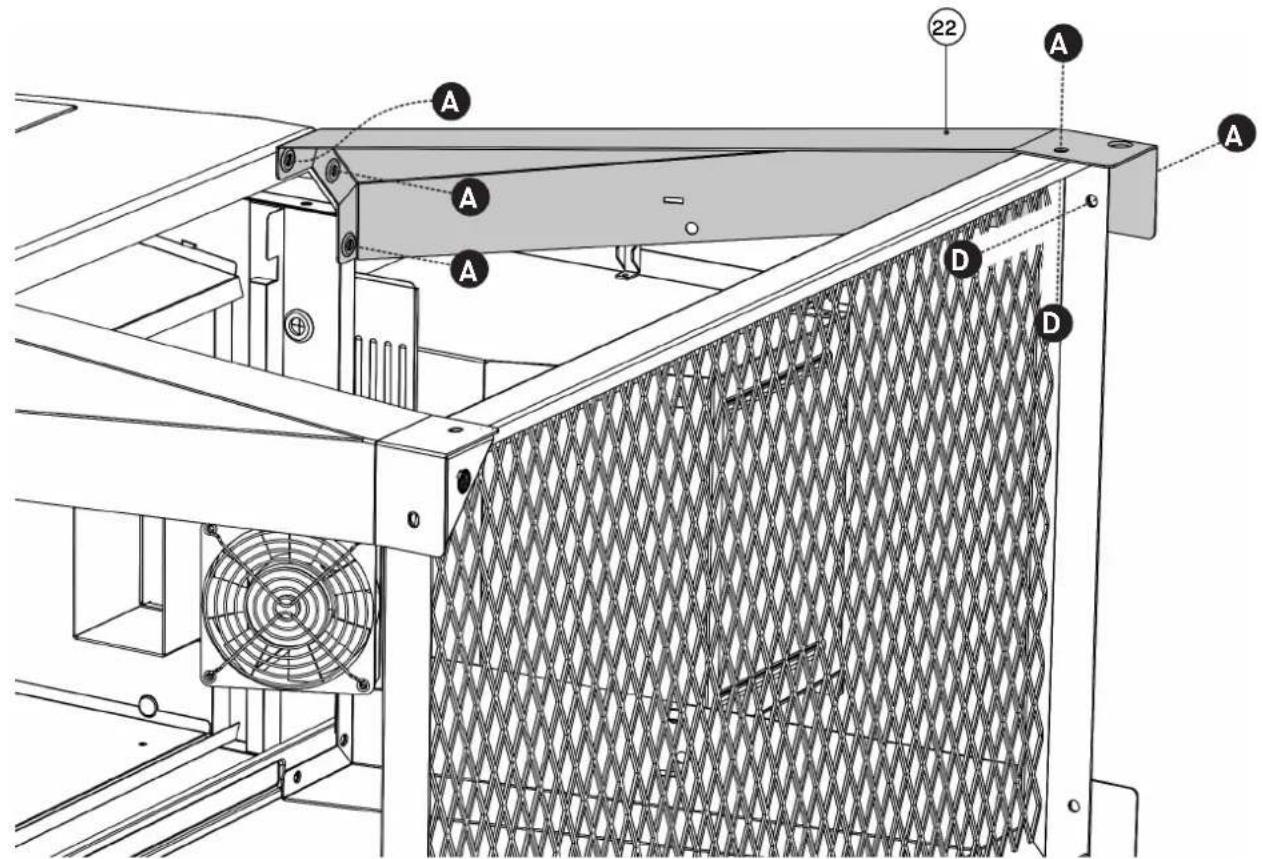
X5

X2

Assembly
11
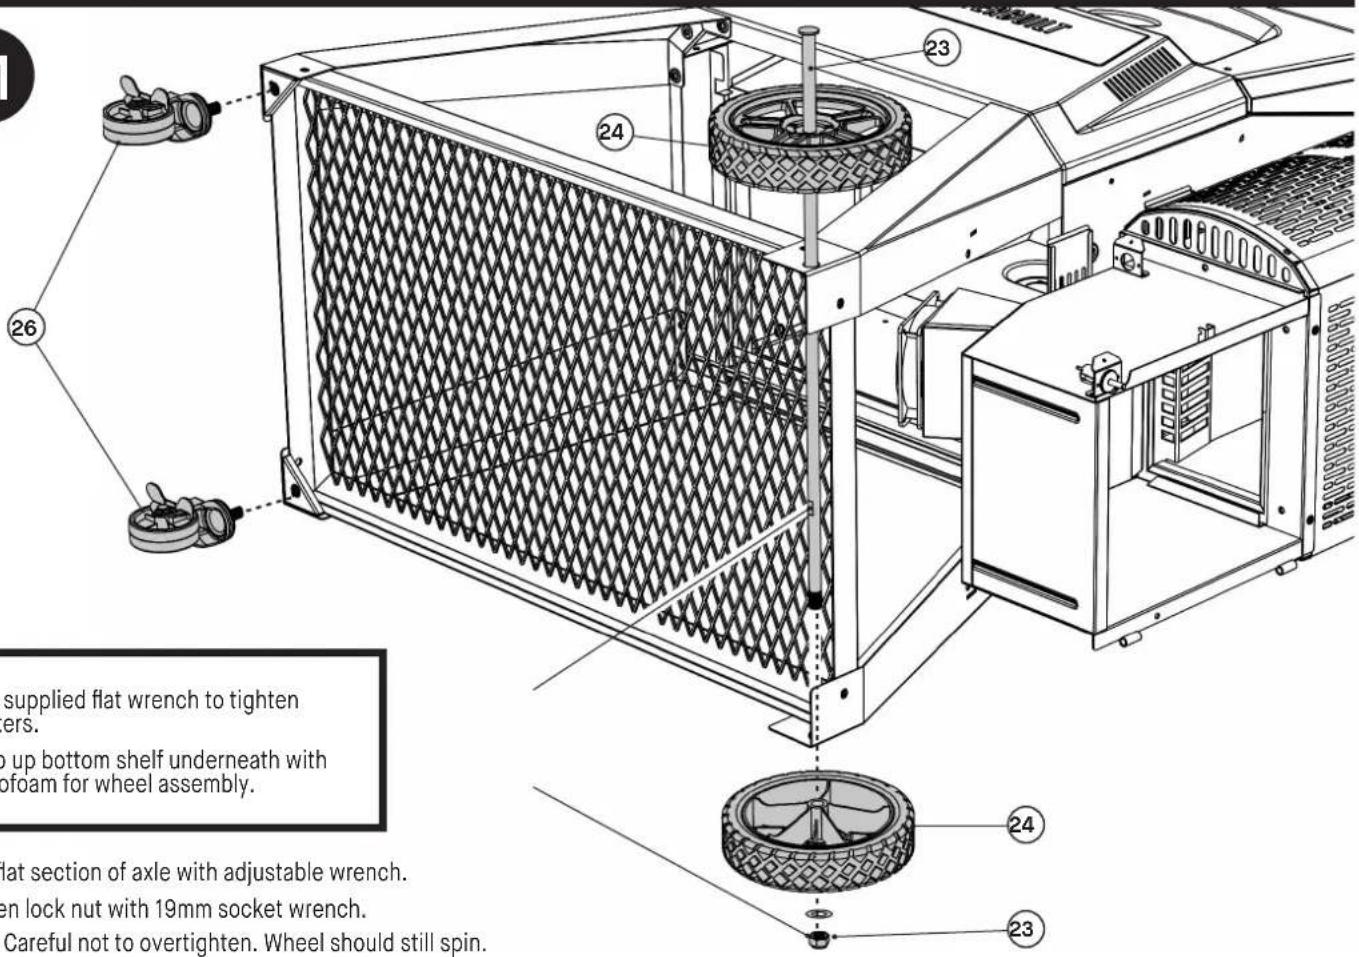
Use supplied flat wrench to tighten casters.
Prop up bottom shelf underneath with styrofoam for wheel assembly.
Hold flat section of axle with adjustable wrench.
Tighten lock nut with 19mm socket wrench.
Note: Careful not to overtighten. Wheel should still spin.
12

A
X1
Stand grill upright and lock both casters for stability.
Note: Ensure screws/nuts on legs and bottom shelf are tight.

Assembly
13
A X4
D X4
M

Assembly
14

natural_image
Technical line drawing of a mechanical assembly with no visible text or symbols15
Connect hopper and fan wires to the grill body as shown. Use the provided twist tie to bundle the connected wires against the bottom of the body.

natural_image
Technical diagram of an air conditioning unit with fan, cables, and connector (no text or symbols)
natural_image
Line drawing of a cabinet interior with cables and a mounted bracket (no text or symbols)Assembly
Assembly
18

19

natural_image
Technical line drawing of a mechanical enclosure with ventilation grilles and a door, showing no text or symbols.Assembly

M
Assembly
22

X2
Instal left handle support with notch to lid, align handle tube with notch an insert right handle support onto handle tube securing to lid.

23
Remove hex nut and washer from temperature gauge, then Re-instal as illustrated.

24
Instal screws (C) halfway.

X2

natural_image
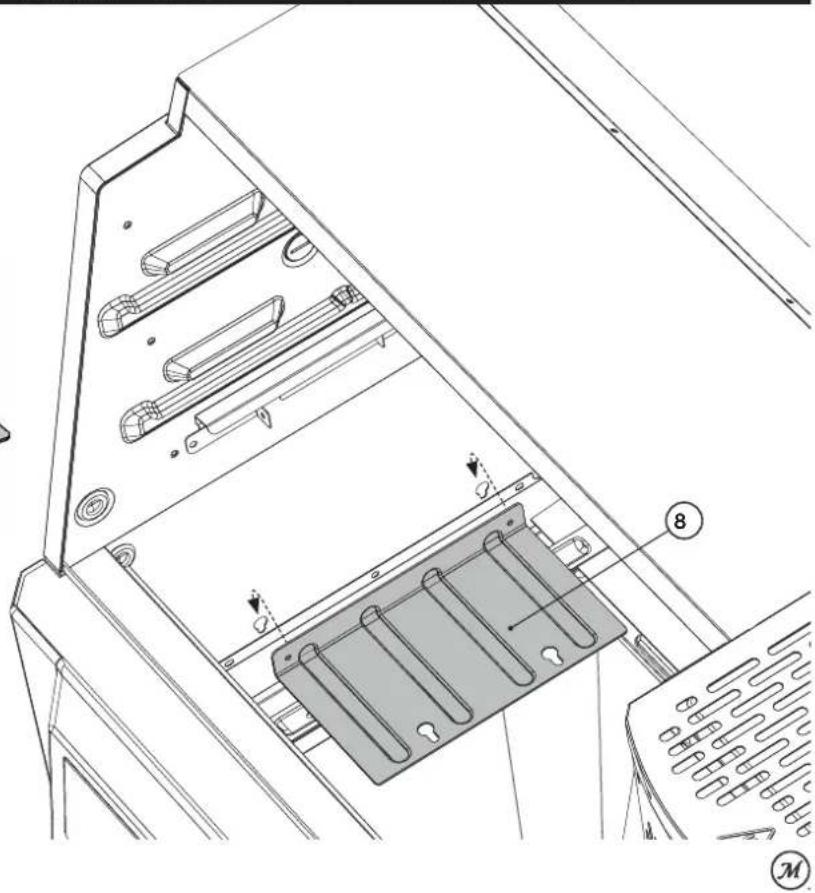
3D diagram of a metal tray with internal slots and labeled points (C and 8), no text or symbols present.Insert screw head through holes in grill wall. Tighten from outside of grill.
natural_image
Technical line drawing of a mechanical device with internal components and labeled parts (no text or symbols beyond basic diagram)Assembly

26
Instal the antenna by screwing it onto the back of the panel. Then, turn the top portion of the antenna as shown.

natural_image
Technical line drawing of an electronic device with internal components and a highlighted section (no text or symbols)M
Assembly
27
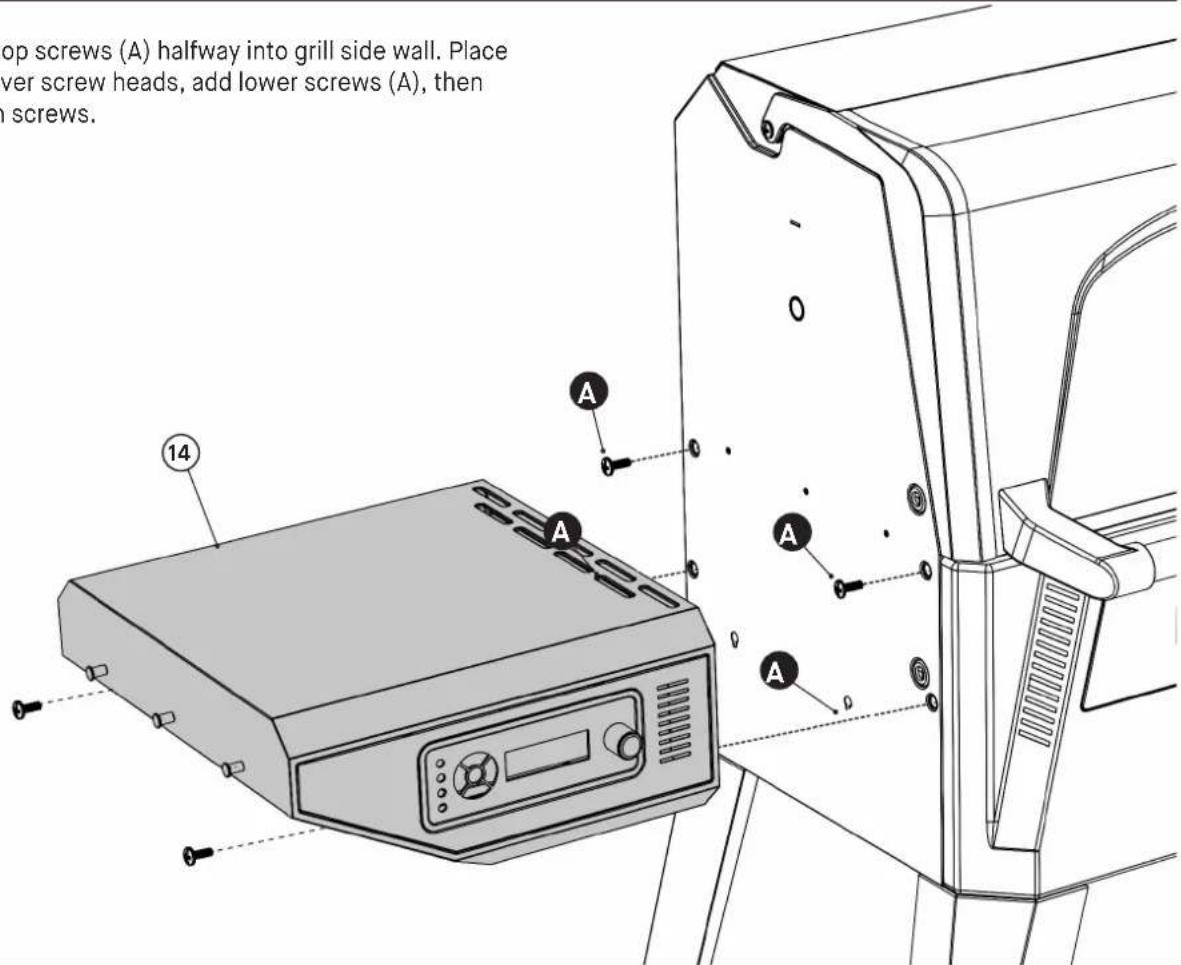
Instal top screws (A) halfway into grill side wall. Place shelf over screw heads, add lower screws (A), then tighten screws.
A
X4
28

natural_image
Technical line drawing of a mechanical device with labeled components and motion arrows (no readable text or symbols)Assembly

M
Assembly
31
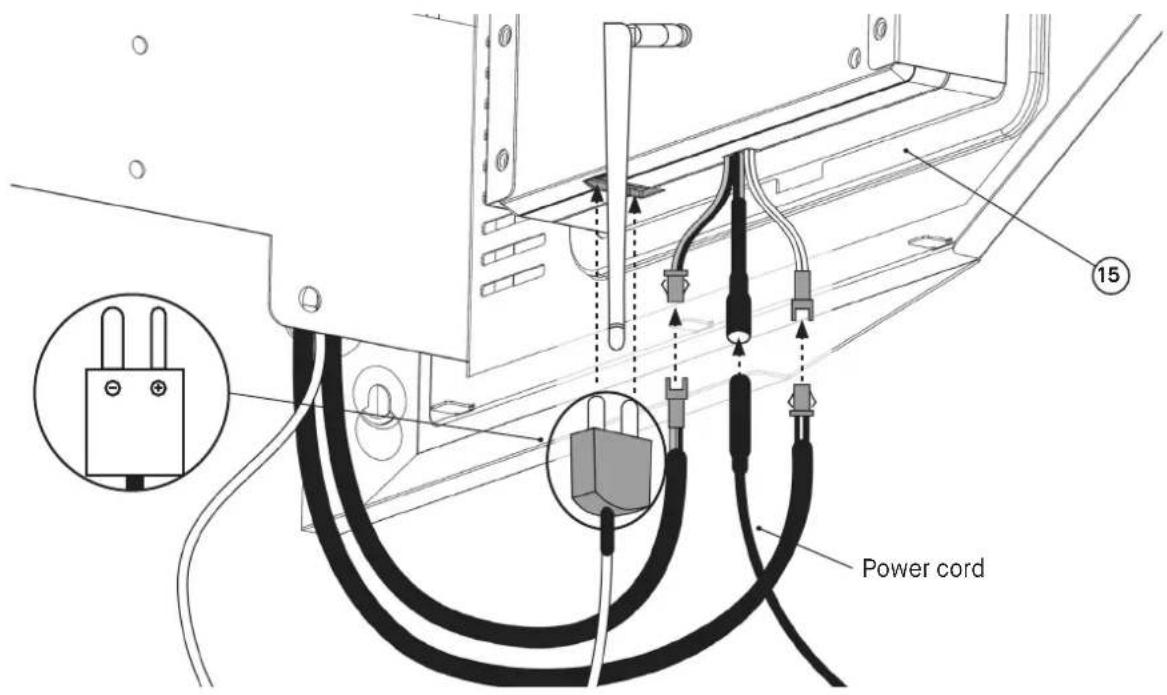
Connect the three cords from inside the grill to the digital control panel. Note that the prongs of the circled plug differ in size, with the larger one being the negative charge and the smaller one being the positive charge. Make sure to match the size of the prong with the size of the slot when plugging it into the control panel. This should not require much force. Connect the power cord last.
32

ASSEMBLY IS DONE. LET'S HAVE SOME FUN!
PRE-SEASONING
Pre-seasoning will rid your grill of chemicals and oils left over by the manufacturing process, allowing them to burn off. PRE-SEASON GRILL PRIOR TO FIRST USE.
- Fill the hopper with charcoal approximately 1/4–1/2 full.
- Start grill following the START-UP instructions and set the temperature to 120^ C for 60 minutes.
- Set the temperature to 205^ C for 30 minutes.
- Shut down the grill following the SHUTDOWN instructions.
- Allow grill to cool COMPLETELY.
- Using a napkin or cloth, rub a light coat of cooking oil on smoke + sear grates, warming/smoking racks, charcoal grate and the inside of the grill lid and body.
- Repeat steps 3–6 at 175°C
Frequent seasoning prevents rusting. If rusting occurs, clean with a steel brush, apply vegetable shortening and heat as indicated above.
START-UP
-
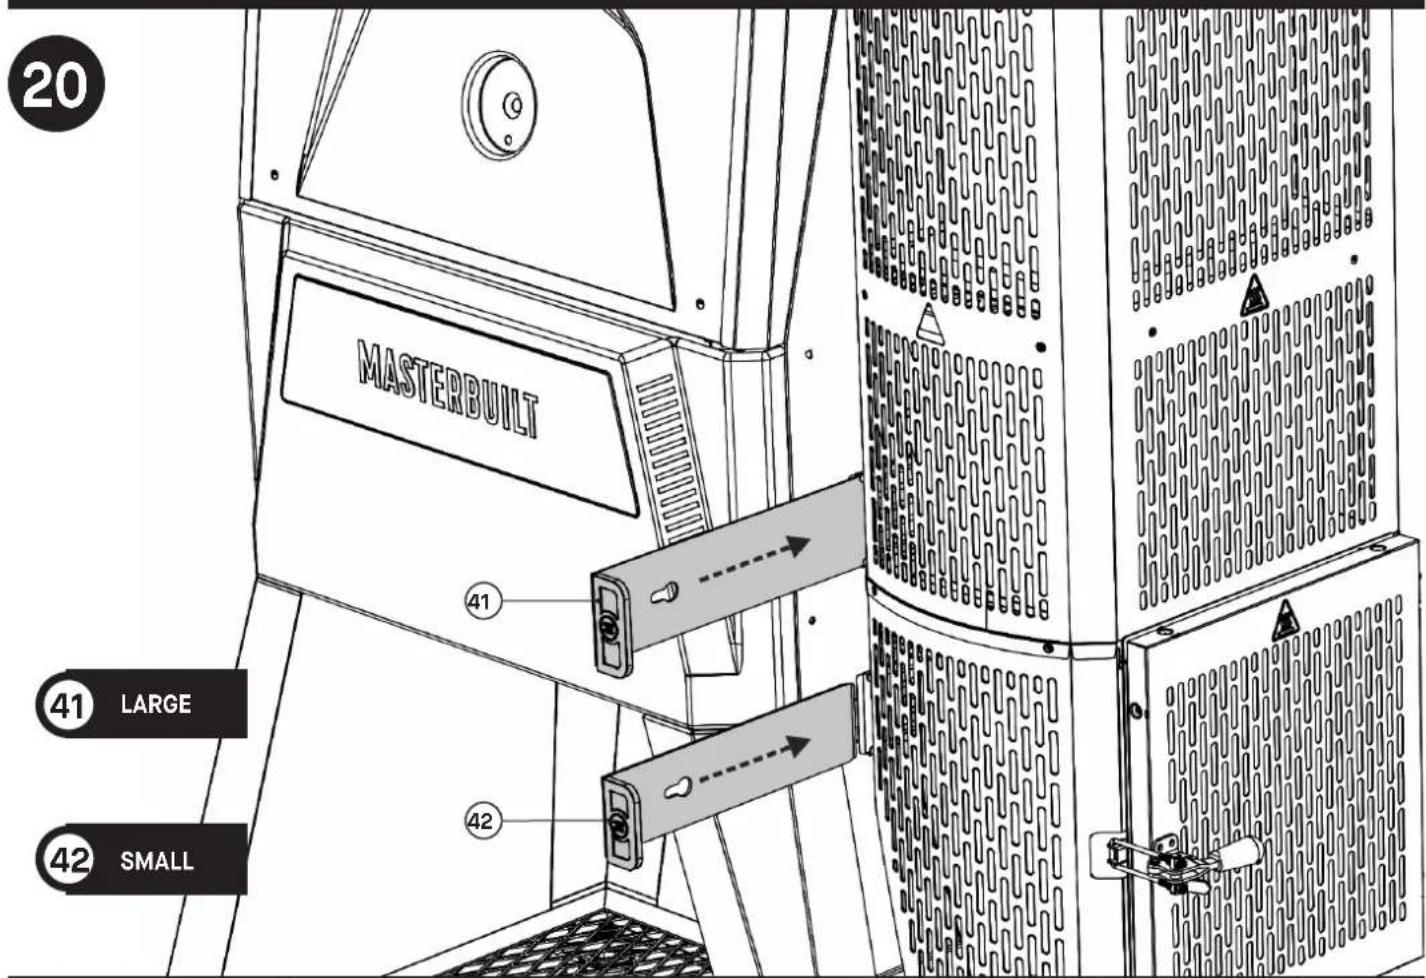
REMOVE heat intake and air intake slides. (Refer to assembly step 21.)
-
Open hopper lid and hopper ash door.
-
There is a safety switch at each of these doors that will prevent the fan from running when these doors are opened.
- If charcoal remains from a previous cook, shake the charcoal grate to ensure all ash falls through to the ash tray.
-
Discard any ash from the ash tray.
-
Fill hopper with charcoal.
• Approximately 7.25 kg of charcoal briquettes.
• Approximately 4.5 kg of lump charcoal.
- Never use fast light charcoal or lighting fluid.
- If charcoal slips through charcoal grate into ash can, remove before starting.
-
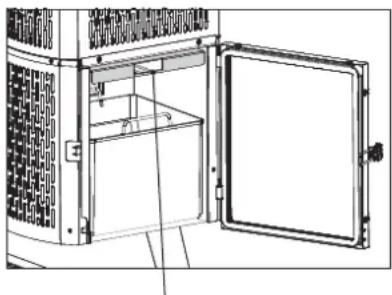
Place fire starter in charcoal grate and light.
-
Use a food safe fire starter block or twisted paper towel/paper.
- Place in charcoal grate on the fire starter support bars.
-
Use caution and wear protective gloves.
• Light with match stick or lighter. -
Turn on controller and set to desired temperature.
- Wait 1–2 minutes after lighting fire starter to ensure fire starter is fully lit.
- Close hopper lid and ash door.
• This will activate the fan.
- Wait for grill to reach desired set temperature.
• Approximately 13 minutes to reach 370^ C.
• Approximately 7 minutes to reach 105^ C.
natural_image
Technical diagram of an open industrial machine with ventilation grilles and a door (no text or symbols)Note: Fire starter will be placed here.
Operating Instructions
RELOAD
If it is necessary to refill the hopper while cooking, follow the safe reloading instructions below.
• DO NOT add charcoal when grill is in excess of 121^ C.
- The fan will turn off if you open the hopper lid or ash door. This reduces the chimney effect created when these doors are opened.
- Gravity fed technology works by maintaining a completely sealed hopper. When the hopper lid is opened the flame will rise from the top of the hopper like a torch. Closing the hopper lid and ash door will return the flame to the normal operating level.
- The amount of charcoal in the hopper determines how quickly the flame will rise when the hopper lid is opened.
Adding charcoal:
- Open hopper lid.
- Use caution and wear protective gloves. Hopper lid will be hot.
- Flame will rise from hopper after a short time depending on the charcoal level.
- Pour charcoal into hopper.
- Close hopper lid.
SHUTDOWN
- Turn controller off.
- Close grill lid, hopper lid and ash door.
- Instal heat intake and air intake slides.
- The grill is designed to starve the charcoal of oxygen when shut down. This allows a percentage of unused charcoal to be saved for the next cook.
- Failure to install slides when shutting down may cause damage to grill.
ADDING SMOKE/FLAVOR
Option 1: Place wood chunks or charcoal in the ash tray to add flavour before setting temperature. As the charcoal in the hopper burns, the hot embers will fall onto the wood/charcoal in the tray, causing it to burn at a slower rate and release more flavour into the grill.
* NOTE: Never add more than 225 g at a time. Additional chunks or charcoal should not be added until any previously added have ceased generating smoke.
Option 2: Mix wood chunks in the hopper with charcoal.
* NOTE: Never use more than 0.7 kg of wood chunks throughout the hopper.
CONTROL PANEL

Power ON/Off Controller:
- Press button to power controller ON.
- Press and hold button to power controller OFF.

Set Temperature:
- Press button.
- Turn knob to desired temperature.
- Press button again to set temperature (Time will automatically set after 3 seconds.)

Set Time:
- Countdown Timer
- Press button.
- Turn knob to desired hours.
- Press button to set hours.
- Turn knob to desired minutes.
- Press button to set minutes. The timer will start.
- Press button to pause and resume timer.
- Press and hold button to reset timer.
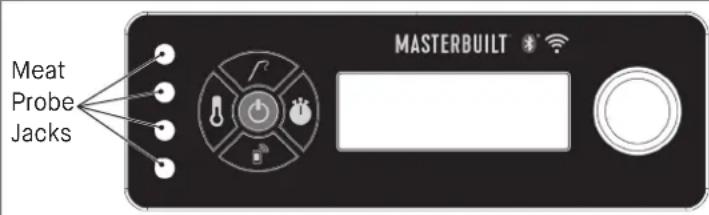
Set Temperature From F^ to C^ :
- With power off, hold set temp button
-
Press power button
-
Unit powers up with "F" or "C" flashing on display
- Use knob to select temp unit
- Press set temp to confirm
- Count Up Timer
- Press and hold button.
- Timer will begin counting up from 00:00.
Timer will count by Minutes:Seconds and then Hours:Minutes.
- Press button to pause and resume timer.
- Press and hold button to reset timer.
Operating Instructions

Set Meat Probe Temperatures:
- Press button and turn knob to select meat probe (MP1, MP2, MP3, MP4). Press button again.
- Press temperature button.
- Turn knob to desired temperature.
- Press temperature button again to set the temperature.
(If meat probe reaches 150^ C, an alarm will sound and the meat probe must be removed from heat and given time to cool. Meat probe will be damaged if left at this temperature.)
* NOTE: Meat probe icon will flash while in setting mode.
- Once set temperature is reached, alarm will sound. Press any button to clear.
Viewing Information on Display:
- Turning the knob will advance the display through grill temperature, timer and meat probes; MP1, MP2, MP3 and MP4.
BLUETOOTH + WiFi


Pairing Grill with Smart Device(s):
- Download the Masterbuilt app from the Apple App Store or Google Play Store onto your smart device(s). For more information go to masterbuilt.com/pages/app-device-requirements.
- Once the download is complete, open the Masterbuilt app and follow the instructions for pairing your Bluetooth + WIFI grill and smart device(s).
BLUETOOTH

Pairing Grill with Smart Device(s):
- Download the Masterbuilt app from the Apple App Store or Google Play Store onto your smart device(s). For more information go to masterbuilt.com/pages/app-device-requirements.
- Once the download is complete, open the Masterbuilt app and follow the instruction for pairing your Bluetooth grill and smart device(s).
This device complies with Part 15 of the FCC Rules. Operation is subject to the following two conditions:
- This device may not cause harmful interference, and
- This device must accept any interference received, including interference that may cause undesired operation.
FCC Warning
Warning: Changes or modifications to this smoker not expressly approved by the party responsible for compliance could void the user's authority to operate the equipment.
FCC Statement
This equipment has been tested and found to comply with the limits for a Class B digital device, pursuant to Part 15 of the FCC Rules. These limits are designed to provide reasonable protection against harmful interference in a residential installation. This equipment generates, uses and can radiate radio frequency energy and if not installed and used in accordance with the instructions, may cause harmful interference to radio communications.
However, there is no guarantee that interference will not occur in a particular installation. If this equipment does cause harmful interference to radio or television reception, which can be determined by turning the equipment off and on, the user is encouraged to try to correct the interference by one or more of the following measures:
- Reorient or relocate the receiving antenna.
- Increase the separation between the equipment and receiver.
- Connect the equipment into an outlet on a circuit different from that to which the receiver is connected.
- Consult the dealer or an experienced radio/TV technician for help.
Note: If you lose connection, smoker will continue as programmed. Smoker can be operated from the control panel if pairing or connection fails.
Operating Instructions
LATCH ADJUSTMENT
The hopper lid and door latches may require adjustment to ensure a proper seal and to prevent excessive smoke leakage. Loosen the latches slightly if they require excessive pressure to close. Tighten the latches slightly if there is excessive smoke leakage.

SMOKE + SEAR GRATES
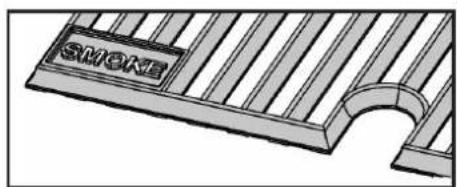
Your grill features Smoke + Sear cast-iron cooking grates for low and slow smoking or high-heat searing. Simply flip the grates to the side that coincides with your method of cooking.
Note: Never flip while grill is on or hot.

natural_image
3D architectural rendering of a building facade with horizontal slats and an arched cutout (no text or symbols)CLEANING AND STORAGE
ALWAYS MAKE SURE GRILL IS COOL TO THE TOUCH BEFORE CLEANING AND STORING.
- Inspect hardware and assembled parts on a regular basis to ensure grill is in safe working condition.
- Clean grill and cooking/smoking grates with mild dish detergent. Wipe outside of grill with a damp rag. DO NOT use oven cleaner or other cleaning agents. Make sure to dry thoroughly.
- Clean the temperature probe (pictured) periodically with mild dish detergent to ensure accurate grill temperature readings. Make sure to dry thoroughly.
• After ashes are cold, clean ash tray and inside of bottom hopper after every use to remove ash buildup, residue and dust.
• Always empty the ash tray after each use once ashes have completely cooled. This will help prolong the life of the ash tray.
- Dispose of cold ashes by placing them in aluminum foil, soaking with water and discarding in a non-combustible container.
• Always cover and store grill in a protected DRY AREA. Store only when fire is out and all surfaces are cold. Store meat probes inside the home.
- When grill is not in frequent use, even when using a grill cover, remember to check your grill periodically to avoid possible rust and corrosion due to moisture buildup.

Troubleshooting
| SYMPTOM CAUSE POSSIBLE SOLUTION | ||
| Controller not ON. Power not ON. | Press the power button on the controller. | |
| Not plugged in. Plug controller into power supply and power supply into wall outlet. | ||
| Circuit breaker tripped. Check wall outlet circuit breaker and reset if tripped. | ||
| Controller malfunction. Masterbuilt Customer Service https://www.masterbuilt.com/pages/support | ||
| Fan not ON. Temperature in cabinet has reached the set temperature. Once the set temperature is reached the fan will turn off. Once the temperature falls below the set temperature the fan will restart. The fan will continue adjusting itself automatically to maintain the set temperature. | ||
| Hopper lid open. For safety, the hopper is equipped with shut-off switches to prevent the fan from stoking the fire when these doors are open. Closing the doors will engage the switches, allowing the fan to continue normal operation. | ||
| Ash door open. | ||
| Fan disconnected from controller. Check that connection is fully seated. | ||
| Fan disconnected from wiring harness. Press the lid / door switch down rapidly 10x to ensure the contact points are clean and not sticking. Quickly pressing and releasing the switch will help clean the contact points. | ||
| Clean Switches | ||
| Err 3 See below. | ||
| Controller temperature inaccurate. | Temperature probe not fully plugged in. | Check that connection is fully seated. |
| Temperature probe is dirty. | Carefully clean temperature probe. | |
| Slow heating. Shutdown slides not removed. | Remove shutdown slides. | |
| Low charcoal. Refill hopper with charcoal. | ||
| Grill lid open. Close grill lid. | ||
| Fan not on. See “Fan not ON.” | ||
| Excessive smoke leaking from hopper. | Loose seal at hopper lid. | Tighten hopper lid latch. |
| Loose seal at ash door. | Tighten ash door latch. | |
| Loose seal between top and middle hopper sections. | After hopper is cold, remove heat shield and tighten screws between top and middle hopper sections. | |
| Err 1 Temperature probe not fully plugged in. | 1. Check that connection is fully seated.2. Unplug controller from power supply, wait 10 seconds and reconnect. | |
| Err 2 Meat probe malfunction. | Masterbuilt Customer Service https://www.masterbuilt.com/pages/support | |
| Err 3 Grill overheated. | 1. Turn off grill.2. Check for cause of overheat.• Grease fire.• Fan malfunction.3. Restart grill. | |
| Err 4 Charcoal failed to ignite. | 1. Ensure shutdown slides are removed.2. Ensure hopper lid and ash door are fully closed.3. Ensure charcoal is not empty.4. Ensure old ash from previous use has not blocked up the ash grate. Shake grate to allow all the old charcoal to fall thru it.5. Restart grill. | |
| Err 5 Meat Probe Temp above 150°C. | 1. Using protective gloves, remove meat probe from grill.2. Unplug from controller.3. Allow meat probe to cool. | |
| Poor Wifi connection Weak signal. | 1. Angle the antenna on back of controller to point at the ground | |
Masterbuilt 2-Year Limited Guarantee/Warranty
WHAT IS NOT COVERED: These guarantees are based on normal and reasonable domestic use and good maintenance of the product. The warranty does not apply to additional or unforeseen damage or breakage, or for damage caused by: transport; drop; wrong assembly; incorrect support; attempts to support the product by means other than an approved Masterbuilt accessories or solid, non-flammable surface under the base; commercial use; amendments; changes; negligence; abuse; improper care / maintenance; hazards on the road; normal and reasonable wear; or natural disasters.
The warranty does not apply to scratches, dents, shards, hairline cracks, the appearance of small cosmetic cracks in the outer layer of glaze that do not affect the operation of the product.
Buying a Masterbuilt product or related items through unauthorised dealers, unauthorised retail channels and unauthorised third parties voids the warranty.
Note: When consumers buy something from an unauthorised source, even if it works as a lawful company and offers products in unopened boxes with blank warranty cards (but is an unauthorised reseller), they sell second-hand products according to the legal definition. If someone buys something from an unauthorised reseller or trader, or from an unauthorised online reseller, it almost always concerns products without a manufacturer's warranty, regardless of any statements or claims made by the seller. This is the standard policy of many brands and companies, not just Masterbuilt.
COVERAGE DATE: Warranty coverage commences when a product purchased from an authorised dealer by the original purchaser and owner is registered with masterbuilt.com as required by these warranty conditions. A valid proof of purchase from an authorised dealer is required to file a warranty claim.
COVERAGE ACCORDING TO THE GUARANTEE: Original parts of Masterbuilt which are found to contain material and construction faults and which are covered by a valid and registered warranty will be replaced or repaired free of charge at Masterbuilt's discretion, subject to the terms and conditions of this warranty.
WARRANTY CLAIM PROCEDURE: For warranty support, please contact the authorised dealer from whom you purchased the item.
For products purchased in countries outside Europe, warranty claims are handled by an authorised dealer or distributor in the country where they were purchased. Consult the INTERNATIONAL section of the masterbuilt.com website to find the recognized international Masterbuilt distributor in your specific region. Warranty claims must be submitted through an authorised dealer or distributor in the country where the item was originally purchased. Do not submit parts for a warranty claim before contacting an authorised dealer or distributor, as in some cases there is no need to return the guaranteed part.

MASTERBUILT®
Rest assured, we're here to help.
Customer Service
masterbuilt.com/contact-us masterbuilt.com/warranty masterbuilt.com/collections/parts
@masterbuilt


masterbuilt.com

natural_image
Black-and-white photo of a person handling food at an outdoor event, with blurred crowd and no visible text or symbols
natural_image
Close-up of hands applying paint to a dark, textured surface with brush (no visible text or symbols)
natural_image
Close-up of hands cutting meat on a white surface with chopsticks (no visible text or symbols)
natural_image
Black-and-white overhead photo of a dining table with various dishes including shrimp, bread, and snacks (no visible text or labels)
natural_image
Black-and-white photo of a dining table with plates, candles, and food items (no visible text or symbols)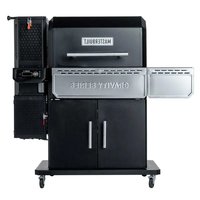

- Welcome to the family. Let's get started.
- WARNING
- CARBON MONOXIDE HAZARD
- WARNINGS AND IMPORTANT SAFEGUARDS
- READ ALL INSTRUCTIONS
- SAVE THESE INSTRUCTIONS
- Structural Proximity and Safe Usage Recommendations
- Hardware
- SAFETY FEATURES
- Assembly
- 22
- 23
- 24
- 26
- 27
- A
- 28
- ASSEMBLY IS DONE. LET'S HAVE SOME FUN!
- PRE-SEASONING
- START-UP
- Operating Instructions
- RELOAD
- Adding charcoal:
- SHUTDOWN
- ADDING SMOKE/FLAVOR
- CONTROL PANEL
- Power ON/Off Controller:
- Set Temperature:
- Set Time:
- Set Temperature From F° to C° :
- - Count Up Timer
- Set Meat Probe Temperatures:
- Viewing Information on Display:
- BLUETOOTH + WiFi
- Pairing Grill with Smart Device(s):
- BLUETOOTH
- FCC Warning
- FCC Statement
- LATCH ADJUSTMENT
- SMOKE + SEAR GRATES
- CLEANING AND STORAGE
- ALWAYS MAKE SURE GRILL IS COOL TO THE TOUCH BEFORE CLEANING AND STORING.
- Masterbuilt 2-Year Limited Guarantee/Warranty
- MASTERBUILT®
Brand : Masterbuilt
Model : MB20042221
Category : Barbecue