CSD130 - Electronic musical instrument Carlsbro - Free user manual and instructions
Find the device manual for free CSD130 Carlsbro in PDF.
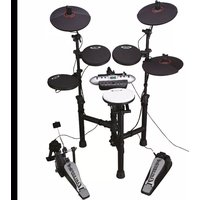


| Product Type | Electronic Drum Set |
| Brand | Carlsbro |
| Model | CSD130 |
| Drum Pads | 3 x Tom Pads, 1 x Snare Pad, 1 x Kick Pad |
| Cymbal Pads | 1 x Hi-Hat, 1 x Crash, 1 x Ride |
| Pedals | Kick Pedal, Hi-Hat Pedal |
| Sound Module | Built-in with 20 preset drum kits |
| Polyphony | 64 Voices |
| Effects | Reverb, EQ |
| Connections | Headphone Output, AUX Input, USB MIDI |
| Power Supply | DC 9V Adapter (included) |
| Dimensions (Stand Assembled) | 120 x 80 x 70 cm |
| Weight | 15 kg |
| Included Accessories | Drum Sticks, Power Adapter, User Manual |
| Material | Plastic Pads, Metal Frame |
| Assembly Required | Yes, simple assembly with included tools |
| Cleaning | Wipe with a soft, dry cloth |
| Warranty | 1 Year Limited Warranty |
Frequently Asked Questions - CSD130 Carlsbro
User questions about CSD130 Carlsbro
0 question about this device. Answer the ones you know or ask your own.
Ask a new question about this device
Download the instructions for your Electronic musical instrument in PDF format for free! Find your manual CSD130 - Carlsbro and take your electronic device back in hand. On this page are published all the documents necessary for the use of your device. CSD130 by Carlsbro.
USER MANUAL CSD130 Carlsbro
POWERED BY CARLSBRO
CSD120/CSD130
DIGITAL DRUM USER GUIDE
Congratulations!
Thank you for purchasing this digital drum set. The drum set has been developed to act and play like a drum set but with greater ease. Before you use the instrument, we recommend you to read through this manual.
Taking care of Your Digital Drum Set
Location
- Do not expose the unit to the following conditions to avoid deformation, discoloration or more serious damage.
- Direct sunlight.
- High temperature (near a heat source, or in a car during the day time).
- Disconnect all cables before moving.
Power Supply
- Make sure to use the suitable AC adaptor, and also make sure the AC outlet voltage in your country matches the input voltage specified on the AC adaptor's label.
- Turn the power switch OFF when the instrument is not in use.
- An AC adaptor should be unplugged from the AC outlet if the instrument is not used for an extended period of time.
- Unplug the AC adaptor during electric storms.
- Avoid plugging the AC adaptor into
- The same AC outlet as appliances with high power consumption, such as electric heaters or ovens. Also avoid using multi-plug adaptors since these can result in reducing the sound quality, operation errors, and possibly damage.
Turn Power OFF When Making Connections
- To avoid damage to the instrument and other devices to which it is connected, turn the power switches of all related devices OFF prior to connecting or disconnecting cables.
Handling and Transport
- Never apply excessive force to the controls, connectors or other parts of the instrument.
- Always unplug cables by gripping the plug firmly, but not pulling on the cable.
- Disconnect all cables before moving the instrument.
- Physical shocks caused by dropping, bumping, or placing heavy objects on the instrument can result in scratches or more serious damage.
Cleaning
- Clean the unit with a dry soft cloth.
- A slightly damp cloth may be used to remove stubborn grime and dirt.
- Never use cleaners such as alcohol or thinner.
- Avoid placing vinyl objects on top of the unit (vinyl can stick to and discolor the surface).
Electrical Interference
- This instrument contains digital circuitry and may cause interference if placed too close to radio or television receivers. If this occurs, move the instrument further away from the affected equipment.
Contents
- Assembly......1
Assemble the drum stand......1
Assemble the pads 3......
Assemble the cymbals 4......
Assemble the module 5......
Assemble the bass drum 5......
Assemble the pedal and bass drum.6
Connect the pads 6......
- Fold the drum stand 8.....
Arrange the pad cables 8......
Fold the crash 8......
Fold the hi-hat and TOM1......8
Fold the ride....10
Fold TOM2 and TOM3 10
Fold the snare....10
Fold the whole set. 11
3. Module function. 13
Front panel....13
Rear panel....14
Display display....15
- Connect with external devices.....15
Connect with audio system or drum speaker cabinet....15
Connect with phone 16
Connect with MP3 or CD player.....16
Connect with PC....17
Connect with MIDI keyboard......17
Power supply....17
- Operation....13
Power switch.18
Adjust the master volume......18
Select drum kit and reverb......19
Pad parameter setting 19......
...Select pad voice.19
Adjust pad volume.20
Pad pan....20
Pad tuning....20
Establish user drum kit.20
Song setting....21
Select song....21
Song playing....21
Accompaniment volume 21
Drum sound of the song 22
Song tempo....22
Tempo setting and the metronome click...22
Tempo....22
Metronome.... 22
- Record and replay....23
Record quickly....23
Play the recorded song....23
- Set up....23
Trigger sensitivity ....23
Crosstalk rejection....24
Trigger curve....24
Save the Set-up.... 25
Local control....25
- Reset setting....26
- MIDI setting....26
MIDI connection....26
Connect with external audio source equipment 26
Used as audio source equipment......26
MIDI list....27
- Trouble shooting 28
- Audio source.specification.28
- Drum kit list .....29
- Voice list ....30
- GM percussion list....36
- DEMO SONG list....38
1. Assembly
Caution**
-While adjusting the collar, please take extra care to avoid injury.
-Set each part to the correct position.
Assembly steps:
Drum stand assembly
1). Take out the drum stand and loosen the screws of the collars. 2). Set the three master tubes at a 120-degree angle. 3). Screw down at the collars.


4). Loosen the screws at the collars. 5). Set the L/R cymbal tubes to the proper height. 6). Screw down to fix the cymbal tubes.

7). Loosen the screws at the collars. 8). Adjust the cymbal collars to proper height. 9). Screw down to fix the cymbal tubes.

10). Loosen the screws at the collars. 11). Adjust the HI-HAT collars to proper height. 12). Screw down to fix the HI-HAT tubes.

13). Loosen the butterfly nuts. 14). Adjust the cymbal rod to proper height and angle. 15). Tighten the butterfly nuts.

16). Loosen the screws at the collars. 17). Adjust the U stand of snare to proper position. 18). Screw down.

19). Loosen the screws at the collars. 20). Set the module stand to proper position. 21). Screw down.

22). Adjust the balance of the drum stand. 23). Tighten all the screws at the collars. Tighten the clip screw.

Assemble the pads
1). Take out the pads (3 TOM and 1 Snare). Loosen the square screw. 2). Assemble the pads onto the tubes and adjust the position. 3). Tighten the square screw.

Assemble the cymbals
1) Loosen the butterfly nut on the left side of the HI-HAT. 2) Assemble the HI-HAT cymbal. 3) Tighten the butterfly nut (Note: don't overtighten)

4). Loosen the butterfly nut on the cymbal rod. 5). Assemble the CRASH/RIDE cymbal onto the rod. 6). Tighten the butterfly nut (Note: don't overtighten)
Loosen the butterfly nut

Assemble the module
1). Loosen the square screws of the module. 2). Assemble the module onto the module stand. 3). Screw down.
Loosen the square screws

Assemble the bass drum (only CSD130)
1) take out the bass drum and bass drum stand 2). loosen the square screw of the bass drum 3). assemble the bass drum on the stand 4). Tighten the square screw.


5). Fix the support bar to the pedal. 6). Fix the bass drum stand the hammer, and tighten the screw
7). Loosen the square screw of the hammer 8). tighter the square screw to fix the hammer
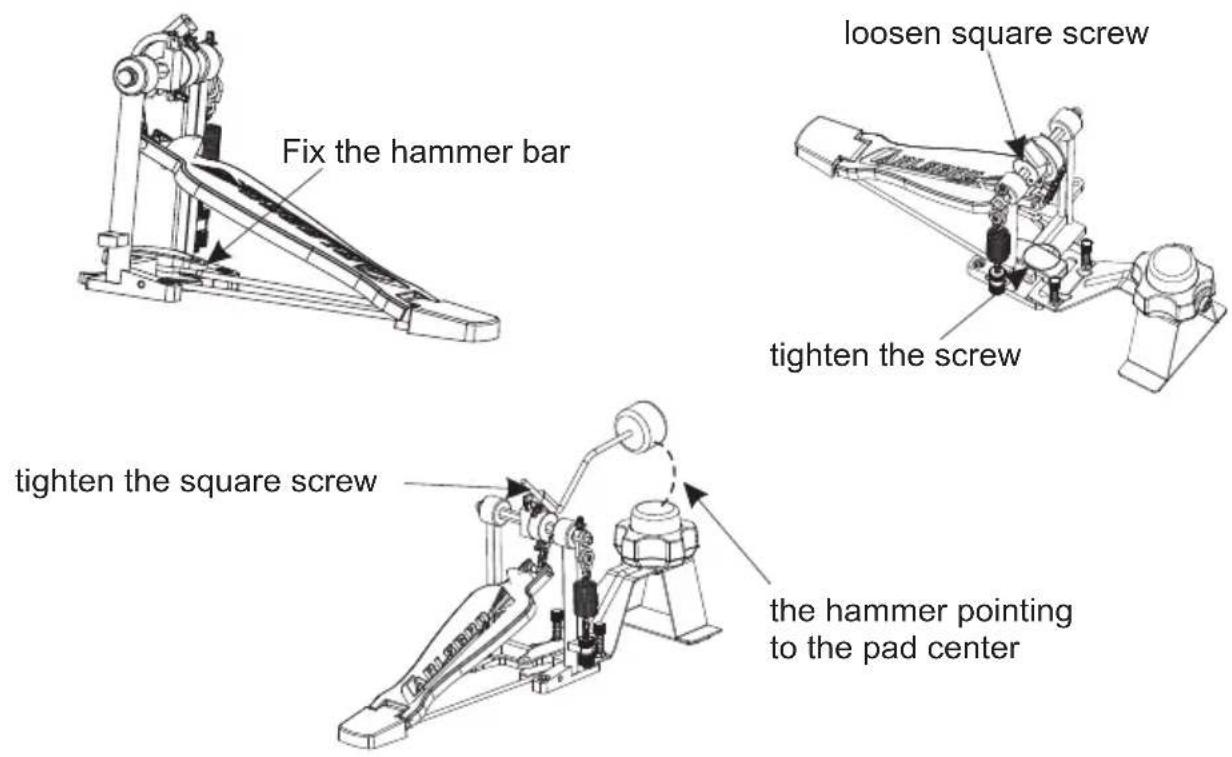
Assemble the pedal and the bass drum
1) Put the pedal on the left floor. 2) Put the bass drum (with hammer) on the right floor.
Note: The CSD120 pedal is used as the bass drum. Each pedal can be used as the bass drum.


Connect the pads
1) Use the cable to connect the D-SUB connector of the module and the pad. 2) Use the cable ties to tie the cables (12 ties).

2. Fold the drum stand
Arrange the pad cables
1) Turn off the power supply. 2) Disconnect all cables from the module. 3) Disconnect all cables from the pads. 4) Take out the cable ties. 5) Rearrange the cables and bind them onto the tubes. 6) Disassemble the module and assemble the screws into the module, then put the module into the bag. 7) Put the pedal into the bag.
Note:
The model CSD130 needs to have the hammer and the bass drum stand disassembled and put into the bag.

Fold the CRASH
1) Loosen the butterfly nuts and knob. 2) Loosen the square screws. 3) Fold the CRASH as shown in the figure below. 4) Tighten the square screw and properly tighten the butterfly nuts.

Fold the Hi-Hat-CYMBAL and TOM1
1) Loosen the square screws. 2) Take out in direction 1, rotate 90 degrees in direction 2, and put in in direction 3. 3) Screw down (as shown in the right figure).


4) Loosen the square screw on the back of TOM1.
5). Put the pad vertically and adjust the position according to the dimension in the figure.

6). Loosen the square screw. Adjust Hi-Hat-CYMBAL & TOM1. 7). Put the collar up as the figure below. 8). Tighten the square screw.

Collar: Put the collar up

Fold the RIDE
1) Loosen the butterfly knob and nut. 2) Loosen the square screw.
a. Fold the RIDE cymbal as the figure below. b. Tighten the square screw. Tighten the butterfly nut & knob properly. Butterfly knob, Square screw


Fold TOM2 and TOM3
1). Loosen the screws on the back of TOM2 and TOM3. 2). Put the pad vertically and adjust the pad position according to the dimension in the figure. 3). Loosen the square screw on the collar and adjust TOM2 & TOM3. 4). Put the collar closely as the figure.
5). Tighten the square screw.

Fold SNARE
1). Loosen the square screw on the clip. 2). Loosen the square screw on the back of SNARE. 3). Adjust SNARE to proper position as the figure below. 4). Tighten the square screw.


Fold the whole set
1). Loosen the square screw. 2). Rotate as the figure below and keep it stable while folding.

3). Rotate as the figure below and put the left and right part close.

4). Rotate the supporting tube as the figure below.

5). Fold the supporting part and keep the collar up closely.

6). Rotate as shown in the figure below and fold the whole set.

Note:
The user can put the whole drum set into the bag (optional bag).

2. Module function
Front panel

① -MASTER VOLUME+ Adjusts the volume of earphone and line output. ② LED Display Displays the menu parameters. ③ -TEMPO+ Enter into the tempo setting (holding the button to change value quickly). ④ -DATA+ Adjusts the parameters, e.g. drum kit, Voice, etc (holding the button to change value quickly). ⑤ KIT REV ON/OFF Drum kit selection and reverb effect on/off. ⑥ SONG Selects DEMO SONG quickly. ⑦ VOICE VOL/PAN/TUN Sets up the voice, volume, pan and tune.
⑧ DRUM OFF DEMO SONG. Turns on/off the drum sound of ⑨ VOLUME Adjusts the accompaniment volume and percussion volume. ⑩ CLICK Turns on/off the metronome. ⑪ UTILITY Practical setting button. ⑫ SAVE Sets the drum kit and save to the user drum kit, or save the trigger in practical setting. ⑬ RECORD Records the drum sound. ⑭ START/STOP Starts/stops the instrument playing or the recording playing. Press once to start the Demo song playing, twice to start recording playing, a third time to stop. ⑮ POWER It turns on/off the power supply.

⑯ USB interface
Connects with PC to deliver MIDI signal.
⑰ MIDI in/out port
Connects with external MIDI devices (The drum MIDI signal outputs via MIDI OUT to external audio source. The external MIDI signal inputs to the drum via MIDI IN.)
⑱ Trigger in connector
Pad signal input connector.
⑲ AUX IN
External stereo input connector, e.g., for MP3 or CD player.
20 -OUTPUT- L/mono R
Stereo output connector to connect to an audio system or drum amp. Provides L/R stereo output and L/mono output.
②1 PHONE
Stereo phone output connector.
②2 DC-In
Power adapter connector, 9V DC.
LED Display

Drum kit LED lights up: the number indicates the drum kit number.

Tone LED lights up: the number indicates the voice number.

Preset song LED lights up: the number indicates the preset song number.
4. Connect with external devices
Connecting with audio system or drum speaker cabinet
Connect one end to L/mono R, and the other end to an audio system or drum amplifier, such as the EDA series.
Note:
1). L/mono is only for the left channel output. 2). When connecting with stereo devices, it needs to connect L/mono and R connectors. The volume is controlled by the module volume knob and device volume knob.

Connect with Headphones
Connect the phone with 1/4" stereo connector on the module (if 1/8" phone is used, use an adaptor). The volume is controlled by the volume knob on the module.

Connect with MP3 or CD player
Connect the output of MP3 or CD player with AUX IN connector of the module. The input signal can be mixed with the drum signal. User can strike the pad according to the metronome click of input signal.

Connect with PC
1). Connect PC via USB
Receives and delivers MIDI signal.
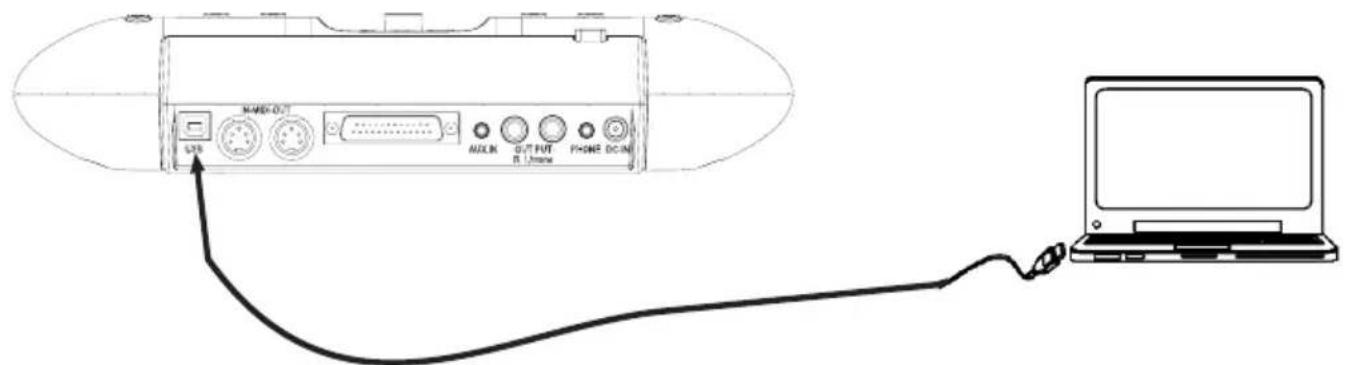
2). Connect PC via MIDI port
MIDI IN: receives external MIDI signal.
MIDI OUT: delivers pad signal to external MIDI device or PC.

Connect with MIDI keyboard
MIDI port: connect with the MIDI OUT connector of MIDI keyboard or external pads as the external audio source to control this digital drum.

Power supply
1). Turn off the module power switch. 2). Connect the power supply with DC IN connector. 3). Confirm all the pads are correctly connected. Set the module volume to minimum, then turn on the power switch of the module. The display lights up and it enters into the drum kit menu.
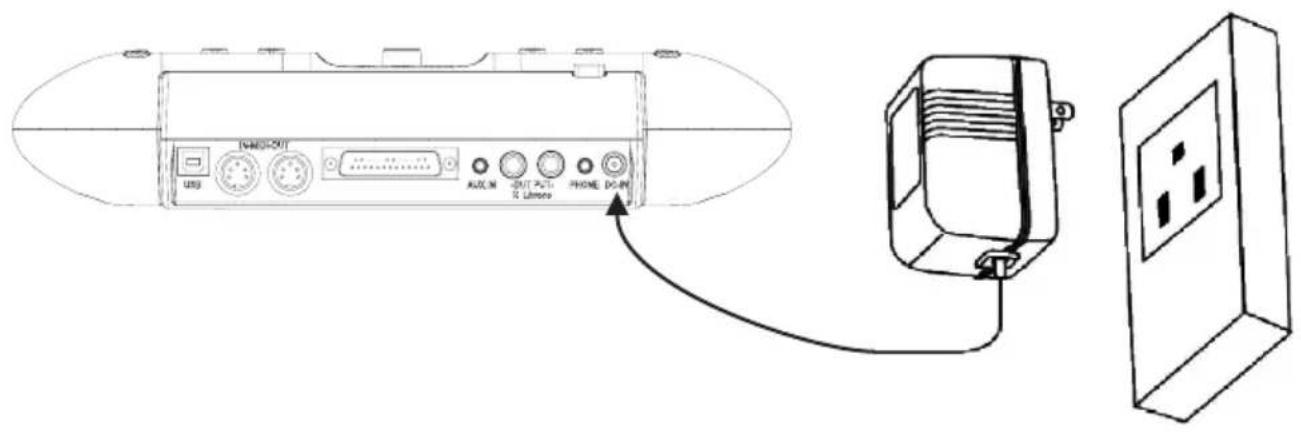
Turn off the power switch before connecting with other devices.
5. Operation
Power switch
1). Confirm all the cables are connected well, then set the module volume to minimum, then turn on the power switch.

- MASTER VOLUME+

2). When the display lights up, enter into the module menu operation (enter into the drum kit menu when on.

Adjust the master volume
Strike the pads and adjust the volume knob for proper master volume.
Select drum kit and reverb
1). Press [KIT REV ON/OFF] key to enter into drum kit setting or to switch drum kit and reverb effect.
![graph LR A[" "] --> B["KIT REV"] B --> C[" "] C --> D[" "]](/content/2026/06/1357824/images/3eedb6a2c5527eea0f5c9e9205df5953fbd51f6309536f36e697acd24b567b5d.jpg)
2). Press [KIT REV ON/OFF] key to enter into drum selection. The display shows drum kit number and the KIT LED lights up. Use [-DATA+] button to select drum kit.
Preset drum kit: KIT01---20
User drum kit: USER01---10

DATA
3). Press [KIT REV ON/OFF] button to enter into reverb setting. LED shows the reverb effect. Use [-DATA+] button to switch the reverb effect (use the reverb effect to make the sound fuller)


Pad parameter setting
Press [VOICE VOL/PAN/TUN] key to enter into the pad parameter setting and then enter into voice, level, pan, tuning.
![graph LR A["VOICE"] --> B["LEVEL"] B --> C["PAN"] C --> D["TUNING"]](/content/2026/06/1357824/images/13ab6381dd411f2070fa0bd2b20e48b2d577254df54b4be79fa43806e64c1d7a.jpg)
Voice: the module has 250 voices. Please refer to the voice list.
Select pad voice
1) Press [VOICE VOL/PAN/TUN] button for the first time to enter into voice setting. The display shows the current pad voice and the voice LED lights up.


2) Strike the pad of which voice to be changed. Use [-DATA+] button to select the voice (voice Number: 001-250, non-recycle).
Adjust pad volume
1) When adjusting the pad volume, press once again [VOICE VOL/PAN/TUN] button to enter into pad volume setting. The first LED shows 'L', and the other two LEDs show the volume value. VOICE LED lights up. 2) Strike the pad of which volume to be changed. Use [-DATA+] button to select the volume (00-32, non-recycle).


Pad pan
1) Press [VOICE VOL/PAN/TUN] button continuously to enter into the pan setting. The display shows letter 'P' first and then the pan value. The VOICE LED lights up. 2) Strike the pad of which the pan to be adjusted. Use [-DATA+] button to adjust the pad pan (±8, non-recycle).


Pad tuning
This function is used for tuning the pad.
1) Press [VOICE VOL/PAN/TUN] button continuously to enter into pad tuning. The display shows letter 't', and then the tuning value. VOICE LED lights up. 2) Strike the pad to be tuned. Use [-DATA+] button to adjust pad tuning (±2, non-recycle).


Establish user drum kit
In the drum kit menu, user can select the preset drum kit to play, or user can select the pad voice and relative parameters, e.g. voice, volume, L/R pan, tuning.
This module has 30 drum kits: Preset drum kits: KIT01---20
User drum kits: USER01---10
1). In the drum kit menu, press [SAVE] button to enter into user drum kit setting. Use [-DATA+] button to select the user drum kit (U01-U10, non-cycle). During this process, the drum kit number flashes. 2). Press the pad parameter setting to change the pad tone/volume/pan/tune. 3). Press [SAVE] button once again to save the drum kit setting, and the former drum kits will be covered by the new drum kit. The drum kit number stops flashing.
SAVE

Note: if the drum kit number has been changed or the power fails before saving, the former drum kit parameters will be lost.
Song setting
Select song
1). Press [SONG] button to enter into song setting. The display shows the song number. SONG LED flashes once and then lights off. 2). Use [-DATA+] button to select the current song number (1-20, non-recycle).
SONG

Song playing
1). Press [START/STOP] button to play the selected song. During playing, change the song via [-DATA+] button. 2). After playing it stops automatically; during playing, press [START/STOP] button two times to stop playing. (Note: during playing, press [START/STOP] button one time to switch to play the recorded songs.)
START/STOP
Note: during playing, user can send real time MIDI signal via MIDI OUT.
Accompaniment volume
During playing, user can adjust the volume of accompaniment and of the drum sound.
1). Press [ACCOMP VOLUME] button to enter into accompaniment volume setting. The display shows letter “A” first, and the accompaniment volume value next. SONG LED lights up. 2). Use [-DATA+] button to adjust the accompaniment volume (0-32, non-recycle).
VOLUME

Drum sound volume of the song
1). Press [ACCOMP VOLUME] button continuously to enter into the drum sound setting. The display shows letter "d" first, and the drum sound volume next. SONG LED lights up. 2). Use [-DATA+] button to adjust the drum sound volume of the song (0-32, non-recycle).
VOLUME

Song tempo
During playing DEMO SONG, use [-TEMPO+] button to adjust the song tempo.
Drum sound of the song (percussion)
Press [DRUM OFF] button to start/close the drum sound function. If “DRUM OFF” starts, the drum sound will be closed and “DRUM OFF LED lights on.”
DRUM OFF
Tempo setting and the metronome click
Tempo
1). Press [-TEMPO+] button to enter into the tempo setting to change the metronome click and song tempo (35-280, non-recycle). 2). If the tempo has not been changed in 2 seconds, the module will return back to the former menu automatically.
TEMPO
Metronome
1). Press [CLICK] button to start/close the metronome voice. This module has two metronome voices: triangle and click. When the metronome starts, it offers the triangle voice. Press [CLICK] button twice it switches to click voice. 2). When the metronome counts the beats, the beats (2/4, 3/4, 4/4, 5/4, 6/8) is shown on The display. Use [-DATA+] button to change the beats (recycle).
3) Use the master volume knob to change the metronome volume.
CLICK

Note: during playing the songs, the metronome is closed. Press [CLICK] button to start metronome function.
6. Record and replay
Record quickly
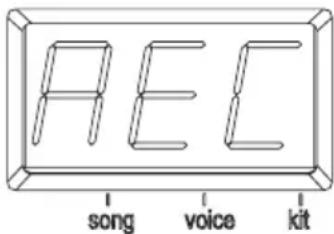
1). Press [RECORD] button, and [RECORD] LED lights up and flashes. It shows “REC”. 2). Strike the pads to start recording or record only the drum sound of the song being played. 3). Press [RECORD] button to stop recording. [RECORD] LED lights off. The song or the user's performance has been recorded.
RECORD
Note:
1). During recording, the metronome function will not automatically start. If user needs to start the metronome function, user can press [CLICK] button before recording instead of pressing it after recording. 2). The metronome sound can not be recorded. 3). If user is not satisfied with the recorded result, press [RECORD] to restart recording. (Note: this module supports the recording function, but not saving function. The recorded data will cover the former data, and all the data will not be saved after the module is powered off).
Play the recorded song
1). Press [START/STOP] button twice to replay the recorded song, and meanwhile [START/STOP] button and [RECORD] LED lights up. 2). After replaying, [UTILITY] button and [RECORD] LED lights off.
7. Practical setting
Press [] button to enter into practical setting, then into the following menu gradually.UTILITY
![graph LR A["Input"] --> B["Sensitivity"] B --> C["Crosstalk"] C --> D["Curve"] D --> E["Local On/off"]](/content/2026/06/1357824/images/7767abb0fc632520d28a332d1e108b5845ed3fe1d883c3260a0d02951667fa9f.jpg)
Trigger sensitivity
1). Press [ ] button to enter into the trigger sensitivity setting. The display shows letter UTILITY『E』 first, and the sensitivity level next. 2). Strike the pads to select proper sensitivity.
3). Use [-DATA+] button to adjust the trigger sensitivity (01-08, non-recycle). The higher the value means higher sensitivity.


Crosstalk rejection
Strike a pad (trigger) and the vibration may cause crosstalk.
1). Press [SET UP] button continuously to enter into trigger sensitivity setting. The display shows letter『O first and the crosstalk rejection level next.』 2). Use [-DATA+] button to adjust the trigger sensitivity rejection level (01-16, non-recycle). The higher value means higher rejection level.

Trigger curve
1). Press [SET UP] button continuously to enter into trigger curve setting. The display shows letter "CU first and the trigger curve number next. I" 2). Use [-DATA+] button to select the trigger curve (1-6, non-recycle). This will change the relation between force and the loudness. 3). CURVE 1: Small dynamic response. Select this curve and it delivers high but stable volume. CURVE2: The standard setting to deliver natural signal. CURVE3: Compared to CURVE2, low striking force causes big volume change. CURVE4: Compared to CURVE2, comparatively high striking force causes comparatively big change. volume CURVE5: Compared to CURVE2, comparatively high striking force causes very big volume change. CURVE6: The striking force causes extreme change. volume


Save the set-up
Press [SAVE] button to save the 3 setting mentioned above: sensitivity/crosstalk rejection/striking force.

Local control
1). Press [SET UP] button to enter into the local setting. It shows the local control status: "Lon" for ON or "Lof" for OFF. Use [-DATA+] button to switch. Refer to the following figure for the local control setting:
![graph TD A["Trigger Input"] --> B["MIDI signal"] B --> C{Local On/Off} C -->|Local On/Off| D["Sound module"] D --> E["MIDI in"] E --> F["MIDI out"] F --> B](/content/2026/06/1357824/images/2df905f2bb109e6765842d3993ba30b2bed09cfb96eb27a35123f91e785b8e62.jpg)


Local control: used to control the connection of trigger detection and the audio source sequencer. In the default ON status, the two modules are connected. Striking the pad will generate sound and it outputs the relative MIDI signal. When this function is turned off, the audio source module will not be controlled by the trigger directly, but will controlled by the MIDI input signal.
8. Reset setting
Hold [TEMPO+] and [SET UP] button at the same time. It reset back to the factory setting:
All user drum kits: voice/volume/pan/tuning
Practical setting: sensitivity/crosstalk rejection/striking force curve
9. MIDI setting
This equipment is compatible with various MIDI devices and can be used as a trigger device or audio source. It is also compatible with part of the GM standard, and can be used with many audio sequencer software programs.
MIDI connection
MIDI IN: receives external MIDI signals when connected to external MIDI devices.
MIDI OUT: sends external MIDI signals when connected to external MIDI devices.
USB: the standard USB2.0 interface can be connected to standard USB MIDI devices or a PC.
The operating system has its driver, so there is no need for repeated installation. It is compatible with computer systems such as XP, Win7, Vista, and Mac OSX. After connection, the system recognizes this equipment as a USB COMPOSITE DEVICE.
(USB is only used when connected to MIDI devices)
Note: when USB is connected to a PC, all MIDI data can be sent or received via USB.
Connect with external audio source equipment
This equipment can send its various information via channel 10, including: trigger notes, force, hi-hat pedal performance and status, etc.
(Note: the song replaying and metronome information cannot be sent)
Use the external audio sequencer to record the performance
1). Connect an external audio sequencer or PC via MIDI OUT or USB. 2). Set the equipment to channel 10 in the audio sequencer or in the sequence software, and then start recording. 3). Play the pads. 4). Stop the performance and recording, and listen to the performance.
Used as audio source equipment
When connecting with an external MIDI keyboard or audio sequencer via MIDI OUT or USB cable, it receives its MIDI output signal. At this time, this equipment can play the effective signals. The output voice changes as the drum kit is switched. This equipment has most of the GM voices. Users can establish user drum kits. Refer to the MIDI List for MIDI information.
| MIDI IMPLEMENTATION CHART | ||||
| FUNCTION | TRAN | SMITTED | RECOGNIZED | REMARKS |
| Basic Default 10 Ch | 1~16 | |||
| Channel Changed x | x | |||
| Default x | x | |||
| Mode Massages x | x | |||
| Altered x | x | |||
| Note | ********** | 0~127 | ||
| Number: True Voice | ********** | 0~127 | ||
| Velocity Note On | ○ | ○ | ||
| 99H,V=1~127 | ||||
| Note Off | x | ○ | ||
| after Key's | x | x | ||
| Touch Ch's | x | x | ||
| Pitch Bend | ||||
| Control 0 | x | x | Bank Select | |
| Change 1 | x | x | Modulation | |
| 5 | x | x | Portamento Time | |
| 6 | x | ○ | Data Entry | |
| 7 | x | ○ | Volume | |
| 10 | x | ○ | Pan | |
| 11 | x | x | Expression | |
| 64 | ○ | Sustain Pedal | ||
| 65 | x | x | Portamento On/Off | |
| 66 | x | x | Sostenuto Pedal | |
| 67 | x | x | Soft Pedal | |
| 80 | x | x | Reverb Program | |
| 81 | x | x | Chorus Program | |
| 91 | x | x | Reverb Level | |
| 93 | x | x | Chorus Level | |
| 120 | x | ○ | All Sound Off | |
| 121 | x | ○ | Reset All Controllers | |
| 123 | x | ○ | All Notes Off | |
| Program | x | x | ||
| Change :True Number | x | x | ||
| System Exclusive | x | x | ||
| System :Song Position | x | x | ||
| Common :Song Select | x | x | ||
| :Tune | x | x | ||
| System :Clock | ○ | x | ||
| Real :Comands | ○ | x | Start And Stop Only | |
| Time | ||||
| Aux :Local On/Off x | ○ | |||
| :All Notes Off | x | x | ||
| Massage :Active Sensing | x | x | ||
| :Reset | x | x | ||
10. Troubleshooting
| Problem | Reason |
| No sound | Please confirm the volume knob is not turned off |
| Pad has no sound | 1.confirm the pad connection is correct.2.confirm the pad volume is not set to 0 |
| Metronome has no sound | Confirm the metronome volume is not set to 0 |
| DEMO SONG has no sound | Confirm the DEMO SONG volume is not set to 0 |
11. Audio source specification
Max polyphony: 32
Drum kits: 20 preset drum kits: KIT01---20
15 user drum kits: USER01---15
Voice: 250 voices (DRUMS, PERCUSSION, SFX)
Effect: the reverb switch
Audio sequencer: DEMO SONG 20
Recording: real-time recording, but cannot be saved.
Tempo: 035---280
Display: red or green
Connection: Phone stereo out connector (1/4"), AUX IN stereo connector (1/8"),
Audio output connector (1/4" L/mono R),
USB, MIDI IN/MIDI OUT
Power supply: DC 9V inner+ outer -
Dimension: 246(L)*154(W)*127(H)
Weight: 0.5Kg
(The specification is subject to change without prior notice.)
12. DRUM KIT LIST
| NO. | PRESET DRUM KIT | NO. | USER DRUM KIT |
| 1 | POP1 | 1 | POP1 |
| 2 | POP2 | 2 | POP2 |
| 3 | POP3 | 3 | POP3 |
| 4 | ROCK1 | 4 | ROCK1 |
| 5 | ROCK2 | 5 | ROCK2 |
| 6 | ROCK3 | 6 | ROCK3 |
| 7 | FUNK1 | 7 | FUNK1 |
| 8 | FUNK2 | 8 | FUNK2 |
| 9 | FUNK3 | 9 | FUNK3 |
| 10 | LATIN1 | 10 | LATIN1 |
| 11 | LATIN2 | ||
| 12 | JAZZ1 | ||
| 13 | JAZZ2 | ||
| 14 | BRUSH | ||
| 15 | ORCH | ||
| 16 | DANCE1 | ||
| 17 | DANCE2 | ||
| 18 | EAST1 | ||
| 19 | EAST2 | ||
| 20 | PERCUSSION |
- VOICE LIST
| NO. | NAME | |
| KICK | 1 | KICK1 |
| 2 | KICK2 | |
| 3 | KICK3 | |
| 4 | JAZZBD2 | |
| 5 | LTBD1 | |
| 6 | POPKICK1 | |
| 7 | POPKICK2 | |
| 8 | POPKICK3 | |
| 9 | POPKICK4 | |
| 10 | POPKICK5 | |
| 11 | POPKICK6 | |
| 12 | POPKICK7 | |
| 13 | ACKICK | |
| 14 | SYNBD02 | |
| 15 | EKICK05 | |
| 16 | NOISEBD | |
| 17 | EKICK01 | |
| 18 | EKICK02 | |
| ACOUSTIC SNARE | 19 | BRSHSN1 |
| 20 | FNKSN1 | |
| 21 | FNKSN2 | |
| 22 | POPSN1 | |
| 23 | HRDBT1 | |
| 24 | JZSLP1 | |
| 25 | JZSLP2 | |
| 26 | ORCHSN3 | |
| 27 | SDSTK3 | |
| 28 | SNRIM | |
| 29 | HVSN | |
| 30 | TITESN1 | |
| 31 | TITESN2 | |
| 32 | TITESN3 | |
| 33 | POPSN2 | |
| 34 | TITESN4 | |
| 35 | TITESN5 | |
| 36 | TRDSN1 | |
| 37 | SNCOMBO3 | |
| 38 | SNCOMBO4 | |
| 39 | SNCOMBO5 | |
| 40 | SNCOMBO6 | |
| 41 | SRSTD | |
| 42 | SRIMC4 | |
| 43 | POPSN1 | |
| 44 | POPSN2 | |
| 45 | POPSN3 | |
| 46 | POPSN4 | |
| 47 | POPSN5 | |
| 48 | POPSN5 | |
| ELECTRIC SNARE | 49 | SYNSN01 |
| 50 | ESN11 | |
| 51 | ESN1 | |
| 52 | ESN2 | |
| 53 | ESN3 | |
| 54 | ESN4 | |
| 55 | ESN5 | |
| 56 | ESN6 | |
| 57 | ESN7 | |
| HI-HAT | 58 | CHH1 |
| 59 | CHH2 | |
| 60 | CHH3 | |
| 61 | CHH4 | |
| 62 | CHH5 | |
| 63 | CHH6 | |
| 64 | CHH7 | |
| 65 | CHH8 | |
| 66 | LOOSHH1 | |
| 67 | LOOSHH2 | |
| 68 | LOOSHH3 | |
| 69 | LOOSHH4 | |
| 70 | OHHSTD | |
| 71 | OHIHAT1 | |
| 72 | OHIHAT2 | |
| 73 | OHIHAT3 | |
| 74 | OHIHAT4 | |
| 75 | OHIHAT5 | |
| 76 | PHHJZ | |
| 77 | PHH2 | |
| 78 | PHH3 | |
| 79 | CHHPOP1 | |
| 80 | CHHPOP2 | |
| 81 | CHHPOP3 | |
| 82 | CHHPOP4 | |
| EHH | 83 | EHH01 |
| 84 | EHH02 | |
| 85 | EHH03 | |
| 86 | EHH04 | |
| 87 | EHH05 | |
| 88 | EHH06 | |
| 89 | EHH07 | |
| TOM | 90 | BRSHT1 |
| 91 | BRSHT2 | |
| 92 | BRSHT3 | |
| 93 | TOM1 | |
| 94 | TOM2 | |
| 95 | TOM3 | |
| 96 | TOM4 | |
| 97 | TOM5 | |
| 98 | TOM6 | |
| 99 | TOM7 | |
| 100 | TOM8 | |
| 101 | TOM9 | |
| 102 | TOMHSTD | |
| 103 | TOMMSTD | |
| 104 | TOMPOP1 | |
| 105 | TOMPOP2 | |
| 106 | TOMPOP3 | |
| 107 | TOMPOP4 | |
| 108 | TOMPOP5 | |
| 109 | TOMPOP6 | |
| 110 | 808T1 | |
| 111 | 808T2 | |
| 112 | 808T3 | |
| 113 | ETOM05 | |
| CYMBAL | 114 | CRASH1 |
| 115 | CRASH9 | |
| 116 | CRSHJS1 | |
| 117 | CRSHJS2 | |
| 118 | CRSHSTD1 | |
| 119 | CRSHSTD2 | |
| 120 | LTCRSH1 | |
| 121 | LTCRSH2 | |
| 122 | LTCRSH3 | |
| 123 | ORCCYM1 | |
| 124 | ORCCYM2 | |
| 125 | ORCCYM3 | |
| 126 | ORCCYM4 | |
| 127 | RBLLSTD | |
| 128 | RIDEBELL | |
| 129 | REVCYM1 | |
| 130 | REVCYM2 | |
| 131 | REVCYM3 | |
| 132 | REVCYM4 | |
| 133 | RIDEJZ1 | |
| 134 | RIDEJZ2 | |
| 135 | RIDESTD | |
| 136 | RIDE1 | |
| 137 | RIDE2 | |
| 138 | REVCYMBAL | |
| 139 | SPLSH1 | |
| 140 | SPLSH2 | |
| 141 | CRASHC1 | |
| 142 | CNCYMBAL | |
| 143 | CRASHPOP1 | |
| 144 | CRASHPOP2 | |
| 145 | CRASHPOP3 | |
| 146 | CRASHPOP4 | |
| 147 | SPLASHC | |
| 148 | RIDELC2 | |
| 149 | RIDEH1 | |
| 150 | RIDEH2 | |
| 151 | ECRASH1 | |
| 152 | ECRASH2 | |
| 153 | ECRASH3 | |
| 154 | ECRASH4 | |
| 155 | SPLASH | |
| PERCUSSION | 156 | EMRCA1 |
| 157 | EMTRI | |
| 158 | ETRNGL1 | |
| 159 | ETRNGL2 | |
| 160 | EBELL1 | |
| 161 | ECBSA2 | |
| 162 | ETMBRIN1 | |
| 163 | ETMBRIN2 | |
| 164 | CABASA1 | |
| 165 | CABASA2 | |
| 166 | CHKR01 | |
| 167 | CHKR02 | |
| 168 | CHKR03 | |
| 169 | CLAP1 | |
| 170 | CLAP2 | |
| 171 | CLAP3 | |
| 172 | CLAP4 | |
| 173 | COWBLL1 | |
| 174 | COWBLL2 | |
| 175 | COWBLL13 | |
| 176 | COWBLL14 | |
| 177 | COWBLL15 | |
| 178 | HAGOGO1 | |
| 179 | HAGOGO2 | |
| 180 | HAGOGO3 | |
| 181 | HIBNGO01 | |
| 182 | HIBNGO02 | |
| 183 | HTMBL1 | |
| 184 | HTMBL2 | |
| 185 | HTMBL3 | |
| 186 | LOBNGO | |
| 187 | LOCNGA01 | |
| 188 | LOCNGA02 | |
| 189 | MHCNGA03 | |
| 190 | MTRNGL | |
| 191 | OHCNGA01 | |
| 192 | OHCNGA02 | |
| 193 | OHCNGA03 | |
| 194 | OHCNGA04 | |
| 195 | OPNTRNGL | |
| 196 | TMBRN1 | |
| 197 | TMBRN2 | |
| 198 | TMBRN3 | |
| 199 | TMBRN4 | |
| 200 | TMBRN5 | |
| 201 | VSLP03 | |
| 202 | CNBGONG | |
| 203 | CNLCYMBL | |
| 204 | CNLDRM1 | |
| 205 | CNLDRM2 | |
| 206 | CNSCYMBL | |
| 207 | CNSDRM | |
| 208 | CNSGONG | |
| 209 | SUPRGNG | |
| 210 | TAIKO1 | |
| 211 | TAIKO2 | |
| 212 | TAIKO3 | |
| 213 | TAIKO4 | |
| 214 | TAIKOSD1 | |
| 215 | TAIKOSD3 | |
| 216 | CHIM1 | |
| 217 | CHIM2 | |
| 218 | STICK2 | |
| 219 | TIM1 | |
| 220 | TIM2 | |
| 221 | TIM3 | |
| 222 | TIM4 | |
| 223 | TIM5 | |
| 224 | TMPNS3 | |
| 225 | BELLTREE | |
| 226 | High Q | |
| 227 | SLAP | |
| 228 | SCRATCH PUSH | |
| 229 | SCRATCH PULL | |
| 230 | STICKS | |
| 231 | CLIP | |
| 232 | METRONOME CLICK | |
| 233 | METRONOME BELL | |
| 234 | SHAKER | |
| 235 | JINGLEBELL | |
| 236 | CASTANETS | |
| 237 | MUTESURDO | |
| 238 | OPNSURDO | |
| 239 | L0TMBL1 | |
| 240 | LAGOGO1 | |
| 241 | MRCAS1 | |
| 242 | SWHSL1 | |
| 243 | LWHSL1 | |
| 244 | SGUIRO | |
| 245 | LGUIRO | |
| 246 | CLV | |
| 247 | HWBLK | |
| 248 | LWBLK | |
| 249 | MCUICA | |
| 250 | OCUICA |
GM Percussion
| Note No. | Standard name | Voice No. | Voice Name |
| 27 – D#1 | High Q | 226 | High Q |
| 28 E1 | Slap | 227 | SLAP |
| 29 – F1 | Scratch Push | 228 | SCRATCH PUSH |
| 30 – F#1 | Scratch Pull | 229 | SCRATCH PULL |
| 31 – G1 | Sticks | 230 | STICKS |
| 32 – G#1 | Square Click | 231 | CLIP |
| 33 – A1 | Metronome Click | 232 | METRONOME CLICK |
| 34 – A#1 | Metronome Bell | 233 | METRONOME BELL |
| 35 – B1 | Acoustic Bass Drum | 13 | ACKICK |
| 36 – C2 | Bass Drum 1 | 1 | KICK1 |
| 37 – C#2 | Side Stick | 41 | SRSTD |
| 38 – D2 | Acoustic Snare | 37 | SNCOMBO3 |
| 39 – D#2 | Hand Clap | 169 | CLAP1 |
| 40 – E2 | Electric Snare | 57 | ESN7 |
| 41 – F2 | Low Floor Tom | 103 | TOMMSTD |
| 42 – F#2 | Closed Hi Hat | 60 | CHH3 |
| 43 – G2 | High Floor Tom | 100 | TOM8 |
| 44 – G#2 | Pedal Hi-Hat | 77 | PHH2 |
| 45 – A2 | Low Tom | 93 | TOM1 |
| 46 – A#2 | Open Hi-Hat | 70 | OHHSTD |
| 47 – B2 | Low-Mid Tom | 99 | TOM7 |
| 48 – C3 | Hi-Mid Tom | 98 | TOM6 |
| 49 – C#3 | Crash Cymbal 1 | 118 | CRSHSTD1 |
| 50 – D3 | High Tom | 95 | TOM3 |
| 51 – D#3 | Ride Cymbal 1 | 135 | RIDESTD |
| 52 – E3 | Chinese Cymbal | 142 | CNCYMBAL |
| 53 – F3 | Ride Bell | 127 | RBLLSTD |
| 54 – F#3 | Tambourine | 196 | TMBRN1 |
| 55 – G3 | Splash Cymbal | 139 | SPLSH1 |
| 56 – G#3 | Cowbell | 173 | COWBLL1 |
| 57 – A3 | Crash Cymbal 2 | 120 | LTCRSH1 |
| 58 – A#3 | Vibraslap | 201 | VSLP03 |
| 59 – B3 | Ride Cymbal 2 | 136 | RIDE1 |
| 60 – C4 | Hi Bongo | 181 | HIBNGO01 |
| 61 – C#4 | Low Bongo | 186 | LOBNGO |
| 62 – D4 | Mute Hi Conga | 189 | MHCNGA |
| 63 – D#4 | Open Hi Conga | 191 | OHCNGA01 |
| 64 – E4 | Low Conga | 187 | LOCNGA01 |
| 65 - F4 | High Timbale | 183 | HTMBL1 |
| 66 - F#4 | Low Timbale | 239 | L0TMBL1 |
| 67 - G4 | High Agogo | 178 | HAGOGO1 |
| 68 - G#4 | Low Agogo | 240 | LAGOGO1 |
| 69 - A4 | Cabasa | 164 | CABASA1 |
| 70 - A#4 | Maracas | 241 | MRCAS1 |
| 71 - B4 | Short Whistle | 242 | SWHSL1 |
| 72 - C5 | Long Whistle | 243 | LWHSL1 |
| 73 - C#5 | Short Guiro | 244 | SGUIRO |
| 74 - D5 | Long Guiro | 245 | LGUIRO |
| 75 - D#5 | Claves | 246 | CLV |
| 76 - E5 | Hi Wood Block | 247 | HWBLK |
| 77 - F5 | Low Wood Block | 248 | LWBLK |
| 78 - F#5 | Mute Cuica | 249 | MCUICA |
| 79 - G5 | Open Cuica | 250 | OCUICA |
| 80 - G#5 | Mute Triangle | 190 | MTRNGL |
| 81 - A5 | Open Triangle | 195 | OPNTRNGL |
| 82 - A#5 | Shaker | 234 | SHAKER |
| 83 - B5 | Jingle Bell | 235 | JINGLEBELL |
| 84 - C6 | Bell Tree | 225 | BELLTREE |
| 85 - C#6 | Castanets | 236 | CASTANETS |
| 86 - D6 | Mute Surdo | 237 | MUTESURDO |
| 87 - D#6 | Open Surdo | 238 | OPNSURDO |
15. DEMO SONG LIST
Carlsbro Holdings Ltd
Unit 11, Torc MK, Chippenham Drive, Milton Keynes,
MK10 0BZ. United Kingdom
Tel: +44(0)1908 281072
Web: www.carlsbro.com Email: sales@carlsbro.com




- CSD120/CSD
- DIGITAL DRUM USER GUIDE
- CONGRATULATIONS
- TAKING CARE OF YOUR DIGITAL DRUM SET
- LOCATION
- POWER SUPPLY
- TURN POWER OFF WHEN MAKING CONNECTIONS
- HANDLING AND TRANSPORT
- CLEANING
- ELECTRICAL INTERFERENCE
- CONTENTS
- ASSEMBLY
- ASSEMBLY STEPS
- DRUM STAND ASSEMBLY
- ASSEMBLE THE PADS
- ASSEMBLE THE CYMBALS
- ASSEMBLE THE MODULE
- ASSEMBLE THE BASS DRUM (ONLY CSD130)
- ASSEMBLE THE PEDAL AND THE BASS DRUM
- CONNECT THE PADS
- FOLD THE DRUM STAND
- ARRANGE THE PAD CABLES
- FOLD THE CRASH
- FOLD THE HI-HAT-CYMBAL AND TOM
- FOLD THE RIDE
- FOLD TOM2 AND TOM
- FOLD SNARE
- FOLD THE WHOLE SET
- NOTE
- MODULE FUNCTION
- FRONT PANEL
- LED DISPLAY
- CONNECT WITH EXTERNAL DEVICES
- CONNECTING WITH AUDIO SYSTEM OR DRUM SPEAKER CABINET
- CONNECT WITH HEADPHONES
- CONNECT WITH MP3 OR CD PLAYER
- CONNECT WITH PC
- ). CONNECT PC VIA USB
- ). CONNECT PC VIA MIDI PORT
- CONNECT WITH MIDI KEYBOARD
- OPERATION
- POWER SWITCH
- ADJUST THE MASTER VOLUME
- SELECT DRUM KIT AND REVERB
- PAD PARAMETER SETTING
- SELECT PAD VOICE
- ADJUST PAD VOLUME
- PAD PAN
- PAD TUNING
- ESTABLISH USER DRUM KIT
- SONG SETTING
- SELECT SONG
- SONG PLAYING
- ACCOMPANIMENT VOLUME
- DRUM SOUND VOLUME OF THE SONG
- SONG TEMPO
- DRUM SOUND OF THE SONG (PERCUSSION)
- TEMPO SETTING AND THE METRONOME CLICK
- TEMPO
- METRONOME
- RECORD AND REPLAY
- RECORD QUICKLY
- PLAY THE RECORDED SONG
- PRACTICAL SETTING
- TRIGGER SENSITIVITY
- CROSSTALK REJECTION
- TRIGGER CURVE
- SAVE THE SET-UP
- LOCAL CONTROL
- RESET SETTING
- MIDI SETTING
- MIDI CONNECTION
- CONNECT WITH EXTERNAL AUDIO SOURCE EQUIPMENT
- USED AS AUDIO SOURCE EQUIPMENT
- TROUBLESHOOTING
- AUDIO SOURCE SPECIFICATION
- DRUM KIT LIST
- CARLSBRO HOLDINGS LTD
Brand : Carlsbro
Model : CSD130
Category : Electronic musical instrument