
HD9747 - Deep fryer PHILIPS - Free user manual and instructions
Find the device manual for free HD9747 PHILIPS in PDF.


| Product Type | Airfryer (oil-free deep fryer) |
| Model | HD9747 |
| Brand | Philips |
| Capacity | 1.4 kg (approx. 3 lbs) of fries, 2.2 lb (1 kg) for chicken |
| Basket Capacity | 0.8 kg (1.75 lbs) of ingredients |
| Dimensions (L x W x H) | 433 x 321 x 308 mm (17.0 x 12.6 x 12.1 in) |
| Weight | 7.9 kg (17.4 lbs) |
| Power Supply | 220-240 V, 50/60 Hz |
| Power Consumption | 2225 W |
| Temperature Range | 80°C – 200°C (175°F – 400°F) |
| Timer | Digital, up to 60 minutes with auto shut-off |
| Preset Programs | 7 presets: frozen fries, fresh fries, chicken, steak, fish, baking, and keep warm |
| Display | Digital touch screen with LED display |
| Rapid Air Technology | Yes, with starfish design for even heating |
| Fat Reduction | Up to 90% less fat compared to traditional deep fryers |
| Dishwasher Safe Parts | Yes, basket and pan are dishwasher safe |
| Cleaning | Non-stick coating, easy to clean with soft sponge |
| Safety Features | Auto shut-off, cool-touch handles, non-slip feet, overheat protection |
| Cord Length | 0.8 m (2.6 ft) |
| Warranty | 2 years |
| Accessories Included | Airfryer, basket, pan, recipe book |
Frequently Asked Questions - HD9747 PHILIPS
User questions about HD9747 PHILIPS
0 question about this device. Answer the ones you know or ask your own.
Ask a new question about this device
Download the instructions for your Deep fryer in PDF format for free! Find your manual HD9747 - PHILIPS and take your electronic device back in hand. On this page are published all the documents necessary for the use of your device. HD9747 by PHILIPS.
USER MANUAL HD9747 PHILIPS
User manual
TABLE OF CONTENTS
Important 3
Electromagnetic fields (EMF) 5
Introduction 6
General description 6
Before first use 8
Preparing for use 8
Placing the removable mesh bottom and fat reducer 8
Placing the EasyClick handle 9
Food table 10
Cooking table for presets 12
Using the appliance 12
Airfrying 12
Changing the cooking temperature during cooking 17
Changing the cooking time during cooking 18
Choosing the preset modes 18
Choosing the keep warm mode 19
Making home-made fries 20
Using the non-stick grill pan (HD9743 only) 21
Cleaning 21
Cleaning table 23
Storage 23
Recycling 24
Guarantee and support 24
Troubleshooting 24
Important
Read this important information carefully before you use the appliance and save it for future reference.
Danger
- Always put the ingredients to be fried in the basket, to prevent them from coming into contact with the heating elements. - Do not cover the air inlet and the air outlet openings while the appliance is operating. - Do not fill the pan with oil as this may cause a fire hazard. - Never immerse the appliance in water or any other liquid, nor rinse it under the tap.
Warning
-Check if the voltage indicated on the appliance corresponds to the local mains voltage before you connect the appliance. -Do not use the appliance if the plug, the mains cord or the appliance itself is damaged. -If the mains cord is damaged, you must have it replaced by Philips, a service center authorized by Philips or similarly qualified persons in order to avoid a hazard. -This appliance can be used by children aged from 8 years and above and persons with reduced physical, sensory or mental capabilities or lack of experience and knowledge if they have been given supervision or instruction concerning use of the appliance in a safe way and understand the hazards involved. Children shall not play with the appliance. Cleaning and user maintenance shall not be made by children unless they are older than 8 years and supervised. -Keep the appliance and its cord out of reach of children less than 8 years. -Keep the mains cord away from hot surfaces.

-Only connect the appliance to an earthed wall socket. Always make sure that the plug is inserted into the wall socket properly.
-Always place and use the appliance on a dry, stable, level and horizontal surface.
-This appliance is not intended to be operated by means of an external timer or a separate remote-control system.
-Do not place the appliance against a wall or against other appliances. Leave at least 10cm free space on the back and sides and 10cm free space above the appliance. Do not place anything on top of the appliance.
-Do not use the appliance for any other purpose than described in the user manual.
-During hot air frying, hot steam is released through the air outlet openings. Keep your hands and face at a safe distance from the steam and from the air outlet openings. Also be careful of hot steam and air when you remove the pan from the appliance.
-The accessible surfaces may become hot during use.
-Make sure before each use of the device that the heater and heater surrounding are clean and clear from any food remainders in order to ensure a flawless function.
-Do not place the appliance on or near a hot gas stove or all kinds of electric stove and electric cooking plates, or in a heated oven.
-The pan, basket and accessories inside the Air fryer become hot during use. Be careful when you handle them.
Caution
-This appliance is intended for normal household use only. It is not intended for use in environments such as staff kitchens of shops, offices, farms or other work environments. Nor is it intended to be used by clients in hotels, motels, bed and breakfasts and other residential environments.
-Always return the appliance to a service centre authorised by Philips for examination or repair. Do not attempt to repair the appliance yourself, otherwise the guarantee becomes invalid.
-This appliance is designed to be used at ambient temperatures between 5°C and 40°C.
-Always unplug the appliance after use.
-Let the appliance cool down for approximately 30 minutes before you handle or clean it.
-Do not overfill the basket. Only fill the basket to the MAX indication.
-Make sure the ingredients prepared in this appliance come out golden-yellow instead of dark or brown. Remove burnt remnants. Do not fry fresh potatoes at a temperature above 180°C (to minimise the production of acrylamide).
-Be careful when cleaning the upper area of the cooking chamber: Hot heating element, edge of Metal parts.
-Do not use the appliance for any other purpose than described in the user manual and use only original accessories.
Electromagnetic fields (EMF)
This Philips appliance complies with all applicable standards and regulations regarding electromagnetic fields.
Introduction
Congratulations on your purchase and welcome to Philips! To fully benefit from the support that Philips offers, register your product at www.philips.com/welcome.
General description
1 Control Panel
A. Temperature button B. Temperature indication C. Time indication D. Timer button E. Power On/Off button F. Keep warm button G. Keep warm indication H. Presets: frozen French fries, chicken drumstick, fish, chop/cutlet I. Preset button
2 Air inlet
3 QuickControl dial
4 Pan
5 Basket release button
6 EasyClick handle
7 Air outlets
8 Cord storage wrap
9 Mains cord
10 Fat reducer
11 Removable mesh bottom
12 Basket
13 MAX indication
14 Non-stick grill pan (HD9743 only)

Before first use
1 Remove all packing material. 2 Remove any stickers or labels from the appliance. 3 Thoroughly clean the appliance before first use, as indicated in the cleaning table.
Preparing for use
Placing the removable mesh bottom and fat reducer

1 Remove the pan from the appliance.

2 Put the pan with the basket on a suitable surface, press the basket release button and lift the basket out of the pan.

3 Insert the hook of the mesh bottom into the slot on the right bottom side of the basket. Push the mesh bottom down until it locks into position ('click' on both sides).

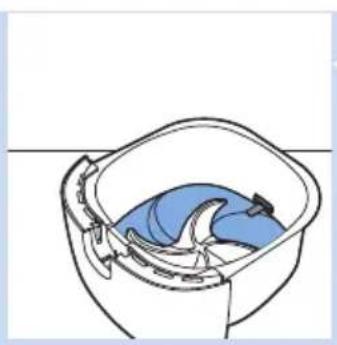
4 Place the fat reducer into the pan.

Note
- When placed in the pan, make sure the fat reducer is underneath the metal support for the basket.
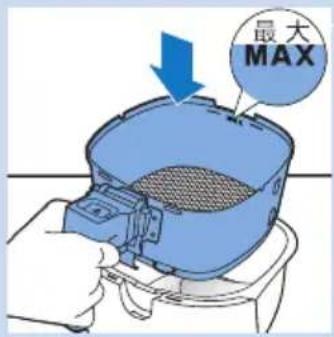
5 Put the basket back into the pan.

6 Slide the pan back into the appliance.

Note
- Never use the pan without the basket in it.
Placing the EasyClick handle

Warning
• Always make sure the basket and the handle have cooled down before you attach or detach the EasyClick handle.

Note
- The EasyClick handle also fits to the non-stick grill pan. It helps you clean and store the appliance in an easy way.
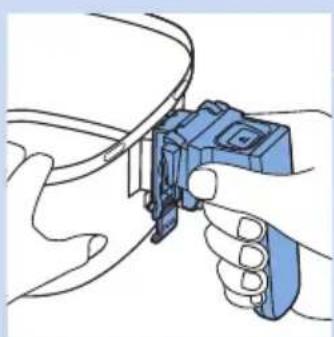
To attach the EasyClick handle:
1 Hold the basket with one hand and hold the handle with the other hand.


2 Slide the handle into the opening on the basket from below until it locks into place ('click').
To detach the EasyClick handle:
1 Hold the basket with one hand and hold the handle with the other hand.
2 Pull gently with your finger on the red release tab while pulling the handle straight down.
Food table
The table below helps you select the basic settings for the types of food you want to prepare.

Note
- Keep in mind that these settings are suggestions. As ingredients differ in origin, size, shape as well as brand, we cannot guarantee the best setting for your ingredients.
| Ingredients | Min.- max. amount (grams) | Time (minutes) | Temperature (°C) | Shake/ Turn | Additional information |
| Frozen fries 200-800 11-23 180 | Shake halfway | ||||
| Home-made fries (1 x 1 cm / 1/2 x 1/2 in thick) | 200-800 13-26 180 | Shake halfway | Soak 30 min. in water, dry then add 1/2 tbsp of oil. | ||
| Potato wedges 200-800 16-30 180 | Shake halfway | Soak 30 min. in water, dry then add 1/2 tbsp of oil. | |||
| Frozen snacks (e.g. spring rolls, chicken nuggets) | 100-400 8-12 200 | Turn or shake halfway | For the cooking times, refer to the instructions on the packaging of the snack. Time compared to oven should be halved. | ||
| Chops 100-500 11-18 200 | |||||
| Hamburger 100-500 10-15 160 | |||||
| Sausages | 100-500 9-15 160 | ||||
| Drumsticks | 100-500 15-22 180 | ||||
| Chicken breast | 100-500 12-18 180 | ||||
| Quiche 300 | 20-25 160 | Use a baking tray or oven dish. | |||
| Muffins | 80-300 8-13 180 | Use heat-proof silicone muffin cups. | |||
| Cake | 200-400 15-25 160 | Use a baking pan. | |||
| Mixed veggies | 100-500 10-14 180 | ||||
| Pre-baked bread/rolls | 50-200 3-8 200 | ||||
| Fresh bread/ rolls | 100-500 15-30 180 | ||||
| Fish | 150-400 10-18 200 | ||||
| Shellfish 100-400 7-15 180 | |||||
| Breaded schnitzel | 100-300 9-17 180 | Add oil to the breadcrumbs. |
Cooking table for presets
The grams in bold represent the amount of food for which the preset is designed for. If you cook with a different amount, adapt the cooking time accordingly. You can also adapt the cooking time according to your personal preference in regards to doneness and browning level.
The minutes in bold represent the preset cooking time on the appliance.
| g min °C | ||||
| Frozen fries |  | 150 | 11 | 180 |
| 400 | 18 | |||
| 600 | 23 | |||
| Chicken drumsticks |  | 300 | 17 | 180 |
| 450 | 20 | |||
| 600 | 23 | |||
| 750 | 26 | |||
| Fish |  | 200 | 13 | 200 |
| 400 | 16 | |||
| 600 | 19 | |||
| 800 | 22 | |||
| Meat (around 2.5 cm thick) |  | 100 | 11 | 200 |
| 250 | 14 | |||
| 500 | 18 | |||
Using the appliance
Airfrying


Caution
- This is an Airfryer that works on hot air. Do not fill the pan with oil or frying fat.
- Do not touch hot surfaces. Use handles or knobs. Only hold the pan by the basket handle. • This product is for household use only. •The appliance may produce some smoke when you use it for the first time. This is normal.
- Preheating of the appliance is not necessary.
1 Place the appliance on a stable, horizontal, level and heat-resistant surface.

Note
- Do not put anything on top or on the sides of the appliance. This could disrupt the airflow and influence the frying result.

Caution
- Do not place the appliance on non-heat-resistant surfaces.
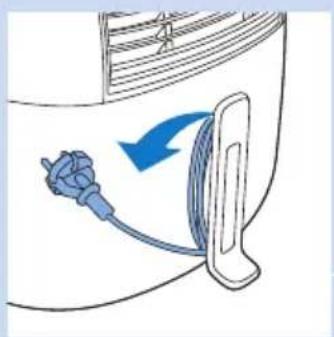
2 Unwind the power cord from the cord storage wrap.
3 Put the plug in the wall outlet.
4 Remove the pan from the appliance.
5 Put the ingredients in the basket.

Note
- The Airfryer can prepare a large range of ingredients. Consult the 'Food table' for the right quantities and approximate cooking times.
- Do not exceed the amount indicated in the 'Food table' section or overfill the basket beyond the 'MAX' indication as this could affect the quality of the end result.
- If you want to prepare different ingredients at the same time, make sure you check the suggested cooking time required for the different ingredients before you start to cook them simultaneously. Home-made fries and drumsticks, for example, can be cooked simultaneously because they require the same settings.


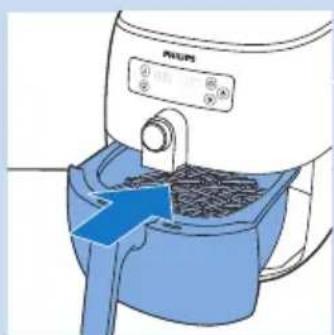
6 Slide the pan back into the appliance.


Caution
- Never use the pan without the basket in it. If you heat up the appliance without basket, use oven gloves to open the pan. The edges and inside of the pan become very hot.
- Do not touch the pan, fat reducer or basket during and for some time after use, as they get very hot.
7 Press the "Power On/Off" button to switch on the appliance.
8 The temperature indication blinks and is set to 180°C by default.
→To change the temperature, turn the QuickControl dial.
→To confirm the temperature, push the QuickControl dial.


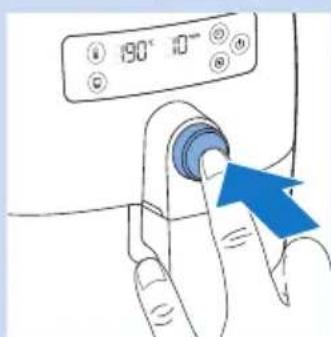

9 After the temperature is confirmed, the time indication “- -” starts blinking.
→To change the cooking time, turn the QuickControl dial.
To confirm the cooking time, push the QuickControl dial.
10 The appliance starts cooking after the cooking time has been confirmed.

Tip
• To pause the cooking process, push the QuickControl dial. To resume the cooking process, push the QuickControl dial again.

Note
- Some ingredients require shaking or turning halfway through the cooking time (see 'Food table'). To shake the ingredients, remove the pan from the appliance and shake it over the sink. Then slide the pan back into the appliance. To reduce the weight, you can also remove the basket from the pan.
- Be careful not to press the basket release button while shaking.
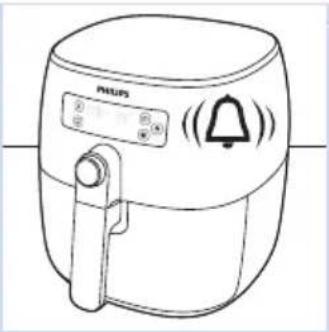
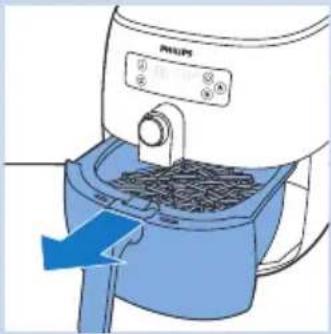

11 When you hear the timer bell, the set cooking time has elapsed.

Note
- If you cook several batches of fatty ingredients (e.g. drumsticks, sausages or hamburgers), excess oil or rendered fat may accumulate in the pan below the fat reducer. Pour off the oil/fat after each batch and when you notice oil/fat flows over the fat reducer.
12 Remove the pan from the appliance and place it on a heat-resistant surface.

Note
- If the ingredients are not ready yet, simply put the pan back into the appliance and set the timer for a few extra minutes.

Caution
• After the cooking process, the pan, the fat reducer, the basket, interior housing and the ingredients are hot. Depending on the type of ingredients in the Airfryer, steam may escape from the pan.
13 Press the basket release button and lift the basket out of the pan.
14 Empty the basket contents into a bowl or onto a plate. Always remove the basket with ingredients from the pan to serve, as hot oil or rendered fat may be in the bottom of the pan.

Tip
- To remove large or fragile ingredients, use a pair of tongs to lift the ingredients out of the basket.

Note
- Excess oil or rendered fat from the ingredients is collected on the bottom of the pan below the fat reducer. - Depending on the type of ingredients cooking, you may want to carefully pour off any excess oil or rendered fat from the pan after each batch or before shaking or replacing the basket in the pan. Place the basket on a heat-resistant surface. Wearing oven-safe gloves, lift the pan off tracks and place on heat-resistant surface. Carefully remove the fat separator from the pan using rubber tipped tongs. Pour off excess oil or rendered fat. Return the fat separator to the pan, the pan to the drawer, and the basket to the pan.
When a batch of ingredients is ready, the Airfryer is instantly ready for preparing another batch.
Changing the cooking temperature during cooking

1 During cooking, press the temperature button.

→To change the cooking temperature, turn the QuickControl dial.

→To confirm the cooking temperature or time, push the QuickControl dial.
Changing the cooking time during cooking

1 During cooking, press the timer button.

→To change the cooking time, turn the QuickControl dial.

→To confirm the cooking time, push the QuickControl dial.
Choosing the preset modes

1. After the appliance is switched on, press the preset button.
→ The preset indication for frozen French fries starts blinking.
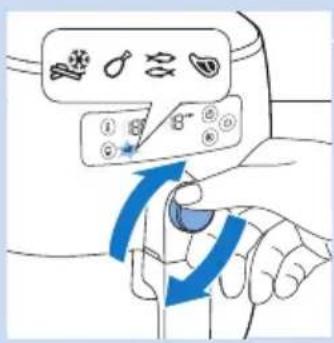
2. Turn the QuickControl dial to select the preset you need.


3. Push the QuickControl dial to confirm the preset.
→ The cooking temperature displays on the screen and the recommended cooking time blinks.
→ To change the cooking time, turn the QuickControl dial.

Note
- Changing the temperature is not possible when using a preset mode. If you press the temperature button when selecting the preset mode, the appliance will exit the preset mode.
4. Push the QuickControl dial again to confirm the cooking time, and the appliance starts cooking.

Tip
- Refer to the “Cooking table for presets” to find the suitable cooking time and more information.
Choosing the keep warm mode
1. Press the keep warm button (you can activate the keep warm mode at any time).
→ The keep warm indication goes on. → The keep warm timer is set to 30 minutes. You cannot adjust the keep warm time. To cease the keep warm mode, simply switch off the appliance.

Tip
- If food like French fries loses too much crispness during the keep warm mode, please either shorten the keep warm time by switching off the appliance earlier or crisp them up for 2-3 minutes at the temperature of 180°C.

Note
- If you activate the keep warm mode during cooking, the appliance will keep your food warm for 30 minutes after the cooking time has elapsed.
- During the keep warm mode, the fan and heater inside of the appliance is on from time to time.
- The keep warm mode is designed to keep your dish warm immediately after it is cooked in the Airfryer. It is not meant for reheating.
Making home-made fries
To make great home-made fries in the Airfryer:
- Choose a potato variety suitable for making fries, e.g. fresh, slightly floury potatoes.
- It is best to air fry the fries in portions of up to 500 grams for an even result. Larger fries tend to be less crispy than smaller fries.
- Shake the basket 2-3 times during the air frying process.
1 Peel the potatoes and cut into sticks (1 x 1 cm / 1/2 x 1/2 in thick). 2 Soak the potato sticks in a bowl of water for at least 30 minutes. 3 Empty the bowl and dry the potato sticks with a dish towel or paper towel. 4 Pour a half tablespoon of cooking oil in the bowl, put the sticks in the bowl and mix until the sticks are coated with oil. 5 Remove the sticks from the bowl with your fingers or a slotted kitchen utensil so excess oil remains in the bowl.

Note
- Do not tilt the bowl to pour all the sticks in the basket at once to prevent excess oil from going into the pan.
6 Put the sticks in the basket.
7 Fry the potato sticks and shake the basket halfway through the air frying process. Shake 2-3 times if you prepare more than 400g of fries.
6 Put the sticks in the basket. 7 Fry the potato sticks and shake the basket halfway through the air frying process. Shake 2-3 times if you prepare more than 400g of fries.

Note
- Consult the “Food table” for the right quantities and cooking times.
Using the non-stick grill pan (HD9743 only)

1 Follow steps 1 to 3 of section 'Airfrying'.
2 Press the basket release button and lift the basket out of the pan.
3 Attach the EasyClick handle to the non-stick grill pan (see 'Placing the EasyClick handle').

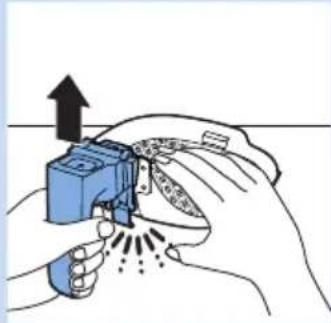

4 Place the non-stick grill pan in the pan. 5 Put the ingredients on the non-stick grill pan. 6 Follow steps 6 to 13 of section 'Airfrying'.
Cleaning

Warning
- Let the basket, pan, fat reducer and the inside of the appliance cool down completely before you start cleaning.
- Do not remove using your fingers as hot fat or oil collects under the fat reducer.
- The pan, basket, fat reducer and inside of the appliance have a non-stick coating. Do not use metal kitchen utensils or abrasive cleaning materials as this may damage the non-stick coating.


Clean the appliance after every use. Remove oil and fat from the bottom of the pan after every use.
1 Press the On/Off button to switch off the appliance, remove the plug from the wall outlet and let the appliance cool down for 10 minutes.

Tip
- Remove the pan and the basket to let the Airfryer cool down more quickly.
2 Remove the fat reducer from the pan using rubber tipped tongs. Dispose of rendered fat or oil from the bottom of the pan.
3 Clean the pan, basket, fat reducer and other accessories in a dishwasher. You can also clean them with hot water, dishwashing liquid and a non-abrasive sponge.

Tip
- If food residues are stuck to the pan, basket, fat reducer or other accessories, you can soak them in hot water and dishwashing liquid for 10-15 minutes. Soaking loosens the food residues and makes it easier to remove. Make sure you use a dishwashing liquid that can dissolve oil and grease. If there are grease stains on the pan, basket or fat reducer, and you have not been able to remove them with hot water and dishwashing liquid, use a liquid degreaser.
- If necessary, food residues stuck to the heating element can be removed with a soft to medium bristle brush. Do not use a steel wire brush or a hard bristle brush, as this might damage the coating on the heating element.
4 Wipe the outside of the appliance and the control panel only with a moist cloth.

5 Clean the heating element with a cleaning brush to remove any food residue. 6 Clean the inside of the appliance with hot water and a non-abrasive sponge.
Cleaning table
 |  |  | |
 | √ | √ | × |
 |  |  |  |
 |  |  |  |
 |  |  |  |
Storage
1 Unplug the appliance and let it cool down. 2 Make sure all parts are clean and dry before storing. 3 Wrap the power cord onto the cord storage wrap.

Note
- Always hold the Airfryer horizontally when you carry it. Make sure that you also hold the drawer on the front part of the appliance as it can slide out of the appliance if accidentally tilted downwards. This can lead to damaging of the drawer.
- Always make sure that the removable parts of the Airfryer e.g. EasyClick handle, removable mesh bottom, etc. are fixed before you carry and/or store it.
Recycling

- This symbol means that this product shall not be disposed of with normal household waste (2012/19/EU).
- Follow your country's rules for the separate collection of electrical and electronic products. Correct disposal helps prevent negative consequences for the environment and human health.
Guarantee and support
If you need information or support, please visit www.philips.com/support or read the separate worldwide guarantee leaflet.
Troubleshooting
This chapter summarizes the most common problems you could encounter with the appliance. If you are unable to solve the problem with the information below, visit www.philips.com/support for a list of frequently asked questions or contact the Consumer Care Center in your country.
Problem Possible cause Solution
| The outside of the appliance becomes hot during use. | The outside of the appliance becomes hot because the heat inside radiates to the outside walls. | This is normal. All handles, knobs and buttons that you need to touch during use stay cool enough to touch. |
| The pan, basket, fat reducer, non-stick grill pan and the inside of the appliance always become hot when the appliance is switched on to ensure the food is properly cooked. These parts are always too hot to touch. | ||
If you leave the appliance switched on for a longer time, some areas get too hot to touch. These areas are marked on the appliance with the following icon: As long as you are aware of the hot areas and avoid touching them, the appliance is completely safe to use. As long as you are aware of the hot areas and avoid touching them, the appliance is completely safe to use. | ||
| Problem Possible cause Solution | ||
| My home-made fries do not turn out as I expected. | You did not use the right potato type. | To get the best results, use fresh, slightly floury potatoes. If you need to store the potatoes, do not store them in a cold environment like in a fridge. Choose potatoes whose package states that they are suitable for frying. |
| The amount of ingredients in the basket is too big. | Follow the instructions in this user manual to prepare home-made fries (see ‘Food table’ or download the free Airfryer App). | |
| Certain types of ingredients need to be shaken halfway through the cooking time. | Follow the instructions in this user manual to prepare home-made fries (see ‘Food table’ or download the free Airfryer App). | |
| The Airfryer does not switch on. | The appliance is not plugged in. | When you switch on the appliance, the temperature indication starts blinking on the display. If you do not see anything on the display, check if the plug is inserted in the wall outlet properly. |
| Several appliances are connected to one outlet. | The Airfryer has a high wattage. Try a different outlet and check the fuses. | |
| I see some peeling off spots inside my Airfryer. | Some small spots can appear inside the pan of the Airfryer due to the incidental touching or scratching of the coating (e.g. during cleaning with harsh cleaning tools and/or while inserting the basket). | You can prevent damage by lowering the basket into the pan properly. If you insert the basket at an angle, its side may knock against the wall of the pan, causing small pieces of coating to chip off. If this occurs, please be informed that this is not harmful as all materials used are food-safe. |
| White smoke comes out of the appliance. | You are cooking fatty ingredients and the fat reducer is not put in the pan. | Carefully pour off any excess oil or fat from the pan, place the fat reducer in the pan and then continue cooking. |
| The pan still contains greasy residues from previous use. | White smoke is caused by greasy residues heating up in the pan. Always clean the pan and basket thoroughly after every use. | |
| Marinade, liquid or meat juices are splattering in the rendered fat or grease. | Pat food dry before placing it in the basket. | |
| Breading or coating did not adhere properly to the food. | Tiny pieces of airborne breading can cause white smoke. Firmly press breading or coating to food to ensure it sticks. | |
My display shows 5 dashes as illustrated in the picture below. | Safety feature has been activated due to overheating of the appliance. | Unplug the appliance and let it cool down for 1 minute before plugging in again. |


- TABLE OF CONTENTS
- IMPORTANT
- INTRODUCTION
- GENERAL DESCRIPTION
- BEFORE FIRST USE
- PREPARING FOR USE
- USING THE APPLIANCE
- MAKING HOME-MADE FRIES
- USING THE NON-STICK GRILL PAN (HD9743 ONLY)
- CLEANING
- STORAGE
- RECYCLING
- GUARANTEE AND SUPPORT
- TROUBLESHOOTING
- DANGER
- WARNING
- CAUTION
- ELECTROMAGNETIC FIELDS (EMF)
- CONTROL PANEL
- PLACING THE REMOVABLE MESH BOTTOM AND FAT REDUCER
- NOTE
- PLACING THE EASYCLICK HANDLE
- TO ATTACH THE EASYCLICK HANDLE
- TO DETACH THE EASYCLICK HANDLE
- FOOD TABLE
- COOKING TABLE FOR PRESETS
- AIRFRYING
- TIP
- CHANGING THE COOKING TEMPERATURE DURING COOKING
- CHANGING THE COOKING TIME DURING COOKING
- CHOOSING THE PRESET MODES
- PUSH THE QUICKCONTROL DIAL TO CONFIRM THE PRESET
- PUSH THE QUICKCONTROL DIAL AGAIN TO CONFIRM THE COOKING TIME, AND THE APPLIANCE STARTS COOKING
- CHOOSING THE KEEP WARM MODE
- PRESS THE KEEP WARM BUTTON (YOU CAN ACTIVATE THE KEEP WARM MODE AT ANY TIME)
Brand : PHILIPS
Model : HD9747
Category : Deep fryer