
SL2100 - Telephone NEC - Free user manual and instructions
Find the device manual for free SL2100 NEC in PDF.


| Product Type | VoIP Desk Phone |
| Brand | NEC |
| Model | SL2100 |
| Dimensions (H x W x D) | Approximately 8.3 x 4.7 x 2.4 in (210 x 120 x 60 mm) |
| Weight | Approximately 1.5 lbs (0.68 kg) |
| Power Supply | Power over Ethernet (PoE) IEEE 802.3af or AC adapter (5V DC, 1A) |
| Display | 2.4-inch monochrome LCD with backlight |
| Key Features | Speakerphone, 4 programmable keys, headset jack, volume control, ringer tone selection |
| Network Interface | 1 x 10/100 Mbps Ethernet port |
| Audio Codec Support | G.711, G.729, G.722 |
| Number of Lines | Up to 4 lines (depending on system configuration) |
| Installation | Plug-and-play with NEC SL2100 system via Ethernet |
| Maintenance | Wipe with soft dry cloth; avoid liquids and abrasives |
| Safety Instructions | Use only supplied power adapter; do not expose to moisture; disconnect during storms |
| Spare Parts and Repairability | Replacement handset, handset cord, base, and power adapter available from NEC authorized dealers |
| Compliance | FCC, CE, RoHS |
Frequently Asked Questions - SL2100 NEC
User questions about SL2100 NEC
0 question about this device. Answer the ones you know or ask your own.
Ask a new question about this device
Download the instructions for your Telephone in PDF format for free! Find your manual SL2100 - NEC and take your electronic device back in hand. On this page are published all the documents necessary for the use of your device. SL2100 by NEC.
USER MANUAL SL2100 NEC
natural_image
Black ABC phone with keypad and cord, no visible text or symbols on device bodyPlease read this manual carefully before operating this product and save this manual for future use.
Before using Your Terminal...
Thank you for purchasing NEC SL2100 system.
Due to the flexibility built into the system, your Dialing Codes and Feature Capacities may differ from those in this guide. Check with your NEC Authorized Supplier / System Administrator and make a note of any differences.
Installing the Handset and LAN Cable

When installing the handset :
-
Make sure the handset cord is plugged into the handset jack on the telephone base.
-
The LAN cable routes through the channel on the telephone base or the telephone legs. (The LAN cable is customer provided.)
* Power Feeding: PoE (IEEE802.3af) Only
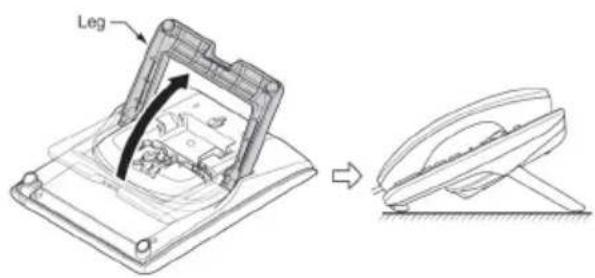
Adjust the two-position Viewing Angle
To set the low viewing angle position:
- Fold the legs all the way back.
To set the high viewing angle position:
- Flip up the two leg supports.
- Fold the legs back until the supports contact the base.

NEC Corporation reserves the right to change the specifications, functions, or features at any time without notice. NEC Corporation has prepared this document for use by its employees and customers. The information contained herein is the property of NEC Corporation and shall not be reproduced without prior written approval of NEC Corporation.
Copyright 2017, NEC Corporation
Using Your Terminal

* The illustration shows IP7WW-8IPLD-C1 TEL
** Up to "8" physical keys are available and it can be expanded up to 32 keys by changing the "DESI-Less Page" by pressing the Scroll Key.

Handsfree Options
- Handsfree lets you place and answer calls by pressing "Speaker" instead of using the handset.
- With Automatic Handsfree, you can press a Speaker Key without lifting the handset. Normally, you have Automatic Handsfree.
- Use Handsfree Answerback to answer a voice-announced Intercom call by speaking toward your phone without lifting the handset.
Using Your Terminal
**IP7[]-8IPLD-C1 Display
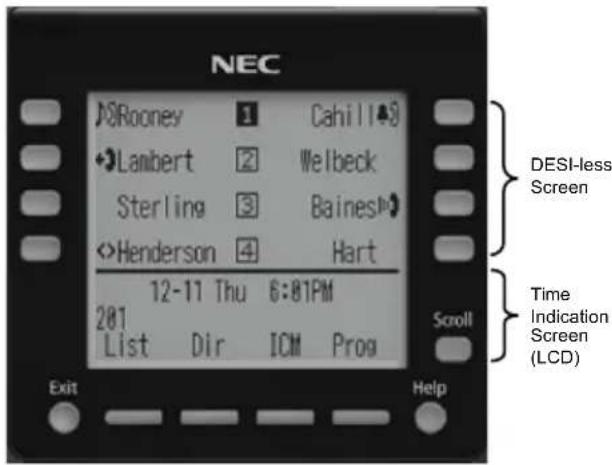
32 (8 keys x 4 pages) additional programmable keys are provided. They can be programmed as Flexible Line/Programmable feature key by Telephony Server Administrator. For the SL2100, the programmable keys can be set by WebPro/PCPro/Tel Pro and user can also set them.
Note: Maximum 11 characters (including icon) Maximum 13 Characters (including icon)
1) Icon
Status of the Line key such as Call Ringing, Call Hold or Busy, and setting on the Feature key are shown as Icons.
| User's Status Icon | Flashing Pattern | |
| Idle | No Icon | - |
| I-HOLD |  | Blink |
| Others Hold |  | Blink |
| Recall |  - - | Blink |
| Incoming Ringing |  | Blink |
| -During Conversation (Individual Use)-Call Transfer-Conference |  | |
| -During Conversation (Other Party Use)-Active Feature (Under a setting of feature key like a “Call Forwarding”) |  - - | |
| Others |  | Steady Lit |
| -Key is busy (example, if programmed as a virtual extension and the virtual extension is busy). |  | Steady Lit |
2) Feature Key Information
Feature Key Information displays the followings.
| Key | Description | Maximum digits to be displayed |
| Line Key | Name and Number Information | Refer to Note* |
| Feature Key | Feature Name | Refer to Note* |
| One-Touch Speed Dial Key | -Speed Dial Name Information-Number Information | Refer to Note* |
Note*: Maximum 11 characters (including icon) Maximum 13 characters (excluding icon)
3) LCD
LCD (Liquid Crystal Display) provides SL2100 activity information plus date, time and Softkey Operation.
The LCD on the IP7[]-8IPLD-C1 has a 28-character and 3-line capability.
| 1-10 TUE 9:43AM | |||
| 210 | Donald Fagen | ||
| List | Dir | ICM | Prog |
\*\*\*Menu Key
From the Menu Key, the user can use various application features.
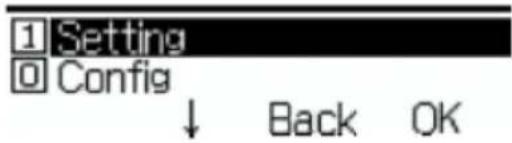
1) To Display Menu List
Press the Menu Key. The Menu List is displayed in LCD. Use Cursor Key to select desired Menu Items.
| No. | Menu Item | Description |
| 1 Setting | To set up the terminal such as ringing tones setting and download of Music on Hold...etc. | |
| 0 | Config | This item is used for Configuration setting of IP7WW-8IPLD-C1 terminal. |
2) Simple Operation by Menu Key and Cursor Key
By using Menu Key and Cursor Key, Terminal user can have access to terminal settings with simple operation. As an example, the following shows the operations how to access to Directory menu.
Ask your NEC Authorized Supplier for the details.
For Your Convenience
■ Programmable Function Keys
Programmable Function Keys can be assigned as "Trunk" Key and/or other Function Keys. You can just press the function key to activate the assigned function without dialing the Service Code.

flowchart
graph LR
    A["Speaker"] --> B["7 5 1\n7 5 2"]
    B --> C["Function Key"]
    C --> D["? ? ? ..."]
    D --> E["Speaker"]
- There are 2 levels of Function Keys. (General Keys : assigned by 751, Appearance Keys : assigned by 752)
- Appearance Keys have priority. You can overwrite the Appearance Key at the General Key.
- If you want to overwrite the General Key at the Appearance Key, you have to erase the Appearance Key by dialing "752 + 000" before General Key assignment.
- In the default setting, Programmable Function Key No. 1 to 12 is assigned as "Trunk" Key. If you want to assign Function Keys (General) at the unused Trunk Keys, these unused keys should be erased by "752 + 000" operation.
- Programmable Function Keys can be erased by dialing "752 + 000" or "751 + 00".
- Programmable Function Keys can be assigned by Soft Key operation as well.
Programmable Function Keys can be assigned as DSS (Direct Station Selection) or One-Touch Keys. You can place an Outside / Intercom Call by just pressing this key without dialing the number.

flowchart
graph TD
    A["Speaker"] --> B["7 5 1"]
    B --> C["Function Key"]
    C --> D["0 1"]
    D --> E["Trunk Access Code"]
    E --> F["9 / 0"]
    F --> G["Telephone Number"]
    G --> H["..."]
    H --> I["Extension Number"]
    I --> J["? ? ? ? ? ? ? ? ? ? ? ? ? ? ? ? ? ? ? ? ? ? ? ? ? ? ? ? ? ? ? ? ? ? ? ? ? ? ? ? ? ? ? ? ? ? ? ? ? ? ? ? ? ? ? ? ? ? ? ? ? ? ? ? ? ? ? ? ? ? ? ? ? ? ? ? ? ? ? ? ? ? ? ? ? ? ? ? ? ? ? ? ? ? ? ? ? ? ? ? ? ?<br>    "]
    D --> K["Hold"]
    K --> L["Speaker"]
• To change the Trunk Access Code, Ask your NEC Authorized Supplier for the details.
- In the default setting, Programmable Function Key No. 1 to 12 is assigned as "Trunk" Key. If you want to assign DSS Keys at the unused Trunk Keys, these unused keys should be erased by "752 + 000" operation before the above operation.
• In case of DSS Key, the extension status can be indicated on the BLF. (idle : extinguished, Busy : lit)
- When you register a telephone number, the Trunk Access Code should be added in front of the number.
- Up to 36 digits dialing can be registered, but the name can not be registered.
- If you want to continue the operation, press Programmable Function Key instead of Speaker Key to finish.
- One-Touch Keys can be assigned by Soft Key operation as well.
For Your Convenience
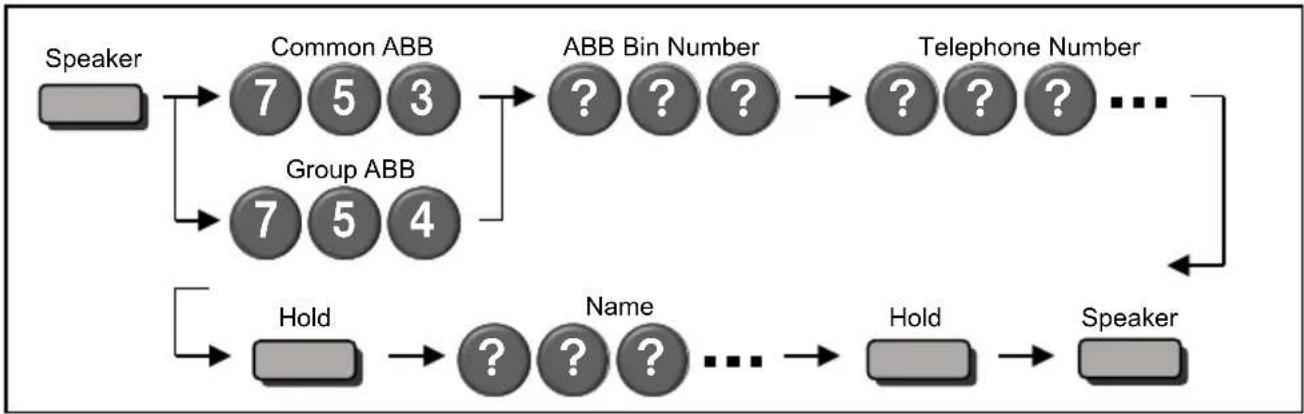
■ Abbreviated Dial (Speed Dial) Registration
flowchart
graph TD
    A["Speaker"] --> B["Common ABB 7 5 3"]
    A --> C["Group ABB 7 5 4"]
    B --> D["ABB Bin Number ? ? ?"]
    C --> D
    D --> E["Telephone Number ? ? ? ..."]
    E --> F["Speaker"]
    G["Hold"] --> H["? Name ... Hold"]
    H --> I["Speaker"]
- The digit of Bin No. depends on the system setting. (0-9
/ 00-99 / 000-999) - System setting is necessary for Group ABB function. Ask your NEC Authorized Supplier for the details.
- Name can be entered by Dial Pad Keys. (See below)
- Up to 36 digits dialing can be registered, and up to 12 characters can be registered as name.
- If you want to continue the operation, dial Bin No. instead of Speaker Key to finish.
- You can skip to enter the name. (No enter any character, then press "Hold" Key).
- You can erase the registered number & name by pressing "Exit" Key after dialing Bin No.
- Common Abbreviated Dial can be registered by Soft Key / Cursor Key operations as well.
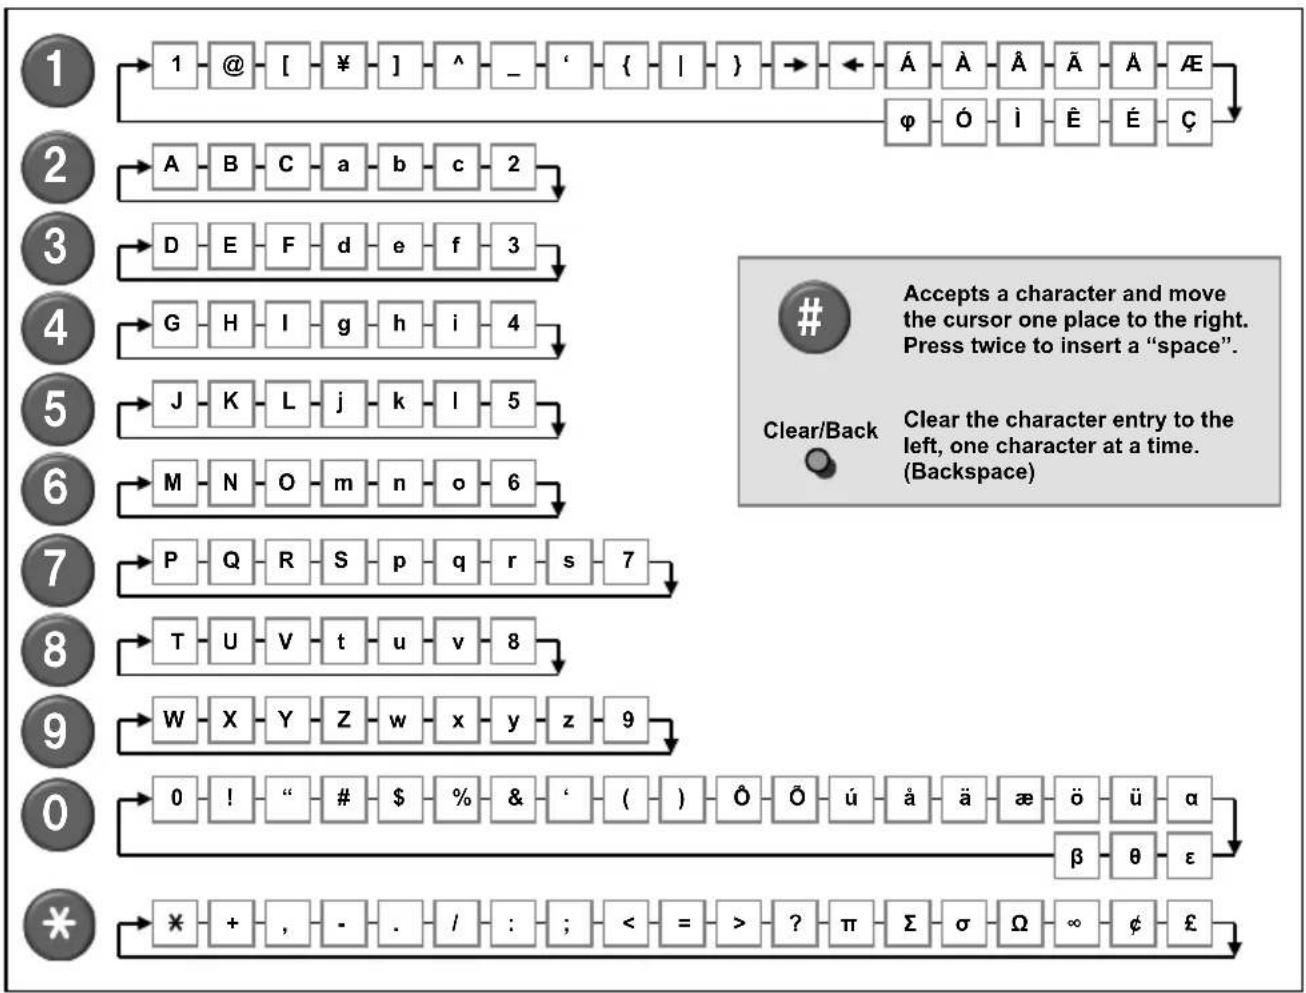
■ Entering Alphanumeric Characters
When you enter a name, use Dial Pad Keys to enter letters as below. For example, press "2" key once for "A", twice for "B", etc...
flowchart
graph TD
    A["1"] --> B["1 @ [¥"] ^ _ ' { | } → ← Á À Å Ä Å Æ]
    B --> C["φ Ó i Ê É Ç"]
    D["2"] --> E["A B C a b c 2"]
    E --> F["D E F d e f 3"]
    F --> G["G H I g h i 4"]
    G --> H["J K L j k l 5"]
    H --> I["M N O m n o 6"]
    I --> J["P Q R S p q r s 7"]
    J --> K["T U V t u v 8"]
    K --> L["W X Y Z w x y z 9"]
    L --> M["0 ! " # $ % & ' ( ) Ô Ô ú à ä æ õ ü α β θ ε"]
    M --> N["★ + , - . / : ; < = > ? π Σ σ Ω ∞ φ £"]
Placing Calls
■ Place an Outside Call

flowchart
graph LR
    A["Trunk Key"] --> B["Telephone Number"]
    B --> C["..."]
    C --> D["Output"]
- Listen to the Dial Tone before dialing a Telephone Number.
- You can have function keys for Trunks or Trunk Groups. Ask your NEC Authorized Supplier for the details.
■ Place an Outside Call

flowchart
graph TD
    A["Speaker"] --> B["Trunk Access Code 9 / 0"]
    B --> C["Terbone Number ? ? ? ..."]
    A --> D["Trunk Group No. 7 0 4 + ?"]
    A --> E["Trunk No. # 9 / # 0 + ? ? ?"]
    C --> F["Phone Signal"]
    F --> G["Output"]
(e.g.: 005 = Trunk No.5)
• To change the Trunk Access Code, Ask your NEC Authorized Supplier for the details.
- Listen to the Dial Tone before dialing a Telephone Number.
- In case the number of Trunk Group is more than 10, you should enter 2 digits (e.g. 11 : Group 11) after dialing "704". Ask your NEC Authorized Supplier for the details.
- For the dial digit of Trunk No., ask your NEC Authorized Supplier for the details.
■ Place an Intercom Call

flowchart
graph LR
    A["Speaker"] --> B["Extension Number"]
    B --> C["Output"]
- Your call will ring or voice-announce. If you hear ringing, wait for an answer. If you hear a beep, begin speaking. Dialing "1" changes voice/ring mode. (in case the destination is Multi-line Terminal)
Placing Calls Quickly
■ Directory Dialing

flowchart
graph LR
    A["On-Hook Condition"] --> B["Search 1/90<br>ABC Ltd"]
    B --> C["1st Character you want to search"]
    C --> D["Search 6/24<br>N NEC CORP"]
    D --> E["Press several times to search"]
- After searching the desired destination, press "Enter" Key to confirm the telephone number before lifting the handset, if necessary.
- You can enter more Characters (up to 12) to make desired destination's search even more specific.
- You can also search the desired destination without entering the Characters. (press Cursor Keys only)
- To cancel the Directory Dialing operation, press "Clear/Back" Key.
- Directory Dialing can be activated by Soft Key operation as well.
■ Last Number Dialing

flowchart
graph TD
    A["On-Hook Condition"] --> B["Dialed Number 01/10\n0312345678\nDEC TUE 22 03:29PM"]
    B --> C["Dialed Number 03/10\n0987654321\nDEC TUE 22 01:12PM"]
    C --> D["Press several times to search"]
    E["Quick Redial"] --> F["Speaker"]
    F --> G["# 5"]
    G --> H["Trunk Key"]
    H --> I["LINE 03\nLnd Save Rls"]
    I --> J["End"]
- The system retains the last 10 numbers dialed which can be reviewed and redialed.
- To cancel the Redial List operation, press "Clear/Back" Key.
■ Callback by Received Number

flowchart
graph LR
    A["On-Hook Condition"] --> B["Received Call 01/10\n03344455566\nDEC TUE 22 04:31PM"]
    B --> C["Received Call 03/10\n09988776655\nDEC TUE 22 11:38AM"]
    C --> D["Press several times to search"]
- Caller-ID function is required to use this operation for outside calls. Ask your NEC Authorized Supplier for more details.
- To cancel the Callback operation, press "Clear/Back" Key.
Placing Calls Quickly
■ Abbreviated (Speed) Dialing

flowchart
graph TD
    subgraph_Common_ABB["Common ABB"]
        A1["Speaker"] --> B1["# 2"]
        B1 --> C1["Common ABB Key (SC751+27)"]
        C1 --> D1["Common ABB Bin Number"]
        D1 --> E1["Phone"]
    end

    subgraph_Group_ABB["Group ABB"]
        A2["Speaker"] --> B2["# 4"]
        B2 --> C2["Group ABB Key (SC751+28)"]
        C2 --> D2["Group ABB Bin Number"]
        D2 --> E2["Phone"]
    end
• The digit of Bin No. depends on the system setting. (0-9
- Telephone Numbers shall be pre-registered to the system.
- System setting is necessary for Group ABB function. Ask your NEC Authorized Supplier for the details.
- When you assign the Common ABB Key on the Programmable Function Key, "Press HOLD" is required after dialing the Function Code 27.
flowchart
graph LR
    A["On-Hook Condition"] --> B["One-Touch / DSS Key (SC751+01)"]
    B --> C["End"]
- Telephone / Extension number should be pre-registered to a One-Touch / DSS Key.
- Trunk Access Code should be added in front of the Telephone number.
If your call doesn't go through...
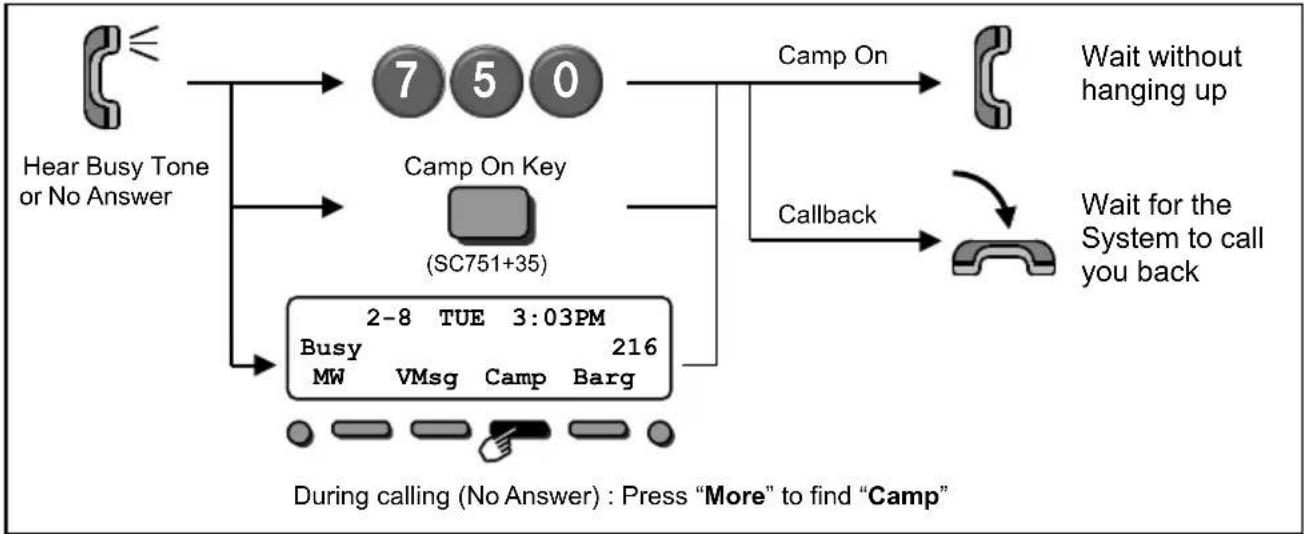
■ Set Camp On / Callback
flowchart
graph TD
    A["≤"] --> B["7 5 0"]
    B --> C["Camp On Key (SC751+35)"]
    C --> D["2-8 TUE 3:03PM"]
    D --> E["Busy MW VMsg Camp Barg"]
    F["Wait without hanging up"] --> G["Call Back"]
    G --> H["Wait for the System to call you back"]
    I["Hear Busy Tone or No Answer"] --> B
    J["During calling (No Answer) : Press "More" to find "Camp""]
- Camp On In case of Intercom Call, when you hear ringing, wait for the called party to answer. In case of Outside Call, when you hear Dial Tone, begin telephone number dialing.
- Callback In case of Intercom Call, when your terminal starts the ringing, lift handset and wait for the called party to answer. In case of Outside Call, when your terminal starts the ringing, lift handset, hear Dial Tone, and begin telephone number dialing.
- This function is applicable in case all trunks are busy condition. (not applicable for dialed outside party busy)
■ Cancel Camp On / Callback

flowchart
graph LR
    A["Device"] --> B["Cell"]
    B --> C["7 7 0"]
    C --> D["Cell"]
■ Repeat Dialing

flowchart
graph TD
    A["Hear Busy Tone or No Answer"] --> B["Repeat Dial Key (SC751+29)"]
    B --> C["Line 03 00:05 Park Trf More"]
    B --> D["Line 03 00:07 Conf Save Time More"]
    B --> E["Line 03 00:09 Rpt More"]
- When the Repeat Dialing is set, Repeat Dial Key shall flash and the system automatically and periodically redials a call. Repeat duration is programmable. Ask your NEC Authorized Supplier for the details.
- You should lift the handset when the called party answered.
- Press flashing Repeat Dial Key to cancel.
If your call doesn't go through...
■ Set a Message Waiting

flowchart
graph TD
    A["Phone"] --> B["MW Key (SC751+38)"]
    B --> C["Telephone"]
    D["Hear Busy Tone or No Answer"] --> B
    B --> E["2-8 TUE 3:03PM MW"]
    E --> B
- When you set a MW, the called party's Indicator starts to flash, and your Indicator is lit in Red.
■ Answer a Message Waiting (Your terminal's Indicator is flashing in Red)

flowchart
graph TD
    A["Check & Answer"] --> B["On-Hook Condition"]
    B --> C["Help"]
    C --> D["* 0"]
    D --> E["Mobile Phone"]
    F["Quick Answer"] --> G["Quick Answer"]
    G --> H["MW Key (SC751+38)"]
    H --> I["Next Step"]
- When you answer a MW, the Indicator shall automatically be off when the called party answers.
- If multiple message are in queue, you can select the desired party by pressing Up key after dialing “×, 0”, if several number of Message Waiting has been set.
■ Cancel Message Waiting

flowchart
graph LR
    A["Individual Cancel\n(Originated extension)"] --> B["7 7 1"]
    C["All Cancel\n(At any extension)"] --> D["7 7 3"]
    B --> E["? ? ?"]
    D --> F["? ? ?"]
    E --> G["Extension Number"]
    F --> G
Answering Calls
■ Answering an Outside Call

flowchart
graph LR
    A["Ringing Extension"] --> B["Speaker"]
    B --> C["Trunk Key (Flashing)"]
    C --> D["Non-Ringing Extension"]
    D --> E["Ringing"]
    E --> B
- Confirm the status of Mute Key if you want to answer by Handsfree. (Mute On: LED On, Mute Off: LED Off)
■ Answering an Intercom Call

flowchart
graph LR
    A["Signal Mode Extension"] --> B["Ringing"]
    B --> C["Speaker"]
    C --> D["Voice Mode Extension"]
    D --> E["Voice"]
    E --> F["Speak toward your terminal"]
- Intercom Call Mode (Signal or Voice) can be set at your terminal by :
"Signal": Speaker -> 723 "Voice": Speaker -> 721 - Confirm the status of Mute Key if you want to answer by Handsfree. (Mute On : LED On, Mute Off : LED Off)
■ Picking up a Call for other Extensions

flowchart
graph TD
    A["In same Group"] --> B["Speaker"]
    B --> C["Call Pickup Key (SC751+24)"]
    C --> D["Phone"]
    E["In other Group"] --> F["Speaker"]
    F --> G["Call Pickup for other Group Key (SC751+25)"]
    G --> H["Phone"]
    I["Specified Extension"] --> J["Speaker"]
    J --> K["Extension Number"]
    K --> L["Phone"]
- System setting is necessary to create a Call Pickup Group. Ask your NEC Authorized Supplier for the details.
- Call Pickup operations are available using Soft Key operation.
Hold / Transferring Calls
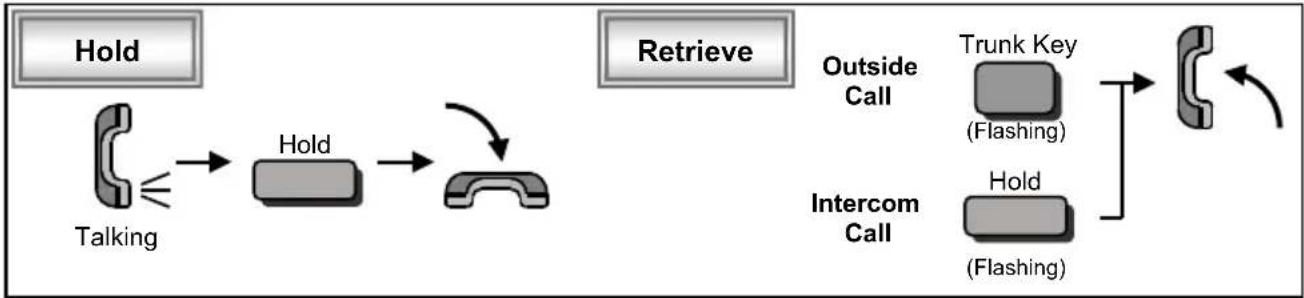
■ Holding a Call / Retrieving a Held Call
flowchart
graph LR
    A["Hold"] --> B["Talking"]
    B --> C["Hold"]
    C --> D["Retrieve"]
    D --> E["Trunk Key (Flashing)"]
    D --> F["Hold (Flashing)"]
    E --> G["Recycle to Phone"]
    F --> G
- In case of Intercom, the call shall be held as "Exclusive Hold" on your terminal.
- This operation puts your outside call on System Hold. Other extension user can take the call off Hold.
■ Holding a Call Exclusively

flowchart
graph LR
    A["Talking"] --> B["Exclusive Hold Key (SC751+45)"]
    B --> C["Retrieve"]
    C --> D["Trunk Key (Flashing)"]
    C --> E["Hold (Flashing)"]
    D --> F["Recycle to Trunk Key"]
    E --> F
- This operation puts your outside call on Exclusive Hold. Other extension user can not take the call off Hold.
■ Retrieve a Held Outside Call

flowchart
graph LR
    A["Speaker"] --> B["6"]
    B --> C["7"]
    C --> D["2"]
    D --> E["?"]
    E --> F["?"]
    F --> G["?"]
    G --> H["Trunk Number you want to retrieve"]
    H --> I["Car Icon with Arrow"]
- Ask your NEC Authorized Supplier for the details about your Trunk Number dialing digits.
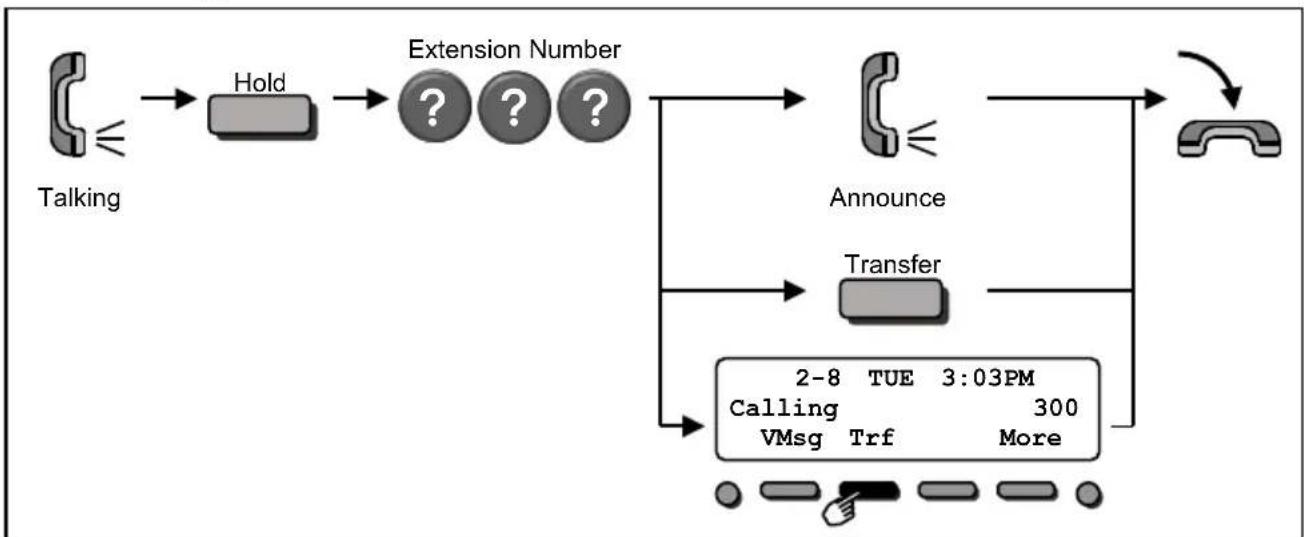
■ Transferring a Call to the other Extension
flowchart
graph TD
    A["Talking"] --> B["Hold"]
    B --> C["Extension Number"]
    C --> D["Announce"]
    D --> E["Transfer"]
    E --> F["2-8 TUE 3:03PM\nCalling 300\nVMsg Trf More"]
    F --> G["End"]
- If your terminal has DSS/One-Touch key, just press it instead of "HOLD" and "Extension Number" dialing.
For more Convenient Use...
■ Do Not Disturb (DND)

flowchart
graph LR
    A["On-Hook Condition"] --> B["DND"]
    B --> C1["1: DND : Trunk Incoming Call"]
    B --> C2["2: DND : Intercom Incoming Call"]
    B --> C3["3: DND : Trunk & Intercom Incoming Call"]
    B --> C4["4: DND : Transferred (CFW) Call"]
    B --> C5["0: DND : Cancel"]
- When you set DND function, DND Key shall be lit and the Internal Dial Tone pattern shall be changed.
■ Conference

flowchart
graph TD
    A["Talking"] --> B["2-8 TUE 3:03PM Conf"]
    B --> C["Extension Number"]
    C --> D["Trunk Key + Telephone Number"]
    D --> E["2-8 TUE 3:03PM Add Rls"]
    E --> F["Talking"]
    F --> G["Begin Dir CONF Start Conference"]
    G --> H["Start Conference"]
    style A fill:#f9f,stroke:#333
    style H fill:#ccf,stroke:#333
- You can repeat this operation to add more parties.
- You may be able to have up to 16 parties. (include your terminal) You may need to adjust the volume level due to the Environment where calls are placed. Ask your NEC Authorized Supplier for the details.
For more Convenient Use...
■ Call Forwarding / Follow Me
When you set Call Forward / Follow Me, the destination extension shall be displayed on the LCD, and the Internal Dial Tone pattern shall be changed. (Call Forward / Follow Me can be set by Soft Key as well)
Call Forward Immediate
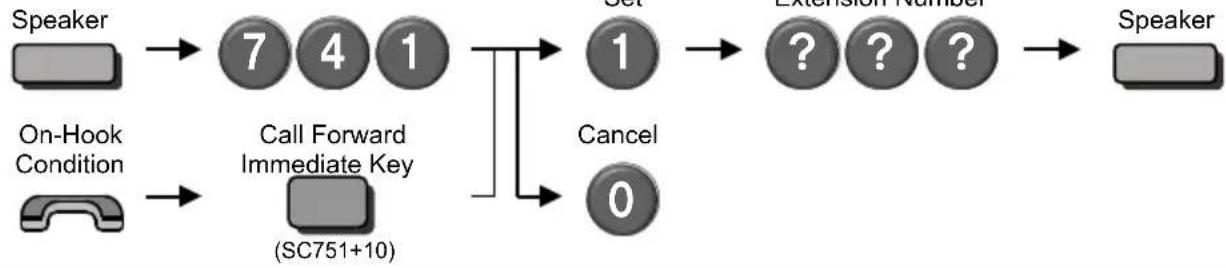
flowchart
graph LR
    A["Speaker"] --> B["7 4 1"]
    C["On-Hook Condition"] --> D["Call Forward Immediate Key (SC751+10)"]
    B --> E["1"]
    D --> F["0"]
    E --> G["Extension Number"]
    F --> G
    G --> H["Speaker"]
Call Forward when Busy

flowchart
graph LR
    A["Speaker"] --> B["7 4 2"]
    C["On-Hook Condition"] --> D["Call Forward when Busy Key (SC751+11)"]
    B --> E["1"]
    D --> F["0"]
    E --> G["Extension Number"]
    F --> G
    G --> H["Speaker"]
Call Forward when No Answer

flowchart
graph LR
    A["Speaker"] --> B["7 4 3"]
    C["On-Hook Condition"] --> D["(SC751+12)"]
    B --> E["Call Forward when No Answer Key"]
    D --> E
    E --> F["0"]
    F --> G["Cancel"]
    G --> H["1"]
    H --> I["Extension Number"]
    I --> J["Speaker"]
Call Forward when Busy / No Answer

flowchart
graph LR
    A["Speaker"] --> B["7 4 4"]
    C["On-Hook Condition"] --> D["(SC751+13)"]
    B --> E["Call Forward when Busy / No Ans. Key"]
    D --> E
    E --> F["1"]
    F --> G["OK"]
    G --> H["? ? ?"]
    H --> I["Speaker"]
    F --> J["Cancel"]
    J --> K["0"]
For more Convenient Use...
■ Call Forwarding / Follow Me (Cont'd)

flowchart
graph LR
    A["Speaker"] --> B["7 4 5"]
    C["On-Hook Condition"] --> D["Call Forward Both Ring Key (SC751+14)"]
    B --> E["Set 1"]
    D --> E
    E --> F["Extension Number"]
    F --> G["Speaker"]
    E --> H["Cancel 0"]

flowchart
graph LR
    A["Speaker"] --> B["7 4 6"]
    C["On-Hook Condition"] --> D["Call Forward Follow Me Key (SC751+15)"]
    B --> E["Set 1"]
    D --> E
    E --> F["Extension Number"]
    F --> G["Speaker"]
    E --> H["Cancel 0"]
Soft Keys Operation
■ "Menu" Soft Key
The following table shows the menu structure of "Menu" Soft Key. You can reach the desired feature by following operation.

flowchart
graph LR
    A["2-8 TUE 3:03PM\n200\nMenu Dir VM:00 CL:00"] --> B["Prev Next Select Exit"]
    B --> C["Prev Next Select Back"]
It is possible to search the desired feature by pressing Cursor the Keys (Up / Down / Right / Left) several times instead of "Prev" or "Next" Soft Keys, it's also possible to access the desired feature directly by dialing the 2 digit Menu Code after pressing the "Menu" Soft Key.
| Item | Menu Code | Next Operation after pressing the “Select” |
| 10 : Volume Preferences | 11 : Ring12 : Off-Hook Ring | Press “Down” or “Up” to adjust the selected option. |
| 20 : Display Preferences | 21 : Contrast22 : Minimum Brightness23 : Maximum Brightness | Press “Down” or “Up” to adjust the selected option. |
| 30 : Feature Preferences | 31 : Voice Announce32 : Handsfree Reply33 : Automatic Call Timer34 : Preview Dial35 : Illuminated Dialpad36 : Auto Call Screening37 : Incoming Page38 : Ringing Line Preference | For the selected option, press “On” (enable) or “Off” (disable). |
| 40 : Ring Preferences | 41 : Intercom42 : Line Keys43 : Each Line Keys | Press “<<” or “>>” to select and save option. |
| 50 : Key Assignments | 51 : Feature Keys52 : Primeline Key | Press “<<” or “>>” to select and save option. |
| 60 : Call Forwarding | 61 : Immediate62 : Ring No Ans63 : Busy No Ans64 : Call Forward AME65 : Display Message66 : Follow Me67 : Both Ring | Press “Set” or “Cancel”, enter the destination and select option to save. |
| 70 : Speed Dial | 71 : Personal Speed Dial72 : Company Speed Dial | Enter Bin number and Phone number, Name and save. |
| 80 : Name and Language | 81 : Extension Name82 : Display Language | For Name, enter the name using Alphanumeric Characters, For Language, press “<<” or “>>” to select and save. |
| 90 : Option Preferences | 91 : Headset Mode92 : Headset Voice Announce93 : System Information94 : VoIPDB Information95 : Not Used96 : IP Address Information97 : IP Phone log off98 : Change login password | For Headset option, press “On” (enable) or “Off” (disable).For System / VoIPDB information (IP Address, MAC Address), press “Select”. |
| 00 : Admin | 01 : Time02 : Date03 : Extension Name04 : Clear All Call Fwd05 : System Night Key Mode | For Time, Date and Extension Name, enter the Time, Date and Extension Number and Name to save. For Clear All Call Fwd, press “Yes”. |
Soft Keys Operation
■ "Dir" Soft Key
You can activate the Directory Dialing feature by pressing the "Dir" Soft Key.

flowchart
graph LR
A["200<br>Menu Dir VM:00 CL:00"] --> B["Search 1/90<br>ABC Ltd"]
C["Refer to Page 7<br>"Directory Dialing""] --> B
■ "VM" Soft Key
Number of new messages in your mailbox is displayed on the "VM" Soft Key; you can access your mailbox by pressing this key.

flowchart
graph TD
    A["200 Menu Dir VM:03 CL:00"] --> B["Press "More" to switch"]
    B --> C["Vmail - Mailbox:200 Msgs New: 3 Arch: 1 Lstn Greet LvMsg More>"]
    C --> D["Vmail - Mailbox:200 Msgs New: 3 Arch: 1 Setup Mgr RcNam More>"]
    D --> E["Vmail - Mailbox:200 Msgs New: 3 Arch: 1 Page List Exit More>"]
    style A fill:#f9f,stroke:#333
    style B fill:#ccf,stroke:#333
    style C fill:#cfc,stroke:#333
    style D fill:#fcc,stroke:#333
    style E fill:#cff,stroke:#333
| Soft Key Indication | Feature | Next Operation after pressing Soft Key |
| Lstn | Listen to Left Messages | Press “Next” to play next message, press “Rplay” to repeat played message, press “Del” to delete played message. Press “More” for other Mailbox features. |
| Greet | Mailbox Greeting Press one of “Gr1” / “Gr2” / “Gr3” to choose the desired personal greeting message, and press “Lstn” (Listen) / “Rec” (Record) / “Del” (Delete) to maintain it. | |
| LvMsg | Leave Message | Start message recording and press “Done” to complete it. Dial extension number you want to send this message and press “Send”. |
| Setup | Mailbox Option Menu | Press “Code” (Security Code) / “Notify” (Message Notification) / “CallH” (Call Handling Option) / “ATime” (Auto Time Stamp) to maintain each mailbox option. |
| RcNam | Name Menu | Press “Lstn” (Listen) / “Rec” (Record) / “Del” (Delete) to maintain the Mailbox Name. |
| Page | Page Message Menu | Press “Lstn” (Listen) / “Rec” (Record) / “Del” (Delete) to maintain the Paging Message. |
| List | Message List | Press “All” / “New” / “Arch” to set the message listen mode (message list) which you want to listen. |
| Exit | Exit VM Menu | --- |
Soft Keys Operation
■ "CL" Soft Key
Number of new unanswered calls is displayed on the "CL" Soft Key; you can access your Caller-ID List by pressing this key.

flowchart
graph TD
    A["2-8 TUE 3:03PM\nCheck List\nMenu Dir VM:00 CL:02"] --> B["↓"]
    B --> C["Total:05 New:02\nUnans:03 Ans:02\nAll Unan Del Exit"]
    C --> D["↓"]
    D --> E["01: 12349876\n2-6 13:19\nCall Store Del More"]
| Soft Key Indication | Feature | Next Operation after pressing Soft Key |
| All | All Incoming Calls List | See below |
| Unan | Unanswered Calls List | See below |
| Del | Delete List | Press “Yes” to delete all Caller-ID List. (or press “No” to cancel) |
| Exit | Exit from Summary | --- |
Press "More" to switch

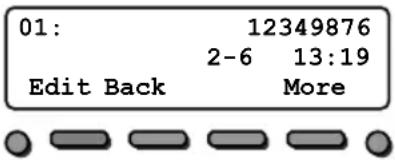
Press "VOL Up / Down" Keys to select the desired number.
| Soft Key Indication | Feature | Next Operation after pressing Soft Key |
| Call | Call to displayed number | Lift the handset to talk when the destination answered. |
| Store | Store displayed number | Press “STA” (Personal Speed Dial) or “Abb” (Common Abbreviated Dial), and dial Bin Number to store the displayed number with name. (Press Hold Key to save.) |
| Del | Delete displayed number | Next received Caller-ID shall be automatically displayed, and continue the Caller-ID Soft Key operation. |
| Edit | Edit displayed number | Press “<-” or “->” to change the cursor position, press “DEL” to delete a digit, and dial new digit. (Press Hold Key to save.) Press “CNCL” to cancel Edit Mode. |
| Back | Return to Summary | Continue the Caller-ID Soft Key operation. |
Soft Keys Operation
■ Soft Key Operations during Off-Hook condition
When you press the Speaker Key or lift the handset, you will see the following Soft Keys.

flowchart
graph LR
    A["2-8 TUE 3:03PM<br>Dir Page Pkup More"] -->|Press "More" to switch| B["2-8 TUE 3:03PM<br>VM:00 Barg Save More"]
| Soft Key Indication | Feature | Next Operation after pressing Soft Key |
| Dir | Directory Dialing | Refer to Page 7 for Directory Dialing operation. |
| Page | Paging | Press “InPg” (Internal Paging) or “ExPg” (External Paging), and dial the Group/Zone number to page. |
| Pkup | Call Pickup | Press “Pers” for Extension Call Pickup.Press “ExPg” for External Paging pickupPress “InPg” for Internal Paging pickup |
| VM:00 | Mailbox Access | Refer to Page 17 (VM Soft Key) |
| Barg | Barge-In | Dial the target extension number to barge in. |
| Save | Saved Number Dial | Saved number is dialed automatically. Wait for answer. |
■ Soft Key Operations during Intercom Calling
During Intercom calling (called party does not answer yet), you will see the following Soft Keys.

flowchart
graph LR
A["2-8 TUE 3:03PM<br>Calling 216<br>MW Voice Rls More"] --> B["Press "More" to switch"]
C["2-8 TUE 3:03PM<br>Calling 216<br>VMsg Camp More"] --> B
| Soft Key Indication | Feature | Next Operation after pressing Soft Key |
| MW | Message Waiting | Message Waiting is set. Hang up to finish. |
| Voice (Signal) | Intercom Call Mode Switching (Signal / Voice) | Signal -> Voice : Start to talk after beep tone.Voice -> Signal : Wait for called party answer.Press “Voice” (or “Signal”) again to switch Call Mode, if necessary. |
| RIs | Hang Up | --- |
| VMsg | Leave a Message (In-Mail) (Option) | Start recording your message. |
| Camp | Camp On / Callback | Camp OnWait for the system to call you back without hanging up.CallbackHang up and wait for the system to call you back. |
Soft Keys Operation
■ Soft Key Operations after establishing an Intercom Call
After establishing an Intercom call, you can use following feature by Soft Key.
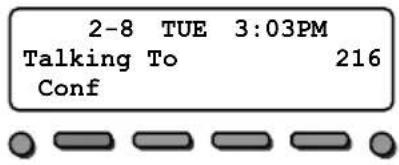
Refer to Page 13 "Conference"
| Soft Key Indication | Feature | Next Operation after pressing Soft Key |
| Conf | Conference | Dial the desired extension number, or seize an idle trunk and place a call to establish a conference. Press “Conf” to invite the other party, or press “Add” and “Begin” to start a conference. Press “AnHd” to retrieve a held call. |
■ Soft Key Operations during Outside Call
When you seize a trunk for outgoing call, or you answered an incoming call, you can use following features by Soft Key.
(When you seize a Trunk)
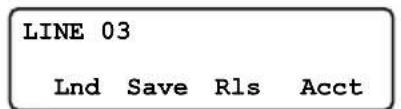

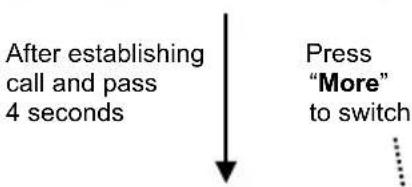
flowchart
graph TD
    A["After establishing call and pass 4 seconds"] --> B["Press "More" to switch"]
| Soft Key Indication | Feature | Next Operation after pressing Soft Key |
| Lnd | Last Number Dialing | Last dialed number is dialed automatically. Wait for answer. |
| Save | Saved Number Dialing | Saved number is dialed automatically. Wait for answer. |
| RIs | Hang Up | --- |
| Acct | Account Code Entry (Option) | Enter the Account Code. |

flowchart
graph LR
    A["LINE 03\nPark Trf More"] --> B["LINE 03\nConf Save Time More"]
    B --> C["LINE 03\nRpt More"]
| Soft Key Indication | Feature | Next Operation after pressing Soft Key |
| Lnd | Last Number Dialing | Last dialed number is dialed automatically. Wait for answer. |
| Park | Park Hold | Press “Sys” (System Park) or “StaP” (Extension Park) to select type of Park Hold. |
| Trf | Transfer | Dial the desired extension number, or seize an idle trunk and place a call to transfer. |
| Conf | Conference | Dial the desired extension number, or seize an idle trunk and place a call to establish a conference. Press “Add” to invite the other party, or press “Add” and “Begin” to start a conference. Press “AnHd” to retrieve a held call. |
| Save | Save dialed Number | --- |
| Time | Call Duration Time Indication | Press “Time” again to turn off the Call Duration Time indication. |
| Rpt | Repeat Dialing | Repeat Dialing feature is set, and the system automatically places a call periodically. Wait for answer. |
Cursor Keys Operation
■ Menu Structure when PRG15-02-60 is set to Advanced Mode 1
The following table shows the menu structure of the Cursor Keys. You can reach the desired menu by pressing Navigation Keys (Up / Down / Right / Left) or dial 3 digits for shortcut access after pressing the "Enter Key" to activate a menu.

flowchart
graph TD
    A["Main Menu"] --> B["100 : Call History"]
    B --> C["110 : Missed Call"]
    C --> D["111 - 11x : Missed Call Data"]
    B --> E["120 : Received Call"]
    E --> F["121 - 12x : Received Call Data"]
    B --> G["130 : Dialed Number"]
    G --> H["131 - 13x : Dialed Call Data"]
    B --> I["200 : Contacts"]
    I --> J["210 : Search Contact"]
    J --> K["211 - 21x : Name Started from A-Z"]
    I --> L["220 : New Contact"]
    L --> M["221 : Save Private Phone Book"]
    L --> N["222 : Save Common Phone Book"]
    L --> O["223 : Save Group Phone Book"]
    I --> P["230 : Edit Contact"]
    P --> Q["231 - 23x : Name Started from A-Z"]
    I --> R["400 : User Features"]
    R --> S["410 : Call Voice Mail"]
    S --> T["420 : Call Forward"]
    T --> U["421 : All Calls"]
    T --> V["422 : Both Ring"]
    T --> W["423 : Busy"]
    T --> X["424 : No Answer"]
    T --> Y["425 : Busy/No Answer"]
    T --> Z["426 : Follow Me"]
    R --> AA["430 : Paging"]
    AA --> AB["431 : Internal Zone"]
    AA --> AC["432 : External Zone"]
    R --> AD["440 : Dept.Grp login/out"]
    AD --> AE["441 : Join"]
    AD --> AF["442 : Withdraw"]
Cursor Keys Operation

flowchart
graph TD
    A["500 : Phone Setting"] --> B["510 : Not Used"]
    B --> C["520 : Display"]
    C --> D["530 : Ring Options"]
    D --> E["540 : Key Touch Tone"]
    E --> F["550 : Headset"]
    F --> G["560 : Key Assignment"]
    G --> H["610 : System Time"]
    H --> I["620 : System Date"]
    I --> J["630 : Manage Messages"]
    J --> K["810 : Phone"]
    K --> L["820 : System"]
    L --> M["830 : VoIPDB"]
    M --> N["840 : IP Address"]

    B --> O["521 : Contrast"]
    C --> P["522 : Minimum Brightness"]
    C --> Q["523 : Maximum Brightness"]
    D --> R["531 : Ringing/ Voice Call"]
    D --> S["532 : Ringing Volume"]
    D --> T["533 : Ring Tones"]
    F --> U["551 : Headset Ringing Volume"]
    G --> V["561 - 56x : Key 1 – Key 24"]

    H --> W["611 : Edit"]
    H --> X["612 : Save"]
    H --> Y["613 : Cancel"]
    I --> Z["621 : Edit"]
    I --> AA["622 : Save"]
    I --> AB["623 : Cancel"]
    J --> AC["631 : Record"]
    J --> AD["632 : Listen"]
    J --> AE["633 : Erase"]

    K --> AF["Port Information"]
    L --> AG["Main Software Version MAC Address Hardware Key Code"]
    M --> AH["VoIPDB TYPE MAC Address Active/Reserved"]
    N --> AI["IP Address Information System xxx.xxx.xxx.xxx VoIPDB xxx.xxx.xxx.xxx"]
Built-In Automated Attendant
System setting is necessary to use Built-In Automated Attendant. Ask your NEC Authorized Supplier for the details.
■ Record / Listen / Erase Answering Messages
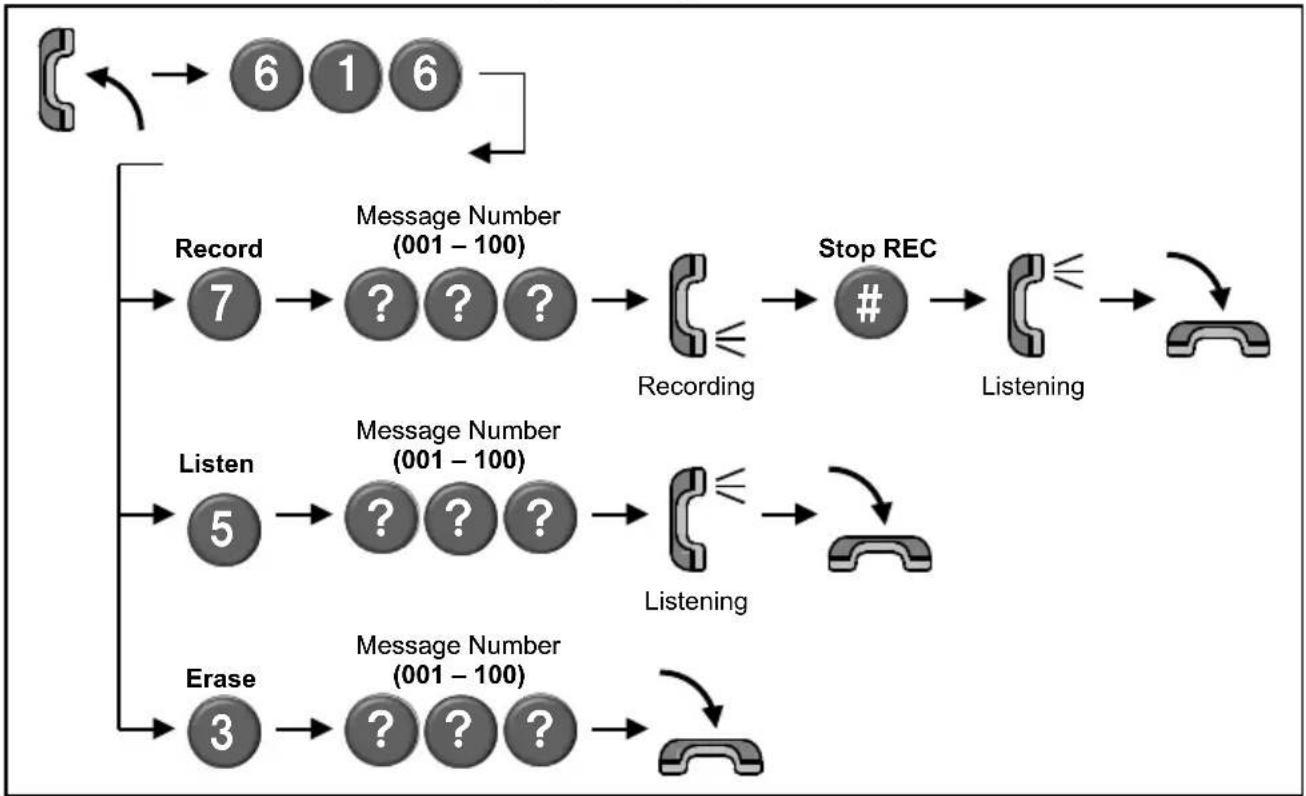
flowchart
graph TD
    A["Phone"] --> B["6 1 6"]
    B --> C["Record 7"]
    C --> D["Message Number (001 - 100)"]
    D --> E["Recording"]
    E --> F["#"]
    F --> G["Listening"]
    G --> H["Listen 5"]
    H --> I["Message Number (001 - 100)"]
    I --> J["Listening"]
    J --> K["Erase 3"]
    K --> L["Message Number (001 - 100)"]
    L --> M["Listen 3"]
    M --> N["Stop REC"]
    N --> O["Listening"]
    O --> P["Listen 2"]
    P --> Q["Stop REC"]
    Q --> R["Listen 1"]
    R --> S["Stop REC"]
    S --> T["Listen 0"]
- Up to 100 types of messages can be recorded.
• The Message length can not exceed 4 minutes.
In-Mail (Voice Mail)
Optional hardware and System setting is necessary to use In-Mail (Voice Mail) feature. Ask your NEC Authorized Supplier for the details.
■ Log-On to the In-Mail

flowchart
graph TD
    A["Speaker"] --> B["Voice Mail Pilot Number"]
    B --> C["Your Mailbox Number"]
    C --> D["Security Code (if it is set)"]
    D --> E["Main Menu"]

    F["Main Menu"] --> G["L 5 Listen to Messages"]
    G --> H["While listening you can: RE Record Reply 73 MM 66 Mark Message as new"]
    H --> I["Rease Msg 3"]
    I --> J["Pause/Resume Listening ✕"]
    G --> K["MF Have Msg Forwarded 63 L 5 Listen to Next Msg"]
    K --> L["1N Select New Message List"]
    G --> M["MC Make Call to Sender 62 B 2 Backup a Few Seconds"]
    M --> N["1S Select Saved Message List"]
    G --> O["TI Get Time, Date 84 BB 22 Backup to Beginning"]
    G --> P["SA S Ave Message 72 G 4 Go Ahead a Few Seconds"]
    P --> Q["1A Select All Message List"]
    P --> R["# # Exit Listen Mode"]

    S["RS Record & Send Message"] --> T["G Mailbox Greeting 4 Callers hear your active greeting (1-3) only if you do not answer or are busy. If Auto Attendant DND is ON, the Auto Attendant does not ring your phone. Callers immediately hear your active greeting. If OFF, the Auto Attendant will try your extension."]
    T --> U["RN Record Mailbox Name 76 In-Mail will play your mailbox name in the voice prompts instead of your mailbox number."]
    U --> V["PG PaGing Message"]
    V --> W["OP Mailbox Options"]
    W --> X["TI Time and Date"]
    X --> Y["1N Select New Message List"]
    X --> Z["1S Select Saved Message List"]
    X --> AA["1A Select All Message List"]
    X --> AB["X 9 EXit Mailbox"]

    AC["While recording you can: ✕ Pause/Resume ✕ E 3 Erase Recording"]
    AC --> AD["# # End Recording"]

    AE["Enter mailbox number, then: ✕ Reenter mailbox number ✕ # # Send Message"]

    AF["The mailbox options are: S 7 AT 28 Security Code"]
    AF --> AG["N 6 Message Notification"]
    AF --> AH["CO 26 Call Handling Option"]

    AI["Auto Time Stamp"] --> AJ["# #"]
    AK["Exit to Main Menu"] --> AL["AO 27 Auto Play Option"]

    AM["RS Record & Send Message"] --> AN["G Mailbox Greeting 4 Callers hear your active greeting (1-3) only if you do not answer or are busy. If Auto Attendant DND is ON, the Auto Attendant does not ring your phone. Callers immediately hear your active greeting. If OFF, the Auto Attendant will try your extension."]
In-Mail (Voice Mail)
■ Call Forward to Voice Mail
Convenient Operation by Function Key

Press "Automated Attendant" Key several times to change the status. (All Calls -> No Answer -> Busy -> Busy/No Answer -> Cancel)
Forward All Incoming Calls

flowchart
graph LR
    A["Speaker"] --> B["7 4 1"]
    C["On-Hook Condition"] --> D["Call Forward Immediate Key (SC751+10)"]
    B --> E["Set 1"]
    D --> E
    E --> F["Voice Mail Pilot Number"]
    F --> G["Speaker"]
    E --> H["Cancel 0"]
Forward Incoming Call when Busy

flowchart
graph LR
    A["Speaker"] --> B["7 4 2"]
    C["On-Hook Condition"] --> D["Call Forward when Busy Key (SC751+11)"]
    B --> E["Set 1"]
    D --> E
    E --> F["Voice Mail Pilot Number"]
    F --> G["Speaker"]
    E --> H["Cancel 0"]
Forward Incoming Call when No Answer

flowchart
graph LR
    A["Speaker"] --> B["7 4 3"]
    C["On-Hook Condition"] --> D["(SC751+12)"]
    B --> E["Call Forward when No Answer Key"]
    D --> E
    E --> F["Set 1"]
    F --> G["Voice Mail Pilot Number"]
    G --> H["Speaker"]
    I["Cancel"] --> F
    J["0"] --> F
Forward Incoming Call when Busy / No Answer

flowchart
graph LR
    A["Speaker"] --> B["7 4 4"]
    C["On-Hook Condition"] --> D["(SC751+13)"]
    B --> E["Call Forward when Busy / No Ans Key"]
    D --> E
    E --> F["Set 1"]
    F --> G["Voice Mail Pilot Number"]
    G --> H["Speaker"]
    I["Cancel"] --> F
In-Mail (Voice Mail)
■ Mailbox Greeting

flowchart
graph TD
    A["Log-On to the In-Mail"] --> B["Greeting Option 4"]
    B --> C["Greeting No. (1-3) ?"]
    C --> D["Record 7"]
    D --> E["Recording ≤"]
    E --> F["Stop REC #"]
    F --> G["Return to Main Menu #"]
    D --> H["Listen 5"]
    H --> I["Listening ≤"]
    I --> J["Finish #"]
    J --> K["Erase 3"]
    K --> H
- Selected Greeting (one of three) shall be made active.
■ Mailbox Security Code

flowchart
graph LR
    A["Log-On to the In-Mail"] --> B["6"]
    B --> C["7"]
    C --> D["7"]
    D --> E["?"]
    E --> F["?"]
    F --> G["?"]
    G --> H["?"]
    H --> I["7"]
    I --> J["#"]
    K["Security Code (4 digits, using 0-9)"] --> E
    L["Delete Security Code"] --> M["*"]
    M --> I
    N["Accept"] --> I
    O["Return to Main Menu"] --> I
※ The type of Security Code can be assigned as below.
- Dial 4 digits Security Code followed by "7": Security Code for all log-on
- Dial 4 digits Security Code followed by "6": Security Code for remote log-on only
- System Administrator can delete a Mailbox Security Code.
In-Mail (Voice Mail)
■ Listen to Left Messages in your Mailbox
Convenient Operation by Function Key

flowchart
graph LR
    A["On-Hook Condition"] --> B["Mailbox Key (SC751+77 + Ext No.)"]
    B --> C["Security Code (if it is set)"]
    C --> D["Listen 5"]
    D --> E["Listening"]
Convenient Operation by Soft Key

flowchart
graph TD
    A["On-Hook Condition"] --> B["2-8 TUE 3:03PM\n200\nMenu Dir VM:03 CL:00"]
    B --> C["Security Code (if it is set)"]
    C --> D["Vmail - Mailbox:200\nMsgs New: 3 Arch: 1\nLstn Greet LvMsg More>"]
    D --> E["Listening"]
Basic Operation without Function Key
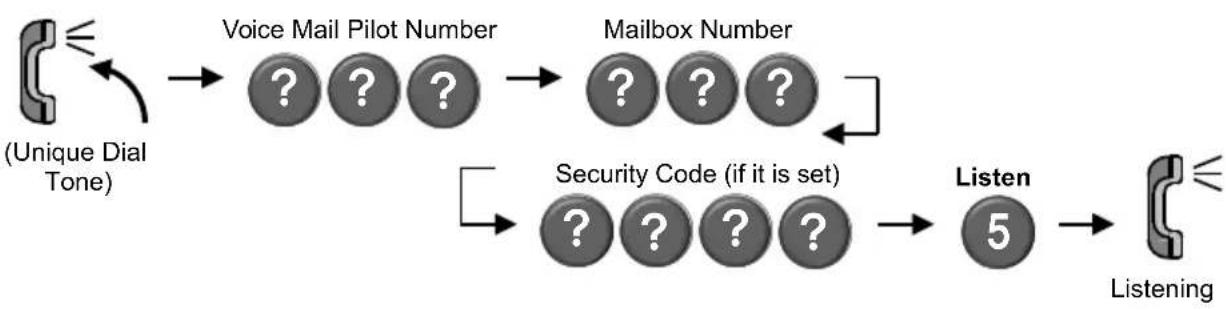
flowchart
graph TD
    A["(Unique Dial Tone)"] --> B["Voice Mail Pilot Number"]
    B --> C["Mailbox Number"]
    C --> D["Security Code (if it is set)"]
    D --> E["Listen 5"]
    E --> F["Listening"]
In-Mail (Voice Mail System Administrator)
The following administrative features are only available at the system administrator's extension (extension 101 at default). Ask your NEC Authorized Supplier for details on how to become a system administrator..
■ Log-In to the In-Mail
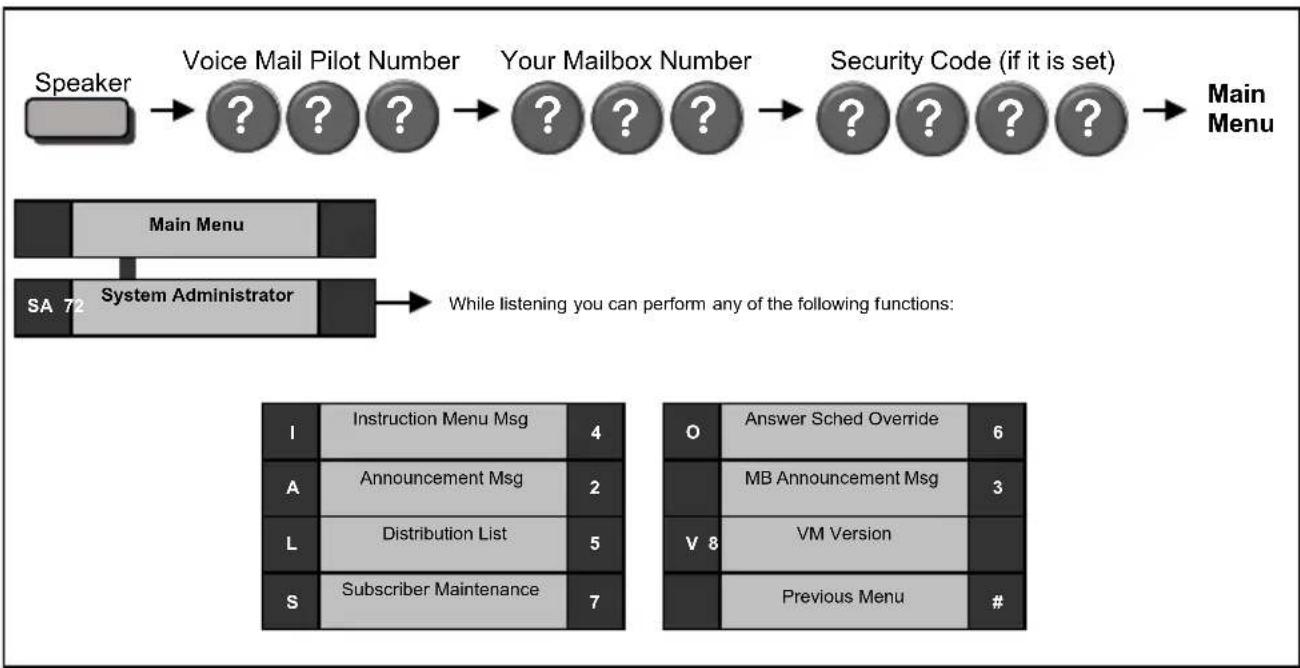
flowchart
graph TD
    A["Speaker"] --> B["Voice Mail Pilot Number"]
    B --> C["Your Mailbox Number"]
    C --> D["Security Code (if it is set)"]
    D --> E["Main Menu"]

    F["SA 72 System Administrator"] --> G["While listening you can perform any of the following functions:"]
    H["I"] --> I1["Instruction Menu Msg"]
    H --> I2["Announcement Msg"]
    H --> I3["Distribution List"]
    H --> I4["Subscriber Maintenance"]
    J["O"] --> K["Answer Sched Override"]
    L["A"] --> M["MB Announcement Msg"]
    N["L"] --> O["VM Version"]
    P["S"] --> Q["Previous Menu"]
◆ Instruction Menu Message are used as the Automated Attendant Main Greetings (e.g. Day Mode greeting, Night Mode greeting, etc)
• To record an instruction Menu from the System Administrator Menu, dial the digit 4 (Instruction Menu Messages). Dial the mailbox number (001 - 032).
-Press the digit 5 to Listen to the message.
-Press the digit 7 to Record the message.
-Press the digit 3 to Delete the message.
-Press # to return to the System Administrator Menu.
◆ Announcement Message are used to announce general information to callers such as directions, hours of operation, etc.
• To record an Announcement Message from the System Administrator Menu, dial the digit 2 (Announcement Messages). Dial the mailbox number (001 - 032).
-Press the digit 5 to Listen to the message.
-Press the digit 7 to Record the message.
-Press the digit 3 to Delete the message.
-Press # to return to the System Administrator Menu.
◆ Distribution List is a list of extensions set to receive a single voice mail message. Any message left in the distribution mailbox will be sent to all extensions in the list.
- To review or modify the Distribution List from the System Administrator Menu, dial the digit 5 (Distribution List). Dial the mailbox number (001 - 032) to be modified..
▶Press the digit 6 to Review or Modify the list.
-Press the digit 2 to Add an extension to the distribution list.
-Press the digit 3 to Delete the current extension from the list.
-Press the digit 6 to step to the Next entry.
-Press # to return to the System Administrator Menu.
▶Press the digit 76 to record a Name for the distribution list.
-Press the digit 5 to Listen to the name.
-Press the digit 7 to Record a new name.
-Press the digit 3 to Delete the name.
-Press # to exit this feature.
▶Press # to return to the System Administrator Menu.
In-Mail (Voice Mail System Administrator)
◆ Subscriber Maintenance is used to modify the subscriber mailboxes.
- To modify a Subscriber Mailbox from the System Administrator Menu, dial the digit 7 (Subscriber Maintenance). Dial the extension number of the mailbox you wish to modify.
-Press the digit 32 to Delete all messages.
-Press the digit 34 to Delete the mailbox greeting.
-Press the digit 36 to Delete to the mailbox name.
-Press the digit 7 to Delete the security code.
-Press the digit 6 to Record a new name.
-Press # to return to the System Administrator Menu.
◆ Answer Schedule Override provides alternate answering for the Automated Attendant by sending calls to a specified Override mailbox, when enabled. As an example you can use the Answering Schedule Override to provide Holiday and Bad Weather closing announcements.
• To modify the Answer Schedule Override from the System Administrator Menu dial 6 (Answer Schedule override). Dial the answer table number (01-16) you wish to override.
-Press the digit 6 to toggle On/Off the answer schedule table.
-Press the digit 2 to enter a New answer schedule override mailbox. Enter the override mailbox number (001-032 or a valid subscriber extension). The override mailbox can be an announcement, call routing box, or a subscriber box.
-Press # to return to the System Administrator Menu.
◆ Mailbox Announcement Message is a message recorded by the system administrator that plays to each subscriber when they log into their mailbox. This message will play each time the subscriber logs into their box until it expires, is deleted, or is made inactive by the system administrator.
• To record and modify the Mailbox Announcement Message from the System Administrator Menu, dial the digit 3 (Mailbox Announcement Message).
-Press the digit 5 to Listen to the mailbox announcement message.
-Press the digit 7 to Record a new mailbox announcement message.
-Press the digit 3 to Delete the mailbox announcement message.
-Press the digit 2 to Specify the amount of days the message is active. Enter * for an indefinite amount of days or enter 01-99 for 1-99 days.
-Press # to return to the System Administrator Menu.
◆ Voice Mail Version will play a message indicating the software level of the voice mail.
• To hear the current Voice Mail Version from the System Administrator Menu, dial the digit 8 (Voice mail Version).
MEMO
SL2100
IP Multiline Terminal
User Guide
GVT-025184-301-00
Issue 1.0
May 2017
NEC Corporation

- Before using Your Terminal...
- Thank you for purchasing NEC SL2100 system.
- Installing the Handset and LAN Cable
- When installing the handset :
- Adjust the two-position Viewing Angle
- To set the low viewing angle position:
- To set the high viewing angle position:
- Using Your Terminal
- Handsfree Options
- 1) Icon
- 2) Feature Key Information
- 3) LCD
- \*\*\*Menu Key
- 1) To Display Menu List
- 2) Simple Operation by Menu Key and Cursor Key
- For Your Convenience
- ■ Programmable Function Keys
- ■ Entering Alphanumeric Characters
- Placing Calls
- ■ Place an Outside Call
- ■ Place an Intercom Call
- Placing Calls Quickly
- If your call doesn't go through...
- ■ Set Camp On / Callback
- ■ Cancel Camp On / Callback
- ■ Repeat Dialing
- Answering Calls
- Hold / Transferring Calls
- For more Convenient Use...
- ■ Call Forwarding / Follow Me
- Soft Keys Operation
- ■ "Menu" Soft Key
- ■ "Dir" Soft Key
- ■ "VM" Soft Key
- ■ "CL" Soft Key
- ■ Soft Key Operations during Off-Hook condition
- ■ Soft Key Operations during Intercom Calling
- ■ Soft Key Operations after establishing an Intercom Call
- ■ Soft Key Operations during Outside Call
- Cursor Keys Operation
- ■ Menu Structure when PRG15-02-60 is set to Advanced Mode 1
- Built-In Automated Attendant
- In-Mail (Voice Mail)
- ■ Call Forward to Voice Mail
- ■ Listen to Left Messages in your Mailbox
- In-Mail (Voice Mail System Administrator)
- ■ Log-In to the In-Mail
- MEMO
- SL2100
Brand : NEC
Model : SL2100
Category : Telephone