
TT-6520ER - Whiteboard Newline - Free user manual and instructions
Find the device manual for free TT-6520ER Newline in PDF.


| Product Type | Interactive Whiteboard |
| Brand | Newline |
| Model | TT-6520ER |
| Display Size | 65 inches (diagonal) |
| Resolution | 3840 x 2160 (4K UHD) |
| Touch Technology | Infrared touch |
| Touch Points | 20 touch points |
| Operating System | Android 11 |
| Built-in Storage | 32 GB |
| RAM | 4 GB |
| Connectivity | HDMI (x3), USB (x4), VGA, RJ45, Wi-Fi, Bluetooth |
| Audio | Built-in speakers (2 x 15W) |
| Power Supply | AC 100-240V, 50/60Hz |
| Power Consumption | 200W (typical), <0.5W standby |
| Dimensions (W x H x D) | 1524 x 914 x 86 mm (without stand) |
| Weight | 38 kg (with stand) |
| VESA Mount | 800 x 400 mm |
| Accessories Included | 2 styluses, remote control, wall mount kit, power cable |
| Cleaning Instructions | Use a soft dry cloth; avoid liquid cleaners directly on screen |
| Safety Features | Anti-glare glass, overheat protection, security lock slot |
| Spare Parts Available | Stylus, remote, power supply, touch module |
| Warranty | 3 years (standard) |
Frequently Asked Questions - TT-6520ER Newline
User questions about TT-6520ER Newline
0 question about this device. Answer the ones you know or ask your own.
Ask a new question about this device
Download the instructions for your Whiteboard in PDF format for free! Find your manual TT-6520ER - Newline and take your electronic device back in hand. On this page are published all the documents necessary for the use of your device. TT-6520ER by Newline.
USER MANUAL TT-6520ER Newline
Collaboration Touch Screen User Manual

natural_image
Blank white image with a diagonal gray line on the left edge, no text or symbols present.ER Series
V1.0
Please keep this Manual properly for future reference!
This manual is a general manual, the pictures are for reference only, Please refer to the real product.
Contents ...... I
Symbol Convention....1
Safety Instructions 2
1 Product Overview ....6
1.1 Product Introduction ...... 6
1.2 Parts 7
1.3 Ports 9
1.3.1 Front Ports....9
1.3.2 Rear ports....11
1.4 Front Buttons.... 14
1.5 Remote Control 15
1.5.1 Remote Control Buttons.... 15
1.5.2 Range of Remote Control 18
2 Installation Guide ....19
2.1 Safety Precautions....19
2.2 Installation Precautions....20
2.3 Ventilation 21
2.4 OPS Computer Installation 22
3 Power On /Off....24
3.1 Power On....24
3.2 Power Off 24
4 Operating the Touch Screen 27
4.1 Home 27
4.2 OPS Computer 31
4.3 Sources 32
4.4 Whiteboard 33
4.4.1 Page Operations 35
4.4.2 Whiteboard Setting 36
4.5 Annotation 37
4.6 Tutorial 39
4.7 Floating bar 39
4.8 Gadget 42
4.8.1 Newline Cast 43
4.8.2 File Commander 44
newline
4.9 System Settings 47
4.9.1 Network Settings....48
4.9.2 Language and Input....49
4.9.3 Date and Time Settings 50
4.9.4 Storage 52
4.9.5 Applications....53
4.9.6 Display & Theme 53
4.9.7 Tool bar....54
4.9.8 Input and Output Setting 55
4.9.9 Power ON/OFF Setting 55
4.9.10 Security Setting 58
4.9.11 Smart Eye Protection....58
4.9.12 System 59
4.10 Save session....59
4.11 Automatically End Session 62
5 Add Shortcut....63
5.1 Add Shortcuts to Dock....63
5.2 Delete shortcuts to Dock....64
5.3 Newline Assistant 65
5.3.1 Introduction ...... 65
5.3.2 Installation....65
5.3.3 Add Quick Start Windows Programs in Smart System 65
6 Quick Setting Menu 67
7 D. Mode....70
8 Serial Port Control ....71
9 VGA Signal Input Specifications ....78
10 Formats Supported by Multi-media....79
11 Troubleshooting....80
12 Maintenance....83
13 Technical Parameter ....84
Thank you for choosing Newline collaboration touch screen.
The symbol of the crossed out wheeled bin indicates this product should not be placed in municipal waste. Instead, dispose of waste equipment by handing it over to a designated collection point for the recycling of electrical and electronic equipment.

Symbols are used in this document to indicate operations that require special attention. The symbols are defined as follows:
 WARNING WARNING | Indicates a hazard with risk that, if not avoided, could result in death or injury. |
 CAUTION CAUTION | Indicates a potentially hazardous situation that, if not avoided, could result in equipment damage, data loss, performance deterioration, or unanticipated results. |
 NOTE NOTE | Provides additional information to supplement operation in the main text. |
For your safety, please read the following instructions before you use the product. Improper operations may cause severe injury or property damage. Please refrain from repairing the product on your own.
 WARNING WARNING | |
 | If major failures occur, disconnect the product from power source immediately.Major failures include the following:Smoke, peculiar smell or abnormal sound discharged from the product.No image or sound is displayed, or if image error occurs.If the above scenarios occur, do not continue using the product. Disconnect power supply immediately and contact professional staff. |
 | Do not drop liquid, metal or anything combustible into the product.If liquid or pieces of metal get into the product, turn off the power and disconnect the power source, then contact professional staff.Supervise children when they are close to the product. |
| Place the product on a stable surface.An unstable surface includes but is not limited to an inclined surface, a shaky stand, desk or platform, which might cause turnover and damage. | |
 | Do not open the cover or modify the product on your own.High voltage components are installed in the product. When you open the cover, high voltage, electric shock, or other dangerous situations may occur.If inspection, adjustment, or maintenance is required, contact the local distributor for help. |
 | Use the specified power supply voltage.To prevent the product from being damaged, do not use cables other than the one provided with the product.Use a three-wire socket and ensure that it is properly grounded.Pull out the power plug from the socket if the product is not to be used for a long period. |
| Regularly clean the dust and metal around the power plug.Fire or electric shock may be caused if the product is powered on, when you are cleaning.Pull out the power plug before cleaning it with a dried cloth.Do not place items on top of the product.Do not put items, such as a liquid container (a vase, flowerpot, cosmetics or liquid medicine) on the top of the product.If any water or liquid is spilled on the product, a short circuit may occur and cause fire or electric shock.Do not walk on or hang any items on the product. | |
 | |
 | Do not install the product in an improper place.Do not install the product in humid places, such as the bathroom, the shower room, near windows, or outdoor environments that experience rain, snow or other harsh weather. Avoid installation near hot spring vapor. The preceding environments may cause faults in the product or electric shock under extreme conditions.Do not put expose the product to a fire source, such as an ignited candle. |
 | Pull out the power plug during thunderstorms.Do not touch the product during a lighting storm to avoid electric shocks.Install or place components that supply high enough voltage out of the reach of children. |
 | Do not touch the power cable with wet hands. |
CAUTION
 CAUTION CAUTION | |
 | Do not install the product in high temperature environments.Do not install the product near a heat source, such as a radiator, a heat reservoir, a stove or other heating products.Do not expose the product to direct sunlight, which may cause high temperatures and subsequent faults in the product. |
  | Transport of the product.Pack the product for transport or maintenance by using the cartons and cushioning material provided with the product.Keep the product vertical during transport. The screen or other components are easily broken if the product is moved inappropriately.Before you move the product, disconnect all external connections and separate all toppling preventing products. Move the product carefully to prevent it from being hit or squeezed, especially the screen, which may cause injury if broken.Do not cover or block up any vents on the product. Any overheated components may cause fire, damage the product, and shorten the product's service life.Do not lay the product down where the venting surface will be covered.Do not install the product on a carpet or cloth.Do not use a cloth such as table cloth to cover the product. |
 | Keep away from the product when using a radio.The product complies with the international EMI standard regarding prevention of radio interference. However, interference may still exist and cause noises to the radio. If noise occurs in the radio, try the following solutions.Adjust the direction of the radio antenna to avoid the interference from the product.Keep the radio away from the product. |
| If the screen glass is broken or falls off.Keep all personnel 10 feet away from the screen to ensure safety.Do not perform any installation or disassembly while the screen glass is broken or has fallen off. | |
| Do not damage the power cable.Do not damage, change, twist, bend, or forcibly drag the power cable.Do not put weights (such as the product itself) on top of the power cable.Do not forcibly drag the cable when you pull out the power plug. If the power cable is damaged, please contact the local distributor to repair or replace it.The power cable in the accessory box is for this product only. Do not use it on other products. | |
| Correct battery usage.Galvanic corrosion, electric leakage, and even fire may be caused by improper battery usage.It is recommended to use the designated type of battery and install the battery by correct electrodes (positive and negative).Do not use a new battery alongside a used one.Take out the batteries if the remote control is not to be used for a long period.Do not expose the batteries to overheated environments such as sunlight and firing.Dispose of used batteries based on your local regulations. | |
| Suggestions for usage:Use the product in an environment with comfortable lighting. It is harmful to your eyes to watch in a too bright or too dark environment.Rest your eyes after an extended period of usage.Keep sufficient distance from the product to protect your eyes and prevent eyestrain.Adjust the volume to an appropriate level, especially at night.Use amplifier equipment as the audio input source with caution. If you must use amplifier equipment, the input power should not exceed the maximum of speaker power. Otherwise, the speaker can become overpowered and damaged. | |
| About USB port.Front USB ports and rear USB 3.0/USB 2.0 ports switch connections based on signal sources. Ifthe current signal source is reading the data from an external product connecting to the port, please switch the signal source after the data reading is complete. Otherwise, the data or product may be damaged. | |
| Special Notes:Under the premise of ensuring the display quality, the energy consumption can be reduced by reducing the brightness of the display.This product can be paired with various OPS Computers, which can be upgraded or replaced according to your needs. | |
1 Product Overview
1.1 Product Introduction
This machine is a multi-functional device that integrates interactive conference, digital presentation, multimedia presentation, touch operation and handwriting input. From design to production, we have fully considered the application characteristics of business conferences to ensure easy and intuitive operation. Through full digital intelligent control, it allows writing, editing and deleting on the screen using fingers, Smooth pen or opaque objects. It is an ideal product for modern conferences.
Features:
- Advanced infrared array scanning sensing technology achieves superior positioning capability and precise tracking; zooming in and out, free dragging, roaming via fingers, area erasure, all in a touch.
- High-brightness, high-contrast screen, clear and visible under strong light, indoors or outdoors.
- UHD resolution, high-power stereo, clear and smooth picture, stereo surround sound, Hi-Fi live sound, theater-level audio-visual pleasure.
1.2 Parts
Front view
65/75/86 inch:

Rear view
65/75/86 inch:
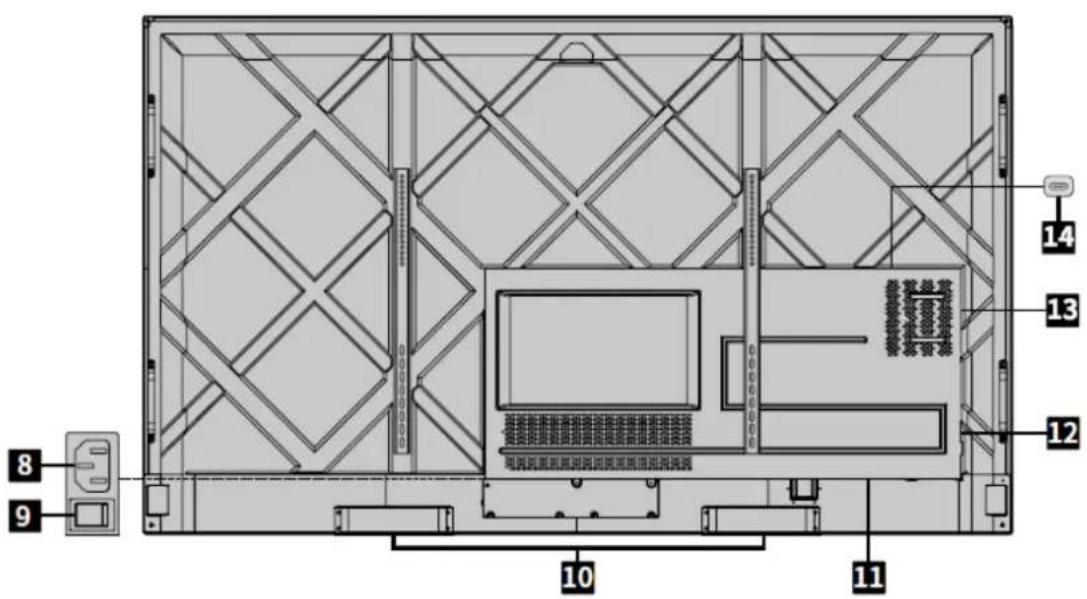
| 1 Touch screen 8 Power socket | |||
| 2 Power button 9 Power switch | |||
| 3 Front button for volume control | 10 Speaker | ||
| 4 IR receiver 11 Rear ports 1 | |||
| 5 | Light sensor | 12 | Rear ports 2 |
| 6 | Front ports | 13 | OPS Computer slot |
| 7 Microphone 14 SoundBar port | |||
1.3 Ports
1.3.1 Front Ports
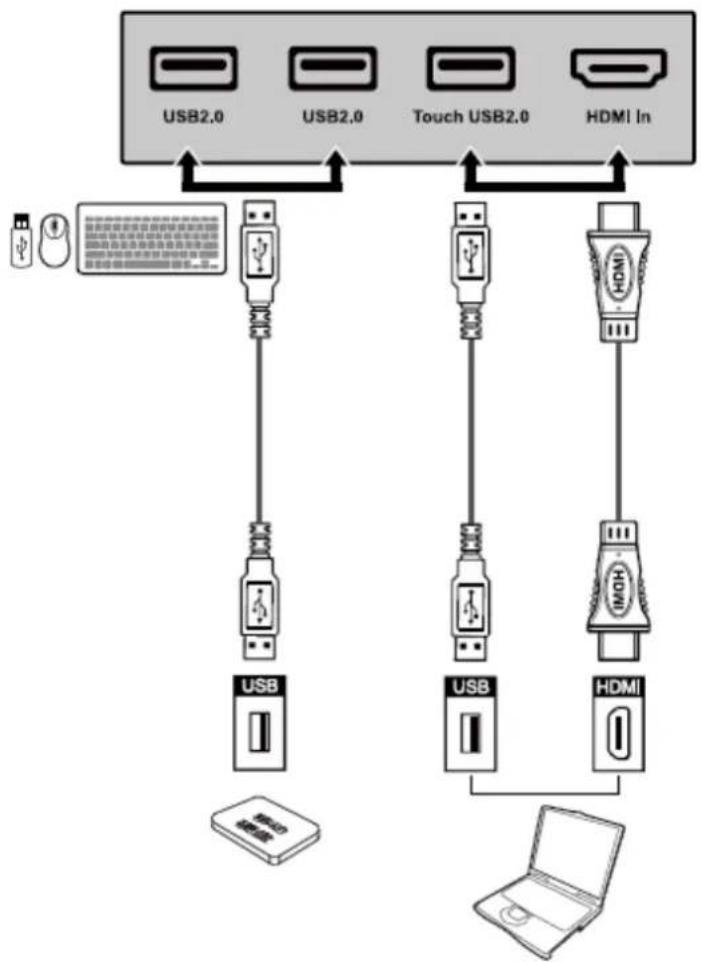
flowchart
graph TD
    A["USB2.0"] --> B["USB"]
    C["USB2.0"] --> D["USB"]
    E["Touch USB2.0"] --> F["USB"]
    G["HDMI In"] --> H["USB"]
    I["HDMI"] --> J["USB"]
    K["Laptop"] --> L["Chip"]
| Name Function description | |
| USB 2.0 | Connect to USB devices such as mobile hard disk, USB flash drive, USB keyboard and mouse.Notes:Users can enter “Setting > Input and output > USB connection” to choose the system (OPS or Smart system) for USB port.If users choose the public, when the interface is Smart system, the device on the USB is used by Smart system. When it switches to OPS, the USB device is connected to OPS. |
| Touch USB 2.0 | Connect to the touch port of your PC. |
| HDMI IN HDMI signal input port.Used in combination with “Touch USB 2.0” to operate the PC via touchscreen technology. |
1.3.2 Rear ports

WARNING
- Front USB 2.0 ports and rear USB 3.0/USB 2.0 ports switch connections based on signal sources. If the current signal source is reading the data from an external storage connecting to the port, please switch the signal source after the data reading is complete. Otherwise, the data or product may be damaged.
- USB2.0/USB3.0 ports output: 5V/500mA (Max.). For qualified device use only otherwise may cause electrical shock or fire.
- Soundbar Connecting port output: 18V/3A. Soundbar connecting port may only use for TS-series Soundbar. The manufacture cannot be responsible for the possible damage caused by connecting to other devices.
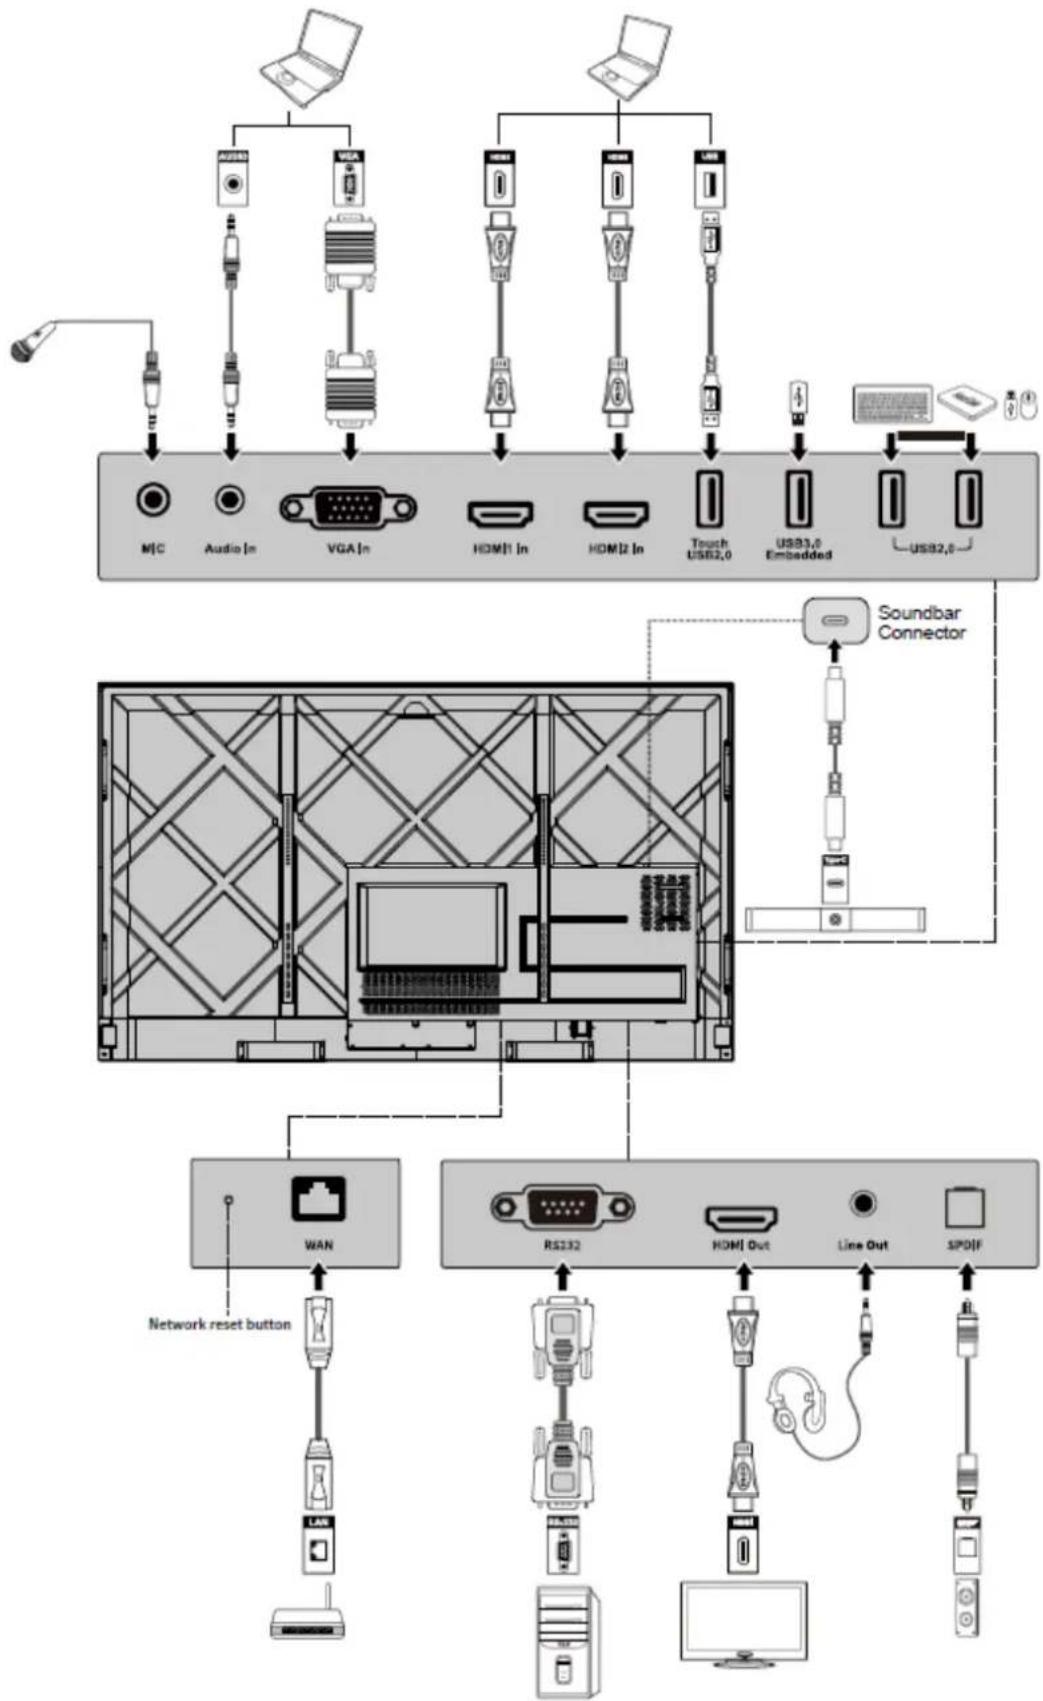
flowchart
graph TD
    A["User"] --> B["Audio In"]
    A --> C["VGA In"]
    A --> D["HDMI In"]
    A --> E["HDMI In"]
    A --> F["Touch USB2.0"]
    A --> G["USB3.0 Embedded"]
    A --> H["USB2.0"]
    B --> I["MIC"]
    C --> J["Audio In"]
    D --> K["Home Device"]
    E --> L["Home Device"]
    F --> M["Home Device"]
    G --> N["Home Device"]
    H --> O["Home Device"]
    I --> P["Network reset button"]
    J --> P
    K --> P
    L --> P
    M --> P
    N --> P
    O --> P
    P --> Q["WAN"]
    Q --> R["RS232"]
    R --> S["Home Out"]
    S --> T["Line Out"]
    T --> U["SPOIF"]
    U --> V["Computer"]
| Name Function description | |
| MIC Microphone input port | |
| Audio In | Audio input port, used in combination with “VGA In”. |
| VGA In VGA signal input port.Used in combination with “Touch USB 2.0” to operate the PC in touch mode. | |
| HDMI 1 In | HDMI signal input port 1.Used in combination with “Touch USB 2.0” to operate the PC in touch mode. |
| HDMI 2 In | HDMI signal input port 2.Used in combination with “Touch USB 2.0” to operate the PC in touch mode. |
| Touch USB 2.0 | Connect to the touch port of your PC. |
| USB 3.0 Embedded | For local playback and system upgrade |
| USB 2.0 | Connect to USB devices such as mobile hard disk, USB flash drive, USB keyboard and mouse. |
| WAN | Network interface, connecting to RJ45 terminal |
| Network reset button | Press the reset button for 5 seconds with a pinhole object to reset the network settings of the product to default. |
| RS232 | Serial port signal input interface, which allows inputting serial port settings through a specific serial port control device to achieve the purpose of controlling the product. |
| HDMI Out | Connect to an electronic video device with HDMI input |
| Line Out | Connect to audio output device such as headphone and speaker. |
| SPDIF | Digital audio interface, optical output interface. Connect audio equipment with fiber optic input; such as amplifiers, stereos, and speakers. |
| Soundbar | Connect to TS series Soundbar (optional)Warning:TS Series Soundbar Connector port only use for TS series Soundbar. The manufacture cannot be responsible for the possible damage caused by connecting to other devices. |
1.4 Front Buttons
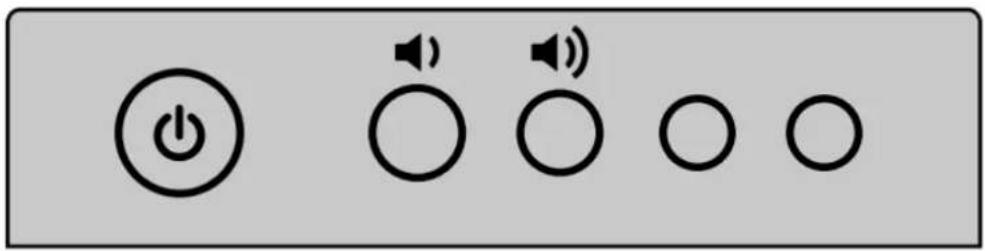
| Buttons Function description | |
 | Power on/off.Turn on: press it to turn on the display, the power indicator will turn to green.Turn off: press it to shut down. The power indicator will turn to red. |
 | Decrease the Volume |
 | Increase the Volume |
Notes:
Press the power button in the power-on state, the product enter shut down mode by default. Users can enter "Settings > Power >Power option" to set the system to enter power off or sleep mode.
1.5 Remote Control
1.5.1 Remote Control Buttons

CAUTION
To avoid potential malfunctions, please read the following instructions and use the remote control appropriately.
- Do not drop or smack the remote control.
- Do not spill liquids on the remote control.
- Do not place the remote control on a wet object.
- Do not expose the remote control to direct sunlight or other heat sources.

| Buttons Functions | |
 | Power on/off. |
 | Return to home source |
| External device | Operate the external device(Automatic learning function) |
| ^v<> Up/Down | n/Left/Right selection button. |
 | Confirm button. |
 | Mute or unmute. |
 | Microphone mute or unmuted. |
 | Press once to return to the previous page;Press twice to exit the current program.Notes: In the settings page, press once to exit. |
 | Take a screenshot. |
 | Freeze the screen.Tap to pause the screen interface and the freeze icon appear on the upper right,Tap again or touch the screen to exit pause. |
 | Enter/exit Sound Only mode |
 | Open the task manager |
 | Open the signal source menu(unavailable in Smart system) |
 | Increase the brightness |
 | Decrease the brightness |
 | Decrease the volume |
 | Increase the volume |
 | Switch to the OPS Computer source. |
 | Enter the external signal source selection page |
 | Adjust the Backlight mode (ECO>Standard>Auto>Custom) |
 | Enter the System Settings |
1.5.2 Range of Remote Control
Use the remote control within 5 meters in front of the remote-control receiver and at an approximate 30^ angle from both sides.

2 Installation Guide
2.1 Safety Precautions
Installation Environment






Installation Direction
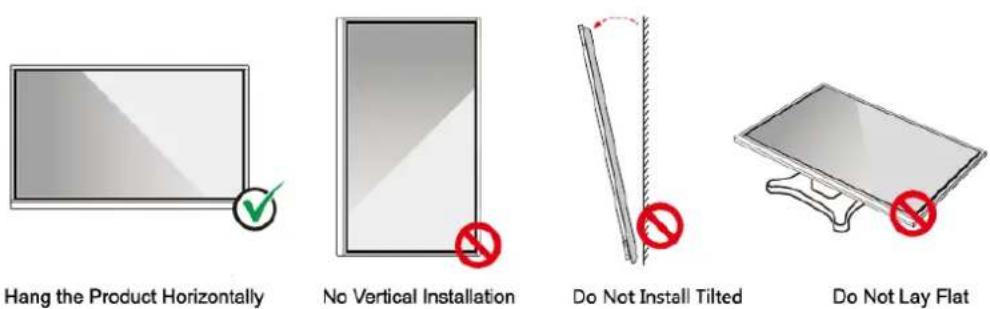
2.2 Installation Precautions
Weight Loading
Net weight of the machine(65",75",86"): 41kg(±2kg), 55kg(±2kg), 70.5kg(±2kg).
- When using a mobile stand, ensure that the weight of the machine is less than the loading capacity of the mobile stand.
- When using the wall-mount bracket, ensure that the wall can support the weight of the machine. We recommend that the wall surface be reinforced and have a loading capacity 4 times of the weight of the machine. Consult a professional installer for wall-mount installation.

NOTE
- The company does not undertake relevant legal responsibility for any problems caused by improper operation if the third party mobile stand, or wall-mount bracket is beyond the scope of the machine.
- Do not install the machine where it might be hit by an opening or closing door.
Vertical Installation
When installing, try to keep the machine vertical. An excessive tilt angle may cause the screen glass to fall off or the machine to collapse.


NOTE
• In case of broken glass, all personnel must stand 3 meters away from the machine to ensure safety.
• Do not install or disassemble the machine if the glass is broken.
- For any problem, please contact our support desk. Our company is not responsible for any damage or losses incurred by users if the users fails to follow the instructions.
- Attaching the VESA Mounting Bracket. This apparatus is intended to be supported by a GS Listed wall-mount bracket.
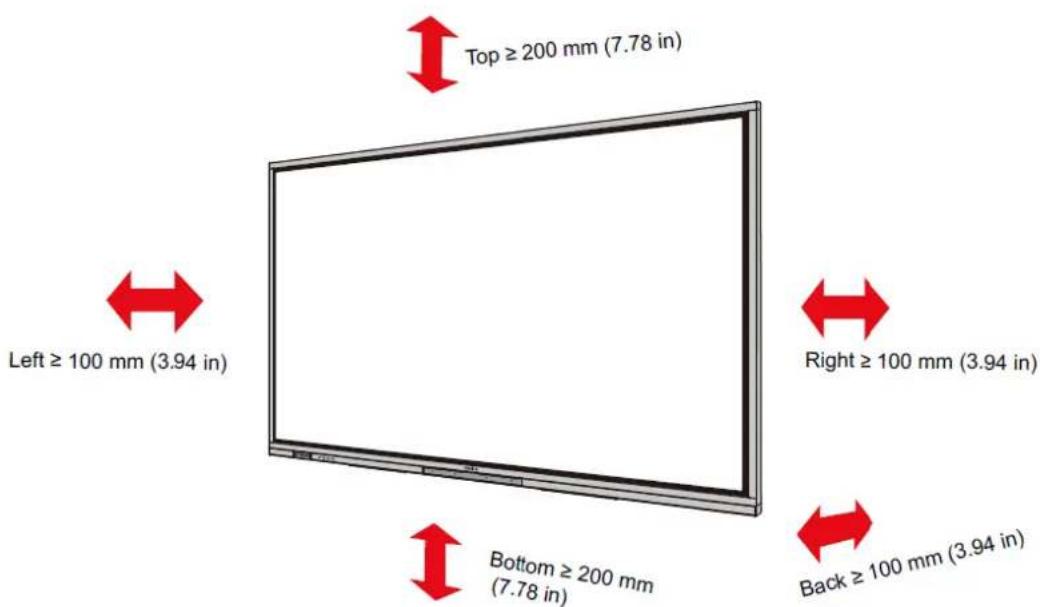
2.3 Ventilation
| Distance from mounting surface (mm) | |||
| Left and right sides | Top Bottom Rear | ||
| 100 | 200 | 200 | 100 |

CAUTION
- In addition to the above requirements, the area of the bottom, side and top vents should not be less than 50% of the sealing area and good air circulation must be maintained when the machine is embedded in the wall and a cabinet.
- For wall mounting, the depth of wall bolts should be greater than 10mm.
2.4 OPS Computer Installation

WARNING
Do not perform the following on the OPS Computer, or the product may be damaged or end up being unusable!
- Do not plug or unplug the OPS Computer with power connected. Please make sure that the power has been turned off before plugging/unplugging.
- Do not use the OPS Computer before the screws have been tightened or if any screws are missing.
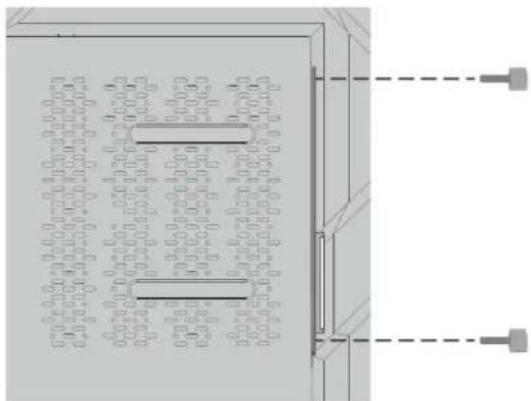
Step 1. (Optional) Unscrew the M3 screws by hand to remove the OPS Computer shielding cover.

Note
This step is optional and suitable for models with the OPS Computer shielding cover.

natural_image
Technical line drawing of a door with a vertical scale and a red arrow pointing to the right side (no text or symbols present)Step 2. Push the OPS Computer horizontally into the interface card slot.

Step 3. Pass the fixing screws through the upper and lower lugs and tighten them.
natural_image
Pure electrical circuit lines without any symbolsNote
If the screen fuzzes, flashes or if no signal is received from the OPS Computer channel after turning on the power, it means that the OPS Computer has not been properly installed. Please check it and re-install.
3 Power On /Off
3.1 Power On
Step 1 Use AC power (100V\~240V, 50Hz/60Hz) as the machine power source. Make sure the power plug fully inserted and that the ground wire of the outlet is properly connected.

natural_image
Technical line drawing of a device interior with grid pattern and connected cables (no text or symbols)Step 2 Turn on the rocker switch (on the rear side of the machine, next to the power socket) after a power source has been connected. The power indicator should be red.

Step 3 Press the “☐” button on the front panel or the “☐” button on the remote control to start the machine (the indicator light turns green).
3.2 Power Off
Step 1. Power off the screen in the following situations:
- If there is no whiteboard data or screenshot(s), press the power button on the front panel or the power button on the remote control to power off the screen. Go to Step 4.
- If there is whiteboard data or screenshot(s), store your session documentations before powering off the touch screen. Otherwise, the product will delete your session documentations after the session is complete.
Press the power button 🏠 on the front panel or the power button 🔒 on the remote control. The Save session page will be displayed as shown in the following figure.

Step 2. Press the power button 📋 on the front panel or the power button 🔒 on the remote control again. The Warning dialog box will be displayed as shown in the following figure.

Step 3. In the Warning dialog box, Tap Cancel. You can save files if desired. After files are saved, return to Step 2. Tap Confirm, and the power indicator will turn to red.
Step 4. If you want to completely turn off the product, turn off the rocker switch under the product (next to the power socket) and unplug the power cord.

CAUTION
- When the product enters sleep mode or shutdown, the system will first detect whether the OPS Computer is turned off. If not, it first turns off the computer before it enters sleep mode or shutdown.
- Please shut down the product before disconnecting the power source or it may damage the machine. Accidental power failure may cause damage to the machine.
- Do not repeatedly turn the power on & off in a short period of time as it may cause malfunction.
| Indicator Product status | |
| Off Shut down or power disconnected | |
| Red Shutdown | |
| Green Working state |
4 Operating the Touch Screen
4.1 Home
When the product is turned on, the product will show the Home page, as shown in the following figure:

1: Logo (Shortcut to Settings)
2: Clock (Shortcut to Clock)
3: Date and Week(Shortcut to Calendar)
4: Side Toolbar
5: Status Bar and Settings
6: Main Icon (Dock)
7: Search Bar
Notes:
On the homepage interface, swipe left to switch to the gadget interface. Users can switch the interface between the Home and Gadget by sliding left and right.
Main Icons
| Icons Functions | |
 | Switch to the OPS Computer source. |
 | Tap Sources to view the connected sources, including Built-in PC, HDMI Front, HDMI 1, HDMI 2, VGA, Newline cast and Files. |
 | Whiteboard takes you to the whiteboard function and screen annotation functions. |
 | Tap “Newline Cast” to enable the wireless screen sharing function. |
 | Switch to the VGA source |
 | Tap File viewer to open the File Manager to explore internal and external files on the display. |
 | Tap Office viewer to open the Office Suite application. |
 | Switch to the HDMI Front source |
 | Switch to the HDMI 1 source |
 | Switch to the HDMI 2 source |
 | Long press the icons in the dock, you can enter the customization mode.Tap Add to customize the icons or rename it. You can add up to 6 shortcuts to your favorite functions. (See more details in “Add Shortcuts to Home Page”) |
Notes:
Users can add or remove main icons as the actual use (OPS, Sources, whiteboard are defaults). More details refer to 5.1 Add Shortcuts to Dock.
- Side Toolbar
Home, Annotation Mode, Whiteboard, Sources, Return, Gadget and Task manager icons are displayed by default in the sidebar on both sides of the screen. Users can enter "Settings"> "Toolbar" to customize the sidebar icon.
You may hide sidebar in the Settings or move it on the screen, shrink or expand by using touch gestures. You may tap the "<" to expand the sidebar. Press the Source icon to unfold level-2 icons.
Shrink

flowchart
graph LR
    A["App Interface"] --> B["Access"]
    B --> C["Exit"]
(绘图要求:增加手势单击)
Unfold level-2 icons

(绘图要求:增加手势单击)
Sidebar > Floating bar
Press the black area above and pulled out, the sidebar can be transformed into a floating bar.
In the floating bar, users can add and delete icons, add custom icons, and drag the floating bar with their fingers to move around on the screen.
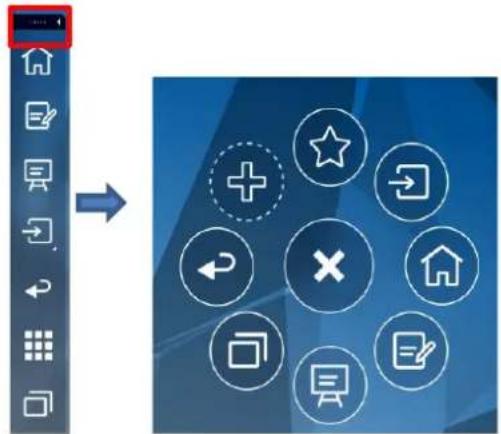
The functions of the sidebar are as follows:
| Icons Functions | |
 | Go to Home page. |
 | Enter annotation mode, and Tap again to exit annotation mode and take a screenshot. |
 | Access whiteboard mode. |
 | Tap to view the external signal sources, including OPS, HDMI Front, HDMI 1 and 2, VGA, Newline Cast and Files. |
 | Return to the previous menu/Exit an app. |
 | Enter the Gadgets interface.Gadget displays all pre-installed applications. Tap the icon of an application to run the application. |
 | Manage currently running applications.Slide left/right the currently running application or Tap “clear all” at the upper right corner to clear all the applications. |
Status Bar and Settings
The upper right corner of the home page displays working status icons (including USB drive(s), Ethernet, and Wi-Fi), Notification and system setting shortcut.
| Icons Functions | |
 | Tap to enter the Notification page (Show red dots when there is a new notification). |
 | If USB drive is connected to the USB port, this icon will appear. |
 | If the product is connected to Ethernet, the icon will appear. |
 | If the product is connected to a wireless network, the icon will appear. |
 | Access the system setting page. |
 | The icon will appear when the product enter Freezing mode. |
4.2 OPS Computer
On the Home page, Tap OPS to enter the Internal PC source page, as shown in the following figure. If the screen is not equipped with an internal PC, "No Signal" is displayed.

On the signal source interface, Tap the Menu button on the remote control to enter the signal source menu interface, and the user can make image settings and display settings, as shown in the following figure:

4.3 Sources
On the Home page, Tap Source to enter the signal sources, including HDMI 1, HDMI 2, VGA, HDMI Front, OPS, File Viewer and Newline Cast.
The icon without signal source connected is gray, and the icon with signal source connected is white. After you choose white icon, the content of the signal source can be displayed in the preview window for real-time preview.
You can enter sources interface by the following methods:
• Tap the Source icon on the dock;
- Tap the → icon on the toolbar;
- Tap the → icon on the remote control.

4.4 Whiteboard
The whiteboard function is designed to present conference writing to attendees in a quick and easy manner. Users can write, draw and take screenshots on the whiteboard page.
Tap the icon in the home page or toolbar to enter the whiteboard interface, as shown in the following figure:

natural_image
Blank gray canvas with tool icons at bottom (no text or symbols on canvas)| Icons Name Functions | ||
 | Annotation | Tap the icon to switch to the annotation function. |
 | More | Tap the icon to enter options interface. Users can Insert image, Text, Sticky note, Search Image or Search Web etc. |
 | Smooth Pen | Tap to use the Smooth Pen function, and the icon turns into blue. Tap and hold the icon for two seconds to set the size and color. |
 | Highlighter | Tap to use the highlighter function, and the icon will turn blue. Tap and hold the icon for two seconds to set the highlighter size or color. |
 | Eraser | Tap the icon to erase whiteboard content. Tap the icon again to select the eraser size. |
 | Insert Auto shape | Tap the icon to enter the auto shape selection interface. Users can insert the shapes and set the shapes color. |
 | Select | Tap the icon to select and edit the whiteboard content.When the object is selected, users can move, zoom in/out, copy, cut, rotate, lock, change layer or delete object. |
 | Clear all | Tap the icon to clear all the whiteboard content. |
 | Undo | Tap the icon to return to the previous step. |
 | Redo | Tap the icon to restore the action that was cancelled in the previous step. |
 | New | Tap the icon to create a new whiteboard page. |
 | Browse | Tap the icon to view all the whiteboard files, and select or delete whiteboard files. |
 | Previous | Tap to enter the previous page. |
 | Next | Tap to enter the next page. |
 | Settings | Tap the icon to enter the Setting interface. |
4.4.1 Page Operations
You can preview, select, and delete the writing page, you also can save the page to you USB Flash device or local files.
Page Preview
Tap 1/1 at the lower right corner in the whiteboard mode. All pages will be displayed. Tap one page to switch to that page for more operations, as shown in the following figure.
NOTE
Only 8 pages are displayed at once, and you can slide up or down by one finger to see more.
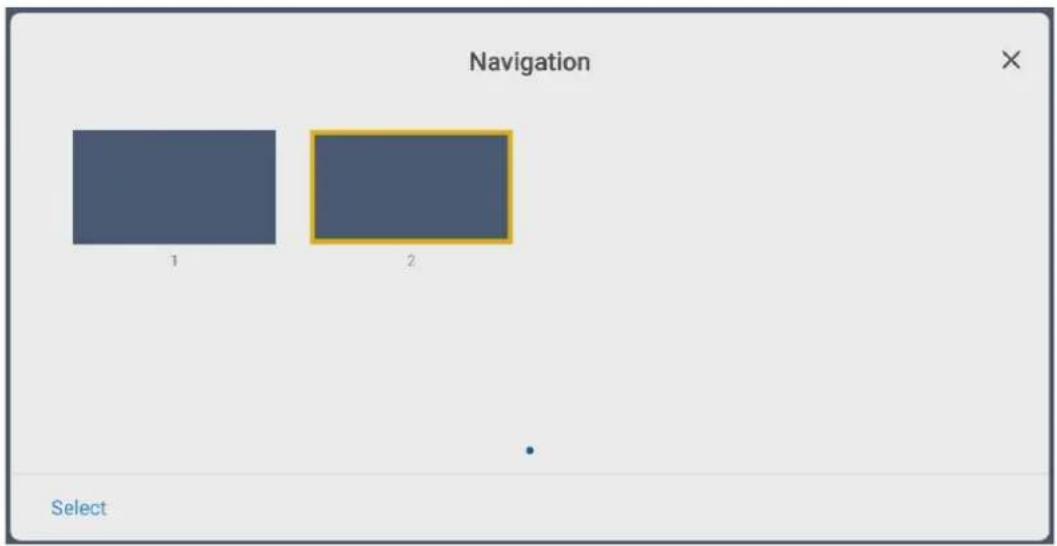
Page Operation
On the Navigation page, you can select or delete writing pages according to requirements, as shown in the following figure:
- Tap to select all pages.
- Tap to save the writing pages to USB flash device.
- Tap to share the writing pages to local file or AquaMail.
- Tap to copy the page.
- Tap to delete selected pages.
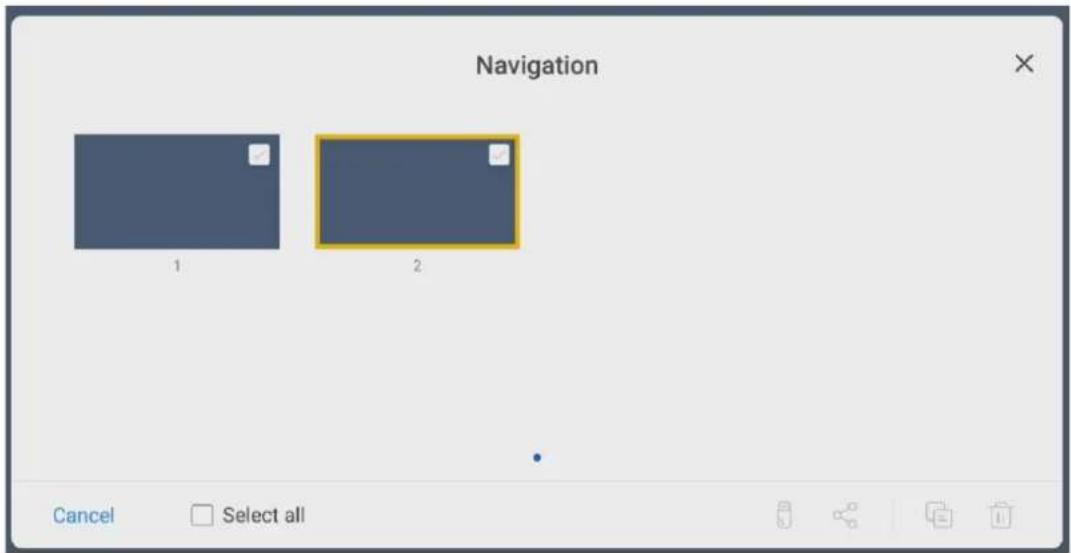
4.4.2 Whiteboard Setting
Tap the 🎨 icon to enter the settings bar, users can set the object recognition, action hint and default settings.

Object recognition
Users can drag the slider to enable the object detection function, users can only write with fine pen in this mode, as shown in the following figure:

- Fine Pen (2mm): User Fine Pen to write and erase with small eraser.
● Fist/palm: identified as an eraser (100 pt). - Tap: select an object without switching to grab tool.
- Drag: move objects or canvas.
- Pinch with two fingers: zoom in/out selected objects or canvas.
- Rotate with two fingers: rotate selected objects.
Action hint: drag the slider to enable the action hint.
Default settings: Tap > to enter default setting page, users can set whiteboard page background, change the color and thickness of Smooth Pen and Highlighter.
4.5 Annotation
In annotation mode, the system generates a transparent layer at the top of the screen, and users can add annotations to the transparent layer until the annotation mode is exited.
The user can enter the annotation mode through the following two methods:
- Tap the “E” icon in the floating bar;
- In the "Whiteboard" interface, tap the " ” icon.

| Icons | Name Functions | |
 | Whiteboard | Tap the icon to enter the whiteboard interface. |
 | Smooth pen | Tap to use the smooth pen function, and the icon turns into blue.Tap and hold the icon for two seconds to set the size and color. |
 | Highlighter | Tap to use the highlighter function, and the icon will turn blue. Tap and hold the icon for two seconds to set the highlighter size or color. |
 | Select | Tap the icon to select and edit the whiteboard content.When the object is selected, users can move, zoom in/out, copy, cut, rotate, lock, change layer or delete object. |
 | Eraser | Tap the icon to enter the eraser function. Tap again to choose the eraser size. |
 | Clear all | Clear all content on the current page. |
 | Undo | Tap the icon to return to the previous step. |
 | Redo | Tap the icon to restore the action that was cancelled in the previous step. |
 | Screenshot | Tap the icon to save the screenshot of the current page in the minutes. |
 | Share | Tap the icon to share the annotation notes to the mail or local files. |
| Settings | Tap the icon to enter the Setting interface. |
NOTES:
For saving screenshots when OPS or other external signal source is displayed, please plug USB flash memory to the "USB3.0 Embedded" port on the back of the screen.
4.6 Tutorial
On the homepage, Tap ? icon on the upper right corner to enter the tutorial interface, users can swipe left and right with fingers to switch the tutorial page. There are 10 pages in the tutorial page, which respectively show the quick use of the product.
On the tutorial page, Tap the ? icon on the upper right corner to exit tutorial.

4.7 Floating bar
In the toolbar, press the black area above and pulled out, the sidebar can be transformed into a floating bar.
In the floating bar, users can tap the icon to enter function interface, add and delete icons, add custom icons, drag the floating bar with their fingers to move around on the screen.
Standard > Minimized
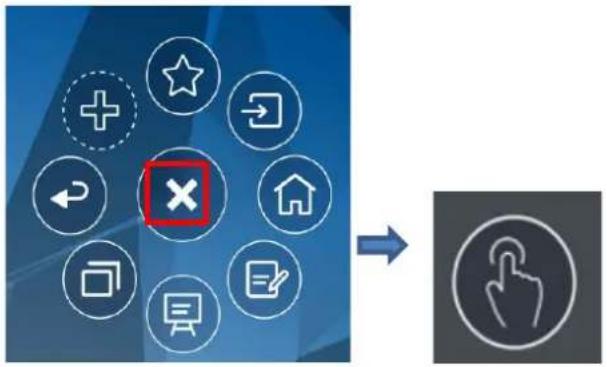
flowchart
graph LR
    A["Input Icon"] --> B["Action Icon"]
    B --> C["Output Icon"]
(绘图要求:增加手势点按红色框区域)
Standard > Favorite

(绘图要求:增加手势点按红色框区域)
Add and delete icons:
In the floating bar interface, tap the + icon to show the following interface, users can tap the icon to add and delete icons. Icons with v on the upper right corner will display in the floating bar.

Add and delete favorite icons:
In the floating bar interface, tap the icon to show , tap + icon to show the following interface. users can Tap the icon to add and delete icons. Icons with √ on the upper right corner will display in the floating bar.

Delete icons:
In the floating bar interface, long press the icons to enter the icon deleting status, tap the × icon on the upper right corner to delete icons.
4.8 Gadget
Gadget displays all pre-installed applications. Tap the icon of an application to run the application. The user can enter the gadget through the following two methods:
● On the homepage interface, swipe left to switch to the gadget interface;
- In the toolbar interface, tap the "☐" icon.
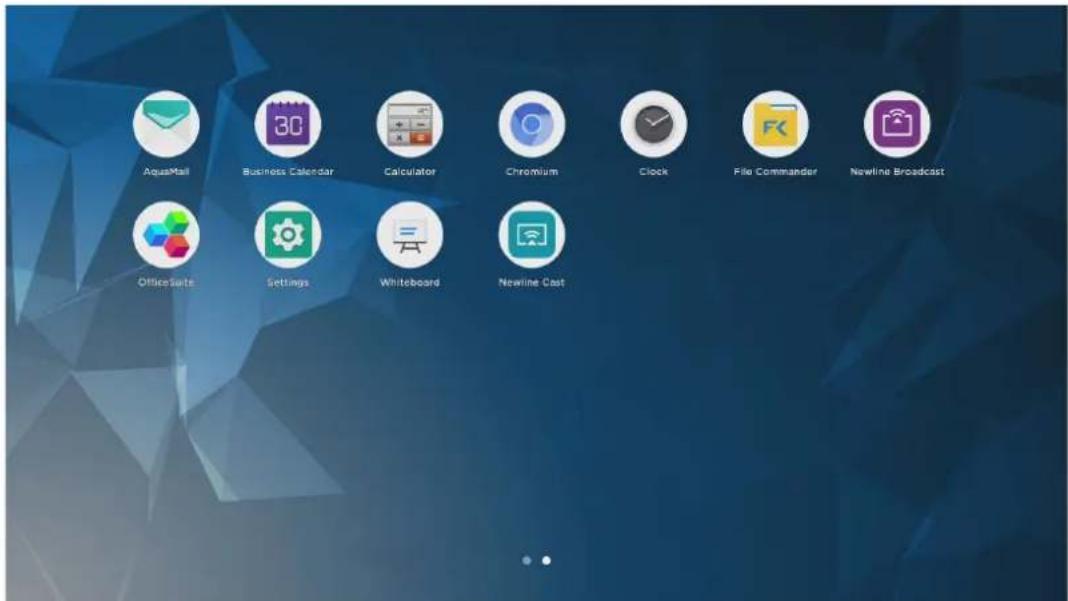
| Name Icons Functions | |
| AquaMail |  Tap this icon to enter the email application and send files.Before sending files, you need to add an email account. Tap this icon to enter the email application and send files.Before sending files, you need to add an email account. |
| Business Calendar |  Tap this icon to enter business calender application. Tap this icon to enter business calender application. |
| Calculator |  Tap this icon to enter the calculator application. Tap this icon to enter the calculator application. |
| Chromium |  Tap this icon to enter chromium application. Tap this icon to enter chromium application. |
| Clock |  Tap this icon to enter clock setting interface. Tap this icon to enter clock setting interface. |
| Name Icons Functions | ||
| File commader |  | Tap this icon to open the File Manager and you can explore all internal and external files on the screen. |
| Newline Broadcast |  | Tap this icon to enter the Newline Broadcast application. |
| Office viewer |  | Tap this icon to enter the Office viewer application. In this application, you can view office files, including excel, word, power point, and PDF files. |
| Settings |  | Tap this icon to enter settings interface. |
| Whiteboard |  | Tap this icon to enter whiteboard application. |
| Newline Cast |  | Tap this icon to enter the Newline Cast application. |
4.8.1 Newline Cast
Multiple devices can be cast wirelessly to the display through several casting modes (Airplay, Google Cast...). To cast: Tap on the gadget Page to enter Newline Cast. On screen directions will appear for you to follow in order to wirelessly cast to the display, as shown in the following figure:

4.8.2 File Commander
Tap the “FK” icon in the “Gadget” interface or toolbar to enter the file manager interface. The interface displays the content of local files of the current system. If any external mobile devices (such as USB storage device, removable hard disk, etc.) are connected, the file content of the mobile device will be displayed at the same time.
Enter the Files application, you can tap the submenu at the left side according to requirements, preview internal storage, external storage devices connected via the USB ports, cloud stored files, FTP uploaded files, and local network files, as shown in the following figure.

File Management
The touch screen supports connection to USB flash memory. Enter the File application, you can preview all files in the internal storage and storage devices connected via USB ports and select, copy, paste, delete and search for files.
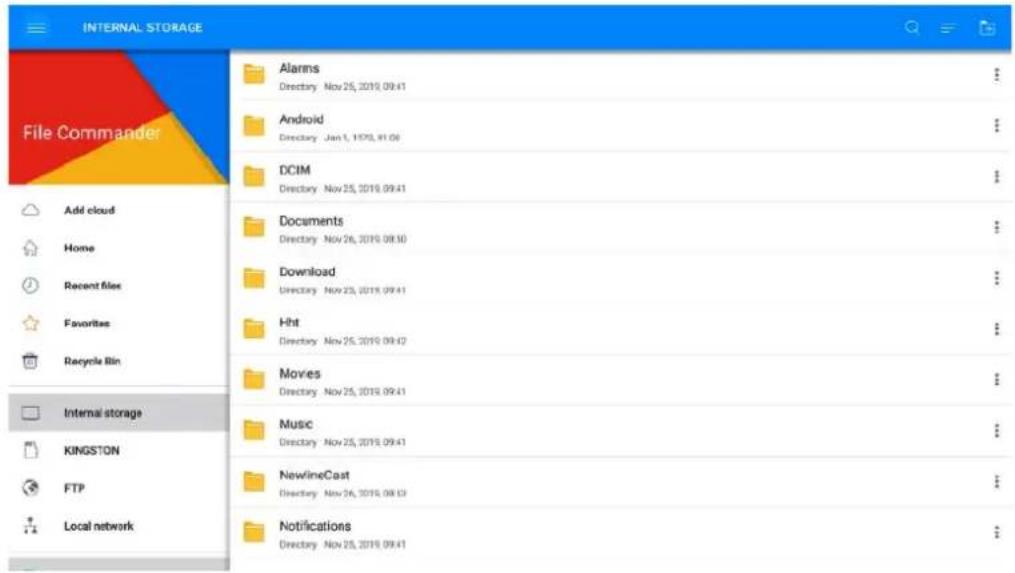
File Filtering
You can tap the menu at the left side to display files by types, for example: Documents, Pictures, Music, Videos, Archives and Downloads.
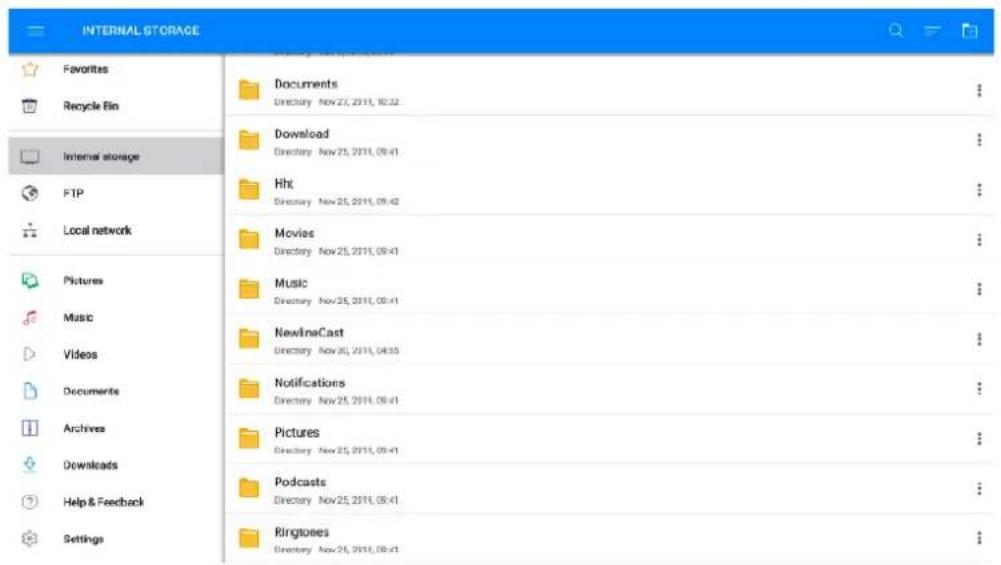
You can also tap on the top right corner to filter files by View mode, Sort by, show only.

File Search
Enter the Files application, and tap in the dialog box that is displayed, enter keywords in the search box according to requirements. The system will display a list of files that match the keywords.

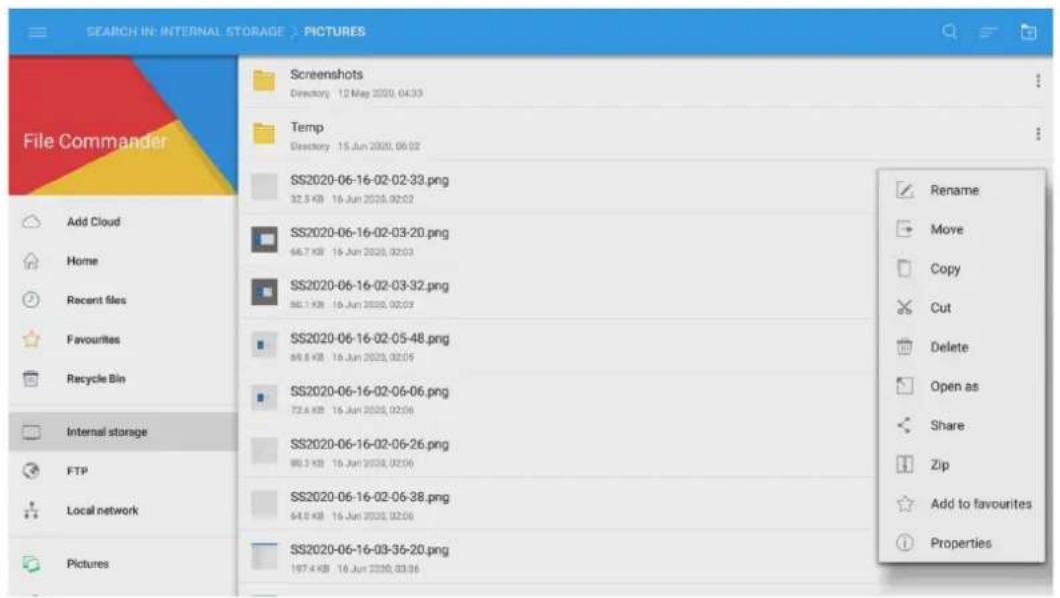
File Operation
Enter the Files application. You can create folders according to requirements, select files, and set rename/move/copy/cut/delete/open as/share/zip. For details on other operation, tap in the right side for more operation.
4.9 System Settings
Enter the system setting page using one of the following methods:
- Tap 🙏 on the Home page.
- Press on the remote control.
• In the Quick Setting Menu, Tap the 🎨 icon.
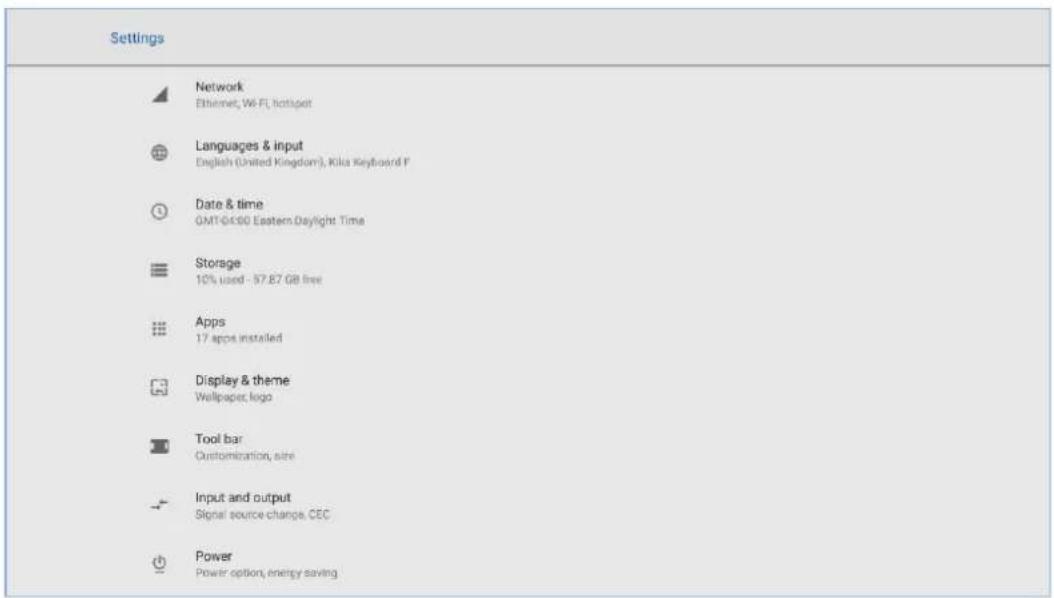
4.9.1 Network Settings
Enter the Network submenu to enable Wi-Fi or Ethernet, view network information, and enable the Wake up via LAN function.
- Wi-Fi: Tap the corresponding button to enable the Wi-Fi function.
- Ethernet: When the RJ45 port is properly connected to the network cable, tap the corresponding button to enable the Ethernet function. User can View the MAC address, IP address, gateway, subnet mask, and DNS information. The user can customize settings to automatically obtain an IP address of the LAN or set a static IP address as needed.
- Hotspot & tethering: The user can customize relevant settings for portable Wi-Fi hotspot.
- Other Settings: The settings of the proxy server and network mode.

4.9.2 Language and Input
Enter the Language & Input submenu to set language and keyboard. The default input method of the system is Kika Keyboard F, and Hardware must be enabled.
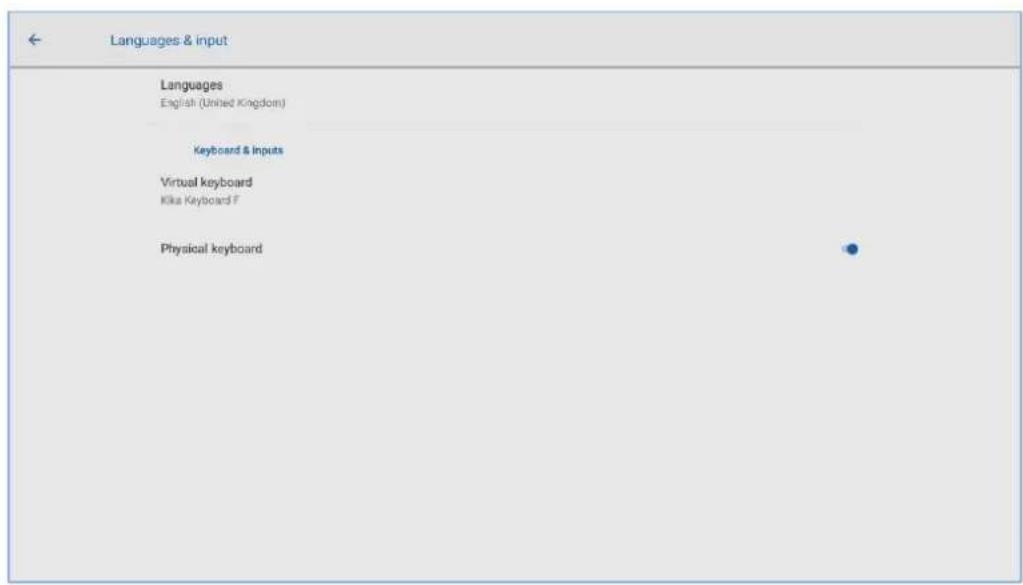
Setting a Language
Tap Language at the left side. In the Change language dialog box that is displayed, select a language or Tap Add language to add a language.

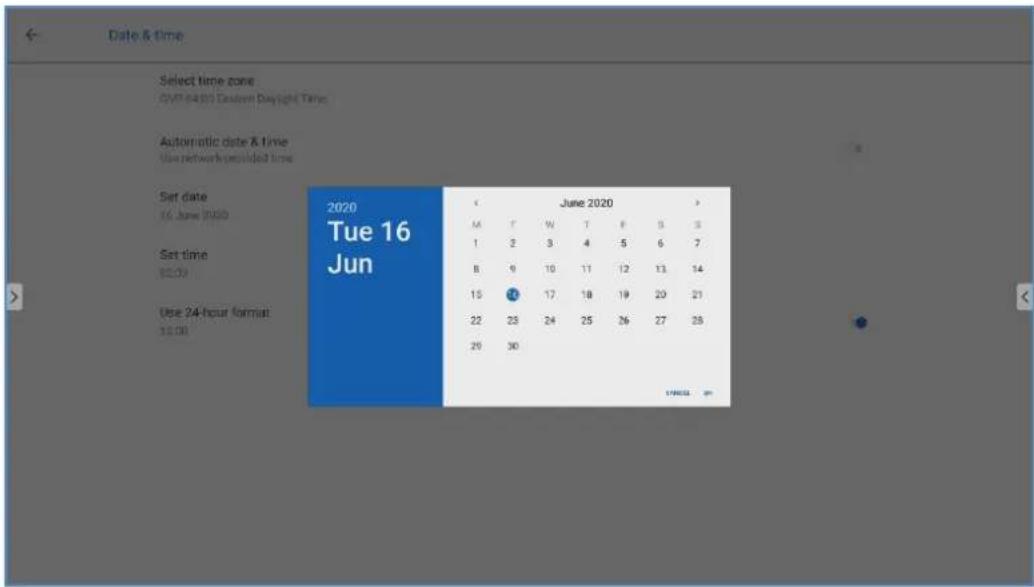
4.9.3 Date and Time Settings
Enter the Date & Time submenu to set the date and time. Before setting the date and time, users should tap Select time zone to select local time zone.

Setting a Date
You can automatically obtain the system date or customize a date.
• To automatically obtain a date, select Automatic date & time.

• To customize a date and date format, set them in Set date.
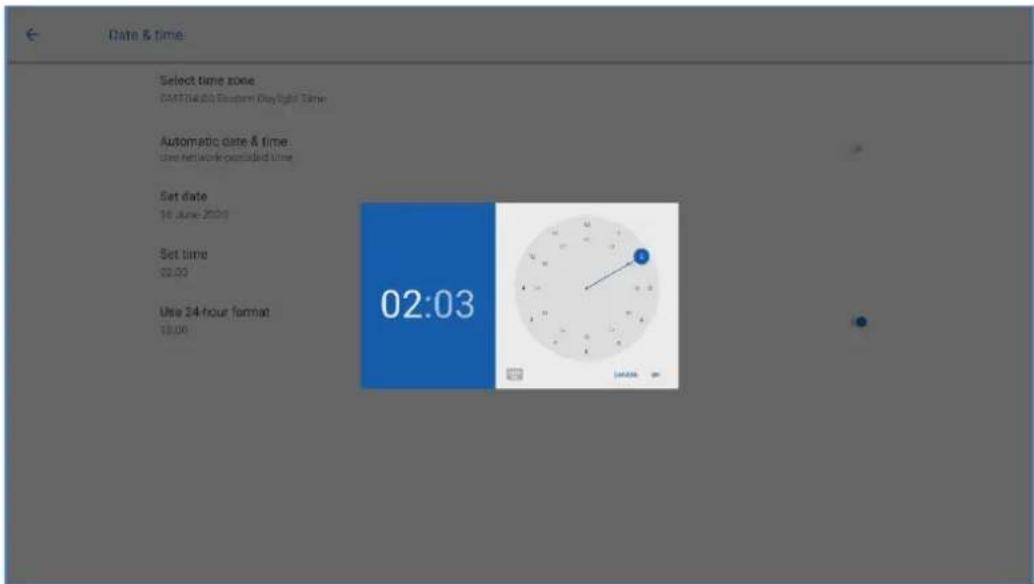
Setting Time
You can automatically obtain the system time or customize time.
• To automatically obtain time, select Automatic date & time.

• To customize time and time format, set them in Set time and Use 24-hour format.
NOTE
Time format will be 24-hours mode only when the Use 24-hour format is selected, othersize time format will be 12 hours mode.
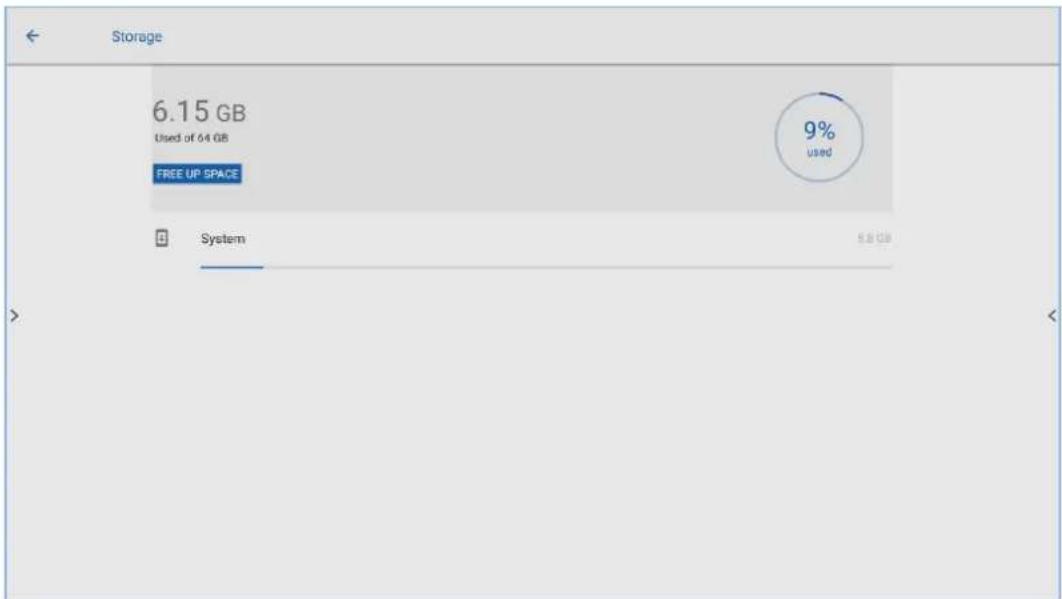
4.9.4 Storage
Enter the Storage submenu to view space distribution of the internal storage.
4.9.5 Applications
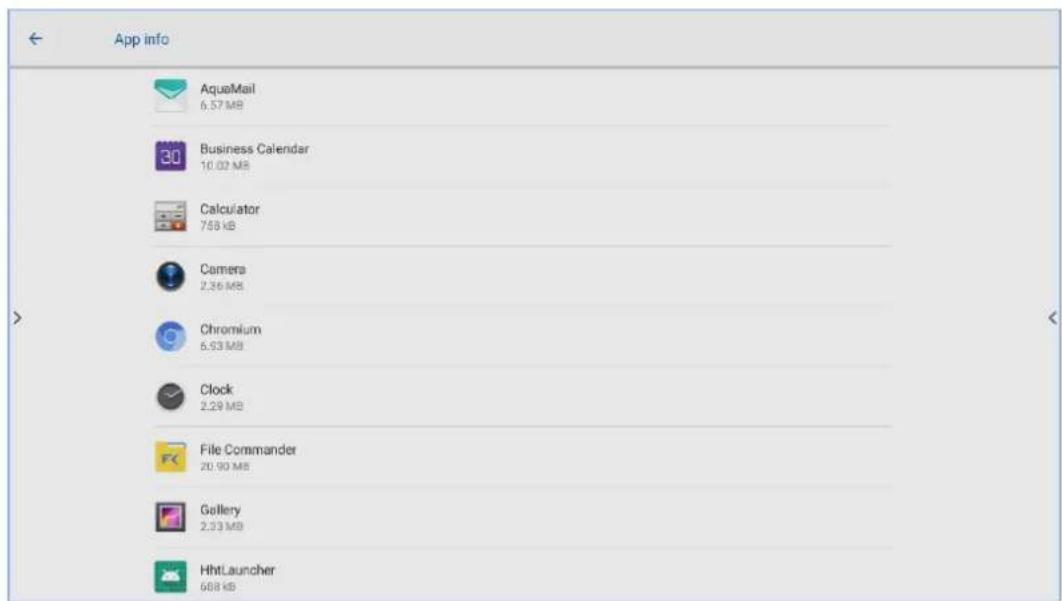
Enter the Apps submenu to view downloaded applications by type, running applications, and all applications.
4.9.6 Display & Theme
Enter the Display & Theme submenu to set the theme, wallpaper, logo and font size.
• Theme: Standard, abstract, galaxy, forest, classic, five theme can be set;
- Wallpaper and logo: users can use default wallpaper and logo, or customize the wallpaper and logo from file viewer;
• Font size: drag the slider to change the font size.

4.9.7 Tool bar
Enter the Tool bar submenu to enable tool bar and quick setting, modify the toolbar icons and toolbar size.

4.9.8 Input and Output Setting
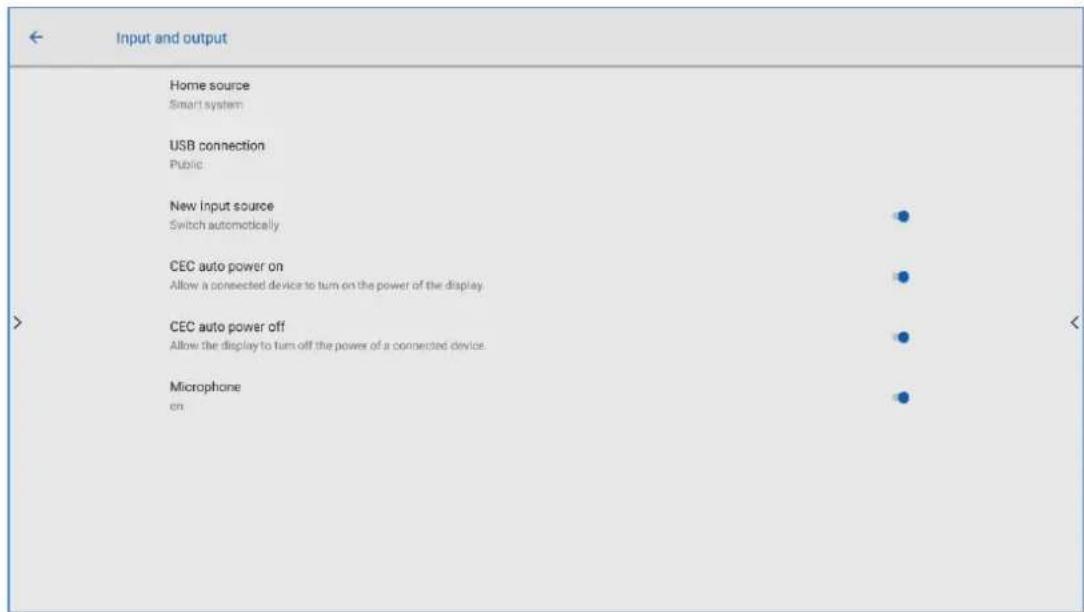
Enter the Input and Output submenu to set the Home source and USB connection, enable new input source, CEC auto and microphone.
- Home source: Customize settings to connect to the signal source after power on. The options are Smart system, HDMI1, HDMI2, VGA, FRONT HDMI, OPS, Whiteboard and Newline cast.
- USB connection: After you connect the USB flash device to the port, you can choose your USB Connection. OPS, Smart system and public can be set.
- New input source: After the New input source function is enabled, the system can automatically switch to the screen of the newly connected signal source.
- CEC Auto Power On: "CEC Auto Power On" is enabled, When the HDMI port of the machine is connected to a CEC device (such as a DVD), and both the CEC device and the machine are turned off, if the CEC device is turned on, the machine automatically turns on after receiving command from the CEC.
- CEC Auto Power Off: "CEC Auto Power Off" is enabled, When the HDMI port of the machine is connected to a CEC device, and both the CEC device and the machine are turned on, if the machine is turned off, the CEC device automatically turns off after receiving the command; if the CEC device is turned off, the machine automatically turns off after receiving the command.
• Microphone: Microphone on or off.
4.9.9 Power ON/OFF Setting
Enter the Power submenu to set power on and off as following:
- Automatic power on/off: Tap the button to enable the function, users can set the power on/ off on time.
• Power on/off on time: Set the power on/ off time, system will automatic power on/off on the customize time.
• Energy saving: Set a duration after which the screen enters the lock mode if the screen is left un-operated.
- Power option: Set the system enter power off or sleep mode when users press power button or end session.
- Sleep and touch to wake up: Tap the button to enable the function, users can touch the screen to wake up the system from sleep mode.

- To set the automatic power on time, select Auto power on, and set the power on time in Power on time, as shown in the following figure.

- To set the automatic power off time, select Auto power off, and set the power off time in Power off time, as shown in the following figure.

- To set the energy saving time, tap Energy saving. In the dialog box that is displayed, set a duration after which the screen enters the lock mode if the screen is left un-operated. After the screen is locked, if the user does not operate the screen within 120s, the screen enters the power off mode. The duration can be set to 30 MIN, 60 MIN, 90 MIN, or NEVER. You can also customize this duration and the range is 3 minutes to 480 minutes.
NOTE
NEVER indicates that the automatic power off mode function is not enabled.

4.9.10 Security Setting
Enter the Security submenu to set whether you need enter the password and modified password when you enter the Home page, settings, installation, gadgets or USB. The password is only limited to 6 digits, English letters are not allowed.

Notes:
- When you drag the slider to enable the setting lock, the setting-related icons will be displayed as locked, and the user needs to enter the password to enter the setting interface.
- When you drag the slider to enable the USB lock, the USB ports, mouse and keyboard will be unusable, the USB device will not be able to read data and the Android or external signal source will be locked.
4.9.11 Smart Eye Protection
Enter the Smart eye protection submenu to set Eye protection writing mode, Eye protection brightness control mode and Bluelight filter. Only when Bluelight filter is opened can Filter level be set.

4.9.12 System
Enter the System submenu to reset the system or view system upgrade, network update, firmware or system version information, import, export and factory setting.

4.10 Save session
Save session button will appear at the bottom of the screen when there is whiteboard data, new screenshot data. Tap Save session button or tap the power button to enter the Save session pop-up window. Users can save the session file as their needs.

Save Session Data
When no external USB flash memories are connected, icons will be gray. When an external USB flash memory is connected, icons will turn into blue.
- Save to USB flash: Tap the 📋 in blue. The "newline" folder will be created under the root folder, and the selected files will be saved in it.
- Share to mail: Tap the icon to share the files. Tap AquaMail to share current session files by email.
- Back to session: Tap the BACK icon to back to session. The session will be continued; session data are not cleared.
- End session: Tap the ✗ icon to end session. The Warning dialog box will be displayed.
- Tap Confirm. All writing pages and screenshots will be deleted and touch screen will be powered off.
- Tap Cancel. The session continues and the system go back to the Home page.


NOTE
- Picture files are named in the following of prefix + creation file. Slide up/down using a finger to switch pictures. Prefix name rule: WB (discussion mode page), AN (annotation page screenshot), and SS (remote control screenshot).
- Do not eject USB flash memory before completing the saving process.
- If the USB flash memory is bigger than 16GB or the file format is not FAT32, the data will not be saved properly.
4.11 Automatically End Session
If the touch screen is left un-operated for a specified duration, it will be locked to guarantee your privacy. Choose Settings > Power > Energy Saving to set the duration. For details on the setting method, see "Power ON/OFF Setting".
After the display is locked, if it is operated again within 120 seconds, the display is unlocked. Otherwise, the display enters the shut down mode and automatically deletes all session content. After the display is unlocked, the countdown dialog box will not appear in current session.

Notes:
Touch screen enter shut down mode by default in energy saving mode. Users can enter "Settings > Power >Power option" to set the system to enter sleep mode.
5 Add Shortcut
5.1 Add Shortcuts to Dock
Step 1. Long press any one of icons in the dock bar to enter the editing state. As shown in the following figure:

Step 2. Tap the "+" icon to enter the add Main Icon interface, users can add up to 6 icons, as shown in the following figure:
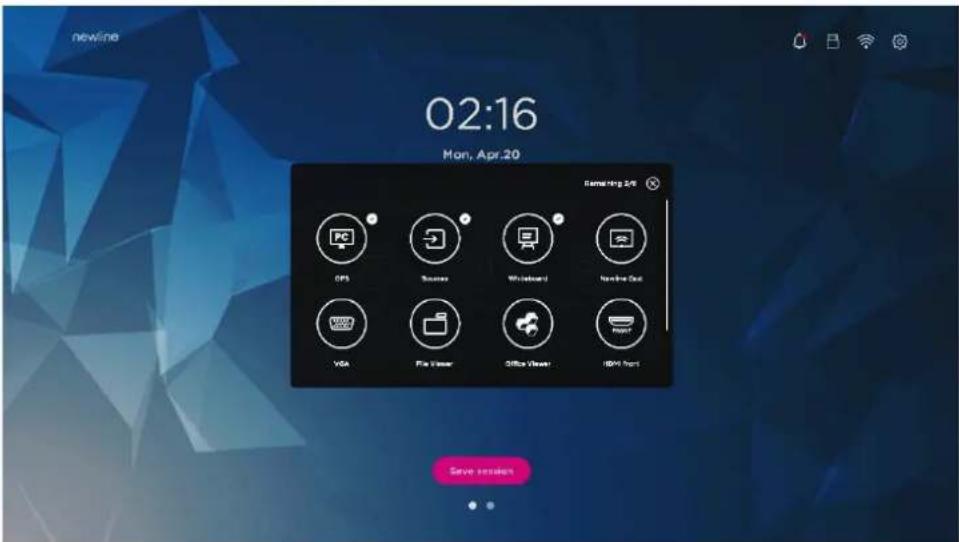
Step 3. At the Home page, Tap the shortcut icon and you can start the program/application or change to the external signal source.

Notes:
Long press the icon to enter the edit state, the + icon will not appear when the 6 main icons are all added.
5.2 Delete shortcuts to Dock
Long press any one of icons in the dock bar to enter the editing state. Tap the × icon in the upper left corner to delete the Main Icon.

Notes:
Users also can tap the icon name to modify as your need.
5.3 Newline Assistant
5.3.1 Introduction
The Newline Assistant is the tool used as a bridge between the smart system and the OPS Computer (OPS). It helps add Windows software shortcut to the gadget Page, as well as to protect USB data when switching between sources.
Therefore we strongly recommend users install the Newline Assistant after installing the OPS Computer.
5.3.2 Installation
Step 1. Connect OPS Computer correctly (See also "2.4 OPS Computer Installation").
Step 2. On the Home Page, tap OPS. It will switch the signal source to the Internal Windows system.
Step 3. Visit our website at www.newline-interactive.com and choose Products > ER series > download to download the Newline Assistant installation package.
Step 4. Install the Newline Assistant as instructed.
5.3.3 Add Quick Start Windows Programs in Smart System
Step 1. In Windows, run the Newline Assistant program and drag the software icons or folder shortcut icons that you want to add from the desktop or menu to the Newline Assistant window. The applications added or deleted through the Windows system will be automatically updated to the smart system until the upload progress reaches 100%. If
there is an application not updated, tap Sync in the upper right corner to manually update all icons in the Newline assistant window to the smart system.
TIP
Only folders and .exe file are supported.

(绘图要求:增加手势拖动效果图示)
Step 2. Tap the icon in the sidebar to enter gadget interface to view all the Windows software shortcuts added by the Newline Assistant in Step 1.
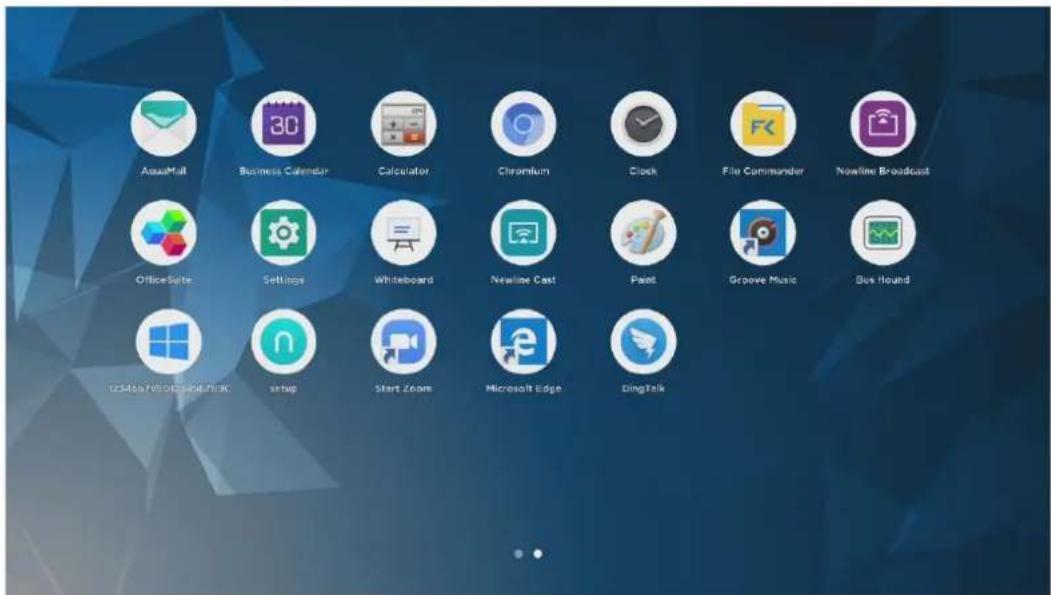
Step 3. In the gadget interface. Tap the icon of an added Windows application to start the software.
6 Quick Setting Menu
Using two fingers to swipe up from the bottom of the screen, the Quick Settings menu will appear, tap wherever outside of the menu to hide the quick setting menu. As shown in the following figure.
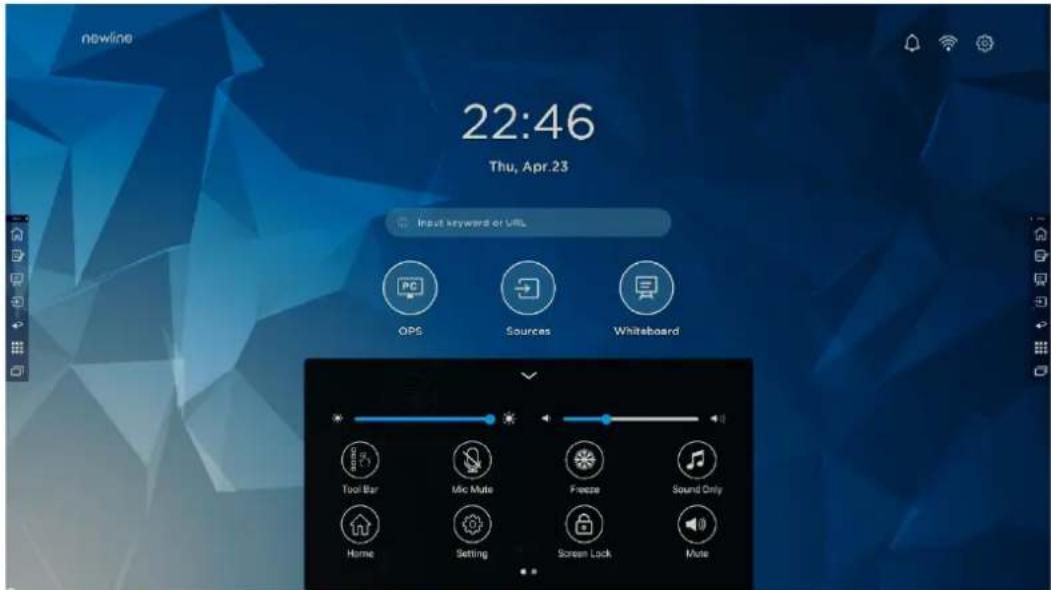
In the quick settings menu interface, swipe left or right with your finger to switch the page, as shown in the following figure:

| Icons Name Functions | ||
 | Brightness | Drag the slider to adjust the brightness. |
 | Volume | Drag the slider to adjust the volume. |
 | Toolbar | Tap the icon to turn on/off the toolbar. |
 | Microphone mute | Tap the icon to mute/unmute Microphone. |
 | Freeze | Tap the icon to enter/exit freeze function. |
 | Sound only | Tap the icon to enable sound only mode.In sound only mode, the screen LCD displays and LED backlight turns off, other functions are in normal operating condition. |
 | Home | Tap the icon to return to Home page. |
 | Setting | Tap the icon to enter the settings page. |
| Icons Name Functions | |
 | Screen Lock Tap the icon to enter/exit screen lock function. User can set the temporary passkey for locking the screen. |
 | Mute Tap the icon to mute or unmute. |
 | Wi-Fi Tap the icon to turn on/off the Smart system Wi-Fi. |
 | Bluelight Fliter Tap the icon to turn on/off the blue light filter. |

CAUTION
- Please switch off the touch screen when it is not used and enable the function of Sound Only when you do not need to watch the screen, which help reduce power consumption and save energy.
- On the premise of ensuring viewing effect, the energy consumption can be reduced by lowering display brightness.
- To better save energy, the automatic power-off function is configured for the touch screen, users can enter Settings > Power > Energy Saving to set the duration.

Press on the remote controller to enter the D. mode (ECO > Standard > Auto > Custom). Hold the button to switch between the four modes.
- In the ECO mode, the power output is reduced 50%, screen brightness is 40% of standard.
• In the Standard mode, the screen brightness keeps the same.
• In the Auto mode, the screen brightness is 80% of standard. - In the Custom mode, the screen brightness is 80% of standard. Brightness can be adjusted manually.
8
Serial Port Control
RS232 communication cable (please use cross data cables)
| PIN | This Device | Computer |
| 1 NC NC | ||
| 2 RXDO TXDO | ||
| 3 TXDO RXDO | ||
| 4 NC NC | ||
| 5 GND GND | ||
| 6 NC NC | ||
| 7 NC NC | ||
| 8 NC NC | ||
| 9 NC NC | ||
| Cover GND GND |

RS232 port of touch screen
Connect the RS-232 port to a computer or central control device, turn on the RS-232 serial port connection, and customize settings as follows.
| Port No.: COM1 (set according to the port number of the computes or the central control device) | |||
| Bit Rate | 19200 | Parity Check | None |
| Data Bit | 8 | Stop Bit | 1 |
The button control code is assigned as follows: (TV issues the return code to the serial port after receiving the serial port command, and returns to the host computer)
| Functions | Control Codes | Return Codes |
| Power on | 7F 08 99 A2 B3 C4 02 FF 01 00 CF | 7F 09 99 A2 B3 C4 02 FF 01 00 01 CF |
| Power off | 7F 08 99 A2 B3 C4 02 FF 01 01 CF | 7F 09 99 A2 B3 C4 02 FF 01 01 01 CF |
| Mute/Unmute toggle | 7F 08 99 A2 B3 C4 02 FF 01 02 CF | 7F 09 99 A2 B3 C4 02 FF 01 02 01 CF |
| Mute On | 7F 08 99 A2 B3 C4 02 FF 0F 00 CF | 7F 09 99 A2 B3 C4 02 FF 0F 00 01 CF |
| Mute Off | 7F 08 99 A2 B3 C4 02 FF 0F 01 CF | 7F 09 99 A2 B3 C4 02 FF 0F 01 01 CF |
| Signal source | 7F 08 99 A2 B3 C4 02 FF 01 06 CF | 7F 09 99 A2 B3 C4 02 FF 01 06 01 CF |
| Enable whiteboard | 7F 08 99 A2 B3 C4 02 FF 01 07 CF | 7F 09 99 A2 B3 C4 02 FF 01 07 01 CF |
| HDMI front | 7F 08 99 A2 B3 C4 02 FF 01 0A CF | 7F 09 99 A2 B3 C4 02 FF 01 0A 01 CF |
| HDMI rear 1 | 7F 08 99 A2 B3 C4 02 FF 01 52 CF | 7F 09 99 A2 B3 C4 02 FF 01 52 01 CF |
| HDMI rear 2 | 7F 08 99 A2 B3 C4 02 FF 01 53 CF | 7F 09 99 A2 B3 C4 02 FF 01 53 01 CF |
| Internal PC | 7F 08 99 A2 B3 C4 02 FF 01 38 CF | 7F 09 99 A2 B3 C4 02 FF 01 38 01 CF |
| VGA | 7F 08 99 A2 B3 C4 02 FF 01 0D CF | 7F 09 99 A2 B3 C4 02 FF 01 0D 01 CF |
| Page up | 7F 08 99 A2 B3 C4 02 FF 01 13 CF | 7F 09 99 A2 B3 C4 02 FF 01 13 01 CF |
| Page down | 7F 08 99 A2 B3 C4 02 FF 01 14 CF | 7F 09 99 A2 B3 C4 02 FF 01 14 01 CF |
| VOL - | 7F 08 99 A2 B3 C4 02 FF 01 17 CF | 7F 09 99 A2 B3 C4 02 FF 01 17 01 CF |
| VOL + | 7F 08 99 A2 B3 C4 02 FF 01 18 CF | 7F 09 99 A2 B3 C4 02 FF 01 18 01 CF |
| Menu | 7F 08 99 A2 B3 C4 02 FF 01 1B CF | 7F 09 99 A2 B3 C4 02 FF 01 1B 01 CF |
| Home page | 7F 08 99 A2 B3 C4 02 FF 01 1C CF | 7F 09 99 A2 B3 C4 02 FF 01 1C 01 CF |
| Return (exit) | 7F 08 99 A2 B3 C4 02 FF 01 1D | 7F 09 99 A2 B3 C4 02 FF 01 1D 01 |
newline
| Functions | Control Codes | Return Codes |
| CF | CF | |
| OK | 7F 08 99 A2 B3 C4 02 FF 01 2B CF | 7F 09 99 A2 B3 C4 02 FF 01 2B 01 CF |
| ← | 7F 08 99 A2 B3 C4 02 FF 01 2C CF | 7F 09 99 A2 B3 C4 02 FF 01 2C 01 CF |
| → | 7F 08 99 A2 B3 C4 02 FF 01 2D CF | 7F 09 99 A2 B3 C4 02 FF 01 2D 01 CF |
| ↑ | 7F 08 99 A2 B3 C4 02 FF 01 2E CF | 7F 09 99 A2 B3 C4 02 FF 01 2E 01 CF |
| Set volume | 7F 08 99 A2 B3 C4 02 FF 05 XX CFNOTES:XX indicates the volume value (0 to 100), corresponding to hexadecimals 00 to 64. | 7F 09 99 A2 B3 C4 02 FF 05 XX 01 CF |
| Query the firmware version number | 7F 08 99 A2 B3 C4 02 FF 01 3D CF | 7F 09 99 A2 B3 C4 02 FF 01 3D 01 CF |
| Set display mode | 7F 08 99 A2 B3 C4 02 FF 06 XX CFNOTES:XX indicates the mode.00=Standard, 01=Eco,02=Auto, 03= Custom | 7F 09 99 A2 B3 C4 02 FF 06 XX 01 CF |
| Enable the annotation mode | 7F 08 99 A2 B3 C4 02 FF 01 40 CF | 7F 09 99 A2 B3 C4 02 FF 01 40 01 CF |
| Microphone mute toggle | 7F 08 99 A2 B3 C4 02 FF 01 41 CF | 7F 09 99 A2 B3 C4 02 FF 01 41 01 CF |
| Microphone Mute On | 7F 08 99 A2 B3 C4 02 FF 0C 01 CF | 7F 09 99 A2 B3 C4 02 FF 0C 01 01 CF |
| Microphone Mute Off | 7F 08 99 A2 B3 C4 02 FF 0C 02 CF | 7F 09 99 A2 B3 C4 02 FF 0C 02 01 CF |
| Increase backlight brightness | 7F 08 99 A2 B3 C4 02 FF 01 47 CF | 7F 09 99 A2 B3 C4 02 FF 01 47 01 CF |
| Decrease backlight brightness | 7F 08 99 A2 B3 C4 02 FF 01 48 CF | 7F 09 99 A2 B3 C4 02 FF 01 48 01 CF |
| Set the value of backlight brightness | 7F 08 99 A2 B3 C4 02 FF 09 XX CFNOTES:XX indicates the value ofbacklight brightness (0 - 100), corresponding to the hexadecimal number system (00 - 64). | 7F 09 99 A2 B3 C4 02 FF 09 XX 01 CF |
| Switch backlight | 7F 08 99 A2 B3 C4 02 FF 01 15 CF | 7F 09 99 A2 B3 C4 02 FF 01 15 XX CFNOTES:XX = 01 indicates the backlight is on.XX = 00 indicates the backlight is off. |
| Switch Backlight On | 7F 08 99 A2 B3 C4 02 FF 0E 01 CF | 7F 09 99 A2 B3 C4 02 FF 0E 01 01 CF |
| Switch Backlight Off | 7F 08 99 A2 B3 C4 02 FF 0E 00 CF | 7F 09 99 A2 B3 C4 02 FF 0E 00 01 CF |
| Screenshot | 7F 08 99 A2 B3 C4 02 FF 01 1F CF | 7F 09 99 A2 B3 C4 02 FF 01 1F 01 CF |
| Settings | 7F 08 99 A2 B3 C4 02 FF 01 20 CF | 7F 09 99 A2 B3 C4 02 FF 01 20 01 CF |
| Freeze ON/OFF toggle | 7F 08 99 A2 B3 C4 02 FF 01 3B CF | 7F 09 99 A2 B3 C4 02 FF 01 3B 01 CF |
| Freeze On | 7F 08 99 A2 B3 C4 02 FF 0B 00 CF | 7F 09 99 A2 B3 C4 02 FF 0B 00 01 CF |
| Freeze Off | 7F 08 99 A2 B3 C4 02 FF 0B 01 CF | 7F 09 99 A2 B3 C4 02 FF 0B 01 01 CF |
| Switch router mode (NAT/Bridge) | 7F 08 99 A2 B3 C4 02 FF 03 XX CFNOTES:XX = 01 indicates that the router mode is NAT.XX = 02 indicates that the router mode is Bridge. | 7F 09 99 A2 B3 C4 02 FF 03 XX 01 CF |
| Enable Newline Cast | 7F 08 99 A2 B3 C4 02 FF 0B 02 CF | 7F 09 99 A2 B3 C4 02 FF 0B 02 01 CF |
| Close Newline Cast | 7F 08 99 A2 B3 C4 02 FF 0B 03 CF | 7F 09 99 A2 B3 C4 02 FF 0B 03 01 CF |
| Enable Newline Broadcast | 7F 08 99 A2 B3 C4 02 FF 0B 04 CF | 7F 09 99 A2 B3 C4 02 FF 0B 04 01 CF |
| Close Newline Broadcast | 7F 08 99 A2 B3 C4 02 FF 0B 05 CF | 7F 09 99 A2 B3 C4 02 FF 0B 05 01 CF |
| Power supply | 7F 08 99 A2 B3 C4 02 FF 01 37 CF | 7F 09 99 A2 B3 C4 02 FF 01 37 XX CFNOTES:01: power on state00: power off state |
| Speaker | 7F 08 99 A2 B3 C4 02 FF 01 82 CF | 7F 09 99 A2 B3 C4 02 FF 01 82 XX CFNOTES:01: mute00: unmute |
| Current signal source | 7F 08 99 A2 B3 C4 02 FF 01 50 CF | 7F 09 99 A2 B3 C4 02 FF 01 50 XX CFNOTES:Smart system = 30PC = 17HDMI rear 1 = 1FHDMI Rear 2 = 1EHDMI Rear 3 = 18HDMI Front = 19TYPEC = 21VGA=22 |
| Speaker volume | 7F 08 99 A2 B3 C4 02 FF 01 33 CF | 7F 09 99 A2 B3 C4 02 FF 01 33 XX CFNOTES:XX indicates current volume value (XX is a hexadecimal value, range: 00~64).For example, XX = 20 indicates current volume value is 32 (decimal value), XX = 00 indicates mute state. |
| D.Mode | 7F 08 99 A2 B3 C4 02 FF 01 35 CF | 7F 09 99 A2 B3 C4 02 FF 01 35 XX CFNOTES:00: Standard01: Eco02: Auto(VN only)03: Custom |
| Microphone status | 7F 08 99 A2 B3 C4 02 FF 01 45 CF | 7F 09 99 A2 B3 C4 02 FF 01 45 XX CFNOTES:01: the microphone is mute.02: the microphone is not mute. |
| Backlight brightness | 7F 08 99 A2 B3 C4 02 FF 01 49 CF | 7F 09 99 A2 B3 C4 02 FF 01 49 XX CFNOTES:XX indicates the value of backlight brightness (0 - 100), corresponding to the hexadecimal number system (00 - 64). |
| Backlight status | 7F 08 99 A2 B3 C4 02 FF 01 81 CF | 7F 09 99 A2 B3 C4 02 FF 01 81 XX CFNOTES:00: backlight is on.01: backlight is off. |
| Check to screen lock status | 7F 08 99 A2 B3 C4 02 FF 01 84 CF | 7F 09 99 A2 B3 C4 02 FF 01 84 XX CFNOTES:00: screen lock is off.01: screen lock is on. |
| Whiteboard status | 7F 08 99 A2 B3 C4 02 FF 01 83 CF | 7F 09 99 A2 B3 C4 02 FF 01 83 XX CFNOTES:01: the whiteboard is activated00: the whiteboard is not activated. |
| Return to system state of the previous 11 options | 7F 08 99 A2 B3 C4 02 FF 0A 00 CF | 7F 13 99 A2 B3 C4 02 FF 0A 00 ABCD EF GH IJ KL MN OP QR ST UV CFNOTES:AB: Power supplyCD: SpeakerEF: Current signal sourceGH: Speaker volumeIJ: D.ModeKI: microphone |
newline
| Functions | Control Codes | Return Codes |
| MN: camera positionOP: backlight brightnessQR: backlight stateST: Whiteboard stateUV: Switch to child safety lock |
VGA (Video Graphics Array) is a computer display standard for analog signals. The VGA port is a dedicated VGA standard computer data output port. The table below lists the specifications of VGA signal input.
| No. | Standard | Resolution | Refresh rate (Hz) |
| 1 VGA | 720 x 400 70Hz | ||
| 2 VGA | 800 x 600 60Hz (VESA) | ||
| 3 VGA | 800 x 600 72Hz (VESA) | ||
| 4 VGA | 1280 x 1024 75Hz (VESA) | ||
| 5 VGA | 1280 x 1024 60Hz | ||
| 6 VGA | 1920 x 1080 | 60.00 Hz(recommended) | |
| 7 VGA | 1360 x 768 | 60.02 Hz |
10
Formats Supported by Multi-media
| Multimedia type Format | |
| Photo | JPEG, PNG, BUMP, GIG |
| Video | VP9, VP8, MJPEG |
| Audio | PCM, FFMPEG_ADEC, ADPCM, APE, FLAC, ALAC, TTA, MIDI, MP3, BLURAYLPCM, OGG VORBIS, WAVEPACK |
Before contacting a service technician, please conduct an inspection according to the following table. If the problem can't be solved by following the suggested steps, please contact your local dealer. For your safety, do not repair the machine on your own.
| Issue Solution | |
| The machine can’t be properly turned on / the indicator is off | Check whether the power socket is connected to the power source.Check whether the power plug is properly plugged in.Check whether the power line is in poor condition.Check whether the rocker switch has been turned on. |
| Automatically turn on/off when unused | Turn off the automatic power on/off function.Check whether the device has been idle for a significant period and therefore the machine has entered sleep mode.Check whether the input power is stable. |
| No image display | Check whether the power cord is connected to an electrical outlet and whether the power is turned on.Check whether the rocker switch of the machine has been turned on.Check whether the power is turned on.Check whether the input computer is correctly connected.Check whether the input source is correct. |
| The image is normal, but there is no sound | Check the volume.Check whether the mute button on the remote control has been pressed.Check whether the mute function in the menu is turned on. |
| Image or sound is disturbed | Find interfering electrical equipment nearby and move it away from the machine.Do not share the same power outlet with interfering electrical equipment. |
| Remote control failure | Replace the battery.Clean the transmission port in the top of the remote control (check whether it is blocked).Check whether the batteries are poorly installed. |
| Image color is abnormal | Check whether the HDMI cable is connected properly.Check whether the VGA cable is connected properly. |
| There is no touch control under external source channel | Try switching between different external sources.Make sure that the USB cable is connected to the correct interface. For details, see the “Rear Port” section.Re-plug the USB cable. |
| Built-in computer has no signal | Check whether the built-in computer is properly inserted into the slot.Check whether the built-in computer is in sleep mode.Press the power button on the built-in computer (refer to the built-in computer manual for details) and turn it on manually. |
| Built-in computer can't be turned on | Check whether the computer and the machine are properly connected.Replace the built-in computer. |
| Pen shakes (jitters) when writing | The use of a Smooth pen is recommended. Hold the Smooth pen far away from the tip and keep the angle between the Smooth pen and the screen surface greater than 60° (keep your sleeve or wrist away from the screen surface). |
| Remove sources of interference or change to an environment without interference. | |
| Strokes are intermittent when writing (only certain part allows writing) | The use of a Smooth pen is recommended. Hold the Smooth pen far away from the tip and keep the angle between the Smooth pen and the screen surface greater than 60° (keep your sleeve or wrist away from the screen surface). |
| Replace the tip or write with a larger occlusion area. | |
| Check whether there is any foreign object on the infrared strip. | |
| Remove sources of interference or change to an environment without interference. | |
| Unable to write | Replace with a different colored pen. |
| The use of a Smooth pen is recommended. Hold the Smooth pen far away from the tip and keep the angle between the Smooth pen and the screen surface greater than 60° (keep your sleeve or wrist away from the screen surface). | |
| Remove sources of interference or change to an environment without interference. | |
| The use of a Smooth pen is recommended. Hold the Smooth pen far away from the tip and keep the angle between the Smooth pen and the screen surface greater than 60° (keep your sleeve or wrist away from the screen surface). |
The following conditions are not failures:
- Since the panels require precise production technology, there may be very few pixels that are bright or dark, such as tiny red, blue and green spots (bright spots) on the screen, or dark spots on some screens. This isn't malfunction and will not affect the overall performance of the machine.
- The machine will make a slight noise due to backlight adjustment or heat dissipation. This phenomenon is normal.
- When the projected image and audio sounds are normal, static energy may be felt by touching the screen and the metal back cover.

NOTE
Because the machine is not optical bonding type, so in the case of high temperature difference and high humidity, the inside of the screen glass may fog, this phenomenon can be removed by running the machine continuously for about three hours.
Daily Maintenance
- Do not install or place the machine near a heat source, or place it in direct sunlight, in a dusty or humid environment, or where there is mechanical vibration or shock. To ensure performance, keep it away from high voltage, transmission grid, large metal objects, radar stations and other equipment.
- Do not wipe the body with chemical agents, as the chemicals may cause the cover to deteriorate or cause damage to the surface paint. If there is dust or dirt, turn off the power and wipe it with a soft cloth. Wipe the touch screen gently with a clean soft cloth.
- Do not switch the machine on and off frequently, as this will affect the machine's service life. After a normal shutdown, please wait at least three minutes before turning it back on. If it is not to be used for a long period of time, please turn off the power and unplug the power cord.
- Do not set the brightness and contrast to the maximum value for extended periods of time as this affects the service life of the screen.
- Do not write on the touch screen with any hard object in order to avoid scratching.
Infrared Strip Cleaning
The machine utilizes an infrared matrix in the horizontal and vertical directions to detect and locate the user's touch. There are infrared strips (i.e., IR receiving tubes and IR transmitting tubes) around the screen, which form an optical net made of infrared rays on the surface of the screen. When you touch the screen, fingers or other opaque objects will block the horizontal and vertical infrared rays that pass through the point, and the controller will determine the coordinate position of the point.
Due to the long-term exposure to the air, the surface of the screen is extremely easy to accumulate dust, resulting in insensitive touch or inaccurate positioning. Therefore, the infrared strips around the screen should be cleaned regularly.

13
Technical Parameter
| Specification Parameter | |||
| Model | TT-6520ER | TT-7520ER | TT-8620ER |
| Display | |||
| Backlight Type LED | |||
| Aspect Ratio 16:9 | |||
| Physical Resolution | 3840 x 2160 Pixel | ||
| Degree of color | 8 Bit | 8 Bit | 10 Bit |
| Loudspeaker | |||
| Location Bottom | |||
| Maximum Power Output | 2 x 15 W | ||
| Touch | |||
| Material of Touch Surface | Tempered glass | ||
| Touch Sensing Technology | IR | ||
| Touch Points | 20 points | ||
| Writing Points | Thick pen 8mm; Fine pen 3mm | ||
| Writing Instrument | Pens, Finger, Opaque object | ||
| Power Dissipation / Transportation / Storage | |||
| Stand-by Power Consumption | ≤0.5W | ||
| Working Voltage | 100V ~ 240V, 50Hz/60Hz | ||
| Storage Temperature/Humidity | -10°C ~45°C / 20% ~ 90% (Non coagulation) | ||
| Working Temperature/Humidity | 0 °C ~ 40 °C/ 20% ~ 80% (Non coagulation) | ||
| Installation Method | Wall-mount or Stand | ||
newline
| Specification Parameter | |||
| Model | TT-6520ER | TT-7520ER | TT-8620ER |
| Rated Power | ≤ 300W | ≤ 400W | ≤ 450W |
| Rated Current | Max 3A | Max 4A | Max 4.5A |
| Display Area length×width (mm) | 1428.48×803.52 mm | 1650.24×928.36 mm | 1895.04×1065.96 mm |
| Boundary Dimension (length × width × the thickness of the bare / With hanging ) (mm) | 1514.7×916.8×96 /114.2 mm | 1736.6×1040.7×97.1 /132.1 mm | 1982.6×1180.5×97.2 /132.1 mm |
| Package Size | 1640*221*1036 mm | 1859*247*1160 mm | 2119*275*1281 mm |
| Net Weight | 40KG | 55KG | 70KG |
| Gross Weight | 49KG | 67KG | 86.5KG |
| Other Functions | |||
| Internal Wi-Fi | 2.4G/5G (Support for WIFI and hotspot co-existence) | ||
| Android System | |||
| RAM | 3 GB | ||
| Flash | 64 GB | ||
| Multimedia file format | Supports most popular multimedia file formats | ||
| Android Software | |||
| The Android Version | 8.0.0 | ||
| Function | Support screen annotation, whiteboard, wireless screen, check in, vote and other functions. | ||
For more machine information, please visit:
https://newline-interactive.com/apac/technical-support/
The company is committed to machine updates and technical improvements. The technical parameters and specifications are subject to change without prior notice. The pictures in this manual are for reference only.
- Collaboration Touch Screen User Manual
- ER Series
- Contents ...... I
- Symbol Convention....1
- Safety Instructions 2
- Product Overview ....6
- Installation Guide ....19
- Power On /Off....24
- Operating the Touch Screen 27
- newline
- Thank you for choosing Newline collaboration touch screen.
- CAUTION
- Product Overview
- Product Introduction
- Features:
- Parts
- Ports
- Front Ports
- Rear ports
- WARNING
- Front Buttons
- Notes:
- Remote Control
- Remote Control Buttons
- Range of Remote Control
- Installation Guide
- Safety Precautions
- Installation Precautions
- Weight Loading
- NOTE
- Vertical Installation
- Ventilation
- OPS Computer Installation
- Power On /Off
- Power On
- Power Off
- Operating the Touch Screen
- Home
- - Side Toolbar
- Status Bar and Settings
- OPS Computer
- Sources
- Whiteboard
- Page Operations
- Page Preview
- Page Operation
- Whiteboard Setting
- Object recognition
- Annotation
- Tutorial
- Floating bar
- Gadget
- Newline Cast
- File Commander
- File Management
- File Filtering
- File Search
- File Operation
- System Settings
- Network Settings
- Language and Input
- Setting a Language
- Date and Time Settings
- Setting a Date
- Setting Time
- Storage
- Applications
- Display & Theme
- Tool bar
- Input and Output Setting
- Power ON/OFF Setting
- Security Setting
- Smart Eye Protection
- System
- Save session
- Save Session Data
- Automatically End Session
- Add Shortcut
- Add Shortcuts to Dock
- Delete shortcuts to Dock
- Newline Assistant
- Introduction
- Installation
- Add Quick Start Windows Programs in Smart System
- TIP
- Quick Setting Menu
- 8
- Serial Port Control
- 10
- Formats Supported by Multi-media
- Daily Maintenance
- Infrared Strip Cleaning
- 13
- Technical Parameter
Brand : Newline
Model : TT-6520ER
Category : Whiteboard