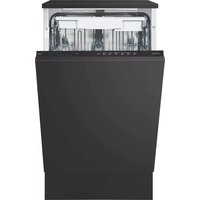
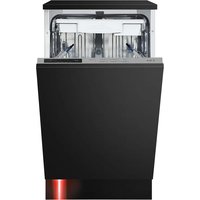
CDI4251 - Dishwasher CDA - Free user manual and instructions
Find the device manual for free CDI4251 CDA in PDF.


| Product Type | Dishwasher |
| Brand | CDA |
| Model | CDI4251 |
| Installation Type | Built-in |
| Dimensions (H x W x D) | 850 x 600 x 600 mm |
| Weight | 50 kg |
| Power Supply | 220-240 V, 50 Hz, 10 A |
| Place Settings | 13 |
| Noise Level | 44 dB(A) |
| Water Consumption per Cycle | 9.5 L |
| Energy Consumption per Cycle | 0.92 kWh |
| Programs | Eco, Intensive, Quick, Glass, Pre-wash |
| Functions | Delay Start, Half Load, Child Lock |
| Interior Material | Stainless Steel |
| Safety Features | Water Leak Protection, Overflow Protection |
| Maintenance | Clean Filters Regularly, Run Maintenance Cycle |
| Spare Parts Availability | Filters, Spray Arms, Detergent Dispenser |
| Warranty | 2 Years |
Frequently Asked Questions - CDI4251 CDA
User questions about CDI4251 CDA
0 question about this device. Answer the ones you know or ask your own.
Ask a new question about this device
Download the instructions for your Dishwasher in PDF format for free! Find your manual CDI4251 - CDA and take your electronic device back in hand. On this page are published all the documents necessary for the use of your device. CDI4251 by CDA.
USER MANUAL CDI4251 CDA
Integrated dishwasher
Use and maintenance
Contents
3 Important information
5 Important notes
6 Before first use
7 Using your dishwasher
9 Starting a programme
10 Changing a programme
10 Cancelling a programme
12 Detergent information
13 Salt information
14 Softener adjustment
15 Rinse aid information
17 Dishwasher basket information
18 Glass guards
20 Raising the baskets
21 Recommended and erroneous loads
22 Standard loading and test data
23 Programme listing
24 Care and Maintenance
26 Fault code information
27 Troubleshooting
28 Electrical Information
30 Installation
33 Fitting a (non-standard) decor door (additional to template)
34 Warranty and service
Important
The CDA Group Ltd cannot be held responsible for injuries or losses caused by incorrect use or installation of this product. Please note that CDA reserve the right to invalidate the guarantee supplied with this product following incorrect installation or misuse of the appliance.
This appliance is not designed to be used by people (including children) with reduced physical, sensorial or mental capacity, or who lack experience or knowledge about it, unless they have had supervision or instructions on how to use the appliance by someone who is responsible for their safety.
Under no circumstances should any external covers be removed for servicing or maintenance except by suitably qualified personnel.
Appliance information:
Please enter the details on the appliance rating plate below for reference, to assist CDA Customer Care in the event of a fault with your appliance and to register your appliance for guarantee purposes.
Appliance Model
Serial Number
This appliance has been designed for domestic use only. Commercial use will invalidate the warranty.
EU Declarations of Conformity:
This product meets the requirements of all applicable EU directives with the corresponding harmonised standards, which provide for CE marking.
Availability of this manual in an alternative format:
A soft copy of this manual is available for download from www.cda.eu.
IMPORTANT INFORMATION FOR CORRECT DISPOSAL OF THE PRODUCT IN ACCORDANCE WITH EC DIRECTIVE 2012/19/EU.
At the end of its working life, the product must be taken to a special local authority waste collection centre or to a dealer providing appliance recycling services.
Disposing of a household appliance separately avoids possible negative consequences for the environment and health. It also enables the constituent materials to be recovered, saving both energy and resources. As a reminder of the need to dispose of household appliances separately, the product is marked with a crossed-out wheeled dustbin ✉
Important
- Read the instructions prior to installation and use of the appliance.
- Do not lean or climb on the open dishwasher door, to prevent damage.
- Close the dishwasher door after use to prevent accidents.
- Use only detergents, salt and rinse aid specifically designed for dishwashers.
- Do not put solvents in the dishwasher detergent compartment to prevent risk of explosion.
- Only put dishwasher safe items into the dishwasher. If in doubt, check with the manufacturer of the items.
- Take care when loading the dishwasher to observe the recommendations for best loading practice, and also to ensure that sharp objects such as knives are placed blade down to prevent accidents.
- Do not open the dishwasher door when a programme is running. If it is necessary to do so, then open it only slightly to allow the dishwasher to pause the programme and prevent any water spilling out. Remember that the water in the dishwasher can be very hot when the programme is running.
- When the dishwasher is not in use, we recommend that you turn off the water supply at the supply tap and disconnect the main supply.
- If you are leaving the dishwasher for an extended period you should leave the door slightly open to prevent the formation of unpleasant smells.
- This appliance can be used by children aged from 8 years and above and persons with reduced physical, sensory or mental capabilities or lack of experience and knowledge if they have been given supervision or instruction concerning use of the appliance in a safe way and understand the hazards involved. Children shall not play with the appliance. Cleaning and user maintenance shall not be made by children without supervision.
- The plastic housing on the water inlet pipe contains an electrically operated valve. The wires that connect to this valve are inside the inlet hose. Do not cut through the inlet hose and do not put the plastic housing in water.
- Children could get locked inside the appliance. Therefore, when disposing of an old appliance cut off the plug and set aside. Damage the door lock so that the door can no longer be closed.
Recommendations
• To reduce energy and water consumption, remove all dirt residues from the dishes prior to loading the dishwasher.
- Loading the dishwasher to the capacity indicated by the manufacturer will save energy and water.
- Place hollow items (bowls, glasses and pans) face down in the basket.
- Do not put dishes, cutlery or other items with tobacco ash, wax, lubricating grease or paint residues in the dishwasher.
- It is not recommended to pre-rinse the tableware, as this leads to an increase in water and energy consumption.
- Washing tableware in a household dishwasher usually uses less energy and water than washing up by hand.
Before First Use
- Set the water softener level as required by the water hardness in the area (see pages 13-14).
- Add 1kg of salt into the salt compartment and then fill with water to the top of the salt compartment.
- Remove all the packaging materials from the interior of the dishwasher.
• Fill the rinse aid compartment. - Run a hot programme without any dishes in the dishwasher.
Control Panel
On/Off button
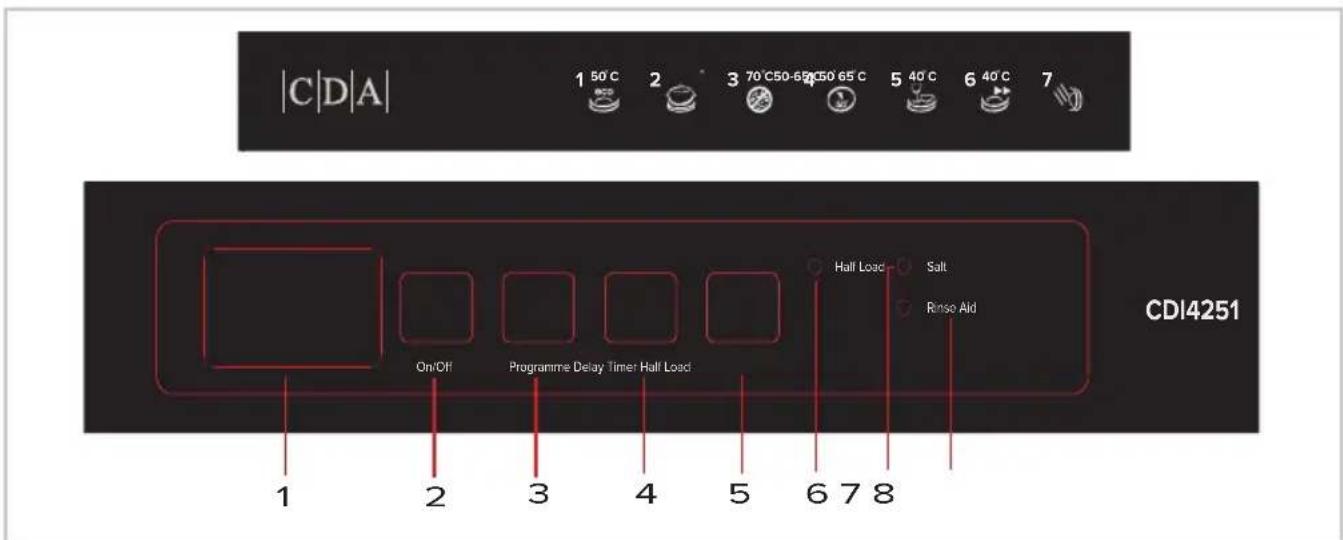
To switch the power to the dishwasher on or off, press the ‘On/Off’ button (2). When you switch on the dishwasher, two dashes will appear on the programme display (1).
Programme selection button
To select an alternative programme, press the ‘Programme selection’ button (3) several times, until the programme display (1) shows the desired programme. The dishwasher will store, in its memory, the last programme used.
Delay timer button
The dishwasher is equipped with a variable delay timer which can be set between 1 hour and 19 hours. Pressing this button (4) once will delay the start time for 1 hour, and continuing to press will increase the delay time. Press the Delay button to change or cancel the delayed start. If you switch off the machine while delay timer is active, the delayed time is cancelled.
Half load button and indicator light
The dishwasher is equipped with a half-load function that allows for small numbers of dishes to be washed, spread between both baskets. This reduces the amount of water and electricity used.
To use this function, press the half-load button (5). The indicator light (6) will illuminate and shows that this function is selected.
If you have selected the half-load function for a programme, then this function will automatically be selected the next time the dishwasher is used. To cancel the selection of this function, press the half-load button (5) until the indicator light goes out.
Salt and rinse aid warning lights
When the dishwasher salt or rinse aid begins to run out, the relevant warning light (7 or 8) will illuminate to advise that it needs refilling
- Then close the door. The dishwasher will begin the new programme from the point at which the old programme stopped.
Starting a programme
- Pressthe'On/Off'button.
- Press the ‘Programme selection’ button until the required ‘Programme’ light is illuminated.
- If required, press the 'Delay Timer' button.
- Once a programme is selected, the display will show the desired programme.
- When you close the dishwasher door the programme will start automatically.
Please note: The dishwasher stores the most recently used programme in its memory. To change the programme, simply press the ‘Programme selection’ button.
At the end of a programme
If possible, do not open the dishwasher door once the programme has started.
During the programmes cycle the InfoLed will illuminate a red light underneath the appliance door on to the floor. Once the program has finished the light illumination will be green.
Changing a programme
It is possible to change the programme if necessary once the programme has started.
- First open the door slightly to reduce the risk of water spillage.
- Press the ‘Programme selection’ button until the required programme is shown on the display.
- Then close the door. The dishwasher will begin the new programme from the point at which the old programme stopped.
Cancelling a programme
It is possible to cancel the programme once the programme has started.
- First open the door slightly to reduce the risk of water spillage.
- Press and hold the ‘Programme selection’ button for approximately three seconds and a ‘1’ shows on the display.
- Then close the door. The dishwasher will drain for approximately thirty seconds. Once this is complete, the dishwasher will beep five times and the display will show ‘00’.
Switching the dishwasher off
- Once the dishwasher beeps five times, the dishwasher can be switched off by pressing the ‘On/Off’ button.
- Then, turn off the water tap and remove the plug from the power socket.
Please note: The dishwasher will automatically continue on the programme it has started if operation is interrupted.
Buzzer sound control
To change the buzzer sound level, follow the below steps:
- Open the door and press Programme (2) and Delay (4) buttons simultaneously for 3 seconds.
- When sound setting is recognized, buzzer gives a long sound and machine will display last set level, from "S0" to "S3".
- To decrease sound level press Programme button (2). To increase sound level, press Delay button (4).
- To save the selected sound level, turn off the machine. "S0" level means all sounds are off. The factory setting is "S3"
Save Power Mode
To activate or deactivate Save Power Mode, follow the below steps:
- Open the door and press Delay (4) and Half Load (5) buttons simultaneously for 3 seconds.
- After 3 seconds, the machine will display last Setting, "IL1" or "IL0".
- When Save Power Mode is activated, "IL1" will be displayed. On this mode, interior lights will turn off 4 minutes after the door is opened, and the machine will turn off after 15 minutes of no activity in order to save energy.
- When Save Power Mode is deactivated “ILO” will be displayed. If Save Power Mode is deactive, interior lights will be on as long as the door is open, and the machine will always be on unless it is turned off by the user.
- To save the selected setting, turn off the machine.
In factory setting, Save Power Mode is active.
Detergent
To fill the detergent compartment
- Push the latch to open the compartment.
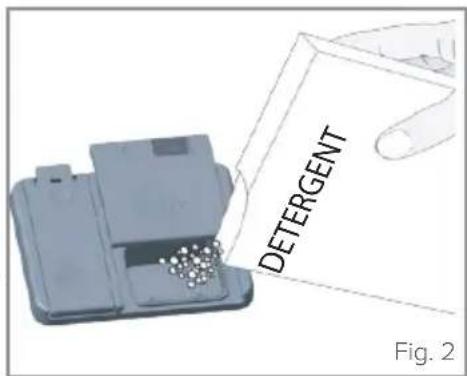
- Add the required amount of detergent. The main detergent compartment (b in Fig. 2) has lines to allow for specific amounts of detergent.
These are marked at either 15cm^3 or 25cm^3 , depending on how dirty the dishes are.
If your dishes are in need of an intensive wash, then add 5cm^3 of detergent into the prewash section of the compartment (a in Fig 2).
- Then close the detergent compartment lid until the latch locks.
Please note: You should only use detergents designed specifically for use in dishwashers.
If using dishwasher tablets, always use the detergent compartment. Do not put them in the main body of the dishwasher or in the cutlery basket.
The solubility of dishwasher tablets can vary depending on the temperature and duration of the programme. As a result, it is recommended that powder detergents (and not 3-in-1 tablets) should be used in the quick wash and half-load programmes to allow better performance.

natural_image
Illustration of a mechanical device with a gear and housing, labeled Fig. 3 (no text or symbols on the diagram itself)
natural_image
Illustration of a coffee maker pouring liquid into a container on a stand, with no visible text or symbols.CDA recommends the use of separate detergent, rinse aid and dishwasher salt rather than combination tablets as separates achieve better wash performance.
If you do use combination detergents, add salt and rinse aid to the dishwasher and then adjust the water hardness setting and rinse aid setting to the minimum. When you then use separate detergents again, you should fill the salt and rinse aid compartments, adjust the water hardness setting to the maximum and run an empty wash, then adjust the water hardness setting and the rinse aid setting to the appropriate level.
Salt
To ensure the best efficiency, the dishwasher needs soft water. Hard water means that lime residues remain on the dishes and the interior of the dishwasher, affecting performance. The softener system is designed to remove the ions that make the water hard to provide the best quality wash performance. This is achieved by using dishwasher salt.
To add dishwasher salt
-
Remove the lower dishwasher basket and then unscrew the salt compartment cap, as shown in Fig. 3 (page 12).
-
Fill the compartment with dishwasher salt (do not use table salt), carefully to prevent unnecessary spillage. Before first use, you should fill the compartment with 1kg of dishwasher salt and then fill up the salt compartment with water (up to the brim of the compartment) as shown in Fig. 4 (page 12).
-
Replace the cap and the lower basket.
When the ‘Salt’ light on the control panel illuminates, you should refill the salt compartment with salt only – do not add water to the salt compartment after the first use.
You should run a programme immediately after adding dishwasher salt, to prevent any damage to the dishwasher systems.
Fill the salt compartment with just water on first use.
Softener Adjustment
The efficiency of your dishwasher depends on the softness of the tap water. To ensure best efficiency, the dishwasher is equipped with a system that reduces the hardness in the mains water supply. The efficiency will increase when the system is correctly set. To find out the water hardness level of your water supply you can use the test strip supplied or alternatively contact your local water board.

-
Open the testing strip.
-
Run water through the tap for one minute.
-
Hold the testing strip in water for one second.
-
Shake the testing strip after taking it out of the water.
-
Wait for one minute.
-
Check the number of marks on the strip to see the level of water hardness.
If the hardness of the water you use is above 90dF or if you are using well water; you are recommended to use filter and water refinement devices.
Please note: The level of water hardness is preset to level 3.
- Press and hold down the 'Programme Selection' button.
- Press the 'On/Off' to switch on the dishwasher.
- Keep the ‘Programme Selection’ button pressed until ‘SL’ shows on the display and then disappears.
- After the ‘SL’ disappears, the machine displays the last water hardness setting entered.
- To adjust the level, press the ‘Programme selection’ button until the required level is selected. The programme display will illuminate with certain figures as in the table of water hardness settings below.
- To store the selected water hardness level, press the 'On/Off' button.
| Water Hardness Level | British Hardness dE | Display Shows |
| 1 | 0 – 6 | L1 |
| 2 | 7 – 14 | L2 |
| 3 | 15 – 21 | L3 |
| 4 | 22 – 28 | L4 |
| 5 | 29 – 42 | L5 |
| 6 | 43 - 63 | L6 |
Rinse aid
Rinse aid helps to ensure better quality wash results and increased drying performance.
To fill the rinse aid compartment, open the rinse aid compartment lid.
Fill the compartment with rinse aid to the MAX level and then close the lid. Be careful not to overfill the rinse aid compartment and ensure that you wipe up any spillages.
In order to change the rinse aid level, follow the steps below before turning on the machine:
- Press and hold down the 'Programme selection' button
- Press the 'On/Off' button to switch on the dishwasher
- Keep the ‘Programme selection’ button pressed until “rA” shows on the display and then disappears
- To adjust the level, press the programme selection button until
the required level is shown on the display, as listed in the table on below.

natural_image
Illustration of a hand using a tool to press or adjust a device into a flat case (no text or symbols present)- To store the selected rinse aid level, press the 'On/Off' button.
| Level Brightener Dose Indicator | |
| 1 Rinse-aid not dispensed r1 is shown the on display. | |
| 2 1 dose is dispensed r2 is shown the on display. | |
| 3 2 doses are dispensed r3 is shown the on display. | |
| 4 3 doses are dispensed r4 is shown the on display. | |
| 5 4 doses are dispensed r5 is shown the on display. | |
If the dishes are not drying properly or are spotted with food debris, dirt etc., increase the rinse aid level. If blue stains appear on your dishes, decrease the rinse aid level.
Always refill the rinse aid when the rinse aid indicator light on the control panel is illuminated. Many brands of rinse aid (as well as detergents) contain phosphates which escape sewage treatment and can cause excessive algae growth in waterways. This in turn
can pollute drinking water and cause marine life ‘dead zones’ which are underwater environments deprived of oxygen that are subsequently unable to support life. Please consider the environment and, if you wish to use rinse aid, try to source an environmentally friendly brand.
Dishwasher Baskets
There are three baskets in the dishwasher which have been designed to maximise capacity and efficiency.
Upper cutlery basket
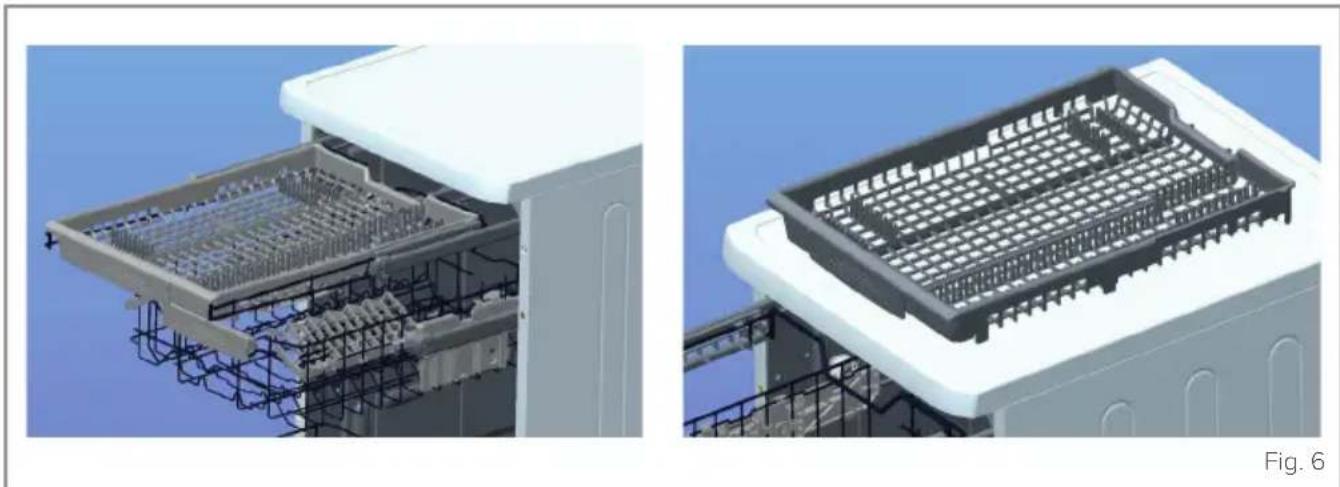
The upper cutlery basket has been designed for you to place cutlery and other smaller items (e.g. metal skewers) in. It is easily removable from the machine allowing for easy loading and unloading.
natural_image
Architectural rendering of a building facade with grid-like structural elements and safety railings against a clear blue sky (no text or symbols)To remove the cutlery basket, simply open it fully along the runners and then lift the basket away. Place it in an area where it will neither cause nor receive damage.
IMPORTANT: Knives and other sharp objects must be placed horizontally in the upper cutlery basket.
Upper basket
The upper basket has been designed for smaller items such as saucers, dessert plates, salad bowls, cups and glasses. There are dish racks on the upper basket which can be in either the closed or open position. When they are in the open position (a) you can place cups on them and when they are in the closed position (b) you can place tall glasses in the basket. These racks can also be used for utensils, provided they are placed laterally.

natural_image
3D architectural floor plan with labeled components (a, b) and red arrows indicating directions, no readable text or symbols beyond labelsThere are two grey racks on the upperbasket (marked by arrows in Fig. 8 to the (right) that are foldable. These allow you to customise the wash load space as necessary.
Glass Guards
The upper basket racks come with a ‘GlassGuard’ feature. These allow you to place wine glasses securely into the dishwasher and help to prevent the glasses from causing or receiving damage. They are simple to use and involve placing the stem of the glass into
the blue grooves along the outside edge of the racks. These are pictured on the following page.

natural_image
3D architectural or engineering diagram of a building complex with structural framework and internal components (no visible text or symbols)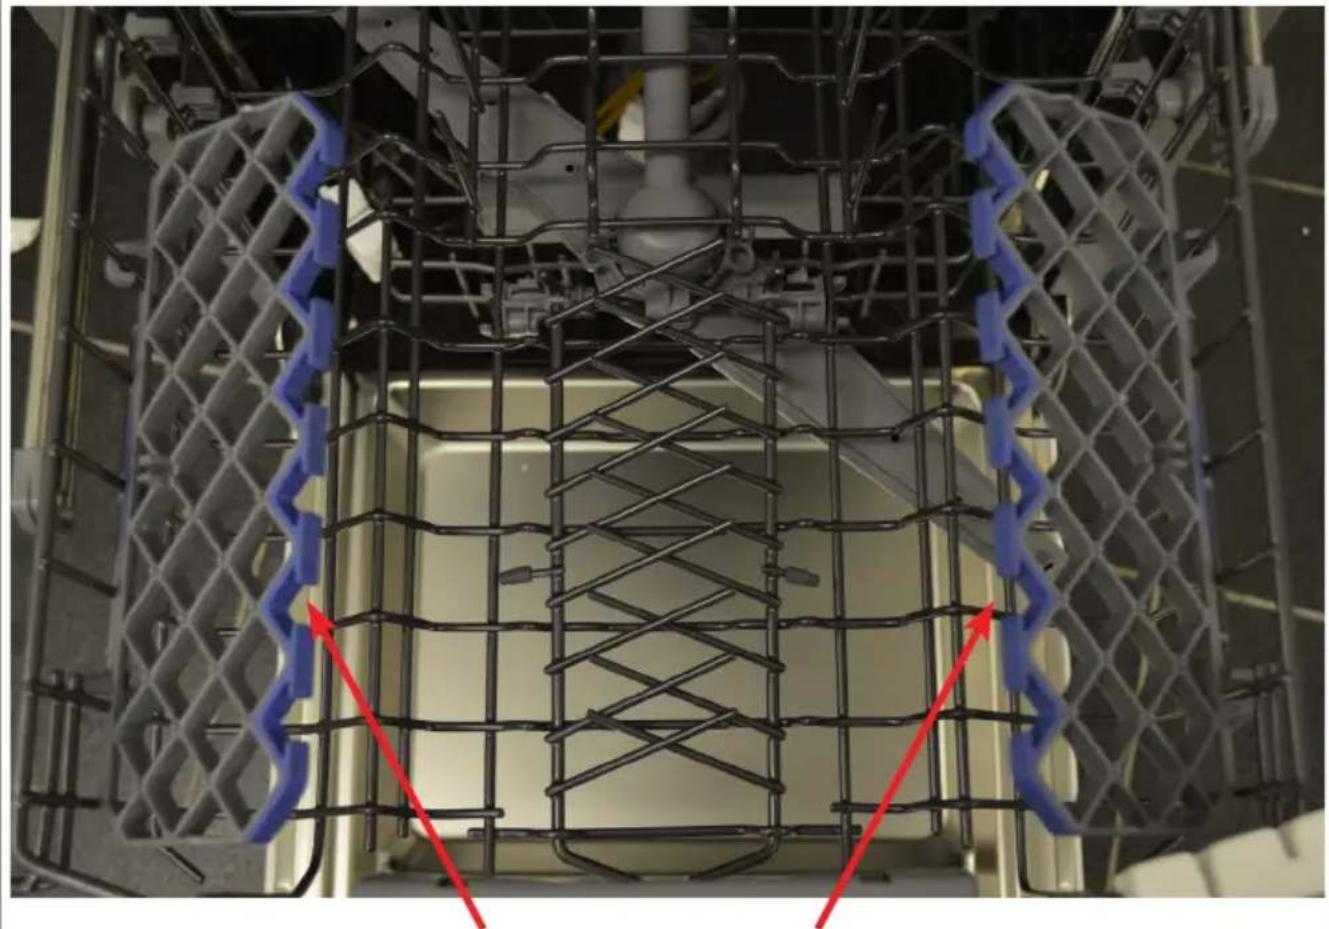
natural_image
Close-up of a mechanical assembly with blue and red directional arrows indicating components (no text or symbols)Glass Guards
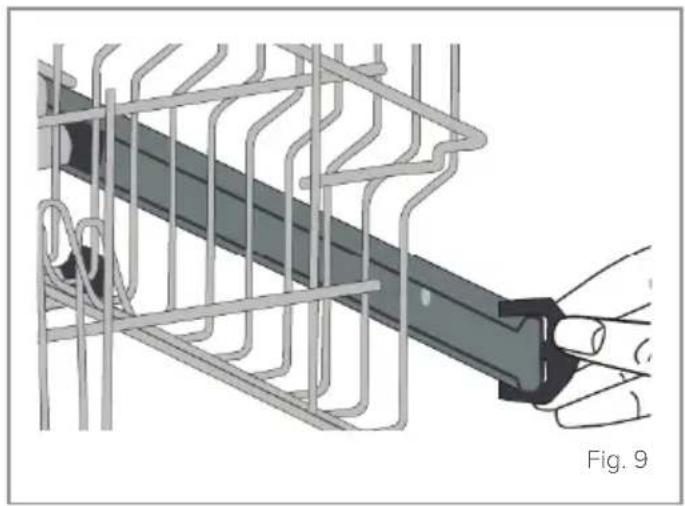
Adjust the height of the upper basket
-
Open the basket retaining clips, as shown in Fig. 9, by turning them to the side.
-
Remove the upper basket, and relocate the alternate set of wheels on the runner, as shown in Fig. 10, pushing the basket back into place.
-
Close the basket retaining clips.
natural_image
Technical illustration of a mechanical assembly with wire mesh and a hand holding a bracket (no text or symbols)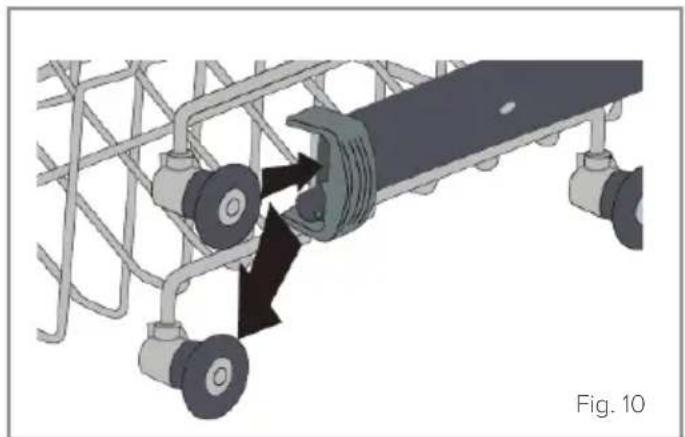
natural_image
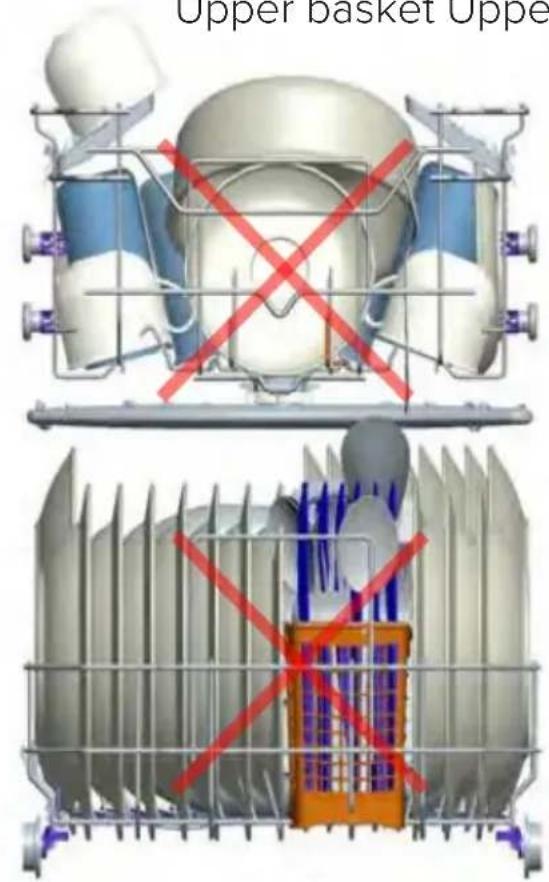
Mechanical assembly diagram showing a conveyor belt system with pulleys and a central rotating component (no text or symbols)The following images are designed as guidance as to best practice (and malpractice) for loading the dishwasher.
Recommended loads


natural_image
3D diagram of a mechanical or electrical component with blue and white components arranged in a grid, no visible text or symbols.Erroneous loads
Upper basket Upper basket
Lower basket
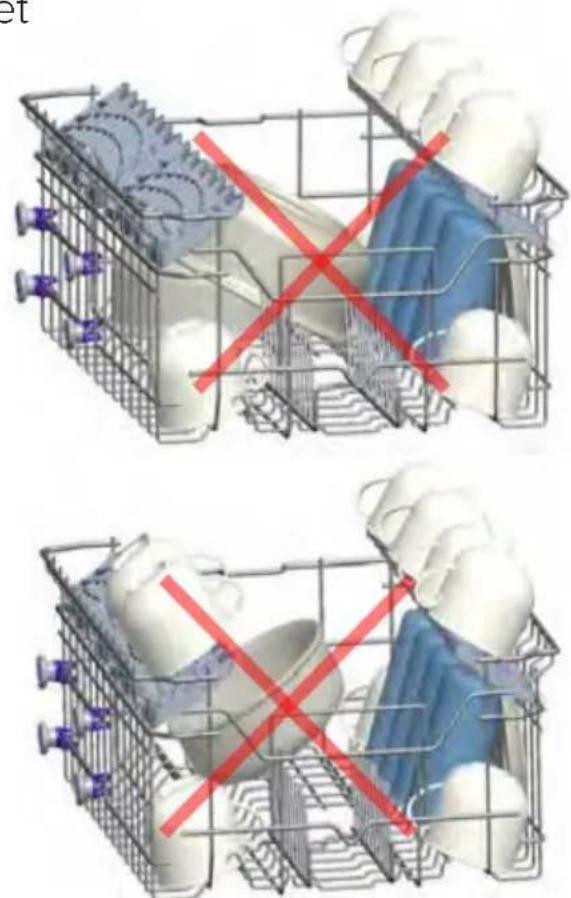
natural_image
Two identical wire cage setups with a red X mark indicating no change or comparison between them (no text or symbols present)Upper basket
Standard Loading and Test Data
Capacity
• Upper and lower baskets: 10 place settings.
- The upper basket should be adjusted to high position.
- Cups should be placed onto the dish rack pins.
Detergent / Rinse aid
- 5 + 25cm^3 , in accordance with EN50242-DIN 44990 IEC 436 (international norms) / Rinse aid dosage adjustment: 5.
Programme test
- Eco 50°C, in accordance with EN50242 (international norms.).
Programme Listing
| P1 P2 P3 P4 P5 P6 P7 | |||||||
| Programme Name | Eco 50°C | Auto 50 - 65°C | Hygiene Pro 70°C | Super 50' 65°C | Delicate 40°C | Quick 30' 40°C | Prewash |
| Level of soil | Medium Heavy Heavy Medium Light Light Light | ||||||
| Amount of detergent: A = 25cm3B = 15cm3 | A A A A A A | ||||||
| Programme Duration (h:mm) | 03:42 | 01:50 -02:15 | 02:20 | 00:50 | 01:30 | 00:30 | 00:15 |
| Electricity consumption (kWh/cycle) | 0.755 | 1.150 - 1.550 | 1.650 | 0.950 | 0.800 | 0.670 | 0.020 |
| Water consumption (l/cycle) | 9.0 | 11.2 - 17.6 | 15.1 | 11.2 | 14.1 | 10 | 3.5 |
Warning: Short programmes do not include a drying stage.
The values and times provided on the previous page have been obtained under laboratory conditions according to relevant standards.
This information can change depending on the conditions of the dishwasher's use and environment (network voltage, water pressure, water input temperature and environment temperature).
Laboratory measured values in accordance with European standard EN50242
Care and Maintenance
Before beginning any care or maintenance, you should always disconnect the appliance from the electricity supply, and also turn off the water supply.
Door seals
Wipe the dishwasher door seals regularly with a damp cloth to remove any residues.
Filters
You should clean the filters at least once a month.
- Remove the lower basket.
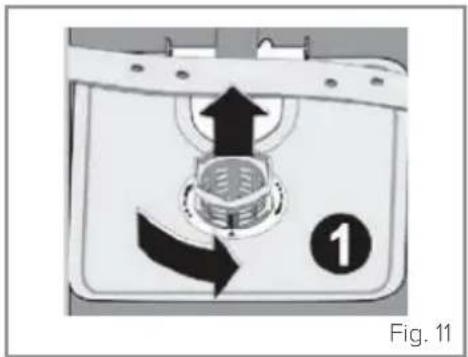
- Turn the microfilter anticlockwise and then lift it out (Fig. 11).
- Remove the coarse filter (b) from the microfilter (a) (Fig. 12).
- Remove the base filter from the dishwasher compartment (Fig. 13). You should clean and rinse the filters thoroughly before replacing all the sections in reverse order to that above. The microfilter should lock into place once it is secure (Fig. 14).
natural_image
Diagram of a device interior with directional arrows and a numbered label (1), no readable text or symbols present.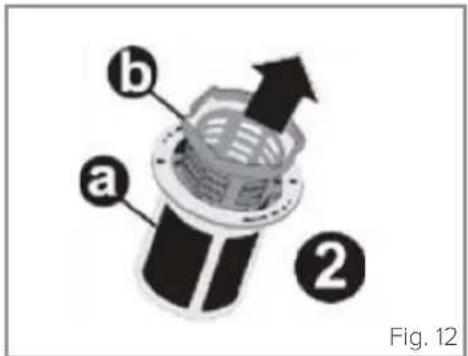


natural_image
Diagram of a device with a valve and directional arrows, labeled '4', no readable text or symbols beyond the number and label.Please note: Never run a programme without the filters in place.
Incorrect fitting of the filters may reduce wash performance and potentially damage your appliance.
Spray arms
You should clean the spray arms at least once a month.
- Remove the lower basket.
- Pull the lower spray arm upwards to remove it.
- To remove the upper spray arm, first remove the nut on the upper spray arm by turning it. You should clean and rinse the spray arms thoroughly before replacing them. Ensure that the upper spray arm nut is securely tightened when refitting the upper spray arm.
Dishwasher interior
To deal with an accumulation of dirt, oil or limescale in the dishwasher, run an intensive programme with detergent when the dishwasher is empty. Alternatively, there are specialist dishwasher cleaners available that can be used.
Items unsuitable for dishwashing
- Ashtrays or any similar receptacle containing ashes.
- Receptacles that have held paint, glues, polish, chemicals or iron-alloys.
- Wooden, bone, ivory or nacre-coated handled cutlery.
• Aluminium or silver objects - Certain delicate glass types, ornamental porcelains, crystal items, non-heat resistant items, synthetic fibre items and chopping boards.
- Absorbent items such as sponges or kitchen towels.
- Items other than cookware, dishes and cutlery.
Error Codes
The programme display also serves as a diagnostic display to help in the event of a problem with the appliance. Potential error codes, their causes and potential solutions are below:
| Error code | Possible error Advice | |
| FF Water inlet system failure | Make sure the water inlet tap is open and water is flowing | |
| Seperate the inlet hose from the tap and clean the filter fo the hose | ||
| Contact CDA customer care if the error continues | ||
| F5 Pressure system failure Contact CDA customer care | ||
| F3 Continuous water input Close the tap and contact CDA customer care | ||
| F2 Inability to discharge water | Water discharge hose and filters may be clogged - Remove foreign bodies such as food residue or glass shards | |
| Cancel the programme | ||
| If the error continues contact CDA customer care | ||
| F8 Heater error Contact CDA customer care | ||
| F1 Overflow | Unplug the machine and close the tap | |
| Contact CDA customer care | ||
| FE Faulty electronic card Contact CDA customer care | ||
| F7 Overheating Contact CDA customer care | ||
| F9 Divisor position error Contact CDA customer care | ||
| F6 Faulty heater sensor | Contact CDA customer care | |
| HI | High voltage failure | Contact CDA customer care |
| LO | Low voltage failure | Contact CDA customer care |
Troubleshooting
| Problem Possible cause | |
| The programme will not start | Check the plug, fuse and circuit breakers of the mains supply.The water tap is turned off.The dishwasher door is not fully closed.The water inlet filter or the machine filters are blocked. |
| Water remains inside the dishwasher at the end of a programme | The water drain hose is blocked or kinked.The filters are blocked. |
| The dishwasher stops in the middle of a programme | Power failure.Water inlet failure.Programme is on standby. |
| Wash performance is of a low standard | Poor loading of dishes hinders wash performance.Insufficient detergent added.Inappropriate wash programme selected.Spray arm is blocked.Filters clogged or incorrectly fitted.Water drain pump is blocked. |
| White stains on the dishes | Insufficient detergent added.Rinse aid setting is too low.Insufficient dishwasher salt added.Water softener setting is too low.Salt compartment cap may not be completely closed. |
| The dishes are not completely dry at the end of a programme | A programme without a drying stage was selected.Rinse aid setting is too low.Dishes unloaded too soon (allow time for drying). |
| There are rust stains on the dishes | Different sets of cutlery should be kept separate.Too much salt (water softener setting is too high).Salt compartment cap not completely closed.Poor appliance earth (check mains electrical supply). |
| The door is not opening or closing properly Door tension not correctly adjusted for the decor door. | |
Electrical Information
Warning! This appliance must be earthed.

The mains lead of this appliance has been fitted with a BS 1363A 13 amp fused plug. To change a fuse in this type of plug, follow the steps below:
- Remove the fuse cover and fuse.
- Fit replacement 13A fuse, ASTA approved to BS 1362 type, into the fuse cover.
- Replace fuse cover.
Important: Do not use the appliance without the fuse cover in position.
How to connect an alternative plug
If the fitted plug is not suitable for your socket outlet, then it should be cut off and disposed of safely to avoid the risk of electric shock. A suitable alternative plug of at least 13Amp rating to BS 1363 should be used.
As the colours of the wires in the mains lead of this appliance may not correspond with the coloured markings identifying the terminals in your plug, proceed as follows:-
- The wire which is coloured GREEN and YELLOW must be connected to the terminal which is marked with the letter (E) or by the Earth symbol for coloured GREEN and YELLOW.
- The wire which is coloured BLUE must be connected to the terminal which is marked with the letter (N) or coloured BLACK or BLUE.
- The wire which is coloured BROWN must be connected to the terminal which is marked with the letter (L) or coloured RED or BROWN.
If in doubt regarding the electrical connection of this appliance, consult a qualified electrician.
Do not shorten the supply cable, the appliance may require removing for servicing.
N.B. Ensure that the plug socket is situated in an easily accessible place.
Installation
- Do not install this appliance if it is damaged in any way. Installing a damaged appliance may invalidate the warranty and could cause further damage to the surrounding area.
- Do not hold the appliance by the door or control panel to move it as this may cause damage. We recommend seeking the help of another individual when moving and installing this appliance.
- We would recommend leaving a certain clearance either side of the dishwasher so that removal of the appliance is easier, should the need arise.
- The water supply tap should be located in an adjacent cupboard so that it can be accessed after installation.
- Ensure the appliance is level by adjusting the feet as necessary. Problems with the level seating of the appliance can lead to issues with the door opening and closing.
- Only use the water inlet supplied with the appliance.
- If the water pressure is above 10 bar, a pressure relief valve should be used.
- After connecting the water supply, check to ensure there are no leaks.
- The water outlet can either be connected to a water drain or to a sink outlet spigot. Where the dishwasher drain hose is to be connected to a sink spigot, ensure that the spigot is cut/opened (if required) before attaching the drain hose.
- The drain connection (fig. 16) should be at a minimum of 600mm and a maximum of 1100mm from the floor. The drain hose should be no longer than 4m in length to ensure good performance from the dishwasher.
• This appliance is cold fill only.
Figures 15 and 16 on page 32 show the recommended installations of our dishwashers. The set-ups in these figures should be mimicked wherever possible to help to ensure the best performance of the appliance. Please carry out the below checks/measures before, during and after installation.
Drain hose
- This can be connected to a water drain or to a sink outlet spigot. Where the hose is to be connected to a spigot, ensure that the spigot is cut/opened (if required) before attaching the hose. A circlip can be used to secure this connection. Observe the 150mm minimum height distance between the spigot and drain hose support as per fig. 16.
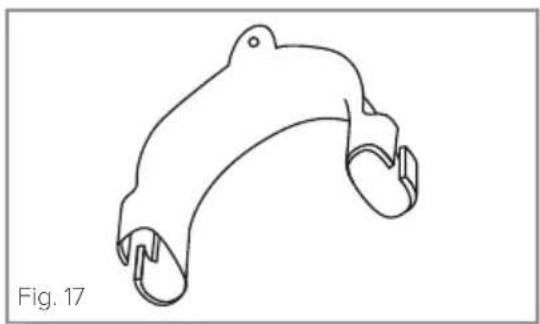
- The drain hose support (fig. 17) must be secured at a minimum of 60cm and a maximum of 110cm from the floor and must be higher than the sink waste.
- Should be no longer than 4m in order to ensure good performance.
- Must be free from kinks, debris or damage. It is important that this is checked before and after installation.
Inlet hose
- This must be free from kinks, debris or damage. This must be checked before and after installation.
- Should have a bend radius of 200mm minimum to ensure the proper flow of water to the appliance.
-
Ensure the supply to the hose (water valve) is turned on.
-
Use the additional fitting template and kit supplied with the appliance to fit the appliance into the cabinet, secure it and fit and secure the decor door.
- Adjust the dishwasher door hinge tension as necessary to ensure the appliance door opens and closes properly and safely with the decor door attached. There are labels on the dishwasher door to advise you. An improperly fitted (or adjusted) decor door will prevent the appliance door from opening and closing as normal and could cause issues with operation such as leaks.

natural_image
Line drawing of a curved, segmented object resembling a stylized animal or creature (no text or symbols)
Fitting the decor door
Where non-standard decor doors are to be used, additional fitting instructions are required to ensure compatibility with this product.
The appliance is supplied with a fitting template and these instructions should be followed as normal.
However, the fitting template needs to be located lower down the fascia door. This is shown below:
The amount of offset, Y, depends upon the height of the fascia door and can be calculated as X = 723mm.
For example, if you have a 731mm tall fascia door and are fitting a door to your dishwasher, then Y = 731-723 = 8mm.
Ensure that the hinge tensioners are adjusted to balance the weight of the door.

Warranty and service
The manufacturer shall not be held liable for any damage caused by improper use of the product.
- Repairs carried out by unqualified persons may seriously endanger the appliance user
- Pursuant to Commission Regulation (EU) 2019/2023, The minimum availability period for spare parts necessary to repair the appliance is 7 or 10 years depending on the type and purpose of the spare part
- The list of spare parts and the ordering procedure are available on the websites of the manufacturer, importer or an authorised representative
- The minimum warranty period for the appliance offered by the manufacturer, importer or authorised representative is given in the warranty card
- The warranty shall be void if you make any independent adaptations or alterations, tamper with seals or other appliance safety devices or its parts or interfere with the appliance contrary to operating instructions
For more information about the product, please refer to the EU EPREL Product Database at https://eprel.ec.europea.eu.
Alternatively you can use your mobile device to scan the QR code on the energy label or enter the product model listed on the energy label in the EPREL search engine.
Notes
The CDA Group
Harby Road
Langar
Nottinghamshire
NG13 9HY
Sales Department
Phone: 01949 862010
Email: sales@cda.eu
CDA Customer Care
Phone: 01949 862012
Email: customer.care@cda.eu




- Contents
- Important
- Appliance information:
- EU Declarations of Conformity:
- Availability of this manual in an alternative format:
- IMPORTANT INFORMATION FOR CORRECT DISPOSAL OF THE PRODUCT IN ACCORDANCE WITH EC DIRECTIVE 2012/19/EU.
- Recommendations
- Before First Use
- Control Panel
- On/Off button
- Programme selection button
- Delay timer button
- Half load button and indicator light
- Salt and rinse aid warning lights
- Starting a programme
- At the end of a programme
- Changing a programme
- Cancelling a programme
- Switching the dishwasher off
- Buzzer sound control
- Save Power Mode
- Detergent
- To fill the detergent compartment
- Salt
- To add dishwasher salt
- You should run a programme immediately after adding dishwasher salt, to prevent any damage to the dishwasher systems.
- Softener Adjustment
- Please note: The level of water hardness is preset to level 3.
- Rinse aid
- In order to change the rinse aid level, follow the steps below before turning on the machine:
- Dishwasher Baskets
- Upper cutlery basket
- Upper basket
- Glass Guards
- Adjust the height of the upper basket
- Recommended loads
- Erroneous loads
- Standard Loading and Test Data
- Capacity
- Detergent / Rinse aid
- Programme test
- Programme Listing
- Warning: Short programmes do not include a drying stage.
- Care and Maintenance
- Door seals
- Filters
- Incorrect fitting of the filters may reduce wash performance and potentially damage your appliance.
- Spray arms
- Dishwasher interior
- Items unsuitable for dishwashing
- Error Codes
- Electrical Information
- How to connect an alternative plug
- Installation
- Drain hose
- Inlet hose
- Fitting the decor door
- Warranty and service
- Notes
Brand : CDA
Model : CDI4251
Category : Dishwasher