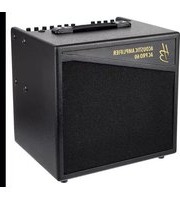
AC PRO 60 - Guitar amplifier Harley Benton - Free user manual and instructions
Find the device manual for free AC PRO 60 Harley Benton in PDF.


| Product Type | Guitar Amplifier |
| Brand | Harley Benton |
| Model | AC PRO 60 |
| Power Output | 60 Watts RMS |
| Speaker Configuration | 1x12" Custom Speaker |
| Channels | 2 (Clean and Overdrive) |
| Controls | Gain, Volume, Treble, Mid, Bass, Reverb |
| Inputs | 1/4" Instrument Input |
| Outputs | 1/4" Headphone Jack, Line Out |
| Dimensions (W x H x D) | 450 x 400 x 250 mm |
| Weight | 15 kg |
| Power Supply | AC 230V / 50Hz (IEC Cord) |
| Power Consumption | 100W |
| Safety Class | Class I (Grounded Plug) |
| Cabinet Material | Plywood with Tolex Covering |
| Grille Cloth | Black Vintage Style |
| Reverb Type | Spring Reverb |
| Effects Loop | Series Effects Loop (Send/Return) |
| Footswitch | Optional (Channel and Reverb) |
| Maintenance | Clean with dry cloth; avoid solvents |
| Repairability | Service by qualified technician only |
| Warranty | 2 Years (EU) |
Frequently Asked Questions - AC PRO 60 Harley Benton
User questions about AC PRO 60 Harley Benton
0 question about this device. Answer the ones you know or ask your own.
Ask a new question about this device
Download the instructions for your Guitar amplifier in PDF format for free! Find your manual AC PRO 60 - Harley Benton and take your electronic device back in hand. On this page are published all the documents necessary for the use of your device. AC PRO 60 by Harley Benton.
USER MANUAL AC PRO 60 Harley Benton
Harley Benton
AC PRO 60
guitar combo
Musikhaus Thomann
Thomann GmbH
1.1 Further information.... 5
1.2 Notational conventions.... 6
1.3 Symbols and signal words.... 6
2 Safety instructions.... 8
3 Features.... 12
4 Installation and starting up.... 13
5 Components and functions.... 14
6 Technical specifications.... 23
7 Plug and connection assignment.... 25
8 Protecting the environment.... 28
AC PRO 60
th·mann
This manual contains important instructions for the safe operation of the unit. Read and follow the safety instructions and all other instructions. Keep the manual for future reference. Make sure that it is available to all those using the device. If you sell the unit please make sure that the buyer also receives this manual.
Our products are subject to a process of continuous development. Thus, they are subject to change.
1.1 Further information
On our website (www.thomann.de) you will find lots of further information and details on the following points:
| Download This manual is also available as PDF file for you to download. | |
| Keyword search | Use the search function in the electronic version to find the topics of interest for you quickly. |
| Online guides | Our online guides provide detailed information on technical basics and terms. |
| Personal consultation For personal consultation please contact our technical hotline. | |
| Service | If you have any problems with the device the customer service will gladly assist you. |
AC PRO 60

1.2 Notational conventions
This manual uses the following notational conventions:
Letterings
The letterings for connectors and controls are marked by square brackets and italics.
Examples: [VOLUME] control, [Mono] button.
1.3 Symbols and signal words
In this section you will find an overview of the meaning of symbols and signal words that are used in this manual.
| Signal word Meaning | |
| DANGER! This combination of symbol and signal word indicates an immediate dangerous situation that will result in death or serious injury if it is not avoided. | |
| CAUTION! This combination of symbol and signal word indicates a possible dangerous situation that can result in minor injury if it is not avoided. | |
| NOTICE! This combination of symbol and signal word indicates a possible dangerous situation that can result in material and environmental damage if it is not avoided. | |
| Warning signs Type of danger | |
 | Warning – high-voltage. |
 | Warning – danger zone. |
AC PRO 60
th·mann MUSIC IS OUR PASSION
Safety instructions
2 Safety instructions
Intended use
This device is intended to be used for amplification and playback of signals from musical instruments with electromagnetic pickups. Any other use or use under other operating conditions is considered to be improper and may result in personal injury or property damage. No liability will be assumed for damages resulting from improper use.
This device may be used only by persons with sufficient physical, sensorial, and intellectual abilities and having corresponding knowledge and experience. Other persons may use this device only if they are supervised or instructed by a person who is responsible for their safety.
Safety
DANGER!
Danger for children
Ensure that plastic bags, packaging, etc. are disposed of properly and are not within reach of babies and young children. Choking hazard!
Ensure that children do not detach any small parts (e.g. knobs or the like) from the unit. They could swallow the pieces and choke!
Never let children unattended use electrical devices.
guitar combo

DANGER!
Electric shock caused by high voltages inside
Within the device there are areas where high voltages may be present. Never remove any covers.
There are no user-serviceable parts inside.
DANGER!
Electric shock caused by short-circuit
Always use proper ready-made insulated mains cabling (power cord) with a protective contact plug. Do not modify the mains cable or the plug. Failure to do so could result in electric shock/death or fire. If in doubt, seek advice from a registered electrician.
AC PRO 60
th·mann MUSIC IS OUR PASSION

CAUTION!
Possible hearing damage
The device can produce volume levels that may cause temporary or permanent hearing impairment. Over an extended period of time, even levels that seem to be uncritical can cause hearing damage.
Decrease the volume level immediately if you experience ringing in your ears or hearing impairment. If this is not possible, keep a greater distance or use sufficient ear protectors.

NOTICE!
Risk of fire
Do not cover the device nor any ventilation slots. Do not place the device near any direct heat source. Keep the device away from naked flames.

NOTICE!
Operating conditions
This device has been designed for indoor use only. To prevent damage, never expose the device to any liquid or moisture. Avoid direct sunlight, heavy dirt, and strong vibrations.

NOTICE!
Power supply
Before connecting the device, ensure that the input voltage (AC outlet) matches the voltage rating of the device and that the AC outlet is protected by a residual current circuit breaker. Failure to do so could result in damage to the device and possibly injure the user.
Unplug the device before electrical storms occur and when it is unused for long periods of time to reduce the risk of electric shock or fire.
AC PRO 60
th·mann MUSIC IS OUR PASSION
3 Features
Special features of the device:
Inputs:
– Channel 1: Instrument (switchable sensitivity)
- Channel 2: MIC/LINE (switchable sensitivity)
- MP3 player, AUX
■ Outputs: Headphones, tuner, mixer/amp
Effects loop
Speakers: 8" bass, 1" tweeter
- Separate controls for channels 1 and 2:
– Channel 1: Gain, bass, mids, treble, contour
– Channel 2: Gain, bass, treble
■ Switchable effects: Reverb, plate reverb, chorus, delay
■ Effects depth and assignment to channels 1 and 2 steplessly adjustable
■ Foot switch connector for an optionally available FS for effects on/off control
Volume control
■ Black textured coating
■ Automatic standby (can be disabled)
4 Installation and starting up
Unpack and carefully check that there is no transportation damage before using the unit. Keep the equipment packaging. To fully protect the device against vibration, dust and moisture during transportation or storage use the original packaging or your own packaging material suitable for transport or storage, respectively.
Establish all connections as long as the unit is switched off. Use the shortest possible high-quality cables for all connections.

NOTICE!
Possible property damage by magnetic fields
Loudspeakers produce a static magnetic field. Therefore, maintain an appropriate distance to devices that can be adversely affected or damaged by an external magnetic field.
AC PRO 60

5 Components and functions
Top panel

1 [INPUT]
1/4" TS phone socket for the input signal from your instrument.
2 [HIGH/LOW]
Input sensitivity switch (channel 1).
3 [CLIP]
This indicator lights red on preamp clipping (channel 1). If this occurs, reduce the input gain using the [GAIN] control (6).
4 [CONTOUR]
Switch for mid attenuation and simultaneous increasing of low and high frequencies (channel 1).
5 [CONTOUR]
Indicator light (red) for the [CONTOUR] switch (4).
6 [GAIN]
Input gain control (channel 1).
7, 8, 9 [BASS], [MIDDLE], [TREBLE]
Controls to attenuate or increase the low, mid and high frequencies (channel 1) by ±10 dB each.
AC PRO 60
th·mann MUSIC IS OUR PASSION
10 [INPUT BALANCED]
XLR/1/4" combo socket for an additional signal input (channel 2), e.g. another instrument or microphone.
11 [LINE/MIC]
Use this switch to adapt the sensitivity (channel 2) to the signal source.
12 [CLIP]
This indicator lights red on preamp clipping (channel 2). If this occurs, reduce the input gain using the [GAIN] control (13).
13 [GAIN]
Input gain control (channel 2).
14, 15 [BASS], [TREBLE]
Controls to attenuate or increase the low and high frequencies (channel 2) by ±10 dB each.
16 [EFF PAN]
Control to steplessly assign effects to both channels.
If you only use the built-in effects module, then please note:
In the mid position of the control, the effect selected with the [MODE] switch affects both channels 1 and 2. In [CH1] position, the effect affects only channel 1, in [CH2] position, the effect only affects channel 2.
If using the built-in effects module plus an additional external effects device on the effects loop ([SEND]/[RETURN]), then please note:
In the mid position of the control, both effects affect both channels. In [CH1] position, the internal effects module affects channel 1 and the external effects device affects channel 2. On the other hand, in [CH2] position, the internal effects module affects channel 2 and the external effects device affects channel 1.
17 [MODE]
Use this switch to select one of the internal effects (reverb, plate reverb, chorus or delay).
18 [LEVEL]
Control for setting the effects depth.
AC PRO 60
![Harley Benton AC PRO 60 - [LEVEL] - 1](/content/2026/06/1347462/images/f69c0ae5a6b0ec9da6b5981dd21ddd8f333610bb49be06aa09df2a04dbbd581d.jpg)
Components and functions
19 [MASTER]
Overall volume control.
20 [POWER]
This indicator lights red when the unit is switched on and operational.
Rear panel
AC PRO 60
th·mann MUSIC IS OUR PASSION
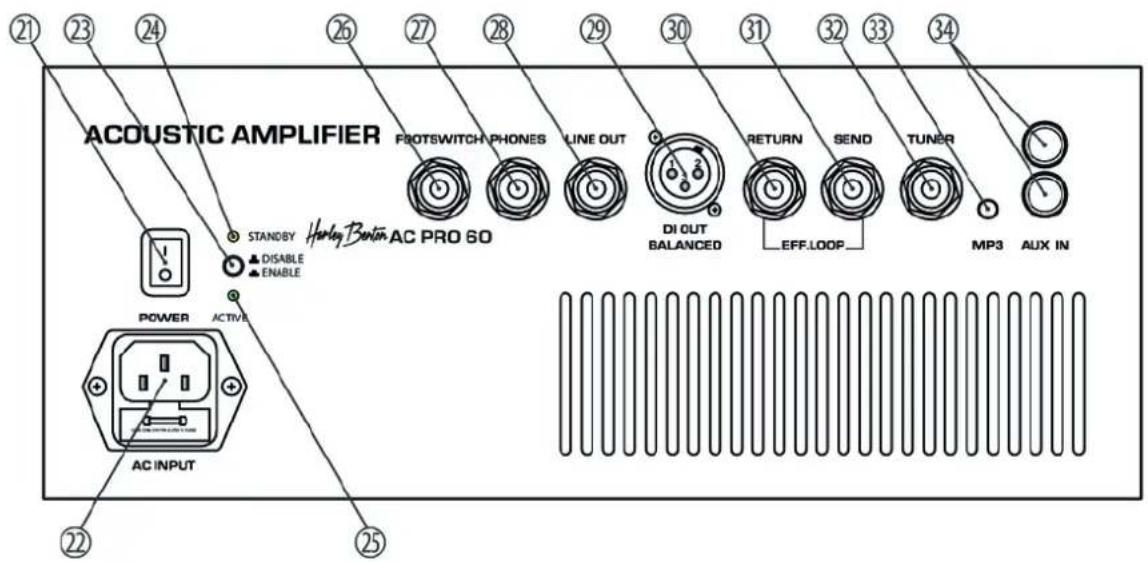
21 [POWER]
Use the mains switch to turn the unit on or off.
22 IEC chassis connector with fuse holder.
23 [STANDBY]
Push button to enable or disable the energy saving mode.
If the power is on and there is no signal input at the [INPUT] jack for 15 minutes, the device will automatically enter standby mode. As soon as the [INPUT] jack receives a instrument signal, the device switches back to normal mode.
24 LED [STANDBY]
Standby mode. This LED lights yellow when the energy saving mode is enabled and the box enters the standby mode. It goes off again when the box switches back to normal.
25 LED [ACTIVE]
Power indicator LED (green). This LED is permanently on in normal mode. It goes off when the energy-saving mode is enabled and the box enters the standby mode.
26 [FOOTSWITCH]
You can connect a foot switch (not supplied) to this 1/4" phone socket to turn the effects function on or off.
27 [PHONES]
1/4" phone socket for headphones. If you connect headphones, the internal speaker is disconnected.
To avoid annoying noise, turn the [MASTER] (19) control to minimum before plugging headphones in or out.
28 [LINE OUT]
1/4" TS phone socket providing the preamp out signal. Use this output to feed the preamp signal e.g. into a separate power amp.
29 [DI OUT BALANCED]
XLR mounting plug (balanced wiring) providing the preamp out signal. Use this output to feed the preamp signal e.g. into the microphone input of a mixing console.
30 [RETURN]
1/4" TS phone socket. Connect the output of an effects device here (effects return).
31 [SEND]
1/4" TS phone socket. Connect the input of an effects device here (effects send).
32 [TUNER]
1/4" TS phone socket. Here you can connect a tuner.
AC PRO 60
th·mann MUSIC IS OUR PASSION
Components and functions
33 [MP3]
1/8" TRS mini phone socket as additional signal input, e.g. for an MP3 player.
34 [AUX IN]
RCA sockets as additional signal input, e.g. for a CD player.
6 Technical specifications
| Input [CH1] 470 kΩ; 1/4" phone socket | |
| Input [CH2] LINE: 22 kΩ; MIC: 600 Ω; XLR/1/4" combo socket | |
| Input [RETURN] 1/4" phone socket | |
| Input [MP3] 1/8" mini phone socket | |
| Input [AUX IN] RCA sockets | |
| Output power 45 W (RMS, 8 Ω) | |
| Output [LINE OUT] 1/4" phone socket | |
| Output [SEND] 1/4" phone socket | |
| Output [TUNER] 1/4" phone socket | |
| Output [DI OUT] XLR mounting plug | |
| Output [PHONES] 1/4" phone socket | |
| Bass, mid, treble control | ±10 dB |
AC PRO 60

Technical specifications
| Operating voltage supply | 230 V ~(AC), 50 Hz |
| Fuse 5 mm × 20 mm, 1 A, 250 V, slow-blow | |
| Dimensions (W × D × H) 346 mm × 280 mm × 346 mm | |
| Weight 11 kg |
7 Plug and connection assignment
Introduction
This chapter will help you select the right cables and plugs to connect your valuable equipment in such a way that a perfect sound experience is ensured.
Please note these advices, because especially in 'Sound & Light' caution is indicated: Even if a plug fits into the socket, an incorrect connection may result in a destroyed power amp, a short circuit or 'just' in poor transmission quality!
Balanced and unbalanced transmission
Unbalanced transmission is mainly used in semi-professional environment and in hifi use. Instrument cables with two conductors (one core plus shielding) are typical representatives of the unbalanced transmission. One conductor is ground and shielding while the signal is transmitted through the core.
Unbalanced transmission is susceptible to electromagnetic interference, especially at low levels, such as microphone signals and when using long cables.
In a professional environment, therefore, the balanced transmission is preferred, because this enables an undisturbed transmission of signals over long distances. In addition to the conductors 'Ground' and 'Signal', in a balanced transmission a second core is added. This also transfers the signal, but phase-shifted by 180^ .
AC PRO 60

Since the interference affects both cores equally, by subtracting the phase-shifted signals, the interfering signal is completely neutralized. The result is a pure signal without any noise interference.
1/4" TS phone plug (mono, unbalanced)

Three-pole 1/8" mini phone jack (stereo, unbalanced)

1 Signal
2 Ground, shielding
1 Signal (left)
2 Signal (right)
3 Ground, shielding
th·mann MUSIC IS OUR PASSION
guitar combo
XLR plug (balanced)
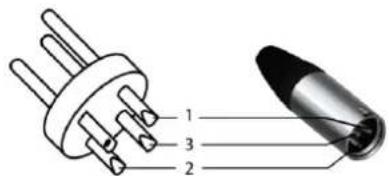
1 Ground, shielding
2 Signal (in phase, +)
3 Signal (out of phase, -)
RCA connection

Drawing and table indicate the pin assignment of an RCA plug.
1 Signal
2 Ground, shielding
8 Protecting the environment
Disposal of the packaging material

For the transport and protective packaging, environmentally friendly materials have been chosen that can be supplied to normal recycling.
Ensure that plastic bags, packaging, etc. are properly disposed of.
Do not just dispose of these materials with your normal household waste, but make sure that they are collected for recycling. Please follow the notes and markings on the packaging.
Disposal of your old device

This product is subject to the European Waste Electrical and Electronic Equipment Directive (WEEE) in its currently valid version. Do not dispose with your normal household waste.
Dispose of this device through an approved waste disposal firm or through your local waste facility. When discarding the device, comply with the rules and regulations that apply in your country. If in doubt, consult your local waste disposal facility.
Notes
AC PRO 60
th·mann MUSIC IS OUR PASSION
Notes
th·mann MUSIC IS OUR PASSION
guitar combo

natural_image
Solid olive green background with no visible text, symbols, or patterns

- Harley Benton
- Further information
- Notational conventions
- Letterings
- Symbols and signal words
- Safety instructions
- Intended use
- Safety
- DANGER!
- Danger for children
- Electric shock caused by high voltages inside
- Electric shock caused by short-circuit
- CAUTION!
- Possible hearing damage
- NOTICE!
- Risk of fire
- Operating conditions
- Power supply
- Features
- Special features of the device:
- Installation and starting up
- Possible property damage by magnetic fields
- Components and functions
- [EFF PAN]
- [MODE]
- [LEVEL]
- Components and functions
- [PHONES]
- [LINE OUT]
- [DI OUT BALANCED]
- [RETURN]
- [SEND]
- [TUNER]
- Technical specifications
- Plug and connection assignment
- Introduction
- Balanced and unbalanced transmission
- Protecting the environment
Brand : Harley Benton
Model : AC PRO 60
Category : Guitar amplifier