Dolphin Swash - Pool robot MAYTRONICS - Free user manual and instructions
Find the device manual for free Dolphin Swash MAYTRONICS in PDF.


| Type | Robotic pool cleaner |
| Brand | Maytronics |
| Model | Dolphin Swash |
| Dimensions (L x W x H) | 17.5 x 17.5 x 9.5 inches |
| Weight | 22 lbs |
| Power supply | 100-240 VAC, 50/60 Hz |
| Motor power | 180 W |
| Cleaning coverage | Floor, walls, and waterline |
| Filter type | Fine particle filter (cartridge) |
| Filter capacity | 0.5 gallons |
| Programmable cleaning cycles | Daily, weekly, or custom |
| Cleaning time | 2 hours per cycle |
| Mobility | Autonomous with intelligent navigation |
| Climbing ability | Up to 45° incline |
| Cable length | 50 ft |
| Safety features | Automatic shut-off, low voltage |
| Recommended pool size | Up to 50 ft |
| Warranty | 2 years |
| Included accessories | Power supply, cable, filter cartridge, caddy |
Frequently Asked Questions - Dolphin Swash MAYTRONICS
User questions about Dolphin Swash MAYTRONICS
0 question about this device. Answer the ones you know or ask your own.
Ask a new question about this device
Download the instructions for your Pool robot in PDF format for free! Find your manual Dolphin Swash - MAYTRONICS and take your electronic device back in hand. On this page are published all the documents necessary for the use of your device. Dolphin Swash by MAYTRONICS.
USER MANUAL Dolphin Swash MAYTRONICS
Robotic Pool Cleaner Swash CLX/TCX
User Instructions
Contents
- INTRODUCTION ...... 2
- SPECIFICATIONS ...... 2
- WARNINGS AND CAUTIONS 2
3.1. Warnings....2
3.2. Cautions....2
- POOL CLEANER PARTS 3
- USING THE POOL CLEANER....4
5.1. Setup.... 4
5.2. Putting the Pool Cleaner into the pool....5
5.3. Removing the Pool Cleaner from the pool....6
- CLEANING THE FILTER BAG OR CARTRIDGES 7
6.1. Removing and cleaning the filter bag....7
6.2. Replacing the filter bag 8
6.3. Cleaning the filter cartridges 8
6.4. Cleaning the impeller 10
- OFFSEASON STORAGE....10
- TROUBLESHOOTING....11
Robotic Pool Cleaner
User Instructions
1. INTRODUCTION
Thank you for purchasing a Maytronics Robotic Pool Cleaner.
We are sure that your Maytronics Robotic Pool Cleaner will provide you with reliable, convenient and cost effective pool cleaning. Its reliable filtration in all pool conditions, active brushing, and all-surface climbing brush enhance maximum pool hygiene.
Robotic Pool Cleaners by Maytronics deliver advanced cleaning technology, long lasting performance and easy maintenance. You and your family will be free to enjoy your swim with the full confidence that it is completely clean.
2. SPECIFICATIONS
Motor protection: IP 68
Minimum depth: 0.80m/2.6ft
Maximum depth: 5m/16.4ft
3. WARNINGS AND CAUTIONS
3.1. Warnings

- Use the originally supplied power supply only
- Ensure the electrical outlet is protected by a ground fault interrupter (GFI) or an earth leakage interrupter (ELI)
- Keep the power supply out of standing water
- Position the power supply at least 3m/10ft away from the edge of the pool
- Do not enter the pool while the Pool Cleaner is working
- Unplug the power supply before servicing
3.2. Cautions
When not in use store the Pool Cleaner on the Caddy in a shaded area.
Use the Pool Cleaner in the following water conditions only:
| Chlorine Max 4 ppm | |
| pH 7.0 - 7.8 | |
| Temperature 6°-34°C/43°-93°F | |
| NaCl Maximum = 5000 ppm | |
4. POOL CLEANER PARTS
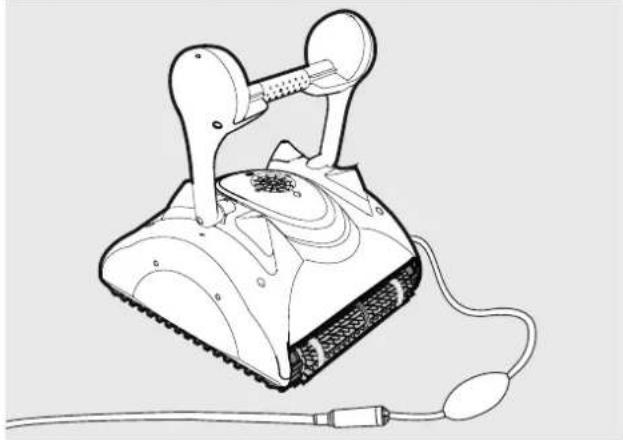
▶ Robotic Pool Cleaner Swash

natural_image
Line drawing of a portable electronic device with a coiled cable and earpiece (no text or symbols)▶ Robotic Pool Cleaner Swash
natural_image
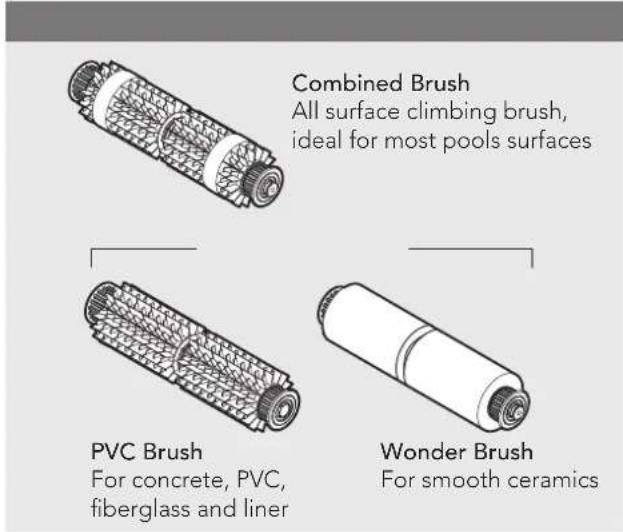
Line drawing of a mechanical device with a coiled cable and attached sensor port (no text or symbols)Brushes

▶ Power Supply unit

natural_image
Line drawing of a power supply device with handle and control buttons (no text or symbols on the device itself)
natural_image
Line drawing of a power supply device with handle and control panel (no text or symbols on the device itself)▶ Filtration Options

5. USING THE POOL CLEANER
The Pool Cleaner is very easy to use. Just follow the simple steps to get started, and your Pool Cleaner is ready to go.
5.1. Setup
Before using the Pool Cleaner for the first time perform the following steps:
Unwind the cable and stretch it out completely so that it has no kinks.

natural_image
Illustration of a person spraying water onto a device with a hose, set against a grid background (no text or symbols)
Position the power supply so that it is approximately in the middle of the long side of the pool at a distance of 3m/10ft.

natural_image
Illustration of hands inserting a component into a device (no text or symbols visible)Some models arrive with plastic coverings on the brushes. Remove them before use.

Attach the floating cable to the power supply by inserting it with the notch on the connector (1) lined up with the groove in the socket on the power supply and turning clockwise (2).

natural_image
Diagram of a power supply device connected to a socket, showing wiring and battery (no text or symbols)Plug in the power supply and leave it in the OFF position.
5.2. Putting the Pool Cleaner into the pool
If your Pool Cleaner is equipped with brushes that contain sponges, dip the brushes in the water and squeeze them so that they will absorb water the first time you use the Pool Cleaner, or if the brushes have dried out between uses.
Holding the Pool Cleaner upside down in the water, gently rock it back and forth with your fingers holding the plastic doors on the bottom lid open to release trapped air. Continue until no more bubbles are released.
Release the Pool Cleaner and let it sink to the floor of the pool.
Make sure that the floating cable is free of any obstructions.
To avoid kinks in the floating cable, place approximately enough cable in the water for the Pool Cleaner to reach the farthest corner of the pool.
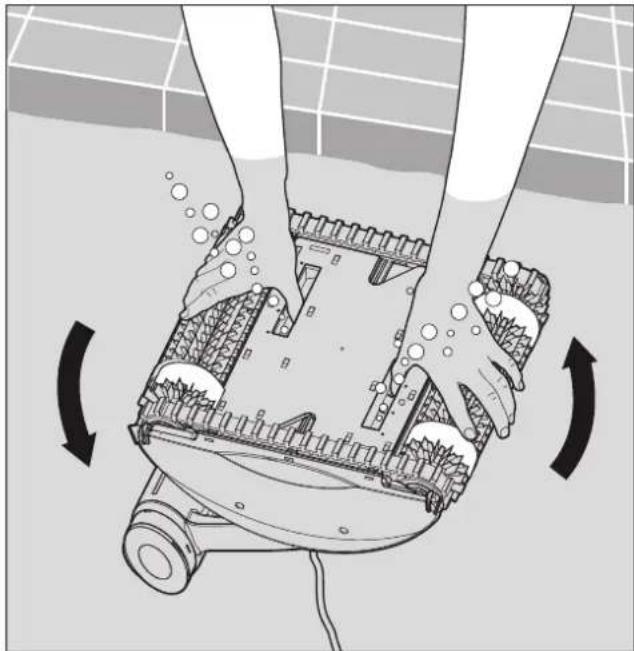
natural_image
Diagram of a robotic device with rotating arms and foot, showing mechanical components and motion arrows (no text or symbols)
Turn the power supply ON.
The Pool Cleaner will now operate until it has reached the end of the cleaning cycle.
5.3. Removing the Pool Cleaner from the pool
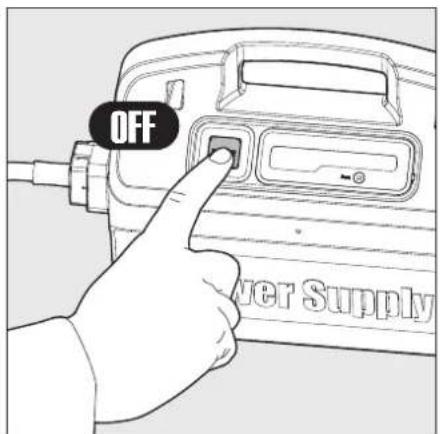

Turn OFF and unplug the power supply.
Using the floating cable, bring the Pool Cleaner to the pool's edge. Using the handle, remove the Pool Cleaner from the pool.


natural_image
Illustration of a robotic tool with a hand operating it, showing mechanical components and an upward arrow (no text or symbols)
DO NOT PULL THE POOL CLEANER FROM THE POOL USING THE CABLE.

Place the Pool Cleaner on the edge of the pool and let the water drain out.
6. CLEANING THE FILTER BAG OR CARTRIDGES
Depending on the model, your Pool Cleaner may be equipped with a filter bag or cartridges. It is recommended to clean the filter bag or cartridges after each cleaning cycle.
6.1. Removing and cleaning the filter bag


Unplug the power supply.
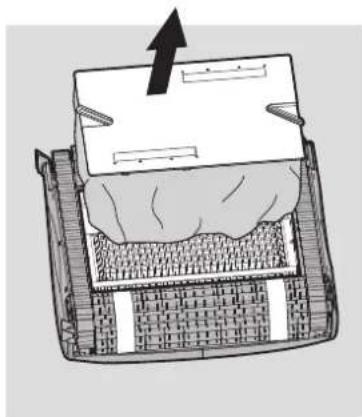
Turn the Pool Cleaner upside-down. Open the bottom lid.

natural_image
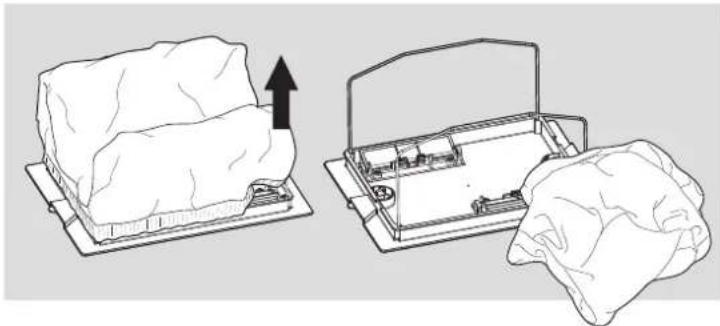
Cross-sectional diagram of a mechanical or architectural component with layered structure and an arrow indicating direction (no text or symbols)Remove the filter bag.
natural_image
Diagram showing two steps of a mechanical device: one with an upward arrow, the other with a closed component and cloth (no text or symbols)
natural_image
Illustration of a person using a handheld tool to spray or spread a cloth (no text or symbols visible)Clean the filter bag with a hose.
We recommend that you periodically wash the filter bag in a washing machine using the gentle cycle program.
Periodically clean the brushes with a hose.
6.2. Replacing the filter bag
Put the filter bag over the frame so that the strap is in the middle of the shortest side. Make sure that filter bag is positioned properly on the frame.

natural_image
Medical procedure illustration showing steps to organize a patient's abdomen with surgical tools (no text or labels)6.3. Cleaning the filter cartridges
Note: Don't let the filter cartridges dry out before cleaning.

Unplug the power supply.
With the Pool Cleaner upside down open the bottom lid and pull it out.


natural_image
Diagram of a computer monitor with an open lid and ventilation grilles, showing no text or symbols.
natural_image
Technical illustration of a mechanical assembly with two views showing internal components and directional arrows (no text or symbols)
natural_image
Technical line drawing of a mechanical frame assembly with a magnified inset showing internal structure (no text or symbols)Open the clips and remove the filter.

natural_image
Illustration of a person using a handheld tool to filter or inspect a grid-patterned object (no text or symbols visible)Clean the filters with a hose.
Insert the filters with the plastic backing facing out.
Insert the cartridge unit.

6.4. Cleaning the impeller
If you notice debris trapped in the impeller open the impeller and remove the debris.


Unplug the power supply.
Using a screwdriver, remove the two screws on the impeller cover and remove it.
Clear any debris that may be in the impeller.

Replace the screws.
If the Pool Cleaner will not be in use for an extended period, perform the following storage steps:
- Disconnect the Pool Cleaner from mains
• Make sure that no water is left in the Pool Cleaner - Thoroughly clean the filter bag or cartridges and insert in place
- Roll up the cable so that it has no kinks and place on the Caddy
- Store the Pool Cleaner upright on the Caddy or simply upside down in a protected area out of direct sun / rain / snow at a temperature of between 5°-45°C / 41°-113°F
8. TROUBLESHOOTING
If the suggest solutions do not solve the problem contact your dealer
| Symptom Possible | reason Corrective action | |
| 1. Cable twisting or cable coils up | Obstruction in poolExcess cable in the poolFilter bag/cartridge dirtyIn all abovementioned cases | Remove obstruction in pool.Remove excess cable out of the pool.Clean filter bag/cartridge.Straighten cable and lay in sun periodically. |
| 2. The Pool Cleaner is moving in circles | Dirt stuck in moving partsClogged filter bag/cartridgePower supply incorrectly positionedIncorrect mounting of bottom lidAlgae or pool water is out of Spec | Remove dirt from moving parts.Clean filter bag/cartridge.Place power supply in a position so that the Pool Cleaner can reach all walls.Lock bottom lid in the right position.Correct pool and water conditions. |
| 3. The Pool Cleaner does not cover the entire pool | Power supply incorrectly positionedThe handle is not positioned in accordance to the pool conditions | Place power supply in a position so that the Pool Cleaner can reach all walls.You may enhance the pool coverage by adjusting the handle float. For optimal pool coverage the Pool Cleaner should turn on the floor at 90° angle (the Pool Cleaner rotates twice before completing the 90° turn).If the Pool Cleaner does not complete a 90° turn, shift the float opposite to the cable's entry-side towards the handle center.If the Pool Cleaner turns in an angle wider than 90°, shift the float on the cable's entry-side towards the handle center. |
| 4. The Pool Cleaner does not climb walls | Filter bag/cartridge is fullAlgae on wallsWater temperature too lowBrushes wornSlippery ceramic wall tilesDebris caught around impellerThe Pool Cleaner is too light - trapped airUnsuitable pH level | Empty and wash filter bag/cartridge.Brush walls.Ideal water temperature between 6°-34°C/43°-93°F.Replace brushes - contact your dealer.Consult with your dealer about special brushes.Remove impeller tube. Clean impeller.Turn the Pool Cleaner upside down under water to remove trapped air.Check pH level between 7 and 7.8. |
| 5. Motors not working | Impeller blockedDrive system blockedElectrical problem - motor unit, cable or power supply | Remove impeller tube and clean impeller.Clean tracks and wheels.Consult with your dealer and Service Center. |
| 6. The Pool Cleaner will not sink | Air caught in filter bag/cartridgeSpecial combined climbing brushes are dry | Turn the Pool Cleaner upside-down under water to remove trapped air. Wash the filter bag/ cartridge.Open two inlet flaps in the bottom lid to remove dirt and/or trapped air.Soak brushes in water. |
| 7. Power supply or power supply switch light is not working | Not plugged properly or non-functioning socket | Check power to the socket and reconnect the Pool Cleaner. |
- Robotic Pool Cleaner Swash CLX/TCX
- User Instructions
- Contents
- Robotic Pool Cleaner
- INTRODUCTION
- SPECIFICATIONS
- WARNINGS AND CAUTIONS
- Warnings
- Cautions
- POOL CLEANER PARTS
- USING THE POOL CLEANER
- Setup
- Putting the Pool Cleaner into the pool
- Removing the Pool Cleaner from the pool
- CLEANING THE FILTER BAG OR CARTRIDGES
- Removing and cleaning the filter bag
- Replacing the filter bag
- Cleaning the filter cartridges
- Cleaning the impeller
- Unplug the power supply.
- TROUBLESHOOTING
Brand : MAYTRONICS
Model : Dolphin Swash
Category : Pool robot