Accusmart 720 - Glucometer Yuwell - Free user manual and instructions
Find the device manual for free Accusmart 720 Yuwell in PDF.


| Product Type | Blood Glucose Meter |
| Brand | Yuwell |
| Model | Accusmart 720 |
| Dimensions (approx.) | 95 x 50 x 20 mm (3.7 x 2.0 x 0.8 inches) |
| Weight (with battery) | Approx. 50 g (1.8 oz) |
| Power Supply | 2 x 1.5V AAA batteries (alkaline recommended) |
| Battery Life | Approximately 1000 tests |
| Display | LCD screen with backlight |
| Measurement Range | 1.1-33.3 mmol/L (20-600 mg/dL) |
| Sample Type | Fresh capillary whole blood |
| Sample Volume | Approximately 1 μL |
| Measurement Time | 5 seconds |
| Memory | Up to 500 test results with date and time |
| Data Transfer | USB (optional cable) for data upload |
| Average Calculation | 7-, 14-, 21-, 28-, 60-, and 90-day averages |
| Hematocrit Range | 20-55% |
| Operating Temperature | 10-40 °C (50-104 °F) |
| Storage Temperature | -20-60 °C (-4-140 °F) |
| Humidity Range | 20-90% RH (non-condensing) |
| Cleaning | Wipe with a soft, dry cloth. Do not use liquid cleaners. |
| Safety Features | Auto-power off after 2 minutes of inactivity; low battery indicator |
| Spare Parts / Accessories | Test strips (Yuwell type), lancets, lancing device, USB cable, carrying case |
| Warranty | 1 year (subject to local regulations) |
Frequently Asked Questions - Accusmart 720 Yuwell
User questions about Accusmart 720 Yuwell
0 question about this device. Answer the ones you know or ask your own.
Ask a new question about this device
Download the instructions for your Glucometer in PDF format for free! Find your manual Accusmart 720 - Yuwell and take your electronic device back in hand. On this page are published all the documents necessary for the use of your device. Accusmart 720 by Yuwell.
USER MANUAL Accusmart 720 Yuwell
JIANGSU YUYUE MEDICAL EQUIPMENT & SUPPLY CO.,LTD. Sales Center Address: Huanyuan East Road No.1, Xuzhuang Software Park, Nanjing, Jiangsu Province, P.R. China, 210000 Manufacturing Address: YunYang Industrial Park, DanYang, Jiangsu Province, P.R. China, 212300 http://www.yuwell.com
1230103-0A

yuwell
ACCUSMART 720
Blood Glucose Monitoring System
User's manual
Please read the user's manual closely!
Welcome to use the blood glucose monitoring system of Yuwell series
Thank you for choosing Yuwell products. Jiangsu Yuyue Medical Equipment & Supply Co., Ltd., specializes in medical equipment R & D, manufacturing and marketing. "Quality casts brand" is the company's core value; quality culture is the core of the company culture. The company apart from the establishment of a complete quality control system, and through the ISO13485 quality system certification, all the major products has been certified by the FDA, CE quality certification, Japan SG security authentication international certification. With excellent quality and services, medical equipment Yuwell products have been known to the international counterparts, as the majority of domestic and international procurement of preferred brands.
The blood glucose monitoring system of Yuwell series will provide you with a more convenient and ergonomic monitoring measurement of blood glucose. You can get an accurate result only by following some simply procedures. Accusmart 720 blood glucose monitoring system (The product, blood glucose monitoring system for short in the following content) is suitable for diabetics to test their blood glucose at home; it can also help health professional to monitor the effect of controlling diabetes.
Important information. Please read carefully
For the sake of safety and accuracy, be sure to read through the user's manual carefully before using the meter:
This product is specific for blood glucose testing and only for testing fresh capillary whole blood samples. It can not be used for testing plasma or serum.
This product can be used for hospital and homecare to test the blood glucose level in fresh capillary. It cannot be used for diagnosing of diabetes or a newly born baby.
This product is exclusively used for testing blood glucose.
■ You can not change the treatment only according to the test result without consulting doctors or diabetes professionals.
■ To better care diabetics by using this blood glucose monitoring system, please consult doctors or diabetic professionals.
Table of contents
Table of contents
Chapter one: System review
Packing form .01
Product descriptions 02
Blood glucose test strip -03
Chapter two: Preparations before using
Battery installation -04
Mode setting 05
Code chip matching -08
Chapter three: Blood glucose testing
Procedures to use the lancing device -09
Preparation for blood glucose testing 13
Blood glucose testing 15
Chapter four: Memory function
Showing record 1.7
Check the average results 18
Delete records 19
Chapter five: Control solution
Quality control 21
Flag the quality control result -22
Chapter six: Storage and maintenance
Storage and maintenance 23
Chapter seven: Specification and execution standard
Technical parameters 24
Standard and regulation 26
Table of contents
System review
Chapter eight: Self-monitoring time, frequency and control target of the blood glucose
Self-monitoring time ·27
Frequency of self-monitoring · 28
Criteria for the Diagnosis of Diabetes 29
Chapter nine: Other information
The dos and don'ts
Some symbols and their meaning ·31
Errors and trouble removing ·31
Packing form
Blood glucose meter, lancing device, lithium battery (CR2032), potable bag, user's manual, quick instruction card.
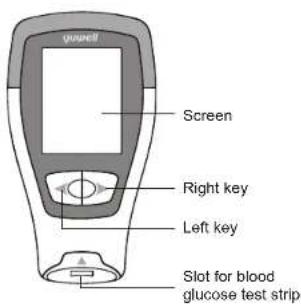

System review
System review
Product descriptions
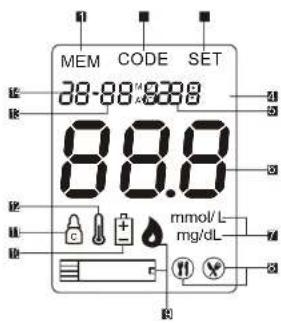
1 Memory: the stored records
2 Code: corresponding code
3 Setting: displaying set mode
4 Displaying minutes
5 Displaying hour
6 Displaying test result
7 Blood glucose units
8 Before/after meal
9 The flashing blood drop indicates it is ready to test
10 Low battery warning
11 Control solution
12 Temperature warning
13 Displaying date
14 Displaying month
Blood glucose test strip
Principles of electrochemistry are used here. The test strip is first inserted into the meter slot; a blood drop will be automatically sucked into the reaction area when it touches the strip edge. Then the glucose in the blood will be catalyzed by the oxidase to have redox reaction, generating micro-current that can be calculated, displayed and stored by the monitoring system.
Note: Please use Yuwell Blood glucose test strip, which exclusively match the blood glucose monitoring system.
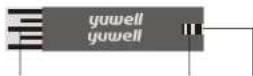
Strip end to meter slot
Blood inletReactive
Preparations before using Preparations before using
Battery installation
A: Open battery lid.

B: Put the positive pole "up" to install the battery, and then close the battery lid.

natural_image
Three-step photo sequence showing hand holding a device with a black screw and a white remote control (no text or symbols visible)Note: Please insert the battery end with spring piece, push to the bottom and then push it.
C: Press to the inside along both sides of the trough, as shown in the picture, and then you can get the battery out.

Note: The battery spacer may be pulled out for the first time use.
Mode setting
Enter the mode setting
A: Installing a new battery or replacing the old one. Please see the battery installment.
B: Press "▶" for three seconds to enter the setting mode with a beep sound.

natural_image
Illustration of a hand holding a medical or electronic device with a dial indicator (no text or symbols visible)Preparations before using Preparations before using
Time and date setting
A: When the year is flashing, press "◀" to the current year(only the last two digits of the year is displayed, for example: 14=2014). Press "▶" to set the year and shift to the month setting.
B: When the month is flashing, press "◀" to the current month. Press "▶" to set the month and shift to the date setting.
C: When the date is flashing, press "◀" to the current date, press "▶" to set the date and shift to the hour setting.


D: When the hour is flashing, press "◀" to the current hour, press "▶" to set the hour and shift to the minute setting.
E: When the minute is flashing, press "◀" to the current minute, press "▶" to set the minute.
F: In the setting mode, if no activity is conducted for 30 seconds, the blood glucose monitoring system will automatically turn off.

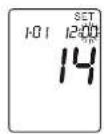
Preparations before using Blood glucose testing
Code chip matching
Take the new code chip from your test strip vial; make sure the number in the code chip matches the number on the test strip vial.
If these two do not match, stop using it and contact the supplier for the correct ones. Otherwise, you will get a false result.
If these two matches with each other insert the new code chip and test strip into the meter, it will automatically turn on and read the correct code.

Note: Discard the old code chip. Replace the new code chip which is provided in the new Yuwell blood glucose test strip box.
Procedures to use the lancing device
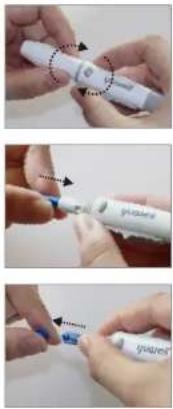
A: Unscrew the end-cap from the lancing device.
B: Insert a lancet firmly.
C: Twist off the lancet cap; be sure not to discard it (see the procedure I).
Blood glucose testing
Blood glucose testing
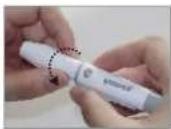
D: Screw the end-cap of the lancing device.
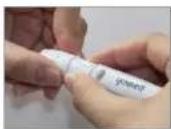
E: Adjust the depth for lancet shooting.
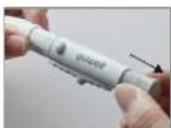
F: Pull the handle backward until the click is heard.
Wash hands with warm soapy water and dry them well.
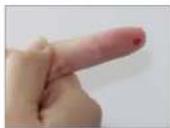
G: Press the top of the lancing device on the puncture site of your fingertip and press the release button for blood collecting. Wipe the first blood drop.
H: Use the second blood drop for blood glucose test.

Blood glucose testing
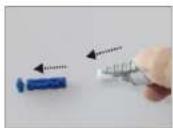
I: Discard the used lancet: Unscrew the end-cap; protect needle with lancet-cap shown as figure then eject the used lancet.
Note: The lancing device is for exclusively used and the lancet is for one time used only.


Blood glucose testing
Preparation for blood glucose testing
A: Confirm the code shown in the meter's screen with the code shown on the vial's (or pouch's) label. If they matched, continue to do the testing (Caution: re-cap the vial immediately after taking a test strip to avoid damp). If mis-matched, consult the store and replace a correct code. The test strip should be used for test within 5 minutes to avoid moisture which might degrade the strip performance.
B: Insert the test strip firmly.


Blood glucose testing
Blood glucose testing
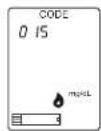
C: Beep. Meter turns on, automatically. LCD screen shows the code number, first.

D: Screen shows flashing " 🔒 " and code number, alternately.
Blood glucose testing
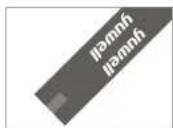
A: Touch the tip of the test strip to the drop of blood. The blood is sucked into the test strip, automatically.
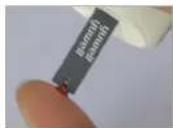
B: Make sure a sufficient blood to avoid any incorrect result.
Blood glucose testing
Memory function
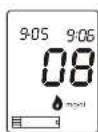
C: Blood glucose level will show in 8 seconds.
D: The blood glucose monitoring system will automatically store the testing records and turn off after the strip is removed.
E: To flag the test result, press "▶" for 3 seconds before pulling the tested strip from meter. The screen displays "(H)" icon; press again it displays "(Y)" icon.


Showing record
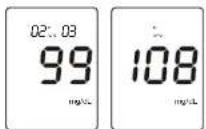
With the meter off, press "◀" to view the latest result. Press "◀" again to view the previous records. Meter will turn off if there is no activity in 15 seconds.

Memory function Memory function
Check the average results
■ Check the average results of the blood glucose for 7 days, 14 days, 30 days, 2 months or 3 months.
When the meter is off, press "◀" for 3 seconds to view the average blood glucose in the latest 7 days. Press "◀" again to see results in the latest 14 days, 30 days, 2 months and 3 months, respectively. The meter will turn off automatically if there is no further operation for 15 seconds.

Delete records (caution to use)
Erase entire records
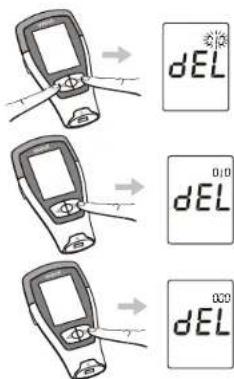
When the meter is off or being viewed, presses "◀" and "▶" simultaneously for 3 seconds. The screen displays "dEL" and a flashing numbers indicating memories set is shown on the top right corner. Press "▶" twice to erase entire records and flashing number shows 0 which means the memory is reset completely.
Delete the current measured results
When finishing the test and before pulling the tested strip out, press "◀" and "▶" simultaneously for 2 seconds, the current result will be erased.

Quality control
If you want to know whether your blood glucose monitoring system is working properly, please contact the customer service to test it for you.
Caution: Please follow the local government's regulation to dispose the used meter, strip, battery and accessories.
Control solution
Flag the quality control result
Quality control solution is used to validate the whole system working properly when the solution result falls on the control range.
A: Use quality control solution to test: Replace blood drop with solution and follow the blood glucose test procedure A, B, C.
B: Press "▶" for 3 seconds after the test is done. The screen appears "☐"; press again, it appears "☒".
C: Press again, it appears 🔒". Pull the tested strip to finish the control solution test.
Note: The meter will turn off if there is no operation in 15 seconds.

Storage and maintenance
Storage and maintenance
■ Wash the end-cap of the lancing device with non-toxic detergent in warm water and dry it well. Medicinal alcohol can also be used for disinfection.
■ Lancing device is for exclusively use, hospital using is not recommended.
■ The storage of testing strip shall follow the test strip's instruction.
■ Battery shall be removed if the meter has not been used for a long time.
■ The meter shall be kept in dry, clean and ventilate place, avoid exposing it to excessive heat, cold or light.
■ Storage and Transportation:
Ambient Temperature: -10°E50 °C
Relative Humidity: <90% and no condensation
■ Use lint-free tissue or 75% alcohol to clean the meter. Bleach and strong detergent are forbidden.
To ensure the meter is in good condition, check it, regularly. Call our service center and stop using it immediately, once found broken.
■ The product is maintained by our service center, solely. Please don't hit it or open it.
Specification and execution standard
Specification and execution standard
Technical parameters
| Metering unit | mg/dL |
| Testing range | 20mg/dL- 600mg/dL |
| Type of blood sample | Fresh capillary whole blood |
| Rectification standard | Blood plasma rectification |
| Blood volume | 1ul (microliter) |
| Hematocrit | 30%-60% |
| Testing time | 8 seconds |
| Memory group number | 250 results |
| Auto power-off | 15 seconds to 3 minutes |
| Equipment operation | Continuous operation |
| Battery life | CR2032 the lithium battery can test about 1000 times |
| Working condition | Ambient temperature range: 10°C40 °CRelative humidity range: <85% |
| Electromagnetic interference | Interference of electromagnet from other equipment has not yet been found. To avoid electrostatic discharge, do not use the blood glucose monitoring system close to cell phone, computer and other home appliances. |
Specification and execution standard
Standard and Regulation
The result deviation between the blood glucose monitoring system and the biochemical instrument (clinical lab) is within 95%, which shall follow below:
Precision:
| Testing range | Precision |
| < 75mg/dL | No more than ± 15 mg/dL |
| >75mg/dL | No more than ± 20% |
Accuracy:
| Testing range Accuracy | |
| < 100 mg/dL | SD<7.5 mg/dL |
| > 100 mg/dL | CV< 7.5% |
Self-monitoring time, frequency and control target of the blood glucose
Self-monitoring time
Diabetics shall regularly test to observe the change of blood glucose level. Your doctor will give specific advice for the time and frequency. While the following time for test is just for reference only.
■ Wake up and before meal
■ After breakfast
■ 1-2 hours after breakfast
Before lunch
■ 1-2 hours after lunch
■ Before and after exercise
Before dinner
■ 1-2 hours after dinner
■ Before sleeping at night
■ After having deserts
■ 2-3 am (if inject the Insulin)
Self-monitoring time, frequency and control target of the blood glucose
Frequency of self-monitoring
■ Poor blood glucose control patients and critical patients shall test 3 days in a week with 5-7 times for each day until the blood glucose is under control.
■ 3 days a week with twice for each day is enough if illness has become stable and the blood glucose has met the target range.
Those treated with insulin have to perform the test 5 times every day, and then turn to 2-4 times when the treatment has achieved the target range.
■ Those treated with oral medicines shall perform the test 2-4 times every week.
Self-monitoring time, frequency and control target of the blood glucose
Criteria for the Diagnosis of Diabetes mg/dL(mmol/L)
| Criteria for the Diagnosis of Diabetes mg/dL(mmol/L) | |||
| Fasting plasma glucose | 2-h plasma glucose during an OGTT | A random plasma glucose | |
| Normal | 70~100(3.9~5.6) | <140(7.8) | - |
| Glucose Impaired | 101~125(5.6~6.9) | 140~199(7.8~11.0) | - |
| Diabetes | ≥126(7.0) | ≥200(11.1) | ≥200(11.1) |
Amrcn_Dbts_Assctn_Cmplt_Gud_to_Dbts.pdf
American Diabetes Association Complete Guide to Diabetes, 4th Ed., ISBN 1-58040-237-2. 2005
Other information Other information
The dos and don'ts
This product is only used to test blood glucose, it is not for diagnosing blood glucose, nor can it be used for testing glucose relating to metabolic disorders.
Expired, damaged or polluted test strips are forbidden to use. Test shall be performed by strictly following the rules; otherwise, false result might be caused.
■ Lancing device can only be used for one person; lancet can not be repeatedly used.
- Keep the lancing device free of lotion, oil and dust.
■ Lancing device is not to be socked in any liquid.
■ The result is between 20 and 600 mg/dL.
If the result is lower than 20 mg/dL, "LO" is in display.
If the result is higher than 600 mg/dL, "HI" is in display.
Some symbols and their meaning
| Symbols | Meaning |
| This side up | |
| Fragile | |
| Damp proof | |
| Caution(refer to accompanying documents) | |
| Blood drop symbol |
Errors and trouble remove

The result is higher than the measuring range
It means that you have serious hyperglycemia, consult your doctor's instruction for a recheck or treatment.
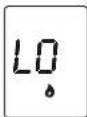
The result is lower than the measuring range
It means that you have hypoglycemia, consult your doctor's instruction for a recheck or treatment.
Other information
Other information
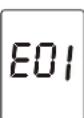
Test strip has been used or damaged
Change the test strip and perform a new test.
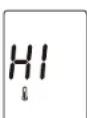
Temperature is higher than 40°C
Move the meter to a 10°C \~40°C environment and perform the test after 30 minutes.

Battery power is low, the equipment will turn off automatically
Change the battery Immediately.
Note: If you can not solve the problems, or even meet with other problems, please contact our service center.

Code chip is wrong
Insert the correct code chip.
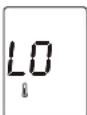
Temperature is lower than 10^ C
Move the meter to a 10°C \~40°C environment and perform the test after 30 minutes.

Battery power is low
Change the battery immediately.
- yuwell
- ACCUSMART 720
- Welcome to use the blood glucose monitoring system of Yuwell series
- Important information. Please read carefully
- Table of contents
- Chapter one: System review
- Chapter two: Preparations before using
- Chapter three: Blood glucose testing
- Chapter four: Memory function
- Chapter five: Control solution
- Chapter six: Storage and maintenance
- Chapter seven: Specification and execution standard
- System review
- Packing form
- Blood glucose test strip
- Preparations before using Preparations before using
- Battery installation
- Mode setting
- Enter the mode setting
- Time and date setting
- Preparations before using Blood glucose testing
- Code chip matching
- Procedures to use the lancing device
- Blood glucose testing
- Preparation for blood glucose testing
- Memory function
- Showing record
- Memory function Memory function
- Check the average results
- Delete records (caution to use)
- Erase entire records
- Delete the current measured results
- Quality control
- Control solution
- Flag the quality control result
- Storage and maintenance
- Specification and execution standard
- Standard and Regulation
- Self-monitoring time, frequency and control target of the blood glucose
- Self-monitoring time
- Frequency of self-monitoring
- Other information Other information
- The dos and don'ts
- Some symbols and their meaning
- Errors and trouble remove
- Other information
Brand : Yuwell
Model : Accusmart 720
Category : Glucometer