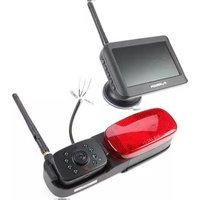
Vision S FOS43TASR - Rear Camera Furrion - Free user manual and instructions
Find the device manual for free Vision S FOS43TASR Furrion in PDF.


| Product Type | Wireless Rear View Camera System |
| Brand | Furrion |
| Model | Vision S FOS43TASR |
| Monitor Screen Size | 4.3 inches |
| Camera Resolution | 480p (VGA) |
| Wireless Range | Up to 492 ft (150 m) in open area |
| Night Vision | Yes, with infrared LEDs |
| Viewing Angle | 120° diagonal |
| Power Supply | 12V DC (camera and monitor) |
| Power Consumption | Monitor: 5W; Camera: 3W |
| Weight | Monitor: 0.4 lb (180 g); Camera: 0.3 lb (136 g) |
| Dimensions (Monitor) | 4.7 x 3.1 x 1.2 in (120 x 80 x 30 mm) |
| Dimensions (Camera) | 2.4 x 2.0 x 1.8 in (60 x 50 x 45 mm) |
| Waterproof Rating | IP66 (camera) |
| Wireless Frequency | 2.4 GHz |
| Mounting Type | Surface mount (camera); dash mount (monitor) |
| Operating Temperature | -4°F to 140°F (-20°C to 60°C) |
| Maintenance | Clean camera lens and monitor screen with soft cloth |
| Safety Notes | Ensure proper wiring to avoid short circuit; do not use damaged cables |
| Spare Parts Available | Replacement camera and monitor available separately |
| Repairability | Designed for easy replacement of camera and monitor; no user-serviceable internal parts |
| Certifications | CE, FCC |
| Warranty | 2 years limited |
Frequently Asked Questions - Vision S FOS43TASR Furrion
User questions about Vision S FOS43TASR Furrion
0 question about this device. Answer the ones you know or ask your own.
Ask a new question about this device
Download the instructions for your Rear Camera in PDF format for free! Find your manual Vision S FOS43TASR - Furrion and take your electronic device back in hand. On this page are published all the documents necessary for the use of your device. Vision S FOS43TASR by Furrion.
USER MANUAL Vision S FOS43TASR Furrion
natural_image
Exterior view of a modern office building (no signage)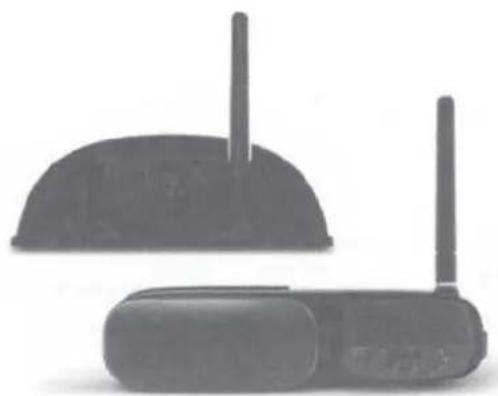
natural_image
Two black electronic devices with visible antennas and a dome-shaped base (no text or symbols)* The packing contents may be different based on the kit you purchased. Please take the actual product as standard.
* Le contenu de l'emballage peut être différent en fonction de la trousse achetée. Veuillez prendre le produit réel en référence.
* Es posible que los contenidos del embalaje sean diferentes según el kit que haya comprado. Tome el producto real como estándar.
Welcome
Thank you for purchasing the Furrion® Vision S Camera System. Before operating your new product, please read these instructions carefully. This instruction manual contains information for safe use, installation and maintenance of the product.
Please keep this instruction manual in a safe place for future reference. This will ensure safe use and reduce the risk of injury. Be sure to pass on this manual to new owners of this product.
The manufacturer does not accept responsibility for any damages due to not observing these instructions.
If you have any further questions regarding our products, please contact us at support@furrion.com
Contents
Welcome 1
Contents 2
Important Safety Instructions....3
FCC Statement 4
IC Statement 5
Product Overview 6
Product Description 6
Monitor 6
Rear Camera 6
Sharkfin Camera 7
Installation 8
What's in the box 8
Monitor Installation....8
Camera Installation 8
Electrical Connections....13
Getting Started 14
Activate the Monitor 14
Pairing the Camera and Monitor 14
Change Settings....16
Camera Setting 16
Picture Setting 18
Software Version 18
Operation....19
Adjust the Camera Angle 19
Operating the System....19
Care and Cleaning....20
Specifications 21
Troubleshooting....22
Warranty....23
Important Safety Instructions
READ THESE INSTRUCTIONS CAREFULLY BEFORE INSTALLING OR USING THE SYSTEM
This product is intended to assist in safe driving and to allow the driver to have a broader view while the vehicle is in reverse. You, as the driver, are solely responsible for the safe operation of your vehicle and the safety of your passengers according to your local traffic regulations. Do not use any features of this system to the extent it distracts you from safe driving.
Your first priority while driving should always be the safe operation of your vehicle. Furrion cannot accept any responsibility for accidents resulting from failure to observe these precautions or safety instructions.
- This product utilizes high voltage. Any unauthorized modifications or damage to the product may result in electrical shock. Handle all components with care. Inspect regularly for damage to components and cabling.
- You are responsible for ensuring the installation of this product does not void or affect the vehicle manufacturer's warranty. Furrion is not liable in full or in part for improper installation resulting in loss or damage to your property, or for voiding all or part of the vehicle manufacturer's warranty.
- Do not apply excessive force to any of the components contained within this kit. Excessive force used before, during or after installation that results in a damaged or nonfunctional part will void all warranties.
- Please follow the procedures in this instruction manual. Improper installation or modification of this product will void all warranties.
Many jurisdictions have laws and regulations relating to the use of cameras and some do not allow for the obstruction of information contained on a license plate. Before using this product, it is the buyer's responsibility to be aware of and comply with any applicable laws and regulations that apply to license plates or may prohibit or limit the use of cameras.
Electrical Safety
- A battery or 12V DC electrical system presents a risk of electrical shock or burn. Ensure all power sources are isolated before installation.
- Insulate unconnected wires with vinyl tape or similar.
- Use insulated tools when working with a power supply.
Caution
- There are no serviceable parts in the Furrion Wireless Observation Camera System. Do not disassemble or attempt any repairs.
- There are no fuses or disconnects in the Furrion Wireless Observation Camera System. Install external fuses/breakers as required.
Installation
- Installation and wiring of this product require specialist skills. To ensure proper and safe installation, please seek a specialist technician.
• Only use supplied or recommended parts. - Use watertight connectors for the camera power supply cable to power source.
- Connect the camera to a 12-24V DC circuit using 18AWG or larger cables.
- Ensure correct polarity of DC power supply to the camera.
- To reduce the risk of fire, connect the camera only to a circuit provided with a maximum branch-circuit over current protection device.
- Do not route wiring in areas that may get hot.
- Take necessary precautions when working at elevated levels.
Important Safety Instructions
Use
- Electrical appliances and overhead power lines can affect the wireless signal.
- Do not place the monitor in a location where it might hinder field of vision while driving.
- Consideration should be given to any airbags when installing the monitor. Do not place the monitor where it might hinder the airbag or become hazardous if the airbag is deployed.
Care
- Do not wash the vehicle with an automatic car wash or high pressure water. This may damage the camera.
- Clean the LCD screen with a microfiber cloth. Do not use coarse or abrasive materials.
- Do not use alcohol or ammonia based products to clean the LCD screen. Only use specialist screen cleaning products.
- Use a wet cloth to clean the camera lens. A dry cloth may scratch the camera lens.
FCC Statement
The equipment complies with RF exposure limits. This module is limited to installation in mobile or fixed applications. The antenna used for this transmitter must not be co-located or operating in conjunction with any other antenna or transmitter.
This device complies with Part 15 of the FCC Rules. Operation is subject to the following two conditions:
(1) This device may not cause harmful interference.
(2) This device must accept any interference received, including interference that may cause undesired operation.
NOTE: The Grantee is not responsible for any changes or modifications not expressly approved by the party responsible for compliance. Such modifications could void the user's authority to operate the equipment.
NOTE: This equipment has been tested and found to comply with the limits for a Class B digital device, pursuant to part 15 of the FCC Rules. These limits are designed to provide reasonable protection against harmful interference in a residential installation. This equipment generates, uses and can radiate radio frequency energy and, if not installed and used in accordance with the instructions, may cause harmful interference to radio communications. However, there is no guarantee that interference will not occur in a particular installation. If this equipment does cause harmful interference to radio or television reception, which can be determined by turning the equipment off and on, the user is encouraged to try to correct the interference by one or more of the following measures:
– Reorient or relocate the receiving antenna.
– Increase the separation between the equipment and receiver.
- Connect the equipment into an outlet on a circuit different from that to which the receiver is connected.
- Consult the dealer or an experienced radio/TV technician for help.
RF Exposure
The device has been evaluated to meet general RF exposure requirement.
To maintain compliance with FCC's RF exposure guidelines, this equipment should be installed and operated with a minimum distance of 20cm between the radiator and your body.
Important Safety Instructions
IC Statement
This device complies with Industry Canada licence-exempt RSS standard(s). Operation is subject to the following two conditions: (1) this device may not cause interference, and (2) this device must accept any interference, including interference that may cause undesired operation of the device.
RF Exposure
The device has been evaluated to meet general RF exposure requirement. To maintain compliance with RSS-102 — Radio Frequency (RF) Exposure guidelines, this equipment should be installed and operated with a minimum distance of 20cm between the radiator and your body.
Product Overview
Product Description
The Furrion Vision S Camera System is designed to assist the driver by providing a clear and wide image of the area behind the vehicle whenever the vehicle is shifted into reverse. Never rely solely on this product to ensure the area is clear of children and/or obstructions. Use your monitor and look both ways. This product is not intended to replace existing safety procedures, but rather to add an additional safety tool for your vehicle.
CAUTION: Do not back up your vehicle while watching the monitor screen. Always look in the direction the vehicle is traveling. Use the monitor as an aid to ensure there are no children or obstructions. The image on the monitor is not designed to show distance and may be misleading. The actual distance is less than appears in the monitor. The range of the image is limited. Be aware of blind spots.
Monitor
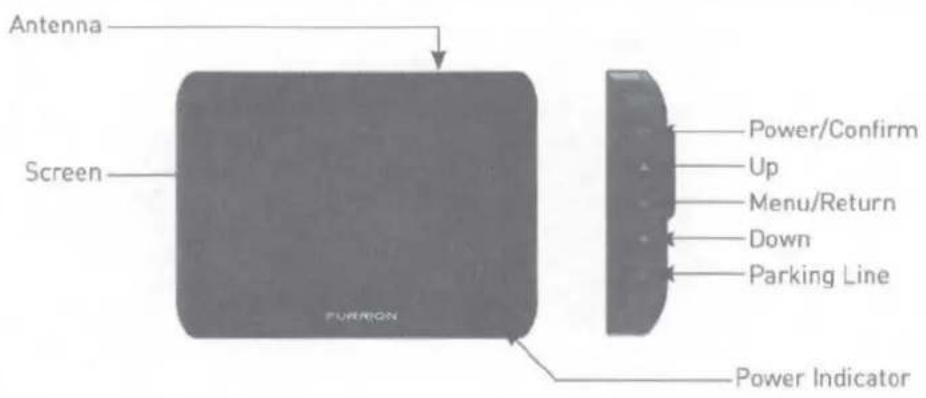
Rear Camera
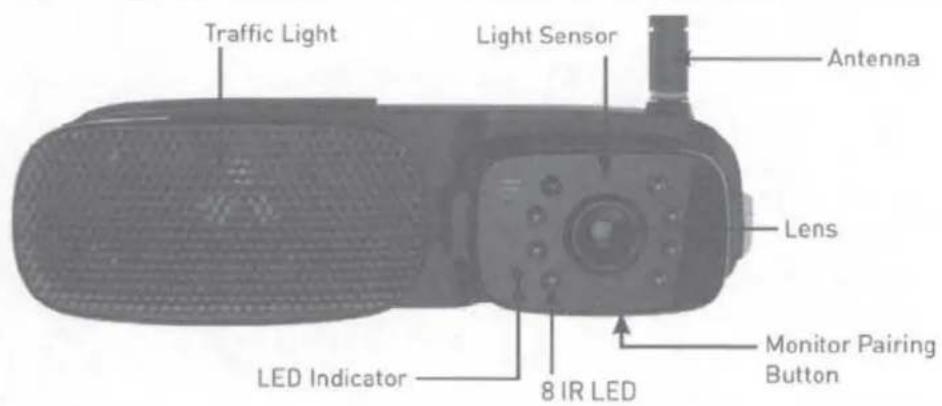
Product Overview
Sharkfin Camera
English

Installation
READ THIS MANUAL BEFORE INSTALLATION
NOTE: We have included all of the items needed for most standard installations, but all vehicles are different. We recommend you review your vehicle completely before starting.
What's in the box
Make sure you have the following items included in the packaging. If any item is damaged or missing, contact your dealer.
- Monitor x 1
• Windshield Stand x 1
• Monitor Power Cable x 1 - Camera (different by model)
• Antenna (quantity different by model) - Warranty Card x 1
• Instruction Manual x 1
NOTE: The contents included may be different based on the kit you purchased. Please take the actual product as standard.
Monitor Installation
Choose a monitor location in your vehicle that does not block your view and complies with local laws for safe driving. Do not place in an area where it might interfere with driving.
WARNING: To prevent the risk of electric shock or fire, during installation, remove the key from the ignition and isolate the 12V or 24V power source.
- Clean the mounting area where you are going to install the monitor with a cleaner that does not leave a residue.
- Remove the protective film from the bottom of the suction cup.
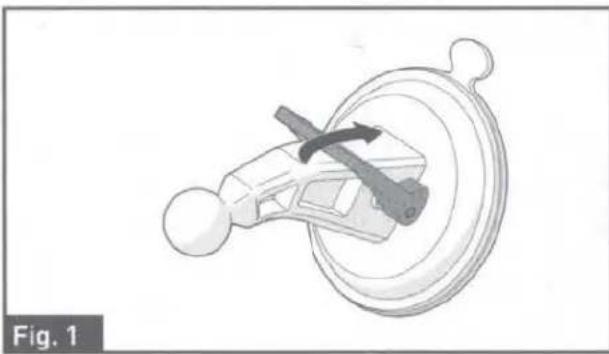
- Carefully position the suction cup on the windshield and rotate the locking arm downwards to affix securely. (Fig. 1)
natural_image
Mechanical component diagram showing a lever mechanism inside a housing (no text or symbols)English
- Align the ball of the suction cup with the opening on the back of the monitor and push firmly until locked into place. (Fig. 2)

natural_image
Technical line drawing of a mechanical assembly with a component and a separate view (no text or symbols)- Rotate the monitor to adjust the visual angle as needed.
Camera Installation
CAUTION: Ensure there are no electrical cables, gas lines, pipes or other important parts behind where the drill holes will be. To prevent the risk of electric shock or fire, during installation, remove the key from the ignition and isolate the 12V or 24V power source.
Installation
Suitable Installation Position
- For optimum performance, the camera should be mounted where there is minimal obstruction between the camera and monitor. Dense side-wall material and electrical appliances can reduce signal strength.
- Where practical install, as high as possible at the rear of the vehicle.
- Horizontal-center of the vehicle or as close as is optimal.
- Mount camera at least 2 inches above or below running lights. Close proximity to lights may cause image blooming, blurring and reduced night vision performance.
- The area should be flat with enough surface area to accommodate the bracket.
- The surface area should be clean and dry for a watertight installation.
- Ensure that power can be fed to the installation area from within the vehicle.

Camera Location
Testing
Prior to permanently mounting the camera, it is advisable to check if the intended mounting location will achieve adequate signal.
- Pair the camera and monitor (see Pairing the Camera and Monitor section).
-
Temporary secure the camera in the intended location or as close as possible.
-
Check signal icon Y.all on the monitor. Ideally there should be 3-4 bars.
- If the signal is 0–1 bars, reposition the camera and or monitor. The signal can also be improved by decreasing the amount of obstructions between the camera and monitor.

Good Signal

Poor Signal
Sharkfin Camera Installation (if purchased)
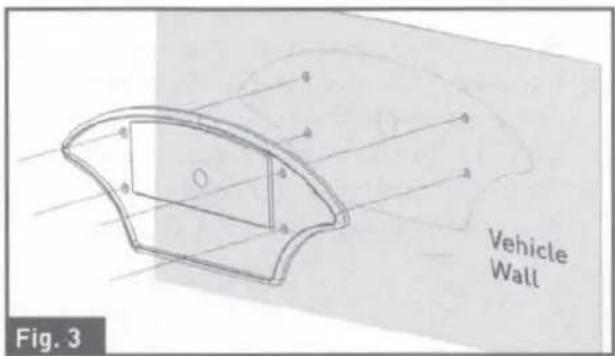
- Select a suitable mounting position where you are going to install the doorway camera. Mark a basic outline using the provided bracket gasket. (Fig. 3)
Installation
- Drill a 58 " center hole on the vehicle wall using a 58 " hole saw. (Fig. 4)

- Feed the supplied 6-foot camera power cable through the gasket. Ensure the bare end of the cable goes into the vehicle and the flat side faces inward. (Fig. 5)

- Pull out the camera power cable, leaving approx 2 inches of slack. (Fig. 6)

- Install the antenna onto the camera and rotate clockwise to lock into place. (Fig. 7)

natural_image
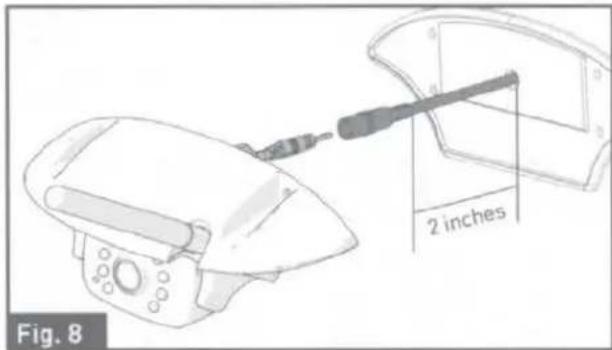
Diagram of a Purrison device with a screwdriver inserted, labeled Fig. 7 (no text or symbols on the device itself)- Connect the camera power cable to the camera cable. (Fig.8)
- Place the attached cables and connections into the bracket housing by first placing the cable to the right. Place the camera cable filter in the left of the bracket housing. (Fig. 9)

natural_image
Technical line drawing of a mechanical component with a cylindrical tool inserted, labeled Fig. 9 (no text or symbols on the diagram itself)Installation
- Fix the gasket and bracket to the vehicle using four 34 " flat self-tapping screws. Make sure the camera power cable is not damaged while attaching the device to the vehicle. (Fig. 10)
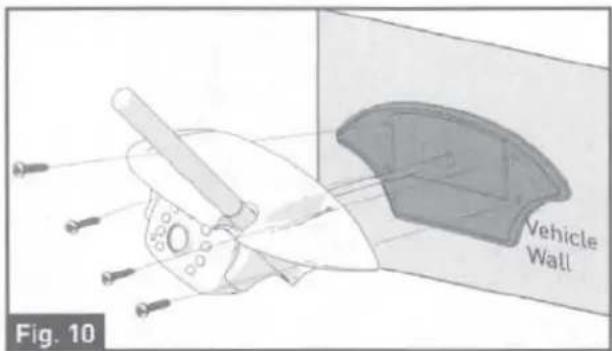
- Make sure the sealing lip around the edge of the gasket is seated over the edge of the bracket before fully tightening the screws.
Rear Camera Installation (if purchased)
- Select a suitable position on the back of the vehicle wall where you would like to install the camera.
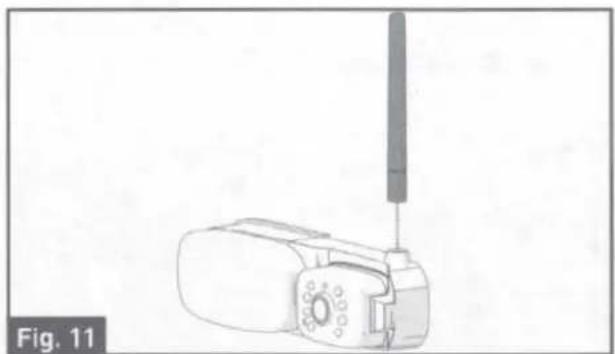
- Install the antenna onto the camera and rotate clockwise to lock into place. (Fig. 11)
natural_image
Illustration of a handheld electronic device with a screwdriver inserted, labeled 'Fig. 11' (no text or symbols on the device itself)- Remove the lens cover by lifting the slot at the bottom of the traffic light. (Fig. 12)

natural_image
Diagram of a device with an open lid and internal components, showing a directional arrow (no text or symbols)- Remove the two screws holding the camera part using a Phillips-head screwdriver and set aside. (Fig. 13)

- Pull to remove the camera part from traffic light and save in a safe place in case of future use. (Fig. 14)

Installation
- Secure the traffic light base on the vehicle wall using the four flat self-tapping screws (quad drive flat head #6 x 3/4" self-drilling wood screw). (Fig. 15)

natural_image
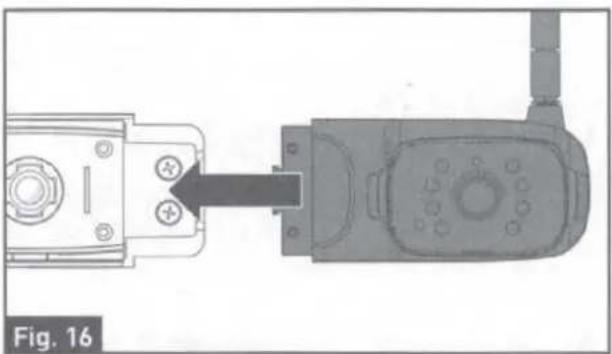
Technical illustration of a mechanical component with multiple pins and light rays, labeled Fig. 15 (no text or symbols on the diagram itself)- Insert the front or rear camera into the traffic light base and secure with two flat self-tapping screws provided. (Fig. 16 and Fig. 17)
natural_image
Diagram of a mechanical device with a connector and housing, labeled Fig. 16 (no text or symbols on the diagram itself)
natural_image
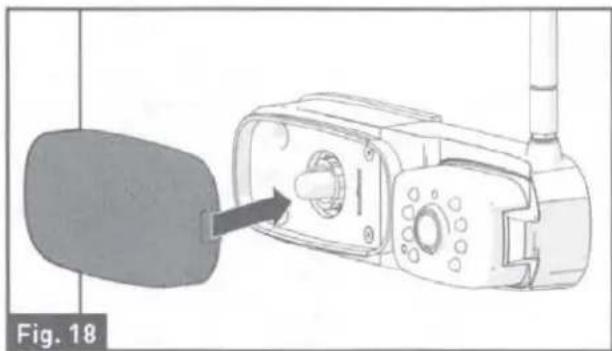
Technical line drawing of a mechanical device with internal components and labeled parts (no readable text or symbols)- Replace the lens cover over the traffic light base and press until a "click" is heard. The camera is now fully installed onto the vehicle. (Fig. 18 and Fig. 19)
natural_image
Mechanical device with a circular component inserted into a housing, labeled Fig. 18 (no text or symbols on the device itself)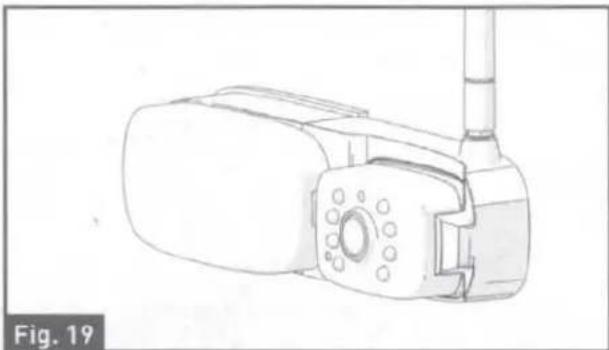
natural_image
Line drawing of a mechanical device with no visible text or symbols- Repeat steps 1 to 7 to install the other camera.
Installation
Electrical Connections
Connecting the Monitor
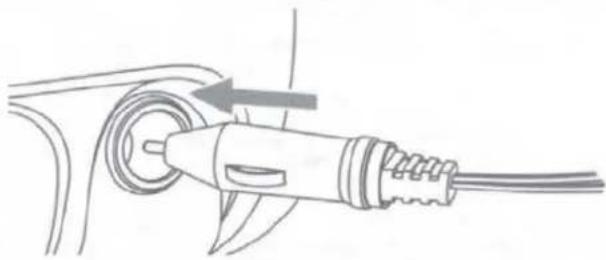
- Route the power cable to the vehicle's cigarette lighter socket 12/24V power outlet. The cable must not interfere with the safe operation of the vehicle.
- Insert the small 12/24 Volt DC plug of the power cable into the right side of the monitor.
- Plug the 12/24 Volt cigarette lighter plug into the vehicle's cigarette lighter socket.
natural_image
Diagram of a cable connector with a pull-up cable and arrow indicating direction (no text or symbols)Connecting the Camera
WARNING
When connecting wires, ensure the circuit is isolated by disconnecting the negative terminal on the battery.
- Ensure correct polarity when wiring the cables. RED + BLACK -.
- Ensure correct polarity when wiring.
- Wire connections and terminals must be sealed and waterproof.
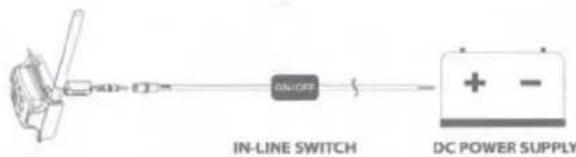
The Furrion Vision S Camera System can be connected to an electrical power source via a 7 Way Connector.
Wiring to running lights: the camera will activate when the running lights are switched on.
Wiring to reverse lights: the camera will activate when the vehicle engages reverse gear.

Consult the vehicle's service manual for specific wiring color code.

flowchart
graph LR
    A["Motor"] --> B["Switch"]
    B --> C["Light"]
    C --> D["Running, Reverse or Auxiliary Lights"]
When wiring this camera directly to a 12V battery or converter in your RV, use an in-line switch on the power cable to power on or off your camera. This will enable this camera to be used when parked without a tow vehicle connected.
Connecting the Traffic Light
- Route the power cable to the vehicle's 12V running light. The cable must not interfere with the safe operation of the vehicle.
WARNING
Never connect the traffic light to a power source over 12V, damage to the traffic light may occur.

Getting Started
The camera and monitor need to be paired the first time you are using your Vision S Camera System.
NOTE: Ensure both the camera and monitor has power supplied during pairing and setting processes. (The vehicle may need to be running.)
Activate the Monitor
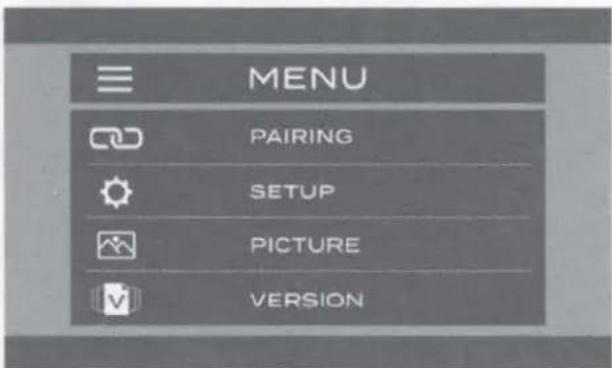
In off mode, press the ⏻ button on the right of the monitor to turn on the monitor. In on mode, press and hold the ⏻ button to activate the monitor.
There are four options that allow you to set the wireless vehicle rear observation system before operating.
Pairing the Camera and Monitor
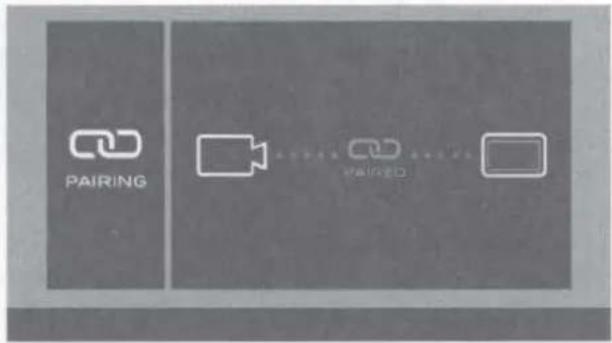
- Use ▲ or ▼ button to highlight PAIRING menu, then press ⏻ to enter the next page.
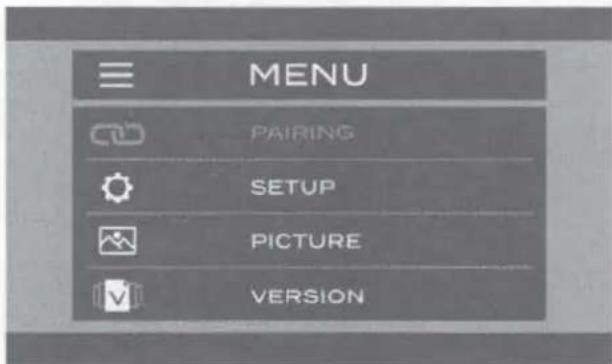
- Press the "MONITOR PAIRING" button at the bottom of selected camera to pair.


Getting Started
- Once paired successfully, a red icon will appear after the device list.
English
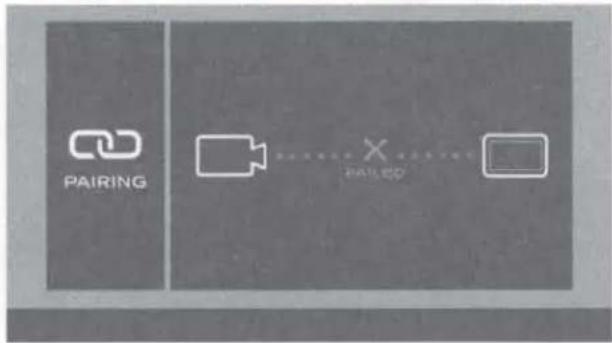
- An ✗ icon indicates pairing failed, repeat steps 2 and 3 to pair again.


- Refer to "Camera Settings" section for detail settings of the camera.
Change Settings
Camera Setting
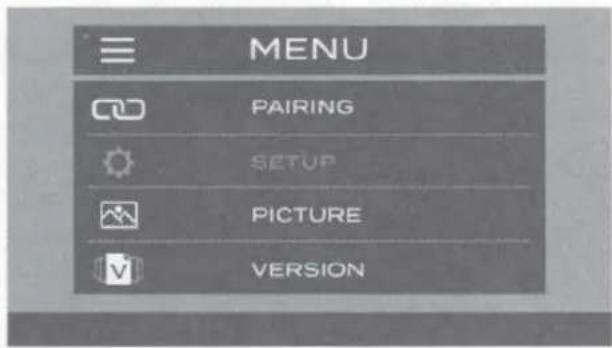
Use ▲ or ▼ button to highlight SETUP menu, then press ⏻ to enter the next page or press ≡ button to return to the previous page.
MIRROR SETTING
- Use ▲ or ▼ button to highlight MIRROR menu, then press ⏻ to enter.

- Press ▲ or ▼ button to set the camera image as NORMAL (0°), ROTATE (180°), FLIP (Horizontal Mirror) or FLIP & ROTATE (Vertical Mirror). Press ⏻ to confirm your selection or press ≡ button to return to the previous page.

VOLUME SETTING
- Use ▲ or ▼ button to highlight VOLUME menu, then press ⏻ to enter.

- Press ▲ to increase the volume or press ▼ to decrease.

Change Settings
AUTO DIM SETTING
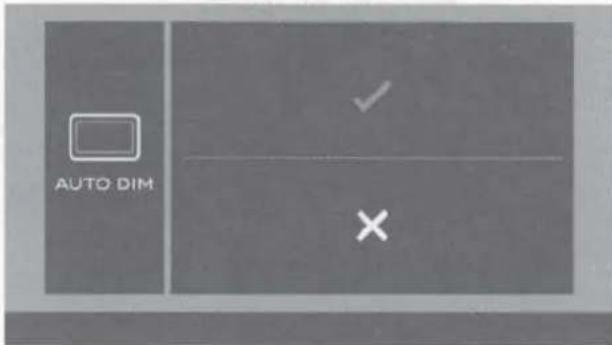
- Use ▲ or ▼ button to highlight AUTO DIM menu, then press ⏻ to enter.

- Use ▲ or ▼ button to select √ or ✗. Press ⏻ to confirm your selection or press ≡ button to return to the previous page. Press √ or ✗ to enable or disable the light detective function.
LCD AUTO OFF SETTING
- Use ▲ or ▼ button to highlight LCD AUTO OFF menu, then press ⏻ to enter.

- Press ▲ or ▼ button to set the LCD auto off time as 10 SEC, 20 SEC, 30 SEC or × (off). Press ⏻ to confirm your selection or press ≡ button to return to the previous page.

MOTION DETECT SETTING
The motion detect function is used to detect objects in motion and assist in safe driving while the vehicle is in reverse. When on, the monitor LCD will be illuminated automatically when motion is detected.
- Use ▲ or ▼ button to highlight MOTION DETECT menu, then press ⏻ to enter.

Change Settings
- Press ▲ or ▼ button to set the LCD auto off time as LOW, MEDIUM, HIGH or × (off). Press ⏻ to confirm your selection or press ≡ button to return to the previous page.

Picture Setting
- Use ▲ or ▼ button to highlight LCD AUTO OFF menu, then press ⏻ to enter.

- Use ▲ or ▼ button to highlight BRIGHTNESS, CONTRAST or COLOR menu, then press ⏻ to enter.
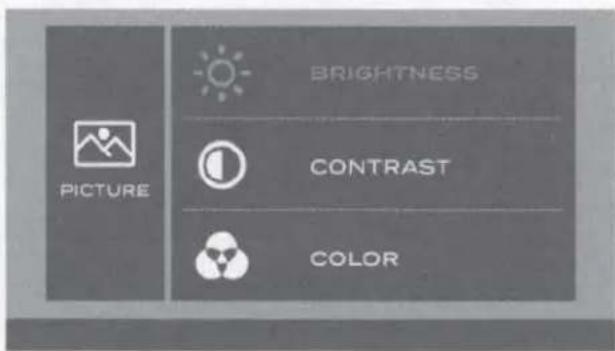
- Press ▲ or ▼ to change the BRIGHTNESS, CONTRAST or COLOR setting. Press ⏻ to confirm your selection or press ≡ button to return to the previous page.

natural_image
Simple diagram with a sun icon and a plus sign, no text or symbols presentSoftware Version
Use ▲ or ▼ button to highlight VERSION menu, then press ⏻ to enter and view the current software version.

Operation
English
The Wireless Vehicle Rear Observation System operates when the vehicle is shifted into reverse. The Camera transmits a clear and wide image with Audio from the area behind the vehicle to the monitor inside the vehicle. During the vehicle in moving, the speaker is recommended to be mute.
The monitor, when powered, remains in sleep mode until it receives a video signal on the 2.4GHz frequency. When the monitor receives a video signal, it automatically turns on and displays the image from the camera. The monitor automatically adjusts for color, brightness, and contrast, for either daytime viewing or nighttime viewing. At night the picture will appear Black and White. This is due to the low light level and is normal.
NOTE: Because this is a wireless system, the monitor is always watching for a video signal. It is possible to receive signals from other cameras. Systems such as security cameras, baby monitors, and even other back up camera systems can trigger the monitor to briefly turn on. This is normal for wireless products. If you find you have too much activation due to video signals in your area, use the included monitor power wire and run it to the rear of the vehicle. Attach it to the same power source as the camera, this will insure the monitor will only come on when you are in reverse and will eliminate any false signals.
Adjust the Camera Angle
You can manually adjust the rear and sharkfin cameras. Both rotate upwards and downwards (0\~50°). (Fig. 20 and Fig. 21)

natural_image
Diagram of a mechanical device with a rotating button and fan mechanism (no text or symbols)
natural_image
Diagram of a mechanical device with a rotating knob and directional arrow (no text or symbols)Fig. 21
Operating the System

| Button | Function |
| Use this button to turn the monitor On and Off and to confirm menu selections. | |
| Use this button to navigate menu selections and adjust settings. | |
| Use this button to switch between the viewing screen and the menu screen.Press to return to the previous menu. | |
| Use this button to navigate menu selections and adjust settings. | |
| P | Use this button to turn on the screen guidelines On and Off. |
Care and Cleaning
Though your monitor requires little care, you will still need to maintain its condition and performance by following the guidelines below.
- Keep your system away from excessive moisture, extreme heat or cold.
- Keep liquids away from the display.
- Occasionally clean the surface of the monitor with a soft cloth moistened with water or glass cleaner.
Only clean the unit with a dry cloth. Do not clean the unit with strong chemical agents or abrasive cleaners. Never spill liquid of any kind on the product. Do not allow residue or liquids to enter any part of the appliance as this may cause risk of electrocution. Always disconnect from the mains before cleaning.
CAUTION: Never use solvents such as benzene, thinner or cleaners available commercially to clean the system.
Specifications
English
| Specifications | |
| SUPPLY VOLTAGE | DC8 to 30V |
| WIRELESS FREQUENCY | 2.4 GHz |
| WIRELESS RANGE | 150m (open area) |
| TRANSMITTING SPEED | 6 Mbps (single) |
| RECEIVING SENSITIVITY | 18+/-2dBm |
| DECOMPRESSION FORM | H.264 |
| DELAYING TIME | <250ms |
| CAMERA | |
| IMAGE DISTANCE | <5m |
| CMOS SIZE | 1/3" |
| OPTICAL LENS | F2.0 |
| IR CUT FILTER | 850nm automatic |
| VIEW ANGLE | 120" |
| CURRENT (IR ON) | <400mA@12V |
| CURRENT (IR OFF) | <200mA@12V |
| CAMERA PIXEL | 720x480 |
| DISPLAY | |
| LCD POWER OFF | <30mA@12V |
| LCD BACKLIGHT ON | <500mA@12V |
| LCD BACKLIGHT OFF | <300mA@12V |
| LCD SIZE | 4.3" |
| LCD RESOLUTION AT 1 VIEW | 480x272 |
| LCD BRIGHTNESS | 200cd/m2 |
| LCD CONTRAST | 600:1 |
| LCD VIEWING ANGLE | L/R75,U60,D70 |
| LCD ASPECT RATIO | 16:9 |
Troubleshooting
| Problem | Solution |
| Monitor won't turn on (no blue LED) | Check the power cable is connected. |
| Check the cigarette lighter has 12-24V DC Output. | |
| Check the fuse in the cigarette socket adapter. | |
| Camera & Monitor won't pair | Check if the camera is receiving power. |
| Make sure to hold the camera pairing button for 2 seconds. | |
| Intermittent / Weak signal icon appears | Check if the camera antenna is fitted and secured correctly - it should be vertical. |
| Distance between camera and monitor is too great. Reduce distance between Camera and Monitor. | |
| Large dense objects could be obscuring the signal. If possible, move the objects. | |
| Interference from electrical appliances may be affecting the wireless signal. Turn off the appliances when using the system. | |
| Interference from overhead power lines may be affecting the signal. | |
| Try unpairing and pairing. | |
| Night vision is poor or does not function | The light sensor on the camera may be dirty or obstructed. |
| Ensure the camera unit is installed at least 2 inches away from rear lights. | |
| Monitors Blue LED no light with no picture | The camera has no power connected. |
| Ensure the tow vehicle is running. | |
| Ensure the 7 way connector is connected. | |
| Ensure that the circuit the camera is connected to has power and is running. |
Warranty
Furrion warrants for a period of 1 year from date of retail purchase by the original end-use purchaser, that this product, when delivered to you in new condition, in original packaging, from a Furrion authorized reseller and used in normal conditions, is free from any defects in manufacturing, materials, and workmanship. In case of such defect, Furrion shall replace or repair the product at no charge to you. This warranty does not cover: products where the original serial numbers have been removed, altered or cannot readily be determined; damage or loss caused by accident, misuse, abuse, neglect, product modification, failure to follow instructions in instruction manual, commercial or industrial use; damage or loss caused to the decorative surface of product; to any data, software or information; and normal wear and tear. This warranty only protects the original end-user ("you") and is not transferable; any attempt to transfer this warranty shall make it immediately void. This warranty is only valid in the country of purchase.
THIS WARRANTY AND REMEDIES SET FORTH ABOVE ARE EXCLUSIVE AND IN LIEU OF ALL OTHER WARRANTIES, REMEDIES AND CONDITIONS, WHETHER ORAL OR WRITTEN, EXPRESS OR IMPLIED. FURRION SPECIFICALLY DISCLAIMS ANY AND ALL IMPLIED WARRANTIES, INCLUDING, WITHOUT LIMITATION, WARRANTIES OF MERCHANTABILITY AND FITNESS FOR A PARTICULAR PURPOSE. IF FURRION CANNOT LAWFULLY DISCLAIM IMPLIED WARRANTIES UNDER THIS LIMITED WARRANTY, ALL SUCH WARRANTIES, INCLUDING WARRANTIES OF MERCHANTABILITY AND FITNESS FOR A PARTICULAR PURPOSE ARE LIMITED IN DURATION TO THE DURATION OF THIS WARRANTY.
No Furrion reseller, agent, or employee is authorized to make any modification, extension, or addition to this warranty.
FURRION IS NOT RESPONSIBLE FOR DIRECT, INDIRECT, SPECIAL, INCIDENTAL OR CONSEQUENTIAL DAMAGES RESULTING FROM ANY BREACH OF WARRANTY OR CONDITION, OR UNDER ANY OTHER LEGAL THEORY, INCLUDING BUT NOT LIMITED TO LOST PROFITS, DOWNTIME, GOODWILL, DAMAGE TO OR REPLACEMENT OF ANY EQUIPMENT OR PROPERTY, ANY COSTS OF RECOVERING, REPROGRAMMING, OR REPRODUCING ANY PROGRAM OR DATA STORED IN OR USED WITH FURRION PRODUCTS. FURRION'S TOTAL LIABILITY IS LIMITED TO THE REPAIR OR REPLACEMENT OF THIS PRODUCT PURSUANT TO THE TERMS OF THIS WARRANTY.
SOME STATES DO NOT ALLOW THE EXCLUSION OR LIMITATION OF INCIDENTAL OR CONSEQUENTIAL DAMAGES OR EXCLUSIONS OR LIMITATIONS ON THE DURATION OF IMPLIED WARRANTIES OR CONDITIONS, SO THE ABOVE LIMITATIONS OR EXCLUSIONS MAY NOT APPLY TO YOU. THIS WARRANTY GIVES YOU SPECIFIC LEGAL RIGHTS, AND YOU MAY ALSO HAVE OTHER RIGHTS THAT VARY BY STATE OR (WHERE APPLICABLE IN THE COUNTRIES WHERE FURRION HAS NON-US/CANADIAN AUTHORIZED DEALERS) COUNTRY. NO ACTION OR CLAIM TO ENFORCE THIS WARRANTY SHALL BE COMMENCED AFTER THE EXPIRATION OF THE WARRANTY PERIOD.
Keep your receipt, delivery slip, or other appropriate payment record to establish the warranty period. Service under this warranty must be obtained by contacting Furrion at
warranty@furrion.com
Product features or specifications as described or illustrated are subject to change without notice.
FURRION
Furrion Innovation Center & Institute of Technology
● 52567 Independence Ct., Elkhart, IN 46514, USA ● Toll free:1-888-354-5792
Email: support@furrion.com
©2007-2018 Furrion Ltd. Furrion® and the Furrion logo are trademarks licensed for use by Furrion Ltd. and registered in the U.S. and other countries.
Vehicle Observation System
4.3" Furrion Vision S™ Single Camera System with Marker Light

natural_image
Black rectangular electronic device labeled 'FURRION' with no visible text or symbols on its body4.3" Monitor

natural_image
Silhouette of a person standing at a desk within a circular frame (no text or symbols)Windshield Mount

natural_image
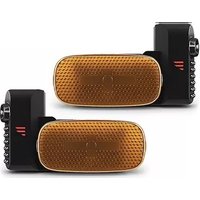
Red and black electronic device with antenna and control panel (no visible text or symbols)Rear Camera with Marker Light
Main Features
Monitor & Accessories

DIGITAL WIRELESS

ANTI-GLARE

REAR ASSIST
MARKER LINES

SECURITY CAMERA
AUTO WAKE

AUDIO

WINDSHIELD MOUNT
Rear Camera with Marker Light

CMOS 120°
VIEW ANGLE
Rear Camera with Marker Light

Windshield Mount
![Φ15/16"[22.4mm] Φ35/16"[84mm] 41/8"(103.5mm) 37/8"[98mm]5/6"[15.5mm] 13/4"[43mm]](/content/2026/06/1340380/images/60c268e8fbef86059f499b6804e267f631a692e013dc68782fd2f35fed32cb9a.jpg)

Specifications
Camera
| Night Vision Distance | <16ft (5m) |
| CMOS Size | 1/3" |
| Optical Lens | Doorway/Rear: F2.0 |
| IR Cut Filter | 850nm Automatic |
| View Angle/Degree | 120° |
| Working Current (IR ON) | <400mA@12V |
| Working Current (IR OFF) | <250mA@12V |
| Camera Pixel | 720 x 480 |
| Waterproof | IP65 |
Monitor
| LCD Backlight ON | <500mA@12V |
| LCD Backlight OFF | <300mA@12V |
| LCD Size | 4.3" |
| LCD Resolution at 1View | 480 x 272 |
| LCD Brightness | 240 cd/m2 |
| LCD Contrast | 900:1 |
| LCD Viewing Angle | L/R75, U60, D70 |
| LCD Aspect Ratio | 16:9 |
Camera/Monitor
| Supply Voltage | DC8 to 30V |
| Wireless Frequency | 2.4GHz |
| Wireless Range | <150m (open area) |
| Emitting Power | 18+/-2 dBm |
| Transmitting Speed | 6 Mbps (single) |
| RF Modulation | OFDM |
| Receiving Sensitivity | -88 +/-3dBm |
| Decompression Form | H.264 |
| Delaying Time | <250ms |
| Channel Bandwidth | 20MHz |
| Type Approval | FCC Part 15 |
Dimensions/Weight
| Individual Packaging Dimensions(W x H x D) | 7.48 x 8.78 x 2.83"(190 x 223 x 72mm) |
| Net weight (lbs/kgs) | 1.2/0.5 |
| Gross weight (lbs/kgs) | 1.7/08 |
Master Carton
| Quantity per Master Carton | 8 |
| Master Carton Dimensions (W x H x D) | 12 x 18.11 x 8.27" (305 x 460 x 210mm) |
| Master Carton Gross Weight (lbs/kg) | 13.9/6.3 |
FOS43TASR-V1.5
FURRION
WARRANTY LEAFLET...... ENGLISH (EN)
LIVRET DE GARANTIE...... FRANÇAIS (FR)
FOLLETO DE LA GARANTÍA ...... ESPAÑOL (ES)
FOS43TASR

S/N:1911900260-122019-00342
Congratulations on purchasing your new Furrion product. All Furrion products are made to strict quality standards. If used properly for its intended purpose, your product should provide many years of use. The details of this warranty are set out in the terms and conditions (see reverse) which supplement the authorized reseller or dealer's Terms and Conditions of Sale. This warranty is given in addition to your other rights under the laws of the country where you purchased this product. Please visit www.furrion.com
LIMITED WARRANTY TERMS AND CONDITIONS
- Furrion warrants that this product will be free from defects in workmanship and materials for a period of 12 months with parts and labor, except the products in the following table, from date of retail purchase, by the original end-use purchaser ("you") when delivered to you in new condition, in original packaging, from a Furrion authorized reseller or dealer and used in normal conditions. If a valid claim is made under warranty, then you will only be entitled to claim in accordance with paragraph 6 below.
| Product Type | Warranty Period |
| Air Conditioning | 24 months |
| Gas Water Heater | 24 months |
| Solar | 24 months |
| AC/DC Power Centers | 24 months |
| Cordsets & Adapters, Power Inlets (RV, and Marine) | 60 months |
-
The warranty only applies to Furrion products: with a valid serial number; used for consumer, private use and not for commercial or industrial use; and where you have validated the warranty in accordance with paragraph 4 below.
-
The warranty does not cover damage or loss: caused by poor, faulty or incorrect use, installation or maintenance; caused by accident (including force majeure or natural forces), misuse, negligence, abrasion, improper storage following delivery, rot and/or infestation following delivery, leaks (or similar incidents); occurring during shipment (even when Furrion arranged or paid for shipping); caused by failure to follow instructions in the owner's guide, damaged; caused by normal wear and tear; caused by maintenance, repairs or modifications other than those carried out by an authorized dealer; caused to the decorative surface of the product; caused to any data, software or information. This warranty also excludes claims based on any misrepresentations by the seller; or if this product's serial number has been altered, defaced, removed or rendered unidentifiable. This warranty is only valid in the country of purchase. Please see section 14 for specific product details.
-
To validate the warranty, you must: (a) complete the registration via www.furrion.com, or by call center; and (b) register the warranty covering this product within 6 months of the date of the bill of sale; and (c) have the original bill of sale to validate warranty of this product.
-
If you require warranty service on this product, please cease using the product when a fault arises and contact us directly. You will have to present your original bill of sale to establish warranty coverage. Furrion's customer service can be reached at:
(i) For USA/Canada customers:
www.furrion.com
Recreational Vehicle products
Email: support@furrion.com
Toll-free Number: +1 800 789 3341
Non-Recreational Vehicle products
Toll-free Number: +1 877 853 1900
-
Following the filing of a claim, Furrion will investigate the claim. If we believe there is a defect covered by the warranty, we will at our option either repair or replace the defective product (or part). It is Furrion's right to replace with new or refurbished product. If the product is part of an advanced exchange program, you may be required to provide a credit authorization during the claiming process.
-
Please note in the event that no defect can be found, it is your responsibility to pay for the re-delivery of the replacement items. If a defect is found, Furrion will pay for the re-delivery of the replacement items.
-
Installation of any repaired or replaced product will not be Furrion's responsibility.
-
If you do not allow the authorized dealer to inspect the product which is the subject of the warranty claim, you will invalidate the warranty in respect of that claim.
-
Any repaired or replaced Furrion product parts shall be guaranteed on the terms of this warranty for the unexpired portion of the warranty period only.
-
This warranty is non-transferrable and is personal to the original end-use purchaser as shown on the original dated bill of sale. Any attempt to transfer this warranty shall immediately render it void.
-
This warranty is subject to the jurisdiction of the courts of the State where you purchased this product, and any dispute or claim arising out of, or in connection with it or its subject matter, shall be governed by, and construed in accordance with the laws of that State.
-
In the event of any difference between this warranty and the provisions in any owner's manuals, warranty leaflets, or packaging cartons, the terms of this warranty shall prevail to the fullest extent allowed by law.
-
THIS WARRANTY AND REMEDIES SET FORTH ABOVE ARE EXCLUSIVE AND IN LIEU OF ALL OTHER WARRANTIES, REMEDIES AND CONDITIONS, WHETHER ORAL OR WRITTEN, EXPRESS OR IMPLIED. FURRION SPECIFICALLY DISCLAIMS ANY AND ALL IMPLIED WARRANTIES, INCLUDING, WITHOUT LIMITATION, WARRANTIES OF MERCHANTABILITY AND FITNESS FOR A PARTICULAR PURPOSE. IF FURRION CANNOT LAWFULLY DISCLAIM IMPLIED WARRANTIES UNDER THIS LIMITED WARRANTY, ALL SUCH WARRANTIES, INCLUDING WARRANTIES OF MERCHANTABILITY AND FITNESS FOR A PARTICULAR PURPOSE ARE LIMITED IN DURATION TO THE DURATION OF THIS WARRANTY. NO FURRION RESELLER, AGENT, OR EMPLOYEE IS AUTHORIZED TO MAKE ANY MODIFICATION, EXTENSION, OR ADDITION TO THIS WARRANTY. FURRION IS NOT RESPONSIBLE FOR DIRECT, INDIRECT, SPECIAL, INCIDENTAL OR CONSEQUENTIAL DAMAGES RESULTING FROM ANY BREACH OF WARRANTY
OR CONDITION, OR UNDER ANY OTHER LEGAL THEORY, INCLUDING BUT NOT LIMITED TO LOST PROFITS, DOWNTIME, GOODWILL, DAMAGE TO OR REPLACEMENT OF ANY EQUIPMENT OR PROPERTY, ANY COSTS OF RECOVERING, REPROGRAMMING, OR REPRODUCING ANY PROGRAM OR DATA STORED IN OR USED WITH FURRION PRODUCTS. FURRION'S TOTAL LIABILITY IS LIMITED TO THE REPAIR OR REPLACEMENT OF THIS PRODUCT PURSUANT TO THE TERMS OF THIS WARRANTY. SOME STATES DO NOT ALLOW THE EXCLUSION OR LIMITATION OF INCIDENTAL OR CONSEQUENTIAL DAMAGES OR EXCLUSIONS OR LIMITATIONS ON THE DURATION OF IMPLIED WARRANTIES OR CONDITIONS, SO THE ABOVE LIMITATIONS OR EXCLUSIONS MAY NOT APPLY TO YOU. THIS WARRANTY GIVES YOU SPECIFIC LEGAL RIGHTS, AND YOU MAY ALSO HAVE OTHER RIGHTS THAT VARY BY STATE OR (WHERE APPLICABLE IN THE COUNTRIES WHERE FURRION HAS NON-US/CANADIAN AUTHORIZED DEALERS) COUNTRY. NO ACTION OR CLAIM TO ENFORCE THIS WARRANTY SHALL BE COMMENCED AFTER THE EXPIRATION OF THE WARRANTY PERIOD.

natural_image
Abstract graphic of three horizontal black bars on white background (no text or symbols)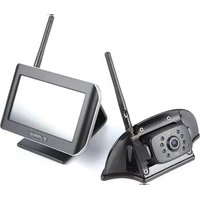


- Welcome
- Contents
- Welcome 1
- Contents 2
- Important Safety Instructions....3
- Product Overview 6
- Installation 8
- Getting Started 14
- Change Settings....16
- Operation....19
- Care and Cleaning....20
- Specifications 21
- Troubleshooting....22
- Warranty....23
- Important Safety Instructions
- READ THESE INSTRUCTIONS CAREFULLY BEFORE INSTALLING OR USING THE SYSTEM
- Electrical Safety
- Caution
- Installation
- Use
- Care
- FCC Statement
- RF Exposure
- IC Statement
- Product Overview
- Product Description
- Monitor
- Rear Camera
- Sharkfin Camera
- READ THIS MANUAL BEFORE INSTALLATION
- What's in the box
- Monitor Installation
- Camera Installation
- Suitable Installation Position
- Testing
- Sharkfin Camera Installation (if purchased)
- Rear Camera Installation (if purchased)
- Electrical Connections
- Connecting the Monitor
- Connecting the Camera
- WARNING
- Connecting the Traffic Light
- Getting Started
- Activate the Monitor
- Pairing the Camera and Monitor
- Change Settings
- Camera Setting
- MIRROR SETTING
- VOLUME SETTING
- AUTO DIM SETTING
- LCD AUTO OFF SETTING
- MOTION DETECT SETTING
- Picture Setting
- Software Version
- Operation
- English
- Adjust the Camera Angle
- Operating the System
- Care and Cleaning
- Specifications
- Troubleshooting
- Warranty
- warranty@furrion.com
- FURRION
- Furrion Innovation Center & Institute of Technology
- Vehicle Observation System
- 4.3" Furrion Vision S™ Single Camera System with Marker Light
- Main Features
- LIMITED WARRANTY TERMS AND CONDITIONS
- For USA/Canada customers:
- Recreational Vehicle products
- Non-Recreational Vehicle products
Brand : Furrion
Model : Vision S FOS43TASR
Category : Rear Camera