MS-RA70 - Radio Fusion - Free user manual and instructions
Find the device manual for free MS-RA70 Fusion in PDF.


| Product Type | Marine Digital Media Receiver |
| Model | MS-RA70 |
| Brand | Fusion |
| Dimensions (W x H x D) | 7.0" x 2.0" x 5.0" (178 x 51 x 127 mm) |
| Cutout Dimensions | 6.9" x 1.9" (175 x 48 mm) |
| Weight | 1.5 lbs (0.68 kg) |
| Power Supply | 10.8-16 VDC (negative ground) |
| Current Draw | 10A max |
| Fuse Rating | 10A (ATC/ATO) |
| Maximum Power Output | 4 x 50W |
| RMS Power Output | 4 x 22W @ 4Ω |
| Supported Audio Formats | MP3, WMA, FLAC, WAV, AAC |
| Radio Bands | AM/FM with RDS |
| Bluetooth | Built-in (A2DP, HFP, AVRCP) |
| SiriusXM Ready | Yes (requires SiriusXM Connect tuner) |
| NMEA 2000 Connectivity | Yes |
| Waterproof Rating | IPX6 (water jets) |
| Display | 2.4" Color TFT (240 x 320 pixels) |
| Rear Camera Input | Yes (RCA, auto-switch) |
| Remote Control | Included (wired or wireless optional) |
| Operating Temperature | -20°C to 60°C (-4°F to 140°F) |
| Cleaning Instructions | Wipe with damp cloth; mild soap if needed |
| Safety Standards | CE, FCC, UL 94V-0 rated materials |
| Spare Parts Availability | Contact Fusion support for replacement parts |
Frequently Asked Questions - MS-RA70 Fusion
User questions about MS-RA70 Fusion
0 question about this device. Answer the ones you know or ask your own.
Ask a new question about this device
Download the instructions for your Radio in PDF format for free! Find your manual MS-RA70 - Fusion and take your electronic device back in hand. On this page are published all the documents necessary for the use of your device. MS-RA70 by Fusion.
USER MANUAL MS-RA70 Fusion
FUSION® MS-RA70/MS-RA70N
MARINE ENTERTAINMENT SYSTEM
OWNER'S MANUAL
© 2015–2016 Garmin Ltd. or its subsidiaries
All rights reserved. Under the copyright laws, this manual may not be copied, in whole or in part, without the written consent of Garmin. Garmin reserves the right to change or improve its products and to make changes in the content of this manual without obligation to notify any person or organization of such changes or improvements. Go to www.fusionentertainment.com for current updates and supplemental information concerning the use of this product.
Garmin®, the Garmin logo, FUSION®, and the Fusion logo are trademarks of Garmin Ltd. or its subsidiaries, registered in the USA and other countries. These trademarks may not be used without the express permission of Garmin.
Apple®, the Apple logo, iPod touch®, and iPhone® are trademarks of Apple Inc., registered in the U.S. and other countries. Android™ is a trademark of Google Inc. Bluetooth® word mark and logos are owned by the Bluetooth SIG, Inc. and any use of such marks by Garmin is under license. NMEA®, NMEA 2000®, and the NMEA 2000 logo are registered trademarks of the National Marine Electronics Association. Other trademarks and trade names are those of their respective owners.
Made for iPhone 7 Plus, iPhone 7, iPhone 6s Plus, iPhone 6s, iPhone 6 Plus, iPhone 6, iPhone 5s, iPhone 5c, iPhone 5, and iPod touch (5th and 6th generation).
"Made for iPod and iPhone" means that an electronic accessory has been designed to connect specifically to an iPod or an iPhone respectively, and has been certified by the developer to meet Apple performance standards. Apple is not responsible for the operation of this device or its compliance with safety and regulatory standards. Please note that the use of this accessory with an iPhone may affect wireless performance.
A02834 B02834
Table of Contents
Side Dimensions 6
Top Dimensions 6
Index 7
Getting Started 1
Stereo Controls 1
Using the Dial to Select Items 1
Selecting a Source 1
Entering Text 1
Adjusting the Backlight Brightness and Contrast 1
Stereo Screen 1
Media Player Connection 1
USB Device Compatibility 1
Connecting a USB Device 2
Connecting an Auxiliary Device 2
Connecting the Stereo to a Garmin® Watch 2
Adjusting the Volume 2
Adjusting the Tones 2
Speaker Zones 2
Bluetooth Device Playback 3
Connecting a Compatible Bluetooth Device 3
Bluetooth Range Information 3
Selecting a Different Bluetooth Source 3
Bluetooth Source Settings 3
FUSION-Link Smartphone App 3
USB Device Playback
Controlling Music Playback on an Apple or Android Device 3
Controlling Music Playback on a USB Flash Drive 3
Shuffling Songs 3
Setting a Song to Repeat 4
Radio 4
Setting the Tuner Region 4
Changing the Radio Station 4
Presets 4
Saving a Station as a Preset 4
Selecting a Preset from a List 4
Removing Presets 4
DAB Playback 4
Setting the Tuner Region 4
Scanning for DAB Stations 4
Changing DAB Stations 4
Selecting a DAB Station from a List 4
Selecting a DAB Station from a Category 4
DAB Presets 4
Saving a DAB Station as a Preset 5
Selecting a DAB Preset from a List 5
Removing DAB Presets 5
General Settings 5
Additional Stereo Control Options 5
Optional Wired Remote Controls 5
FUSION-Link 5
Audio Control with NMEA 2000 5
Appendix 5
Registering Your MS-RA70/MS-RA70N 5
Troubleshooting 5
The stereo does not respond to key presses 5
The stereo keeps locking up when connected to an Apple device 5
The stereo is not finding my connected Apple device 5
My Bluetooth audio is interrupted by short breaks 6
The stereo does not display all song information from my
Bluetooth source 6
Specifications 6
Stereo Dimension Drawings 6
Front Dimensions 6
Getting Started
This manual covers the features of both the FUSION ® MS-RA70 and the FUSION MS-RA70N. Only the FUSION MS-RA70N is compatible with NMEA 2000 ® , and all topics that refer to NMEA 2000 functionality apply to the FUSION MS-RA70N only.
Stereo Controls

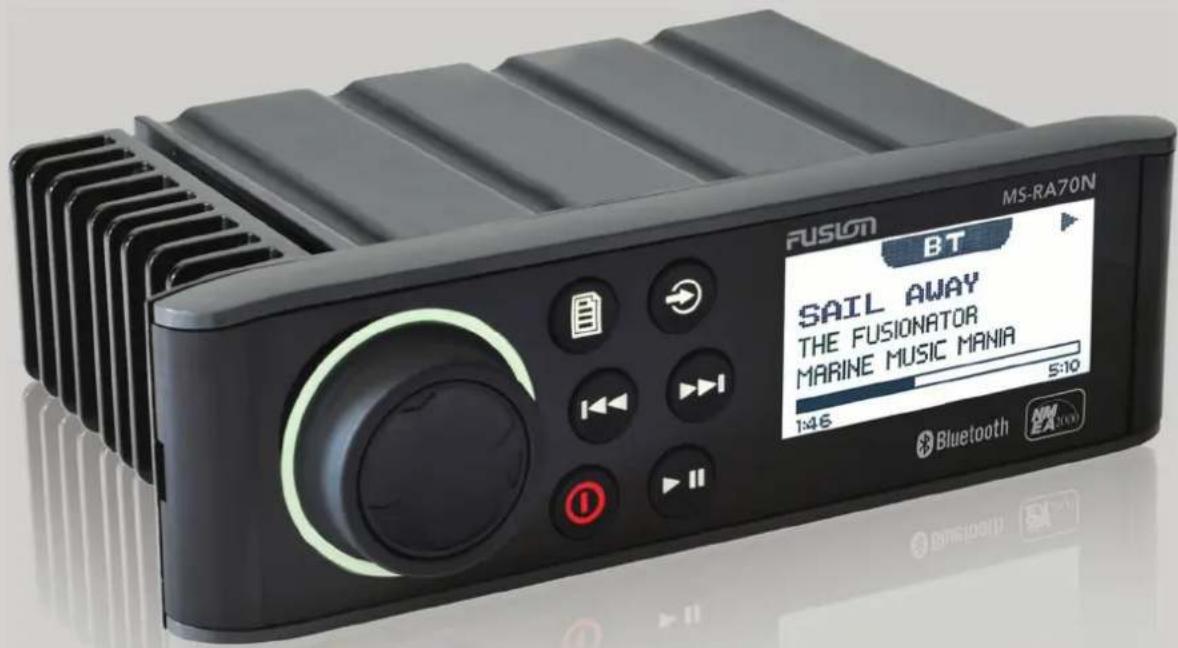
| Dial1 | Turn to adjust the volume.Press to switch between zones.Hold for at least one second to adjust the subwoofer levels.Turn to move through the menus or adjust a setting.Press to select the highlighted option. |
| Select to open a menu.Select to return to the previous screen or menu. | |
| Select to change the source (Selecting a Source, page 1). | |
| Select to skip to the previous track, when using an applicable source.AM or FM source:Select to tune to the previous station.Hold for faster tuning (manual mode only).AUX source: Select to decrease the gain for the connected source.DAB source: Select to return to the previous DAB station in the ensemble. When you reach the beginning of the current ensemble, the stereo automatically changes to the last available station in the previous ensemble. | |
| Select to skip to the next track, when using an applicable source.AM or FM source:Select to tune to the next station.Hold for faster tuning (manual mode only).AUX source: Select to increase the gain for the connected source.DAB source: Select to advance to the next DAB station in the ensemble. When you reach the end of the current ensemble, the stereo automatically changes to the first available station in the next ensemble. | |
| Select to turn on the stereo.When the stereo is on, select to mute the stereo.Hold to turn off the stereo. | |
| Select to pause or resume.AM or FM source:Select to cycle through the tuning modes (auto or manual) and presets (when two or more presets are saved).Hold to save this station as a preset.DAB source: Select to scan for DAB stations. |
Using the Dial to Select Items
You can use the dial to highlight and select items on the screen.
- Turn the dial to select an item on the screen.
- Press the dial to select the highlighted option.
Selecting a Source
1 Select
2 Select an option:
- Turn the dial to highlight a source.
- Select repeatedly to highlight a source.
3 Press the dial to select the source.
Entering Text
You can enter text to change some settings field values on this device.
1 In a settings field that allows you to enter text, select to erase the existing characters.
2 Use the dial to choose a letter, and press the dial to select it.
3 Add additional letters to finish entering the text.
4 Select ▶ to save the new text.
Adjusting the Backlight Brightness and Contrast
1 Select ▶ SETTINGS > LCD.
2 Press the dial to select brightness or contrast.
3 Adjust the brightness or contrast.
4 Select Eto exit the menu.
Stereo Screen
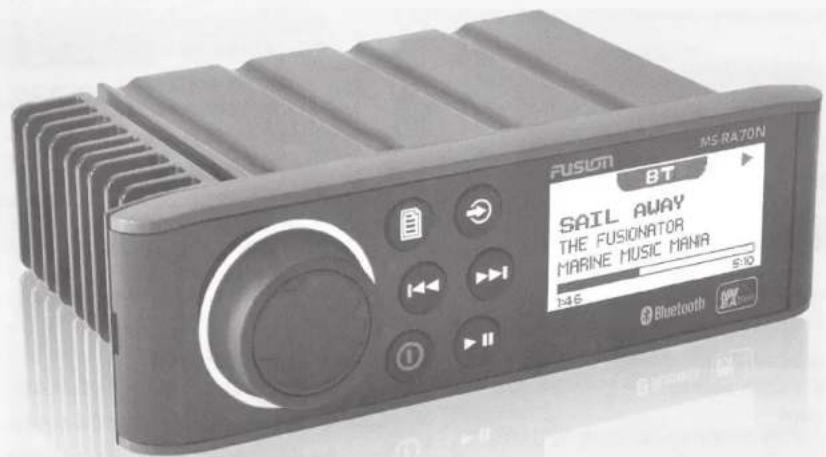
The information displayed on the stereo screen varies depending on the source selected. This example shows the stereo playing a track on an iPhone ® mobile digital device.
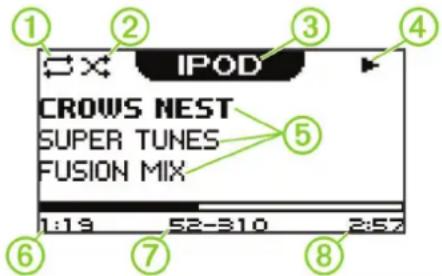
| 1 | Repeat status icon |
| 2 | Shuffle status icon |
| 3 | Source |
| 4 | Play status icon |
| 5 | Track details (if available) |
| 6 | Elapsed time |
| 7 | Current track number out of total number of tracks in the playlist (if available) |
| 8 | Track duration |
Media Player Connection
CAUTION
Always disconnect your media player from the stereo when not in use and do not leave it in your vessel. This helps reduce the risk of theft and damage from extreme temperatures.
Do not remove the media player or use your stereo in a distracting manner while operating the vessel. Check and obey all marine laws in association with use.
The stereo accepts a variety of media players, including smartphones and other mobile devices. You can connect a compatible media player using a Bluetooth ® wireless connection or a USB connection to the USB port.
NOTE: If you connect a supported media player to the USB port, you must either disable Bluetooth on the media player, or unpair the Bluetooth connection from the stereo to avoid possible media-playback issues.
USB Device Compatibility
You can use a USB flash drive or the USB cable included with your media player to connect a media player or mobile device to the USB port.
The stereo is compatible with iAP2 Apple ® devices such as the iPhone 7 Plus, iPhone 7, iPhone 6s Plus, iPhone 6s, iPhone 6 Plus, iPhone 6, iPhone 5s, iPhone 5c, iPhone 5, and iPod touch ® (5th and 6th generation).
The stereo is compatible with Android ™ devices that support the Android Open Accessory (AOA) protocol.
NOTE: The stereo is not compatible with Android devices in MTP or PTP mode. See the instructions for your Android device to connect using AOA, if necessary.
The stereo is compatible with media players and other USB mass storage devices, including USB flash drives. Music on USB drives must meet these conditions:
- The USB mass storage device must be formatted using the FAT32 file system.
- The music files must be formatted as MP3 files.
• Each folder on the storage device can contain a maximum of 250 MP3 files.
Connecting a USB Device
You can connect a USB device to the USB port on the stereo.
1 Locate the USB port on the back of the stereo.
2 Connect the USB device to the USB port.
3 Select the USB source.
Connecting an Auxiliary Device
You can connect various auxiliary devices to the stereo. These devices have either RCA connectors, a line output, or a headphone output jack.
1 Locate the auxiliary connectors on the wiring harness.
2 If necessary, connect an RCA-to-3.5 mm adapter cable to the auxiliary device.
3 Connect the auxiliary device to the RCA connectors on the wiring harness.
Adjusting the Gain for the Auxiliary Device
You can adjust the gain for the connected auxiliary device to achieve a volume level similar to that of other media sources. You can adjust the gain in 1 dB increments.
1 Select an auxiliary source.
2 Select an option:
- To increase the gain, select .
- To decrease the gain, select .
| Auxiliary Device Recommended Gain | Setting(dB) |
| Portable media player with headphone output | from -9 dB to -6 dB |
| CD/DVD player with line output -6 dB | |
| Portable media player with line output 0 dB | |
| Game console with line output 0 dB | |
| Older audio/visual equipment with line output (for example, VHS or cassette deck) | from 6 dB to 9 dB |
NOTE: To achieve the best audio quality when using a portable media player with headphone output, it may be necessary to adjust the volume control on the media player, instead of adjusting the gain.
Connecting the Stereo to a Garmin ® Watch
For a list of a compatible Garmin watches, go to www.fusionentertainment.com/marine.
For more information about the watch, see the watch manual at www.garmin.com/manuals.
1 Following the instructions in the watch manual, install the FUSION-Link™ app from the Connect IQ™ store onto the watch.
2 On the stereo, select the BT source.
3 Select ▶ DISCOVERABLE.
The stereo remains discoverable for two minutes.
4 Bring the watch within 3 m (10 ft.) of the stereo.
NOTE: Stay 10 m (33 ft.) away from other ANT ® devices while pairing.
5 Open the FUSION-Link app on the watch.
The first time you open the app on the watch, the watch automatically pairs with and connects to the stereo. If you need to pair to another stereo, in the FUSION-Link app, select Settings > Pair new.
6 Control the audio playback using the FUSION-Link app on the watch.
After the devices are paired, they connect automatically when they are turned on, within range, and the app is open on the watch.
Adjusting the Volume
1 Use the dial to adjust the volume.
2 If necessary, press the dial to switch between zones.
TIP: To control all zones at the same time, press the dial until all zones are highlighted.
Adjusting the Tones
1 Select ▶ SETTINGS > TONE.
2 Use the dial to adjust the level.
3 Press the dial to switch to a different tone.
Speaker Zones
You can group speakers in one area into speaker zones. This enables you to control the audio level of the zones individually. For example, you could make the audio quieter in the cabin and louder on deck.
Zones 1 and 2 are powered by the on-board, Class AB amplifier. To use the two line outputs and the two subwoofer outputs, you must connect external amplifiers.
You can set the balance, volume limit, and name for each zone. You can set the subwoofer level for zone 1.
Setting up Speaker Zones
1 Select ➤ SETTINGS > ZONE.
2 Select a zone.
3 Select one or more options:
NOTE: Not all options are available for all zones.
- To link zones 1 and 2, select LINK TO ZONE 1 to fill the option button (zone 2 only).
- To adjust the right and left speaker balance of this zone, select BALANCE, and use the dial to set the balance.
- To limit the maximum volume output of this zone, select VOLUME LIMIT, and use the dial to set the limit.
- To set the subwoofer filter, select SUB FILTER, and use the dial to set the filter (zone 1 only).
- To set the subwoofer level, select SUB LEVEL, and use the dial to set the level (zone 1 only).
TIP: To open the subwoofer level from any screen, press and hold the dial for three seconds.
- To give the zone a specific name, select SET ZONE NAME (Entering Text, page 1).
Linking Zones
1 Select ➕ SETTINGS > ZONE > ZONE 2.
2 Select LINK TO ZONE 1 to fill the button.
When zones 1 and 2 are linked, +appears between zones 1 and 2 on the volume screen.
Adjusting the Subwoofer Filter
You can use the subwoofer filter setting to control the subwoofer cutoff frequency, which can enhance the blend of the sound produced by the speakers and the subwoofer. Audio signals
above the selected frequency are not passed to the subwoofer. The setting applies to both subwoofer outputs.
1 Select > SETTINGS > ZONE > ZONE 1 > SUB FILTER.
2 Select a frequency.
3 Press the dial to save the selection.
Bluetooth Device Playback
You can pair the stereo to up to eight Bluetooth media devices.
You can control the playback using the keys, but you cannot browse the music collection. You should select the song or playlist on the media device.
The availability of song information such as song title, artist name, and track duration depends on the capability of the media player and music application. The shuffle and repeat status icons are not supported over Bluetooth wireless technology.
Connecting a Compatible Bluetooth Device
You can play media from a compatible Bluetooth device using the Bluetooth wireless connection.
1 Select the Bluetooth source.
2 Select ➕ DISCOVERABLE to make the stereo visible to your compatible Bluetooth device.
NOTE: The stereo is discoverable for only two minutes to prevent interruption to audio streaming over Bluetooth wireless. If more than two minutes pass before you connect a compatible device, you must repeat this step.
3 Enable Bluetooth on your compatible Bluetooth device.
4 Bring the compatible Bluetooth device within 10 m (33 ft.) of the stereo.
5 On your compatible Bluetooth device, search for Bluetooth devices.
6 Select the stereo from the list of detected devices.
7 Follow the on-screen instructions to pair and connect to the discovered stereo.
When pairing, your compatible Bluetooth device may ask you to confirm a code on the stereo. The stereo does not display a code, but it does connect correctly when you confirm the message on the Bluetooth device.
8 If your compatible Bluetooth device does not immediately connect to the stereo, repeat steps 1 through 7.
Bluetooth Range Information
The stereo and Bluetooth wireless devices have a range of 10 m (33 ft.). For optimal performance, the Bluetooth wireless device should also have a clear line of sight to the stereo.
Selecting a Different Bluetooth Source
When you have more than one Bluetooth device paired to the stereo, you can select a different source when needed. You can connect the stereo to up to eight Bluetooth devices.
1 With the BLUETOOTH source selected, select ☐
2 Select a Bluetooth device.
Bluetooth Source Settings
With the BLUETOOTH source selected, select
DISCOVERABLE: Allows the stereo to be visible to Bluetooth devices. This setting turns off automatically after two minutes to prevent possible interruption to audio after pairing a Bluetooth device to the stereo.
REMOVE DEVICE: Removes the Bluetooth device from the stereo. To listen to audio from this Bluetooth device again, you must pair the device again.
FUSION-Link Smartphone App
You can use the FUSION-Link smartphone app on your compatible Apple or Android device to adjust the stereo volume, change the source, control playback, and adjust some stereo settings.
The app communicates with the stereo using the Bluetooth connection for the mobile device. You must connect your compatible device to the stereo using Bluetooth to use the app.
For information about the FUSION-Link smartphone app for compatible Apple or Android devices, go to the Apple App Store SM or the Google Play TM store.
USB Device Playback
You can connect various USB media players and smartphones to the stereo. For example, you can connect an Android smartphone, a USB flash drive, or a compatible Apple device. How you access the USB source depends on which type of media player is connected. The stereo is designed for use with one USB connection at a time. You must disconnect one USB device before connecting another.
NOTE: If you connect an Apple media player to the USB port on the stereo, you must either disable Bluetooth on the media player, or unpair the Bluetooth connection from the stereo to avoid possible media-playback issues.
| Media Player Source Selections | |
| Android device ANDROID | |
| Apple device IPOD | |
| USB flash drive USB | |
| MP3 media player (as a mass-storage device) | USBNOTE: If your MP3 media player does not support mass-storage when connected using USB, you must connect it to the stereo as an auxiliary device (Connecting an Auxiliary Device, page 2). |
The availability of song information such as song title, artist name, and track duration depends on the capability of the media player and music application.
Controlling Music Playback on an Apple or Android Device
1 Connect a compatible Apple or Android device to the stereo using USB or Bluetooth.
2 Select the appropriate source.
3 Launch a music application on the connected Apple or Android device and begin playback.
You can use the stereo controls to play, pause, and skip tracks.
Controlling Music Playback on a USB Flash Drive
1 Connect a compatible USB flash drive or media player to the stereo.
2 Select the USB source.
3 Select
4 Select the name of the USB drive to view the file structure of the USB flash drive or media player.
5 Select a song to begin music playback.
Shuffling Songs
The shuffle feature is available on the USB source only.
NOTE: The shuffle feature is controlled by the music application on connected Apple and Android devices, if supported by the application.
1 From the USB source, select ☐
2 Select SHUFFLE.
Setting a Song to Repeat
The repeat feature is available on the USB source only.
NOTE: The repeat feature is controlled by the music application on connected Apple and Android devices, if supported by the application.
1 From the USB source, select ☐
2 Select REPEAT.
Radio
To listen to AM or FM radio, you must have a suitable marine AM/FM antenna properly connected to the stereo and be within range of a broadcasting station. For instructions on connecting an AM/FM antenna, see the stereo installation instructions.
To listen to DAB stations, you must have the appropriate equipment (DAB Playback, page 4). For instructions on connecting a DAB adapter and antenna, see the installation instructions provided with your adapter and antenna.
Setting the Tuner Region
You must select the region you are in to receive AM and FM stations properly.
If you are connected to a compatible DAB module and antenna (not included), you must select the region you are in to receive DAB stations properly.
NOTE: DAB stations are not available in all regions.
1 Select ➕ SETTINGS > TUNER REGION.
2 Select the region you are in.
Changing the Radio Station
1 Select an applicable source, such as FM.
2 Select ▶ repeatedly to move through the tuning modes:
- Select AUTO to scan and stop on the next available station.
- Select MANUAL to select a station manually.
- Select PRESETS to select a saved station preset.
3 Select or to tune to the station.
Presets
You can save your favorite AM stations and FM stations as presets for easy access.
Saving a Station as a Preset
1 With an applicable source selected, tune the stereo to a station.
2 Select ➕ PRESETS.
3 Select SAVE CURRENT.
TIP: You can quickly save the selected station as a preset by holding ▶.
Selecting a Preset from a List
Before you can select a preset from a list, you must save at least one station as a preset.
1 Select the applicable source.
2 Select ▶ PRESETS.
3 Select a preset from the list.
Removing Presets
1 With an applicable source selected, select ➕ PRESETS > REMOVE PRESET.
2 Select an option:
- To remove one preset, select the preset.
- To remote all presets, select REMOVE ALL PRESETS.
DAB Playback
When you connect a compatible Digital Audio Broadcasting (DAB) module and antenna, such as the MS-DAB100A to the MS-RA70/MS-RA70N stereo, you can tune in to and play DAB stations.
DAB broadcasts are not available in all regions. When the stereo is not set to a compatible region, the DAB source is not available.
Setting the Tuner Region
You must select the region you are in to receive DAB stations properly.
1 Select ▶ SETTINGS > TUNER REGION.
2 Select the region you are in.
Scanning for DAB Stations
Before you can scan for DAB stations, you must connect a compatible DAB module and antenna (not included) to the stereo. Because DAB signals are broadcast in select countries only, you must also set the tuner region to a location where DAB signals are broadcast.
1 Select the DAB source.
2 Select ▶ to scan for available DAB stations.
When scanning is complete, the first available station in the first ensemble found begins playing.
NOTE: After the first scan is complete, you can select ▶ again to re-scan for DAB stations. When the re-scan is complete, the system starts playing the first station in the ensemble you were listening to when you started the re-scan.
Changing DAB Stations
1 Select the DAB source.
2 If necessary, select ▶ to scan for local DAB stations.
3 Select or to change the station.
When you reach the end of the current ensemble, the stereo automatically changes to the first available station in the next ensemble.
Selecting a DAB Station from a List
1 Select the DAB source.
2 If necessary, select ▶ to scan for local DAB stations.
3 Select ➤ BROWSE > STATIONS.
4 Select a station from the list.
Selecting a DAB Station from a Category
1 Select the DAB source.
2 If necessary, select ▶ to scan for local DAB stations.
3 Select ➤ BROWSE > CATEGORIES.
4 Select a category from the list.
5 Select a station from the list.
DAB Presets
You can save your favorite DAB stations as presets for easy access.
You can save up to 15 DAB-station presets.
Saving a DAB Station as a Preset
1 With the DAB source selected, change the stereo to a DAB station.
2 Select > BROWSE > PRESETS > SAVE CURRENT.
TIP: You can quickly save the selected DAB station as a preset by holding ▶II
Selecting a DAB Preset from a List
Before you can select a DAB preset from a list, you must save at least one DAB station as a preset.
1 Select the DAB source.
2 Select > BROWSE > PRESETS > VIEW PRESETS.
3 Select a preset from the list.
Removing DAB Presets
1 With the DAB source selected, select B> BROWSE > PRESETS.
2 Select an option:
- To remove one preset, select REMOVE PRESET, and select the preset.
- To remove all presets, select REMOVE ALL PRESETS.
General Settings
Select ▶ SETTINGS.
NOTE: When an option button is filled, the option is on. When the option button is clear, the option is off.
ZONE: Enables you to configure the speaker zones.
ZONE > TONE: Adjusts the bass, middle, and treble tones.
LCD: Adjusts the backlight brightness and contrast settings (Adjusting the Backlight Brightness and Contrast, page 1).
POWER SAVE: Disables the LCD backlight after one minute of inactivity to save battery power.
LANGUAGE: Sets the language on the device.
TUNER REGION: Sets the region used by the FM, AM, and DAB sources.
TEL MUTE: Sets the behavior of the mute function when the device is connected to a hands-free mobile phone. When a call is received, the device can either mute the audio or broadcast the call through the AUX input. See your hands-free kit instructions.
SET DEVICE NAME: Sets a name for this stereo (Entering Text, page 1).
UPDATE > UPDATE SOFTWARE: Updates the stereo using a valid software update file on a connected USB flash drive.
UPDATE > MS-NRX200: (FUSION MS-RA70N only) Updates compatible remote controls on the same NMEA 2000 network using a valid software update file on a connected USB flash drive.
UPDATE > DAB MODULE: Updates a connected DAB module using a valid software update file on a connected USB flash drive.
UPDATE > FACTORY RESET: Resets all settings to the factory default values.
ABOUT: Shows the software versions for the stereo, FUSION-Link™, and connected remote.
Additional Stereo Control Options
When connected to an optional NMEA 2000 network, FUSION MS-RA70N models can be controlled by compatible devices, such as a FUSION NRX200 remote control or a compatible multi-function display on the same NMEA 2000 network.
Optional Wired Remote Controls
The stereo can be controlled by compatible FUSION wired remote controls installed in the audio zones throughout the vessel. Operating the entertainment system from the remote control is similar to operating it from the main stereo.
The wired remote controls operate over an existing NMEA 2000 network. All remote controls connected to the same NMEA 2000 network as the stereo can control the stereo.
The remote control can also serve as an NMEA ® display showing NMEA navigation data or vessel performance data from other NMEA devices on an existing NMEA 2000 network.
FUSION-Link
FUSION-Link technology allows you to fully control compatible FUSION entertainment systems on compatible multi-function displays installed at the helm, flybridge, or navigation station of the vessel. This provides you with integrated entertainment control and a less cluttered console.
The partnered multi-function display becomes the portal on which all audio on the vessel is controlled, no matter where on the vessel the stereo is installed. The FUSION-Link equipped stereo can be installed out of sight if space is an issue and users need to access the stereo only to replace removable media.
FUSION-Link technology offered on this device operates over existing industry-standard NMEA 2000 networks.
For a list of FUSION-Link capable products from companies that are partnering with FUSION, go to www.fusionentertainment.com.
Audio Control with NMEA 2000
NMEA 2000 is the most popular marine standard for data communication within vessels. It has become the standard for sending navigation and engine management data within vessels. FUSION introduces an industry-first product by incorporating NMEA 2000 functionality in its audio remote control devices. This enables the user to monitor a series of available NMEA sentences.
Go to www.fusionentertainment.com for a full list of supported NMEA sentences.
Appendix
Registering Your MS-RA70/MS-RA70N
Help us better support you by completing our online registration today.
- Go to www.fusionentertainment.com.
- Keep the original sales receipt, or a photocopy, in a safe place.
Troubleshooting
The stereo does not respond to key presses
- Turn off power to the stereo for two minutes to reset the stereo.
The stereo keeps locking up when connected to an Apple device
- Press and hold the power button to reset the stereo.
- Reset the Apple device. Go to www.apple.com for more information.
- Make sure you have the latest version of iTunes ® and the latest operating software on your Apple device.
The stereo is not finding my connected Apple device
- Make sure you have the latest version of iTunes and the latest operating software on your Apple device.
- Make sure you have the latest version of the FUSION-Link application on your Apple device.
- Reset the Apple device.
Go to www.apple.com for more information. - Contact your FUSION dealer or send an email to FUSION from www.fusionentertainment.com.
My Bluetooth audio is interrupted by short breaks
- Ensure the media player is not covered or obstructed.
Bluetooth technology performs best with line-of-sight operation.
- Bring the media player within 10 m (33 ft.) of the stereo.
- Turn off the DISCOVERABLE setting after pairing a Bluetooth device to the stereo.
The stereo does not display all song information from my Bluetooth source
The availability of song information such as song title, artist name, track duration, and album cover artwork depends on the capability of the media player and music application.
Album cover artwork and shuffle and repeat status icons are not supported by Bluetooth technology.
Specifications
| General | |
| Weight 556 g (19.6 oz.) | |
| Water resistance IEC 60529 IPX7 (front), IEC 60529 IPX3 (rear) | |
| Operating temperature range From 0 to 50°C (from 32 to 122°F) | |
| Storage temperature range From -20 to 70°C (from -4 to 158°F) | |
| Input voltage From 10.8 to 16 Vdc | |
| Current (max.) 15 A | |
| Current (muted) less than 900 mA | |
| Current (standby) FUSION MS-RA70: less than 5 mAFUSION MS-RA70N: less than 15 mA | |
| NMEA 2000 LEN 1 (50 mA) | |
| ANT wireless range Up to 3 m (10 ft.) | |
| Compass-safe distance 15 cm (5.9 in.) | |
| On-board, Class AB Amplifier | |
| Output music power per channel | 50 W max. x 4 channels at 4 Ohms per channel |
| Total output music power 200 W | max. |
| Tuner Europe and Australasia | USA Japan | ||
| FM radio frequency range | From 87.5 to 108 MHz | From 87.5 to 107.9 MHz | From 70 to 95 MHz |
| FM frequency step | 50 kHz 200 kHz | 50 kHz | |
| AM radio frequency range | From 522 to 1620 kHz | From 530 to 1710 kHz | From 522 to 1620 kHz |
| AM frequency step | 9 kHz | 10 kHz 9 kHz | |
Stereo Dimension Drawings
Front Dimensions

| 1 | 188 mm (7.40 in.) |
| 2 | 60 mm (2.36 in.) |
Side Dimensions
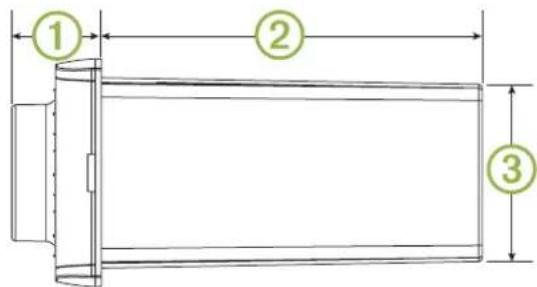
| 1 | 23.5 mm (0.93 in.) |
| 2 | 100 mm (3.94 in.) |
| 3 | 50 mm (1.97 in.) |
Top Dimensions

| 1 | 161 mm (6.34 in.) |
| 2 | 23.5 mm (0.93 in.) |
| 3 | 12 mm (0.47 in.) |
Index
A
AM 4
Android device 3
ANT devices 2
Apple device 1, 3, 5
auxiliary input 2
B
backlight 1
bass 2
Bluetooth 3
Bluetooth devices 3
D
DAB 4,5
device 1
keys 1
registration 5
F
FM 4
FUSION-Link 5
G
gain 2
K
keys 1, 5
L
language 5
M
media player 1
menu key 1
N
NMEA 2000 5
P
power key 1
presets 4, 5
DAB 5
product registration 5
R
radio
AM 4
FM 4
registering the device 5
remote control 5
repeat 3,4
S
smartphone 3
source 1
speaker zones 2
subwoofer 2
T
time
format 5
setting 5
tone 2,5
treble 2
U
USB 1-3
flash drive 3,4
V
volume 2
adjusting 2
W
watch 2
FUSION SUPPORT
New Zealand 09 369 2900
Australia 1300 736 012
Europe +44 (0) 370 850 1244
USA 623 580 9000
Pacific +64 9 369 2900


FUSION® MS-RA70/MS-RA70N Quick Start Manual
Quick Start Manual 2
| Dial 1 | Turn to adjust the volume.Press to switch between zones.Hold for at least one second to adjust the subwoofer levels.Turn to move through the menus or adjust a setting.Press to select the highlighted option. |
| Select to open a menu.Select to return to the previous screen or menu. | |
| Select to change the source (page 2). | |
| Select to skip to the previous track, when using an applicable source.AM or FM source:Select to tune to the previous station.Hold for faster tuning (manual mode only).AUX source: Select to decrease the gain for the connected source.DAB source: Select to return to the previous DAB station in the ensemble.When you reach the beginning of the current ensemble, the stereo automatically changes to the last available station in the previous ensemble. |
| Dial 1 | Turn to adjust the volume.Press to switch between zones.Hold for at least one second to adjust the subwoofer levels.Turn to move through the menus or adjust a setting.Press to select the highlighted option. |
| Select to open a menu.Select to return to the previous screen or menu. | |
| Select to change the source (page 2). | |
| Select to skip to the previous track, when using an applicable source.AM or FM source:Select to tune to the previous station.Hold for faster tuning (manual mode only).AUX source: Select to decrease the gain for the connected source.DAB source: Select to return to the previous DAB station in the ensemble.When you reach the beginning of the current ensemble, the stereo automatically changes to the last available station in the previous ensemble. |
| ▶▶I | Select to skip to the next track, when using an applicable source.AM or FM source:Select to tune to the next station.Hold for faster tuning (manual mode only).AUX source: Select to increase the gain for the connected source.DAB source: Select to advance to the next DAB station in the ensemble.When you reach the end of the current ensemble, the stereo automatically changes to the first available station in the next ensemble. |
| ➊ | Select to turn on the stereo.When the stereo is on, select to mute the stereo.Hold to turn off the stereo. |
| ▶II | Select to pause or resume.AM or FM source:Select to cycle through the tuning modes (auto or manual) and presets (when two or more presets are saved).Hold to save this station as a preset.DAB source: Select to scan for DAB stations. |
Using the Dial to Select Items
You can use the dial to highlight and select items on the screen.
• Turn the dial to select an item on the screen.
- Press the dial to select the highlighted option.
Selecting a Source
1 Select
2 Select an option:
• Turn the dial to highlight a source.
- Select → repeatedly to highlight a source.
3 Press the dial to select the source.
Stereo Screen
The information displayed on the stereo screen varies depending on the source selected. This example shows the stereo playing a track on an iPhone ® mobile digital device.

| 1 | Repeat status icon |
| 2 | Shuffle status icon |
| 3 | Source |
| 4 | Play status icon |
| 5 | Track details (if available) |
| 6 | Elapsed time |
| 7 | Current track number out of total number of tracks in the playlist (if available) |
| 8 | Track duration |
Media Player Connection
CAUTION
Always disconnect your media player from the stereo when not in use and do not leave it in your vessel. This helps reduce the risk of theft and damage from extreme temperatures.
Do not remove the media player or use your stereo in a distracting manner while operating the vessel. Check and obey all marine laws in association with use.
The stereo accepts a variety of media players, including smartphones and other mobile devices. You can connect a compatible media player using a Bluetooth® wireless connection or a USB connection to the USB port.
NOTE: If you connect a supported media player to the USB port, you must either disable Bluetooth on the media player, or unpair the Bluetooth connection from the stereo to avoid possible media-playback issues.
USB Device Compatibility
You can use a USB flash drive or the USB cable included with your media player to connect a media player or mobile device to the USB port.
The stereo is compatible with iAP2 Apple ® devices such as the iPhone 7 Plus, iPhone 7, iPhone 6s Plus, iPhone 6s, iPhone 6 Plus, iPhone 6, iPhone 5s, iPhone 5c, iPhone 5, and iPod touch ® (5th and 6th generation).
The stereo is compatible with Android™ devices that support the Android Open Accessory (AOA) protocol.
NOTE: The stereo is not compatible with Android devices in MTP or PTP mode. See the instructions for your Android device to connect using AOA, if necessary.
The stereo is compatible with media players and other USB mass storage devices, including USB flash drives. Music on USB drives must meet these conditions:
- The USB mass storage device must be formatted using the FAT32 file system.
• The music files must be formatted as MP3 files.
• Each folder on the storage device can contain a maximum of 250 MP3 files.
Connecting a USB Device
You can connect a USB device to the USB port on the stereo.
1 Locate the USB port on the back of the stereo.
2 Connect the USB device to the USB port.
3 Select the USB source.
Connecting a Compatible Bluetooth Device
You can play media from a compatible Bluetooth device using the Bluetooth wireless connection.
1 Select the Bluetooth source.
2 Select □> DISCOVERABLE to make the stereo visible to your compatible Bluetooth device.
3 Enable Bluetooth on your compatible Bluetooth device.
4 Bring the compatible Bluetooth device within 10 m (33 ft.) of the stereo.
5 On your compatible Bluetooth device, search for Bluetooth devices.
6 On your compatible Bluetooth device, select the stereo from the list of detected devices.
7 On your compatible Bluetooth device, follow the on-screen instructions to pair and connect to the discovered stereo.
When pairing, your compatible Bluetooth device may ask you to confirm a code on the stereo. The stereo does not display a code, but it does connect correctly when you confirm the message on the Bluetooth device.
8 If your compatible Bluetooth device does not immediately connect to the stereo, repeat steps 1 through 7.
To prevent interruption to audio streaming over Bluetooth wireless, you can turn off the DISCOVERABLE setting after pairing a Bluetooth device to the stereo.
Bluetooth Range Information
The stereo and Bluetooth wireless devices have a range of 10 m (33 ft.). For optimal performance, the Bluetooth wireless device should also have a clear line of sight to the stereo.
Connecting the Stereo to a Garmin ® Watch
For more information about the watch, see the watch manual at www.garmin.com/manuals.
1 Following the instructions in the watch manual, install the FUSION-Link™ app from the Connect IQ™ store onto the watch.
2 On the stereo, select the BT source.
3 Select > DISCOVERABLE.
The stereo remains discoverable for two minutes.
4 Bring the watch within 3 m (10 ft.) of the stereo.
NOTE: Stay 10 m (33 ft.) away from other ANT devices while pairing.
5 Open the FUSION-Link app on the watch.
The first time you open the app on the watch, the watch automatically pairs with and connects to the stereo. If you need to pair to another stereo, in the FUSION-Link app, select Settings > Pair new.
6 Control the audio playback using the FUSION-Link app on the watch.
After the devices are paired, they connect automatically when they are turned on, within range, and the app is open on the watch.
Playing Media
Setting the Tuner Region
You must select the region you are in to receive AM and FM stations properly. If you are connected to a compatible DAB module and antenna (not included), you must select the region you are in to receive DAB stations properly.
NOTE: DAB stations are not available in all regions.
2 Select the region you are in.
Changing the Radio Station
1 Select an applicable source, such as FM.
2 Select▶▶ repeatedly to move through the tuning modes:
- Select AUTO to scan and stop on the next available station.
- Select MANUAL to select a station manually.
- Select PRESETS to select a saved station preset.
3 Select ◀◀ or ▶▶ to tune to the station.
Scanning for DAB Stations
Before you can scan for DAB stations, you must connect a compatible DAB module and antenna (not included) to the stereo. Because DAB signals are broadcast in select countries only, you must also set the tuner region to a location where DAB signals are broadcast.
1 Select the DAB source.
2 Select ▶ to scan for available DAB stations.
When scanning is complete, the first available station in the first ensemble found begins playing.
NOTE: After the first scan is complete, you can select ▶ again to re-scan for DAB stations. When the re-scan is complete, the system starts playing the first station in the ensemble you were listening to when you started the re-scan.
Changing DAB Stations
1 Select the DAB source.
2 If necessary, select ▶ to scan for local DAB stations.
3 Select ◀◀ or ▶▶ to change the station.
When you reach the end of the current ensemble, the stereo automatically changes to the first available station in the next ensemble.
Adjusting the Volume
1 Use the dial to adjust the volume.
2 If necessary, press the dial to switch between zones.
TIP: To control all zones at the same time, press the dial until all zones are highlighted.
More Information
Getting the Owner's Manual
You can get the latest owner's manual and translations of manuals from the web.
1 Go to www.fusionentertainment.com/marine.
2 Select your product.
3 Select Manuals & Downloads.
4 Select a manual.
Registering Your MS-RA70/MS-RA70N
Help us better support you by completing our online registration today.
• Go to www.fusionentertainment.com.
- Keep the original sales receipt, or a photocopy, in a safe place.
物質宣言
New Zealand 09 369 2900
Australia 1300 736 012
Europe +44 (0) 370 850 1244
USA 623 580 9000
Pacific +64 9 369 2900

Made for iPhone iPad


Garmin ® , the Garmin logo, FUSION ® , and the Fusion logo are trademarks of Garmin Ltd. or its subsidiaries, registered in the USA and other countries. These trademarks may not be used without the express permission of Garmin.
Apple ® , the Apple logo, iPod touch ® , and iPhone ® are trademarks of Apple Inc., registered in the U.S. and other countries. Android ™ is a trademark of Google Inc. Bluetooth ™ word mark and logos are owned by the Bluetooth SIG, Inc. and any use of such marks by Garmin is under license. NMEA ® , NMEA 2000 ® , and the NMEA 2000 logo are registered trademarks of the National Marine Electronics Association. Other trademarks and trade names are those of their respective owners.
Made for iPhone 7 Plus, iPhone 7, iPhone 6s Plus, iPhone 6s, iPhone 6 Plus, iPhone 6, iPhone 5s, iPhone 5c, iPhone 5, and iPod touch (5th and 6th generation).
"Made for iPod and iPhone" means that an electronic accessory has been designed to connect specifically to an iPod or an iPhone respectively, and has been certified by the developer to meet Apple performance standards. Apple is not responsible for the operation of this device or its compliance with safety and regulatory standards. Please note that the use of this accessory with an iPhone may affect wireless performance.
A02834 B02834
Garmin, the Garmin logo, FUSION, and the Fusion logo are trademarks of Garmin Ltd. or its subsidiaries, registered in the USA and other countries. These trademarks may not be used without the express permission of Garmin.
Apple, the Apple logo, iPod touch, and iPhone are trademarks of Apple Inc., registered in the U.S. and other countries. Android is a trademark of Google Inc. Bluetooth word mark and logos are owned by the Bluetooth SIG, Inc. and any use of such marks by Garmin is under license. NMEA, NMEA 2000, and the NMEA 2000 logo are registered trademarks of the National Menne Electronics Association. Other trademarks and trade names are those of their respective owners.
Made for iPhone 7 Plus, iPhone 7, iPhone 6s Plus, iPhone 6s, iPhone 6 Plus, iPhone 6, iPhone 5s, iPhone 5c, iPhone 5, and iPod touch (5th and 6th generation).
"Made for iPod and iPhone" means that an electronic accessory has been designed to connect specifically to an iPod or an iPhone respectively, and has been certified by the developer to meet Apple performance standards. Apple is not responsible for the operation of this device or its compliance with safety and regulatory standards. Please note that the use of this accessory with an iPhone may affect wireless performance.
A02834 B02834
Failure to follow these warnings and cautions could result in personal injury, damage to the vessel, or poor product performance.
See the Important Safety and Product Information guide in the product box for product warnings and other important information.
This device must be installed according to these instructions.
Disconnect the vessel's power supply before beginning to install this product.
Before applying power to this product, make sure it has been correctly grounded, following the instructions in the guide.
CAUTION
Always wear safety goggles, ear protection, and a dust mask when drilling, cutting, or sanding.
NOTICE
When drilling or cutting, always check what is on the opposite side of the surface.
You must read all installation instructions before beginning the installation. If you experience difficulty during the installation, contact FUSION Product Support.
What's In the Box
• DIN mounting plate
• Four 8-gauge, self-tapping screws
• Power and speaker wiring harness
• Auxiliary-in, line-out, and subwoofer-out wiring harness
Tools Needed
• Phillips screwdriver
Electric drill
• Drill bit (size varies based on surface material and screws used)
• Rotary cutting tool or jigsaw
• Marine sealant (optional)
Mounting Considerations
- The stereo can be mounted on a flat surface or in a single-DIN opening as a replacement for an existing stereo.
- The stereo must be mounted in a location that allows open airflow around the rear of the stereo for heat ventilation.
- If you are installing the stereo in a location that may be exposed to water, it must be mounted within 45 degrees of the horizontal plane.

- If you are installing the stereo in a location that may be exposed to water, the cable should have a drip loop to allow water to drip down off the cable and avoid damage to the stereo.
- If you need to mount the stereo outside a boat, it must be mounted in a location far above the waterline, where it is not submerged.
- If you need to mount the stereo outside a boat, it should be mounted in a location where it cannot be damaged by docks, pilings, or other pieces of equipment.
• To avoid interference with a magnetic compass, the stereo should be installed at least 15 cm (5.9 in.) away from a compass.
Mounting the Stereo in a New Location
NOTICE
Be careful when cutting the hole to mount the stereo. There is only a small amount of clearance between the case and the mounting holes, and cutting the hole too large could compromise the stability of the stereo after it is mounted.
Before you can mount the stereo in a new location on the mounting surface, you must select a location in accordance with the mounting considerations.
1 Trim the template and make sure it fits at the mounting location.
2 Adhere the template to the mounting surface.
3 Using a drill bit appropriate for the mounting surface, drill a hole inside the corner of the dashed line on the template to prepare the mounting surface for cutting.
4 Using a rotary-cutting tool, cut the mounting surface along the inside of the dashed line on the template.
5 Place the stereo in the cutout to test the fit.
6 If necessary, use a file and sandpaper to refine the size of the cutout.
7 After the stereo fits correctly in the cutout, ensure the mounting holes on the stereo line up with the pilot holes on the template.
8 If the mounting holes on the stereo do not line up, mark the new pilot-hole locations.
9 Using an appropriately sized drill bit for the mounting surface and screw type, drill the pilot holes.
10 Remove the template from the mounting surface.
11 Make the necessary wiring connections (Connection Considerations, page 3).
12 Place the mounting gasket on the back of the stereo ①.

13 Place the stereo in the cutout.
14 Secure the stereo to the mounting surface using the included screws ②.
15 Snap the screw covers in place ③.
Replacing an Existing Stereo
1 Remove and disconnect the existing stereo.
2 If necessary, remove the existing wiring harness or install a vehicle- or vessel-specific wiring-harness adapter (not included) to provide access to the power and speaker wiring.
3 Place the mounting gasket on the back of the stereo ①.

4 Place the mounting bracket ② behind the mounting surface.
5 Make the necessary wiring connections (Connection Considerations, page 3).
6 Place the stereo in the opening.
7 Secure the stereo to the mounting bracket using the included screws ③.
NOTE: You might need to reach behind the mounting surface to hold the bracket in place when securing the stereo to the bracket.
8 Snap the screw covers in place ④.
Connection Considerations
The stereo must be connected to power, to speakers, and to media input sources to function correctly. You should carefully plan the layout of the stereo, wired remote, speakers, optional NMEA 2000 ® network, and your input sources before making any connections.
Port Identification
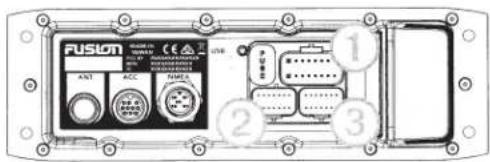
| Item | Description |
| ANT | Connects the stereo to a typical AM/FM antenna using an RF coaxial connector.If you are installing the stereo on a boat with a metal hull, you must use a ground-dependent antenna, and if you are installing the stereo on a boat with a non-metal hull, you must use a ground-independent antenna. See the installation instructions provided with your antenna for more information. |
| ACC | Connects to a FUSION DAB module to receive DAB stations where available (not included). |
| NMEA | Connects the stereo to a NMEA 2000 network ("N" models only) (NMEA 2000 System Wiring Diagram, page 4). |
| USB | Connects the stereo to a USB source. |
| FUSE | Contains the fuse for the device.See the device specifications for replacement fuse information. |
| 1 | Connects the stereo to the power and speaker wiring harness. |
| 2 | Connects the stereo to the auxiliary in and line/subwoofer out wiring harness. |
| 3 | Reserved for future use. |
Wiring Harness Wire and Connector Identification

| Wire Function | Wire Color/ Number | Notes |
| Power (+) | Red (yellow on some wire harnesses) | Connects to the positive terminal of a 12 Vdc power source capable of supplying 15 A. |
| Ground (-) | Black | Connects to the negative terminal of a 12 Vdc power source capable of supplying 15 A. This wire should be connected before connecting the yellow wire. All accessories connected to the stereo must share a common ground location. |
| Amplifier on | Blue | Connects to an optional external amplifier to turn it on when the stereo turns on. |
| Mute | Brown | Activates when connected to ground. For example, when connected to a compatible hands-free mobile phone, the audio mutes or the input switches to AUX when a call is received and the phone connects this wire to ground. This functionality can be configured from the settings menu. |
| Dim | Orange | Connects to the boat's illumination wire to dim the stereo screen when the lights are on. The gauge of the illumination wire must be suitable for the fuse supplying the circuit it is connected to. |
| Speaker zone 1 left (+) | White | |
| Speaker zone 1 left (-) | White/black | |
| Speaker zone 1 right (+) | Gray | |
| Speaker zone 1 right (-) | Gray/black | |
| Speaker zone 2 left (+) | Green | |
| Speaker zone 2 left (-) | Green/black | |
| Speaker zone 2 right (+) | Purple | |
| Speaker zone 2 right (-) | Purple/black | |
| Auxiliary in left Auxiliary in right | Provides a red and white RCA stereo line input for audio sources, such as a CD or MP3 player. | |
| Zone 1 line out (left) Zone 1 line out (right) | Provides a full-range output to an external amplifier, and is associated with the volume control for zone 1. | |
| Zone 2 line out (left) Zone 2 line out (right) | 3 | Provides a full-range output to an external amplifier, and is associated with the volume control for zone 2. |
| Subwoofer out | 4 | Each cable provides a single mono output to a powered subwoofer or subwoofer amplifier, and one or both cables can be used, depending on the connection requirements of the subwoofer or amplifier.A connected subwoofer is associated with the volume control for zone 1. |
Connecting to Power
When connecting the stereo to power, you should connect it through the ignition or another manual switch.
If it is necessary to extend the power and ground wires, use 14 AWG (2.08 mm 2 ) wire. For extensions longer than 1 m (3 ft.), use 12 AWG (3.31 mm 2 ) wire.
1 Route the power wire ① to the ignition or another manual switch ②, and route the black ground wire ③ to the battery.

2 If necessary, route a wire ④ between the switch and the battery.
3 Route the wiring-harness plug to the stereo.
Do not connect the wiring harness to the stereo until after all of the bare wire connections have been made.
4 Connect the black wire to the negative (-) battery terminal.
5 Connect the power wire to the ignition or another manual switch, and connect the switch to the positive (+) battery terminal if necessary.
6 Connect the wiring harness plug to the stereo.
Speaker Zones
You can group speakers in one area into speaker zones. This enables you to control the audio level of the zones individually. For example, you could make the audio quieter in the cabin and louder on deck.
You can set the balance, volume limit, subwoofer level, and name for each zone.
Single-Zone System Wiring Diagram

| 1 | Speakers |
| 2 | Water-tight connection |
Complete System Wiring
![graph TD A["Component 1"] --> B["Component 2"] C["Component 3"] --> D["Component 4"] E["Component 6"] --> F["Component 7"] G["Component 8"] --> H["Component 9"] I["Component 5"] --> J["Device"] K["Component 3"] --> L["Component 4"] M["Component 3"] --> N["Component 7"] O["Component 3"] --> P["Compon…](/content/2026/06/1340337/images/7824722b9d0542595fd137c77162774a89c59d5af43c6f8add9043d323684d11.jpg)
| Item | Description |
| 1 | Zone 2 speakers |
| 2 | Water-tight connection |
| 3 | Powered amplifier |
| 4 | Zone 2 line out |
| 5 | Amplifier-on signal wire |
| 6 | Zone 1 speakers |
| 7 | Zone 1 line out |
| 8 | Zone 1 subwoofer outEach cable provides a single mono output to a powered subwoofer or subwoofer amplifier, and one or both cables can be used, depending on the connection requirements of the subwoofer or amplifier. |
| 9 | Powered subwoofer |
NMEA 2000 System Wiring Diagram
NOTE: NMEA 2000 is available on FUSION MS-RA70N models only.

| 1 | Stereo |
| 2 | Supported chartplotter MFD or compatible FUSION NMEA 2000 remote control |
| 3 | In-line switch |
| 4 | NMEA 2000 power cable |
| 5 | NMEA 2000 drop cable from the stereo, up to 6 m (20 ft.) |
| 6 | NMEA 2000 drop cable from the chartplotter MFD or compatible FUSION NMEA 2000 remote control |
| 7 | 9 to 16 Vdc power supply |
| 8 | NMEA 2000 terminator or backbone cable |
| 9 | NMEA 2000 T-connector |
| 10 | NMEA 2000 terminator or backbone cable |
Stereo Information
Specifications
| General | |
| Weight | 556 g (19.6 oz.) |
| Water resistance | IEC 60529 IPX7 (front), IEC 60529 IPX3 (rear) |
| Operating temperature range | From 0 to 50°C (from 32 to 122°F) |
| Storage temperature range | From -20 to 70°C (from -4 to 158°F) |
| Input voltage | From 10.8 to 16 Vdc |
| Current (max.) | 15 A |
| Current (muted) | less than 900 mA |
| Current (standby) | FUSION MS-RA70: less than 5 mAFUSION MS-RA70N: less than 15 mA |
| NMEA 2000 LEN | 1 (50 mA) |
| ANT ® wireless range | Up to 3 m (10 ft.) |
| Compass-safe distance | 15 cm (5.9 in.) |
On-board, Class AB Amplifier
| Output music power per channel | 50 W max. x 4 channels at 4 Ohms per channel |
| Total output music power | 200 W max. |
| Tuner | Europe and Australasia | USA | Japan |
| FM radio frequency range | From 87.5 to 108 MHz | From 87.5 to 107.9 MHz | From 70 to 90 MHz |
| FM frequency step | 50 kHz | 200 kHz | 50 kHz |
| AM radio frequency range | From 522 to 1620 kHz | From 530 to 1710 kHz | From 522 to 1620 kHz |
| AM frequency step | 9 kHz | 10 kHz | 9 kHz |
Stereo Dimension Drawings
Front Dimensions

| 1 | 188 mm (7.40 in.) |
| 2 | 60 mm (2.36 in.) |
Side Dimensions

| 1 | 23.5 mm (0.93 in.) |
| 2 | 100 mm (3.94 in.) |
| 3 | 50 mm (1.97 in.) |
Top Dimensions

| 1 | 161 mm (6.34 in.) |
| 2 | 23.5 mm (0.93 in.) |
| 3 | 12 mm (0.47 in.) |
Registering Your FUSION MS-RA70/MS-RA70N
Help us better support you by completing our online registration today.
• Go to www.fusionentertainment.com.
- Keep the original sales receipt, or a photocopy, in a safe place.
Software Updates
For best results, you should update the software in all FUSION devices at the time of installation to ensure compatibility.
Go to www.fusionentertainment.com/marine to download the latest software.
Software updates and instructions are available on your device product page.
Important Safety and Product Information....2
Important Safety and Product Information
WARNING
Failure to heed the following warnings could result in an accident resulting in death or serious injury
Marine Operation Warnings
- You are responsible for the safe and prudent operation of your vessel. This device does not relieve you from the responsibility of safely operating your vessel. Avoid navigational hazards and never leave the helm unattended.
• Always be prepared to promptly regain control of the vessel. Use caution near hazards in the water, such as docks, pilings and other vessels.
Hearing Damage Warning
Listening to the stereo at high volume can cause damage to your hearing
Product Environmental Programs
Information about the Garmin product recycling program and WEEE, RoHS, REACH, and other compliance programs can be found at www.garmin.com/aboutGarmin/environment.
Declaration of Conformity
Hereby, Garmin declares that this product is in compliance with the essential requirements and other relevant provisions of Directive 1999/5/EC. To view the full Declaration of Conformity, go to www.fusionentertainment.com.
Innovation, Science and Economic Development Canada Compliance
This device complies with Innovation, Science and Economic Development Canada license-exempt RSS standard(s). Operation is subject to the following two conditions: (1) this device may not cause interference, and (2) this device must accept any interference, including interference that may cause undesired operation of the device.
Radio Frequency Radiation Exposure
This device is a mobile transmitter and receiver that uses an internal antenna to send and receive low levels of radio frequency (RF) energy for data communications. The device emits RF energy below the published limits when operating in its maximum output power mode and when used with Garmin authorized accessories. To comply with RF exposure compliance requirements, the device should be installed and operated with a minimum of 20 cm (7.87 in.) between the device and your body. The device should not be used in other configurations. This device must not be co-located or operated in conjunction with any other transmitter or antenna.
FCC Compliance
This device complies with part 15 of the FCC Rules. Operation is subject to the following two conditions: (1) this device may not cause harmful interference, and (2) this device must accept any interference received, including interference that may cause undesired operation.
This equipment has been tested and found to comply with the limits for a Class B digital device, pursuant to part 15 of the FCC rules. These limits are designed to provide reasonable protection against harmful interference in a residential installation.
This equipment generates, uses, and can radiate radio frequency energy and may cause harmful interference to radio communications if not installed and used in accordance with the instructions. However, there is no guarantee that interference will not occur in a particular installation. If this equipment does cause harmful interference to radio or television reception, which can be determined by turning the equipment off and on, the user is encouraged to try to correct the interference by one of the following measures:
• Reorient or relocate the receiving antenna.
- Increase the separation between the equipment and the receiver.
- Connect the equipment into an outlet that is on a different circuit from the GPS device.
- Consult the dealer or an experienced radio/TV technician for help.
This product does not contain any user-serviceable parts. Repairs should only be made by an authorized Garmin service center. Unauthorized repairs or modifications could result in permanent damage to the equipment, and void your warranty and your authority to operate this device under Part 15 regulations.
Software License Agreement
BY USING THE DEVICE, YOU AGREE TO BE BOUND BY THE TERMS AND CONDITIONS OF THE FOLLOWING SOFTWARE LICENSE AGREEMENT. PLEASE READ THIS AGREEMENT CAREFULLY.
Garmin Ltd. and its subsidiaries ("Garmin") grant you a limited license to use the software embedded in this device (the "Software") in binary executable form in the normal operation of the product. Title, ownership rights, and intellectual property rights in and to the Software remain in Garmin and/or its third-party providers.
You acknowledge that the Software is the property of Garmin and/or its third-party providers and is protected under the United States of America copyright laws and international copyright treaties. You further acknowledge that the structure, organization, and code of the Software, for which source code is not provided, are valuable trade secrets of Garmin and/or its third-party providers and that the Software in source code form remains a valuable trade secret of Garmin and/or its third-party providers. You agree not to decompile, disassemble, modify, reverse assemble, reverse engineer, or reduce to human readable form the Software or any part thereof or create any derivative works based on the Software. You agree not to export or re-export the Software to any country in violation of the export control laws of the United States of America or the export control laws of any other applicable country.
Limited 1-Year Marine Consumer Warranty
Garmin New Zealand Limited, trading as FUSION Entertainment ('FUSION'), warrants that this FUSION Marine product is free from defects in material and workmanship, according to the following terms and conditions:
- The initial limited warranty for the FUSION product purchased extends to the first 12 months beginning on the date of purchase of the product.
- The limited warranty extends only to the original consumer purchaser (consumer) of the product and is not assignable or transferable to any subsequent purchaser/end user.
- The limited warranty extends only to consumers who purchase the product in one of the countries (or areas) set forth on www.fusionentertainment.com. The limited warranty is only valid in FUSION's intended country (or area) of sale of the product.
- During the limited warranty period. FUSION or its authorised service network will repair or replace (at FUSION's discretion) any defective product or parts thereof with new and return the product to the consumer in working condition. No charge will be made to the consumer for either parts or labour in repairing or replacing the product. All replaced parts and cosmetic parts should be free of defects at the time of shipment and, therefore shall not be covered under these limited warranty terms.
- Repaired product will be warranted for the balance of the original warranty period or for ninety (90) days from the date of repair, whichever is longer.
- All warranty claims must be accompanied with a copy of this warranty card, and a copy of proof of purchase.
The consumer shall have no coverage or benefits under this limited warranty if any of the following conditions are applicable:
- The product has been subject to: abnormal use, abnormal conditions, improper storage, unauthorised modifications, unauthorised connections, unauthorised repair including but not limited to use of unauthorised spare parts in repairs, misuse, neglect, abuse, accident, alteration, improper installation, acts of God, spill of foods or liquids, maladjustment of customer controls or other acts which are beyond the reasonable control of FUSION, including deficiencies in consumable parts such as fuses, and breakage or damage to antennae unless caused directly by defects in materials or workmanship, and normal wear and tear of the product.
- FUSION was not notified by the consumer of the alleged defect or malfunction of the product during the applicable limited warranty period.
• The product serial number or the accessory date code has been removed, defaced or altered.
- The product was used with or connected to an accessory not supplied by FUSION or fit for use with FUSION product, or used in a manner other than its intended use.
If a problem develops during the limited warranty period, the consumer should take the following step-by-step procedure:
1 The consumer shall return the product to any authorised FUSION dealer in authorised sales countries for repair or replacement processing. FUSION assumes no freight or shipping responsibility for returning goods to an authorised FUSION dealer, or return freight from an authorised dealer to the consumer submitting the warranty claim.
2 The consumer shall be charged for any parts or labour charges not covered by this limited warranty. The consumer shall be responsible for expenses related to removal and reinstallation of the product.
3 If the product is returned to FUSION after the expiration of the warranty period, FUSION's normal service policies shall apply and the consumer will be charged accordingly.
THE BÉNEFITS CONFERRED BY THIS LIMITED WARRANTY APPLY TO THE EXTENT THAT THEY ARE NOT SUPERCEDED BY ANY OTHER RIGHTS AND REMEDIES UNDER ANY APPLICABLE LEGISLATION THAT CANNOT BE EXCLUDED. OTHERWISE, TO THE EXTENT PERMITTED BY LAW, ANY IMPLIED WARRANTY IS EXCLUDED AND THE FOREGOING WARRANTY IS THE PURCHASER'S SOLE AND EXCLUSIVE REMEDY AND IS IN LIEU OF ALL OTHER WARRANTIES, EXPRESS OR IMPLIED. TO THE EXTENT PERMITTED BY LAW, FUSION SHALL NOT BE LIABLE FOR INCIDENTAL OR CONSEQUENTIAL DAMAGES OR A LOSS OF ANTICIPATED BENEFITS OR PROFITS, OUT OF USE OR INABILITY TO USE THE PRODUCT.
- Applicable law may not allow the limitation or exclusion of liability in some situations therefore the above limitations or exclusions may not apply to you.
- FUSION neither assumes nor authorises any authorised service centre or any person or entity to assume for it any other obligation or liability beyond that which is expressly provided for in this warranty.
- All warranty information, product features and specifications are subject to change without notice.
Limited 1-Year Marine Consumer Warranty for Australian Consumers
Garmin Australasia, 30 Clay Place, Eastern Creek, NSW 2766, Australia.
EMAIL: australia@fusionentertainment.com PHONE: 1800 235 822
THE FUSION PROMISE OF QUALITY LIMITED 1-YEAR CONSUMER WARRANTY
This warranty is given in addition to other rights and remedies available to the consumer under Australian Consumer Law. In addition to the FUSION Warranty, our goods come with guarantees that cannot be excluded under the Australian Consumer Law. You are entitled to a replacement or refund for a major failure and for compensation for any others reasonably foreseeable loss or damage. You are also entitled to have the goods repaired or replaced if the goods fail to be of acceptable quality and the failure does not amount to a major failure.
Garmin New Zealand Limited, trading as FUSION Entertainment ('FUSION'), warrants this FUSION Product including. Speaker, Subwoofer, Amplifier, Head Unit, or genuine FUSION Accessory 'product' is free from defects in materials and workmanship, in accordance with the following terms and conditions:
- The limited warranty for the FUSION product purchased is only available for twelve (12) months after the date of purchase. - The limited warranty extends only to the original consumer of the product and may not be assigned or transferred to any other person or consumer without FUSION's prior written consent being provided.
- During the limited warranty period, FUSION or its authorised service network will repair or replace any defective or faulty product or parts at its own cost.
- Repaired or replaced product will be warranted for the balance of the original warranty period or for ninety (90) days after the date of repair, whichever is longer.
- All warranty claims must be notified to FUSION or its authorised Dealer in writing during the warranty period accompanied with a copy of this warranty card, proof of purchase date and the product with an intact and unaltered serial number or accessory date code.
This warranty will not apply if:
The consumer causes the Product to be of unacceptable quality or fails to take steps to prevent the product from becoming of unacceptable quality and/or it is damaged by abnormal use. Examples of goods becoming of unacceptable quality or of abnormal use by the consumer include:
• Storage of product under improper conditions.
- Exposure to excessive moisture or dampness.
- Exposure to excessive temperature extremes or other adverse environmental conditions.
- Unauthorised modifications of product, connections or otherwise unauthorised repairs including, but not limited, to the use of unauthorised parts in the repair of products.
- Improper use of or installation of, or interference with, product adjustments or controls and or including antenna breakage or damage due to misuse.
• Damage caused by consumables or by electricity supply
- Acts of god (force majeure), exposure of product to food spills, or any other type of fluid ingress.
• Using the product in a way for which was not intended to be used or connecting it to an accessory not supplied by, specified by, or authorised by FUSION.
• Any other abnormal use of or conduct causing product to become of unacceptable quality.
Other exclusions:
- This warranty extends to the repair or replacement of FUSION product only and the consumer is responsible for any expenses relating to the removal or installation of the product or related services including the cost of delivering the product to FUSION or its authorised dealer.
- Repair work conducted by FUSION after this warranty has expired or if this warranty for any other reason this FUSION warranty does not apply is subject to FUSION's normal service policies and FUSION charges for labour and material may apply.
- This is a manufacturer's warranty provided to consumers of FUSION products. Variations to this warranty may only be made by FUSION and will be notified to the customer in writing or issued on the FUSION website. FUSION Dealers, agents and authorised dealers are not authorised to make changes or vary this FUSION warranty.
- All warranty information, product features and specifications are subject to change without notice.
- FUSION is not responsible for replacing or the cost of replacing any consumer data lost occurring either due to equipment failure or during the repair and replacement process.


- FUSION® MS-RA70/MS-RA70N
- TABLE OF CONTENTS
- GETTING STARTED 1
- BLUETOOTH DEVICE PLAYBACK 3
- USB DEVICE PLAYBACK
- GETTING STARTED
- USING THE DIAL TO SELECT ITEMS
- SELECTING A SOURCE
- ENTERING TEXT
- ADJUSTING THE BACKLIGHT BRIGHTNESS AND CONTRAST
- STEREO SCREEN
- MEDIA PLAYER CONNECTION
- CAUTION
- USB DEVICE COMPATIBILITY
- CONNECTING A USB DEVICE
- CONNECTING AN AUXILIARY DEVICE
- ADJUSTING THE GAIN FOR THE AUXILIARY DEVICE
- CONNECTING THE STEREO TO A GARMIN ® WATCH
- ADJUSTING THE VOLUME
- ADJUSTING THE TONES
- SPEAKER ZONES
- SETTING UP SPEAKER ZONES
- LINKING ZONES
- ADJUSTING THE SUBWOOFER FILTER
- BLUETOOTH DEVICE PLAYBACK
- CONNECTING A COMPATIBLE BLUETOOTH DEVICE
- BLUETOOTH RANGE INFORMATION
- SELECTING A DIFFERENT BLUETOOTH SOURCE
- BLUETOOTH SOURCE SETTINGS
- FUSION-LINK SMARTPHONE APP
- CONTROLLING MUSIC PLAYBACK ON AN APPLE OR ANDROID DEVICE
- CONTROLLING MUSIC PLAYBACK ON A USB FLASH DRIVE
- SHUFFLING SONGS
- SETTING A SONG TO REPEAT
- RADIO
- SETTING THE TUNER REGION
- CHANGING THE RADIO STATION
- PRESETS
- SAVING A STATION AS A PRESET
- SELECTING A PRESET FROM A LIST
- REMOVING PRESETS
- DAB PLAYBACK
- SCANNING FOR DAB STATIONS
- CHANGING DAB STATIONS
- SELECTING A DAB STATION FROM A LIST
- SELECTING A DAB STATION FROM A CATEGORY
- DAB PRESETS
- SAVING A DAB STATION AS A PRESET
- SELECTING A DAB PRESET FROM A LIST
- REMOVING DAB PRESETS
- GENERAL SETTINGS
- ADDITIONAL STEREO CONTROL OPTIONS
- OPTIONAL WIRED REMOTE CONTROLS
- FUSION-LINK
- AUDIO CONTROL WITH NMEA 2000
- APPENDIX
- REGISTERING YOUR MS-RA70/MS-RA70N
- TROUBLESHOOTING
- THE STEREO DOES NOT RESPOND TO KEY PRESSES
- THE STEREO KEEPS LOCKING UP WHEN CONNECTED TO AN APPLE DEVICE
- THE STEREO IS NOT FINDING MY CONNECTED APPLE DEVICE
- MY BLUETOOTH AUDIO IS INTERRUPTED BY SHORT BREAKS
- THE STEREO DOES NOT DISPLAY ALL SONG INFORMATION FROM MY BLUETOOTH SOURCE
- STEREO DIMENSION DRAWINGS
- INDEX
- A
- B
- D
- F
- G
- K
- L
- M
- N
- P
- R
- S
- T
- U
- V
- W
- FUSION SUPPORT
- FUSION® MS-RA70/MS-RA70N QUICK START MANUAL
- PLAYING MEDIA
- GETTING THE OWNER'S MANUAL
- NOTICE
- WHAT'S IN THE BOX
- TOOLS NEEDED
- MOUNTING CONSIDERATIONS
- MOUNTING THE STEREO IN A NEW LOCATION
- REPLACING AN EXISTING STEREO
- CONNECTION CONSIDERATIONS
- CONNECTING TO POWER
- NMEA 2000 SYSTEM WIRING DIAGRAM
- STEREO INFORMATION
- REGISTERING YOUR FUSION MS-RA70/MS-RA70N
- SOFTWARE UPDATES
- IMPORTANT SAFETY AND PRODUCT INFORMATION
- WARNING
- MARINE OPERATION WARNINGS
- HEARING DAMAGE WARNING
- PRODUCT ENVIRONMENTAL PROGRAMS
- DECLARATION OF CONFORMITY
- RADIO FREQUENCY RADIATION EXPOSURE
- FCC COMPLIANCE
- SOFTWARE LICENSE AGREEMENT
- LIMITED 1-YEAR MARINE CONSUMER WARRANTY
- LIMITED 1-YEAR MARINE CONSUMER WARRANTY FOR AUSTRALIAN CONSUMERS
Brand : Fusion
Model : MS-RA70
Category : Radio