
MOC20200R - Microwave BEKO - Free user manual and instructions
Find the device manual for free MOC20200R BEKO in PDF.


| Product Type | Solo Microwave |
| Brand | Beko |
| Model | MOC20200R |
| Capacity | 20 Liters |
| Dimensions (H x W x D) | 26 x 45 x 35 cm |
| Weight | 11 kg |
| Power Supply | 230 V ~ 50 Hz |
| Power Consumption | 800 W (Microwave), 1000 W (Grill) |
| Microwave Power | 800 W |
| Grill Function | Yes, 1000 W Quartz Grill |
| Display | LED Digital Display with Clock |
| Control Type | Touch Control + Rotary Knobs |
| Number of Power Levels | 5 |
| Defrost Function | Yes, by weight or time |
| Timer | Up to 95 minutes |
| Child Lock | Yes |
| Interior Light | Yes |
| Turntable | Glass turntable, 27 cm diameter |
| Safety Features | Door interlock, automatic shut-off |
| Maintenance | Clean with damp cloth; avoid abrasives |
| Spare Parts | Turntable, glass tray, fuse available |
| Repairability Index | 7.5 / 10 |
| Certifications | CE, RoHS |
Frequently Asked Questions - MOC20200R BEKO
User questions about MOC20200R BEKO
0 question about this device. Answer the ones you know or ask your own.
Ask a new question about this device
Download the instructions for your Microwave in PDF format for free! Find your manual MOC20200R - BEKO and take your electronic device back in hand. On this page are published all the documents necessary for the use of your device. MOC20200R by BEKO.
USER MANUAL MOC20200R BEKO
MOC20200R MOC20200M
MOC20200C MOC20200B
EN
Please read this manual first!
Dear Customer,
Thank you for purchasing a Beko product. We hope that you get the best results from your product which has been manufactured with high quality and state-of-the-art technology. Therefore, please read this entire user manual and all other accompanying documents carefully before using the product and keep it as a reference for future use. If you handover the product to someone else, give the user manual as well. Follow all warnings and information in the user manual.
Meanings of the symbols
Following symbols are used in the various section of this user manual:

Important information and useful hints about usage.

Warnings for dangerous situations concerning the safety of life and property.
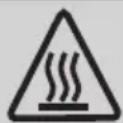
Warning for hot surfaces.

This product has been manufactured in environmental friendly modern plants without giving any harm to the nature.
1 Important safety and environmental instructions 4
1.1 General safety....4 1.1.1 Electrical safety....6 1.1.2 Product safety....7 1.2 Intended use 8 1.3 Children's safety....9 1.4 Compliance with the WEEE Directive and disposal of waste products ....10 1.5 Package information ....10 1.6 Plug Wiring....10
2 Your microwave oven 11
2.1 Overview 11 2.2 Technical data 12
3 Installation 13
4 Operation 14
4.1 Control panel 14 4.2 Before cooking 14 4.3 Auto cooking/time.Weight knob 14 4.4 Pause/cancel 14 4.5 Auto reminder 14 4.6 Clock setting 14 4.7 Microwave cooking 15 4.8 Express cooking 16 4.9 Defrost 16 4.10 Auto cooking 16 4.11 Automatic starting (delayed function) 17 4.12 Multi-sequence cooking 18 4.13 Child lock function 18
5 Cooking tips 19
6 Cleaning 20
6.1 Microwave oven care 20 6.2 Tips for cleaning 20 6.3 Storage 20
Important Safety Instructions Read Carefully And Keep For Future Reference
This section contains safety instructions that will help protect from risk of fire, electric shock, exposure to leak microwave energy, personal injury or property damage. Failure to follow these instructions shall void any warranty.
1.1 General safety
- The microwave oven is intended for heating food and beverages. Drying of food or clothing and heating of warming pads, slippers, sponges, damp cloth and similar may lead to risk of injury, ignition or fire.
- This appliance is intended to be used in domestic household applications.
- Do not attempt to start the oven when its door is open; otherwise you may be exposed to harmful microwave energy. Safety locks should not be disabled or tampered with.
- Do not place any object between the front side and the door of the oven. Do not allow dirt or cleaning agent remnants built-up on the closure surfaces.
- Any service work involving removal of the cover that provides protection against exposure to microwave energy must be performed by authorized persons/service. Any other approach is dangerous.
- Your product is intended for cooking, heating, and defrosting food at home. It must not be used for commercial purposes. The manufacturer shall not be held liable for damages that have arisen from misuse.
- Do not use this appliance outdoors, in bathrooms, humid environments, or in places where it can get wet.
- No responsibility or warranty claim shall be assumed for damages arising from misuse or improper handling of the appliance.
- Never attempt to dismantle the appliance. No warranty claims are accepted for damage caused by improper handling.
1 Important safety instructions
- Only use the original parts or parts recommended by the manufacturer.
- Do not leave this appliance unattended while it is in use. Always use the appliance on a stable, flat, clean, dry, and non-slip surface.
- The appliance should not be operated with an external clock timer or separate remote control system.
- Before using the appliance for the first time, clean all parts. Please see the details given in the "Cleaning and Maintenance" section.
- Operate the appliance for its intended purpose only as described in this manual. Do not use abrasive chemicals or steam on this appliance. This oven is particularly intended for heating and cooking food. It is not intended for industrial or laboratory use.
- Do not use your appliance to dry clothes or kitchen towels.
- The appliance becomes very hot while it is in use. Pay attention not to touch the hot parts inside the oven.
- Your oven is not designed to dry any living being.
- Do not operate the oven empty.
- Only use utensils that are suitable for use in microwave ovens.
- Cooking utensils may become hot due to heat transferred from the heated food. You may need oven gloves to hold the utensil.
- Utensils should be checked to ensure they are suitable for use in microwave ovens.
- Do not place the oven on stoves or other heat-generating appliances. Otherwise, it may be damaged and the warranty becomes void.
- The microwave oven must not be placed in a cabinet that does not comply with the installation instructions.
- Steam may escape when opening covers or foil after cooking food.
- Use gloves when removing any heated food.
- The appliance and its accessible surfaces may become very hot during use.
- The door and outer glass may become very hot during use.
1 Important safety instructions
1.1.1 Electrical safety
- If the supply cord is damaged, it must be replaced by the manufacturer, its service agent, or a similarly qualified person to avoid a hazard.
- Beko Microwave Ovens comply with the applicable safety standards; therefore, in case of any damage on the appliance or power cable, it should be repaired or replaced by the dealer, service center or a specialist and authorized service alike to avoid any danger. Faulty or unqualified repair work may be dangerous and cause risk to the user.
Make sure that your mains power supply complies with the information supplied on the rating plate of the appliance.
The only way to disconnect the appliance from the power supply is to remove the power plug from the power outlet.
- Use the appliance with a grounded outlet only.
- Never use the appliance if the power cable or the appliance itself is damaged.
- Do not use this appliance with an
extension cord.
- Never touch the appliance or its plug with damp or wet hands.
- Place the appliance in a way so that the plug is always accessible.
- Prevent damage to the power cable by not squeezing, bending, or rubbing it on sharp edges. Keep the power cable away from hot surfaces and naked flame.
- Make sure that there is no danger that the power cable could be accidentally pulled or that someone could trip over it when the appliance is in use.
- Unplug the appliance before each cleaning and when the appliance is not in use.
- Do not pull the power cable of the appliance to disconnect it from its power supply and never wrap its power cable around the appliance.
- Do not immerse the appliance, power cable, or power plug in water or any other liquids. Do not hold it under running water.
- When heating food in plastic or paper containers, keep an eye on the oven due to the possibility of ignition.
- Remove the wire strings and/or metal handles of paper or plastic bags before placing bags suitable for use in microwave oven to the oven.
1 Important safety instructions
Remove the wire strings and/or metal handles of paper or plastic bags before placing bags suitable for use in microwave oven to the oven.
- If smoke is observed, switch off or unplug the appliance and keep the door closed in order to stifle any flames.
- Do not use inside of the oven to store something. Do not leave paper items, cooking material or food inside the oven when it is not being used.
- The contents of feeding bottles and baby food jars shall be stirred or shaken and the temperature shall be checked before consumption, in order to avoid burns.
- This appliance is a Group 2 Class B ISM equipment. Group 2 contains all ISM (Industrial, Scientific and Medical) equipment in which radio-frequency energy is intentionally generated and/or used in the form of electromagnetic radiation for the treatment of material, and spark erosion equipment.
- Class B equipment is suitable for use in domestic establishments and establishments directly connected to a low voltage power supply network.
- Door or outer surface of the appliance may become hot when it is in use.
1.1.2 Product safety
- Heating the beverages with microwave may cause them to boil by splashing around after they have been taken out of the oven; so be careful when you are holding the containers.
- Do not roast anything in the oven. Hot oil may damage the components and materials of the oven, and it may even cause skin burns.
- Pierce food with thick crust such as potatoes, zucchini, apples and chestnuts.
1 Important safety instructions
• The appliance must be placed so that the rear side is facing the wall. - Before moving the appliance, secure the turntable to prevent damage. - Eggs in their shell and whole hard-boiled eggs must not be heated in microwave ovens since they may explode, even after microwave heating has ended. - Never remove the parts at the rear and sides of the appliance, which protect the minimum distances between the cabinet walls and the appliance in order to allow for the required air circulation.
1.2 Intended use
- The oven should be cleaned regularly and any food deposits removed.
- Failure to maintain the oven in a clean condition could lead to deterioration of the surface that could adversely affect the life of the appliance and possibly result in a hazardous situation.
- Cleaning the door seals and adjacent parts: Use hot soapy water. Clean with a dish cloth, do not scour. Do not use a metal or glass scraper for cleaning.
- WARNING: If the door or door seals are damaged, the oven must not be operated until it has been repaired by a competent person.
- WARNING: It is hazardous for anyone other than a competent person to carry out any service or repair operation which involves the removal of a cover that gives protection against exposure to microwave energy.
- WARNING: Liquids and other foods must not be heated in sealed containers since they are liable to explode.
- Microwave oven is intended for built-in use only.
- Do not use the appliance for anything other than its intended use.
- Do not use the appliance as a heat source.
- Microwave oven is intended to thaw, cook and stew food only.
- Do not over-cook foods; otherwise, you may cause a fire.
- Do not use steam assisted cleaners to clean the appliance.
1 Important safety instructions
1.3 Children's safety
- Extreme caution is advised when using this appliance near children and persons with restricted physical, sensory, or mental abilities.
- This appliance can be used by children aged 8 years and above, and by persons with reduced physical, sensory, or mental capabilities, or lack of experience and knowledge, provided they have been given supervision or instruction concerning use of the appliance in a safe way and understand the hazards involved. Children shall not play with the appliance. Cleaning and user maintenance shall not be made by children unless they are older than 8 and supervised.
- Danger of choking! Keep all packaging materials away from children.
- Only allow children to use the oven without supervision when adequate instructions have been given so that the child is able to use the microwave oven in a safe way and understands the hazards of improper use.
- Due to excessive heat that arises in grill and combination modes, children should only be allowed to use these modes under supervision of an adult.
- Keep the product and its power cable out of reach of children under 8 years old.
- The appliance and its accessible surfaces may become very hot during use. Keep children away.
- This appliance is not intended for use by persons (including children) with reduced physical, sensory, or mental capabilities, or lack of experience and knowledge, unless they have been given supervision or instruction concerning use of the appliance by a person responsible for their safety.
- Young children should be supervised to ensure that they do not play with the appliance.
- WARNING: Only allow children to use the oven without supervision when adequate instructions have been given so that the child is able to use the oven in a safe way and understands the hazards of improper use.
1
Important safety and environmental instructions
1.4 Compliance with the WEEE Directive and disposal of waste products
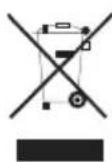
This product does not include harmful and prohibited materials specified in the "Regulation for Supervision of the Waste Electric and Electronic Appliances" issued by the Ministry of Environment and Urban Planning. It complies with the WEEE Directive. This product has been manufactured with high quality parts and materials which can be reused and are suitable for recycling.
Therefore, do not dispose of the product with normal domestic waste at the end of its service life. Take it to a collection point for the recycling of electrical and electronic equipment. Ask the local authority in your area for these collection points. Help protect the environment and natural resources by recycling used products.
1.5 Package information

The package of the product is made of recyclable materials in accordance with our National Legislation. Do not dispose of the packaging materials together with domestic or other wastes. Take them to the packaging material collection points designated by the local authorities.
1.6 Plug Wiring
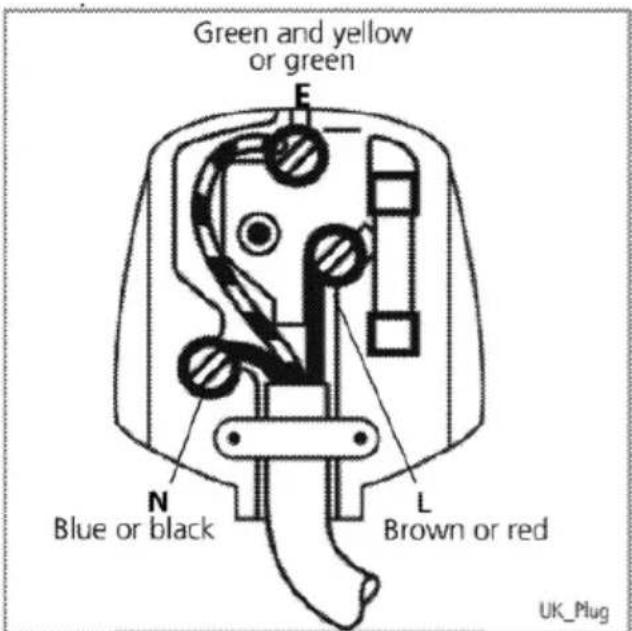
The moulded plug on this appliance incorporates a 13 A fuse. Should the fuse need to be replaced, an ASTA approved BS1362 fuse of the same rating must be used. Do not forget to refit the fuse cover. In the event of losing the fuse cover, the plug must not be used until a replacement fuse cover has been fitted. The colour of the replacement fuse cover must be the same colour as that visible on the pin face of the plug. Fuse covers are available from any good electrical store.
- Fitting a different plug
- As the colours of the wires in the mains lead of this appliance may not correspond with the coloured markings identifying the terminals on your plug, proceed as follows:
- Brown cable = L (Live)
- Blue cable = N (Neutral)
- Green/yellow cable must be connected to ground (E).
- With alternative plugs, a 13 A fuse must be fitted either in the plug or adaptor, or in the main fuse box. If in doubt, contact a qualified electrician.
2 Your microwave oven
2.1 Overview
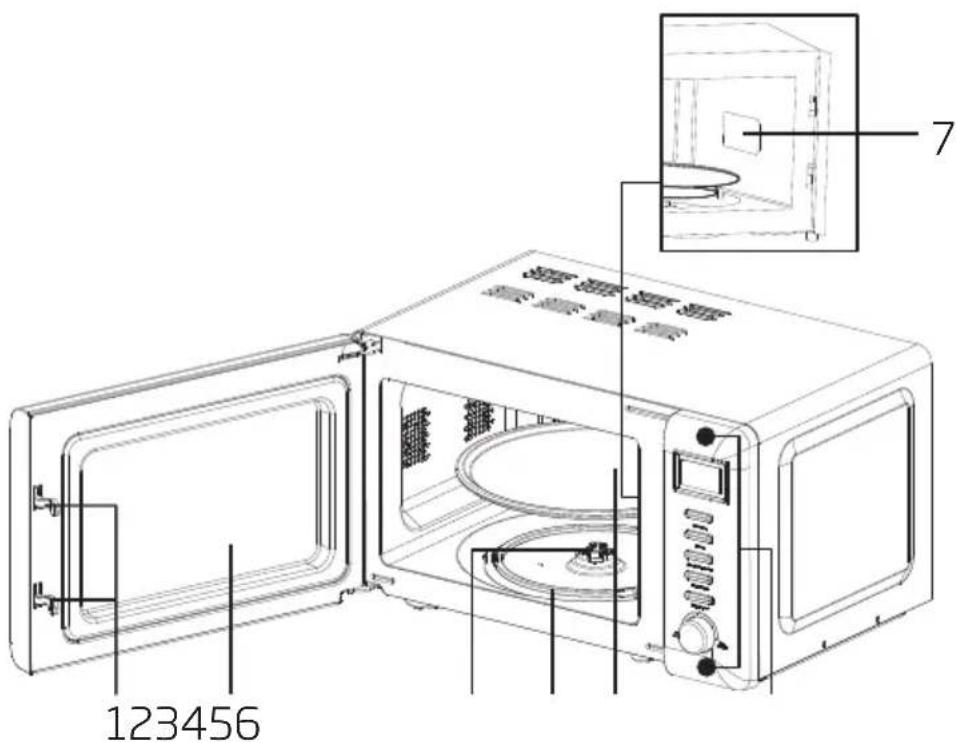
- Door lock
- Viewing window
- Rotating axis
- Rotating ring
- Turntable
- Control panel
- Waveguide cover
Markings on the product or the values stated in other documents supplied with the product are values obtained under laboratory conditions as per relevant standards. These values may vary according to the usage of the appliance and ambient conditions. Power values are tested at 230V.
2 Your microwave oven
1. Door lock
Microwave oven door must be properly closed in order for it to operate
2. Viewing window
Allow user to see the cooking status
3. Rotating axis
The glass turntable sits on the axis; the motor underneath it drives the turntable to rotate.
4. Rotating ring
The glass turntable sits on its wheels; it supports the turntable and helps it to balance when rotating.
5. Turntable
The food sits on the turntable; its rotation during operation helps to cook food evenly.

- Place the rotating ring first.
- Fit the turntable onto the rotating axis and make sure that it is geared in properly.
6. Control panel
See below for details (the control panel is subject to change without prior notice).
7. Waveguide cover
It is inside the microwave oven, next to the wall of the control panel.

Never remove the waveguide cover.
2.2 Technical data
| Model | MOC 20200 RMOC 20200 MMOC 20200 CMOC 20200 B |
| Voltage / Frequency | 230V~, 50Hz |
| Power Input - Microwave | 1280W |
| Power Output - Microwave | 800W |
| Microwave Frequency | 2450MHz |
| Turntable diameter | |
| External dimensions | 455*350*255 mm |
| Oven cavity dimensions | |
| Oven Capacity | 20L |
| Net weight | 10.6 kg |
3 Installation
- Take out all the packing. If there is a safe film over the oven, tear it off before use. Check carefully for damage. If any, immediately notify the dealer or send to the manufacturer's service center.
- Microwave ovens must be placed in dry and non-corrosive environments, kept away from heat and humidity, such as gas burners or water tanks.
- To ensure sufficient ventilation, the distance from the back of the microwave to the wall should be at least 10 cm, the side to the wall at least 5 cm, and the free distance above the top surface at least 20 cm. The distance from the microwave to the ground should be at least 85 cm.
- The oven should be positioned far from the TV, radio, or antenna to avoid picture disturbance. The distance should be more than 5 m.
- The appliance must be positioned so that the plug is accessible, and must ensure good grounding in case of leakage; a ground loop can be formed to avoid electric shock.
- The microwave oven must be operated with the door closed.
- The microwave oven must not be placed in a cabinet. The microwave oven is intended to be used freestanding.
- As there is manufacturing residue or oil remaining on the oven cavity or heating element, it is normal to smell an odor or even see slight smoke. This is normal and will not occur after several uses. Keep the door or window open to ensure good ventilation. It is strongly recommended to place a cup of water on the turntable, set to high power, and operate for several times.
4 Operation
4.1 Control panel 4.2 Before cooking
![graph TD A["Micro Power"] --> B["Express"] B --> C["Preset/Defrost/Clock"] C --> D["Instat/Start"] D --> E["Pause/Cancel"] E --> F["Time Weight"] F --> G["Auto Cooking"]](/content/2026/06/1340303/images/8ee295a503ebc578655055821a3fc284b50fe7ec5ce35e3df3beab92e0dfaa1e.jpg)
The LED flashes 3 times when plugged into the power supply. Then it flashes "", prompting you to input the cooking menu and time.
4.3 Auto cooking/time. Weight knob
You can increase or decrease cooking time, weight, or choose the auto cooking menu during operation by turning the Auto cooking/Time.Weight knob.
4.4 Pause/cancel
At the initial or input stage: press once to cancel input programs and resume the initial stage.
During cooking: press once to stop oven operation, press twice to cancel cooking programs.
4.5 Auto reminder
When your preset cooking procedure has finished, the LED display will show End and three beeps will sound to prompt you to take out food. If you do not press Pause/Cancel button once or open the door, the beep will sound at an interval of 3 minutes.
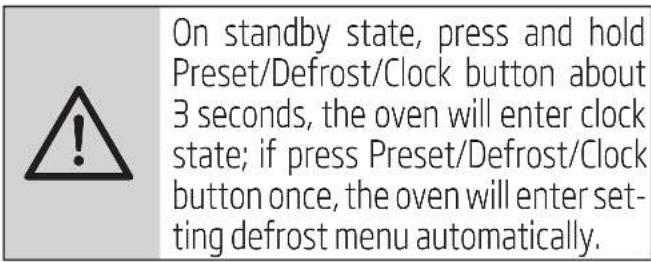
4.6 Clock setting
The Clock button allows you to input the current or preset time when ":" flashes on the LED display after plugging in, or you can skip it if not needed.
4 Operation

After setting the current time, set the desired cooking menu and cooking time, then press and hold the Preset/Defrost/Clock button for about 3 seconds, and the oven will enter preset state.
| Example: to set 12:30 | ||
| Steps Display | ||
| 1 | After power-up, the colon flashes : | |
| 2 | Press Preset/Defrost/Clock button for 3 seconds | 00:00 |
| 3 | Turn Auto Cooking/ Time. Weight knob to set exact hours. | 12:00 |
| 4 | Press Preset/Defrost/Clock button once again. | 12:00 |
| 5 | Turn Auto Cooking/ Time. Weight knob to set exact minutes. | 12:30 |
| 6 | Press Preset/Defrost/Clock button once again or wait for 5 seconds, and the numbers will go steadily. | |
4.7 Microwave cooking
This function is used for cooking and heating food. Pressing the Micro Power button, the LED cycles through 100P – 80P – 60P – 40P – 20P.
| High power | 100% microwave power. Applicable for quick and thorough cooking |
| Medium High power | 80% microwave power. Applicable for medium express cooking |
| Medium power | 60% microwave power. Applicable for steaming food |
| Medium Low power | 40% microwave power. Applicable for defrosting food |
| Low power | 20% microwave power. Applicable for keeping warm |

- The maximum time that can be set is 60 minutes. Never operate the oven empty.
- If you turn the food during operation, press the Instant/Start button once and the preset cooking procedure will continue.
- If you intend to remove the food before the preset time, you must press the Pause/Cancel button once to clear the preset procedure to avoid unintended operation next time.
- At maximum microwave power, the oven will automatically lower the power after a certain time of cooking to lengthen the service life.
| Example: To cook at P80 for 10 minutes. | ||
| Steps Display | ||
| 1 | After power-up, the colon flashes : | |
| 2 | Select the desired microwave power by pressing Micro Power button consecutively | 80P |
| 3 | Set cooking time by turning Auto Cooking/ Time. Weight knob | 10:00 |
| 4 | ||
4 Operation
4.8 Express cooking
Press the Express button, and the LED display will cycle through 0:30, 1:00, 1:30.
This function will allow you to heat a cup of water or beverage conveniently, omitting the steps of setting time. Choose the proper time depending on the beverage capacity.
| Example: To cook with express for 1 minute | ||
| Steps Display | ||
| 1 | After power-up, the colon flashes : | |
| 2 | Press Express button consecutively to select desired menu | 80P |
| 3 | Start cooking by pressing Instant/ Start button | 1:00 |
4.9 Defrost
This function is used for defrosting food. Press the Preset/Defrost/Clock button and the LED display will cycle to show d.1-d.2-d.3.
| d.1 For defrosting meat, the weight range from 0.1 to 2.0 kg. |
| d.2 For defrosting poultry, the weight range from 0.2 to 3.0kg. |
| d.3 For defrosting seafood, the weight range from 0.1 to 0.9kg. |

- It is necessary to turn over the food during operation to obtain uniform effect. • Usually defrosting will need longer time than that of cooking the food.
- If the food can be cut by knife, the defrosting process can be considered completed. • Microwave penetrates around 4cm into most food
- Defrosted food should be consumed as soon as possible, it is not advised to put back to fridge and freeze again.
| Example: To defrost 0.4kg poultry | ||
| Steps Display | ||
| 1 | After power-up, the colon flashes : | |
| 2 | Press Preset/Defrost/Clock button to set the food kind. | d.2 |
| 3 | Turn Auto Cooking/ Time. Weight knob to set the defrost weight | 0.4 |
| 4 | Start cooking by pressing Instant/ Start | |
| 5 | In half way during defrosting beep sounds will be heard to prompt you turn over the food. Open the door and turn over the food. Then close the door. Press Instant/start button again to continue defrosting. | |
4.10 Auto cooking
The oven has default cooking menu for simple operation. When the LED flash colon, turn the Auto Cooking knob and LED will cycle to show A.1, A.2 ..... A.8
Choose the appropriate menu according to the food type and weight and strictly observe the directions in below table, otherwise the cooking effect will be largely influenced.
4 Operation
| Display Kind Method | ||
| A.1 Popcorn | Suitable for | popping a bag of corn, which is available in the market, weighted 85g.Popcorn prior to completing, if the popping speed has been decreased to 1 time per 1-2 seconds you should press Pause/Cancel button to stop the popping process |
| A.2 Popcorn | Same as | A.1 except 100g weight |
| A.3 Pizza Warm a piece | of chilled pizza of 0.15kg | |
| A.4 Beverage Heating | a cup of 250 ml liquid. The liquid temperature is about 5-10 °C. Use a big mouth cup and do not seal | |
| A.5 Beverage Heating | a cup of 500 ml liquid. The liquid temperature is about 5-10 °C. Use a big mouth cup and do not seal | |
| A.6 Potato Cooking the potato strips, cut into 5mm width and height, length. Total weight is about 0.45kg. Place the strips on a large dish and cover the dish with a thin film to prevent water loss | ||
| A.7 Potato Same as A.6 | except the weight of potato strips is about 0.65kg | |
| A.8 Fish Suitable for steaming a fish of 0.45kg. After the fish washed and scales removed, make a slits on the skin of fish .Put the fish on a shallow dish of 22-27cm diameter sprinkle lightly with some ingredient and cover the dish with a thin film to prevent water loss. After cooking, stand for 2 minutes. | ||

- The temperature of food before cooking would be 20-25 °C. Higher or lower temperature of the food before cooking would require increase or decrease of cooking time.
- The temperature, weight and shape of food will largely influence the cooking effect. If any deviation has been found to the factor noted on above menu, you can adjust the cooking time for best result.
| Example: Steam 0.45kg fish | ||
| Steps | Display | |
| 1 | After power-up, the colon flashes | : |
| 2 | Turn Auto Cooking/ Time. Weight knob to set the cooking menu | A.8 |
| 3 | Start cooking by pressing Instant/ Start button and LED will count down to show running time. | |
4.11 Automatic starting (delayed function)
If you do not want the menu be started immediately, you can preset the cooking menu and time and the preset menu will be automatically started at your set time. The setting will consist of 2 steps:
- Setting the current clock;
- Setting the cooking menu and time.
4 Operation
| Example: Now it is 12:30 clock, if you hope that the microwave oven will automatically start cooking with 100P microwave power for 9 minutes and 30 seconds at 14:20 | ||
| Steps Display | ||
| 1 | After power-up, the colon flashes | |
| 1.1 | Press Preset/Defrost/Clock button for 3 seconds | 00:00 |
| 1.2 | Set hours by turning Auto Cooking/ Time. Weight knob | 12:00 |
| 1.3 | Press Preset/Defrost/Clock button again to confirm hours | 12:00 |
| 1.4 | Set minutes by turning Auto Cooking/ Time. Weight knob | 12:30 |
| 1.5 | Press Preset/Defrost/Clock button once or waiting for 5 seconds, and the numbers will go steady. | 12:30 |
| 2 | Set the cooking menu and time | |
| 2.1 | Select cooking power by pressing Micro Power button | 100P |
| 2.2 | Turn Auto Cooking/ Time. Weight knob to set cooking time | 9:30 |
| 2.3 | Press and hold Preset/Defrost/ Clock button for 3 seconds to enter preset state. | |
| 3 | Set the time you expect to start. Repeat the steps of 1.2, 1.3, 1.4 | |
| 4 | Press Preset/Defrost/Clock button to confirm the delayed menu. Now the program has been activated. And the menu will be started at 14:20. | |
| 5 | You may check the preset starting time by pressing Preset/Defrost/ Clock button. | |
4.12 Multi-sequence cooking
To obtain the best cooking result, some recipes call for different cooking modes and times. You may program your personalized menu as follows:
| Example: You want cook food with 100P microwave for 3 minutes then 20P for 9 minutes. This is 2 sequence setting. | ||
| Steps Display | ||
| 1 | 100P microwave for 3min | |
| 1.1 | Press Micro Power button to select power level. | 100P |
| 1.2 | Turn Auto Cooking/ Time. Weight knob to set cooking time. | 3:00 |
| 2 | 20P for 9min | |
| 2.1 | Press Micro Power button to select desired menu | 20P |
| 2.2 | Turn Auto Cooking/ Time. Weight knob to set cooking time. | 9:00 |
| 3 | Start cooking by pressing Instant/ Start | |

- When microwave 100 power cooking is finished, the microwave oven will begin the next operation automatically.
- Max 4 sequences can be set per time. Repeat the steps.
4.13 Child lock function
Use this feature to lock the control panel when you are cleaning or so that children cannot use the oven unsupervised. All the buttons are rendered inoperable in this mode.
- Set lock: Hold the Pause/Cancel button for about 3 seconds.
- Cancel lock: Hold the Pause/Cancel button for about 3 seconds.
5 Cooking tips
The following factors may affect the cooking result:
Food arrangement
Place thicker areas towards the outside of the dish, the thinner part towards the centre, and spread it evenly. Do not overlap if possible.
Cooking time length
Start cooking with a short time setting, evaluate it after it times out, and extend it according to actual need. Overcooking may result in smoke and burns.
Cooking food evenly
Food such as chicken, hamburger, or steak should be turned once during cooking.
Depending on the type of food, if applicable, stir it from outside to center of dish once or twice during cooking.
Allow standing time
After cooking times out, leave the food in the oven for an adequate length of time. This allows it to complete its cooking cycle and cool down in a gradual manner.
Whether the food is done
Color and hardness of food help to determine if it is done. These include:
- Steam coming out from all parts of food, not just the edge.
- Joints of poultry can be moved easily.
- Pork or poultry shows no signs of blood.
- Fish is opaque and can be sliced easily with a fork.
Browning dish
When using a browning dish or self-heating container, always place a heat-resistant insulator such as a porcelain plate under it to prevent damage to the turntable and rotating ring.
Microwave safe plastic wrap
When cooking food with high fat content, do not allow the plastic wrap to come into contact with food as it may melt.
Microwave safe plastic cookware.
Some microwave safe plastic cookware might not be suitable for cooking foods with high fat and sugar content. Also, the preheating time specified in the dish instruction manual must not be exceeded.
6 Cleaning
6.1 Microwave oven care

The oven should be cleaned regularly and any food deposits removed.

WARNING: Only allow children to use the oven without supervision when adequate instructions have been given so that the child is able to use the oven in a safe way and understands the hazards of improper use.
WARNING:
- Remove the power cord from the wall outlet before cleaning. Don't immerse the appliance in water or other fluids when cleaning.
- Failure to maintain the oven in a clean condition could lead to deterioration of the surface that could adversely affect the life of the appliance and possibly result in a hazardous situation.
- Never use hard detergent, gasoline, abrasive powder or metal brush to clean any part of the appliance.
- Do not remove the waveguide cover.
- When the microwave oven has been used for a long time, there may be some strange odors exist in the oven. The following 3 methods can get rid of them:
- Place several lemon slices in a cup, then heat with high microwave power for 2-3 minutes.
- Place a cup of red tea in oven, then heat with high micro power.
- Put some orange peel into oven, and then heat them with high Micro Power for 1 minute.
6.2 Tips for cleaning
Details for cleaning door seals, cavity and adjacent parts:
Exterior:
- Wipe the enclosure with a dampened soft cloth
Door:
- Using a dampened soft cloth, wipe clean the door and window
- Wipe the door seals and adjacent parts to remove any spill or spatter
- Wipe the control panel with a slightly dampened soft cloth
Interior walls:
- Wipe clean the cavity with a dampened soft cloth
- Wipe clean the waveguide cover to remove any food splashed
Turntable/ Rotation ring/ Rotation axis:
- Wash with mild soapy water.
- Rinse with clean water and allow to dry thoroughly.
6.3 Storage
- If you do not intend to use the appliance for a long time, please store it carefully.
- Please make sure that the appliance is unplugged, cooled down and totally dry. Store the appliance in a cool and dry place.
- Keep the appliance out of the reach of children.
It is strongly recommended to use containers that are suitable and safe for microwave cooking. Generally speaking, containers made of heat-resistant ceramic, glass, or plastic are suitable for microwave cooking. Never use metal containers for microwave cooking and combination cooking, as sparking is likely to occur. You can refer to the table below.
| Material of container Microwave Notes | ||
| Heat-resistant ceramic | Yes | Never use the ceramics which are decorated with metal rim or glazed |
| Heat-resistant plastic Yes Can not be used for long time microwave cooking | ||
| Heat-resistant glass Yes | ||
| Plastic film | Yes | It should not be used when cooking meat or chops as the over-temperature may do damage to the film |
| Grill rack No | ||
| Metal container No It should not be used in microwave oven. Microwave can not penetrate through metal | ||
| Lacquer No Poor heat-resistant. Can not be used for high-temperature cooking | ||
| Bamboo wood and paper | No | Poor heat-resistant. Can not be used for high-temperature cooking |
12 months breakdown and repair guarantee
Guarantor: Beko plc, 1 Greenhill Crescent, Watford, Hertfordshire. WD18 8UF
The guarantee does not in any way diminish your statutory or legal rights.
Your microwave has the benefit of our manufacturer's guarantee, which covers the product for 12 months from the date of original purchase.
This gives you reassurance that if within that time your microwave is proven to be defective because of either workmanship or materials, we will at our discretion either repair or replace your microwave.
The microwave must be correctly installed, located, and operated in accordance with the instructions contained in the user manual. The guarantor disclaims any liability for accidental or consequential damage.
The guarantee is subject to the following conditions:
- Documentary proof of the original purchase date is provided. The microwave has been installed and operated correctly and in accordance with our operating and maintenance instructions. The microwave is used only on the electricity supply on the rating plate. The microwave has only been used for normal domestic purposes. The microwave has not been altered, serviced, dismantled, or otherwise interfered with by any person. The microwave is used in the United Kingdom or Republic of Ireland. Any parts removed during repair work or any product that has been replaced becomes our property. The guarantee is not transferable if the product is resold.
The Guarantee does not cover:
- Transit, installation or delivery damage.
- Accidental damage.
- Misuse or abuse.
- Replacement of any consumable item or accessories. These include but are not limited to: plugs, cables, light bulbs, knobs, filters and flaps.
- Repairs or replacements required as a result of unauthorised repairs or inexpert installation that fails to meet the requirements contained in the user guide or instruction book.
- Repairs to products used in commercial or non-residential household premises.
How to obtain after sales service, help or general advice
Please keep your purchase receipt or other proof of purchase in a safe place as you will need to show us this document if your product requires attention within the guarantee period.
Please also record your product details below, which will allow you to access our services more quickly and help us identify your product. The model number is printed on the front of the user guide and the serial and model number is shown on your products rating plate.
| Model number | Serial number | Purchased from | Date of purchase |
Please call our UK based Customer Service department if you need help or advice from us:
United Kingdom and Northern Ireland: 0333 207 9710
Republic of Ireland: 01 862 3411
You can also contact us through our website: www.beko.co.uk
- PLEASE READ THIS MANUAL FIRST
- MEANINGS OF THE SYMBOLS
- IMPORTANT SAFETY AND ENVIRONMENTAL INSTRUCTIONS
- YOUR MICROWAVE OVEN
- INSTALLATION
- OPERATION
- COOKING TIPS
- CLEANING
- IMPORTANT SAFETY INSTRUCTIONS READ CAREFULLY AND KEEP FOR FUTURE REFERENCE
- GENERAL SAFETY
- IMPORTANT SAFETY INSTRUCTIONS
- ELECTRICAL SAFETY
- PRODUCT SAFETY
- INTENDED USE
- CHILDREN'S SAFETY
- COMPLIANCE WITH THE WEEE DIRECTIVE AND DISPOSAL OF WASTE PRODUCTS
- PACKAGE INFORMATION
- PLUG WIRING
- OVERVIEW
- DOOR LOCK
- VIEWING WINDOW
- ROTATING AXIS
- ROTATING RING
- TURNTABLE
- CONTROL PANEL
- WAVEGUIDE COVER
- CONTROL PANEL 4.2 BEFORE COOKING
- AUTO COOKING/TIME. WEIGHT KNOB
- PAUSE/CANCEL
- AUTO REMINDER
- CLOCK SETTING
- MICROWAVE COOKING
- EXPRESS COOKING
- DEFROST
- AUTO COOKING
- AUTOMATIC STARTING (DELAYED FUNCTION)
- MULTI-SEQUENCE COOKING
- CHILD LOCK FUNCTION
- FOOD ARRANGEMENT
- COOKING TIME LENGTH
- COOKING FOOD EVENLY
- ALLOW STANDING TIME
- WHETHER THE FOOD IS DONE
- BROWNING DISH
- MICROWAVE SAFE PLASTIC WRAP
- MICROWAVE SAFE PLASTIC COOKWARE
- MICROWAVE OVEN CARE
- WARNING
- TIPS FOR CLEANING
- EXTERIOR
- DOOR
- INTERIOR WALLS
- TURNTABLE/ ROTATION RING/ ROTATION AXIS
- STORAGE
- MONTHS BREAKDOWN AND REPAIR GUARANTEE
- THE GUARANTEE IS SUBJECT TO THE FOLLOWING CONDITIONS
- THE GUARANTEE DOES NOT COVER
- HOW TO OBTAIN AFTER SALES SERVICE, HELP OR GENERAL ADVICE
Brand : BEKO
Model : MOC20200R
Category : Microwave