
ER-8102P-3 - Barbecue Ambiano - Free user manual and instructions
Find the device manual for free ER-8102P-3 Ambiano in PDF.


| Product Type | Electric Barbecue Grill |
| Brand | Ambiano |
| Model | ER-8102P-3 |
| Power Supply | 220-240 V ~ 50/60 Hz |
| Power Consumption | 2000 W |
| Dimensions (L x W x H) | Approx. 50 x 30 x 20 cm |
| Weight | Approx. 4.5 kg |
| Cooking Surface | Non-stick coated, approx. 40 x 25 cm |
| Temperature Control | Adjustable thermostat with multiple settings |
| Indicator Lights | Power and ready lights |
| Drip Tray | Removable drip tray for easy cleaning |
| Housing Material | Stainless steel and heat-resistant plastic |
| Safety Features | Overheat protection, auto shut-off |
| Cleaning | Non-stick surface, wipe with damp cloth; drip tray dishwasher safe |
| Spare Parts | Available from manufacturer or authorized dealers |
| Repairability | Modular design; professional repair recommended |
Frequently Asked Questions - ER-8102P-3 Ambiano
User questions about ER-8102P-3 Ambiano
0 question about this device. Answer the ones you know or ask your own.
Ask a new question about this device
Download the instructions for your Barbecue in PDF format for free! Find your manual ER-8102P-3 - Ambiano and take your electronic device back in hand. On this page are published all the documents necessary for the use of your device. ER-8102P-3 by Ambiano.
USER MANUAL ER-8102P-3 Ambiano
RANGE MASTER®
FOLDABLE TABLE TOP GAS GRILL
USER GUIDE
Now that you have purchased a Range Master product you can rest assured in the knowledge that as well as your 2 year parts and labor warranty you have the added peace of mind of dedicated helplines and web support.
AFTER SALES SUPPORT

USA 888-892-2075 email:rangemaster@1800acs.com
MODEL: ER-8102P-3
ITEM # 45090 - 14

RANGE MASTER®
FOLDABLE TABLE TOP GAS GRILL
Congratulations!
You have made an excellent choice with the purchase of this quality Range Master product.
By doing so you now have the assurance and peace of mind which comes from purchasing a product that has been manufactured to the highest standards of performance and safety, supported by the high quality standards of ALDI.
We want you to be completely satisfied with your purchase so this Range Master product is backed by a comprehensive manufacturer's 2 year warranty and an outstanding after sales service through our dedicated Helpline.
We hope you will enjoy using your purchase for many years to come.
If you require technical support or in the unlikely event that your purchase is faulty please telephone our Helpline for immediate assistance. Faulty product claims made within the 2 year warranty period will be repaired or replaced free of charge provided that you have satisfactory proof of purchase (keep your receipt). This guarantee is in addition to your statutory rights. Your statutory rights are not affected. This limited warranty does not
apply in cases of damage caused by accident, improper use, abuse and force majeure.
This limited warranty will be invalidated if the appliance is tampered with in any way whatsoever. In case of questions or technical problems please call the following toll-free help line number: 888-892-2075, Monday – Friday 9am to 5pm CST.
If the appliance has to be returned to us, it must be packed correctly as we cannot accept any responsibility for damage caused in transit.


WARNING FOR YOUR SAFETY:
For Outdoor Use Only (Outside any enclosure)

WARNING FOR YOUR SAFETY:
- Improper installation, adjustment, alteration, service or maintenance can cause injury or property damage
- Read the installation, operation, and maintenance instructions thoroughly before installing or servicing this equipment.
- Failure to follow these instructions could result in fire or explosion, which could cause property damage, personal injury, or death.
Table of Contents
Limited Warranty Page 2
Important Safeguards 4
Expanded View & Hardware 6
Assembly Instructions 7
Operating Instructions 11
Connecting LP Gas Tank 11
Checking for Leaks 11
Lighting Instructions....13
Initial Use....14
Cleaning and Care 14
Troubleshooting....15
California Proposition 65:
Chemicals known to the State of California to cause cancer birth defects, or other reproductive harm are created by the combustion of propane.
Save these instructions for future reference. If you are assembling this unite for someone else, give this manual to him or her to read and save for future reference.

WARNING FOR YOUR SAFETY:
If you smell gas-
- Shut off gas to appliance.
- Extinguish any open flame.
- Open lid.
-
If odor continues, immediately call your gas supplier or your fire department.
-
Do not store spare LP cylinder within 10 feet (3.05m) of this appliance.
- Do not store or use gasoline or other liquids with flammable vapors within 25 feet (7.62m) of this or any other appliance.
- An LP cylinder not connected for use shall not be stored in the vicinity of this or any other appliance.

Intertek 4009237
The use and installation of this product must conform to local codes. In absence of local codes, Conforms to ANSI STD Z21.89-2013 Outdoor Cooking Specialty Gas Appliance
Manufactured in China
The installation must conform with local codes or, in the absence of local codes, with either the National Fuel Gas Code, ANSI Z223.1/NFPA 54, Natural Gas and Propane Installation Code, CSA B149.1, or Propane Storage and Handling Code, B149.2, or the Standard for Recreational Vehicles, ANSI A 119.2/NFPA 1192, and CSA Z240 RV Series, Recreational Vehicle Code, as applicable.

SAFETY FIRST DANGERS AND CAUTIONS

- This grill is for outdoor use only, and shall not be used in a building, garage, or any other enclosed area.
- This grill is NOT for commercial use.
- This grill is for use with liquid propane (LP) gas only. The conversion to or attempted use of natural gas in this LP gas grill is dangerous and will void your warranty.
- LP gas Characteristics:
a. LP gas is flammable and hazardous if handled improperly. Become aware of the characteristics before using any LP gas product.
b. LP gas is explosive under pressure, heavier than air, and settles and pools in low areas.
c. LP gas in its natural state has no odor. For your safety, an odorant is added that smells like rotten cabbage.
d. Contact with LP gas can cause freeze burns to skin.
- LP gas tank needed to operate. Only tanks marked "propane" may be used.
- The LP gas supply tank must be constructed and marked in accordance with the Specifications for LP gas Cylinders of the U.S. Department of Transportation (DOT) or the National Standard of Canada, CAN/CSA-B339, Cylinders, Spheres and Tubes for the Transportation of Dangerous Goods; and Commission
- LP gas tank must be arranged for vapor withdrawal.
- Dented or rusted LP gas tanks may be hazardous and should be checked by your LP gas supplier prior to use.
- The LP gas tank should not be dropped or handled roughly.
- Tanks must be stored outdoors out of the reach of children and must not be stored in a building, garage, or any other enclosed area. Your tank must never be stored where temperatures can reach over 125° F.
- Never attempt to attach this grill to the self-contained LP gas system of a camper trailer, motor home, or house.
- The use of alcohol, or prescription or non-prescription drugs may impair the consumer's ability to properly assemble or safely operate the appliance.
- Never use charcoal, lighter fluid, lava rocks, gasoline, kerosene, or alcohol with this product.
- Your grill has been checked at all factory connections for leaks. Recheck all connections, as movement in shipping can loosen connections.
- Check for leaks even if your unit was assembled for you by someone else.
- Do not operate if gas leak is present. Gas leaks may cause a fire or explosion.
- You must follow all leak-checking procedures before operating. To prevent fire or explosion hazard when testing for a leak:
a. Always perform leak test before lighting the grill and each time the tank is connected for use.
b. No smoking. Do not use or permit sources of ignition in the area while conducting a leak test.
c. Conduct the leak test outdoors in a well-ventilated area.
d. Do not use matches, lighters, or a flame to check for leaks.
e. Do not use grill until any and all leaks are corrected.
If you are unable to stop a leak, disconnect the LP gas supply. Call a gas appliance serviceman or your local LP gas supplier.
- Do not use in an explosive atmosphere. Keep grill area clear and free from combustible materials, gasoline and other flammable vapors and liquids.
- Keep all combustible items and surfaces at least 39 inches away from the grill at all times. Do not use this grill or any gas product under any overhead or near any unprotected combustible constructions.
- It is essential to keep the grill is valve compartment, burners, and circulating air passages clean. Inspect grill before each use.
- Do not alter grill in any manner.
- Do not use the grill unless it is COMPLETELY assembled and all parts are securely fastened and tightened.
- This grill should be thoroughly cleaned and inspected on a regular basis.
- Use only the regulator provided. The replacement regulator shall be that specified by the manufacturer.
- Do not use this appliance without reading "Operating Instructions" in this manual.
- Do not touch metal parts of grill until it has completely cooled (about 45 min.) to avoid burns, unless you are wearing protective gear (Pot holders, gloves, BBQ mittens, etc.).
- Do not install or use in or on boats or recreational vehicles.
- When cooking, fire extinguishing materials shall be readily accessible. In the event of an oil grease fire, do not attempt to extinguish with water. Use type BC dry chemical fire extinguisher or smother with Dirt, sand or baking soda.
- Do not use grill in high winds.
- Never lean over the grill when lighting.
- Do not leave a lit grill unattended, especially keep children and pets away from grill at all times.
- Do not attempt to move grill when in use. Allow the grill to cool before moving or storing.
- Storage of grill indoors is permissible only if the tank is disconnected, removed from the grill and properly stored outdoors.
- Always open grill lid carefully and slowly as heat and steam trapped within grill can severely burn you.
- Do not attempt to disconnect the gas regulator from the tank or any gas fitting while the grill is in use.
- Disconnect cylinder when not in use.
- Always use your grill on a hard, non-combustable level surface. An asphalt or blacktop surface may not be acceptable for this purpose.
- Use extreme caution on wooden decks.
- Keep all electrical cords away from a hot grill.
- Do not use grill for indoor cooking or heating. TOXIC fumes can accumulate and cause asphyxiation.
- After a period of storage and/or nonuse, check for leaks, burner obstructions and inspect for any abrasion, wear, cuts to the hose.
- Failure to open lid while igniting the grill is burner, or not waiting 5 minutes to allow the gas to clear if the grill does not light, may result in an explosive flame-up.
- If grill is not in use, the gas must be turned off at the supply tank.
- Never operate grill without heat plate installed.
- Always use a meat thermometer to ensure food is cooked to a safe temperature.
- Do not store a spare LP gas tank under or near this appliance.
- Deaths, serious injury or damage to property may occur if the above is not followed exactly.
Expanded View
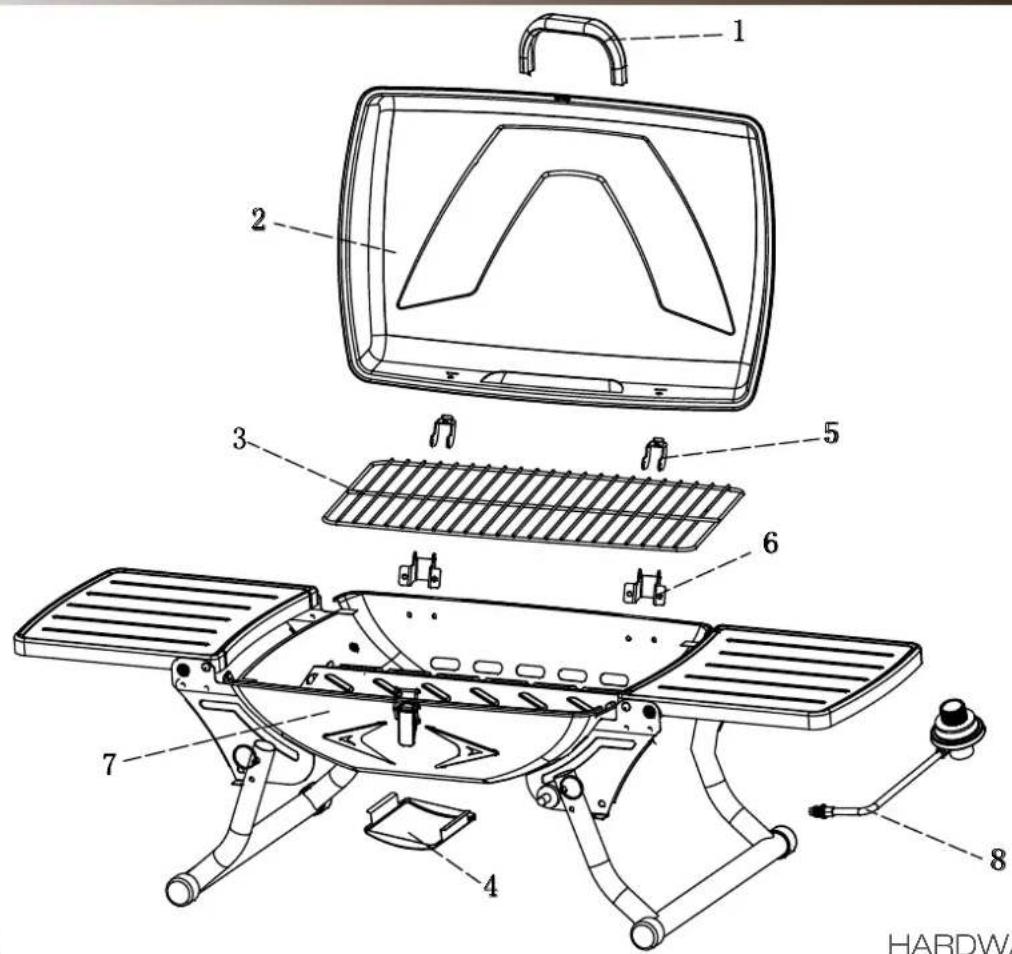
PARTS
| 1 Lid Handle 1 5 Lid Hindge 2 * | * |
| 2 Lid 1 6 Bottom Hindge 2 * | * |
| 3 Cooking Grid *1 | 7 Body *1 |
| 4 Grease Tray 1 8 Regulator 1 | * |
HARDWARE PARTS
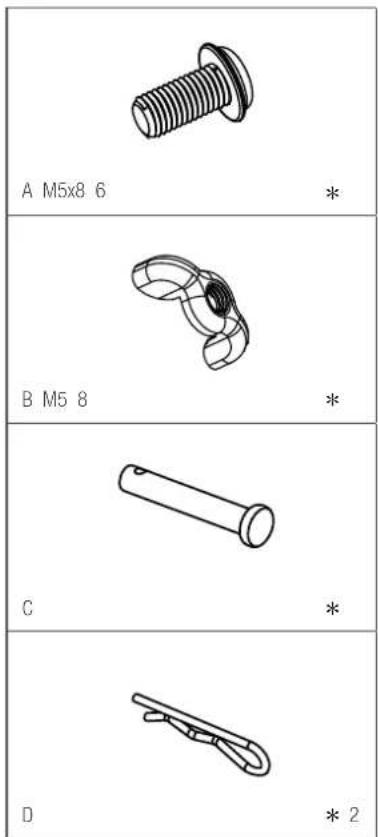
TOOLS NEEDED FOR ASSEMBLY
Phillips Head Screwdriver (not included)
BEFORE ASSEMBLY
Please read all instructions thoroughly before proceeding.
Find a large, clean area in which to assemble your barbecue. Please refer to the parts list and assembly diagram as necessary.
Ensure any transit protection or packaging is removed.
A. ASSEMBLY OF THE GRILL
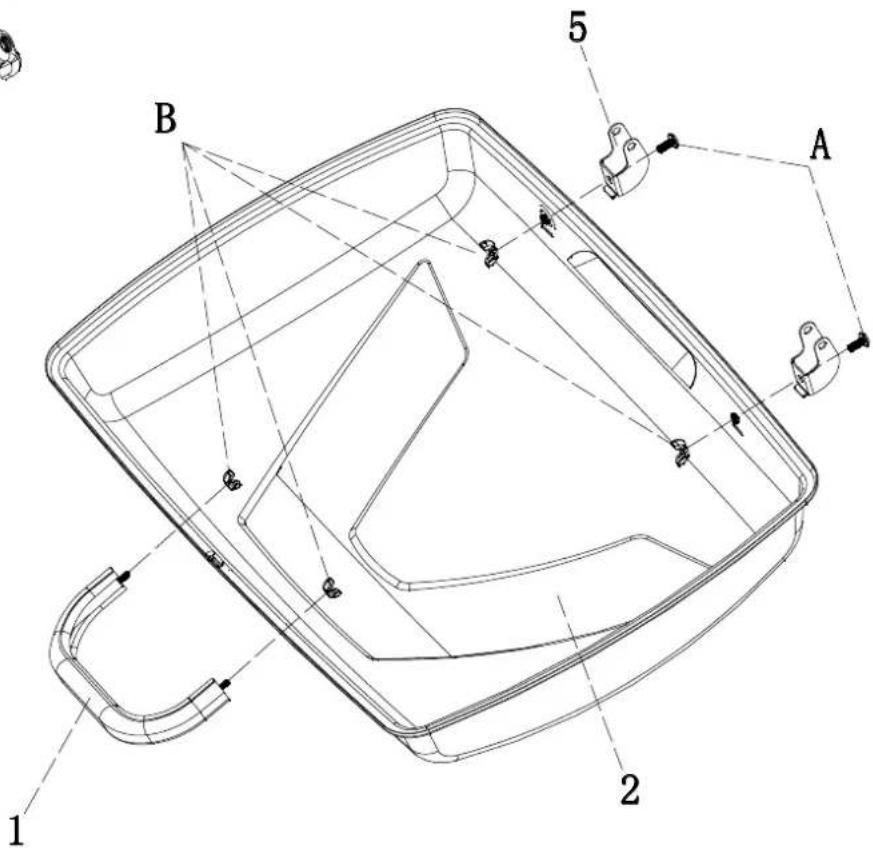
STEP 1 ATTACH LID HANDLE AND TOP HINGE
— Attach lid handle to lid using 2 sets of wing nuts (B)
— Attach the top hinge to lid using 2 sets of screws and wing nuts (B).
A*2
B*4


STEP 2 ATTACH BOTTOM HINGE
— Attach bottom hinge to the Body using 4 sets of screw(A), and 2 wing nuts (B).
A*4
B*4


— Insert the Heat shield(7) over the burner.
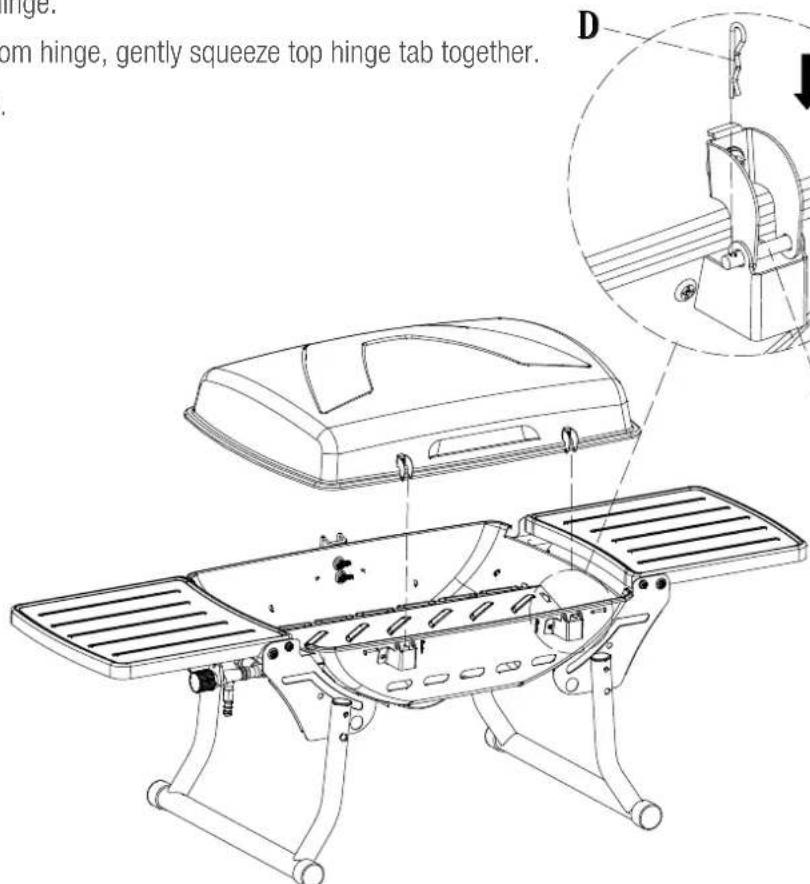
STEP 3 ATTACH LID
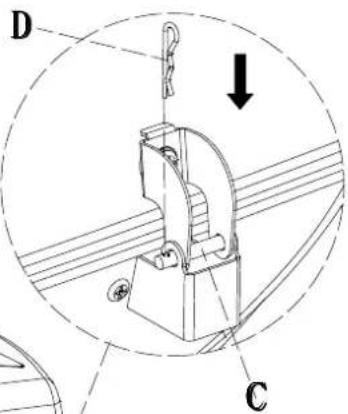
— Insert the top hinge into the bottom hinge.
Note: If top hinge does not fit the bottom hinge, gently squeeze top hinge tab together.
— Secure with pin (C) and cotter pin (D).
C*2
D*2
9
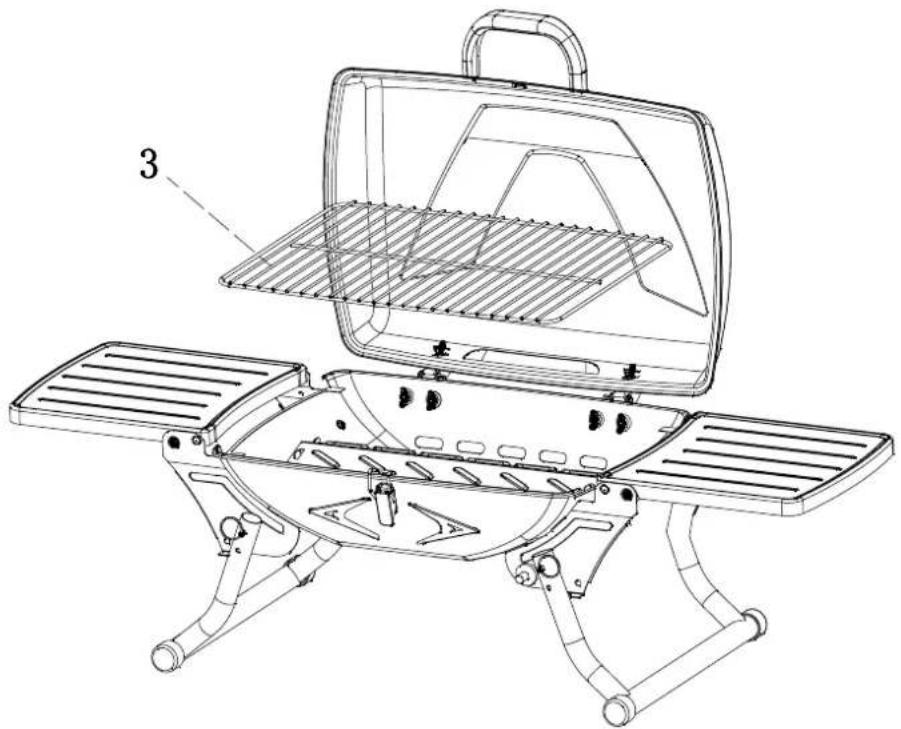
— Place cooking grid into barbeque
STEP 5 USING THE LOCK
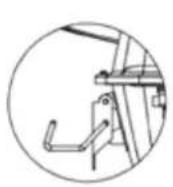
— To lock:
lift up on lock handle,
place lock bracket onto rise on lid,
push lock handle down to secure.
— To unlock:
lift up on lock handle,
remove lock bracket from rise on lid,
push lock handle down.
A

B

C

STEP 6 CONNECT THE REGULATOR TO THE BURNER
— Screw the front nut in a clockwise motion into the burner. This brass nut should be 1/4 turn past tight. DO NOT OVER TIGHTEN.
The regulator assembly will rotate from left to right when the brass nut is tightened, this is normal.

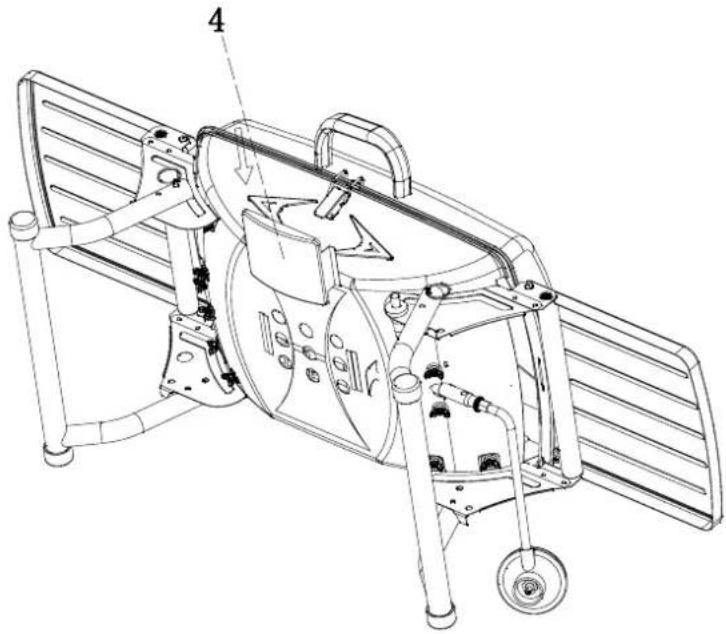
STEP 7 INSERT GREASE TRAY
— Slide the grease tray(4) into the slots provided in the base of the BBQ housing
IF YOU NEED HELP OR HAVE A WARRANTY OR CUSTOMER SERVICE QUERY,
PLEASE CALL 888-892-2075.
DO NOT RETURN TO PLACE OF PURCHASE.
This grill is designed to operate with a 1 lb. 7.75 in. or 10.6 in. high disposable / 16.4 oz. or 14.1 oz. propane gas tank (DOT 39 Cylinder) (Figure 1). DO NOT ATTEMPT TO REFILL ANY 1 lb. (16.4 oz. or 14.1 oz.) PROPANE GAS TANKS!
Only cylinders marked "propane" may be used.
Note: 1 lb cylinders may form frost when near empty.
- Make sure the regulator/control knob is in the "OFF" position.
- Lubricate the threads of the regulator/control knob with petroleum jelly.
Line up threads on LP gas tank with regulator/control knob. - Insert and rotate LP gas tank clockwise until they fit snugly together. (Figure 1)
HAND TIGHTEN ONLY. Be careful not to crossthread when screwing in tank. - Perform leak test per "Checking for Leaks" section.
2. DISCONNECTING LP GAS TANK
- Turn the regulator/control knob to the "OFF" position.
- Rotate LP gas tank counterclockwise until it is detached (Figure 2).
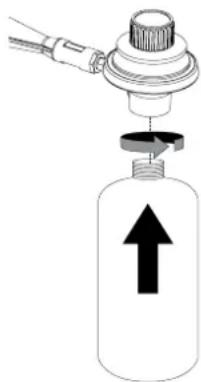
Figure 1

Figure 2
3. CHECKING FOR LEAKS

WARNING: FAILURE TO INSPECT THIS CONNECTION OR FOLLOW THESE INSTRUCTIONS COULD CAUSE A FIRE OR AN EXPLOSION WHICH CAN CAUSE DEATH, SERIOUS BODILY INJURY OR DAMAGE TO PROPERTY.
BURNER CONNECTIONS
Make sure the control valve is securely fastened to the burner.
If your unit was assembled for you, visually check the connection between the burner pipe and control valve.
Make sure the burner pipe fits over the control valve.
Make 2-3 oz. of leak solution by mixing one part liquid dishwashing soap with three parts water.
Make sure control knob is off.
Spoon several drops of solution, or use squirt bottle, at the burner connection.
Turn gas control on.
Inspect the solution at the connection, looking for bubbles. If NO bubbles appear, the connections are secure.
If bubbles appear, you have a leak.
Loosen and retighten this connection, making sure the connection is secure.
TANK/GAS LINE CONNECTION
Make 2-3 oz. of leak detection solution by mixing one part liquid dishwashing soap with three parts water.
Make sure regulator/control knob is in the "OFF" position.
Spoon the detection solution on the connection between the LP Gas tank and the regulator.
Turn Gas on.
If any bubbles appear, remove the LP gas tank and reconnect, making sure the connection is secure.
If you continue to see bubbles after several attempts, remove the LP gas tank per "Disconnecting LP Gas Tank" section, and contact 888-892-2075 for assistance.
If no bubbles appear after one minute, turn regulator/control knob to the "OFF" position, wipe away solution and proceed.

WARNING: KEEP OUTDOOR GAS COOKING APPLIANCE AREA CLEAR AND FREE FROM COMBUSTIBLE MATERIALS, GASOLINE AND OTHER FLAMMABLE VAPORS AND LIQUIDS. WARNING: ATTEMPTING TO LIGHT THE BURNER WITH THE LID CLOSED MAY CAUSE AN EXPLOSION.
WARNING: MAKE SURE THERE ARE NO OBSTRUCTIONS OF AIRFLOW TO THE GAS UNIT. SPIDERS, INSECTS CAN NEST WITHIN AND CLOG THE BURNER/ VENTURI TUBE AT THE ORIFICE. A CLOGGED BURNER TUBE CAN LEAD TO A FIRE BENEATH THE APPLIANCE.
LIGHTING
- Open lid.
- Push and turn the control knob to HIGH.
- Press the igniter button repeatedly to light burner.
- If ignition does not occur in 5 seconds, turn Burner control knob OFF position, wait 5 minutes and repeat lighting procedure.
- If igniter does not light burner, use a match to light burner manually. Access the burner through the hole in bottom bowl.
- After lighting, observe the burner flame. Make sure all burner ports are lit and flame height matches illustration.

Proper flame height.

WARNING: IF BURNER FLAME GOES OUT DURING OPERATION, IMMEDIATELY TURN THE GAS "OFF" AND OPEN LID TO LET THE GAS CLEAR FOR ABOUT 5 MINUTES BEFORE RELIGHTING.
INITIAL USE
Before cooking on this grill for the first time, operate the grill for about 15 minutes with the lid closed and the gas turned on “HIGH.” This will “heat clean” the internal parts and dissipate odor from the manufacturing processes.
COOKING
- Light burner per lighting instructions.
- Set burner to desired temperature
-
Place food on grid
-
With lid open or closed, cook until desired internal temperatures are achieved
TIPS FOR BETTER COOK OUTS AND LONGER PRODUCT LIFE
- Spray or coat cooking surfaces with vegetable oil before cooking to avoid sticking.
- Place vegetables or delicate foods into aluminum foil pouches
- Use a quality grill brush after each event to keep cooking surfaces clean and rust free.
- A one pound tank will provide approximately 2 hours of cooking time with control on "HIGH"
CLEANING AND CARE

- ALL CLEANING AND MAINTENANCE SHOULD BE DONE WHEN GRILL IS COOL AND WITH THE FUEL SUPPLY DISCONNECTED
- DO NOT CLEAN ANY GRILL PART IN A SELF CLEANING OVEN. THE EXTREME HEAT WILL DAMAGE THE FINISH.
NOTICES
- Abrasive cleaners will damage this product.
- Never use over cleaner to clean any part of grill
- Do not clean any grill part in a self cleaning oven. The extreme heat will damage the finish
CLEANING SURFACES
- Wipe surfaces clean with mild dishwashing detergent or baking soda.
- For stubborn surfaces use a citrus based degreaser and nylon scrubbing brush.
- Rinse clean with water.
CLEANING BURNER
- Turn gas off at the control knob and LP gas tank.
- Remove cooking grates and heat plate.
- Removes burner by removing the fasteners securing the burner to the grill bottom.
- Lift burner up and away from gas valve orifice.
-
Disconnect wire from spark electrode.
-
Clean inlet (venturi) of burner with small bottle brush or compressed air.
- Remove all food residue and dirt on burner surface.
- Clean any clogged ports with a stiff wire (such as an opened paper clip)
- Inspect burner for any damage (cracks or holes). If damage is found, replace with new burner.
Reinstall burner, check to insure that gas valve orifices are correctly positioned inside burner inlet (venturi). Also check position of spark electrode.
TROUBLESHOOTING
| Problem Possible Cause Prevention/Cure | ||
| Burner will not light with match No gas flow Check if LP cylinder is empty | ||
| Obstruction of gas flow Clear burner tubes | ||
| Spiderwebs or insect nest in venturi Clean venturi | ||
| Burner ports dogged or blocked Clean burner port | ||
| Irregular flame pattern, flame does not run the full length of burner | Burner ports dogged or blocked Clean burner port | |
| Flame is yellow or orange New burner may have residual manufacturing oils. | Burn grill for 15 minutes with the lid closed | |
| Spiderwebs or insect nest in venturi Clean venturi | ||
| Food residue , grease of seasoning salt on burner | ||
| Flame blow out High or gusting winds Turn front of grill to face wind or increase flame height | ||
| Low on LP Gas Replace LP cylinder | ||
| Flare-up Grease buildup Clean grill | ||
| Excess fat in meat Trim fat from meat at before grilling | ||
| Excessive cooking temperature Adjust (lower) temperature accordingly | ||
| Persistent grease fire | Grease trapped by food buildup around burner system | Turn knobs to "LOCK OFF POSITION". Let fire burn out. Leave lid position in closed and let fire burn out. After grill cools, remove and clean all parts. |
| Flashback(fire in burner tube(s)) | Burner and/or burner tube is blocked | Clean burner and/or burner tube. |
| Inside of lid is peeling-like paint peeling | The lid porcelain coated, not paint. | Baked on grease buildup has turned to carbon and is flaking off. Clean thoroughly. |
IF YOU NEED HELP OR HAVE A WARRANTY OR CUSTOMER SERVICE QUERY,
PLEASE CALL 888-892-2075.
DO NOT RETURN TO PLACE OF PURCHASE.
RANGE MASTER®
FOLDABLE TABLE TOP GAS GRILL
Your details:
Name
Address

E mail
Date of purchase*
* We recommend you keep the receipt with this warranty card
Location of purchase
Description of malfunction:
Return your completed warranty card to:
Hark Enterprises
C/O ACS
5805 Peachtree
Corners East Suite C
Norcross,
GA 30092
E-mail: rangemaster@1800acs.com
AFTER SALES SUPPORT


email:rangemaster@1800acs.com888
MODEL: ER-8102P-3
ITEM # 45090-14
Phone lines available Monday to Friday, 9am - 5pm CST
2
YEAR WARRANTY


- RANGE MASTER®
- FOLDABLE TABLE TOP GAS GRILL
- USER GUIDE
- CONGRATULATIONS
- WARNING FOR YOUR SAFETY
- TABLE OF CONTENTS
- SAFETY FIRST DANGERS AND CAUTIONS
- EXPANDED VIEW
- TOOLS NEEDED FOR ASSEMBLY
- BEFORE ASSEMBLY
- ASSEMBLY OF THE GRILL
- STEP 1 ATTACH LID HANDLE AND TOP HINGE
- STEP 2 ATTACH BOTTOM HINGE
- STEP 3 ATTACH LID
- STEP 5 USING THE LOCK
- STEP 6 CONNECT THE REGULATOR TO THE BURNER
- STEP 7 INSERT GREASE TRAY
- DISCONNECTING LP GAS TANK
- CHECKING FOR LEAKS
- BURNER CONNECTIONS
- TANK/GAS LINE CONNECTION
- LIGHTING
- INITIAL USE
- COOKING
- TIPS FOR BETTER COOK OUTS AND LONGER PRODUCT LIFE
- CLEANING AND CARE
- NOTICES
- CLEANING SURFACES
- CLEANING BURNER
- AFTER SALES SUPPORT
Brand : Ambiano
Model : ER-8102P-3
Category : Barbecue