
RC338 - DVD Combo LG - Free user manual and instructions
Find the device manual for free RC338 LG in PDF.


| Product Type | DVD Combo System |
| Model | RC338 |
| Brand | LG |
| Dimensions (W x H x D) | 430 x 45 x 250 mm |
| Weight | 2.5 kg |
| Power Supply | AC 100-240V, 50/60Hz |
| Power Consumption | 15 W (standby < 1 W) |
| Playback Formats | DVD, DVD+R/RW, DVD-R/RW, CD, CD-R/RW, MP3, JPEG, DivX |
| USB Playback | Yes, USB 2.0 |
| FM Radio | Yes, with RDS |
| Audio Output | Stereo RCA, Headphone jack |
| Video Output | Composite, Component, HDMI (if applicable) |
| Remote Control | Included |
| Maintenance | Clean with soft dry cloth; avoid liquids for optical lens |
| Safety | Do not expose to moisture; keep ventilation slots clear |
| Spare Parts & Repairability | Contact LG support or authorized service centers |
| Warranty | Standard LG warranty (check local regulations) |
| General Info | User manual available in PDF at notice-facile.com |
Frequently Asked Questions - RC338 LG
User questions about RC338 LG
0 question about this device. Answer the ones you know or ask your own.
Ask a new question about this device
Download the instructions for your DVD Combo in PDF format for free! Find your manual RC338 - LG and take your electronic device back in hand. On this page are published all the documents necessary for the use of your device. RC338 by LG.
USER MANUAL RC338 LG
This lightning flash with arrowhead symbol within an equilateral triangle is intended to alert the user to the presence of uninsulated dangerous voltage within the product's enclosure that may be of sufficient magnitude to constitute a risk of electric shock to persons.

The exclamation point within an equilateral triangle is intended to alert the user to the presence of important operating and maintenance (servicing) instructions in the literature accompanying the product.
WARNING: TO PREVENT FIRE OR ELECTRIC SHOCK HAZARD, DO NOT EXPOSE THIS PRODUCT TO RAIN OR MOISTURE.
WARNING: Do not install this equipment in a confined space such as a book case or similar unit.
CAUTION: Do not block any ventilation openings. Install in accordance with the manufacturer's instructions.
Slots and openings in the cabinet are provided for ventilation and to ensure reliable operation of the product and to protect it from over heating. The openings should be never be blocked by placing the product on a bed, sofa, rug or other similar surface. This product should not be placed in a built-in installation such as a bookcase or rack unless proper ventilation is provided or the manufacturer's instruction has been adhered to.

CAUTION:CLASS 3B VISIBLE AND INVISIBLE LASER RADIATION WEN OPEN AND INTERLOCKS DEFEATED AVOID EXPOSER TO THE BEAM.
CAUTION: This product employs a Laser System.
To ensure proper use of this product, please read this owner's manual carefully and retain it for future reference. Should the unit require maintenance, contact an authorized service center.
Use of controls, adjustments or the performance of procedures other than those specified herein may result in hazardous radiation exposure.
To prevent direct exposure to laser beam, do not try to open the enclosure. Visible laser radiation when open. DO NOT STARE INTO BEAM.
CAUTION: The apparatus should not be exposed to water (dripping or splashing) and no objects filled with liquids, such as vases, should be placed on the apparatus.
CAUTION concerning the Power Cord
Most appliances recommend they be placed upon a dedicated circuit; That is, a single outlet circuit which powers only that appliance and has no additional outlets or branch circuits. Check the specification page of this owner's manual to be certain. Do not overload wall outlets. Overloaded wall outlets, loose or damaged wall outlets, extension cords, frayed power cords, or damaged or cracked wire insulation are dangerous. Any of these conditions could result in electric shock or fire. Periodically examine the cord of your appliance, and if its appearance indicates damage or deterioration, unplug it, discontinue use of the appliance, and have the cord replaced with an exact replacement part by an authorized service center. Protect the power cord from physical or mechanical abuse, such as being twisted, kinked, pinched, closed in a door, or walked upon. Pay particular attention to plugs, wall outlets, and the point where the cord exits the appliance. To disconnect power from the mains, pull out the mains cord plug. When installing the product, ensure that the plug is easily accessible.
Disposal of your old appliance

- When this crossed-out wheeled bin symbol is attached to a product it means the product is covered by the European Directive 2002/96/EC.
- All electrical and electronic products should be disposed of separately from the municipal waste stream via designated collection facilities appointed by the government or the local authorities.
- The correct disposal of your old appliance will help prevent potential negative consequences for the environment and human health.
- For more detailed information about disposal of your old appliance, please contact your city office, waste disposal service or the shop where you purchased the product.
CE This product is manufactured to comply with EMC Directive 2004/108/EC and Low Voltage Directive 2006/95/EC.
European representative:
LG Electronics Service Europe B.V.
Veluwezoom 15, 1327 AE Almere, The
Netherlands
(Tel : +31-036-547-8940)
Copyrights
- Recording equipment should be used only for lawful copying and you are advised to check carefully what is lawful copying in the area in which you are making a copy. Copying of copyright material such as films or music is unlawful unless permitted by a legal exception or consented to by the rights owner.
- This product incorporates copyright protection technology that is protected by method claims of certain U.S. patents and other intellectual property rights owned by Macrovision Corporation and other rights owners. Use of this copyright protection technology must be authorized by Macrovision Corporation, and is intended for home and other limited viewing uses only, unless otherwise authorized by Macrovision corporation. Reverse engineering or disassembly is prohibited.
- CONSUMERS SHOULD NOTE THAT NOT ALL HIGH DEFINITION TELEVISION SETS ARE FULLY COMPATIBLE WITH THIS PRODUCT AND MAY CAUSE ARTIFACTS TO BE DISPLAYED IN THE PICTURE. IN CASE OF 625 PROGRESSIVE SCAN PICTURE PROBLEMS, IT IS RECOMMENDED THAT THE USER SWITCH THE CONNECTION TO THE 'STANDARD DEFINITION' OUTPUT. IF THERE ARE QUESTIONS REGARDING OUR TV SET COMPATIBILITY WITH THIS MODEL 625p RECORDER, PLEASE CONTACT OUR CUSTOMER SERVICE CENTER.
Manufactured under license from Dolby Laboratories. Dolby and the double-D symbol are registered trademarks of Dolby Laboratories.
Contents
Before you start 5-6
Remote control 7
Main Unit 8
Hooking up the unit 9-12
Auto setup 13
Using the Home Menu 13
Adjust the SETUP settings....14-18
Displaying disc Information .....18-19
Play a tape 20
Play a disc .....20-21
Playing a DivX® movie files .....22
Listening to a music .23
Viewing a photo 24
Recording 25-26
Editing a title .27-30
Dubbing 30
Language Codes ....31
Area Codes 31
Troubleshooting 32-33
Specifications ....33
Before connecting, operating or adjusting this product, please read this instruction booklet carefully and completely.
Before you start
Recordable and Playable discs
This unit can play and record all widely-used DVD types. The table below shows some specific compatibility differences depending on the disc types.
| DVD-R DVD-RW DVD+R DVD+RW | ||||
| Symbol used in this manual |  |  -RWVideo -RWVideo |  |  |
| Logos |  |  |  |  |
| ■ | ■W | DVD+ | DSC+ | |
| Re-Writable | No Yes No Yes | |||
| Formatting Mode (new discs) | Video mode Video mode Auto Auto | |||
| Editing | Limited Yes Limited Yes | |||
| Play on other players | The player must compatible with corresponding media and the media has to be finalized. | |||
| Recommended discs | Mitsubishi(8x,16x) Mitsubishi(4x) Mitsubishi(8, 16x) Verbatim(8x,16x) | Verbatim(4x) JVC(4x) Maxell(4x) | Mitsubishi(4x) Verbatim(8, 16x) | HP(4x) Verbatim(4x) Ricoh(4x) |
playable discs
The table below shows the file formats and media types that this unit can playback.
| DVD Audio CD | Video CD | Data disc (DivX, JPEG, MP3 or WMA) | ||||
| Symbol used in this manual |  |  |  |  |  |   |
| Logos |  |  |  |  |  | |
| Characteristics | Discs such as movies that can be purchased or rented. | Music CDs or CD-R/RWs in music CD format that can be purchased | VIDEO CD or CD-R/RW in VIDEO CD/SuperVIDEO CD format. | CD-R/CD-RW/DVD discs that contain DivX, JPEG, MP3 or WMA files. | ||
Notes on discs
- Depending on the conditions of the recording equipment or the CD-R/RW (or DVD±R/RW) disc itself, some CD-R/RW (or DVD±R/RW) discs cannot be played on the unit.
- Do not attach any seal or label to either side (the labeled side or the recorded side) of a disc.
- Do not use irregularly shaped CDs (e.g., heart-shaped or octagonal). Doing so may result in malfunctions.
- Depending on the recording software & the finalization, some recorded discs (CD-R/RW or DVD±R/RW) may not be playable.
- DVD-R/RW, DVD+R/RW and CD-R/RW discs recorded using a personal computer or a DVD or CD Recorder may not play if the disc is damaged or dirty, or if there is dirt or condensation on the Unit's lens.
- If you record a disc using a personal computer, even if it is recorded in a compatible format, there are cases in which it may not play because of the settings of the application software used to create the disc. (Check with the software publisher for more detailed information.)
- This unit requires discs and recordings to meet certain technical standards in order to achieve optimal playback quality. Pre-recorded DVDs are automatically set to these standards. There are many different types of recordable disc formats (including CD-R containing MP3 or WMA files) and these require certain pre-existing conditions (see above) to ensure compatible playback.
- Customers should note that permission is required in order to download MP3 / WMA files and music from the Internet. Our company has no right to grant such permission. Permission should always be sought from the copyright owner.
Restrictions on copying
Some video material is copy-once protected: Such material cannot be copied to VHS Tape or DVD. You can identify copy-once protected material during play-back by displaying disc information on-screen.
- NTSC format signals from the analog or the DV inputs is not recorded correctly with this unit.
- Video signals in SECAM format (from the built-in TV tuner or from the analog inputs) are recorded in PAL format.
About the Symbol Display
"may appear on your TV display during operation and indicates that the function explained in this owner's manual is not available on that specific media.
Regional Codes
This unit has a regional code printed on the rear of the unit. This unit can play only DVD discs labeled same as the rear of the unit or "ALL".
- Most DVD discs have a globe with one or more numbers in it clearly visible on the cover. This number must match your unit's regional code or the disc cannot play.
- If you try to play a DVD with a different regional code from the unit, the message "Incorrect region code. Can't play back" appears on the TV screen.
Remote Control Operation
Point the Remote Control at the remote sensor and press the buttons.
Remote Control Battery Installation
Remove the battery cover on the rear of the Remote Control, and insert R03 (size AAA) battery with and matched correctly.
Remote control
1
2
3
4
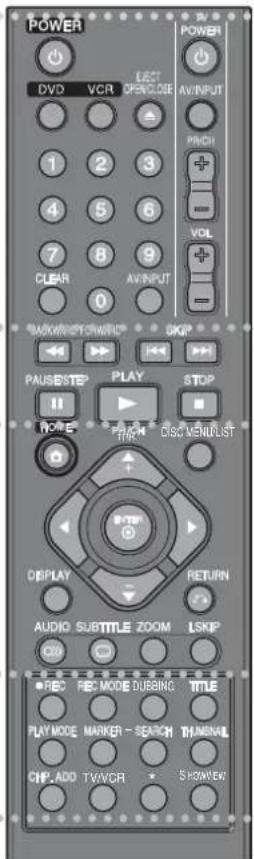
POWER: Switches the unit ON or OFF.
DVD: Selects the unit's mode to DVD.
VCR: Selects the unit's mode to VCR.
EJECT, OPEN/CLOSE: Opens and closes the disc tray, and eject the tape in the VCR deck.
0-9 numerical buttons: Selects numbered options in a menu.
CLEAR: Removes a mark on the Marker Search menu.
AV/INPUT: Changes the input source (Tuner, AV1-3, or DV IN).
TV Control Buttons: You can control the sound level, input source, selects TV's channel and power switch of your TV.
2
BACKWARD / FORWARD (◀◀ / ▶▶):
- DVD: Search backward or forward.
- VCR: Rewinds/Advances the tape during the STOP mode, for fast reverse/forward picture search.
SKIP (I◄◄ / ►►I): Go to next or previous chapter or track.
PAUSE/STEP (III): Pause playback or recording temporarily.
PLAY (▶): Starts playback.
STOP (■): Stops playback or recording.
3
HOME: Accesses or removes the HOME menu.
DISC MENU/LIST: Accesses menu on a DVD disc. Switches between Title List-Original and Title List-Playlist menu.
DISPLAY: Accesses On-Screen Display.
RETURN (💡): Removes the on-screen displays.
◀ / ▶ / ▲ / ▼ (left/right/up/down):
Used to navigate on-screen displays.
ENTER (Acknowledges menu selection)
PR/CH TRK (+/-): Scans up or down through memorized channels and adjust tracking.
AUDIO (0) Selects an audio language or audio channel.
SUBTITLE (3) Selects a subtitle language.
ZOOM: Enlarges DVD video image.
I.SKIP (INSTANT SKIP): Skips 30 seconds forward during playback.
REC (●): Starts recording.
REC MODE: Selects the recording mode.
DUBBING : Press to copy DVD to VCR (or VCR to DVD).
TITLE: Displays the disc's Title menu, if available.
PLAY MODE: Selects a play mode.
MARKER: Marks any point during playback.
SEARCH: Displays Marker Search menu.
THUMBNAIL: Selects a thumbnail picture.
CHP. ADD: Inserts a chapter marker when playing/recording.
TV/VCR: Press to switch between 'TV mode', in which you get the picture and sound from the TV's tuner, and 'VCR mode', in which you get picture and sound from this unit.
*: Feature is not available.
SHOWVIEW: To display the program menu for SHOWVIEW System programming
Setting up the remote to control your TV
You can operate your TV with the supplied remote control. If your TV is listed in the table below, set the appropriate manufacturer code.
While holding down TV POWER button, and press the manufacturer code for your TV with the numerical buttons (see the table below). Release the TV POWER button to complete setting.
Manufacturer Code Number
| LG / GoldStar 1 (Default), 2 |
| Zenith 1, 3, 4 |
| Samsung 6, 7 |
| Sony 8, 9 |
| Hitachi | 4 |
Depending on your TV, some or all buttons may not function on the TV, even after entering the correct manufacturer code.
When you replace the batteries of the remote, the code number you have set may be reset to the default setting. Set the appropriate code number again.
Main Unit

1 ⏻ (POWER button)
Switches the unit ON or OFF.
2 Disc Tray
Insert a disc here.
3 DVD (△)
Opens or closes the disc tray.
4 Display window
Shows the current status of the recorder.
5 Remote Sensor
Point the remote control here.
6 DV IN
Connect the DV output of a digital camcorder.
7 AVIN 3 (VIDEO IN/AUDIO IN (Left/Right))
Connect the audio/video output of an external source (Audio system, TV/Monitor, VCR, Camcorder, etc.).
8 VCR (▲)
Ejects the tape in the VCR deck.
9 ▶ / II (PLAY / PAUSE)
Starts playback.
Pause playback or recording temporarily; press again to exit pause mode.
10 ■ (STOP)
Stops playback or recording.
11 ● (REC)
Starts recording. Press repeatedly to set the recording time.
12 PROG. (▼ / ▲)
Scans up or down through memorized channels.
13 DUBBING
Press to copy DVD to VCR (or VCR to DVD).
14 DVD/VCR
Toggles control between the DVD deck and the VCR deck.
15 P/SCAN (Progressive Scan) Switches the progressive mode. 576i(OFF), 576p(ON)
Hooking up the unit
1 Antenna connection Connect the Terrestrial TV antenna to the ANTENNA IN jack on the unit.

3 SCART connection
Connect one end of the scart cable into the AV1 SCART jack on the unit and other end to the corresponding in jack on your TV. You can get Audio and Video signals together with this connection.

2 Antenna connection to your TV
Connect one end of the RF cable to ANTENNA OUT jack on the unit and other end to ANTENNA IN jack on your TV.

4 Power cord connection
Connect the mains lead to the AC IN terminal on the unit. Then plug the power cord into the mains.

Hooking up the unit - more you can do
Component connection
Connect one end of the component(Y PB PR) cable to the COMPONENT OUTPUT jack on the unit and other end to the COMPONENT INPUT jack on your TV.
Connect one ends of the audio cables (red and white) to the analog AUDIO OUTPUT jack on the unit and other ends to the AUDIO INPUT jack on your TV.

If your television is a high-definition or "digital ready" television, you may take advantage of the unit's progressive scan output for the highest video resolution possible. If your TV does not accept the Progressive Scan format, the picture will appear scrambled with the progressive signal.
Set the resolution to 576p using P/SCAN button on the front panel for progressive signal.
S-Video connection
Connect one end of the S-Video cable to the S-VIDEO OUTPUT jack on the unit and other end to the S-Video INPUT jack on your TV. Connect one ends of the audio cables (red and white) to the analog AUDIO OUTPUT jack on the unit and other ends to the AUDIO INPUT jack on your TV.

Digital audio connection
Connecting to an amplifier/receiver, Dolby Digital/MPEG/DTS decoder or other equipment with a digital input.
Connect one end of the digital audio cables (COAXIAL or OPTICAL) to the digital audio output jack (COAXIAL or OPTICAL) on the unit and other end to the digital audio input jack (COAXIAL or OPTICAL) on your amplifier.

Connecting a cable box or satellite receiver
You can watch or record satellite/cable box if you connect a decoder (not supplied) to the unit. Disconnect the unit's mains lead from the mains when connecting the decoder. You do not need to turn on the unit to view the signals from the connected tuner on your TV.
![graph TD A["Aerial/Cable TV Wall Jack"] --> B["Cable Box or Satellite Receiver"] B --> C["Decoder"] C --> D["Rear of Recorder"] D --> E["Antenna"] E --> F["Antenna"] F --> G["Antenna"] G --> H["Antenna"] H --> I["Antenna"] I --> J["Antenna"] J --> K["Antenna"] K --> L["Antenna"] L --> M["Antenna"] M…](/content/2026/06/1335799/images/8431dd6e923ac2a16f2ae616312fa202158e08f13b297591968ff7ab767ada63.jpg)
To watch or record satellite/cable box, set [AV2 Connection] option to [Decoder] (see page 15) and set the program's [Decoder On/Off] option to [On] on the Setup menu (page 13).
If you disconnect the unit's mains lead, you will not be able to view the signals from the connected decoder.
- Pictures containing copy protection signals that prohibit any copying cannot be recorded.
- If you pass the unit signals via the VCR, you may not receive a clear image on your TV screen.
Be sure to connect your VCR to the unit and your TV in the order shown below. To watch video tapes, watch the tapes through a second line input on your TV.

- When you record to a VCR from this unit, do not switch the input source to TV by pressing the TV/VCR button on the remote.
- If you are using a B Sky B tuner, be sure to connect the tuner's VCR SCART jack to the AV2 DECODER jack.
- If you disconnect the unit's mains lead, you will not be able to view the signals from the connected VCR or tuner.
Connecting to the AV2 DECODER jack
Connect a VCR or similar recording device to the AV2 DECODER jack of this unit. You do not need to turn on the unit to view the signals from the connected
tuner on your TV.

To watch or record the source from AV2 DECODER jack, set [AV2 Connection] option to [Other Device] (see page 15) and set [AV2 Recording] option to [Auto], [CVBS], [RGB] or [S-Video] as required (see page 17).
Rear of Recorder
Connecting to the AV IN 3 Jacks
Connect the input jacks (AV IN 3) on the unit to the audio/video out jacks on your accessory component using audio/video cables.

Connecting a Digital Camcorder
Using the front panel DV IN jack, it is possible to connect a DV digital camcorder and digitally transfer DV tapes to DVD.
Use a DV cable (not supplied) to connect the DV in/out jack of your DV cam-corder to the front panel DV IN jack of this unit.

The DV IN jack is for connection to DV digital camcorder only. It is not compatible with digital satellite tuners or D-VHS video decks. Disconnecting the DV cable while recording a contents of the connected digital camcorder may result in malfunction.
Auto setup
| When the first time to turn on the unit, the initial setup wizard sets the language. clock and channels automatically. | ON REMOTE |
| 1 Turn on the unitThe initial setup wizard appears on the screen. | POWER |
| 2 Choose a language: | ▲▼ |
| 3 Select the chosen language: | ENTER |
| 4 Check the antenna and go to the next step: | ENTER |
| 5 Choose a country you are using the unit: | ▲▼▶ |
| 6 Select the [Start] and starts channel scan: | ▶ ENTER |
| 7 Choose a clock setting mode: | ▲▼ |
| 8 Select the chosen clock setting mode: | ENTER |
| 9 Set the clock:This step is not available for Auto mode | ▲▼◀▶ENTER |
| 10 Close the initial setup: | ENTER |
Auto setup - more you can do
Adjust the programmed channels
Press HOME, then use ◀◀▶ to select [Setup] option. Press ENTER while [Start] is selected. The SETUP menu appears on the screen. Select the [Program Edit] on the second level options then press ▶to move to the third level. Press ENTER while [Edit] option is selected. The channel editing screen appears on the screen.
Select which channel you would like to edit and press ENTER. An option menu appear on the left side of the screen.

[Program Edit]: Change the settings of a channel manually.
[Station Rename]: Change a name of the selected channel.
[Move]: Moves the program's location on the program list.
[Delete]: Delete the selected channel from programmed channel list.
[Decoder On/Off] Sets the channels for the decoder. You need this setting to watch or record satellite/cable box. Press ENTER so [Decoder] appears on the display. Press ENTER again to turn off the setting.
[NICAM Auto/off]: Sets the channels for the NICAM broadcast.
Editing a channel
You can change the settings of programmed channel by selecting [Program Edit] option on the left side of the channel editing screen.
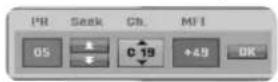
[PR]: Indicates the selected channel position.
[Seek]: Searches for a channel automatically. Searching stops when the unit tunes in a channel.
[Ch.] Changes the channel number.
[MFT] Fine tunes the channel to obtain a clearer picture.
[OK]: Confirm the settings and return to the channel list menu.
Using the Home Menu
| ON REMOTE | |
| 1 Displays the HOME menu: HOME | |
| 2 Select a main option: | ◀◀▶▶ |
| 3 Select a sub option: | ▲▼ |
| 4 Execute the selected option ENTER | |
| 5 Exit the HOME menu: HOME |

Using the Home Menu - more you can do
Setup
Start - Displays SETUP menu. (page 14-18)
MOVIE
VCR – Plays back the movie of the VCR
DISC
- Displays [Title List] menu, which shows recorded titles on the disc. (page 27)
- Displays [Movie List] menu, which shows DivX movie files on the disc. (page 22)
- Plays Video CD or DVD-Video disc (page 20).
PHOTO
DISC – Displays [Photo List] menu, which shows photo files on the disc. (page 24)
MUSIC
DISC – Displays [Music List] menu, which shows music files or audio tracks on the disc. (page 23)
Easy Menu
Disc Manager – Displays the disc settings menu. (page 17-18).
DV Input – Changes to DV Input mode.
Rec Mode – Displays [Disc Record Mode] option in the SETUP Menu. (page 17)
Dubbing – Copy the contents of a DVD or VHS tape (and vice versa). (page 29)
TV
Auto Ch. Scan – Displays [Auto Programming] option in the SETUP Menu. (page 15)
PR Edit – Link to the Program Edit. (page 13)
Timer Record – Displays [Timer Record] menu. (page 25)
Adjust the SETUP settings
| ON REMOTE | |
| 1 Displays the HOME menu: HOME | |
| 2 Select the [Setup] option: | ◀◀▶▶ |
| 3 Select the [Start] option: ENTER | |
| 4 Select a desired option on the first level: | ▲▼ |
| 5 Move to second level: | ▶▶ |
| 6 Select a desired option on the second level: | ▲▼ |
| 7 Move to third level: | ▶▶ |
| 8 Adjust or confirm the setting: | ▲▼, ENTER |
| 9 Go back to the previous level: | ◀◀ |

Adjust the SETUP settings - more you can do
Adjust the general settings

Auto Programming – This option automatically scans and sets the available channels.
[Country]: Select a country where you operate this unit. If the country that you want to set is not listed, select [Others].
[Start]: Start the channel scanning.
Program Edit – This option allows you to add channels and edit preset channels.
[Edit]: Displays the screen which show preset channel list and channel editing options. (page 13)
Clock Set - The clock must be set in order to use [Timer record].
[Auto]: Set the channel that broadcasts a clock signal and the clock will be set automatically.
[Manual]: If there is no channel that broadcasts a clock signal in your area, you can set the time and date manually.
TV Aspect – Selects the aspects ratio of the connected TV.
[4:3 Letter Box]: Select this when connecting to a standard 4:3 screen TV and prefer the wide picture with bands on the upper and lower portions of the screen.
[4:3 Pan Scan]: Select this when connecting to a standard 4:3 screen TV and prefer the wide picture on the entire screen cuts off the portions that do not fit.
[16:9 Wide]: Select this when connecting to a wide-screen TV.
VCR Play Aspect
[Auto]: Automatically plays back Wide-Screen programs as Wide-Screen and Normal programs as normal.
[4:3]: Only for playing back Normal format recordings (4:3).
[16:9]: Only for playing back Wide-Screen format recordings (16:9).
VCR Play System – Your video recorder uses triple colour standards, PAL and MESECAM. During play your video recorder should select the colour system automatically, however if you experience problems you may need to do it manually.
AV2 Connection – You can connect a decoder, satellite receiver or the other device to the AV2(DECODER) jack on the rear panel.
[Decoder]: Select this when you connect a external decoder box to the AV2(DECODER) jack on the unit.
[Satellite Receiver]: Select this when you connect a satellite/cable box to the AV2(DECODER) jack on the unit.
[Other Device]: Select this when you connect a VCR or similar recording device to the AV2(DECODER) jack on the unit.
Video output format – Select an option according to the TV connection type. [YPbPr]: When your TV is connected to the COMPONENT OUTPUT jacks on the unit.
[RGB]: When your TV is connected to the SCART jack on the unit.
Power Save mode – Selects whether this unit is in power save mode when the power is turned off. This option is not available when a timer recording is set.
[ON]*: The front panel display is off and only signals arriving at the antenna input are passed through when the unit is turned off. [OFF]: Turns off the [Power Save Mode].
*1 If you turns off the unit while receiving encoded signals, the power save mode does not work
Factory Set – You can reset the unit to all its factory settings. Some options cannot be reset (Rating, Password, and Area Code). The auto setup menu appears on the screen after the factory settings.
Adjust the language settings

Display Menu – Select a language for the Setup menu and on-screen display.
Disc Menu/Audio/Subtitle – Select a language for the Menu/Audio/Subtitle.
[Original]: Refers to the original language in which the disc was recorded. [Others]: To select another language, press number buttons to enter the corresponding 4-digit number according to the language code list on page 31. If you make a mistake while entering number, press CLEAR repeatedly to delete numbers one by one then correct it. [OFF] (for Disc Subtitle): Turn off Subtitle.
Adjust the audio settings

Dolby Digital / DTS / MPEG – Selects the type of digital audio signal when using the DIGITAL AUDIO OUTPUT jack.
[Bitstream] – Select this when you connect this unit's DIGITAL AUDIO OUTPUT jack to an audio component with a built-in Dolby Digital, DTS or MPEG decoder. [PCM] (for Dolby Digital / MPEG) – Select this when you connect this unit's DIGITAL AUDIO OUTPUT jack to an audio component without a built-in Dolby Digital or MPEG decoder. [Off] (for DTS) – Select this when you connect this unit's DIGITAL AUDIO OUTPUT jack to an audio component without a built-in DTS decoder.
Sampling Freq. (Frequency) – Selects the sampling frequency of the audio signal.
[48 kHz]: In case of DVD with 96KHz sampling, Output is converted to 48kHz. If your receiver or amplifier is NOT capable of handling 96 kHz signals, select [48 kHz]. [96 kHz]: The digital audio signals are output in their original sampling format
DRC (Dynamic Range Control) – Make the sound clear when the volume is turned down (Dolby Digital only). Set to [On] for this effect.
Adjust the lock settings

To access the Rating, Password or Area Code options, you must enter the 4-digit password. If you have not yet entered a password you are prompted to do so. Enter a 4-digit password. Enter it again to verify. If you make a mistake while entering number, press CLEAR repeatedly to delete numbers one by one then correct it.
If you forget your password, you can reset it. Displays the SETUP menu. Input '210499' and select [OK] to confirm. The password has now been cleared.
Rating – Select a rating level. The lower the level, the stricter the rating. Select [No Limit] to deactivate the rating.
Set Password – Changes or deletes the password.
[Change]: Enter the new password twice after entering the current password. [Delete]: Delete the current password after entering the current password. Area code – Select a code for a geographic area as the playback rating level. This determines which area's standards are used to rate DVDs controlled by the parental lock. See the Area Codes on page 31.
Adjust the recording settings

Disc Record Mode – Select the picture quality for recording from XP, SP, LP, EP or MLP. See recording time of each mode on page 33.
[XP]: Highest picture quality.
[SP]: Standard picture quality.
[LP]: Slightly lower picture quality than [SP] mode.
[EP]: Low picture quality.
[MLP]: The longest recording time with the lowest picture quality.
VCR Record Mode – Select the picture quality for VCR recording from; SP (Standard Play), LP (Long Play).
VCR Record System – Your video recorder uses triple colour standards, PAL, MESECAM and Auto. During recording your video recorder should select the colour system automatically, however if you experience problems you may need to do it manually.
DV Record Audio – You need to set this if you have a camcorder using 32kHz/12-bit sound connected to the front panel DV IN jack.
Some digital camcorders have two stereo tracks for audio. One is recorded at the time of shooting; the other is for overdubbing after shooting.
On the Audio 1 setting, the sound that was recorded while shooting is used. On the Audio 2 setting, the overdubbed sound is used.
AV2 Recording – Selects a method of inputting video signals for the
AV2(DECODER) jack. The picture will not be clear if this setting does not match the type of the video input signal.
[Auto]: The video input signal will automatically follow the video signal received.
[CVBS]: Inputs CVBS(composite) video signals.
[RGB]: Inputs RGB signals.
[S-VIDEO]: Inputs S-Video signals.
Auto Chapter – When DVD recording, chapter markers are added automatically in every specified interval (5 or 10 min.).
If you select None, switch off automatic chapter marking altogether with the No Separation setting.
Adjust the disc settings

Initialize – You can Initialize a DVD by pressing ENTER while [Start] is selected. The [Initialize] menu appears. The unit starts formatting after confirmation. You can select a mode between VR and Video for DVD-RW discs. The everything recorded on the DVD will be erased after formatting.
The disc format for DVD-R, DVD+R, DVD+RW, discs is always "Video" format - the same as pro-recorded DVD-Video discs.
(You can play a DVD-R, DVD+R, DVD+RW, discs in a regular player).
If you load a completely blank disc, the unit will initialize the disc automatically. See "Formatting mode (new disc)" on page 5 for more information.
Finalize – Finalizing is necessary when you play disc recorded with this unit on other DVD equipment. How long finalization takes depends on the disc condition, recorded length and number of titles.
[Finalize]: The [Finalize] menu appears. The unit starts finalizing after confirmation.
[Unfinalize]: The finalized DVD-RW discs can be unfinalized after confirming on the [Unfinalize] menu. After unfinalizing, the disc can be edited and re-record.
Before finalizing, check the characteristics between the disc type in the table below.
| -RW | The finalized DVD-RW discs can be unfinalized so that the disc can edit or record again. |
| -R+ | Once you finalize a disc, you can not edit or record anything on the disc. |
| +RW | Discs are automatically finalized when removed from the unit. The edited contents are playable on DVD+RW compatible players only after finalization |
Disc Label – This function allows you to change the default disc name to something more descriptive. This name appears when you load a disc and when you display disc information on-screen. The keyboard menu appears by pressing ENTER while [Edit] is selected.
Disc Protect – This function allows you to protect discs from accidental record, erasure and editing by setting this option to [ON]. The DVD-R and Video mode formatted DVD-RW are not available to protect.
PBC (Playback control) – Playback control provides special navigation features that are available on some Video CDs. Select [On] to use this feature.
About DivX(R) – We provide you with the DivX® VOD (Video On Demand) registration code that allows you to rent and purchase videos using the DivX® VOD service. For more information, visit www.divx.com/vod.
Press ENTER when [Enter] icon is highlighted and you can view the registration code of the unit.
Displaying disc information
| ON REMOTE | |
| 1 Play the disc loaded on the unit PLAY | |
| 2 Displays current status of playback: DISPLAY | |
| 3 Displays the playback menu: DISPLAY | |
| 4 Select an item: | ▲▼ |
| 5 Adjust the playback menu settings: | ◀▶ |
| 6 Exit the disc playback menu DISPLAY |
Displaying disc Information - more you can do
Adjusting playback menu item
You can select an item by pressing ▲▼ and change or select the setting by pressing ◀▶.

—Current title/track / Total number of titles/tracks
—Current chapter / total number of chapters
—Elapsed playing time
—Selected audio language or audio channel
—Selected subtitle
—Selected angle / Total number of angles
—Selected sound mode
Moving to another title/track/file


DivXV
When a disc has more than one title, you can move to another title. Press DISPLAY twice during playback then use ▲ / ▼ to select the title icon. Then, press the appropriate numbered button (0-9) or ◀ / ▶ to select a title number. On a Video CD with PBC, you must set PBC to Off to use this function. (See page 18).
Starting playback from selected time

DivXD
Press DISPLAY twice during playback. The time search box shows the elapsed playing time. Select the time search box and then input the required start time in hours, minutes, and seconds from left to right. For example, to find a scene at 2 hours, 10 minutes, and 20 seconds, enter "21020" and press ENTER. If you enter the wrong numbers, press ◀/▶ to move the under bar (_) to the wrong number. Then enter the correct numbers.
Selecting a subtitle language

DivXD
During playback, press DISPLAY twice to display the playback menu. Use ▲▼ to select the subtitle option then use ◀▶ to select desired subtitle language. OR
During playback, press SUBTITLE then use ◀▶ to select desired subtitle language.
Watching from a different angle DVD

If the disc contains scenes recorded at different camera angles, you can change to a different camera angle during playback. During playback, press DISPLAY twice to display the playback menu. Use ▲▼ to select the angle option then use ◀▶ to select desired angle.
Selecting a sound mode


DivXV
This unit can produce a 3D Surround effect, which simulates multi-channel audio playback from two conventional stereo speakers, instead of the five or more speakers normally required to listen to multi-channel audio from a home theater system. During playback, press DISPLAY twice to display the playback menu. Use ▲▼ to select the sound option then use ◀▶ to select desired sound mode (3D SUR. or NORMAL).
Displaying information while watching TV
During viewing the TV, Press DISPLAY to display the information displayed on-screen.

1 Indicates disc name and format.
2 Indicates the record mode, free space, and elapsed time progress bar.
3 Indicates channel number, station name, and audio signal (STEREO, MONO) received by the tuner.
4 Indicates current audio channel.
5 Indicates current date and time.
Play a Tape
| ON REMOTE | |
| 1 Press VCR to control the VCR deck: VCR | |
| 2 Insert a prerecorded video cassette: | - |
| 3 Starts playback: PLAY (If a tape without a safety tab is inserted, the unit starts playback automatically. | ▶) |
| 4 Stops playback: STOP ( | ■)] |
Play a tape - more you can do
Tracking Control VHS
If noise appears on the screen during playback, press either PR/CH(TRK) (▲/▼) on the remote control or PROG. (▲/▼) on the front panel until the noise on the screen is reduced.
Pause playback and Frame-by-Frame playback VHS
Press PAUSE/STEP (Ⅲ) to pause playback.
Press PAUSE/STEP (III) repeatedly to play Frame-by-Frame playback. Press PLAY (▶) to continue playback.
After 5 minutes in STILL mode, the playback stops to protect the tape and video heads.
Fast forward or fast reverse VHS
Press BACKWARD / FORWARD (◀◀ or ▶▶) to play fast forward or fast reverse during playback. Press PLAY (▶) to continue play at normal speed. If the Recorder is left in the SEARCH mode for more than 3 minutes, the Recorder will automatically enter the PLAY mode, to protect the tape and video heads.
Slow Motion playback VHS
While playback is paused, press FORWARD (▶) to slow down forward playback. Press PLAY (▶) to continue play at normal speed. If slow motion mode continues for more than 3 minutes, the Recorder will automatically change to normal play mode.
Hearing a different audio VHS
Press AUDIO then sets tape audio to HIFI, LEFT, RIGHT or NORMAL. Use ◀/▶ buttons to select tape audio you want.
Counter Memory Function VHS
Resets the current tape counter position to 0:00:00 by pressing CLEAR. To automatically go to tape counter position 0:00:00, press RETURN while the tape is in Stop mode or in Play mode.
Play a disc
| ON REMOTE | |
| 1 Open the disc tray: EJECT OPEN/CLOSE ( | ▲) |
| 2 Insert a disc: - | |
| 3 Close the disc tray: EJECT OPEN/CLOSE ( | ▲) |
| 4 Adjust the disc menu settings:A disc menu may not appears on the screendepending on the disc. | ▲▼◄► |
| 5 Starts playback: PLAY ( | ▶) |
| 6 Stops playback: STOP ( | ■) |
Play a disc - more you can do
Playing a disc that contains a menu VCDD
The menu screen may be displayed first after loading a DVD or Video CD which contains a menu.
DVD – Use the ◀/▶/▲/▼ buttons to select the title/chapter you want to view, then press ENTER to start playback. Press TITLE or DISC MENU/LIST to return to the menu screen.
VCD – Use the number buttons to select the track you want to view. Press RETURN (♂) to return to the menu screen.
Menu setting and the operating procedures for using the menu may differ depending on the disc. You may also set PBC to [OFF] (see page 18).
Skip to the next/previous chapter/track/file

Press SKIP (▶▶▶) to move to the next chapter/track/file.
Press SKIP (◀◀) to return to the beginning of the current chapter/track/file. Press SKIP (◀◀) twice briefly to step back to the previous chapter/track/file
Pause a playback
Press PAUSE/STEP (III) to pause playback. Press PLAY (▶) to continue playback.

Press PAUSE/STEP (III) repeatedly to play Frame-by-Frame playback.

Press BACKWARD / FORWARD (◀◀ or ▶▶) to play fast forward or fast reverse during playback. You can change the various playback speed by pressing BACKWARD / FORWARD (◀◀ or ▶▶) repeatedly. Press PLAY (▶) to continue play at normal speed.

Press AUDIO then press ◀ or ▶ repeatedly to hear a different audio language, audio track or encoding method.

While playback is paused, press BACKWARD / FORWARD (◀◀ or ▶▶) to slow down forward or reverse playback. You can change the various playback speed by pressing BACKWARD / FORWARD (◀◀ or ▶▶) repeatedly. Press PLAY (▶▶) to continue play at normal speed. The slow down the playing speed in reverse is not available for Video CD.

Press PLAY MODE repeatedly to select an item to be repeated. The current title, chapter, folder or track will be played back repeatedly. To return to normal playback, press PLAY MODE repeatedly to select [Off]. On a Video CD with PBC, you must set PBC to Off to use this function. (See page 18).

Press PLAY MODE to select [A-] at the beginning of the portion you wish to repeat and press ENTER at the end of the portion. Your selected portion will be repeated continually.
To return to normal playback, press PLAY MODE repeatedly to select [Off].
Watching a enlarged video image DVD ALL
During playback or pause mode, press ZOOM repeatedly to select zoom mode. You can move through the zoomed picture using ▲▼◀▶ buttons. Press CLEAR to exit.
Marking a favorite scene DVD ALL
You can mark positions by pressing MARKER at the desired position up to six markers. Also you can recall or clear positions by pressing SEARCH.
Use ◀/▶/▲/▼ to select a desired marker, then press ENTER to recall it or CLEAR to clear it.
Viewing the Title menu DVD
Press TITLE to displays the title menu or disc menu. If the current DVD title has a menu, the title menu appears on the screen. Otherwise, the disc menu may appears.
Last Scene Memory DVD
This unit memorizes last scene from the last disc that is viewed. The last scene remains in memory even if you remove the disc from the player or switch off the unit. If you load a disc that has the scene memorized, the scene is automatically recalled.
Playing DivX® movie files
| ON REMOTE | |
| 1 Displays the HOME menu: HOME | |
| 2 Selects a [MOVIE] option: | |
| 3 Selects an option that contains DivX file: | ▲▼ ENTER |
| 4 Selects a movie file from the menu: ▲▼ | |
| 5 Plays the selected movie file: PLAY | |
| 6 Stops the playback: STOP |
Playing a DivX® movie files - more you can do
Movie List menu options
Select which file you would like to show menu and press ENTER. An options menu appear on the left side of the screen.

[Play]: Starts playback the selected file.
[Open]: Opens the folder and a list of files in the folder appears.
Notice for displaying DivX® subtitle
If the subtitle does not display properly, press PAUSE/STEP when the subtitle appears. Then press and hold SUBTITLE about 3 seconds to display the language code menu. Use ◀/▶ to change the language code until the subtitle is displayed properly. Press PLAY (▶) to continue playback.
Displaying movie file information
Press DISPLAY while the file you want to show the file information is selected. The unit shows the various kind of file information on the screen.
Divx file requirement
Available resolution size: 720x576 (W x H) pixel
DivX file extensions: ".avi", ".divx"
\Playable DivX subtitle: ".smi", ".srt", ".sub (Micro DVD format only)", ".txt (Micro DVD format only)" \
playable Codec format: "DIV3", "MP43", "DIVX", "DX50",
\* \ Playable Audio format: "AC3", "PCM", "MP2", "MP3", "WMA" Sampling frequency: within 8-48 kHz (MP3), within 32-48kHz (WMA) Bit rate: within 8 - 320kbps (MP3), within 32 - 192kbps (WMA)
CD-R Format: ISO 9660 and JOLIET
DVD±R/RW Format: ISO 9660 (UDF Bridge format)
Maximum Files/Disc: Less than 1999 (total number of files and folders)
Notes on DivX format
- The DivX subtitle file name has to be identified with the DivX file name to be display on the unit.
- If the number of the screen frame is over 29.97 frames per second, this unit may not operate normally.
- If the video and audio structure of DivX ® file is not interleaved, returns to the menu screen.
- If there is impossible code to express in the DivX file name, it may be displayed as '*' mark.
- This unit does not support the DivX file that is recorded with GMC (Global Motion Compensation).
Listening to a music
| ON REMOTE | |
| 1 Displays the HOME menu: HOME | |
| 2 Select a [MUSIC] option: | |
| 3 Selects an option that contains music: | ▲▼ ENTER |
| 4 Selects a music from the menu: ▲▼◀▶ | |
| 5 Plays the selected music: PLAY | |
| 6 Stops the playback: STOP |
Listening to a music - more you can do
Music List menu options
Select which file/track you would like to show menu and press ENTER. A menu appears on the left side of the screen.

Audio CD MP3/WMA

[Play]: Starts playback the selected file/track.
[Random]: Starts or stops random playback.
[Open]: Opens the folder and a list of files in the folder appears.
Displaying MP3/WMA file information
Press DISPLAY while the file you want to show the file information is selected. The unit shows the ID3-Tag information of the file. If the file does not have ID3-Tag information, [ID3-Tag: None] appears on the screen.
Playing musics in random order
When you select the [RANDOM] option on the Music List menu then press ENTER, the unit automatically begins random playback and "RANDOM" appears on the menu screen. To return to normal playback, select [Random] option again then press ENTER.
MP3/WMA audio file requirement
File extensions: ".mp3", ".wma".
Sampling frequency: within 8 - 48 kHz (MP3), within 32 - 48kHz (WMA)
Bit rate: within 8 - 320kbps (MP3), within 32 - 192kbps (WMA)
CD-R Format: ISO 9660 and JOLIET.
DVD±R/RW Format: ISO 9660 (UDF Bridge format)
Maximum Files/Disc: Less than 1999 (total number of files and folders)
Viewing a photo
| ON REMOTE | |
| 1 Displays the HOME menu: HOME | |
| 2 Selects a [PHOTO] option: | |
| 3 Selects an option that contains photo file: | ▲▼ ENTER |
| 4 Selects a photo from the menu: ▲▼◀▶ | |
| 5 Displays the selected photo in full screen: PLAY | |
| 6 Returns to the Photo List: STOP | |
Viewing a photo - more you can do
Photo List menu options
Select which file/track you would like to show menu and press ENTER.
A menu appears on the left side of the screen.

[Full Screen]: Shows the selected file in full screen.
[Open]: Opens the folder and a list of files in the folder appears.
[Slide Show]: Displays the [Slide Show] menu.
Skip to the next/previous photo
Press SKIP (I◄◄ or ►►I) to view the previous/next photo while displayed in full screen.
Rotate a photo
Use ▲▼ to rotate the photo while displayed in full screen.
Viewing photo files as a slide show
To slide show photos in the [Photo list], select the [Slide Show] option on the left side of the screen then press ENTER, The [Slide Show] menu appears on the screen. Set the [Object] and [Speed] options then press ENTER while [Start] option is selected. The unit starts slide show as you set on the menu.
[Object] option:
- [Selected] Views slide show only selected files. Use the MARKER button to select multiple files.
• [All] Views slide show all files.
[Speed] option:
Sets the Slide Show speed to [Slow], [Normal], or [Fast].
Pause a slide show
Press PAUSE/STEP to pause a slide show. Press PLAY to continue the slide show.
Photo file requirement
File extension: ".jpg"
Photo size: Less than 4MB recommended
CD-R Format: ISO 9660 and JOLIET.
DVD±R/RW Format: ISO 9660 (UDF Bridge format)
Maximum Files/Disc: Less than 1999 (total number of files and folders)
Notes on JPEG file
- Progressive and lossless compression JPEG image files are not supported.
- Depending on the size and number of the JPEG files, it may take several minutes to read the contents of the media.
Recording
| Follow the instruction below to record a TV channel or other source. The recording continues until the media is full or you stop the recording. | ON REMOTE |
| 1 Selects a recording mode:You can select a recording mode on the SETUP menu.(DVD: XP, SP, LP, EP or MLP) or (VCR: SP, LP) | HOME▲▼◄►ENTER |
| 2 Selects a recording media: | VCR or DVD |
| 3 Selects a channel or source you want to record: | PR(+,-) or AV/INPUT |
| 4 Starts recording: | REC |
| 5 Stops recording: | STOP |
Recording - more you can do
Changing TV audio channel
Before recording, you can change the TV audio channel for stereo and bilingual broadcast. Press AUDIO repeatedly to change the audio channel. The current audio channel is displayed on-screen.
Instant timer recording
Instant timer recording allow you to make a recording of preset length easily.


When the REC is first pressed, recording starts. Press REC repeatedly to select a certain amount of time. Each press of REC to displays the increased recording time on-screen. You can set the instant timer recording within the free space available.
To Pause the Recording
Press PAUSE/STEP to pause recording. When you want to continue recording, press PAUSE/STEP.
Setting a timer record
This unit can be programmed to record up to 16 timer recording within a month. The clock must be set correctly before setting a timer record.

Press HOME and select [TV] option. Press ▲▼ to select the [Timer Record] and press ENTER to display [Timer record List] menu. Use ▲▼ to select [New] and press ENTER to display [Timer Record] menu. Adjust the each field using ▲▼◀▶.
[Media]: Choose a media to record (VCR or DVD).
[PR]: Choose a memorized program number, or one of the external inputs from which to record.
[Date]: Choose a date up to 1 month in advance.
[Start Time]: Set the start time.
[End Time]: Set the end time.
[Mode] Choose a recording mode (DVD: XP, SP, LP, EP, MLP or AT) or (VCR: SP, LP or AT)
AT (Auto) mode determines how much time is available on the disc or tape and switches record mode, if necessary, to complete recording the program.
Press ENTER to set a timer recording. The "Rec OK" on the [Check] field on the [Timer Record List] menu indicates the timer recording is programmed correctly.

Canceling a timer record
You can cancel a timer record before the timer recording actually starts. Select a timer recording that you want to cancel on the [Timer Record List] menu and press CLEAR to confirm.
Timer Recording Troubleshooting
Even though the timer is set, the unit will not record when:
– There is no disc (or tape) loaded.
– A non-recordable disc (or tape) is loaded.
- [Disc Protect] option is set to [ON] in the Setup menu (see page 18).
– The unit is in operating (recording, deleting etc.).
– There are already 99 titles (DVD-RW, DVD-R), 49 titles (DVD+R, DVD+RW) recorded on the disc.
You cannot enter a timer program when:
– A recording is already underway.
– The time you're trying to set has already passed.
– There are already 16 timer programs set.
If two or more timer programs overlap:
– The earlier program takes priority.
- When the earlier program finishes, the later program starts.
- If two programs are set to start at exactly the same time, the program entered first takes priority.
Timer recording with SHOWVIEW® code
A SHOWVIEW code is a series of numbers which you can use to automatically program your unit to record a certain program. Most TV guides publish SHOWVIEW programming numbers with their program details.

Press SHOWVIEW button.
The ShowView menu will appear. Press SHOWVIEW again to exit the menu. Enter the SHOWVIEW programming number using numerical buttons then press ENTER to shows the [Timer Record] menu. You can change the settings on the [Timer Record] menu as required.
The "Rec OK" on the [Check] field on the [Timer Record List] menu indicates the timer recording is programmed correctly.
ShowView is a registered trademarks of Gemstar Development Corporation. The SHOWVIEW System is manufactured under license from Gemstar Development Corporation.
Recording From an external inputs
You can record from an external component, such as a camcorder or VCR, connected to any of the recorder's external inputs. Each press of the AV/INPUT changes the input source as described below. Make sure that the component you want to record from is connected properly to the unit before recording an external source.
- Tuner: Built-in tuner
• AV1: AV1 scart jack mounted on back panel - AV2: AV2 DECODER scart jack mounted on back panel
- AV3: AV IN 3 (VIDEO, AUDIO (L/R)) mounted on the front panel
Editing a title
| Using the Title list menu, you can edit video contents. | ON REMOTE |
| 1 Displays a [Title List] menu: | DISC MENU/LIST |
| 2 Selects a title you want to edit: | ▲▼◀▶ |
| 3 Displays an editing menu:The options are differ depending on the media type. | ENTER |
| 4 Selects a menu option: | ▲▼◀▶, ENTER |
| 5 Exit the [Title List] menu: | RETURN |
Editing a title - more you can do
About title list menu
Press DISC MENU/LIST to display the Title List menu. Playback should be stopped when you do this. You can also access it using HOME menu, select [MOVIE] option then select [DISC] option and press ENTER. If you are editing a VR mode disc, press DISC MENU/LIST to switch between Original and Playlist menu.
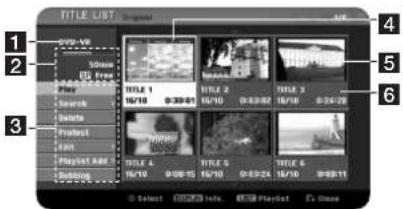
1 Current media
2 Indicates the record mode, free space, and elapsed time progress bar.
3 Menu options: To display menu option, select a title or chapter then press ENTER. The options displayed differ depending on the disc type.
4 Currently selected title.
5 Thumbnail
6 Shows the title name, recorded date, and recording length.
Before editing
This unit offers various edit options for various disc types. Before you edit, check the disc type, and select the option available for your disc.
You can enjoy advanced edit functions with VR mode formatted DVD (DVD-RW). Editing either the original recording(called the "original"), or the playback information created from the original (called a "Playlist").
Edits made to the original titles are final. If you plan to edit a title without editing the original title, you can create a Playlist title for editing.
A Playlist is a group of Playlist titles created from the original title for editing purpose.
Titles in the disc's original content contain one or more chapters. When you insert a disc's title into the Playlist, all the chapters within that title also appear. In other words, chapters in the Playlist behave exactly as chapters on a DVD-Video disc do. Parts are sections of Original or Playlist titles. From the Original and Playlist menu you can add or delete parts. Adding a chapter or title to the Playlist creates a new title made up of a section (ie., chapter) of an Original title. Deleting a part removes part of a title from the Original or Playlist menu.
Adding chapter markers VR +R+
You can create chapters within a title by inserting chapter marks at the desired point. Press CHP.ADD at the desired point while playback or recording. A chapter marker icon appears on the screen.
The chapter markers can be added at regular interval automatically by setting the [Auto Chapter] option in the SETUP menu.
Changing the thumbnail VR +R+
Each title displayed in the Title List menu is represented by a thumbnail picture taken from the start of that title or chapter.
Press THUMBNAIL to make the currently displayed picture that appears in the Title List menu.
Deleting a title or chapter
When you delete a title or chapter from the PlayList, the title or chapter in the Original still remains. However, if you delete a chapter or title from Original, the title or chapter deleted from the Original are also removed from PlayList.
Select a title or chapter that you want to delete and press ENTER. Select [Delete] option from the menu on the left of the screen and press ENTER to confirm.
Chapter search -RWVR Video -R+F
You can select the start of a title by searching a chapter. Select a title that you want to search and press ENTER. Select [Chapter] in the [Search] option from the menu on the left of the screen, and press ENTER to display the [Chapter List] menu.
Use ▲▼◀▶ to find the chapter you want to start playback, and press PLAY to start playback.
Making a new PlayList -RWVR
The PlayList allow you to edit or re-edit a title or chapter without changing the Original recordings. Use this function to add an Original title or chapter to a new PlayList or the registered Playlist.

Select an Original title or chapter that you want to put into the PlayList then press ENTER. Select the [Playlist Add] option and then press ENTER to display the [Select PlayList] menu. Choose a PlayList-title that you want to put the selected Original title or chapter or select the [New PlayList] to create a new PlayList.
Moving a PlayList chapter -RWVR
Use this function to re-arrange the playing order of a PlayList title on the [Chapter List-Playlist] menu. Select [Move] option from the menu on the left of the [Chapter List-Playlist] screen and press ENTER. Use ▲▼◀▶ to choose the place you want to move the chapter then press ENTER. The updated menu is displayed.
Time search -RWvr Video -R+R
You can select the start of a title by searching time. Select a title that you want to search and press ENTER. Select [Time] in the [Search] option from the menu on the left of the screen and press ENTER to display the [Search] menu.
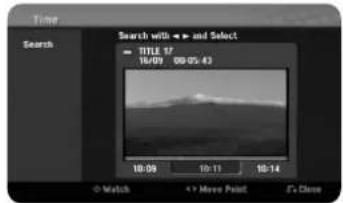
Use ◀ to find the time you want to start. Each press of ◀ to moves 1 minute and press and hold ◀ to moves 5 minutes. Press ENTER to watch a title from a selected time.
Hiding a chapter or title +RW
You can skip through playing chapters or titles without actually deleting them. Select a chapter or title you want to hide and press ENTER. Select [Hide] in the [Edit] option then press ENTER.
If you want to recover the hidden title or chapter, select the hidden title or chapter and press ENTER. Select [Show] in the [Edit] option then press ENTER to recover it.
Deleting a part -RWVR
You can delete a part which you do not want in the title.

Select a title that you want to delete part and press ENTER. Select [Delete Part] in the [Edit] option from the menu on the left of the screen and press ENTER to display the [Delete part] menu. You can find the point using PLAY, SCAN, PAUSE/STEP buttons.
[Start Point]: Select starting point of a part that you want to delete then press ENTER.
[End Point]: Select ending point of a part that you want to delete then press ENTER.
[Cancel]: Press ENTER to cancel the selected part.
[Done]: Press ENTER to delete the selected part.
Dividing a title +RW
Use this function to split a title up into two titles. Select a title that you want to divide and press ENTER. Select [Divide] in the [Edit] option from the menu on the left of the screen and press ENTER to display the [Divide] menu. Find the point you want to divide a title using PLAY, SCAN, PAUSE/STEP buttons and press ENTER while [Divide] option is selected. The playback screen shows the divided point. Select [Done] option and press ENTER to divide.
Naming a title
When a title is recorded by this unit, the title name will be named by a number. You can change a title name by using this function.

Select a title that you want to change a name and press ENTER. Select [Title Name] option from the menu on the left of the screen and press ENTER to display the keyboard menu. Use ▲▼◀▶ to select a character then press ENTER to confirm your selection on the keyboard menu.
[OK]: Finish the naming.
[Cancel]: Cancels all entered characters.
[Space]: Inserts a space at the cursor position.
[Delete]: Deletes the previous character at the cursor position.
You can use remote control buttons for entering a name
PLAY (▶): Inserts a space at the cursor position.
II (PAUSE/STEP): Deletes the after character at the cursor position.
■ (STOP), CLEAR: Deletes the previous character at the cursor position.
◀◀ / ▶▶: Moves cursor to left or right.
Numbers (0-9): Enters the corresponding character at the cursor position.
Combining chapters VR +R+
Use this function to merge the selected chapter with adjacent chapter. Select a chapter and press ENTER. Select [Combine] option to views combine indicator between chapter thumbnails. Press ENTER to combine indicated two chapters.
This function is not available in conditions as listed below.
• There is only one chapter within the title.
• The first chapter is selected.
- The chapters that you want to combine are created by deleting a part from an Original title.
- The chapters that you want to combine are created from different titles.
• One of the playlist chapter that you want to combine has been moved.
Protect a title VR +R+
Use this function to protect a title against accidental recording, editing or deleting. Select a title you want to protect and press ENTER. Select [Protect] option from the menu on the left and press ENTER. The lock mark will appears on the title thumbnail.
If you want to unprotect the title, select the protected title and press ENTER. Select [Unprotect] option from the menu on the left and press ENTER to unprotect it.
Overwriting +RW
You can overwrite a new video recording on a recorded title that is not protected. Select the TV channel or input source you want to record. Press DISC MENU/LIST to display the Title List menu. Use ▲▼◀▶ to highlights a title you want to overwrite and then press REC to start overwrite. To stop the recording, press STOP.
If you overwrite the longer recording than the current title on the fully recorded disc, the next title is overwritten. If next title is protected, the overwriting stops at the starting point of the title.
Dubbing
| ON REMOTE | |
| 1 Selects a media that you want to dub: VCR or DVD | |
| 2 Finds a position of video contents you want to dub from: | ◀◀, ▶▶, PLAY |
| 3 Pauses the playback: PAUSE/STEP | |
| 4 Displays the [Dubbing] menu: DUBBING | |
| 5 Sets the [Rec mode] option: DVD: XP, SP, LP, EP, MLP or VCR: SP, LP | ▲▼◀▶ |
| 6 Highlights the [Dubbing] icon: DUBBING | |
| 7 Stops dubbing: | STOP |


Dubbing a title - more you can do
Notes on dubbing
- If the video contents you are attempting to copy is copy protected, you will not be able to copy the disc. It is not permitted to copy Macrovision encoded video contents.
- If you press PAUSE/STEP during dubbing, both the DVD and VCR decks go into pause mode. While in pause mode, you can adjust the playing media position using PLAY, BACKWARD, FORWARD, PAUSE/STEP, etc. The recording media will remain in Pause mode. To resume dubbing, press the DUBBING button twice.
Language Codes
Use this list to input your desired language for the following initial settings: Disc Audio, Disc Subtitle, Disc Menu.
| Language Code | Language Code | Language Code | Language Code | Language Code | Language Code | ||||||
| Afar | 6565 | Croatian | 7282 | Hausa | 7265 | Lingala | 7678 | Quechua | 8185 | Tajik | 8471 |
| Afrikaans | 6570 | Czech | 6783 | Hebrew | 7387 | Lithuanian | 7684 | Rhaeto-Romance | 8277 | Tamil | 8465 |
| Albanian | 8381 | Danish | 6865 | Hindi | 7273 | Macedonian | 7775 | Rumanian | 8279 | Telugu | 8469 |
| Ameharic | 6577 | Dutch | 7876 | Hungarian | 7285 | Malagasy | 7771 | Russian | 8285 | Thai | 8472 |
| Arabic | 6582 | English | 6978 | Icelandic | 7383 | Malay | 7783 | Samoan | 8377 | Tonga | 8479 |
| Armenian | 7289 | Esperanto | 6979 | Indonesian | 7378 | Malayalam | 7776 | Sanskrit | 8365 | Turkish | 8482 |
| Assamese | 6583 | Estonian | 6984 | Interlingua | 7365 | Maori | 7773 | Scots Gaelic 7168 | Turkmen | 8475 | |
| Aymara | 6588 | Faroese | 7079 | Irish | 7165 | Marathi | 7782 | Serbian | 8382 | Twi | 8487 |
| Azerbaijani | 6590 | Fiji | 7074 | Italian | 7384 | Moldavian | 7779 | Serbo-Croatian | 8372 | Ukrainian | 8575 |
| Bashkir | 6665 | Finnish | 7073 | Javanese | 7487 | Mongolian | 7778 | Shona | 8378 | Urdu | 8582 |
| Basque | 6985 | French | 7082 | Kannada | 7578 | Nauru 7865 | Sindhi | 8368 | Uzbek | 8590 | |
| Bengali; Bangla 6678 | Frisian | 7089 | Kashmiri | 7583 | Nepali | 7869 | Singhalese | 8373 | Vietnamese | 8673 | |
| Bhutani | 6890 | Galician | 7176 | Kazakh | 7575 | Norwegian | 7879 | Slovak | 8375 | Volapūk | 8679 |
| Bihari | 6672 | Georgian | 7565 | Kirghiz | 7589 | Oriya | 7982 | Slovenian | 8376 | Welsh | 6789 |
| Breton | 6682 | German | 6869 | Korean | 7579 | Panjabi | 8065 | Spanish | 6983 | Wolof | 8779 |
| Bulgarian | 6671 | Greek | 6976 | Kurdish | 7585 | Pashto, Pushto 8083 | Sudanese | 8385 | Xhosa | 8872 | |
| Burmese | 7789 | Greenlandic | 7576 | Laothian | 7679 | Persian | 7065 | Swahili | 8387 | Yiddish | 7473 |
| Byelorussian | 6669 | Guarani | 7178 | Latin | 7665 | Polish | 8076 | Swedish | 8386 | Yoruba | 8979 |
| Chinese | 9072 | Gujarati | 7185 | Latvian, Lettish 7686 | Portuguese | 8084 | Tagalog | 8476 | Zulu | 9085 | |
Area Codes
Choose an area code from this list.
| Area Code | Area Code | Area Code | Area Code | Area Code | Area Code | ||||||
| Afghanistan | AF | Costa Rica | CR | Greenland | GL | Maldives | MV | Paraguay | PY | Sri Lanka | LK |
| Argentina | AR | Croatia | HR | Hong Kong | HK | Mexico | MX | Philippines | PH | Sweden | SE |
| Australia | AU | Czech Republic | CZ | Hungary | HU | Monaco | MC | Poland | PL | Switzerland | CH |
| Austria | AT | Denmark | DK | India | IN | Mongolia | MN | Portugal | PT | Taiwan | TW |
| Belgium | BE | Ecuador | EC | Indonesia | ID | Morocco | MA | Romania | RO | Thailand | TH |
| Bhutan | BT | Egypt | EG | Israel | IL | Nepal | NP | Russian Federation | RU | Turkey | TR |
| Bolivia | BO | El Salvador | SV | Italy | IT | Netherlands | NL | Saudi Arabia | SA | Uganda | UG |
| Brazil | BR | Ethiopia | ET | Jamaica | JM | Netherlands Antilles | AN | Senegal | SN | Ukraine | UA |
| Cambodia | KH | Fiji | FJ | Japan | JP | New Zealand | NZ | Singapore | SG | United States | US |
| Canada | CA | Finland | FI | Kenya | KE | Nigeria | NG | Slovak Republic | SK | Uruguay | UY |
| Chile | CL | France | FR | Kuwait | KW | Norway | NO | Slovenia | SI | Uzbekistan | UZ |
| China | CN | Germany | DE | Libya | LY | Oman | OM | South Africa | ZA | Vietnam | VN |
| Colombia | CO | Great Britain | GB | Luxembourg | LU | Pakistan | PK | South Korea | KR | Zimbabwe | ZW |
| Congo | CG | Greece | GR | Malaysia | MY | Panama | PA | Spain | ES | ||
Troubleshooting
General
The power does not turned on.
→ Plug the power cord into the wall outlet securely.
There is no picture.
- Select the appropriate video input mode on the TV so the picture from the unit appears on the TV screen.
→ Connect the video connection securely. - Check the [Video Output Format] in SETUP menu is set to the appropriate item that conforms to your video connection.
Picture noise appears.
→ You are playing a disc recorded in a color system that is different from your TV.
→ The video signal from the external component is copy-protected.
→ Set the resolution that your TV can accepts.
The channel is not found or stored.
→ Check your antenna connection.
There is no sound.
→ Connect the audio connection securely.
The input source setting on the amplifier or the connection to the amplifier is incorrect.
→ The unit is in scan, slow motion, or pause mode.
The remote control does not work properly.
The remote control is not pointed at the remote sensor of the unit.
→ The remote control is too far from the unit.
There is an obstacle in the path of the remote control and the unit.
→ The batteries in the remote control are exhausted.
Playback
The unit does not start playback.
- Insert a playable disc. (Check the disc type, color system, and regional code.)
→ Place the disc with the playback side down.
→ Place the disc on the disc tray correctly inside the guide.
→ Clean the disc.
→ Cancel the Rating function or change the rating level.
Cannot play a disc recorded using this unit on other player.
→ Finalize the disc.
→ Check the disc compatibility of the player.
→ Place the disc on the disc tray correctly inside the guide.
→ Discs recorded with copy-once material cannot be played on other players.
The angle cannot be changed.
→ Multi-angles are not recorded on the DVD Video being played.
→ The angle cannot be changed for the titles recorded on this unit.
The subtitle language cannot be changed or turned off.
Subtitles are not recorded on the DVD Video being played.
The subtitle cannot be changed for the titles recorded on this unit.
Cannot shows a disc menu of Video CD
→ Disc menu is not supported on the Video CD being played.
→ Set the [PBC] option to [On] in the SETUP menu.
Cannot play MP3/WMA/JPEG/DivX files.
The files are not recorded in a format that the unit can play.
→ The unit does not support the codec of the DivX movie file.
→ The resolution is higher than the unit can support.
Recording
Cannot record or does not record successfully.
→ Check the remaining space on the disc.
→ Check that the source you are trying to record in not copy protected.
The power may have failed during recording.
→ Use a VR mode formatted disc for copy-once material.
Timer record does not record successfully.
→ Clock is not set to correct time.
→ The start time of the timer recording is past.
Two timer recordings may have overlapped, in which case only the earlier one will record completely.
When setting the recording channel, make sure you set the unit's built-in tuner, not the TV's built-in tuner.
Stereo Audio Record and/or Playback is not present.
→ TV is not Stereo-compatible.
→ Broadcast program is not in stereo format.
The A/V Output jacks on the unit are not connected to TV A/V In jacks.
Resetting the unit
If you observe any of the following symptoms.
- The unit is plugged in, but the power will not turn on or off.
- The front panel display is not working.
- The unit is not operating normally.
You can reset the unit as follows.
- Press and hold the POWER button for at least five seconds. This will force the unit to power off then turn the unit back on.
- Unplug the power cord, wait at least five seconds, and then plug it in again.
Specifications
General
Power requirements AC 200-240V, 50/60 Hz
Power consumption 23W
Dimensions (approx.) 430 X 78.5 X 260 mm (w x h x d) without foot
Net weight (approx.) 4.2 kg
Operating temperature 5°C to 35°C
Operating humidity 5 % to 90 %
Television system PAL B/G, PAL I/I, SECAM D/K, color system
Recording format PAL
System
Laser Semiconductor laser, wavelength 650 nm
Video head system Double azimuth 6 heads, helical scanning
Signal system PAL
Recording
Recording format DVD Video Recording, DVD-VIDEO
Recordable media DVD-RW, DVD-R, DVD+RW, DVD+R,
Recordable time DVD (4.7GB): Approx. 1 hour (XP mode),
2 hours (SP mode), 4 hours (LP mode),
6 hours (EP mode), 14 hours (MLP mode)
Video recording format
Sampling frequency 27MHz
Compression format MPEG2 (VBR supported)
Audio recording format
Sampling frequency 48kHz
Compression format Dolby Digital
Playback
| Frequency response | DVD (PCM 48 kHz): 8 Hz to 22 kHz,CD: 8 Hz to 20 kHz |
| DVD (PCM 96 kHz): 8 Hz to 44 kHz | |
| Signal-to-noise ratio | More than 100 dB (AUDIO OUT connector) |
| Harmonic distortion | Less than 0.008% (AUDIO OUT connector) |
Inputs
| Dynamic range | More than 95 dB (AUDIO OUT connector) |
| ANTENNA IN | Antenna input, 75 ohms |
| VIDEO IN | 1.0 Vp-p 75 ohms, sync negative,RCA jack x 1 / SCART x 2 |
| AUDIO IN | 2.0 Vrms more than 47 kohms, RCA jack(L, R) x 1 / SCART x 2 |
| DV IN | 4 pin (IEEE 1394 standard) |
Outputs
| VIDEO OUT | SCART x 2 |
| S-VIDEO OUT | (Y) 1.0 V (p-p), 75 Ω, sync negative, Mini DIN 4-pin x 1(C) 0.3 V (p-p) 75 Ω |
| COMPONENT VIDEO OUT | (Y) 1.0 V (p-p), 75 Ω, sync negative, RCA jack x 1, (PB)/(PR) 0.7 V (p-p), 75 Ω, RCA jack x 2 |
| Audio output (digital audio) | 0.5 V (p-p), 75 Ω, RCA jack x 1 |
| Audio output (optical audio) | 3 V (p-p), 75 Ω, Optical connector x 1 |
| Audio output (analog audio) | 2.0 Vrms (1 kHz, 0 dB), 600 Ω, RCA jack (L, R) x 1 / SCART x 2 |
Accessories
Scart cable (1), RF cable (1), Remote control (1), Batteries (1)

- CAUTION:CLASS 3B VISIBLE AND INVISIBLE LASER RADIATION WEN OPEN AND INTERLOCKS DEFEATED AVOID EXPOSER TO THE BEAM
- CAUTION CONCERNING THE POWER CORD
- DISPOSAL OF YOUR OLD APPLIANCE
- CE THIS PRODUCT IS MANUFACTURED TO COMPLY WITH EMC DIRECTIVE 2004/108/EC AND LOW VOLTAGE DIRECTIVE 2006/95/EC
- COPYRIGHTS
- CONTENTS
- BEFORE YOU START
- RECORDABLE AND PLAYABLE DISCS
- PLAYABLE DISCS
- NOTES ON DISCS
- RESTRICTIONS ON COPYING
- ABOUT THE SYMBOL DISPLAY
- REGIONAL CODES
- REMOTE CONTROL OPERATION
- REMOTE CONTROL BATTERY INSTALLATION
- REMOTE CONTROL
- SETTING UP THE REMOTE TO CONTROL YOUR TV
- HOOKING UP THE UNIT
- 3 SCART CONNECTION
- 2 ANTENNA CONNECTION TO YOUR TV
- 4 POWER CORD CONNECTION
- HOOKING UP THE UNIT - MORE YOU CAN DO
- COMPONENT CONNECTION
- S-VIDEO CONNECTION
- DIGITAL AUDIO CONNECTION
- CONNECTING A CABLE BOX OR SATELLITE RECEIVER
- CONNECTING TO THE AV2 DECODER JACK
- CONNECTING TO THE AV IN 3 JACKS
- CONNECTING A DIGITAL CAMCORDER
- AUTO SETUP - MORE YOU CAN DO
- ADJUST THE PROGRAMMED CHANNELS
- EDITING A CHANNEL
- USING THE HOME MENU - MORE YOU CAN DO
- SETUP
- MOVIE
- PHOTO
- MUSIC
- EASY MENU
- TV
- ADJUST THE SETUP SETTINGS - MORE YOU CAN DO
- VCR PLAY ASPECT
- ADJUST THE LANGUAGE SETTINGS
- ADJUST THE AUDIO SETTINGS
- ADJUST THE LOCK SETTINGS
- ADJUST THE RECORDING SETTINGS
- ADJUST THE DISC SETTINGS
- DISPLAYING DISC INFORMATION - MORE YOU CAN DO
- ADJUSTING PLAYBACK MENU ITEM
- MOVING TO ANOTHER TITLE/TRACK/FILE
- STARTING PLAYBACK FROM SELECTED TIME
- SELECTING A SUBTITLE LANGUAGE
- WATCHING FROM A DIFFERENT ANGLE DVD
- SELECTING A SOUND MODE
- DISPLAYING INFORMATION WHILE WATCHING TV
- PLAY A TAPE - MORE YOU CAN DO
- TRACKING CONTROL VHS
- PAUSE PLAYBACK AND FRAME-BY-FRAME PLAYBACK VHS
- FAST FORWARD OR FAST REVERSE VHS
- SLOW MOTION PLAYBACK VHS
- HEARING A DIFFERENT AUDIO VHS
- COUNTER MEMORY FUNCTION VHS
- PLAY A DISC - MORE YOU CAN DO
- PLAYING A DISC THAT CONTAINS A MENU VCDD
- SKIP TO THE NEXT/PREVIOUS CHAPTER/TRACK/FILE
- PAUSE A PLAYBACK
- WATCHING A ENLARGED VIDEO IMAGE DVD ALL
- MARKING A FAVORITE SCENE DVD ALL
- VIEWING THE TITLE MENU DVD
- LAST SCENE MEMORY DVD
- PLAYING A DIVX® MOVIE FILES - MORE YOU CAN DO
- MOVIE LIST MENU OPTIONS
- NOTICE FOR DISPLAYING DIVX® SUBTITLE
- DISPLAYING MOVIE FILE INFORMATION
- DIVX FILE REQUIREMENT
- NOTES ON DIVX FORMAT
- LISTENING TO A MUSIC - MORE YOU CAN DO
- MUSIC LIST MENU OPTIONS
- DISPLAYING MP3/WMA FILE INFORMATION
- PLAYING MUSICS IN RANDOM ORDER
- MP3/WMA AUDIO FILE REQUIREMENT
- VIEWING A PHOTO - MORE YOU CAN DO
- PHOTO LIST MENU OPTIONS
- SKIP TO THE NEXT/PREVIOUS PHOTO
- ROTATE A PHOTO
- VIEWING PHOTO FILES AS A SLIDE SHOW
- PAUSE A SLIDE SHOW
- PHOTO FILE REQUIREMENT
- NOTES ON JPEG FILE
- RECORDING - MORE YOU CAN DO
- CHANGING TV AUDIO CHANNEL
- INSTANT TIMER RECORDING
- TO PAUSE THE RECORDING
- SETTING A TIMER RECORD
- CANCELING A TIMER RECORD
- TIMER RECORDING TROUBLESHOOTING
- EVEN THOUGH THE TIMER IS SET, THE UNIT WILL NOT RECORD WHEN
- YOU CANNOT ENTER A TIMER PROGRAM WHEN
- IF TWO OR MORE TIMER PROGRAMS OVERLAP
- TIMER RECORDING WITH SHOWVIEW® CODE
- RECORDING FROM AN EXTERNAL INPUTS
- EDITING A TITLE - MORE YOU CAN DO
- ABOUT TITLE LIST MENU
- BEFORE EDITING
- ADDING CHAPTER MARKERS VR +R
- CHANGING THE THUMBNAIL VR +R
- DELETING A TITLE OR CHAPTER
- CHAPTER SEARCH -RWVR VIDEO -R+F
- MAKING A NEW PLAYLIST -RWVR
- MOVING A PLAYLIST CHAPTER -RWVR
- TIME SEARCH -RWVR VIDEO -R+R
- HIDING A CHAPTER OR TITLE +RW
- DELETING A PART -RWVR
- DIVIDING A TITLE +RW
- NAMING A TITLE
- COMBINING CHAPTERS VR +R
- PROTECT A TITLE VR +R
- OVERWRITING +RW
- DUBBING A TITLE - MORE YOU CAN DO
- NOTES ON DUBBING
- TROUBLESHOOTING
- GENERAL
- PLAYBACK
- RECORDING
- STEREO AUDIO RECORD AND/OR PLAYBACK IS NOT PRESENT
- RESETTING THE UNIT
- IF YOU OBSERVE ANY OF THE FOLLOWING SYMPTOMS
- YOU CAN RESET THE UNIT AS FOLLOWS
- SPECIFICATIONS
- SYSTEM
- VIDEO RECORDING FORMAT
- AUDIO RECORDING FORMAT
- ACCESSORIES
Brand : LG
Model : RC338
Category : DVD Combo