SG552DWN - Cooker Tricity Bendix - Free user manual and instructions
Find the device manual for free SG552DWN Tricity Bendix in PDF.


| Product Type | Freestanding Electric Cooker |
| Brand | Tricity Bendix |
| Model | SG552DWN |
| Width | 60 cm |
| Depth | 60 cm |
| Height | 85 cm |
| Weight | 55 kg |
| Power Supply | 230 V ~ 50 Hz, 32 A |
| Hob Type | Ceramic Glass Hob with 4 Zones |
| Oven Type | Electric Fan Oven with Grille |
| Oven Functions | Convection, Grill, Top Heat, Bottom Heat, Defrost |
| Cleaning | Enamel Interior, Removable Oven Door |
| Safety Features | Child Lock, Automatic Shut-off, Residual Heat Indicator |
| Spare Parts Availability | Available through Tricity Bendix Service Network |
| Warranty | 2 Years Parts and Labour |
| Energy Efficiency Class | A |
Frequently Asked Questions - SG552DWN Tricity Bendix
User questions about SG552DWN Tricity Bendix
0 question about this device. Answer the ones you know or ask your own.
Ask a new question about this device
Download the instructions for your Cooker in PDF format for free! Find your manual SG552DWN - Tricity Bendix and take your electronic device back in hand. On this page are published all the documents necessary for the use of your device. SG552DWN by Tricity Bendix.
USER MANUAL SG552DWN Tricity Bendix
natural_image
Line drawing of a two-tiered kitchen oven with front and top views (no text or symbols)Important safety information
These warnings are provided in the interests of your safety. Ensure that you understand them all before installing or using the appliance. Your safety is of paramount importance. If you are unsure about any of the information in this book contact the Customer Care Department.
Installation
Germany
The appliance must be installed by an authorised person in order to guarantee that the local requirements of the gas supplier are considered.
Unqualified works or repairs are dangerous as they could lead to explosion, short circuit or electrocution. Work on the appliance must only be done by a qualified person (e.g. tech. after sales person). It is important that the appliance is suitable for your gas supply. Your installer should check the rating plate.
Make sure that a stability bracket is fitted.
The appliance must be installed in an adequately ventilated room.
If the appliance is to be placed on a base, measures must be taken to prevent the appliance from slipping from the base.
This appliance is heavy and care must be taken when moving it.
Do not attempt to lift or move this appliance by the handles.
All packaging, both inside and outside the appliance must be removed before the appliance is used.
It is dangerous to alter the specifications or modify the appliance in any way.
After installation please dispose of the packaging with due regard for safety and the environment. Your local authority can arrange this.
Child safety
Do not allow children to play with any part of the packaging.
Do not allow children to sit or climb on the drop down doors.
This appliance is not intended for use by children and other persons whose physical, sensory or mental capabilities or lack of experience and knowledge prevents them from using the appliance safely without supervision or instruction by a responsible person to ensure that they can use the appliance safely.
Children should be supervised to ensure that they do not play with the appliance.
CAUTION: Accessible parts may be hot when the grill is in use. Young children should be kept away.
During use
This appliance is not intended to be operated by means of an external timer or separate remote control system.
This appliance has been designed for domestic use to cook edible foodstuffs only and must not be used for any other purposes.
Take great care when heating fats and oils as they will ignite if they become too hot.
When you are lighting any burner check that it is lit before you leave the appliance. When turning off a burner, do not leave the appliance until the flame has gone out.
Never place plastic or any other material that may melt in or on the oven.
Always support the grill pan when it is in the withdrawn or partially withdrawn position.
Always use oven gloves to remove and place food in the oven.
Ensure cooking utensils are large enough to contain foods to prevent spillages and boil overs.
During use the appliance becomes hot. Care should be taken to avoid touching the heating elements inside the oven.
Ensure that all vents are not obstructed to ensure ventilation of the oven cavity.
Never line any part of the appliance with foil.
Always stand back from the appliance when opening the oven door to allow any build up of steam or heat to release.
Never leave the appliance unattended when the oven doors are open.
Do not place sealed cans or aerosols inside the oven. They may explode if they are heated.
Ensure that all control knobs are in the OFF position when not in use.
Do not stand on the appliance or on the open oven doors.
Do not hang towels, dishcloths or clothes from the appliance or its handles.
Do not use this appliance if it is in contact with water. Never operate it with wet hands.
Cleaning and maintenance
For hygiene and safety reasons this appliance should be kept clean at all times. A build-up of fats or other foodstuffs could result in a fire especially in the grill pan.
Do not leave cookware containing foodstuffs, e.g. fat or oil in the appliance in case it is inadvertently switched on.
Do not disconnect the appliance from the gas supply if the supply pipe does not have a bayonet connection as described in the installation section. If this is the case contact the person who installed the appliance.
Always allow the appliance to cool before switching off at the wall prior to carrying out any cleaning/maintenance work.
Only clean this appliance in accordance with the instructions given in this book.
Never use steam or high pressure steam cleaners to clean the appliance.
At the end of the appliance's life
The symbol 📁 on the product or on its packaging indicates that this product may not be treated as household waste. Instead it shall be handed over to the applicable collection point for the recycling of electrical and electronic equipment. By ensuring this product is disposed of correctly, you will help prevent potential negative consequences for the environment and human health, which could otherwise be caused by inappropriate waste handling of this product. For more detailed information about recycling of this product, please contact your local city office, your household waste disposal service or the shop where you purchased the product.
Contents
For the user
Important safety information 2
Description of the appliance 5
Getting to know your appliance 6
Before using the appliance 7
Rating plate 7
Preparing to use your appliance 7
Condensation and steam 7
Cookware 7
Grill and oven furniture 7
The timer 9
The hob 10
Using the hob 10
To light the hob burners 10
To turn off any burner 11
Things to note 11
Hints & tips 11
The grill 12
Using the grill 12
Things to note 12
The grill pan and handle 13
Hints & tips 13
Grilling chart 14
The main oven 15
Heat zones 15
Preheating 15
To fit the main oven shelves 15
Using the main oven 15
Hints & tip 16
Cooking chart 17
Roasting chart 18
Slowcook 19
Using slowcook 19
Food preparation 19
General points 20
Care and cleaning 21
Cleaning materials 21
Cleaning the outside of the appliance 23
Cleaning the control knobs and
handles 21
Cleaning the hob 22
When replacing hotplate burner parts 22
Cleaning the shelves and grill/oven
furniture 23
Cleaning the grill 23
Cleaning inside the oven(s) 23
Hints and tips 23
Cleaning the door(s) 24
Replacing an oven light bulb 25
Something not working 26
Service and spare parts 28
Guarantee conditions 29
For the installer
Technical details 30
Important safety requirements 31
Provision for ventilation 31
Moving your appliance 31
For your safety 32
Location of appliance 32
Levelling the appliance 33
Connecting to electricity supply 33
Connecting to gas supply 34
Fitting the stability bracket 34
Testing 35
General note 35
To help you the following symbols will be found in the text.

Hints and Tips

Safety Instructions
Please read the instruction book carefully before use and retain for future reference.
Description of the appliance
Gas slip-in single oven
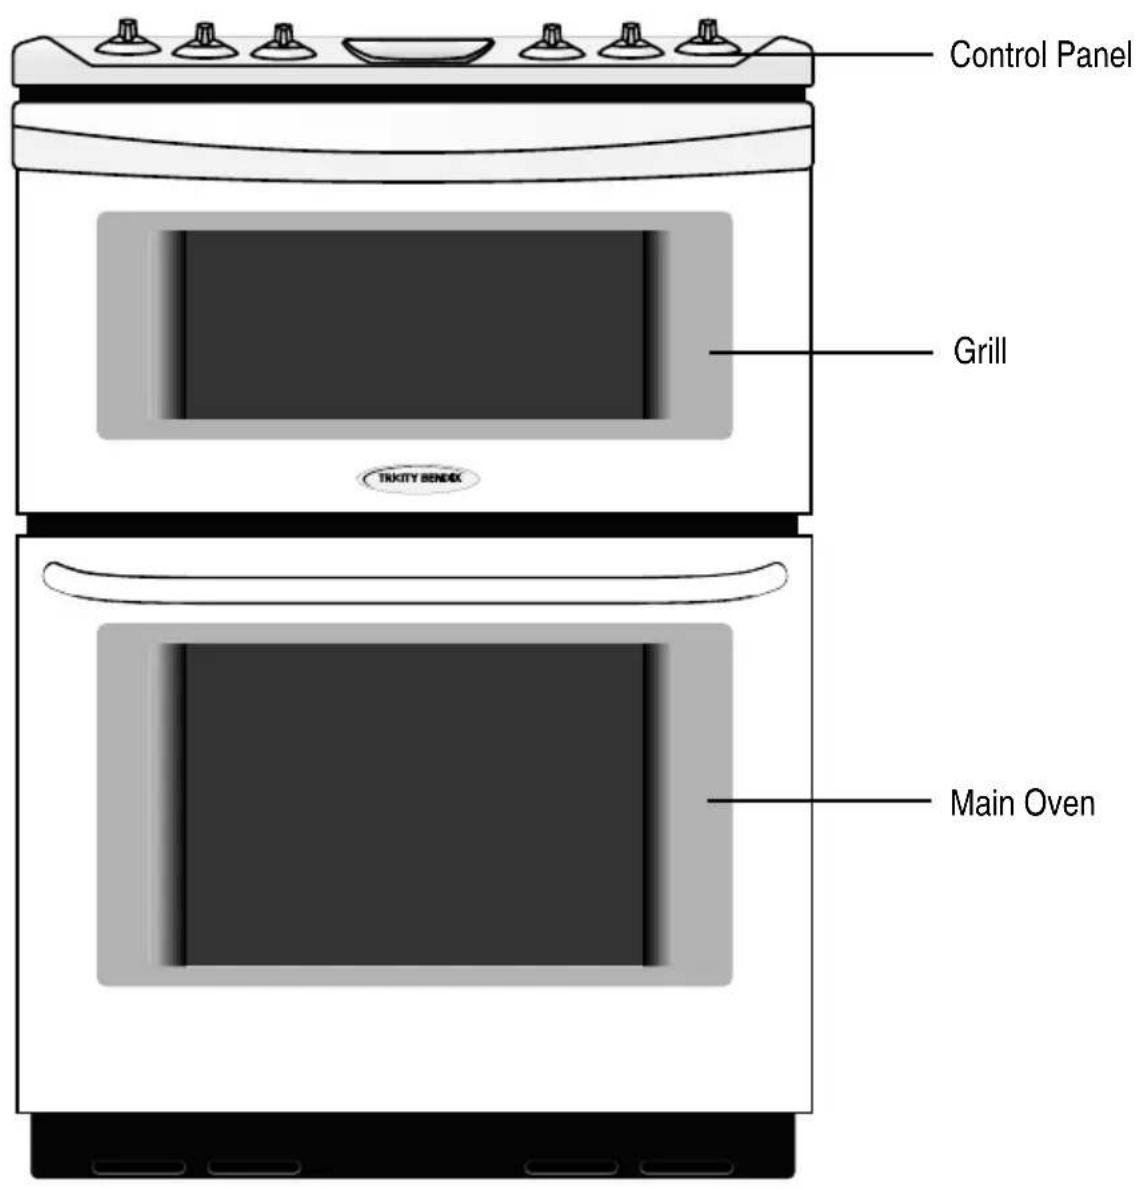
Getting to know your appliance
The control panel

Features
A - Grill control
B - Hotplate controls
C - Electronic minute minder
D - Hotplate controls
E - Main oven temperature control
F - Ignition switch
Before using the appliance
Rating plate
This is situated on the lower front frame of the appliance and can be seen upon opening the door. Alternatively the rating plate may also be found on the back or top of some models (where applicable).
The appliance must be protected by a suitably rated fuse or circuit breaker. The rating of the appliance is given on the rating plate.
Do not remove the rating plate from the appliance as this may invalidate the guarantee.
Preparing to use your appliance
Wipe over the base of the oven(s) with a soft cloth and hot soapy water and wash the furniture before use. We suggest that you run the oven(s) and grill for 10 – 15 minutes at maximum temperature, to burn off any residue from their surfaces. Accessible parts may become hotter than in normal use. Children should be kept away. During this period an odour may be emitted, it is therefore advisable to open a window for ventilation.
Condensation and steam
When food is heated it produces steam similar to a boiling kettle. The vents allow some of this steam to escape. However, always stand back from the appliance when opening the door(s) to allow any build up of steam or heat to release.
If the steam comes into contact with a cool surface on the outside of the appliance, e.g. a trim, it will condense and produce water droplets. This is quite normal and is not caused by a fault on the appliance.
To prevent discolouration, regularly wipe away condensation and also soilage from surfaces.
For your safety wall coverings at the rear of the appliance should be securely fixed to the wall.
Cookware
Main oven - Do not use baking trays larger than 30cm x 30cm (12" x 12") as they will restrict the circulation of heat and may affect performance.
Grill and oven furniture
The following items of grill and oven furniture have been supplied with the appliance. If you require replacements of any of the items listed below please contact your local Service Force Centre, quoting the relevant part number.
1 grill pan (311409401)

natural_image
Simple line drawing of a square container with side markers (no text or symbols)1 grill pan handle (311468100)

natural_image
Line drawing of a bone-shaped tool with a curved blade and handle (no text or symbols)Note:
If you require an additional handle for your grill pan, this can be ordered from your local Service Force Centre by quoting part number 311479800\6.
1 grill pan grid (311757500)

natural_image
Isometric line drawing of a flat rectangular plate with diagonal grooves and corner notches (no text or symbols)1 straight shelf (for grilling)

natural_image
Simple line drawing of a corrugated metal grate (no text or symbols)2 straight shelves (for main oven cooking)

natural_image
Simple line drawing of a rack with multiple vertical ribs (no text or symbols)Electronic minute minder
1 = (-) Decrease control & Minute minder
2 = (+) Increase control
( ) Bell Symbol
The electronic minute minder can also be used to show the time of day.
Please note that this is a 24 hour clock, for example 2.00pm is shown as 1400.
In the following pages we explain how to set the controls. Read through them a few times until you are familiar with the procedure.
If the appliance is switched off on the wall, or there is a loss of power, the clock will stop and you will not be able to use the main oven.
Set the time of day
When the electricity supply is first switched ON, the display will flash 0.00. See Fig.1.
Press buttons (1) and (2) together. Release buttons, 0.00 will appear in the display as
Fig. 2. Within 5 seconds press button (2), 12.00 will show in the display as Fig. 3.
Within 5 seconds press and hold either button (1) to decrease or button (2) to increase the time until the correct time of day on the 24 hour clock is reached, e.g. 14.30.
See Fig. 4.
Note: The increase and decrease control buttons operate slowly at first and then more rapidly. They should be pressed separately.
The minute minder
The minute minder gives an audible reminder at the end of any period of cooking up to 23 hours and 59 minutes.
To set press button (1) and the display will read 0.00, see Fig. 5.


Fig.1
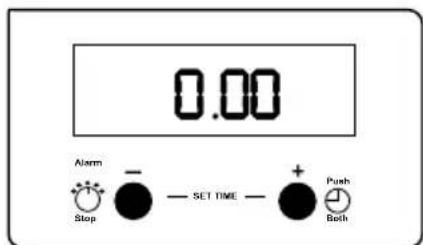
Fig.2

Fig.3
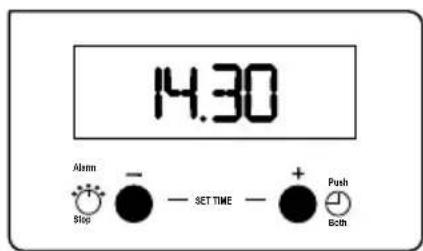
Fig.4
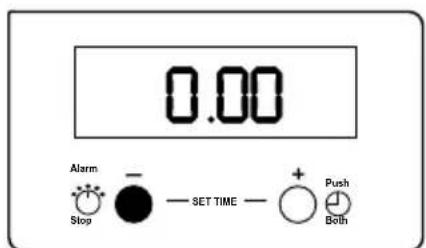
Fig.5
Release button (1) and press and hold button (2). The display will count up in one minute intervals until the interval to be timed is reached e.g. 30 minutes, see Fig. 6. If necessary press and hold button (1) to achieve the correct time interval. The bell symbol will show in the display.
The minute minder will begin to count down once set. The time of day will show in the display. To show the remainder of the cook time press button (1).
At the end of the timed period an audible signal will sound for up to 2 minutes. The bell symbol will flash and the time of day will show in the display, see Fig 7.
To stop the sound press button (1). The bell symbol will go out and show the time of day e.g. 15.00, see Fig 8.
To cancel the minute minder
If you change your mind and want to cancel the minute minder. Press and release button (1).
Press and hold button (1) and the display will count down in one minute intervals to 0.00. See Fig. 9.
Release button (1). After a few seconds the time of day will show in the display, see Fig. 10.
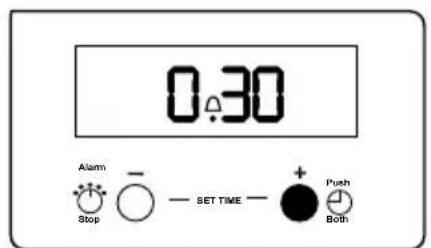
Fig.6

Fig.7

Fig.8
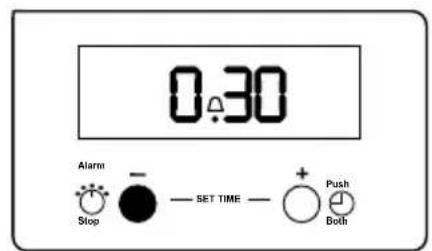
Fig.9

Fig.10
The hob
Using the hob
The gas hob has different burner sizes to suit different types of cooking:
To ensure maximum burner efficiency only use pots and pans with flat bases appropriate to the burner size used.
Larger burner (Rapid) - use a large pan for food such as chips.
Medium burners (Normal) - use for everyday cooking.
Small burner (Simmer) - use for simmering foods such as soups and stews.
The largest pan which you should use on any burner is 230mm (9"). The base of the smallest pan should not measure less than 100mm (4").

e the pan supports are correctly fitted before using the hob.
To light the hob burners
The hob ignition works by means of an electric spark system.
- Push in and hold the control knob, turn to the large flame symbol (highest setting) and press the ignition button immediately. Keep the control knob depressed for up to 5 seconds, but no longer than 10 seconds. After this time release the controls. The flame should remain alight. If after 10 seconds the burner has not lit, stop operating the appliance and wait at least 1 min before attempting a further ignition of the burner.
- When the burner has lit release the control and ignition button, adjust the setting as required.
Warn
ng: If the ignition button is not pressed immediately a build up of gas may cause the flame to spread.


To turn off any burner
- Turn the control knob to the off position. This is shown by a large dot.

lighting any burner, ensure that it is lit before you leave the appliance.
When turning off a burner, ensure the flame has gone out before leaving the appliance.
the event of the burner flames being accidentally extinguished, turn off the burner control and do not attempt to re-ignite the burner for at least 1 min.
Things to note
If you are having any difficulty lighting a hob burner turn all the hob controls off and make sure the burner parts have been replaced correctly.

Hints and tips
- Do not overfill pans or they will boil over.
- Do not use pans with very heavy handles which cause the pan to tip.

Place pans on the centre of the burners.
Position pans so the handles cannot be accidentally knocked or overhang the appliance.
Lift pans on and off the pan supports.
Do not slide them across the hob.
- Do not leave accidental spillage on the hob or removable parts. The spillage should be wiped up and the parts washed and carefully dried as soon as the hob, pan supports and burner parts are cool enough to touch.
- A flat based Wok will stand stable on the pan supports. If you use a round Wok with a collar support, the collar must be the open wirework type otherwise the performance of the burner will be affected.

Take care to avoid burns and scalds when reaching across the hotplate.

Take extra care when deep fat frying, do not cover the pan with a lid. Do not leave a pan unattended. If the pan catches fire, leave it where it is and turn off all controls. Place a damp cloth or a fitting lid over the pan to smother the flames. Never put water on the fire. Leave to cool for 30 minutes.
The grill
CAUTION – Accessible parts may be hot when the grill is in use. Young children should be kept away.
When you first operate the grill you may hear some sounds as the burner heats up, this is quite normal and is not a fault on the appliance.
Using the grill
- Fully open the door. Push in and hold the control knob, turn to the large flame symbol (highest setting) and press the ignition button immediately. Keep the control knob depressed for up to 5 seconds, but no longer than 10 seconds. After this time release the controls. The flame should remain alight. If after 10 seconds the burner has not lit, stop operating the appliance and wait at least 1 min before attempting a further ignition of the burner.
- When the burner has lit release the control and ignition button, adjust the setting as required.

The grill door must be left open when grilling.
Things to note
- Some smoke from fat splashes may be evident as the grill cleans itself.
Never cover the grill pan or grid with foil as this can lead to grill fires.

The grill pan and handle
The grill pan is supplied with a removable handle.
To attach the handle, place the wirework under the cut out in the pan so that the metal plate hooks over the top of the grill pan.
Slide the handle to the left and over the central bump on the grill pan.

Ensure the handle is correctly located. It is not necessary to remove the grill pan handle during grilling.
Place the grill pan on the shelf so that the pan is positioned centrally beneath the grill.
To remove the handle, slide the handle to the right and lift the handle away from the cut out on the grill pan.

Hints and tips
- Most foods should be placed on the grid in the grill pan to allow maximum circulation of air to lift the food out of the fats and juices.
- Adjust the grid and grill pan runner position to allow for different thicknesses of food.
- Food should be thoroughly dried before grilling to minimise splashing. Brush lean meats and fish lightly with a little oil or melted butter to keep them moist during cooking.
- Accompaniments such as tomatoes and mushrooms may be placed underneath the grid when grilling meats.
- When toasting bread use the shelf in position 2 with the grid in the high position.
- Preheat the grill on a full setting for a few minutes before sealing steaks or toasting. Adjust the heat setting and the shelf as necessary during cooking.
- The food should be turned over during cooking as required.

Grilling chart
| Food Position Grill time | (mins in total) | |
| Bacon Rashers | Adjust | 5 - 6 |
| Beefburgers | grill | 10 - 15 |
| Chicken Joints 30 - 40 setting | ||
| Chops – Lamb 15 - 20 Pork and 20 - 30 | ||
| Fish – Whole Trout/Mackerel | grill 15 - 25 | |
| Fillets – Plaice/Cod pan 10 - 15 | ||
| Kebabs grid 20 - 30 | ||
| Kidneys – Lamb/Pig | to | 8 - 12 |
| Liver – Lamb/Pig | suit 10 - 20 | |
| Sausages | different | 20 - 30 |
| Steaks – Rare | thicknesses | 6 - 12 |
| Medium | 12 - 16 | |
| Well Done | of | 14 - 20 |
| Toasted Sandwiches | food | 3 - 4 |
The times quoted above are given as a guide and should be adjusted to suit personal taste.
The main oven
Heat zones
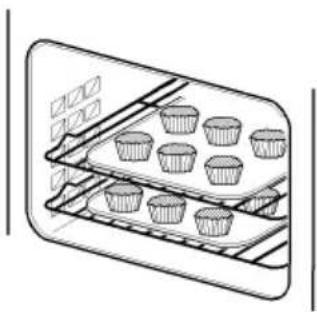
There are zones of heat within the oven. The temperature in the middle is the gas mark you have chosen. The top of the oven is slightly hotter and the lower shelf slightly cooler. The base of the oven is quite a lot cooler. You can make use of these heat zones when you are cooking foods requiring different temperatures all at the same time. If you are cooking more than one tray of similar items, for example cakes or biscuits, swap the trays during cooking or you can remove the top tray when the food is cooked and move the lower tray to the higher shelf to finish cooking.
Preheating
When you need to preheat the oven, we recommend you do so for 20 minutes.
For recipes needing high temperatures, e.g. bread, pastries, scones, soufflés etc., best results are achieved if the oven is preheated first. For best results when cooking frozen or cooked chilled ready meals always preheat the oven first.
To fit the main oven shelves
The shelves should be fitted with the straight rods uppermost on the frame and the forms towards the back of the oven. If not fitted correctly the anti-tilt and safety stop mechanism will be affected.

Using the main oven
- Open the oven door.
- Push in the control knob and turn it to gas mark 9.
- When the burner has lit release the button. There will only be small flames at first.
- Turn the control knob to the required gas mark.
- Wait until the oven burner is showing large flames.
- Close the oven door.
- To turn the oven off, push in the control knob and turn to the off position. This is shown by a large dot.

Things to note
The oven light will illuminate.
i Hints and tips
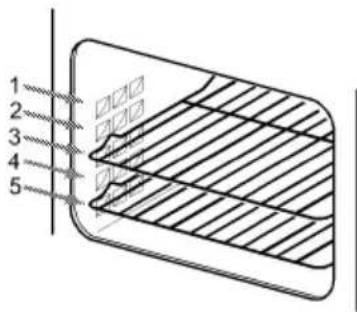
- Arrange the shelves in the required positions before switching the oven on. Shelf positions are numbered from the top downwards.
- Ensure that food is placed centrally on the shelf and there is sufficient room around the baking tray/dish to allow for maximum circulation.
- Do not push dishes too far back as food will burn if it overhangs the burner flame.
- Stand dishes on a suitably sized baking tray on the shelf to prevent spillage onto the oven base and to help reduce cleaning.
- The material and finish of the baking tray and dishes used affect base browning. Enamelware, dark, heavy or non-stick utensils increase base browning. Shiny aluminium or polished steel trays reflect the heat away and give less base browning.
- When cooking more than one dish in the oven, place dishes centrally on different shelves rather than cluster several dishes on one shelf, this will allow the heat to circulate freely for the best cooking results.
- If you are cooking more than one tray of similar items, for example cakes or biscuits, swap the trays during cooking or you can remove the top tray when the food is cooked and move the lower tray to the higher shelf to finish cooking.
- Do not place baking trays directly on the oven base as it interferes with the oven air circulation and can lead to base burning; use the lower shelf position.
Do not place cookware and cooking pots with rough bases e.g. cast iron on the oven door as damage to the glass may occur.
natural_image
Line drawing of a baking tray with multiple cupcake cavities (no text or symbols)
natural_image
Illustration of a microwave oven with a basin and a grid of square tiles, crossed by a black X (no text or symbols)Cooking chart
The oven temperatures are intended as a guide only. It may be necessary to increase or decrease the temperatures to suit individual preferences and requirements.
| Food Shelf Position Gas Mark | Approx Cook Time (min) | |||
| Biscuits 2+4 5 10 - 20 | ||||
| Bread 3 8* 30 - 40 | ||||
| Bread rolls/buns 2 8* 10 - 20 | ||||
| Cakes: Small & Queen | 2+4 | 5 | 15 - 25 | |
| Sponges | 2+4 | 4 | 18 - 20 | |
| Victoria Sandwich (7") | 2+4 | 4 | 20 - 30 | |
| Madeira (7)" | 4 | 4 | 1 - 11⁄4 | |
| Rich Fruit (8)" | 3 | 2 | 21⁄2h - 23⁄4 | |
| Christmas (8)" | 3 | 2 | 4 - 5h depends on size | |
| Gingerbread | 3 | 2 | 11⁄4 - 11⁄2h | |
| Meringues | 3 | 1 | 21⁄2 - 3h | |
| Flapjack | 3 | 5 | 25 - 30 | |
| Shortbread | 3 | 3 | 45 - 65 | |
| Casseroles: | Beef/Lamb | 4 | 3 | 21⁄2 - 3h |
| Chicken | 4 | 4 | 11⁄4 - 11⁄2h | |
| Convenience Foods | Follow manufacturer's instructions | |||
| Fish | 2 | 4 | 20 - 30 | |
| Fish Pie (Potato Topped) | 3 | 6 | 20 - 25 | |
| Fruit Pies, Crumbles | 3 | 6 | 40 - 50 | |
| Milk Puddings | 3 | 2 | 11⁄2 - 2h | |
| Pasta/Lasagne etc. | 3 | 5 | 30 - 40 | |
| Pastry: | Choux | 2 | 6 | 30 - 35 |
| Eclairs, Profiteroles | 2 | 5 | 20 - 30 | |
| Flaky/Puff Pies | 2 | 6 | 25 - 40 | |
| Shortcrust | Mince Pies | 2+4 | 5 | 15 - 20 |
| Meat Pies | 2 | 7 | 25 - 35 | |
| Quiche,Tarts, Flans | 2 | 5 | 25 - 45 | |
| Roasting Meat, Poultry | 4 | 5 | see roasting chart | |
| Scones | 2+4 | 7 | 8 - 12 | |
| Shepherd's Pie | 3 | 7 | 30 - 40 | |
| Soufflés | 3 | 5 | 20 - 30 | |
| Vegetables: | Baked Jacket Potatoes | 2 | 5 | 11⁄2h - 2h |
| Roast Potatoes | 2 | 6 | 1 - 11⁄2h | |
| Yorkshire Pudding: | Large | 1 | 7 | 25 - 40 |
| Individual | 1 | 7 | 15 - 25 | |
*When baking bread cook for 10 minutes at gas mark 8 then reduce to mark 6 for the remaining cook time.
Note: Shelf positions are counted from the top of the oven downwards.
To help pastry dishes brown on the underside cook on a metal plate or place on a baking tray.
Roasting chart
| INTERNAL TEMPERATURES –Rare : 50-60°C; Medium : 60-70°C; Well done : 70-80°C | ||
| MEAT | GAS MARK | COOKING TIME |
| Beef/ Beef boned 5 | 25-35 minutes per 1⁄2kg (1lb)and 20-35 minutes over | |
| Mutton/Lamb 5 25-35 minutes per 1⁄2kg (1lb) | and 25-35 minutes over | |
| Pork/Veal/Ham 5 30-40 minutes per 1⁄2kg (1lb) | and 30-40 minutes over | |
| Chicken 5 20-25 minutes per 1⁄2kg (1lb) | and 20 minutes over | |
| Turkey/Goose 5 20-25 minutes per 1⁄2kg (1lb) up to | 31⁄2kg (7lb) then 10 minutes per 1⁄2kg (1lb) over 31⁄2kg (7lb) | |
| Duck 5 25-35 minutes per 1⁄2kg (1lb) | and 25-30 minutes over | |
| Pheasant 5 35-40 minutes per 1⁄2kg (1lb) | and 35-40 minutes over | |
| Rabbit 5 20 minutes per 1⁄2kg (1lb) | and 20 minutes over | |
The roasting temperatures and times given in the chart should be adequate for most joints, but slight adjustments may be required to allow for personal requirements and the shape and texture of the meat. However, lower temperatures and longer cooking times are recommended for less tender cuts or larger joints.
Wrap joints in foil if preferred, for extra browning uncover for the last 20 – 30 min. cooking time.
Slow cook
The slow cook setting gives a very low heat in the oven. It is particularly useful when you are cooking soups, stews and casseroles because the long slow cooking will make cheaper, tougher cuts of meat more tender. Some foods such as pastry and biscuits are not suitable for slow cooking because the temperature is too low. Cover all food during cooking to prevent it from drying out. You can uncover food for the last half hour if it is normally served golden brown.
Using slow cook
- You need to cook food at gas mark 6 for 30 minutes before you turn the oven down to the slow cook setting. This makes sure that the temperature of the food gets hot enough to start the food cooking.
Food preparation – slow cooking
Joints of meat and poultry
- Do not cook meat joints over 2.7kg (6lb).
- Do not cook poultry over 2 kg (4lb 8oz).
- Cook on the middle shelf of the oven or above.
• Cook stuffing separately.
• Cook for at least six hours. - Only cook joints of pork if you can make sure, by using a meat thermometer, that the temperature inside the joint is at least 88°C.
- For good air circulation always stand joints on a rack in a roasting tin or casserole.
- Thaw all frozen meat and poultry before you cook it.
- Prime cuts of meat do not benefit from slow cooking.
- Remove excess fat and skin unless it is browned first.

Soups, casseroles and stews
- Do not cook casseroles over 2.7 kg (6lb).
- Bring to the boil on the hotplate then cook on slow cook.
- Cook on the middle shelf of the oven or above.
- Cover food with a tight fitting lid or tin foil.
Vegetables
- Cut into small pieces.
- Dried beans must be pre-soaked then boiled in an open pan for 15 minutes before adding to any dish.
- Place vegetables under meat in casseroles.
- Cover food with a tight fitting lid or tin foil.
Milk puddings
- Cover the cereal with boiling water and leave it to stand for 30 minutes.
- Drain and make the pudding in the usual way.
General points
Frozen Foods
Thaw thoroughly before cooking.
Thickening
Toss meat in flour for casseroles. Alternatively blend cornflour with water and add it at the end of cooking.
Flavouring
Flavours are held in the food because there is little evaporation. Adjust flavouring at the end of the cooking time.
Liquid
Use slightly less liquid as there is little evaporation during cooking. Always add milk and milk products, for example cream towards the end of cooking to prevent them from curdling.
Reheating
Cool left over food quickly and then put it in the fridge. Do not reheat food using the slow cook setting. Reheat food in the usual way or in a microwave. Only reheat food once.
Care and cleaning

ore cleaning always allow the appliance to cool down.
Cleaning materials
Before using any cleaning materials on your appliance, check that they are suitable and that their use is recommended by the manufacturer.
Cleaners that contain bleach should NOT be used as they may dull the surface finishes. Harsh abrasives must also be avoided.
Cleaning the outside of the appliance
Do not use abrasive cleaning materials e.g. Hob Brite, Brillo pads or scourers on painted or printed finishes as damage may occur. Regularly wipe over the control panel, doors and appliance sides using a soft cloth and hot soapy water. To prevent streaking finish with a soft cloth.
Stainless Steel cream cleaners are abrasive and should be avoided as they may dull the surface finish. Any spillage on the stainless steel finish must be wiped off immediately.

not attempt to remove any of the control knobs from the appliance as this may cause damage and is a safety hazard.
Cleaning the control knobs and handles
It is strongly recommended that only hot soapy water is used for cleaning the control knobs and handles. ANY OTHER CLEANING MATERIALS MAY DULL THE SURFACE FINISH.
natural_image
Illustration of spray bottles and containers, no text or symbols present
natural_image
Line drawing of a hand cleaning a rectangular panel with a scroll inside (no text or symbols)
natural_image
Diagram of a hand pressing a button on a mechanical component with lightning bolts (no text or symbols)Cleaning the hob
Clean the hotplate top using a mild abrasive. Take care not to damage the spark electrodes. If the spark electrodes are damaged the burners will not light.
You can remove the pan supports, burner caps and burner crowns to clean them. Again take care not to damage the spark electrodes.
Clean the burner crowns and pan supports by soaking them in very hot soapy water. Aluminium based saucepans can leave shiny metal marks on the pan supports. You can remove any stubborn stains by scouring with a soap impregnated steel wool pad. If you look after the burner crowns and pan supports in this way they will stay reasonably clean. However the surface will dull with time. After cleaning the appliance parts, dry them thoroughly before you put them back.
When replacing hotplate burner parts
- Crown to body. (Do not try to force the crown on to the body).
Make sure that the hole in the crown is over the electrode. Check that the location pegs sit in the slots in the body. When the crown is in this position let it fall freely on to the body. Check that the crown can be moved slightly from side to side.
-
Cap to crown. Place cap centrally on the top of crown (enamel side up). Move sideways and front to back to check the cap is properly fitted.
-
Check for ignition. If a burner will not light then you need to check the crown and cap positions.

Cleaning the shelves and grill/oven furniture
All removable parts, can be washed in the dishwasher.
The grill pan, grill pan grid and oven shelves may be cleaned using a soap impregnated steel wool pad. Soaking first in hot soapy water will make cleaning easier.
Cleaning the grill
Do not clean the grill burner itself. Cleaning the grill may cause the holes in the burner to become blocked preventing it from operating correctly. Due to the nature of stainless steel the grill burner may tarnish through use over a period of time. This is quite normal and is not a fault on the appliance. Clean the area around the grill frequently using hot soapy water.
Cleaning inside the oven(s)
The sides and back of the main oven compartment are coated with a special Stayclean coating. They should not be cleaned manually.
The vitreous enamel main oven base and grill compartment can be cleaned using normal oven cleaners with care. Ensure that the manufacturers instructions are followed and that all parts are well rinsed afterwards.

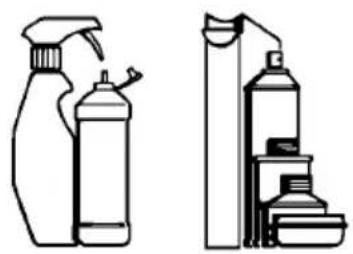
Aerosol cleaners must not come into contact with elements/burners, door seal, or any painted finishes as this may cause damage.

nts and tips

Aerosol cleaners must not be used on Stayclean surfaces.
To carry out the cleaning cycle remove the oven shelves and set the oven to gas mark 7. It is a good idea to run the oven for an hour or two per week to ensure continued good performance from the Stayclean finish. Slight discoloration and polishing of the Stayclean surfaces may occur in time. This DOES NOT affect the Stayclean properties in any way.
Use minimal, if any, extra oil or fat when roasting meat, potatoes only require brushing with fat before cooking. Extra fat in the oven during roasting will increase splashing and soilage.
It is NOT necessary to add water to a meat tin when roasting. The water and the fat juices from the joint create excessive splattering during cooking – even at normal temperatures, as well as causing condensation.
Covering joints during cooking will also prevent splashing onto the interior surfaces. Removing the covering for the last 20-30 minutes will allow extra browning if required. Some large joints and turkeys especially benefit by this method of cooking, allowing the joint to cook through before the outside is over browned.
Cleaning the door(s)

To prevent damaging or weakening the door glass panels avoid the use of the following:
• Household detergents and bleaches
- Impregnated pads unsuitable for non-stick saucepans
- Brillo/Ajax pads or steel wool pads
• Chemical oven pads or aerosols
- Rust removers
- Bath/Sink stain removers
Cleaning between the outer and inner door glass
The outer door glass is removable for cleaning.
To remove the outer glass
- Open the oven door slightly to gain access to the two cross head screws on the top of the oven door.
- Loosen the two screws using a Pozidrive screwdriver.
- Hold the door glass securely in place with one hand before removing the screws completely with the other hand.
- Using both hands, gently tilt the top of the door glass towards you, lift slightly to disengage the locators from the two bottom brackets.
- Clean the outer and inner glass using hot soapy water or Hob Brite cleaner may be used. DO NOT use Hob Brite on the Stainless Steel or painted finishes. DO NOT try to clean the foil which is inside the door. The foil is there to help keep the door cool, if it is damaged it will not work. Ensure that all parts are well rinsed and thoroughly dried before attempting to replace the outer door.

natural_image
Diagram of a folding frame with a magnified inset showing a screw (no text or symbols)
If the door glass panel becomes chipped or has deep scratches the glass will be weakened and must be replaced to prevent the possibility of the panel shattering. Please contact your local Service Force Centre who will be pleased to advise further.
To replace the outer glass
- Holding the oven glass with both hands, gently place the locators into the holes of the brackets at the bottom of the oven door.
- Push the top of the oven glass towards the oven door, ensuring the screw location holes line up.
- Hold the glass in place with one hand and insert the cross head screws into the location holes with the other hand. Give the screws one turn to ensure the glass is secure.
- Tighten the screws positively with a Pozidrive screwdriver before closing the oven door.

Do not attempt to use the oven without the glass being in place.
To clean the inner glass door panels
Clean the inner glass door panels using a soft cloth and hot water to which a little washing up liquid has been added. If the inner panel is heavily soiled, Hob Brite may be used. Do not use abrasive cleaning materials on the door glass. Ensure that all parts are well rinsed and thoroughly dried before attempting to replace the glass.
Replacing an oven light bulb
The type of bulb required is a 300^ C 25 watt small Edison Screw.

Disconnect the appliance from the electricity supply before replacing the bulb.
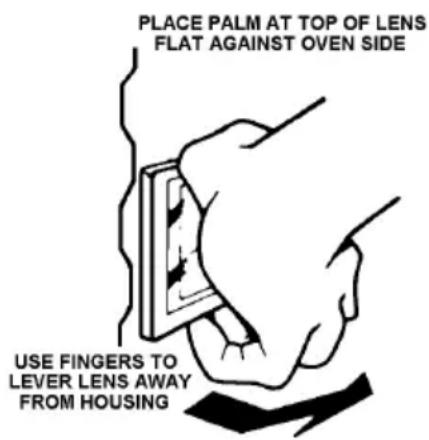
Open the door and remove the shelves to enable easy access to the oven light assembly. Insert a flat blade screwdriver between the oven side and glass which covers the bulb.
Support the glass with your hand and prise out sufficiently to release the glass cover. Unscrew the bulb in an anticlockwise direction until it is possible to remove the bulb with ease.
Fit the new bulb by turning in a clockwise direction until it is secure. Ensuring the indent to the flange is pointing to the rear of the oven, replace the glass by pushing it firmly into the hole to cover the bulb assembly.
Replace the shelves. Restore the electricity supply.
Something not working
Maintenance must only be carried out by a competent/qualified person. Do not try to alter/modify the appliance yourself, as this could be dangerous.
We recommend that your appliance has an annual gas safety check carried out by our approved service organisation.
Please carry out the following checks on your appliance before calling a Service Engineer. It may be that the problem is a simple one that you can solve yourself without the expense of a service call.
In-guarantee customers should make sure that the checks have been made as the engineer will make a charge if the fault is not a mechanical or electrical breakdown.
Please note that proof of purchase is required for in-guarantee service calls.
| Problem Possible solution | |
| The grill oven and timer do not work. | Check that the appliance has been wired in to the appliance supply and is switched on at the wall. |
| Check that there is not a problem with your gas supply.You can do this by making sure the other gas appliances such as central heating or gas fires are working. | |
| Check that the main appliance fuse is working. | |
| If you have checked the above:Allow the appliance to cool for a couple of hours. The appliance should now be working normally. | |
| The timer does not work | Check that the instructions for the operation of the timer are being closely followed. |
| Check that the appliance is correctly installed and is level. The oven is not | |
| Check that the recommended temperatures and shelf positions are being used. | |
| The oven light fails to illuminate. | The oven light bulb may need replacing. |
| The oven temperature is too high or too low. | Check that the recommended temperatures and shelf positions are being used. Be prepared to adjust the temperature up or down slightly to achieve the results you want. |
| Refer to the main oven section. | |
| The hob burners will not light. Ensure the burner parts have been placed correctly. | |
| Check that there is not a problem with your gas supply. You can do this by making sure the other gas appliances such as central heating or gas fires are working. | |
Something not working continued
| Problem Possible solution | |
| The flame colour is orange/yellow. | Due to the design of the burner the flame can appear to be orange/yellow (flame disturbance) in certain areas of the burner this is a natural occurrence. |
| The burner is not igniting or only partially lighting. | Check that the burner is dry and that food spillage or cleaning fluids are not present on the burner. This can be dried with a cloth and stubborn marks cleaned away with a dry nylon brush (old toothbrush etc.) |
| The burner sounds noisy. It is natural for the burners to emit noise as the gas is being drawn through the burner and may reduce as they heat up. | |
| The burner is emitting a popping sound. | This is a natural occurrence when the burner is alight and does not affect the performance of the burner. |
| Noise. | It is normal for some metal parts on the cooker to produce noise when in use, this is due to expansion and contraction when heating up and cooling down. |
Service and spare parts
SERVICEFORCE
In the event of your appliance requiring service, or if you wish to purchase spare parts, please contact your local Service Force Centre by telephoning:-
0870 5 929929
Your telephone call will be automatically routed to the Service Force Centre covering your post code area.
For the address of your local Service Force Centre and further information about Service Force, please visit the website at www.serviceforce.co.uk.
Before calling out an engineer, please ensure you have read the details under the heading "Something Not Working?".
When you contact the Service Force Centre you will need to give the following details:
- Your name, address and post code.
- Your telephone number.
- Clear and concise details of the fault.
- The model and serial number of the appliance (found on the rating plate).
- The purchase date.
Please note that a valid purchase receipt or guarantee documentation is required for in-guarantee service calls.
Customer care department
For general enquires concerning your Tricity Bendix appliance, or for further information on Tricity Bendix products, please contact our Customer Care Department by letter or telephone at the address below.
Customer Care Department
Tricity Bendix
Major Appliances
Addington Way
Luton
Bedfordshire
LU4 9QQ
Tel: 0870 5 950950 (*)
* calls to this number may be recorded for training purposes.
Guarantee conditions
Standard guarantee conditions
We, Tricity Bendix, undertake that if within 12 months of the date of the purchase this Tricity Bendix appliance or any part thereof is proved to be defective by reason only of faulty workmanship or materials, we will, at our option repair or replace the same FREE OF CHARGE for labour, materials or carriage on condition that:
The appliance has been correctly installed and used only on the electricity supply stated on the rating plate.
The appliance has been used for normal domestic purposes only, and in accordance with the manufacturer's instructions.
The appliance has not been serviced, maintained, repaired, taken apart or tampered with by any person not authorised by us.
All service work under this guarantee must be undertaken by a Service Force Centre.
Any appliance or defective part replaced shall become the Company's property.
This guarantee is in addition to your statutory and other legal rights.
Home visits are made between 8.30am and 5.30pm Monday to Friday. Visits may be available outside these hours in which case a premium will be charged.
Exclusions
This guarantee does not cover:
Damage or calls resulting from transportation, improper use or neglect, the replacement of any light bulbs or removable parts of glass or plastic.
Costs incurred for calls to put right an appliance which is improperly installed or calls to appliances outside the United Kingdom.
Appliances found to be in use within a commercial environment, plus those which are subject to rental agreements.
Products of Tricity Bendix manufacture which are not marketed by Tricity Bendix.
Technical details
Dimensions
Height: 900mm (nominal)
Width: 600mm (nominal)
Depth: 600mm (to front of door panel)
Weight: 67.0Kg
Space for fixing at hotplate level 2mm minimum clearance
Space for fixing above hotplate level See important note 'Location of appliance'.
Minimum space above hotplate level 787mm (If a cooker hood is fitted refer to the cookerhood installation instructions).
Minimum distance from rear wall 5mm (spacer given by pressed spacer on vent panel).
Connections
Gas connection:- Rear left hand side of appliance at hotplate level Rc 12 " ( 12 " B.S.P. female)
Electrical connection:- 230V-240V 50Hz
Hotplate
| Natural Gas | ||||
| Heat input R.H.F R.H.R L.H.R L.H.F. | ||||
| 1.0kW(3412 Btu/h) | 1.9kW(6483 Btu/h) | 1.9kW(6483 Btu/h) | 2.9kW(9895 Btu/h) | |
| Injector marking | 074 | 106 | 106 | 133 |
Grill Natural Gas
| Heat Input | 2.45kW (8361 Btu/h) |
| Injector marking | 121 |
Main oven
| Heat input | 2.16kW (7330 Btu/h) |
| Injector marking | 108 |
| Thermostat bypass marking | 069 |
General
| Ignition | (H.T. Spark) |
| Spark gap | 3-4mm |
Gas category countries of destination
CAT. I2ELL DE

This appliance complies with: European Council Directives Low voltage Directive 73/23/EEC, Gas Directive 90/396/EEC EMC Directive 89/336/EEC, CE Marking Directive 93/68/EEC.
Installation instructions Important - safety requirements
This appliance is suitable for installing on gas I2ELL and I2E.
To install the appliance on gas supply of I2E the hotplate injectors must be changed to those supplied with the appliance.
| INJECTOR MARKINGI2ELL | INJECTOR MARKINGI2E | |
| RHF 074 | 070 | |
| RHR 106 | 096 | |
| LHF 106 | 096 | |
| LHR 133 | 119 |
Check that this model is suitable for the type of supply available. This appliance must be installed and or serviced by a competent person in accordance with the local Gas Safety/Electrical requirements.

This appliance must be installed by a qualified electrician / competent person. Safety may be impaired if installation is not carried out in accordance with these instructions.
Before connecting the appliance make sure that the voltage of your electricity supply is the same as that indicated on the rating plate. This is situated on the lower front frame of the appliance and can be seen upon opening the door. Alternatively the rating plate may also be found on the back or top of some models (where applicable).
Do not alter the electrical circuitry of this appliance.
Provision for ventilation
This appliance is not connected to a combustion products evacuation device. It shall be installed and connected in accordance with the current installation regulations. Particular attention shall be given to the relevant requirements regarding ventilation.
The room containing the appliance should have an air supply in accordance with local requirements. All rooms require an openable window or equivalent and some rooms will require a permanent vent as well. For room volumes up to 5m ^3 an air vent of 100cm ^2 is required: for room volumes between 5m ^3 and 10m ^3 an air vent of 50cm ^2 is required. If the room has a door that opens directly to the outside, no air vent is required. For room volumes that exceed 11m ^3 no air vent is required. If there are other fuel burning appliances in the same room, local requirements should be consulted to determine the requisite air vent requirements.
Prolonged intensive use of the appliance may call for additional ventilation, for example opening a window, or more effective ventilation, for example increasing the level of mechanical ventilation where present.
Moving your appliance
You may damage some soft or badly fitted floor coverings when you move the appliance. The floor covering under the appliance should be securely fixed so it does not ruck up when you move the appliance across it. Alternatively you could remove the floor covering. This appliance is heavy and care must be taken when moving it. Do not try to move the appliance by pulling the door handles.
To move the appliance, open the grill door. Raise the appliance off its front feet by lifting it from inside the oven. Pull the appliance forward. When you replace the appliance push it back to the stop and make sure there is the same gap at each rear corner.
For your safety
Do not try to disconnect the appliance from the gas supply if the supply pipe does not have a bayonet connection, as described in the installation instructions. If this is the case contact the person who installed the appliance.
Location of appliance
This appliance must not be installed in a bed-sitting room of volume less than 20m ^3 or in a bathroom, shower room or garage. It is essential that the appliance is positioned as Fig 1a. Shelves, wall cabinets and cooker hoods must be fitted a minimum of 787mm directly above the top of the hotplate (or greater for cooker hoods if recommended by manufacturers instructions) and 400mm above the hotplate when fitted in line with the outside of the appliance. If the units are intended to be fitted adjacent to the appliance but less than 400mm above the hotplate, then a minimum space of 100mm must be maintained between the sides of the unit and the appliance (See Fig 1b). Curtains must not be fitted immediately behind the appliance or within 150mm of the sides of the hotplate. If fitted next to or between two base units a minimum space of 1mm must be left between each unit and the sides of the appliance. The hotplate must be set to a minimum of 7mm above the adjacent units. (Note: The levelling feet fitted to the appliance will achieve a nominal height of 907mm -5+ 13mm. Base units not meeting the above conditions must be a minimum of 100mm away from the hotplate.

Fig 1.a
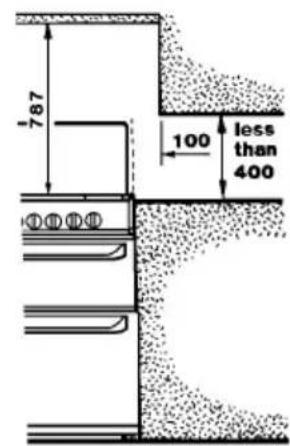
Fig 1.b
Levelling the appliance
Adjustment to suit floor conditions or height is obtained by rotating clockwise or anti clockwise the feet at the front and rear of the appliance. A spirit level should be placed on one of the shelves to confirm the appliance is correctly levelled.
Connecting to electricity supply

Warning: This appliance must be earthed.
Do not earth this appliance to the gas supply piping.
Connect to 230-240 A.C supply only.
Connection to the electricity supply should be made via a properly earthed, readily accessible wall socket. Which is adjacent to, but not directly above and not more than 1.7m away from the appliance and capable of electrical isolation. The cooker point should be within 1.7m of the appliance to make it accessible to switch off the appliance in case of emergency. The mains lead should be routed so that it cannot touch hot parts of the cooker i.e. the back panel above a height of 650mm from the floor. Should this plug not fit the socket outlet in your home it should be cut off and replaced with a suitable plug as outlined below.
If the moulded plug is cut from the cable for any reason it must be destroyed or disposed of safely, as protruding wires will be an electrical shock hazard.
If the fitted plug is removed.
Important: The wires in the mains lead fitted to the appliance are coloured in accordance with the following code.
Connecting to gas supply
This appliance is designed to be installed with an appliance flexible connection only. Supply piping should not be less than R ^3/_8 . Connection is made to the Rc 12 ( 12 ” B.S.P.) female threaded entry pipe located just below the hotplate level on the rear left hand side of the appliance. NOTE: ONLY LIQUID SEALANTS TO BE USED WHEN INLET GAS PIPE IS FITTED I.E.: DO NOT USE P.T.F.E. SEALANT TAPE.
Carry out a gas tightness test after connecting to the gas supply. The gas bayonet connector must be fitted in the shaded area indicated in Fig.2. Take into account that it must be possible to pull the appliance forward sufficiently. Ensure the hose does not become trapped when pushing the appliance into position.
IMPORTANT: FLEXIBLE TUBING USED MUST COMPLY WITH BS.669 CURRENT EDITION.
Fitting the stability bracket
It is recommended that if the appliance is to be installed with a flexible supply pipe, a stability bracket be fitted and is available from your supplier (see Important Safety Requirements). These instructions should be read in conjunction with any leaflet packed with the stability bracket.
- Place the appliance in its intended position and level appliance.
- Mark off 300mm from the left hand side of the appliance as shown in dimension 'A', Fig 3a. This is the centre line of the fixing bracket.
- Draw a line 100mm from the front edge of the feet (see Fig.3a) and remove appliance from its position. Mark off dimension 'B' (see Fig.3a) back from this line on the centre line of the bracket to locate the front edge of the lower bracket.


Fig.3a.
Fig.3b.
Fix lower bracket (with two fixing holes) to the floor then measure the height from floor level to engagement edge on back of appliance, dimension ' C' of Fig. 3b.
- Assemble upper bracket to lower bracket so that the underside of bracket is dimension ' C' + 3mm above floor level. (See Fig. 3b)
Reposition appliance and check that top bracket engages into appliance back as shown in Fig. 3b.
Pressure testing
- The oven injector is used as a pressure test point.
- Connect the pressure gauge to the oven injector.
- Check the supply pressure by turning the oven burner on and one other hotplate burner full on and light the appropriate burner. The pressure should be :- (i) For Natural Gas 20mbar
- Turn off the taps, disconnect the pressure gauge.
- Check operation of each hotplate burner.
Checking the grill
Place the grill pan containing the grid with the handle attached in to the grill compartment. To light the grill push in and hold the control knob, turn to large flame symbol (highest setting) and press the ignition button immediately. Keep the control knob depressed for up to 5 seconds but no longer than 10 seconds. After this time release the controls. The flame should remain alight.
Checking the hotplate
Fit the burner crowns and caps ensuring that they are correctly seated. Fit the pan supports. To light the hotplate burners push in and hold the control knob, turn to large flame symbol (highest setting) and press the ignition button immediately.
Keep the control knob depressed for up to 5 seconds, but no longer than 10 seconds. After this time release the controls. The flame should remain alight.
Turn off the hotplate and wait 1 minute. Turn the hotplate control knob to large flame symbol (highest setting). DO NOT depress or attempt to ignite the burner. No gas should flow.
Checking the main oven
- Turn on the oven thermostat control knob to mark 9. As soon as the burner is alight the button can be released.
- There should now be a low gas rate to the burner, which is the F.S.D bypass rate.
- When the F.S.D. phial has heated up it opens the F.S.D valve which allows the main gas supply to the oven burner.
- After 1 minute check that the flame covers the full width of the burner and is stable.
- Set the oven control to Mk 2, close the oven door and check that after about 10 minutes the flame size has reduced.
- Turn off the control and check that the oven flames go out.
General note
Instruct the user on how to use the appliance and its ignition system. Refer the user to the wording on the inside cover which gives advice on the safe operation of the appliance.
TRICITY BENDIX
www.electrolux.com
www.tricity-bendix.co.uk
- Important safety information
- Installation
- Germany
- Child safety
- During use
- Never leave the appliance unattended when the oven doors are open.
- Cleaning and maintenance
- At the end of the appliance's life
- Contents
- For the user
- For the installer
- Description of the appliance
- Gas slip-in single oven
- Getting to know your appliance
- The control panel
- Features
- Before using the appliance
- Rating plate
- Preparing to use your appliance
- Condensation and steam
- Cookware
- Grill and oven furniture
- Note:
- Electronic minute minder
- Set the time of day
- The minute minder
- To cancel the minute minder
- The hob
- Using the hob
- To light the hob burners
- To turn off any burner
- Things to note
- Hints and tips
- The grill
- Using the grill
- The grill pan and handle
- Grilling chart
- The main oven
- Heat zones
- Preheating
- To fit the main oven shelves
- Using the main oven
- i Hints and tips
- Cooking chart
- Roasting chart
- Slow cook
- Using slow cook
- Food preparation – slow cooking
- Joints of meat and poultry
- Soups, casseroles and stews
- Vegetables
- Milk puddings
- General points
- Frozen Foods
- Thickening
- Flavouring
- Liquid
- Reheating
- Care and cleaning
- Cleaning materials
- Cleaning the outside of the appliance
- Cleaning the control knobs and handles
- Cleaning the hob
- When replacing hotplate burner parts
- Cleaning the shelves and grill/oven furniture
- Cleaning the grill
- Cleaning inside the oven(s)
- nts and tips
- Cleaning the door(s)
- Cleaning between the outer and inner door glass
- To remove the outer glass
- To replace the outer glass
- To clean the inner glass door panels
- Replacing an oven light bulb
- Something not working
- Something not working continued
- Service and spare parts
- SERVICEFORCE
- 5 929929
- Customer care department
- Guarantee conditions
- Standard guarantee conditions
- Exclusions
- This guarantee does not cover:
- Technical details
- Dimensions
- Connections
- Gas category countries of destination
- Installation instructions Important - safety requirements
- Provision for ventilation
- Moving your appliance
- For your safety
- Location of appliance
- Levelling the appliance
- Connecting to electricity supply
- If the fitted plug is removed.
- Connecting to gas supply
- Fitting the stability bracket
- Pressure testing
- Checking the grill
- Checking the hotplate
- Checking the main oven
- General note
- TRICITY BENDIX
Brand : Tricity Bendix
Model : SG552DWN
Category : Cooker