
VW-DTM21 - Software License PANASONIC - Free user manual and instructions
Find the device manual for free VW-DTM21 PANASONIC in PDF.


| Product Name | VW-DTM21 Software License |
| Brand | Panasonic |
| Model | VW-DTM21 |
| Product Type | Software License |
| License Type | Perpetual |
| Number of Licenses | 1 user |
| Platform | Windows, macOS |
| System Requirements | 2 GHz processor, 4 GB RAM, 500 MB free disk space |
| Delivery Method | Electronic download (license key via email) |
| Activation Method | Online activation with product key |
| Validity | Lifetime |
| Updates | Included for 1 year from purchase |
| Support | Email and phone support for 90 days |
| Language | English, French, German, Spanish |
| Compatibility | Panasonic devices and third-party software |
| Installation | Run installer and enter license key |
| Reinstall | Allowed on same device after deactivation |
| Transfer | Not permitted to another user |
| Refund Policy | No refunds after activation |
Frequently Asked Questions - VW-DTM21 PANASONIC
User questions about VW-DTM21 PANASONIC
0 question about this device. Answer the ones you know or ask your own.
Ask a new question about this device
Download the instructions for your Software License in PDF format for free! Find your manual VW-DTM21 - PANASONIC and take your electronic device back in hand. On this page are published all the documents necessary for the use of your device. VW-DTM21 by PANASONIC.
USER MANUAL VW-DTM21 PANASONIC
DV Editing Software with DV Interface Board
Model No. VW-DTM21E
DV Editing Software with DV Interface Card
Model No. VW-DTM22E
Operating Instructions (Setup/Quick reference)
End User License Agreement
ENGLISH
Before opening the CD-ROM package, please read the following.
End User License Agreement
You ("licensee") are granted a license for the Software defined in this End User License Agreement ("Agreement") on condition that you agree to the terms and conditions of this Agreement. If Licensee does not agree to the terms and conditions of this Agreement, promptly return the Software to Matsushita Electric Industrial Co., Ltd. ("Matsushita"), its distributors or dealers from which you made the purchase.
Article 1 License
Licensee is granted the right to use the software, including the information recorded or described on the CD-ROM, instruction manuals, and any other media provided to Licensee (collectively "software"), but all applicable rights to patents, copyrights, trademarks and trade secrets in the Software are not transferred to Licensee.
Article 2 Use by a Third Party
Licensee may not use, copy, modify, transfer or allow any third party, whether free of charge or not, to use, copy or modify the Software, except as expressly provided for in this Agreement.
Article 3 Restrictions on Copying the Software
Licensee may make a single copy of the Software in whole or in part, in machine-readable form, solely for back-up purpose. Licensee must include, in such copy of the software, the same copyright notice as included in the software.
Article 4 Computer
Licensee may use the Software only on one computer, and may not use it on more than one computer. The Software may not be transferred or transmitted to, or shared with, or accessed by other computers over or through computer networks and/or by other means.
Article 5 Reverse Engineering, Decompiling or Disassembly
Licensee may not reverse engineer, decompile, or disassemble the Software, except to the extent either of them is permitted under law or regulation of the country where Licensee resides. Matsushita, or its distributors or dealers will not be responsible for any defects in the Software or damage to Licensee caused by Licensee's reverse engineering, decompiling, or disassembly of the Software.
Article 6 Indemnification
The Software is provided "AS-IS" without warranty of any kind, either expressed or implied, including, but not limited to, warranties of non-infringement, merchantability and/or fitness for a particular purpose. Further, Matsushita does not warrant that the operation of the Software will be uninterrupted or error free. Matsushita or any of its distributors or dealers will not be liable for any damage suffered by Licensee arising from or in connection with Licensee's use of the Software.
Article 7 Export Control
Licensee agrees not to export or re-export to any country the Software in any form without the appropriate export licenses under regulations of the country where Licensee resides, if necessary.
Article 8 Termination of License
The right granted to Licensee hereunder will be automatically terminated if Licensee contravenes any of the terms and conditions of this Agreement. In this event, Licensee must destroy the Software and related documentation together with all the copies thereof at Licensee's own expense.
To reduce the risk of fire or shock hazard, do not expose this equipment to rain or moisture.
CAUTION:
To reduce the risk of fire or shock hazard and annoying interference, use the recommended accessories only.
WARNING:
End User License Agreement 2
Before Use
Features....7
Name and function of the packaging items.... 8
Operating environment 9
Installing MotionDV STUDIO 10
Uninstalling MotionDV STUDIO.... 12
Connection.... 13
Basic Use
Start 15
Downloading the images to the PC.... 16
Connecting the images in the preferred order 18
Inserting video effects.... 20
Inserting the effect in the scene transition point.... 21
Adding the audio.... 22
Creating a title with 3-D text....24
Posting and arranging illustrations.... 26
Recording the edited images on tape 28
Advanced Use
Recording using the hybrid editing.... 30
Sending animated mail with VideoGift 32
Outputting to a MPEG file 34
Converting the file to a file format that can be edited.... 35
Useful Information
P & S.... 36
Suggestions and requirements 40
For DV Interface Card/Board
Installing the card driver.... 41
Connect the digital video device (DV Interface Card).... 43
Remove the card... 43
Suggestions and requirements (DV Interface Card) 44
Installing the DV Interface Board 45
Installing the driver of the DV Interface Board... 46
Check that the setup is correct 48
Connect the digital video device (DV Interface Board)... 48
Suggestions and requirements (DV Interface Board) 49
Specifications 49
This application is localized in English, German and French versions.
The screen images inserted into this manual are captured from the English version.
Features
MotionDV STUDIO is software that allows you to connect a personal computer to a digital video device (such as a digital movie camera) and edit images.
Image editing includes non-linear editing and tape (linear) editing. With MotionDV STUDIO, you can carry out both. You can also carry out hybrid editing, combining the benefits of both methods.
■ Non-linear editing
The images of the digital video device are downloaded to the PC and edited. This method allows you to apply several special effects.
① Image capture (Capture) ② Arranging the captured images (videoclip)
③ Editing/Processing Video effects, transition effects and audiomix can be applied to the videoclips. Otherwise, you can use the title to apply the effects.
4 Recording on tape or other media
You can record edited contents in a digital video device equipped with DV input function.
![graph TD A["1: Camera"] --> B["2: Laptop"] B --> C["3: Image Collection"] C --> D["4: Image Collection"]](/content/2026/06/1333050/images/80815d9cf8098c05bd52c03dde350daf0a80004df8bdb915ce0d07462e60a1fa.jpg)
■ Tape (linear) editing (To perform this editing, the PC must be equipped with 2 i.LINK/IEEE1394a standard terminals)
Editing is performed by connecting 2 digital video devices to the PC. When applying this editing method, images are not downloaded to the PC, and the PC just controls the 2 devices. (Images are sent directly from the first to the second device)
① The PC controls the digital video devices
② Flow of data, including image information
![graph LR A["Camera"] -->|①| B["Laptop"] B -->|①| C["Camera"] C -->|②| B](/content/2026/06/1333050/images/9f18cacffc150dafb859a05e35d624b470936dc273566eb491da4289f09edcb5.jpg)
Hybrid editing
It allows to exploit the benefits of non linear editing and of tape editing.
Non linear editing allows to insert several special effects, but you need a great capacity hard-disk to download long-playing images. (1GB every 4 minutes of images.) On the other hand, with tape (linear) editing you can easily edit long-playing images, but you can't add special effects and audio. MotionDV STUDIO allows to effectively use
tape editing for long-playing images and non linear editing for the scenes to which you wish to add special effects.
Name and function of the packaging items
After buying the software, first of all check that all items are present.
■ DV Editing Software/VW-DTM20E
1 MotionDV STUDIO (CD-ROM)
Install on the PC to edit DV animated images.
■ DV Editing Software with DV Interface Board/VW-DTM21E
① MotionDV STUDIO (CD-ROM) Install on the PC to edit the DV animated images. ② DV cable (4-6 pin) Use it to connect the PC and the digital video equipment. ③ DV interface board It allows to connect the DV device even though the PC is not equipped with IEEE1394 terminal. It is an interface board equipped with 2 IEEE1394 terminals. It allows to connect the DV device even though the PC is not equipped with IEEE1394 terminals.
- For information about installing the DV interface board, please refer to paragraph [Installing the DV interface Board].
VW-DTM20E 1
VW-DTM21E 1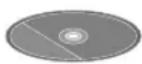
2
3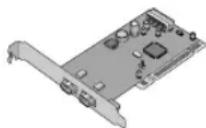
■ DV Editing Software with DV Interface Card/VW-DTM22E
① MotionDV STUDIO (CD-ROM) Install on the PC to edit the DV animated images. ② DV cable (4-6 pin) Use it to connect the PC and the digital video equipment. ③ DV Interface Card It is a Type II card complying with the standard CardBus of the PC Card Standard. It allows to connect the DV device even though the PC is not equipped with IEEE1394 terminal. - For information about inserting the DV Interface Card please refer to paragraph [Installing the card driver].
VW-DTM22E 1
②
③
Operating environment
To install and use MotionDV STUDIO, the PC operating environment must be as described below.
■ Operating environment
OS compatible:
Microsoft® Windows® Me (Millennium Edition) or Microsoft® Windows® 98 Second Edition pre-installed
CPU:
Intel® Celeron™ processor 333MHz or more
Hard Disk:
Ultra DMA-33 or more
130MB (or more) disk space is required (Compact installation)
320MB (or more) disk space is required (Standard installation)
1GB every 4 minutes data
(Standard hard disk capacity required to download the images)
Available memory:
64MB or more (additional memory set up will enable you to operate smoothly)
Video:
1024x768 or more/High Color (16 bit) or more (Direct Draw Overlay Support)
Sound:
PCM audio source (Direct Sound Support)
Interface:
i.LINK terminal (accord with IEEE1394a)
Other: CD-ROM Drive
- i.LINK complies with the IEEE1394-1995 specifications and with its extended specifications. ● Though the above operating environment requirements are met, the software might be unable to work on some PCs.
- When you record in CD-R/RW (Video CD format etc.), a CD-R/RW drive and writing software are necessary.
■ Compatible digital video device/Requirements
Compatible digital video device:
Digital video device produced by Panasonic with built-in i.LINK (IEEE1394/DV terminal) (sold separately)
Requirements:
DV tape, (supplied DV cable)
- Use a DV cable suitable for the PC terminal shape.
- With the digital video device without the function of DV input, it cannot record on a tape the contents edited with this software.
Other
Before using MotionDV STUDIO, close all other applications and resident programs, such as antivirus programs. Also, disable the screen saver and the energy saving settings. Test images recorded with this software are for personal use only. For profit-making use, authorization by the licensee is required. Please note that the contents of the screens shown in these instructions might not correspond to what you actually see on the display, due to different versions of the software and the PC operating environment. Microsoft® Windows® is a registered trademark of Microsoft Corporation in the United States and other countries. Intel® Celeron™ is a registered trademark of Intel Corporation. Other product names or company names are trademarks of their respective companies. The contents of this manual could be changed without notice. Any partial or complete reproduction or copy of this manual is strictly forbidden.
Installing MotionDV STUDIO
Installing MotionDV STUDIO. Disconnect the DV cable before installation.
Insert the MotionDV STUDIO CD into the PC.
The setup program will start automatically. If it does not start automatically, double-click on the SETUP.EXE icon in the CD-ROM.
Click on the [Next] button.
The next screen will be displayed.
Click on the [Next] button.
You can also choose between [Compact] and [Custom].
Click on the [Next] button.
Click on the [Next] button.
Check that the [PAL System] is selected.
1
2
3
4
5
![PANASONIC VW-DTM21 - Click on the [Next] button. - 6](/content/2026/06/1333050/images/83cc43bf3a4cbe64e43e6d5c2cbd6600c687ff1caf4122914309966afd5d0d37.jpg)
At the end of the Set Up, click on the [Finish] button
Set Up is completed and the Set Up end screen will be displayed.
![PANASONIC VW-DTM21 - At the end of the Set Up, click on the [Finish] button - 1](/content/2026/06/1333050/images/986f74acbda994569df201ba5460345e54160b81ee1c5557f0ed78af114adcbf.jpg)
After clicking on [Finish], reboot the computer and start MotionDV STUDIO
- First of all, select [Start]→[Programs]→[Panasonic]→[MotionDV STUDIO 3]→[Readme First] and read the supplementary instructions and the most up-to-date information.
If you use Windows ® 98 Second Edition, after procedure 6 the driver installation screen for the digital video device will be displayed. (If Windows ® Millennium Edition is installed, it can be used as standard)
①Click on the [Yes] button ②Read the driver update license contract, then click on the [Yes] button ③At the end of the set up, click on the [Yes] button to restart the computer. Setup is finished.
Start MotionDV STUDIO
When operating a PC in Spanish, Italian or Chinese OS environment, the application, PDF manual and Readme file installed to the PC are the English version.
Please refer to each folder below in the CD-ROM where you can find the PDF manuals and Readme files of Spanish, Italian and Traditional Chinese version.
- Spanish version:[/Es]
- Italian version:[/It] ● Traditional Chinese version:[/Ch]
![PANASONIC VW-DTM21 - After clicking on [Finish], reboot the computer and start MotionDV STUDIO - 1](/content/2026/06/1333050/images/0c035a653b656922a229e8864c0a2697389b69a6ccc5cc57f583525af3c9144d.jpg)

![PANASONIC VW-DTM21 - After clicking on [Finish], reboot the computer and start MotionDV STUDIO - 3](/content/2026/06/1333050/images/c97ccc3168f29eac90f55b76f519a07efca7407f0134c84db0aadf4904bb4466.jpg)

![PANASONIC VW-DTM21 - After clicking on [Finish], reboot the computer and start MotionDV STUDIO - 5](/content/2026/06/1333050/images/b29fd39a4aac2ba766b36b38b1c417e7f03b5beaf8c104980cb0cf111b33ad95.jpg)

![PANASONIC VW-DTM21 - After clicking on [Finish], reboot the computer and start MotionDV STUDIO - 7](/content/2026/06/1333050/images/84ec1fdc411313e441010603e2631bc07060678313dccddff087aab8351b44ea.jpg)

![PANASONIC VW-DTM21 - After clicking on [Finish], reboot the computer and start MotionDV STUDIO - 9](/content/2026/06/1333050/images/b1ab07a7bb76bf76dd4c8eec23e5e5102412dbf9949089674d612daa2cb7bda1.jpg)

Uninstalling MotionDV STUDIO
Uninstall MotionDV STUDIO when you no longer need it. If the software is already installed, you can uninstall it even if the setup is complete.
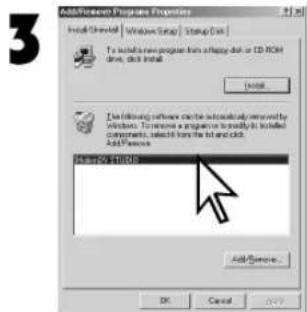
1. Select [Start] → [Settings] → [Control Panel] from the Windows start menu. 2. Double-click on [Add/Remove Programs]. The next screen is displayed. 3. Select [MotionDV STUDIO], then click on the [Add/Remove] button. The uninstall will start. 4. Select [Remove], then click on the [Next] button. 5. Click on the [OK] button. When the uninstall is complete, click on the [Finish] button to restart the PC. Restart the PC before using it.




Connection
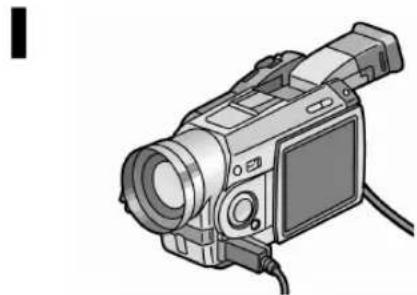
After starting the PC, make the connection as shown in the figure below. Connect the DV cable, always making sure that the device is powered.

① Connect the PC and the DV cable after powering the digital video equipment. Make the connection after setting the operation mode (e.g., play mode) of the digital video device.
After making the connection, it might take a while for the PC to recognize the device.
- When the device is connected for the first time, a version conflict message will be displayed. Click on the [Yes] button.
③ When connecting 2 digital video devices, connect them as described in ①, then check the connection as described in ②.
4. Start MotionDV STUDIO. Select [Start] → [Programs] → [Panasonic] → [MotionDV STUDIO 3] → [MotionDV STUDIO] from the Windows start menu.
② Check that the connection has succeeded.
① Right-click on the [My Computer] icon, then select [Properties] from the Context Menu. The [System Properties] window will be displayed. ② Click on the [Device Manager] tab. ③ Double-click on the [Imaging Device] icon. Check that the current device model is displayed. The displayed name (like [Panasonic DV Tape Recorder/Player]) is different depending on the device model and on the operating system.
■ Suggestions and requirements for the connection
- Don't turn off the digital video equipment during the connection. ● During the connection, insert and eject the tape with the equipment ON.
- Remove the tape when starting the software in Camera mode.
- When disconnecting the 2 devices, disconnect the first device, then check the connection status before disconnecting the second one.
- When using a digital movie camera, use an AC adapter.
- If you are unable to make the connection properly, read the [P & S].
■ About calibration
Depending on the digital video device you use, you might notice that some sections of the tape are not recorded, or that some images are cut off due to a slight timing difference in the recorded images. Before recording the images, perform the calibration and correct the timing. To perform the calibration, select [Equipment] from the [Tool] → [Settings] menu item. Make the corrections manually if the calibration stops midway. (The calibration can only be performed in digital video devices equipped with DV input function.)
Start
Quick starting instructions for MotionDV STUDIO.
For further information about using it, read the PDF manual. In this manual the user instructions are short and concise.

Select [Programs]→[Panasonic]→[MotionDV STUDIO 3]→[MotionDV STUDIO] from the Windows start menu.
When you start the software for the first time, the user license will be displayed. Read it thoroughly, then click the [I agree] button.
![PANASONIC VW-DTM21 - Select [Programs]→[Panasonic]→[MotionDV STUDIO 3]→[MotionDV STUDIO] from the Windows start menu. - 1](/content/2026/06/1333050/images/d49cb33fd2d2868e81b8338d2a44172ac5eb125d011e93af351be43eee0d9c90.jpg)
MotionDV STUDIO will start.
① Control screen
Controls the connected device and the captured images (videoclip).
② Edit Field
The images of the connected digital video device will be displayed in the Input tape track (top).
In the edit track (bottom) you arrange the images of the connected device and the videoclips to edit them.
③ Library Field
The videoclips, the editing data and so on will be displayed here.

■ About the control screen
The control screen has different functions depending on the mode type (input or edit mode).
- When switching to Input mode clicking on the [Input Tape] button, you can operate the connected device.
- When switching to edit mode clicking on the [Edit] button, you can check the videoclips arranged on the track. (For further information about the button, please read the PDF manual and the Help).


Downloading the images to the PC
First of all let's download to the PC the images with the scenes to be edited.
Click on the [Input Tape] button
It changes to the input tape mode.
In this mode you can operate the connected video device.
2 Play the images and display the still image where you wish to start the capture
Clicking on the Play button [▶], the image will be displayed on the preview screen.
Clicking on the still picture button [■], the still picture will be displayed.
3 Click on the [Mark-in] button
The capture starting point will be set and a yellow mark [▶] will be displayed on the Input tape track.
The picture on the right is an example of icon display. Clicking on the [Switch Views] button, the view will switch to time axis display.
4 Play the images and display the still image where you wish to finish the capture
Clicking on the still picture button [■], the still picture will be displayed.
5 Click on the [Mark-out] button
The capture finish point will be set and a yellow mark [◀] will be displayed on the Input tape track.
1
2
3
4
5
6 Double-click on the icon of the image to be captured
The property screen will be displayed.
7 Click on the [Capture] button
The capture setting screen will be displayed.
8 Click on the [Start] button
The tape will be automatically rewound to the capture start point and the image will be downloaded.
Click on the [Close] button to return to the property screen. Click on the [OK] button to close the property screen.
9 When the capture is completed, the captured image (videoclip) will be displayed under [Video] in the Library.
![PANASONIC VW-DTM21 - When the capture is completed, the captured image (videoclip) will be displayed under [Video] in the Library. - 1](/content/2026/06/1333050/images/13cf50890f69b08640e1b9c413796b87adeb690146613446f8272e6ca9af52ef.jpg)
■Capturing with a single click
When playing the image, you can download it clicking on the [Capture] button in the Control screen.
Click on the [Exit] button to end the capture.


Connecting the images in the preferred order
Connect the captured images (videoclip) in the preferred order.
Click on the [Video] tab from the library. The videoclips will be displayed. 2 Drag and drop any videoclips of your choice in the edit track. The videoclip will be displayed in the edit track. 3 Repeat procedure 2 and arrange the videoclips in the preferred order

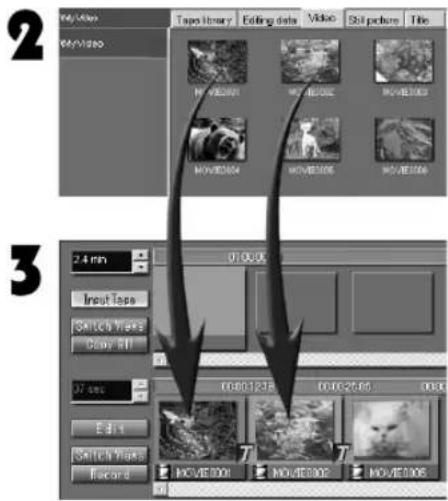

■ To change the videoclip arrangement order
Drag and drop the videoclips and insert them in a position of your choice.

■ To play the aligned videoclips
①Switch to edit mode clicking on the [Edit] button ②Drag the current bar (the red line of the edit track) to the beginning of the track ③Click the Play [▶] button

■ To change the videoclip length (trimming)
Move the current bar (red line) to the position you wish to set as the video clip start point. Click on the [Mark-in] button. The image will be cut before the newly set start point. Move the current bar (red line) to the position you wish to set as the video clip finish point. Click on the [Mark-out] button. The image will be cut behind the newly set finish point.
- When trimming the video clip, it is advisable to display the time axis by clicking on the [Switch Views] button.
- You can also trim the video clips by dragging the trimming mark [ ] at the left and right end of the video clip. (Use this method if you wish to repeat the trimming.)


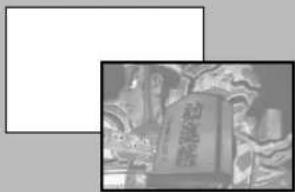


Inserting video effects
Inserting video effects in the aligned video clips. The above figures are examples of video effects.
Right-click on the video clip where you wish to insert the effect, then select [Video Effect] from the context menu.
The video effect setting screen will be displayed.
2. Select the type of video effect.
Dragging the slider [ ] you can check the effect on the partial preview screen.
3. Click the [OK] button.
Rendering will start.
4. When the rendering is completed, the [EF] mark will be applied at the top right of the video clip in the edit track.
The video clip containing the effect will also be displayed in the Library.


Inserting the effect in the scene transition point
Inserting the effect between two aligned video clips. The above figures are examples of transition effects.
Double-click on the transition mark [7] of the section where you wish to insert the effect. The transition effect setting screen will be displayed.
Click on any transition pattern to select it. Dragging the slider [ ] you can check the effect on the partial preview screen.
Click on the [OK] button. Rendering will start.
When the rendering is completed, the [TR] will be applied at the top left of the videoclip in the edit track.
The videoclip containing the effect will also be displayed in the Library.

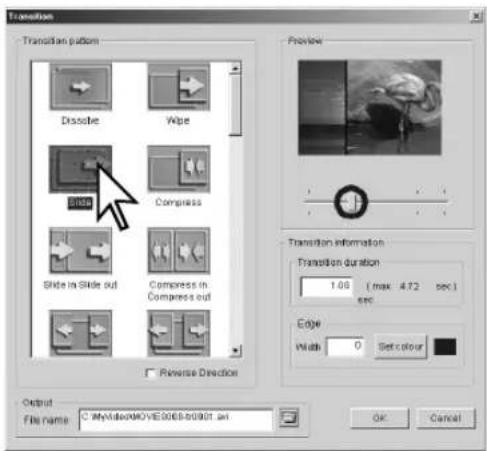
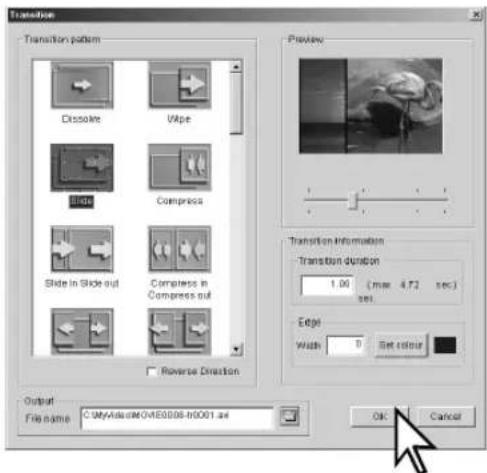


Adding the audio
Adding audio to the videoclips, record the audio (Audio mix), convert it to a WAVE file, then add the sound files to the videoclip.
Select [File]→[Input]→[Import Audio Material] from the menu.
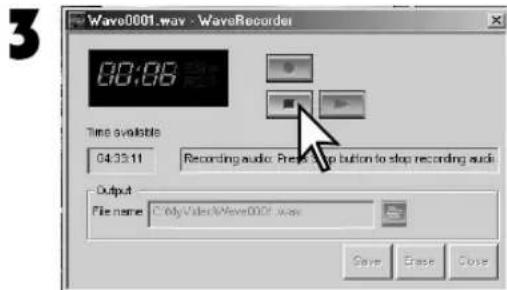
The [WaveRecorder] screen will be displayed.
Connect a sound device or a microphone to the microphone terminal on the PC. (It might be necessary to set it with Windows. Read the PC manual.)
2. Click on the Record button [●].
Sound recording will start, then the playing equipment will start.
If you wish to insert any narration, speak in the direction of the microphone.
3. Click on the Stop button [■].
Sound recording will stop.
Click on [▶] to check the recorded sound.
4. Click on the [Save] button.
The save message will be displayed.
Click on [OK] to save the audio.
When the recording is completed, click on the [Close] button to close the [WaveRecorder] screen.
We have thus created an audio file (WAVE file) to be used in audio mix.
5. Click on the [Audio] tab in the library.
The created WAVE file will be displayed.




![PANASONIC VW-DTM21 - Click on the [Audio] tab in the library. - 6](/content/2026/06/1333050/images/bdd2b9761dbaf44d9ce2a024664e2c1f77eea8ed7899575d3bc3d49272e2b559.jpg)
Drag and drop the WAVE file onto the videoclip where you wish to start adding the audio.
The audio mix screen will be displayed.

Set the sections and the length of the WAVE files.
Set the start point by dragging the slider [ ] to the right and to the left.
Set the finish point by dragging the slider [ ] to the right and to the left.

Adjust the volume by dragging the slider [ ] up and down.
Selecting the Fade in/Fade out box makes the sound gradually fade.
![PANASONIC VW-DTM21 - Adjust the volume by dragging the slider [ ] up and down. - 1](/content/2026/06/1333050/images/e059436d144d57040a427dc51c6d9a19d3b94e9fdaf43893b0b79207bcefe484.jpg)
Check the sound by clicking the play button [▶] in the Preview, then click the [OK] button. Rendering will start.
![PANASONIC VW-DTM21 - Check the sound by clicking the play button [▶] in the Preview, then click the [OK] button. Rendering will start. - 1](/content/2026/06/1333050/images/e1291291d76fbac04dc227f6d7f45f1900e47a43bcf37bfb94a0308ff6572339.jpg)
When rendering is completed, the mark [♪] will be applied at the bottom left of the videoclip in the edit track.
The videoclip containing the audio will also be displayed in the Library.
![PANASONIC VW-DTM21 - Check the sound by clicking the play button [▶] in the Preview, then click the [OK] button. Rendering will start. - 2](/content/2026/06/1333050/images/0da8a125b490e20faf3dfc22a68984a87d8e113505d0f97378fb14852bcef246.jpg)

![PANASONIC VW-DTM21 - Check the sound by clicking the play button [▶] in the Preview, then click the [OK] button. Rendering will start. - 4](/content/2026/06/1333050/images/ba771b32504b930308e9e7947eff5b6ee87265b0c115d5c75ebbccaf9331f92a.jpg)

![PANASONIC VW-DTM21 - Check the sound by clicking the play button [▶] in the Preview, then click the [OK] button. Rendering will start. - 6](/content/2026/06/1333050/images/555cd3548cacbbb06bb0539d5140403c3e00fe4cbe63cd00fc767621c8fa5ae4.jpg)

![PANASONIC VW-DTM21 - Check the sound by clicking the play button [▶] in the Preview, then click the [OK] button. Rendering will start. - 8](/content/2026/06/1333050/images/70e5146408eb5b4660afcfe3a647cee363452840a2f5a7d9b65df647ffafd532.jpg)

![PANASONIC VW-DTM21 - Check the sound by clicking the play button [▶] in the Preview, then click the [OK] button. Rendering will start. - 10](/content/2026/06/1333050/images/932920916649c8ae2a85922b33b552e531fd8a373e432665fc4e4b23308cd0a2.jpg)


Creating a title with 3-D text.
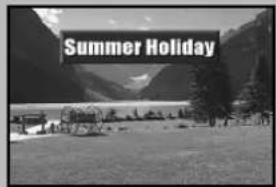
Creating text titles using the title. The above pictures are examples of text titles. The Title has several other functions.
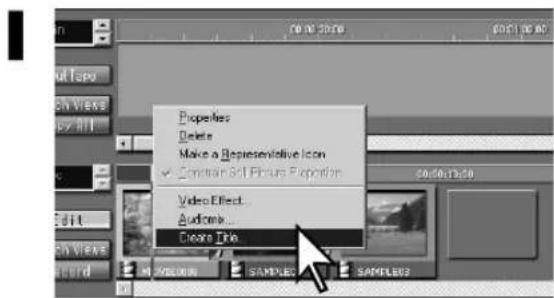
Right-click on the videoclip where you wish to insert 3-D text, then select [Create Title]. The title will start. 2. Click the Text input mode button, then click on the screen. The Text Field is displayed. 3. Input text. 4. Click the Select Mode button [ ]. Text should be laid out.
You can change the size ①, color ②, and font ③.


5 Right-click on the text, then select [Text attributes] from the context menu. The text property setting screen will be displayed.
6 Click on the [3D] tab, then select the [3D Text] box. The 3D display mode will be applied.
7 Click on the 3D text transverse shape to select it, then click on the [OK] button. The 3D text will be displayed on the screen.
You can also apply a motion to the characters. Select the text. From the [Object] menu, select [Motion settings].
8 Select [File]→[Save as Video] from the title menu and save. Enter the title name and save.
If you save the title as animated picture, you'll be able to edit it in MotionDV STUDIO.
9 Select [File]→[Exit application] from the title menu.
The save change message will be displayed. Click on [Yes] to exit from the title and restart MotionDV STUDIO.
The created title is displayed in the edit track and in the library.


Posting and arranging illustrations
Inserting animated pictures using the title. The pictures above are examples of illustrated titles. The title has several other functions.
Right-click on the videoclip where you wish to insert a picture, then select [Create Title]. The titler will start.
2 Drag and drop the desired picture from the [Display animation frame window] to the edit field. The picture will be arranged.
- When the [Display animation frame window] is not displayed, select its box in [View] → [Display animation frame window].
3 Right-click on the picture, then select [Motion settings] from the context menu. The [Motion settings] screen will be displayed.


4 Set the picture motion direction
To move it vertically, select the motion by clicking on the pull-down button [Roll] [▼].
To move it horizontally, select the motion by clicking on the pull-down button [Crawl] [▼].
Clicking on the pull-down button [Advance] you can set the free motion.
5 Check the set motion by clicking on the Play button [▶], then click on the [OK] button.
The [Motion settings] screen will disappear.
● To actually move the picture you must save it as an animated picture.
6 Select [File]→[Save as Video] from the title menu and save.
Enter the title name and save.
Saving the title as an animated picture will allow you to edit it with MotionDV STUDIO.
7 Select [File]→[Exit application] from the title menu.
The save change message will be displayed. Click [Yes] to exit the title and restart MotionDV STUDIO.
The created title is displayed in the edit track and in the Library.


Recording the edited images on tape
You can record the edited contents on a DV tape. Before recording, connect the PC and the digital video equipment with the DV cable.
Carry out the calibration when using the digital video device for the first time. (With a digital video device without the DV input function, it cannot record edited content onto a tape.)
Insert the tape to be used for recording into the digital video equipment.
Before inserting the tape, set the cassette's erasure prevention slider to [REC].
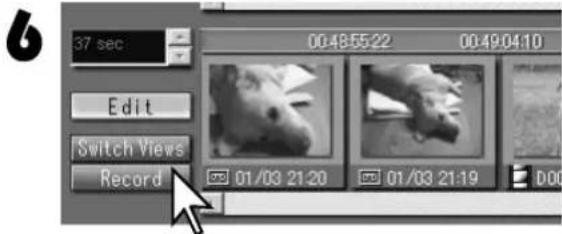
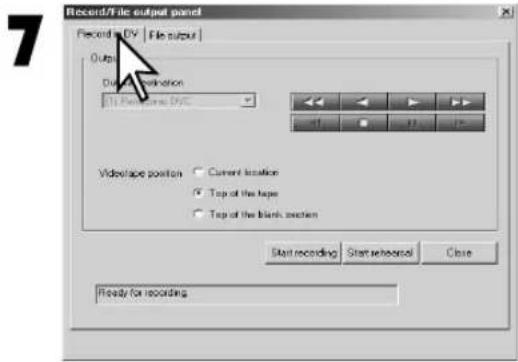
2. Check that the edited videoclip is displayed in the edit track. 3. Click the [Record] button. The recording/file output setting screen will be displayed. 4. Click the [Record in DV] tab. If you record on a DV, the tape setting screen will be displayed. 5. Click the [Start rehearsal] button and check image recording on the screen of the connected digital video device.


6. Select [Current location].
Recording starts from the tape's current position.
Selecting [Top of the tape] or [Top of the blank section], the record start position on the tape will be automatically searched. (Procedure 7 is not necessary.)
- In some devices, it might be impossible to select the option [Top of the blank section].
7. Search the tape position from which you wish to start recording using the control buttons.
8. Click on the [Start recording] button.
Recording will start.
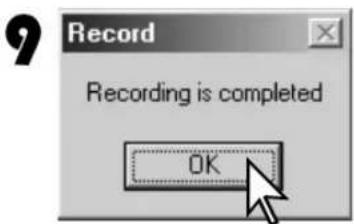
9. When the "Recording is completed" message is displayed, click on the [OK] button.
Thus, we have been able to record the edited images on tape.


Recording using hybrid editing.
It allows the use of a mix of non-linear editing and linear editing (tape editing). (You must first download to the PC the sections where you wish to add effects to the images.)
Carry out the calibration when using the digital video equipment for the first time. (With a digital video device without the DV input function, it cannot record edited contents onto a tape.)
Connect two digital video devices and select the playing device by clicking on the pull-down button [▼].
Play the digital video device by clicking on the Play [▶] button and set the Mark in/out in the section you wish to record on tape.
Set the Mark in at the capture start point and the Mark out at the capture finish point.
Drag and drop the picture displayed in the input tape track onto the edit track.
The picture icon will also be displayed in the edit track.
No video effects can be added to this image. To insert effects, download it once to the PC.
Drag and drop the videoclip from [Video] in the Library to the edit track.
Repeat procedures 2 to 4 and align the images in the preferred order.
Before operating the digital video device, click on the [Input Tape] button and select the Input tape mode.


Click the [Record] button.
The recording/output file setting screen will be displayed.
Click the tab [Record in DV].
The DV tape recording setting screen will be displayed.
Select [Current location] and search for the tape position from which you wish to start recording.
The device starts recording from the tape current position.
Selecting [Top of the tape] or [Top of the blank section], the device will automatically search the tape recording start position.
- In some devices it might be impossible to select the option [Top of the blank section].
9 Click on [Start recording]
Recording will start.
10 When the "Recording is completed" message is displayed, click on the [OK] button
Thus we have been able to record on the recording device tape the images of the playing device tape and the edited contents of the videoclips.

![Record/File output panel Record in DV | File output | Output Output destination [1] Performance GVC Vide-tape position: Current location Top of the tape Top of the blank section Start recording Start rehearsal Close Ready for recording.](/content/2026/06/1333050/images/f5dc717e3e1259c666d2f15a48b1288f5ac93f03cc7ca72ec02fce4d531b6042.jpg)

Sending animated mail with VideoGift
Using VideoGift, we'll send animated files through e-mail messages. (An Internet connection and an e-mail program are required to send e-mail messages)
Select the videoclip from the [Video] Library and right-click on it, then select [Videogift] from the context menu
VideoGift will start and the initial screen of the videoclip will be displayed.
2 Drag the slider [ ] and select the start/finish points
Set the start point dragging the left slider; set the finish point dragging the right slider.
This setting is not necessary if you send all the opened clip files.
3 Click on [Setting] to set size and quality of the image
Selecting [High] increases the size of the image data. Selecting [Low] will result in poor image quality, but the data size is reduced.
4 Click on [Preview].
AVI files are converted to ASF files. (In preview mode, ASF files are not converted.)
5 Click on the [OK] button.
The converted file will be displayed in the preview.


![PANASONIC VW-DTM21 - Click on the [OK] button. - 6](/content/2026/06/1333050/images/7373ded6edec66a57882550da618b2d8b9f14c909bb916e217e11497848a96bc.jpg)
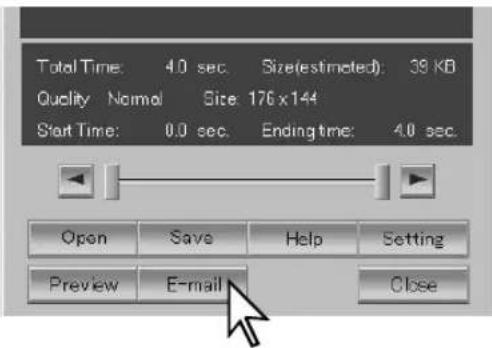
Click on the [E-mail] button.
Click to send the set image by e-mail.
![PANASONIC VW-DTM21 - Click on the [E-mail] button. - 1](/content/2026/06/1333050/images/bc18ec68e424d40b6ebc9de98aae88cec36735e0ea469f88c4b280aa10cddccd.jpg)
Read the message, then click on the [OK] button.
![PANASONIC VW-DTM21 - Read the message, then click on the [OK] button. - 1](/content/2026/06/1333050/images/5d558ca92761ad2a96e7fa72c2669b0812bae312b3ec736653ce4bed3fa5804b.jpg)
Start the e-mail software. Create and send the e-mail message.
If you use Outlook Express or Outlook, the animation file is attached automatically. With other programs, drag and drop the file to be attached into the program screen.
If you use an e-mail program other than [Outlook Express], click on [▼] in the [Mailer Settings] screen and select [Other], then select the executable file (file extension: .exe) of the e-mail program you wish to use.

■ Reproducing sent movies
To play the animation file sent with VideoGift, the addressee shall have Windows® Media Player 6.4 or higher.
Install as described below.
In Windows®98, select [Start] → [Windows Update] and install by clicking on [PRODUCT UPDATES]. Install after downloading the update from the address below:



Outputting to a MPEG file
Outputting the edited image to a MPEG file.
Display the edited videoclip on the edit track.
2 Click on the [Record] button The recording/file output setting screen will be displayed.
3 Click on the [File output] tab
4 Click on the pull down button [▼] in the setting box [Output] and select the file format
5 Select the image quality clicking on it under [Quality]
6 Click the [File output] button and create the MPEG file The MPEG file icon will be displayed in [MPEG/ASF] in the Library.
● Depending on the file length, it might take a while to output it.


![Output File name: C:\MyVideo\DV0001.mpg Output File format: MPEG2 MPEG1 MPEG2 DV AVI Expected file size: 4034 KB Total duration: 5 Sec. ( 125 Frame) Video quality: MPEG2 [Standard] Size: 720 * 400 Audio: MPEG1 Auto 224Kbps Quality High Quality Standard High Compression](/content/2026/06/1333050/images/6417b2843261761524e6704eee87aaee70f50322c165d8bffa2f5387badb385f.jpg)
![Output File name: C:\MyVideo\DV0001.mpg Output File format: MPEG2 Output file data Filename: C:\MyVideo\DV0001.mpg Expected file size: 4834 KB Total duration: 5. Seq. ( 125 Frame) Video quality: MPEG2 [Standard] Size: 720*400 Audio: MPEG1 Audio 224Kbps Quality High Quality Standard High Compression](/content/2026/06/1333050/images/d1b4be356a539c14af585ea0e3e5f47ac7629e8004a9750571c5ec780b163424.jpg)

Converting the file to a file format that can be edited
Converting the MPEG file to an AVI file, it will be possible to use it for editing. Converting to the WAVE format even audio files, like those in MP3 format, you can use them for editing.
Select [File] →[Input] →[Media Import] from the menu
The Media Import screen will be displayed.
2 Click on the output format to select it
[Convert to DVAVI format]:
Converts MPEG1/2 and ASF (MPEG4) files to AVI format.
[Convert to WAV format]:
Converts the audio sections of AVI, MPEG1/2, ASF (MPEG4) files, and MP3, WMA files to WAV format.
3 Click on the file to be converted to select it.
To select a file located in a folder other than the current folder in MotionDV STUDIO, click on the folder button to select the folder and then the file.
4 Click on the [Convert] button.
The file conversion will start.
5 When the "Conversion completed" message is displayed, click on the [OK] button and close the Media Import screen by clicking on the [Close] button.
The converted file will be displayed in the Library screen. (It can only be saved in the folders used with MotionDV STUDIO.)


Let's see the possible solutions to the problems occurring when using MotionDV STUDIO. (Also read the PDF manual.)
![PANASONIC VW-DTM21 - When the "Conversion completed" message is displayed, click on the [OK] button and close the Media Import screen by clicking on the [Close] button. - 6](/content/2026/06/1333050/images/6bef2adf165db681dc9ad4f13787dc461ab18edf8be8f7b4edbb519becfbbd24.jpg)
: The digital video device is not recognized by the PC or it cannot be operated.
![PANASONIC VW-DTM21 - When the "Conversion completed" message is displayed, click on the [OK] button and close the Media Import screen by clicking on the [Close] button. - 7](/content/2026/06/1333050/images/ce9e06aa62544621defb7d6f4842a06059d076eb34142e59ca71852fb93f6920.jpg)
: Check that the digital video device is powered.
: Check that the DV cable is firmly connected. If the PC doesn't recognize the device, disconnect the DV cable once.
: Check that nothing unusual has occurred in the connected digital video device.
: Check that the connected digital video device is manufactured by Panasonic.
: The PC might be unstable. Try rebooting the PC.
![PANASONIC VW-DTM21 - When the "Conversion completed" message is displayed, click on the [OK] button and close the Media Import screen by clicking on the [Close] button. - 8](/content/2026/06/1333050/images/5f00eb1c1ad1599ac43be39a2771e3ffe929a78ed90e9255f574b2df7b1c2823.jpg)
: The images of the digital video device are not displayed in the PC.
![PANASONIC VW-DTM21 - When the "Conversion completed" message is displayed, click on the [OK] button and close the Media Import screen by clicking on the [Close] button. - 9](/content/2026/06/1333050/images/7898a9c40c6f3b4ea2b1be80ba834f74ba69a03364b5110e4ff56fc0c7183788.jpg)
: Though activating the PC play control images are displayed in the digital video device, it takes a while before the images are displayed on the PC screen.
: If 2 digital video devices are connected, check that the playing device (input) and the recording device (output) have been properly selected.
: Selecting [Stop displaying on PC monitor while recording] in the recording settings, images being recorded are not displayed on the PC preview screen. To set the recording settings select [Tool] →[Settings] from the menu and click on the [Advanced settings] tab.
: Check that the model of the digital video device allows DV input.
![PANASONIC VW-DTM21 - When the "Conversion completed" message is displayed, click on the [OK] button and close the Media Import screen by clicking on the [Close] button. - 10](/content/2026/06/1333050/images/257fb599ffd6eecc6e6d4d7527e49896ed25fa82275337ca447c8353cdc44c4a.jpg)
: Images cannot be downloaded.
![PANASONIC VW-DTM21 - When the "Conversion completed" message is displayed, click on the [OK] button and close the Media Import screen by clicking on the [Close] button. - 11](/content/2026/06/1333050/images/19086f5e0a3402fc183a6c96b0e19f04639d816fad46743b029486b0300e0875.jpg)
: To download about 4 minutes of images you must have at least 1GB free on disk. Check that there is enough free disk space. Images might not be downloaded properly when the time code is not recorded uninterruptedly in tape images. Use a recorded tape where the time code is registered continuously.
![PANASONIC VW-DTM21 - When the "Conversion completed" message is displayed, click on the [OK] button and close the Media Import screen by clicking on the [Close] button. - 12](/content/2026/06/1333050/images/3a4cdba751cf1b6c87f9f3f673ad7ba669db1051e6b2bac8a48e2d5f52052594.jpg)
: The calibration stops midway.
![PANASONIC VW-DTM21 - When the "Conversion completed" message is displayed, click on the [OK] button and close the Media Import screen by clicking on the [Close] button. - 13](/content/2026/06/1333050/images/0a598c6532bb627e18b9dfd2658cfa7cb4b51142837b4a735bfa8fb51d2ddbb1.jpg)
: If the calibration stops while it was running, repeat it. If it stops again, perform the calibration manually. Correct the manual setting entering a different number of frames in the [Timing adjustment] setting field on the calibration setting screen. The recording start position and finish position can be adjusted up to -50\~+50 frames respectively. (See the PDF manual)
: If the model of the digital video device doesn't allow the DV iutput, calibration cannot be performed.
![PANASONIC VW-DTM21 - When the "Conversion completed" message is displayed, click on the [OK] button and close the Media Import screen by clicking on the [Close] button. - 14](/content/2026/06/1333050/images/e3f8955b79c57bcb798c9a443fa326585ee93dc91e7824753cd82e62cb32ee21.jpg)
: During image capture, some frames are dropped or the audio stops.
![PANASONIC VW-DTM21 - When the "Conversion completed" message is displayed, click on the [OK] button and close the Media Import screen by clicking on the [Close] button. - 15](/content/2026/06/1333050/images/d2f622d01d1e17b380ed036fa353ce7e34378ad6f456a5da90c3880c16afc2fb.jpg)
: If the DMA is not set in the PC hard disk, recording might fail. DMA settings can be performed by opening the hard disk properties in Windows system properties and clicking on the [Settings] tab.
![PANASONIC VW-DTM21 - When the "Conversion completed" message is displayed, click on the [OK] button and close the Media Import screen by clicking on the [Close] button. - 16](/content/2026/06/1333050/images/1c4438167f3c33e979f7ef50f204ef35cfa28964dabc3c7daae08c3148d77b15.jpg)
: Special effects are not applied.
![PANASONIC VW-DTM21 - When the "Conversion completed" message is displayed, click on the [OK] button and close the Media Import screen by clicking on the [Close] button. - 17](/content/2026/06/1333050/images/722348faaefafe90cd8040a1116c56e575cb432905b99d4bed850e7db9c3cef5.jpg)
: You aligned the still picture or the input tape track image on the edit track, but you cannot apply special effects like video effects or transition effects. Regarding the still picture, start the title and save it as an AVI file; now you'll be able to apply the effects. Regarding the input tape track, the special effects will be applied only after downloading it to the PC and arranging it.
![PANASONIC VW-DTM21 - When the "Conversion completed" message is displayed, click on the [OK] button and close the Media Import screen by clicking on the [Close] button. - 18](/content/2026/06/1333050/images/57f25e81458f309141dfc818112532a8573761c797c5d8b6d61e4662d6d0ff5d.jpg)
: How can I insert the special effect in a part of a long videoclip?
![PANASONIC VW-DTM21 - When the "Conversion completed" message is displayed, click on the [OK] button and close the Media Import screen by clicking on the [Close] button. - 19](/content/2026/06/1333050/images/45c0a27106acb066e6aff5e162a6671e55806d1eebde7a17b06137924de32667.jpg)
: The arranged videoclip may be split. After splitting it, you can add special effects to the desired section only. To split the videoclip into 2 sections move the current bar (red line) to the position where you wish to split the videoclip arranged on the edit track, then click on the [Divide] button. (See the PDF manual)
![PANASONIC VW-DTM21 - When the "Conversion completed" message is displayed, click on the [OK] button and close the Media Import screen by clicking on the [Close] button. - 20](/content/2026/06/1333050/images/bd9634c664a0f218a62cd8ed30f6b82d59011ab70782c4787c7c1b9d1374e4e7.jpg)
: The title doesn't animated even though the motion has been set with the title.
![PANASONIC VW-DTM21 - When the "Conversion completed" message is displayed, click on the [OK] button and close the Media Import screen by clicking on the [Close] button. - 21](/content/2026/06/1333050/images/8269a2cd1c2733d56a3462dd394e0b287c9afeb8a25edf82ffefdc9c6af1d44c.jpg)
: After setting the motion, to animate the title select [Save as Video] and convert it to an AVI file. To check the result play the AVI file with Windows® Media Player.
![PANASONIC VW-DTM21 - When the "Conversion completed" message is displayed, click on the [OK] button and close the Media Import screen by clicking on the [Close] button. - 22](/content/2026/06/1333050/images/d0f3034031e5e85a8d7c416cb901ab02dd6abf9a5120055230d17ef62afb6b5f.jpg)
: How can I print the captured image?
![PANASONIC VW-DTM21 - When the "Conversion completed" message is displayed, click on the [OK] button and close the Media Import screen by clicking on the [Close] button. - 23](/content/2026/06/1333050/images/857da9cbd6677d3ae7198a35a60ebc78a5d4902594a436c429664d5e34dd0fdb.jpg)
: With MotionDV STUDIO, you cannot print the captured image; you can print the labels of the DV tape or of the VHS tape. You can also print the image information as Time Sheet. (See the PDF manual)
![PANASONIC VW-DTM21 - When the "Conversion completed" message is displayed, click on the [OK] button and close the Media Import screen by clicking on the [Close] button. - 24](/content/2026/06/1333050/images/3b2c70a94bce6be4aae96c865d627b0363db7df52e4a69d2dc87225d7c0d8e17.jpg)
: You cannot apply 3D motions to pictures using the [Motion settings] option of the title.
![PANASONIC VW-DTM21 - When the "Conversion completed" message is displayed, click on the [OK] button and close the Media Import screen by clicking on the [Close] button. - 25](/content/2026/06/1333050/images/6d56806295b9974ab31018823156c1210fd4b5746fb5448852916df8e7d781da.jpg)
: 3D settings are only available for text and 3D text. In pictures and in the subsidiary screen of the AVI format, you can set the vertical and horizontal motion, as well as the parabolic and wavy line motion. (Advance) (See the PDF manual)
![PANASONIC VW-DTM21 - When the "Conversion completed" message is displayed, click on the [OK] button and close the Media Import screen by clicking on the [Close] button. - 26](/content/2026/06/1333050/images/aee57c28cfdbca3e7fba9a4fc3d20ef913afeaa9a0405f88dd06daa2ec93a329.jpg)
: How can I create a different animated picture inside the animated picture?
![PANASONIC VW-DTM21 - When the "Conversion completed" message is displayed, click on the [OK] button and close the Media Import screen by clicking on the [Close] button. - 27](/content/2026/06/1333050/images/f2d157dd8f2beb64ba9e36a3d8a9f9d5d082b8c79a3bc18f13700133a51c33de.jpg)
: Right-click on the videoclip in the Library, select [Create Title], start the title and select [Object]→[Insert AVI file]. Selecting the animated file (AVI) you wish to display, an other picture will be placed in the videoclip as subsidiary screen. (Saving them as animated picture, the 2 image files will be merged into a single videoclip) (See the PDF manual)
![PANASONIC VW-DTM21 - When the "Conversion completed" message is displayed, click on the [OK] button and close the Media Import screen by clicking on the [Close] button. - 28](/content/2026/06/1333050/images/89c830def3cf902f9f54c7ef2827dd6a133c52618e1958abda92858b56d55f14.jpg)
: How can I create a gradually fading title?
![PANASONIC VW-DTM21 - When the "Conversion completed" message is displayed, click on the [OK] button and close the Media Import screen by clicking on the [Close] button. - 29](/content/2026/06/1333050/images/6edc7fdd89176326d12c1681b561aac89d9f0433f9875fedba9f29b18d25eb98.jpg)
: Arrange the text and the picture with the title, then select [Object] →[Motion settings] from the menu. Clicking on the [Still] button and setting the fade duration, you can create a title that will gradually fade out (or fade in).
![PANASONIC VW-DTM21 - When the "Conversion completed" message is displayed, click on the [OK] button and close the Media Import screen by clicking on the [Close] button. - 30](/content/2026/06/1333050/images/df4c461b768bcc1108480a654898efafec3a605cf149715d7ec156388d467353.jpg)
: You cannot set the motion for a picture drawn on the screen.
![PANASONIC VW-DTM21 - When the "Conversion completed" message is displayed, click on the [OK] button and close the Media Import screen by clicking on the [Close] button. - 31](/content/2026/06/1333050/images/b8af56cc8bc61f0c1368166f2b3379c864f8a5ea73a4b35d8a81970a61c4555e.jpg)
Using the title drawing tools you can create circles, rectangles and lines, but you cannot animate these figures. If you wish to set the motion in the figures you created, save the drawings in Bitmap format with a software like Paint, supplied with Windows. Now you'll be able to set the motion selecting [Object] →[Insert sprite] from the menu and arranging the image. (See the PDF manual)
![PANASONIC VW-DTM21 - When the "Conversion completed" message is displayed, click on the [OK] button and close the Media Import screen by clicking on the [Close] button. - 32](/content/2026/06/1333050/images/2e82ab7865cbf0b543529f6c624a5e7fcc141164505a30025d0055e03a922702.jpg)
How can I add to the image the audio of another image on DV tape?
![PANASONIC VW-DTM21 - When the "Conversion completed" message is displayed, click on the [OK] button and close the Media Import screen by clicking on the [Close] button. - 33](/content/2026/06/1333050/images/26faff08d528f58c50fa28a5670ccf98055b6e556f0308eb9db75fcbaa89653b.jpg)
Select from the edit track the videoclip where you wish to begin inserting the audio, then select [Edit] →[Audio Mix] from the menu. Entering as WAVE file name the path and file name of the image (videoclip) captured from the DV tape, the audio of that image will be added. (See the PDF manual)
![PANASONIC VW-DTM21 - When the "Conversion completed" message is displayed, click on the [OK] button and close the Media Import screen by clicking on the [Close] button. - 34](/content/2026/06/1333050/images/b6b499610e32cfd7951077c41a4edb057eae5bb0a590a68b793d595d8700a192.jpg)
How can I capture the still picture from the DV tape images and from the videoclip?
![PANASONIC VW-DTM21 - When the "Conversion completed" message is displayed, click on the [OK] button and close the Media Import screen by clicking on the [Close] button. - 35](/content/2026/06/1333050/images/af53cacdc799c2047ba0efa2b3dbd19542acccc090d078d0e54aba833a2ddd39.jpg)
To import an image as still picture you can freeze the images of the digital video device in the point you wish to capture (for the videoclip, move the current bar to the position you wish to capture), then click on the [Snapshot] button. Before importing the image, set the still picture format (BMP format or JPEG format) selecting it from [Tool]→[Settings]. (See the PDF manual)
![PANASONIC VW-DTM21 - When the "Conversion completed" message is displayed, click on the [OK] button and close the Media Import screen by clicking on the [Close] button. - 36](/content/2026/06/1333050/images/acfa1c5cb30aa140b9bb8408a3dad4dfe883923e3edafa1a9b4c7003a3e8633a.jpg)
How can I use the [Index]?
![PANASONIC VW-DTM21 - When the "Conversion completed" message is displayed, click on the [OK] button and close the Media Import screen by clicking on the [Close] button. - 37](/content/2026/06/1333050/images/48bda0e764ffad7bd2183fafec4048cadce5307d37008f0a6d05735447ab0beb.jpg)
To apply the index, click on the [Index] button while playing the tape images. (The scenes of the input tape track will be split where the index is inserted.) Using multiple selection you can easily download to the PC the images between the indexes. Clicking on the [Auto Index] button, the scene transition points will be searched and the index will be applied automatically. You can save the index information. This information may be used when editing again the same tape. (See the PDF manual)
![PANASONIC VW-DTM21 - When the "Conversion completed" message is displayed, click on the [OK] button and close the Media Import screen by clicking on the [Close] button. - 38](/content/2026/06/1333050/images/f68f9dff3a1fd6dbdd7a938f4f94abb6c235c32b262300e4bda22d956b628172.jpg)
How can I insert music from an audio CD using the Audio mix?
![PANASONIC VW-DTM21 - When the "Conversion completed" message is displayed, click on the [OK] button and close the Media Import screen by clicking on the [Close] button. - 39](/content/2026/06/1333050/images/cd268f97d17bbf267487394fa4a13d2da8e122dad524dbe8d5fca886a97b4478.jpg)
To record the sounds from an audio CD you must set the sound recording device in Windows. Follow the procedure below.
1 Select [Start]→[Programs] → [Accessories] → [Entertainment] → [Volume Control] ② Select [Options]→[Properties], then select [Recording]; finally select all the boxes in the displayed controls ③ Select [Mixer] On some PC audio recording from the CD might fail. For further information, read the PC manual. (See the PDF manual)
Suggestions and requirements
Suggestions and requirements are reported in detail in the PDF manual as well. Please read both.
● While using MotionDV STUDIO the computer might become unstable or the application might close. This also depends on computer usage conditions, but the PC might become unstable because image editing requires its full power. - If the auto index has been interrupted, click the [Auto Index] button again. The auto index will restart. - Operate the device about 10 seconds after inserting the tape. - If you use a portable computer, switch on the AC power supply. When using the batteries, CPU efficiency might be reduced, depending on computer settings. (In this case, frame dropping often occurs) - Don't disconnect the power supply of the digital video equipment while using MotionDV STUDIO. If you disconnect the power supply, MotionDV STUDIO might be unable to work. - When performing the hybrid editing, images and audio might be interrupted where the videoclip images join those of the tape. - If the input tape contains images recorded in both SP and LP mode, capture might be incorrect where the mode changes. ● Always perform the calibration before recording the images to be edited. Don't operate the digital video equipment during the calibration. When the calibration stops midway, adjust the frames manually. - If the tape images are aligned on the edit track using drag and drop, only images lasting less than 2 seconds may not be aligned. ● Recording might be incorrect near the beginning and the end of the tape. - If the file format is converted using Media Import, the conversion of some file might fail. - Rendering of a long-playing videoclip takes much time. During rendering, don't perform any other PC operations. Otherwise, rendering might be incorrect.
- If the file is converted with Media Import, the progress bar displaying the development status won't be updated during the conversion of WMA format files, but the change will be made properly.
- When recording the edited contents on tape, it is advisable to click on the [Start recording] button after freezing the tape position where you wish to start recording. (If the option [Current location] is selected)
Installing the card driver
Install the driver when using the DV Interface card. (When using DV Editing Software with DV Interface Card/VW-DTM22E)
■For Windows ® Me (Millennium Edition) users
After starting the PC, insert the card straight into the PC card slot
The driver setup screen will be displayed. (If the driver setup has already been completed, the setup screen will not be displayed)
2 Click on the [Next] button Check that the option [Automatic search for a better driver] is selected.
3 Click on the [Finish] button The driver setup will be completed.


■ For Windows® 98 Second Edition users
If you use Windows ® 98 Second Edition, follow the procedure below to set up the card.
After starting the PC, insert the card straight into the PC card slot (See previous page)
The driver setup screen will be displayed. (If the driver setup has already been completed, the setup screen will not be displayed)
2 Click on the [Next] button
3 Click on the [Next] button Check that the option [Search for the best driver for your device] is selected.
4 Deselect all the boxes, then click on the [Next] button
5 Click on the [Next] button Check that the option [The update driver] is selected.
6 Click on the [Next] button
7 Click on the [Finish] button The driver setup is completed.
- If a message prompting to insert the CD-ROM of Windows® 98 Second Edition is displayed during the setup, insert the CD-ROM of Windows® 98 Second Edition and continue the setup.


Connect the digital video device (DV Interface Card)
Connect the digital video device and the PC using the DV cable (4-6 pin). For further information about the connection, read the paragraph Connection. (When using DV Editing Software with DV Interface Card/VW-DTM22E)
Connect the 6-pin side of the DV cable supplied to the DV Interface Card, then connect the 4-pin side to the digital video device Before making the connection, turn on the digital video equipment and start the PC.
Remove the card
To remove the card follow the procedure described below.
Quit all the applications and disconnect the DV cable connected to the card Disconnect the DV cable holding it on the connector side.
2 Double-click on the icon of the PC card at the right of the task bar, select [Texas Instruments OHCI Compliant IEEE1394 Host Controller], then click on the [Stop] button
● After clicking on the [OK] button, you can remove the card. - Press the eject button of the PC and remove the card holding the concave part on the card side.


Suggestions and requirements (DV Interface Card)
Read carefully before connecting the card.
Precautions to be taken when connecting the card
The card insertion and removal procedure depends upon the type of PC. Carefully read the PC manual. - When installing the DV Interface Card on a PC equipped with i.LINK terminal and performing video editing, a message will be displayed to confirm where the digital video device is connected. Select [Yes] or [No] according to the type of connection. - Don't install the card on the PC when the DV cable is connected, otherwise faults might occur. - Check the card direction when inserting it. If it is not inserted properly, faults might occur both in the card and in the PC. - If you connect 2 digital video devices to the PC use 2 DV Interface Card terminals. You cannot perform the editing using the PC i.LINK terminal and the card terminal one at a time. - If you use a PC with a 2-level card slot, insert this card in the upper slot. If you insert it in the lower slot, you'll be unable to insert any other PC card. (However some PC cards cannot be used in conjunction with this card due to their shape.) - You cannot install 2 cards like this at the same time.
Checking whether the card has been recognized
Check whether the card has been properly recognized by the PC with the following procedure.
1. Right-click on [My computer] and select [properties]. 2. Click on the [Device Manager] tab. 3. Double-click on the [1394 Bus Controller] icon. If [Texas Instruments OHCI Compliant IEEE1394 Host Controller] is displayed, the card has been properly installed.
Using and maintaining the card
- Don't wet or bind the card, don't let it fall to the ground and avoid hard knocks.
- Don't store the card in hot or dusty places, or in places exposed to direct sun radiation.
- Don't disassemble or modify the card.
- The correct image display depends upon the computer and upon the environment where it is used.
Installing the DV Interface Board
Install the DV Interface Board into the PCI slot of the PC. (When using DV Editing Software with DV Interface Board/VW-DTM21E)
Switch off the PC and disconnect the power line. Before beginning the operation disconnect the power line, then wait for a while.
2 Open the PC casing and insert the DV Interface Board into the PCI slot. For information about the position of the PCI slot and the installation method, read the PC manual.
2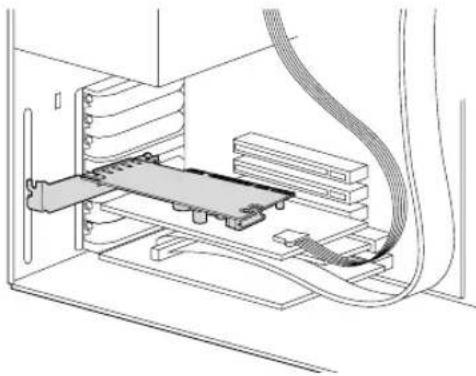
Installing the driver of the DV Interface Board
Install the driver to use the DV Interface Board. (When using the DV Editing Software with DV Interface Board/VW-DTM21E)
■For Windows Me (Millennium Edition) users
Install the DV Interface Board and start the PC.
The driver setup screen will be displayed.
(If the driver setup has already been completed, the setup screen will not be displayed.)
2 Click on the [Next] button.
Check that the option [Automatic search for a better driver] is selected.
3 Click on the [Finish] button.
The driver setup will be completed.
![PANASONIC VW-DTM21 - Click on the [Finish] button. - 1](/content/2026/06/1333050/images/ce4d6edb3e38325d7af4bbe4780c9d277ac8831d049d47cb57cdfd0049d4193a.jpg)
New Hardware Found
![PANASONIC VW-DTM21 - Click on the [Finish] button. - 2](/content/2026/06/1333050/images/eac4ab6ef1467e6b75e7c32eddbb4d2a8708fac227a9f974ed1f0ce0a4b53a3e.jpg)
PCI FireWire | IEEE 1394
Windows has found new hardware and is locating the software for it.
![PANASONIC VW-DTM21 - Click on the [Finish] button. - 3](/content/2026/06/1333050/images/54892e33c39488f5f3a693048f9f9702a82f44da43ff338d8c1a2b323235be00.jpg)
Add New Hardware Wizard
![PANASONIC VW-DTM21 - Click on the [Finish] button. - 4](/content/2026/06/1333050/images/2d95c51947a402fa74a5c699b74f9b1409629cf386ab3f41e5ac761722d7790f.jpg)
Windows has found the following new hardware:
Texas Instruments OHCI Compliant IEEE 1394 Host Controller
Windows can automatically search for and install software that supports your hardware. If your hardware came with installation media, insert it now and click Next.
What would you like to do?
Automatic search for a better driver (Recommended)
Specify the location of the driver (Advanced)
![PANASONIC VW-DTM21 - Click on the [Finish] button. - 5](/content/2026/06/1333050/images/10d2df27d8d38a98f29311c12f13cf2fd11b27c1fe00dfdf15cc116cb79b847f.jpg)
![PANASONIC VW-DTM21 - Click on the [Finish] button. - 6](/content/2026/06/1333050/images/d1af1c580b95350c618a74894db4e74c2a9b1bd12e0090728b2a29b95baf2e9e.jpg)
Add New Hardware Wizard
![PANASONIC VW-DTM21 - Click on the [Finish] button. - 7](/content/2026/06/1333050/images/9689a0cc7f47da8210829bceba34a6965c621256a7289a75a59adafdc36c02d1.jpg)
Texas Instruments OHCI Compliant IEEE 1394 Host Controller
Windows has finished installing the new hardware device.
![PANASONIC VW-DTM21 - Click on the [Finish] button. - 8](/content/2026/06/1333050/images/db70e2bea575e217602bd9bc5604694d3c3eb1b6bf4de2d94aa222c901acb1d7.jpg)
For Windows® 98 Second Edition users:
Install the DV Interface Board and start the PC. The driver setup screen will be displayed. (If the driver setup has already been completed, the setup screen will not be displayed.) 2. Click on the [Next] button. 3. Click on the [Next] button. Check that the option [Search for the best driver for your device] is selected. 4. Deselect all the boxes, then click on the [Next] button. 5. Click on the [Next] button. Check that the option [The update driver] is selected. 6. Click on the [Next] button. 7. Click on the [Finish] button.
The driver setup is completed.
If a message prompting to insert the CD-ROM of Windows® 98 Second Edition is displayed during the setup, insert the CD-ROM of Windows® 98 Second Edition and continue the setup.


Check that the setup is correct.
Check that the DV Interface Board has been properly installed as described below. (When using DV Editing Software with DV Interface Board/VW-DTM21E)
Right-click on [My computer] and select [properties]
2 Click on the [Device Manager] tab 3 Double-click on the icon [1394 Bus Controller] If [IEEE1394 Texas Instruments OHCI Compliant IEEE1394 Host Controller] is displayed, the setup is correct.
Connect the digital video device (DV Interface Board)
Connect the digital video device and the PC using the DV cable (4-6 pin). For further information about the connection, read the paragraph Connection.
Connect the 6-pin side of the DV cable supplied to the terminal of the DV Interface Board, then connect the 4-pin side to the digital video device. Before making the connection turn on the digital video device and start the PC.


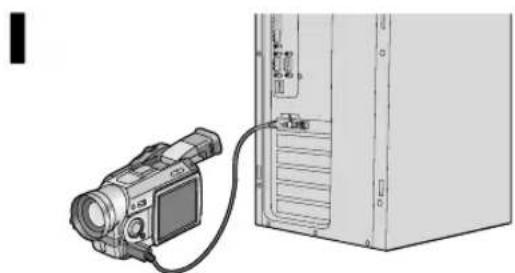
Suggestions and requirements (DV Interface Board)
Read carefully before installing the DV Interface Board.
● This board is not compatible with the PCs equipped with a Low Profile PCI slot. - Never disassemble or modify this board. Don't bind it, don't let it fall to the ground and don't put heavy objects on it. - This board is an electrical device, therefore it doesn't generate static electricity. don't use great speakers or monitors near the board, as they might cause malfunctions. - Don't wet or bind the card, don't let it fall to the ground and avoid hard knocks. - Don't store the card in hot or dusty places, or in places exposed to direct sun radiation. - When using i.Link terminal of DV interface Board except for the purpose of moving picture editing, there is no operating assurance.
Specifications
■ DV Interface Board(VW-DTM21E)
Interface: Support 32bit PCI bus
Number of i.LINK terminals: 6 pin x 2
Transmission speed: Max. 400Mbps
Dimensions: W 75 X D 127 mm
■ DV Interface Card (VW-DTM22E)
Interface: PC Card compliant
CardBus standard supported
Number of i.LINK terminals: 6-pin x2
Transmission speed: Max. 400 Mbps
Dimensions: W 54 x D 127 x H 5 mm
(Connector height is
approximately 15 mm)
- OPERATING INSTRUCTIONS (SETUP/QUICK REFERENCE)
- END USER LICENSE AGREEMENT
- ARTICLE 1 LICENSE
- ARTICLE 2 USE BY A THIRD PARTY
- ARTICLE 3 RESTRICTIONS ON COPYING THE SOFTWARE
- ARTICLE 4 COMPUTER
- ARTICLE 5 REVERSE ENGINEERING, DECOMPILING OR DISASSEMBLY
- ARTICLE 6 INDEMNIFICATION
- ARTICLE 7 EXPORT CONTROL
- ARTICLE 8 TERMINATION OF LICENSE
- CAUTION
- WARNING
- BEFORE USE
- BASIC USE
- ADVANCED USE
- USEFUL INFORMATION
- FOR DV INTERFACE CARD/BOARD
- FEATURES
- NON-LINEAR EDITING
- TAPE (LINEAR) EDITING (TO PERFORM THIS EDITING, THE PC MUST BE EQUIPPED WITH 2 I.LINK/IEEE1394A STANDARD TERMINALS)
- HYBRID EDITING
- NAME AND FUNCTION OF THE PACKAGING ITEMS
- DV EDITING SOFTWARE/VW-DTM20E
- MOTIONDV STUDIO (CD-ROM)
- DV EDITING SOFTWARE WITH DV INTERFACE BOARD/VW-DTM21E
- DV EDITING SOFTWARE WITH DV INTERFACE CARD/VW-DTM22E
- OPERATING ENVIRONMENT
- OS COMPATIBLE
- CPU
- HARD DISK
- AVAILABLE MEMORY
- VIDEO
- SOUND
- INTERFACE
- COMPATIBLE DIGITAL VIDEO DEVICE/REQUIREMENTS
- COMPATIBLE DIGITAL VIDEO DEVICE
- REQUIREMENTS
- OTHER
- INSTALLING MOTIONDV STUDIO
- INSERT THE MOTIONDV STUDIO CD INTO THE PC
- CLICK ON THE [NEXT] BUTTON
- AT THE END OF THE SET UP, CLICK ON THE [FINISH] BUTTON
- AFTER CLICKING ON [FINISH], REBOOT THE COMPUTER AND START MOTIONDV STUDIO
- UNINSTALLING MOTIONDV STUDIO
- CONNECTION
- SUGGESTIONS AND REQUIREMENTS FOR THE CONNECTION
- ABOUT CALIBRATION
- START
- SELECT [PROGRAMS]→[PANASONIC]→[MOTIONDV STUDIO 3]→[MOTIONDV STUDIO] FROM THE WINDOWS START MENU
- MOTIONDV STUDIO WILL START
- ABOUT THE CONTROL SCREEN
- DOWNLOADING THE IMAGES TO THE PC
- CLICK ON THE [INPUT TAPE] BUTTON
- PLAY THE IMAGES AND DISPLAY THE STILL IMAGE WHERE YOU WISH TO START THE CAPTURE
- CLICK ON THE [MARK-IN] BUTTON
- PLAY THE IMAGES AND DISPLAY THE STILL IMAGE WHERE YOU WISH TO FINISH THE CAPTURE
- CLICK ON THE [MARK-OUT] BUTTON
- DOUBLE-CLICK ON THE ICON OF THE IMAGE TO BE CAPTURED
- CLICK ON THE [CAPTURE] BUTTON
- CLICK ON THE [START] BUTTON
- WHEN THE CAPTURE IS COMPLETED, THE CAPTURED IMAGE (VIDEOCLIP) WILL BE DISPLAYED UNDER [VIDEO] IN THE LIBRARY
- CAPTURING WITH A SINGLE CLICK
- CONNECTING THE IMAGES IN THE PREFERRED ORDER
- TO CHANGE THE VIDEOCLIP ARRANGEMENT ORDER
- TO PLAY THE ALIGNED VIDEOCLIPS
- TO CHANGE THE VIDEOCLIP LENGTH (TRIMMING)
- INSERTING VIDEO EFFECTS
- RIGHT-CLICK ON THE VIDEO CLIP WHERE YOU WISH TO INSERT THE EFFECT, THEN SELECT [VIDEO EFFECT] FROM THE CONTEXT MENU
- SELECT THE TYPE OF VIDEO EFFECT
- CLICK THE [OK] BUTTON
- WHEN THE RENDERING IS COMPLETED, THE [EF] MARK WILL BE APPLIED AT THE TOP RIGHT OF THE VIDEO CLIP IN THE EDIT TRACK
- INSERTING THE EFFECT IN THE SCENE TRANSITION POINT
- ADDING THE AUDIO
- SELECT [FILE]→[INPUT]→[IMPORT AUDIO MATERIAL] FROM THE MENU
- CLICK ON THE RECORD BUTTON [●]
- CLICK ON THE STOP BUTTON [■]
- CLICK ON THE [SAVE] BUTTON
- CLICK ON THE [AUDIO] TAB IN THE LIBRARY
- DRAG AND DROP THE WAVE FILE ONTO THE VIDEOCLIP WHERE YOU WISH TO START ADDING THE AUDIO
- SET THE SECTIONS AND THE LENGTH OF THE WAVE FILES
- ADJUST THE VOLUME BY DRAGGING THE SLIDER [ ] UP AND DOWN
- CHECK THE SOUND BY CLICKING THE PLAY BUTTON [▶] IN THE PREVIEW, THEN CLICK THE [OK] BUTTON. RENDERING WILL START
- CREATING A TITLE WITH 3-D TEXT
- POSTING AND ARRANGING ILLUSTRATIONS
- SET THE PICTURE MOTION DIRECTION
- CHECK THE SET MOTION BY CLICKING ON THE PLAY BUTTON [▶], THEN CLICK ON THE [OK] BUTTON
- SELECT [FILE]→[SAVE AS VIDEO] FROM THE TITLE MENU AND SAVE
- SELECT [FILE]→[EXIT APPLICATION] FROM THE TITLE MENU
- RECORDING THE EDITED IMAGES ON TAPE
- SELECT [CURRENT LOCATION]
- SEARCH THE TAPE POSITION FROM WHICH YOU WISH TO START RECORDING USING THE CONTROL BUTTONS
- CLICK ON THE [START RECORDING] BUTTON
- WHEN THE "RECORDING IS COMPLETED" MESSAGE IS DISPLAYED, CLICK ON THE [OK] BUTTON
- RECORDING USING HYBRID EDITING
- CLICK THE [RECORD] BUTTON
- CLICK THE TAB [RECORD IN DV]
- SELECT [CURRENT LOCATION] AND SEARCH FOR THE TAPE POSITION FROM WHICH YOU WISH TO START RECORDING
- CLICK ON [START RECORDING]
- SENDING ANIMATED MAIL WITH VIDEOGIFT
- SELECT THE VIDEOCLIP FROM THE [VIDEO] LIBRARY AND RIGHT-CLICK ON IT, THEN SELECT [VIDEOGIFT] FROM THE CONTEXT MENU
- DRAG THE SLIDER [ ] AND SELECT THE START/FINISH POINTS
- CLICK ON [SETTING] TO SET SIZE AND QUALITY OF THE IMAGE
- CLICK ON [PREVIEW]
- CLICK ON THE [OK] BUTTON
- CLICK ON THE [E-MAIL] BUTTON
- READ THE MESSAGE, THEN CLICK ON THE [OK] BUTTON
- START THE E-MAIL SOFTWARE. CREATE AND SEND THE E-MAIL MESSAGE
- REPRODUCING SENT MOVIES
- OUTPUTTING TO A MPEG FILE
- CONVERTING THE FILE TO A FILE FORMAT THAT CAN BE EDITED
- SELECT [FILE] →[INPUT] →[MEDIA IMPORT] FROM THE MENU
- CLICK ON THE OUTPUT FORMAT TO SELECT IT
- [CONVERT TO DVAVI FORMAT]
- [CONVERT TO WAV FORMAT]
- CLICK ON THE FILE TO BE CONVERTED TO SELECT IT
- CLICK ON THE [CONVERT] BUTTON
- WHEN THE "CONVERSION COMPLETED" MESSAGE IS DISPLAYED, CLICK ON THE [OK] BUTTON AND CLOSE THE MEDIA IMPORT SCREEN BY CLICKING ON THE [CLOSE] BUTTON
- SUGGESTIONS AND REQUIREMENTS
- INSTALLING THE CARD DRIVER
- AFTER STARTING THE PC, INSERT THE CARD STRAIGHT INTO THE PC CARD SLOT
- CLICK ON THE [NEXT] BUTTON CHECK THAT THE OPTION [AUTOMATIC SEARCH FOR A BETTER DRIVER] IS SELECTED
- CLICK ON THE [FINISH] BUTTON THE DRIVER SETUP WILL BE COMPLETED
- FOR WINDOWS® 98 SECOND EDITION USERS
- AFTER STARTING THE PC, INSERT THE CARD STRAIGHT INTO THE PC CARD SLOT (SEE PREVIOUS PAGE)
- DESELECT ALL THE BOXES, THEN CLICK ON THE [NEXT] BUTTON
- CONNECT THE DIGITAL VIDEO DEVICE (DV INTERFACE CARD)
- REMOVE THE CARD
- SUGGESTIONS AND REQUIREMENTS (DV INTERFACE CARD)
- PRECAUTIONS TO BE TAKEN WHEN CONNECTING THE CARD
- CHECKING WHETHER THE CARD HAS BEEN RECOGNIZED
- USING AND MAINTAINING THE CARD
- INSTALLING THE DV INTERFACE BOARD
- INSTALLING THE DRIVER OF THE DV INTERFACE BOARD
- FOR WINDOWS ME (MILLENNIUM EDITION) USERS
- INSTALL THE DV INTERFACE BOARD AND START THE PC
- CLICK ON THE [FINISH] BUTTON
- CHECK THAT THE SETUP IS CORRECT
- CONNECT THE DIGITAL VIDEO DEVICE (DV INTERFACE BOARD)
- SUGGESTIONS AND REQUIREMENTS (DV INTERFACE BOARD)
- SPECIFICATIONS
Brand : PANASONIC
Model : VW-DTM21
Category : Software License