
DMR-HW120 - Blu-ray player PANASONIC - Free user manual and instructions
Find the device manual for free DMR-HW120 PANASONIC in PDF.


| Product Type | Blu-ray Player/Recorder |
| Model | DMR-HW120 |
| Brand | Panasonic |
| Disc Playback | BD-ROM, BD-RE, BD-R, DVD-ROM, DVD-R, DVD-RW, CD, CD-R, CD-RW |
| Playback Video Formats | MPEG-2, MPEG-4, H.264, VC-1, AVCHD |
| Audio Formats | Dolby Digital, Dolby Digital Plus, Dolby TrueHD, DTS, DTS-HD, LPCM |
| HDMI Output | 1 x HDMI (1080p upscaling) |
| Video Output | 1 x Composite, 1 x Component |
| Audio Output | 1 x Optical, 1 x Coaxial |
| USB Input | 2 x USB 2.0 |
| Ethernet | 1 x 10/100/1000 |
| Wireless | Built-in Wi-Fi (802.11 b/g/n) |
| Recording Features | HDD Recording, DVD Recording, Timer Recording |
| Power Consumption | Approx. 25W |
| Dimensions (W x D x H) | 430 x 249 x 59 mm |
| Weight | Approx. 3.0 kg |
| Remote Control | Yes |
| Safety | Class 1 Laser Product |
| Care & Cleaning | Use a soft, dry cloth; avoid liquids and abrasive cleaners. |
| Accessories Included | Remote control, batteries, AV cable, power cord, user manual |
Frequently Asked Questions - DMR-HW120 PANASONIC
User questions about DMR-HW120 PANASONIC
0 question about this device. Answer the ones you know or ask your own.
Ask a new question about this device
Download the instructions for your Blu-ray player in PDF format for free! Find your manual DMR-HW120 - PANASONIC and take your electronic device back in hand. On this page are published all the documents necessary for the use of your device. DMR-HW120 by PANASONIC.
USER MANUAL DMR-HW120 PANASONIC
Operating Instructions
HDD Recorder
Model No. DMR-HW220
DMR-HW120

High Definition

Thank you for purchasing this product.
For optimum performance and safety, please read these instructions carefully.
Please keep this manual for future reference.
- This HDD Recorder is for viewing and recording free to view channels only. It does not receive pay TV or encrypted channels.
guide
Web Site: http://www.panasonic-europe.com
Model number suffix "EB" denotes UK model.
EB
VQT4E91
Safety precautions
WARNING
Unit
- To reduce the risk of fire, electric shock or product damage,
- Do not expose this unit to rain, moisture, dripping or splashing.
- Do not place objects filled with liquids, such as vases, on this unit.
- Use only the recommended accessories.
- Do not remove covers.
- Do not repair this unit by yourself. Refer servicing to qualified service personnel.
- Do not let metal objects fall inside this unit.
- Do not place heavy items on this unit.
AC mains lead
- To reduce the risk of fire, electric shock or product damage,
- Ensure that the power supply voltage corresponds to the voltage printed on this unit.
- Insert the mains plug fully into the socket outlet.
- Do not pull, bend, or place heavy items on the lead.
- Do not handle the plug with wet hands.
- Hold onto the mains plug body when disconnecting the plug.
- Do not use a damaged mains plug or socket outlet.
- Install this unit so that the AC mains lead can be unplugged from the socket outlet immediately if any problem occurs.
SD card
- Keep the Memory Card out of reach of children to prevent swallowing.
CAUTION
Unit
- Do not place sources of naked flames, such as lighted candles, on this unit.
- This unit may receive radio interference caused by mobile telephones during use. If such interference occurs, please increase separation between this unit and the mobile telephone.
- This unit is intended for use in moderate climates.
Placement
- Place this unit on an even surface.
- To reduce the risk of fire, electric shock or product damage,
- Do not install or place this unit in a bookcase, built-in cabinet, or another confined space. Ensure this unit is well ventilated.
- Do not obstruct this unit's ventilation openings with newspapers, tablecloths, curtains, and similar items.
- Do not expose this unit to direct sunlight, high temperatures, high humidity, and excessive vibration.
Batteries
- Danger of explosion if battery is incorrectly replaced. Replace only with the type recommended by the manufacturer.
- Mishandling of batteries can cause electrolyte leakage and may cause a fire.
- Do not mix old and new batteries or different types at the same time.
- Do not heat or expose to flame.
- Do not leave the battery(ies) in a car exposed to direct sunlight for a long period of time with doors and windows closed.
- Do not take apart or short circuit.
- Do not recharge alkaline or manganese batteries.
- Do not use batteries if the covering has been peeled off.
- Remove batteries if you do not intend to use the remote control for a long period of time. Store in a cool, dark place.
- When disposing the batteries, please contact your local authorities or dealer and ask for the correct method of disposal.
Caution for AC Mains Lead
For your safety, please read the following text carefully.
This appliance is supplied with a moulded three pin mains plug for your safety and convenience.
A 5-ampere fuse is fitted in this plug.
Should the fuse need to be replaced please ensure that the replacement fuse has a rating of 5-ampere and that it is approved by ASTA or BSI to BS1362.
Check for the ASTA mark or the BSI mark on the body of the fuse.
If the plug contains a removable fuse cover you must ensure that it is refitted when the fuse is replaced.
If you lose the fuse cover the plug must not be used until a replacement cover is obtained.
A replacement fuse cover can be purchased from your local dealer.
Before use
Remove the connector cover.
How to replace the fuse
The location of the fuse differs according to the type of AC mains plug (figures A and B). Confirm the AC mains plug fitted and follow the instructions below.
Illustrations may differ from the actual AC mains plug.
- Open the fuse cover with a screwdriver.

- Replace the fuse and close or attach the fuse cover.

Supplied accessories
Please check and identify the supplied accessories.
(Product numbers correct as of March 2012. These may be subject to change.)
Remote control: 1 pc.
HW220 (N2QAYB000764)
HW120 (N2QAYB000780)
Batteries for remote control: 2 pcs.
AC mains lead (K2CT2YY00003): 1 pc.
RF coaxial cable (K1TWACC00003): 1 pc.
- Do not use AC mains lead with other equipment.
Indemnity concerning recorded content
Panasonic does not accept any responsibility for damages directly or indirectly due to any type of problems that result in loss of recording or edited content (data), and does not guarantee any content if recording or editing does not work properly. Likewise, the above also applies in a case where any type of repair is made to the unit (including any other non-HDD related component).
Table of contents
Safety precautions 2
Caution for AC Mains Lead....3
Supplied accessories ....3
Getting started
HDD and media information .....6
- Recordable/playable contents .....6
- Notes 7
Unit care 9
Control reference guide ....10
Connection....12
- Basic connections .....12
- Amplifier/receiver connections .....14
- Network connection .....16
Settings 18
- TV operation buttons .....18
- Easy Setting .....19
- Easy Network Setting .....21
FUNCTION MENU screen .....23
Watching broadcasts
Watching broadcasts .....24
- Using Channel List .....24
- Using TV Guide system.....25
- Using channel information .....25
- Operations while watching broadcast .....26
- REWIND LIVE TV/PAUSE LIVE TV .....27
Recording
Recording TV programmes....28
- Operation during Recording .....29
Timer recording. 30
- Various functions with Freeview .....32
- Manually programming timer recording .....33
- Timer recording options. . . . . . . . . . . . . . . . . . . . . . . . . . . . . . . . . . . . . . . . . . . 33
- Timer recording from channel information .....34
- Notes on timer recording .....34
- To confirm and edit a timer programme .....35
Playing back video
Playing titles on the HDD ....36
- DIRECT NAVIGATOR (VIDEO) screen .....36
Playing titles on the media .....39
Operation during play .....40
- General operations. . . . . . . . . . . . . . . . . . . . . . . . . . . . . . . . . . . . . . . . . . . . . . 40
- 3D video playback .....42
Editing video
Deleting recorded titles .....43
Editing recorded titles .....44
Copying video
Copying titles 47
Photo
Playing photos 48
- DIRECT NAVIGATOR (PHOTO) screen .....48
- Photo play option .....49
- Slideshow Settings .....49
Editing photos ....50
Copying photos....51
- Selecting and copying the photos .....51
- Copying automatically....51
Music
Playing music....52
- Copying music to HDD .....52
- Playing music recorded on HDD .....53
- Operations during music play .....54
Editing music/playlist ....55
With Other Equipment
Copying the HD Video or the SD Video .....56
- Copying HD Video (AVCHD format) .....56
- Copying SD Video (MPEG2 format) .....57
Convenient functions
Registering the external HDD (USB HDD) . . .58
- Connecting the USB HDD ....58
- Disconnecting the USB HDD ....58
- Registering the USB HDD .....59
Format SD card 60
Smart Home Networking (DLNA) .....61
- Using this unit as Server .....61
- Using this unit as Client .....62
- Using this unit as Media Renderer .....63
VIERA Connect
(Enjoying Internet Service)....64
- To enjoy video communication (e.g., Skype) .....64
VIERA Link functions .....65
Playback menu....66
Changing the unit's settings (Setup) ..... 68
- Common procedures. 68
-Tuning 70
- HDD / USB HDD 73
- Picture ....
- Sound 74
- Display 74
- Connection 75
- Network ....
- Others 77
- Language code list 79
Software (Firmware) Update 80
Other operations 81
- Entering text 81
- Switching the aspect ratio of the screen ..... 81
- HOLD function. 81
Troubleshooting
Troubleshooting guide.... 82
- General operation. 82
- Displays 83
- TV screen and video 83
- Sound 84
- Recording, timer recording and copying ..... 84
- Play 85
- Edit 85
- Photo 85
- USB 85
- TV Guide 86
- Broadcast 86
- VIERA Link 86
- Network 86
- Reset 87
- Messages on the unit's display 87
- When you experience problems with Easy Network Setting 88
Reference
Specifications 90
Licenses 93
Index 95
About descriptions in these operating instructions
• These operating instructions are applicable to models DMR-HW220 and DMR-HW120. The illustrations in these Operating Instructions show images of DMR-HW220 unless otherwise indicated.
- HW220 : indicates features applicable to DMR-HW220 only.
- HW120 : indicates features applicable to DMR-HW120 only.
- Pages to be referred to are indicated as “⇒ ○○”.
Getting started
Watching broadcasts
Recording
Playing back video
Editing video
Copying video
Photo
Music
With Other Equipment
Convenient functions
Troubleshooting
Reference
HDD and media information
Recordable/playable contents (−: Impossible)
| Media type Standard symbol Playable contents | Recordable contents | |||
| Built-in hard disk drive (HDD) |  | HDD | VideoAVCHD/AVCHD 3DJ P E GMPO (3D photo)MP3 | |
| External HDD (⇒ 58), 2 |  | USB HDD | Video | |
SD Cards |  | SD | AVCHD/AVCHD 3D※3J P E GM P E G52MP4MPO (3D photo) | J P E GMPO (3D photo) |
| USB memories USB |  | AVCHD/AVCHD 3D※3,4DivX®MP4J P E GM P E G62MP3MKVMPO (3D photo) | - | |
※1 Referred to as "USB HDD" in these operating instructions. *2 It cannot be recorded directly. (Only compatible with copying from the built-in HDD) ※3 Recorded with AVCHD compatible devices (Panasonic video camera, etc.). It may not be able to play back depending on the device. ※4 It cannot be played back directly from the USB memory. Playback is possible by copying to the HDD. (⇔ 56) ※5 Some SD Video (MPEG2) contents recorded by a video camera, etc., can be played back only after copying to HDD. Other MPEG2 contents will not be played back. (⇒ 57) ※6 Some SD Video (MPEG2) contents recorded by a video camera, etc., can be played back only after copying to HDD. Other MPEG2 contents can be played back directly. (⇒ 57)

- [USB] Video images of the copyright-protected DivX contents stored on USB device can be output only through the HDMI output terminal.
- With certain recording states and folder structures, the play order may differ or playback may not be possible.
playable contents on a DLNA server
When this unit works as a DLNA client (⇒ 62), following contents are playable.
- Recorded video *
• A V C H D
• MP4 • MPEG2
- JPEG • MPO (3D photo) • MP3 • FLAC
※ Only when the server is another DIGA. (→ 61) - Depending on the server, the contents other than stated above can be played back.
Notes
About extension of files
| File format Extension | |
| JPEG “.JPG” “.jpg” | |
| MPO (3D photo) “.MPO” “.mpo” | |
| MP3 “.MP3” “.mp3” | |
| DivX “.DIVX” “.divx” “.AVI” “.avi” | |
| Subtitle text files* | “.SRT” “.srt” “.SUB” “.sub” “.TXT” “txt” |
| MKV | “.MKV” “.mkv” |
| Subtitle text files* | “.SRT” “.srt” “.SSA” “.ssa” “.ASS” “.ass” |
| MPEG2 | “.MPG” “.mpg” “.MPEG” “.mpeg” “.M2TS” “.m2ts” “.MTS” |
| “.mts” “.TS” “.ts” | |
| MP4 “.MP4” “.mp4” “.MOV” “.mov” | |
The video file and subtitles text file are inside the same folder, and the file names are the same except for the file extensions. - Some files may not be played back even if they have these extensions.
HDD and media information
Notes for the USB devices
- This unit does not guarantee connection with all USB devices.
- FAT12, FAT16 and FAT32 file systems are supported.
- This unit supports USB 2.0 High Speed.
- Although this unit can use USB 3.0 devices as USB 2.0 devices, in certain cases USB 3.0 devices cannot be used due to differing connector shape, larger current ratings, etc. (Use of USB 2.0 devices is recommended.)

- USB memories support DivX and MKV files less than 4 GB.
- [HW220] When using Communication Camera (TY-CC20W or TY-CC10W), connect it to the rear terminal of this unit. (→ 64)
- HW120 When using Wireless LAN Adaptor (DY-WL5), connect it to the rear terminal of this unit. (→ 17)
Notes for the SD cards
- Compatible SD card
- SD Memory Card (from 8 MB to 2 GB, FAT12 and FAT16 formats)
- SDHC Memory Card (from 4 GB to 32 GB, FAT32 format)
- SDXC Memory Card (48 GB, 64 GB, exFAT format)
• Using miniSD card or microSD card
Mini-type and micro-type cards can also be used, but must be used with adaptor cards (optional).
To format an SD card
Refer to "Format SD card". (⇒ 60)

- Usable memory is slightly less than the card capacity.
- If the SD card is formatted on other equipment, the time necessary for recording may be longer or the card may not be able to be used on this unit. In these cases, format the card on this unit.
- SDHC Memory Cards and SDXC Memory Cards can be used in equipment that is compatible with the appropriate cards. (SDHC Memory Cards can also be used in equipment compatible with SDXC Memory Cards)
Media handling
- Do not touch the terminal surface of the SD cards.

- Do not expose the terminals of the SD card to water, garbage or other strange things.
- Do not place in the following areas:
- In hot places, such as under the direct sunlight.
- In very dusty or humid areas.
- Locations susceptible to significant temperature differences (condensation can occur).
- Where static electricity or electromagnetic waves occur.
Unit care
HDD/USB HDD handling care
- The HDD is a high precision device. The HDD is a high precision recording instrument and is easily susceptible to damage. Therefore, be careful of the following points while the unit is turned on, especially during operation, otherwise the HDD and the recorded content may be damaged:
- Do not subject the unit to any vibration and shock.
- Do not remove the AC mains lead from the household mains socket.
- The HDD is a temporary storage device. This unit cannot save (backup) the HDD titles to media. You have to be very careful when handling the unit and editing the title.
- If the HDD or USB HDD is damaged, the recorded content cannot be recovered.
Setup precautions
- Place the unit on a surface that is flat and not subject to vibration or impact.
- Do not place on anything that generates heat like a Set Top Box, etc.
- Place in an area where condensation does not occur. Conditions where condensation may occur
- When there is an extreme change in temperature (e.g., when subjected to an air conditioner or when cooled air directly impacts the unit).
- When there is high humidity or a lot of steam in the room.
In the above situation, without turning the unit on, let the unit adjust to the room temperature and wait 2–3 hours until condensation is gone.
- Do not block the cooling fan on the rear of the unit.
- The unit may breakdown if cigarette smoke or bug spray/vapour, etc. gets inside the unit.
When moving the unit
1 Switch the unit to standby mode. (Wait until "BYE" disappears from the display.) 2 Remove the AC mains lead from the household mains socket. 3 Move only after the unit has come to a complete stop (approx. 3 minutes) in order to avoid subjecting to vibration and shock. (Even after the unit is switched to standby mode, the HDD continues operating for a short time.)
Cleaning
- Wipe with a soft, dry cloth.
- Never use alcohol, paint thinner or benzine to clean this unit.
- Before using chemically treated cloth, carefully read the instructions that came with the cloth.
When requesting this unit for repair
The registration of the USB HDD may be cancelled in the process of repairing this unit. You can use the USB HDD again by re-registering, but all recorded content already on the USB HDD will be lost. In such cases, the recorded content (data) cannot be recovered.
Control reference guide
Instructions for operations are generally described using the remote control.
Remote control
① Transmit the remote control signal - Point it at remote control signal sensor on this unit. (⇒ 11) ② Switch the unit from on to standby mode or vice versa ③ Select drive (HDD, SD or USB) ④ Select channels and title numbers, etc./Enter numbers or characters ⑤ Switch to the previously watched channel (⇒ 24) ⑥ Basic operations for recording and play, REWIND LIVE TV/PAUSE LIVE TV (⇔ 27) ⑦ Show Information (⇒ 25, 37, 40) ⑧ Selection/OK, Frame-by-frame (⇒ 40) ⑨ Show DIRECT NAVIGATOR (⇒ 36) ⑩ Show OPTION menu (⇒ 44, 50, 55) ⑪ Colour buttons (red, green, yellow, blue) (Use in accordance with instruction on the screen.) ⑫ Start recording (⇒ 28) ⑬ Listen to Audio Description (⇒ 26, 41) ⑭ Show the Timer Recording screen (⇒ 33) ⑮ Create chapter (⇒ 41) ⑯ Show Setup menu (⇒ 68) ⑰ Skip the specified time (⇒ 41) ⑱ TV operation buttons (⇒ 18) ⑲ Channel select (⇒ 24)/Change pages in the DIRECT NAVIGATOR screen etc. ⑳ Show the VIERA Connect screen (⇒ 64) ② Switching to the radio channel list (⇒ 24) ②2 HW220 Start up a video communication (→ 64) ②3 Exit the menu screen ②4 Show the TV Guide screen (→ 25) ⑲ Show the FUNCTION MENU screen (→ 23) ②6 Return to previous screen ⑳ Show subtitles (⇒ 26, 41) ⑳ Show Digital teletext (⇒ 26) ⑲ Show NETFLIX screen (→ 64) ③0 To delete unwanted recorded titles, timer programmes, photos or music (⇒ 43) ③1 Skip approx. 1 minute forward (⇒ 41) ③2 Skip approx. 10 seconds backward (⇒ 41)

Insert batteries
Insert so the poles (+ and −) match those in the remote control.
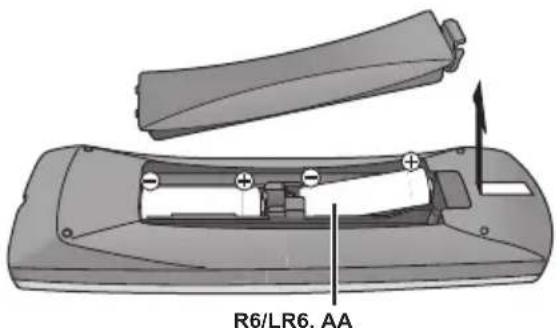
(Alkaline or manganese batteries)
Main unit

① Standby/on switch (⏻/l)
Press to switch the unit from on to standby mode or vice versa. In standby mode, the unit is still consuming a small amount of power.
② Recording indicator
- The indicator will light up while recording.
- The indicator will blink while recording is paused and before recording starts.
③ HW220 CALL LED
- The LED will light up when this unit receives incoming call etc. of the video communication. (⇒ 64)
④ Remote control signal sensor
- Angle: Approx. 20° up and down, 30° left and right • Distance: Within approx. 7 m in front of the unit
⑤ Start PAUSE LIVE TV ( ⇒ 27)
⑥ USB port
⑦ SD card slot
- When removing the SD card, press on the centre of the card and pull it straight out.
⑧ Channel select ( ⇒ 24)
⑨ Display
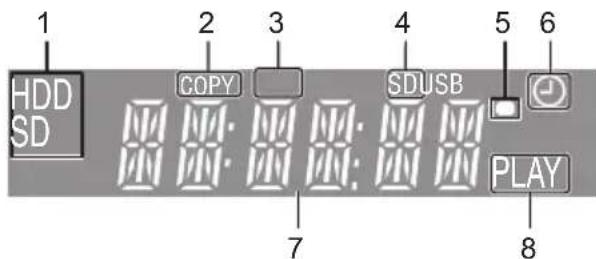
1 Drive (HDD or SD) indicator 2 Copying indicator 3 USB port indicator 4 SD card slot indicator 5 Remote control signal indicator 6 Timer recording indicator
- This indicator lights up when the timer recording standby is activated.
7 Main display section indicator
- Current time
- Playback counter
- Various messages ( ⇒ 87)
8 Playback indicator

- While writing to/reading from the media, do not switch the unit to standby mode or remove the media. Such action may result in loss of the media contents.
- When inserting the media, ensure that it is facing the right way up.
Connection
Basic connections
3D programmes can be played back when this unit is connected to a 3D compatible TV.
- Before connection, turn off all equipment and read the appropriate operating instructions.
BE SURE TO READ THE CAUTION FOR AC MAINS LEAD ON PAGE 3
To connect and register the USB HDD (optional)
Refer to "Registering the external HDD (USB HDD)". (→ 58)
HW220 To connect the Communication Camera (optional)
Refer to "VIERA Connect (Enjoying Internet Service)". (→ 64)
About HDMI cable
- Use the High Speed HDMI cables. Non-HDMI-compliant cables cannot be utilized.
- When outputting 1080p signal, please use HDMI Cables 5.0 meters or less.
- Recommended Panasonic HDMI cable part number: RP-CDHS15 (1.5 m), RP-CDHS30 (3.0 m), RP-CDHS50 (5.0 m), etc.
When the unit is not to be used for a long time
To save power, unplug it from the household mains socket. This unit consumes a small amount of power, even when the unit is in standby mode.
[approx. 0.2 W (“Power Save in Standby” is activated and “RF OUT (Aerial Signal)” is set to “Off”)]
- Keep the RF coaxial cables as far away as possible from other cables.
- Do not roll up the RF coaxial cables.
- The HDMI connection supports VIERA Link "HDAVI Control" (⇒ 65).
- You cannot connect this unit to DVI devices that are incompatible with HDCP. Depending on the device, images may not display properly or at all when connecting with a DVI/HDMI switching cable. (Audio cannot be output.)
- If you are connecting to a TV that is only compatible with 2 channel audio output, audio with 3 channels or more will be down mixed and output as 2 channels, even if connecting with an HDMI cable.
Connection
Amplifier/receiver connections
HDMI terminal
3D programmes can be played back when this unit is connected to a 3D compatible amplifier/receiver and a 3D compatible TV.
- You will not be able to view 3D programmes with this connection if your amplifier/receiver is not 3D compatible.
![graph TD A["HDMI (ARC compatible)"] --> B["HDMI cable"] B --> C["(ARC compatible)"] C --> D["HDMI INHDMI OUT"] D --> E["TV"] E --> F["Amplifier/receiver"] G["RF IN"] --> H["RF OUT"] I["LAN"] --> J["HD/AV OUT"] K["OPTICAL"] --> L["Digital Audio Out / P/MB/T/TEAM"] M["R"] --> N["AUDIO OUT"]](/content/2026/06/1331529/images/e57e901afcef09d3fe6c2554542fe945612b4a8a731fb684cee3a550badb13c3.jpg)

• VIERA Link function is possible by connecting to a TV or amplifier/receiver compatible with VIERA Link. - When using a TV or an amplifier/receiver that does not display "ARC compatible" on the HDMI terminal, it is necessary to connect the TV and the amplifier/receiver with a digital audio cable to enjoy the TV audio on the amplifier/receiver.
■ Amplifier/receiver not compatible with 3D
3D programmes can be played back when this unit is connected to a 3D compatible TV.
• This connection only supports up to 5.1ch.
![graph TD A["Amplifier/receiver"] --> B["HDMI IN (ARC compatible)"] B --> C["HDMI cable"] C --> D["HDMI (ARC compatible)"] D --> E["HDMI"] E --> F["HDMI cable"] F --> G["Digital Audio Out PCM/MTSTREAM"] G --> H["AUDIO OUT"] I["TV"] --> J["Computer"]](/content/2026/06/1331529/images/4ad707fb5d16b37ac79d5cb11a44a90e445bf5b397c771e96b8c020bb0530dae.jpg)

• VIERA Link function is possible by connecting to a TV or amplifier/receiver compatible with VIERA Link. - When using a TV or an amplifier/receiver that does not display "ARC compatible" on the HDMI terminal, it is necessary to connect the TV and the amplifier/receiver with a digital audio cable to enjoy the TV audio on the amplifier/receiver.
DIGITAL AUDIO OUT terminal


- When you do not want the audio to be output from the TV, set "HDMI Audio Output" to "Off" (⇔ 68, 75).
AUDIO OUT terminal
- Connect to terminals of the same colour.

Connection
Network connection
Following functions will be available when this unit is connected to the network.
• Smart Home Networking (DLNA) (⇒ 61) • VIERA Connect (Enjoying Internet Service) (⇒ 64) - Updating the software (firmware) of this unit from Internet (⇒ 80)
For details about connection method, refer to the instructions supplied with the connected equipment.
After you make the LAN cable/Wireless LAN connection, the network setting is needed. (⇒ 21, Easy Network Setting)
LAN cable connection
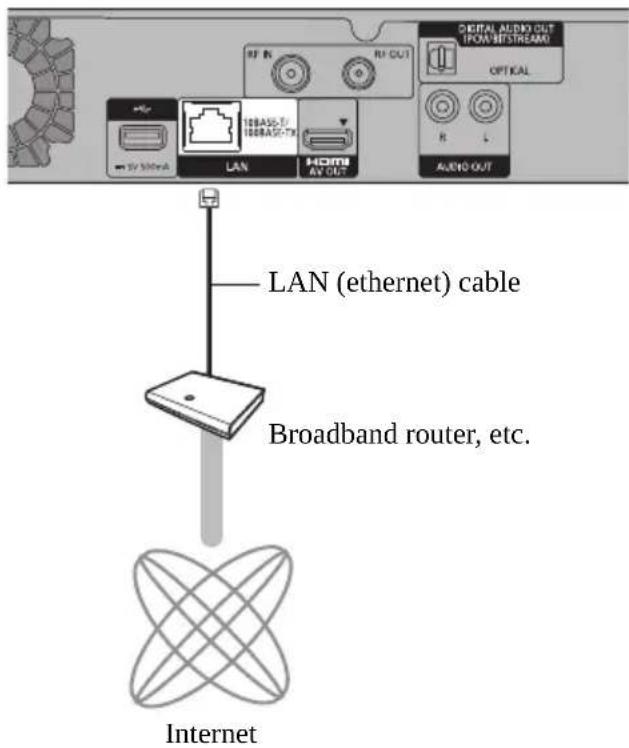

- Use category 5 or above straight LAN cables (STP) when connecting to peripheral devices.
- Inserting any cable other than a LAN cable in the LAN terminal can damage the unit.
Wireless LAN connection
- HW220 Wireless LAN is built in. (There is no need to connect a Wireless LAN Adaptor.)
- HW120 Connect the Wireless LAN Adaptor DY-WL5 (optional).
HW120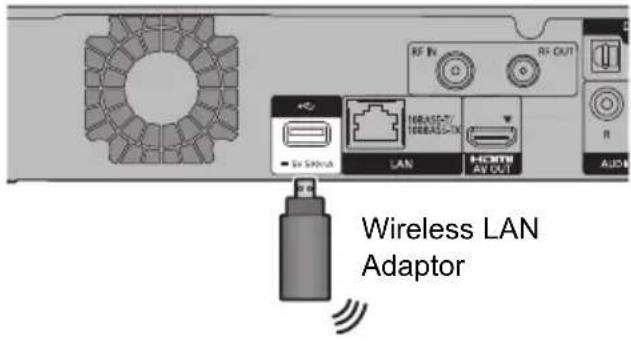


- HW120 Only the Wireless LAN Adaptor DY-WL5 (optional) can be used. Read the operating instructions for DY-WL5 thoroughly when using it. Connect/disconnect DY-WL5 when the unit is in standby mode and not using the network functions, such as downloading a programme, etc.
- For up-to-date compatibility information on your Wireless router refer to http://panasonic.jp/support/global/cs/ (This site is in English only.)
- The unit is not compatible with public wireless LAN services.
■ Precautions of Wireless LAN connection
The following limits are in place regarding the usage of this unit. You must be aware of these limits before using this unit.
Panasonic will in no way be responsible for any incidental damage which may arise due to a failure to obey these limits, or to any condition of use or disuse of this unit.
- Data transmitted and received over radio waves may be intercepted and monitored.
- This unit contains delicate electronic components.
Please use this unit in the manner in which it was intended and follow the following points:
- Do not expose this unit to high temperatures or direct sunlight.
- Do not bend, or subject this unit to strong impacts.
- Keep this unit away from moisture.
- Do not disassemble or alter this unit in any way.
Settings


TV operation buttons
The TV can be operated from the TV operation buttons of the remote control.
- Perform the setting if you cannot operate the TV with the TV operation buttons.
While pressing [TV ⏻], enter the code with the number buttons.
Manufacturer and Code No.
| Brand Code | Brand Code | ||
| Panasonic | 01/02/03/04 | NEC | 36 |
| AIWA 35 | NOBLEX | 33 | |
| AKAI | 27/30 | NOKIA | 25/26/27/60/61 |
| BEKO 05/71/72/73/74 | NORDMENDE | 10 | |
| BENQ 58/59 | OLEVIA | 45 | |
| BRANDT 10/15 | ONWA | 30/39/70 | |
| BUSH 05 | ORION | 05 | |
| CENTREX 66 | PEONY | 49/69 | |
| CURTIS | 05 | PHILCO | 41/48/64 |
| DAEWOO | 64/65 | PHILIPS | 05/06/46 |
| DESMET | 05 | PHONOLA | 05 |
| DUAL | 05 | PIONEER | 37/38 |
| ELEMIS | 05 | PROVIEW | 52 |
| FERGUSON | 10/34 | PYE | 05 |
| FINLUX | 61 | RADIOLA | 05 |
| FISHER | 21 | SABA | 10 |
| FUJITSU 53 | SALORA | 26 | |
| FUNAI 63/67 | SAMSUNG | 32/42/43/65/68 | |
| GOLDSTAR | 05/50/51 | SANSUI | 05 |
| GOODMANS | 05 | SANYO | 21/54/55/56 |
| GRADIENTE 36 | SCHNEIDER | 05/29/30 | |
| GRUNDIG | 09 | SEG | 05/69/75/76/77/78 |
| HITACHI | 05/22/23/40/41 | SELECO | 05/25 |
| IRRADIO | 30 | SHARP | 18 |
| ITT | 25 | SIEMENS | 09 |
| JVC | 17/30/39/70 | SINUDYNE | 05 |
| KDS | 52 | SONY | 08 |
| KOLIN 45 | TCL | 31/33/66/67/69 | |
| KONKA | 62 | TELEFUNKEN | 10/11/12/13/14 |
| LG | 05/50/51 | TEVION | 52 |
| LOEWE | 07/46 | THOMSON | 10/15/44 |
| MAG | 52 | TOSHIBA | 16/57 |
| METZ | 05/28/79 | WHITE | 05 |
| MITSUBISHI | 05/19/20/47 | WESTINGHOUSE | |
| MIVAR 24 | YAMAHA | 18/41 |
- If the brand of your TV is not listed or the code number is invalid for the TV, this remote control is not compatible with your TV.

- If your TV brand has more than one code listed, select the one that allows correct operation.
Easy Setting
1 Turn on the TV, then select the appropriate AV input to suit the connections to this unit.
2 Press [⏻] on the remote control or [⏻/l] on this unit.
- The Easy Setting will start at the initial power on.
- The Auto Setup screen appears. It takes about 3 minutes.

After tuning has been completed, the clock will be set automatically.
- If the region selection screen appears, select repeatedly until you reach the available region.
- If the clock setting screen appears, set the time manually (see 78, Clock).
3 Enter the PIN.
This PIN will be used only for the Owner ID-Data Entry screen.

1 Press the number buttons to enter a 4-digit PIN. 2 Repeat step 1 to confirm.
- Make a note of the PIN in case you forget it. The PIN number cannot be reset.
- Steps 3 – 5 will be skipped in the Easy Setting after “Shipping Condition” (see 79) is performed. (See step 6 on page 20.)
4 Set the Owner ID-Data Entry ("NAME", "HOUSE NO" and "POSTCODE").
e.g.,

1 Select the item, then press [OK]. 2 Select the character, then press [OK]. Repeat this step.
3 Press [BACK/RETURN]. 4 Repeat steps 1-3 to enter all data. 5 Press [BACK/RETURN] to exit from the Owner ID-Data Entry screen.
5 Enter the new PIN for parental control.

- The default PIN is "0000".
1 Select the number, then press [▶] (right). Repeat this step.
- Make a note of PIN in case you forget it.
2 Press [OK] twice.
Settings
6 Set "Power Save" to "On", "On Timer" or "Off", then press [OK].

- On*
It will go into the Power Save in Standby mode.
- On Timer
Set the start and stop time and then press [OK].
- "Power Save in Standby" is activated when the set time comes.
- Off
It is possible to start quickly from standby mode. (Quick Start mode)
- If you use Home Network function ( → 77), select "Off". This function is not available with other settings.
※ "Unit's Display" is fixed to "Automatic" in the Setup menu. (→ 74)
When "Easy Setting has been completed." appears, Easy Setting is complete.
- Select "Yes" to proceed to "Easy Network Setting". (⇒ 21)
- Select "No" to finish the Easy Setting.
To stop partway
Press [BACK/RETURN]
To restart setup
1 Press [SETUP]. (⇒ 18)
2 Select "Auto Setup" in "Tuning", then press [OK].
3 Select "Yes", then press [OK].
To display the Owner ID information on TV
1 While the unit is on, press and hold [OK], the yellow button and the blue button on the remote control at the same time for more than 5 seconds. - "00 RET" is displayed on the unit's display.
2 Repeatedly press [▶] (right) on the remote control until "01 OID" is displayed on the unit's display.
3 Press [OK] on the remote control. The PIN is not displayed.
To confirm that channels have been tuned correctly
Refer to "Using Channel List". (→ 24)
To change PIN for parental control
Refer to "PIN Entry". (→ 78)
To change the region for Channel Sorting
Refer to "Channel Sorting by Region". (→ 71)

- If tuning is cancelled partway through, it may not be possible to receive the channels. Restart setup again.
Easy Network Setting
After completing "Easy Setting", you can continue with "Easy Network Setting".
Preparation
- Before beginning wireless connection setup Obtain your Network name (SSID).
An SSID (Service Set IDentification) is a name used by wireless LAN to identify a particular network. Transmission is possible if the SSID matches for both devices.
1 Select "Wired" or "Wireless", then press [OK].
HW220

- HW120 If "Wireless LAN Adaptor is not connected." is displayed, check that the Wireless LAN Adaptor is fully inserted. Alternatively, disconnect and reconnect it. If there is still no change in the display, consult your dealer for advice.
2 Follow the on-screen instructions and make the following confirmation and settings.
"Wired" connection:
- Home Network Connection Check
- Home Network function
- Internet Connection Test
"Wireless" connection:
- Wireless Settings
- Home Network Connection Check
- Home Network function
- Internet Connection Test
3 When "Easy Network Setting is finished." appears.
Press [OK].
Connection method to wireless access point
Search for wireless network:
1 Select "Search for wireless network", then press [OK]. 2 The available wireless networks will be displayed. Select your network name and press [OK]. - If your Network name is not displayed search again by pressing the red button on the remote control. - Stealth SSID will not be displayed. Enter manually by using "Wireless Settings". (⇒ 68, 76) - If your wireless network is encrypted, Encryption Key Input Screen will be displayed. Input the encryption key of your network.
WPS (PUSH button):
If your Wireless router supports WPS (PUSH button), you can easily perform the settings by pressing WPS button on it.
WPS (Wi-Fi Protected Setup™) is a standard that facilitates settings relating to the connection and security of wireless LAN devices.
1 Select "WPS (PUSH button)", then press [OK]. 2 Press the WPS button or the corresponding button on the wireless router until the lamp starts flashing.

- A Wi-Fi Protected Setup™-compatible wireless router may have this mark.
- For details, refer to the operating instructions of the wireless router.
3 Press [OK].
Settings
When you experience problems
Refer to "When you experience problems with Easy Network Setting". (88)
To restart Easy Network Setting
1 Press [SETUP]. (→ 18) 2 Select "Easy Network Setting" in "Network", then press [OK].
To redo settings individually
If "Easy Network Setting" did not work properly or when you change the settings individually, perform the following steps:
1 Press [SETUP]. (→ 18) 2 Select "Network Settings" in "Network", then press [OK]. 3 Refer to "Network Settings". (→ 76)
Check security before using the Home Network function
If you set "Home Network function" to "On", all connected devices on the same network can access this unit. Ensure that the router for your home network has adequate security system to prevent unauthorized access.

- Refer to the operating instructions of the hub or router.
- Home Network function setting can be set only when you selected "Off" for "Power Save in Standby" in "Easy Setting". (⇒ 20, step 6)
- Even if you set "Home Network function" to "Off", it is possible to set to "On" later. (⇒ 68, 77)
- Do not use this unit to connect to any wireless network for which you do not have usage rights. During automatic searches in a wireless network environment, wireless networks (SSID) for which you do not have usage rights may be displayed; however, using these networks may be regarded as illegal access.
- After performing network settings on this unit, the settings (encryption level, etc.) of the Wireless router might change. When you have trouble getting online on your PC, perform the network settings on your PC in accordance with the settings of Wireless router.
- Please be aware that connecting to a network without encryption may result in the content of the communication being illegitimately viewed by a third party, or the leaking of data such as personal or secret information.
FUNCTION MENU screen
You can easily access the desired functions, such as playback, timer recording, the unit's settings etc. via the FUNCTION MENU.
1 Press [FUNCTION MENU].
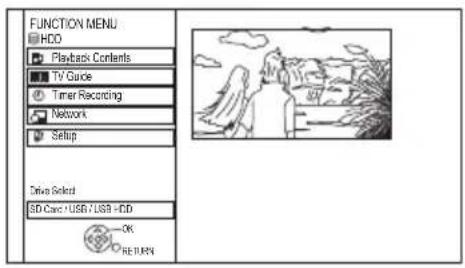
2 Select the item, then press [OK]
FUNCTION MENU list
FUNCTION MENU
![graph TD A["Playback Contents"] --> B["Video (⇒ 36)"] A --> C["Video (AVCHD) (⇒ 39)"] A --> D["Video (MP4) (⇒ 39)"] A --> E["Photo (⇒ 48)"] A --> F["Music (⇒ 53)"] A --> G["TV Guide (⇒ 25)"] A --> H["Timer Recording (⇒ 33)"] A --> I["Network"] I --> J["Home Network (DLNA Client) (⇒ 62)"] I --> K["Ho…](/content/2026/06/1331529/images/980ba12fada4f998d2d010b9d4a5c121d4676dc9276dbb9a3d773ae187fbd87b.jpg)
- Selectable items will change depending on the type and status of the media.
Watching broadcasts
Instructions for operations are generally described using the remote control. (⇒ 10)
Press [CH ∧ ∨] to select the channel.

- You can also select the channel by the following operations
- Using number buttons.
- Using Channel List (=> right)
- Using TV Guide system (=> 25)
- Using channel information (=> 25)
To switch to the channel you have previously watched
Press [LAST VIEW]
- This function does not work correctly depending on the situations.
To switch to the radio channels
Press [RADIO/TV].

- If you have locked channels (→ 72, Child Lock List), PIN is required to start viewing the broadcast.
- When you are watching the 3D programme, subtitles and TV Guide, etc., may not display correctly depending on the settings. (⇒ 42, 3D Type, Signal Format)
Using Channel List
You can select from the list of channel names.
1 Press [OK].

2 Select the channel, then press [OK].
To edit the Channel List
Refer to "Channel List". (=> 71)

- Encrypted channels cannot be watched.
Using TV Guide system
1 Press [GUIDE]. TV Guide screen appears.

2 Select the programme, then press [OK]. 3 Select "View", then press [OK].
Page up/down
Press [CH ∧ ∨ ].
To view a programme list for another day Press the green button (Previous) or the yellow button (Next).
To see programme information
Press [STATUS].
To retrieve the programme data for the area where data have not been acquired
Select the area, then press [STATUS]
- Some broadcasters may not send the programme data. You cannot retrieve the data from them.
To set a timer Recording using the TV Guide System
Refer to "Timer recording". (=> 30)

- Selection of channel is made easy by creating a Favourite of the channels you watch often. (→ 70, Favourites Edit)
- If you make access to Rovi Guide via VIERA Connect, you can use an additional TV Guide which can search programmes by keywords and can display the detailed information, etc. (current as of March, 2012). (⇒ 64)
Using channel information
While watching a programme
Press [STATUS]

① Set timer (⇒ 34) ② Current Category ③ Programme with Guidance information for parental control (⇒ 73, Child Lock for Playback) ④ Audio Description ⑤ Subtitle ⑥ Digital teletext ⑦ Multiple audio
To show detailed information
Press [STATUS] again.
To hide the information screen
Press [EXIT]
To change Category
Press the blue button.
- Register your favourite channels
1 Press [OPTION]. 2 Select "Digital TV Menu", then press [OK]. 3 Select "Favourites Edit", then press [OK]. 4 Refer to "Favourites Edit". (See page 70)
To switch between the current programme and the next programme
Press [◀, ▶].
To switch to another channel
Press [▲, ▼], then press [OK].
Watching broadcasts
Operations while watching broadcast
To show subtitle
When "STTL" appears in channel information (See page 25)
Press [STTL]
- Press again to hide subtitle.
Switching audio
When "Multi Audio" appears in channel information (See page 25)
1 Press [OPTION]. 2 Select "Multi Audio" in "Digital TV Menu", then press [OK]. 3 Select the desired audio.
- Press [EXIT] to exit from the screen.
To listen to the Audio Description
Audio Description adds an additional soundtrack to describe events on screen (narration) and aids understanding and enjoyment, particularly for visually-impaired viewers.
When “AD” appears in channel information ( ⇒ 25)
1 Press [AD]. 2 Select "Audio Description" and set to "Automatic". 3 Select "Volume", then adjust the volume with [◀, ▶].

- Audio Description may not be available depending on the type of audio format.
- When “Dolby Digital / Dolby Digital Plus”, “MPEG” or “HE-AAC” is set to “Bitstream”, the Audio Description may not work. Set them to “PCM” ( ⇒ 74, Digital Audio Output).
- You can also set "Audio Description" active in the Setup menu. ( ⇒ 72)
To show Digital teletext (MHEG)
When "TEXT" appears in channel information ( ⇒ 25)
1 Press [TEXT].
2 Use [▲, ▼, ◀, ▶], number buttons or colour buttons, etc. according to on-screen instructions.

- Some functions of Digital teletext are deactivated during recording.
- "Freeview Players" applies access control for some MHEG services. If you have locked viewing of Digital teletext (MHEG) ( ⇒ 72, Freeview Players), PIN is required to start viewing.
Aspect
You can switch the screen mode.
Refer to "Switching the aspect ratio of the screen". (=> 81)
REWIND LIVE TV/PAUSE LIVE TV
This unit temporarily saves a live TV programme you are watching with this unit's tuner on HDD.
REWIND LIVE TV
You can rewind live TV programme up to 1.5 hours before.
PAUSE LIVE TV
You can pause live TV programme and restart watching from the paused position.
1 While watching TV
REWIND LIVE TV:
Press [SLOW/SEARCH ◀◀] to rewind.
PAUSE LIVE TV:
Press [PAUSE Ⅲ] to pause.
- The maximum amount of the temporary save is 1.5 hours.
2 When you want to resume:
Press [PLAY/×1.3 ▶].
- You can perform search or Quick View, etc.
- If temporary save stops (=> right), playback will be performed from that point.
Display information
While pausing or rewinding a broadcast:
Press [STATUS].
![graph TD A["Pause"] --> B["1"] A --> C["2"] A --> D["3"] B --> E["8.05 9.35"] C --> F["8.50"]](/content/2026/06/1331529/images/b65283792070eea55bf3b50d409f0270d545d94824a53077d8b1c374526d31b3.jpg)
- Press [STATUS] again.

① The time that you can rewind the live programme. ② The amount of time temporarily saved on HDD. ③ The time of the current playback position.
To stop REWIND LIVE TV or PAUSE LIVE TV
1 Press [STOP ■]. 2 Select "Yes", then press [OK].
To hide the display information
Press [EXIT]

- The unit cannot rewind and play more than 1.5 hours prior to the current time.
- Temporary save stops in the following cases:
- When switching to other channels or other screen
- When recording of the watched programme is started
- When two programmes simultaneous recording is started
- When performing PAUSE LIVE TV or REWIND LIVE TV for more than 8 hours (This may vary depending on the HDD free space.)
• These functions do not work in the following cases:
- When the clock is not set
- While recording two programmes simultaneously
- While copying
- While watching a programme being recorded
- When a radio programme is selected
- REWIND LIVE TV:
When "REWIND LIVE TV" is set to "Off" (=> 73)
- PAUSE LIVE TV:
You can operate this unit with the TV remote control by using VIERA Link (=> 65).
Refer to the TV operating instructions.
Recording TV programmes
The titles can only be recorded to the built-in HDD and cannot be copied from the built-in HDD to media other than USB HDD.

- This unit can record two programmes being broadcast at the same time.
1 Select the channel to record.
2 Press [REC ●].
Recording starts.
- "REC1" or "REC2" will light on the unit's display.
3 Select "Automatic Stop", then press [OK].
• One touch recording (OTR)
Recording stops automatically when the programme ends.

- You can also select "Recording Time" or "Continuous recording". (→ right)
To set the recording time
1 Select "Recording Time" or "Continuous recording" in step 3 (→ left).
Recording Time:
You can set the length of recording time from 30 minutes to 4 hours.
- You can select the recording time with [◀, ▶].
Continuous recording:
The recording is continued until you press [STOP ■].
2 Press [OK].
![PANASONIC DMR-HW120 - Press [OK]. - 1](/content/2026/06/1331529/images/98b66563cdc952199a5a80503d7dce04484134e83f14f88abd582ce249d110b9.jpg)
- One recording will terminate when simultaneous recording is being done and timer recording starts. • Digital teletext will not be recorded.
- The following contents or media cannot be played back while recording:
- DivX and MKV files
- Photos
- USB memory
- Copying cannot be performed while recording.
- When “Automatic Standby after OTR” is set to “On” (⇒ 77), this unit is turned to standby mode if this unit is not operated for approximately 5 minutes after completing “Automatic Stop” or “Recording Time”.
Operation during Recording
To check the recording programme
Press [STATUS].
e.g., While recording two programmes simultaneously
![graph TD A["HDD"] --> B["REC1/OTR AUTO"] B --> C["1"] C --> D["○○○○"] E["5"] --> F["REC2"] G["Recording programme displayed on the TV"] --> H["Recording programme not displayed on the TV"]](/content/2026/06/1331529/images/0bfa81f5a5e7338cc3ac1c5a950da77c4ade11e6b26dc2a95601d15039270ab5.jpg)
To stop recording
Press [STOP ■].
When recording one programme: If the following screen appears
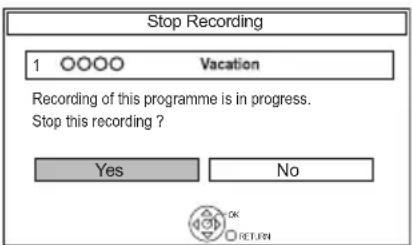
Select "Yes", then press [OK].
When recording two programmes: If the following screen appears

1 Select the programme, then press [OK]. 2 Select "Yes", then press [OK].
To pause recording
After displaying the recording programme, press [PAUSE ■].
- Press again to restart recording. (A title is not split into separate titles.)

- Timer recording programme cannot be paused.
To record two programmes simultaneously
While recording, perform steps 1–3 on page 28.

- Channel can only be switched between the recording programmes.
Simultaneous record and playback
You can play the recording title from the beginning or the titles previously recorded to the HDD.
1 Press [DIRECT NAVIGATOR].
- If the DIRECT NAVIGATOR screen of music is displayed, press the red button, then select "VIDEO".

"●" is displayed on the recording programme.
2 Select the title, then press [OK].
Timer recording

• This operation will only record to the built-in HDD. - This unit can record two programmes being broadcast at the same time.
1 Press [GUIDE].
The TV Guide screen appears.

2 Select the programme, then press the red button.

The timer icon (red) is displayed.
- If on-screen instructions are displayed, follow them.
To use the TV Guide system
Refer to "Using the TV Guide system". (⇒ 25)
To edit the timer recording on the TV Guide screen
1 Select the programme to edit, then press the red button. 2 Select "Timer Rec Edit", then press [OK]. 3 Go to step 3 on page 33. - Some options cannot be changed when "Guide Link" is effective. (⇒ 32, 33)
To cancel a timer recording on the TV Guide screen
1 Select the programme to cancel, then press the red button. 2 Select "Timer Rec Cancel", then press [OK]. ("⊕" disappears)
If the screen for selecting single or series timer recording appears
Select "Single Timer Rec." or "Series Timer Rec." (⇒ 32), then press [OK].
If "Programme Selection" screen appears
Depending on the signal sent from the broadcaster, both High Definition picture programme and Standard Definition picture programme exist.
Select the programme, then press [OK].

If "Overlapped Timer Recording" screen appears

You can eliminate the overlapping or may change with repeat event for the duplicated programme.
1 Select "Change", then press [OK]. 2 Follow the on-screen instructions.
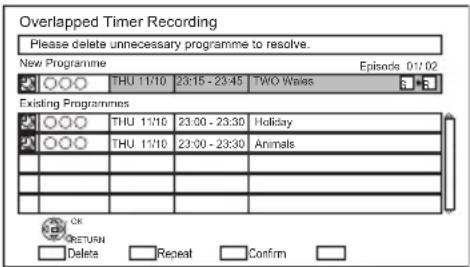
Red: Delete programme
Green: Record Repeat programme
Yellow: Exit
(Overlapping is not resolved)
Operation during Recording
Refer to "Operation during Recording". (=> 29)

- Some broadcasters may not send programme information. When programme information is not displayed correctly, use manual timer recording. (=> 33)
- Titles recorded using "Series Timer Rec." are bundled and displayed as a "group" in the DIRECT NAVIGATOR screen (=> 36).
- If the unit cannot record the selected programme, the unit will record the repeat programme if it is available. However, this unit will not record the repeat programme, if any part of the selected programme is recorded.
- The series recording will be cancelled if there has been no episode of the series for 13 weeks.
To select the programmes of a specific category
1 On the TV Guide screen: Press the blue button. 2 Select the item, then press [OK].
To return to the previous TV Guide list
Select "All Channels" in step 2.

- Category may not be assigned correctly depending on the programme information.
Timer recording
Various functions with Freeview
This unit has several functions that enable timer recordings to be controlled by the signal sent from the broadcaster.
Guide Link
The recording's start and stop times can be controlled by the broadcaster, e.g. delayed start. In order to make the timer recording work successfully, we recommend you set the start time earlier and the end time later by some minutes, up to a maximum of 10 minutes.
- This is indicated by "Guide Link" in the Timer Recording screen (> 33).
- The "Guide Link" function may not work if you manually change the start time or the stop time over 10 minutes.
Series Timer Recording
You can record all the episodes of a series by setting just one timer recording.
• To check the schedule of the series
On the Selection Screen (> right, Recording recommended programme, step 1): Press the blue button.

| F | Programme for which you set the timer recording |
| S | The episode to be recorded |
| R | Repeat programme |
| HD | High definition programme |
Split Programme
You can record a programme separated into two or more parts by some other programmes, e.g. news.
When setting timer from the 1st split programme, other parts of the programme will be automatically set and indicated by the timer icon on the TV Guide.
- This is indicated by "Split" in the Timer Recording screen (>33).

- If the signal is not sent correctly, the recording may lack the beginning or the ending part of the programmes.
Recording recommended programme (Recommendation Booking)
You can record a programme that the broadcaster recommends.
1 On the TV Guide screen: Select the programme, then press [OK].

2 Select "Recommended", then press [OK].

3 Select the programme, then press [OK].
- If the screen for selecting single or series timer recording, or "Programme Selection" screen appears, refer to page 30.
4 Press [OK].
The timer icon (red) is displayed on the Recommendation List.
• To exit from the screen Press [EXIT]⊗
To cancel the timer recording on the Recommendation List
1 Select the programme with the timer icon (red), then press [OK]. 2 Select "Yes", then press [OK]. (The timer icon disappears.)

- "Recommended" cannot be selected if there is no recommended programme.
Manually programming timer recording
1 Press [PROG/CHECK].

2 Select "New Timer Programme", then press [OK]. 3 Select the items and change the items. (⇒ right, Timer recording options) 4 Press [OK]. The timer programme is stored.

To confirm and edit the timer programme
Refer to "To confirm and edit a timer programme". (⇒ 35)
Operation during Recording
Refer to "Operation during Recording". (=> 29)
Timer recording options
Select the items and change the items.
e.g.,
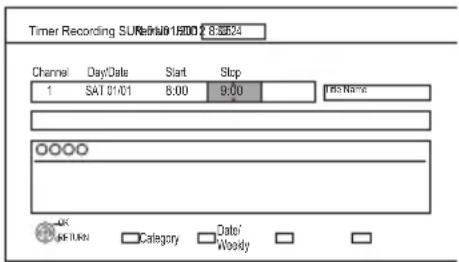
Channel
- You can select Category with the red button.
Day/Date
- You can select "Date" or "Weekly" by pressing the green button.
Start/Stop
- Press and hold [▲, ▼] to alter in 15-minute increments.
Auto Renewal Recording
(Only daily/weekly/series timer recording)
The unit will record the new programme over the old one.
1 Select "Renew".
2 Select "ON".
Title Name
1 Select "Title Name", then press [OK]. 2 Refer to "Entering text". (→ 81)
Timer recording
Timer recording from channel information
You can make timer recording of the current or next programme.
1 While watching a programme Press [STATUS]
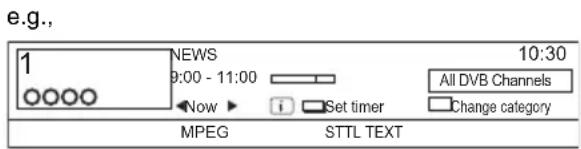
2 Display the channel information of a programme to record.
- Switch the programme with [◀, ▶].
- Switch the channel with [▲, ▼].
3 Press the yellow button.
4 Go to step 3 on page 33.
- Some options cannot be changed when "Guide Link" is effective. (⇒ 32, 33)
Notes on timer recording
- You can enter up to 32 programmes within a month in advance. (Each daily, weekly or series programme is counted as one programme.)
- Even if you switch the unit to standby mode during the timer recording, the recording is continued.
- When you programme successive timer recordings to start, about the last 1 minute of the earlier programme will not be recorded.
- Timer recording will not start while:
- copying HD Video (AVCHD format) from USB device or SD card
- copying photos/music
- formatting
To confirm and edit a timer programme
1 Press [PROG/CHECK].
e.g.,
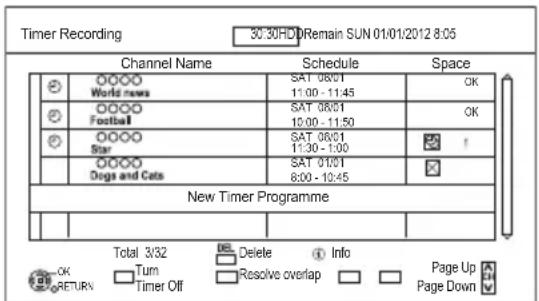
2 Select the programme, then perform the operations.
To deactivate a timer programme
Press the red button.
- The timer icon “💡” will change from red to grey.
- Press the red button again to activate timer recording standby. (The timer icon “💡” will change to red.)
To delete a timer programme
Press [DEL].
To edit a timer programme
1 Press [OK]. 2 Change the timer recording options.
- Refer to "Timer recording options". (⇒ 33)
3 Press [OK].
To show programme information
Press [STATUS]
To exit the timer recording list
Press [EXIT]

- "No Data" is displayed on a series recording item if there will be no episode of the series for the next 8 days. We recommend you delete the "No Data" item after you confirm the last episode of the series is recorded.
Screen icons

Red: Timer recording standby is activated. Grey: Timer recording standby is deactivated.

Currently recording programme

A part or all of the programme will not be recorded since the programme is overlapping.
- Programme overlapping can be resolved with repeat programme if available. Select the programme, then press the green button.
(⇒ 31, If "Overlapped Timer Recording" screen appears)

- This function is not available for the timer programmes that were set manually.

The HDD is full.

Copy-protected programme It was not recorded.

The recording of the programme was not completed because of some reason.

Auto Renewal Recording is set (⇒ 33).

Guide Link (⇒ 32)

Split Programme (⇒ 32)

Series Timer Recording (⇒ 32)

Displayed if the recording can fit in the remaining space

Daily or weekly timer programme is set.
(Date)
! It may not be possible to record because: - there is not enough space left. - the number of possible titles has reached its maximum. (⇒ 91) - programmes are deactivated, etc.
Playing titles on the HDD


1 Press [DRIVE SELECT] to select "HDD", then press [DIRECT NAVIGATOR].
- If the DIRECT NAVIGATOR screen of photo or music is displayed, press the red button, then select "VIDEO".
e.g.,

- USB HDD When connecting registered USB HDD, "USB HDD" tab and registration number appears. Select "USB HDD" tab.
e.g.,

2 Select the title, then press [OK].
Playback starts.
Resume play function
If the following screen appears, select the point to start playback.

DIRECT NAVIGATOR (VIDEO)
screen
Screen icons
 | Currently recording programme |
 | Protected title |
 | Title was not recorded due to recording protection |
| ### | Title cannot be played (When data is damaged etc.) |
| [DOZY] | Grouped titles |
| [3THC] | Title has not yet been played |
| ### | Title is recorded using a different encoding system from that of the unit. Change the “TV System” (⇒ 68, 75). |
 | Radio programme |
 | 3D contentsThis icon will not display even with 3D programmes when a broadcast programme is recorded. |
 | Recorded in 1080/50p contents |
| [524W] | Recorded in 1080/60p contents |
| [3550] | This icon is displayed with the following titles when “Child Lock for Playback” is set to “On” (⇒ 73). - Title with Guidance information - Title restricted by Child Lock List (⇒ 72)PIN is required to play. |
| [XZWZ] | Title has been recorded in Series timer recording. |
| [63TZ] | Title has been recorded in Series timer recording and has not yet been played. |
| [7XWZ] | Recording did not complete as the timer recording has started. |
| [8Y9] | Title cannot be played from DLNA client not compatible with DTCP-IP (⇒ 61) |
Tab
Titles will be categorised automatically. You can quickly find the recorded titles by selecting the tab.
To select the tab
Press [◀, ▶].
To change the displayed programme type tab
1 Select the programme type, then press the green button. 2 Select the item, then press [OK].
To change the programme type of title
Refer to "Changing programme type of title". ( ⇒ 45)
Switching to the PHOTO or MUSIC screen
1 Press the red button. 2 Select "PHOTO" or "MUSIC", then press [OK].
Showing Information
Select the title, then press [STATUS]
Switching the appearance
1 Press [OPTION]. 2 Select "Grouped Titles" or "All Titles", then press [OK]. Two or more titles recorded in the daily/weekly/series timer recording mode are bundled and displayed as one item.
Grouped Titles:
All Titles:
Displays all titles.
Playing back grouped titles
1 On the Grouped Titles screen: Select the item marked with

2 When playing all titles:
Press [PLAY/×1.3 ▶].
When playing the individual title:
Press [OK] and select the title, then press [OK].
Playing titles on the HDD
Editing the grouped titles
1 Select the title or the group, then press the yellow button.
- A check mark is displayed. Repeat this step.
- Press the yellow button again to cancel.
- If you perform "Remove", select the title in the group.
2 Press [OPTION]. 3 Select the item, then press [OK].
Create Group:
Selected titles are bundled to form a group. Select "Create", then press [OK].
Release Grouping:
All the titles in the group are released. Select "Release", then press [OK].
Remove:
Selected titles are removed from the group. Select "Remove", then press [OK].
Changing the group name
1 Select the group, then press [OPTION]. 2 Select "Edit", then press [OK]. 3 Select "Enter Title Name", then press [OK]. 4 Refer to "Entering text". (→ 81)
Playback from Chapter View
Regarding chapters
You can divide a title into multiple chapters. Each section between the division points (Chapter Marks) becomes a chapter.
![graph TD A["Title"] --> B["Chapter"] B --> C["Chapter Marks"] C --> D["Chapter"] style A fill:#f9f,stroke:#333 style B fill:#ccf,stroke:#333 style C fill:#cfc,stroke:#333 style D fill:#fcc,stroke:#333](/content/2026/06/1331529/images/44d3751e1140b172202e9dc18e9f0014312599bb6e4bb7a78f7fde4457ec4bae.jpg)
1 Select the title, then press [OPTION]. 2 Select "Chapter View", then press [OK]. e.g., HDD

3 Select the chapter, then press [OK].
To edit the chapter in Chapter View Refer to "Editing chapters". (→ 46)
Playing titles on the media


1 Insert the media.
Depending on the type of the media, play starts from the specified position, or the screen appears.
2 When the menu screen etc., appears:
Select the item or title, then press [OK].
- Repeat this step if necessary.
Playback starts.

- Some DivX and MKV files may not be played back, depending on the video resolution and frame rate condition.
Menu screen
Selecting screen for each operation is displayed when the media is inserted, and you can access the operation screen easily.
e.g., USB

- Display items differ depending on what is recorded in each media.
If the menu screen is not displayed, display it by performing the following operation.
1 While stopped
Press [OPTION].
2 Select "Drive Select", then press [OK].
3 Select the media, then press [OK].
Video list screen
e.g.,
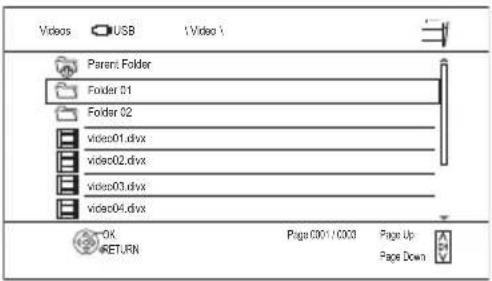
Screen icons:

Folder

Titles

Move to the parent folder
DIRECT NAVIGATOR (AVCHD) screen

e.g.,

Showing Information
1 Select the title, then press [OPTION]. 2 Select "Information", then press [OK].
About screen icons on the DIRECT NAVIGATOR
Refer to "Screen icons". (⇒ 36)
Operation during play


- Depending on the media and the type of file, some operations may not be possible.
- Depending on the media, it may take time for the menu screen, pictures, sound, etc. to start.
General operations
Status messages
Press [STATUS] twice.
e.g.,

Stop
Press [STOP ■].
Resume play function
Press [PLAY/×1.3 ▶] to restart from the stopped position.
- Stopped position
HDD USB HDD :
Stopped position for each title is memorized.
Quick View
Press and hold [PLAY/×1.3 ▶].
- Press again to return to normal speed.
- DivX, MKV, MP4 and MPEG2 (USB): Quick View is not effective.

Search
Press [SLOW/SEARCH ◀◀] or [SLOW/SEARCH ▶▶].
- Press [PLAY/×1.3 ▶] to restart play.

• The speed increases up to 5 steps. - DivX, MKV, MP4 and MPEG2 (USB): Audio is not heard during all levels of search.
Pause
Press [PAUSE ■].
- Press [PLAY/×1.3 ▶] to restart play.
Slow-motion
While paused, press [SLOW/SEARCH ◀◀] or [SLOW/SEARCH ▶▶].
- Press [PLAY/×1.3 ▶] to restart play.

• The speed increases up to 5 steps. - DivX, MKV, MP4 and MPEG2 (USB): Slow-motion is not effective. - AVCHD (SD): Forward direction [SLOW/SEARCH ▶▶] only.
Frame-by-frame
While paused, press [◀] (◀▶) or [▶] (▶▶).
• Each press shows the next frame. - Press and hold to change in succession forward or backward. - Press [PLAY/×1.3 ▶] to restart play.

- DivX, MKV, MP4 and MPEG2 (USB): Frame-by-frame is not effective.
- AVCHD (SD): Forward direction [▶] (▶) only.
Manual Skip
Skip forward 1 minute:
Press [MANUAL SKIP +60s].
Skip backward 10 seconds:
Press [MANUAL SKIP -10s].

• DivX and MKV: Manual Skip is not effective.
Skipping the specified time
1 Press [TIME SLIP]. 2 Select the time with [▲, ▼].
- Press and hold [▲, ▼] to change the time by 10-minute increments.
3 Press [OK].
- Play skips the specified time.

- DivX, MKV, AVCHD, MP4 and MPEG2 ([USB]): Skipping the specified time is not effective.
Skipping the title or chapter
Press [SKIP ◀◀◀] or [SKIP ▶▶▶].

- [HDD] [USB_HDD]: It will not skip the title. But the title in the grouped titles will be skipped. (> 37)
To create Chapter Marks
[HDD] [USB_HDD]
During playback or pause
Press [CHAPTER].
To delete the Chapter Mark
[HDD] [USB_HDD]
1 While paused
Press [SKIP ◀◀◀] or [SKIP ▶▶▶] and skip to the location you want to delete.
2 Press [CHAPTER]. 3 Select "Yes", then press [OK].
Changing audio
Select the desired audio with "Multi Audio" in the Content menu (>66).
Switching subtitles
[HDD] [USB_HDD]:
1 Press [STTL]. 2 Select "On" or "Off". - If you want to switch the subtitle language, select it in the Content menu (> 66).
DivX and MKV:
Display with "Subtitles" in the Content menu (>66).
Listening to the Audio Description
[HDD] [USB_HDD]
1 Press [AD]. 2 Select "Audio Description" and set to "Automatic". 3 Select "Volume", then adjust the volume with [◀, ▶].

- When "Dolby Digital / Dolby Digital Plus", "MPEG" or "HE-AAC" is set to "Bitstream", the Audio Description may not work. Set them to "PCM" (> 74, Digital Audio Output).
- You can also set "Audio Description" active in the Setup menu. (> 72)
Aspect
You can switch the screen mode.
Refer to "Switching the aspect ratio of the screen". (> 81)
Operation during play
3D video playback
Preparation
Connect 3D compatible TV to this unit. (=> 12)
- Perform the necessary preparations for the TV.
Play back following the instructions displayed on the screen.
Preparatory 3D settings
Perform the following settings as necessary.
3D Type
If 3D video cannot be played back in 3D, you may be able to play it in 3D by changing the setting.
(⇒ 68, 75)
3D AVCHD Output
If 2D AVCHD video is recognised as 3D video and cannot be played back correctly, you may be able to play it by changing the setting. (⇒ 68, 75)
3D Playback Message
Hide the 3D viewing warning screen. (⇒ 68, 75)
Graphic Display Level
Adjust the 3D position for the playback menu or message screen etc. (⇒ 66)
3D settings during playback
Change this setting when the screen is not correctly displayed for 3D compatible programmes.
1 Press [OPTION]. 2 Select "3D Settings", then press [OK]. 3 Select the item, then press [OK].
Signal Format
- Original
Keep original picture format.
- Side by side
3D picture format comprising of left and right screens.
• 2D to 3D
Converts 2D pictures to 3D effect while playing.
3D Picture Mode
- Normal
Normal 3D effects.
- Soft
Soft 3D effects.
- This function cannot be enabled when "Signal Format" is set to "2D to 3D".
- Manual Settings
Set 3D effect manually.
- Distance
Set the amount of depth perception.
- Screen Type
Selects how the screen appears during 3D playback (flat or round).
- Frame Width
Set the amount of feathering at the edge of screen.
- Frame Colour
Set the colour of feathering at the edge of screen.

- Depending on the contents, displayed items are different.
- This unit only guarantees the playback of the Frame Sequential and the Side-by-Side (Half) programme types.
- Please refrain from viewing 3D images if you do not feel well or are experiencing visual fatigue.
In the event that you experience dizziness, nausea, or other discomfort while viewing 3D images, discontinue use and rest your eyes.
- Depending on the connected TV, the video being played back might switch to 2D video due to changes in resolution etc. Check the 3D setting on the TV.
- 3D video might not output the way it is set in "HDMI Video Format" (=> 75).
- It may display as Side-by-Side when playback of the 3D video is started.
Deleting recorded titles
Once deleted, recorded content cannot be restored to its original state. Make certain before proceeding.


1 On the DIRECT NAVIGATOR screen: Select the title.

2 Press [DEL].
3 Select "Delete", then press [OK].
Multiple deleting
Select the title, then press the yellow button in step 1.

A check mark is displayed. Repeat this step.
- Press the yellow button again to cancel.
Deleting during play
1 Press [DEL] while playing. 2 Select "Delete", then press [OK].
Editing recorded titles
Once deleted, divided or partially deleted, recorded content cannot be restored to its original state. Make certain before proceeding.


- PIN is required to edit the titles with some functions. (=> 36)
1 On the DIRECT NAVIGATOR screen: Select the title.

2 Press [OPTION]. 3 Select the item, then press [OK]. e.g.,
![graph TD A["Playback"] --> B["Edit"] C["Delete Title"] --> B D["Information"] --> B E["Chapter View"] --> B F["Create Group"] --> B G["Release Grouping"] --> B H["All Titles"] --> B I["Enter Title Name"] --> J["Set up Protection"] K["Cancel Protection"] --> L["Partial Delete"] M["Divide Title"] -->…](/content/2026/06/1331529/images/a19ece9ea7d53b76bd7f17c561680fc9e2548f7f324d976cec5b9da9420aab3d.jpg)
- "Edit" has several functions.
Multiple editing
Select the title, then press the yellow button in step 1.
A check mark is displayed. Repeat this step.
- Press the yellow button again to cancel.
Deleting
1 Select "Delete Title", then press [OK]. 2 Select "Delete", then press [OK].
Entering title name
1 Select "Enter Title Name" in "Edit", then press [OK]. 2 Refer to "Entering text". (→ 81)
Setting protection
Protection setting prevents the title from accidental deletion.

1 Select "Set up Protection" or "Cancel Protection" in "Edit", then press [OK]. 2 Select "Yes", then press [OK].
appears when setting the protection.
Partial deleting
1 Select "Partial Delete" in "Edit", then press [OK]. 2 Press [OK] at the start point and end point to delete. - You can find the desired point by using play, search, etc. (⇒ 40) 3 Select "Continue", then press [OK]. - Select "Next", then press [OK] to delete other sections. Up to 20 sections can be set. (⇒ go to step 2) 4 Select "Delete", then press [OK]. - Chapter Mark is generated in the scene that was partially deleted. 5 Press [BACK/RETURN].
Dividing title
1 Select "Divide Title" in "Edit", then press [OK]. 2 Press [OK] at the point to divide the title. - You can find the desired point by using play, search, etc. (⇒ 40) 3 Select "Continue", then press [OK]. 4 Select "Divide", then press [OK].
To confirm the division point
After performing step 2.
Select "Preview", then press [OK].
- The unit plays 10 seconds before and after the division point.
To change the division point
After performing step 2.
Restart play and select "Divide", then press [OK] at the division point.

- Divided titles will become a group of titles.
Changing thumbnail
1 Select "Change Thumbnail" in "Edit", then press [OK]. 2 Press [OK] at the point to use as a thumbnail. - You can find the desired point by using play, search, etc. (⇒ 40) 3 Select "Finish", then press [OK].
To change the point
After performing step 2.
Restart play and select "Change", then press [OK] at the point to change.
Changing programme type of title
HDD
Programme type information in the title can be edited.

1 Select "Change Prog.Type" in "Edit", then press [OK]. 2 Select the item to change a programme type, then press [OK]. 3 Select the programme type, then press [OK]. 4 Select "Set", then press [OK].
Editing recorded titles
Editing chapters
1 Select "Chapter View", then press [OK]. 2 Perform the editing operations.
Edit Chapter Mark:
Select the point where you want to start a new chapter while viewing the title.
1 Press the green button. 2 Press [OK] at the point you want to divide. - Repeat this step. 3 Press [BACK/RETURN] to go to Chapter View screen.
To delete the chapter:
1 Select the chapter, then press [DEL]. Multiple editing Select the chapter, then press the yellow button.
A check mark is displayed. Repeat this step.
- Press the yellow button again to cancel.
2 Select "Delete", then press [OK].
To combine chapters (Delete chapter mark):
1 Select the chapter, then press [OPTION]. 2 Select "Combine Chapters", then press [OK]. 3 Select "Combine", then press [OK]. The selected chapter is combined to the next chapter.
Playback from Chapter View
Refer to "Playback from Chapter View". (→ 38)

• The maximum number of chapters: (Depends on the state of recording.) Approx. 1000 per title - When the title has the maximum number of chapters, you cannot perform the Resume play function (→ 36) or the "Change Thumbnail" (→ 45) with the title.
Copying titles

* The title in the source media will be deleted.
1 Connect the USB HDD.
2 Press [DRIVE SELECT] to select "HDD", then press [DIRECT NAVIGATOR].
- If the DIRECT NAVIGATOR screen of photo or music is displayed, press the red button, then select "VIDEO".
3 Select the title, then press the yellow button.
A check mark is displayed. Repeat this step.

- Press the yellow button again to cancel.
4 Press the blue button.
5 Select "Yes", then press [OK].
- If you select "No", you can change the selection. (→ right)
6 Set other settings, then press [OK]. e.g.,

(→ right, Setting the copying options)
7 Select "Yes", then press [OK].
To register the external HDD (USB HDD)
Refer to "Registering the USB HDD". (⇒ 59)

- You can only play back the titles in built-in HDD or record a programme while copying.
To change the selection
1 Select "No", then press [OK] in step 5 (⇒ left). 2 Select the title, then press the yellow button. Repeat this step to select titles. 3 Go to step 4 (⇒ left).
Screen icon

Titles that cannot be copied
About screen icons on the DIRECT NAVIGATOR
Refer to "Screen icons". (⇒ 36)
Setting the copying options
1 Select the item in step 6 (⇒ left). 2 Press [◀, ▶] to change the settings.
• Automatic Standby after Copy On:
This unit is turned to standby mode when it is not operated for approximately 5 minutes after completing copy.
Playing photos


- In order to play back 3D photo (MPO), this unit should be connected to a Full HD 3D compatible TV.
1 HDD
1 Press [FUNCTION MENU]. 2 Select "Photo" in "Playback Contents", then press [OK].
SD USB
1 Insert the media. The menu screen appears. (⇒ 39) 2 Select "View Photos", then press [OK].
2 Select the event, then press [OK].
e.g., HDD

- To select the tab
Press [◀, ▶].
- Start Slideshow
Refer to "Slideshow Settings". (→ 49)
- Switching the Calendar screen (HDD)
Press [PAUSE III].
3 Select the photo, then press [OK].
- Press [◀, ▶] to display the previous or next photo.
To exit the Calendar screen
Press [PAUSE ■].

- When there are many files and/or folders, some files may not be displayed or be playable. (→ 91)
DIRECT NAVIGATOR (PHOTO)
screen
e.g., HDD
Album (⇒ below)

Event
It is displayed for each recording date.
- It is displayed for each folder for media other than HDD.
Screen icons

(Tab)
Album
Placing photos in albums of your choice makes it easier to find them. (=> 50)
3D
(Tab)
3D photos (MPO) are automatically sorted. Select from this tab to play back in 3D. (It will play back in 2D when selected from other tabs.)

Photo protected

New photo which is stored and not viewed
Switching to the VIDEO or MUSIC screens
HDD
1 On the DIRECT NAVIGATOR screen: Press the red button. 2 Select "VIDEO" or "MUSIC", then press [OK].
Photo play option
1 While displaying a photo: Press [OPTION]. 2 Select the item, then press [OK].
Aspect
You can switch the screen mode. (=> 81)
Graphic Display Level
You can change the 3D position of the screen display, etc., during 3D photo playback.
Photo Menu
- Start Slideshow
You can start a slideshow.
- Rotate RIGHT/Rotate LEFT
e.g.,

- The information of the rotated photos will not be stored depending on the media.
• Information
Information (shooting date, etc.) is shown.
Slideshow Settings
1 On the DIRECT NAVIGATOR screen: Press the green button.
| Slideshow | |
| Start Slideshow | |
| Interval | Normal |
| Transition Effect | Fade |
| Repeat Play | On |
| Music Selection | No background music |
| Background Music | No List |
| Random BGM | Off |
2 Select the item, then press [OK].
Start Slideshow
You can start a slideshow.
Interval
You can set the time until the next photo is displayed.
Transition Effect*
You can set the effect for the next photo to be displayed.
Repeat Play
You can set it to play back repeatedly.
Music Selection*
You can select background music (either from HDD or USB) or turn it off.
Background Music*
You can select background music from HDD (My Favourites or Playlists) or USB (Folder).
Random BGM*
You can play back the BGM (Background Music) in random order.
This function is not available during 3D photo playback.
To pause the Slideshow
Press [PAUSE III].
- Press [PAUSE III] again to restart.
To stop the Slideshow
Press [BACK/RETURN]
Editing photos


1 On the DIRECT NAVIGATOR screen:
e.g., HDD
To edit the event:
Select the event.
To edit the photo:
1 Select the event, then press [OK].
2 Select the photo to edit.
• To select multiple events or photos
Press the yellow button when selecting the event or photo.
A check mark is displayed. Repeat this step.
- Press the yellow button again to cancel.
2 Press [OPTION].
- Selectable items will change depending on the media and the type of file.
3 Select the item, then press [OK].
Edit
- Add to Album
HDD
1 Select the destination album, then press [OK].
2 Press [OK].
- Combine Events
HDD
Select "Yes", then press [OK].
- Remove from Album
HDD
Select "Yes", then press [OK].
- Enter Album Name
HDD
Refer to "Entering text". (=> 81)
- Enter Event Name
Refer to "Entering text". (=> 81)
Delete Photos
Select "Yes", then press [OK].
Set up Protection
SD
Select "Yes", then press [OK].
appears when the protection is set.
- Even if the protection is set, the photo may be deleted by another unit.
Cancel Protection
SD
Select "Yes", then press [OK].
Copying photos


Selecting and copying the photos
HDD → SD
SD USB → HDD
1 On the DIRECT NAVIGATOR screen:
To copy the event:
Select the event, then press the blue button.
To copy the photo:
1 Select the event, then press [OK]. 2 Select the photos to copy, then press the blue button.
• To select multiple events or photos
Press the yellow button when selecting the event or photo.
A check mark is displayed. Repeat this step.
- Press the yellow button again to cancel.
2 When copying to HDD:
Select "Yes" or "No", then press [OK].
- If you select "Yes": Select the album, then press [OK]. e.g., SD

- You can categorise and manage the events and photos on the HDD by copying to the album. (⇒ 48)
3 Select "Yes", then press [OK]. Copying starts.
To stop copying
Press and hold [BACK/RETURN] for 3 seconds.

- The name of the copied photos will be changed.
- If the number of files/folders to be copied exceeds the maximum (=> 91), copying will stop partway through.
Copying automatically
SD USB → HDD
Newly added photos will automatically be copied to the HDD.
1 Insert the media. The menu screen appears. (=> 39)
2 Select "Copy New Photos", then press [OK]. e.g., SD

3 Select "Yes", then press [OK]. Copying starts.
4 Once the copy is completed, select "Yes" or "No", then press [OK].
To stop copying
Press and hold [BACK/RETURN] for 3 seconds.

- Photos without shooting date will be categorised using the creation date.
- If the space on the destination drive runs out or the number of files/folders to be copied exceeds the maximum (see page 91), copying will stop partway through.
- The names of the copied photos will be changed.
Playing music

1 Insert the USB memory.
The menu screen appears. (see page 39)
2 Select "Play / Copy Music (MP3)", then press [OK].
Playback will start.
• Using the tree screen to find a folder
1 Press [OPTION].
2 Select "Select Folder", then press [OK].
3 Select the folder, then press [OK].
To play other music (track)
Select the item, then press [OK].


- The track/artist name will be displayed if the information is contained in the ID3 tag of the MP3 file.
- If there is a large amount of photo data, etc., within an MP3 file, playback may not be possible.
Copying music to HDD
USB → HDD
After performing steps 1–2 (⇒ left)
1 Press the blue button. 2 Select "Copy", then press [OK].
To stop copying
Press and hold [BACK/RETURN] for 3 seconds.

- While copying, no other operations can be performed. Timer recordings will not proceed.
- All tracks in the folder will be recorded.
- Tracks recorded to HDD in one operation will be regarded as one album.
Playing music recorded on HDD
HDD
1 Press [FUNCTION MENU]. 2 Select "Music" in "Playback Contents", then press [OK].

3 Select the item, then press [OK].

Artists
1 Press [◀, ▶] to select the initial of the artist. 2 Select the name of the artist, then press [OK]. 3 Select the album, then press [OK]. 4 Select the track, then press [OK].

Albums
1 Press [◀, ▶] to select the initial of the album. 2 Select the album, then press [OK]. 3 Select the track, then press [OK].

My Favourites
Tracks registered in "My Favourites".
Select the track, then press [OK].
- Registering a track to the "My Favourites". (Up to 99 tracks)
While the Track List screen is displayed: Select the track, then press the green button.

Playlists
1 Select the playlist, then press [OK]. 2 Select the track, then press [OK].

Frequently Played
Tracks most often played recently (up to 30 tracks).
Select the track, then press [OK].

Random Play
Random playback of all tracks.
Playback starts.
Switching to the VIDEO or PHOTO screens
1 On the DIRECT NAVIGATOR (Music Menu) screen:
Press the red button.
2 Select "VIDEO" or "PHOTO", then press [OK].
Showing Track Information
On the Track List screen:
1 Select the track, then press [OPTION].
2 Select "Information", then press [OK].
Playing music
Operations during music play
HDD USB
Stop
Press [STOP ■].
Pause
Press [PAUSE ■].
- Press [PLAY/×1.3 ▶] to restart play.
Search
Press [SLOW/SEARCH ◀◀] or
[SLOW/SEARCH ▶▶].
- Press [PLAY/×1.3 ▶] to restart play.
Skip
Press [SKIP ◀◀◀] or [SKIP ▶▶▶].
Repeat Play/Random
Refer to "Repeat Play" or "Random" in Play menu (⇒ 66).
Sound Effects
Refer to "Sound Effects" in Sound menu (⇒ 67).
Displaying photos (Slideshow)
Photos stored on the "Album" of the HDD can be played back as slideshow during playback of the music.
While playing the music
Press the red button.
• To change the photos to display
1 While slideshow playing Press [OPTION].
2 Select "Select Photo Album", then press [OK].
3 Select the album, then press [OK]. e.g.,

To end the slideshow
Press [BACK/RETURN]
How to create the photo album
Refer to "Add to Album". (⇒ 50)
To play music continuously even if the Power off link works
Refer to "Playing music continuously even after turning off power to the TV". (⇒ 65)
Editing music/playlist

1 On the DIRECT NAVIGATOR screen: Press [OPTION].
e.g.,

2 Select the item, then press [OK]. e.g., while selecting an Album

- Editing operations will change depending on the screen.
Delete All Tracks
1 If the confirmation screen appears: Select "Yes", then press [OK]. 2 Select "Delete", then press [OK].
Delete Album
Select "Delete", then press [OK].
Delete
Select "Delete", then press [OK].
Edit Album Name/Edit Track Name/Edit Artist Name/Edit Playlist Name
Refer to "Entering text" on page 81.
Remove All Tracks
Select "Remove", then press [OK].
- Tracks themselves are not deleted from the HDD.
Clear My Favourites/Clear Frequently Played
Select "Clear", then press [OK].
- Tracks themselves are not deleted from the HDD.
Remove
Select "Remove", then press [OK].
- Tracks themselves are not deleted from the HDD.
Add to Playlist
You can register your favourite albums and tracks into 10 preset playlists.
Select the playlist, then press [OK].
- New playlist cannot be added.
- Up to 999 tracks can be registered to each playlist.
Copying the HD Video or the SD Video


This unit cannot copy the titles in the HDD to the media. Be careful when deleting the original title on the media.
e.g., Connecting to the Panasonic video camera

USB connection cable (optional)

- If you connect a Panasonic product with a USB connection cable, setup screen may be displayed on the connected equipment. For details, refer to the instructions for the connected equipment.
Copying HD Video (AVCHD format)
SD USB, video camera, etc. → HDD
1 Connect the video camera or insert the media.
The menu screen appears. (⇒ 39)
Make the video camera ready for data transfer.
2 Select "Copy Video (AVCHD)", then press [OK].
3 Select the title, then press the yellow button. A check mark is displayed. Repeat this step.

Press the yellow button again to cancel. (All the recordings on the same date become a title.)
4 Press [OK].
5 Select "Start", then press [OK].
It may take time for the copying to start.
To stop copying
Press and hold [BACK/RETURN] for 3 seconds.

An AVCHD title with 100 or more scenes will be divided into titles every 99th scene and copied.
Screen icons
N (NTSC) Title recorded using a different encoding system from that of the unit. P (PAL)
Titles displaying these marks cannot be selected.
Copying SD Video (MPEG2 format)
SD USB, video camera, etc. → HDD
1 Connect the video camera or insert the media.
- Make the video camera ready for data transfer.
The menu screen appears. (⇒ 39)
2 Select "Copy Video (MPEG2)", then press [OK].
e.g.,
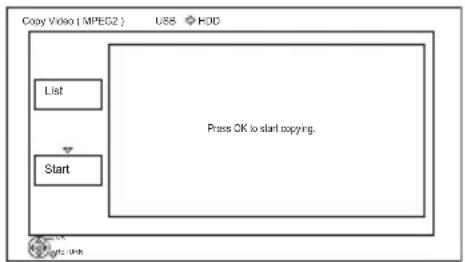
All titles of SD video on the media that can be copied are registered in the copying list.
3 Select "Start", then press [OK]. 4 Select "Yes", then press [OK] to start copying.
To stop copying
Press and hold [BACK/RETURN] for 3 seconds.

- The titles will be copied in the order of the copying list. If you want to specify the order, edit the copying list after the titles are selected.
- The total data size shown may be larger than the sum of the data sizes for each registered item.
To edit the copying list
1 Select "List", then press [▶] (right) after step 2. (⇒ left) 2 Press [OPTION]. 3 Select the item, then press [OK].
Delete All:
All titles that you registered to copy are deleted.
Select "Yes", then press [OK].
Add:
Add new items to the copying list.
1 Select the title, then press the yellow button.
Repeat this step to select titles.
2 Press [OK].
Delete:
Selected titles are deleted.
- Select the title, then press the yellow button before step 2.
Repeat this step to select titles.
Select "Yes", then press [OK].
Move:
Change the order of items on the copying list.
- Select the title to move before step 2.
Select the destination, then press [OK].
4 Press [◀].
Screen icons
Data size of each registered item

Size:
Data size recorded to the HDD
N (NTSC)
P (PAL)
Title recorded using a different encoding system from that of the unit.
- Titles displaying these marks cannot be selected.
Registering the external HDD (USB HDD)
If you connect and register a USB HDD, you can move the data in the built-in HDD to the USB HDD, thus saving the capacity in the built-in HDD.
If you use a USB HDD with this unit, the USB HDD must first be registered on this unit.
- Registering of a USB HDD will format the USB HDD and all the content already recorded will be deleted.
- Up to eight USB HDDs can be registered on this unit.
- Registered USB HDDs cannot be used with devices other than this unit.
Regarding the external HDD (USB HDD)
Please use a confirmed USB HDD.
For the latest information on confirmed USB HDDs, please check the following website. http://panasonic.jp/support/global/cs/
- Certain non-confirmed USB HDDs cannot be used with this unit.
- If a problem occurs with the USB HDD, please contact the manufacturer of the device.
Connecting the USB HDD
Connect this unit with optional USB HDD.

- Only one USB HDD can be connected at the same time.
- Do not connect additional HDDs using a USB hub.
- For details about connection method, refer to the instructions supplied with the USB HDD.
Disconnecting the USB HDD
Please use the following procedure to disconnect. Disconnecting without following this procedure may result in the loss of recorded content from the USB HDD or the internal HDD.
1 Press [SETUP]. 2 Select "Settings for USB HDD" in "HDD / USB HDD", then press [OK]. 3 Select "USB HDD Disconnection", then press [OK]. 4 Select "Yes", then press [OK]. 5 Disconnect the USB HDD from this unit.
Registering the USB HDD
- If the registering screen appears when connecting the USB HDD, go to step 4.
1 Press [SETUP]. 2 Select "Settings for USB HDD" in "HDD / USB HDD", then press [OK]. 3 Select "USB HDD Registration", then press [OK]. 4 Select "Yes", then press [OK].
- If you have already registered eight USB HDDs, it will be necessary to delete one or more of them before registering a new USB HDD.
The message screen appears:
1 Select "Yes", then press [OK]. 2 Select the USB HDD to cancel, then press [OK].
The confirmation screen appears
3 Select "Yes", then press [OK].
5 When the registering is complete, message screen appears.
Press [OK].
6 The confirmation screen appears.
Press [OK].
To cancel all USB HDD registrations
Refer to "Cancellation of all USB HDD
Registrations". (→ 73)

- If you register a USB HDD, all the content already recorded on the USB HDD will be deleted.
- It is not possible to play back the content on the USB HDD whose registration has been cancelled.
- You can check the registration number of the USB HDD on the DIRECT NAVIGATOR. (⇔ 36)
Format SD card

Formatting deletes all contents (including computer data), and they cannot be restored. Check carefully before proceeding.
1 Press [FUNCTION MENU]. 2 Select "SD Card Management" in "Others", then press [OK]. 3 Select "Format Card", then press [OK]. 4 Select "Yes", then press [OK]. 5 Select "Start", then press [OK]. 6 Press [OK].

- The contents are deleted when you format a card even if you have set protection.
- Do not disconnect the AC mains lead while formatting. This can render the card unusable.
- When a card has been formatted using this unit, it may not be possible to use it on any other equipment.
Smart Home Networking (DLNA)
Smart Home Networking (DLNA) allows you to watch the contents on Server equipment connected on the same network from Client equipment.
This unit can be used both as Server and Client. Additionally, if used as Client, this unit can also be used as Media Renderer, which can be controlled by a Smartphone, etc.
Preparation
• Network connection ( ⇒ 16, 21) - Perform Home Network settings of the DLNA compatible equipment.
For more details, refer to the following website and the operating instructions for each item of equipment.
http://panasonic.jp/support/global/cs/
(This site is in English only.)

- Some video cannot be played back depending on the equipment, the condition of this unit, or the file type.
- Ensure that the router for your home network has adequate security system to prevent unauthorized access.
Using this unit as Server
You can enjoy the video and photos saved on the HDD of this unit on DLNA (Client) compatible equipment connected via a network.
- The titles with access restriction (e.g., copy restriction) signals sent from broadcasters are not available for this function.
- You cannot play back music from the playback equipment (Client).
![graph TD A["Computer monitor with soccer ball"] --> B["Image of people"] B --> C["Server Unit"] style A fill:#f9f,stroke:#333 style C fill:#ccf,stroke:#333](/content/2026/06/1331529/images/0ba65871bbb72e7c616b59e418d42d30e1b8ef2be86c8d8aea4a61c5ca9a54d6.jpg)
DLNA compatible equipment (Client)
For details regarding the connection and operation of equipment connected via a network, refer to their respective operating instructions.
Preparation
- When DLNA (Server) Function is deactivated, make the settings. (⇒ 68, 77, Home Network Settings)
1 Operate the playback equipment (Client) to display the list of contents on this unit. - Refer to their respective operating instructions.
2 Select the item, then press [OK].

- The DLNA compatible device that is to be connected to the unit should be connected to the same hub or broadband router as the unit.
- Files not on the HDD cannot be played back.
- Playing back 3D video recorded on this unit may not work properly.
- 3D photos copied to this unit cannot be played back in 3D.
- Editing is not possible.
Smart Home Networking (DLNA)
Using this unit as Client
You can share videos, photos and music stored in the DLNA Certified media server (such as a PC with Windows 7 installed etc.) connected via a network with this unit.
![graph TD A["Player"] --> B["Music Note"] B --> C["Laptop Screen"]](/content/2026/06/1331529/images/2cb4b409852e9e6c02f1221be9c80bf99530379b7bc56cd72c3e584435120b2c.jpg)
This unit (Client) DLNA compatible equipment (Server)
1 Press [FUNCTION MENU]. 2 Select "Home Network (DLNA Client)" in "Network", then press [OK].
A list of equipment connected via the network is displayed.
- This list can be updated by pressing the red button.
3 Select the equipment, then press [OK]. 4 Select the item, then press [OK].
- Menu structure will be different depending on the equipment. Select the contents by repeating the operation.
- Convenient functions can be used by pressing [OPTION] depending on the contents.
- Control Panel
Control Panel is displayed once the playback starts.
Operation can be performed with [▲, ▼, ◀, ▶], [OK] and [EXIT ⊗].
- Press [OK] if the Control Panel is not displayed.
- Press [BACK/RETURN] to hide the Control Panel.

- You may not be able to use the Control Panel even if you use Panasonic DLNA compatible equipment.
- Depending on the contents and the connected equipment, playback may not be possible.
- Playlist of Windows Media® Player can play back only the contents that are stored in the libraries.
- While playing back the 3D programme, you cannot set "3D Settings". (⇒ 42)
- Items displayed in grey on the display cannot be played back by this unit.
- Depending on the performance of the connected PC, video frames may be dropped during playback, or video may not be played back at all. (⇒ 87)
Support format of DLNA client
Video
| Container | Video codec | Audio codec | Example of file extension |
| AVCHD H.264 | Dolby® Digital | .mts | |
| MP4 H.264 AAC | .mp4 | ||
| MOV H.264 AAC | .mov | ||
| Recorded programmes (XP/SP/LP/EP/FR)* | MPEG2 | Dolby® Digital Linear PCM | .mpg.mpeg |
| Recorded programmes (DR/HG/HX/HE/HL/HM)* | MPEG2H.264 | MPEGHE-AAC Dolby® Digital | .m2ts.ts |
* Recording mode in Panasonic Blu-ray Disc recorder
Photo
| Format Example of file extension | |
| JPEG | .jpg |
Audio
| Audio codec | Example of file extension |
| MP3 | .mp3 |
| FLAC | .flac |
| Linear PCM |
Using this unit as Media Renderer
This unit will work as Media Renderer, which allows you to play back the contents on DLNA Server by operating a Digital Media Controller (a smartphone, etc.).
Possible applications:![graph TD A["This unit (Media Renderer)"] --> B["Controller*"] B --> C["Server"] D["Image: Video player, Story, Animal"] --> E["Audio icon"] E --> C](/content/2026/06/1331529/images/5b9d6a25b7327c2ca0c90f343077da1d049d0bfc1e62c3233b8bc7d7219b5dde.jpg)
![graph LR A["This unit (Media Renderer)"] --> B["Music Processing"] B --> C["Server + Controller *"]](/content/2026/06/1331529/images/a00f19e9b7fdd7e575d9166a49ae1628f65b809f96d39f4e1a140120b78603ee.jpg)
* Digital Media Controller compatible software should be installed.
Following steps are necessary to use this unit as Media Renderer.
1 Press [FUNCTION MENU]. 2 Select "Home Network (Media Renderer)" in "Network", then press [OK]. 3 Operate the Digital Media Controller compatible equipment.
To exit from Home Network (Media Renderer) screen
Press [BACK/RETURN]

- Depending on the contents and the connected equipment, playback may not be possible.
- Items displayed in grey on the display cannot be played back by this unit.
- This unit can be played back via connected equipment only when controlled using Digital Media Controller.
- Depending on the performance of the connected PC, video frames may be dropped during playback, or video may not be played back at all. (⇒ 87)
VIERA Connect (Enjoying Internet Service)
VIERA Connect allows you to access some specific websites supported by Panasonic, and enjoy Internet contents such as photos, videos, etc. from VIERA Connect home screen. This unit has no full browser function and all features of websites may not be available.
e.g.,
![graph TD A["XXXXXX"] --> B["XXXX"] C["XXXXXX"] --> D["XXXXXX"] E["XXXXXXX"] --> F["DIOA"] G["MODI STEP"] --> H["XXXX"] I["XXXX"] --> J["XXXX"] K["XXXX"] --> L["XXXX"] M["XXXX"] --> N["XXXX"] O["XXXX"] --> P["XXXX"] Q["XXXX"] --> R["XXXX"] S["XXXX"] --> T["XXXX"] U["XXXX"] --> V["XXXX"] W["XXXX"] -->…](/content/2026/06/1331529/images/4e7993d8f041c3c1a85da4bf121312a6d9f5d4c612156ad9e470905bc192d018.jpg)
VIERA Connect Home screen
- Images are for illustration purpose, contents may change without notice.
Preparation
• Network connection (=> 16, 21)
HW220
To enjoy video communication (e.g., Skype™)
- Connect this unit with optional Communication Camera (TY-CC20W or TY-CC10W). Depending on the area, this optional camera may not be available. Please consult your local Panasonic dealer for advice.
e.g.,
This unit's rear panel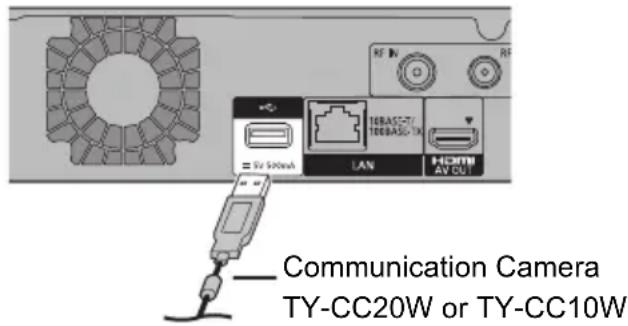
- For operating method refer to the following website. http://panasonic.jp/support/global/cs/ (This site is in English only.)
- Cannot be used while recording or copying.
1 Press [INTERNET].
The message is displayed. Please read it carefully and then press [OK].
- NETFLIX can be accessed directly by pressing [NETFLIX] button.
- HW220 The video communication service can be accessed directly by pressing [ ]s button.
2 Select the item, then press [OK].
- Operable buttons:
[▲, ▼, ◀, ▶], [OK], [BACK/RETURN ☺], colour buttons and number buttons.
To exit from VIERA Connect
Press [EXIT]⊗
![PANASONIC DMR-HW120 - Press [EXIT]⊗ - 1](/content/2026/06/1331529/images/a4afaf31be85fe23d75eb8a168713dd72229b7d7d107af932bb7d98a6f35c3ac.jpg)
- When playing content from an SD card or USB device, VIERA Connect cannot be accessed.
- In the following cases, settings are possible using "Network Service Settings" (⇒ 68, 76)
- When restricting the use of VIERA Connect.
- When the audio is distorted.
- If using a slow Internet connection, the video may not be displayed correctly. A high-speed Internet service with a speed of at least 6 Mbps is recommended.
- Be sure to update the software (firmware) when a software (firmware) update notice is displayed on the screen. If the software (firmware) is not updated, you will not be able to use the VIERA Connect function.
- The services through VIERA Connect are operated by their respective service providers, and service may be discontinued either temporarily or permanently without notice. Therefore, Panasonic will make no warranty for the content or the continuity of the services.
- All features of websites or content of the service may not be available.
- Some contents may be inappropriate for some viewers.
- Some contents of VIERA Connect may only be available for specific countries and may be presented in specific languages.
- If timer recording starts, VIERA Connect will stop.
VIERA Link functions
What is VIERA Link "HDAVI Control"?
VIERA Link “HDAVI Control” is a convenient function which links the operations of this unit and a Panasonic TV (VIERA) or an amplifier/receiver. You can use this function by connecting the equipment with the HDMI cable. See the operating instructions for connected equipment.
Automatic input switching/Power on link
When the following operations are performed, the input channel of the TV will be automatically switched and the screen of this unit will be displayed. Additionally, when the TV is off, the TV will automatically turn on.
- When play starts on this unit
- When an action that uses DIRECT NAVIGATOR or FUNCTION MENU, etc., is performed
Power off link
When you set the TV to standby mode, this unit is also automatically set to standby mode. - The power off link function does not work when recording, copying, etc.
Playing music continuously even after turning off power to the TV
The following operations make it possible to keep the power of the unit on and to play music continuously.
When the unit is directly connected to an amplifier/receiver.
1 While playing music, press [OPTION]. 2 Select "TV Power Off", then press [OK].
- Sound may be discontinued for several seconds when the power to the TV is turned off.
- This function is available with the TV that supports "HDAVI Control 2" or later.
PAUSE LIVE TV
You can operate this unit with the TV remote control.
Refer to "PAUSE LIVE TV". (→ 27)
- This function is available with the TV that supports “HDAVI Control 3” or later.
Direct TV Recording
This function allows you to immediately start recording the programme that you are viewing on the TV.
Refer to the TV operating instructions for operation.
- This function is available with the TV that supports "HDAVI Control 3" or later.
Easy control only with VIERA remote control
You can operate this unit using the TV remote control.
Refer to the operating instructions of the TV about the buttons that you can use.
- This function is available with the TV that supports "HDAVI Control 2" or later.

- This unit supports "HDAVI Control 5" function. "HDAVI Control 5" is the newest standard (current as of November, 2011) for Panasonic HDAVI Control compatible equipment. This standard is compatible with Panasonic's conventional HDAVI equipment. Please refer to individual manuals for other manufacturers' equipment supporting VIERA Link function.
- VIERA Link "HDAVI Control", based on the control functions provided by HDMI which is an industry standard known as HDMI CEC (Consumer Electronics Control), is a unique function that we have developed and added. As such, its operation with other manufacturers' equipment that supports HDMI CEC cannot be guaranteed. • These functions may not work normally depending on the equipment condition.
- Use the remote control supplied with this unit if you cannot operate this unit using buttons on the TV remote control.
- The operation of this unit may be interrupted when you press certain buttons on the TV remote control.
Playback menu
A variety of operations and settings such as changing the subtitles and audio languages can be performed during playback of video or music. Also, picture and sound quality can be set to your personal taste.
1 Press [OPTION]. 2 Select "Playback Settings" in "Playback Menu" or select "Playback Settings", then press [OK].
e.g.,

Menu Item Setting
3 Select the menu, then press [▶] (right). 4 Select the item, then press [▶] (right). 5 Select the setting.
- Some items can be changed by pressing [OK].
Depending on the condition of the unit (playing, stopped, etc.) and media contents, there may be some items which cannot be selected or for which the effects do not work properly.
To clear the Playback menu
Press [BACK/RETURN]
Content
Video
The original video recording method (MPEG-4 AVC etc.) appears.
Soundtrack
Show or change the soundtrack.
Subtitles
Turn the subtitles on/off, and change the language depending on the media.
Multi Audio
Switch in the case of multiple audio.
Subtitle Language
Select the subtitle language in the case of multiple languages.
Audio Channel
Change audio (LR/L/R) during playback.
Play
Repeat Play
Select the item which you want to repeat.
Random
Select whether to play random or not.
Graphic Display Level
You can change the 3D position of the playback settings display, etc., during 3D playback.
Picture
Mode
Select the picture quality mode during playback.
- Normal
Default setting
- Soft
Soft picture with fewer video artifacts
- Fine
Details are sharper
- Cinema
Mellows movies, enhances detail in dark scenes.
- Cartoon
A mode suitable for viewing animations.
Advanced Settings
- HD optimizer
This will compensate the mosaic noise in the video and haze around the characters precisely.
- Chroma Process
The high-resolution processing of HDMI chroma signals produces a high-resolution picture with rich picture quality.
- Detail Clarity
The picture becomes sharp and detailed.
- Super Resolution
Standard picture quality video is corrected to sharp and crisp picture quality when it is output as 1080i/1080p from the HDMI terminal.
Progressive
Select the method of conversion for progressive output to suit the type of title being played.
• Auto
Automatically detects the film and video content, and appropriately converts it.
• Video
Select this setting when the content is distorted if "Auto" is selected.
• Film
Select this if the edges of the film content appear jagged or rough when "Auto" is selected. However, if the video content is distorted as shown in the illustration to the right, then select "Auto".

Sound
Sound Effects
- This function is effective when "Digital Audio Output" is set to "PCM". (⇒ 74)
• Re-master 1/Re-master 2
Sound becomes more natural by adding higher frequency signals not recorded on the track.
Dialogue Enhancer
The volume of the centre channel is raised to make dialogue easier to hear.
Other
Position
Change the position where this menu screen appears on your TV.
Audio attribute
Digital/Digital+/
MPEG/HE-AAC:
Signal type
k (kHz): Sampling frequency
b (bit): Number of bits
ch (channel): Number of channels
Language
ENG: English CHI: Chinese
FRA: French KOR: Korean
DEU: German MAL: Malay
ITA: Italian VIE: Vietnamese
ESP: Spanish THA: Thai
NLD: Dutch POL: Polish
SVE: Swedish CES: Czech
NOR: Norwegian SLK: Slovak
DAN: Danish HUN: Hungarian
POR: Portuguese FIN: Finnish
RUS: Russian * : Others
JPN: Japanese

- The menu is not displayed when playing photos.
Changing the unit's settings (Setup)
You can change the unit's settings of Tuning, Sound, Display, Connection, Network etc. in the menu.
Common procedures
1 Press [SETUP].

2 Select the menu, then press [OK]. 3 Select the item, then make the setting. (⇒ right)
- Follow the instructions on the screen if further operations are necessary.
- Depending on the connection or the status of this unit some items cannot be selected or changed.
To return to the previous screen Press [BACK/RETURN]
Menu list
The locations of the setting items are as follows. For details on each setting item, please refer to the following pages.
Tuning
![graph TD A["Favourites Edit (⇔ 70)"] --> B["Channel List (⇔ 71)"] B --> C["Auto Setup (⇔ 71)"] C --> D["Channel Sorting by Region (⇔ 71)"] D --> E["Manual Tuning (⇔ 71)"] E --> F["Update Channel List (⇔ 71)"] F --> G["Signal Condition (⇔ 72)"] G --> H["New Channel Message (⇔ 72)"] H --> I["Child Loc…](/content/2026/06/1331529/images/ab8d11788c4e2c2f973b6f524c87ba07e7ece988d3a515eec658b677e37d242e.jpg)
HDD / USB HDD
![graph TD A["Child Lock for Playback (⇒ 73)"] --> B["REWIND LIVE TV (⇒ 73)"] B --> C["HDD Management (⇒ 73)"] C --> D["Delete all titles (⇒ 73)"] C --> E["Delete all photos (⇒ 73)"] C --> F["Format HDD (⇒ 73)"] G["Settings for USB HDD (⇒ 73)"] --> H["USB HDD Registration (⇒ 73)"] G --> I["USB HDD Dis…](/content/2026/06/1331529/images/55ec7b0bf08410d89a079c06dacffb00441dd6153aacef375847b5001e987cd5.jpg)
Picture
Sound
![graph TD A["Dynamic Range Compression (⇒ 74)"] --> B["Downmix (⇒ 74)"] B --> C["Digital Audio Output (⇒ 74)"] C --> D["PCM Down Conversion (⇒ 74)"] C --> E["Dolby Digital / Dolby Digital Plus (⇒ 74)"] C --> F["MPEG (⇒ 74)"] C --> G["HE-AAC (⇒ 74)"] C --> H["Audio Delay (⇒ 74)"]](/content/2026/06/1331529/images/d29832c89339b88bb36ef09513baef1f1824eb57f386618e71dbe3e707ff8c3b.jpg)
Display

Connection
![graph TD A["3D Settings (⇒ 75)"] --> B["3D Type (⇒ 75)"] B --> C["3D AVCHD Output (⇒ 75)"] C --> D["3D Playback Message (⇒ 75)"] E["TV Aspect (⇒ 75)"] --> F["Aspect for 4:3 Video (⇒ 75)"] F --> G["TV System (⇒ 75)"] G --> H["HDMI Connection (⇒ 75)"]](/content/2026/06/1331529/images/e82925c5a779e751ca4f13f8f607fa5d13dc9b49cf7e1edcfcf148cbf6a8a56b.jpg)

Network
![graph TD A["Easy Network Setting (⇒ 76)"] --> B["Network Settings (⇒ 76)"] B --> C1["LAN Connection Mode (⇒ 76)"] B --> C2["Wireless Settings (⇒ 76)"] C1 --> D1["Connection Setting (⇒ 76)"] C1 --> D2["Double Speed Mode Setting (2.4GHz) (⇒ 76)"] C2 --> D3["IP Address / DNS Settings (⇒ 76)"] C2 --> D4…](/content/2026/06/1331529/images/07cfabdaefdbf02d75d6d91e814cf8cf7ec8cba1055c64e99a81ee896784b5f2.jpg)
Others
![graph TD A["Standby Settings (→ 77)"] --> B["Power Save in Standby (→ 77)"] A --> C["Automatic Standby (→ 77)"] A --> D["Automatic Standby after OTR (→ 77)"] A --> E["Automatic Standby after Copy (→ 77)"] A --> F["RF OUT (Aerial Signal) (→ 78)"] G["Remote Control (→ 78)"] --> H["Clock (→ 78)"] G -->…](/content/2026/06/1331529/images/217dfaeb593ab061c705291d81154d3187c66e04b36e5cf32511c3f9e0062060.jpg)
Changing the unit's settings (Setup)
About the PIN for parental control
PIN is required to change the following settings. Enter the 4-digit PIN with the number buttons following the on-screen instructions.
- The PIN is common for the following items.
- Auto Setup
- Child Lock
- Child Lock for Playback
- Lock (Network Service Settings)
PIN can be changed via the "PIN Entry" in "Others". (=> 78)
Tuning
Favourites Edit
You can create four favourites of channels for making viewing and recording easier.

After editing as follows, save the Favourites. Press [BACK/RETURN] then press [OK].
- To select the other Favourites list: Press the green button.
- To add channels to the Favourites list: Select the channel in the "All DVB Channels" column, then press [OK]. Repeat this step.
- Yellow: Add all the available channels to the Favourites. (This function is available only when there are no channels in the "Favourites".)
- To change the order of the channels list:
1 Select the channel in the "Favourites" column to move, then press the green button. 2 Select the new position, then press the green button.
• To delete channels:
Select the channel in the "Favourites" column, then press [OK].
- Yellow: Delete all channels.
• To change the name of the Favourites list:
1 Press the red button in the "Favourites" column. 2 Press [▲, ▼, ◀, ▶] to select a character, then press [OK].
Repeat this step to enter other characters.
- Red: Delete a character.
- Blue: Delete all characters.
3 Press [BACK/RETURN].
Channel List
You can edit the Channel List.

• To hide unwanted channels
1 Select the channel. 2 Press [OK].
The check mark is removed.
- Yellow: Reveal all channels.
• To change the channel number assignment
1 Select the channel, then press the green button. 2 Enter the channel number to reassign with the number buttons.
3 Press [OK].
- If another channel is already assigned to the channel number, the two channels will be switched.
• To set the channel manually
1 Press the red button. 2 Refer to "Manual Tuning". ( ⇒ right)
Auto Setup
You can restart the Auto Setup. (⇒ 19)
PIN is required when you have locked channels. (⇒ 72, Child Lock List)
Select "Yes", then press [OK].

- The timer recording programmes are cancelled.
- If you perform “Channel Sorting by Region” (⇔ below), you can sort the channel list best suited to your region after Auto tuning is finished.
Channel Sorting by Region
If you want to sort the channel list best suited to your region, follow the on-screen instructions to select the region you live in.
Normally, you should select "Best signal quality (All Regions)".
Manual Tuning
You can add new channels manually.
1 Adjust the frequency.
- Adjust the frequency by checking the signal strength and signal quality displays.
2 Press [OK] to start scan.
- The set channel is displayed in the table.
Update Channel List
You can update the channel list to the latest one.

- After performing "Update Channel List" or "Manual Tuning", if the channel number has already been assigned, channel numbers for them will be assigned from 800ch onward.
Changing the unit's settings (Setup)
Signal Condition
You can check the quality and strength of signals.
Press [CH ∧ ∨ ] to select the channel.
![DVB Signal Condition Channel Name ○○○○○ Signal Quality 100 Signal Strength 100 Bit Error Rate ○○○○○○ Network Name ○○○○○○○○○ Frequency ○○○ MHz [○○○] RETURN Channel Up Channel Down](/content/2026/06/1331529/images/a944f37dd4fcaad1d879568a34916ddac2e882997351d0880ce88cd3605cf543.jpg)
- Signal Quality: Red bar: Bad Yellow bar: Poor Green bar: Good
- Signal Strength:
"0": 0%
"10": 100%

- The channels you can receive are affected by weather conditions, seasons, time (day/night), region, length of the cable that is connected to the aerial, etc.
- When the signal is too strong (red bar), reduce the signal amplification at your aerial.
New Channel Message
Set whether to obtain the information automatically when a new DVB channel is added.
Child Lock
• PIN is required to change. (=> 70)
Child Lock List
You can restrict the viewing of channels. You can lock each channel.
1 Select the channel to lock.
2 Press [OK].
G is displayed.
- Press [OK] again to cancel.
- Green: Lock all channels.
- Yellow: Unlock all channels.
Freeview Players
You can restrict the viewing of Digital teletext (MHEG) unsuitable to children.
Preferred Multi Audio
Multi Audio
Select the language for multi broadcast. If the selected language is not available, the original language will be selected.
Audio Description
(When Audio Description is available in the programme) When “Automatic” is selected, Audio Description will be set as default while watching.

- When “Dolby Digital / Dolby Digital Plus”, “MPEG” or “HE-AAC” is set to “Bitstream”, the Audio Description may not work. Set them to “PCM” (=> 74, Digital Audio Output).
Preferred Subtitles
Subtitles
Choose the subtitle language for broadcast. If the selected language is not available, then the original language will be selected.
HDD / USB HDD
Child Lock for Playback
You can restrict playback of the following titles:
- Titles that are recorded with guidance information
- Titles restricted by Child Lock List (=> 72)
(Titles with icon in DIRECT NAVIGATOR, etc.)
• PIN is required to change. (=> 70)
REWIND LIVE TV
Turn on/off the REWIND LIVE TV function.
- When “Automatic Standby” is set to “Off” (=> 77), “On” cannot be selected.
HDD Management
Press and hold [OK] for 3 seconds to show the following settings.
Delete all titles
Delete all titles (video) on the built-in HDD.
- Delete does not work if one or more titles are protected.
Delete all photos
Delete all photos on the built-in HDD.
Format HDD
Formatting deletes all contents on the built-in HDD, and they cannot be restored. Check carefully before proceeding.
Settings for USB HDD
USB HDD Registration
Register the USB HDD. (=> 59)
USB HDD Disconnection
This function puts the USB HDD in a state in which it can be safely disconnected. (=> 58)
USB HDD Management
Press and hold [OK] for 3 seconds to show the following settings.
Delete all titles
Delete all titles on the USB HDD.
- Delete does not work if one or more titles are protected.
Format USB HDD
Formatting deletes all contents, and they cannot be restored. Check carefully before proceeding.
Cancellation of all USB HDD Registrations
This function cancels the registrations of all the USB HDDs registered on this unit. Only do this if you are going to dispose of this unit.

- Before operation, perform "USB HDD Disconnection" ( ⇔ left) and remove the USB HDD.
- It is not possible to play back the content from a USB HDD whose registration has been cancelled.
Picture
Still Mode
Select the type of picture shown when you pause play.
- Field:
Select if jittering occurs when "Automatic" is selected. (The picture is coarser.)
- Frame:
Select if small text or fine patterns cannot be seen clearly when "Automatic" is selected. (The picture is clearer and finer.)
Seamless Play
The segments can be played back seamlessly.
- When "Off" is selected, frame-dropping between the segments can be avoided, but the video may freeze for a moment between the segments.
- Seamless Play function does not work depending on the condition or the kind of programme.
Changing the unit's settings (Setup)
Sound
Dynamic Range Compression
To lower the dynamic range for playback (e.g., at night).
- This does not work depending on broadcasts and recorded titles.
Downmix
Select the downmix system of multi-channel to 2-channels sound.
- Select "Surround encoded", when the connected equipment supports the virtual surround function.
- There is no effect on "Bitstream" via HDMI AV OUT and DIGITAL AUDIO OUT terminal.
- The audio will be output in "Stereo" during AVCHD playback.
Digital Audio Output
PCM Down Conversion
Select how to output audio with a sampling frequency of 96 kHz.
- On: Signals are converted to 48 kHz. (Choose when the connected equipment cannot process signals with a sampling frequency of 96 kHz.)
- Off: Signals are output as 96 kHz.
- The signals will be converted to 48 kHz regardless of the setting when the signals have a sampling frequency of over 96 kHz.
Dolby Digital / Dolby Digital Plus MPEG HE-AAC
Select the audio signal to output.
- Select "PCM" when the connected equipment cannot decode the respective audio format.
- Not making the proper settings may result in noise.

- When using the DIGITAL AUDIO OUT terminal, there are following restrictions on Dolby Digital / Dolby Digital Plus.
- When "Bitstream" is selected, Dolby Digital Plus audio is output as Dolby Digital.
- When "PCM" is selected, audio is output as Down-mixed 2ch PCM.
Audio Delay
Mis-sync between the video and audio is corrected by delaying the audio output.
Display
On-Screen Information
Select the time until the channel information screen ( ⇒ 25) disappears automatically.
Unit's Display
Changes the brightness of the unit's display.
- If "Automatic" is selected, the display turns dark during play and disappears when the unit is in standby mode. It reappears momentarily if a button is pressed. While using this mode, the standby power consumption can be reduced.
- When "Power Save in Standby" is set to "On" or "On Timer" ( ⇒ 77), this function is fixed to "Automatic".
Screen Saver
This is to prevent burn-in on the screen.
Connection
3D Settings
3D Type
If 3D video cannot be played back in 3D, you may be able to play it in 3D by changing the setting.
- Change the settings for 3D on the TV also when "Side by side" is selected.
3D AVCHD Output
If 2D AVCHD video is recognized as 3D video and cannot be played back correctly, you may be able to play it by changing the setting.
3D Playback Message
Set to display or hide the 3D viewing warning screen.
TV Aspect
Set to match the type of TV connected.
• 16:9
When connected to a 16:9 widescreen TV.
• 4:3
Side picture is trimmed for 16:9 picture.
The pictures may be shown in the letterbox style depending on the content.
- Letterbox:
Black bands appear for 16:9 picture.


Aspect for 4:3 Video
To play a 4:3 title, set how to show pictures on a 16:9 TV.
TV System
Set in accordance with the TV System for the connected TV.
HDMI Connection
HDMI Video Format
You can only select items compatible with the connected equipment.
- If "Automatic" is selected, the output resolution best suited to the connected TV (1080p, 1080i, 720p or 576p/480p) is automatically selected.
- To enjoy High Quality Video up-converted to 1080p, you need to connect the unit to a 1080p compatible HDTV. If this unit is connected to an HDTV through other equipment, it must also be 1080p compatible.
Deep Colour Output
This setting is for selecting whether to use Deep Colour output when a TV that supports Deep Colour is connected.
HDMI Audio Output
Select "Off" when connected to an amplifier/receiver not compatible with HDMI with a DIGITAL AUDIO OUT terminal.
Contents Type Flag
If "Automatic" is selected, the optimal method of playback depending on the TV (e.g. cinema) will automatically be selected (only when the TV supports Contents Type Flag).
VIERA Link
Select "Off" when you do not want to use "HDAVI Control".
Changing the unit's settings (Setup)
Network
Easy Network Setting
Press [OK] to start Easy Network Setting. (=> 21)
Network Settings
LAN Connection Mode
Select the LAN connection method.
- HW120 "Wireless" is enabled only when the Wireless LAN adaptor DY-WL5 (optional) is connected.
Wireless Settings
This allows to set and check the connection settings of the Wireless router.
e.g.,

① Encryption type ② Reception ③ Type of wireless router
Connection Setting
The Wireless router connection wizard will be displayed.
Double Speed Mode Setting (2.4GHz)
When a 2.4 GHz wireless format is used, this setting sets the connection speed.
- If you connect using the “Double Speed Mode (40MHz)”, 2 channels use the same frequency band, and there is consequently a greater risk of reception interference. This can cause the connection speed to drop or the connection to become unstable.
IP Address / DNS Settings
Check the connection of the network or set the IP address and DNS.
- To set the IP address and DNS: 1. Set "IP Address Auto-assignment" and "DNS-IP Auto-assignment" to "Off". 2. Select the item, then press [OK] to show the respective setting.
- When the router's DHCP server function is not activated, check the numbers of other connected devices such as personal computers, then assign a number different from those of other devices for the "IP Address" and assign the same number for "Subnet Mask" and "Gateway Address".
Proxy Server Settings
Check and set the connection to the Proxy server.
- Press [OK] to show the respective setting.
Network Service Settings
Lock
You can restrict using VIERA Connect.
• PIN is required to change. (=> 70)
Automatic Volume Control
Volume is adjusted automatically to the standard volume while using VIERA Connect.
- Depending on contents, this function will not work.
- Select "Off" when the audio is warped.
Home Network Settings
You can set the DLNA (Server) function. (⇒ 61)
Home Network function
You can switch between enable/disable of the DLNA (Server) and DMR (Media Renderer) function.
- If "On" is selected, "Power Save in Standby" is fixed to "Off". (→ right)
- This cannot be set to "On" if the connection with the wireless broadband router is not encrypted in the wireless connection.
Setting device name
It is also possible to change the name of this unit on the network.
- Select from a preset list Select the preset name, then press [OK].
- Create name Enter the name. Refer to "Entering text". (⇒ 81)
Registration type for remote devices
- Automatic: All connected devices on the same network can access this unit.
- Manual: Only registered devices can access this unit.
Remote device list
• To register equipment manually 1 Select the device name or the MAC Address for the device you want to register, then press [OK]. 2 Select "Yes", then press [OK]. • To deregister equipment 1 Select the registered equipment, then press [OK]. 2 Select "Yes", then press [OK].
- This function cannot be enabled when "Automatic" is selected in "Registration type for remote devices". (See above)
- The maximum number of equipment that can be registered is 16.
Others
Standby Settings
Power Save in Standby
- On: It will go into the "Power Save in Standby" mode.
- On Timer: "Power Save in Standby" is activated when the set time comes.
- If the clock has not been set, "Power Save in Standby" is activated at all hours. • Off: It is possible to start quickly from standby mode. (Quick Start mode)
- This function cannot be enabled when the DLNA function is enabled in "Home Network function". (See left)
- If "On" or "On Timer" is selected, "Unit's Display" is fixed to "Automatic". (See page 74)
- HW220 The setting may be changed to "Off" automatically when the setting for video communication is changed. (See page 64)
Automatic Standby
Set the time to turn the unit to standby mode automatically.
When the unit is not operating, the unit will be turned to standby mode once the set time has passed.
- When "REWIND LIVE TV" is set to "On" (⇒ 73), "Off" cannot be selected.
Automatic Standby after OTR
- On:
This unit is turned to standby mode when it is not operated for approximately 5 minutes after completing “Automatic Stop” or “Recording Time” (⇒ 28).
Automatic Standby after Copy
- On:
This unit is turned to standby mode when it is not operated for approximately 5 minutes after completing copy (⇒ 57).
Changing the unit's settings (Setup)
RF OUT (Aerial Signal)
Set whether to output the aerial signal or not from RF OUT while in standby mode (When "Power Save in Standby" is activated).
- If "On" is selected, the aerial signal is output from this unit.
Remote Control
Change the remote control code on the main unit and the remote control if you place other Panasonic products close together.
- Use "Set Code1", the factory set code, under normal circumstances.
1 Select the code, then press [OK]. 2 While pressing [OK], press and hold the number button ([1] to [6]) for more than 5 seconds. 3 Press and hold [OK] for more than 5 seconds. 4 Press [OK]. - Operation is possible only with Panasonic remote controls with "IR6" printed at the bottom when the remote control code of this unit is set to "Set Code 4", "Set Code 5" or "Set Code 6".

Clock
If the time is not set correctly, use the settings listed in the method below.
- Automatic This unit usually obtains time and date information from digital broadcasts.
- Time Zone When the time is not correct, set "Time Zone". (GMT - 6 to + 6)
- Manual Setting 1 Select "Off" of "Automatic", then press [OK]. 2 Select the item you want to change. 3 Change the setting. 4 Press [OK] when you have finished the settings. 1 Select "Off" of "Automatic", then press [OK]. 2 Select the item you want to change. 3 Change the setting. 4 Press [OK] when you have finished the settings.
Owner ID
In order to prevent another person from using this unit if it is stolen, you can set a PIN and input your personal information (NAME, HOUSE NO, POSTCODE).
Once the PIN has been set, you cannot return to the factory preset. Make sure not to forget this.
PIN Entry
You can set/change the PIN for parental control.
1 Enter your 4-digit PIN with the number buttons. 2 Enter the new 4-digit PIN with the number buttons.
- Make a note of PIN in case you forget it. e.g.,

3 Press [OK].
System Update
Software Update in Standby
When you set this unit to standby mode, software (firmware) updates (⇒ 80) are downloaded automatically at the time you have specified.
Software Update Now (Broadcast)
Refer to "Software (Firmware) Update". (⇒ 80)
Software Update Now (Internet)
Refer to "Software (Firmware) Update". (⇒ 80)
Software Licence
Information about the software licence is displayed.
System Information
Display software (firmware) version, HDAVI Control version, Wireless Module version (When using wireless connection only), and terminal ID (ESN) of this unit.
DivX Registration
You need this registration code to purchase and play DivX Video-on-Demand (VOD) content.
• After playing DivX VOD content for the first time, the registration code is not displayed. - If you purchase DivX VOD content using a registration code different from this unit's code, you will not be able to play this content.
- To cancel the unit's registration Select "Yes". Use the deregistration code to cancel the registration at www.divx.com.
Initialize
Shipping Condition
All settings except for basic settings return to the factory preset. The timer recording programmes are also cancelled.
Default Settings
All settings other than the tuning settings, clock settings, parental control settings, remote control code, etc. return to the factory presets.
Language code list
| Abkhazian: 6566 | Lingala: 7678 | ||
| Afar: 6565 | Lithuanian: | 7684 | |
| Afrikaans: 6570 | Macedonian: | 7775 | |
| Albanian: 8381 | Malagasy: | 7771 | |
| Amharic: 6577 | Malay: | 7783 | |
| Arabic: 6582 | Malayalam: | 7776 | |
| Armenian: 7289 | Maltese: | 7784 | |
| Assamese: 6583 | Maori: | 7773 | |
| Aymara: 6589 | Marathi: | 7782 | |
| Azerbaijani: 6590 | Moldavian: 7779 | ||
| Bashkir: 6665 | Mongolian: | 7778 | |
| Basque: 6985 | Nauru: 7865 | ||
| Bengali; Bangla: 6678 | Nepali: | 7869 | |
| Bhutani: 6890 | Norwegian: | 7879 | |
| Bihari: 6672 | Oriya: | 7982 | |
| Breton: | 6682 | Pashto, Pushto: | 8083 |
| Bulgarian: | 6671 | Persian: | 7065 |
| Burmese: | 7789 | Polish: | 8076 |
| Byelorussian: | 6669 | Portuguese: | 8084 |
| Cambodian: | 7577 | Punjabi: | 8065 |
| Catalan: | 6765 | Quechua: 8185 | |
| Chinese: 9072 | Rhaeto-Romance: | 8277 | |
| Corsican: | 6779 | Romanian: 8279 | |
| Croatian: | 7282 | Russian: | 8285 |
| Czech: 6783 | Samoan: | 8377 | |
| Danish: | 6865 | Sanskrit: | 8365 |
| Dutch: | 7876 | Scots Gaelic: | 7168 |
| English: | 6978 | Serbian: | 8382 |
| Esperanto: | 6979 | Serbo-Croatian: | 8372 |
| Estonian: 6984 | Shona: | 8378 | |
| Faroese: 7079 | Sindhi: | 8368 | |
| Fiji: | 7074 | Singhalese: | 8373 |
| Finnish: | 7073 | Slovak: | 8375 |
| French: | 7082 | Slovenian: | 8376 |
| Frisian: | 7089 | Somali: | 8379 |
| Galician: 7176 | Spanish: | 6983 | |
| Georgian: 7565 | Sundanese: | 8385 | |
| German: 6869 | Swahili: | 8387 | |
| Greek: | 6976 | Swedish: 8386 | |
| Greenlandic: | 7576 | Tagalog: 8476 | |
| Guarani: | 7178 | Tajik: | 8471 |
| Gujarati: | 7185 | Tamil: | 8465 |
| Hausa: | 7265 | Tatar: | 8484 |
| Hebrew: | 7387 | Telugu: | 8469 |
| Hindi: | 7273 | Thai: | 8472 |
| Hungarian: 7285 | Tibetan: | 6679 | |
| Icelandic: | 7383 | Tigrinya: 8473 | |
| Indonesian: | 7378 | Tonga: 8479 | |
| Interlingua: 7365 | Turkish: | 8482 | |
| Irish: | 7165 | Turkmen: | 8475 |
| Italian: | 7384 | Twi: | 8487 |
| Japanese: 7465 | Ukrainian: | 8575 | |
| Javanese: | 7487 | Urdu: | 8582 |
| Kannada: | 7578 | Uzbek: | 8590 |
| Kashmiri: 7583 | Vietnamese: | 8673 | |
| Kazakh: | 7575 | Volapük: 8679 | |
| Kirghiz: | 7589 | Welsh: | 6789 |
| Korean: | 7579 | Wolof: | 8779 |
| Kurdish: 7585 | Xhosa: | 8872 | |
| Laotian: | 7679 | Yiddish: 7473 | |
| Latin: | 7665 | Yoruba: | 8979 |
| Latvian, Lettish: | 7686 | Zulu: | 9085 |
Software (Firmware) Update
You cannot operate the unit until the update is complete. Do not remove the AC mains lead during the update. Removing the AC mains lead while the update is in progress may damage the unit.
Software of this unit can be updated automatically by the following methods at the specified time.
(Default setting is 3 a.m. ⇒ 78, Software Update in Standby)
- From broadcasts
- From Internet *
- To update the software (Firmware) immediately, use the following function:
- Software Update Now (Broadcast): Software of this unit will be updated from broadcasts if update information is detected.
- Software Update Now (Internet) *: Software of this unit will be updated from the Internet if update information is detected.
* Network connection and settings are required. (⇒ 16, 21)
If a software (firmware) update is available, a notification is displayed.
New software version has been found. The software will be updated automatically after this unit is switched to standby. Do not disconnect the AC mains lead.
Update of the software (firmware) will start when the unit is turned to standby mode.
The unit's display during the update
e.g.,
SM - II
- When “FINISH” is displayed, update of the software (firmware) has completed.

- It may take up to a few hours until the update is completed depending on the network or broadcast environment.
- The timer recording always takes preference over the software (firmware) download; if the timer recording is scheduled to start, the downloading will be performed at the next opportunity.
- You can also download the latest software (firmware) from the following website. http://panasonic.jp/support/global/cs/
Other operations
Entering text
Preparation
- Show the "Enter Title Name" screen, etc.
1 Select a character, then press [OK]. Repeat this step to enter other characters.
e.g.,

• To delete a character: Select the character in the name field, then press [PAUSE ■]. - To enter characters with number buttons: e.g., entering the letter "R"
1 Press [7] to move to the seventh row. 2 Press [7] twice to highlight "R". 3 Press [OK].

2 Press [STOP ■] (Set).
"Writing..." appears then the screen returns to the previous screen and so on.
To end partway
Press [BACK/RETURN] (Text is not added.)

- If a name is long, parts of it may not be shown in some screens.
Switching the aspect ratio of the screen
When the image does not match the screen size of the TV, you can enlarge the image to fill the screen.
1 Press [OPTION]. 2 Select "Aspect", then press [OK]. 3 Select the item, then press [OK].
Normal:
Normal output
Side cut:
The black bars on the right and left sides of the 16:9 image disappear and the image is enlarged.
Zoom:
The black bars on the top and bottom sides of the 4:3 image disappear and the image is enlarged.

- This function does not work when watching 3D programme and playing back 3D title or 3D photo.
- It may also be adjusted using the screen mode of the TV etc.
- The screen mode is switched to "Normal" in the following situations:
- when you change the channel
- when you start or end the playback of a title
- when you switch the unit on or to standby mode.
- When "TV Aspect" (=> 75) is set to "4:3" or "Letterbox", the "Zoom" effect is disabled.
HOLD function
The HOLD function deactivates all buttons on the unit and remote control.
Press and hold [OK] and [BACK/RETURN] simultaneously until "X HOLD" appears on the unit's display.

Unit's display
To cancel the HOLD function
Press and hold [OK] and [BACK/RETURN] simultaneously until "X HOLD" disappears.
Troubleshooting guide
Before requesting service, make the following checks. If the problem still persists, consult your dealer for instructions.
Updating to the latest software (firmware) may solve the problem. (→ 80)
The following do not indicate a problem with this unit:
- Regular HDD rotating sounds.
- Poor reception due to atmospheric conditions. • Image disturbance during search.
- Interruptions in reception due to periodic broadcasting breaks.
- When you switch the unit on or to standby mode, there may be an unexpected sound.
General operation
The unit does not work.
- Check the connections. (→ 12)
- One of the unit's safety devices may have been activated.
Reset the unit as follows:
1 Press [∅/l] on the main unit to switch the unit to standby. - If the unit does not switch to standby, press [⏻/l] on the main unit for about 3 seconds. The unit is forcibly switched to standby. Alternatively, disconnect the AC mains lead, wait one minute, then reconnect it.
2 Press [⏻/l] on the main unit to switch it on. If the unit still cannot be operated, consult the dealer.
The unit is switched to standby mode automatically.
• VIERA Link has worked. (⇒ 65, Power off link)
The remote control does not work.
- The remote control and main unit are using different codes. Change the code on the remote control.
Unit's display
Press and hold [OK] and the indicated number button at the same time for more than 5 seconds.
(→ 78)
- Software (firmware) is updating when “UPD □/□” is displaying on the unit’s display. Wait until the update is completed. (⇒ 80)
• The HOLD function is activated. (→ 81)
Startup is slow.
- Startup takes time in the following situations:
- The clock is not set.
- Immediately after a power failure or the AC mains lead is connected.
- When the "Power Save in Standby" is activated. (⇒ 77)
Displays
"0:00" is flashing on the unit's display.
- Set the clock. (⇒ 68, 78)
The clock does not display on the unit when switched to standby.
- The clock does not display when "Unit's Display" is set to "Automatic". (→ 74)
TV screen and video
Screen size is wrong.
- Check the "TV Aspect" or "Aspect for 4:3 Video". (75)
- Adjust the aspect ratio setting on TV.
- If you connect to 4:3 TV, set "HDMI Video Format" to "576p/480p". (⇒ 68, 75)
The black screen appears on the TV.
- This phenomenon may occur, depending on the TV setting, when "Power Save in Standby" is set to "Off". Depending on the TV, this phenomenon may be prevented by reconnecting to a different HDMI input terminal.
TV reception is not displayed.
- Broadcast signals are not output from this unit's RF OUT terminal. Select "On" in "RF OUT (Aerial Signal)". (⇒ 68, 78)
Picture does not appear with the HD quality although HD setting was made.
- The pictures are output with 576p/480p depending on the title.
The screen changes automatically.
- If "Screen Saver" is set to "On", the screen saver function will be activated when there is no operation for 5 minutes or more. (74)
There is a lot of image lag when playing video.
- Set "HD optimizer" in the Picture menu to "Off". (⇒ 67)
- Set "Audio Delay". (⇒ 68, 74)
The images do not appear on the TV.
The picture is distorted during play, or video will not play correctly.
- Check the connections. (→ 12)
- Check the settings of the connected TV, etc.
- An incorrect resolution is selected in "HDMI Video Format". Reset the setting as follows:
1 While the unit is on, press and hold [OK], the yellow button and the blue button at the same time for more than 5 seconds.
- "00 RET" is displayed on the unit's display.
2 Repeatedly press [▶] (right) until "04 PRG" is displayed on the unit's display.
3 Press and hold [OK] for at least 3 seconds. Set the item again. (⇒ 68, 75)
- When Dolby Digital Plus audio is not output properly, select "Yes" in "Default Settings" and make proper settings. (⇒ 68, 79)
• Picture may not be seen when more than 4 devices are connected with HDMI cables. Reduce the number of connected devices. - The picture may be distorted or a black screen may appear between scenes recorded with different aspect ratios. - Set "Deep Colour Output" (⇒ 68, 75) or "Contents Type Flag" (⇒ 68, 75) to "Off".
Troubleshooting guide
3D video is not output correctly.
- 3D video may be output correctly by changing the following settings:
- "3D Type" of "3D Settings" (⇒ 75)
- "Signal Format" (⇒ 42, 3D settings during playback)
- Check the settings of the connected TV.
- When a non-3D compatible amplifier/receiver is connected between this unit and a TV, 3D video is not output. (⇒ 14)
- When the amplifier/receiver which is connected between this unit and a TV is off, 3D video is not output. (⇒ 14)
- When "HDMI Audio Output" is set to "Off", 3D video may not be output correctly. (⇒ 75)
The same video is displayed in each left and right half of the screen.
- This is a 3D programme of the Side-by-Side type.
Change the setting as follows if connecting with a 3D compatible TV:
1 Press [OPTION]. 2 Select "3D Settings", then press [OK]. 3 Select "Side by side" in "Signal Format", then press [OK].
Sound
No sound.
Distorted sound.
- Check the connections. (⇒ 12)
- Check the settings of the connected TV, etc.
- Select the audio with "Multi Audio". (→ 26, 41)
- To output audio from a device connected with an HDMI cable, set "HDMI Audio Output" to "On". (⇒ 68, 75)
Cannot change audio channel.
- You cannot change the audio channel if "Digital Audio Output" is set to "Bitstream" (⇒ 74)
Recording, timer recording and copying
Cannot record.
Cannot copy.
- Some broadcasts are copyright protected.
Timer recording does not work properly.
- Failed timer recordings are displayed in grey with ☒ on the Timer Recording screen. (⇒ 35)
When you programme a timer recording, check the screen icons. If “!” is displayed, this timer programme may not be recorded because:
- there is not enough space left.
- the number of possible titles has reached its maximum.
- programmes are deactivated, etc.
The timer recording programmed via VIERA Connect does not work properly.
- Timer recording programmed via VIERA Connect will be recorded with the same conditions as those of manual timer recording, and some functions such as “Guide Link” (⇒ 32) does not work.
Auto Renewal Recording does not work properly.
- The programme will not be overwritten in the following cases:
- the programme is protected
- any programme is being played back or copied
- a screen such as DIRECT NAVIGATOR is displayed
Instead, the programme will be saved as a separate programme and that will be overwritten.
A part or whole of a recorded title has been lost.
- If there is a power failure or the AC mains lead is disconnected from the household mains socket while recording or editing, the title may be lost or the HDD may become unusable. We cannot offer any guarantee regarding lost programmes.
Play
You have forgotten your PIN number for parental control.
- The PIN number for parental control returns to the factory preset ("0000"). 1 While the unit is on, press and hold [OK], the yellow button and the blue button at the same time for more than 5 seconds.
- "00 RET" is displayed on the unit's display. 2 Repeatedly press [▶] (right) until "03 VL" is displayed on the unit's display. 3 Press [OK].
- "INIT" is displayed on the unit's display.
Image for the Quick View is not smooth.
- Image may not be played back smoothly in case of High definition titles.
Edit
Cannot edit.
- You may not be able to edit on the HDD if there is no available space. Delete any unwanted titles to create empty space. (→ 43)
Cannot create a playlist.
- Creation or editing of playlists cannot be done on this unit.
Photo
The contents of the SD card cannot be read.
- Remove the card from the slot and then insert it again. If this does not solve the problem, switch the unit to standby mode and turn it on again.
Copying, deleting, and setting protection takes a long time.
- When there are a lot of folders and files, it may sometimes take a long time.
Photos do not play back normally.
- Images that were edited on a PC, such as Progressive JPEG, may not play back. (⇒ 91)
USB
This unit does not recognize the USB device correctly.
- If a USB device is connected to this unit while using video communication, the USB device will not be recognized. Press [EXIT] and reconnect the USB device.
- If inserted during playback, the USB device may not be recognized by this unit. Disconnect and reconnect the USB device. If it still does not recognize the connection, switch the unit to standby mode and turn it on again.
- USB devices connected using a USB extension cable other than a dedicated one or a USB hub may not be recognized by this unit.
Troubleshooting guide
TV Guide
The TV Guide information is not displayed properly.
- Set the clock correctly. (⇒ 68, 78, Clock)
- Some broadcast may not send programme information.
- There was a programme change, or TV Guide information from a broadcast station was possibly not correctly transmitted.
- If signal quality is bad, the TV Guide system may not be able to receive any data.
Broadcast
Picture regularly breaks up on some channels.
- Adjust the aerial reception with "Manual Tuning".
Picture very infrequently breaks up on some or all channels.
- Electrical atmospheric interference caused by bad weather may cause pictures to break up and audio to mute or distort momentarily.
VIERA Link
VIERA Link does not work.
- Some functions may not work depending on the version of "HDAVI Control" of the connected TV, etc. This unit supports "HDAVI Control 5" functions.
- Check the settings of the connected TV, etc.
- If the connection for the equipment connected with HDMI was changed, or if there was a power failure or the plug was removed from the household mains socket, “HDAVI Control” may not work. In this case, change TV (VIERA) setting for "HDAVI Control" again.
- This unit does not support "ONE TOUCH PLAY" function of the Panasonic AV Control Receiver.
Network
You cannot access this unit from DLNA compatible equipment on the network.
- Check the network connection and the network settings. ( ⇒ 16, 21)
- It may not be possible to connect depending on the types of the equipment or the status of the equipment.
You cannot play contents properly from DLNA compatible equipment on the network.
- There may be some video that cannot be played back on DLNA compatible equipment depending on the equipment.
- Following titles cannot be played back:
- A title with access restriction
- A title currently being recorded on this unit
- A title with audio only format
- A title with incompatible format
- Playback via DLNA compatible equipment may not be performed when this unit is in the following conditions:
- While simultaneously recording two programmes
- While simultaneously copying and recording
- While displaying the Setup menu
- While executing functions using a network, such as "VIERA Connect"
- You cannot play back simultaneously from two or more items of DLNA compatible equipment.
- If the DLNA compatible equipment is not capable of outputting HE-AAC audio format, etc., sound may not be played back.
When using Wireless LAN connection, video from the DLNA Certified media server is not played back or video frames are dropped during playback.
- Use 802.11n (2.4 GHz) Wireless router. Simultaneous use with a microwave, cordless telephone etc. at 2.4 GHz may result in connection interruptions or other problems.
- On the "Wireless Settings" screen ( ⇒ 76), the continuous lighting of at least four "Reception" indicators is the target for a stable connection. If three or fewer indicators are lit or the connection is being interrupted, change the position or angle of your Wireless router. If there is no improvement, connect to a wired network and perform the "Easy Network Setting" ( ⇒ 21) again.
Reset
To return all the settings to the factory preset
Perform "Shipping Condition" or "Default Settings". ( ⇒ 68, 79)
Messages on the unit's display
The following messages or service numbers appear on the unit's display when something unusual is detected.
SET □
("□" stands for a number.)
The remote control and main unit are using different codes. Change the code on the remote control. ( ⇒ 82)
GUIDE
TV Guide data is being downloaded.
HARD ERR
If there is no change after switching the unit to standby mode and turning it on, consult the dealer.
PLEASE WAIT
- Displayed when the unit is started and is switched to standby mode.
- There was a power failure or the AC plug was disconnected while the unit was on. The unit is carrying out its recovery process. Wait until the message disappears.
PROG FULL
There are already 32 timer programmes. Delete unnecessary timer programmes. (See page 35)
REMOVE
The USB device is drawing too much power. Remove the USB device.
START
Update of the software (firmware) is started. You cannot operate the unit until the update is complete. (See page 80)
SW-DL
Software (firmware) is downloading. Download will stop when the unit is turned on, or the timer recording starts. (See page 80)
UNSUPPORT
The media is not supported.
UPD □ /□
("□" stands for a number.)
The software (firmware) is being updated. You cannot operate the unit until the update is complete. (=> 80)
Troubleshooting guide
U59
The unit is hot.
The unit switches to standby for safety reasons. Wait for about 30 minutes until the message disappears.
Do not block the cooling fan on the rear of the unit.
U61
A malfunction has occurred. The unit is trying to restore to the normal operation. Once the message disappears you can use the unit again. If it remains displayed, consult the dealer.
U76
HDMI cannot be output because it is connected to a model that does not support copyright protection.
U99
The unit fails to operate properly. Press [∅/I] on the main unit to switch the unit to standby mode. Now press [∅/I] on the main unit again to turn the unit on.
XHOLD
The HOLD function is activated. ( ⇒ 81)
H□□ or F□□
("□" stands for a number.)
There is something unusual. (The service number displayed after H and F depends on the unit's condition.)
Reset the unit as follows:
1 Disconnect the plug from the household mains socket, wait a few seconds, then reconnect it.
2 Press [⏻/l] to turn the power on. (The unit may be fixed.)
Request service from the dealer. Inform the dealer of the service number when requesting service.
When you experience problems with Easy Network Setting
If there is any problem, the following message is displayed on the screen.
Wireless Settings
| Display Check the following | |
| A conflict with other devices occurred. | • Please wait a few moments, and then try again. |
| A time out error occurred. | • Setting of the Wireless router for MAC Address etc.• The signal may be weak.HW120 Using the USB extension cable supplied with the Wireless LAN Adaptor, adjust the position of the Wireless LAN Adaptor. |
| An authentication error or a time out error occurred. | • The SSID and the encryption key of the Wireless router.• Please wait a few moments, and then try again. |
| A device error occurred. | • HW120 Connection of Wireless LAN Adaptor• If the problem is not solved, consult your dealer. |
Easy Network Setting ( Home Network Connection Check )
| Display | Check the following | |
| 1. LAN cable connection or Wireless setting: | “Fail” | • Connection of the LAN cables (⇒ 16)• Settings of the hub and router |
| 2. IP address setting: | “Fail” | |
| 3. Connection to gateway: | “Fail” | |
| 1. LAN cable connection or Wireless setting: | “Pass” | • Connection and settings of the hub and router• Settings of “IP Address / DNS Settings” (⇒ 68, 76) |
| 2. IP address setting: | “Fail” | |
| 3. Connection to gateway: | “Fail” | |
| 1. LAN cable connection or Wireless setting: | “Pass” | |
| 2. IP address setting: | “Pass” | |
| 3. Connection to gateway: | “Fail” | |
| 1. LAN cable connection or Wireless setting: | “Pass” | |
| 2. IP address setting: | “Home network available” | |
| 3. Connection to gateway: | “Fail” | |
Easy Network Setting ( Internet Connection Test )
| Display Check the following | |
| Cannot find the server. (B019) | • “Primary DNS” and “Secondary DNS” settings of “IP Address / DNS Settings” (⇒ 68, 76) |
| No connection could be made to the server. (B020) | • The server may be busy or the service may have been suspended. Please wait a few moments, and then try again.• Settings of “Proxy Server Settings” (⇒ 68, 76) and the router. |
Specifications
Specifications are subject to change without notice.
General
Dimensions: 430 mm (W)
59 mm (H)
(excluding the projecting parts)
238 mm (D)
(including the projecting parts)
249 mm (D)
Mass: Approx. 2.5 kg
Power supply: AC 220 to 240 V, 50 Hz
Power consumption: HW220 Approx. 25 W
HW120 Approx. 24 W
"Power Save in Standby" is activated and
"RF OUT ( Aerial Signal )" is set to "Off"
Approx. 0.2 W
"Power Save in Standby" is not activated
Approx. 3 W
Operating temperature: 5 °C to 40 °C
Operating humidity range: 10 % to 80 % RH
(no condensation)
TV system
Tuner System: DVB-T/DVB-T2
Country: UK
Channel Coverage: UHF 21~68
Video
Video system: PAL/NTSC
Recording system:
MPEG-2, MPEG-4 AVC/H.264
Audio
Recording system:
Dolby Digital (DR mode: Max 5.1ch)
Dolby Digital Plus (DR mode: Max 5.1ch)
MPEG (DR mode: 2ch)
HE-AAC (DR mode: Max 5.1ch (DVB-T/T2))
Audio out: Audio Out L/R (pin jack)
Output level: Full scale: 2.0 Vrms at 1 kHz
Output impedance: Less than 1 kΩ
Digital audio out:
Optical terminal
(PCM, Dolby Digital, MPEG)
HDMI terminal
(PCM, Dolby Digital,
MPEG, Dolby Digital Plus)
■ HDMI Output
19 pin type A: 1 pc.
- This unit supports "HDAVI Control 5" function.
■ Internal HDD capacity
HW220 1 TB
HW120 500 GB
■ Other terminals
USB Port (Type A): 2 pcs.
SD Card Slot: 1 pc.
LAN (Ethernet) Port: 1 pc.
10BASE-T/100BASE-TX
■ HW220 Wireless LAN
Standard compliance: IEEE802.11b/g/n
Frequency range: 2.4 GHz band
Security*:
WPA™/WPA2™
(Encryption type: TKIP/AES,
Authentication type: PSK)
WEP (64 bit/128 bit)
* This unit supports WPA and WPA2 encryption.
■ SD Card
Compatible media: SD Memory Card 4
Format: FAT12, FAT16, FAT32, exFAT 2
Data that can be played: JPEG, MPO,
AVCHD format, MPEG-2, MP4
*1 Includes SDHC/SDXC cards. Includes miniSD™ cards (need a miniSD™ adaptor).
Includes microSD TM /microSDHC TM /microSDXC TM cards (need a microSD TM adaptor).
※2 SDXC only
USB device
USB standard: USB2.0 High Speed
Format: FAT12, FAT16, FAT32
Data that can be played: MP3, JPEG, MPO, DivX, MKV, MP4, MPEG-2
About recorded titles
■ Recording quality and approximate recording times
Depending on the content being recorded, the recording time may become shorter than indicated.
| Recording Mode | HDD | |
| HW220(1 TB) | HW120(500 GB) | |
| HD quality 259 hours 129 hours | ||
| SD quality 518 hours 258 hours | ||
- Recording time may vary depending on the bit rate of broadcasting:
- High Definition (HD) quality: estimated bit rate is 8 Mbps
- Standard Definition (SD) quality: estimated bit rate is 4 Mbps
- Regarding recording time remaining:
Remaining time is calculated with a bit rate of 8 Mbps. But the bit rate differs depending on the broadcast, so the displayed remaining time might be different from the actual remaining time.
■ Maximum number of titles that can be recorded
999 titles
(When continuously recording for long durations, titles are automatically divided every 8 hours.)
Information for the files other than recorded programmes
JPEG/MPO
playable media: HDD, SD Card, USB device
Compatible pixels:
Between 34×34 and 8192×8192 pixels (Sub sampling is 4:2:2 or 4:2:0)
Files: JPEG conforming DCF
(Design rule for Camera File system)
MPO conforming MPF
(Multi Picture Format)
Maximum numbers of folders and files:
| Media | Maximum folders | Maximum files |
| HDD | - | 20000 |
| SD Card | 500 | 10000 |
| USB device | 500 | 10000 |
- This unit is not compatible with Motion JPEG or Progressive JPEG.
MP3
playable media: HDD, USB device
Compression rate: 32 kbps to 320 kbps
Sampling rate: 16 kHz, 22.05 kHz, 24 kHz, 32 kHz, 44.1 kHz, 48 kHz
Maximum numbers of folders and files:
| Media | Maximum folders | Maximum files |
| HDD | - | 40000 |
| USB device 300 | 3000 | |
Specifications
DivX
playable media: USB device
Official DivX Certified® product
DivX Certified to play DivX video up to HD 1080p, including premium content.
GMC (Global Motion Compensation) is not supported.
Maximum number of folders: 300 folders (including the root folder)
Maximum number of files: 200 files
- Support version
Picture resolution
Up to 1920×1080 pixels
Video
- Number of stream: Up to 1
- Codec: DIV3, DIV4, DIVX, DV50, DIV6
- FPS (Frame Per Second): Up to 60 fps
Audio
- Number of stream: Up to 8
- Format: MP3, MPEG, Dolby Digital
- Multi-channel: Dolby Digital is supported. MPEG multi is converted to 2 channels.
MKV
Playable media: USB device
MPEG-4 AVC (H.264) profile is up to High Profile, Level 4.
AAC-LC, MP3, Dolby Digital audio, PCM, Vorbis, and FLAC can be decoded.
Maximum number of folders: 300 folders (including the root folder)
Maximum number of files: 200 files
■ SD-Video (Standard Definition)
Playable media: SD Card, USB device Codec: MPEG-2
File Format:
SD-Video format*
Used on Standard Definition Camera (Panasonic and some others)
※ SD-Video Entertainment Video Profile
■ HD-Video (High Definition)
Playable media: SD Card, USB device Codec: MPEG-4 AVC/H.264
File Format: AVCHD format conforming
Licenses
| "AVCHD", "AVCHD 3D", "AVCHD Progressive" and "AVCHD 3D/Progressive" are trademarks of Panasonic Corporation and Sony Corporation. |
| DLNA, the DLNA Logo and DLNA CERTIFIED are trademarks, service marks, or certification marks of the Digital Living Network Alliance. |
| DVB and the DVB logos are trademarks of the DVB Project. |
| Manufactured under license from Dolby Laboratories.Dolby and the double-D symbol are trademarks of Dolby Laboratories. |
| MPEG Layer-3 audio coding technology licensed from Fraunhofer IIS and Thomson. |
| This product is licensed under the AVC patent portfolio license and VC-1 patent portfolio license for the personal and non-commercial use of a consumer to (i) encode video in compliance with the AVC Standard and VC-1 Standard ("AVC/VC-1 Video") and/or (ii) decode AVC/VC-1 Video that was encoded by a consumer engaged in a personal and non-commercial activity and/or was obtained from a video provider licensed to provide AVC/VC-1 Video. No license is granted or shall be implied for any other use. Additional information may be obtained from MPEG LA, LLC.See http://www.mpegla.com. |
| SDXC Logo is a trademark of SD-3C, LLC. |
| Skype, associated trade marks and logos and the "S" logo are trade marks of Skype Limited. |
| VIERA Connect is a trademark of Panasonic Corporation. |
The Wi-Fi CERTIFIED Logo is a certification mark of the Wi-Fi Alliance.The Wi-Fi Protected Setup Mark is a mark of the Wi-Fi Alliance.  |
| "Wi-Fi", "Wi-Fi Protected Setup", "WPA" and "WPA2" are marks or registered marks of the Wi-Fi Alliance. |
| HDAVI ControlTM is a trademark of Panasonic Corporation. |
| HDMI, the HDMI Logo, and High-Definition Multimedia Interface are trademarks or registered trademarks of HDMI Licensing LLC in the United States and other countries. |
| Windows is a trademark or a registered trademark of Microsoft Corporation in the United States and other countries. |
| DivX®, DivX Certified® and associated logos are trademarks of Rovi Corporation or its subsidiaries and are used under license. |
| ABOUT DIVX VIDEO:DivX® is a digital video format created by DivX, LLC, a subsidiary of Rovi Corporation. This is an official DivX Certified® device that plays DivX video. Visit divx.com for more information and software tools to convert your files into DivX videos. |
| ABOUT DIVX VIDEO-ON-DEMAND:This DivX Certified® device must be registered in order to play purchased DivX Video-on-Demand (VOD) movies.To obtain your registration code, locate the DivX VOD section in your device setup menu.Go to vod.divx.com for more information on how to complete your registration. |
| The Freeview service is subject to coverage.An aerial upgrade may be required. The FREEVIEW, FREEVIEW+, FREEVIEW HD and FREEVIEW+ HD words and logos are trade marks of DTV Services LTD.© DTV Services Ltd 2002, 2008. |
Licenses
Rovi and Rovi Guide are trademarks of Rovi Corporation and/or its subsidiaries.
The Rovi Guide system is manufactured under license from Rovi Corporation and/or its subsidiaries.
The Rovi Guide system is protected by patents and patent applications filed in the US, Europe, and other countries including one or more of the United States patents 6,396,546; 5,940,073; 6,239,794 issued to Rovi Corporation and/or its subsidiaries.
Rovi Corporation and/or its subsidiaries and related affiliates are not in any way liable for the accuracy or availability of the program schedule information or other data in the Rovi Guide system and cannot guarantee service availability in your area. In no event shall Rovi Corporation and/or its related affiliates be liable for any damages in connection with the accuracy or availability of the program schedule information or other data in the Rovi Guide system.
This product incorporates the following software or technology:
(1) the software developed independently by or for Panasonic Corporation, (2) the software owned by third party and licensed to Panasonic Corporation, (3) the software developed by the Independent JPEG Group, (4) the software developed by the Freetype Project, (5) the software licensed under the GNU LESSER General Public License (LGPL) and/or, (6) open sourced software other than the software licensed under the LGPL, (7) Windows Media digital right management technology (WM-DRM) licensed by Microsoft Corporation or its affiliates.
For the software categorized as (5), please refer to the terms and conditions of LGPL, as the case may be at http://www.gnu.org/licenses/old-licenses/lgpl-2.1.html
In addition, the software categorized as (5) are copyrighted by several individuals. Please refer to the copyright notice of those individuals at
http://panasonic.net/avc/oss/diga/FCRCP12.html
The LGPL software is distributed in the hope that it will be useful, but WITHOUT ANY WARRANTY, without even the implied warranty of MERCHANTABILITY or FITNESS FOR A PARTICULAR PURPOSE.
At least three (3) years from delivery of products, Panasonic will give to any third party who contacts us at the contact information provided below, for a charge no more than our cost of physically performing source code distribution, a complete machine-readable copy of the corresponding source code covered under LGPL.
Contact Information
cdrequest.diga@gg.jp.panasonic.com
Source code covered under LGPL is also freely available to you and any other member of the public via our website below. http://panasonic.net/avc/oss/diga/FCRCP12.html
For the software categorized as (5) and (6), please refer to the applicable license terms included in the “Software Licence” menu on product.
Further, for WM-DRM categorized as (7), please be aware of the following.
(a) This product is protected by certain intellectual property rights of Microsoft.
Use or distribution of this technology outside of this product is prohibited without a license from Microsoft or an authorized Microsoft subsidiary.
(b) Content providers are using the digital rights management technology for Windows Media contained in this device (“WM-DRM”) to protect the integrity of their content (“Secure Content”) so that their intellectual property, including copyright, in such content is not misappropriated. This device uses WM-DRM software to play Secure Content (“WM-DRM Software”). If the security of the WM-DRM Software in this device has been compromised, owners of Secure Content (“Secure Content Owners”) may request that Microsoft revoke the WM-DRM Software’s right to acquire new licenses to copy, display and/or play Secure Content.
Revocation does not alter the WM-DRM Software's ability to play unprotected content. A list of revoked WM-DRM Software is sent to your device whenever you download a license for Secure Content from the Internet or from a PC. Microsoft may, in conjunction with such license, also download revocation lists onto your device on behalf of Secure Content Owners.
Vorbis, FLAC, WPA Supplicant
The software licenses are displayed when "Software Licence" in the Setup menu is selected. (78)
Index
A
Aspect 75,81
Audio
Broadcasts 26
Playback 41
Audio Description 26, 41, 72
Auto Setup 19, 71
AVCHD
Copy 56
Playback 36, 39
C
Channel information 25
Channel List 24
Edit 71
Chapter 38, 41, 46
Child Lock 72, 73
Clock 78
Connection
Amplifier/receiver 14
AUDIO OUT terminal 15
Basic connections 12
DIGITAL AUDIO OUT terminal ..... 15
HDMI cable 12, 14
Network 16
Copy (Music) 52
Copy (Photo) 51
Copy (Video) 47
HD Video (AVCHD) 56
SD Video (MPEG2) 57
D
Delete
Music 55
Photo 50
Video 43
Delete all photos
HDD 73
Delete all titles
HDD 73
USB HDD 73
Digital teletext 26
DIRECT NAVIGATOR
Music 53
Photo 48
Video 36
DivX
Playback 39
E
Easy Network Setting 21,76
Easy setting 19
Edit (Music) 55
Edit (Photo) 50
Edit (Video) 44
Chapter 41, 46
Delete 43,44
Protection 44
Entering text 81
Index
F
Favourites 70
Format
HDD 73
SD Card 60
USB HDD 73
Freeview 32
FUNCTION MENU 23
H
HD Video (AVCHD)
Copy 56
Play 36,39
HDAVI Control 65,75
HDD
Delete all photos 73
Delete all titles ....73
Format 73
Media information 6
HDMI cable 12
HOLD function 81
J
JPEG 48,91
L
Language code list....79
M
Manual Tuning 71
Media
HDD 6
SD Card 6,8
USB HDD 6
USB memories....6,8
Media Renderer 63
Menu screen ....39
MKV 92
Playback 39
MPEG2 .57, 92
MPO (3D photo) .....48, 91
MP3 52, 91
Music
Copy 52
Delete .....55
Edit ....55
Playback 52
N
Network
Connection....16
DLNA (Client) 62
DLNA (Server) 61, 77
Setting 76
Software (Firmware) Update .....80
VIERA Connect .64
P
PAUSE LIVE TV 27
Photo
Copy 51
Delete 50
Edit....50
Playback 48
Protection ....50
Slideshow 48,54
PIN 70,78
Playback menu 66
Playback (Music)
MP3 52
Recorded on HDD 53
Playback (Photo) 48
Slideshow 48,54
Playback (Video)
AVCHD 36,39
Changing audio 41
Chapter 38
Child Lock for Playback 73
DivX 39
MKV 39
Recorded video contents .....36
Status message 40
Subtitles 41
3D 42
Power Save in Standby 77
Protection
HOLD function 81
Photo 50
Video 44
R
Recording 28
Recording quality 91
Recording time 91
Timer recording 30
Recording quality 91
Remote control 10
HOLD function 81
Manufacturer and Code No. 18
Remote control code 78
TV operation 18
Reset 79,85,87
REWIND LIVE TV 27,73
s
SD Card Format 60
Media information 6,8
miniSD / microSD 8
SD Video (MPEG2)
Copy 57
Setting
Auto Setup 19,71
Easy Network Setting 21,76
Easy setting 19
Setup menu 68
Connection 75
Display 74
HDD / USB HDD 73
Network 76
Others 77
Picture 73
Sound 74
Tuning 70
Skype™ 64
Slideshow 48,54
Smart Home Networking (DLNA)
Client 62
Media Renderer 63
Server 61,77
Software (Firmware) Update 80
Subtitles
Broadcasts 26
Playback 41
T
Timer recording 30
Auto Renewal Recording 33
Guide Link 32
Manually programming timer recording .... 33
Recommendation Booking 32
Series Timer Recording 32
Split Programme 32
Tuning
Channel List 71
Channel Sorting by Region 71
Child Lock 72
Manual Tuning 71
Signal condition 72
TV Guide
Operation 25
Timer recording 30
TV System 75
U
Unit's display
Messages 87
USB HDD
Cancellation of all USB HDD Registrations . . . 73
Delete all titles 73
Disconnection 58,73
Format 73
Media information 6
Registration 59,73
USB memories
Media information 6,8
V
Video
Copy 47
Delete 43
DIRECT NAVIGATOR 36
Edit 44
Playback 36, 39
Protection 44
Recording 28
VIERA Connect 64
VIERA Link 65,75
3D 42
The recording and playback of content on this or any other device may require permission from the owner of the copyright or other such rights in that content. Panasonic has no authority to and does not grant you that permission and explicitly disclaims any right, ability or intention to obtain such permission on your behalf. It is your responsibility to ensure that your use of this or any other device complies with applicable copyright legislation in your country. Please refer to that legislation for more information on the relevant laws and regulations involved or contact the owner of the rights in the content you wish to record or playback.
Information for Users on Collection and Disposal of Old Equipment and used Batteries

These symbols on the products, packaging, and/or accompanying documents mean that used electrical and electronic products and batteries should not be mixed with general household waste.
For proper treatment, recovery and recycling of old products and used batteries, please take them to applicable collection points, in accordance with your national legislation and the Directives 2002/96/EC and 2006/66/EC.
By disposing of these products and batteries correctly, you will help to save valuable resources and prevent any potential negative effects on human health and the environment which could otherwise arise from inappropriate waste handling.
For more information about collection and recycling of old products and batteries, please contact your local municipality, your waste disposal service or the point of sale where you purchased the items.
Penalties may be applicable for incorrect disposal of this waste, in accordance with national legislation.

For business users in the European Union
If you wish to discard electrical and electronic equipment, please contact your dealer or supplier for further information.
[Information on Disposal in other Countries outside the European Union]
These symbols are only valid in the European Union. If you wish to discard these items, please contact your local authorities or dealer and ask for the correct method of disposal.
![PANASONIC DMR-HW120 - [Information on Disposal in other Countries outside the European Union] - 1](/content/2026/06/1331529/images/870589c61332825d88698f653a44267da621c3bc8be5899e2a915300d4f39989.jpg)
Note for the battery symbol (bottom two symbol examples):
This symbol might be used in combination with a chemical symbol. In this case it complies with the requirement set by the Directive for the chemical involved.
HW220
CE 1731①
Declaration of Conformity (DoC)
Hereby, "Panasonic Corporation" declares that this product is in compliance with the essential requirements and other relevant provisions of Directive 1999/5/EC.
Customers can download a copy of the original DoC to our R&TTE products from our DoC server:
http://www.doc.panasonic.de
Contact to Authorised Representative:
Panasonic Marketing Europe GmbH,
Panasonic Testing Centre, Winsbergring 15, 22525 Hamburg, Germany
This product is intended to be used in the following countries.
Austria, Belgium, Bulgaria, Cyprus, Czech Republic, Denmark, Finland, France, Germany, Greece, Hungary, Ireland, Italy, Iceland, Liechtenstein, Luxembourg, Malta, Netherlands, Norway, Poland, Portugal, Romania, Slovakia, Slovenia, Spain, Sweden, United Kingdom, Switzerland
This product is intended for general consumer. (Category 3)
The WLAN feature of this product shall exclusively be used inside buildings.
This product is intended to connect to access points of 2.4 GHz WLAN.
Sales and Support Information
Customer Communications Centre
• For customers within the UK: 0844 844 3899 • For customers within Ireland: 01 289 8333 - For further support on your product, please visit our website: www.panasonic.co.uk
Direct Sales at Panasonic UK
- Order accessory and consumable items for your product with ease and confidence by phoning our Customer Communications Centre Monday–Thursday 9:00 a.m.–5:30 p.m., Friday 9:30 a.m.–5:30 p.m. (Excluding public holidays)
- Or go online through our Internet Accessory ordering application at www.pas-europe.com.
- Most major credit and debit cards accepted.
- All enquiries, transactions, and distribution facilities are provided directly by Panasonic UK.
- It couldn't be simpler!
- Also available through our Internet is direct shopping for a wide range of finished products. Take a browse on our website for further details.
Digital Switchover for Terrestrial broadcasts
Starting in late 2007 and ending in 2012, TV services in the UK will go completely digital, TV region by TV region. If you have any questions, please call Digital UK on 08456 50 50 50 or visit www.digitaluk.co.uk
Digital Switchover will cover a period of several weeks.
When it starts you will lose all Analogue TV channels and some Digital TV channels will be missing. You will need to retune this unit each time this happens to recover your digital channels.
- To retune this unit → "Auto Setup" in "Tuning" ( ⇒ 71)
- Due to the digital reception technologies involved, quality of the digital signals may be relatively low in some cases, despite good reception of analogue channels.
Pursuant to at the directive 2004/108/EC, article 9(2)
Panasonic Testing Centre
Panasonic Marketing Europe GmbH
Winsbergring 15, 22525 Hamburg, Germany

Environment friendly printed on chlorine free bleached paper.
Panasonic Corporation
Web Site: http://panasonic.net

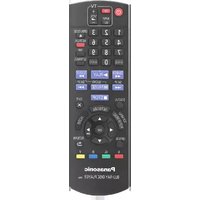
- OPERATING INSTRUCTIONS
- HDD RECORDER
- MODEL NO. DMR-HW
- DMR-HW
- SAFETY PRECAUTIONS
- WARNING
- UNIT
- AC MAINS LEAD
- SD CARD
- CAUTION
- PLACEMENT
- BATTERIES
- CAUTION FOR AC MAINS LEAD
- BEFORE USE
- HOW TO REPLACE THE FUSE
- SUPPLIED ACCESSORIES
- INDEMNITY CONCERNING RECORDED CONTENT
- TABLE OF CONTENTS
- GETTING STARTED
- WATCHING BROADCASTS
- RECORDING
- PLAYING BACK VIDEO
- EDITING VIDEO
- COPYING VIDEO
- PHOTO
- MUSIC
- WITH OTHER EQUIPMENT
- CONVENIENT FUNCTIONS
- TROUBLESHOOTING
- REFERENCE
- ABOUT DESCRIPTIONS IN THESE OPERATING INSTRUCTIONS
- HDD AND MEDIA INFORMATION
- PLAYABLE CONTENTS ON A DLNA SERVER
- NOTES
- NOTES FOR THE USB DEVICES
- NOTES FOR THE SD CARDS
- COMPATIBLE SD CARD
- USING MINISD CARD OR MICROSD CARD
- TO FORMAT AN SD CARD
- MEDIA HANDLING
- UNIT CARE
- HDD/USB HDD HANDLING CARE
- SETUP PRECAUTIONS
- WHEN MOVING THE UNIT
- CLEANING
- WHEN REQUESTING THIS UNIT FOR REPAIR
- CONTROL REFERENCE GUIDE
- REMOTE CONTROL
- INSERT BATTERIES
- MAIN UNIT
- ① STANDBY/ON SWITCH (⏻/L)
- ② RECORDING INDICATOR
- ③ HW220 CALL LED
- ④ REMOTE CONTROL SIGNAL SENSOR
- ⑤ START PAUSE LIVE TV ( ⇒ 27)
- ⑥ USB PORT
- ⑦ SD CARD SLOT
- ⑧ CHANNEL SELECT ( ⇒ 24)
- ⑨ DISPLAY
- CONNECTION
- BASIC CONNECTIONS
- ABOUT HDMI CABLE
- WHEN THE UNIT IS NOT TO BE USED FOR A LONG TIME
- [APPROX. 0.2 W (“POWER SAVE IN STANDBY” IS ACTIVATED AND “RF OUT (AERIAL SIGNAL)” IS SET TO “OFF”)]
- AMPLIFIER/RECEIVER CONNECTIONS
- HDMI TERMINAL
- AMPLIFIER/RECEIVER NOT COMPATIBLE WITH 3D
- DIGITAL AUDIO OUT TERMINAL
- AUDIO OUT TERMINAL
- NETWORK CONNECTION
- LAN CABLE CONNECTION
- WIRELESS LAN CONNECTION
- PRECAUTIONS OF WIRELESS LAN CONNECTION
- SETTINGS
- TV OPERATION BUTTONS
- EASY SETTING
- TO STOP PARTWAY
- TO RESTART SETUP
- TO DISPLAY THE OWNER ID INFORMATION ON TV
- TO CONFIRM THAT CHANNELS HAVE BEEN TUNED CORRECTLY
- TO CHANGE PIN FOR PARENTAL CONTROL
- TO CHANGE THE REGION FOR CHANNEL SORTING
- EASY NETWORK SETTING
- PREPARATION
- WIRED" CONNECTION
- WIRELESS" CONNECTION
- CONNECTION METHOD TO WIRELESS ACCESS POINT
- SEARCH FOR WIRELESS NETWORK
- WPS (PUSH BUTTON)
- WHEN YOU EXPERIENCE PROBLEMS
- TO RESTART EASY NETWORK SETTING
- TO REDO SETTINGS INDIVIDUALLY
- CHECK SECURITY BEFORE USING THE HOME NETWORK FUNCTION
- FUNCTION MENU SCREEN
- PRESS [FUNCTION MENU]
- SELECT THE ITEM, THEN PRESS [OK]
- FUNCTION MENU LIST
- FUNCTION MENU
- TO SWITCH TO THE CHANNEL YOU HAVE PREVIOUSLY WATCHED
- TO SWITCH TO THE RADIO CHANNELS
- USING CHANNEL LIST
- TO EDIT THE CHANNEL LIST
- USING TV GUIDE SYSTEM
- PAGE UP/DOWN
- TO SEE PROGRAMME INFORMATION
- TO RETRIEVE THE PROGRAMME DATA FOR THE AREA WHERE DATA HAVE NOT BEEN ACQUIRED
- TO SET A TIMER RECORDING USING THE TV GUIDE SYSTEM
- USING CHANNEL INFORMATION
- TO SHOW DETAILED INFORMATION
- TO HIDE THE INFORMATION SCREEN
- TO CHANGE CATEGORY
- TO SWITCH BETWEEN THE CURRENT PROGRAMME AND THE NEXT PROGRAMME
- TO SWITCH TO ANOTHER CHANNEL
- OPERATIONS WHILE WATCHING BROADCAST
- TO SHOW SUBTITLE
- SWITCHING AUDIO
- TO LISTEN TO THE AUDIO DESCRIPTION
- TO SHOW DIGITAL TELETEXT (MHEG)
- ASPECT
- REWIND LIVE TV/PAUSE LIVE TV
- REWIND LIVE TV
- PAUSE LIVE TV
- WHILE WATCHING TV
- WHEN YOU WANT TO RESUME
- DISPLAY INFORMATION
- TO STOP REWIND LIVE TV OR PAUSE LIVE TV
- TO HIDE THE DISPLAY INFORMATION
- RECORDING TV PROGRAMMES
- SELECT THE CHANNEL TO RECORD
- PRESS [REC ●]
- SELECT "AUTOMATIC STOP", THEN PRESS [OK]
- TO SET THE RECORDING TIME
- RECORDING TIME
- CONTINUOUS RECORDING
- PRESS [OK]
- OPERATION DURING RECORDING
- TO CHECK THE RECORDING PROGRAMME
- TO STOP RECORDING
- TO PAUSE RECORDING
- TO RECORD TWO PROGRAMMES SIMULTANEOUSLY
- SIMULTANEOUS RECORD AND PLAYBACK
- TIMER RECORDING
- PRESS [GUIDE]
- SELECT THE PROGRAMME, THEN PRESS THE RED BUTTON
- TO USE THE TV GUIDE SYSTEM
- TO EDIT THE TIMER RECORDING ON THE TV GUIDE SCREEN
- TO CANCEL A TIMER RECORDING ON THE TV GUIDE SCREEN
- IF THE SCREEN FOR SELECTING SINGLE OR SERIES TIMER RECORDING APPEARS
- IF "PROGRAMME SELECTION" SCREEN APPEARS
- IF "OVERLAPPED TIMER RECORDING" SCREEN APPEARS
- TO SELECT THE PROGRAMMES OF A SPECIFIC CATEGORY
- TO RETURN TO THE PREVIOUS TV GUIDE LIST
- VARIOUS FUNCTIONS WITH FREEVIEW
- GUIDE LINK
- SERIES TIMER RECORDING
- TO CHECK THE SCHEDULE OF THE SERIES
- SPLIT PROGRAMME
- RECORDING RECOMMENDED PROGRAMME (RECOMMENDATION BOOKING)
- SELECT THE PROGRAMME, THEN PRESS [OK]
- TO CANCEL THE TIMER RECORDING ON THE RECOMMENDATION LIST
- MANUALLY PROGRAMMING TIMER RECORDING
- TO CONFIRM AND EDIT THE TIMER PROGRAMME
- TIMER RECORDING OPTIONS
- CHANNEL
- DAY/DATE
- START/STOP
- AUTO RENEWAL RECORDING
- TITLE NAME
- TIMER RECORDING FROM CHANNEL INFORMATION
- NOTES ON TIMER RECORDING
- TO CONFIRM AND EDIT A TIMER PROGRAMME
- PRESS [PROG/CHECK]
- SELECT THE PROGRAMME, THEN PERFORM THE OPERATIONS
- TO DEACTIVATE A TIMER PROGRAMME
- TO DELETE A TIMER PROGRAMME
- TO EDIT A TIMER PROGRAMME
- TO SHOW PROGRAMME INFORMATION
- TO EXIT THE TIMER RECORDING LIST
- SCREEN ICONS
- PLAYING TITLES ON THE HDD
- PRESS [DRIVE SELECT] TO SELECT "HDD", THEN PRESS [DIRECT NAVIGATOR]
- SELECT THE TITLE, THEN PRESS [OK]
- RESUME PLAY FUNCTION
- DIRECT NAVIGATOR (VIDEO)
- SCREEN
- TAB
- TO SELECT THE TAB
- TO CHANGE THE DISPLAYED PROGRAMME TYPE TAB
- TO CHANGE THE PROGRAMME TYPE OF TITLE
- SWITCHING TO THE PHOTO OR MUSIC SCREEN
- SHOWING INFORMATION
- SWITCHING THE APPEARANCE
- GROUPED TITLES
- ALL TITLES
- PLAYING BACK GROUPED TITLES
- WHEN PLAYING ALL TITLES
- EDITING THE GROUPED TITLES
- CREATE GROUP
- RELEASE GROUPING
- REMOVE
- CHANGING THE GROUP NAME
- PLAYBACK FROM CHAPTER VIEW
- REGARDING CHAPTERS
- PLAYING TITLES ON THE MEDIA
- INSERT THE MEDIA
- WHEN THE MENU SCREEN ETC., APPEARS
- MENU SCREEN
- VIDEO LIST SCREEN
- DIRECT NAVIGATOR (AVCHD) SCREEN
- ABOUT SCREEN ICONS ON THE DIRECT NAVIGATOR
- OPERATION DURING PLAY
- GENERAL OPERATIONS
- STATUS MESSAGES
- STOP
- QUICK VIEW
- SEARCH
- PAUSE
- SLOW-MOTION
- FRAME-BY-FRAME
- MANUAL SKIP
- SKIP FORWARD 1 MINUTE
- SKIP BACKWARD 10 SECONDS
- SKIPPING THE SPECIFIED TIME
- SKIPPING THE TITLE OR CHAPTER
- TO CREATE CHAPTER MARKS
- TO DELETE THE CHAPTER MARK
- CHANGING AUDIO
- SWITCHING SUBTITLES
- DIVX AND MKV
- LISTENING TO THE AUDIO DESCRIPTION
- D VIDEO PLAYBACK
- PREPARATORY 3D SETTINGS
- D TYPE
- D AVCHD OUTPUT
- D PLAYBACK MESSAGE
- GRAPHIC DISPLAY LEVEL
- D SETTINGS DURING PLAYBACK
- SIGNAL FORMAT
- D PICTURE MODE
- DELETING RECORDED TITLES
- MULTIPLE DELETING
- DELETING DURING PLAY
- EDITING RECORDED TITLES
- MULTIPLE EDITING
- DELETING
- ENTERING TITLE NAME
- SETTING PROTECTION
- PARTIAL DELETING
- DIVIDING TITLE
- TO CONFIRM THE DIVISION POINT
- TO CHANGE THE DIVISION POINT
- CHANGING THUMBNAIL
- TO CHANGE THE POINT
- CHANGING PROGRAMME TYPE OF TITLE
- HDD
- EDITING CHAPTERS
- EDIT CHAPTER MARK
- TO DELETE THE CHAPTER
- TO COMBINE CHAPTERS (DELETE CHAPTER MARK)
- COPYING TITLES
- TO REGISTER THE EXTERNAL HDD (USB HDD)
- TO CHANGE THE SELECTION
- SCREEN ICON
- SETTING THE COPYING OPTIONS
- PLAYING PHOTOS
- SELECT THE EVENT, THEN PRESS [OK]
- SELECT THE PHOTO, THEN PRESS [OK]
- TO EXIT THE CALENDAR SCREEN
- DIRECT NAVIGATOR (PHOTO)
- EVENT
- ALBUM
- D
- SWITCHING TO THE VIDEO OR MUSIC SCREENS
- PHOTO PLAY OPTION
- PHOTO MENU
- SLIDESHOW SETTINGS
- START SLIDESHOW
- INTERVAL
- TRANSITION EFFECT
- REPEAT PLAY
- MUSIC SELECTION
- BACKGROUND MUSIC
- RANDOM BGM
- TO PAUSE THE SLIDESHOW
- TO STOP THE SLIDESHOW
- EDITING PHOTOS
- ON THE DIRECT NAVIGATOR SCREEN
- TO EDIT THE EVENT
- TO EDIT THE PHOTO
- TO SELECT MULTIPLE EVENTS OR PHOTOS
- PRESS [OPTION]
- EDIT
- ADD TO ALBUM
- COMBINE EVENTS
- REMOVE FROM ALBUM
- ENTER ALBUM NAME
- ENTER EVENT NAME
- DELETE PHOTOS
- SET UP PROTECTION
- CANCEL PROTECTION
- COPYING PHOTOS
- SELECTING AND COPYING THE PHOTOS
- TO COPY THE EVENT
- TO COPY THE PHOTO
- WHEN COPYING TO HDD
- SELECT "YES", THEN PRESS [OK]. COPYING STARTS
- TO STOP COPYING
- COPYING AUTOMATICALLY
- PLAYING MUSIC
- INSERT THE USB MEMORY
- SELECT "PLAY / COPY MUSIC (MP3)", THEN PRESS [OK]
- TO PLAY OTHER MUSIC (TRACK)
- COPYING MUSIC TO HDD
- PLAYING MUSIC RECORDED ON HDD
- ARTISTS
- ALBUMS
- MY FAVOURITES
- PLAYLISTS
- FREQUENTLY PLAYED
- RANDOM PLAY
- SWITCHING TO THE VIDEO OR PHOTO SCREENS
- SHOWING TRACK INFORMATION
- OPERATIONS DURING MUSIC PLAY
- SKIP
- REPEAT PLAY/RANDOM
- SOUND EFFECTS
- DISPLAYING PHOTOS (SLIDESHOW)
- TO END THE SLIDESHOW
- HOW TO CREATE THE PHOTO ALBUM
- TO PLAY MUSIC CONTINUOUSLY EVEN IF THE POWER OFF LINK WORKS
- EDITING MUSIC/PLAYLIST
- ON THE DIRECT NAVIGATOR SCREEN: PRESS [OPTION]
- SELECT THE ITEM, THEN PRESS [OK]. E.G., WHILE SELECTING AN ALBUM
- DELETE ALL TRACKS
- DELETE ALBUM
- DELETE
- EDIT ALBUM NAME/EDIT TRACK NAME/EDIT ARTIST NAME/EDIT PLAYLIST NAME
- REMOVE ALL TRACKS
- CLEAR MY FAVOURITES/CLEAR FREQUENTLY PLAYED
- ADD TO PLAYLIST
- COPYING THE HD VIDEO OR THE SD VIDEO
- COPYING HD VIDEO (AVCHD FORMAT)
- COPYING SD VIDEO (MPEG2 FORMAT)
- TO EDIT THE COPYING LIST
- DELETE ALL
- ADD
- MOVE
- REGISTERING THE EXTERNAL HDD (USB HDD)
- REGARDING THE EXTERNAL HDD (USB HDD)
- PLEASE USE A CONFIRMED USB HDD
- CONNECTING THE USB HDD
- CONNECT THIS UNIT WITH OPTIONAL USB HDD
- DISCONNECTING THE USB HDD
- REGISTERING THE USB HDD
- TO CANCEL ALL USB HDD REGISTRATIONS
- FORMAT SD CARD
- SMART HOME NETWORKING (DLNA)
- USING THIS UNIT AS SERVER
- USING THIS UNIT AS CLIENT
- SUPPORT FORMAT OF DLNA CLIENT
- USING THIS UNIT AS MEDIA RENDERER
- VIERA CONNECT (ENJOYING INTERNET SERVICE)
- HW
- TO ENJOY VIDEO COMMUNICATION (E.G., SKYPE™)
- PRESS [INTERNET]
- TO EXIT FROM VIERA CONNECT
- PRESS [EXIT]⊗
- VIERA LINK FUNCTIONS
- WHAT IS VIERA LINK "HDAVI CONTROL
- AUTOMATIC INPUT SWITCHING/POWER ON LINK
- POWER OFF LINK
- PLAYING MUSIC CONTINUOUSLY EVEN AFTER TURNING OFF POWER TO THE TV
- DIRECT TV RECORDING
- EASY CONTROL ONLY WITH VIERA REMOTE CONTROL
- PLAYBACK MENU
- TO CLEAR THE PLAYBACK MENU
- CONTENT
- VIDEO
- SOUNDTRACK
- SUBTITLES
- MULTI AUDIO
- SUBTITLE LANGUAGE
- AUDIO CHANNEL
- PLAY
- RANDOM
- PICTURE
- MODE
- ADVANCED SETTINGS
- HD OPTIMIZER
- CHROMA PROCESS
- DETAIL CLARITY
- SUPER RESOLUTION
- PROGRESSIVE
- AUTO
- FILM
- SOUND
- RE-MASTER 1/RE-MASTER
- DIALOGUE ENHANCER
- OTHER
- POSITION
- AUDIO ATTRIBUTE
- LANGUAGE
- CHANGING THE UNIT'S SETTINGS (SETUP)
- COMMON PROCEDURES
- PRESS [SETUP]
- MENU LIST
- TUNING
- HDD / USB HDD
- DISPLAY
- NETWORK
- OTHERS
- ABOUT THE PIN FOR PARENTAL CONTROL
- FAVOURITES EDIT
- AFTER EDITING AS FOLLOWS, SAVE THE FAVOURITES. PRESS [BACK/RETURN] THEN PRESS [OK]
- CHANNEL LIST
- AUTO SETUP
- CHANNEL SORTING BY REGION
- MANUAL TUNING
- UPDATE CHANNEL LIST
- SIGNAL CONDITION
- NEW CHANNEL MESSAGE
- CHILD LOCK
- CHILD LOCK LIST
- FREEVIEW PLAYERS
- PREFERRED MULTI AUDIO
- AUDIO DESCRIPTION
- PREFERRED SUBTITLES
- CHILD LOCK FOR PLAYBACK
- HDD MANAGEMENT
- DELETE ALL TITLES
- DELETE ALL PHOTOS
- FORMAT HDD
- SETTINGS FOR USB HDD
- USB HDD REGISTRATION
- USB HDD DISCONNECTION
- USB HDD MANAGEMENT
- FORMAT USB HDD
- CANCELLATION OF ALL USB HDD REGISTRATIONS
- STILL MODE
- SEAMLESS PLAY
- DYNAMIC RANGE COMPRESSION
- DOWNMIX
- DIGITAL AUDIO OUTPUT
- PCM DOWN CONVERSION
- DOLBY DIGITAL / DOLBY DIGITAL PLUS MPEG HE-AAC
- AUDIO DELAY
- ON-SCREEN INFORMATION
- UNIT'S DISPLAY
- SCREEN SAVER
- D SETTINGS
- TV ASPECT
- ASPECT FOR 4:3 VIDEO
- TV SYSTEM
- HDMI CONNECTION
- HDMI VIDEO FORMAT
- DEEP COLOUR OUTPUT
- HDMI AUDIO OUTPUT
- CONTENTS TYPE FLAG
- VIERA LINK
- NETWORK SETTINGS
- LAN CONNECTION MODE
- WIRELESS SETTINGS
- CONNECTION SETTING
- DOUBLE SPEED MODE SETTING (2.4GHZ)
- IP ADDRESS / DNS SETTINGS
- PROXY SERVER SETTINGS
- NETWORK SERVICE SETTINGS
- LOCK
- AUTOMATIC VOLUME CONTROL
- HOME NETWORK SETTINGS
- HOME NETWORK FUNCTION
- SETTING DEVICE NAME
- REGISTRATION TYPE FOR REMOTE DEVICES
- REMOTE DEVICE LIST
- STANDBY SETTINGS
- POWER SAVE IN STANDBY
- AUTOMATIC STANDBY
- AUTOMATIC STANDBY AFTER OTR
- AUTOMATIC STANDBY AFTER COPY
- RF OUT (AERIAL SIGNAL)
- CLOCK
- OWNER ID
- PIN ENTRY
- SYSTEM UPDATE
- SOFTWARE UPDATE IN STANDBY
- SOFTWARE UPDATE NOW (BROADCAST)
- SOFTWARE UPDATE NOW (INTERNET)
- SOFTWARE LICENCE
- SYSTEM INFORMATION
- DIVX REGISTRATION
- INITIALIZE
- SHIPPING CONDITION
- DEFAULT SETTINGS
- SOFTWARE (FIRMWARE) UPDATE
- THE UNIT'S DISPLAY DURING THE UPDATE
- OTHER OPERATIONS
- ENTERING TEXT
- TO END PARTWAY
- SWITCHING THE ASPECT RATIO OF THE SCREEN
- NORMAL
- SIDE CUT
- ZOOM
- HOLD FUNCTION
- TO CANCEL THE HOLD FUNCTION
- TROUBLESHOOTING GUIDE
- THE FOLLOWING DO NOT INDICATE A PROBLEM WITH THIS UNIT
- GENERAL OPERATION
- THE UNIT DOES NOT WORK
- THE UNIT IS SWITCHED TO STANDBY MODE AUTOMATICALLY
- THE REMOTE CONTROL DOES NOT WORK
- STARTUP IS SLOW
- DISPLAYS
- THE CLOCK DOES NOT DISPLAY ON THE UNIT WHEN SWITCHED TO STANDBY
- TV SCREEN AND VIDEO
- SCREEN SIZE IS WRONG
- THE BLACK SCREEN APPEARS ON THE TV
- TV RECEPTION IS NOT DISPLAYED
- PICTURE DOES NOT APPEAR WITH THE HD QUALITY ALTHOUGH HD SETTING WAS MADE
- THE SCREEN CHANGES AUTOMATICALLY
- THERE IS A LOT OF IMAGE LAG WHEN PLAYING VIDEO
- THE IMAGES DO NOT APPEAR ON THE TV
- THE PICTURE IS DISTORTED DURING PLAY, OR VIDEO WILL NOT PLAY CORRECTLY
- D VIDEO IS NOT OUTPUT CORRECTLY
- THE SAME VIDEO IS DISPLAYED IN EACH LEFT AND RIGHT HALF OF THE SCREEN
- NO SOUND
- DISTORTED SOUND
- CANNOT CHANGE AUDIO CHANNEL
- RECORDING, TIMER RECORDING AND COPYING
- CANNOT RECORD
- CANNOT COPY
- TIMER RECORDING DOES NOT WORK PROPERLY
- THE TIMER RECORDING PROGRAMMED VIA VIERA CONNECT DOES NOT WORK PROPERLY
- AUTO RENEWAL RECORDING DOES NOT WORK PROPERLY
- A PART OR WHOLE OF A RECORDED TITLE HAS BEEN LOST
- YOU HAVE FORGOTTEN YOUR PIN NUMBER FOR PARENTAL CONTROL
- IMAGE FOR THE QUICK VIEW IS NOT SMOOTH
- CANNOT EDIT
- CANNOT CREATE A PLAYLIST
- THE CONTENTS OF THE SD CARD CANNOT BE READ
- COPYING, DELETING, AND SETTING PROTECTION TAKES A LONG TIME
- PHOTOS DO NOT PLAY BACK NORMALLY
- USB
- THIS UNIT DOES NOT RECOGNIZE THE USB DEVICE CORRECTLY
- TV GUIDE
- THE TV GUIDE INFORMATION IS NOT DISPLAYED PROPERLY
- BROADCAST
- PICTURE REGULARLY BREAKS UP ON SOME CHANNELS
- PICTURE VERY INFREQUENTLY BREAKS UP ON SOME OR ALL CHANNELS
- VIERA LINK DOES NOT WORK
- YOU CANNOT ACCESS THIS UNIT FROM DLNA COMPATIBLE EQUIPMENT ON THE NETWORK
- YOU CANNOT PLAY CONTENTS PROPERLY FROM DLNA COMPATIBLE EQUIPMENT ON THE NETWORK
- WHEN USING WIRELESS LAN CONNECTION, VIDEO FROM THE DLNA CERTIFIED MEDIA SERVER IS NOT PLAYED BACK OR VIDEO FRAMES ARE DROPPED DURING PLAYBACK
- RESET
- TO RETURN ALL THE SETTINGS TO THE FACTORY PRESET
- MESSAGES ON THE UNIT'S DISPLAY
- SET
- GUIDE
- HARD ERR
- PLEASE WAIT
- PROG FULL
- START
- SW-DL
- UNSUPPORT
- UPD
- U
- XHOLD
- H□□ OR F
- WHEN YOU EXPERIENCE PROBLEMS WITH EASY NETWORK SETTING
- SPECIFICATIONS
- GENERAL
- AUDIO
- HDMI OUTPUT
- INTERNAL HDD CAPACITY
- OTHER TERMINALS
- HW220 WIRELESS LAN
- USB DEVICE
- ABOUT RECORDED TITLES
- RECORDING QUALITY AND APPROXIMATE RECORDING TIMES
- MAXIMUM NUMBER OF TITLES THAT CAN BE RECORDED
- INFORMATION FOR THE FILES OTHER THAN RECORDED PROGRAMMES
- JPEG/MPO
- MP
- DIVX
- PICTURE RESOLUTION
- MKV
- SD-VIDEO (STANDARD DEFINITION)
- HD-VIDEO (HIGH DEFINITION)
- LICENSES
- INDEX
- A
- C
- E
- F
- FORMAT
- H
- HD VIDEO (AVCHD)
- J
- L
- M
- MEDIA
- N
- P
- PLAYBACK (MUSIC)
- PLAYBACK (VIDEO)
- PROTECTION
- R
- S
- T
- V
- INFORMATION FOR USERS ON COLLECTION AND DISPOSAL OF OLD EQUIPMENT AND USED BATTERIES
- FOR BUSINESS USERS IN THE EUROPEAN UNION
- [INFORMATION ON DISPOSAL IN OTHER COUNTRIES OUTSIDE THE EUROPEAN UNION]
- NOTE FOR THE BATTERY SYMBOL (BOTTOM TWO SYMBOL EXAMPLES)
- CE 1731①
- DECLARATION OF CONFORMITY (DOC)
- SALES AND SUPPORT INFORMATION
- CUSTOMER COMMUNICATIONS CENTRE
- DIRECT SALES AT PANASONIC UK
- DIGITAL SWITCHOVER FOR TERRESTRIAL BROADCASTS
- PANASONIC CORPORATION
Brand : PANASONIC
Model : DMR-HW120
Category : Blu-ray player